5 minute read
Following 20 hours of operation or daily


3.6.1. Check the oil amount in motor
• Stop the engine and wait ca 5 minutes until oil flows down to crankcase sump. • Pull out the oil dipstick 1, wipe it off, insert it back down to the stop and pull out again to read the oil level.
• Maintain the level within the range of the graduation lines stamped on the dipstick. The lower line L (Low) indicates the lowest possible oil level, the upper line
H (High) the highest one.
• Refill the oil via oil filler following a removal of oil filler plug 2. Wait ca 1 minut until the level gets stable and then check again.
1
! CAUTION! The amount of oil between the marks on the dipstick makes 0,95 liters (1.0 U.S Quart). 2


• Always replenish with oil of identical type. Use oils under Section 3.2.1. • Check the motor tightness, repair any cause of leakage. • Inspect the motor if no damaged or missing parts exist within the motor, and whether no appearance changes have occurred.
! CAUTION! NEVER use the engine unless there is proper oil level inside the engine.
3.6.2. Check the amount of cooling liquid in the motor
• Check visually the level. • Add via filler neck 1.
1
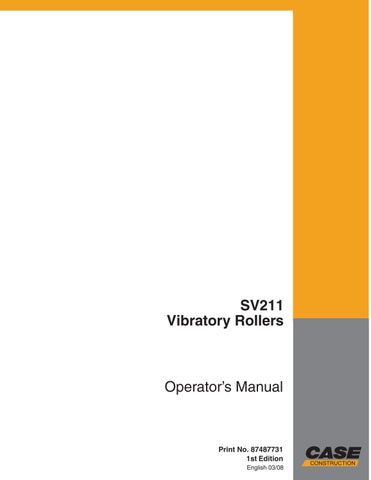
! CAUTION! The level may not drop below the level gauge eyesight. Replenish with coolant consisting of antifreeze agents of identical base per Section 3.2.3. NEVER use additives to remove cooling system leakages with the engine cooling liquid. Do NOT refill hot motor with cold liquid. The casts of the motor may get damaged. When some higher leak occurs, check the cooling system and repair its cause.

Remove the filler plug only after the engine coolant temperature falls below 50 °C (120 °F). Any attempt to remove filler plug at high temperature may cause operator to be scalded with steam or cooling liquid due to inner overpressure.
3.6.3. Check the amount of oil inside hydraulic tank
• Check the level.
• Refill with oil if required.
NOTE
In case of high loss of oil, repair the cause of hydraulic system leakage.
3.6.4. Crankcase Breather
• Inspect the crankcase breather hose to make sure it is not fouled with deposits, chips, or in winter season frozen with ice.


3.6.5. Check fan condition
• Check visually the fan. If damaged (e.g. missing parts of materials, cracks, shape changes etc.) replace the fan.
3.6.6. Check motor belt
• Make visual check of the belt, monitor any of its damage.
• Any cracks perpendiculars to belt width are no damage. When longitudinal cracks occur on the belt or frayed (shattered) belt edges exist, or any torn off parts of material are seen, then the belt must be replaced.


3.6.7. Check engine air intake
• Check if suction rubber hose leading from the filter is not damaged and if tightening clamps are not missing.
• Inspect the gasket between the bonnet and air filter. Replace impaired gasket with the new one if required.
! CAUTION! NEVER operated the Machine with damaged gasket between the bonnet and air filter, or the connection not tight.
• Check the exit slit of air filter vacuum valve, press to remove any dust trapped.
NOTE
The dust caught inside dust valve gets emptied automatically during machine operation.
! CAUTION ! NEVER operate the Machine with dust valve damaged.
• Check and clean up the pre-filter tray 1 when any contamination deposited reaches the mark, first unscrew the nut 2 and remove lid 3.
NOTE:
Pre-filter is optional and is mounted based on separate order only.
3 2


1
3.6.8. Check the amount of fuel
• Check the fuel level per fuel contents gauge (optional).
• Replenish following the cleaning of filler cap 1 and filler neck 2 via a strainer up until the lower edge of the filler neck.
NOTE:
When the Machine is fitted with fuel minimum indicator lamp only (standard outfit), then make up the fuel immediately after the lamp lights up. Fuel tank capacity is 410 l (108 gal US). The fuel tank equals to ca 34 hours of Machine operation.
! CAUTION! Fuel tank is not drained fully. To empty fully you must carry out rather arduous deaeration of the entire fuel system. Use ONLY clean and recommended fuel under Section 3.2.2. NEVER refill fuel with the engine running. Do NOT replenish fuel in closed areas.
Prevent fuel from spilling on the ground. 1

2

3.6.9. How to clean air separator
• Prepare a receptacle to drain the sediment into. • Turn the separator valve 1 clockwise by 4 revolutions until the valve gets extended by ca 25 mm (1") downward.
• Drain the fuel till it starts flowing out pure. Press the valve upward and screw it.
1

! CAUTION ! If you drained more than 6 cl (2ozs) of fuel, then make up the fuel in fuel filter in line with Section 3.6.19., or deaeration per Section 3.6.34. In this way you will avoid problems of difficult engine starting.
Observe fire precautions! NO smoking while at work! Do NOT drain the separator with the engine running.
Collect the fuel with sediment drained in a proper vessel.
3.6.10. Check the alarm & control devices
• Turn ON the switches 23, 24, 25, confirm the horn and the headlamps function well. • Turn the ignition box key 6 into position “I”. Lamps 12, 13, 14 will light up. • Following engine starting “II” the lamps 12, 13 must go off.
When in operation, please check continuously the board instruments and indicator lamps. Repair instantly any failures signaled!