7 minute read
Every 2000 Hours or Every 2 Years


3.6.27. How to change oil in the vibrator
• Position the cylinder so the drain plug on left side of uncoupled axle 3 is in its lowest position, and on the opposite the filler plug 1 in its highest position. • Put a proper receptacle underneath the drain point. • Unscrew all the plugs and let oil to flow out. • When draining is completed reinstall the drain plug. • Use filler hole 1 to refill with recommended oil up to the edge of inspection hole 2 - 8 l (2,1 gal US). • Reinstall the remaining plugs.
! CAUTION! Change oil while oil is hot.
Do NOT touch gearbox or its adjacent sections when these are hot. Observe fire precautions!
Avoid oil to leak into the ground.
Used oil is environmentally hazardous waste – Hand it over for disposal. 1
2 3
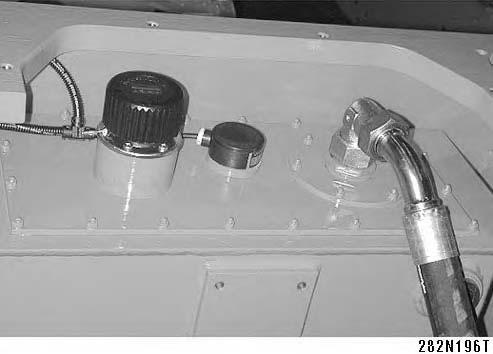
3.6.28. How to change hydraulic oil and filter
! CAUTION! Change oil before season starts, or following a rather long Machine shutdown. Drain oil while oil is hot.
• Unscrew drain plug. Let oil flow out into a vessel installed – total amount of oil that flows out is round 90 l (23,8 gal US).
• Dismantle the cover.
• Remove the suction hose.
• Dismantle the cap complete with strainer. Remove the strainer from the the suction pipe. Wash the strainer, and purge the strainer from inside with compressed air. Inspect the condition of the strainer, if filtration section of the strainer is damaged, replace the strainer. Make visual check of tank’s inner space. When any slag & mill scale are found at the bottom, then clean thoroughly and flush with new oil. Reassemble again, replace O-ring applied with clean oil.


NOTE
To facilitate cleaning you may remove the entire upper cap 3 along with filler neck 4. Use new sealing strip Teflontype when having removed the entire upper cap 3.
4
3
Check oil thermometer sensor

• Remove the sensor and clean its contact. • Submerge the sensor in hot oil of known temperature and read hydraulic oil temperature on the thermometer. Replace with new sensor when there is a malfunction.
NOTE:
Applies only when oil thermometer is installed – optional.
How to repalce pressure filter element
! CAUTION! Replace ALWAYS : - Together with oil exchange - When pressure filter lamp 18 lights up due to oil operating temperature reaching 50 -60 °C (122 - 140 °F).
• • • • • Remove filter vessel 2. Replace filter element. • Clean thoroughly the filter vessel. • Clean the bottom of filtration block contact surface. • Check the condition of sealing rings, apply the rings with clean oil.
• Insert new element into the filter vessel, and screw on back again.


2
• Refill the tank via filler neck 1 with the recommended type of oil up to the bottom of the strainer inside the filler neck - 90 l (23,8 gal US) .
1
• Start the engine, increase its speed to confirm the tightness of filter, temperature sensor, suction hose & cap. Check oil level in oil gauge.
! CAUTION ! Use NO chemical cleaning agents & those means (like clouts) that slip fibres. Refill oil per Section 3.2.4. Use only the original filter elements under Spare Parts Catalogue. Keep clean while at work. Avoid fouling the system with materials that may cause damage to crucial sets and units! Exchange oil and filter element ALWAYS when internal parts of units (hydraulic motors, hydroelectric generators) have been damaged, or following a major overhaul of hydraulic system. Clean & rinse hydraulic tank prior to installing a new unit.
Observe fire precautions! Collect drained oil, and do NOT let it soak in the ground. Blind all the holes with plugs following the disconnection of hydraulic circuits.
Used oil & filter elements are environmentally hazardous waste – Hand it over for disposal.

3.6.29. How to change engine coolant
! CAUTION ! Make it with the engine operation stopped or following the heating of the liquid to 50 °C (122 °F) with the engine running.

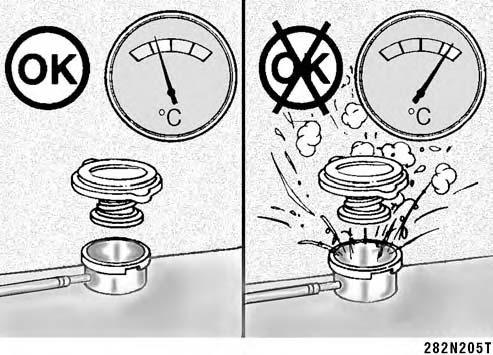
• Remove overpressure plug 1 at the expansion tank to open the cooling system.
Do NOT open the overpressure plug before cooling liquid temperature drops below 50 °C (122 °F). Danger of water splashing when opening the overpressure plug and getting scalded.
• Open the drain cock at the cooler’s bottom chamber.
Let the liquid flow out into the receptacles installed.
The amount drained is ca 24 l (6,3 gal US).
• Confirm no damaged hoses or missing hose clamps exist within the engine cooling system. Check the condition of the cooler for any damage, leaks or whether the cooling gills are fouled with slag & mill scale.
Clean and repair if required.
1


• Close the drain cock and refill the cooling system with new coolant at the ratio of 50 % of water + 50 % of antifreeze.
• Open the bleed valve at the after cooler.
• Fill up to the water gauge top level. Adequate filling speed is 19 l/min [5 gal US/min]. When the system is filled up you must wait 2÷3 minutes to let the bleeding come about. Screw on the expansion vessel cap and close the bleed valve. Start the engine and let the motor heat up to 80 °C (175 °F). Stop the engine and check no cooling liquid leaks. Confirm water gauge level.


NOTE:
When making the change, please flush the system with mixture of water and soda (sodium carbonate) at the ratio of 0,5 kg (1.1 lb) of soda per 23 l ( 6.0 gal) of water in line with instructions of CUMMINS Engine Operating Manual supplied. Refill the system with this mixture and heat up to 80 °C (176°F) with the engine running – do NOT install the expansion vessel cap. Turn OFF the engine and drain the water. Refill with clean water and heat up again the motor. Then drain the water. Repeat this till water is clean.
! CAUTION! Refill with cooling liquid under Section 3.2.3! Follow the instructions of antifreeze manufacturer when changing!
Wear gloves to protect your hands! Wear safety glasses or face shield to protect your eyes!
Hand over used liquid for its safe disposal per the regulations given!
3.6.30. How to check the dampener of engine’s torsional vibrations
• Check the position of marks stamped on the face of both of the sections of the dampener of torsional vibrations. When the marks are mutually shifted by over 1,59 mm [1/16 in] replace the dampener.
• Check the rubber part 3 to confirm it is not higher or lower than 3,18 mm (1/8 in) above the level of metal parts 1 and 2. If the criterion is exceeded you must replace the dampener of torsional vibrations.
• Inspect the dampener of torsional vibrations to make sure it does not move in forward direction. Check that no notches, cracks, fissures occur on the dampener, or it is not spoiled with volatile materials.
1 3

2