7 minute read
9.2 Troubleshooting - scale


T-code Valid from serial number Date Order number
805, 813, 830 3 300 000- 2006-06-19 232020-040
The most common causes of a malfunction are as follows: •Power supply: discharged battery, damaged fuse or problems with the charger •Bad or broken contact •Crushed or cut cables •Loose screws or bolts •Mechanical problem: the fork connector catches on the pallet truck chassis as a result of distortion or a lot of dirt •Moisture in the electronics or load sensors
Order number Date Valid from serial number T-code
232020-040 2006-06-19 3 300 000- 805, 813, 830
Table 4: Troubleshooting chart
Problem: Nothing is working. The display remains blank even when the buttons are pressed.
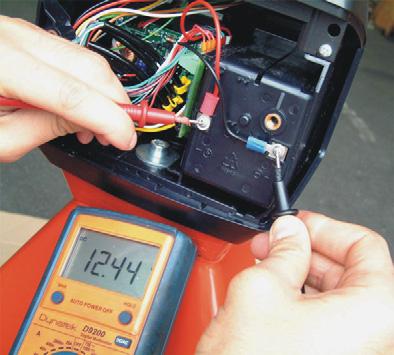
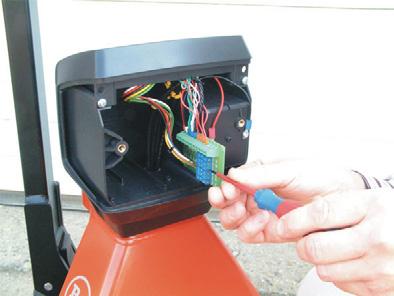
Action: Check the battery and charger. •The simplest way to test the battery is to replace the battery module. •Always check the battery charger. The battery may have discharged or been damaged as a result of a defective charger. The charger must have an output voltage between 12.5 and 13.8 V. Checking the battery and charger •When checking the battery’s voltage, you must check that the indicator has been switched off for around 3 minutes. It may be that the voltage only drops when power is being drawn from the battery. Check the contact points on the battery cover by checking the battery voltage at the poles on the back of the cover.
Check the fuse and indicator •Check the fuse (in the indicator housing). •Check the indicator’s circuit card: If nothing comes on when there is +12 V DC at the correct contact points, the card is broken and must be replaced. •If the indicator is not receiving +12 V, you must check the cables and connections between the fuse and the indicator’s circuit card.
T-code Valid from serial number Date Order number
805, 813, 830 3 300 000- 2006-06-19 232020-040
Table 4: Troubleshooting chart
Problem: Unstable indicator, weight indication increases/decreases
Action: Check the fork structure mechanics: •Check that nothing is jammed between the forks and fork connector: the scale’s results are affected by foreign objects preventing free movement of the fork connector.
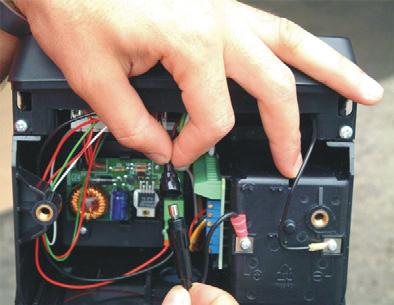
Check the load sensor cables and calibration card •Try moving the load sensor cables close to the connection. If weight indication is affected, this indicates that the cable is damaged and must be replaced. •Take out the calibration card and jiggle it. Jog the cables connected to the calibration card slightly. If the reading is affected, this indicates that the cable is damaged. •If the calibration card is oxidized, you can remedy the problem by heating the solders with a soldering iron. Otherwise, replace the card.
Check the indicator for moisture and loose connections •Check the indicator’s circuit card for moisture and condensation: if necessary, dry the card using hot air. Signs of moisture problems are corrosion on the card’s components, particularly on the pins between the printed lines. Check the load sensors •Measure the resistance between the load sensor cables and the pallet truck chassis: if the measured resistance is not infinite, this means that one or more of the load sensors is affected by moisture. Disconnect the four load sensors and remeasure the individual cables to determine which load sensor is defective. •Reconnect the load sensors to the indicator one at a time: Compare the displayed values for each load sensor. If the value from a particular load sensor is unstable or differs markedly from the others, then that load sensor is the cause of the problem. •If the indicator reading reacts unsteadily to each of the load sensors, the indicator should be inspected.

Order number Date Valid from serial number T-code
232020-040 2006-06-19 3 300 000- 805, 813, 830
Table 4: Troubleshooting chart
Problem: The same load is weighed repeatedly, but the display shows differing weight indications
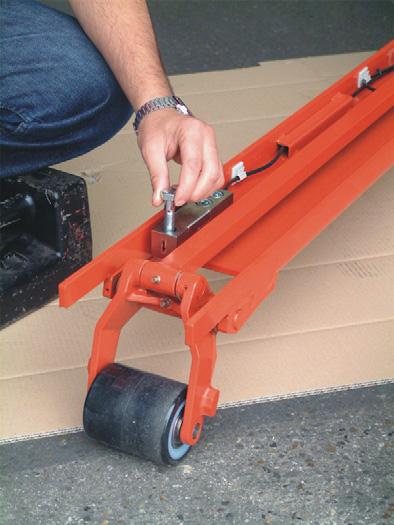
Action: Check the load sensors: •Position yourself on the four corners of the forks. If the weight shown by the display differs by more than 1 kg, the difference between the four corners may cause differing readings depending on the weight distribution on the forks. Check the load sensors: •Remove the fork connector and insert a bolt into the load sensor’s mounting hole. Balance a 20 kg calibration weight on each load sensor. The weight indications must not differ by more than 200 or 400 gram between load sensors.
Check the load sensors: •If the difference is greater, the load sensors must be adjusted relative to each other by turning the small adjustment screws on the potentiometers on the load sensors’ calibration card.
T-code Valid from serial number Date Order number
805, 813, 830 3 300 000- 2006-06-19 232020-040
Table 4: Troubleshooting chart
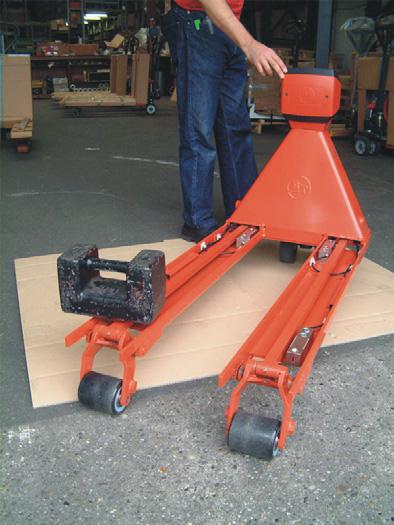
Action: Check the fork structure mechanics: •Check that nothing is jammed between the forks and fork connector: •Place a heavy weight on the forks, press the tare button so that the net weight is displayed as zero kilos, and then position yourself on the four corners of the forks. If the difference is more than 1 or 2 kg, this may indicate that the fork connector is bending so much under heavy loads that it is touching the lower fork structure.

Problem: The reading from the pallet truck scale is correct for light weights but incorrect for heavy weights
Action: Check the fork structure mechanics: •Check that nothing is jammed between the forks and fork connector: •Place a heavy weight on the forks, press the tare button so that the net weight is displayed as zero kilos, and then position yourself on the four corners of the forks. If the difference is more than 1 or 2 kg, this may indicate that the fork connector is bending so much under heavy loads that it is touching the lower fork structure.
Problem: The reading from the pallet truck scale is wrong and the discrepancy is linear. Example: with 100 kg the error is 1 kg, with 500 kg the error is 5 kg, and with 1000 kg it is 10 kg.
Action: Recalibrate the scale.
Order number Date Valid from serial number T-code
232020-040 2006-06-19 3 300 000- 805, 813, 830
Table 4: Troubleshooting chart
Problem: When the forks are empty the indicator shows a weight (positive or negative) that cannot be “cleared”. The display may also show HELP 2 (taring a negative weight), HELP 3 (negative signal from AD transducer) or HELP 7 (overload/signal from AD transducer too high).
Action: Recalibrate the scale in order to reset it (NOTE: Not permitted for scales with commercial weighing status!). •The resetting function only works with limited displacement from zero. Recalibrating the zero point returns the weight indications to normal limitations. Check the load sensors: •Remeasure the output signal in mV using a voltmeter connected between the green and white wire. The output signal must be positive and may not exceed 0.2 mV with an empty scale. Check the load sensors individually if the output signal is too high or is negative. •A defective load sensor can produce a signal that is too high and also cause an overload message to be displayed. Check the cables: •The problem may have been caused by a short circuit in the load sensors’ wiring. Check the indicator: •Check whether the indicator’s circuit card is defective if none of the above solve the problem.
Problem: The display does not react to loads placed on the forks
Action: Remove the battery module: •Static electricity can cause the indicator to “freeze”. The problem can be solved by switching off the power supply and restarting the indicator. Check the indicator’s calibration points: •If old calibration values have not been deleted prior to recalibration, the scale may show the same value for totally different weights. Delete the existing calibration points and recalibrate the scale.
T-code Valid from serial number Date Order number
805, 813, 830 3 300 000- 2006-06-19 232020-040
Table 4: Troubleshooting chart
Problem: The buttons on the indicator are not working
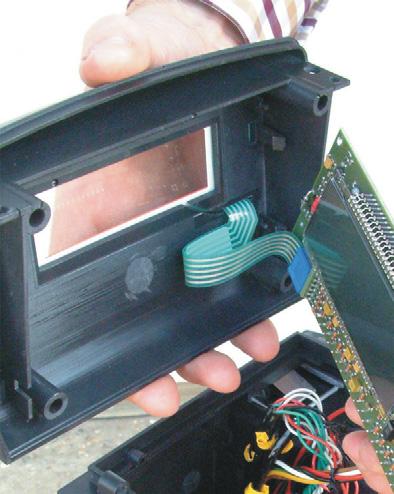
Action: Check the flat cable between the indicator’s circuit card and the keypad. •If any of the buttons are not working, this may be due to the flat cable not being connected or being damaged, thus preventing transfer of signals from the buttons to the indicator. Check if there is moisture in the flat cable. •If certain buttons do not work, but others do, the keypad must be replaced. Check whether the indicator is defective.
Problem: The LCD segment in the display is not working
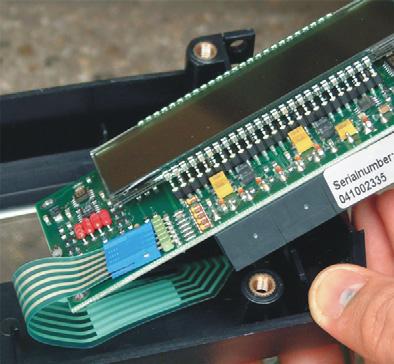
Action: Check the indicator: •If you carefully bend the indicator’s circuit card, you can detect any concealed breaks in the LCD element’s contact pins. Replace the card if it is not possible to solder the pins.
See Troubleshooting for detailed instructions regarding troubleshooting for the scale.


