7. Squeeze the element to remove excess oil.
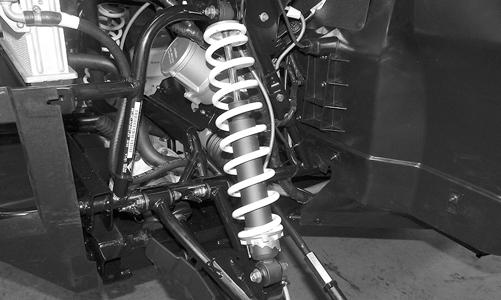
Periodic Maintenance/Tune-Up Tighten all nuts, bolts, and cap screws. Make sure rivets holding components together are tight. Replace all loose rivets. Care must be taken that all calibrated nuts, bolts, and cap screws are tightened to specifications. It is advisable to lubricate certain components periodically to ensure free movement. Apply light oil to the components using the following list as reference.
CAUTION A torn air filter can cause damage to the engine. Dirt and dust may get inside the engine if the element is torn. Carefully examine the element for tears before and after cleaning it. Replace the element with a new one if it is torn.
8. Clean any dirt or debris from inside the filter housing. 9. Inspect the drain beneath the main housing for debris and for proper sealing.
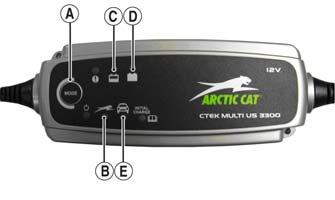
A. Accelerator Pedal Pivot/Cable Ends B. Brake Pedal Pivot C. Shift Cable SPECIAL TOOLS
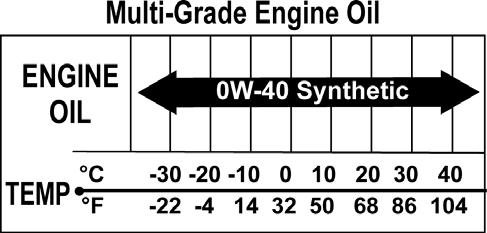
A number of special tools must be available to the technician when performing service procedures in this section. Refer to the current Special Tools Catalog for the appropriate tool description. NOTE: When indicated for use, each special tool will be identified by its specific name, as shown in the chart below, and capitalized. Description Compression Tester Kit
p/n 0444-213
Oil Filter Wrench
0644-389
Timing Light
0644-296
Valve Clearance Adjuster
0444-255
NOTE: Special tools are available from the Arctic
Cat Service Department.
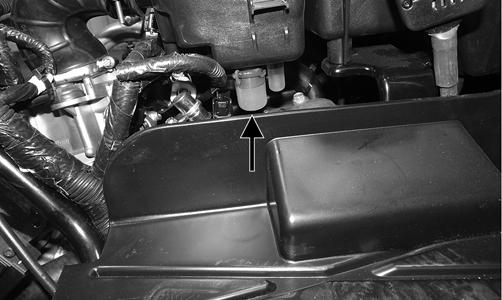
Air Filter/Pre-Filter Air Filter NOTE: To access the air filter, the seats and the cen-
ter console must be removed.
1. Remove dirt and debris from around the filter housing. 2. Unsnap the four spring-clip fasteners and remove the air filter cover. 3. Fill a wash pan larger than the element with a non-flammable cleaning solvent; then dip the element in the solvent and wash it.
PR882A
10. Install the air filter and cover. 11. Install the center console; then install the driver and passenger seats making sure they are securely latched. Pre-Filter
1. Remove the seats and access cover. 2. Loosen the clamp and remove the pre-filter. 3. Clean the pre-filter with a non-flammable cleaning solvent. 4. Rinse thoroughly with warm water, squeeze, and press to remove excess solvent; do not twist. Allow to air dry. 5. Oiling of the pre-filter is not required. Check for wear or damage and replace if necessary.
Valve/Tappet Clearance To check and adjust valve/tappet clearance, use the following procedure. NOTE: The engine must be cold for this procedure.
NOTE: Foam Air Filter Cleaner and Foam Air Fil-
NOTE: The seats, center console, spark plug(s), and air filter housing must be removed for this procedure.
4. Squeeze the element by pressing it between the palms of both hands to remove excess solvent. Do no twist or ring the element or it will develop cracks.
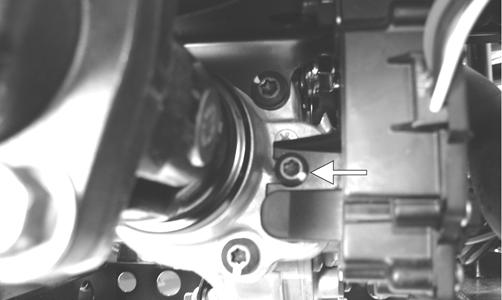
1. Remove the spark plug(s) and timing inspection plug(s); then remove the tappet covers (see Engine/Transmission section - Servicing Top-Side Components).
ter Oil are available from Arctic Cat.
5. Dry the element. 6. Put the element in a plastic bag; then pour in air filter oil and work the oil into the element.
NOTE: On the 1000, remove the crankshaft end cap
and install the special cap screw (left-hand threads) to rotate the engine. 7