Ă„
BATTERY/STARTING/CHARGING SYSTEMS DIAGNOSTICS
(3) Battery chargers vary in the amount of voltage and current they provide. For the time required for the battery to accept measurable charger current at various voltages, refer to Fig. 16. If charge current is
8A - 7
still not measurable after charging period the battery should be replaced. If charge current is measurable during charging time, the battery may be good, and charging should be completed in the normal manner.
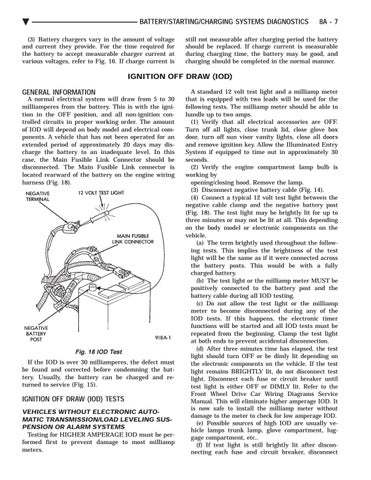
IGNITION OFF DRAW (IOD) GENERAL INFORMATION A normal electrical system will draw from 5 to 30 milliamperes from the battery. This is with the ignition in the OFF position, and all non-ignition controlled circuits in proper working order. The amount of IOD will depend on body model and electrical components. A vehicle that has not been operated for an extended period of approximately 20 days may discharge the battery to an inadequate level. In this case, the Main Fusible Link Connector should be disconnected. The Main Fusible Link connector is located rearward of the battery on the engine wiring harness (Fig. 18).
Fig. 18 IOD Test If the IOD is over 30 milliamperes, the defect must be found and corrected before condemning the battery. Usually, the battery can be charged and returned to service (Fig. 15).
IGNITION OFF DRAW (IOD) TESTS VEHICLES WITHOUT ELECTRONIC AUTOMATIC TRANSMISSION/LOAD LEVELING SUSPENSION OR ALARM SYSTEMS Testing for HIGHER AMPERAGE IOD must be performed first to prevent damage to most milliamp meters.
A standard 12 volt test light and a milliamp meter that is equipped with two leads will be used for the following tests. The milliamp meter should be able to handle up to two amps. (1) Verify that all electrical accessories are OFF. Turn off all lights, close trunk lid, close glove box door, turn off sun visor vanity lights, close all doors and remove ignition key. Allow the Illuminated Entry System if equipped to time out in approximately 30 seconds. (2) Verify the engine compartment lamp bulb is working by opening/closing hood. Remove the lamp. (3) Disconnect negative battery cable (Fig. 14). (4) Connect a typical 12 volt test light between the negative cable clamp and the negative battery post (Fig. 18). The test light may be brightly lit for up to three minutes or may not be lit at all. This depending on the body model or electronic components on the vehicle. (a) The term brightly used throughout the following tests. This implies the brightness of the test light will be the same as if it were connected across the battery posts. This would be with a fully charged battery. (b) The test light or the milliamp meter MUST be positively connected to the battery post and the battery cable during all IOD testing. (c) Do not allow the test light or the milliamp meter to become disconnected during any of the IOD tests. If this happens, the electronic timer functions will be started and all IOD tests must be repeated from the beginning. Clamp the test light at both ends to prevent accidental disconnection. (d) After three minutes time has elapsed, the test light should turn OFF or be dimly lit depending on the electronic components on the vehicle. If the test light remains BRIGHTLY lit, do not disconnect test light. Disconnect each fuse or circuit breaker until test light is either OFF or DIMLY lit. Refer to the Front Wheel Drive Car Wiring Diagrams Service Manual. This will eliminate higher amperage IOD. It is now safe to install the milliamp meter without damage to the meter to check for low amperage IOD. (e) Possible sources of high IOD are usually vehicle lamps trunk lamp, glove compartment, luggage compartment, etc.. (f) If test light is still brightly lit after disconnecting each fuse and circuit breaker, disconnect