KENR9125
5 Disassembly and Assembly Section
Disassembly and Assembly Section i04485873
Fuel Priming Pump - Remove and Install (Electric Fuel Lift Pump (EFLP)) Removal Procedure Table 1
Required Tools Tool
Part Number
A
T410437
Part Description
Qty
Cap Kit
1 Illustration 1
NOTICE Ensure that all adjustments and repairs that are carried out to the fuel system are performed by authorized personnel that have the correct training. Before beginning ANY work on the fuel system, refer to Operation and Maintenance Manual, “General Hazard Information and High Pressure Fuel Lines” for safety information. Refer to System Operation, Testing and Adjusting, “Cleanliness of Fuel System Components” for detailed information on the standards of cleanliness that must be observed during ALL work on the fuel system.
g02485837
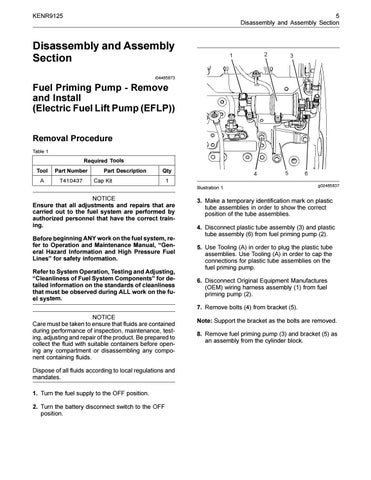
3. Make a temporary identification mark on plastic tube assemblies in order to show the correct position of the tube assemblies. 4. Disconnect plastic tube assembly (3) and plastic tube assembly (6) from fuel priming pump (2). 5. Use Tooling (A) in order to plug the plastic tube assemblies. Use Tooling (A) in order to cap the connections for plastic tube assemblies on the fuel priming pump. 6. Disconnect Original Equipment Manufactures (OEM) wiring harness assembly (1) from fuel priming pump (2). 7. Remove bolts (4) from bracket (5).
NOTICE Care must be taken to ensure that fluids are contained during performance of inspection, maintenance, testing, adjusting and repair of the product. Be prepared to collect the fluid with suitable containers before opening any compartment or disassembling any component containing fluids.
Note: Support the bracket as the bolts are removed. 8. Remove fuel priming pump (3) and bracket (5) as an assembly from the cylinder block.
Dispose of all fluids according to local regulations and mandates. 1. Turn the fuel supply to the OFF position. 2. Turn the battery disconnect switch to the OFF position.
This document is printed from SPI². Not for RESALE