Thisinformation,includingdesignandconstructiondetailsandspecifications,isdocumentedhereto serveasaguideonly.Project-specificcertifieddocumentationanddetailsmustbeobtainedbyrelevant professionalsforallprojectsinanylocation.Healthabitatacceptsnoresponsibilityforanyinformation providedinthisdocument.
Healthabitat would like to thank all of the donors, trade supporters and students who have partnered with us throughout our work in Nepal. Most importantly we would like to thank Bishnu Ji Shrestha and all of the communities we have worked with in Nepal.
We would like to thank all of the volunteers who have assisted in compiling this resource, including former Sanitation Studio students, tradespeople, and general Healthabitat supporters.
In particular: Deb & Russel Brown, Georgia Browning, Hannah Byrne, Emma Gaal, Sahibajot Kaur, Jake Kellow, Steph Palmer, Emerson Sims, Hayley Skelton, Kalyna Sparks, Tom Studholme, Courtney White, Jye Whyte and Sam Wigman.
Special thanks to Dave Donald, Heleana Genaus, Owen Kelly, Justine Playle, Karin Richards, Maria Roberts, Grant Stewart and Bobbie Bayley for their time and knowledge, and for sharing their global experiences.
We acknowledge the legacy that the late Paul Pholeros AM carries globally and, crucially, the role Australian Aboriginal and Torres Strait Islander communities have played in the development of Healthabitat and its work.
Produced by Healthabitat Sydney | Australia www.healthabitat.com | info@healthabitat.com | (02) 9973 1316
Compiled by Bobbie Bayley
Edited by Maria Roberts
This work is copyright. It may be reproduced in whole or in part for study, education, training purposes and to guide projects. It may not be reproduced for commercial usage or sale. Reproduction for purposes other than those indicated above requires permission from Healthabitat.
© Healthabitat 2022
ISBN: 978-0-6455190-0-6 (paperback)
ISBN: 978-0-6455190-2-0 (Digital version)
For further copies, please contact Healthabitat. Further e-copies can be downloaded from the Healthabitat website September 2022
INTRODUCTION
Healthabitat works with local communities to improve the health of people living in poverty by improving their living environments.
Healthabitat is an Australian-based not-for-profit company that started in 1989 working to improve the health of Aboriginal people by improving housing in Australia. As time went on it became clear that environmental health issues affect many nations and so the methodology has been applied and successfully practised worldwide, including in Nepal.

Safety and the 9 Healthy Living Practices form the framework that Healthabitat projects follow globally to create measurable improvements to health through targeted improvements in people’s living environments.
AIM OF THE GUIDE
The purpose of this guide is to put in one place all the work, lessons and thinking accumulated by Healthabitat in Nepal since 2007.
Over this period of time, the work, ideas and expertise of dozens of students, plumbers, other trades and local communities have helped to create a successful and robust toilet design. This includes aspects such as the sizing of septic systems, local adaptations for soakage trenches and the modular sizing of toilet cubicles.
WHO IS THIS GUIDE FOR?
This guide is open source and intended for:
• Healthabitat to use as a comprehensive reference document in future projects
• Nepalese or international NGOs working in schools and communities in Nepal
• International NGOs working in other countries to learn about the Healthabitat process
• Students and volunteers to understand the complex parts that make up a ‘simple’ design to improve health.
3
TABLE OF CONTENTS
INTRODUCTION 3
AIM OF THE GUIDE 3
WHO IS THIS GUIDE FOR? 3
TABLE OF CONTENTS 4
TIMELINE 6
01 Healthabitat & Projects Overview 9
WHO ARE HEALTHABITAT ? 11
HOW DOES THE LIVING ENVIRONMENT IMPACT HEALTH? 11 What is health hardWare & Why is it important? 11
WHAT ARE ‘HEALTHY LIVING PRACTICES’ (HLPs) ? 12
HEALTHABITAT’S METHODOLOGY 13
HEALTHABITAT PROJECTS 14
PROJECT OVERVIEW 15
02 Nepal, School Sanitation & The HLPs 17
PROJECT OVERVIEW 19
SCHOOL SANITATION & THE TARGETED HLPs 20 safety 20
hlp 1 - Washing people 20 hlp 3 - removing Waste Water 21 hlp 6 - reducing negative effects of animals, insects, and vermin 21 hlp 9 - reducing hazards that cause trauma 21
SCHOOL SANITATION - THE HEALTH STORY 22
03 Nepal Projects: Method & Process 25
KEY PEOPLE 26
PROCESS OVERVIEW 28
STAGE 1: PROJECT INITIATION 29
STAGE 2: PROJECT FEASIBILITY 30 2.1 project suitability overvieW 30
STAGE 3: DESIGN 32 3.1 design process overvieW 32 3.2 project brief 33
site analysis 34
design criteria 36
further design considerations 36
design presentations 38
tools & student involvement 39
STAGE 4: CONSTRUCTION 40 4.1 milestones 40
STAGE 5: MAINTENANCE 41
STAGE 6: REPORTING 42 6.1 milestones 42
PROJECT CASE STUDIES 43 a project story - the soakage trench saga... 43
3.3
3.4
3.5
3.6
3.7
4 NSTDG
04 Design & Construction 47 THE OVERALL TOILET DESIGN 50 THE KEY DESIGN FEATURES 51 TOILET NUMBERS, SIZES & CONFIGURATIONS 52 1. STONE FOUNDATIONS, DOUBLE BRICK CONSTRUCTION & EARTHQUAKE BANDING 54 2. STEEL FRAMED ROOF CONSTRUCTION & STEEL ROOF SHEETING 59 3. SECURE & RELIABLE WATER SUPPLY (TO TOILET BLOCK) 61 4. PLUMBING DESIGN 63 5. TOOTH, HAND & FACE WASHING 66 6. WASTE DISPOSAL SYSTEM 67 7. STONE & BRICK FOOTPATH 71 8. CUBICLE DESIGN & HARDWARE 72 9. VENTILATION & INSECT SCREENING 77
Maintenance
WHY IS MAINTENANCE IMPORTANT? 80 HOW IS MAINTENANCE CARRIED OUT? 81 1. training a maintenance manager 81 2. maintenance checklist 82 3. toolkit & restocking checklist 83 4. cleaning checklist 84
DEFINITIONS, ACRONYMS & EXPLANATIONS 88 RELEVANT RESOURCES 88 Website links 88 articles & guides 88 specifications 88 feasibility document 89 feasibility document - additional reference
project process checklists
Water process
septic tanks/ Water tank sizes
toilet footprint
maintenance checklists
toolkit & restocking checklist
cleaning checklist
5
05
79
06 Appendix 87
92
93
96
97
98
99
104
105
TIMELINE of HEALTHABITAT WORKING IN NEPAL
Itbeginswith2toilets Healthabitat starts work in a small village building toilets with the community identifying key design criteria and testing these in real life with careful monitoring.
TIMELINE
Fromsinglevillage toilets to school toilet blocks

“Sanitation Studios” commence with university students, plumbers, local trades and community members collaborating on refining the design of toilets and waste systems. Here, a siting kit is rolled out at 1:1 scale.
After the careful evaluation of the first 30 or so toilets, 58 toilets and waste disposal systems are completed in one village.

‘How a Septic Tank Works’ YouTube animation story created
The Sanitation Studio produces a maintenance checklist for toilets based on community knowledge and careful monitoring.


2007 2008 2009 2010 2011 2012 2013 2014
6 NSTDG
After the earthquake in 2015, an earthquake banding system was developed to aid in the rebuilding of houses in communities to make them safer in the future. This system was adapted and used within school toilets.


School toilets continue to be constructed as part of sanitation projects, leading to over 2500 people getting access to functioning toilets, handwashing and waste disposal. A maintenance manual, toolkit and training package is developed and delivered to schools, with training, to ensure ongoing function for sanitation facilities in Nepal.

Devastating earthquake and aftershocks - All toilets survive
Sanitation Studios continue, leading to the design and construction of several more sanitation facilities for Nepalese schools.

2015
2016 2017 2018 2019 2020 2021 2022
The first school Sanitation Studio, leading to the design and construction of a new water supply and handwashing facilities, toilets and waste disposal system.
7
Diarrhoeal and respiratory diseases, in particular, are the major causes of illness among Indigenous children and also play a major role in malnutrition in the first three years of life.
Skin infection is one of the most common problems of Indigenous children...persistent skin infection is known to increase the risk of developing kidney disease and rheumatic fever.
All these illnesses are commonly linked to poverty.
- Housng for Health:The Guide
“ “ 8 NSTDG - 01 Healthabitat and Projects Overview
chapter 01


An overview of Healthabitat, their worldwide projects and the focus of improving health through the HLPs
01 Healthabitat & Projects Overview 9
• Health Hardware: Image from ‘AP Design Guide’ explaining what ‘health hardware’ is

10 NSTDG - 01 Healthabitat and Projects Overview
Healthabitat is an Australian-based not-for-profit company governed by a board of directors who draw upon the experience of a dedicated team who have worked on Healthabitat projects over many years. It is a multidisciplinary team of architects, environmental health officers, plumbers and other professionals.

They work with local communities to improve the health of people living in poverty around the world by improving the living environment.
Healthabitat has a clear methodology: Safety and the 9 Healthy Living Practices. Healthabitat projects follow this methodology globally to create measurable improvements to health through targeted improvements in the living environment.
HOW DOES THE LIVING ENVIRONMENT IMPACT HEALTH?
More buildings or toilet blocks in communities will not guarantee better health outcomes.
Poor housing conditions in places of poverty are associated with a wide range of health conditions. For example:
• Persistent scabies infections can lead to an increased risk of infection by bacteria (especially Group A streptococcus). These infections are most effectively treated by frequent washing and this will also help to reduce the consequent high rates of renal disease, rheumatic fever and rheumatic heart disease.
• In many regions, Indigenous children have high rates of trachoma and bacterial eye infections. Studies have shown regular face washing can reduce the amount of eye infection.
• Washing hands after using the toilet can significantly reduce the transmission of hepatitis.
• Waste water in the living environment can make people sick. If people come into direct contact with waste water, or if their water supply is contaminated with waste water, there is a greater risk of transmitting bacteria and viruses that cause disease. These risks are also increased if animals, vermin or insects have been in direct contact with waste water, which can pass bacteria on to people.
‘health hardware’ is the term used to describe the physical equipment needed to give people access to the healthgiving services in a house, including items such as a:
• toilet
• waste drain
• sewage system
• tap
• spout
• shower rose.
Research has shown that improving essential health hardware (electrical repairs, fixing a leaking toilet and having properly functioning sewage systems and waste treatment, sufficient hot water, and a place to wash hands and face and somewhere to wash a baby or child, etc.) can lead to improvements in health status and reduce the risk of disease and injury.
What is Health Hardware & Why is it Important?
HEALTHABITAT ? 11
WHO ARE
WHAT ARE ‘HEALTHY LIVING PRACTICES’ (HLPs) ?
Safety and the 9 Healthy Living Practices (HLPs) are based on bestpractice public health knowledge and apply globally.
They identify elements of the living environment that can compromise safety and/or health. The HLPs are a series of practical considerations to better inform the design and maintenance process.

Life-threatening issues have the highest priority, followed by washing people, especially children 0-5 years old.
Safety and the 9 HLPs were developed in 1989 to “stop people getting sick”. They are the key focus of every Healthabitat project, in the order shown in the diagrams on this page.
• Safety and life-threatening issues.
• HLP 1. Washing people.
• HLP 2. Washing clothes and bedding.


• HLP 3. Removing waste water safely.
• HLP 4. Improving nutrition, the ability to store, prepare and cook food.
• HLP 5. Reducing the negative impacts of over-crowding.
• HLP 6. Reducing the negative effects of animals, insects and vermin.

• HLP 7. Reducing the health impacts of dust.
• HLP 8. Controlling the temperature of the living environment.


• HLP 9. Reducing hazards that cause trauma.

S
4 7
5 9 8
6 3 2 1
12 NSTDG - 01 Healthabitat and Projects Overview
Healthabitat’s main program of work is called ‘Housing for Health’. The program has a clear 7 stage methodology that is followed for each project which begins and ends with the community.
Alongside the 7 stage methodology, Healthabitat uses the HLPs and certain priorities as a clear framework for every project to ensure health is being improved. These priorities include:
Local Teams & Community Engagement
• The project has to come from community groups or organisations already working with the community, as they have the greatest vested interest in improving their communities and know what the local people want and need.
• Local people bring important local expertise to a project, whilst also remaining within the community to maintain the environment when other project team members have left.
• Local people are engaged in active roles in all aspects of the work, providing training and skill sharing to train local teams.
• Local teams undertake much of the on-the-ground work.
• Image: Community team members review completed work
Partnerships with Professional Trades
• Bring highly trained people with skills and expertise to all projects
• Ensure projects are carried out to industry standards
• Play a large role in providing training and facilitating skill sharing with local community members.
• Image: A trade professional teaching skills to community members


• The late eye surgeon Professor Fred Hollows coined the phrase ‘no survey without service’, insisting that his teams make a tangible difference on day one of any project.

• Skilled local teams and professional trades are engaged to deliver a project and are integral to the success of the ‘no survey without service’ methodology, making a difference from the very beginning of each project.
• Image: Professor Fred Hollows in action
• Data is recognised as an important resource and is used to measure and compare the function rates of homes before and after the work.
• Analysis of water usage data can be a useful way to inform the size and design of systems and health hardware.
• Image: Community team member filling out Housing for Health survey sheets

HEALTHABITAT’S METHODOLOGY
‘No Survey Without Service’ Data Collection & Reports 13
HEALTHABITAT PROJECTS

Heathabitat has engaged with communities globally by applying the HLPs to improve health outcomes.
Nepal-Sanitation
Bangladesh-WaterandSanitation India - Water & Sanitation
South Africa - Sanitation
Ethiopia-ReducingTrachoma


NavajoNation-HousingforHealth NewYork-HousingforHealth Alabama-HousingforHealth

Australia-HousingforHealth
Indonesia-CommunityPlumbingChallenge PNG - Sanitation with SAGO Network

14 NSTDG - 01 Healthabitat and Projects Overview
PROJECT OVERVIEW AUSTRALIA | HOUSING FOR HEALTH

• Map: Project locations in Aboriginal & Torres Strait Islander communities across Australia

Location

Housing for Health projects are located largely in indigenous communities in regional and remote areas of Australia.


Beneficiaries
• Over 59,000 people living in these houses
• Local teams trained and employed to work on project teams
Aim
The aim of the Housing for Health projects is to work with local communities to provide a healthy living environment and better health outcomes.
Partners and Donors
• Federal and state government departments

• The Fred Hollows Foundation
• Industry partners


• Individual Indigenous communities
• Volunteers working on projects
Detail
The Housing for Health program has conducted surveyfix work, research and development and maintenance on over 9,600 existing houses in 252 communities as of February 2022.
Impact
• Over 305,000 items fixed or inspected in houses


• Over 2,500 local staff trained and employed
• 40% reduction in hospitalisations from illnesses associated with the living environment
• Targeted Healthy Living Practices: The Australian projects target Safety and all 9 HLPs
15
TARGETED HEALTHY LIVING PRACTICES
S 1 2 3 4 5 6 7 8 9

16 NSTDG - 02
The
Nepal, School Sanitation &
HLPs
• Image: Tap heights are tested on school children of all ages during construction to ensure they are suitable
chapter02
An overview of school sanitation Healthabitat projects in Nepal and improving health through targeted HLPs
02 Nepal, School Sanitation & The HLPs 17
PROJECT OVERVIEW
NEPAL | SCHOOL SANITATION
• Map: Project locations in communities across Nepal
Location

School sanitation projects have been located at five participating schools in the Bagmati Zone of central Nepal.
Aims
The aim of the projects is to improve sanitation to reduce gut infections, respiratory illness and improve dental health, as well as improve the structural integrity of buildings against future earthquakes to improve safety.
Better toilet facilities are also known to improve school attendance, especially for girls experiencing menstruation.
Details
The projects involve the design and building of toilet facilities with handwashing facilities, waste water treatment and water storage facilities.
Beneficiaries
• Over 1500 school students and teachers
Partners and Donors
• WorldSkills Australia
• The International Association of Plumbing and Mechanical Officials (IAPMO)
• Reece Plumbing
Impact
• Functioning toilets, waste water treatment systems and handwashing facilities
• Safer buildings for future earthquakes
• Local staff trained and employed
• Targeted Healthy Living Practices: The Nepal school sanitation projects target S, HLP1, HLP3, HLP6 & HLP9.
19
TARGETED HEALTHY LIVING PRACTICES S 1 3 6 9
SCHOOL SANITATION & THE TARGETED HLPs

Healthabitat’s work in Nepal targets Safety, HLP1, HLP3, HLP6 and HLP9.
The health research that underpins the 9 HLPs tells us that a toilet is not as effective at improving health unless there is also handwashing available. Therefore, handwashing is a critical part of the toilet design.
Safety
When designing, upgrading or maintaining sanitation structures, immediate and life-threatening dangers are given the highest priority.

The design of sanitation structures in Nepal should provide earthquake-resilient walls and roofs. While it is common in Nepal to see roof sheeting held down with rocks, these structures are susceptible to collapse during high wind or earthquakes. Falling rocks can also be a danger to people.


HLP 1 - Washing People
In Nepal, many schools lack basic or well-maintained washing and toilet facilities.


Being able to use functioning washing facilities reduces the spread of diseases, including diarrhoea, respiratory disease, hepatitis and infections. These diseases can have lifelong negative effects on people.
Handwashing facilities can assist in improving dental hygiene, tooth brushing and reducing dental diseases.
20 NSTDG -
02
Nepal, School Sanitation & The HLPs
• Images: Devastation caused by the 2015 earthquake shows the importance of structural safety
S 1
• Images: Examples of existing poor water supply, washing facilities and waste water removal at project sites
Waste water in the living environment can make people sick.
If people come into direct contact with human waste, or if their water supply is contaminated with waste, there is a greater risk of transmitting bacteria and viruses that cause diseases, specifically gut and bowel problems.
The lack of toilet facilities within schools and communities means that human waste and waste water is commonly found on the ground, which increases the risk of foot and skin infections.
Removing the waste safely requires toilet facilities that are adequately built and maintained.
HLP 6 - Reducing Negative Effects of Animals, Insects, and Vermin


People’s health can be affected by contact with animals, vermin and insects in the living environment, as they can carry a variety of diseases.
Mosquitoes and flies transmit diseases such as trachoma, malaria, Japanese encephalitis, and dengue fever.
These risks are also increased if animals, vermin or insects have been in direct contact with waste or waste water, which can pass bacteria on to people.
HLP 9 - Reducing Hazards that Cause Trauma

If sanitation facilities are poorly designed and constructed, or not well maintained, there is an increased risk that people may be injured.
Hazardous or broken materials causing cuts and abrasions, trips or falls are typical hazards and should be prevented.
Personal security is also an issue, especially for women, due to a lack of privacy within the toilet facilities, or lack of toilet facilities.
HLP 3
- Removing Waste water
21 3 6 9
3. 2.
The Health Issue
1. Human waste and contaminated waste water create a greater risk of transmitting bacteria and viruses that cause disease.
2. Having nowhere to wash hands after using the toilet increases the transmission of hepatitis and diarrhoea.
3. Personal security is also an issue, especially for women, due to a lack of privacy within the toilet facilities, or lack of toilet facilities.

SCHOOL SANITATION - THE HEALTH STORY
1. 22 NSTDG - 02 Nepal, School Sanitation & The HLPs
7.
The Environmental Solution
4. A secure, well-built toilet, made by local trades with a place for handwashing and teeth cleaning, can address these issues.
5. Safe collection and treatment of human waste and water takes faeces off the ground, reducing the risk of transmitting bacteria and viruses that cause disease.
The Health Outcome

6. Less faeces on the ground will lead to better gut health, less diarrhoea especially in children, and improved dental health.
7. Young women are also more empowered, leading to better, more confident and safe school attendance.
S 1 3 6 9
5. 4. 6. 23

24 NSTDG - 03 Nepal Projects: Method & Process
• Image: 2019 University of Newcastle Architecture Sanitation Studio with two Australian and North American IAPMO funded project plumbers - a thank you ceremony from the school before leaving
chapter03
03 Nepal Projects: Method & Process
An overview of the established method and process used for all Nepal-based school sanitation projects. A method that can be replicated in any part of the world, yet must be tailored to suit the community needs, context and site location
25
The key people in the project team during the design and construction phases include both local Nepali and international contributors. Each group plays a specific role in the project development, drawing on their expertise and experiences, which include:

Client
The local school that requires the project for improved healthy living practices is the client.
The client is responsible for guiding the project brief, location, requirements and ongoing maintenance. Local staff can speak the local language and liaise between the community and work teams employed.
Designers & Engineers
Designers, such as architects, collate the information collected from the project brief, client discussions and site analysis to find the best design solution.
Their goal is to problem-solve and provide a design relevant to available local materials, local techniques of construction and local building standards.

The engineer reviews the design and specifies requirements, such as size of structural members, tie down details and earthquake banding requirements.
The designer and engineer collaborate to produce a finished documentation package of the design and specifications ready for construction.
The engineer should continue to be engaged, providing site inspections throughout the project construction, similar to the role of a ‘building certifier’ in Australia.
Project Manager
Project managers are of Nepali origin and come from the local communities or central towns. They are accredited and contracted by Healthabitat to run Nepal sanitation projects.

They are responsible for all stages of the project and report at regular, specified intervals to Healthabitat on project progress.
Project managers are the most experienced members of the Healthabitat team and bring decades of knowledge to each project.
KEY PEOPLE
• A local school group in their new toilet block
• University architecture students collating ideas
• Nepali Project Manager and dentist, Bishnu, addresses the local community about a project
26 NSTDG - 03 Nepal Projects: Method & Process
Trade Experts
International trade volunteers are supported by organisations that have a broad charter aimed at using trade skills to improve living conditions and assist the training of people in developing countries.
Trade experts range from plumbers, carpenters, engineers and architects to environmental health officers.
The organisations that have supported Healthabitat projects include IAPMO (International Association of Plumbing and Mechanical Officials), World Skills and Reece Plumbing.
Environmental Health Workers
International health workers assist with solutions for a sanitary environment. The outcome should meet the standard list of the healthy living practices and be easily maintained in this condition.

Alongside this are dental camps that are part of the Teeth and Toilets (TT) program, providing critical dental care for villages in addition to teaching young people about the importance of oral health.
Local Teams
The local team are responsible for building all elements. Throughout this process they work in collaboration with the project manager and international trade experts, learning new skills and techniques.
The local team carries out all the site works and builds the required structures to the required design and specifications.
They may also be responsible for maintaining the structures at project completion, working on other projects nearby and educating others.


• Trained builders constructing the roof for a project and local labourers excavating the soakage trenches for septic tanks
 • IAPMO Australia plumber Grant teaches local plumber and workers new methods
27
• A young school child washes their hands in the finished handwashing station
Healthabitat utilises a staged methodology, inspired by their Housing for Health projects in Australia. Beginning and ending with direct community involvement, the process follows these 6 stages:


PROCESS OVERVIEW
1: PROJECT INITIATION STAGE
PROJECT FEASIBILITY STAGE 3: DESIGN STAGE 4: CONSTRUCTION STAGE 5: MAINTENANCE STAGE 6: COMMUNITY FEEDBACK 28 NSTDG - 03 Nepal Projects: Method & Process
STAGE
2:
Projects are initiated when organisations already working on the ground or community leaders, groups or members seek help from Healthabitat to assist with building projects, health issues, workshops or other initiatives. Projects can be instigated through word-of-mouth or through community contacts where other projects have already taken place.


STAGE 1: PROJECT INITIATION
• Example of a letter of Invitation from a community in 2018 for a school sanitation project
01 - PROJECT INITIATION CHECKLIST :
Obtainofficialrecordofinitiationinwriting
Begintodiscussexpectations,roleofengagement,timeframes,accessconcerns,seasonsandweather
What are the details of the brief? 29
STAGE 2: PROJECT FEASIBILITY
After accepting the school’s invitation, the second step in the project’s development is establishing its drivers, needs and requirements. The careful planning of each project is fundamental to its success.
The school and local community are involved throughout the process to help negotiate with different groups and improve access to the preferred project site. Engaging locals from the start of the project ensures that local knowledge of place, infrastructure services (power, water and waste), construction methods and final users are a crucial part of the project’s development.
2.1 Project Suitability Overview
Although a community group or organisation may want a project delivered in a certain way or expect a certain outcome, the project or process may not always be suitable or feasible.
The early consultation period will determine which aspects of the project are suitable or unsuitable. This stage must determine the following:
02 - PROJECT FEASIBILITY/ PROJECT SUITABILITY CHECKLIST
Project Initiation/Feasibility:

What are the key project expectations and do these align with the HLPs?
Whatdoestheschoolexpecttobeapart/notapartoftheproject?
e.g.Doestheschoolwantyoutobuildatoiletwithnosecurewatersupply?Ordoestheschoolwantthe toilet to have no roof?
Where is the project funding coming from?
Whatistheexpectedcostofalltheprojectstagesandcontractor? Whatisthesourceoffunding?
Isthefundingalreadysecuredwithnostringsortimeframesattached?
Iffundingiscomingfromoutsideofthecommunity,whatwilltheschoolcontribute?Theremustbelocal investment,whichcouldbein-kindsupportsuchaslabour,materials,maintenancefunding.
Are there travel requirements or access restrictions?
Isthereanairfarecostassociatedwithreachingthecommunity?Ifso,howmuchisit?
Isit4WDroadaccessonlyforpeopleandmaterials?
Are there seasonal access restrictions such as the monsoon season?
What are the private vs. community needs and benefits?
Althoughthisisaschooltoilet,willthecommunityuseitalso?
Do the government, NGOs or the school have future development plans or are they already doing work?
AreotherNGOsdoingsimilarorthesameprojectintheareaalready?Ifso,whatistheirprojectdifference andsimilarities-canyoucollaborateorjoinresources?

Design & Construction:
Who is the project management team and the licence or insurance holder?
Whowillbetheon-the-groundprojectmanagementteamforallphasesincludingconstructioninspections and defects?
Whatifsomebodygetshurtduringtheproject?Aretheyinsured?
Who will be the construction team?
Are there local workers/labour available?
Aretherelocaltradestodothework-plumbers,electricians,engineers,inspectors?
Ifnotlocal,whoaretheyandwheredotheyhavetotravelfrom?
After the Project is Over:
Who will pay for and carry out the maintenance?
Whowillbetrainedasthededicatedmaintenancemanagerandcarryoutmaintenanceregularly?
Whowillrestockandsupervisethetoolkitsandtraining?
Who will carry out a defects inspection at project completion?
Istheremoneyinthebudgettofixanydefectsorpoorlyconstructedaspects?
NOTE: SeeFeasibilitydocumentsintheAppendixforreference/use
30 NSTDG - 03 Nepal Projects: Method & Process
Sample page from the ‘Water supply and sanitation feasibility study’ document

See Appendix for Feasibility resources 31
•
STAGE 3: DESIGN
After official project initiation and feasibility studies, the project team commences detailed planning and design with stakeholders, students and staff. The process overview below explains the common path of design development. This section provides information and resources that show how to carry out this process effectively.
3.1 Design Process Overview
03 - DESIGN CHECKLIST:
Project Brief - Finalised and agreed on by all stakeholders
Havetherebeendiscussionswiththeclient,schoolcommittee,parents,studentsandstaff?
Areinclusions,exclusionsandexpectationsnotedintheprojectbrief?
Projecttimelineandalldesignandconstructionphasesaredocumentedincludinginspections
Site Analysis - Completed and documented
Siteobservations,futureplansandsitequalitiesareunderstoodandcaptured
Prosandconsofthelocationandpossiblesiteshavebeenunderstoodandcaptured
Thesehavebeenreviewedwithstakeholdersforconfirmationsandinput
Sketch Design - Options are developed by understanding the brief and site
Minimumoftwoplanninganddesignoptionsaredevelopedusinghandsketches,siteplans,building plans,elevationsandsectionsandscalemodelstocommunicateideas

Presentedtostakeholdersforapprovalandselectionofmostappropriatesolution
Design Development and Detailed Design
Theselecteddesignisdevelopedanddetailedtoapointwhereitissufficienttoengageexternal consultantsandcompleteconstructiondocumentation
Presentedtostakeholdersforfinalapproval
Construction Documentation, External Consultants Engaged and Planning Approval
Externalconsultantsareengaged,suchasanengineer,toconfirmdesignanddetailspecifications
Constructionpackageisdevelopedwithconsultantcollaboration
Submittedtoauthoritiesforplanningorconstructionpermissionandapproval
Projectisbegunandcarriedoutaccordingtoprojecttimeline
NOTE: Theprojectmanagermustbeavailableatallstagesoftheprojecttotroubleshootanyunforeseenissues orquestionsandengageanyconsultantsasrequired,especiallythroughouttheconstructionphase.
32 NSTDG - 03 Nepal Projects:
& Process
Method
3.2 Project Brief


The project brief outlines the project requirements, inclusions and exclusions. There is often a lengthy process involving the client and stakeholders to clarify and document what their wants and expectations for the project are. • Example of stakeholder discussions informing project brief development

33
Site Analysis

‘Site analysis’ is carried out before any design commences. It is a focused study of the site’s characteristics and local context as it exists now. It also considers any other future plans or development proposals in the area.
All findings, observations, pros and cons must be documented in one place, in the form of sketches, diagrams, site plans, models and photographs, to inform the next design stage.
How a site analysis is executed and captured varies between professionals; there is no wrong or right way, yet a thorough site analysis is critical for ensuring a successful project with a long future.
The dot points below outline basic questions that will inform any site analysis.
The Location (Zoomed out)
• What is the climate? Does it snow or have hot summers? Do you need to capture or block cooling breezes?
• What is the seasonal weather? Are there monsoon downpours restricting access/travel? Does the rain come from the west in the summer? Is there a possibility of earthquakes or landslips?
• In the local culture are there gender requirements or restrictions?


• Are there local traditions that must be considered throughout design and construction?
• What are the local or state building requirements and available materials?
The Site (Zoomed in)
• What are the favourable and unfavourable orientations?
• Is the site made of fill or unstable ground?
• What is the proximity to the main school area? What other buildings are close to it?
• Is the site located to allow passive supervision from teachers?
• Where does water come from and drain to, on and around the site?

• Where are the people, car and machinery site access, exit and travel routes?
• Is there enough space for water storage, a toilet and handwashing block, soakage trenches and septic tank away from play areas?
The Future
• Does the school or community have plans for any future construction or student number expansion?
• Does the government have development plans?
• Do any other local or international NGOs have plans or projects proposed?
•
3.3
See Appendix for Site Analysis resources 34 NSTDG - 03 Nepal Projects: Method & Process
Architecture students carrying out site analysis: tracking path of water supply, interviewing female students, documenting what local materials are available, siting drawing from the ‘Draft Construction Manual’
• Example of plans made for a site analysis


3.4 Design Criteria
With every project, Healthabitat aims to maximise their health impact and so the target HLPs are always the key design criteria.
TARGETED HEALTHY LIVING PRACTICES
S 1 3 6 9
Footprints and
Hand Basin (2 taps) Hand Basin (3 taps)
Hand Basin (2 taps) Hand Basin (3 taps)
• Targeted Healthy Living Practices: The Nepal school sanitation projects target S, HLP1, HLP3, HLP6 & HLP9.
Hand Basin (2 taps) Hand Basin (3 taps)
Hand Basin (2 taps) Hand Basin (3 taps)
3.5 Further Design
Hand Basin (2 taps) Hand Basin (3 taps)
Hand Basin (2 taps) Hand Basin (3 taps)
Considerations
Modular Design
Options: Without Urinal Girls / Teacher Girls / Teacher / Boys 1200
Options: Without Urinal Girls / Teacher Girls / Teacher / Boys
Without Urinal Girls / Teacher
Without Urinal Girls / Teacher
Low Maintenance
Options: Without Urinal Girls / Teacher Girls / Teacher / Boys 1200 2100 3650 450
/ Teacher / Boys
/ Teacher / Boys
Toilet Footprints and Sizes
Hand Basin (2 taps) Hand Basin (3 taps)
Further to Safety, HLP1, HLP3, HLP6 and HLP9, other important considerations must be made in the design and placement of the toilet and handwashing block. These are focused on the local context, the site and future plans and are critical for ensuring a successful project for the place with a long future.

Hand Basin (2 taps) Hand Basin (3 taps)
Hand Basin (2 taps) Hand Basin (3 taps)
Hand Basin (2 taps) Hand Basin (3 taps)
Options: Without Urinal Girls / Teacher Girls / Teacher / Boys
Options: Without Urinal Girls / Teacher Girls / Teacher / Boys
Options: Without Urinal Girls / Teacher Girls / Teacher / Boys
Hand Basin (2 taps) Hand Basin (3 taps)
Options: Without Urinal Girls / Teacher Girls / Teacher / Boys
An understanding of modular design is important to aid the design process when considering toilet configurations for different-sized spaces and for different numbers of students and teachers.
Hand Basin (2 taps) Hand Basin (3 taps)
Options: Without Urinal Girls / Teacher Girls / Teacher / Boys 1200 2100 3650 450 850 1400
• Modules have been well thought through and tested to determine the best sized toilet and handwashing. Site-specific considerations are still encouraged.
Options: Without Urinal Girls / Teacher Girls / Teacher / Boys
4.8m/16’ 2m/6’6” 2m/6’6” 3.8m/12’8” 8.4m/28’

• Modules provide an easy understanding of space requirements when considering siting, layout and design.
6m/20’
• If the school expands they could simply add another toilet or handwashing module.
3.3m/11’ 2.6m/8’8” 3.5m/11’8”
The facilities endure very high use, often becoming the only working public toilet and handwashing service in town. Resources are often not available to consistently fix or repair items. Low maintenance design ensures long-term, high-intensity use.
• Low maintenance toilets are fitted with durable health hardware which can easily be cleaned.
• All tools and materials specified are durable and low maintenance.
Options: Without Urinal Girls / Teacher Girls / Teacher / Boys 1200 2100 3650 450 850 1400 2100
CLIFF FACE
2100 3650 450 850
1200
1400
1200 4’ 16m²/172ft²
6m²/65ft² 22m²/237ft² 10m²/108ft² 16m²/172ft² 22m²/237ft²
1’10” 7’ 1’6” 12’2” 3.3m/11’ 3m/10’ 3m/10’ 6.2m/20’8” 6.2m/20’8” 3.3m/11’ The following are diagrams of possible toilet configurations and their areas
12m²/129ft²
20m²/215ft² 4’8”
1200 2100 3650 450 850
1400
2100 3650 450 850
6m/20’ CLIFF FACE
1200
1400 4.8m/16’ 2.6m/8’8” 3.5m/11’8” 6m/20’
450 850
1200 2100 3650
1400
6m²/65ft²
10m²/108ft²
3m/10’ 3m/10’
The following are diagrams of possible toilet configurations and their areas
Toilet
Sizes 4’ 16m²/172ft² 12m²/129ft²
22m²/237ft²
16m²/172ft² 22m²/237ft² 20m²/215ft² 4’8” 1’10” 7’ 1’6” 12’2” 3.3m/11’
2.6m/8’8” 6.2m/20’8” 6.2m/20’8” 3.3m/11’
1200 2100 3650 450 850 1400 CLIFF FACE
Options:
Girls
1200 2100 3650 450 850 1400 2100 4.8m/16’ 2m/6’6” 2m/6’6” 3.8m/12’8” 8.4m/28’ 3.3m/11’ 2.6m/8’8” 3.5m/11’8” 6m/20’
6m²
²
10m²
²
1’10” 7’
12’2”
3m/10’ 3m/10’
following are diagrams of possible toilet configurations and their areas
850 1400 Toilet Footprints and Sizes 1200 4’ 16m²/172ft² 12m²/129ft²
/65ft
22m²/237ft²
/108ft
16m²/172ft² 22m²/237ft² 20m²/215ft² 4’8”
1’6”
3.3m/11’
2.6m/8’8” 6.2m/20’8” 6.2m/20’8” 3.3m/11’ The
CLIFF FACE
1200 2100 3650 450 850 1400
6m/20’
Options:
Girls
1200 2100 3650 450 850 1400 2100 4.8m/16’ 2m/6’6” 2m/6’6” 3.8m/12’8” 8.4m/28’ 3.3m/11’ 2.6m/8’8” 3.5m/11’8” 6m/20’
CLIFF FACE
2100 3650 450 850 1400
Toilet Footprints and Sizes 1200 4’ 16m²/172ft² 12m²/129ft² 6m²/65ft² 22m²/237ft² 10m²/108ft² 16m²/172ft² 22m²/237ft² 20m²/215ft² 4’8” 1’10” 7’ 1’6” 12’2” 3.3m/11’ 3m/10’ 3m/10’ 2.6m/8’8” 6.2m/20’8” 6.2m/20’8” 3.3m/11’ The following are diagrams of possible toilet configurations and their areas
See Chapter 04 & Appendix for Modular Design 36 NSTDG - 03 Nepal Projects Method & Process
Replaceable & Easily Repairable Materials & Fittings
When items do fail, it is important that they can be easily repaired or replaced to ensure the toilet and handwashing facilities can continue to be used. They must be able to be sourced locally, quickly and easily.

• All items are installed to ensure they can be unscrewed or opened to allow replacement.
• All tools and materials specified are durable and locally available.
• All replaceable items such as taps are locally available, with spares stocked in the maintenance toolbox.
• Healthabitat’s illustrated Maintenance Checklist (see Appendix) encourages the community to ensure all plumbing is maintained and repair jobs are identified and documented.
37
3.6 Design Presentations


Presenting design ideas and development at every stage to the client and stakeholders is crucial for project confidence and success.

This gives an opportunity for design feedback and input from the people who use and will use the proposal most and who know the location and site the best. Such presentations are always most effective when done in person to enable design troubleshooting and resolutions to be brainstormed as the discussions are occurring.

38 NSTDG - 03 Nepal Projects Method & Process
• Design documents from a sketch design presentation by architecture students with Healthabitat
3.7 Tools & Student Involvement
‘Tools’ are the outcome of designers, healthworkers and trade experts working together to produce a series of clear simplified methods over the many years of the projects.
These are processes that have been developed to solve common problems that occur in projects and can be used for the project at hand and for all future projects.
The examples listed below were produced by Australian university students in architecture, engineering, construction management, psychology, ecology and design as part of an ongoing Healthabitat Sanitation Studio since 2013. They are examples of how students can be involved in such projects.
This opportunity has exposed students to the challenges of their industry in foreign contexts and has allowed many Nepalese communities to benefit from the energy, innovation and inspiring design thinking and problem-solving qualities that students possess.

Septic Tank Siting Kit (2013)
This kit consists of three (3) items, to be used in conjunction with each other to assist with communication amongst the villagers:
• Part 1 - Flip charts: Diagrams on pocket-sized cards to discuss the key siting issues.
• Part 2 - Model: A scaled prototype as a small portable model to show the location of all the parts, above and below ground.
• Part 3 - Template: Full-scale shapes to place on the ground and set out each item in preparation for construction.
Mud Test (2015)
Dust and mud being tracked into the toilet areas will mask harmful human waste. Over time, as mud washes down toilet pans and into the septic tank, it reduces the capacity of the system.
Students carried out tests with different ground surfaces (brick and rocks of different sizes) to see which removed mud and dirt from shoes the most effectively.

Results were documented and now inform the design and placement of the path and entry to the toilet block.
Earthquake Banding (2016)
A construction manual was produced which graphically communicates the steps of construction through the stages of design, foundations, earthquake banding, walls and roof.

It provides engineered details and relevant easy-to-check points to ensure that each item is addressed.
Overall, the document is collated in a way that sums up previous tested methods and allows for easy reproduction.
•
•
Document extract: Start of wall construction
• Septic Tank Kit: Template positioned for discussion
Mud Test: Circulation across surfaces
39
After the design phase is complete, it’s time to start on site. Using the site-specific design, developed ‘tools’ and lessons from the expert trades, the key milestones below are followed.
Essential trades, with the support of trained and untrained community members, complete the construction of the project.


4.1 Milestones
Key construction milestones include:
• sourcing materials: ordering and delivery of materials for building the structure and fittings
• preparing the site: marking out the site, excavation and earthworks


• services: installation of services below and above ground as required

• foundations: construction of footings to support the building as designed and specified


• structure: construction of walls, roof and doors as designed and specified
• fixtures, fittings & finishes: installation of health hardware, hooks, shelves and surface finishes as specified.
• Overview of a construction site for a new toilet block (left), and an example of a completed toilet block (right)
• Examples of Stage 4: Construction project milestones
STAGE 4: CONSTRUCTION
40 NSTDG - 03 Nepal Projects Method & Process
5: MAINTENANCE
Without maintenance at all stages of the health hardware ‘chain’ (as discussed in Chapter 01), things will fail.

Maintenance plans, checklists and ongoing funding for the life of the project are essential tools that provide information on taking care of the essential design features. These improve the chances of the project’s long-term success and also ensure the best possible chance of improving the health of its users.
For maintenance to be carried out efficiently and successfully, the following items need to be in place:
05 - MAINTENANCE CHECKLIST:
Ongoing Maintenance Funding - Allocated from day one of feasibility
Fundingforthetrainingandsalaryofadedicatedmaintenancemanager
Fundingfortoolkitrestocking
Fundingforurgentandplannedmaintenancework
Training a Maintenance Manager - Providing the knowledge to carry out maintenance
Theprojectmanagertrainsadedicated,ontheground,maintenancemanagertooverseeregular inspections
Themaintenancemanagermusthavetheknowledge,skillsandtoolstocarryoutrepairsand maintenance
Theymaybeateacherfromtheschool,aparentoratradespersonfromthecommunity
Maintenance Checklist - A system to follow and use to keep records of maintenance work
Anestablishedprocessforinspections,testingandsurveyingitemswithrequiredtimeframes
Ensuresthatfaultsarepreventedordetectedearlyandeffectsoffailurecanbereduced
Isaformaldocumenttoreviewanduseasaresourceforfutureplannedmaintenanceandtoolkit restocking
Hasbeenestablishedasaprioritylist,focusingattentionandfunding
Toolkit & Restocking Checklist - Providing the tools and basic parts (e.g. taps, hooks) to carry out maintenance
Theprojectmanagerattheendofconstructionwilldeliverafullystockedtoolkitandchecklistsand providecompetencytrainingtoundertakemaintenance
Thechecklistincludesallitemsandtoolsrequiredforregularrepairs,maintenanceandreplacementof hardware
Thesemustberestockedregularly
Cleaning Checklist - Cleaning also helps maintain parts of the project
Regularcleaningisimportanttomaintainthetoilet
Forexample,removingdirtbuild-upincubiclesbeforeitgetsflusheddownthetoiletpanreducesdirt build-upinthesepticsystemthatcouldminimiseitscapacity
NOTE: The2019SanitationStudiodevelopedandtestedthesetoolswithexistingprojectcommunities.With feedback,thetoolsareconstantlybeingrevisedtoincreasecommunication,efficiencyandsuccessonthe ground
STAGE
See Chapter 05: Maintenance & Appendix for resources
41
Reporting on project successes, failures and ideas for improvement in all phases is important, and it is also important to document this information. It is then important to feed this information back to the organisation carrying out the works program to help inform future projects.
The project manager on the ground is the point of contact for all community feedback and reporting.
6.1 Milestones
Key reporting milestones include:
• Throughout construction: work progress and photo reports
• End of construction: final report
• After construction: defects reporting, community feedback and maintenance successes and failures.

STAGE 6: REPORTING
42 NSTDG - 03 Nepal Projects: Method & Process
PROJECT CASE STUDIES

Using the details of two past projects in Nepalese schools, the different process stages, as explained in this chapter, can be understood.
These examples show that every project is unique, has unique issues, and that each process stage looks different for every project, yet is based on the same principles.

A Project Story - The soakage trench saga...
The usual way... On projects, Healthabitat had used 100mm polypipe for soakage trenches. They would drill big holes along its length and wrap the pipes in geotech fabric before backfilling with gravel to bury it.

On this particular project an international plumber suggested some changes...
A new way... So, instead of the usual method of drilling holes the plumbers used a thin hack saw to cut thin slits in the polypipe. The pipes were then laid in the trench with geotech fabric laid on top, rather than wrapping the pipes. The trench was backfilled as usual and the toilets and handwashing stations began being used.
The Issue... Some time after its completion, the Project Manager was contacted by the school as the septic tank started backflowing through the toilet block.
The Project Manager visited the school as soon as possible with a plumber, digging up different parts of the system to try to find the source of the issue. There was sewage everywhere!
Digging up the soakage trench, they realised the weight of the dirt on the 100mm polypipe made the pipe compress, closing the sawn slits. This stopped any treated waste water from the septic tank seeping out and soaking into the ground. Instead it filled up the septic tank quickly and backflowed sewage through the toilet block.
The Lessons...
• Every new project changed to specifying and installing rigid 100mm PVC pipes for soakage trenches (rather than softer polypipe), drilling big holes and wrapping in geotech fabric.

• This demonstrated the importance of having a present and contactable project manager on the ground to carry out regular visits, troubleshoot any issues and pass this feedback on for future projects.
• It is important to try new ways of doing things and new products, but start at a small scale, trialling for a specified time and closely monitoring and then approving, before rolling out at large scale across all projects.
43
A higher secondary school which accommodates 600 school students and is located in a mountainous village was severely damaged in the 2015 earthquake. The details of the project stages on this project included:
Stage 3: Design
In February 2015 a 10 day design workshop was undertaken at the school.
The project team included the local project manager, Worldskills Foundation-supported plumbers, a local engineer, local Nepali construction team, local Nepali dental team, Australian university students and staff and Healthabitat staff.
The team’s brief involved many aspects, including:

• Testing methods to reduce mud in the sanitation block due to past project feedback. The team developed the Mud Test tool which informed the specification of the brick and rock path.
• Carrying out a site analysis, site studies and design briefings to design a new toilet and handwashing facility along with upgrading the existing facilities.

• Designing tooth brushing facilities at the school and commencing dental health initiatives.

• Formally developing an Australian university course for the Sanitation Studio.
Stage 4: Construction
All construction work was done by trained locals and members from the school as well as trained international plumbers.


The project was built in 2 stages:
• 1st stage = the girls’ toilet (including toilet cubicles, handwashing, temporary tooth brushing area, waste water treatment and disposal system) and upgrading of the existing boys’ toilet, which had been buried during a mud slide in the wet season. This included remedial works.


• 2nd stage = additional works to the existing boys’ toilet including main drainage line set out, excavation for drainage pipework and effluent line and construction of the septic tank and soakage trench.
Stage 5: Maintenance
The school teachers, management committee and locals were encouraged to be involved in the construction process so they would be familiar with how the building works. These project members were then the dedicated members trained by the project manager in how to carry out maintenance checks and do basic repair work on all the health hardware.
The school was given basic tools and maintenance checklists to assist in the ongoing maintenance.
HIGHER SECONDARY SCHOOL | 2015/16
• Architecture students carried out mud tests and design work and the dental team carried out dental workshops
44 NSTDG - 03 Nepal Projects: Method & Process
SECONDARY SCHOOL | 2017/18
A village near Melamchi was devastated by the 2015 earthquake.
The two toilets that survived at the school were, prior to the earthquake, unsatisfactory for clean handwashing and the safe removal of waste. The situation was exacerbated as the remaining two toilets had to cater to the 627 students enrolled at the school. The Head of School noted that students were suffering from additional obstacles and requested help and support.
Details of the stages on this project included:
Stage 1 & 2: Initiation & Feasibility

In October 2017 Healthabitat completed a feasibility study for the design and construction of new toilet blocks at the school and in January 2018 received a formal invitation from the school to commence the design process.


At the time, Healthabitat was unaware that two other organisations, ‘Mondo’ and ‘HELP,’ had secured funding to rebuild the school, including provision for a set of toilet blocks.
In May 2018, Healthabitat, HELP and Mondo met and agreed on a plan to work together to design and construct new toilet facilities for the staff and students of the secondary school to complement the construction of the school being funded by Mondo.

Stage 5: Maintenance
Specialist teams were brought on site to work and to train local builders/trades in the skills needed to install and maintain the plumbing, fixtures, septic tank and soakage trench.
Staff were trained in the maintenance process, cleaning routines and skills and tools required to carry out the work.
Stage 6: Reporting
Throughout construction the project manager completed work progress and photo reports to detail and report back to Healthabitat, Mondo and HELP on the stage and development of the project.
At the completion of the project, a final report was formulated, with maintenance reporting and community feedback sessions undertaken.
• Architecture students, following in-depth site analysis, produced design and construction documents, including those shown here: a site plan and 3D rendering of the Senior School toilet block
45

46 NSTDG - 04 Design & Construction
• Under construction 2018/19: secondary school sanitation and handwashing project nears completion in February 2019. Note Septic tank in front of the toilet block
04 Design & Construction
DOCUMENTATION&
47
chapter04 An outline of the key design features, specifications and construction details that are utilised to improve health in all Healthabitat’s Nepal school sanitation projects NOTE: THIS INFORMATION IS DOCUMENTED TO SERVE AS A GUIDE ONLY. PROJECT-SPECIFIC, CERTIFIED
DETAILS MUSTBECOMPLETED BYRELEVANT PROFESSIONALS
48 NSTDG - 04 Design & Construction

NOTE: ALL DIMENSIONS AND SPECIFICATIONS NOTED HERE ARE A GUIDE ONLY. REFER TO STRUCTURAL ENGINEER’S DRAWINGS AND NOTES OBTAINED FOR ALL NEW BUILDINGS FOR ACTUAL DIMENSIONS AND SPECIFICATIONS TO FOLLOW.
DESIGN
THE
TOILET
CONFIGURATIONS
1. STONE
2. STEEL
3. SECURE & RELIABLE WATER SUPPLY
4. PLUMBING DESIGN
5. TOOTH, HAND & FACE WASHING
6. WASTE DISPOSAL SYSTEM
7. STONE & BRICK FOOTPATH
8. CUBICLE DESIGN & HARDWARE
9. VENTILATION & INSECT SCREENING
49
04 Design & Construction 47 THE OVERALL TOILET
50
KEY DESIGN FEATURES 51
NUMBERS, SIZES &
52
FOUNDATIONS, DOUBLE BRICK CONSTRUCTION & EARTHQUAKE BANDING 54
FRAMED ROOF CONSTRUCTION & STEEL ROOF SHEETING 59
(TO TOILET BLOCK) 61
63
66
67
71
72
77
2286mm [7'-6"]
THE OVERALL TOILET DESIGN
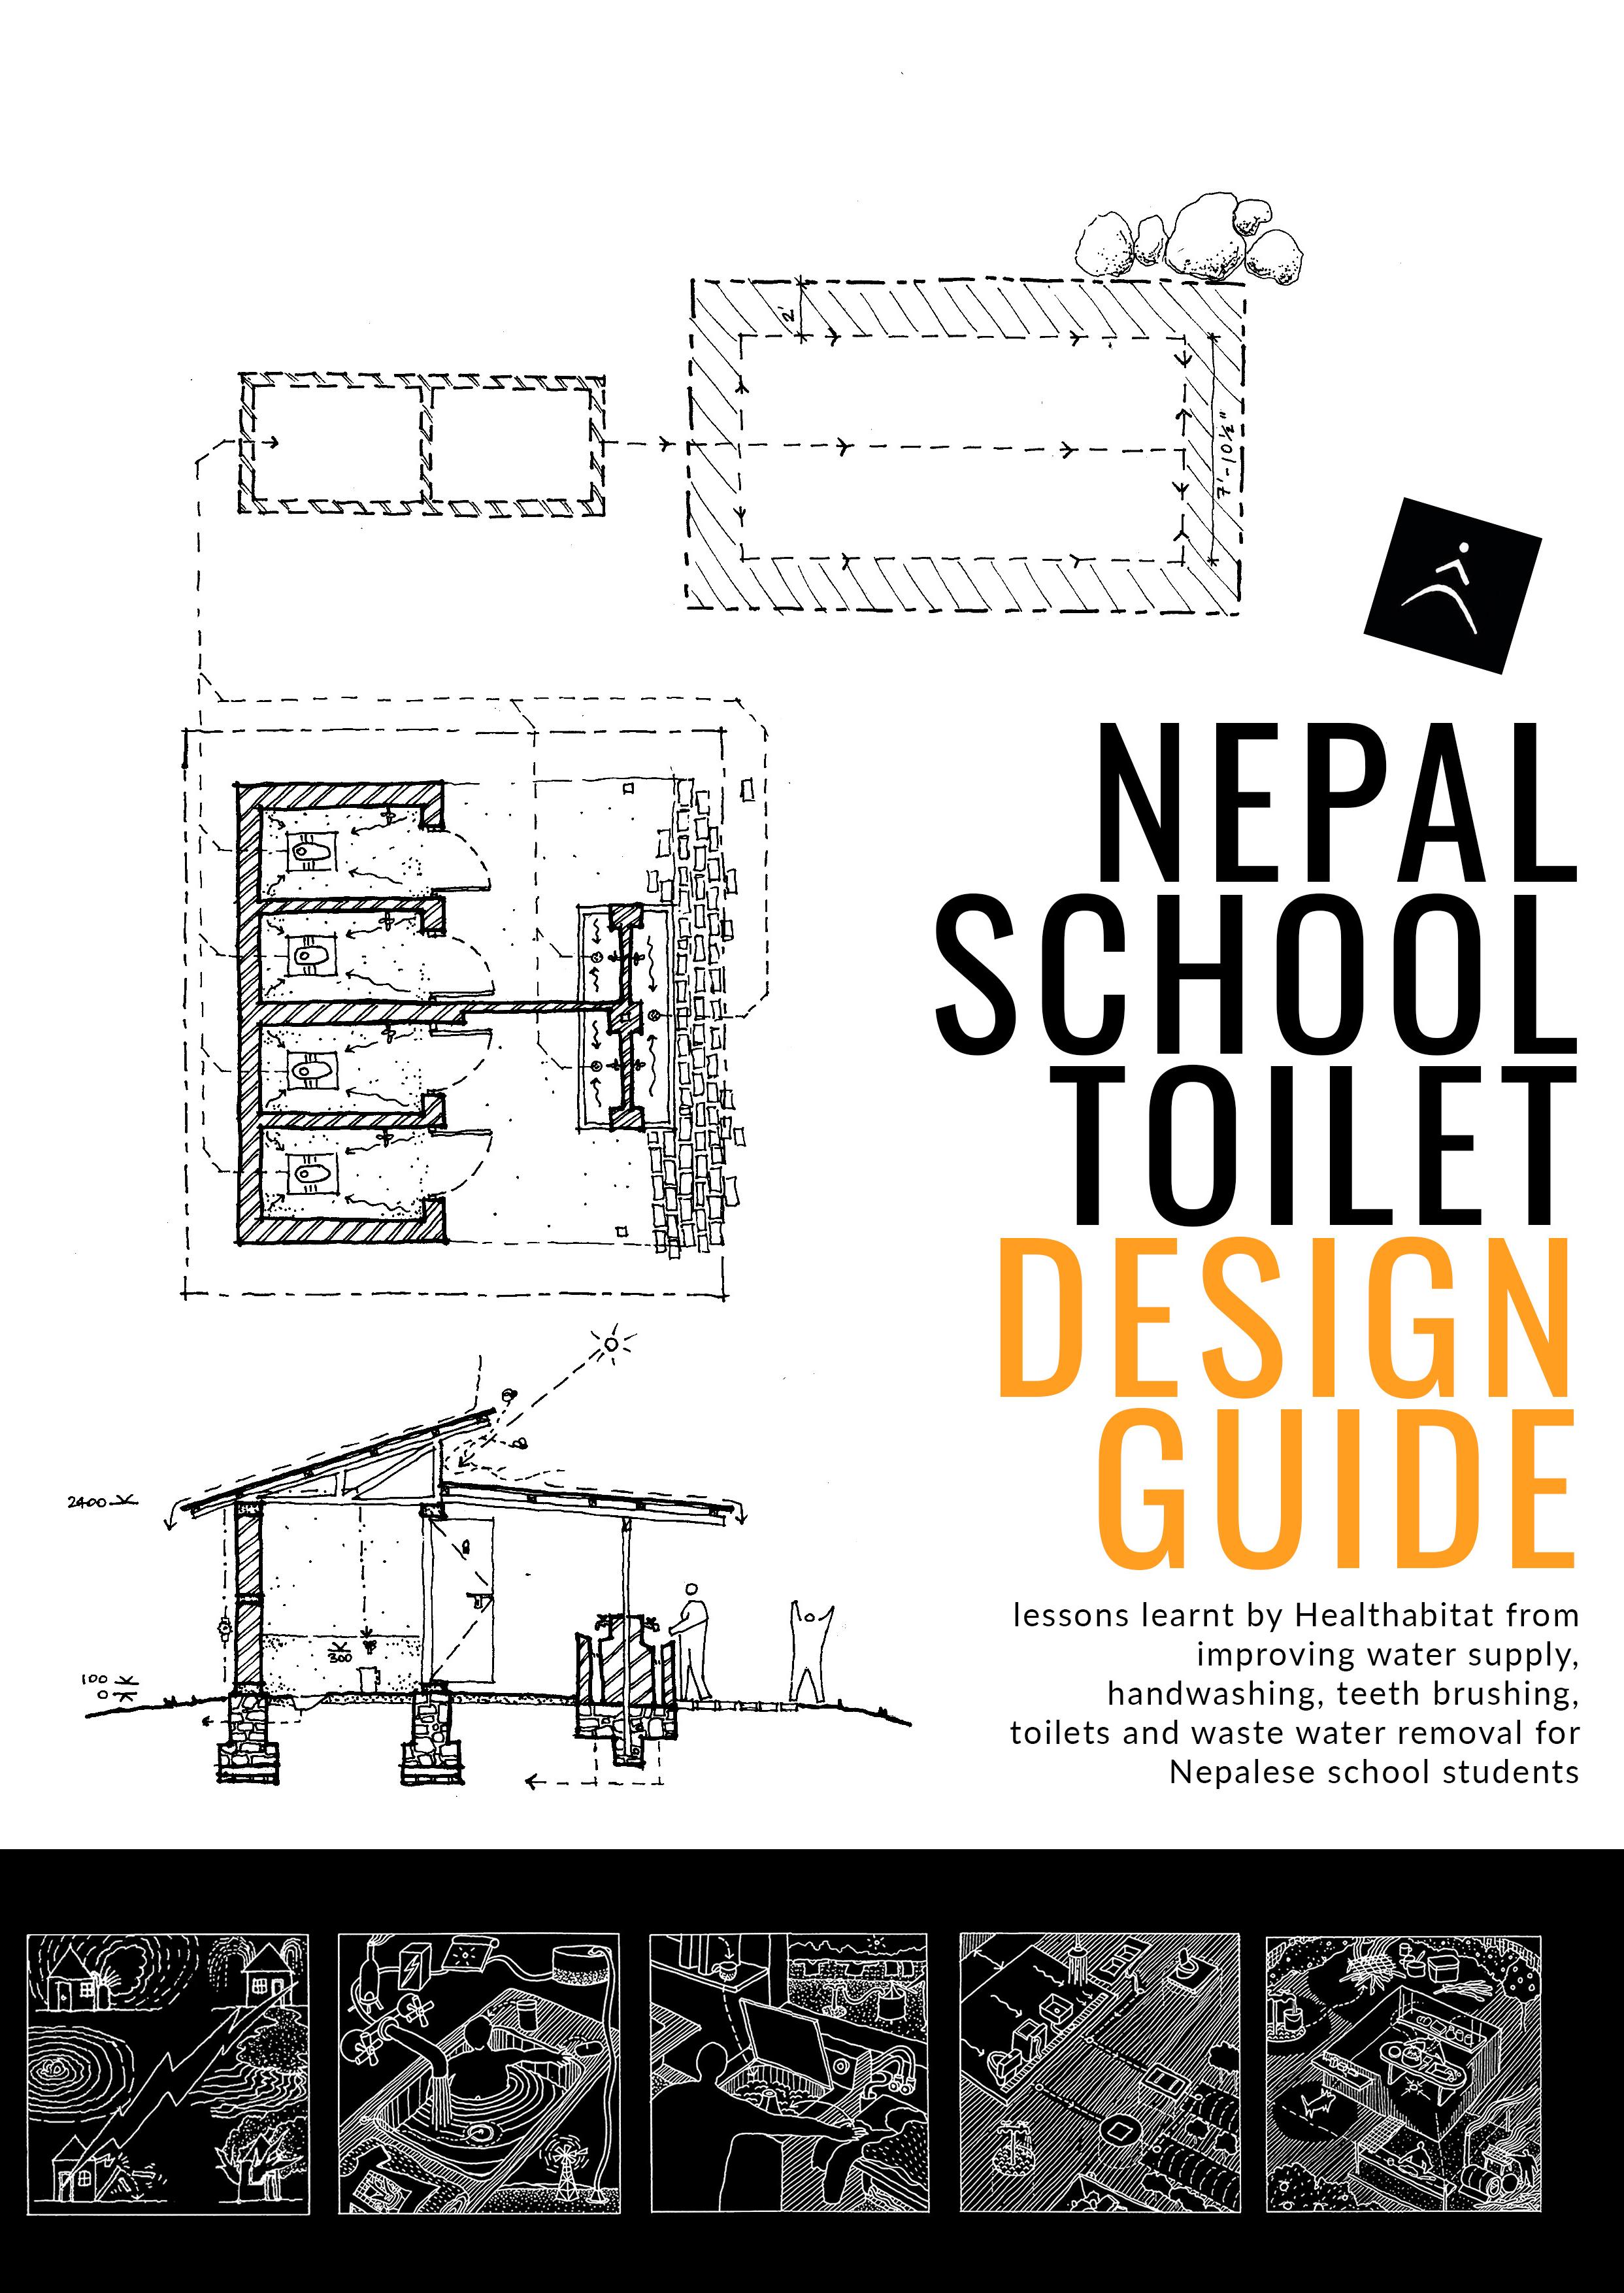
The Healthabitat sanitation block design utilises key design features in every project. These key features are linked to the priority of the HLPs and are proven to improve the health of its users.
Each design will vary in shape, size, aspect and details as a response to the specific conditions of each project site. For example, due to the size of a school there might be more toilets and handwashing facilities, or in a school for young children, the tap and sink height might be lowered. 6261mm [20'-612"]
2286mm [7'-6"]
water tank brick paving verandah of new HELP classroom block
SCHOOL scale: 1:100@A4 A02 date: 22.08.18 issue: SK
6261mm [20'-612"]
water tank brick paving verandah of new HELP classroom block
5766mm [18'-11"]
5766mm [18'-11"]
2059mm [6'-9"] CL P P P P septic tank soakage trenches
SCHOOL scale: 1:100@A4 A02 date: 22.08.18 issue: SK
1250mm [4'-1"]
1250mm [4'-1"]
1250mm [4'-1"] 1250mm [4'-1"] 3900mm [12'-9 1 2 "]
1250mm [4'-1"] 1250mm [4'-1"] 3900mm [12'-9 1 2 "]
new HELP classroom block
new HELP classroom block
2059mm [6'-9"] CL P P P P septic tank soakage trenches
1250mm [4'-1"] 4800mm [15'-9"] 2400mm [7'-1012"]
1500mm [4'-11"] 1809mm [5'-11"]
1500mm [4'-11"] 1809mm [5'-11"]
1250mm [4'-1"] 4800mm [15'-9"] 2400mm [7'-1012"]
• Sanitation block design - plan: Due to plans for a new classroom and the location of existing buildings in this project, the toilet block, septic tank and soakage trenches were located around it, as shown
50 NSTDG - 04 Design & Construction
8 7 4 6 6 7 7 3 5
THE KEY DESIGN FEATURES The key design features are listed in order of HLPs as it is always the priority to maximise health benefits. The HLPs are listed in order of importance. STONE & BRICK FOOTPATH CUBICLE DESIGN & HARDWARE STONE FOUNDATIONS, DOUBLE BRICK CONSTRUCTION & EARTHQUAKE BANDING STEEL FRAMED ROOF CONSTRUCTION & STEEL ROOF SHEETING SECURE & RELIABLE WATER SUPPLY (TO TOILET BLOCK) PLUMBING DESIGN TOOTH, HAND & FACE WASHING WASTE DISPOSAL SYSTEM • Sanitation block design - section 1 2 3 4 5 6 8 7 11' 0" (3350) 12'0"(3660) 900mm [2'-11 1 2 "] cement render brickwork (no render) cement render to handwashing walls 102mm [4"] 2097mm [6'-10 1 2 "] 102mm [4"] 2300mm [7'-6 1 2 "] EB EB tap hard render 615mm [2'] 610mm [2'] 254mm [10"] 1108mm [3'-7 1 2 "] 610mm [2'] 610mm [2'] 1065mm [3'-6"] F1: Column footing 1'x1'x2'deep 723mm [2'-4 1 2 "] 50mm [2"] ventilation screen 2164mm [7'-1"] 2" fall EB render 2'x2' stone footing BHOTENAMLANG SECONDARY SCHOOL SECTION A (both toilets) scale: 1:50@A4 A06 date: 22.08.18 issue: SK 11' 0" (3350) 12' 0" (3660) 900mm 1[2'-11"]2 cement render brickwork (no render) 102mm [4"] 2097mm 1[6'-10"]2 102mm [4"] 2300mm 1[7'-6"]2 EB EB tap hard render 615mm [2'] 1108mm 1[3'-7"]2 610mm [2'] 610mm [2'] 1065mm [3'-6"] 50mm [2"] ventilation screen 2" fall EB render 2'x2' stone footing SHREE BHOTENAMLANG SECONDARY SCHOOL END ELEVATION, SECTION A (both toilets) scale: 1:50@A4 A06 date: 22.08.18 issue: SK 100mm tie beam 1 2 1 2 5 8 9 7 51 S 1 3 6 9 S 9 S-Safetyandlifethreateningissues HLP9-Reducinghazardsthat cause trauma. 1 3 HLP1-Washingpeople HLP3-Removingwastewater 1 3 (continued) HLP1-Washingpeople HLP3-Removingwastewater VENTILATION & INSECT SCREENING 9 6 HLP6.Reducingthenegativeeffectsof animals,insectsandvermin.
TOILET NUMBERS, SIZES & CONFIGURATIONS
Area requirements are dependent on the nature of the program: toilets/handwashing only, teeth only, or toilet/ handwashing plus teeth.
Simple tables outlining student-to-toilet ratio and area diagrams have helped Healthabitat in their feasibility studies and initial conversations to calculate facilities, footprint and cost requirements.
Toilet Numbers
School Population
Toilet Sizes and Areas
Toilet Sizes and Areas
How many boys are at the school?: ...............................................
School Population
How many boys are at the school?: ............................................... How many girls are at the school?: ................................................ How many t eachers are at the school?: ..........................................
How many girls are at the school?: ................................................
How many t eachers are at the school?: ..........................................
Number of toilets and handwashing points
Circle appropriate field based on total number of people using the school’s toilets
Number of toilets and handwashing points
Toilets and hand washing points
Circle appropriate field based on total number of people using the school’s toilets
Number of people using facilities
Number of people using facilities
Toilets required for school (1 toilet per 60 people)
Toilets and hand washing points
Girls Boys* Teachers Hand basins 100 3 1 1 1 2 200 3 1 1 1 2 300 5 2 2 1 2 400 7 3 3 1 4 500 8 3 3 2 4 600 10 4 4 2 4 700 12 5 5 2 6 800 14 6 6 2 6 900 15 6 6 3 8 1000 17 7 7 3 8 *1 of the male toilets will be a urinal, unless the total number of male toilets is less than 2
Toilets required for school (1 toilet per 60 people)
of B Divisional breakdown oy vs girl toilets depends on the ratio of boys:girls at the school hool with 600 people and a ratio of boys:girls = 3:1 toilet allocation for student For example, in a sc s = 6:2 (boys:girls)
Note*
Divisional breakdown of boy-girl toilets is dependent on the ratio of boys to girls at school. For example in a school of 600 people;
Girls Boys* Teachers Hand basins 100 3 1 1 1 2 200 3 1 1 1 2 300 5 2 2 1 2 400 7 3 3 1 4 500 8 3 3 2 4 600 10 4 4 2 4 700 12 5 5 2 6 800 14 6 6 2 6 900 15 6 6 3 8 1000 17 7 7 3 8 *1 of the male toilets will be a urinal, unless the total number of male toilets is less than 2
Ratio of boy: girl = 3:1 Toilet allocation for students would be = 6:2 (boy: girl) Areas
Note* Divisional breakdown of boy-girl toilets is dependent on the ratio of boys to girls at school. For example in a school of 600 people; Ratio of boy: girl = 3:1 Toilet allocation for students would be = 6:2 (boy: girl) Areas
of B Divisional breakdown oy vs girl toilets depends on the ratio of boys:girls at the school hool with 600 people and a ratio of boys:girls = 3:1 toilet allocation for student For example, in a sc s = 6:2 (boys:girls)
Toilet Sizes & Footprint
Notes:
• Excerpt from feasibility study document • Excerpt from feasibility study document
Notes:
The average size of a toilet cubicle, including slab and handwashing points, is 5.2m²
The average size of a toilet cubicle, including slab and handwashing points, is 5.2m²
To calculate approximate area of new toilet blocks, multiply number of toilets (found above) by 5.2m²
To calculate approximate area of new toilet blocks, multiply number of toilets (found above) by 5.2m²
For example, a school with 800 students will need 14 toilets. These will occupy an approximate area of 72.8m² including slab and handwashing points
For example, a school with 800 students will need 14 toilets. These will occupy an approximate area of 72.8m² including slab and handwashing points
See Appendix for Feasibility & Toilet Configuration and Area resources
52 NSTDG - 04 Design & Construction
Hand Basin (2 taps) Hand Basin (3 taps)
Options: Without Urinal Girls / Teacher Girls / Teacher / Boys
Hand Basin (2 taps) Hand Basin (3 taps)
Options: Without Urinal Girls / Teacher Girls / Teacher / Boys
Hand Basin (2 taps) Hand Basin (3 taps)
Options: Without Urinal Girls / Teacher Girls / Teacher / Boys
CLIFF FACE
1200 2100 3650 450 850 1400 2100
1200 4’ 16m²/172ft² 12m
6m²/65ft² 12m²/129ft² 23m²/247ft² 22m²/237ft² 10m²/108ft² 16m
² 22m
1’10” 7’ 1’6” 12’2” 3.3m/11’ 3m/10’ 3m/10’
The following are diagrams of possible toilet configurations and their areas
Toilet Footprints and Sizes
²/129ft²
²/172ft
²/237ft² 20m²/215ft² 4’8”
2.6m/8’8” 6.2m/20’8” 6.2m/20’8” 3.3m/11’
CLIFF FACE
1200 2100 3650 450 850
2100
1400
CLIFF FACE
1200 2100 3650 450 850
2100
2m/6’6” 3.8m/12’8”
6m/20’
1400
4.8m/16’ 2m/6’6”
8.4m/28’ 3.3m/11’ 2.6m/8’8” 3.5m/11’8” 6m/20’
Excerpt from feasibility study document 53
Toilet Configurations •
1. STONE FOUNDATIONS, DOUBLE BRICK CONSTRUCTION & EARTHQUAKE BANDING
Earthquake banding was introduced into Healthabitat’s sanitation projects as a result of the Nepal earthquake in April 2015. The earthquake killed 9,000, injured nearly 22,000 and made hundreds of thousands homeless due to building loss and damage.
PROBLEM - Many buildings failed in the earthquake due to:
• landslips as a result of the earthquake which damaged buildings that were sited on fill on a sloping site
• no steel reinforcing or structural components for tensile stability in walls and foundations
• stone wall gable ends, unreinforced and not tied into the roof or wall structure - in many cases these fell into the building causing injury and death
• placing the roof on top of the walls without tying this into the structure
• little to no use of traditional timber construction due to material shortage and excessive cost. Traditional building techniques often withstood earthquakes due to construction techniques.
SOLUTION - Concrete earthquake banding with the introduction of steel reinforcing is now used, as well as locally available building materials (traditional stone with mud mortar and now double brick). This increases the tensile strength of the building’s walls so that it remains intact in the event of an earthquake, increasing safety for people. There are four key areas of the construction that increase earthquake resilience. Shown through extracts from the ‘Draft Construction Manual’ produced in the 2016 Sanitation Studio, these include:

Excavation and Stone Foundations
Plinth (bottom) Earthquake Band - Steel and Concrete Middle Earthquake Band - Steel and Concrete Roof (Top) Earthquake band - Steel and Concrete
See Appendix under
‘Relevant Resources’ for Nepal Government Earthquake document link
a b c d a b c d 54 NSTDG - 04 Design & Construction
Excavation


•
• accurate set out measurements and footing depths
• types, sizes, cleanliness and quality of stone
• stone laying - staggered joints (common bond pattern).
Typical Footing Plan (nottoscale)
& Stone Foundations When excavating and constructing the stone foundations in preparation for the first concrete band, it is important to consider:
siting and excavation on stable and compacted ground
• Project photos: Strip footing excavation and the beginning of laying stone footings 800 300 6" Thick Plinth Band 265 400 150 150 115 350 115 110 GL GL 580 800 300 6" Thick Plinth Band 265 400 150 150 115 350 115 230 GL GL 580 Stone footing F2 earthquake band / outside double brick wall EB F2 F2 EB EB EB EB F1 F1 F1 650mm F1 F1 650mm 610mm F3 4" PVC form for vertical rod 12mmØ into F1 footing FOOTING PLAN 650mm 569mm 650mm 569mm 650mm 569mm 650mm 569mm 650mm 650mm 1427mm 610mm 1698mm 300mm 1054mm 1219mm 1219mm 1219mm 1219mm 5527mm 2057mm 2687mm 650 x 800 stone footing F1 300 X 600 post footing F2 F3 650 x 600 stone footing a 55
P.C.C (1:3:6) 300mm
Foundations (continued) 230 GL GL 580
Soling Compacted Earth F2 F2 F2 FOOTING PLAN
Stone layouts should have through stones with the placement of vertical steel at corners of the building junctions and at window and door openings. 150 150 115 350 115

TYPICAL FOOTING SECTION (Outer Wall)
TYPICAL FOOTING SECTION (Inner Wall) Stone footing 650 650


ENTRASPACE TECHNICAL CONSULTANT ANAMNAGAR, KATHMANDU Tel: 977-1-4252094 Email:etcconsultation@gmail.com SUBMITTED BY: SUBMITTED TO: PROJECT NAME: SHREE BHOTENAMLANG SECONDARY SCHOOL DESIGN OF TOILET BLOCK
OK? THROUGH STONES - TO TIE THE WALL TOGETHER Typical Footing Section (Outer Wall) (nottoscale) Typical Footing Section (Inner Wall) (nottoscale) • At corners + junctions Install 4” Ø PVC pipe into stone foundation formwork, 1’6” deep with 3/8” steel Remove PVC pipe, infill with concrete to correct ratio as shown 400

• Project photos: Stone and brick wall building with earthquake bands 56 NSTDG - 04 Design & Construction


2 4 FOUNDATIONS
• Project photos: Stone foundations completed and PVC corner pipe with steel; Horizontal steel ladder and vertical rod detail with concrete band Excavation & Stone
a 1 Lyr Flat Brick Soling Compacted Earth 3" Thick P.C.C (1:3:6) 800 300
6" Thick Plinth Band 60 75 265 400 150 150 115 350 115 110 GL GL 580 1 Lyr Flat Brick
3" Thick
4 1/2" PVC PIPE INSTALLED 3/8" STELL INSTALLED 800
OK? OK? OK? 300
REMOVE PVC CONCRETE RATIO 6" Thick Plinth Band 60 75 265
The first concrete band includes a horizontal steel ladder that sits on top of the stonework, followed by a band of concrete on top.
b Plinth Ring Beam (6” Thick)
Middle Tie Ring Beam
Thick)
230 100 2-10mmØ MIDDLE TIE RING BEAM (4" THICK) 6mmØ @ 150 mm C/C 1055mm 100mm 1055mm 230mm 1054mm 100mm 1053mm 230mm 1219mm 1219mm 1219mm 1219mm 5105mm 230mm 1829mm 230mm 2057mm 2286mm 230mm 230 150 4-12mmØ PLINTH RING BEAM (6" THICK) 6mmØ @ 150 mm C/C 990mm 230mm 990mm 230mm 989mm 230mm 988mm 230mm 1219mm 1219mm 1219mm 1219mm 5105mm 230mm 1829mm 230mm 2057mm 2286mm 230mm 230 100 2-10mmØ MIDDLE TIE RING BEAM (4" THICK) 6mmØ @ 150 mm C/C 1055mm 100mm 1055mm 230mm 1054mm 100mm 1053mm 230mm 1219mm 1219mm 1219mm 1219mm 5105mm 230mm 1829mm 230mm 2057mm 2286mm 230mm 230 150 4-12mmØ PLINTH RING BEAM (6" THICK) 6mmØ @ 150 mm C/C 990mm 230mm 990mm 230mm 989mm 230mm 988mm 230mm 1219mm 1219mm 1219mm 1219mm 5105mm 230mm 1829mm 230mm 2057mm 2286mm 230mm outside 230 100 2-10mmØ MIDDLE TIE RING BEAM (4" THICK) 6mmØ @ 150 mm C/C 1055mm 100mm 1055mm 230mm 1054mm 100mm 1053mm 230mm 1219mm 1219mm 1219mm 1219mm 5105mm 230mm 1829mm 230mm 2057mm 2286mm 230mm 230 150 4-12mmØ PLINTH RING BEAM
6mmØ @ 150 mm C/C 990mm 230mm 990mm 230mm 989mm 230mm 988mm 230mm 1219mm 1219mm 1219mm 1219mm 5105mm 230mm 1829mm 230mm 2057mm 2286mm 230mm DATE: SCALE: S1 DSGN BY: AR. SAJANA
ACAD BY: AR. PRERANA
DWG NO CHKD BY: AR. SAJANA
SHEET TITLE: STRUCTURAL DRAWING STRUCTURAL DETAILS TOILET 2 SIGNATURE: 1:50 2018-08-17 NEC NO.:
57
Plinth (bottom) Earthquake Band - Steel and Concrete
(nottoscale)
(4”
(nottoscale)
(6" THICK)
SHRESTHA
JOSHI
SHRESTHA
It is important to install earthquake banding throughout the entire height of the wall in both stone and brick walls to increase their stability to resist earthquakes. Concrete bands at each 2’ of wall height with embedded steel are used, as in the earlier step. c Middle Earthquake Band - Steel and Concrete
ROOF - STEEL


Bend down vertical steel Bend down all vertical steel, tie into horizontal ladder

Install roof ties Tie steel strapping to horizontal steel ladder along exterior walls Space ties to rafter widths at18” centres Stand vertical, install final capping concrete band around the roof ties to all walls as per previous steps


OK ? OK ? VERTICAL
OK ? CONCRETE RATIO GSPublisherEngine 0.12.100.100 5 3 ROOF - STEEL OK? OK? VERTICAL STEEL BENT ROOF
OK? Connecting the
For a single storey
Use the
that
out
the
every
to connect
DO NOT use stone or brick to infill the roof ends ABOVE the ‘earthquake band’. Use timber or metal sheet. 8
• Project photos: Gable ends should be infilled with timber or steel, not brick or stone; Image of steel ties Roof (Top) Earthquake band - Steel and Concrete d Roof
ROOF
6mmØ @ 150 mm C/C 1055mm 100mm 1055mm 230mm 1054mm 100mm 1053mm 230mm 1219mm 1219mm 1219mm 1219mm 5105mm 230mm 1829mm 230mm 2057mm 2286mm 230mm 230 150 4-12mmØ 364mm 1319mm 1186mm 1169mm 540mm 504mm 1018mm 1039mm SHS50x50X2.5 SHS50x50X2.5 TRUSS SECTION DETAILS SHS50x50X2.5 SHS50x50X2.5 6mm truss downs EB to T1 58 NSTDG - 04 Design & Construction
STEEL BENT ROOF TIES INSTALLED
TIES INSTALLED
roof
house
steel strapping
comes
from
‘earthquake band’
18” (450mm) along the LONG walls
the roof timbers.
Key design features of the top concrete band include steel straps to secure the timber roof rafters to the wall. Ensure gable ends are infilled with lightweight material such as timber or metal sheet and not stone or brickwork. To infill with stone or brickwork is a safety hazard during an earthquake. It is important to:
Ring Beam (6” Thick) (nottoscale)
RING BEAM (6" THICK)
PROBLEM - Historically, roof structures in Nepal were made of local hardwood timber. As timber over time has become scarce and more expensive, roof structures have been made of materials that are less strong, durable and safe, with roof sheeting often held down by heavy objects. This is very dangerous and problematic when earthquakes occur, as the roof collapses, damaging property and injuring people.
SOLUTION - The toilet block design uses a steel roof truss system fabricated and welded on site to design and engineering specifications. Roof sheeting screw fixed to the steel structure provides a strong, durable and safe structure to cover the toilet cubicles and handwashing area to ensure the facilities can be utilised in all weather with less chance of collapse and injury during future earthquakes.
2.1 Steel Framed Roof Construction


2. STEEL FRAMED ROOF CONSTRUCTION & STEEL ROOF SHEETING a

Steel Roof Truss to Toilet Cubicles
• Roof structure is directed away from rain and wind, allowing sun into the structure (i.e. roof slopes down towards wind/rain).
• Generous overhang around all sides allows allweather protection in toilets and handwashing areas.
• All design and fabrication is to engineer’s specifications, with engineer inspection upon completion of frame.
Specifications: Continuous fillet weld to all rectangular ollow sections (RHS) members RHS ends capped Mono roof truss fixed down into top of wall to engineer’s specifications All steel structure is painted
Skillion Roof to Handwashing Area
• Sloping the roof in the opposite direction to high level roof ensures water doesn’t fall off roof in one direction.
Specifications: Weld roof into top plate on top of the toilet wall to connect the roof trusses Structure finishes 4”/100mm before end of roof sheeting
•
Truss structure section. detail drawing (example only)

b
59
• Roof framing detailed plan (by engineer): Showing tie down and structural member requirements
2.2 Steel Roof Sheeting

• LYSAGHT Installation Lap & Screw Specifications


a
Steel Roof Sheeting

• Strong
• Durable & easy to source in Nepalcommon construction material
• Generous overhang for wet season and all weather
Specifications: Minimum 600mm overhang to all sides
Roof sheeting extends 4”/100mm past steel roof structure 0.42mm gauge steel roof sheet Sheet lap detail as per manufacturers specification (including to clear roof sheeting)
b
Clear Polycarbonate Roof Sheeting
• Provides natural light into the toilet
• Helps cubicles dry out
Specifications:
-Clearpolycarbonatesheeting Placed over toilet cubicles As per above
c
Screw Fixing
• Mechanical ‘HiHi’ fixings to ensure the roof sheeting is secure through all weather and safe in the event of an earthquake
Specifications:
Screw fix using galvanised self drilling metal roofing screws (HiHi or similar)
Screw spacing as per LYSAGHT

60 NSTDG - 04 Design & Construction
3. SECURE & RELIABLE WATER SUPPLY
(TO TOILET BLOCK)
PROBLEM - The water supply to a village is often from a far away source, with many informal connections. People often make alterations and connections to the supply line which can affect or disconnect other connections. This does not guarantee a good quality or consistent supply.
SOLUTION - A secure, reliable and independent water supply with approximately 3 days’ supply of water should be ensured in case the supply is cut. This allows people to continue to use the toilets, wash their hands and flush away waste safely without affecting people’s health and allows 3 days for the supply to be fixed. This often requires the project plumbers to tap into an existing town supply and establish a durable and independent supply line that can run above and below the ground, using gravity to feed the water pressure to the block.
Water Supply and Waste Treatment
Source
Where is the water coming from? Cistern, stream, mains?
Distance
How far between source and school?
Condition
What condition is the pipe in? What material is it made from?
• Secured supply: In this example, project plumbers made an independent supply line from the village supply to a water tank on top of the school roof with durable fittings
Tank
Is there an existing tank(s)?
If yes, how many? How many litres? What material? Where is it located?
Flow Rate
How long does it take to fill a 10L bucket?

Water What is the water quality?
Toilet Flush Hand Wash
Access to water
Toilet unblocked
Close to toilet Access to soap
2 min

Teeth Brush
2min brushing Teacher supervision
• Water Supply Criteria: This document maps the criteria to be considered when securing an independent supply to the block. This was established by a student Sanitation Studio in 2015
See Appendix for Water resources
61
See Appendix for Water Tank resources 3.1 Water Tank Sizes
Number of people using facilities
Hand washing (1 litre per person)
Toilet dip flush (3 litre per person)
Tooth Brushing @30% (2 litres per person)
Total volume used (litres)
Septic tanks required
Septic tank footprint metres)
So trench length (metres) 100 100 300 60 460 1 2.2*1.5 2.3 200 200 600 120 920 1 2.4*1.5 4.6 300 300 900 180 1380 2 1.3*1.5 6.9 400 400 1200 240 1840 2 1.4*1.5 9.2 500 500 1500 300 2300 2 1.6*1.5 11.5 600 600 1800 360 2760 2 1.7*1.5 13.8 700 700 2100 420 3220 2 1.8*1.5 16.1 800 800 2400 480 3680 2 1.9*1.5 18.4 900 900 2700 540 4140 2 2.0*1.5 20.7 1000 1000 3000 600 4600 2 2.1*1.5 23
Number of People includes teachers and all students Tooth brushing data reflects taps running continuously for 3 minutes
3.2 Water Pressure
PROBLEM - Low water pressure making the cubicle taps and handwashing unusable.
2.1m/7’ 2.4m/8’
2800 Litres 300 - 600mm 100mm
Earth fill Sand fill Fall outlet from septic tank Level pipe in ground
3200 Litres 6200 Litres
Soakage Trench Detail Soakage Trenches 1.2 m 1.2 m1.2 m x
Soakage Trenches 1.2 m Minimum width of each trench cell is 1.2m/4’ Length of soakage trench can vary as shown by the variable x
Geotextile fabric as casing around pipe
/ 15’4” / 23’ / 30’8” / 38’4” / 46’ / 53’8” / 61’4” / 69’ / 76’8” ��aka�� T��n�� ��n����a���ns
Tank �n���n� an� ����s Septic Tank Sizes 1.2 m 1.2 m x
2.3m/7’8” 1.5m/5’ 1.5m/5’ 1.5m/5’ 1.2m/4’ 1.2m/4’ 1.2m/4’ • Project photo showing the installation of a water tank next to the sanitation block to secure a water supply 1metreheight=9.81Hectopascals,idealhouseholdtappressureis150kPa

>1.2 m x
Perforated Pipe
Minimum distance between trench and surrounding objects is 600mm/2’
Septic tank footprint (m/ft) Tank always 5’ wide * ° ° *
Soakage trench length (m/ft) / 7’4” / 8’ / 4’4” / 4’8” / 5’4” / 5’8” / 6’ / 6’4” / 6’8” / 7’ ������
SOLUTION - Having your own water tank means that you are in control of water pressure. The higher the tank, the higher the pressure. If the tank is too high, you risk pipes ‘blowing’ apart as the pressure is too high. If the tank is low, the pressure is lower. If the thank is too low, you will not get enough water out of the taps to use. Healthabitat sanitation projects have generally aimed for the tank outlet to be 2-3 metres above the highest tap. 62 NSTDG - 04 Design & Construction
• Excerpt from septic tanks/water tanks document
4. PLUMBING DESIGN


PROBLEM - Historically, Nepal has poor sanitation design, specifically in removing and treating waste water, which can negatively affect health, particularly in children as discussed in Chapters 01 & 02. If one aspect of the plumbing system fails, it can affect the entire system and make the whole building unusable.

SOLUTION - Well-designed and constructed plumbing helps to reduce the spread of infectious diseases and remove harmful waste water from the environment where people live and play. Healthabitat aims to design and construct robust plumbing systems that can be easily assembled, maintained and fixed by local tradespeople. Standard fittings and fixtures that are easily available and have been robustly tested to ensure their quality and durability should be
l
Toilet & Handwashing Facility
f d e
63
4.1 Pipe Laying (general)
PVC (drainage) pipes
• 100mm poly pipe is used as it does not compress under the weight of gravel
• Rigid PVC pipes carry all waste water away from the toilets and handwashing to be treated
• Correct fall to pipes ensures waste water easily drains away from the building
Specifications
100 Ø rigid PVC pipe
Use 45° ‘Y’ connections only (no 90° elbows) as they are less susceptible to blocking Connections are always installed in the direction of travel of waste
Lay rigid PVC pipe in excavated trenches from toilet to septic tank and from handwashing to septic tank with minimum 1° fall
Extend pipe into septic tank
Connect with PVC cement/glue
Cover pipes
• All pipes are re-covered with soil (remove rocks) with adequate cover to protect from damage from cars, animals and people
4.2 To Water Tank
Orientation and stability
• Check orientation and stability of the tank on its stand for safety and easy access
• Concrete footings should be designed to support the stand and prevent it from blowing away in high winds
Specifications
PVC water tank (capacity depending on people)
To be higher than tap heights to ensure adequate pressure via gravity feeding
From supply to tank
• An independent line with durable fittings should be created from the source
Specifications
Install poly pipe supply line minimum 300mm underground
Install galvanised (GI) pipe supply line above ground; secure with saddles to sturdy substrate

Water fill point
• Insert water fill point connection at top of tank
Specifications
Install float valve to automatically fill tank
Enough height is required to gravity feed water outlet points, minimum 3m above ground
4.3 From Water Tank to Taps
Supply pipes
• Install from tank to tap Specifications
Install poly pipe supply line underground minimum 300mm Install galvanised (GI) pipe supply line above ground; secure with saddles to sturdy substrate
g h i
Isolation valve
• An accessible tap to turn off all supply to the toilet block for maintenance and emergencies Specifications
Install gate or ball valve along the supply line at the water tank or toilet block to restrict water flow to all taps
Install at accessible height but out of reach of young children
Secure pipes
• Fix pipes to wall to ensure stability Specifications
Saddles to all GI pipe to stop water hammer Masonry anchors and screws to saddles for stability in brick walls
External and internal taps
• Install bibcock brass taps (1/2”) for handwashing and dip flushing toilets inside cubicles

Specifications
Bibcock brass tap (1/2”), thread tape used GI pipe with GI 1/2” socket to connect to bibcock tap
a
b c d e f
64 NSTDG - 04 Design & Construction
h f i
4.4 From Toilet to Septic Tank
Squat toilet pan to waste line

• The squat toilet pan is the most widely used toilet in Nepal
• Connect toilet pan to ceramic ‘P’ trap which connects to waste pipe underneath rear wall of toilet cubicle
• Connect ceramic ‘P’ trap to PVC waste pipe and drainage line
• Ensure all falls are correct for waste to flow easily to the septic tank
Specifications
Excavate underneath footing to rear cubicle wall, enough for waste pipe Locate ceramic ‘P’ trap underneath footing to rear wall of toilet cubicle, at correct height for pan


Use 2 part epoxy joining compound to join ‘P’ trap together and PVC pipe to the ‘P’ trap Secure in place using hard render Pan to be laid flat and level on top of ‘P’ trap at correct height for hard render to finish flush with the top of it 100 Ø PVC waste pipe with 90° elbow
See Section 8: Cubicle Design for process pictures
Inspection points
• Easily accessed inspection points allow for blockages to be cleared and maintenance to be carried out
• Inspection points should be constructed at the start of handwashing waste line and to each toilet waste line
Specifications
Install a 90° elbow with screwable inspection cap at the start of each toilet waste line as it exits underneath rear wall to cubicle
Construct protected inspection pit around the elbow when recovering excavation Install a cover to each pit for protection
• Inspection point at the handwashing basin allows for easy inspection and fixing of blockages
T-piece
• Install to the end of drainage pipe, to the inside of the septic only (inlet and outlet)
Specifications 100 Ø PVC pipe
Render around T-piece inlet position to create seal and help keep pipe stable
Install vertical pipe to the bottom of the T-piece into the septic tank, 1 foot long (300mm)
See Section 6: Waste Disposal System for reference
• Left: Drainage plumbing with inspection openings and ‘Y’ ‘T’ connections to prevent blocking
• Right: Toilet inspection opening pit. A lid is made to cover the pit and protect from dirt, vermin and weather and ensure it does not become overgrown
j
k l
k
k
k l 65
5. TOOTH, HAND & FACE WASHING
PROBLEM - The ability to wash your hands and face, especially for children, is crucial for preventing and decreasing the transmission of diseases, including diarrhoeal diseases and infections.
SOLUTION - To install hand basins that remove and treat waste water safely, are secure and that work effectively. Dental camps alongside Healthabitat projects have been a part of the Teeth and Toilets (TT) program, training young people in the importance of oral health.


5.1 Basin Design
Wash basin
• Adequate size for use by many children at one time
• Ensure the quick removal of water without splashing onto children or the ground
Specifications: Projects use: 28” high, 12”-14” deep, 5ft long
Wall mounted stop valve
• An important and accessible feature to easily shut off the water supply to the toilet block in an emergency or for repair work
Specifications: Gate valve 1/2” used for stop valve (or ball valve), installed at height out of reach of children Secured to wall using GI pipe saddles
GI pipe secured
• Secured to reduce risk of damage and water hammer
Specifications: Secured along entire length to top of brick wall with GI pipe saddles
Bibcock taps from GI pipe
• Multiple water outlets to allow multiple users at one time
• Various height taps for younger and older children and adults to wash hands, face and toothbrushing
Specifications: Bibcock brass tap (1/2”), thread tape used GI pipe with GI 1/2” socket to connect to Bibcock tap Tap heights for various height/aged children Spacing between taps min 21”
Hard render lining
• Same hard render to sink as to toilet floor and cubicle walls, for easy cleaning
Specifications:
Mix ratio = 2 portions cement: 1 portion sand Hard rendered lining to trough area and upstand around the trough base and sides See Section 8: Cubicle Design, for coving details

Soap storage
• Location in the basin design to keep soap near the wash basin to encourage use
Specifications: Hard rendered shelf at reachable height for young and old children
a b c
c d
e f
d
e f a
66 NSTDG - 04 Design & Construction
Condition
See Healthabitat YouTube for ‘How a Septic Tank Works’ resource
6. WASTE DISPOSAL SYSTEM
What condition is the pipe in?
What material is it made from?
Tank
Is there an existing tank(s)?
If yes, how many? How many litres?
What material?
Where is it located?
PROBLEM - Current sanitation systems used for removing and treating waste water in Nepal are poor. There is a community demand for a clean and safe system that does not fill up as quickly as drop (dry) toilets. Once drop toilets are full, they are abandoned and quickly fall into disrepair or contaminate living environments.
Water
Flow Rate
How long does it take to fill a 10L bucket?
6.1 Septic Tank
What is the water quality?
SOLUTION - Healthabitat incorporated an on-site septic tank to treat waste water and soakage trenches to dispose of treated waste below ground. This self-sufficient waste disposal system requires little maintenance, with occasional pumping of sludge build-up out of the septic tank approximately every 10 years.
Toilet Flush
Hand Wash Teeth Brush
A septic tank is an airtight underground waste treatment system. The size depends on how many people will use the facility (toilets and handwashing) and the amount of waste water that is produced.
Close to toilet Access to soap
Access to water Toilet unblocked 2min brushing Teacher supervision
Waste water drains from the handwashing drains and toilets via gravity to the septic tank. The septic tank holds this waste for long enough (minimum of 3 days) to allow solids such as faeces to settle down to the bottom, forming a sludge, while the oil and grease floats to the top to form a hard scum layer of bacteria, treating the liquid. The design of the inlet and outlet prevents the scum from leaving the tank and only lets the treated liquid waste water (effluent) exit the tank and drain into the soakage trench.
Waste water Treatment Soakage Trench
2 min
Waste water moves from the first chamber into the secondafter3daysand utilises a combination of aerobic and anaerobic bacteria to treat the waste water. It then drains into the soakagetrench.
Tank walls and base
• Built to the size and height required for the amount of waste water
• Built from reinforced concrete or bricks
Specifications: Hole is excavated and formwork built Flat and sturdy base of concrete or brick Walls are built straight, plumb and strong Inlet and outlet constructed into each end when built
Inlet
• Located where waste water from handwashing drains and toilets enter through T-piece
Specifications: PVC T-piece Render around T-piece inlet position to create seal and help keep pipe stable
Internal dividing wall
• Internal dividing wall to separate solids and liquids. Liquids flow through the wall under the top scum layer into the second chamber

Specifications: Made from same material as exterior wall, and tied into the wall using bricks or steel inside concrete 1 x hole for connecting the two chambers, 1 foot above base, 2 x bricks in height

a c c d b f e in in out out
b a
67
f
Render
• Internal render to line the septic tank to prevent leaking, hard render finish layer
Specifications: Mix ratio = 1 bag cement: 5 bags sand Install render mix to line inside of septic tank 20mm minimum thickness
e f
Outlet
• Underground PVC outlet pipe connects to soakage trench Specifications: Install PVCT-piece 100mm (4”) lower than inlet height Render around T-piece inlet position to create seal and help keep pipe stable
Concrete slab lid

• Custom poured concrete lid to cover septic tank Specifications: Steel mesh encased in lid for strength Bent rod handles cast in, for lifting Minimum 100mm (4”) thick Cure for 21 days Seal join between lids with sand/cement mix after installation
° *
Number of people using facilities
Hand washing (1 litre per person)
Toilet dip flush (3 litre per person)
Tooth Brushing @30% (2 litres per person)
• Excerpt from Septic Tank Influent and Sizes: This document is a guide for
* ������ Tank �n���n� an� ����s Septic Tank Sizes Soakage Trench Detail 2800 Litres 300 - 600mm
* °
Number of People includes teachers and all students Tooth brushing data reflects taps running continuously for 3 minutes
Septic tank footprint (m/ft) Tank always 5’ wide / 7’4” / 8’ / 4’4” / 4’8” / 5’4” / 5’8” / 6’ / 6’4” / 6’8” / 7’ 2.1m/7’ 2.4m/8’ 2.3m/7’8” 1.5m/5’ 1.5m/5’ 1.5m/5’ 1.2m/4’ 1.2m/4’
Septic tank footprint (m/ft) Tank always 5’ wide water
So trench length (metres) 100 100 300 60 460 1 2.2*1.5 2.3 200 200 600 120 920 1 2.4*1.5 4.6 300 300 900 180 1380 2 1.3*1.5 6.9 400 400 1200 240 1840 2 1.4*1.5 9.2 500 500 1500 300 2300 2 1.6*1.5 11.5 600 600 1800 360 2760 2 1.7*1.5 13.8 700 700 2100 420 3220 2 1.8*1.5 16.1 800 800 2400 480 3680 2 1.9*1.5 18.4 900 900 2700 540 4140 2 2.0*1.5 20.7 1000 1000 3000 600 4600 2 2.1*1.5 23
/ 23’ / 30’8” / 38’4” / 46’ / 53’8” / 61’4” / 69’ / 76’8”
usage calculations and septic tank sizes. This was established by the 2015 Sanitation Studio (the table assumes the outlet pipe is 300mm below the top).
Septic Tank Sizes Soakage Trench Detail 2800 Litres 300 - 600mm Earth fill Geotextile fabric as casing around pipe 3200 Litres 6200 Litres 2.1m/7’ 2.4m/8’ 2.3m/7’8” 1.5m/5’ 1.5m/5’ 1.5m/5’ 1.2m/4’ 1.2m/4’ 1.2m/4’ 6.2 Septic Tank Influent & Sizes
Geotextile fabric as casing around pipe 3200 Litres 6200 Litres
d
Total volume used (litres)
Septic tanks required °
Septic tank footprint metres) 100 100 300 60 460 1 2.2*1.5 200 200 600 120 920 1 2.4*1.5 300 300 900 180 1380 2 1.3*1.5 6.9 400 400 1200 240 1840 2 1.4*1.5 9.2 500 500 1500 300 2300 2 1.6*1.5 11.5 600 600 1800 360 2760 2 1.7*1.5 13.8 700 700 2100 420 3220 2 1.8*1.5 16.1 800 800 2400 480 3680 2 1.9*1.5 18.4 900 900 2700 540 4140 2 2.0*1.5 20.7 1000 1000 3000 600 4600 2 2.1*1.5 23 Earth fill Sand fill
1.2m/4’ Number of People includes teachers and all students Tooth brushing data reflects taps running continuously for 3 minutes Number of people using facilities Hand washing (1 litre per person) Toilet dip flush (3 litre per person) Tooth Brushing @30% (2 litres per person) Total volume used
(litres)
Septic tanks required
Septic tank footprint metres)
Soakage trench length (m/ft) / 7’4” / 8’ / 4’4” / 4’8” / 5’4” / 5’8” / 6’ / 6’4” / 6’8” / 7’ See Appendix for Septic Tank & Soakage Trench resources 68 NSTDG - 04 Design & Construction
/ 15’4” / 23’ / 30’8” / 38’4” / 46’ / 53’8” / 61’4” / 69’ / 76’8”
* °
������ Tank �n���n� an� ����s
6.3 Soakage Trench
1500mm [4'-11"] 1809mm [5'-11"] P
5766mm [18'-11"] 3900mm [12'-9 1 2 "]
NOTE:Lengthofsoakagetrenchandpipesneedstobelongerinpoorlydrainingsoilsuchasclay
Location
HELP classroom block
g h h cell #1 Cell #2
septic tank soakage trenches 4800mm [15'-9"] 2400mm [7'-1012"]
• Locate the soakage trench to protect the pipes (see 6.4)
Specifications: Minimum distance between trench and object or existing structure is 2m (7’)
Size of soakage trench
• Length of soakage trench can varying according to site restrictions and soil types
• Width of each soakage trench cell is calculated to ensure soil does not become over-saturated which will affect the function of the septic tank
i j
j k
Specifications Each soakage trench cell is minimum 4’ wide Excavation
• Hole for the soakage trench is dug to the size required for the amount of waste water
Specifications: Hole to be dug, depending on soil type, between 1’ and 2’ deep
Soakage pipes
• Perforated PVC pipes are wrapped in geotextile fabric to stop dirt or debris blocking the holes where water will escape
• Pipes are laid in the trenches on a 2” bed of gravel (20mm size)
Read‘TheSoakageTrenchSaga’inChapter03tosee whathappenswhenthisgoeswrong
Specifications: 100mm rigid PVC pipes are perforated with a large (20mm) drill bit to create large holes along the entire length and all sides of the pipe for water to escape
Perforated pipes are wrapped in geotextile fabric and tied in place
Pipes are connected and laid in the trenches ensuring they are level
Back fill
• The trenches are backfilled with enough gravel to cover and ensure the pipes are safe from damage
Specifications:
Fill 2” below pipe with 20mm gravel
Fill 4” above laid pipes with gravel fill
69
CONTINUES OVER PAGE
Fill 12” - 24” with earth fill to match the level of the existing ground
The treated waste water drains from the septic tank into the underground soakage trench to slowly release and be absorbed by the soil. As the waste water is absorbed by the soil, the water is further treated by removing bacteria and nutrients harmful to people.
Septic Tank Sizes
1.2m/4’ 1.2m/4’ 1.2m/4’
k i j
Soakage Trench Detail
2800 Litres 300 - 600mm 100mm
Soakage Trench Detail
Earth fill
Sand fill
2.1m/7’ 2.4m/8’ 2.3m/7’8” 1.5m/5’ 1.5m/5’ 1.5m/5’ 1.2m/4’ 1.2m/4’ 1.2m/4’
Earth fill Sand fill Fall outlet from septic tank Level pipe in ground
3200 Litres 6200 Litres
3200 Litres 6200 Litres
Geotextile fabric as casing around pipe
Perforated Pipe
Geotextile fabric as casing around pipe
��aka�� T��n�� ��n����a���ns
Fall outlet from septic tank
2800 Litres 300 - 600mm 100mm
Level pipe in ground
6.4 Soakage Trench
��aka�� T��n�� ��n����a���ns
>1.2 m x
Configurations
Minimum width of each trench cell is 1.2m/4’
>1.2 m x
Minimum width of each trench cell is 1.2m/4’
Soakage Trenches
Soakage Trenches 1.2 m
• Extract from ‘Septic Tank Influent and Sizes’ resources to help inform feasibility studies (See Appendix)
Perforated Pipe
Soakage Trenches 1.2 m 1.2 m1.2 m x
Soakage Trenches 1.2 m
1.2 m 1.2 m1.2 m x
Length of soakage trench can vary as shown by the variable x
Length of soakage trench can vary as shown by the variable x
Minimum width of each trench cell is 1.2m/ 4” Lengthofsoakagetrenchcan varyasshownbythevariablex
1.2 m 1.2 m x
Minimum distance between trench and surrounding objects is 600mm/2’
1.2 m 1.2 m x
Minimum distance between trench and surrounding objects is 600mm/2’
Minimum distance between trenchandsurroundingobjects is 2m/ 7”
i • Soakage pipes are drilled with 20mm drill bit along entire length of PVC • PVC pipe laid in the dug trenches at the appropriate ‘fall’ to ensure water runs along pipe and leaks out (See Section 4.1: Pipe Laying)


j
70 NSTDG - 04 Design & Construction
7. STONE & BRICK FOOTPATH
PROBLEM - When mud and silt enter the toilet cubicle and get washed down the toilet, this builds up quickly in the septic tank causing the tank to fill up too quickly.
SOLUTION - To reduce the amount of mud and silt entering the toilet cubicle, Healthabitat tested a series of different paving combinations with different materials and widths to create an optimum configuration which removes as much dirt as possible from shoes.
Paths of waste and overflow, as well as paved surfaces used to assist in maintaining the cleanliness and health of the facilities
a
a
45�
Key
Stone paving
• Stones found from site are laid for removal of mud from shoes
Specifications: Minimum four steps width or 4’
Laid tight and flat to ensure no tripping hazards or loose stones
Solid Waste Liquid Waste Overflow Entry Surfaces
Brick paving
• Brick paving is laid between stone mud area and entry to facility at all points to remove dirt

Specifications: Minimum four steps width or 4’
To finish, the toilet wall render should be capped at a 45° angle. This will shed any water or dust and prevent the deterioration of the render
Laid in stretcher bond
Hard render lining
• Hard render lining with correct falls to ensure water does not pool
Specifications: Mix ratio = 2 portions cement: 1 portion sand All floors except in cubicle to have a 1”:8” (1:100) fall
7.1
Tests to Remove Mud from Shoes

• Different-sized and placed rocks and bricks were tested at how successful they were in removing mud and dirt from shoes.

• Once shoes had walked through the different arrangements of stones and bricks, they were measured to see how clean they were.
• Footprints were compared and the arrangement of stones and bricks that removed the most mud and dirt is used in the design today.

Rendering Details Wall to Floor
of
WALL FLOOR Wall
Top
Render
Render
Wall 25mm
Floor
Render Outside render Hard
Coving
b b a b c c c
71
8. CUBICLE DESIGN & HARDWARE
PROBLEM - The cubicle design is one of the most crucial aspects of the toilet block. If one part of the design fails or is not adequate for its users, the whole facility can fail, as people may not feel safe or it may become unusable. Hardware is often not durable enough or is designed and installed incorrectly and so breaks from high amounts of use.
SOLUTION - A robust design is used, with durable hardware that has been trialled on projects to ensure all the critical elements are detailed and specified to improve the health of its users.
The points below outline the critical elements of the cubicle design, their considerations and their placement.
8.1 Toilet Features (inside)
At
To
a


Toilet brush attached to wall with rope
• Important for cleaning, attached to the wall to ensure it doesn’t get misplaced
Specifications: See Section 8.4: Other
b
Squat toilet pan

• The most widely used toilet pan in Nepal
Specifications: Packed up and Installed level to match the height of the sloped concrete cubicle floor surface for easier cleaning and use Ceramic P-trap See Section 8.2: Detailed Cubicle Plan
Internal tap and plastic bucket for dip flushing and floor cleaning
• Ensures private water supply to each cubicle for regular flushing
• Ensures privacy for female students for sanitary hygiene practices
• Encourages regular cleaning of cubicle
Specifications:
Bibcock brass tap (1/2”), thread tape used Tap height is 1’6” above floor
Hard render finish on floor and walls
• Ensures a durable finish to internal and external walls and floor surfaces in splash zones and high traffic areas
• Easy to clean surface
• Easy to repair
Specifications:
Mix ratios = 2 portions cement: 1 portion sand
Fall of cubicle floor render to pan (critical): 1”:4’ / 25mm: 1200mm / 1:50
Fall of other floor render to areas: 1”: 8’ / 25mm : 2400mm / 1:100
Wall render: 24” (600m) from floor
Coved floor / wall junction: 1” (25mm) coving (see coving detail)
Raked top edge of inside and outside wall render 45° slope (see wall render detail)
Standard floor and wall render underneath, mix ratio = 1 bag cement: 5 bags sand
45 Cleaning Reduction Strategies Rendering Details Wall to Floor Top of Render WALL FLOOR Wall At the junction between the toilet floor render and the wall, the render should form a curve to shed water and prevent pooling To finish, the toilet wall render should be capped at a 45° angle. This will shed any water or dust and prevent the deterioration of the render Render Render Outside render Hard Wall 25mm Coving Floor Key Paths of waste and overflow, as well as paved surfaces used to assist in maintaining the cleanliness and health of the facilities Solid Waste Liquid Waste Overflow Entry Surfaces 45 Rendering Details Wall to Floor Top of Render WALL FLOOR Wall At the junction between the toilet floor render and the wall, the render should form a curve to shed water and prevent pooling To finish, the toilet wall render should be capped at a 45° angle. This will shed any water or dust and prevent the deterioration of the render Render Render Outside render Hard Wall 25mm Coving Floor Key Floor Grades and Surfaces Paths of waste and overflow, as well as paved surfaces used to assist in maintaining the cleanliness and health of the facilities Solid Waste Liquid Waste Overflow Entry Surfaces • Floor grades and surfaces diagram • Hard render coving and rake details Cleaning Reduction Strategies Rendering Details Wall to Floor Top of Render WALL Wall At the junction between the toilet floor render To finish, the toilet wall render should be capped Render Wall Key Floor Grades and Surfaces Paths of waste and overflow, as well as paved surfaces used to assist in maintaining the cleanliness and health of the facilities Solid Waste Liquid Waste Overflow Entry Surfaces 45 Cleaning Reduction Strategies Rendering Details Wall to Floor Top of Render WALL FLOOR Wall
shed
the junction between the toilet floor render and the wall, the render should form a curve to
water and prevent pooling
render Render Render Outside render Hard Wall 25mm Coving Floor Key Floor Grades and Surfaces
the cleanliness and health of the facilities Solid Waste Liquid Waste Overflow Entry Surfaces
finish, the toilet wall render should be capped at a 45° angle. This will shed any water or dust and prevent the deterioration of the
Paths of waste and overflow, as well as paved surfaces used to assist in maintaining
c a b c
d
d 72 NSTDG - 04 Design & Construction
•
NOTE: There should be considerations made for an additional bucket or bin in female student and teacher toilets for the easydisposalofsanitaryitems. Thisbinneedstobeemptiedregularlyand thecontentsdisposedof.Havingsucha facilitywilldiscouragesanitaryitemsbeing flusheddownthetoiletandblockingthe septictank.
g
Insect screen
• Prevent the negative impacts of insects & pests without stopping natural ventilation to the cubicles to dry out water
Specifications: See Section 9: Ventilation & Insect Screening
Sections of clear polycarbonate roofing
• Allows natural light and sun into each toilet cubicle for ease of use
• Assists in drying water on the cubicle floors and walls
• Discourages pests and insects
Specifications: Strategically placed over each toilet cubicle Polycarbonate roofing in same lengths as steel roof sheeting (to span entire length of roof)
See Section 2: Steel Framed Roof Construction & Steel Roof Sheeting for sheet lap and screw fixing detail specifications
Hooks for hanging clothes and bags
• Especially important for female students and sanitary hygiene practices
Specifications: See Section 8.4: Other
h
Exposed plumbing secured to wall
• Exposed galvanised water supply lines are secured to the brick wall to minimise ‘water hammer’ and general movement

• Ensures fittings and connections don’t become loose or damaged over time from movement of the pipe
Specifications: Wall plugs (green) and 2” long screws GI pipe saddles (1/2”) (GI Pipe Clamp) fixed at regular spacings Render installed after pipes installed and secured; pipes are embedded in render where possible
Solid core outward swinging door
• Outward swinging door allows extra space in the toilet cubicle and safety in the case of an emergency in a cubicle, e.g. a student faints
• Inside and outside slide bolts for privacy and securing the door
Specifications: See Section 8.4: Other
8.1 Continued...
Cubicle photographs: Showing crucial parts to the design
e
i g h i f f 73
8.2 Detailed Cubicle Plan
1200mm [3'-11"]
handwash tap 2" fall
tap
2"fall
C
Detailed documentation, such as the plan below, is produced for every project in collaboration with project engineers. This ensures that a clear set of site-specific construction documents is produced for trades on the ground to follow to construct the toilet block. This is required in order to achieve a safe building that improves the health of its users. • Plan: This detailed plan outlines the thinking that goes into each cubicle design. It is important to ensure critical cubicle dimensions, such as length and tap placement, are achieved to ensure users are safe and comfortable, especially female students A
2" fall 74 NSTDG - 04 Design & Construction
229mm [9"] 1054mm [3'-512"] 102mm [4"] 1054mm [3'-512"] 229mm [9"] 1054mm [3'-512"] 102mm [4"] 1054mm [3'-512"] 229mm [9"] 229mm [9"] 1829mm [6'] 229mm [9"] 2286mm [7'-6"] 2034mm [6'-8"] 50mm [2"] 89mm [312"] 50mm 2331mm [7'-8"] 50mm 2445mm [8'] 50mm 229mm [9"] 851mm [2'-912"] 343mm [1'-112"] 864mm [2'-10"] 229mm [9"] 470mm [1'-612"] 813mm [2'-8"] 343mm [1'-112"] 813mm [2'-8"] 229mm [9"] 813mm [2'-8"] 343mm [1'-112"] 813mm [2'-8"] 470mm [1'-612"]
340mm [1'-1 1 2 "] 530mm [1'-9"] 969mm [3'-2"] 327mm [1'-1"] 400mm [1'-312"] 327mm [1'-1"]
8.3 Cubicle Design - Construction Process
A series of photographs from various projects shows the construction process for preparing the cubicle, installing the trap and squat pan level, preparing the floor and walls for rendering underneath and completing the hard render.


1. Dig underneath footing to rear of cubicle to connect pan plumbing.
2. Connect pan trap to waste pipes at rear of block. Ensure it is level.
3. Install squat pan level on top of trap and pack to height of finish render considering the required fall.
4. Set squat pan in location with cement.


5. Fill the cubicle floor with rocks to the desired height as substrate for hard floor render.
6. Install floor render.
7. Install wall and surrounding wet area render, including hard render final finish
Specifications: For render ratios, See Section 8.1: Toilet Features (inside)
1. 7.
5.
3. 4.
6.
2.
75
Other Hardware
There are many other parts to the design that have been trialled on projects and modified as a result of their performance. These parts are crucial for the safety, comfort, ease and privacy of everyday use of the toilet block.
Toilet brush attached to wall with rope
• An important cleaning implement, attached to ensure it doesn’t get misplaced
Specifications: Installed to each cubicle – trialled in earlier village sanitation program Wall plug (green) and 2” galvanised screws, fixed 600mm apart String (nylon, green / orange) tied to end of toilet brush, long enough to reach bottom of trap from wall

Clothes hooks
• Important for changing clothes in female sanitary hygiene process in toilet cubicle
• Useful for hanging towels
Specifications:
Strong clothes hooks made from stainless steel Screw fixed directly into back of solid core door Installed at 5’/1500mm above floor level (depending on age of school children)

Solid core outward swinging door
• Outward swinging door allows extra space in the toilet cubicle
Specifications: Paint door and frame with undercoat and 2 x coats of enamel paint (not acrylic), critical to paint bottom edge of door and all other edges
Stainless steel hinges 4”, 4 x galvanised timber screws For extra protection, consider covering the internal face of doors with aluminium sheet 2” from the bottom to protect the door from water and wear and tear

Strong handles & sliding locks
• Inside and outside slide bolts and handles for privacy and securing the door
toilets at the back of the wall tied by nylon thread and onto the nail.
• Heavy duty to ensure long life of hardware and ongoing use of toilet facilities
Specifications: Fitted to both inside and outside of doors Slide bolts (2 x saddles and 2 x bolt nut and washers‘Antrap’ set)
Door stop to roof frame
• To ensure inside doors to cubicles don’t hit half height walls or edges of brick door openings when fully open
• Secured to steel roof frame to ensure it is not a trip hazard
Specifications: RHS block bolted to RHS roof frame RHS stub where door contacts wrapped in bicycle tube and bolted in place
d
e
a b b c c d
e
76 NSTDG - 04 Design & Construction
8.4
a
9. VENTILATION & INSECT SCREENING

PROBLEM - Pooling water from dripping taps and dip flushing creates breeding areas for insects such as mosquitoes and flies which then transmit disease.
SOLUTION - The grade of the floor and wall render is a critical priority. A further measure to stop insects is to fabricate well-fitting insect mesh to any openings. This not only restricts the insects from entering the toilet cubicles, but also provides constant ventilation to dry out any water in the cubicles.
Timber frame made to size of opening

• Hardwood timber creates a strong frame
• Sized to tightly fit opening to ensure no gaps are left once fitted in place to the steel structure
Specifications: Notched timber joins Glue and nail joins Can be replaced with a SHS steel frame
Insect screen
• Small gauge insect screen is stretched over timber frame and fixed in place
Specifications: Fly screen (12” x 35” roll readily available) Screw fixed in place with timber screws

Securing insect screen to metal roof frame

• The timber frame with insect mesh is secured to the metal roof frame
Specifications: Pre-drill holes through timber frame into metal roof frame Galvanised self-drilling metal roofing screws to fix to metal roof frame at regular intervals
Prime and paint timber frame
• Painting the frame, like the doors and door frames, ensures a durable finish to withstand effects of weather and age
Specifications: Prime timber with wood primer Paint finish with enamel paint to all sides
a
c c d d
a
b b
77
 • Training maintenance managers: Nepal Project Manager trains staff at each project site to fill out maintenance checklists and carry out checks and repairs
chapter05
05 Maintenance
An overview of the importance of maintenance for the lifetime of the building and the process Healthabitat carries out to encourage and train dedicated maintenance managers
79
WHY IS MAINTENANCE IMPORTANT?
Regular, routine maintenance is important to extend the longevity of the toilet, handwashing and waste removal facilities. This allows more people to be impacted by long-term, well-functioning facilities and ensures the greatest value for dollar investment.


Maintenance plans, checklists and ongoing funding for the life of the project are essential. They provide information on taking care of the essential design features, improving chances of long-term success and improving the health of its users.
Common Item Failures and Repairs
•
•
•
• Septic tank lid cracks: The septic tank lid is exposed and can be easily damaged by animals, people, machinery or cars

 Ball valve fails: The handle to the ball valve for the water supply can break off, causing a water leak
Clogged drains and gullies: Items or debris can clog up the sink drain, causing a blockage. Inspection of openings allows drains to be cleared
Ball valve fails: The handle to the ball valve for the water supply can break off, causing a water leak
Clogged drains and gullies: Items or debris can clog up the sink drain, causing a blockage. Inspection of openings allows drains to be cleared
80 NSTDG - 05 Maintenance
Overgrown inspection outlets (IO): Weeds & plants can overgrow making it difficult to inspect drains and make repairs
HOW IS MAINTENANCE CARRIED OUT?
Inspections should be carried out at regular planned intervals using an established and repeatable process by a trained maintenance manager. This allows the wear and tear on items to be monitored and maintenance requirements to be identified. The maintenance manager will then decide whether an immediate fix is required and able to be done, or if trade assistance is required to fix a larger issue.

For maintenance to be carried out efficiently and successfully, the following need to be in place:
05
- MAINTENANCE CHECKLIST:
Ongoing Maintenance Funding - Allocated from day one of feasibility
Funding for the training and salary of a dedicated maintenance manager
Funding for toolkit restocking
Funding for urgent and planned maintenance work
Training a Maintenance Manager - Providing the knowledge to carry out maintenance
The project manager trains a dedicated, on the ground, maintenance manager to oversee regular inspections
The maintenance manager must have the knowledge, skills and tools to carry out repairs and maintenance They may be a teacher from the school, a parent or a tradesperson from the community
Maintenance Checklist - A system to follow and use to keep records of maintenance work
An established process for inspections, testing and surveying items with required time frames
Ensures that faults are prevented or detected early and effects of failure can be reduced
Is a formal document to review and use as a resource for future planned maintenance and toolkit restocking Has been established as a priority list, focusing attention and funding
Toolkit & Restocking Checklist - Providing the tools and basic parts (e.g. taps, hooks) to carry out maintenance
The project manager at the end of construction will deliver a fully stocked toolkit and checklists and provide competency training to undertake maintenance

The checklist includes all items and tools required for regular repairs, maintenance and replacement of hardware
These must be restocked regularly
Cleaning Checklist - Cleaning also helps maintain parts of the project
Regular cleaning is important to maintain the toilet
For example, removing dirt build-up in cubicles before it gets flushed down the toilet pan reduces dirt build-up in the septic system that could minimise its capacity
NOTE: The2019SanitationStudiodevelopedandtestedthesetoolswithexistingprojectcommunities.With feedback,thetoolsareconstantlybeingrevisedtoincreasecommunication,efficiencyandsuccessonthe ground.
1. Training a Maintenance Manager
The dedicated maintenance manager is often a school employee such as a grounds person or maintenance worker who is regularly on site. The project manager trains this person to fill out the maintenance checklists, using and stocking the tool kit and undertaking repairs and maintenance.
• Training a Maintenance Manager: The Nepal project manager trains staff from the school project committee about how to fill out the maintenance checklist and identify and complete maintenance repairs
See Appendix for Checklists 81
2. Maintenance Checklist

The established process for inspections was developed by students in 2019 and taken to the communities of past projects to trial with the maintenance manager and school management team. Feedback was taken on board and used to develop this maintenance checklist, with timeframes to inspect, check and test all items.
HOW TO FILL OUT:
MONTH ► J F M A M J J A S O N D
= OK = NOT OK = FIXED
HOW TO FILL OUT (Translations above):
This is a maintenance checklist for one year, separated into 12 months. Some item checks are monthly,

6 monthly or annually. For each item there are two check boxes. In the top check box a = OK and a = NOT OK.
In the bottom check box a = item has been fixed.
multiple items fails, the check box must have an
COMMON FIX ITEMS:
WHAT IF THERE IS MORE THAN ONE ITEM? For instance, the INSIDE TOILET check notes one tap, although this is relevant for all inside toilet taps.
If there are multiples of an item, all of these must be checked with a or . If any one of the


TAP
• Filling out the maintenance checklist: The checklist covers a one year period with suggested time frames for items to be inspected, tested and changed monthly, 6 monthly or annually. Icons request the manager to fill out if the item is OK, NOT OK and if it has been fixed

GATE VALVE
- Water flowing out from spindle
1. Tighten the spindle nut - Tap cannot be turned off
2. Replace tap washer
1. Using adjustable wrench (shifter), remove top half of tap
- Water flowing out from spindle 1. Tighten the spindle nut - Leaking from sides of gate valve 1. Replace whole gate
PAGE 3/5
See Appendix for Checklists 82 NSTDG - 05 Maintenance
3. Toolkit & Restocking Checklist
The toolkit to carry out the maintenance inspections and repairs was also developed in the 2019 Sanitation Studio and trialled with the communities of past projects. The Toolkits and Restocking Checklist were then hand delivered by the Project Manager to other past projects.

• Maintenance Toolkit and Restocking Checklist: Stocked in a heavy duty toolbox, it is filled with items required for minor maintenance and repairs. The toolkit requires checking and restocking every 6 months


See Appendix for Checklists 83
4. Cleaning Checklist
Regular cleaning is encouraged as it is an important part of maintaining the toilet, handwashing and waste removal facilities.
The Cleaning Checklist accompanies the toolkit and displaying it in a public area is encouraged, such as on the back of the toilet doors. In some schools, the teachers allocate the responsibility for daily cleaning to different groups of students to encourage good hygiene and understanding about the toilet, handwashing and waste removal facilities. Cleaning with non-harsh chemicals (e.g. no bleach) ensures the good bacteria in the septic tank are not killed, so they can continue to do their job breaking down and treating human waste.
NOTE: Do not use Harpic or Bleach on toilets as it badly affect

Toilet & Basin Cleaning Checklist - English & Nepalese
2.
English: Sprinkle 1 spoon of Baking Soda over toilet pan. Pour one cup of vinegar onto toilet pan Nepalese:


English: Scrub inside the pan and on the foot holds Nepalese: 3.
4.
English: Fill bucket with water, wash floor and toilet pan then re-fill bucket Nepalese:
English: Sprinkle 2 spoon of Baking Soda on the basin. Pour one cup of vinegar over all of the basin. Nepalese: 5.

6.
English: Scrub inside and around the basin Nepalese:
English: Turn all the taps on and wash basin out Nepalese: 7.
8.
English: Pick up rubbish and empty buckets into incinerator. Return rubbish buckets. Nepalese:


English: • Make sure all taps are turned off • Put the cleaning bucket back Nepalese:
• Cleaning Checklist: Simple diagrams illustrate important areas and methods of cleaning with non-harsh


See Appendix for Checklists 84 NSTDG - 05 Maintenance
85
06
chapter06
Appendix
DEFINITIONS, ACRONYMS & EXPLANATIONS
HH Healthabitat
HLPs Healthy Living Practices
UPK Anangu Pitjantjatjara Yankunytjatjara Lands in the far north west of South Australia
RELEVANT RESOURCES
Website Links
Healthabitat Nepal & Toilets:
• Safety and The 9 HLPs
• Healthabitat’s work in Nepal
• Healthabitat news article - “Complex problems and big thinking? - maybe try many small ideas”
• Healthabitat news article - “Building Poverty”
• Healthabitat news article - “On tigers and smooth hands - what toilets mean to the villagers of Nepal”
Environmental Health in Central Australia - AP Design Guide & UPK Report:
• UPK report
• Septic Tank Maintenance Guide
• AP Design Guide
Plumbing Resources:
• Health Aspects of Plumbing - World Plumbing Council
Articles & Guides
Nepal Earthquake Resistant Design (Nepal Government)
• Design catalogue for reconstruction of earthquake resistant houses, volume I
Specifications
Steel Roof Framing
• Lysaght Metal roof sheeting Specification (2.12 & 3.8.1)
88 NSTDG - 06 Appendix
FEASIBILITY REPORT
School water supply, toilets, handwashing, dental and waste disposal facilities
Contact details
Date completed
Name of village District
Name of school School Administration contacts: Name Position Phone number
1. 2. 3. School Development Committee contacts: Name Position Phone number
1. 2. 3.
Existing building projects, drawings
Existing building projects in the school 1. 2. 3.
List all grants for new buildings applied for: Who with (eg ADB?) What for?
Date applied? When will you hear?
Are there existing site plans available?
Village information
Number of families in the village
1. 2. 3.
NB: attach photos of existing toilet block, cubicles, school grounds, water tank
Number of government schools in the village
Distance from Kathmandu Road condition & accessibility?
Distance from Melamchi Road condition?
List local trades in the village, eg plumbers, brick layers, renderers, stone mason, labourer?
Location of nearest hardware shop
Are there private health clinics in the village? Is there a pharmacy?
1. 2. 3.
Location of nearest hotel
List number of rooms
Are there government health posts in the village?

CHAPTER 03
Document
- Feasibility
89
School population
How many girls go to the school
What is the most number of girls at any one time
How many boys go to the school
What is the most number of boys at any one time
How many women teachers How many men teachers
Condition Report – Toilets & handwashing
How many existing toilets are there?
Do the doors open & close properly
Is there a tap in the toilet cubicle
Is the toilet blocked
Is there bug proof mesh (ventilation) on all openings
Are there any handwashing points? How many?
Condition Report – Water supply system
Where does water come from for the school?
What is the water supply pipe made of?
What is its condition?
Who cleans the toilets?
Are there locks on the doors
Is there a bucket in the toilet cubicle
Does all water in the cubicle drain into pan
Are there clothes hooks on the walls
Are there handwashing sinks installed? Do they drain to a septic system?
How far away is this from the school?
Is there a water tank? How many? How many litres? What material? Where is it located?
Is there good water pressure? How long does it take to fill a 10 litre bucket?
Condition Report – Waste disposal system
Is there a waste water treatment system?
Is there a drainage system after the septic tank?
Is there a septic tank? How large is the tank? What is its condition?
Do all sinks and toilets drain into the septic tank?
CHAPTER 03 - Feasibility Document cont. 2
90 NSTDG - 06 Appendix
Dental services
Are there dental facilities at the village
Dental programs or camps organised at the school / village beforeinfo from Principal
Dental health condition of the students / local villagers - a view from Principal
Is a dental program needed for the school / community?
Necessity of dental camp program for the villagers? What support can villagers provide for the program
What support can school provide for the program?
Other programs running in the area? if Yes, please provide information
Government support locally
Other notes:
Dental health conditions of villagers: a view from government health service provider
Potential donors/supporters locally
CHAPTER 03 - Feasibility Document
cont.
91
Toilet Sizes and Areas
School Population
How many boys are at the school?: ...............................................
How many girls are at the school?: ................................................
How many t eachers are at the school?: ..........................................
Number of toilets and handwashing points
Circle appropriate field based on total number of people using the school’s toilets
Toilets and hand washing points
Number of people using facilities
Toilets required for school (1 toilet per 60 people)
Girls Boys* Teachers Hand basins 100 3 1 1 1 2 200 3 1 1 1 2 300 5 2 2 1 2 400 7 3 3 1 4 500 8 3 3 2 4 600 10 4 4 2 4 700 12 5 5 2 6 800 14 6 6 2 6 900 15 6 6 3 8 1000 17 7 7 3 8 *1 of the male toilets will be a urinal, unless the total number of male toilets is less than 2
Note* Divisional breakdown of boy-girl toilets is dependent on the ratio of boys to girls at school. For example in a school of 600 people; Ratio of boy: girl = 3:1 Toilet allocation for students would be = 6:2 (boy: girl) Areas
of B Divisional breakdown oy vs girl toilets depends on the ratio of boys:girls at the school hool with 600 people and a ratio of boys:girls = 3:1 toilet allocation for student For example, in a sc s = 6:2 (boys:girls)
The average size of a toilet cubicle, including slab and handwashing points, is 5.2m²
To calculate approximate area of new toilet blocks, multiply number of toilets (found above) by 5.2m²
For example, a school with 800 students will need 14 toilets. These will occupy an approximate area of 72.8m² including slab and handwashing points
Notes:
CHAPTER 03 -
Document - additional
92 NSTDG - 06 Appendix
Feasibility
reference
Project Process Checklists CHAPTER 03 -
01 - PROJECT INITIATION CHECKLIST :
Obtainofficialrecordofinitiationinwriting
Begintodiscussexpectations,roleofengagement,timeframes,accessconcerns,seasonsandweather
What are the details of the brief?
02 - PROJECT FEASIBILITY/ PROJECT SUITABILITY CHECKLIST
Project Initiation/Feasibility:
What are the key project expectations and do these align with the HLPs?
Whatdoestheschoolexpecttobeapart/notapartoftheproject?
e.g.Doestheschoolwantyoutobuildatoiletwithnosecurewatersupply?Ordoestheschoolwantthe toilet to have no roof?
Where is the project funding coming from?
Whatistheexpectedcostofalltheprojectstagesandcontractor?
Whatisthesourceoffunding?
Isthefundingalreadysecuredwithnostringsortimeframesattached?
Iffundingiscomingfromoutsideofthecommunity,whatwilltheschoolcontribute?Theremustbelocal investment,whichcouldbein-kindsupportsuchaslabour,materials,maintenancefunding.
Are there travel requirements or access restrictions?
Isthereanairfarecostassociatedwithreachingthecommunity?Ifso,howmuchisit?
Isit4WDroadaccessonlyforpeopleandmaterials?
Are there seasonal access restrictions such as the monsoon season?
What are the private vs. community needs and benefits?
Althoughthisisaschooltoilet,willthecommunityuseitalso?
Do the government, NGOs or the school have future development plans or are they already doing work?
AreotherNGOsdoingsimilarorthesameprojectintheareaalready?Ifso,whatistheirprojectdifference andsimilarities-canyoucollaborateorjoinresources?
Design & Construction:
Who is the project management team and the licence or insurance holder?
Whowillbetheon-the-groundprojectmanagementteamforallphasesincludingconstructioninspections and defects?
Whatifsomebodygetshurtduringtheproject?Aretheyinsured?
Who will be the construction team?
Are there local workers/labour available?
Aretherelocaltradestodothework-plumbers,electricians,engineers,inspectors?
Ifnotlocal,whoaretheyandwheredotheyhavetotravelfrom?
After the Project is Over:
Who will pay for and carry out the maintenance?
Whowillbetrainedasthededicatedmaintenancemanagerandcarryoutmaintenanceregularly?
Whowillrestockandsupervisethetoolkitsandtraining?
Who will carry out a defects inspection at project completion?
Istheremoneyinthebudgettofixanydefectsorpoorlyconstructedaspects?
NOTE: SeeFeasibilitydocumentsintheAppendixforreference/use
93
CHAPTER 03 - Project Process Checlists cont.
03 - DESIGN CHECKLIST:
Project Brief - Finalised and agreed on by all stakeholders
Havetherebeendiscussionswiththeclient,schoolcommittee,parents,studentsandstaff?
Areinclusions,exclusionsandexpectationsnotedintheprojectbrief?
Projecttimelineandalldesignandconstructionphasesaredocumentedincludinginspections
Site Analysis - Completed and documented
Siteobservations,futureplansandsitequalitiesareunderstoodandcaptured
Prosandconsofthelocationandpossiblesiteshavebeenunderstoodandcaptured
Thesehavebeenreviewedwithstakeholdersforconfirmationsandinput
Sketch Design - Options are developed by understanding the brief and site
Minimumoftwoplanninganddesignoptionsaredevelopedusinghandsketches,siteplans,building plans,elevationsandsectionsandscalemodelstocommunicateideas
Presentedtostakeholdersforapprovalandselectionofmostappropriatesolution
Design Development and Detailed Design
Theselecteddesignisdevelopedanddetailedtoapointwhereitissufficienttoengageexternal consultantsandcompleteconstructiondocumentation
Presentedtostakeholdersforfinalapproval
Construction Documentation, External Consultants Engaged and Planning Approval
Externalconsultantsareengaged,suchasanengineer,toconfirmdesignanddetailspecifications
Constructionpackageisdevelopedwithconsultantcollaboration
Submittedtoauthoritiesforplanningorconstructionpermissionandapproval
Projectisbegunandcarriedoutaccordingtoprojecttimeline
NOTE: Theprojectmanagermustbeavailableatallstagesoftheprojecttotroubleshootanyunforeseenissues orquestionsandengageanyconsultantsasrequired,especiallythroughouttheconstructionphase.
04 - Key construction milestones include:
• sourcing materials: ordering and delivery of materials for building the structure and fittings
• preparing the site: marking out the site, excavation and earthworks
• services: installation of services below and above ground as required
• foundations: construction of footings to support the building as designed and specifications
• structure: construction of walls, roof and doors as designed and specifications
• fixtures, fittings & finishes: installation of health hardware, hooks, shelves and surface finishes as specified.
05 - MAINTENANCE CHECKLIST:
Ongoing Maintenance Funding - Allocated from day one of feasibility
Fundingforthetrainingandsalaryofadedicatedmaintenancemanager
Fundingfortoolkitrestocking
Fundingforurgentandplannedmaintenancework
Training a Maintenance Manager - Providing the knowledge to carry out maintenance
Theprojectmanagertrainsadedicated,ontheground,maintenancemanagertooverseeregular inspections
Themaintenancemanagermusthavetheknowledge,skillsandtoolstocarryoutrepairsand maintenance
Theymaybeateacherfromtheschool,aparentoratradespersonfromthecommunity
Maintenance Checklist - A system to follow and use to keep records of maintenance work
Anestablishedprocessforinspections,testingandsurveyingitemswithrequiredtimeframes
Ensuresthatfaultsarepreventedordetectedearlyandeffectsoffailurecanbereduced Isaformaldocumenttoreviewanduseasaresourceforfutureplannedmaintenanceandtoolkit restocking
Hasbeenestablishedasaprioritylist,focusingattentionandfunding
Toolkit & Restocking Checklist - Providing the tools and basic parts (e.g. taps, hooks) to carry out maintenance
Theprojectmanagerattheendofconstructionwilldeliverafullystockedtoolkitandchecklistsand providecompetencytrainingtoundertakemaintenance
Thechecklistincludesallitemsandtoolsrequiredforregularrepairs,maintenanceandreplacementof hardware
Thesemustberestockedregularly
Cleaning Checklist - Cleaning also helps maintain parts of the project
Regularcleaningisimportanttomaintainthetoilet
Forexample,removingdirtbuild-upincubiclesbeforeitgetsflusheddownthetoiletpanreducesdirt build-upinthesepticsystemthatcouldminimiseitscapacity
NOTE: The2019SanitationStudiodevelopedandtestedthesetoolswithexistingprojectcommunities.With feedback,thetoolsareconstantlybeingrevisedtoincreasecommunication,efficiencyandsuccessonthe ground.
95
Water Supply and Waste Treatment
Source
Where is the water coming from? Cistern, stream, mains?
Distance
How far between source and school?
Condition
What condition is the pipe in? What material is it made from?
Tank
Is there an existing tank(s)?
If yes, how many? How many litres? What material? Where is it located?
Flow Rate
How long does it take to fill a 10L bucket?
Toilet Flush
Access to water Toilet unblocked
Water
What is the water quality?
Hand Wash
Close to toilet Access to soap
2 min
Teeth Brush
2min brushing Teacher supervision
Waste water Treatment
Soakage Trench
Water Process CHAPTER 0496 NSTDG - 06 Appendix
Number of people using facilities
Hand washing (1 litre per person)
Toilet dip flush (3 litre per person)
Tooth Brushing @30% (2 litres per person)
Total volume used (litres)
Septic tanks required
Septic tank footprint metres)
So trench length (metres) 100 100 300 60 460 1 2.2*1.5 2.3 200 200 600 120 920 1 2.4*1.5 4.6 300 300 900 180 1380 2 1.3*1.5 6.9 400 400 1200 240 1840 2 1.4*1.5 9.2 500 500 1500 300 2300 2 1.6*1.5 11.5 600 600 1800 360 2760 2 1.7*1.5 13.8 700 700 2100 420 3220 2 1.8*1.5 16.1 800 800 2400 480 3680 2 1.9*1.5 18.4 900 900 2700 540 4140 2 2.0*1.5 20.7 1000 1000 3000 600 4600 2 2.1*1.5 23
Number of People includes teachers and all students Tooth brushing data reflects taps running continuously for 3 minutes
2.1m/7’ 2.4m/8’ 2.3m/7’8” 1.5m/5’ 1.5m/5’ 1.5m/5’ 1.2m/4’ 1.2m/4’ 1.2m/4’
2800 Litres 300 - 600mm 100mm
Earth fill Sand fill Fall outlet from septic tank Level pipe in ground
3200 Litres 6200 Litres
Geotextile fabric as casing around pipe
������ Tank �n���n� an� ����s Septic Tank Sizes 1.2 m 1.2 m x
/ 15’4” / 23’ / 30’8” / 38’4” / 46’ / 53’8” / 61’4” / 69’ / 76’8” Soakage Trench Detail Soakage Trenches 1.2 m 1.2 m1.2 m x
Perforated Pipe
Soakage Trenches 1.2 m Minimum width of each trench cell is 1.2m/4’ Length of soakage trench can vary as shown by the variable x
>1.2 m x
Minimum distance between trench and surrounding objects is 600mm/2’
CHAPTER 04 - Septic Tanks/ Water Tank Sizes 97
Septic tank footprint (m/ft) Tank always 5’ wide * ° ° *
Soakage trench length (m/ft) / 7’4” / 8’ / 4’4” / 4’8” / 5’4” / 5’8” / 6’ / 6’4” / 6’8” / 7’ ��aka�� T��n�� ��n����a���ns
Hand Basin (2 taps) Hand Basin (3 taps)
Options: Without Urinal Girls / Teacher Girls / Teacher / Boys
Hand Basin (2 taps) Hand Basin (3 taps)
Options: Without Urinal Girls / Teacher Girls / Teacher / Boys
Hand Basin (2 taps) Hand Basin (3 taps)
Options: Without Urinal Girls / Teacher Girls / Teacher / Boys
CLIFF FACE
1200 2100 3650 450 850
2100
Footprints
1200 4’ 16m²/172ft²
6m²/65ft² 12m²/129ft² 23m²/247ft² 22m²
² 10m²/108ft² 16m²
² 22m
1’10” 7’ 1’6” 12’2” 3.3m/11’ 3m/10’ 3m/10’
The following are diagrams of possible toilet configurations and their areas
1400
Toilet
and Sizes
12m²/129ft²
/237ft
/172ft
²/237ft² 20m²/215ft² 4’8”
2.6m/8’8” 6.2m/20’8” 6.2m/20’8” 3.3m/11’
CLIFF FACE
1200 2100 3650 450 850
2100
1400
CLIFF FACE
1200 2100 3650 450 850
2100 4.8m/16’
2m/6’6” 3.8m/12’8”
6m/20’ CHAPTER 04 - Toilet Footprint 98 NSTDG - 06 Appendix
1400
2m/6’6”
8.4m/28’ 3.3m/11’ 2.6m/8’8” 3.5m/11’8” 6m/20’


CHAPTER 05 - Maintenance Checklists MONTH ► J F M A M J J A S O N D EXAMPLE ► Toilet Block Maintenance Checklist + HAND WASHING INSIDE TOILET * * * * INSIDE PAGE 1/5 = OK = NOT OK = FIXED 99


CHAPTER 05 - Maintenance Checklists cont. MONTH ► J F M A M J J A S O N D WATER COLLECTION OUTSIDE GENERAL NOTES: WASTE TREATMENT OUTSIDE PAGE 2/5 INSIDE TANK = OK = NOT OK = FIXED 100 NSTDG - 06 Appendix
HOW TO FILL OUT:
= OK = NOT OK = FIXED
HOW TO FILL OUT (Translations above):


This is a maintenance checklist for one year, separated into 12 months. Some item checks are monthly, 6 monthly or annually. For each item there are two check boxes. In the top check box a = OK and a = NOT OK. In the bottom check box a = item has been fixed.
WHAT IF THERE IS MORE THAN ONE ITEM?
For instance, the INSIDE TOILET check notes one tap, although this is relevant for all inside toilet taps. If there are multiples of an item, all of these must be checked with a or . If any one of the multiple items fails, the check box must have an

COMMON FIX ITEMS:
TAP GATE VALVE
- Water flowing out from spindle
Tighten the spindle nut - Tap cannot be turned off


Using adjustable wrench (shifter), remove top half of tap
Replace tap washer
- Water flowing out from spindle

Tighten the spindle nut - Leaking from sides of gate valve
Replace whole gate valve
- Water overflows from tank:


split pin

ball and stem
internal plug and washer OR replace
- Cracked seal on lid:
Reseal any cracks on lid with cement to ensure air is trapped in Septic system
- Broken trap lid:
Remove trap lid and replace - Blocked trap

Remove trap lid and insert and clean out with hand or pipe
MONTH ► J F M A M J J A S O N D
PAGE 3/5
3.Replace
1.Remove
2.Remove
1.
1.
1.
1.
2.
1.
1.
1.
FLOAT VALVE SEPTIC LID TRAP LID
101
ITEM English EXPLANATION


Inside render OK?


Are there any holes or cracks?
Toilet Brush OK?
Is the toilet brush attached to string and the screws secured into the wall?
Inside toilet taps OK? Can tap be turned on and off 3 times without dripping when off? Is it secure in the wall? Is the spindle loose or leaking? *every 6 months service tap: dis-assemble + replace washer and re-grease
Toilet flush OK? Pour one full bucket of water down the toilet, does it drain quickly?

Bucket and bin OK?


Is a bucket and bin present? Is there a scoop?
Door latch OK?
Is the door latch and screws secure? Can the latch close easily?

Clothes hooks OK?
Is a clothes hook present? Is it secure in the door?
Door hinges and frame OK?
Is the door attached to hinges? Are the hinges and screws secure? Is the door frame fixed to the wall?
Hand washing taps OK? Can tap be turned on and off 3 times without dripping when off? Is it secure in the wall? Is the spindle loose or leaking? *every 6 months service tap: dis-assemble + replace washer and re-grease


Handwash drain OK?
Turn on all the taps and count to ten. Does it drain quickly?

Sink render OK?
Are there any holes or cracks? Do these effect the basin working?

Septic tank lid OK?

Is the lid in good condition and stable? Can you see inside the tank ?
Smell OK?

Does the septic tank area smell ok? Is there any seepage or wet areas?

CHAPTER 05 - Maintenance Checklists cont.
+ PAGE 4/5 INSIDE 102 NSTDG - 06 Appendix
ITEM


English EXPLANATION
Water tank OK?

Is the tank secure and holds water?
Water tank lid OK?

Is there a lid and is it secure?

Water tank connection OK?
Is the water connection secure and not leak ing?

Float Valve/Ball cock OK?


Is the float valve present and working? Does it have any cracks or is leaking?
Floor surface OK?
Does the outside floor render and brick paving have cracks or holes creating mud puddles? Is it secure? Is it slippery?

Insect mesh OK?
Does the mesh have any tears or holes?
Door and latch OK?
Are the door latch and screws secure? Can the latch close easily? Is the door in good condition?

Door handle OK?
Are the door handle and screws secured to the door?
Inspection outlets OK?
Does each outlet unscrew easily? Is the cover present? Is it damaged? Is the outlet covered/ protected? Are the drains clear?
Vent pipe OK?
Is the vent pipe secured to the wall? Does it have any cracks or holes?
Gate valve and water line OK?
Does the gate valve turn off the water? Is the water line to the tank secured or leaking?
Tool Box and Cleaning kit OK?
Does the tool box and cleaning kit have all the items on the list? Do any need to be replaced?

Nepalese EXPLANATION


PAGE 5/5
OUTSIDE
103
INSIDE TANK
Toolkit & Restocking Checklist
Health Improvement Toolkit List
(Items to be replaced on Toolkit when used)
SN Details to be inserted in toolkit

A Tools
QTY 6 Monthly Check 6 Monthly Check
1 Pipe Wrench (Stillsons) (14 Inch) 1 piece
2 Adjustable Wrench / Shifting Spanner (10 inch) 2 piece
3 Screw drivers, phillips and flat head (medium) 1 piece
4 Trowel (Jyawal) 1 piece
5 Pliers (Large) (Penchise) 1 piece
6 Claw Hammer Nail (Killa) Hammer 1 piece
7 Utility Knife 1 piece
8 Hacksaw with 5 x spare blades 1 piece
Consumables
1 Bib Cock Brass Tap (1/2”) 2 piece
2 Tap washers 10 piece
3 Drain Multi Trap (4” / 110mm) 2 piece
4 Multi trap lid (4” / 110mm) 4 piece
5 IO cover (4” / 110mm) (Door Tee Cover only) 2 piece
6 Door Handle 2 piece
7 Hinges (4 inch) 3 piece
8 Slide Bolt (2 x saddles and 2 x bolt nut and washers) (Antrap set) 1 piece
9 Clothes Hook (stainless steel) 2 piece
10 Toilet Brush 1 piece
11 Ball cock valve (1/2”) 1 piece
12 Gate Valve / Ball Valve (1/2”) 2 piece
13 GI plugs / End stops (1/2”) 3 piece
General
1 String (Nylon, green / orange) 2m
2 Tie Wire (Dhalan Taar) 500g
3 Wall plugs (Green) Green Grip Denmark 10 piece
4 Pan Plunger Pan Pump 1 piece
5 Toilet snake ? (Long poly pipe to clean the blockage) 1 piece
6 Bucket (10 lit size to be keep cleaning materials) 1 Piece
7 Baking Powder 1kg
8 Vinegar 1 lit
9 Thread tape (yellow) 5 rolls
10 Gloves (long, silicone / rubber) 2 pair
11 Vent pipe brackets 4” PVC Clamp 2 piece
12 GI pipe saddles (1/2”) (GI Pipe Clamp) 2 piece
13 Couplings (1/2”) (GI Socket) 2 piece
14 Screws (3.5mm x 2” long) (3.5mm x 1”long) 20 piece
15 Masonry nails 2 piece
16 Fly screen (12” x 35”roll) 1 piece
CHAPTER 05104 NSTDG - 06 Appendix
Cleaning Checklist
Toilet & Basin Cleaning Checklist - English & Nepalese
NOTE: Do not use Harpic or Bleach on toilets as it badly affects the Septic System 2.


1.

English: Sprinkle 1 spoon of Baking Soda over toilet pan. Pour one cup of vinegar onto toilet pan Nepalese:
3.
4.
English: Scrub inside the pan and on the foot holds Nepalese:
English: Fill bucket with water, wash floor and toilet pan then re-fill bucket Nepalese:
English: Sprinkle 2 spoon of Baking Soda on the basin. Pour one cup of vinegar over all of the basin. Nepalese: 5.

6.
English: Scrub inside and around the basin Nepalese:
English: Turn all the taps on and wash basin out Nepalese: 7.
8.
English: Pick up rubbish and empty buckets into incinerator. Return rubbish buckets.


Nepalese:
English:
• Make sure all taps are turned off
• Put the cleaning bucket back Nepalese:
CHAPTER 05105
106 NSTDG - 06 Appendix
Healthabitat Sanitation
 The Whirlwind Nepal
Studio Journey Not the typical ‘Architecture’ lecture | 17th - 30th May 2019
• Student cartoon reflection: UoN student Bobbie Bayley recaps The Sanitation Studio
The Whirlwind Nepal
Studio Journey Not the typical ‘Architecture’ lecture | 17th - 30th May 2019
• Student cartoon reflection: UoN student Bobbie Bayley recaps The Sanitation Studio


