2023 Accounting Procedures Manual


This guide should be used to prepare payroll tax returns in Payroll Relief and in Engagement Manager.
Recording employee’s earnings from client source data to produce quarterly and annual reports. (Processed by Accounting Staff, see the quarterly and year-end procedures for in depth instructions)
Payroll computed and checks written by GW’s data processing department and records are kept and updated through this system. (Processed by DP and BDW)
1.Print out the QTLY & YTD Payroll Reports and Payroll Tax Returns from Payroll Relief and pull into engagement. Compare Payroll Tax Returns to Prior year/Qtr, some state forms do not get filed. Put the Quarterly report in this order:
i. 1st - Payroll History Report (Put page with Grand Totals first)
ii. 2nd- Taxes Liabilities and Payments Report-Detail
iii. 3rd – Pending Tax Payments report
iv.4th – Federal Taxes Report
v.5th -State Taxes Report
vi.Optional- Any other reports you use for the Payroll Summary
2.Input wage breakout totals, amounts per Form 941, Tax Payments, and Unemployment amounts and payments from the Reports pdf into the Payroll Summary. The titles on the payroll reports correlate to the area on the Payroll Summary excel.
3.Print the Payroll Summary to a pdf, pull it into engagement and check it against the Payroll Tax Returns. Only put check marks on the Payroll Tax Returns.
a. Check that the Payroll Summary calculations for FICA, Medicare, and Unemployment tie to the Payroll Tax Returns.
b. Check that the tax payments and liabilities per the Payroll Summary tie to the Payroll Tax Returns.
c. Check for missing social security numbers (MD Unemployment Form).
d.Scan for unusual amounts or missing amounts. Such as unemployment wages listed but no gross wages for an individual employee.
e. Check the client information and the dates on the reports.
4.Review the Form 941 amounts compared to the Payroll Summary.
a. Check that the 941 Line 2 Proof on the Payroll Summary zeros out.
b.Review the previous quarter’s 941 for any overpayment or underpayment to be applied to this quarter.
1. Run tapes/excel calculations on source data. Examples of source data are:
a. Client’s payroll summary
b.Client’s copies of voucher checks
c. Payroll earning cards
d.941 and state tax payment confirmations
2. Tapes/excels should contain totals for gross wages, all payroll withholdings and net pay for each employee and then totaled up. Example of the amounts that should be totaled separately:
a. Gross wages
b. Total FICA withholding or Social Security and Medicare separately (computer assumes 6.2% for SS and balance is Medicare).
c.Federal withholding
d. State withholdings (each state totaled separately)
e.Other deductions
f. Net pay
g.Proof tape (balance should be zeroed for above totals)
3. Payroll should be reconciled to the general ledger before processing (if possible). At the minimum, only gross wages or net pay should be reconciled to the general ledger. Examples of sources to compute payroll per general ledger (books) are:
a. Cash Disbursements journal entries
b.Voucher checks
c.Check stubs
d.Net Pay per payroll bank reconciliation
e. Payroll journal entries
f. Net Payroll from day sheets
4. Input the payroll date into the Payroll Summary. The after the fact payrolls have a different excel format. The 941 tax payments and state payments need to be entered to reconcile to the payroll amounts.
5. Payroll Relief Data Entry
a. Accounting Staff enters the payroll information into Payroll Relief quarterly

b.Each employee’s information is entered individually by their wage breakout, remove employees with zero wages.
c. Preview the Payroll Reports and make sure they tie to your tapes
d.Payroll Tax Liabilities and Payments need to be entered manually this flows to the 941 form

6. Once all the payroll data is inputted, pull in the Payroll Reports and Payroll Tax Returns into engagement.
i. Employee Payroll History
ii. Federal Taxes
iii. State Taxes
7. Print the Payroll Summary to a pdf, pull it into engagement and check it against the Payroll Tax Returns. Only put check marks on the Payroll Tax Returns.
a. Check that the Payroll Summary calculations for FICA, Medicare, and Unemployment tie to the Payroll Tax Returns.
b. Check that the tax payments and liabilities per the Payroll Summary tie to the Payroll Tax Returns.
c. Check for missing social security numbers (MD Unemployment Form).
d.Scan for unusual amounts or missing amounts. Such as unemployment wages listed but no gross wages for an individual employee.
e. Check the client information and the dates on the reports.
1.Do the following first:
a. Review prior year’s W-2’s for fringe benefits, then: Check with supervisor whether any fringe benefits need to be applied to payroll. (Examples: auto, life insurance, child care, hospitalization, disability.) Determine how social security and Medicare tax is to be adjusted. Complete an employee adjustment sheet to send to payroll department.
b. Review whether each W-2 Box 13 Retirement Plan should be marked
2.Print out the Year End Payroll Reports and W-3 & W-2s from Payroll Relief and pull into engagement.
3.Figures from each quarter are now summed and proofed on pages 1 and 2 of the payroll
summary. Fill out Page 3 of the Payroll Summary using the year end report and the W-3.
a. Check the differences on the Wage Reconciliation and Quarterly Payments Summary Year End Portion (both on Page 1 of the Payroll Summary). The differences should be zero or the amount should be explainable. Put a description on the Payroll Summary if it is not zero.
b. Check that the Total Tax Liabilities per the Payroll Summary tie to their respective forms.
c. Run tapes on W-2s as follows:
SSA Copies (Copy A) – Tapes are run using excel worksheet within each engagement
1) Use Box #5 (Medicare Wages) to fill out each section of excel worksheet on the first page. If Box #5 wages are over the wage base of the section, enter the wage base instead.
2) Fill in numbers from the Payroll Summary - Year End Portion (Page 3) into their respective places on the excel worksheet to proof the tapes.
State Copies (Copy 1) – (Separate by State) Run tapes on page 2 of excel worksheet
1) Use Box #16 (State Wages) and Box #17 (State Income Tax) to fill out the excel worksheet. If there are multiple states split these up and run Box #16 and Box #17 tapes for each state
2) Fill in numbers from the Payroll Summary - Year End Portion (Page 3) into their respective places on the excel worksheet to proof the tapes.
Employee Copies (Copy B) – ONLY IF PRINTING PHYSICAL COPIES FOR CLIENT
1) Box # 5 (Medicare Wages) – Place tape on top of envelopes for employees.
2) Use W-2 slip and write the number of W-2s. Place on top of envelopes with tape.
ALL FORMS are E-filed through payroll Quarterly
E-filing is done by the Staff Accountants in the same area of Payroll Relief where the forms were printed from. The W-3 and W-2’s should be E-filed before any other forms (ex. The State’s Year End Efilings can only be E-filed AFTER the Federal W-3 and W-2’s have been E-filed).
Double check the payroll forms before E-filing. Use the lighting bolt button at the bottom to E-file.

Mark Returns that do not get field as paper filed. You do this by selecting the return and pushing the record button at the bottom of the screen.
DC Unemp forms get filed outside payroll relief by BDY/DP- NEW 2023 DC WH Can be efiled
After everything has been E-filed, pdfs are printed of these. There should be two files one for the W-3 & W-2’s and one for all other forms. Delete the cover page that prints out from Payroll Relief with the Efiled forms. Create a cover page memo from the PRMEMO2016 file and pull it in as the first page of the E-filed Forms pdf. Both pdfs are pulled into the payroll engagement and re-index in GoFileRoom.
PAYROLL
PROCEDURE S | 5

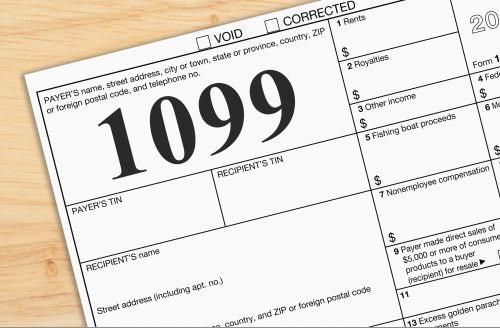

1099s are used to report non-employment income to the IRS. Businesses are required to issue a 1099 form to a taxpayer (excluding Corporations) who has received at least $600. GWCPAS uses the website Track1099 to create and file 1099s for our clients. Some of our clients only issue 1099s to Garbelman Winslow CPS (GW Only 1099s), and some clients issue 1099s to multiple recipients (1099s Additional Recipients).
1. Print Receipt & Adjustment Journal from PCS (January 1, 20XX-December 31, 20XX) and print client information report.
How to get there:
Client Dashboard GW 1099 Info
How to create GW 1099 Info Tab:
In the Client Dashboard select Add View in the top right corner Name the View: GW 1099 Info and select these portlets
2. Create new engagement in EM (See WP TBW 01- Engagement Procedures)
3. Pull GW workpapers into Engagement Manager (EM)
4. Log-in to Track 1099 (https://www.track1099.com/login) Select Track 1099 on the welcome screen.
5.Select the client. You can use the search bar to find the client or scroll through the list.
6.Once you are in the client, go to 1. Payer tab and print a PDF (Ctrl+P) of the screen. Pull this workpaper into AVF. Compare the Payer information to the client information from PCS.
7.Go to 3. Forms Summary tab to fill in the payment amount for GW. Make sure to hit save changes at the bottom.
8.Go to 6. Download tab, under the More Download Options download Preview File: CSV with all info.

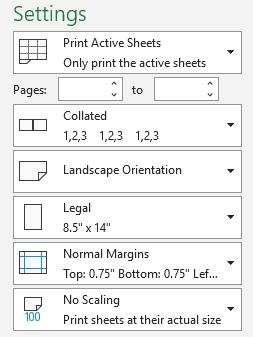
9.Convert the CSV file to an Excel file (.xlsx) and set the print options to Landscape orientation and Legal. Save the Excel file and pull it into EM.
10. Format the excel so it is more readable:
a. Click on the first cell (1A)
b. Hit ‘Ctrl+A’, then ‘Ctrl+C’
c. Click the first empty cell below the copied cells
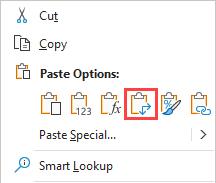
d.Right click, under paste options select Transpose
e.Delete the cells that were copied
f. Place borders around the cells
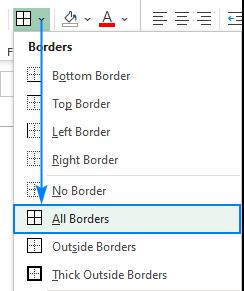
g.Resize all columns (fast way, click arrow above rows and left of columns, double click between any column; this should resize everything to fit)
11.Sign off on the workpapers you prepared, routing slip, and the task in PCS.
1. Scan client GL for additional eligible vendors and pull a report. Request W-9s and payee information for new payees not already listed in Track1099.
2. Confirm that prior year recipient information is correct.
3. See Steps 1-10 in GW Only 1099s for keying amounts and formatting workpapers.
4.In the 3. Forms Summary tab, click on the Box Totals tab and print a PDF to check the keyed amounts are correct for the 1099s

5.On the 1099 Bill & RS Workpaper
a. Select the types of 1099s on the covers sheet tab to match the 1099s being filed.
b.Key in the number of 1099s in cell K25
6.Sign off on the workpapers you prepared, routing slip, and the task in PCS.
1.Go to 4. Efile Tab, “Skip Address Verification”

2.Postal Code for Sales Tax, Enter: 20772. After the first time it should be auto filled in the box.
3.Review the information on the efile screen, then click “Pay Now” to complete the efile. *Insert picture/screen capture*
4.Go to 6. Download Tab, click the Green button “Download All Forms” this will create a zip file with a 1096 and the 1099s.
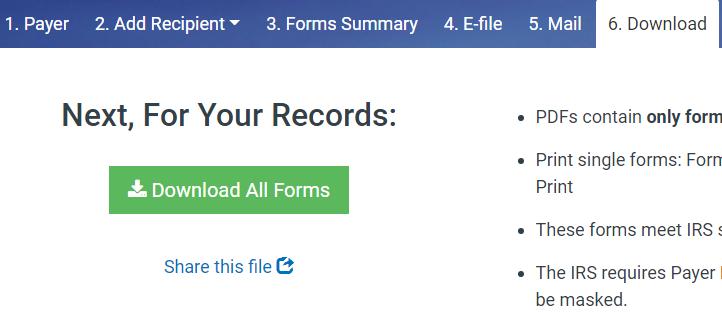
5. Unzip to your PDF folder (Copy + Paste) and add the PDFs in EM as separate workpapers.
a. Add cover letter from 1099 Bill & RS Workpaper to the first page of the 1099s PDF from Track1099.
1.Go to 1. Add New Payer Tab, select “Enter New Payer Manually”
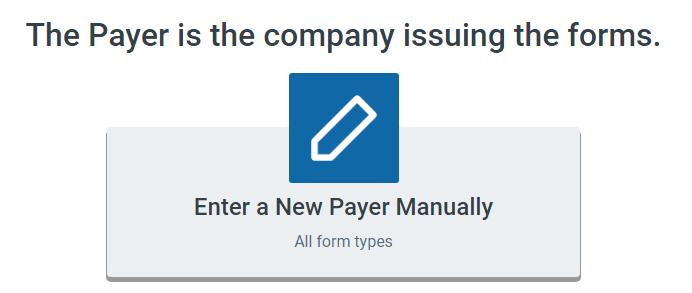
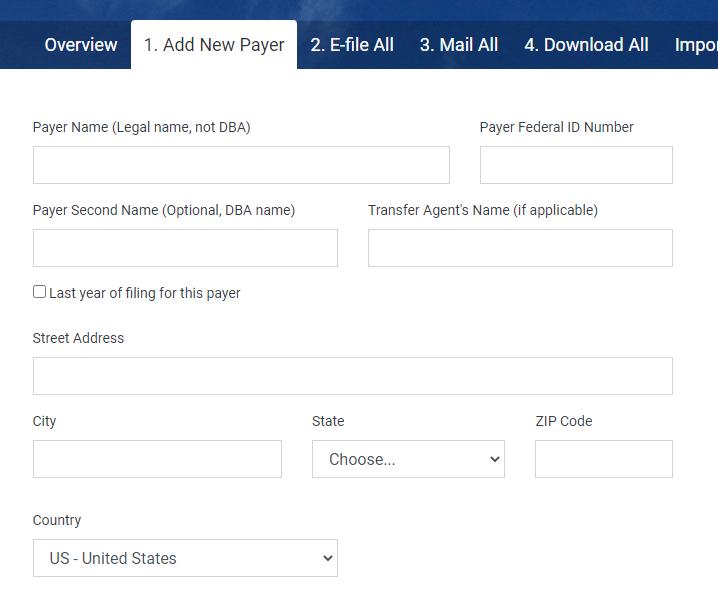
2.Fill out the client information based on the information in PCS. (If any information is missing ask the Manager in charge on the client) Use Caps Lock for information entered.
1.If a client has a new recipient for the year, in the client go to 2. Add Recipient tab
2.Select the type of 1099. Most will be 1099-NEC
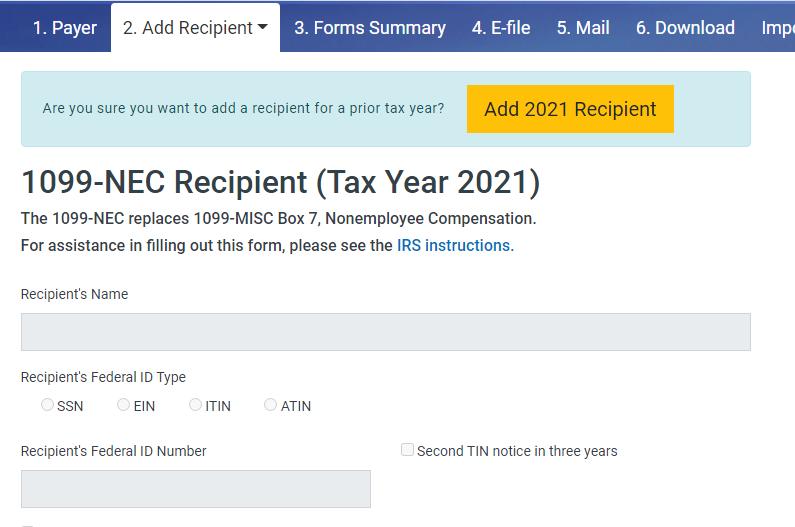
3.Enter the payee information received from the client, also enter the amount of nonemployee compensation in Box 1


Set Up Engagements ………………....……..….…2
Import a Trial Balance into EM..….….…….…..7
Roll Forward an Engagement…………….........11
Additional Important Notes………..….…..12-13
Link Guided Assurance………………….....….…14
Link Inflo………………………………….................15
Finalize an engagement…………………..……...16
Engagement Manager (EM) is a software used by GWCPAS to prepare all sorts of engagements such as compilation, tax returns, reviews etc. This guide provides a step-by-step process on how to create these different types of engagements.
1. Ensure the engagement has not been created already
Go to Engagements, Manage and Manage Engagements
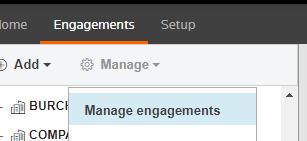
Type in the client’s name or number. Click on next and confirm that the engagement is not there already
2. Go back to the main dashboard. Click on Add and Add Engagement next to Manage.
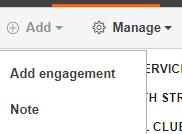
3. There are six steps to follow.
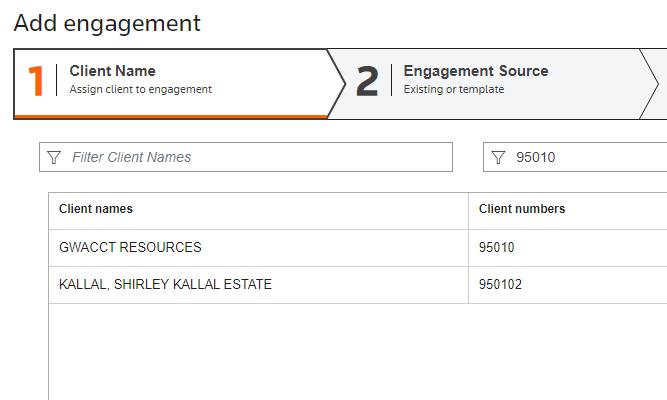
Step 1: Client name
Follow the instructions by typing the client’s name or number in the appropriate box. Select the client and click on Next.
Choose Guided Assurance if the engagement requires disclosures to be completed. Check with the supervisor if unsure. Examples of engagements requiring disclosures will be compilations, reviews, audits etc… Choose None for any other engagements such as Tax Return only or payroll. In the engagement Source box, select Template and GW Templates.
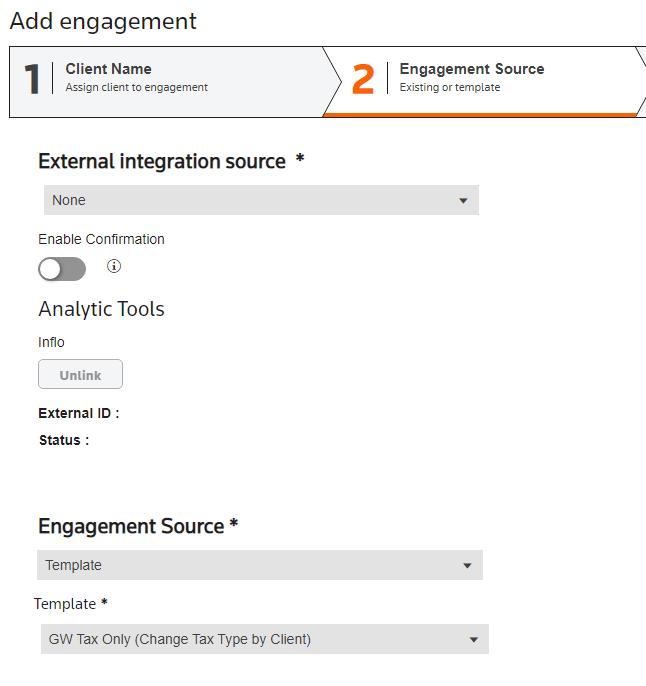
P.S: Start the year off by creating new engagements since the GW templates have updated forms.
If Inflo is used to collect client’s data, it can be linked here or once the engagement has been created under the workpapers tab.
Regarding the Engagement Source, select template. All templates selected should start with GW.
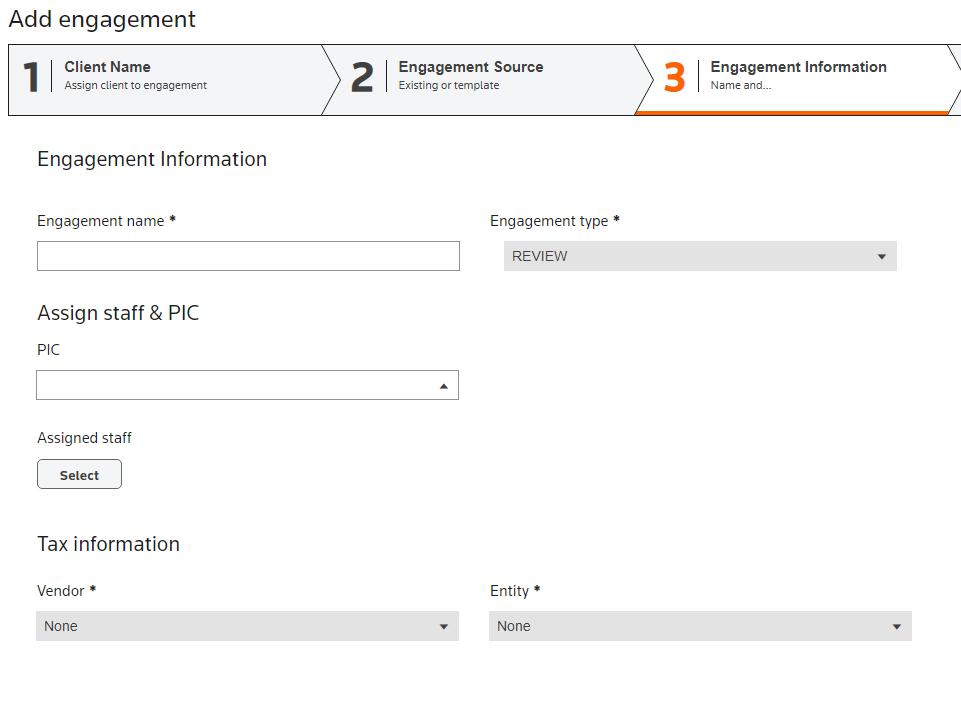
Type in the engagement name (ensure conformity with similar engagements). Select the engagament type. The
PIC is the partner in charge. Under Tax information, select Gosystem and the entity type.
Step
Select the Structure, if applicable, and the reporting period based on the client.
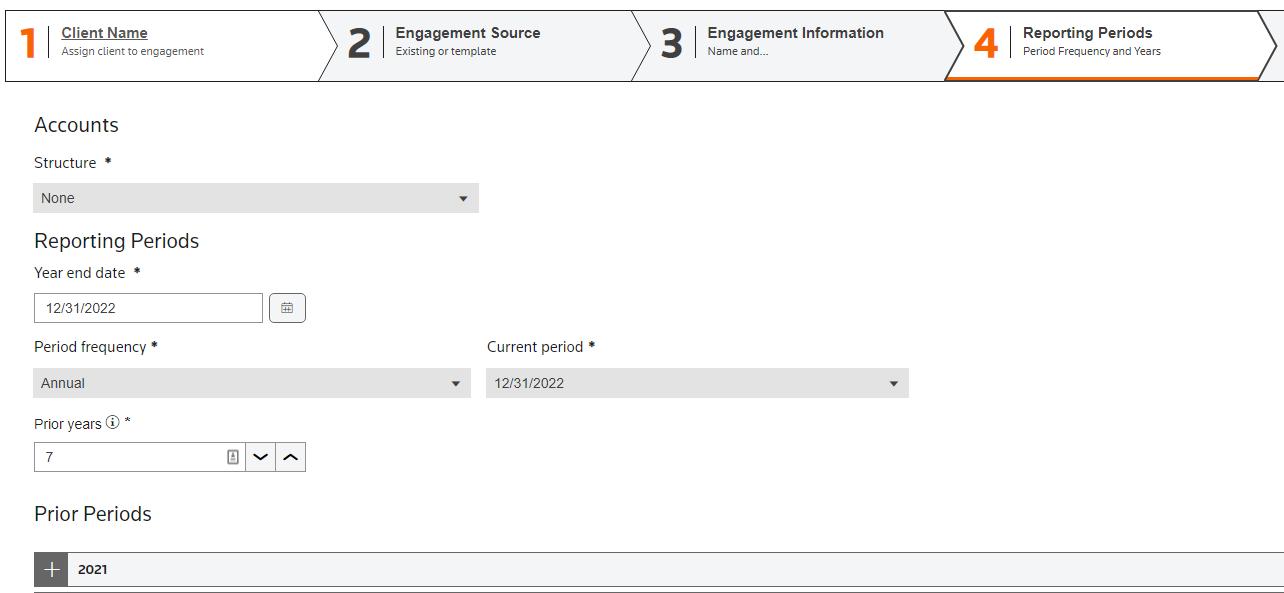
Select Account Classification grouping for all clients. The other groupings will be based on the type of engagements. These other groupings usually apply to clients issuing financial statements.
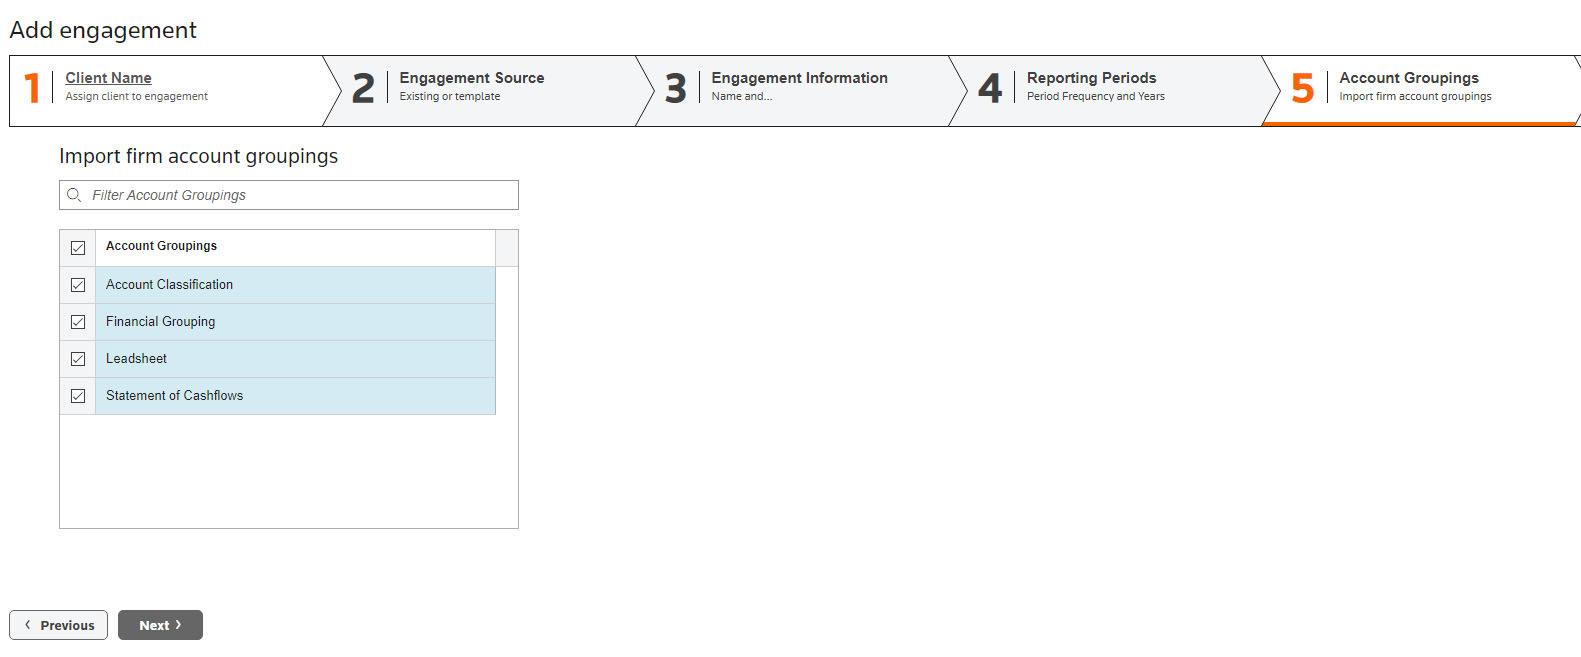
If you forgot to import the account groupings while creating the engagement, please forgot the steps below to import them.
Go to the Trial Balance Tab, click on Setup and Account Groupings
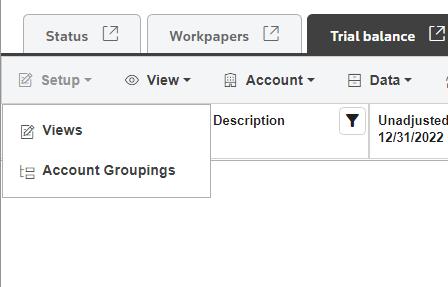
Select Import, then Source will be Firm.

Select the groupings and click on Done.
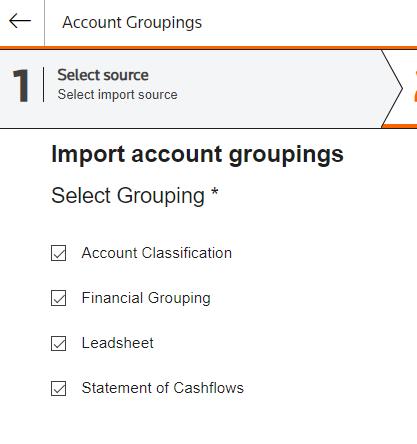
You can also import from a specific engagement. You just need to select this option and follow the steps.
This step is mainly applicable to Audit engagements. No need to enter dates unless an accountant’s report is issued and a formula for the release date is used on the report. Need to confirm the Gofileroom indexing year and click on Next.


Once the engagement has been created, it will appear on the main dashboard. If it doesn’t, click on Manage engagement and follow the instructions stated above to pull up the engagement.
Engagement has been created. Now What?
Based on the client, different scenarios for preparing the Trial Balance will apply.
Scenario 1: If the client uses QuickBooks Desktop or QBO only, do not use the TB feature in EM
Import the TB from the QuickBooks software and add the appropriate workpapers reference in the TB. Instructions on how to import TB below.
Scenario 2: Unadjusted Trial Balance provided by Client. Key or import all balances into EM unadjusted current year.
Scenario 3: No Trial Balance provided by Client. Key or import 1/1 balances into EM as unadjusted current year. If Keying, close PY P&L accounts to equity accounts and key PY 12/31 balance sheet accounts. If importing, follow the steps listed under Roll forward an engagement.
Scenario 4: It’s rare. QB client that is entered into EM to change basis (accrual to cash, etc)
P.S. For Scenarios 2, 3 and 4: Pull the excel version of the trial balance from the template- "Trial BalanceAdjusting" for most clients. The template can be found under account #95010.
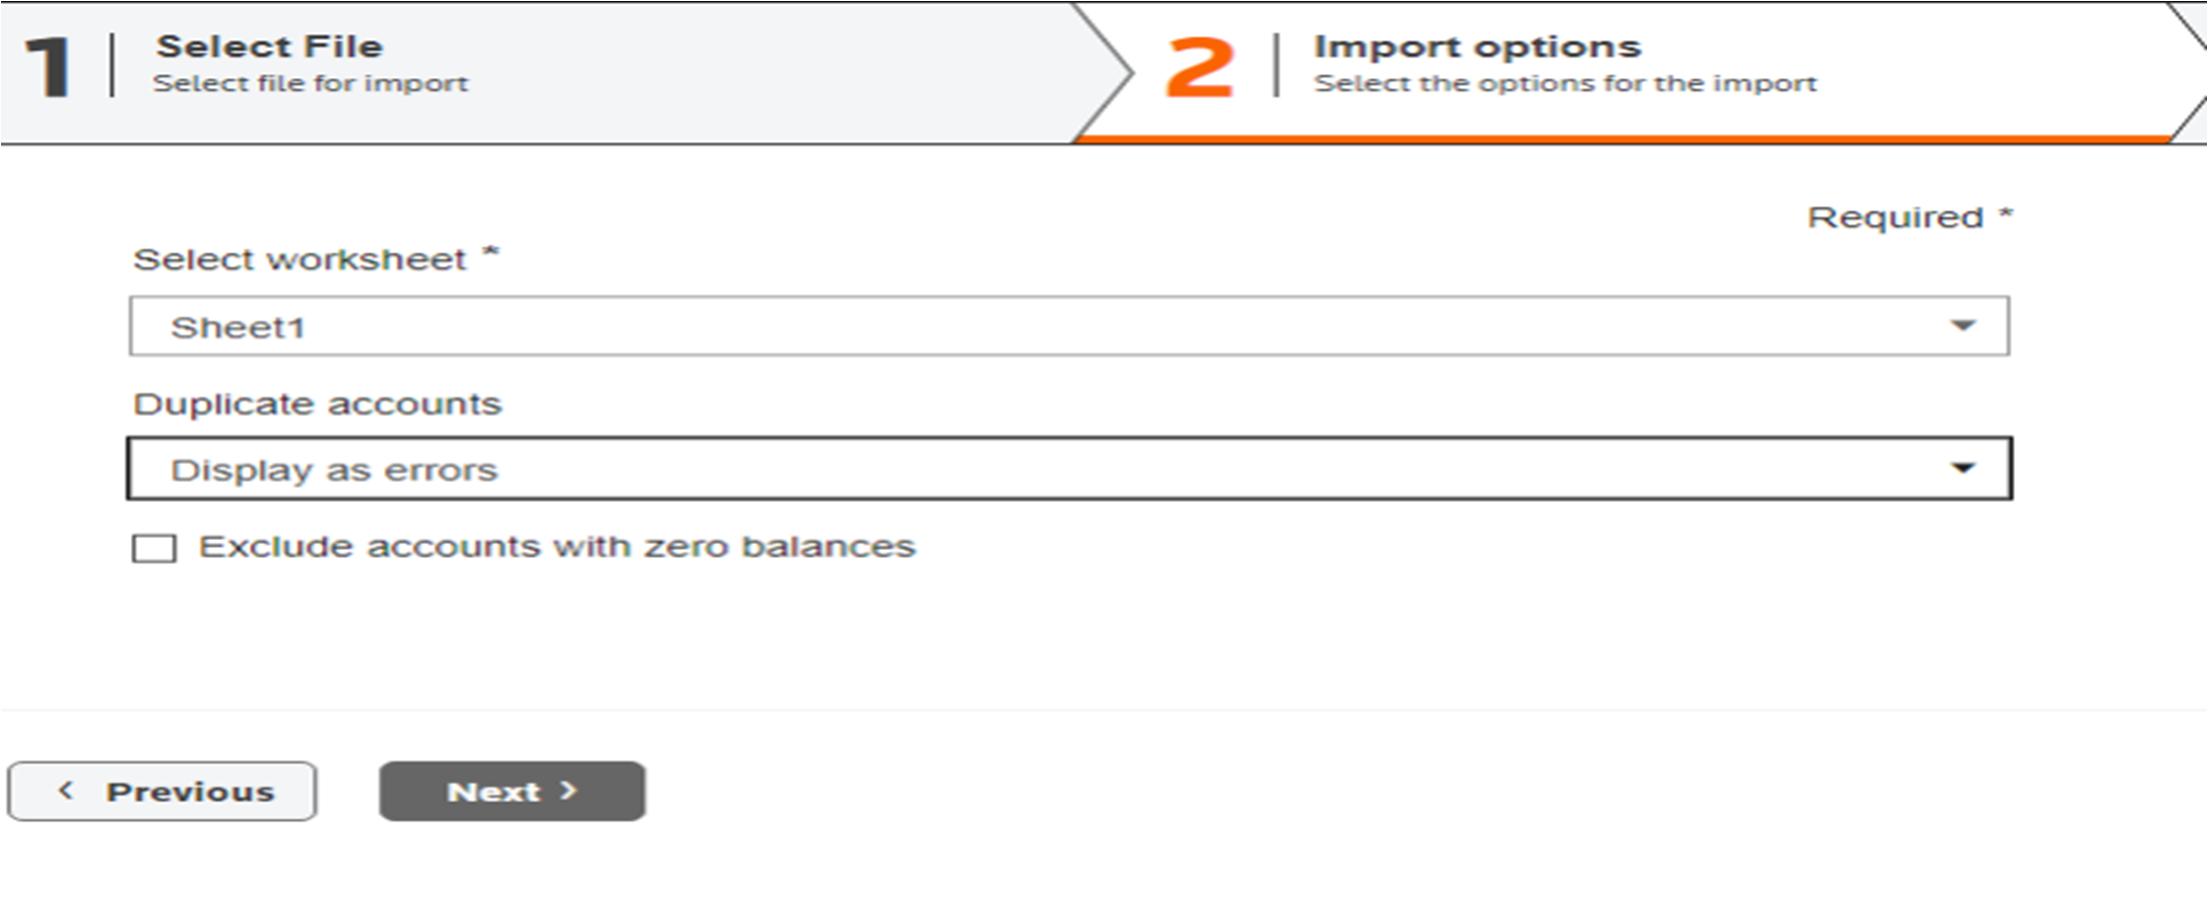
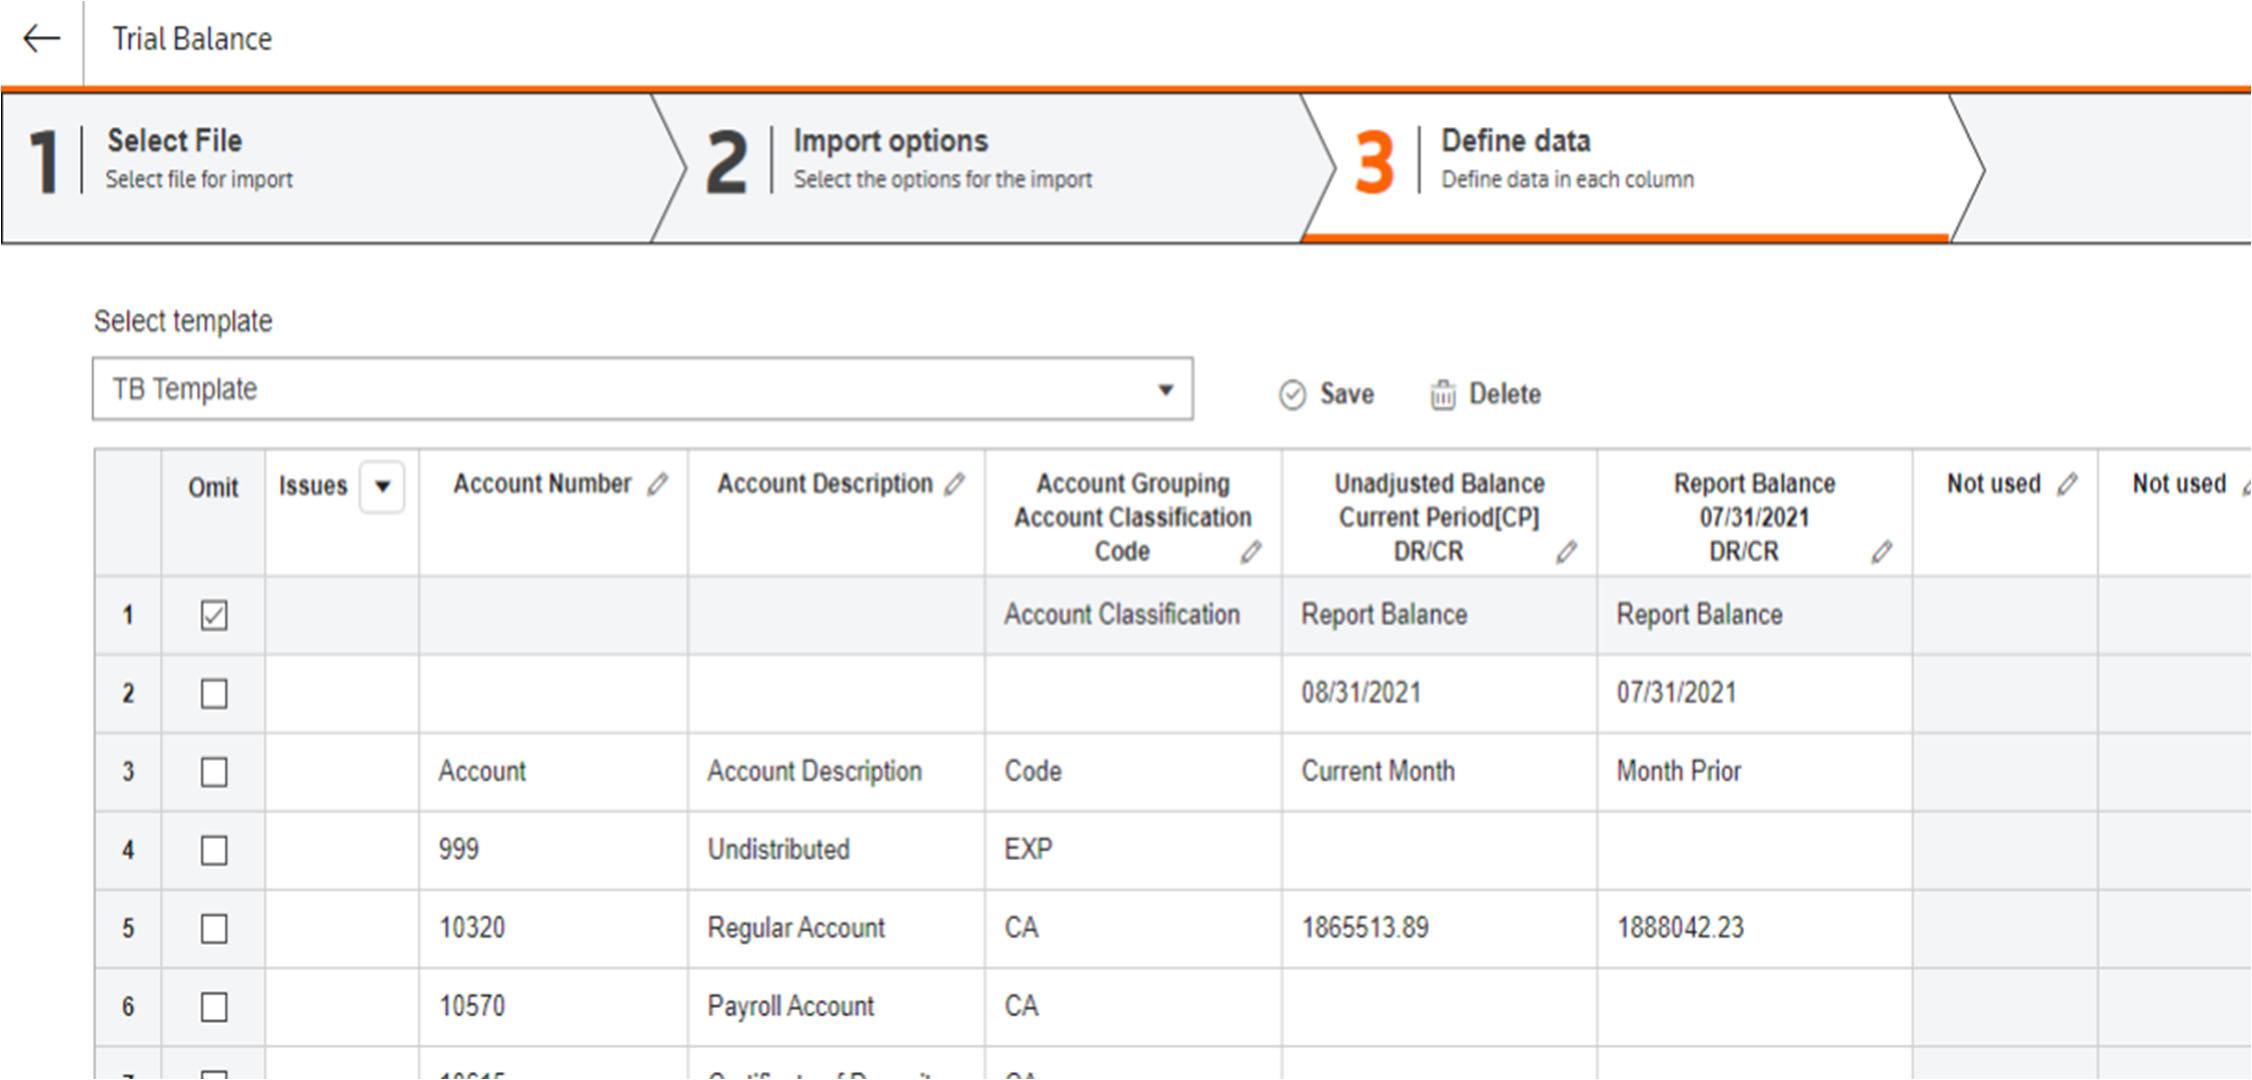
1. Click on the Trial Balance Tab, then Data and Import
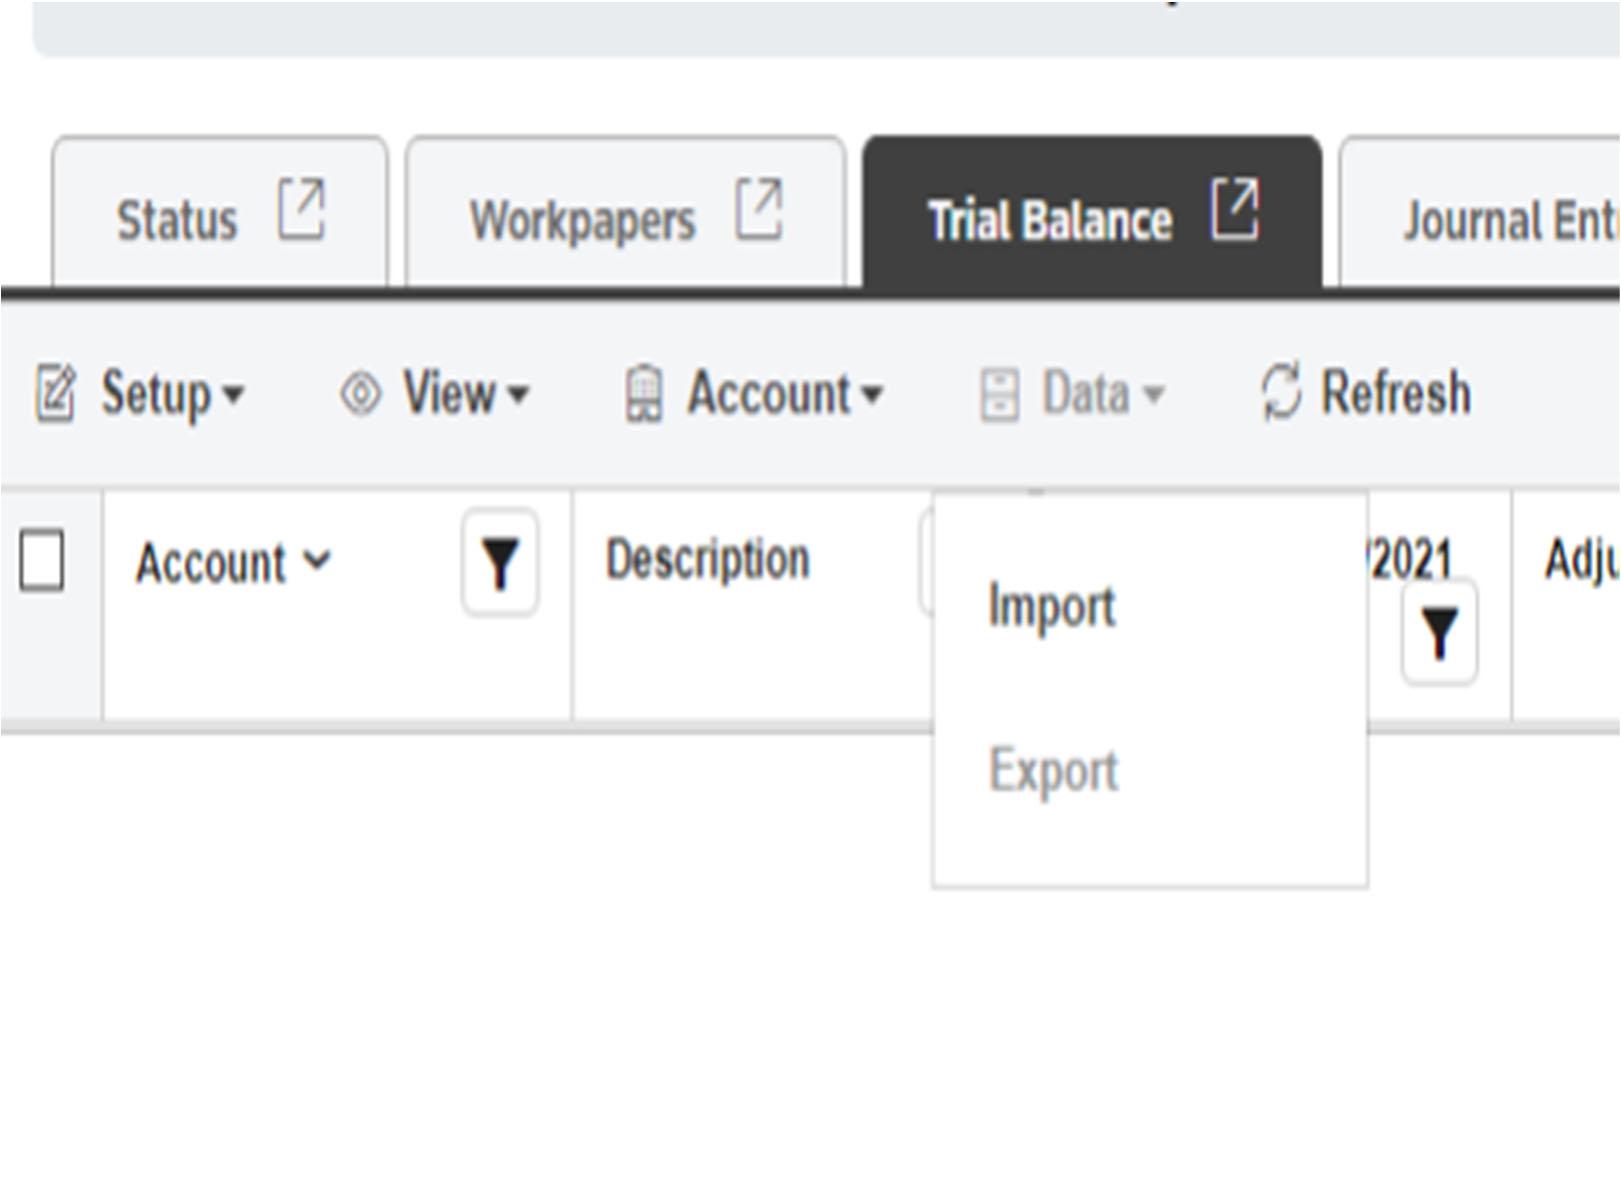
2. Select the file and click on next
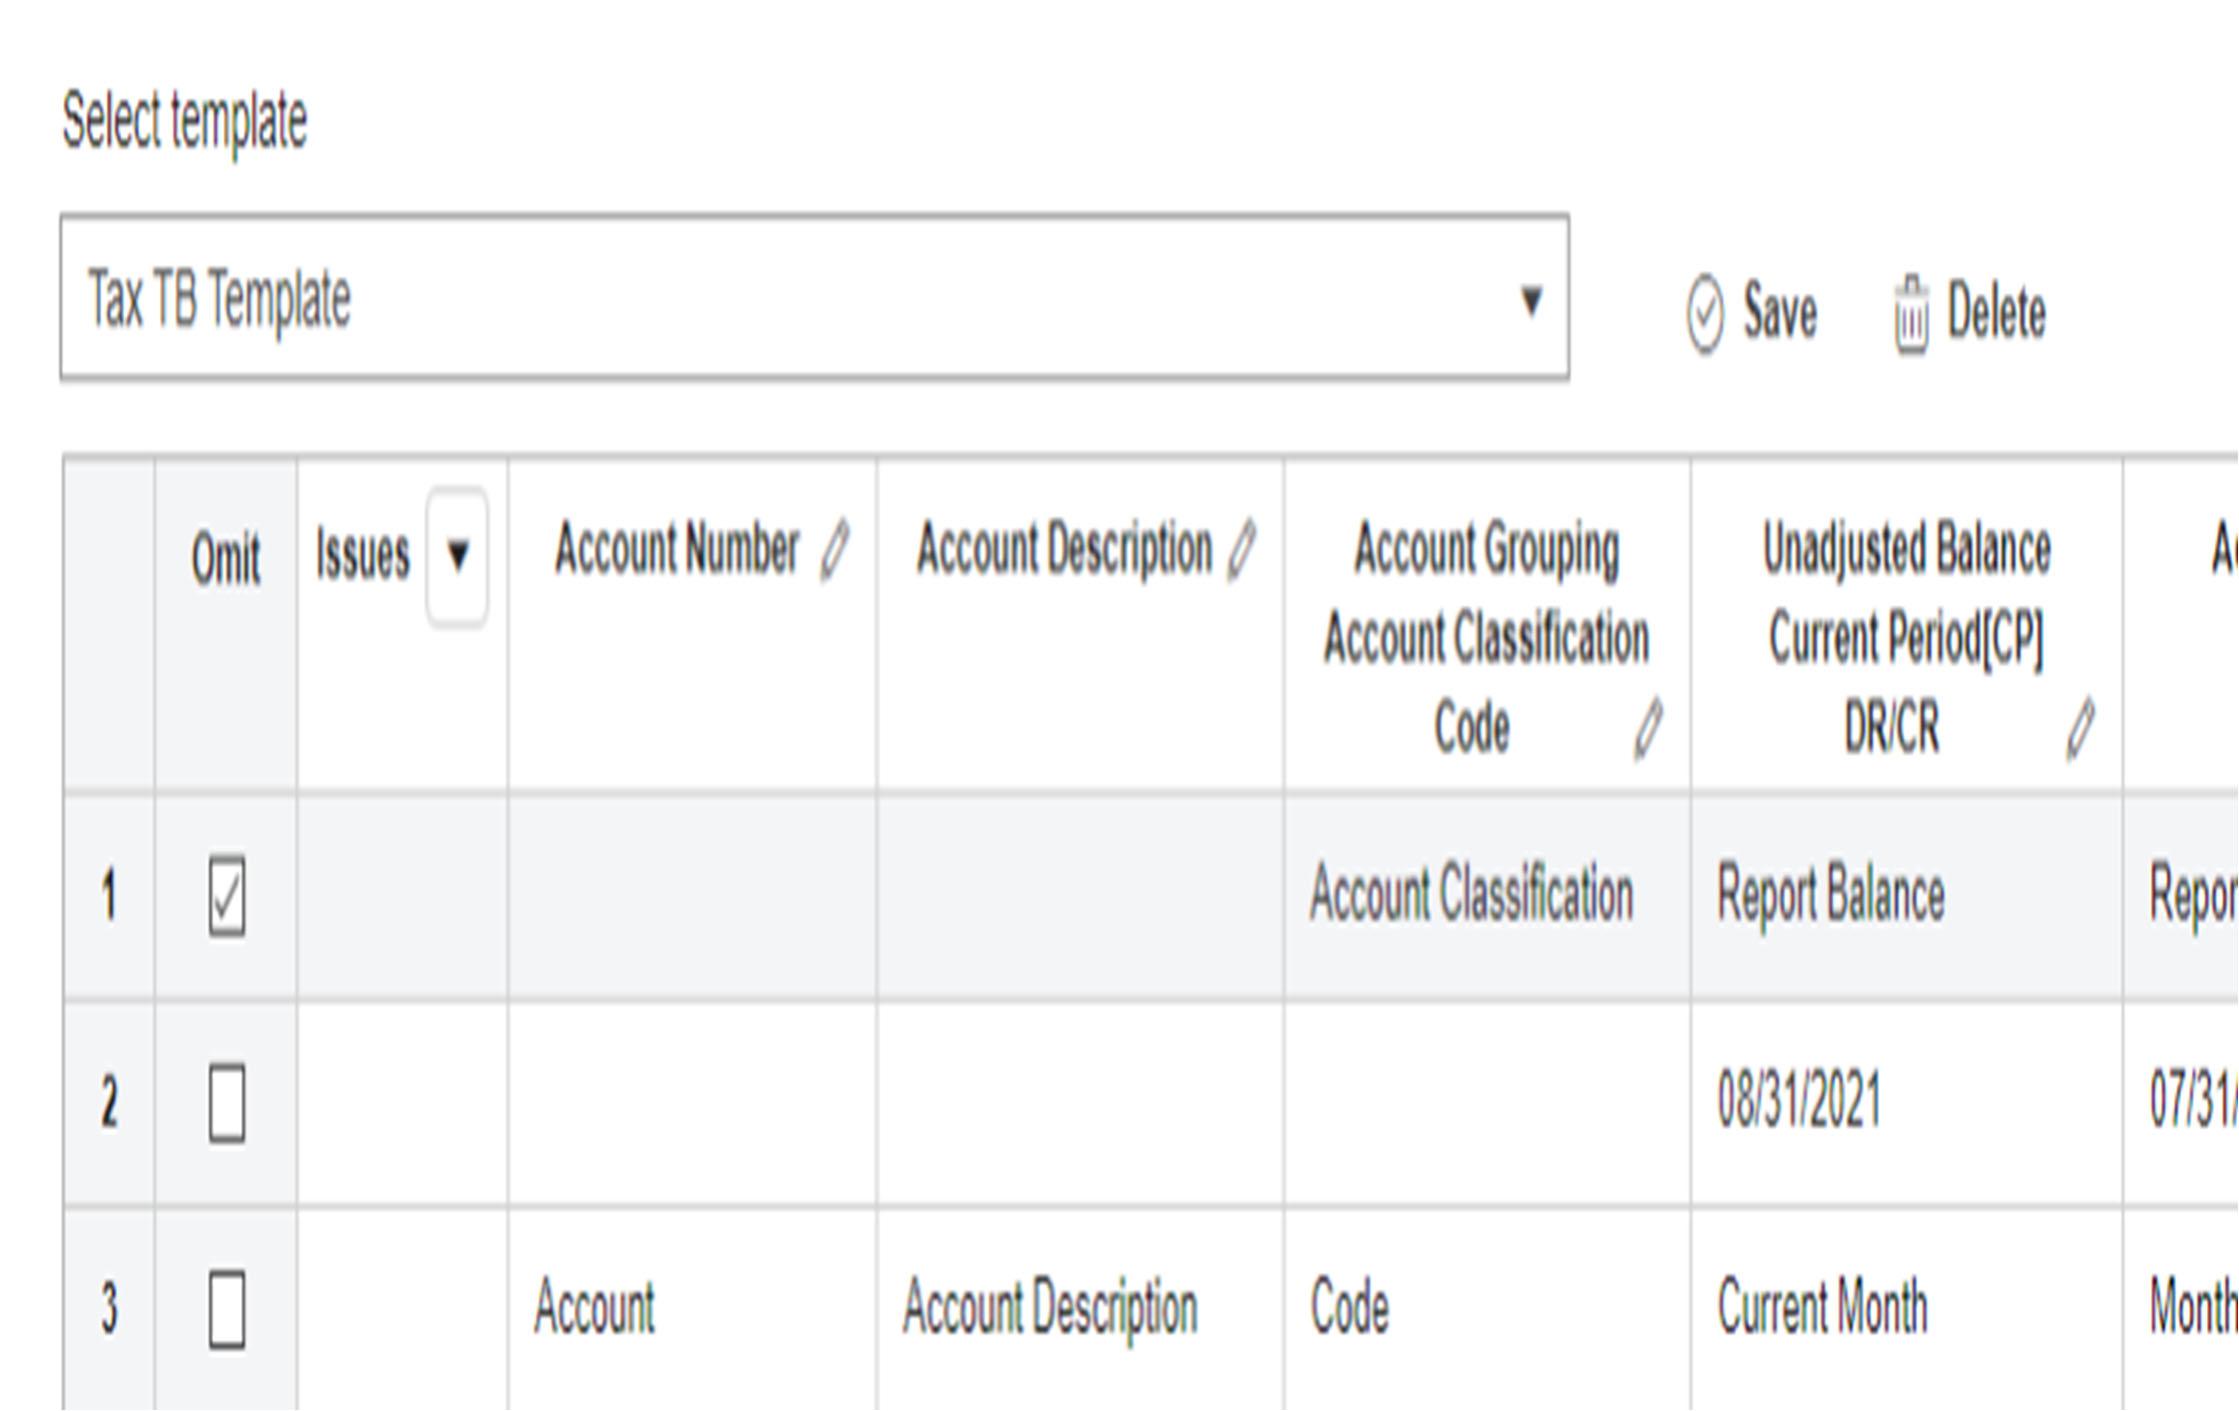
3.The template will be Tax TB Template for Tax Returns only clients. For other clients, create your own template or select from the list of the other templates.
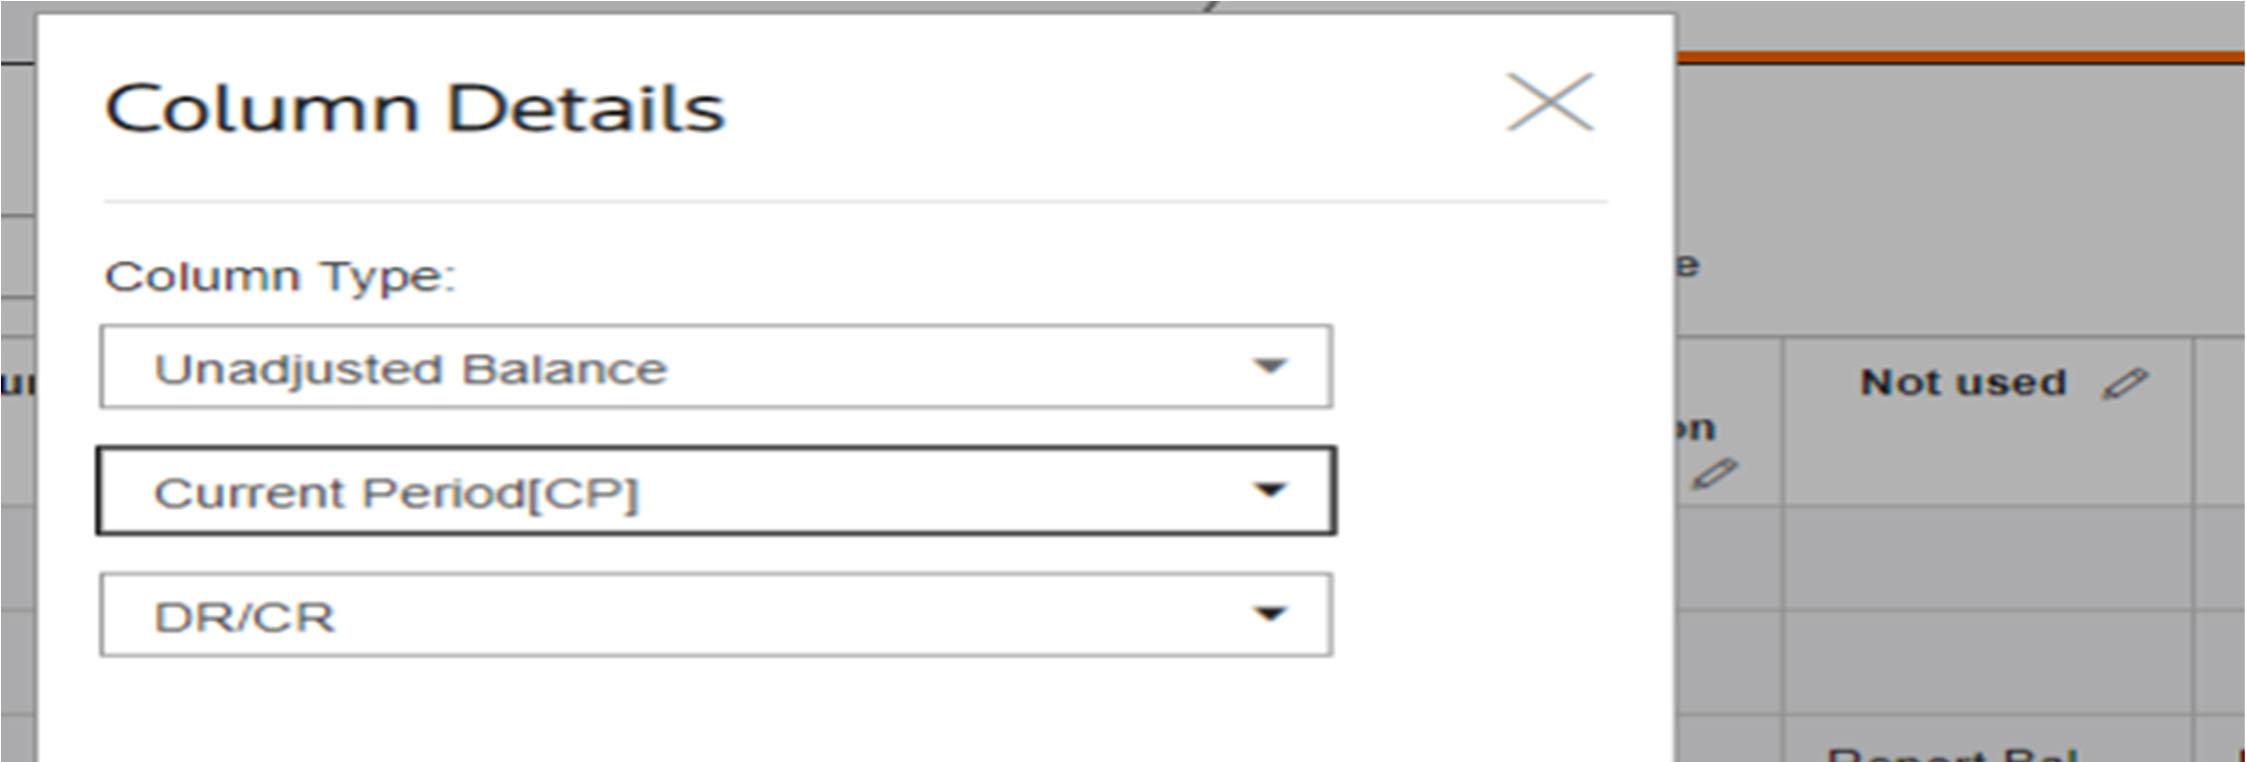
4. To change the header on a column, click on the pencil sign and select “Unadjusted Balance” for the current year and “Report Balance” for the prior year or prior period as an example.

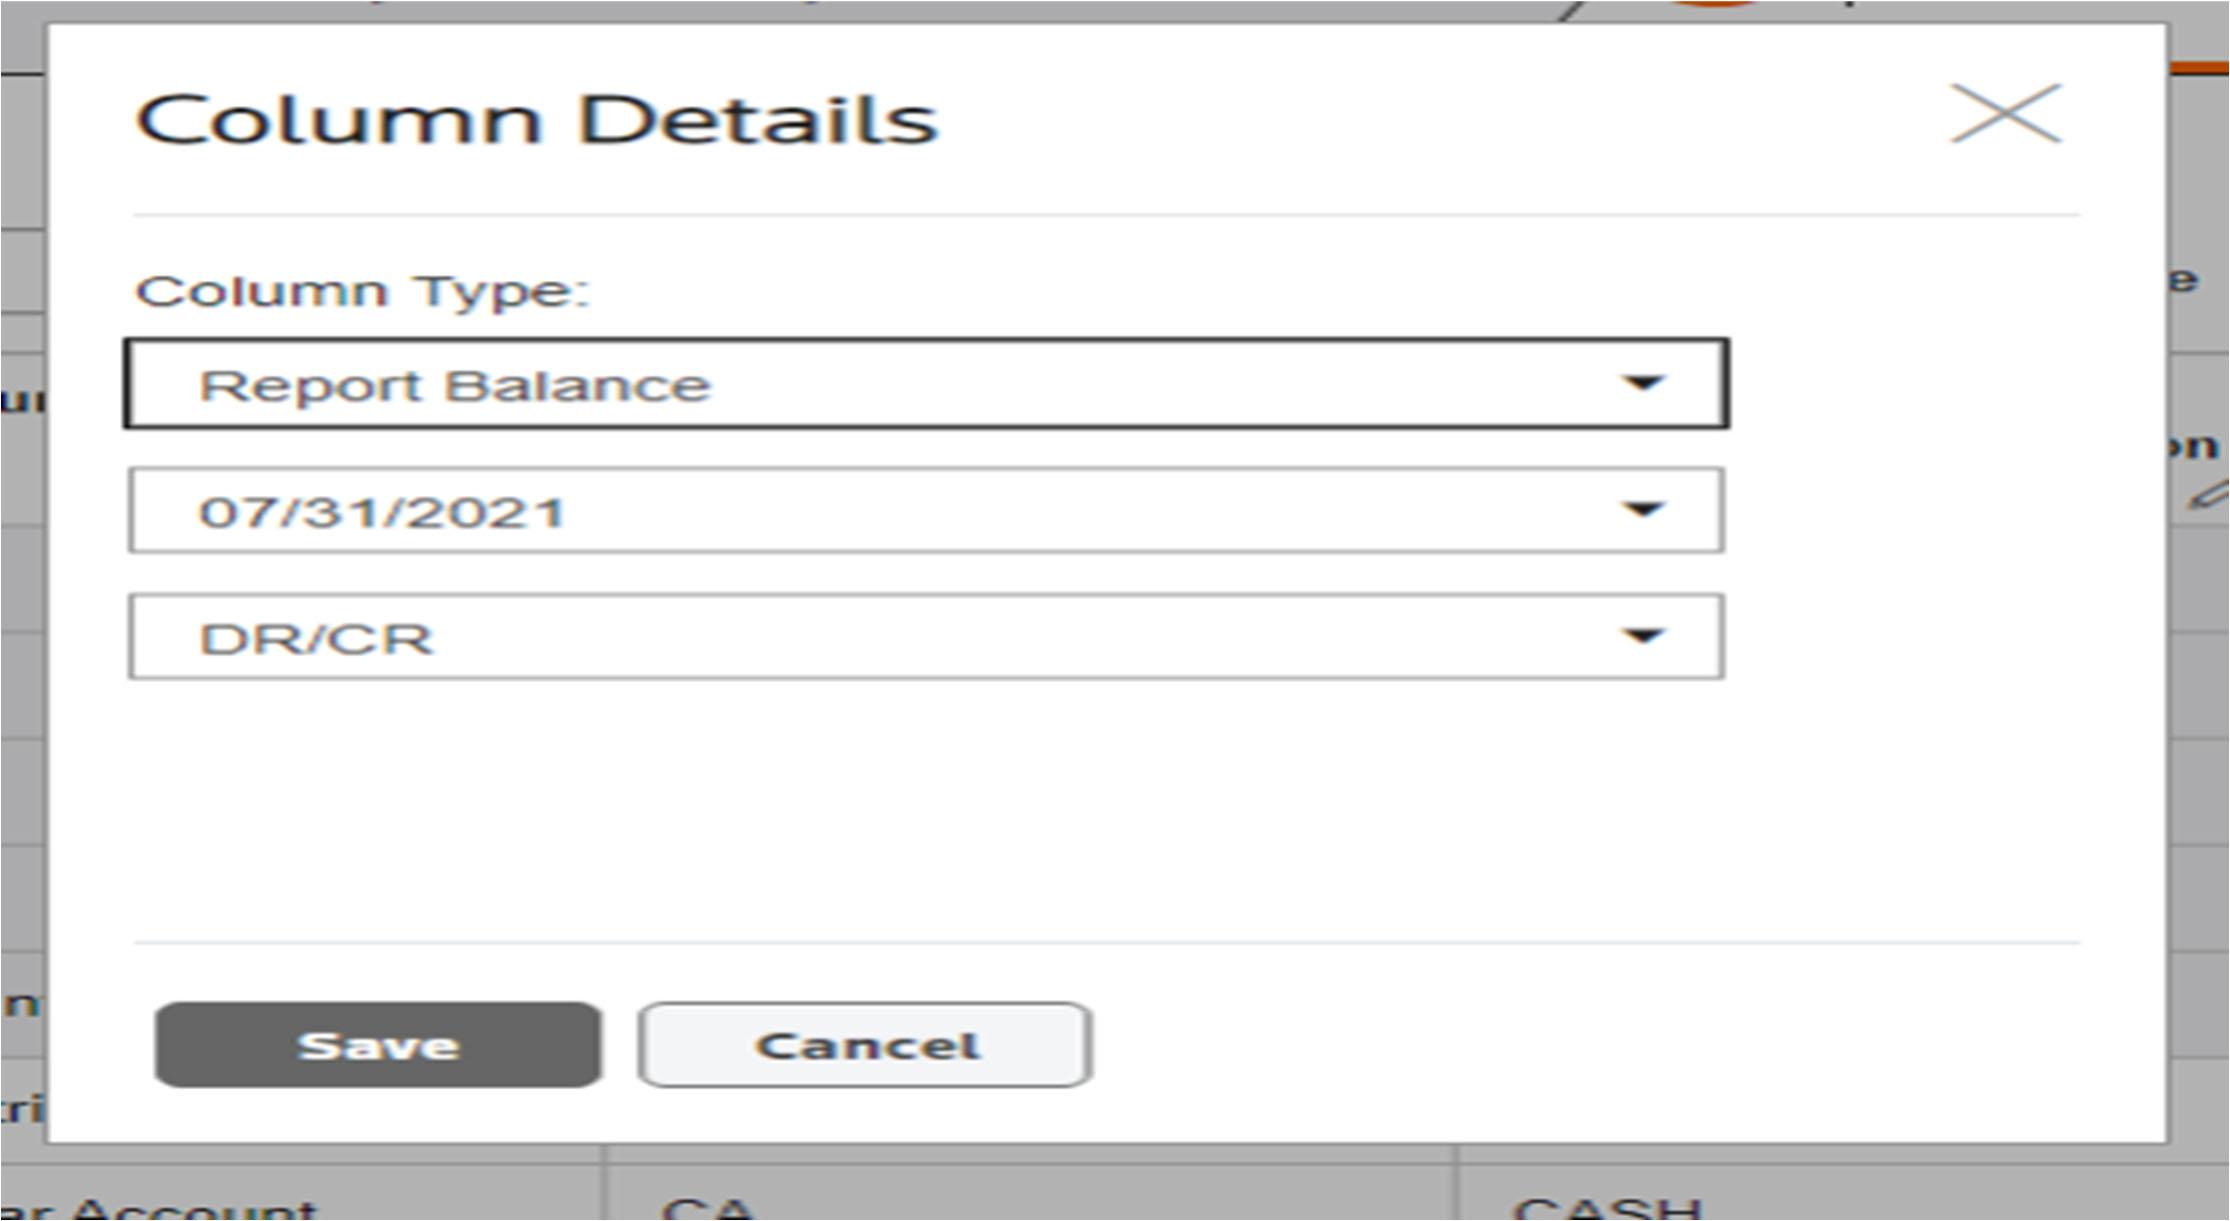
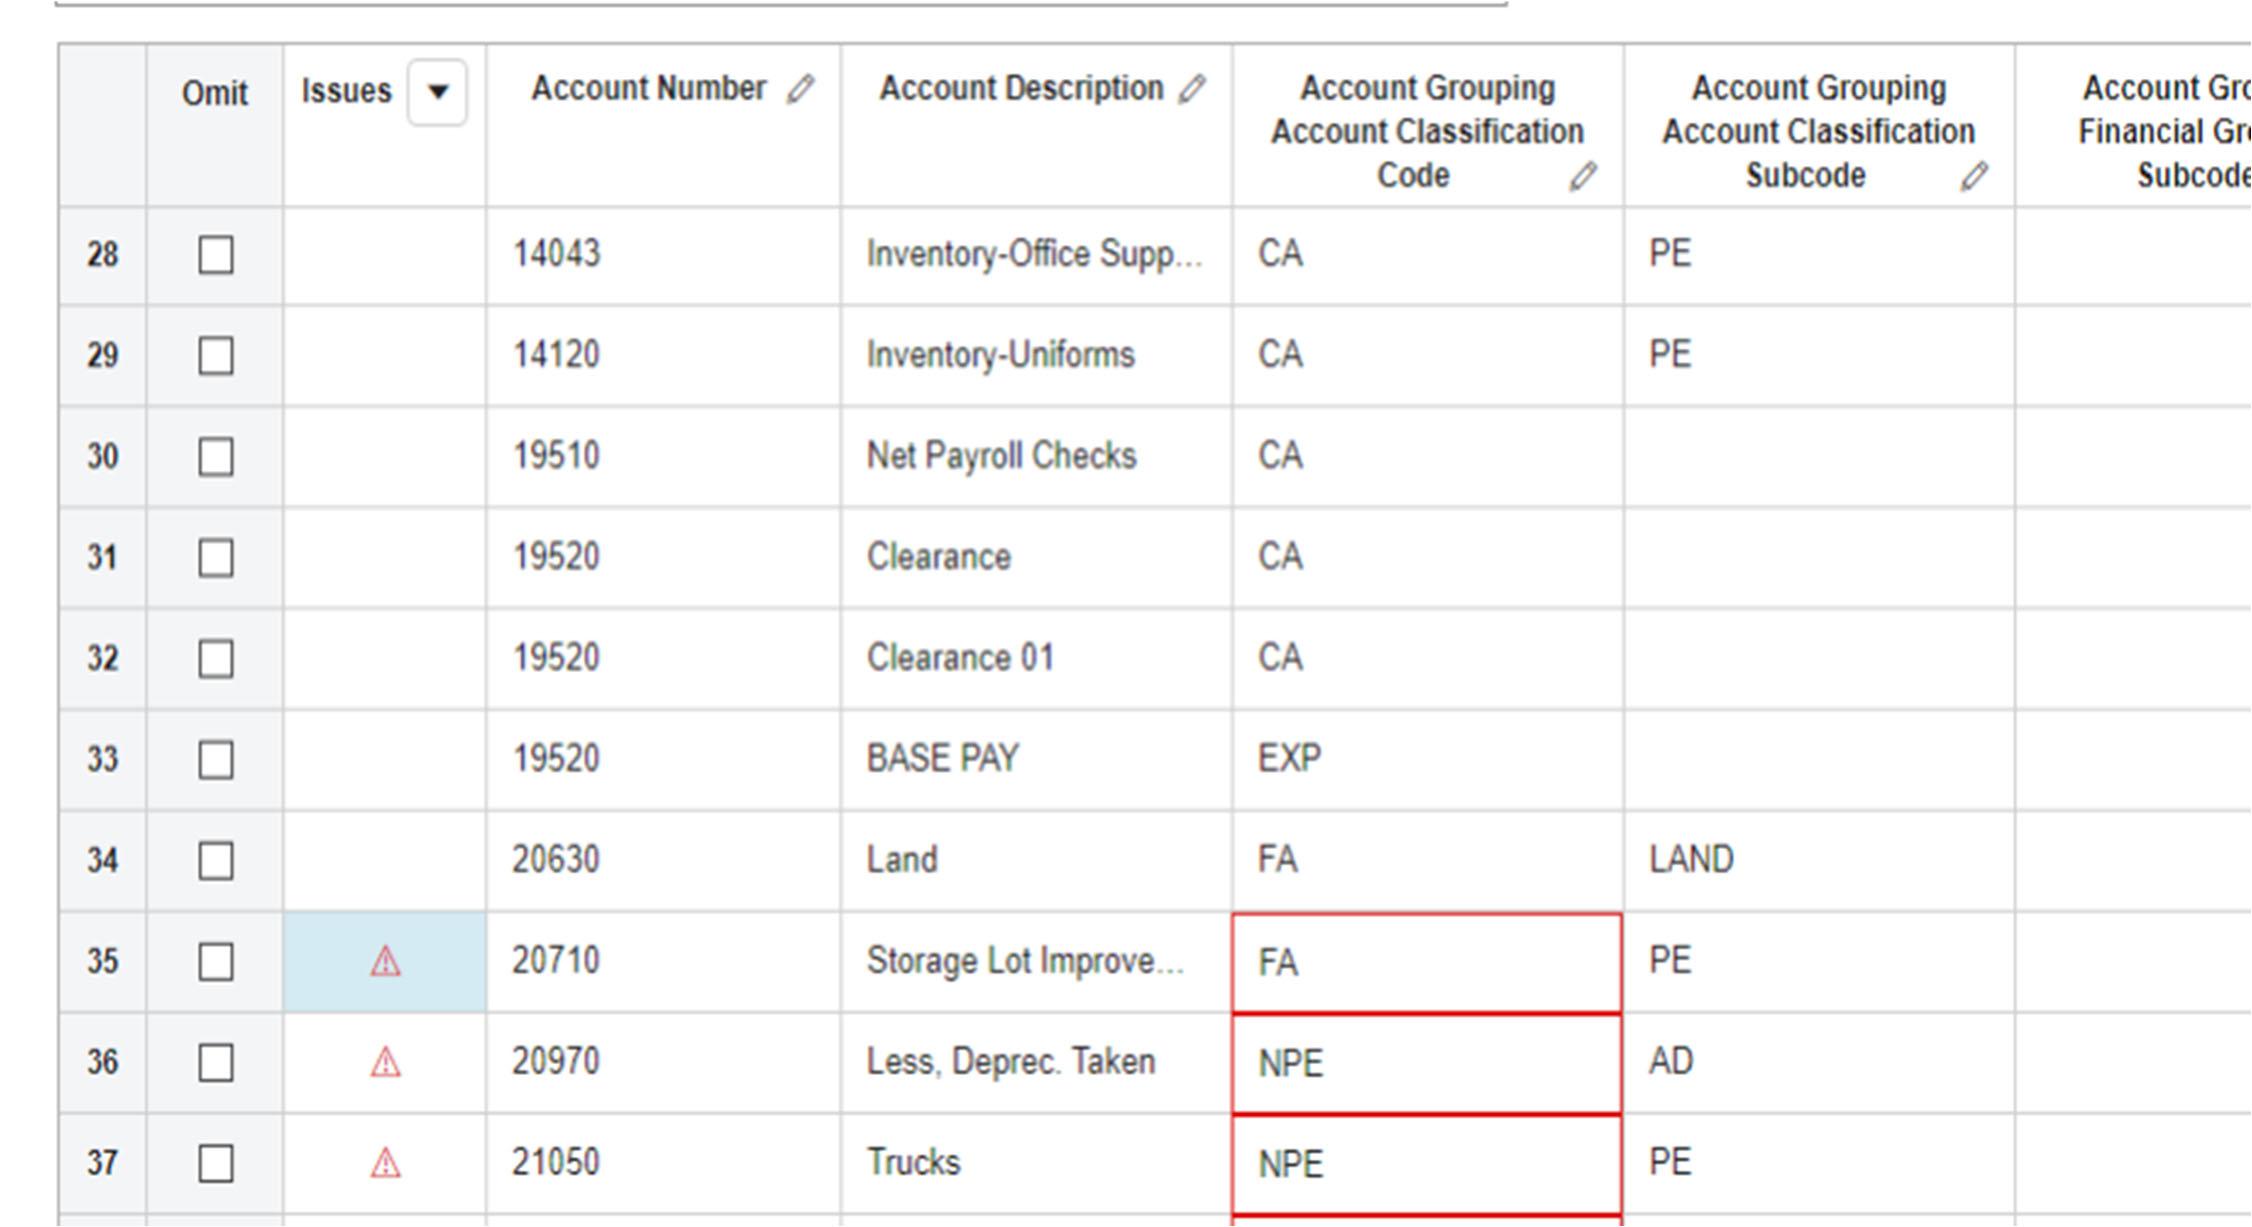
5.This is how the import should look like
PS: Account grouping NPE will be FA. Engagement Manager doesn't recognize the "NPE" code
7.Click on Done and Yes to import the TB


To roll Forward an engagement, right – click on the engagement, select Administration and Roll Forward. Follow the steps. If the prior year balances have not been rolled forward, manually key them in or follow the steps below to import the PY TB.
1. Under the Trial Balance Tab, select Export
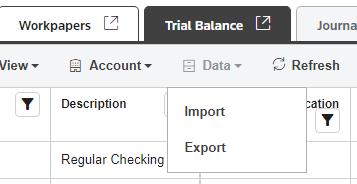
2. Format the exported TB by deleting the columns that are not needed.
3. Refer to the instructions on how to import a TB above and re-import the PY TB balances into EM.
Always start with your book/financial basis Trial balance. Once this is complete with all workpapers tied and traced then move to our tax basis trial balance, if tax basis is different than book. The only workpapers necessary for tax basis are for referencing accounts with different balances. Ex. Depreciation,
We should have a bank rec for all bank accounts. If the client doesn't provide one, then prepare it. Bank Statements will be enough for accounts with little activity.
Review outstanding checks and deposits. Any checks over 90 days or deposits over 15 days o/s should be added to Point Sheet for Manager or Partner to review with client.
In most cases, all Balance Sheet accounts will have a workpaper supporting the balance.
Add all workpapers provided by the client for the current year to the binder
Workpaper numbering should be the account number it supports and is linked toon the trial balance. Additional supporting work papers for the same account are the number followed by a “space” and capital letter.
o Ex. 1000 A
Roll forward all PDFs that still tie to accounts (example amortization schedules)
Any excel workpapers that roll forward from the prior year need to be updated to reflect current year activity and year end balances
Review prior year workpapers to make sure all appropriate workpapers rolled forward.

All linked workpapers should have a showing the number that traces to the Trial Balance
Carefully review workpaper to make sure they have correct dates and all notes are accurate.
There are two programs that we pull the depreciation report from Gosystem- Our tax software
Fixed Asset CS
-very few clients are still in Prosystem fx- If you don't recognize a workpaper, contact your manager or add to point sheet.
For QB only client - Make adjustments in QB before pulling TB – Numbering should be AJE 01 and the name should be “GW CPA LLP”. You will have to add as an other name in QB.
In EM- Using Journal Entry tab
Ref- start w 01 ex. AJE 01 or TAX 01
Type- Adjusting
Description- Required
Workpaper Reference- optional but helpful for next year
May need to scroll up for save button to show up
AJE suggestion- Print prior year AJEs and mark up with proposed changes
Print Adjusting Journal Entry Report when done
On Workpapers Tab
-Create Report
-Report Type- Journal Entry
-Choose Type- Normally Adjusting
-Print to PDF
If you have tax adjustments where the tax trial balance is different than your book, then you will have to do the same steps and use the Federal Tax Adjustments and Trial Balance.
Before sending for first review, make sure you have signed off on all workpapers in the AVF engagement binder. The list review makes it easier to see. Also, put your initials on the excel TB next to the workpaper reference (PY had checkmarks).
PROCEDURES | 15
Compilation Template Example
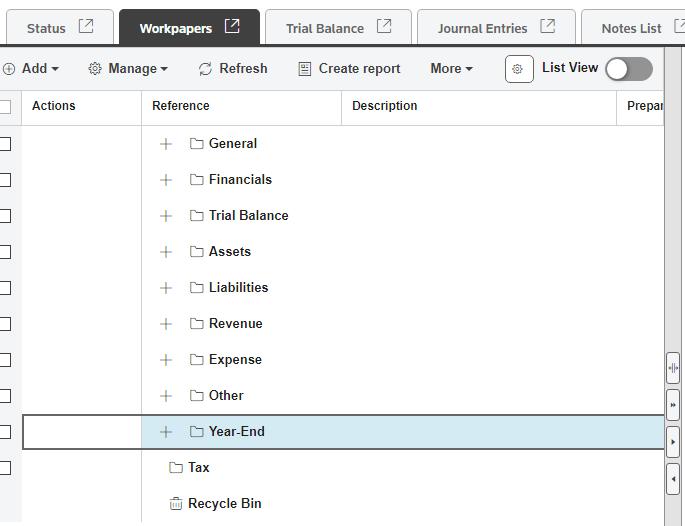
Tax only Template Example
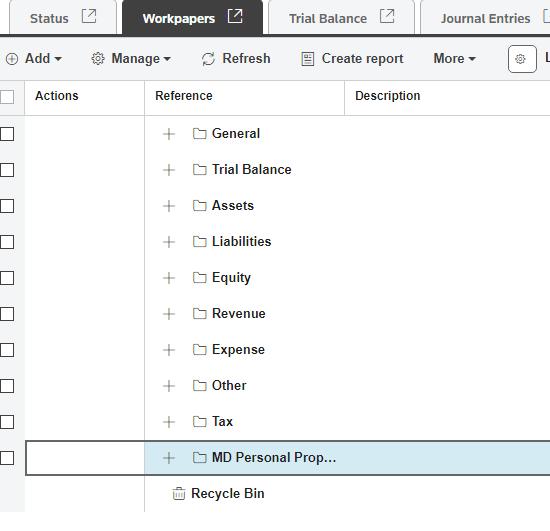
1. Under the Workpapers Tab, click on the link for Guided Assurance (see below)

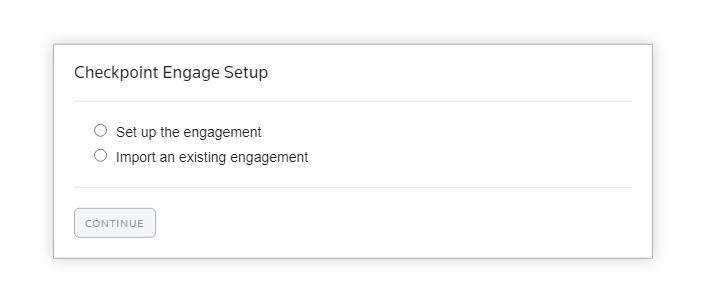
2. Select Set up the engagement
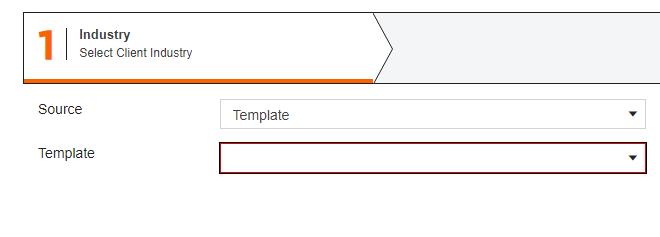
3. Select the Template applicable to your client, Audit, Review or Compilation and click on Done.
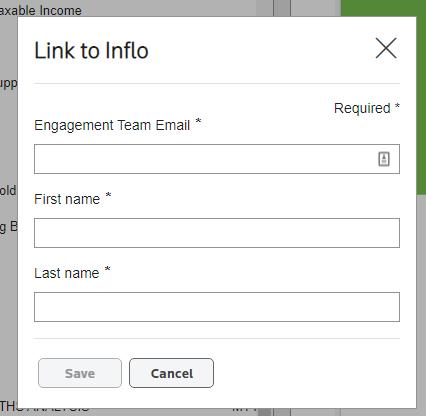
Link Inflo (Additional Details can be found under the GW Resources engagement in EM – Client #95010)
Under the Workpapers Tab, select either New or Existing engagement
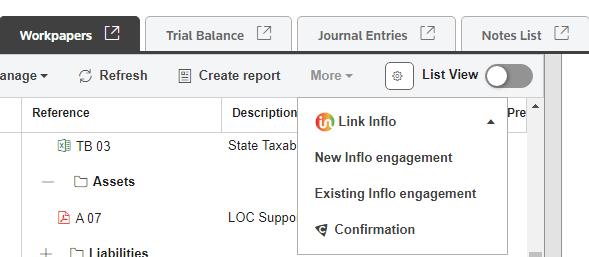
Most of the time, new engagements will be selected. Enter Engagement Team Email, First and Last Name and Click on Save. Follow the rest of the instructions to link Inflo to EM.
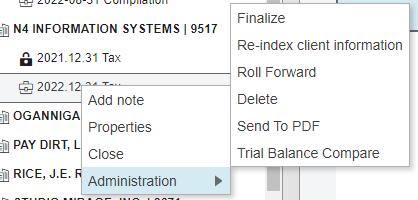
Right click on the engagement, Administration, Finalize and complete the other steps required.
To sign off on more than one workpaper, select each workpaper, right click and click on sign off. Same rule applies if you want to delete more than one workpaper at once. To open more than one window, do a right click on the window and select duplicate.
ENGAGEMENT LETTER
MANAGEMENT REPRESENTATION LETTER
You can roll from prior year if you make sure you pull in templated workpapers from the GW Template. This is for EM Trial Balance Clients Engagements. All others like payroll and 1099 should create a new engagement each year with the GW Templates
STORED IN EM WORKPAPERS AND MUST REINDEX DOCUMENT TYPE IN GFR FROM WORKPAPER TO “ENGAGEMENT LETTER”
STORED IN EM WORKPAPERS AND MUST REINDEX DOCUMENT TYPE IN GFR FROM WORKPAPER TO “MGMT REP LETTER”


Log In To Inflo……..…...........……………..…..…2
Create an Engagement from EM...….…...…..3
Create an Engagement from Inflo………......7
Upload files to Inflo…………….........…….…….8
Download the files ………........………………..10
Inflo is a software used by GWCPAS to request information from clients. This guide provides a step-by-step process on how to use it.
Log in to Inflo
1.Click on the link below https://identity.inflosoftware.com/account/login
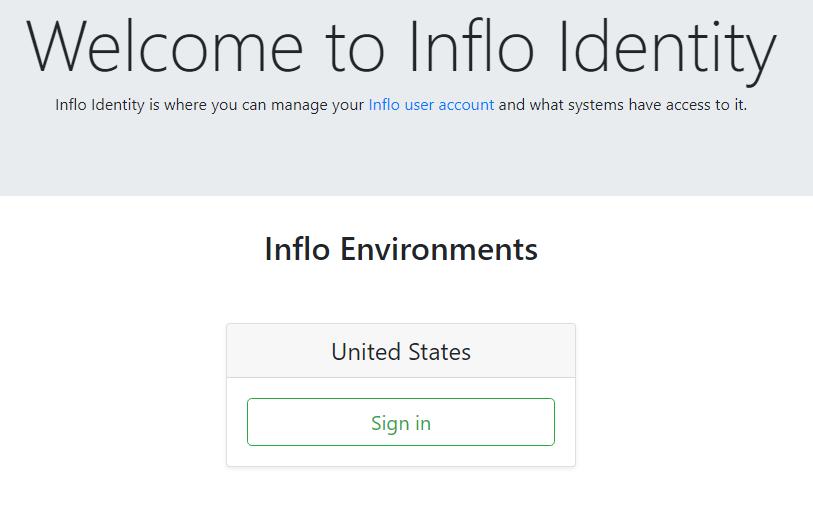
2.Enter the email address and password and click on Sign in. Click on Sign in again if the screen below pops up
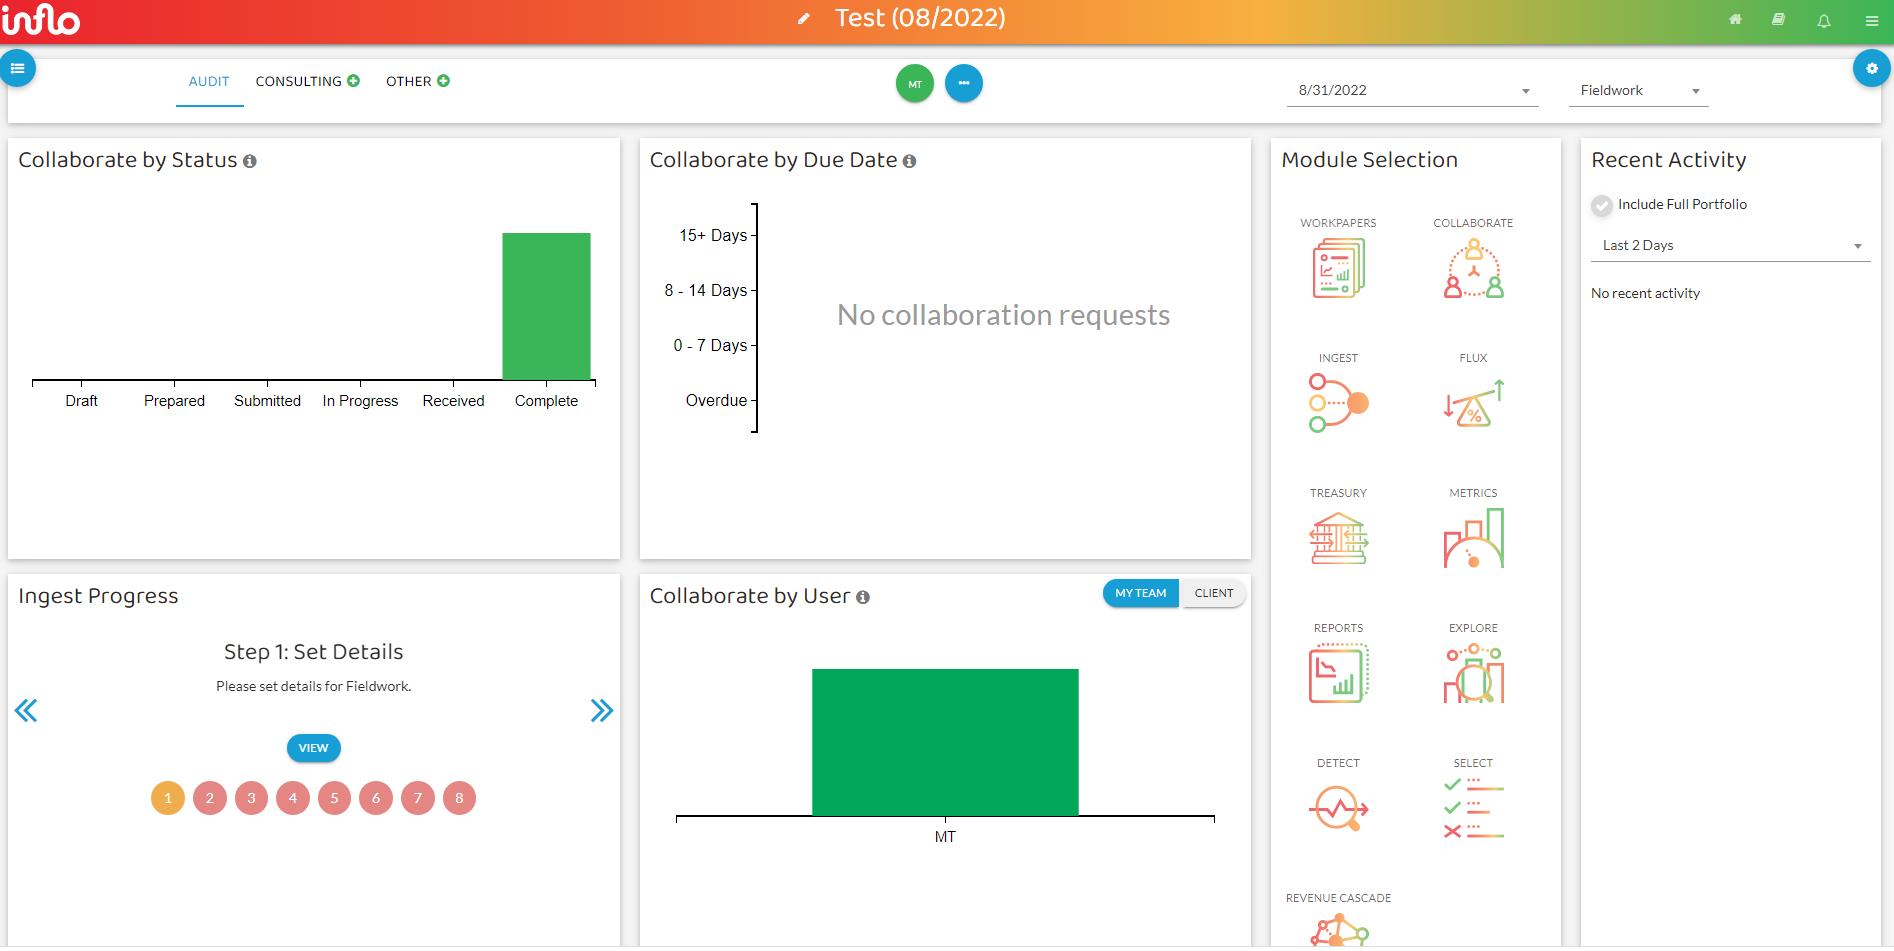
3.This is the main dashboard
Create an engagement
From Engagement Manager
1.Under the Workpapers Tab, select either New or Existing engagement

Most of the time, new engagements will be selected.
2.Enter Engagement Team Email, First and Last Name and Click on Save.

3.Complete the verification process by clicking on Click here to review. Sign in and complete the Engagement Setup in Inflo.
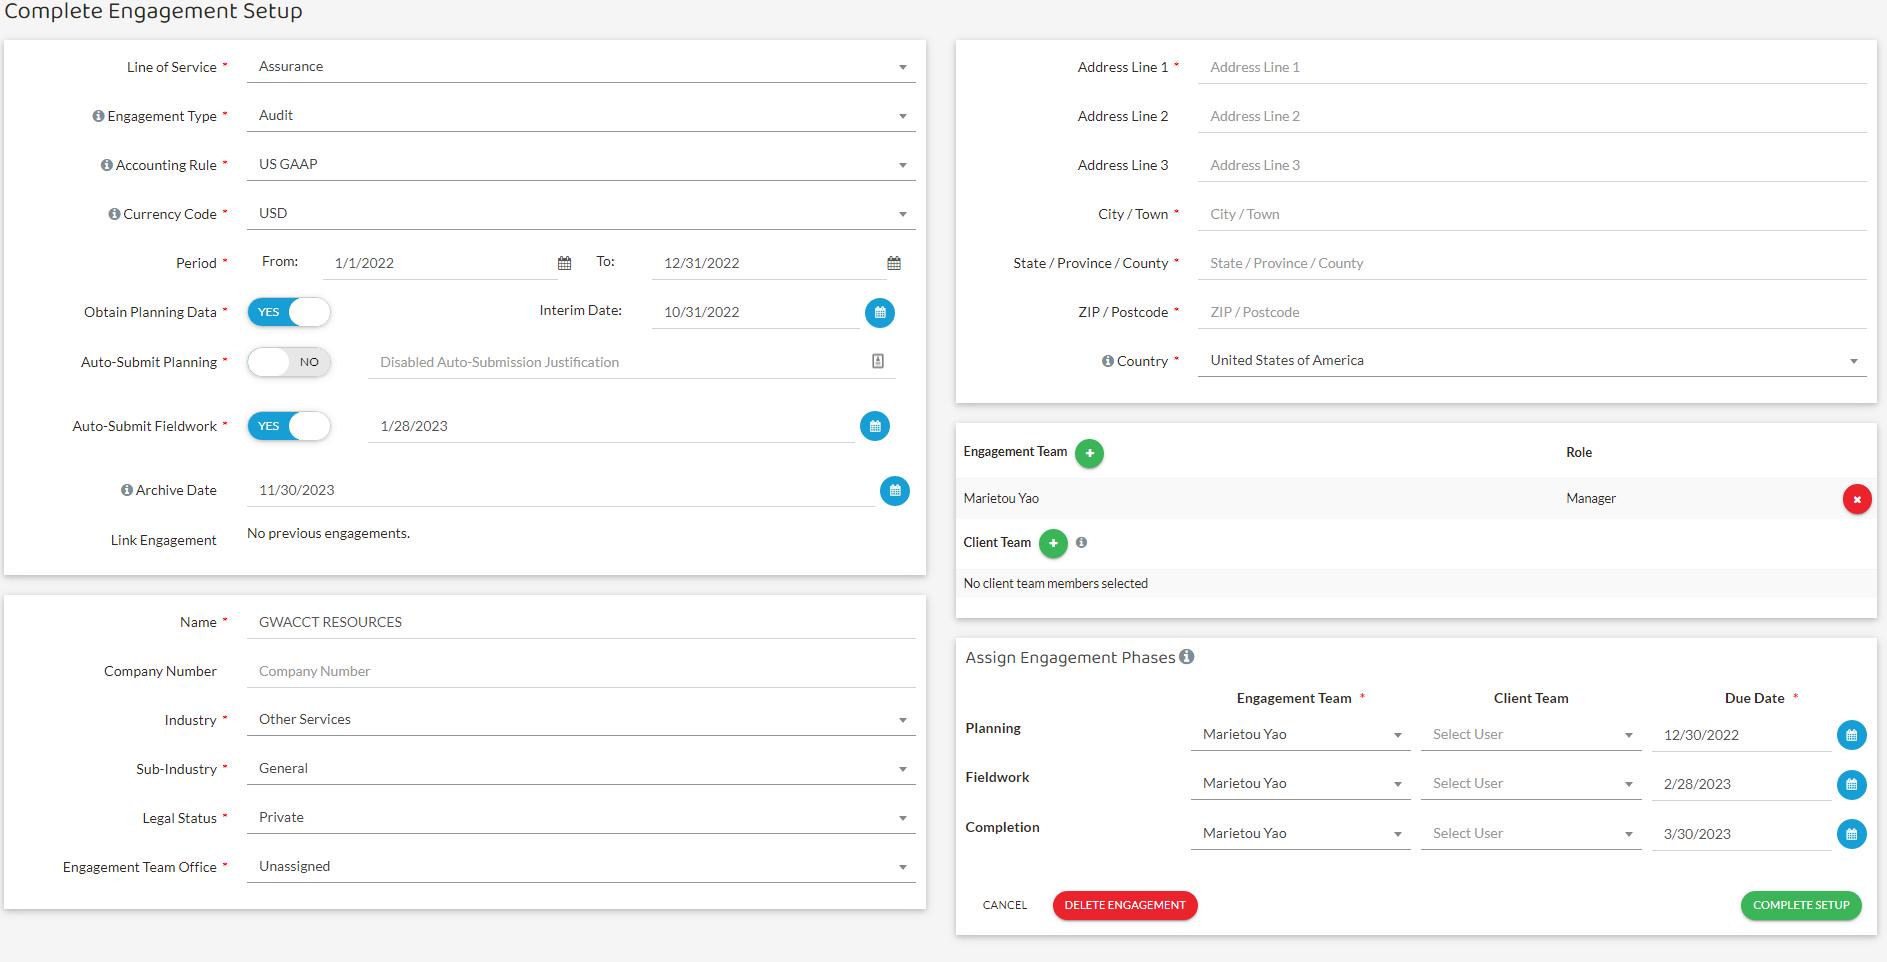
4.This is the main dashboard. Click on Collaborate under the Module Selection Tab.
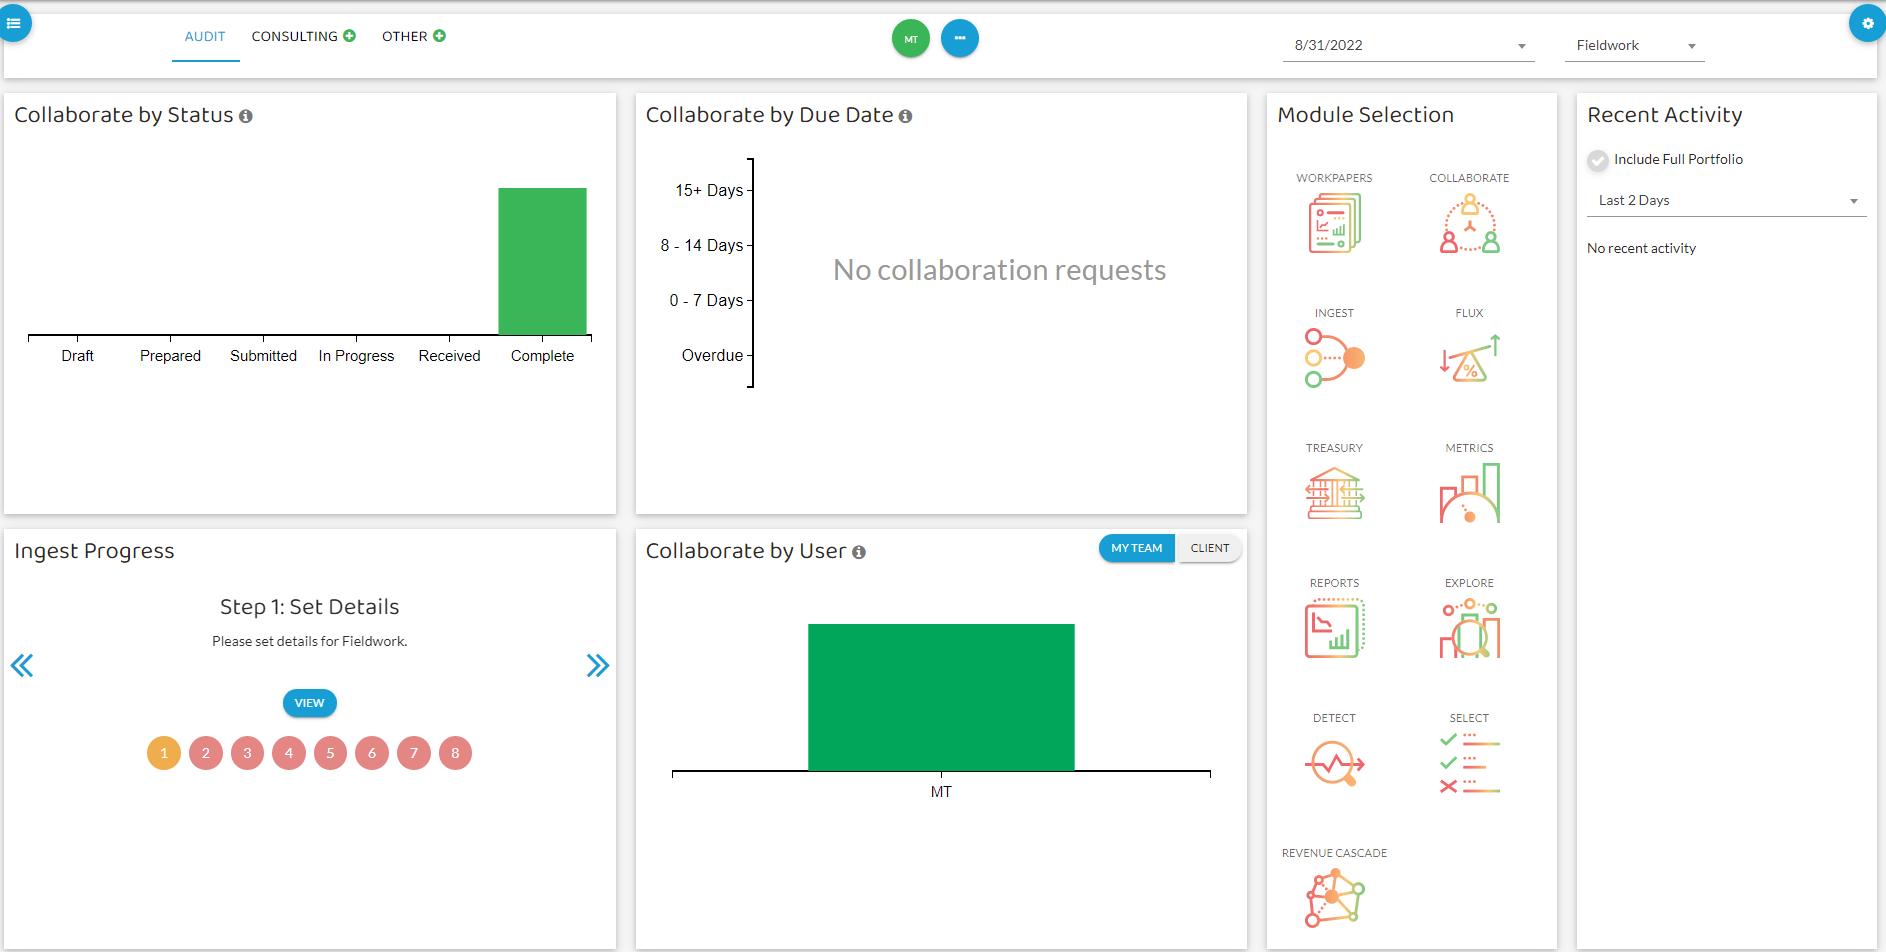
5.Click on Unlock Fieldwork, Unlock, and now you are ready to add requests.
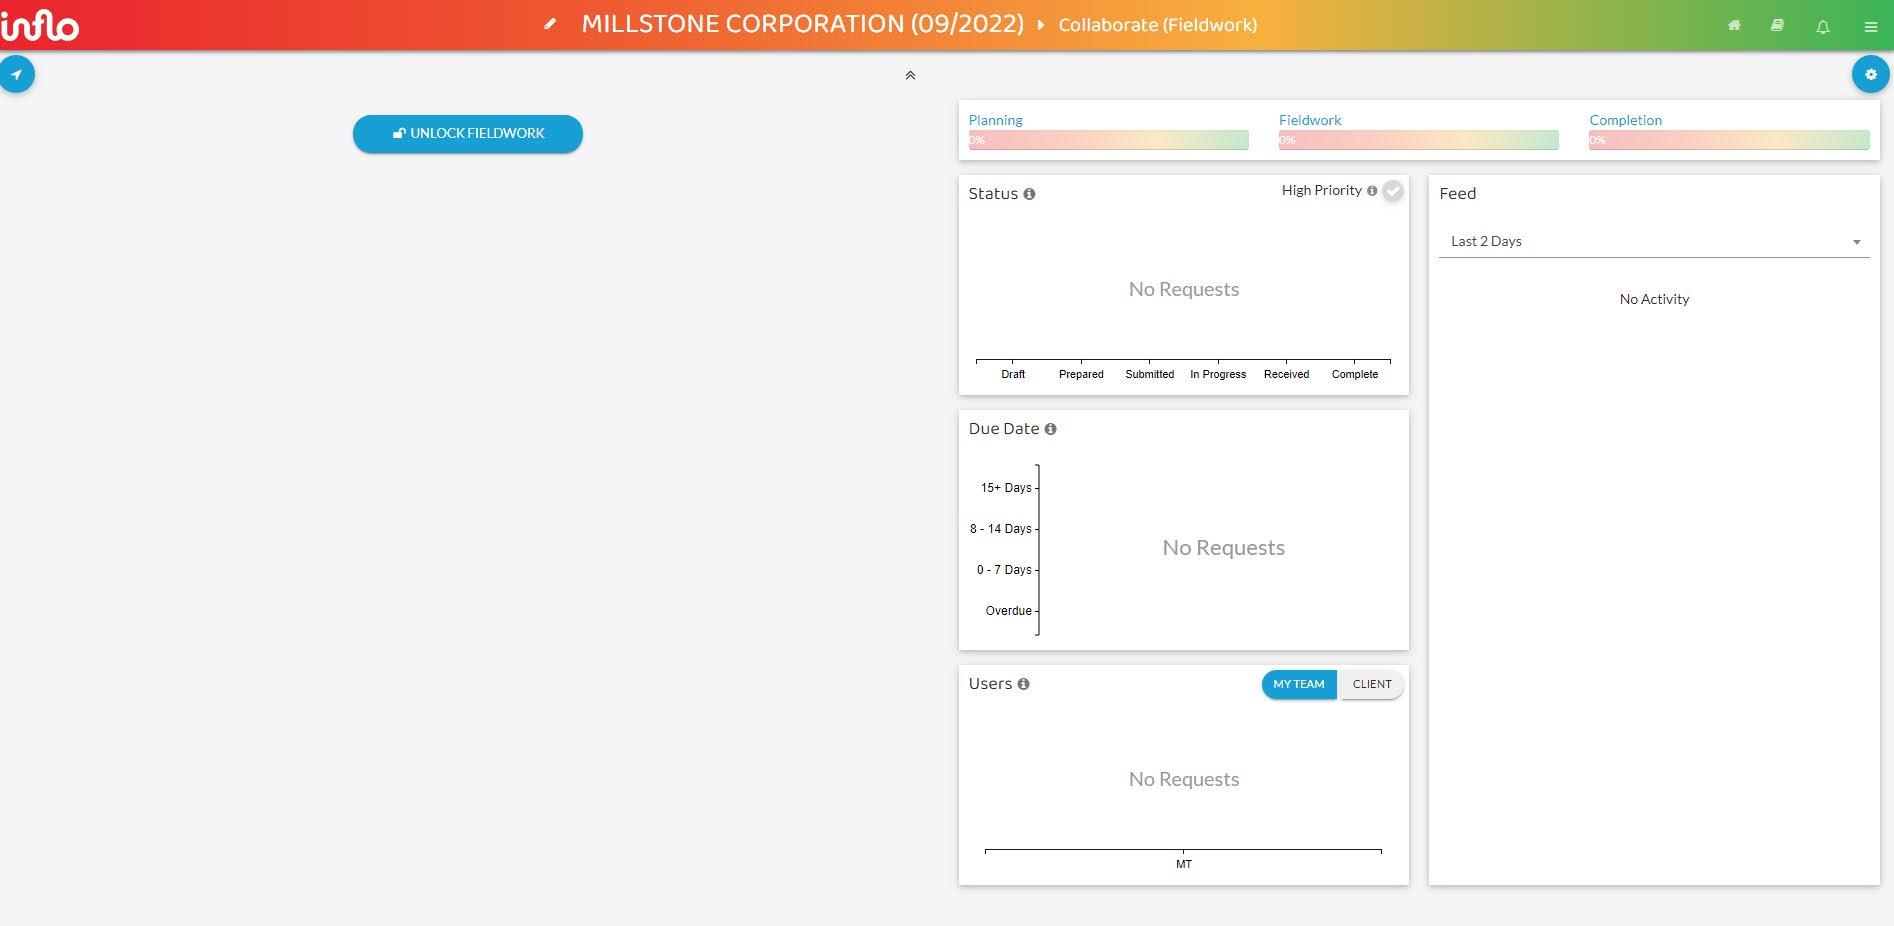
6.Click on Add Requests. There are four options.
Generate using Inflo’s Template
Copy from engagements (to copy from prior period/year engagements)
Import from spreadsheet Add Individual Request
7. If you select Additional Request, click on Create Request and follow the instructions.
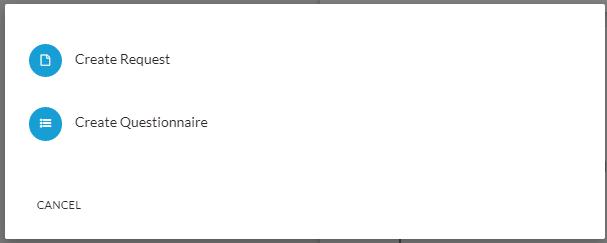
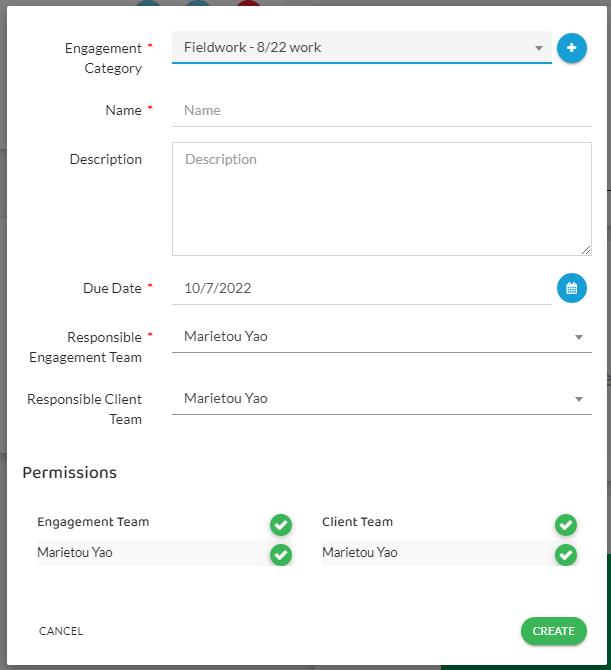
8.Once the main request has been created, you can click on it, which will open this window below. Click on Create Related Request to add other requests under the main one that was created earlier and then on Submit to Client. If you are not ready to submit it to the client, then select Cancel
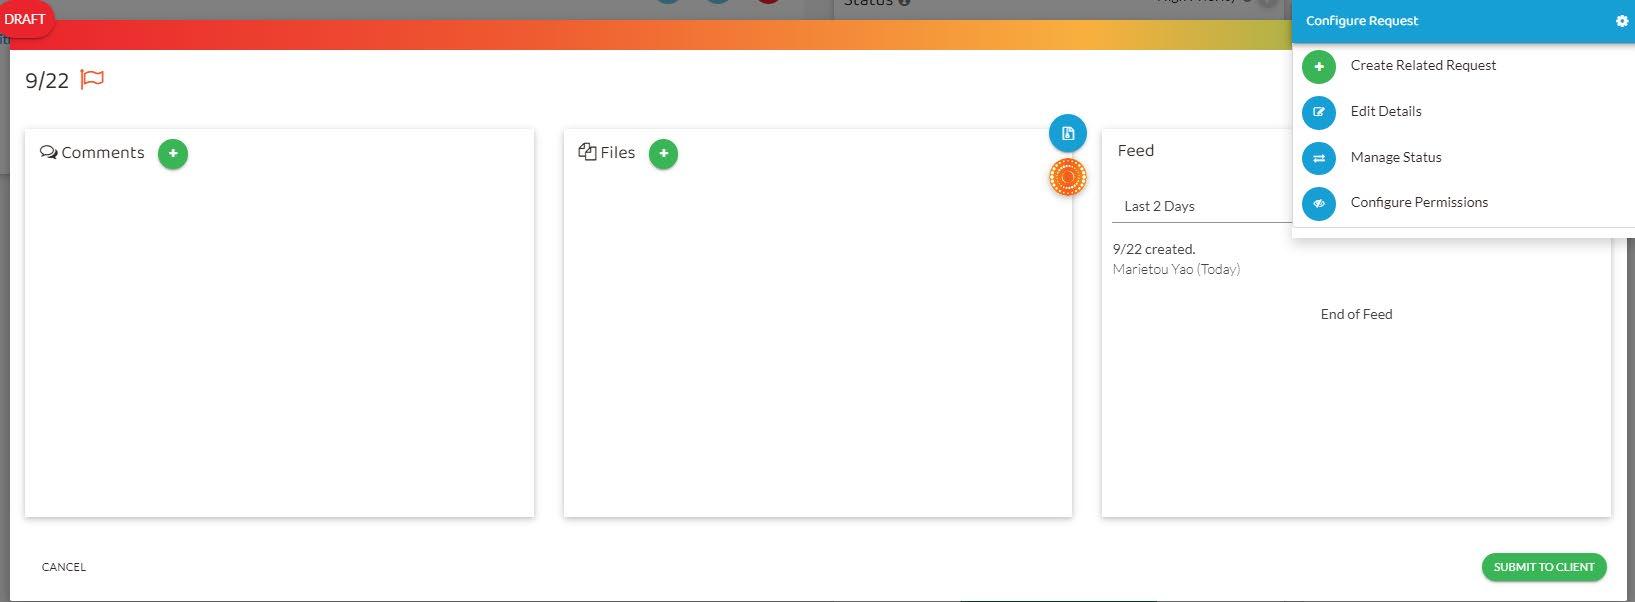
1.Click on the blue icon
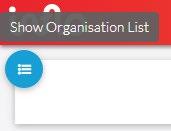
2.Click on the green + sign to create an engagement

3.Fill out the required fields

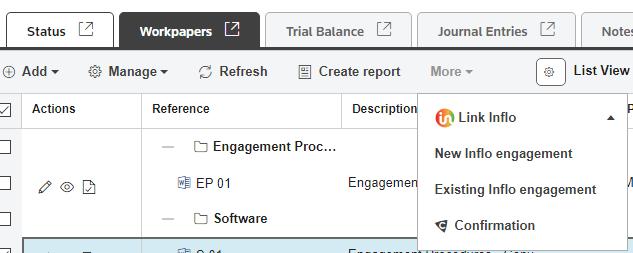
4. Once the engagement has been created, go back to Engagement Manager. Click on the engagement, under the workpapers tab select More, Link Inflo and Existing Inflo engagement. Follow the instructions.
Once the engagement has been created and the request submitted, the client will follow a few steps to upload the documents requested.
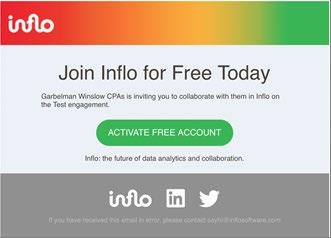
Step 1: The client will receive an email from noreply@inflosoftware.com. This is how the email will look like. The client will click on “Activate Free Account” and follow the steps to create an account.
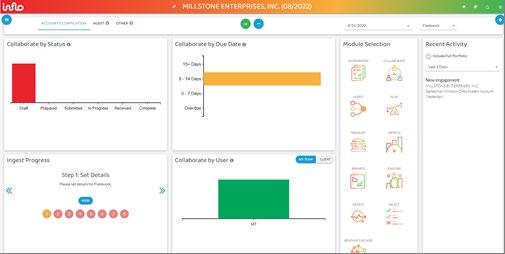
Step 2: Once the account is created, this is the dashboard they will see. They will need to click on Collaborate under the Module Selection to upload the files
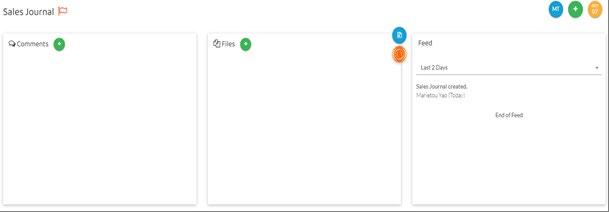
Step 3: They will need to click on each request to upload the files. In the picture below, the client will have to click on Sales Journal and then on Files to upload everything related to that request.
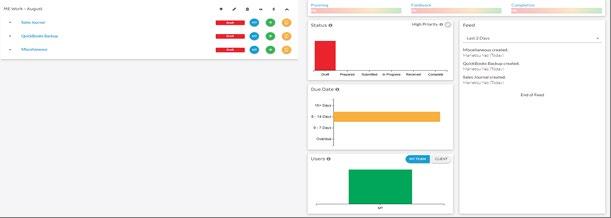
Step 4: Repeat step #3 for the other sections
Download the files
1.Log in to Inflo. From the Collaborate screen, click on the request and either download the files to your pdf folder by clicking on the three dots next to the files or on the orange sign to automatically download the files to Engagement Manager.

2. If you decide to export to Engagement Manager, then click on Confirm after selecting the files you want to download.
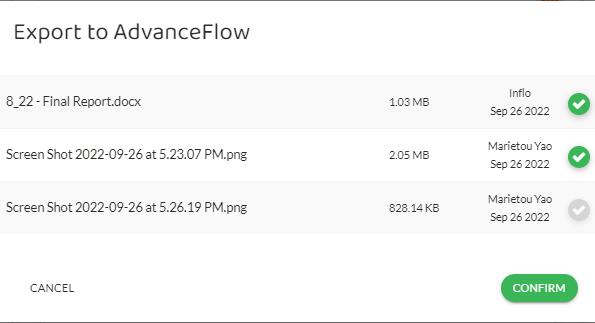
3. Once the files have been downloaded to EM, you will need to update the workpaper reference and move them under the right folder.

NEW IN 2023: Each client should only have 1 annual engagement. Monthly and quarterly request should be done under this annual engagement. You will just need to create a request each month or quarter.

This guide should be used to prepare tax returns in Gosystem. The instructions are based on 1065 returns.
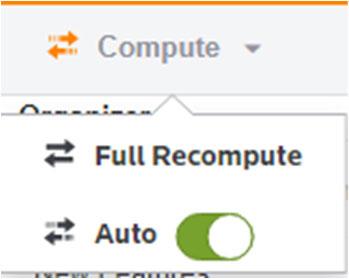
1. Have tax codes uploaded or key in data into Gosystem organizer (MAKE SURE THE RETURN IS ON AUTO COMPUTE). (If you have multiple “activities”, i.e. rental properties, farms, we are discouraging tax codes for 2022 Tax Year).
a. If you imported tax codes look at the following items
Farms- Tax Codes came in as accrual basis
Amortization & Depreciation- Watch out for duplicate deductions if using Gosystem for Depreciation Calculation
Interest Income- came in as Federal Taxable
b. Add Equity Account info-
Contributions and Draws
Partner Information/Partner by Partner Data/Columnar Partner Entry

c. Key in Estimated Pymts and Extension Pymts if applicable
Ex. Organizer/States/Maryland/State Information/Tax Computation
Estimated tax paid w Form 510D
Also use this spot to apply payment to next year
If payment due. Need to activate EL102B
Organizer/States/Maryland/Other State Forms/EL102B
IF you need to override state estimates see below:
Organizer/States/Common State/Estimates and Extensions/Estimate
Options/Overrides
2. Review Tax return on Tax Return Tab
a. Right Click and use "tick" to mark numbers that you agree with

b. Compare return to prior year. Read all questions. Check that questions are correct. If unsure ask.
The list is not exhaustive
For Federal
1. Sch K- Other information SPECIFIED SERVICE TRADE OR BUSINESS (SSTB) – Check workpaper in AVF Tax File. The path is Organizer/Schedule K/Other Information/Other Items
2. General Information- Basic Return Info-Return Information- Signing Partner date- Use 3-15-23
3. Federal Efile- Signature Authorization- Pin entered by – ERO. Use ERO PIN: 95400
For States
1. Need to elect if filing 511 ( Maryland>General Information>General Information) and Add Estimated Tax Pymts
2. 511 - May need a lot of overrides- See Manager or Partner for help
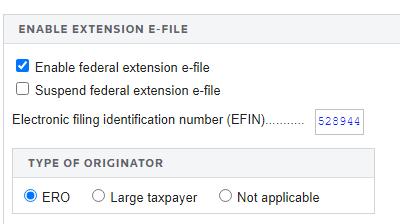
Create E-file
These are the steps to follow:
Organizer/Federal E-file/Enable E-file/Enable E-file
Click "Enable"
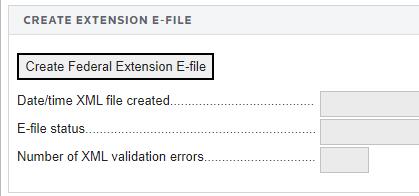
Organizer/Federal E-file/Create E-file
Click "Create Federal Efile"
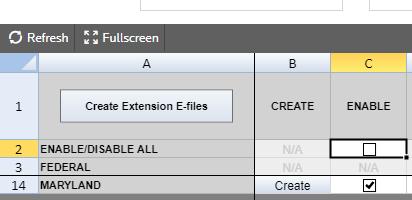
These are the steps to follow:
Organizer/States/State E-file/Enable/Create Returns
Click "Create Return Efiles"
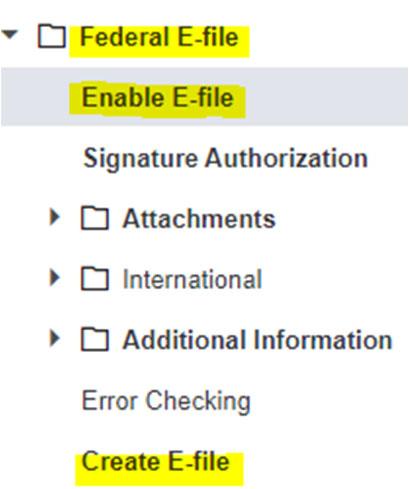
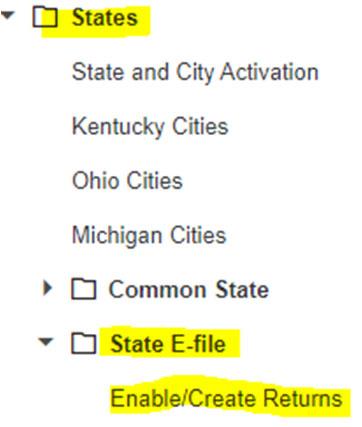
You could use the print preview option to do an interim or final review. It is recommended to open last year and compare each page to the current year.
Frequently Missed Items
Did you file 1099s? To answer the question, you should go to Organizer>General Information>Questions- Default isno
Sch B-Question 4- Organizer>General Information>Questions- Default isno
MD-1 not printing?- Organizer>Balance Sheet/M1-M2-M3>Schedule M-3, Compute Options- Compute M-1 Only
Memos
1. If Necessary-
Turn off Federal Extension- Organizer/Payments and Extension/Automatic Extensions/7004 Basic Data click "Do not print"
2. Federal Filing instructions 1120S -ASAP or specific date
Letters and Filing Instructions/Filing Instructions Options/ top of page (filing instructions)
3. To suppress Estimated Taxes
Organizer/Estimates and Penalties/Estimated Tax/Overpayment/General Options
4. To remove State Ext from Print Review
Organizer/States/Common State/Print Suppression
| 4
5. 1065- Memo- Extended Due Date
Organizer>Extension Information
Return is on extension, suppress Form 7004 print
For 1065 only:
1. If the client has opted out of the centralized audit regime, the disclosure should be on the K-1 letter. Also need to check the box to make the Sec 1.263(a) -1(f)
Go to Federal Tax Elections> Prefixed Elections>IRC 171-351> IRC 263(a)- 1 (f)
Every return needs a processing sheet. This is how to get it.
1. Go to Search Documents in GFR.
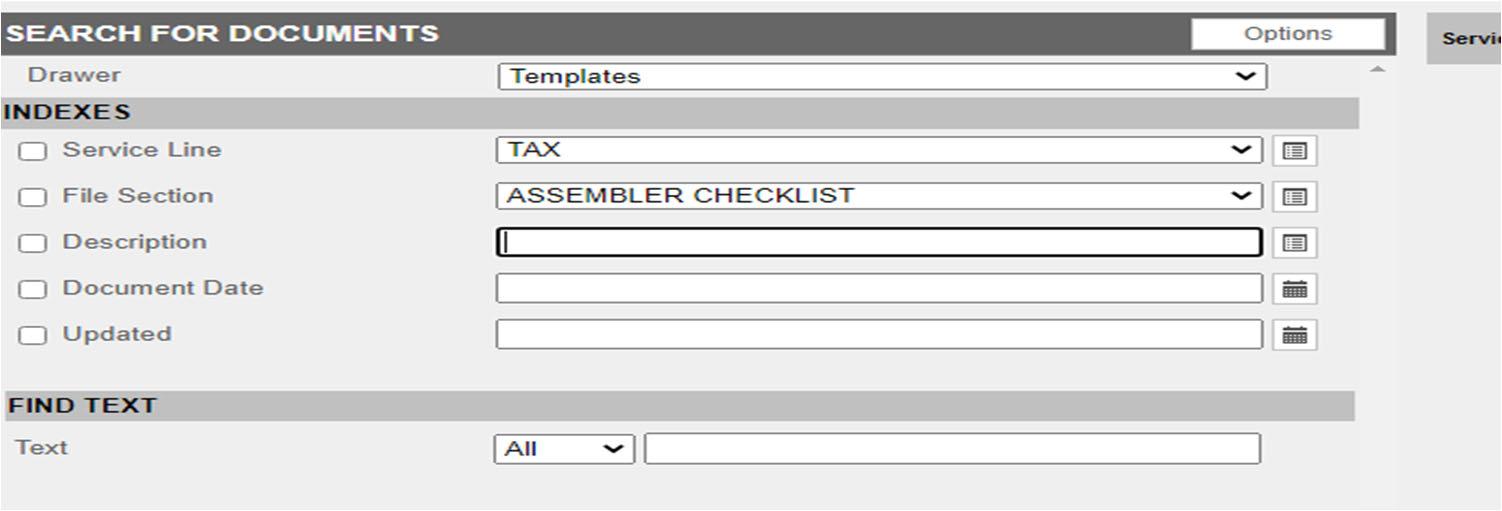
2. Check the Processing sheet that matches Tax Return , Right Click and select Move Document. Fill out the boxes based on the client. See example below.
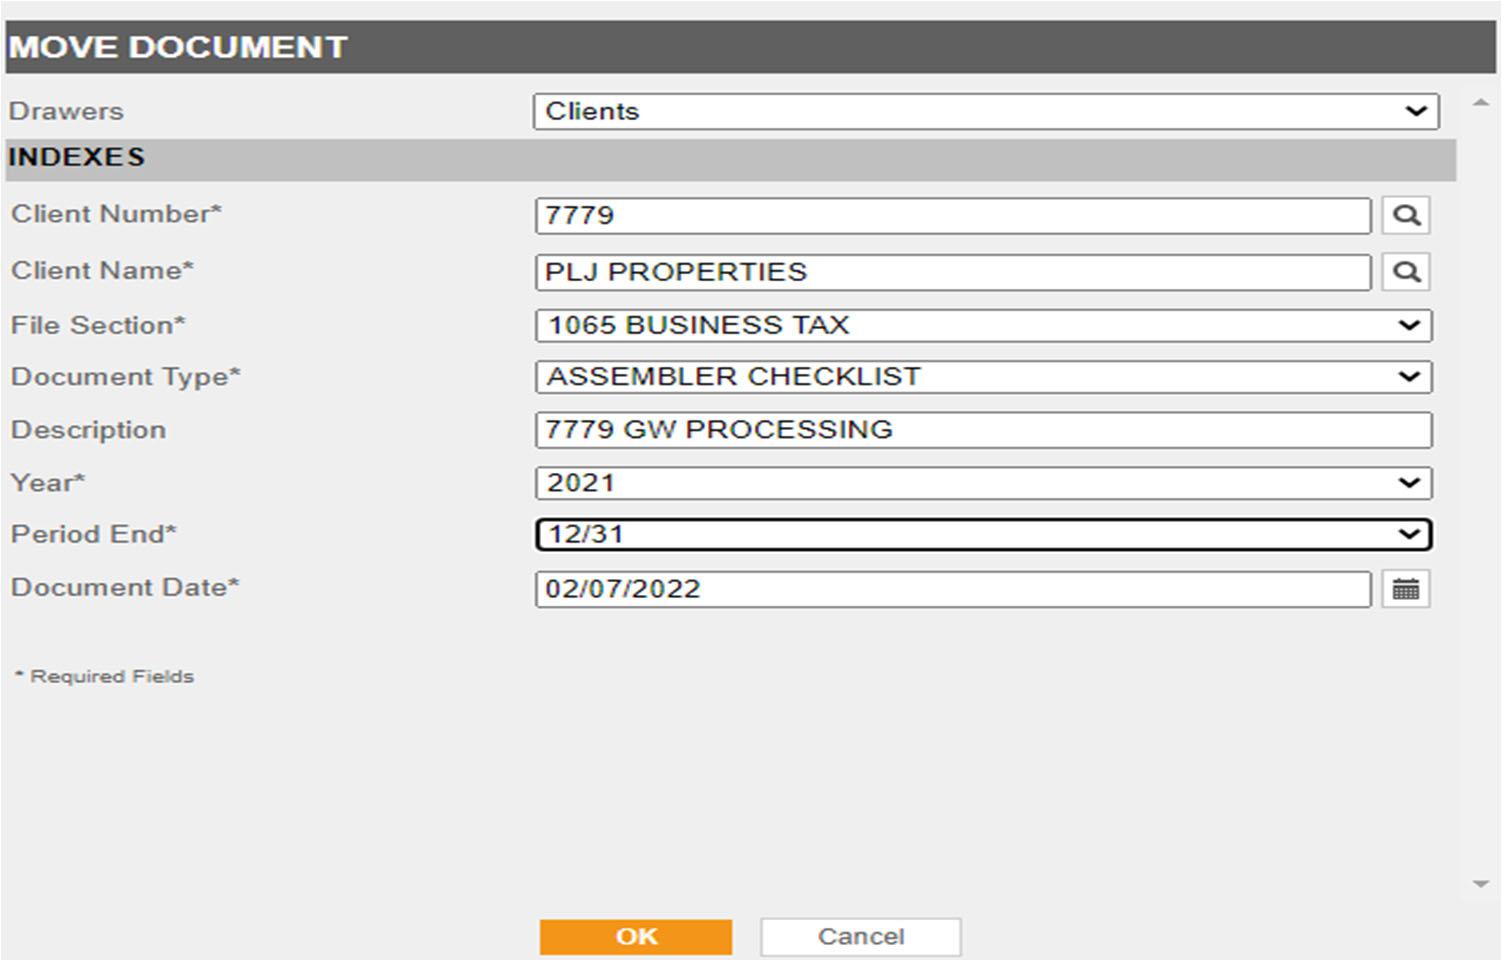
3. Once Done, Go back to Search Documents, Find Processing sheet and fill out. Right Click on it to Edit the Document. You are ready to put the tax return into processing.
Please refer to acct # 91015, Tax reference engagement and the tax return processes workpaper to get additional details on the next steps.
Order of Operations:
1)Turn extensions off
2)Re-compute TR
3)Re-create e-file of returns
4)Print preview the return and make sure nothing has changed in the return that was not supposed to
5)Make sure that payments are showing correctly and it matches the GW processing sheet in GFR.
6) Once that is good complete your task and it will automatically notify John and Aalyiah.







This guide should be used to prepare MD personal property tax returns.
Once you’re done preparing the workpapers in EngagementManager, you’ll need to process the return online. These are the steps:
1.LogIntoWebsiteeitherthroughLastPass(SharedSignin)OR
https://egov.maryland.gov/businessexpress
2.TheusernameshouldbeGWCPA1.Reachouttoyoursupervisorifyoudon’tknowthepassword.
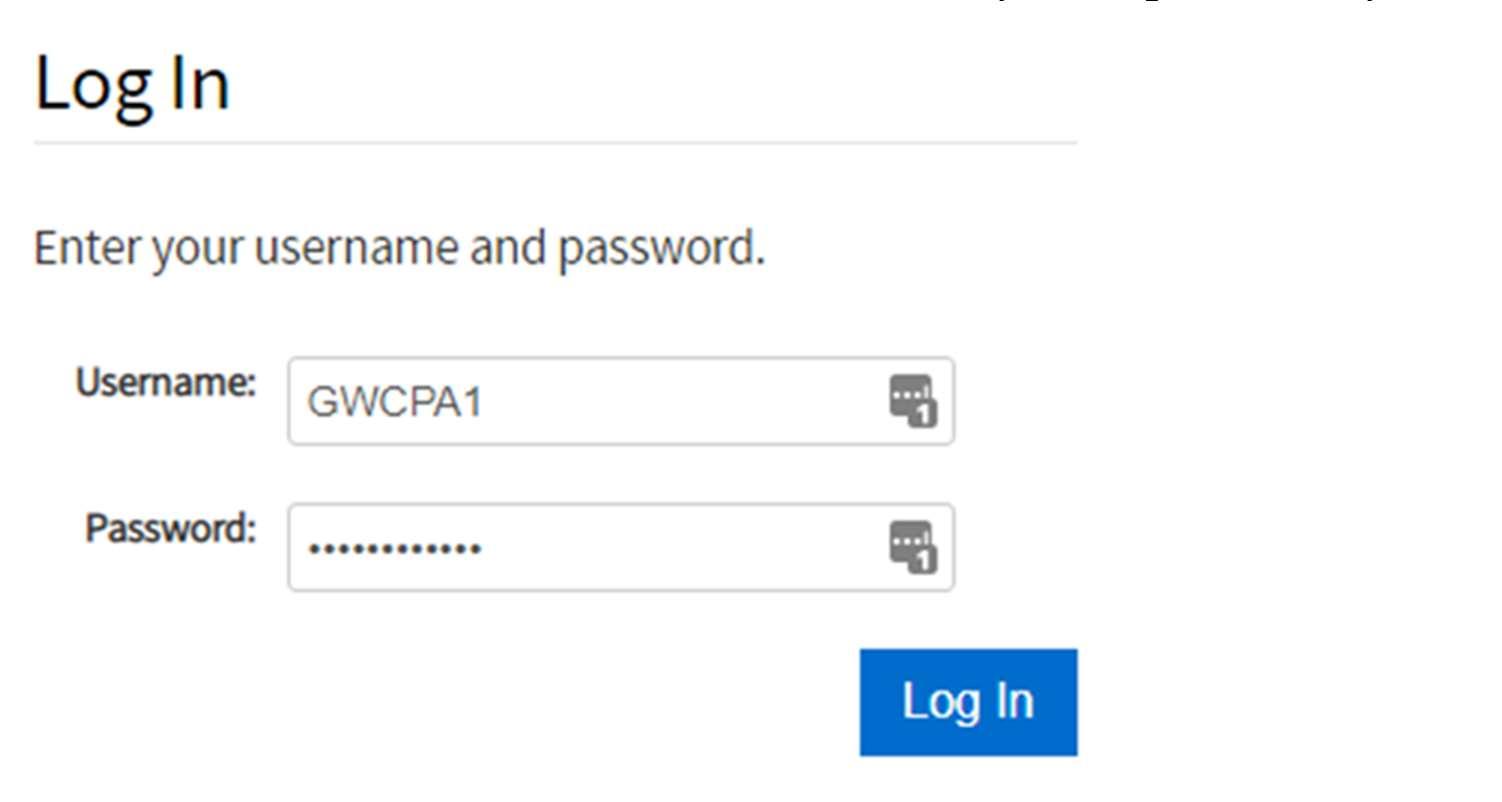
3.HitBusinessTab
4.Select"View:Filingunderoptionsforthisreturnandyouwillseethe2022AnnualReportunder "FilingsnotSubmitted"
5.Select"StartFiling"
6.Itwillaskyouifyouwanttouseinformationfrompreviousyear?andsayYESandcontinue processing!
7.Selecttheclientordoasearchfortheclient

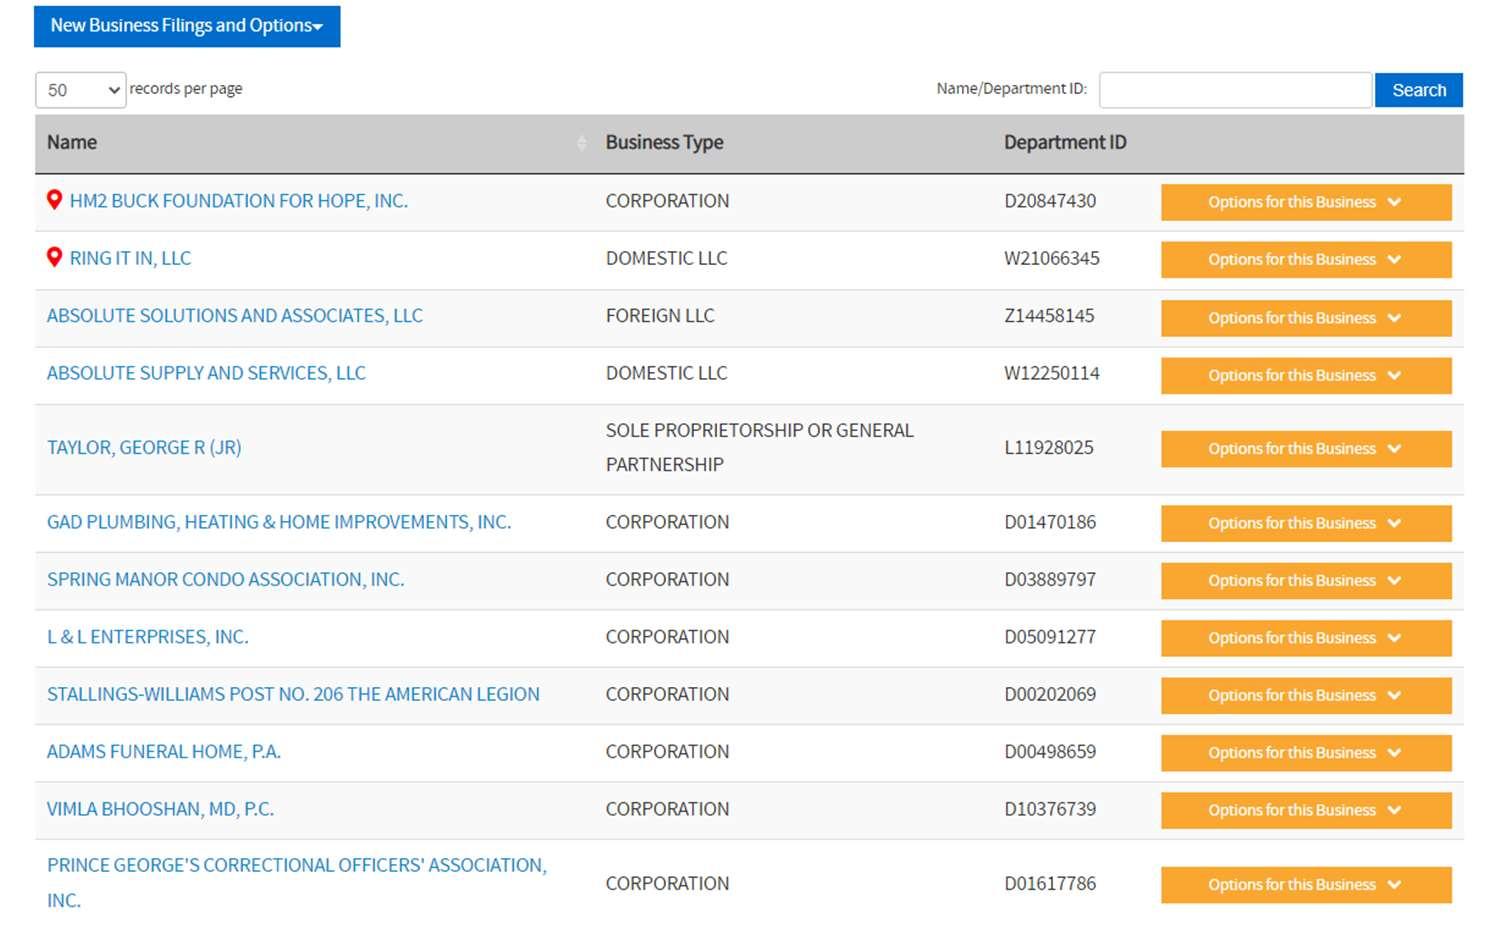
If it’s a new client, click on New Business Filings and Options and then File Annual Report/Personal Property Tax Return
8. ClickOptionsforBusinessandonthedropdownselect“FileAnnualReport/PersonalPropertyTax Return”
9. HitStartYourReport/ReturnHere
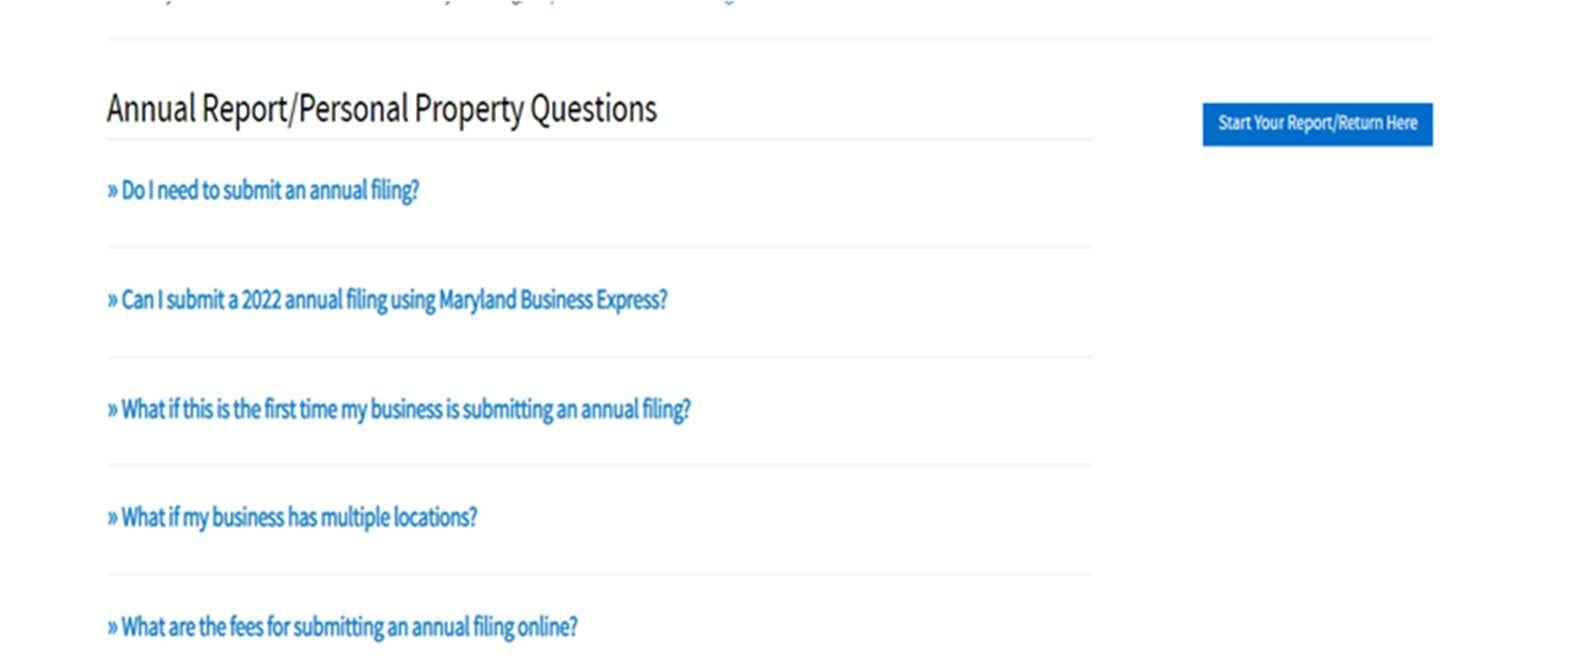
10.MakeSurethisisthecorrectFilingPeriod.HitSave&Continue

11. Fill out information and keep hitting Save & Continue until you can preview the form.
12. Print the Preview to PDF and pull into Engagement Manager
13. STOP here. Need to let Manger/Partner know it is ready for them to review and send to client to make payment
14. After Review, Manager will deliver to client or Partner will give Staff Permission to deliver SeeDelivery Instructions
15.OnceClientmakespayment,Partnerwillbenotified.
16.PartnerwillnotifyStaffmember,paymentforreturnhasbeenpaid.
17.StaffgobackintoMarylandBusinessExpressandchoosecompletedreturn.
18.PullinaPDFofreturnthatiscompletedintoGFR.
19.MarkthePCSprojectascompleted.
Deliveryinstructions-
a. Emailtheclienttoletthemknowanemailfromegov.comisonthewayusingemailtemplate below
b.Logbackontohttps://egov.maryland.gov/businessexpress
c.ChooseReturn-optionsforFiling-EditFiling
d.ScrolldowntothebottomandClick“ProceedtoSignApplication”
e.CertificationStatement
Choose- I am NOT the Corporate Officer. I aman AGENTof the Corporate Officer, who is authorized to prepare this return
f.SignatureofPreparer-Selectfrom“MyContacts”andchoosePartnerincharge
g.Checkthebox“Bycheckingthisbox,IcertifythatIamtheperson(s)whosenameappears aboveandthatIhavedulyexecutedthisdocument.
h.FillinCorporateOfficeEmail-Thisistheemailyouaresendingtheformto
i.FillinFederalEIN-UseclientEinwithoutdashes(thisshouldmatchyouremail)
EmailTemplate-
Goodafternoon,
Youwillreceiveane-mailfromnoreply@egov.comwithalinktoelectronicallysignyourMDpersonal property. Youmayormaynotberequiredtopaya$300filingfeedependingonyourentitytypeorifyou receivedawaiverrelatedtoMarylandSaves. PleasedothisbeforeApril15thanddownloadcopiesforyour files.
Pleasevisithttps://gwcpas.com/blog/new-2023-maryland-pension-planfor moreinformationaboutMaryland Saves.
TheIDnumbertoaccessis_____________________ Pleasecontactmewithanyquestions.
MD PERSONAL PROPERTY
PROCEDURES | 5


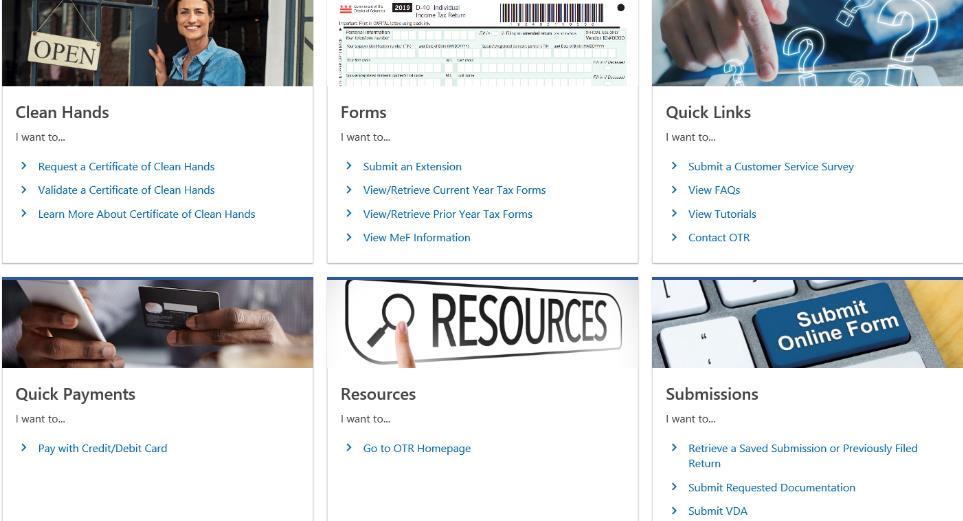
Individuals and businesses that own or hold personal property in trust in the District of Columbia, can easily file the Personal Property tax return electronically at MyTax.DC.gov by following this step-by-step guide.




2
2a

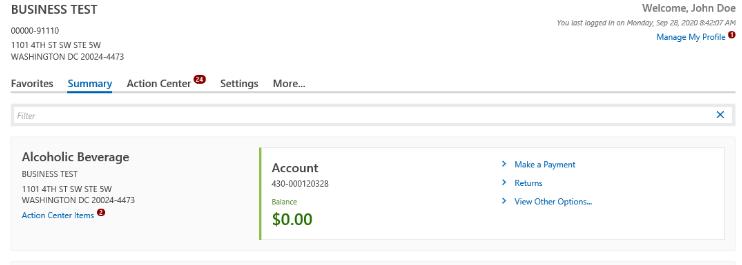
1. From the MyTax.DC.gov homepage, log in using your Username and Password. a. The information is in Last Pass. If you don't have access to both, reach out to support or your supervisor.
2. In the user profile, under Summary, locate your Personal Property tax account. a. Click the Returns hyperlink.

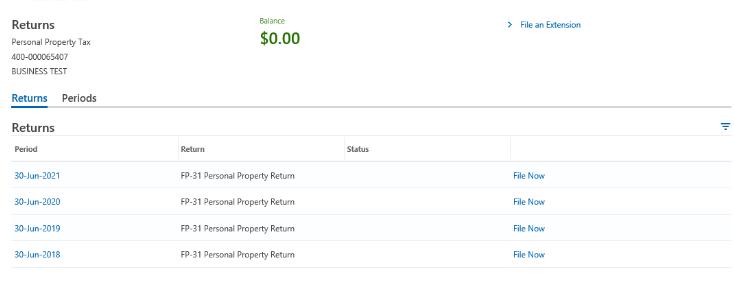
3. Under the Returns section, click the “File now” hyperlink for the return you are filing.
4a

4b
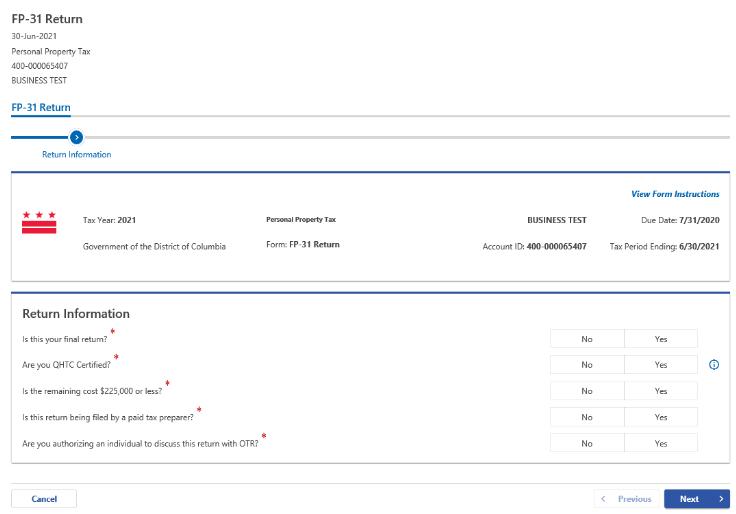
4. The FP-31 Personal Property Tax Return will appear.
a. Answer the Return Information questions on the right side of the screen.
b. Click Next.

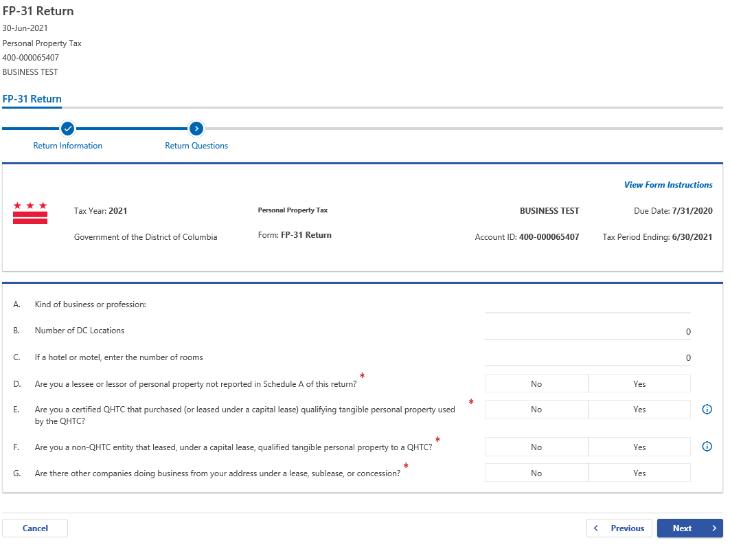
5. Answer the Return Questions on the right side of the screen. a. Click Next.

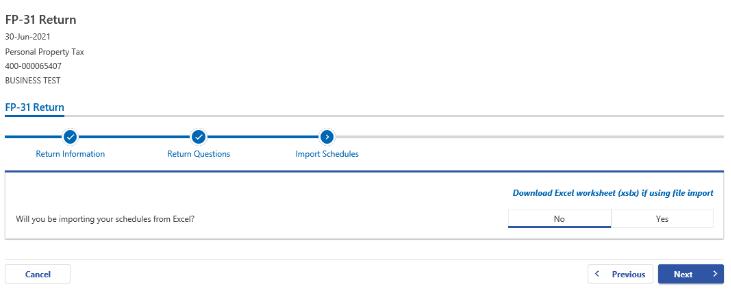
6. On the Import Schedules page, select Yes to indicate you will be uploading your schedules. If you would like to manually import schedule data, click No. For this example, we will click No. a. Click Next.
Note: If you select Yes to upload your schedules, you may click the Download Excel worksheet (xslx) if using file import hyperlink in the upper right corner. A compatible worksheet will download for you to complete and upload.
The template of the compatible worksheet can be found in AVF acct # 95010 Personal Property Returns engagements.

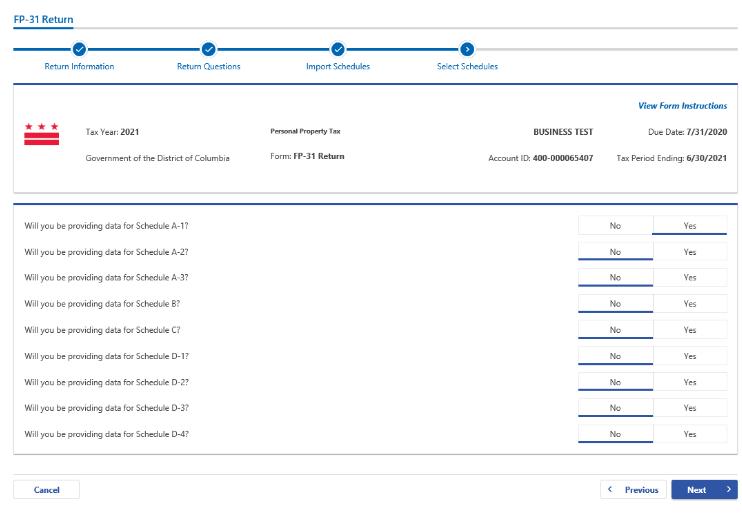
7. Select which Schedule you will be providing data for by clicking Yes For this example, we have selected to provide data for Schedule A-1. a. Click Next.

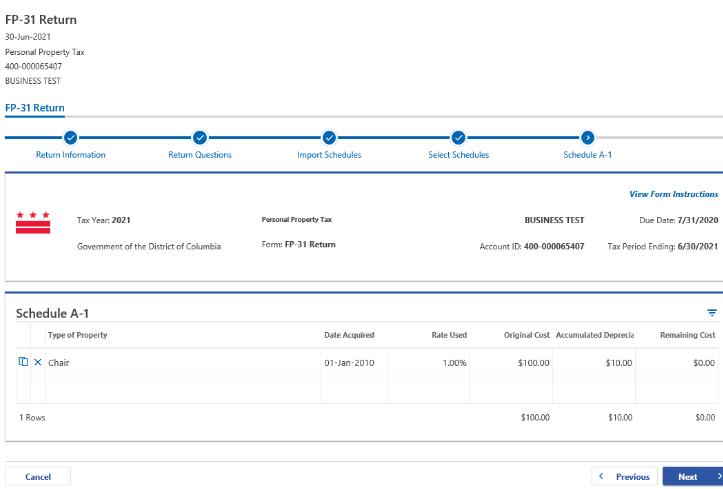
8. Schedule A-1 will display. Enter your Type of Property, Date Acquired, Rate Used, Original Cost, Accumulated Depreciation, and Remaining Cost for each line item. a. Click Next.

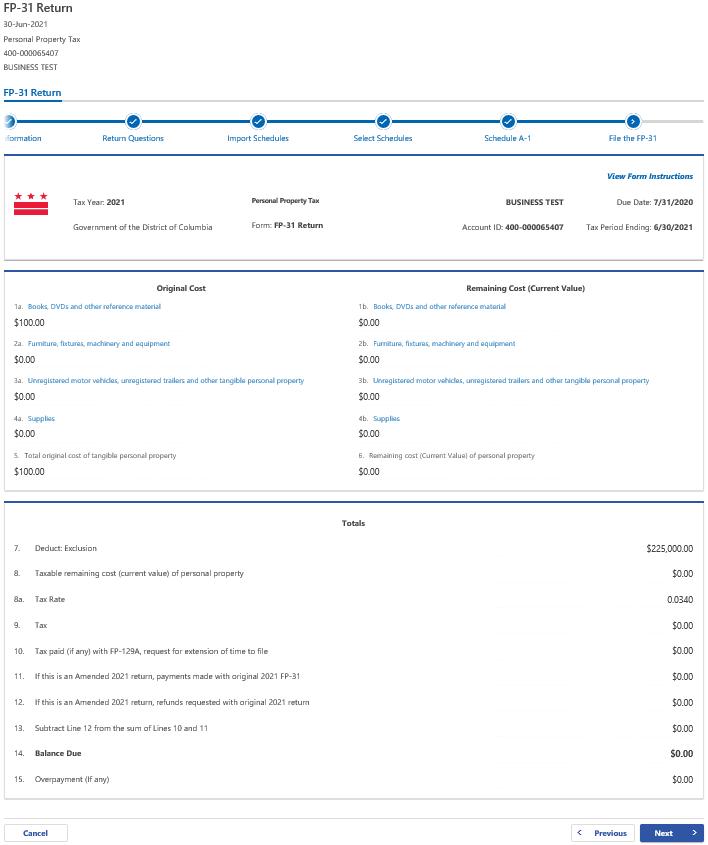
9. On the File the FP-31 section, enter the value(s) of your personal property in the white spaces where applicable. Your entries will determine the automatic calculations where appropriate. If there is a Balance Due, the system will automatically calculate the liability on Line 14 a. Click Next.

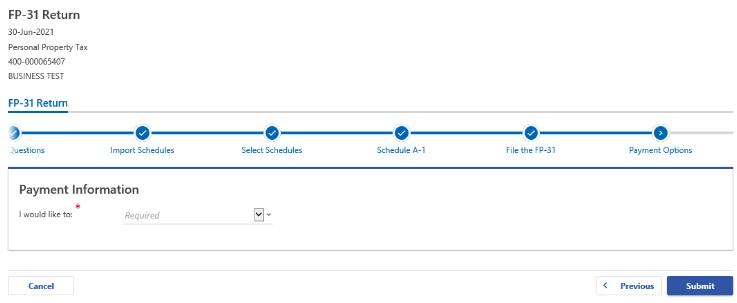
10. From the Payment Options page, select the appropriate Payment Information from the dropdown menu bar. Note: You may choose No Payment is Needed from the drop-down menu bar when you are filing a zero return. The option Pay Later allows you to submit the return without making a payment For this example, we will choose to Pay through ACH Debit. a. Click Submit.

11b
11a
11c
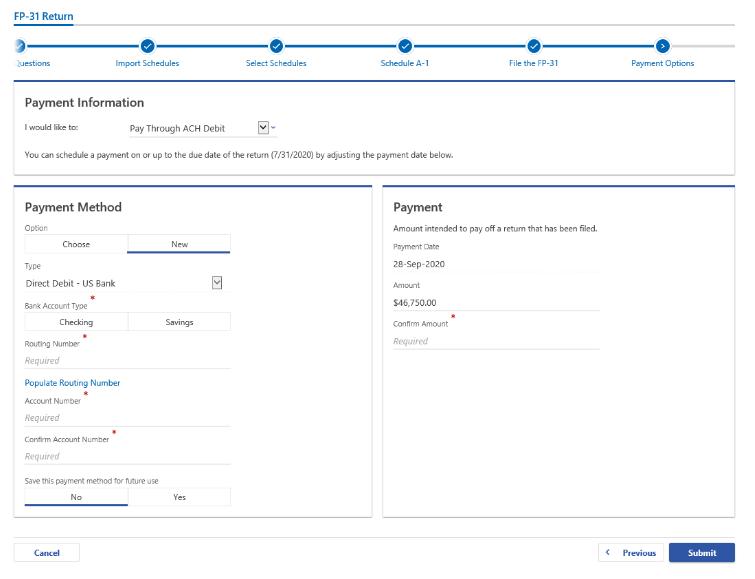
11. Enter your bank account information into the Payment Method section including Bank Account Type, Routing Number, and Account Number. Confirm your Account Number.
a. If you would like MyTax.DC.gov to store your bank account information, click Yes beneath Save this payment method for future use. For this example, we selected No.
b. In the Payment section, your payment date will automatically populate. Enter the Amount of your payment and Confirm that amount.
Note: If you would like to schedule a payment in the future, you can do so from the account summary page by clicking the “Make a Payment” hyperlink. Payments can be scheduled up to one year in advance.
c. Click Submit.

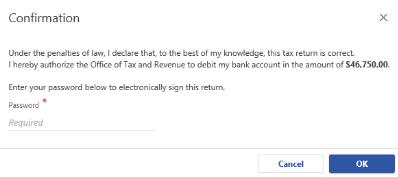
12. In the Confirmation pop-up window, enter your MyTax.DC.gov Password, which will act as your electronic signature. a. Click OK.

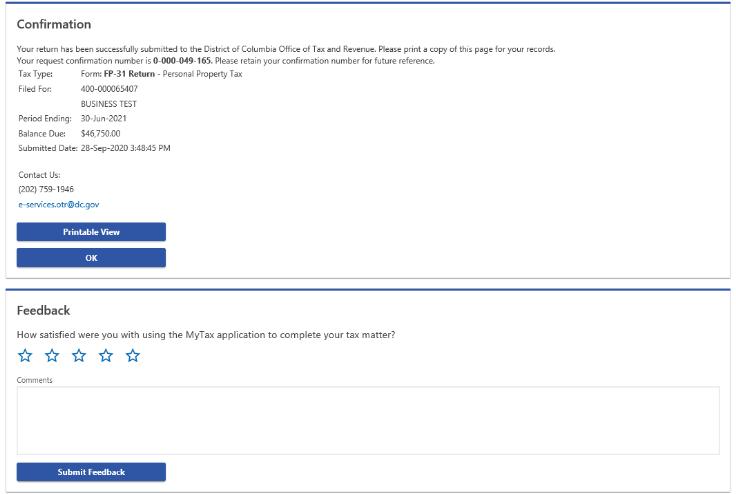
13. A Confirmation page displays. To obtain a printed copy of this page, click Printable View. Otherwise, click OK.
14. A section to provide Feedback will also appear. Please take a moment to let us know how satisfied you were using the MyTax application. You will also be able to share any comments or concerns in the space provided. Once finished, click “Submit Feedback”.