The 7020 Live PTO on letter series tractor Disassemble or start?
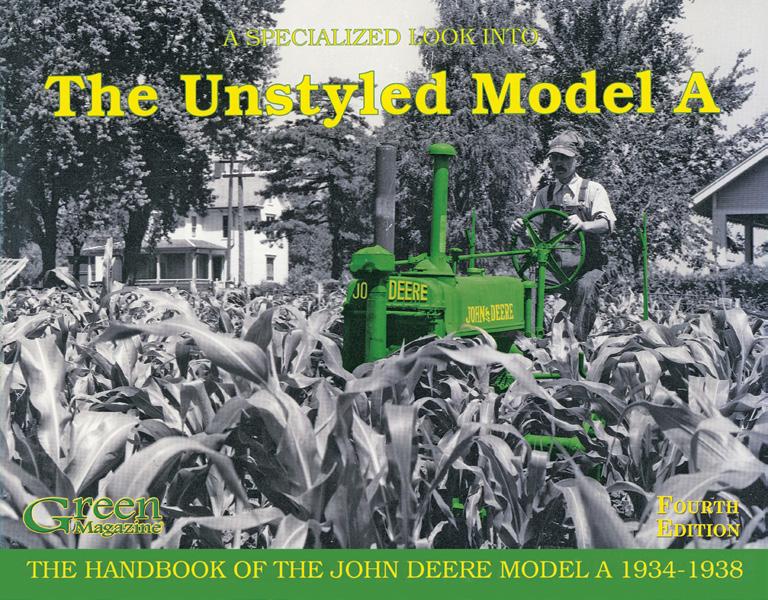
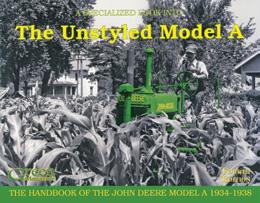
The Handbook of the John Deere Model A 1934-1938
Fourth Edition
• By Wes Malcolm
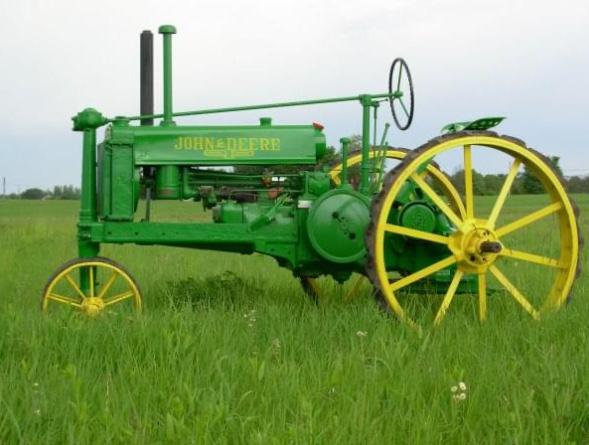
Now in its fourth printing with 15 more pages, this is the handbook of the John Deere model “A,” 1934-1938. A book that should be on the “must read” list of any unstyled “A” owner. There is probably no other book on the market that goes into so much detail on a single model of tractor. Shows illustrations of nearly every change made in the parts that make up the unstyled “A.” 95 pages, 11x8-1/2 inches, soft cover.
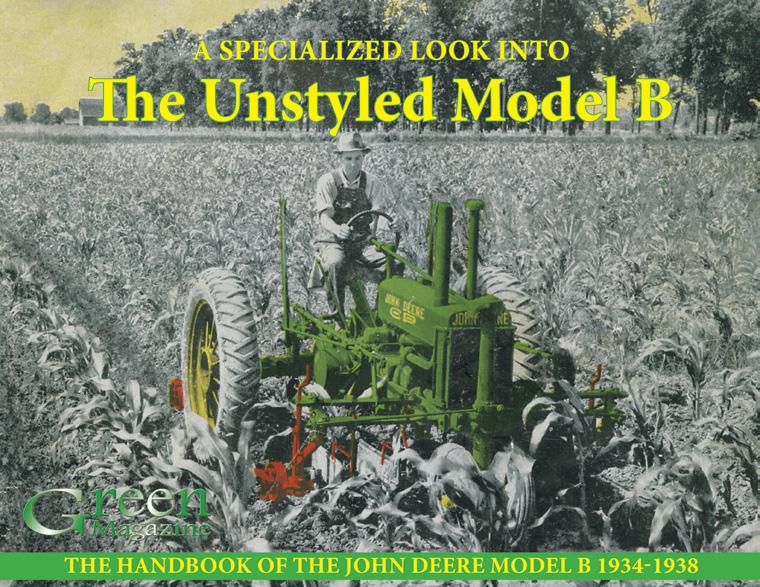
Both books include history, specifications, serial numbers, original prices and much more A Specialized Look Into
The Handbook of the John Deere Model B 1934-1938
The same types of information as available in the book above, except now about the model “B,” written and compiled by a panel of experts who have spent decades collecting and restoring the unstyled version of Deere’s most popular tractor. This book shows nearly every change made in the parts that make up the unstyled “B.” 84 pages, 11”x8 ½”, soft cover, over 200 photos - most in color.
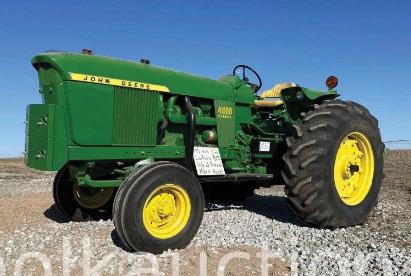
Green Magazine’s 2025/1958 calendar: AVAILABLE SOON!
You can order today!
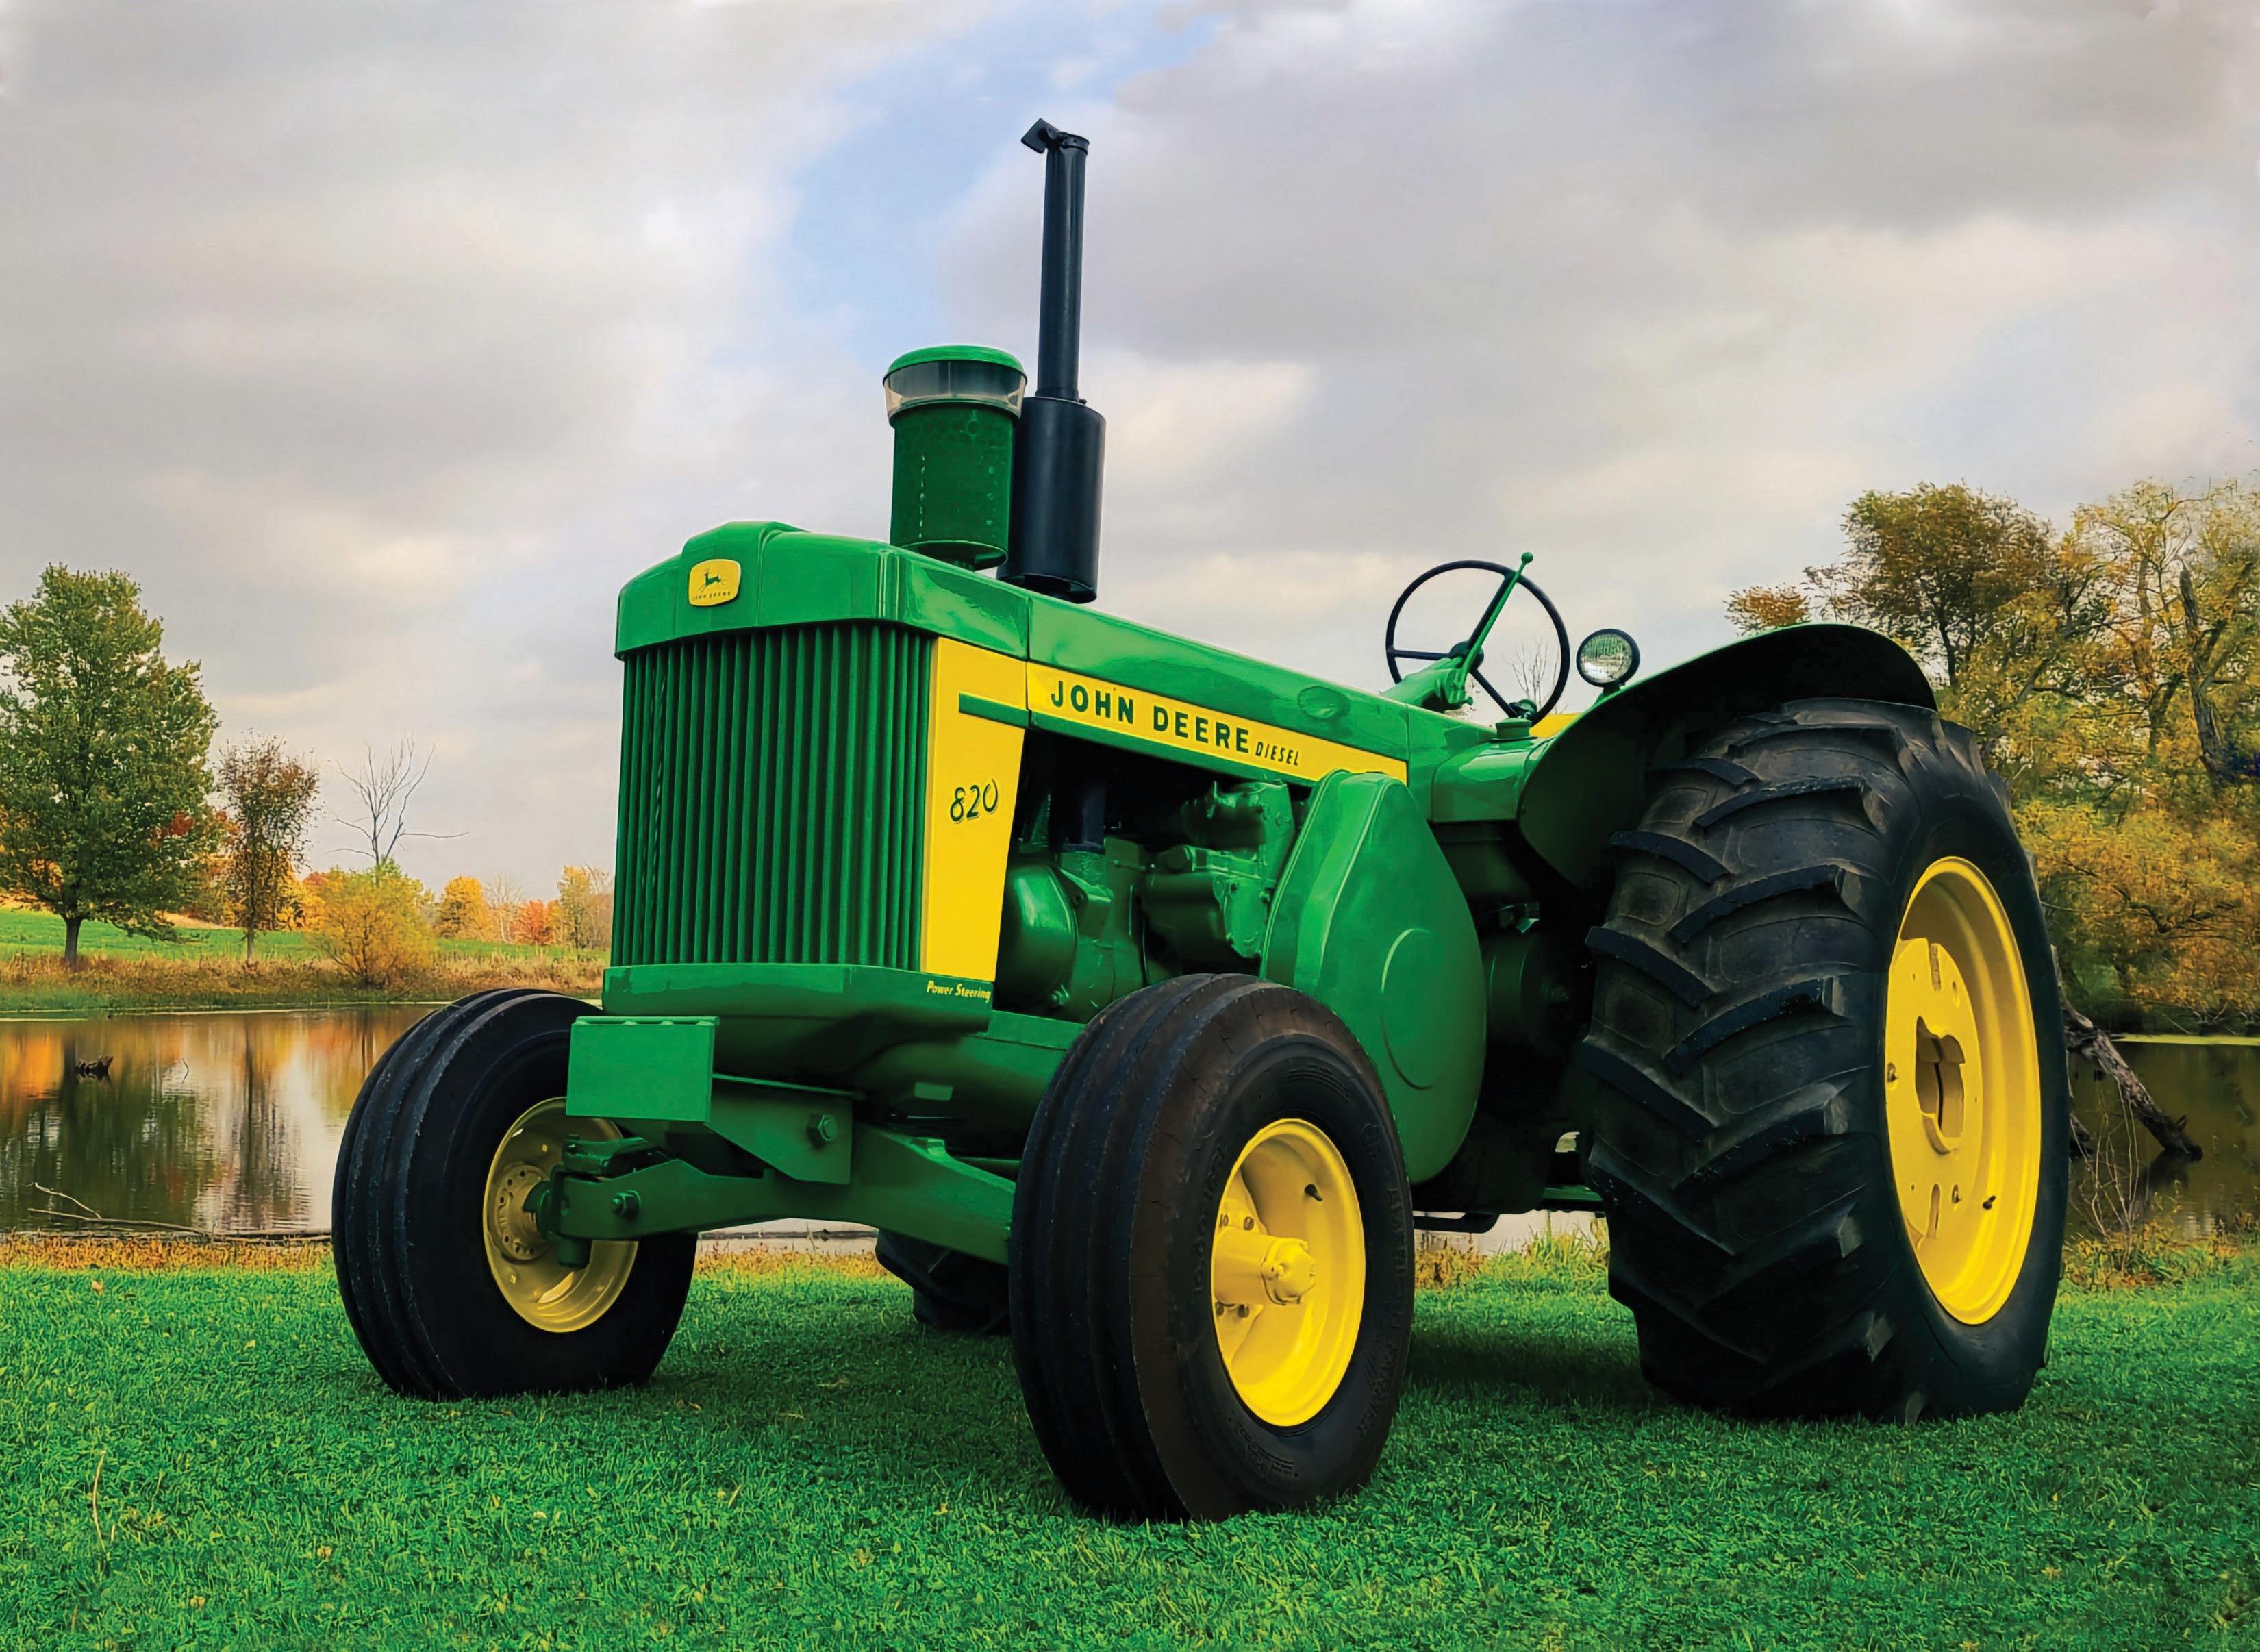
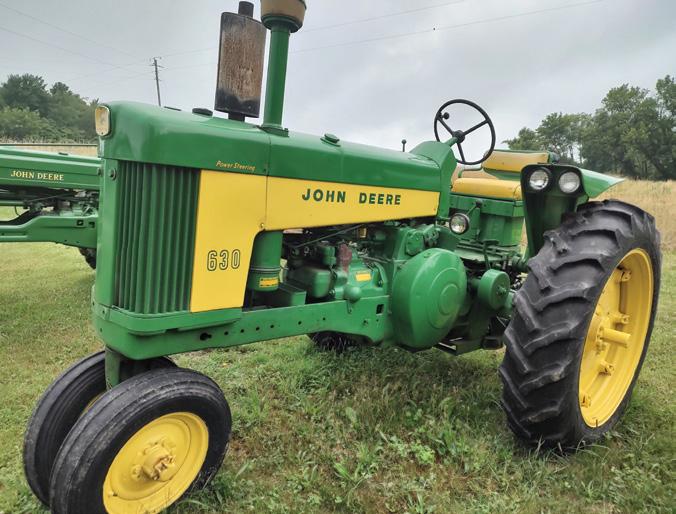
Tractors pictured in Green Magazine’s 2025 calendar are from 1958 — the whole calendar is designed to resemble one from that era. The days in 1958 match up with those in 2025 so the calendar works for next year.
• Only a limited number of calendars are produced so ORDER EARLY before they are gone!
• 12 high quality, professional photos on each calendar
• Photo size is 11” wide x 8-1/2” deep
• Calendar when fully displayed is 11” wide by 18” deep
• Price includes shipping
• Proudly printed in the USA
• Call, go online or send a check to place your order
Green Magazine’s calendar is a customer favorite— order now before they are gone
• Prices include shipping • U.S. funds ONLY, please!
• Multiple calendars must be sent to the SAME ADDRESS to receive the discounted price
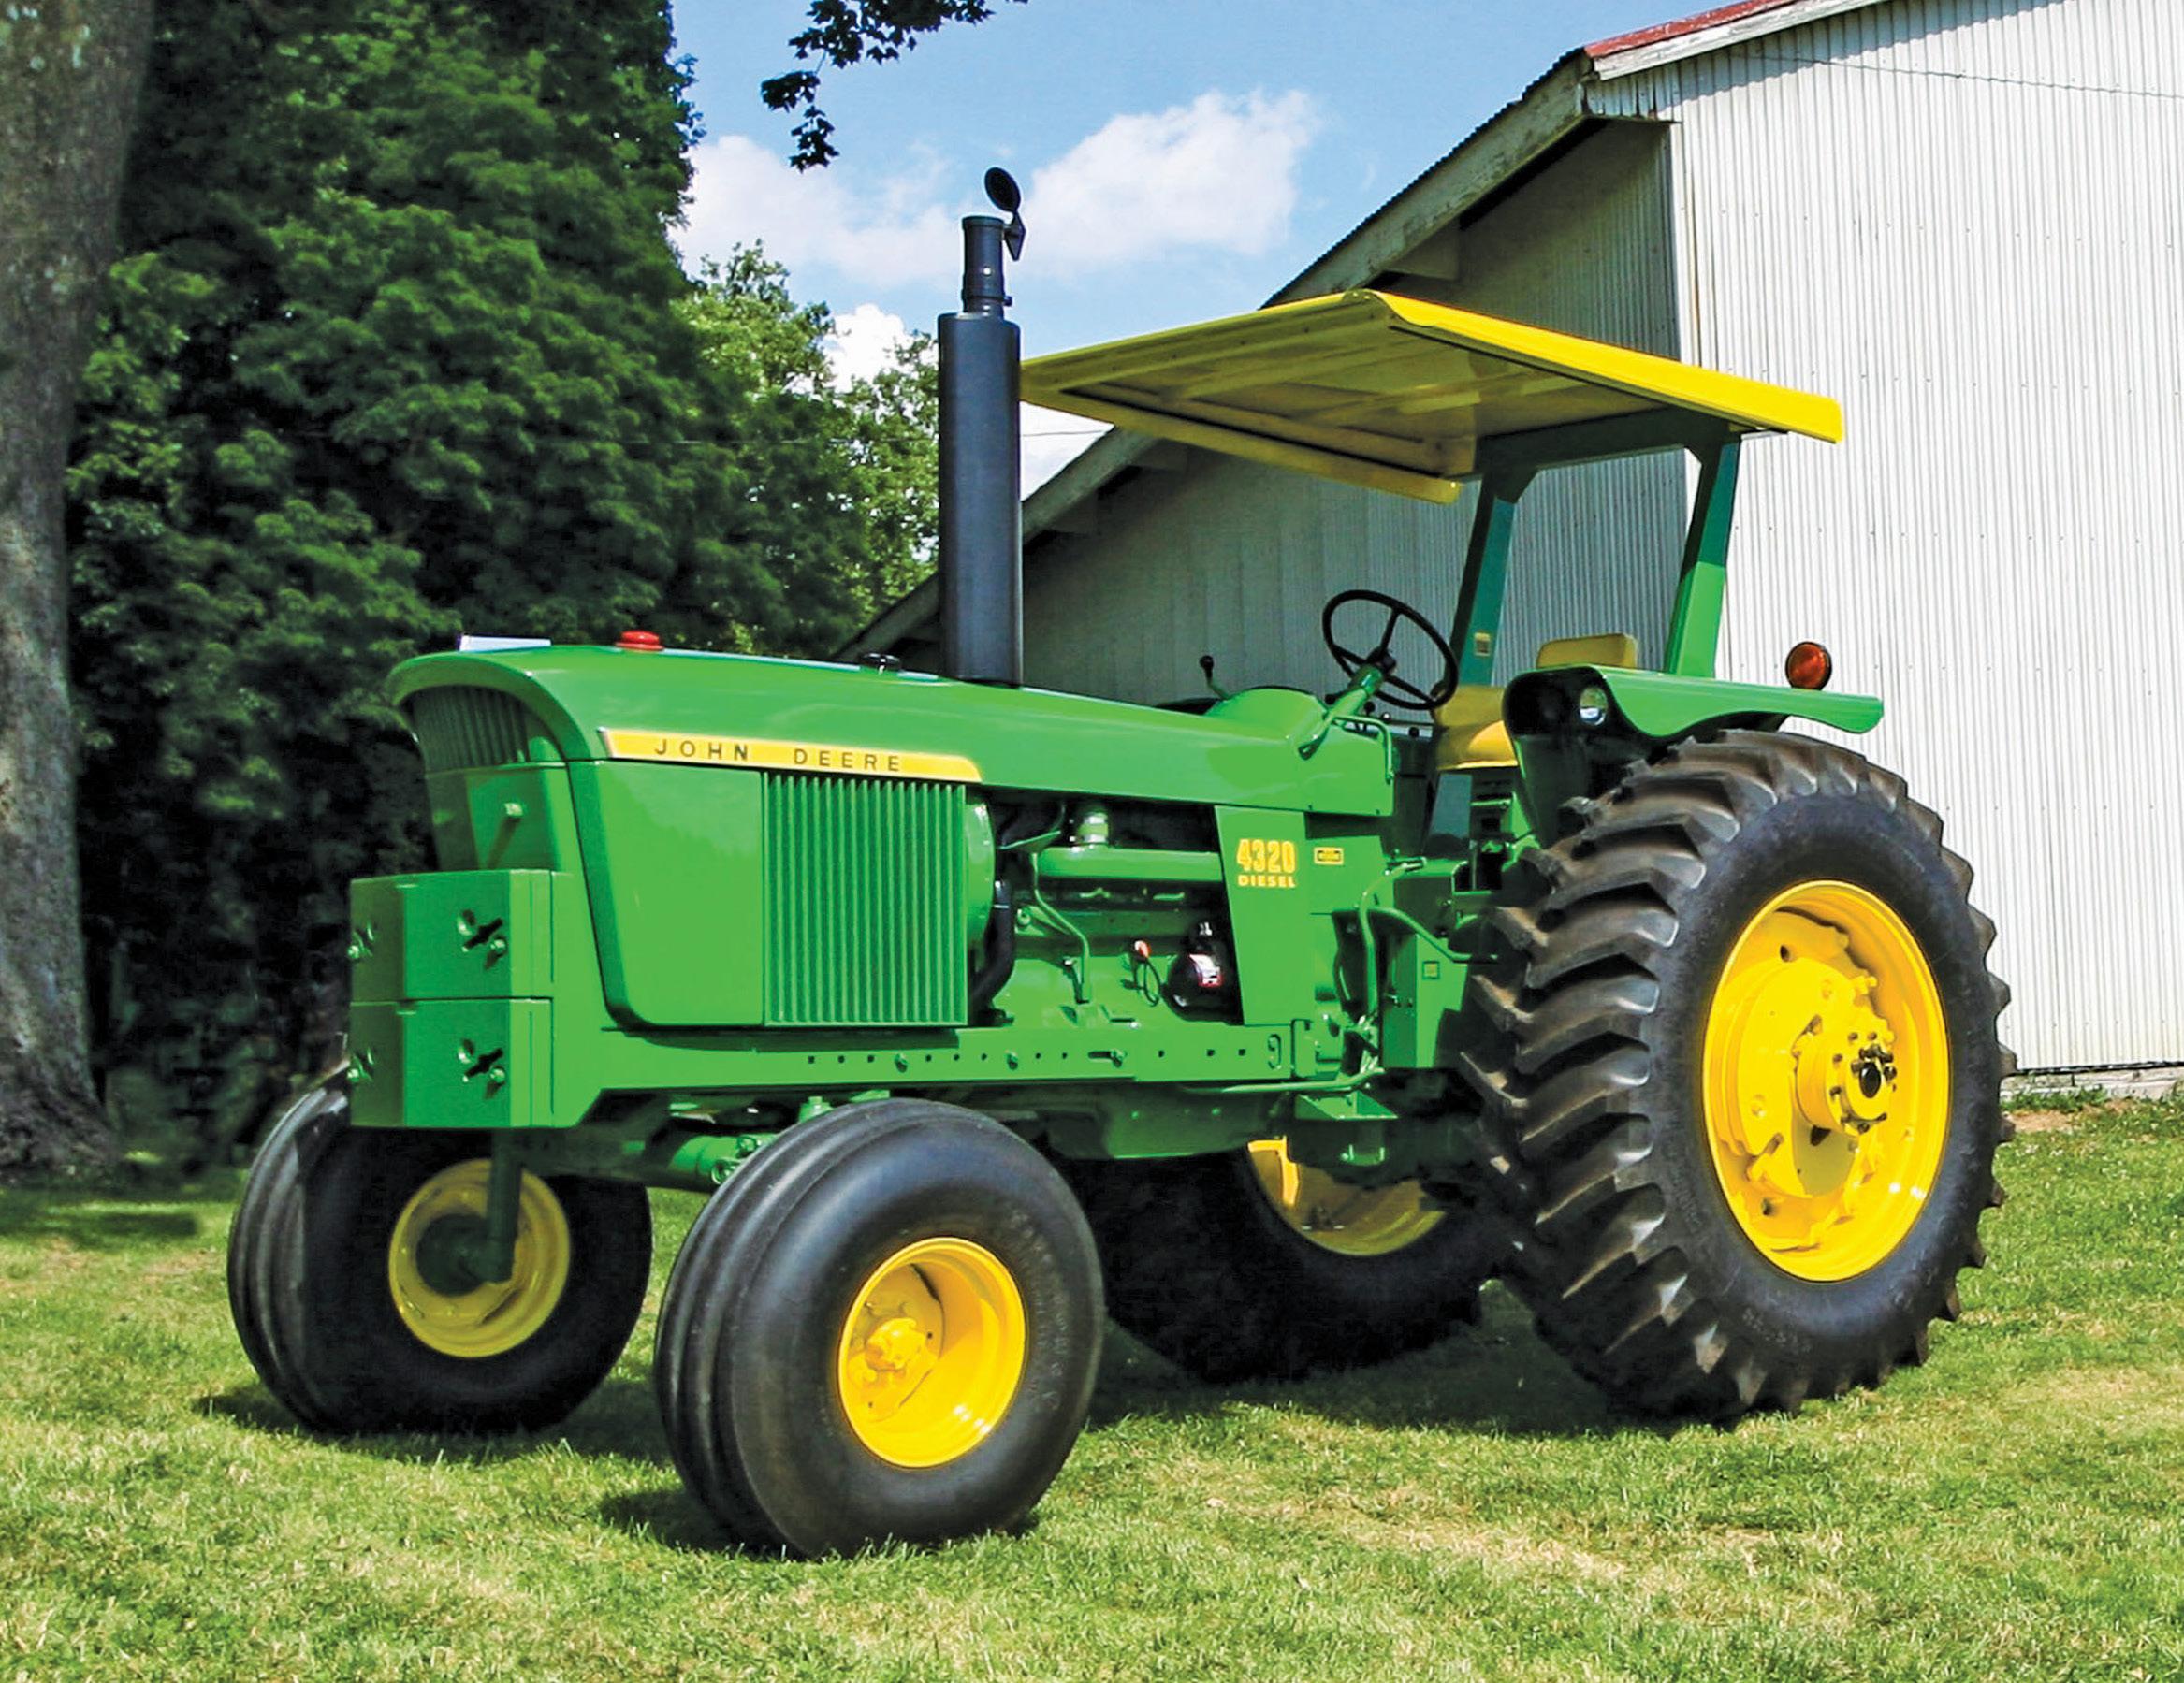
This is one of the 12 photos that will appear in the 2025 Green Magazine calendar.
Layout/Design
U.S.:
Canada: $59.95 / 1 year -
Foreign: $69.95 / 1 year - 12 issues
First Class/Airmail delivery available: See page 5 Visa/Mastercard/Discover/AmExpress accepted
“GREEN MAGAZINE®” (ISSN 0883-5462) is published monthly and released 12 times a year on or about the first of each month for $39.95 per year (Canada: $59.95 per year; Foreign: $69.95 per year) by Hain Publishing, Inc., 2652 Davey Road, Bee, NE 68314-9132. Periodicals postage paid at Bee, NE and additional mailing offices.
POSTMASTER: Send address changes to “GREEN MAGAZINE®, PO Box 95, NE 68314-0095.”
GREEN MAGAZINE® reserves all rights regarding reprints of this publication. Our phone number is (402) 643-6269.
Make it make sense! Electronics, that is. During a heat wave in late June, I was mowing some pasture and an old farm yard with my 4430 in an effort to make some grass/weed/cedar tree hay when the radio and blower (that’s the air conditioner fan) quit working. After wiggling a few wires and pounding on a few things, they would occasionally spring to life, but they then quit entirely. So much for making hay while the sun shines. Yes, I know the old timers were out in the hayfield in 100-degree weather with nothing but a straw hat and a burlap-wrapped jug of switchel, but as tough as these guys were, I’m fairly certain they would have expired if you had put them in a Sound-Gard cab with no air or fan. After replacing the cab relay, messing with the ignition switch, and clipping a jumper wire across the circuit breakers, I still had no joy. Sweat soaked and defeated, I reluctantly called my local Deere service department. A day and a half later a young man drove in to see what he could do. To give you an idea of how young he was, when I was whining about metric bolts while replacing some knives on the disc mower, he said that he actually prefers the metric system to SAE. Oh my. Anyway, it took him quite a while
to find the problem and at one point he pulled apart a wire coupler and the radio started playing. In what universe does unplugging something electrical make it work? He eventually found the problem to be a bad ground under the roof. I have said many times in the past that I thought the electrical systems on Generation II tractors were overly complicated, and this latest experience has done nothing to change my mind.
In other news, in this issue, you will see an ad for our 2025 calendar, which features 1958 model year tractors. Forgive me, those of you who have heard this every late summer for the last 30 years, but the days in 1958 and 2025 are exactly the same, so the calendar looks like it is from 1958. You will find ordering information on page 3. I had a good time at the Eastern National Expo in Lancaster, Ohio a few weeks ago. Saw a lot of nice tractors, talked to a few old friends, and made some new. I’ll probably hit a few local shows and then Albert City. I wish I could make it to more of the shows featuring John Deere this summer, but publishing a magazine and other activities sometimes gets in the way.
See you next month.
Green Magazine announces its spring/summer hours, in effect now through Labor Day : Monday through Thursday 8:30 AM - 4 PM • Friday: CLOSED
Those who want to call to place orders for magazine subscriptions or renewals, gift items or ads, please note this schedule. Our website, www.greenmagazine.com, is always open for orders and ads. Email info@greenmagazine.com with questions, if needed. Thank you!
Missing an issue? We mail every issue by the first of the month. Please contact your post office if you suspect a problem with delivery. We will not replace missed issues three or more months past original mail date (four or more months for foreign subscribers) free of charge.
U.S. subscribers: If it is on or after the 20th of the month and you haven’t received your issue, call us for a replacement.
Canadian subscribers: Due to postage costs, we are forced to ask for a $2 postage fee (U.S. funds, please) for re-sending issues that do not arrive by the end of the published month OR we can add an issue onto your subscription for the missed issue. First Class/Airmail delivery: Call for rates for First Class in the U.S. or Airmail to foreign countries.
Foreign subscribers: We will add an issue onto your subscription OR for a $7 airmail postage fee (U.S. funds), we will resend the missed issue two months after publication date.
Notice: If your address label shows an expiration date of “8/24” above your name, this is your last issue. Renew immediately for continuous service. If your address label reads “9/24,” you have one more issue on your subscription.
Renewal notice: We send postcards to let you know your subscription is about to expire (or has expired). We NEVER call to ask if you would like to renew your subscription. If you
receive such a call, it is most likely from another publication—NOT Green Magazine® for John Deere enthusiasts.
Address Changes: Please send or call with notification of an address change as soon as you know what your new address will be. Periodical mail cannot be forwarded. Green Magazine will not replace issues missed due to late notice of address change. Those missed issues will have to be bought at back issue price. See the back issue listing and prices elsewhere in this issue.
Looking for your photos and stories! Accepted material is subject to such revision as to meet the requirements of this publication. Payment will be made at our current rate within 90 days of publication. Submission of manuscript implies that the material is original and in no way an infringement upon the rights of others. Please send good, clear photographs. If you would like these returned, send us a stamped return envelope to help us get them back to you.
Free Issue Offer: It seems you, our subscribers, are our best form of advertising! More people find out about this publication by “word of mouth” than other forms of advertising. So if you're enjoying Green Magazine®, why not spread the word? Telling others about it can pay benefits. When you tell a friend about Green Magazine® and they subscribe, make sure they tell us who let them know about it. When they do, you will get an issue added to your subscription. These must be new subscribers, not renewals.
We’re responding to the letter on pages 6-7 in the June 2024 Green Magazine issue that had a picture of a 1948 red Chevy truck with a Massey Harris combine loaded on it. This brought back memories of when our family hauled a No. 55 John Deere combine from Hydro, Oklahoma to Limon, Colorado. Our uncle lived and farmed north of Hydro and Dad farmed south of Limon. Most every year, we went to Hydro to help with wheat harvest and brought the combine that our uncle owned to Limon to harvest.
The No. 55 combine was taller than the Massey Harris and more top heavy, because the engine was on top of the combine behind the grain bin, whereas the Massey engine was underneath the grain bin. The operator’s platform on the John Deere was higher than the Massey’s, so you were not in quite as much chaff and dust. To make the JD combine ready for the trip, the clean grain elevator had to be unbolted from the grain bin and lowered to the operator’s platform. The filter screen for the air going into the radiator was removed and put in the grain bin. This had to be done to lower the overall height of the rig so it would clear underpasses and overhead wires. The unloading auger had to be removed as it stuck too far out into the oncoming traffic lane, and it was put on the truck bed underneath the combine, as were all the sideboards for the truck bed.
Getting the combine on the truck was a challenging procedure as the header had to be raised by putting pipe extensions between the header and hydraulic cylinders to get it high enough to go over the truck cab. The rear wheels hung over the back of the truck bed as the bed was not long enough to get the wheels on the bed and that also kept the header higher to clear the truck cab. The rear wheels were taken off to move the combine a
few inches farther forward on the truck so you had a little more weight on the front wheels of the truck. Even then, it handled skittish at best. The truck was a 1948 Dodge with a flathead 6. Sometimes you could get it up to 55 miles per hour going down a long hill and, if there was a rough bridge at the bottom of the hill, it was quite a ride! This trip was repeated annually for approximately 10 years, starting in the year 1950. Driving this rig was not for the faint of heart and it was especially tough for the wife who usually followed in a car because if there were dips in the road or a rough road, there were times when it looked like and felt like this rig was going to topple over into the ditch.
Stan and Gary Swartzendruber
The letter in the June issue of Green Magazine about the truck hauling the combine brought back memories for me.
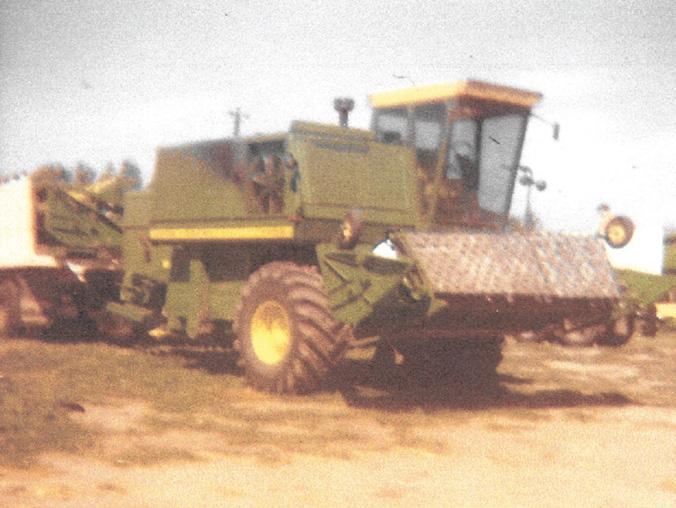
In 1970, I worked on the wheat harvest out west. I worked for Duane Bye of Crary, North Dakota. We had John Deere 7700 combines. It was the first year they were out. We jacked the back of the combine up and bolted on a long hitch to the back frame of the combine. We took off the back wheels and took off the drive shafts to the final drives. We put the grain head in the truck box and left the pickup head on the combine. We hooked the combine to the truck and down the road we went. I think we did this to five combines.
Dennis Ring, WI
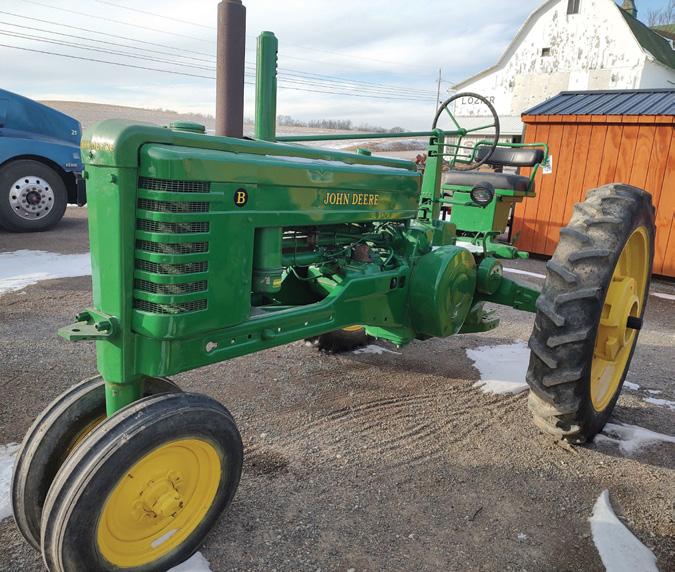
I read Benjamin Hain’s article on the John Deere late styled model “B” with great interest.
I grew up with that tractor, which my dad had bought in the spring of 1947 when he began farming his own place that year. The tractor was a very early production late styled gasoline only “B” and Dad recalled that it had some teething issues in the first year that he owned it. Evidently retooling and production issues following the war were still a problem by early ’47. The “B” had the piston rings improperly installed and it went through 30 gallons of oil during its first season of work. The local dealer in Jerseyville, Illinois corrected that problem but the tractor also had issues getting it timed properly, which (from what I was told) took a lot of head scratching on the dealership’s part to more or less solve the problem. Various versions of the story indicated either an improper number of teeth on the distributor drive gear in the governor housing or improper marking on the flywheel or perhaps even a combination of the two. Whatever the case, at the very least, new timing marks were made and the tractor ran properly with that for the 17 years that we farmed with the “B” as one of our tractors.
I began to learn to drive the “B” at about six years old, choring with it with my dad, driving it through feedlot gates that he would get off of the tractor and open. By about 10, I was doing light work with it in the fields and driving the grain wagon to him to unload the 12A combine’s hopper when we threshed wheat. Early on, the rather roughly machined rear axles would no longer allow the rear wheels to be set back in from the cultivating position for plowing despite the dealer’s best efforts to do so. From that time on until we sold it, the rear wheel tread was set wide. I remember that up until the
last attempt to change the wheel tread width, my dad still plowed with the “B” in the spring using a No. 44 two bottom steel wheeled hydraulic lift plow and that he was very happy with its performance in that area. According to him, it could plow any type of soil in third gear including clay eight to 10 inches deep and could even pull it in fourth in better soils although that was a bit fast for comfort.
In my later years as a teen, I pulled a 12 foot IHC hydraulic variable
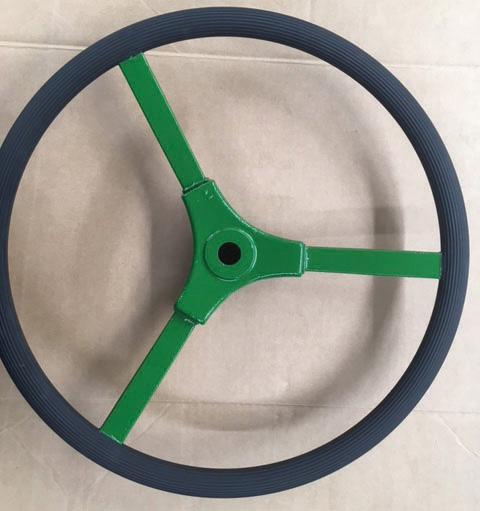
section disk harrow with it in third gear to disk corn stalks in the spring. I have lots of fond memories of time spent cultivating corn and soybeans with its two row front mounted cultivator during the summers of my youth. One additional thing I remember that was peculiar to that tractor was the fact that the steering wheel was of a noticeably smaller diameter than that of our ‘49 “A” and it seems of other later production “Bs.”
I love the great articles your
magazine publishes each month. I’m a lifelong fan of all things John Deere and two cylinder, having grown up farming with my dad’s ‘47 “B” and ‘49 “A” during the ‘50s and early ‘60s and later owning and working a ‘49 “G” and very late production ‘52 “A.” Although I no longer own any tractors, I still love reading about them and learning new things about their operation and history.
Thanks for the memories.
Eric Thatcher
By Doug Foreback
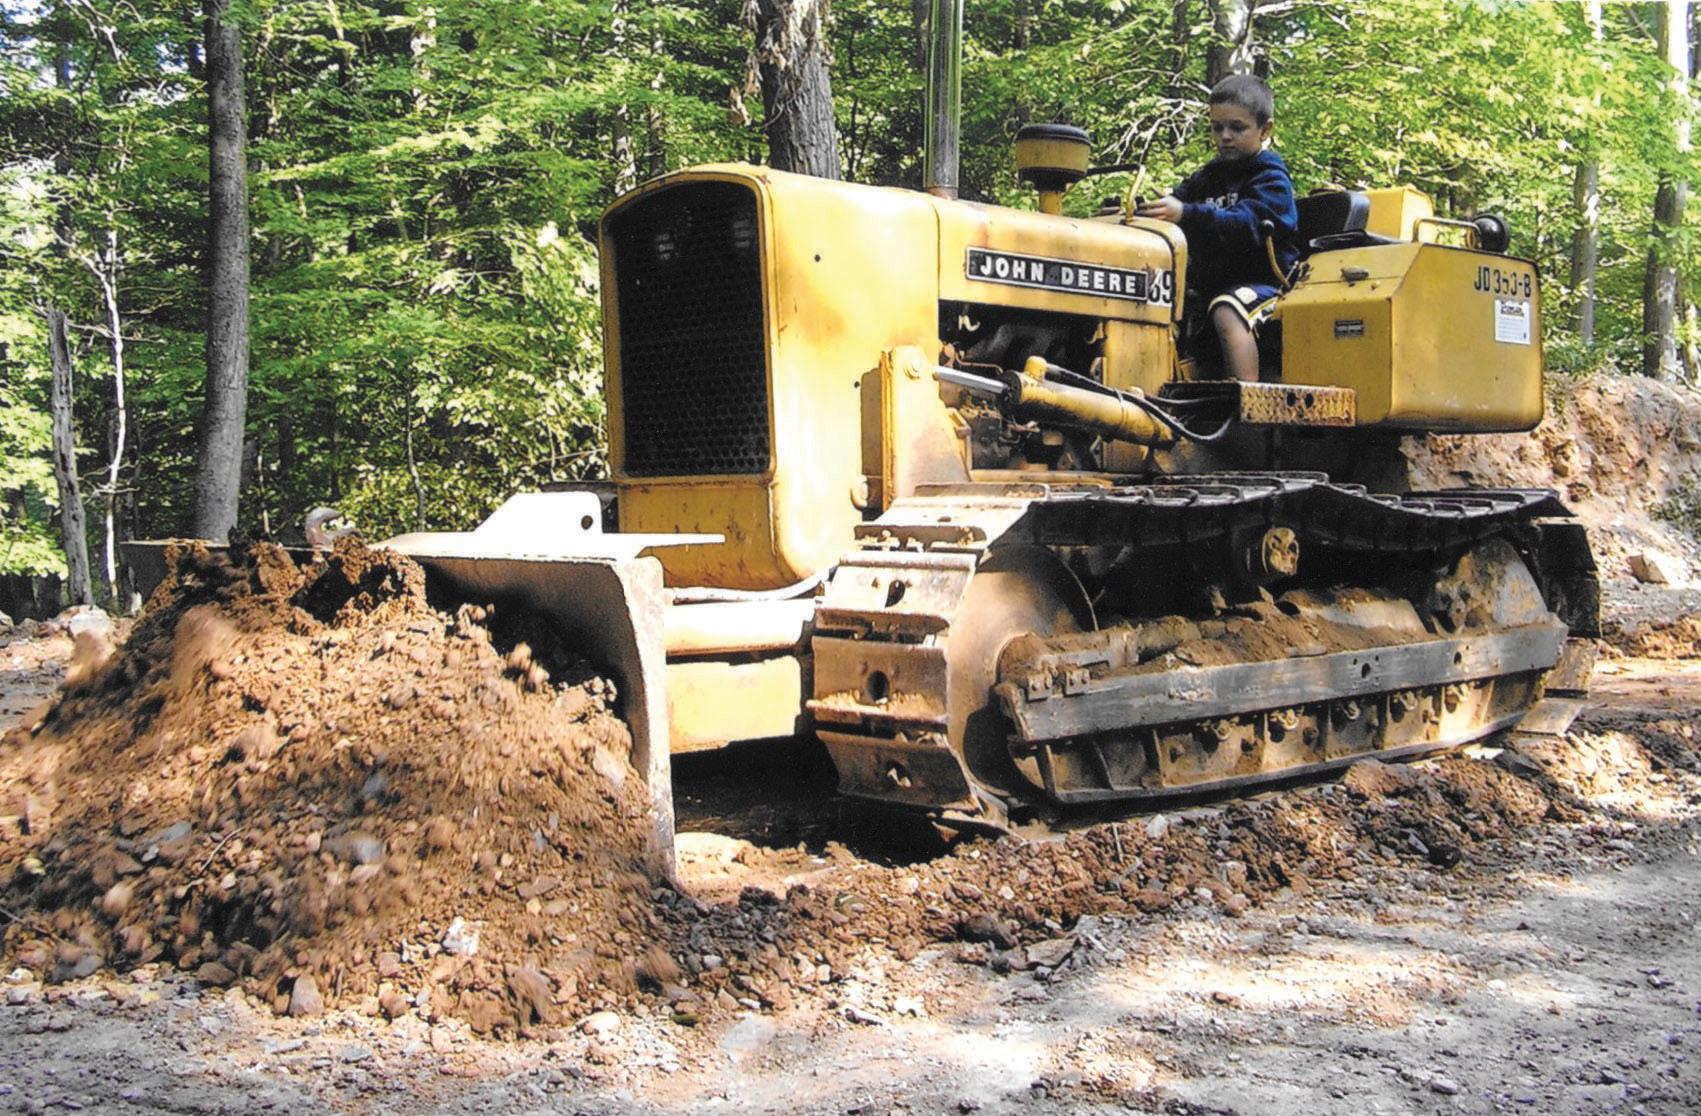
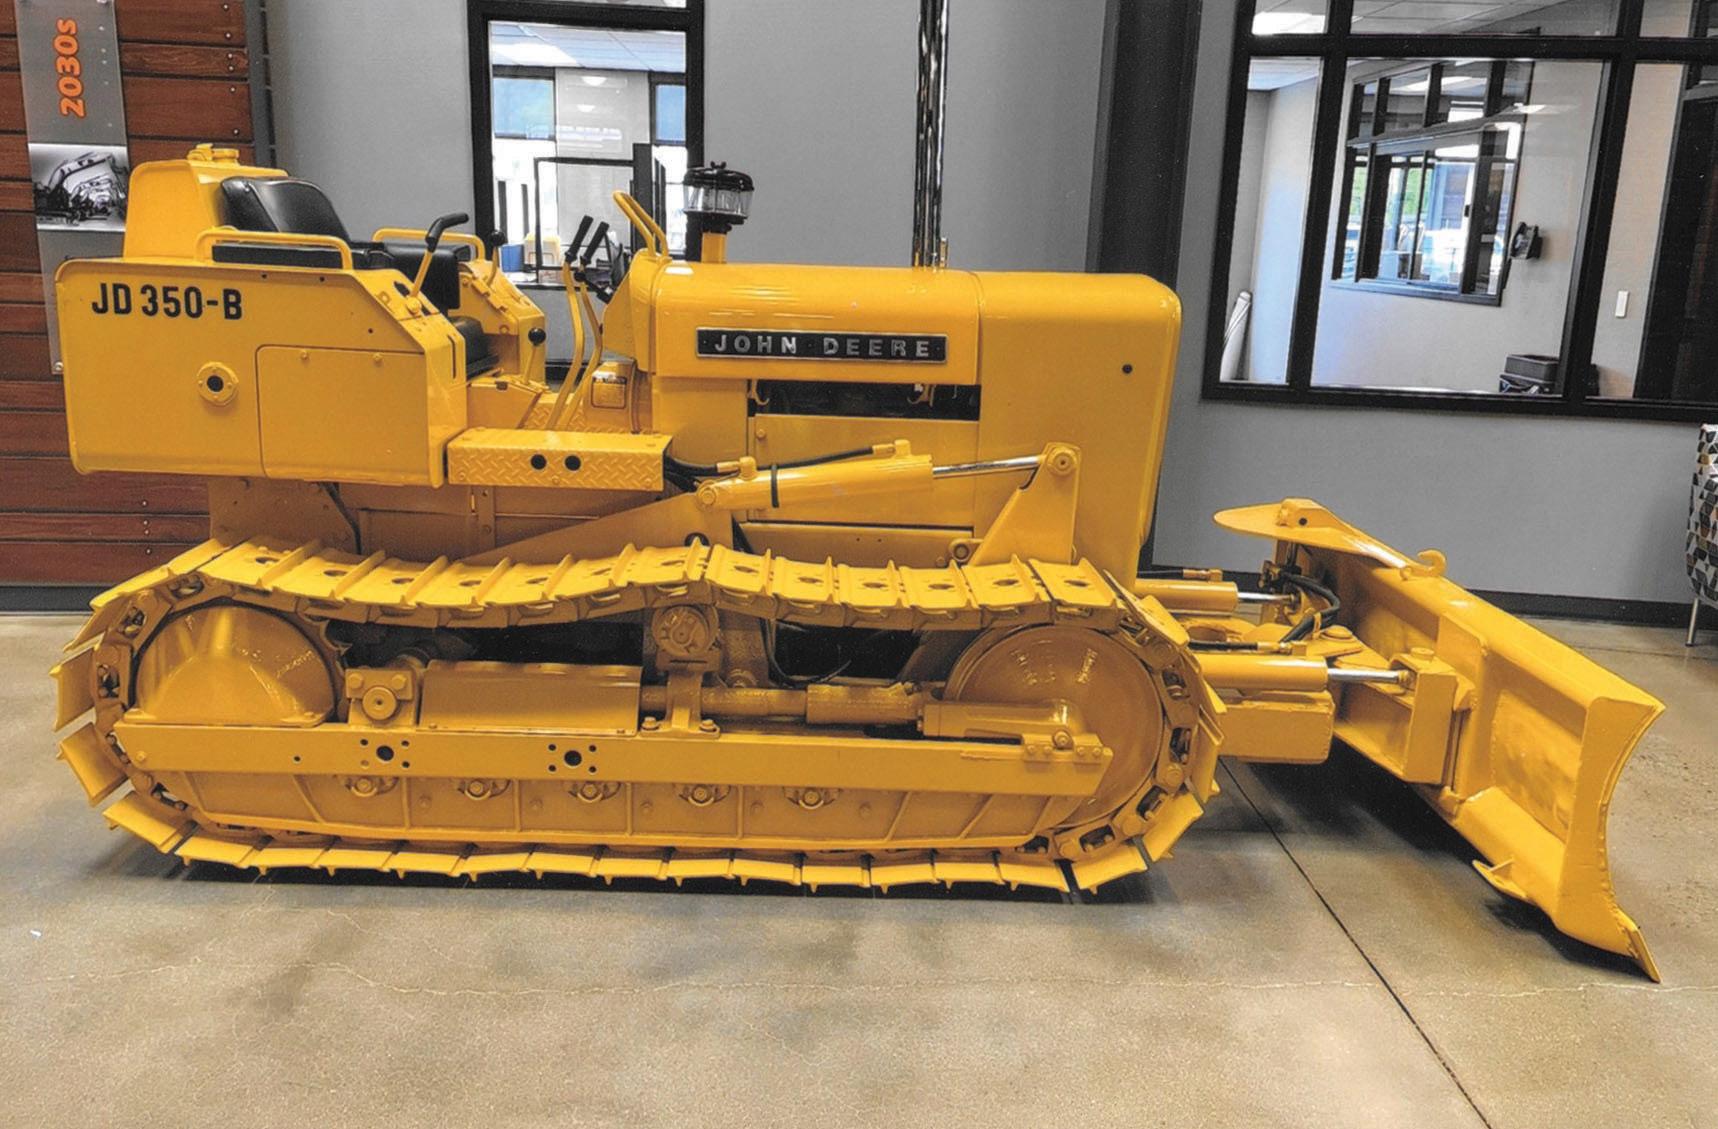
John Deere 350-B crawler
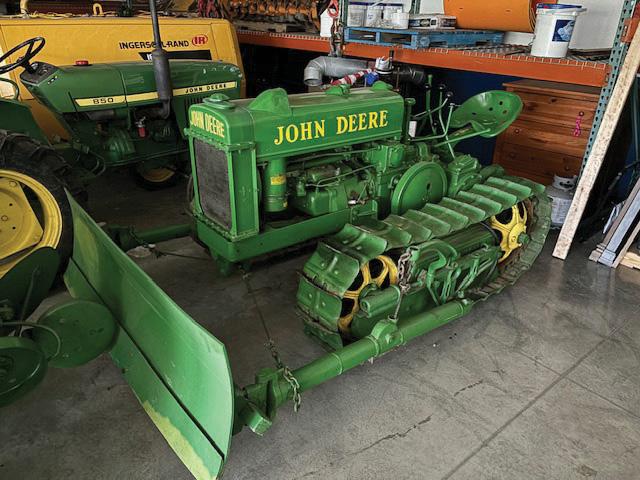
Last spring, I went to David H. Martin Excavating, Inc. (DHM) to purchase sifted topsoil to do spring lawn repairs. Upon entering DHM’s new office building, I couldn’t believe what I saw on display in the office atrium. At first glance, I thought I was looking at a John Deere 1010 crawler, but after a closer look, it turned out to be a beautifully restored John Deere 350-B crawler/dozer.
David H. Martin Excavating, Inc. was found in 1968 by David H. Martin Sr. with a backhoe, a dump truck and a dream. David Sr. operated the company from 1968 to 1988.
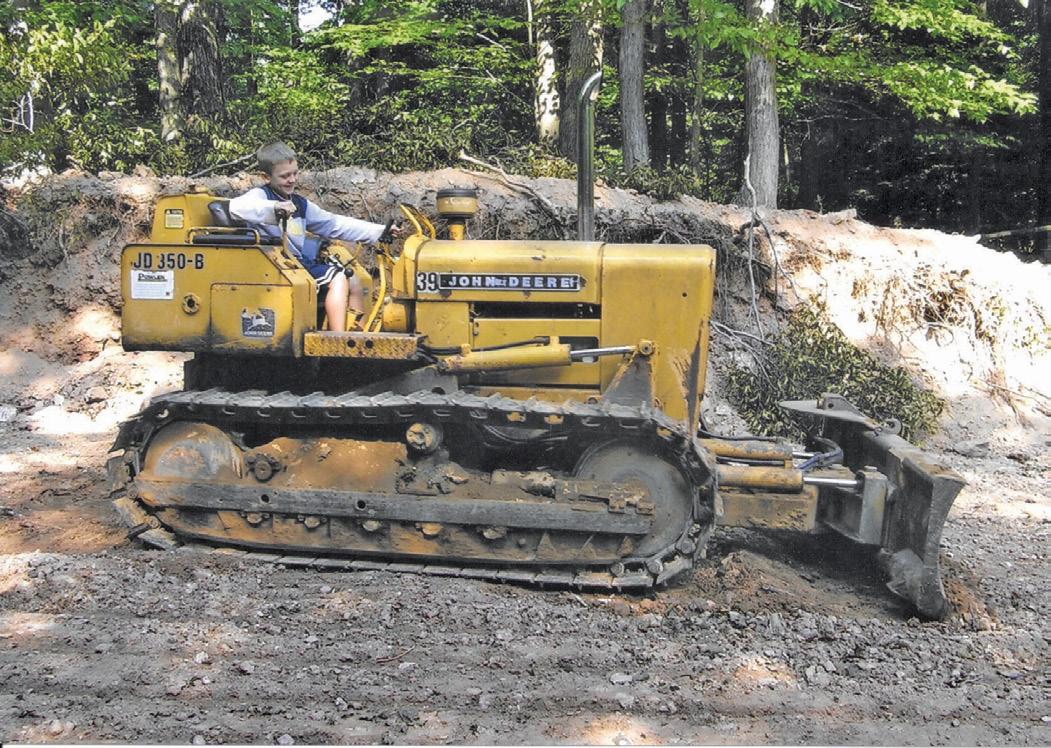
Above: Kirk Martin’s boys, Hunter and Chase, running the 350-B during the summer of 2007.
After retiring, his three sons—David H. Martin Jr., Jeryl Martin and Edwin Martin— took over the company. Today the company is owned by grandson Kirk Martin. David H. Martin Sr. founded the company based on Christian principles and today those principles are still valued by the company.
DHM purchased the JD 350-B in 1972 from a JD industrial dealership in Hagerstown, Maryland. The 350-B was then one of DHM’s main pieces of equipment for three to four years. Over those 10 years, the 350-B put in many long hours, grading and
doing sitework for new homes and small business and construction sites. Son Jeryl Martin was the 350-B’s first operator. As the company expanded, larger equipment was purchased and the 350-B was semi retired and used sparingly for many years by the Martin family, doing small jobs on several acres of mountain ground they owned. After researching the serial number (148590) at the message board on JDcrawlers.com, their data showed the 350-B to be a 1972 “E” code. The “E”
was the production code for a 350-B with a 152 CID three-cylinder diesel engine, inside dozer with reverser (shuttle) transmission and dry steering clutches.
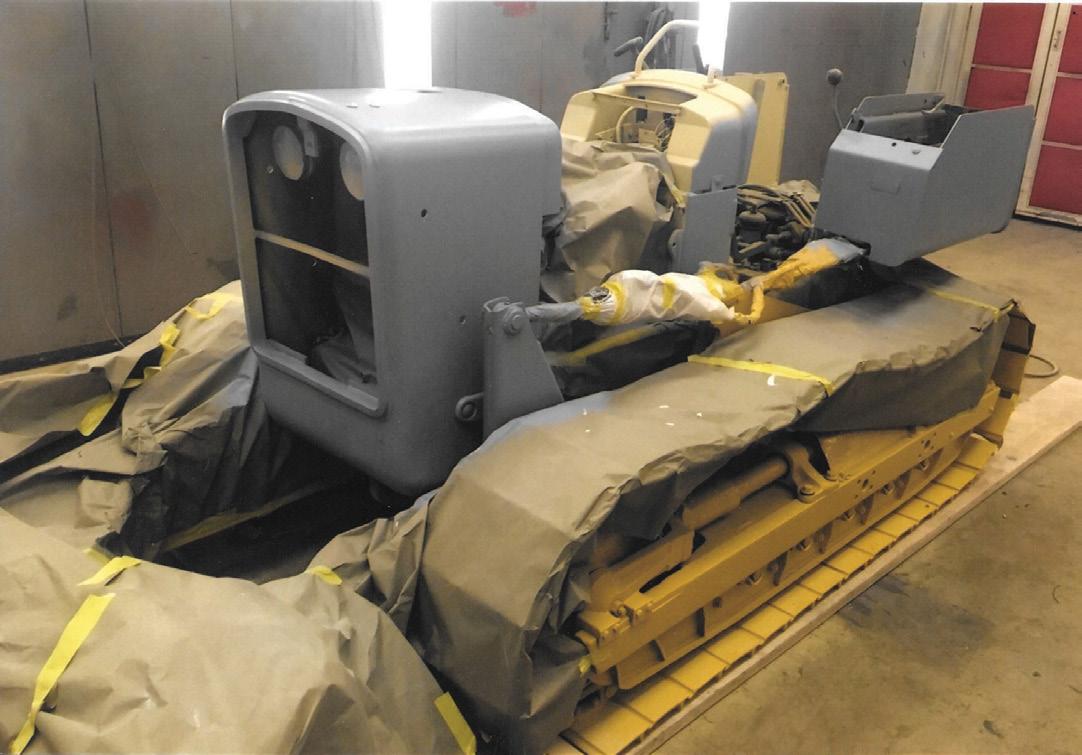
Much of the restoration work was done in-house by DHM’s mechanics and technicians to include the decals. The paint codes, decals and parts came from a local John Deere dealer. The restoration work was done in 1028 and took about six months to complete from start to finish. DHM mechanics worked on the 350-B as they had time. In 2022, DHM constructed a new addition to their existing office complex, completing the project in the fall of 2022. The restored 350-B was permanently retired and carefully moved into the new office atrium where it resides today for all to admire.
The story of the 1972 John Deere 350-B is dedicated to the memory and kindness of its first operator, Jeryl Martin, who left this work much too young after fighting a courageous battle with cancer.
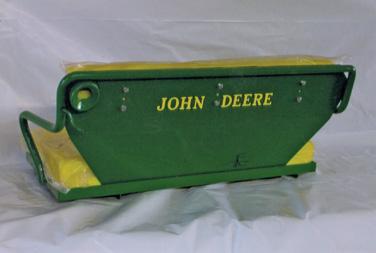
The beautifully restored 350-B on static display in DHM’s new office atrium.
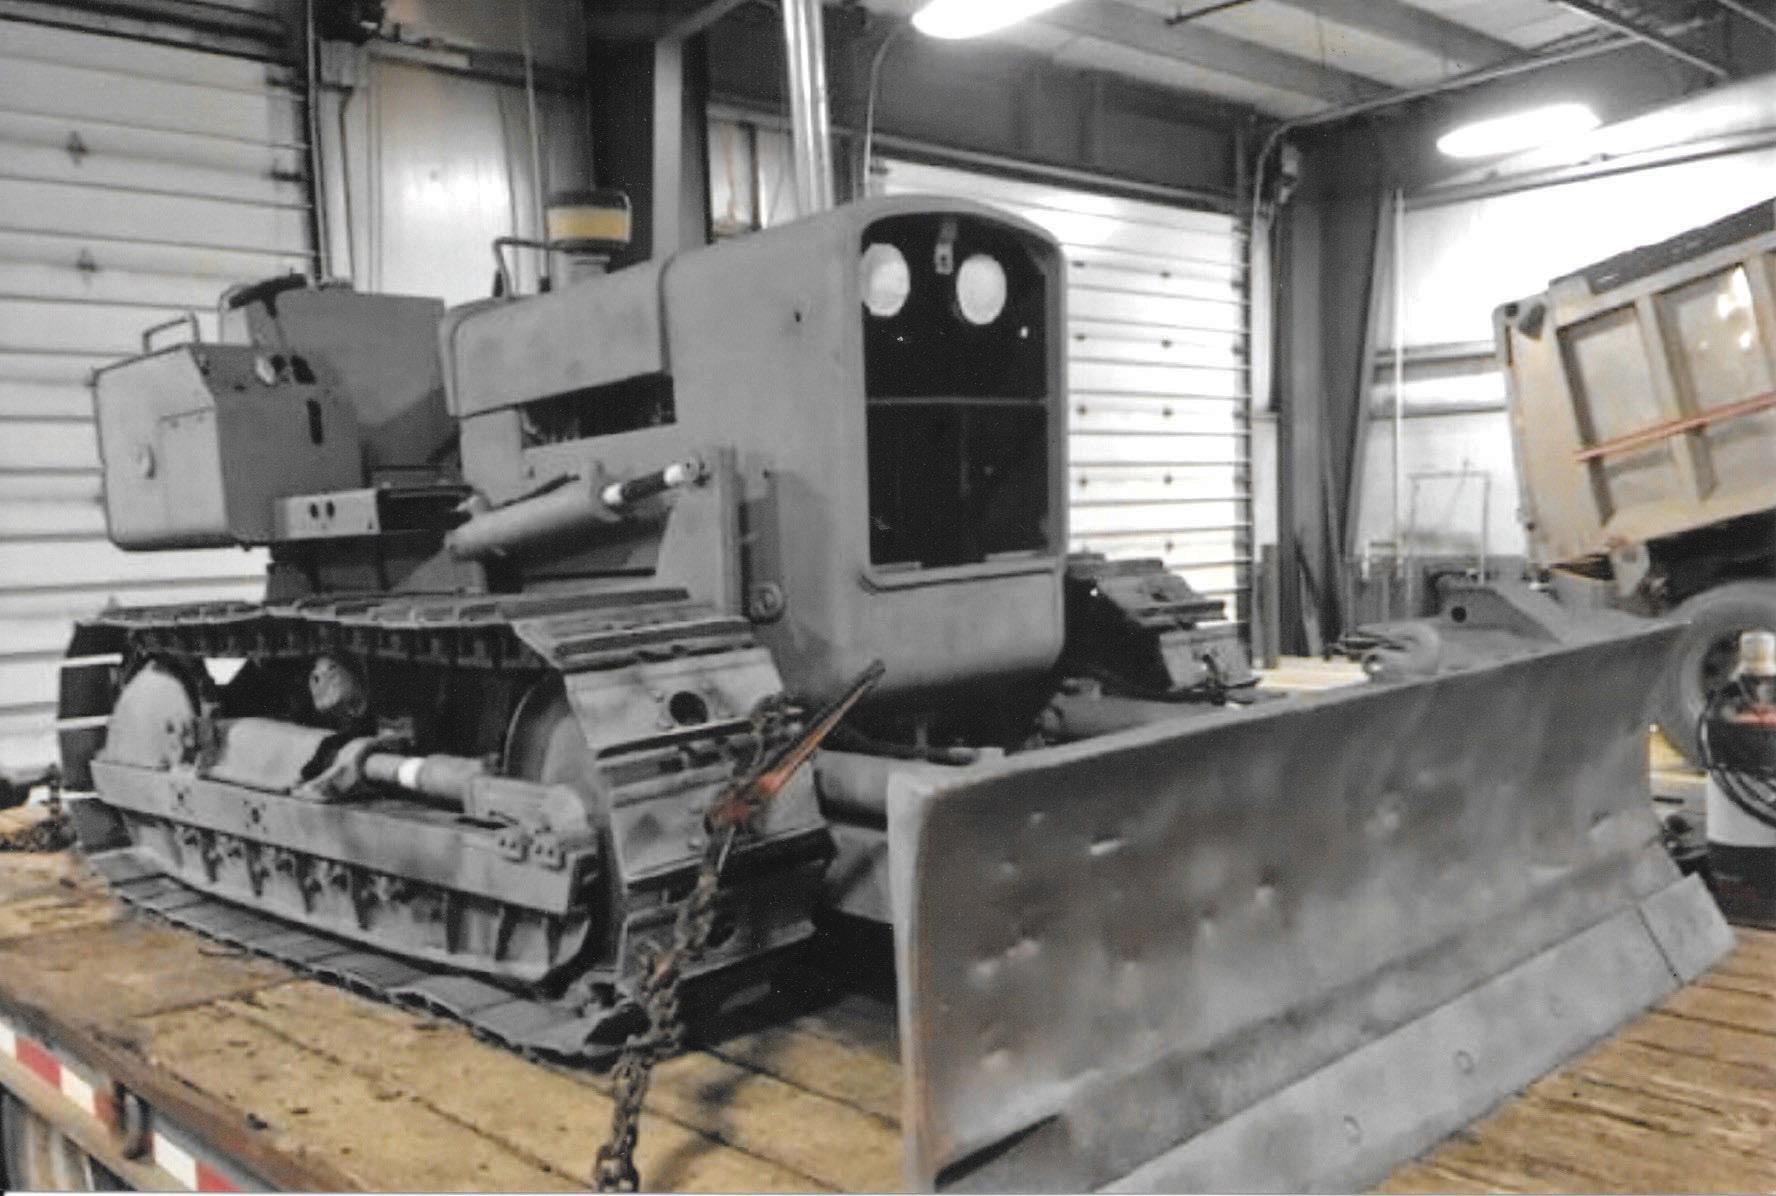
The partially disassembled 350-B.
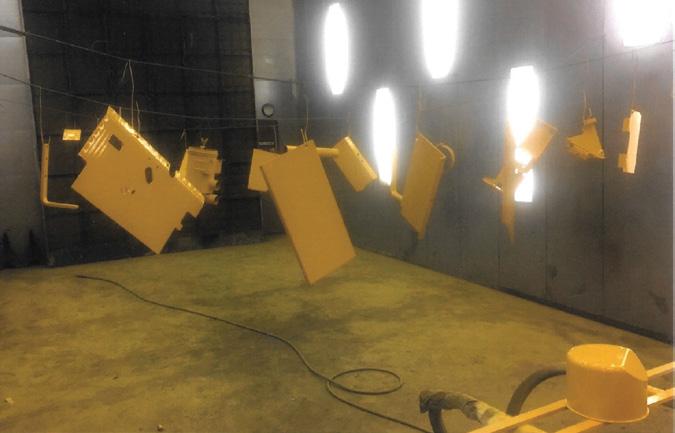
The primed and prepped 350-B, waiting for a coat of JD industrial yellow.
The 350-B ready for the paint booth.
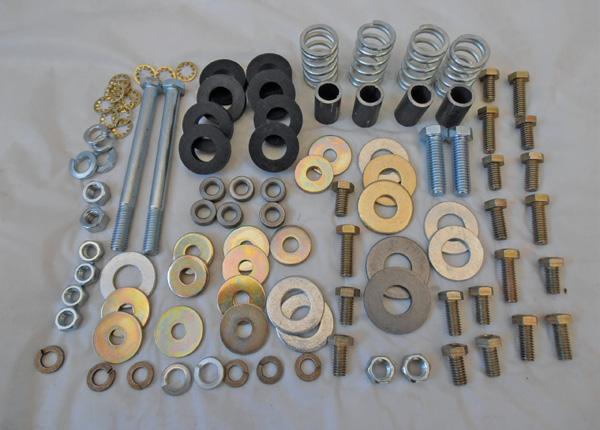
Miscellaneous parts ready to come out of the paint booth.
Lind Bros Tractor and Parts, LLC
• New aftermarket, rebuilt and used parts for JD A, B , D, G, H, M, R, 320, 330, 40, 420, 430, 50, 520, 530, 60, 620, 630, 70, 720, 730, 80, 820, 830, 3010 3020, 4010, 4020.
• Used parts include: weights, 3-pts., toplinks, dual hydraulics, float ride seats, clutch parts, hubs, transmission gears, sheet metal, tires and rims, 720-730 ES parts, all-fuel manifolds, brake parts, square and round tube WFEs, heads, blocks and PTO parts.
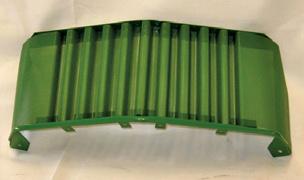
• New parts include: manifolds, battery boxes, carburetor kits, air stacks, mufflers, grill screens, radiator cores, lights and overhaul kits.
• Rebuilt parts include: Taper-Loc flywheels, electric start conversion kits, float ride seats, starters, carburetors, cleaned and lined gas tanks. Also have crack checked heads and blocks.
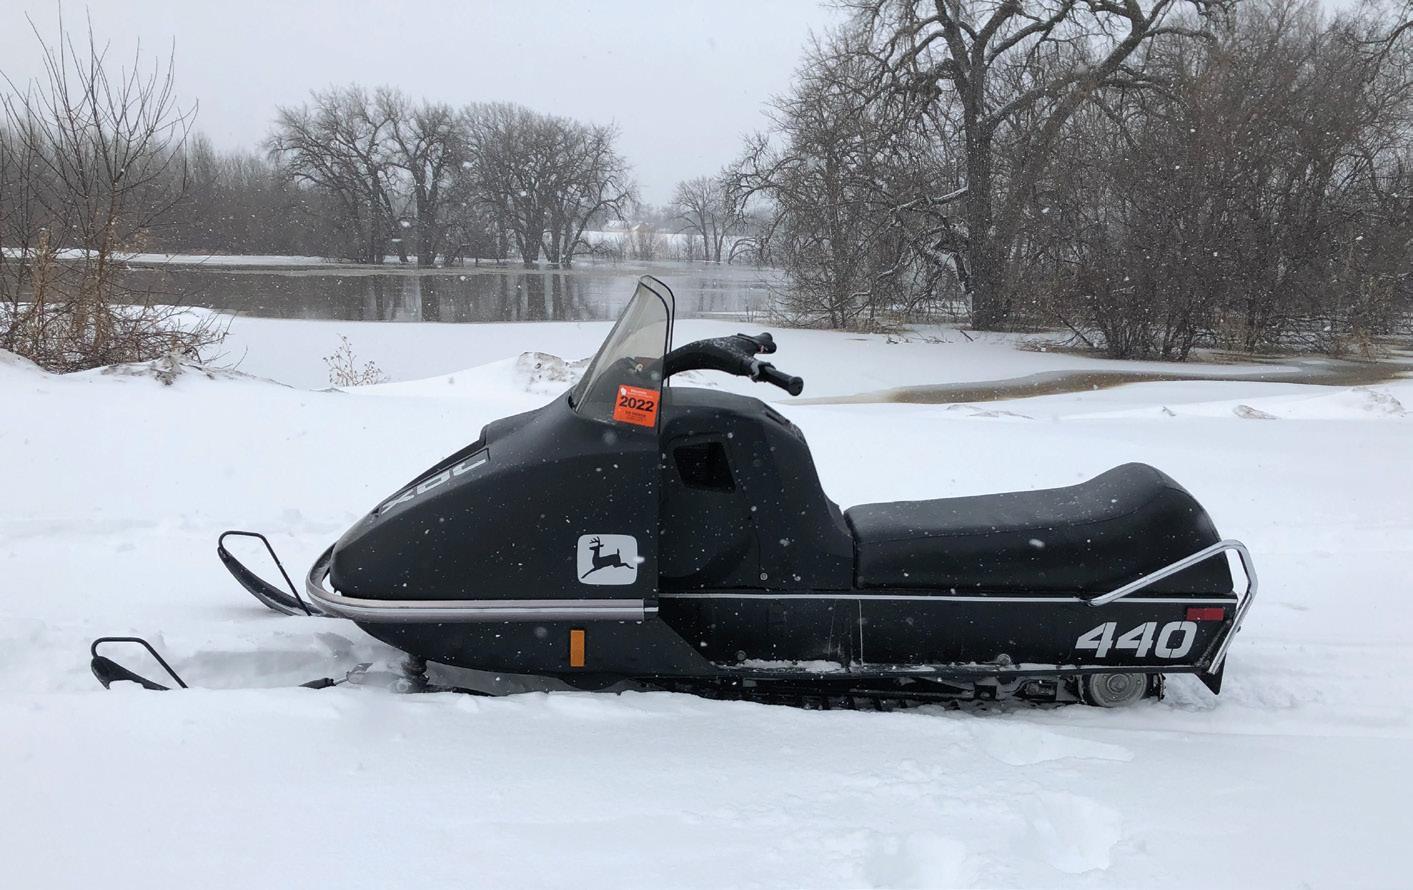
Deere’s snowmobile line up was at a crossroads for the 1975 model year. The high performance 295/s of 1974 had pushed the dated midmount chassis concept as far and as fast (or faster) as it could reasonably be expected to go. The pending release of the limited production, front engine 340/s for the 1975 race season was about to tip Deere’s hand as to what new machines might be in the pipeline for 1976. In the meantime, the Horicon, Wisconsin crew still needed to sell the existing consumer
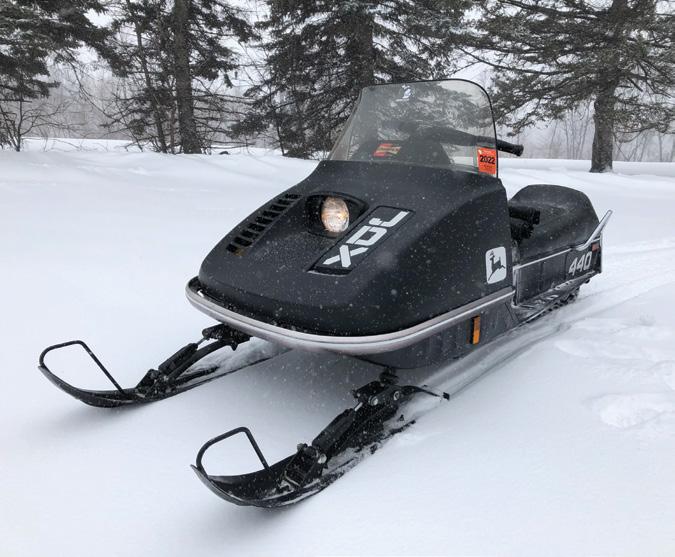
All the Deere snowmobiles received updated bodywork and a sharp new look for 1975. The JDXs were still called the JDX-4, JDX-6 and JDX-8 in the literature, but only said “JDX” on the hood the engine size proudly on the tunnel, such as “440” in the case of Jason Peterson’s beautiful JDX-8 shown here. The JDX-4 was a 340 and the JDX-6 was a 400cc machine and all were case reed motors for the first time.
line up for the winter of 1975.
For the fourth season, the selling updated variations of the same basic snowmobile concept introduced for 1972, something needed to be done without overdoing it to encourage sales. A fresh color for the bogie wheel machines, a face lift and a few technical improvements across the board would help keep things moving. The same conservative hood style that had been used for three seasons in a rapidly evolving market needed some attention. Henry Dreyfuss Associates, Deere’s long time “industrial design” consultant, was called in to give the existing machines a more modern appearance. By sloping the sides hood down, making the headlight fixed
in the center of a new, smaller fixed grill from the previous large flip up grill and changing gas cap access to a narrow flip up panel, the appearance was significantly updated. Replacing the tubular chrome steel front bumper used on most sleds since 1972 (except the aluminum bumper JDX-4, JDX-4 Special and 295/s) with a black extruded aluminum unit added to the new look along with a slightly shorter, and more sculpted windshield. The best part was all this new body work required no significant changes to the chassis, belly pan, seat, or engine cover. The molded snow flaps were also carried over unchanged, except the JDXs received unique white highlights for 75, while the 100 series still had the
The sleeker lines, “blitz black” paint and white contrasting details make the JDX-8 a more contemporary looking machine, considering that the chassis was about the same as the 1974 model.
yellow accent color. Speaking of color, the JDXs remained “Blitz Black” while all the 100 series bogie wheel machines received a sharp new color that first appeared on the 1974 JD295/s, a dark green metallic that Deere called “mean green.”
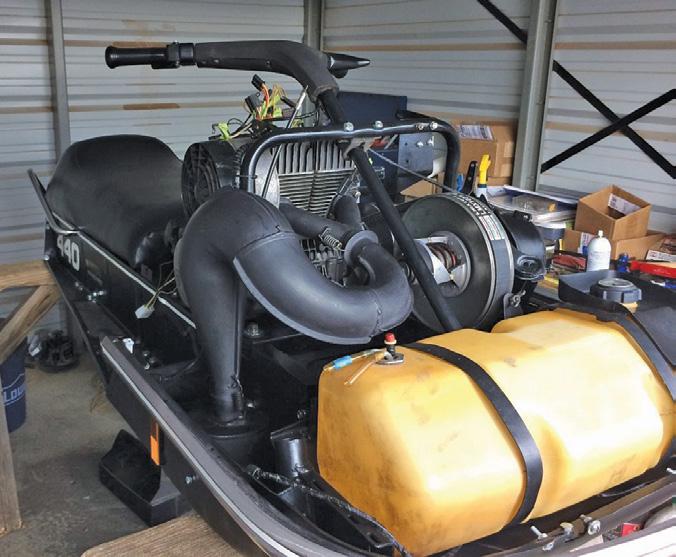
Many of the technical improvements to the lineup were welcome, such as a one-gallon larger plastic fuel tank, increasing capacity to 6.5 gallons. The larger tank not being made from corrosion prone steel was a nice touch,
Jason Peterson restored this JDX-8 himself, in his own garage with impressive results. Here you can see the large plastic tank and the unique looking and sounding “tuned exhaust” system that helped the JDX-8 perform better than most of its 440cc fan cooled contemporaries.
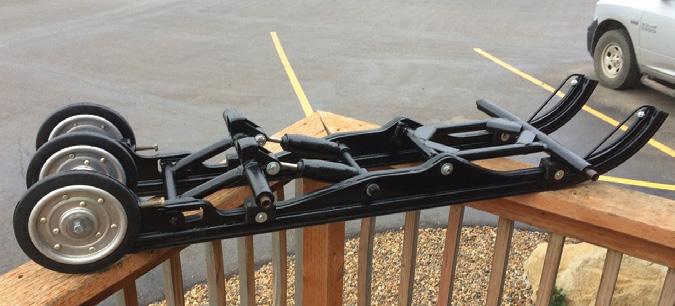
Below: In its second year of production, Deere’s steel slide rail suspension was well regarded by the snowmobile magazines of the day. It was adjustable, which many were not, it rode reasonably well, and helped the machine track well both under braking and acceleration. The dual shock set up on the rear arm was pretty advanced thinking for the day and helped to limit ski-lift under hard acceleration and prevent bottoming out on bumpy trails.
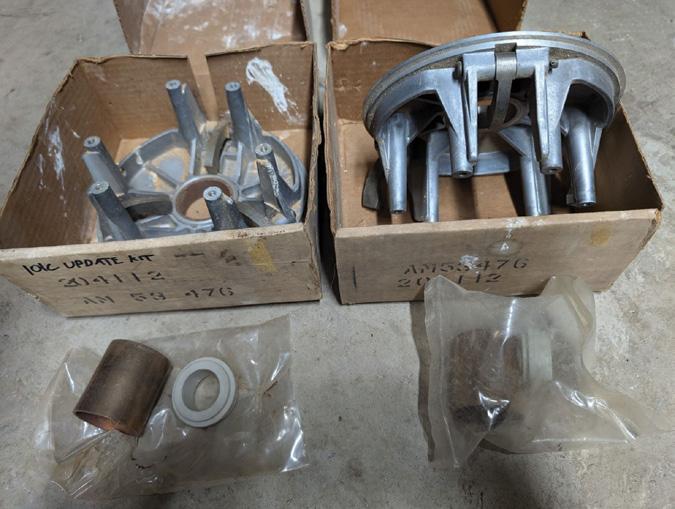
too. A clutching update to the more serviceable and durable Comet 101-C drive clutch from the earlier 100-C was more subtle, but Deere was so happy with the update that they even offered kits to update the older 1974 model and ’73 retrofit “Mod Kit 160” 100-C drive clutches while the 94D driven
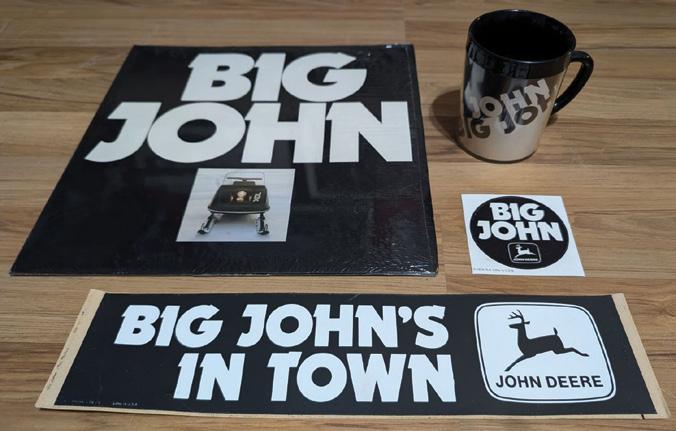
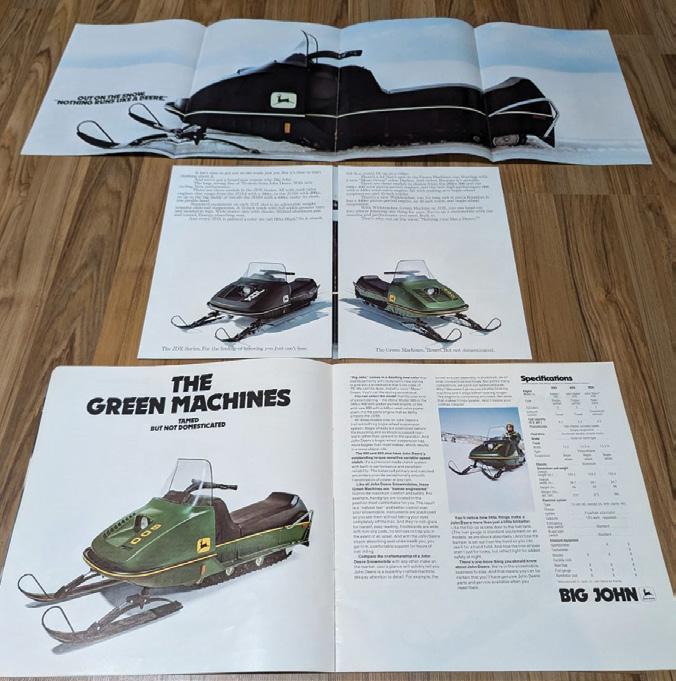
Deere marketing stepped up to help promote the updated version of what were still somewhat dated technology sleds by 1975. They came up with the “Big John” tag line and used on it stickers, “Thermo-serve” mugs, patches and even a promotional 33 LP. They even had a classic song re-written to “Big John Deere” that can be heard with a quick internet search.
Below: Deere not only published large format “BIG JOHN” full color brochures, but also ran a four-page foldout JDX-8 “centerfold” in the snowmobile magazines of the day. Page one of the fold out boldly claimed “BIG JOHN’S IN TOWN” while the dealer brochure looked much like the album cover with a slightly different action shot of the JDX-8.
remained unchanged. Interestingly enough, the skis changed slightly again for ’75, finally getting “top mount” ski shocks like Deere previewed on the ’73 factory race sleds. For the record, the skis were unique from every year from ’72 until at least ’76, not to mention specialty ones like the “round loop” aluminum ski used on the 1974 295/s. Steel skis with round loops did not show up until the ’76 model year, but despite similar appearance, all the “flat top” steel skis had subtle differences every year, mostly around the lower shock mount configuration. On top of the new ski for ’75 was also a lighter mono-leaf spring, a change from the four-leaf multi-pack used from ’72-’74. On top of the consumer line up for 1975 was the improved JDX-8. Aside from the updates all the ’75 models had received, the JDX line had been gifted a slide rail suspension the year before, along with the Goodyear “bonded” cleated track. The slightly heavy steel slide rail unit offered increased travel over the older bogie wheel system, plus both spring preload and ski pressure were adjustable. An-
Deere was confident enough in the updated Comet 101-C drive clutch to offer the AM53476 kit to update the one-year-old 100C drive clutch to the 101 specs. The kit included a new movable face, flyweights, cover and bronze bushing, plus installation instructions of course. This helped make the older clutch far more serviceable, but both units were about to be superseded by the 102-C that Deere first released on the 1975 340/s and used until the 1984 models.
other significant advantage was having dual shock absorbers on the rear suspension arm to increase control. Combined with front ski shocks, this stabilized the sled in bumps and rolls. The steel cleated track was 121 inches long, up from 118 inches as used on all the bogie wheel machines up to this point. The side rail suspension was a welcome addition to the line up in ’74, but while the “bonded on” steel cleats performed well, left a lot be desired for durability. At least the cleats could be riveted in place if they came loose or replaced if they dislodged completely.
The big news for the JDX-8 wasn’t just updated styling for ’75, or a corrosion proof plastic fuel tank. It was power. Deere had been updating the JDX-8 since the bumpy introduction for ’73, and had already updated the Kioritz manufactured case reed 440 to the “KEC440/22” from the “/21” for the ’74 model year. The 440/22 case reed motor received revised transfer
ports, and more of them to help it breath better, while wrist pins were increased from 16mm to 18mm. Due to all the detail changes, most every part of the motor was new from the cases, cylinders, heads, crank and pistons. Deere updated the exhaust system every year from ’73 to ’75, but for 1975, they went all out and designed a tuned pipe with a separate muffler. This was similar in style, but unique in color, tuning and mechanical interfaces from the 295/s unit. This exhaust gave the machine a very unique and distinct exhaust note, and helped deliver a power bump up to 46 horsepower, six more than the original X-8 of 1973.
The extra 15 percent more power gave the JDX-8 sporty acceleration, while the larger fuel tank added range, and the updated bodywork gave the machine an improved appearance. The JDX performed better than most during the spring testing in the Colorado mountains when all the machines
were expected to be down about 27 percent on power due to reduced air pressure at altitude. The acceleration was only bested by the a few of the sportier ’75 model fan cooled 440 cc “family” machines of the day like the Rupp Nitro or Sno-Jet SST, according to Snow Goer’s October 1974 issue. In the top speed performance test, the JDX-8 was able to hit 61 miles per hour on a half-mile of snow at over 9,400 feet up in the Colorado Rockies, while the average of the 13 fan cooled 440 cc machines was 59 mph, with the top speed being 66 mph with the low being 51. The JDX-8 weighed 447 pounds “wet,” while the average 440 was just under at 437 pounds, so not far off the mark again.
Snow Goer (SG) reported some downsides unfortunately. The taller fuel tank may have raised the center of gravity slightly and it’s possible the new mono-leaf springs might have raised the nose a bit, too. Testing on Snow Goer’s “tilting table” showed the ’75 JDX-8 easier to tip side to side than the comparable ’74 version. The machine would tip to the left at 34.5 degrees and 36 degrees to the right, while the ’74 model stayed glued to the table up to 41 degrees of inclination. Snow Goer claimed the 75 X-8 was 16 pounds lighter than the ’74, probably from changing to mono-leave springs, a plastic tank, aluminum bumper, etc. Deere had already changed to front chassis “power unit” frame work to aluminum for ’74, so that was not an issue here. The track and suspension were a carryover from ’74, and I do not believe the suspension was mounted any lower in the tunnel year to year. Perhaps the weight reduction, new front springs, and the taller fuel tank conspired together to make the sled less stable side to side. Seems odd, but a six-degree reduction in stability is a significant change for a sled with basically the same chassis.
comfortable ride.
Aside from the stability issue with the prototype tested in spring of 1974, the magazine generally had a favorable view of the JDX-8 as a “super quality snowmobile” and was impressed with traction and weight
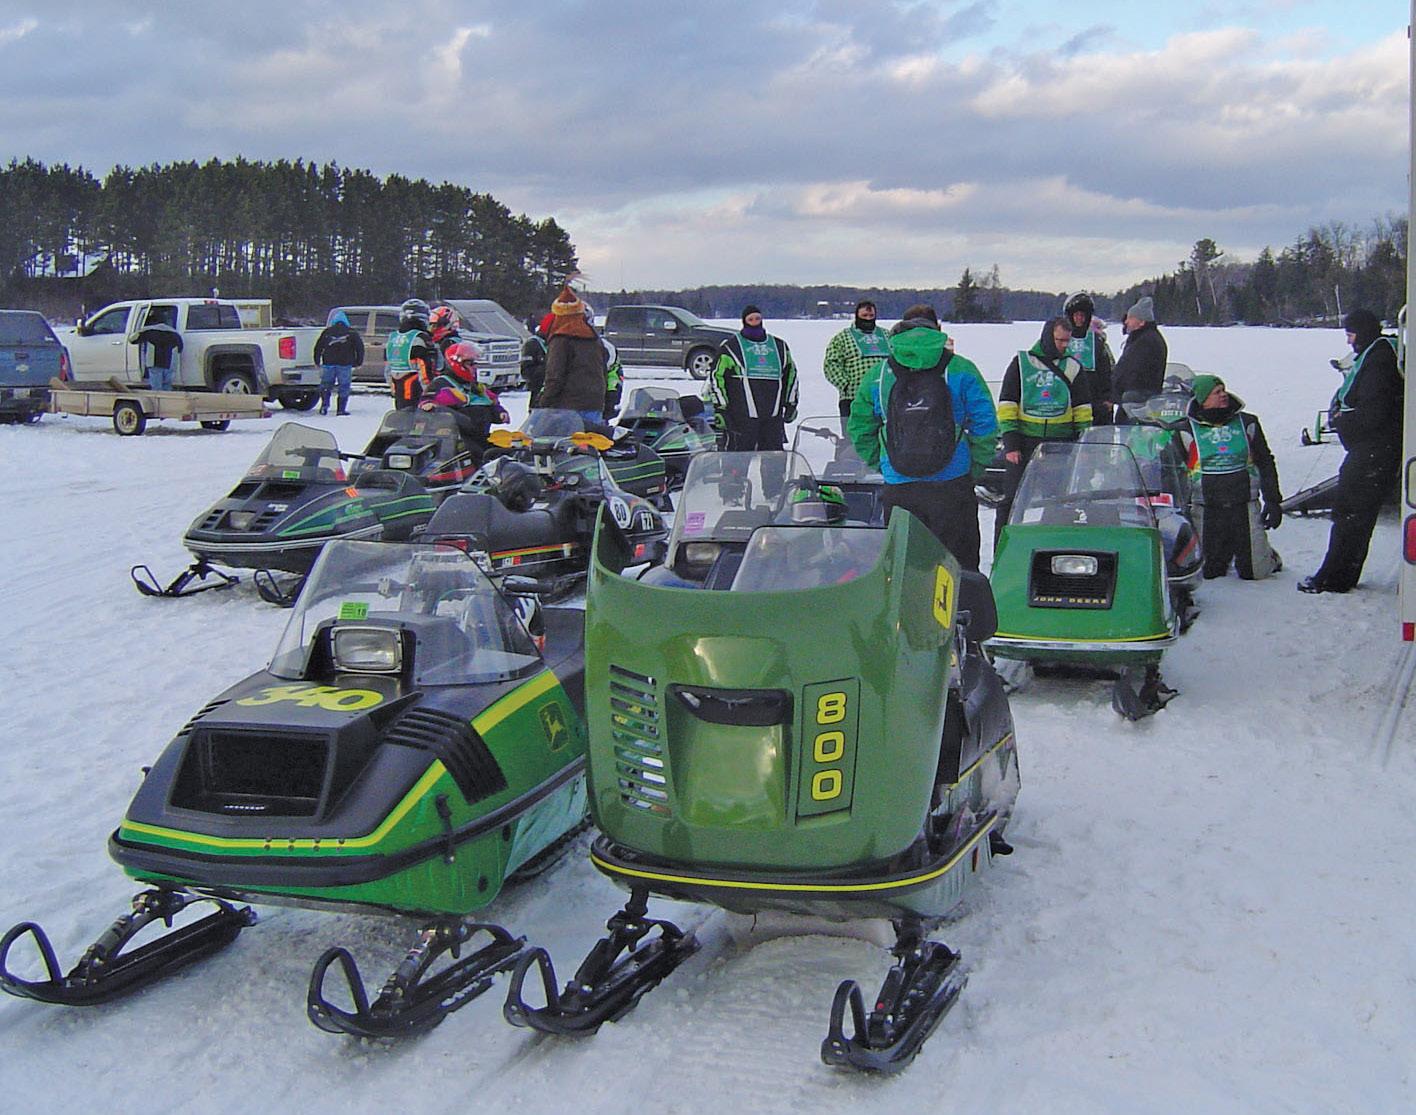
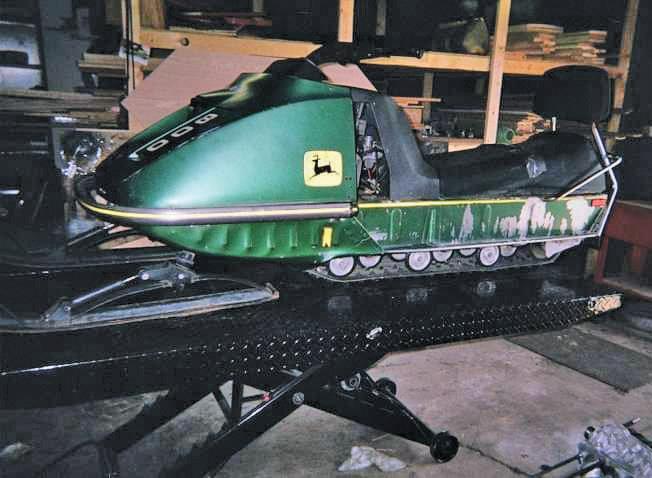
The Vintage Challenge crew stopped on Cisco Lake, at Bent’s Camp, for a refueling pit stop. While I was guiding on my Liquidator (front left), Dustin and his 800 were on my tail, having a very spirited ride. Lindner was also on a bogie wheel machine (behind the 800), showing that you can do a one day, 150 brisk ride without slide rails—although no one argued that I was having more
In February of 2018, Dustin Elder warmed up his “Mean Green” model 800 while Jason Peterson did the same for his “Blitz Black” JDX-8 as they prepared for the start of the HoF Vintage Challenge. Basically the same sleds with different paint and suspensions, it was fun to see how hard and fast Dustin could ride his 800. He said the plastic skis and gas shocks really help keep the front planted and the bogies keep things “interesting.” Jason preferred his JDX for the 150 mile day we had ahead of us.
transfer of Deere’s steel slide rail suspension. SG also commented on how 62 percent of the engine power reached the track, stating the Deere/ Comet clutching system “provides steady torque to the track.” In summary, the magazine claimed that “JDX-8s are sturdy machines, engineered and built to last…” Our vintage riding group can generally back up the durability claims, as collectors like Brian Lindner have driven ’73 and ’74 JDX-8s on the Hall of Fame 150 mile “Vintage Challenge” ride most every year since 2009, and Jason Peterson has put many miles on his ’75 JDX-8 since joining us a few years later.
To help promote the updated line up, Deere’s marketing department came up with the “BIG JOHN” tag line for the brochures, bumper stickers, patches, hats, mugs, and even the infamous 33 RPM LP that featured a 1975 JDX-8 on the cover.
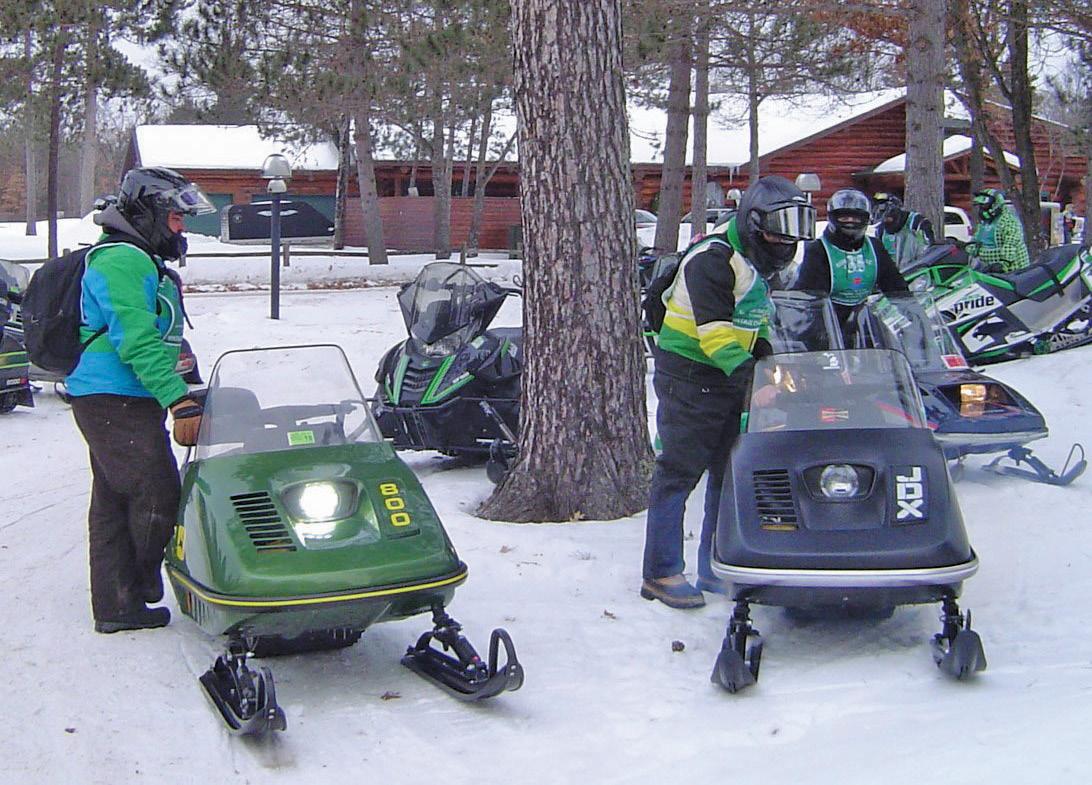
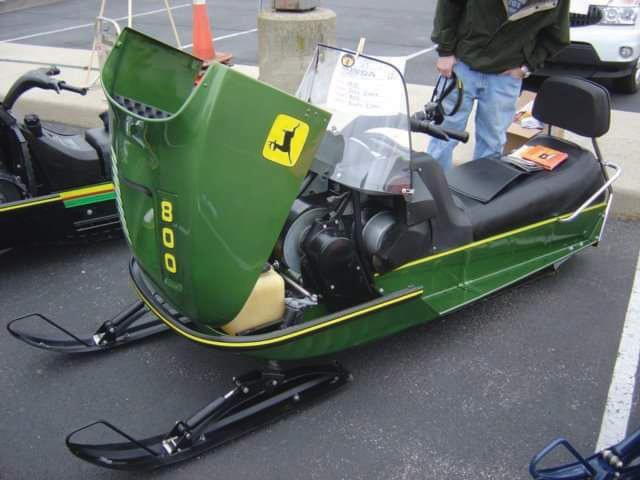
Just to keep things interesting, Deere also made a twin to the JDX-8 for
the 1975 model year. The 440cc piston ported model 500 was discontinued after ’74, and replaced with a machine called the “800” for 1975. The 800 was much more than a 500 with a new face and a dark metallic green paint job, however, as it was basically a “mean green” JDX-8 with, of all things, bogie wheel suspension under the tunnel.
The 800 and JDX-8 shared the same KEC440/22 case reed engine, single Walbro carb, and tuned pipe exhaust. Most all the updates the X-8 received could be found on the 800, from the body work, clutching and even the mono-leaf ski springs, top mounted shocks to the larger plastic fuel tank.
To provide spark, all of the JDX/800 twins were crated out of Horicon with breaker points ignition, similar to the 1974 JDX-8. However, Deere decided to offer a Presolite CDI (capacitor discharge ignition) kit after final assembly. Take rate must have been very good, as few collectors have seen a 75 X-8 or 800 without the
CDI ignition kit installed. This was an updated “B” version with less plugs from the first gen “A” CDI used on the 295/s and 340/s machines, and more like what came out on the later ’76 to ’78 models. The kit also included revised heads to help reduce pre-ignition. General consensus is that most of the sleds were probably updated before they left the dealerships in the winter of ’74 to ’75, but documentation is scarce.
While appreciated by many collectors and vintage riders, the 800 is somewhat of an oddity in the line up, having Deere’s top of the line power train with their entry level rear suspension. Maybe some folks were really reluctant to give up the tried-and-true bogie wheel suspension? But based on my experience with trying to keep pace with Lindner’s ’74 JDX-8 while crossing a windblown Wisconsin lake, the dual shock slide rail suspension sure rides a lot better than Deere’s bogie wheels. Brian was just comfortably cruising along at 55 mph while I was having a small “rodeo” trying to keep up on my ’72 model 400, bouncing all over the place. I was laughing in my helmet over the whole thing, while Lindner insists “there is no difference in the ride between the two sleds, just the riders.” I beg to differ, but he did not offer to switch sleds to prove me wrong either.
So how do the JDX-8 and 800 compare on the trail? Fortunately for us, John Deere collector and rider Jason Peterson owns both a 1975 JDX-8 and an 800 snowmobile. Lindner and I have been fortunate to have ridden “Bogie Bash” and “Vintage Challenge” rides with the very well-prepared Jason on both his JDX-8 and his 800. He personally restored both machines in his garage, and they look and run like new. Jason says that “seat of the pants” feel of each machine is quite different. The JDX-8 tracks nice and straight, even under power and is more stable at speed. He describes his 800 as a little “squirely” and maybe even a bit overpowered. He purchased and restored his 800 first, and on its first ride, he kept pulling over to inspect the rear suspension as the back of the
machine felt bouncy and was sliding out a lot more than expected. Turns out nothing was wrong; it’s just how 800s ride and handle. He found the slightly longer cleated track of the JDX-8 and the dual shock dampened parallel slide rails to be far more planted and stable. For longer runs like the 150 mile “Vintage Challenge,” he prefers the JDX’s smoother, more controlled ride, but for shorter fun runs, the 800 is preferred. Apparently, the squirely ride also equals “fun” to a seasoned mid-mount/bogie wheel rider.
A few of our other friends concur with Jason and claim their own 800s as their favorite vintage Deere rider. Dave Clark calls his 800 “overpowered” but yet “fun” as it is pretty easy to break the track free, even in a straight line. Dave especially likes the simplicity of the single Walbro carburetor for ease of tuning and maintenance. He also speaks highly of the Comet clutch package. Dustin Elder has driven an 800 harder than anyone I have ever seen, and he has described the handling as everything from “erratic” to “squirely” but generally agreed that “squirely” was probably a nicer way to describe it. Dustin upgraded his 800 to modern plastic skis and carbide wear runners, which he claims drastically improved the handling. As Dustin reminded me, you cannot adjust the ski pressure on a bogie wheel-equipped John Deere like you can on the slide rail machines as the bogie springs are not really adjustable.
The front end of an 800 can tend to “float” on corners. Carbide tipped
Right: Deere dealers displayed these four-foot-tall two-sided posters on a rotating seasonal display to promote the updated 1975 models and highlight the features including Deere’s excellent multi-layer seat, tracks, suspensions, clutching and engines. After snowmobile season was over, these could be flipped over to advertise bicycles, chainsaws and snowblowers.
This “before” pic is Dustin Elder’s 800 at the start of his comprehensive restoration. Note how the 800 received all the updates the JDX-8 did for 1975 including the mono-leaf skis with top mounted ski shocks, new bodywork, etc., but kept the original Gates track and bogie wheel suspension. The combination of a high output fan cooled motor and old school suspension makes them “fun,” according their owners.
wear bars on the bottom the factory steel ski helps, but the deeper keel on the plastic ski effectively moves the bottom of the ski downward, increasing steering pressure. With Dustin’s strong running KEC440/22 under the engine cover, he really enjoyed the performance of the machine. He also agreed that it was odd that the 800 even exists and agreed that while it is fun for a seasoned bogie wheel/midmount engine rider to handle, it’s really overpowered for its old school chassis.
By the time Dustin was done with his 800, it was an awardwinning show machine, shown here still wearing the original steel skis. But, he was not afraid to ride it aggressively either. We still laugh when we talk about him sliding and bouncing through rutted trail corners as he kept pace with my Liquidator. Good times with these great guys are what collecting these machines are all about.
I am just glad to see both models on the snow, but the idea of riding a bogie wheel machine with 18 more horsepower than my ’72 model 400 does sound “exciting”…even if I wouldn’t have enough suspension to pass Linder’s ’74 JDX-8 on a bumpy trail.
Photos by Jason Peterson, Brian Lindner and Joe Rainville.
Joe Rainville is from Fort Worth, Texas. To contact him, send an email: joerainville@hotmail.com
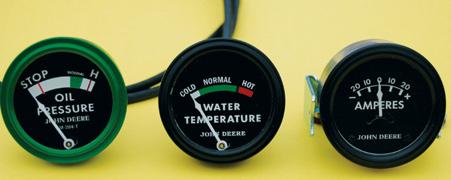
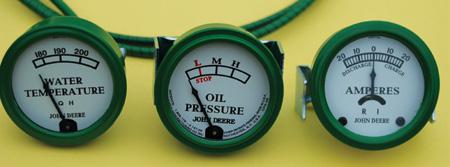
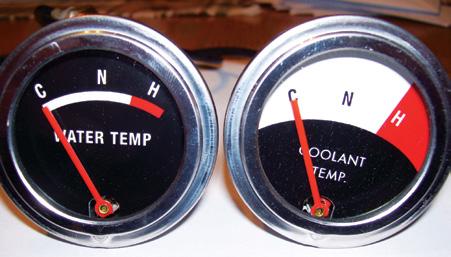
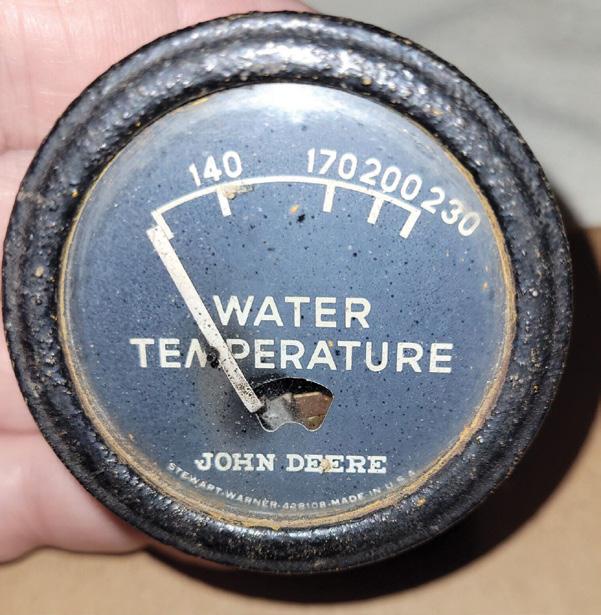
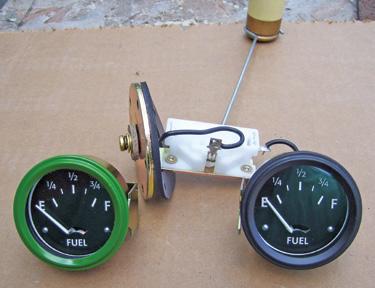
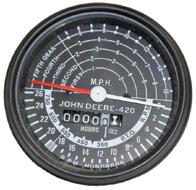
with white or black faces for most 2-cylinder models for the unstyled to the 30 series, Waterloo and Dubuque built models Made in the USA
• All gauges have real glass
• On hand, ready for shipping
• Painted, ready to install
• Gauges come with mounting clamp and hardware
• Faces made by Jorde Decals and have all details of the original gauges
• All gauges are calibrated
Before the “D,” even before the Waterloo Boy, Deere had Joseph Dain’s All-Wheel Drive tractor. This machine had three wheels, one large one in the rear and two smaller ones up front. The engine drove all three of these wheels, and the tractor was reportedly a powerful puller. The effectiveness of putting power to all of a tractor’s wheels was clearly proven through testing—both scientific and anecdotal.
The Dain tractor ended up being abandoned, and afterward, Deere focused on more “conventional” two-wheel drive tractors for quite some time. In the early 1950s, though, the company looked again at four-wheel drive tractors. Machines from Wagner and Steiger were beginning to draw attention, and Deere’s allies, the Lindemans, told Deere that four-wheel drive tractors could outperform tracked machines in many circumstances. Farmers in certain areas claimed that a four-wheel drive tractor was a necessity on their farm, and they longed for one of these built with the quality that Deere was known for. For a tractor like that, they said, they would be willing to pay top dollar.
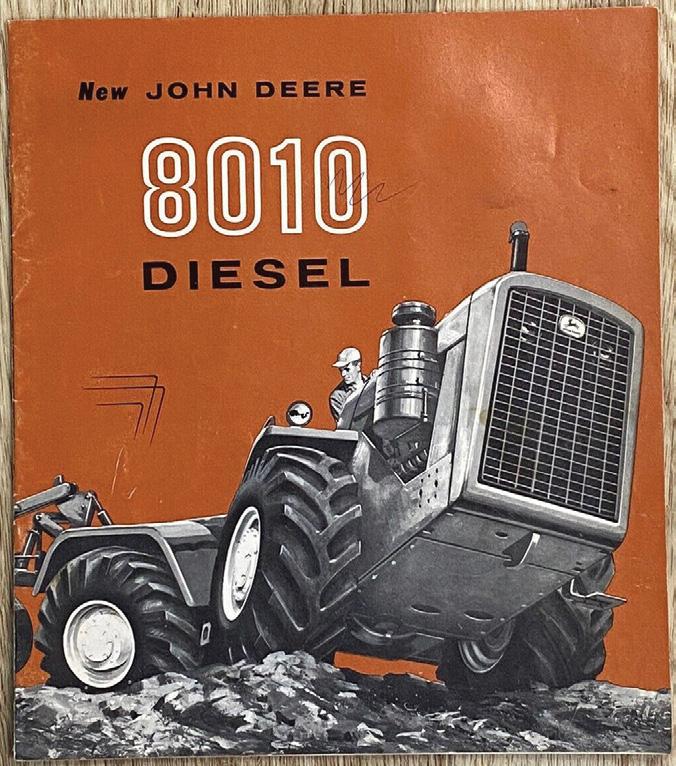
Deere heard these words and built a tractor that was about as big and bold as 1960s’ money could buy. The 8010 boasted a 200 horsepower
engine and four-wheel-drive. It could pull an eight-bottom plow and gangs of other tillage or seeding equipment to cover ground at amazing speed. Customers shied away from the 8010, though. Perhaps Deere had gone too far with this machine too soon. It was expensive—probably more than most farmers would ever have guessed. It was also built with many parts purchased from other manufacturers, and those who were die-hard Deere fans were a bit wary of a machine built of parts not engineered by the name they
most trusted. It took years for Deere to sell the 100 tractors they had built.
Another attempt at the fourwheel drive market occurred in the late 1960s when Deere worked with FWD-Wagner to sell the WA-14 and WA-17 tractors. In a partnership that lasted less than two years, Deere sold even fewer of these tractors than they did of the 8010, owing again to high cost, enormous size, and the fact that they were not designed or built by John Deere.
Despite the poor market per-
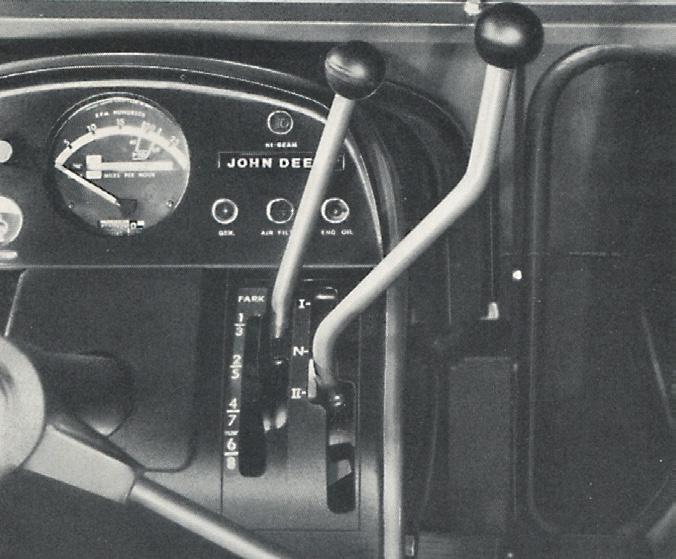
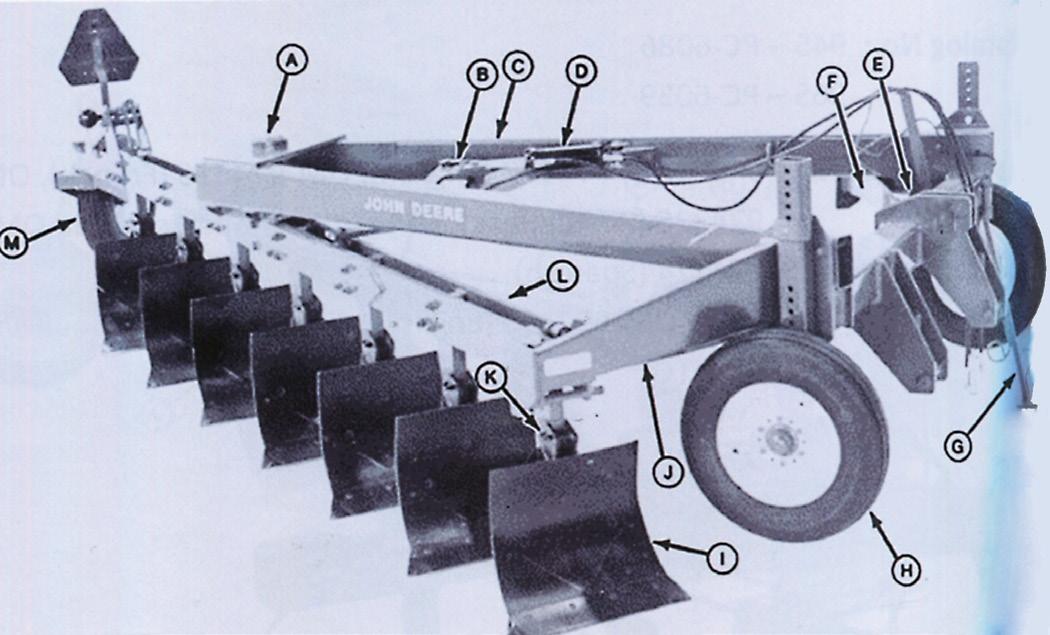
Two levers provide fast, easy speed selection. The left-hand lever lets you select the gear station; lever at right controls high, low, or reverse selections within that range.
formance of these tractors, Deere still managed to get something out of them. The company’s engineers learned a lot working with the machines. They learned what a four-wheel-drive tractor could and could not be. They found out what it took to make them work well. They also discovered what customers did and did not like about Deere’s examples. Deere had also found some success in the four-wheeldrive model 440 log skidder. They were ready to produce a new machine that was all their own, and they were confident that it would be a success.
One of the reasons Deere was so confident was that they were about to open the four-wheel-drive market up to a much larger audience. Until this point, the tractors were only useful on small grain farms. The tires were too wide, the bodies were too low, and the machines were too heavy for row crop farms. Besides that, many could not follow a row through a turn. Deere was about to change that. A four-wheel-drive tractor built for row crop farms would provide the farmer with better traction, especially in hills; it would likely create less soil compaction, and the increased pulling power would mean that 12 or 16 row planters could be used.
Another exciting thing about this new tractor was that it would be built of Deere parts in a Deere factory. This had been a sticking point for the
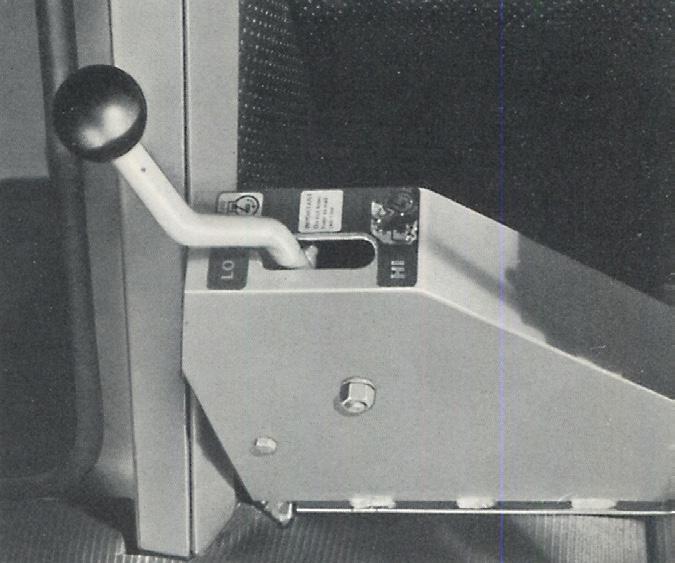
Optional high-low adds eight extra speed choices to the eight-speed Syncro-Range transmission (16 speeds total). The most often. Used working gears are brought close together to enable you to accurately pinpoint speed and power to individual jobs. Simply depress the clutch and move the lever to the high or low range as desired. Fast, easy, effective.
customer with all of Deere’s previous attempts at a four-wheel-drive tractor. Righting this wrong was sure to help with sales of the machine. It seems like Deere was trying to put those past tractors behind them. In advertising literature, Deere published, “Some competitors may boast about their purchased ‘off-the-shelf’ parts. John Deere agrees, most of those parts are good ones—for use in the trucks for which they were originally designed.” Was Deere poking a little fun at their past selves? Perhaps, but they were about to fix that mistake.
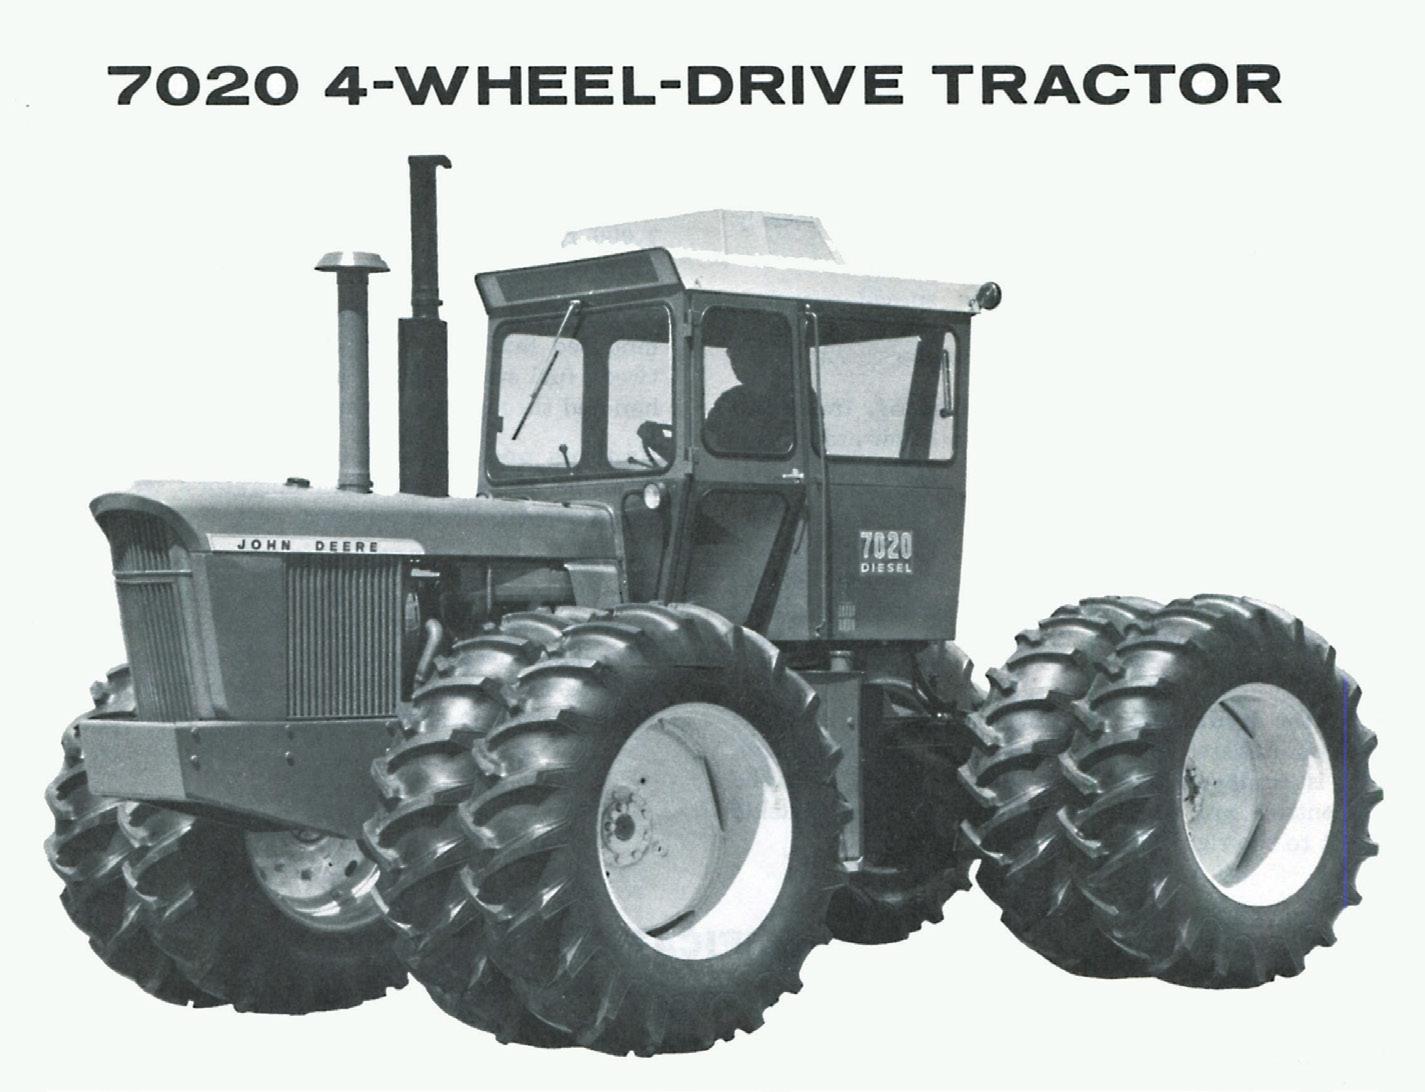
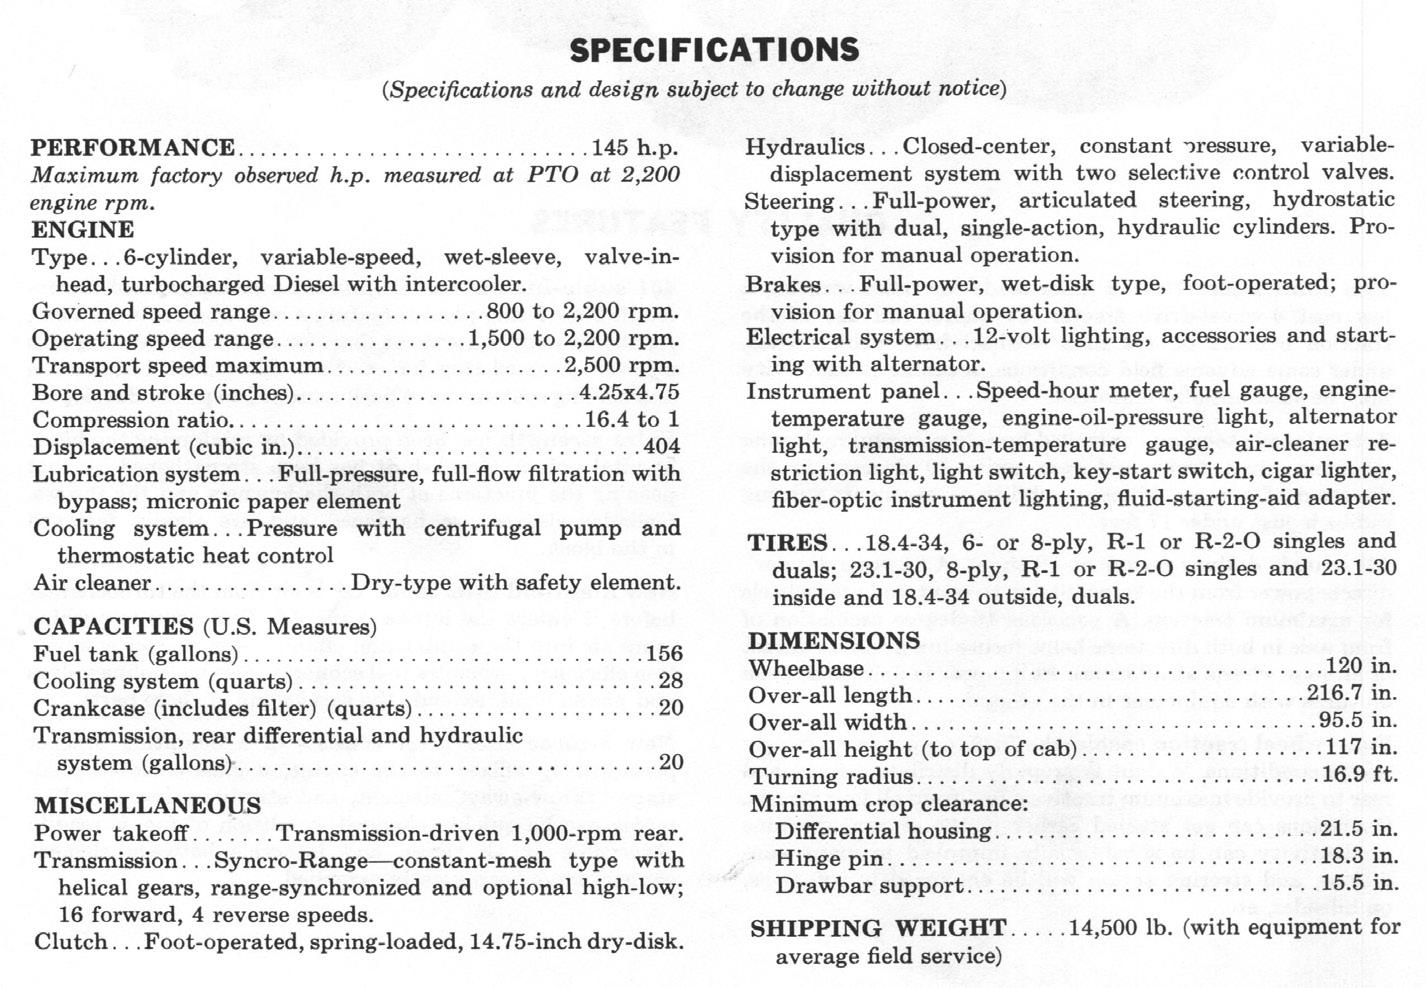
The new tractor designed and built by Deere was the model 7020. The tractor’s engine was a turbocharged and intercooled version of the 404 cubic inch diesel. This engine was proven strong, responsive, and reliable and powered some of the best tractors ever built, including the 4020. The 7020’s engine was tuned to produce 146 horsepower. When tested in Nebraska, the 7020 made 14.28 horsepower hours per gallon of diesel. This efficiency practically matched that of the 4020, which was 14.20. The drawbar pull test showed the 7020 pulling over 18,000 pounds. The 4010 topped out at just
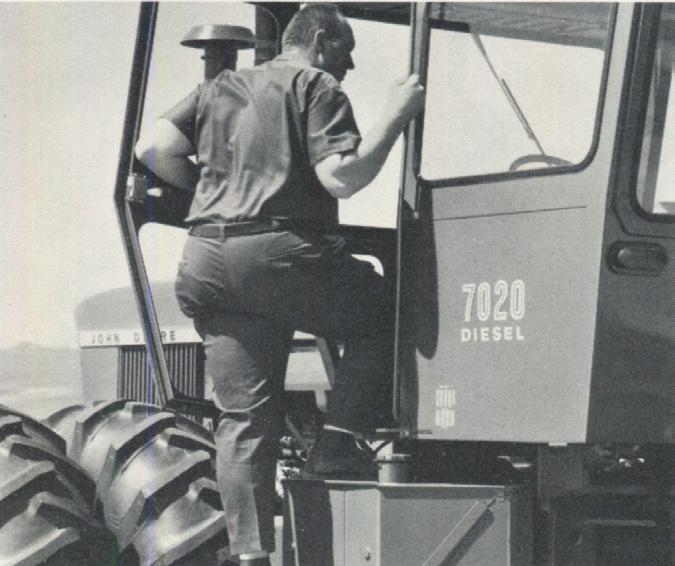
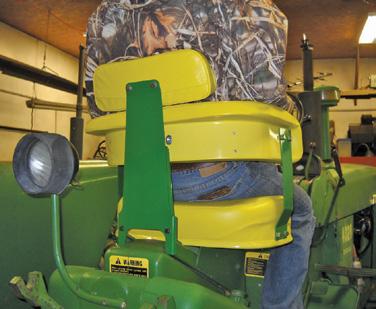
A sturdy Roll-Gard cab was regularly provided. A heater, air conditioner or both could be provided to enable the customer to heat, cool, dehumidify or pressurize the cab. The cab is entered with ease from the left side and featured tinted glass, completed lighting, windshield wiper and acoustical padding on ceiling, walls and floor as regular equipment.
over 10,000 pounds. The 7020 had proven that it could do considerable work but remain efficient.
However, two things that made the 7020 stand out from the rest of the four-wheel-drive crowd were its inboard planetary final drives and row crop axles. Thanks to these, the tread width of the 7020 was adjustable, so it could be moved to match the spacing of your crops. The tractor had also been explicitly designed to run duals in 30 inch rows and still work around crops, provided the machine was equipped with long axles. Several wheel and tire options were on the options list. Farmers could find a setup that allowed the tractor to work in almost any field.
The gudgeon—the center “hinge” between the front and rear parts of the tractor—could twist up to 15 percent. This oscillation allowed the tractor to keep four wheels on the ground at all times, providing four-wheel traction even over hilly terrain and keeping the machine from a rough, tipping ride as the center of gravity dropped a wheel over the crest of a hill.
The price of the 7020 was about $20,000 in 1971. Compared to the 8010
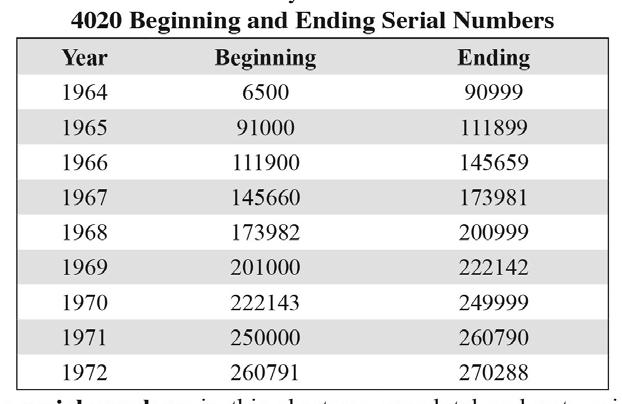
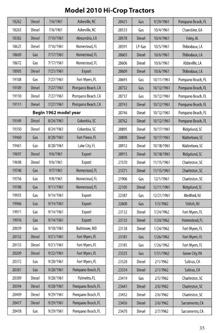
7020 Beginning and Ending Serial Numbers
Year Beginning/Ending
1971 1000-2006
1972 2007-2547
1973 2548-3121
1974 3122-3541
1975 2542-3708
of a decade prior, and adjusting for inflation, the 7020 cost about half as much. The 7020 was a real bargain in comparison. The tractor may not have been as large or powerful, but it was much more versatile and capable of many more farm tasks than the 8010. Deere was able to keep the cost down by using many parts that the company was already building and by further sharing the cost with the new 4620, which shared even more parts with the 7020.
Deere put the Syncro-Range transmission in the 7020. This transmission had proven reliability in the field over many years of use, and that was a virtue that Deere felt was most important, especially for a new form and a powerful machine. Deere made one change to the Syncro-Range for the 7020 by making it a two-stick transmission. Deere found that this worked better for the heavy duty gearbox. Field tests showed that the eight speeds of the Syncro-Range were lacking, so Deere offered the option of a Hi-Lo transmission to add to the 7020. Pressing the clutch to shift the Hi-Lo was necessary, but it could be done on the go. Furthermore, it brought 16 speeds to the tractor, which ranged from two to 22 miles per hour.
The 7020 had a dry disk clutch with seven buttons of friction material instead of a single disk clutch. Having these seven buttons instead of a single ring improved heat dissipation in the clutch, which promoted longevity and less wear.
The 7020 tractor was the first in the world to offer four-wheel drive with adjustable tread width, a feature that made it well suited for row crop farming. Standard equipment includ-
ed 18.4-34 inch single tires on all four corners, with 23.1-30 and 24.5-32 tire options also available. The 7020 had the capacity for dual 18.4-34 tires as well as 24.1-30 inside tires and 18.4-34 outside tires, although this configuration was not suitable for row crop operations.
While Deere built the 7020 to be able to work on row crop farms, they also knew that the tractor would be popular for small grain farms. The 7020 was, after all, Deere’s newest
generation four-wheel-drive offering. Because of this, Deere kept the base tractor pretty simple and left most accessories as options. Those options included a transmission-driven 1000RPM PTO, a three-point hitch with a Quik-Coupler, fenders, weight packages, and more. Two remote hydraulic outlets were standard equipment. A third was optional.
The 7020 had a cab as standard equipment. This was rare for New
Generation tractors; most of the rest had cabs only as an option. The RollGard cab installed on the 7020 was simplistic compared to the SoundGard body that would be available just a few years later, but at least it kept the operator out of the dust. Heating and/or air conditioning were optional additions to the cab, making it an even nicer place to be.
To make the most out of a 7020, a farm needed the large equipment the machine could handle. In 1971, though, few companies were building such tools. Deere engineered and built squadron hitches, allowing the tractor to pull several implements simultaneously. With one of these connected to your 7020, the tractor could combine a couple of planters to knock out 12 rows at a time. With a chain of these hitches, you can run a half-dozen grain drills at once. Things were really getting done now.
The first 7020 was built on November 12, 1970. By the end of that year, Deere had built and sold more of these tractors than of the 8010, WA-14, and WA-17 combined. A legitimately Deere-built fourwheel-drive tractor with row crop capabilities was a success for Deere from the start.
Deere did make a few changes to the 7020 during its lifetime. At serial number 001871, the hydraulic lines and controls were changed. At serial number 002700, during the 1973 model year, Deere improved the air intake system. A precleaner was now added to the air intake pipe. Previously, the air was routed through several tubes under the hood to filter it, but that was overly complicated and warmed the air more than necessary on its way into the engine. At this time, Deere also removed the medallions on the hood’s side and the model designation decals. New decals that put both “JOHN DEERE” and “7020” in one location were placed on the tractor. These decals looked more like those on the brand new Generation II tractors and helped to make the 7020 look like it fit in with these machines.
Four-wheel-drive tractors in the Generation II family were going to hit the market in 1975, so production of the 7020 ended in January of that year to make room for them. In a little over four years of production, Deere built 2,586 model 7020s. This is not a lot of tractors compared to the others in Deere’s lineup, but it was far more than any four-wheel drive machine that Deere had built before, and a sight better than the four-wheel drive tractors that Deere’s competitors were offering.
The 7020 was a workhorse on many farms. It did what other tractors
parts at the rear breaking were not uncommon and sometimes spelled the end of the tractor’s working life. Finally, the cab on the 7020 was dusty and loud—perhaps not compared to other tractors of its period, but certainly in comparison to what rolled out just a couple of years after the 7020’s introduction.
For the collector and restorer, getting ahold of a 7020 may actually be easier than one would guess. Many original examples of these old tractors are out there for sale. The price tags may not be low, but they aren’t exorbitant. Many of the parts of these
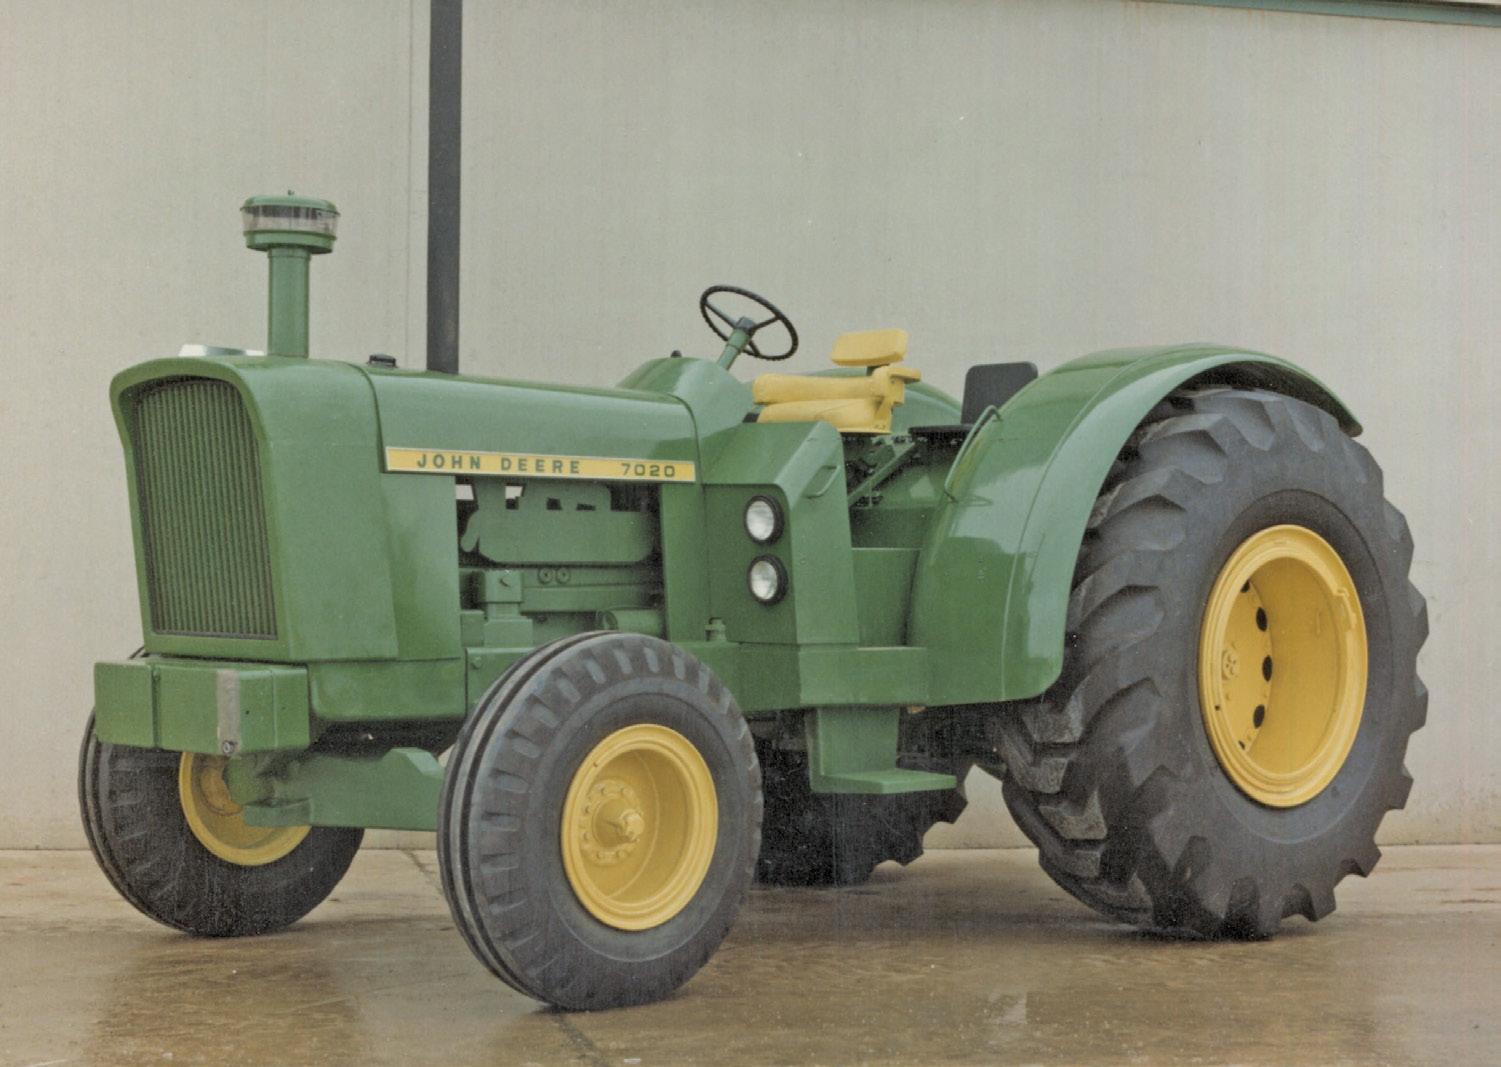
Deere built this mock up of what a 7020 two-wheel drive might look like. Obviously it was never actually produced.
could not do, and many were likely used to farm ground that was previously considered un-farmable. A few problems and complaints did trouble the tractor, though. First, the 7020 was sometimes regarded as underpowered. While it could make more use of its horsepower than a two-wheel drive tractor could, the 140 horses it put down was quite light compared to the big beasts built by Versatile or Steiger over the same period. Despite that lighter power, the 7020 was also known to overpower its own rear end, as complaints of the axles or other
tractors were shared with other New Generation tractors, so finding replacement parts won’t be difficult, for the most part. One major exception to that is the parts in the gudgeon. There are few sources for the parts that make up that hinge, so repairs to that part will not be easy or cheap. Finally, the size of these tractors makes transporting and working on them a bit more difficult than many other tractors. A 7020 weighs more than nine tons without any weight or ballast added. You’ll need a large truck and a CDL to move this thing around.
• We ship DAILY
• Major credit cards accepted
NEW, USED & REBUILT 2
CYLINDER PARTS
Hundreds of tractors parted: Wide fronts, 3-point, carbs, starters, etc. • NOS parts MODELS A THROUGH 730 A&L PARTS
A&L Parts
432 N. Flat Street • Penn Yan, NY 14527
Phone 315-536-0543
Wiring Harnesses - Cables - Switches
We build restoration quality wiring harnesses to fit these John Deere models and their variations:
We also carry: Starters, Regulators, Generators, Alternators, Relays, Coils, Lights, Alternator Brackets, Pulleys We make alternator conversion
About a year and a half ago, I read an article about tractor collectors in England taking their antique tractors on a “pasture ride.” They went through fields of hay, meadows and shallow creek crossings. All participants were overjoyed with the ride. So, I’m thinking, “Why couldn’t we do the same thing with our tractor club, The Oklahoma Antique Tractor Association”?
I floated the idea with some of the club members and
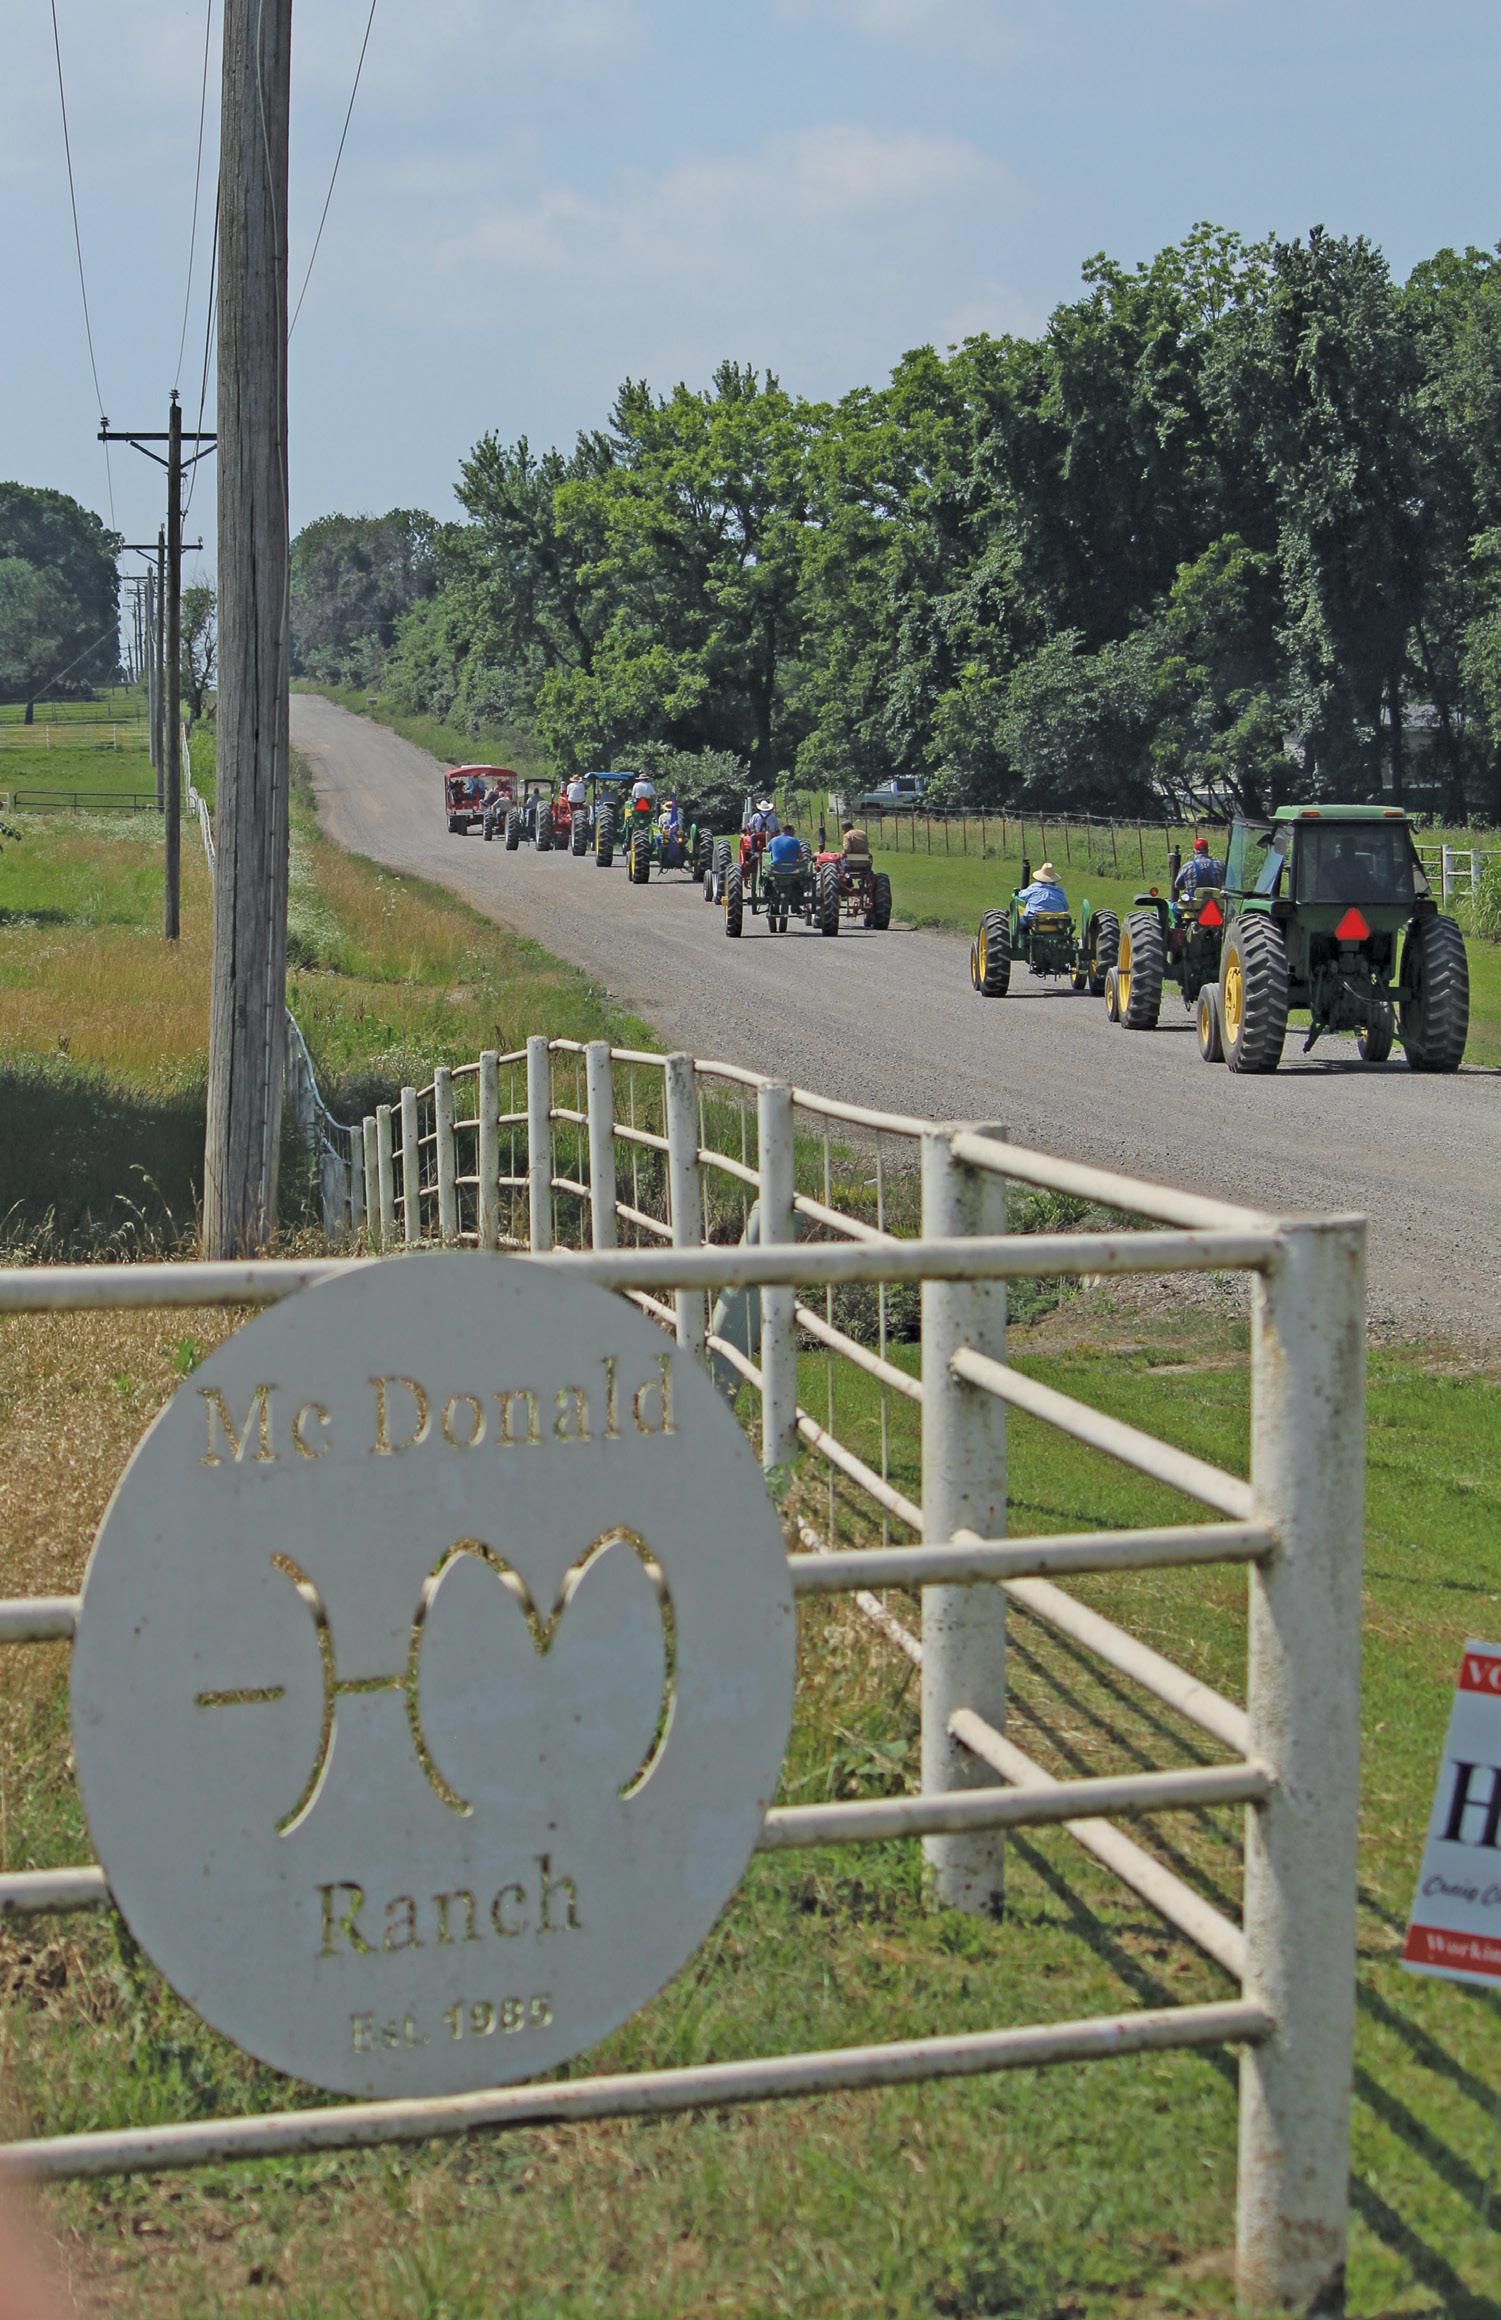
we started looking for suitable sites. We could not find anything with any distance. A mile or so and that was it. Then much to my surprise, we had a new member join our club who owns five or six square miles in eastern Oklahoma. Harold McDonald quickly offered his land for the ride.
got sweetened when we visited with Harold and expressed our concerns that his ranch, yes, it’s the McDonald Ranch, was some distance from most members’ homes. Harold then offered to make available some of his tractors to drive for those who
everyone to come early and stay late. There is also a gun range on the ranch with skeet shooting facilities. Some of the members chose to shoot skeet after the ride and lunch. Most of us just sat around after lunch and shot the breeze.
did not want to trailer their tractors that distance. He has 32 tractors in his collection.
The president of the club and I made a trip to Harold’s place to review a possible ride route. Harold has more than adequate fields, hay meadows, pastures, creek crossings and wooded areas to offer. The pot
Now it just got sweeter from that point. Harold’s wife, Debbie, wanted to provide a lunch for all those attending. Harold also has a stocked fishing pond that he offered to those attending. He wanted
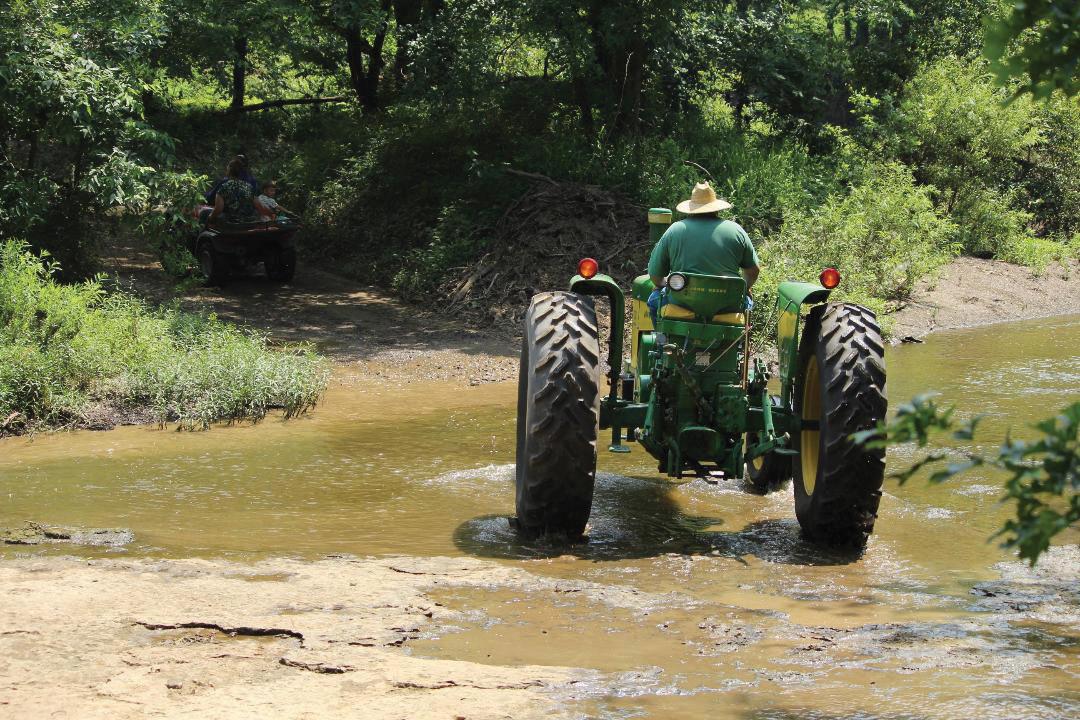
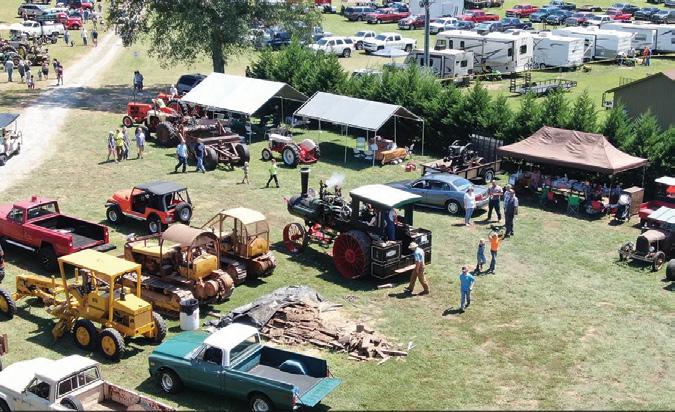
The ride. Eighteen tractors made the initial parade of tractors into the woods and hay fields. There were other people on the ride who were not club members. The word had gotten out that there was going to be an exciting event at the McDonald Ranch. Harold also has a trailer that attendees could ride
along on. Yes, the trailer passed EDGE&TA specs. We passed under mature pin oaks and smaller trees and witnessed many kinds of wild flowers, such as sunflowers, Queen-Anns lace, trumpet vines and other wild flowers. We did do a couple of low water crick crossings. (In Oklahoma, a creek becomes crick). So, it’s like, “Ya all, watch out for that crick crossing.” One nice stretch of the ride was on an abandoned road with the trees grown over the road to make an arched covering.
Mrs. McDonald and some helpers prepared a lunch that was out of this world. Every type of fresh fruit, huge vegetable trays, deviled eggs, baked beans and more covered dishes. There were hamburgers, hot dogs and calf fries. The meal was also topped off with cake and ice cream. Not just a lunch but an over the top lunch. It was out of this world.
Everyone had positive things to say about the ride. Even the 16 people on the trailer had enthusiastic comments. The ride covered approximately five miles and took about an hour and a half. Mr. McDonald had provided me with a very nice John Deere 420 to drive. There was talk that we should do the ride in the fall, when the tree leaves change color. A great idea! Many commented that we should have put this ride on a lot sooner. There were approximately 45 people at the event.
So, it’s looks like there will be another “pasture ride” in the future.
Submitted by, Charles Cavenah Tulsa, Oklahoma
John Deere collectors may recall touring Andy and Lisa Hinrich’s farm during the Gathering of the Green 2022 show. The farm and Andy’s collection, along with that of his late father, Lee Hinrichs, were featured. Besides Andy’s amazing collection that is displayed with organizational skills that Martha Stewart would admire, Andy also has a show, named after his son, AJ’s Garden Tractor Jamboree. The show is held every May.
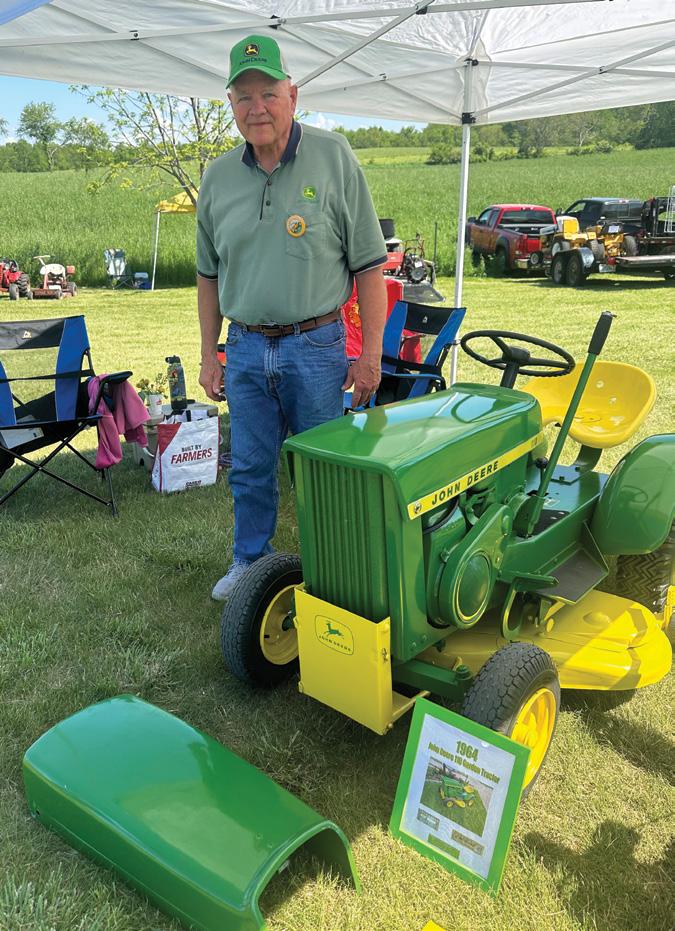
During the 2024 show, Gary Pankratz from Davenport, Iowa had a beautiful 1964 John Deere 110 garden tractor that he restored. “I worked for John Deere for 43 years,” Gary said. “I worked 31 years at Ottumwa, and the last 12 at corporate.”
Gary is deeply rooted in farm equipment because along with working at Deere, he also grew up on a farm in central Kentucky. “Dad ran a bulldozer,” Gary said.
He also had cows that Gary said he planned to get rid of each year until seeing what a tax deduction they were. “He always said, I’ll keep them another year.”
After retiring, Gary decided to try his hand at restoration, and the results are beautiful! He restored a 1964 model 110 with a three speed. “There were only about 500 made in 1963,” he added.
The history of the John Deere 110 began in 1963, one year earlier than Gary’s 110. The first 110s were part of the lawn and garden introduction when lawn mowing became a way to enjoy the out of doors in urban as
Gary Pankratz.
well as rural areas. Along with the 110, attachments like a pull behind sprayer, dump cart, and snow blade and snow thrower added to the value and variations of jobs the little tractor could perform.
At the show, Gary had part of his family there, too. He brought along his son Bryce, his wife Becky and his granddaughter Kinsley, who is eight. Bryce, Gary’s son, works just the opposite of Gary’s past. “I work at CNH,” Bryce said. “I did R and D testing. I was at Burr Ridge, but I’m moving to Racine,” he said, adding the company was closing out the Burr Ridge facility.
his daughter Kinsley, who he says participates in ski jumping and trains nearby.
It was Bryce that found the correct mower deck for the little 110. “He bought it for me for my birthday,” Gary added.
Along with the restored John Deere 110, Gary also had a 1976 John Deere tiller. The garden tiller came about when Gary was doing garden tilling for people, and one of his clients gave it to him. Once he had it, Gary thought it would be great to restore this as well. “I chromed the handles,” Gary said about one of the restoration steps.
Thankfully he lives between the two cities and doesn’t have to relocate residences. It would be a sacrifice for
It was a family affair for the Pankratz family at A.J.’s Garden Tractor Jamboree, a time to share their little 110 and take in the great weather, the friends and fun!
DECALS
Our vinyl computer cut decals are a Licensed Product of Deere & Company.
• For John Deere tractors & equipment!
• Looks like silk screening.
• Pressure sensitive die cut vinyl.
• No film between the letters...they are on pre-spaced application tape.
REPRODUCED PARTS
• Nameplate for 1010 thru 7520, stamped, raised letters, like original.
• Medallions for styled AR through 830, including industrial tractors. Also medallions for steering wheels, power steering and non power steering.
• Correct size medallion: 320, 420, 520 USA made.
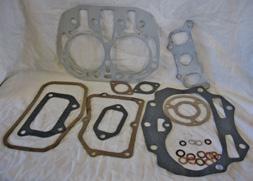
• D306R D manifold gasket.
• F55R early G head gasket.
• Air stacks for A, AR, AOs & B, BR & G unstyled tractors; also styled A, B, G, R, 80, 820.
• Air stack adaptors for 620-630 & 720-730.
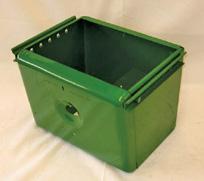
• Tool boxes.
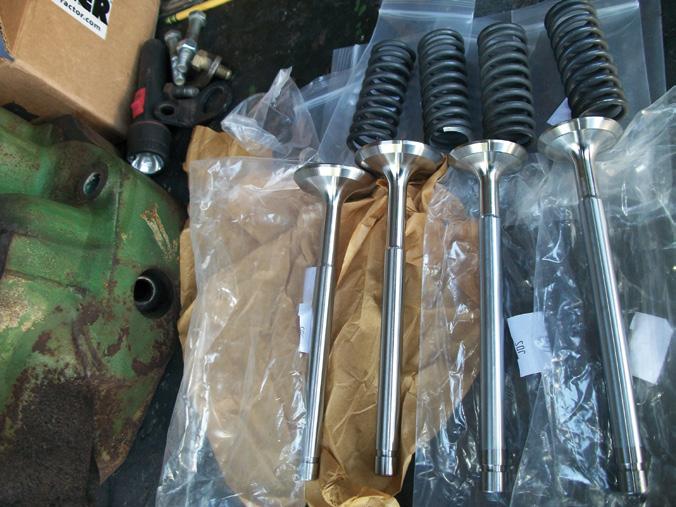
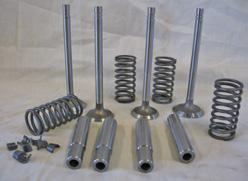
• New valves and guides: GP, D, G, A, B.
• Replacement upper and lower water pipe for 2 cyls.
• Flat top fenders 530-730, New Generation.
• Clamshell and also New Gen Hi-Crop fenders.
• BO Lindeman steps, side plates and fenders.
• PTO shields & casting 520-730.
• GP dust shields for brakes and muffler parts.
• Grill screens, back and seat cushions, arm rest.
• Spark plug wire looms for A, B, G, BR, BO & AR, AO.
• New radiator cores for John Deere and other tractors that use bolt up type radiators (made in USA).
• Wire hose clamps for unstyled A, B, G, 50-630 & 80-830.
• Reproduction steering wheels A-830 and New Gen.
• Early D & GP fuel tanks.
• We bore and sleeve JD 2 cylinder blocks.
• We rebuild carbs and mags for JD & other tractors.
• We carry new parts for Wico mags, also for pony motors.
• Rebuilt mags and carbs for sale.
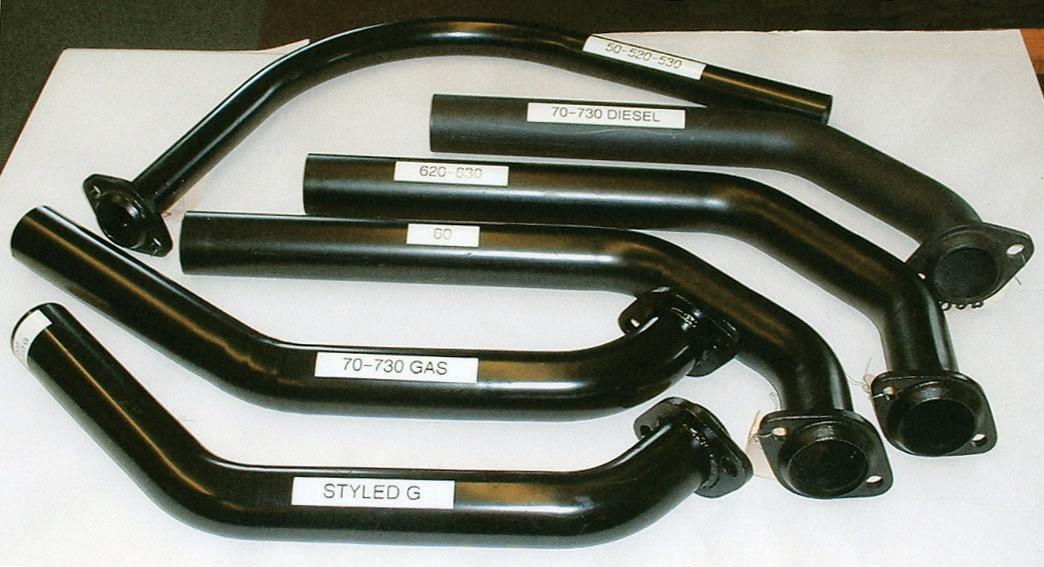
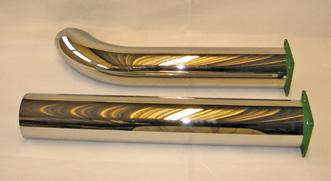
These exhaust pipes are made with smooth mandrel bends like the originals
MADE IN USA
We make styled and unstyled A, B, G, GP Top Steer and 50 through 730D.
4 MUFFLERS
D, AO, GP, GPO Spark Arrestor Style D, AO, AOS, BR, BO A, AR, B, G Styled and Unstyled 50 through 730D
50 through 530 horizontal, 60, 620 Orchard Made in USA • Restoration Quality
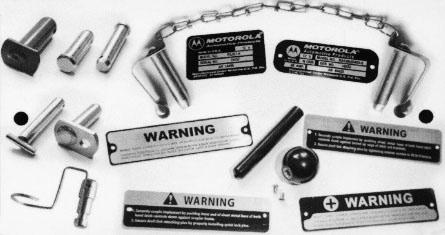
4 AR28048, AR28049 NAMEPLATE
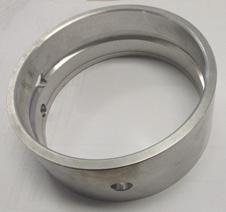
Stamped, polished aluminum like originals Fits 1010 through early 7020
x 27-3/4” • $140.00 per set plus S/H 4 HYDRAULIC OUTLET PLUG
AF3001R, steel w/chain - 2 cylinder AR52623, plastic w/chain - New Gen 4 AR45915 RAIN CAP Fits 3020-4020 side console models
4 CHROME STACKS
Double walled, straight or curved 4 “ NEW” BATTERY TRAY For 4000 model with brackets
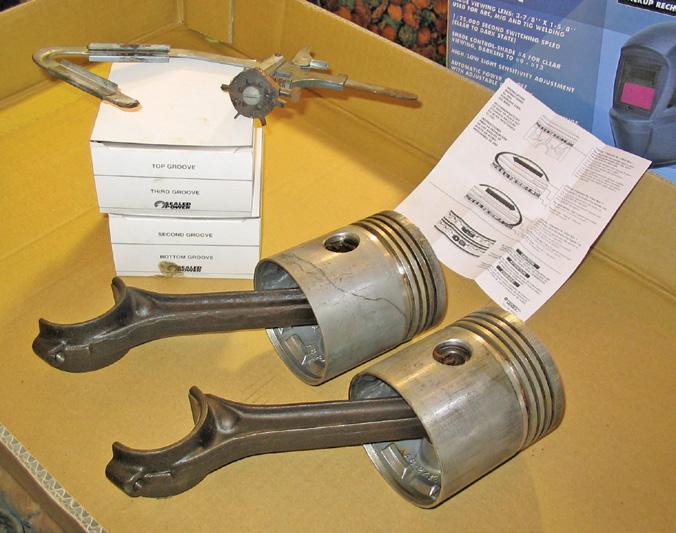
Often times we read or hear of fellow collectors who purchase a tractor, crawler, or power unit that has been sitting for an unknown period of time. Even when a seller claims, “It was just run a short time ago,” you often can’t be sure. It’s a real temptation to “just see if it will run,” to see if we have found “a diamond in the rough.”
How many times do we read, or hear, “I found it in the weeds, put some fresh gas in the tank, gave it a pull and it started right up!” What we often don’t hear are the ones where someone tried to start an engine that has been sitting for a long period of time, and something gets damaged in the process. Some will draw the conclusion it was broken before they tried starting it, or may consider any risks as part of the hobby.
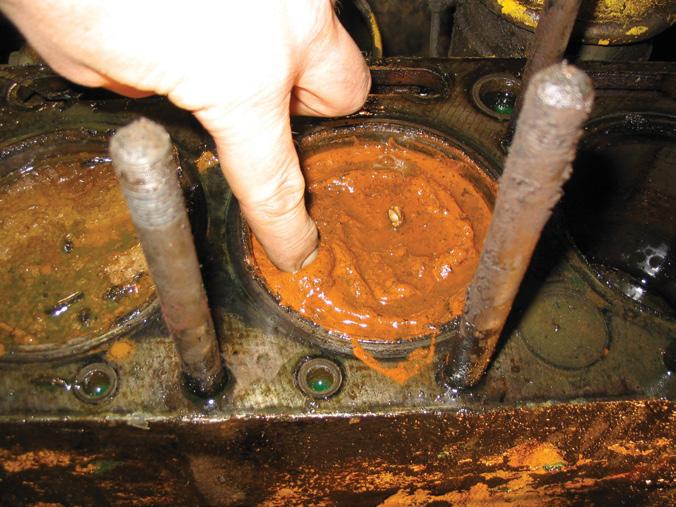
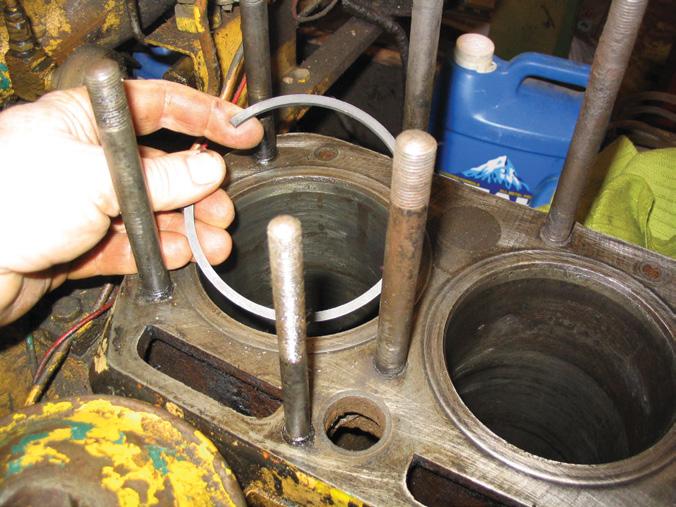
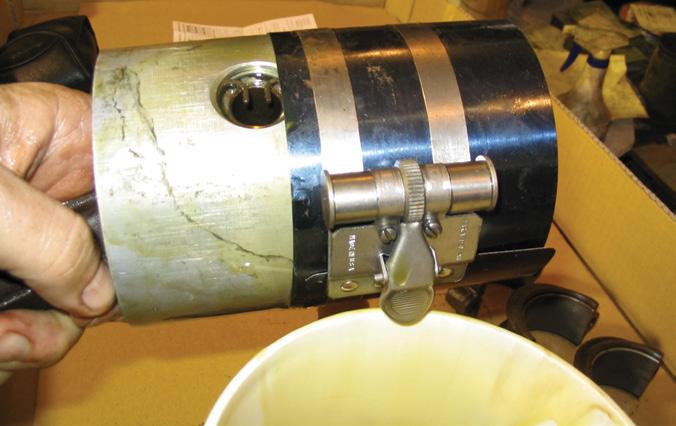
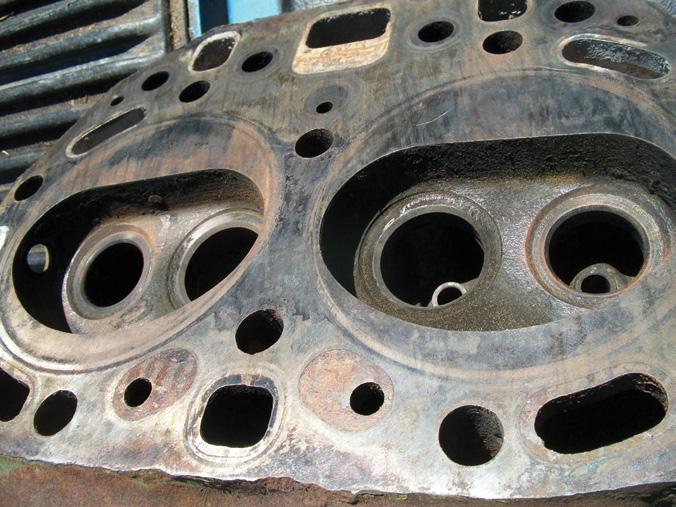
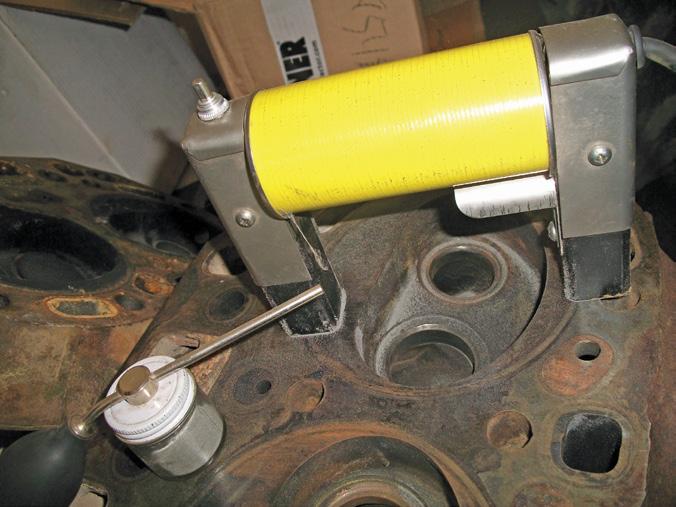
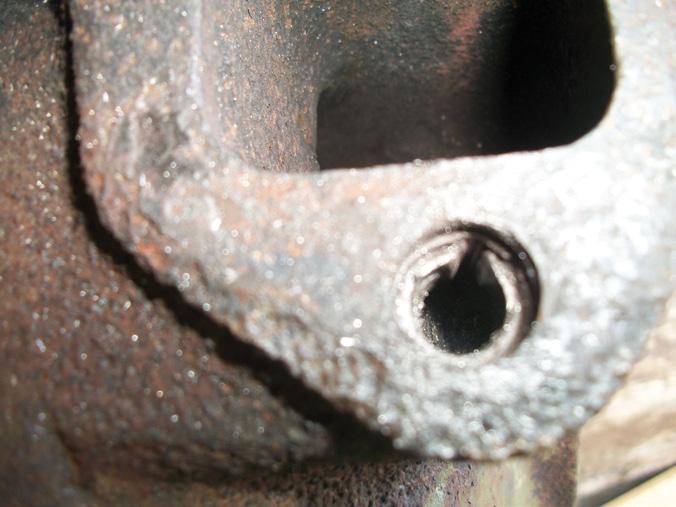
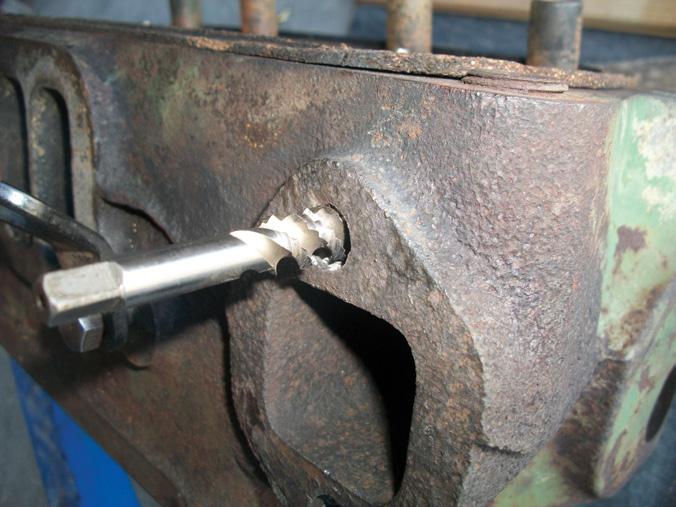
Often times in for sale ads, we read that the engine is “loose” or “free.” While this is a plus, trying to start it without some investigating is risky, and can be very expensive. In this case, the engine was free, the oil looked dirty but okay, there was spark from the magneto, the radiator had good looking anti-freeze in it, and the fuel system appeared to be in good order. Being conservative, and sometimes overcautious, I removed the valve cover. Under here, everything looked in order, except for a missing lash-cap on one of the intake valves. When the spark plugs were removed, they showed
some signs of rust on the electro, but nothing to make a person alarmed. As I’ve indicated, I tend to lean toward being conservative. I also understand the cost of precision parts, and the perils they can be subject to. So, off came the cylinder head for a look-see. Once the cylinder head was off, being cautious paid off this time. The sight on top of the pistons was nothing short of amazing. Had I let the temptation to start it overrule caution, some serious damage would have been done. The sight of about 3/8th inch of rusty “goop” on top of the pistons is fairly common with engines that have been stored in moist areas, or left outdoors, even with the exhaust covered. (Photo 1). Before letting the temptation to hear it run overrule caution, why not disassemble the engine first to know for sure what you are working with? By far, the majority of the time, you will end up spending less money, and end up with a better engine if you disassemble it first after an extended
storage period. The risk of seriously damaging expensive parts just isn’t worth the price.
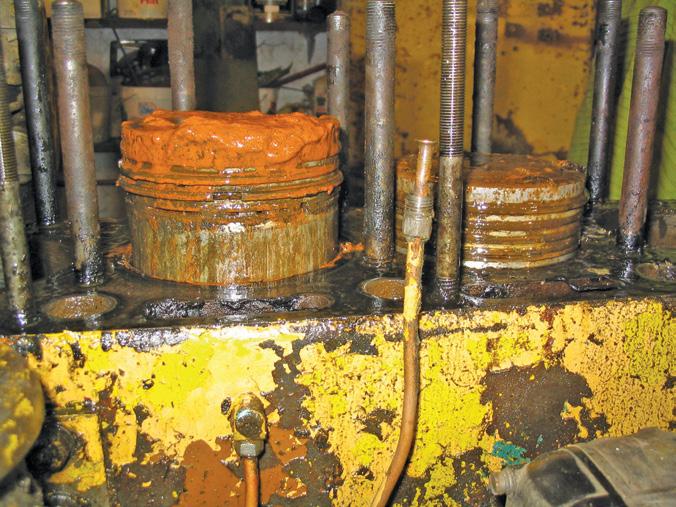
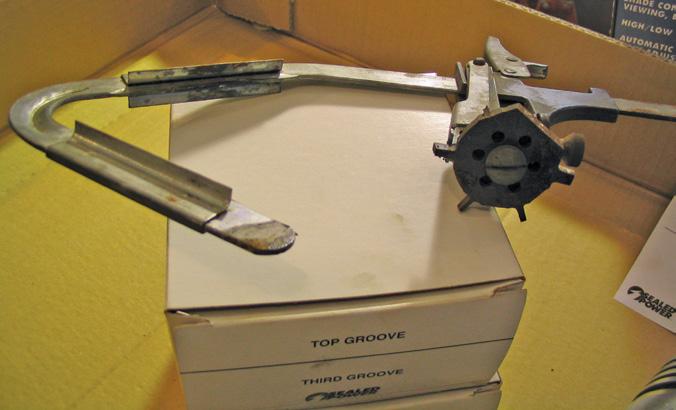
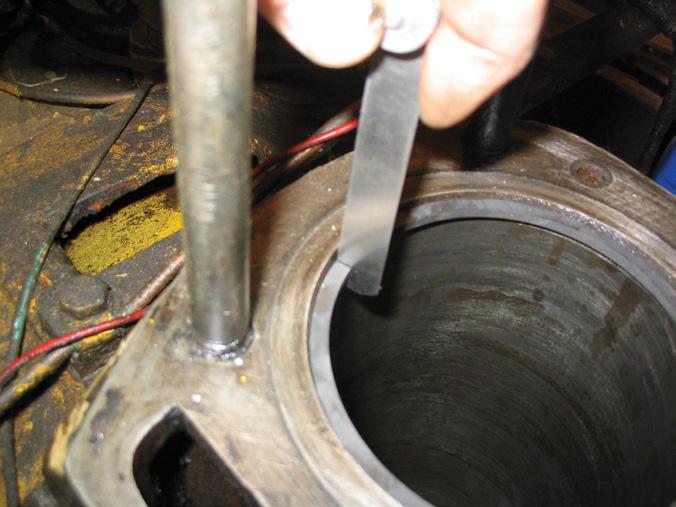
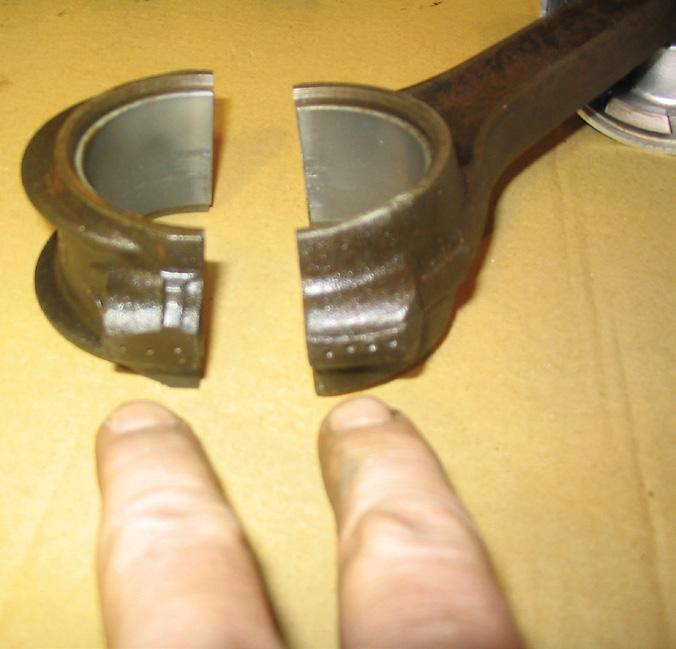
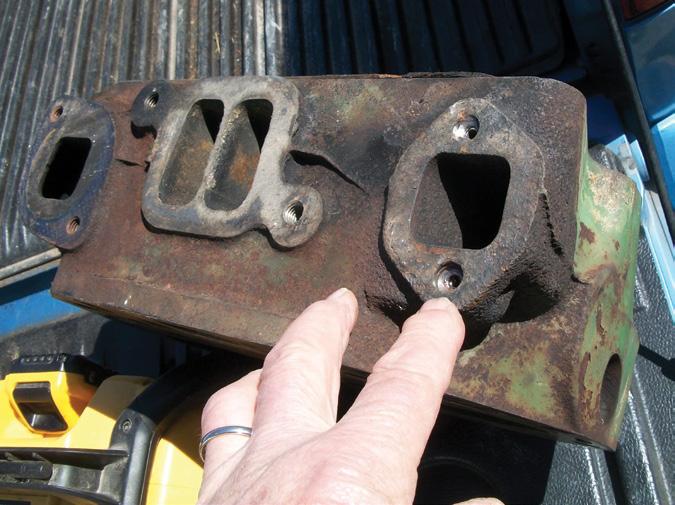
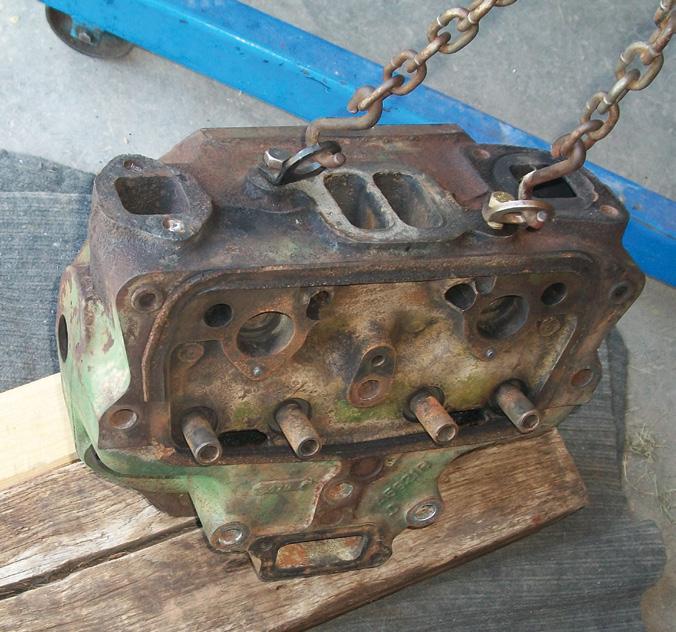
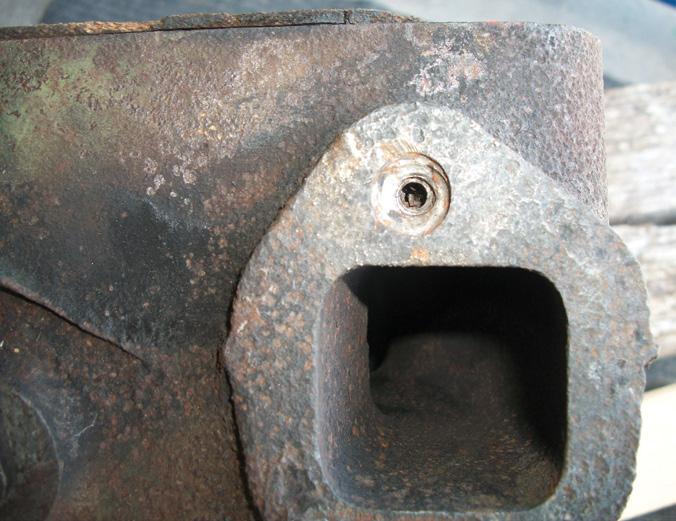
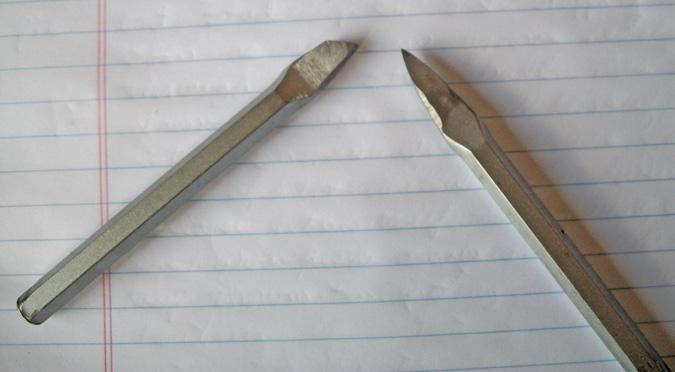
Before removing any pistons, check the connecting rod caps. They should be number punched on each half of the connecting rod. Some connecting rods may simply be marked with center-punched dimples on each half. If there are no markings at all, you need to mark each connecting rod with the cylinder number you are removing it from on both the rod cap, and connecting rod itself. Make a note if the numbers, or dimples, face the left or right side of the engine.
Some people prefer to note if the numbering faces the camshaft or not (Photo 2). Once you have the pistons removed, if your engine has wet sleeves, you can replace them, or if you have a bored block, you can hone the cylinders if they aren’t pitted. If they are pitted, you may be able to bore it over sized, or have the block bored and sleeved back to a standard
Photo 1
Photo 2
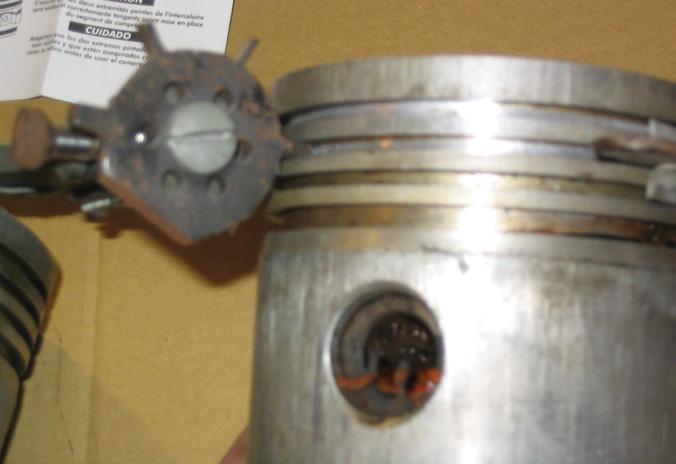
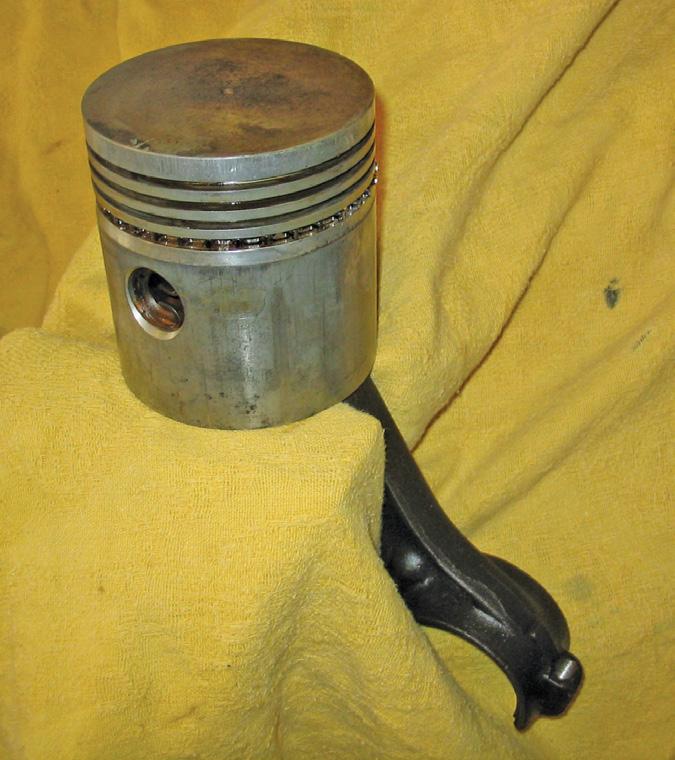
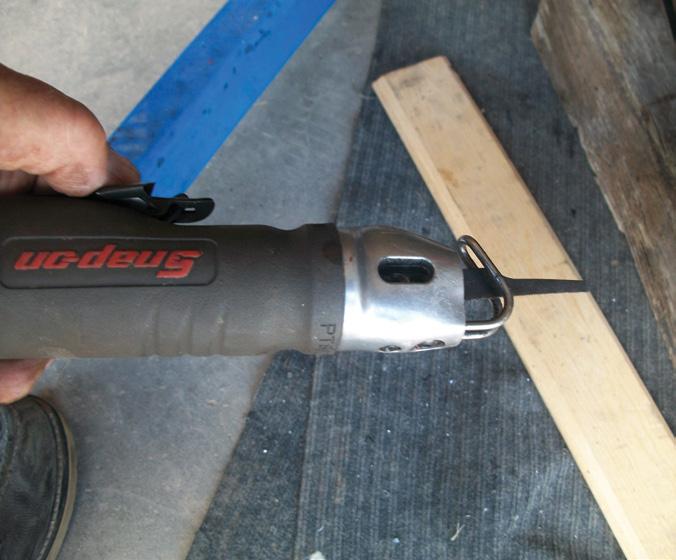
bore. In this case, the owner wanted the sleeves honed, and new rings installed on the existing pistons. The original rings had become seized in their respective ring grooves, which would have caused the pistons to scuff and score had someone attempted to start the engine. So, even though the engine was free, other serious problems existed. The pistons were cleaned with a nylon wheel, and ring groove cleaning tool. It is very
important to clean the ring grooves to remove any carbon that can keep the new rings from flexing freely when the pistons are put back into the cylinders. (Photos 3, 4, 5, 6).
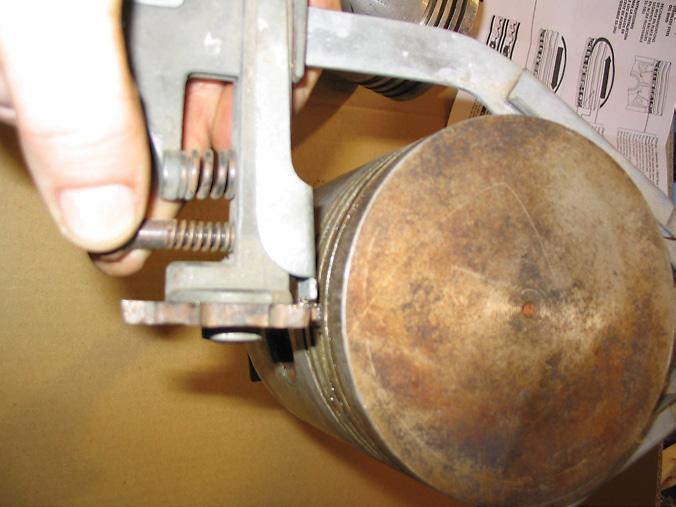
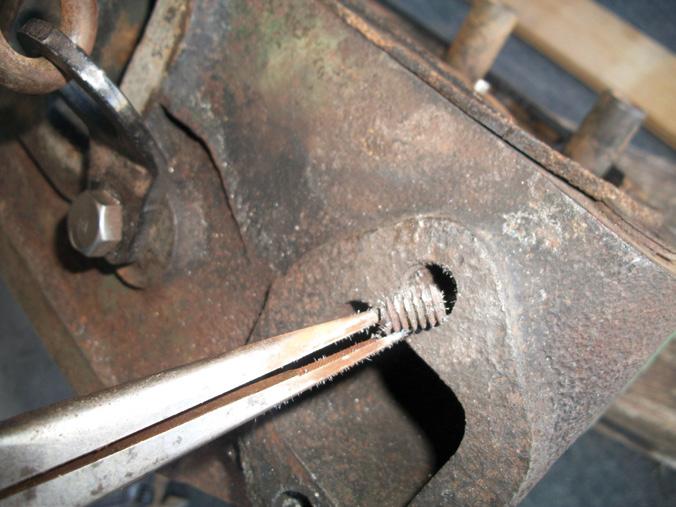
Before installing the new rings on the pistons, place the new top ring for each piston in the cylinder bore (Photo 7). With the piston ring square to the cylinder bore, measure the gap in the piston ring while it is in the cylinder (Photo 8). Compare your measurement with the manufacturer’s specifications. If your gap is larger than specification, your cylinder may have been bored oversized and you have the wrong size of piston rings, or the cylinder may be worn beyond specifications. If your gap measurement is too small, the piston rings are more than likely for an over-bore size larger than your cylinder. If the ring gap is too small, the rings will seize, or break when the pistons are installed, or the engine is started.
Equally important is to check that the rings fit the piston ring grooves without binding, or being too sloppy. Again, check your engine specifications, and/or ring supplier.
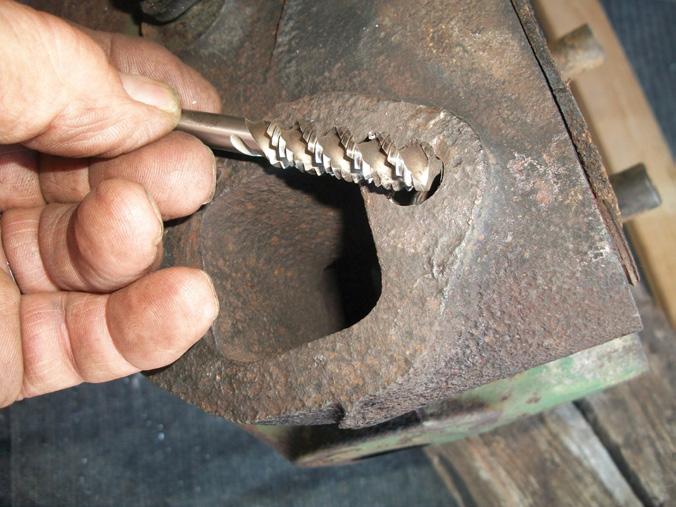
If you are honing your cylinders, move the hone up and down the cyl-
inder bore as your drill is spinning the hone. This will provide a “cross-hatch” pattern necessary for proper ring seating, and oil retention. New piston rings need a cylinder bore completely void of any glazing, mirror finish, or polished areas to seat properly.
After cleaning your pistons, you can install your new rings (Photo 9). This can be very easy using proper tools, or worse than difficult if at-
Photo 9 • Photo 10, below
Photo 7 • Photo 8, below
Photo 5 • Photo 6, below
Photo 3 • Photo 4, below
Photo 11
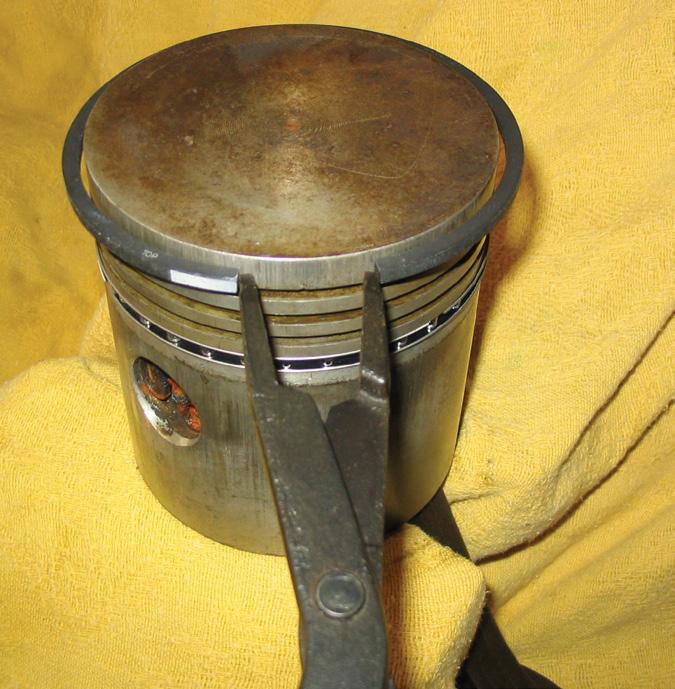
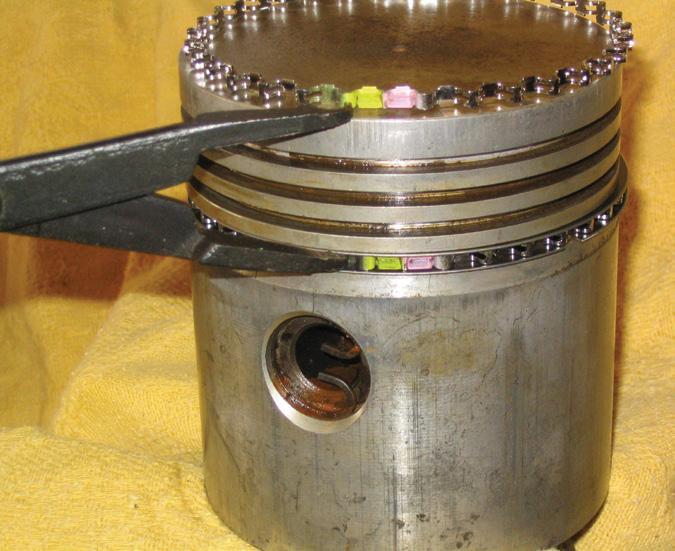
tempted without proper tooling. To prevent breaking your new piston rings, or putting deep scratches in the pistons, use a ring expander designed for your specific bore size, or a universal expander (Photo 10). Expand the new oil control ring just enough to slip over the piston without scratching the piston (Photo 11). Expanding the new rings too far will break them.
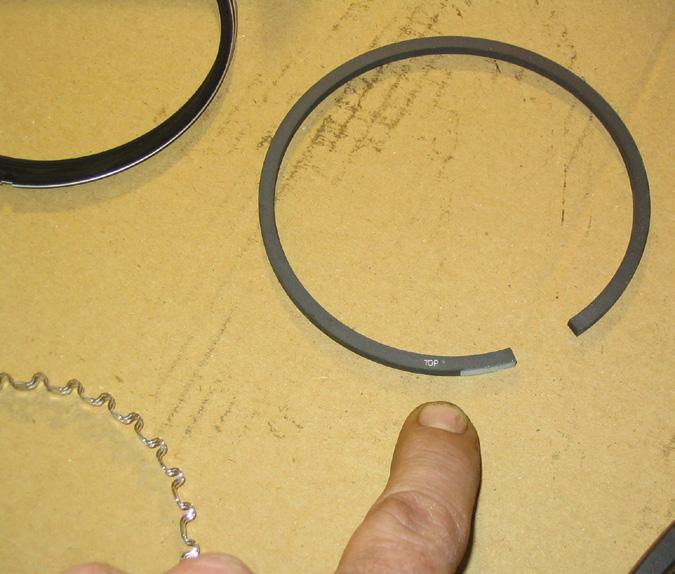
Next install the next ring above the oil control ring, and work your way to the top ring groove. Each ring will be marked indicating which side is the topside. Some manufacturers will print the word “TOP” as shown, some will put a painted or dimpled dot on one side to indicate which side is the top (Photo 12). Some rings have a tapered face without any markings to indicate the topside. With tapered rings, keystone rings, or barrel faced rings, your manufacturer will provide instructions on the package.
With new rings on your pistons, it’s time to put the pistons back in the cylinders (Photos 13 and 14). Coat the cylinder walls with a liberal coating of engine oil. Some people prefer assembling engines with heavy
weight oil like STP oil treatment, or straight 40 weight engine oil. Keeping the cylinders coated with oil, and the piston rings, and piston will help prevent damage from dry starts. With any new engine, if at all possible just prior to starting it, use a drill with a shaft made to fit the oil pump drive. Spin the oil pump in the normal direction of rotation until it builds pressure.
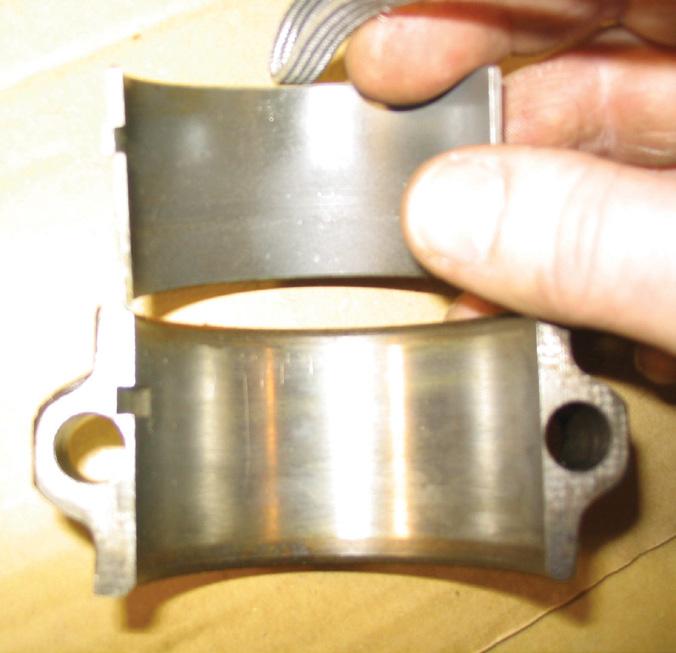
Before installing the pistons into the cylinders, the connecting rod bearing insert surfaces must be clean and dry. Place the bearing inserts into the connecting rod, and rod cap with tabs mating with the notch in the connecting rod and rod cap (Photo 15). Lastly coat the bearing surface with heavy engine oil.
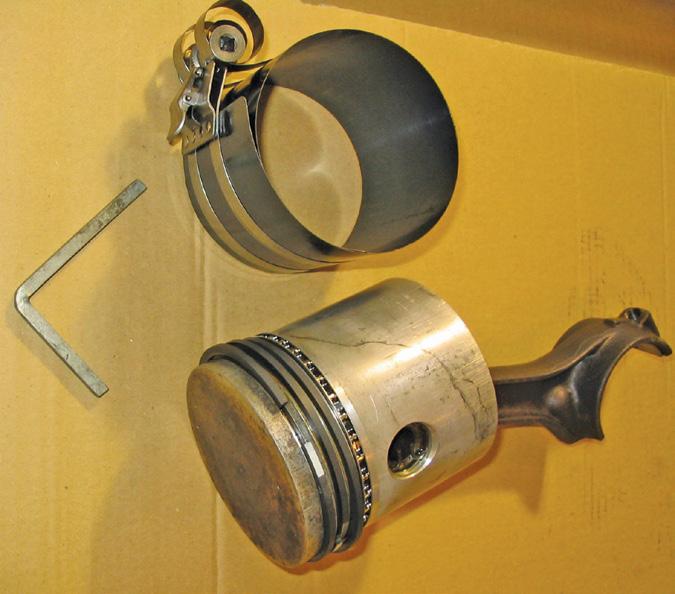
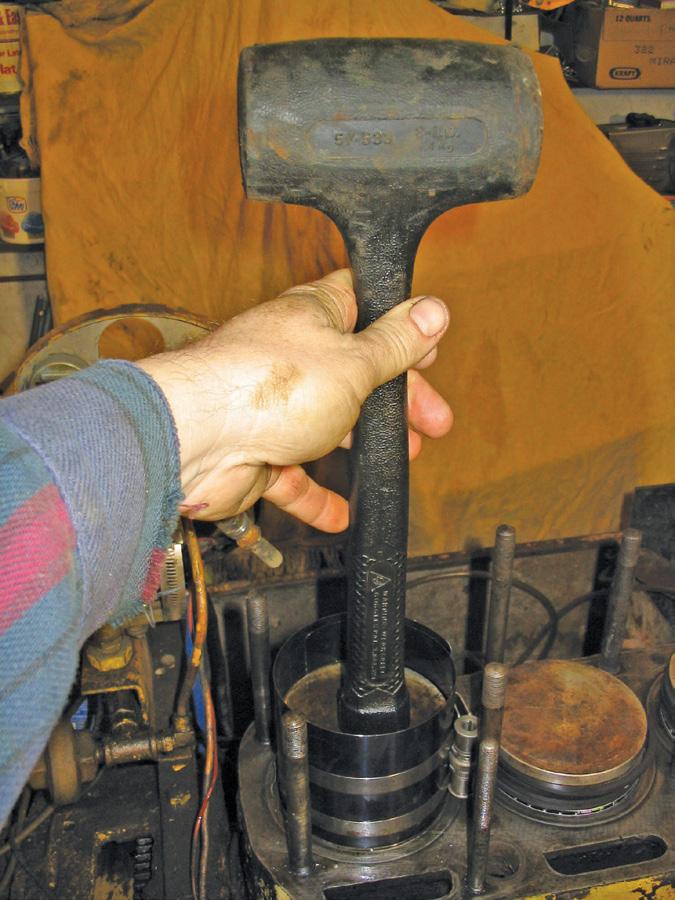
To put the pistons into the cylinders, a ring compressor is a must. Trying to squeeze the rings by hand is asking for problems. Using a ring compressor will make the process easy, and nearly foolproof. With a liberal amount of oil on the piston, rings, and wrist pin, compress the
ring-compressor over the piston rings (Photo 16). Have the oil control ring as near to the bottom of the ring compressor as possible. This will allow the bottom half of the piston to enter the cylinder bore and prevent the piston from cocking, or binding, as you install the piston. With the rings compressed, examine the connecting rod. Install the piston with the connecting rod numbering, or dimples facing the direction noted when you disassembled it (Photo 17). The piston ring compressor will have notches on the outer diameter so it will sit on top of the cylinder, and not slip into the cylinder.
Before attempting to put the piston into the cylinder, make sure the crankshaft journal is at the bottom of its stroke for that cylinder. Using a soft, but firm object such as a dead blow hammer handle, tap the piston out of the ring compressor, and into the cylinder (Photo 18).
When the top of the piston is flush with the top of the cylinder, I prefer to pull the piston down by pulling on the connecting rod until I can rotate the crankshaft into the connecting. You may choose to guide the connecting rod all the down to
Photo 14 • Photo 15, below
Photo 16 • Photo 17, below
Photo 12 • Photo 13, below
the crankshaft journal. With the connecting rod and bearing firmly seated on the crankshaft journal, install the connecting rod cap with numbers, or dimples, matched on each half. Torque the connecting rod bolts to specification.
This will put your pistons and cylinders in tip-top shape. I have purposely skipped some important points such as measuring piston to cylinder wall clearance, and measuring oil clearance between the connecting rod bearings, and crankshaft journal. These can be topics for later discussions.
Once you take the leap as some say, and check your engine over thoroughly, you can hit that
starter, or give that flywheel a twist in confidence, knowing you aren’t running the risk of serious damage. These machined parts are expensive, new or used, and need careful attention to give you years of troublefree happiness. A few hundred dollars spent at this point can save thousands if something goes amiss by not checking your expensive engine over when in doubt, or even if there is the slightest doubt. Take the leap; it’s worth your time.
This article originally ran in the June 2005 issue of Green Magazine. Contact Dan Brotzman at W14729 Meisner Rd., Tigerton, WI 54486; phone 715-535-2595; email danb4230hc@yahoo.com
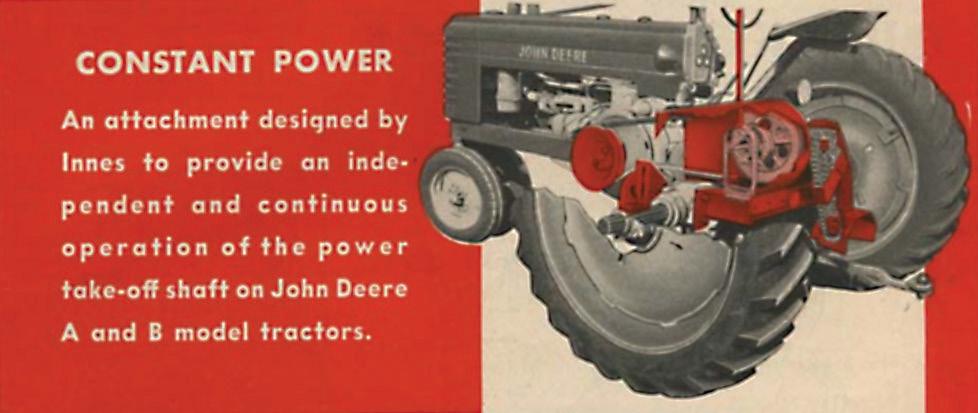
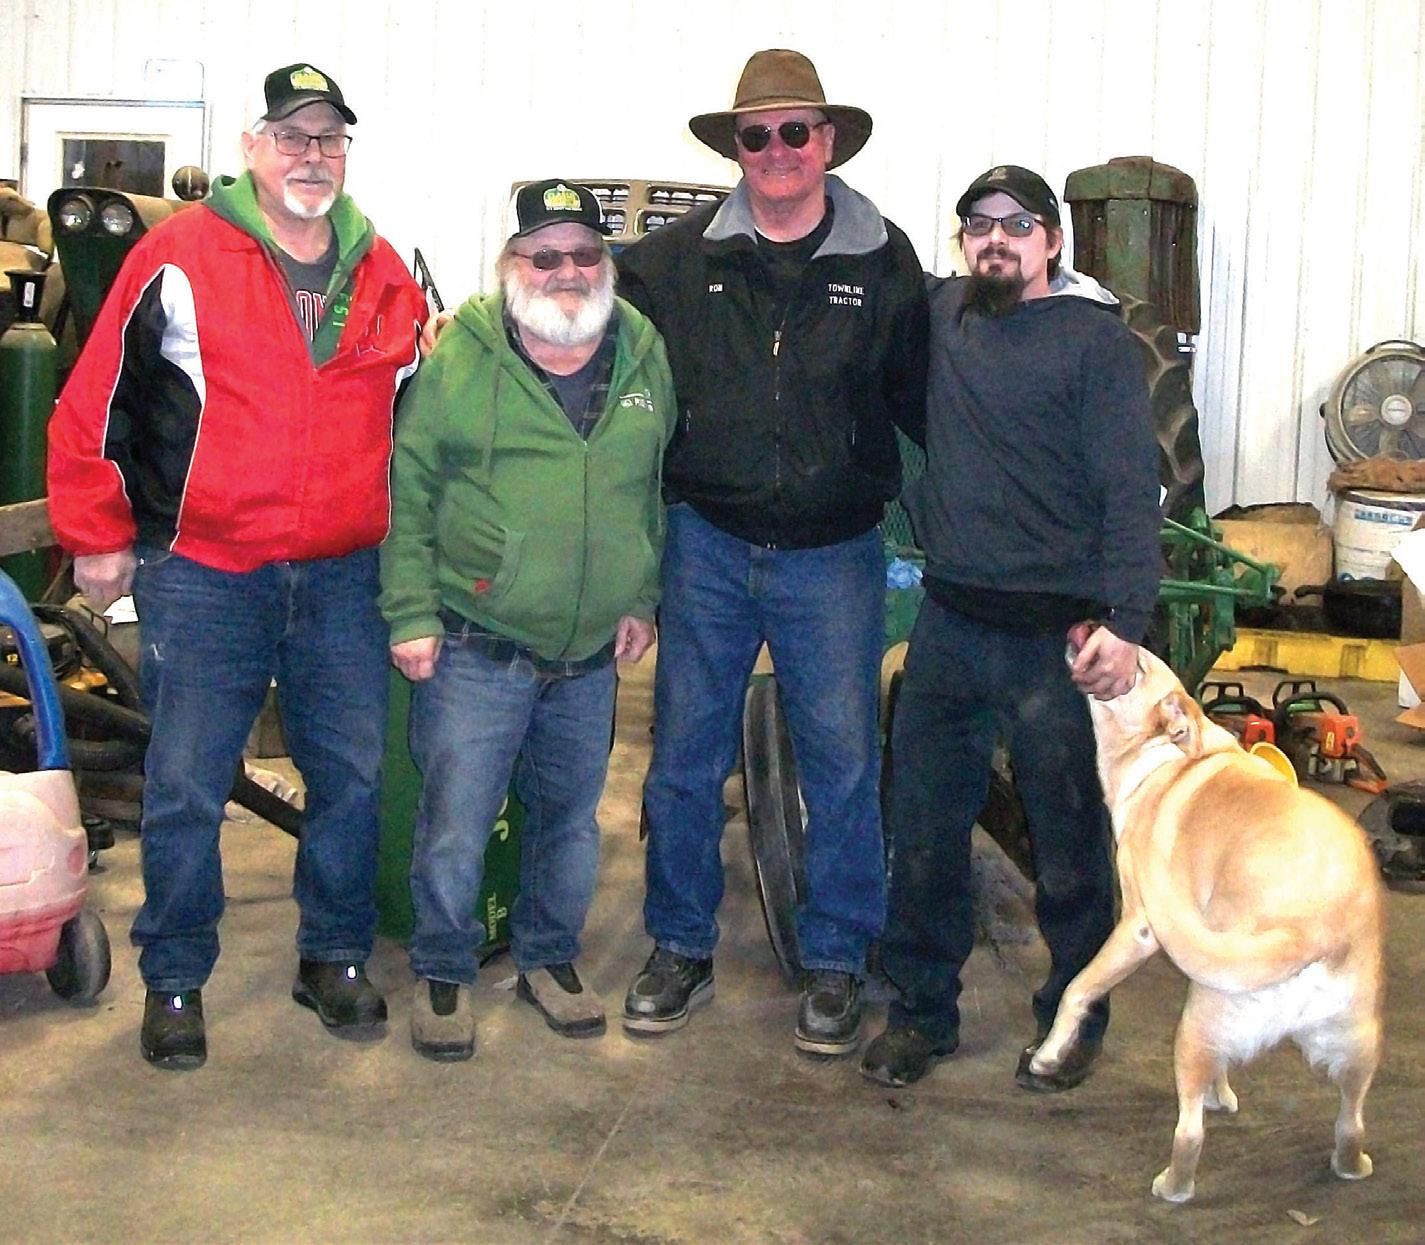
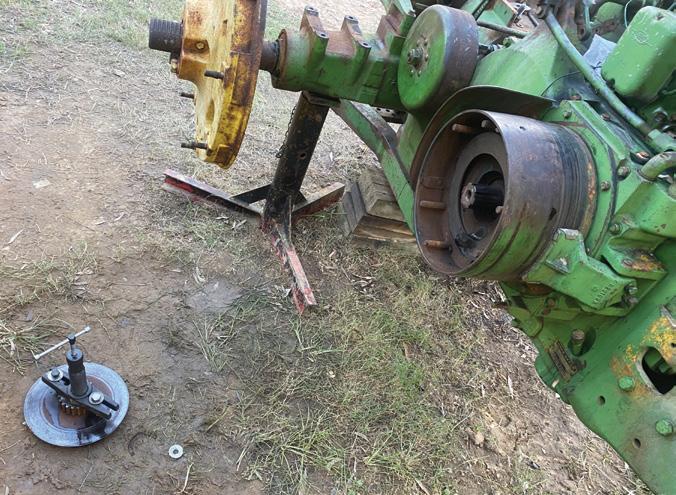
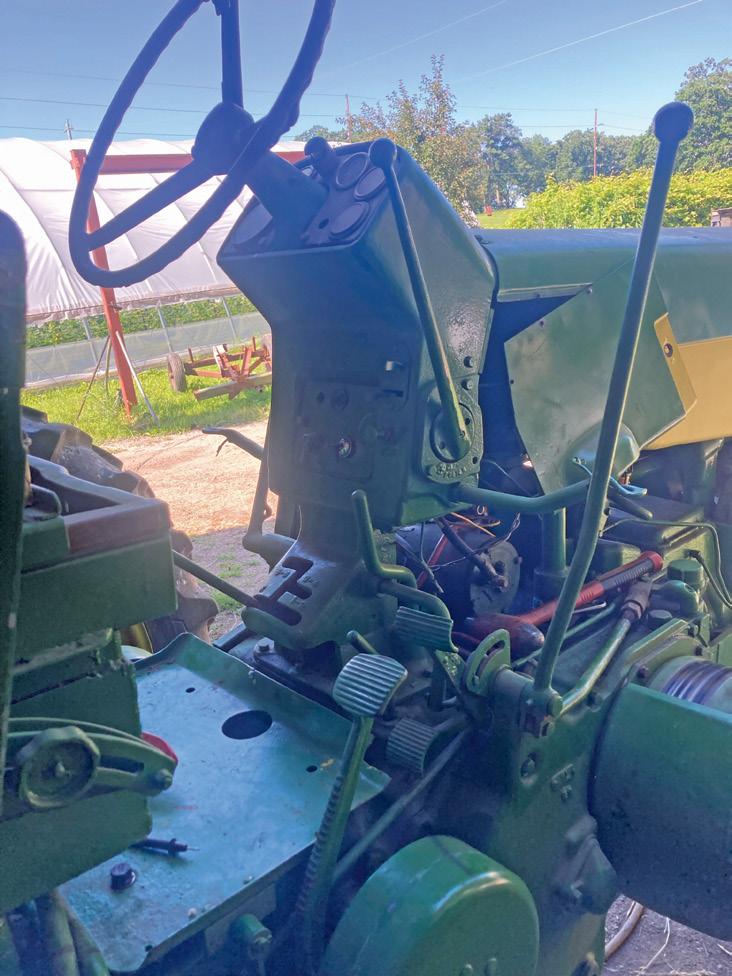
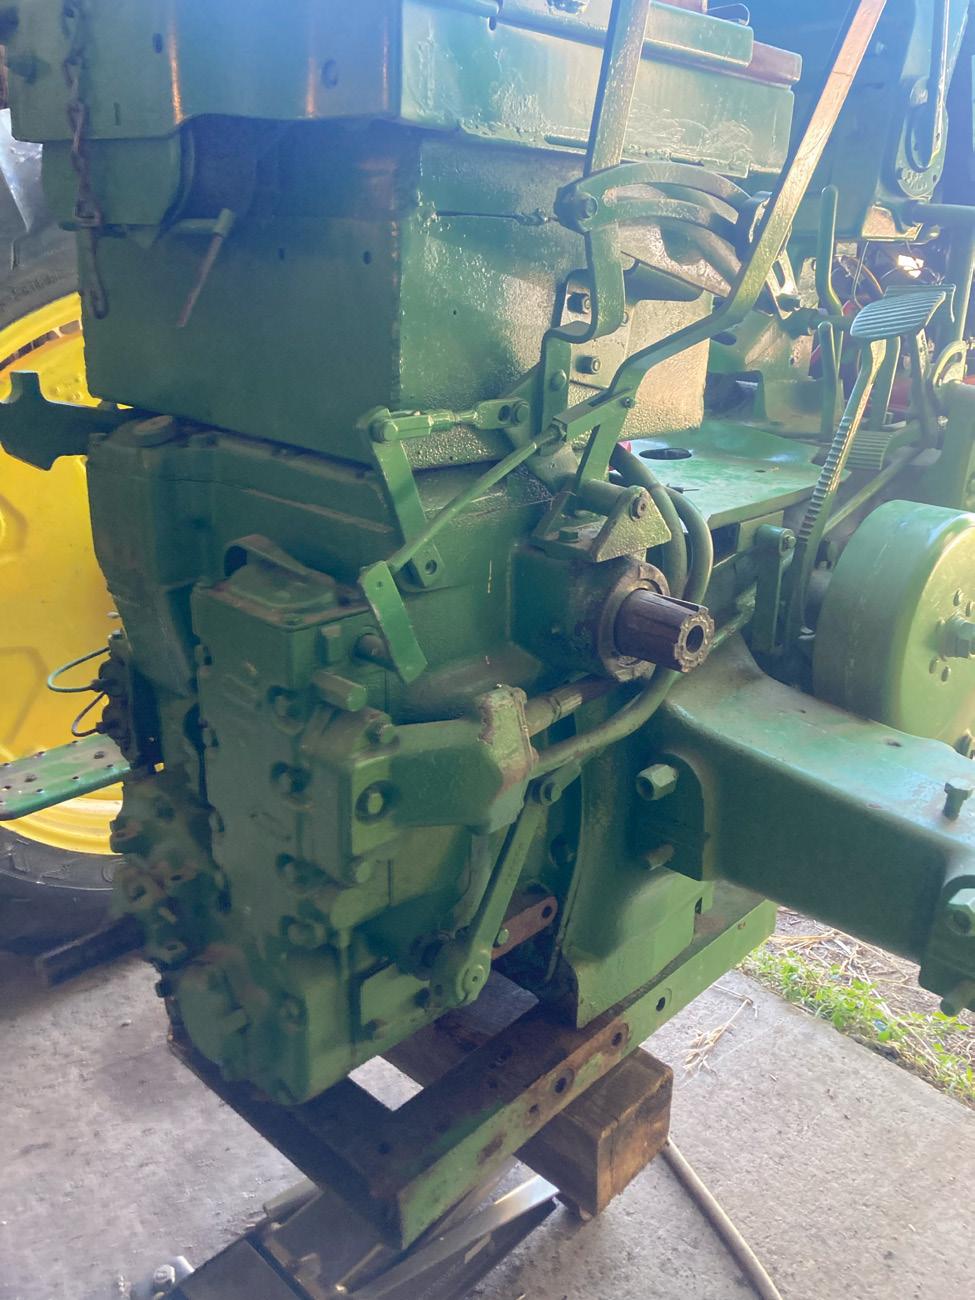
Like many things, you probably can’t appreciate a “live” power take-off until you have operated a tractor and machine without one. For those who don’t know, “live” means that the PTO keeps turning when the tractor’s clutch is disengaged. It’s a nice thing to have when mowing, but even better when operating a baler or combine and, with their introduction, manufacturers started to phase out balers, combines and other equipment having their own engines.
In 1945, Cockshutt was the first company to offer a tractor with PTO followed closely by Oliver. It was not until late in 1952, with the introduction of the 50, 60 and 70, that you could buy a Deere row crop tractor with live PTO.
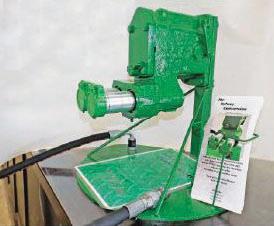
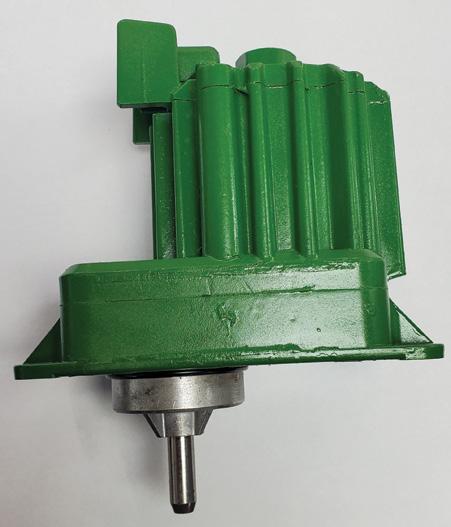
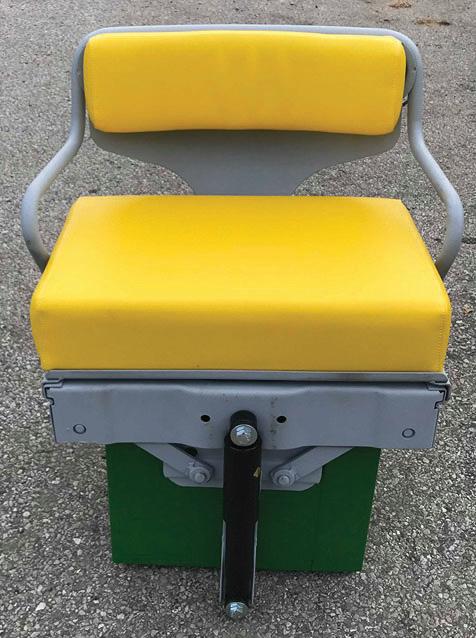
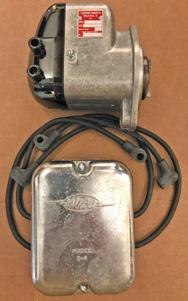
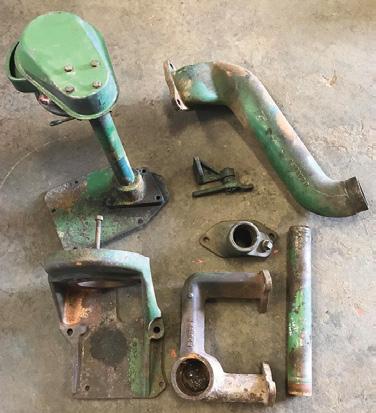
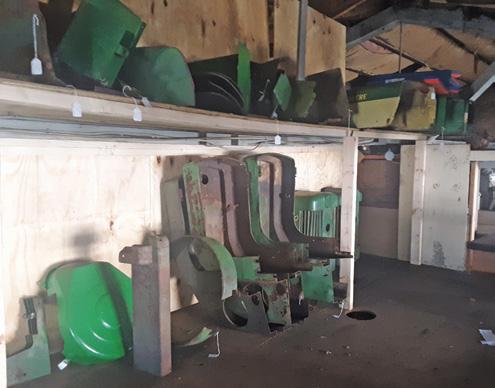
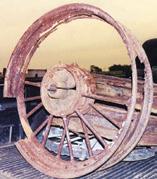
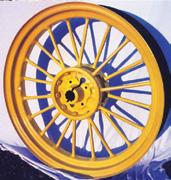
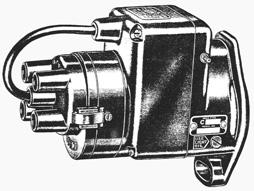
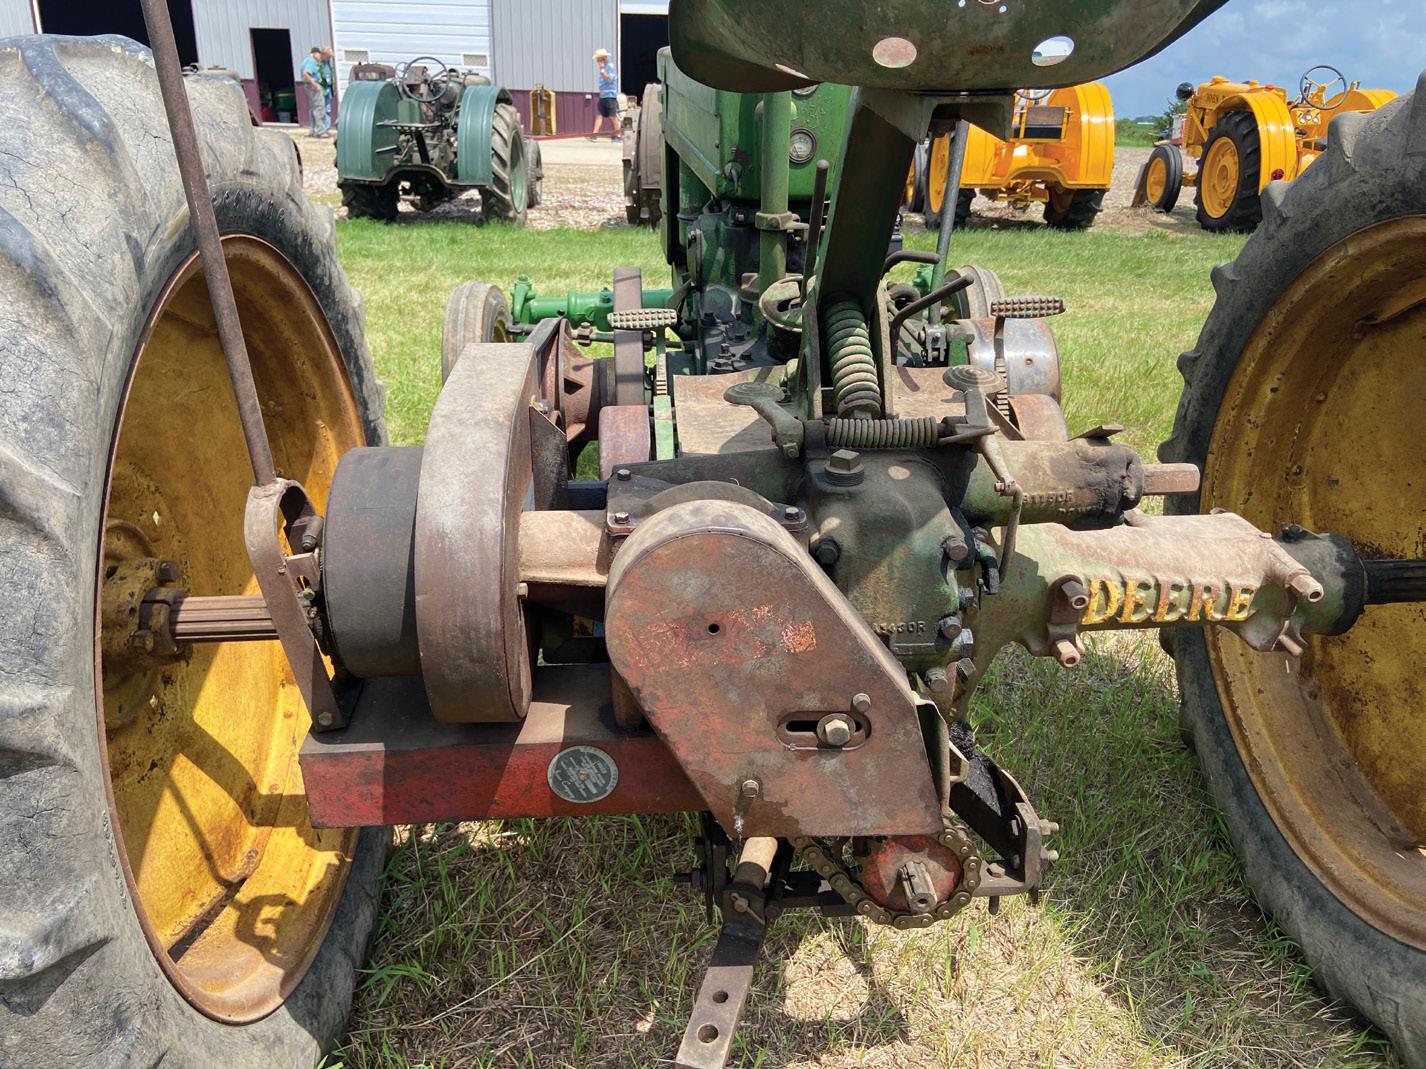
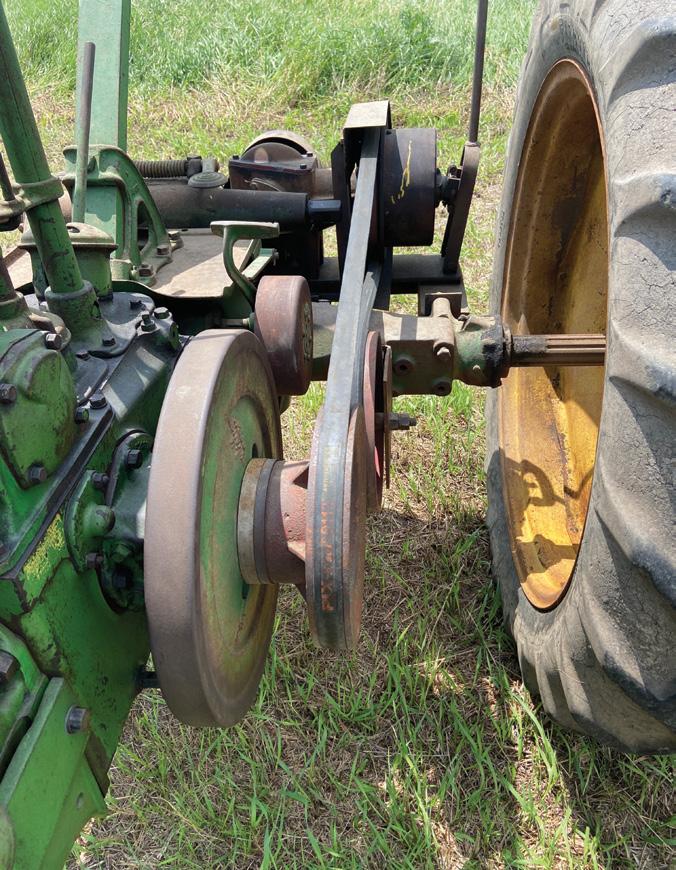
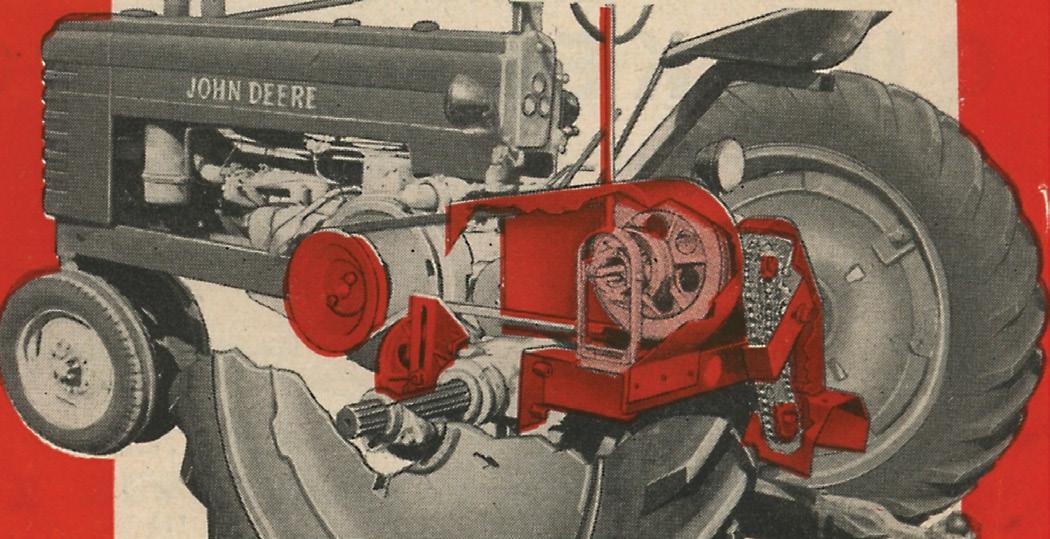
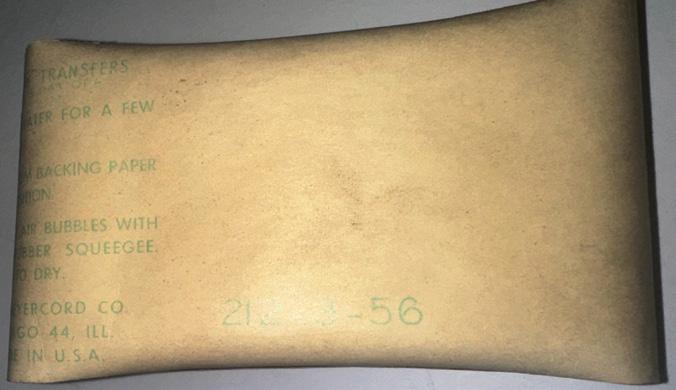
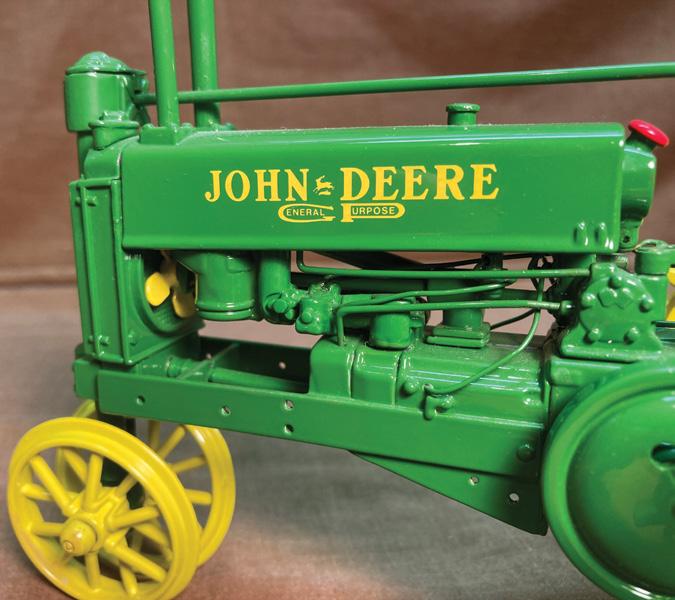
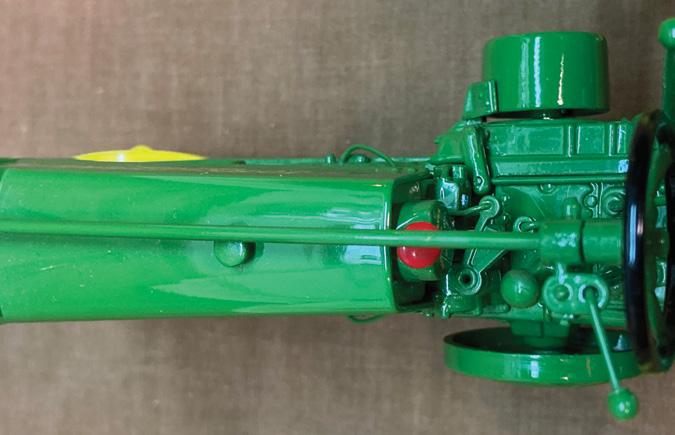
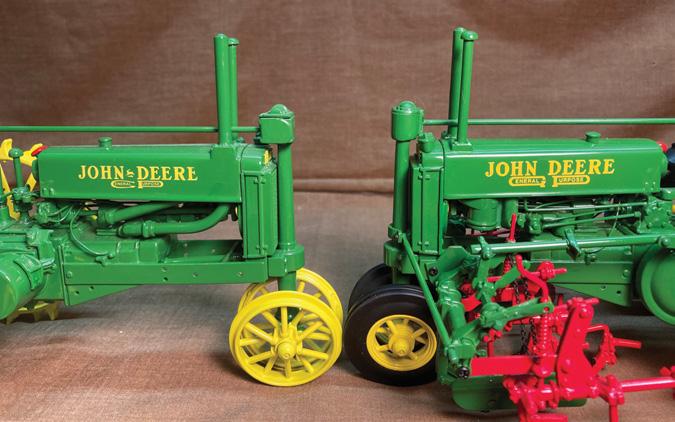
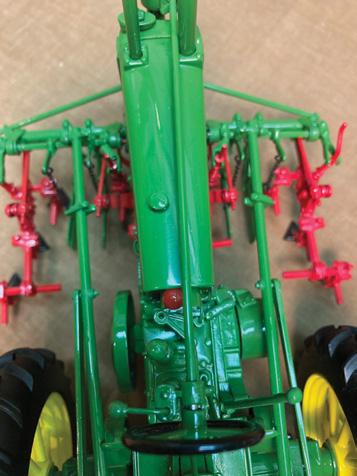
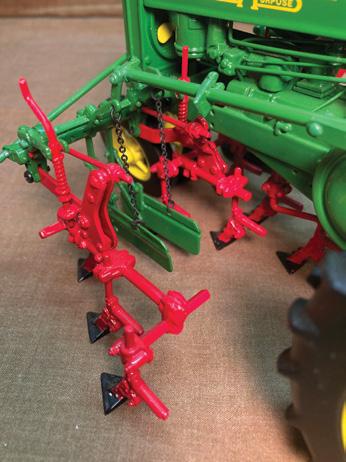
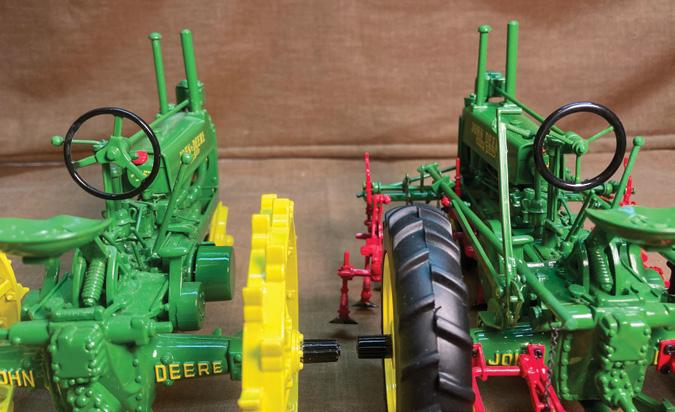
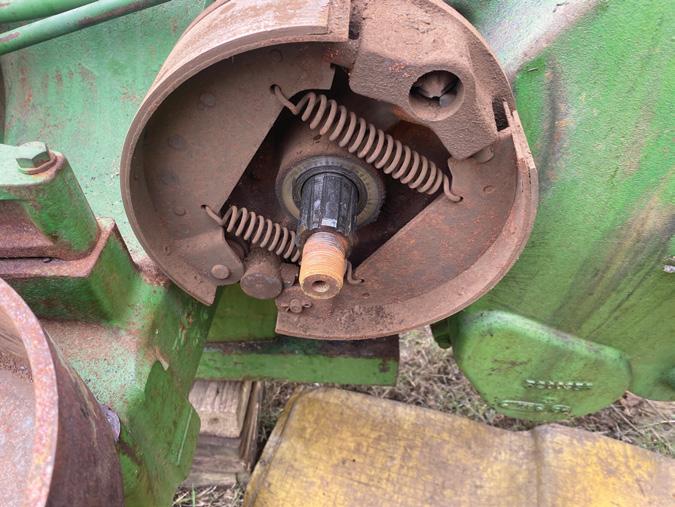
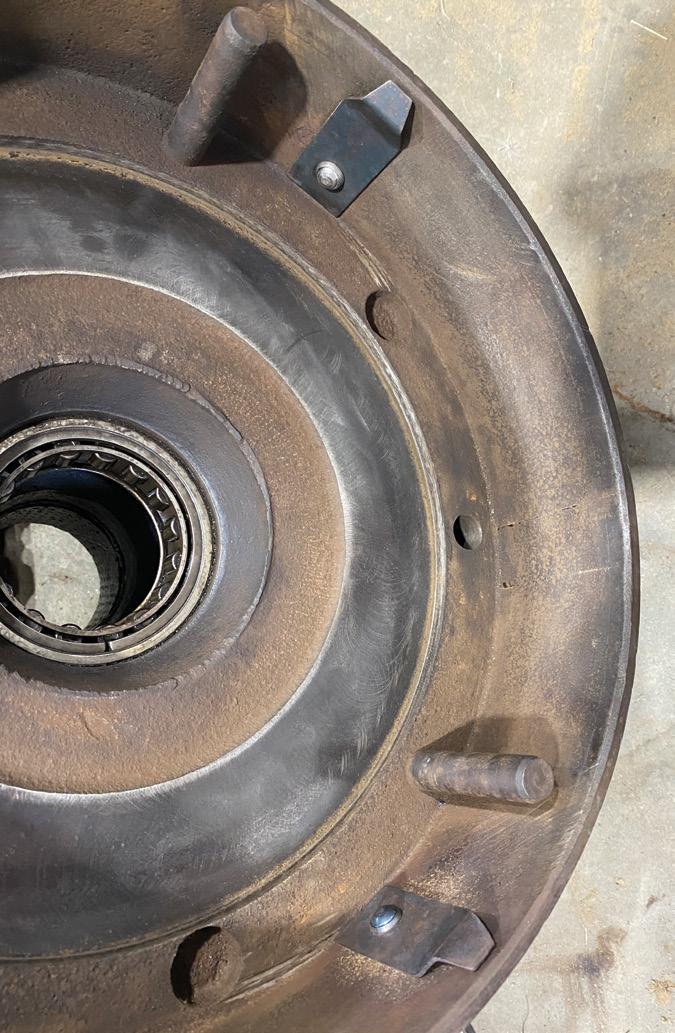
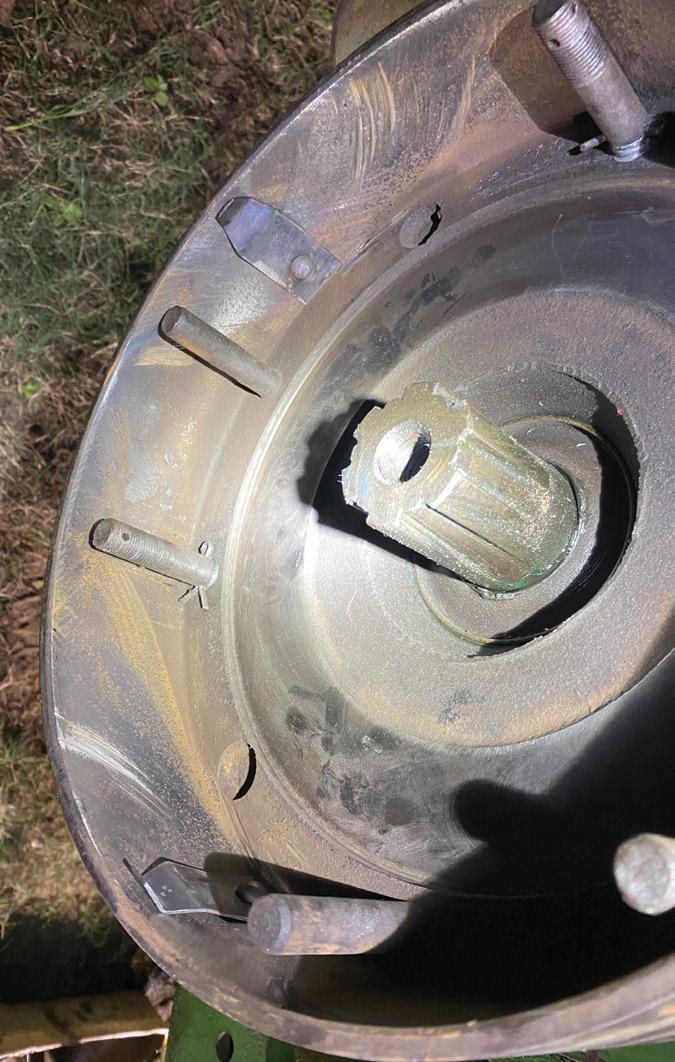
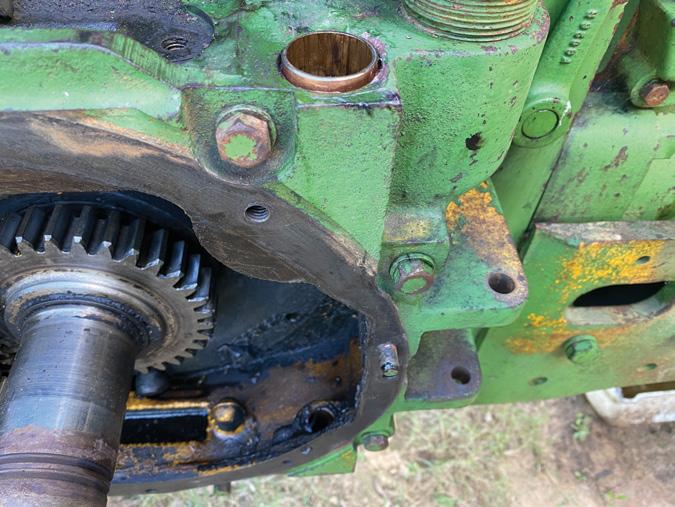
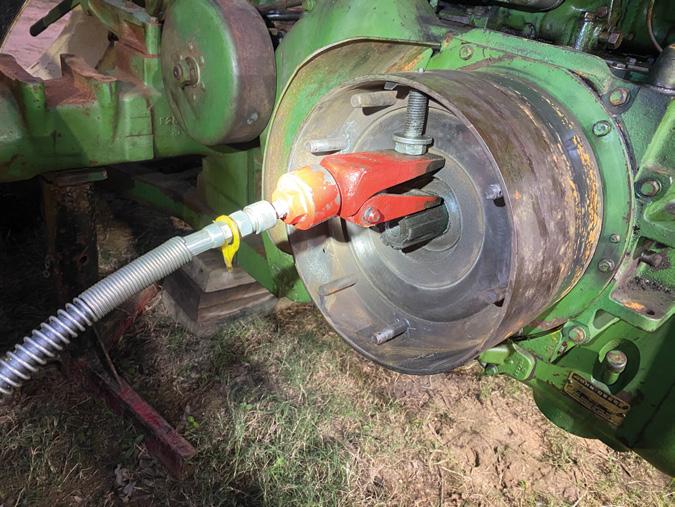
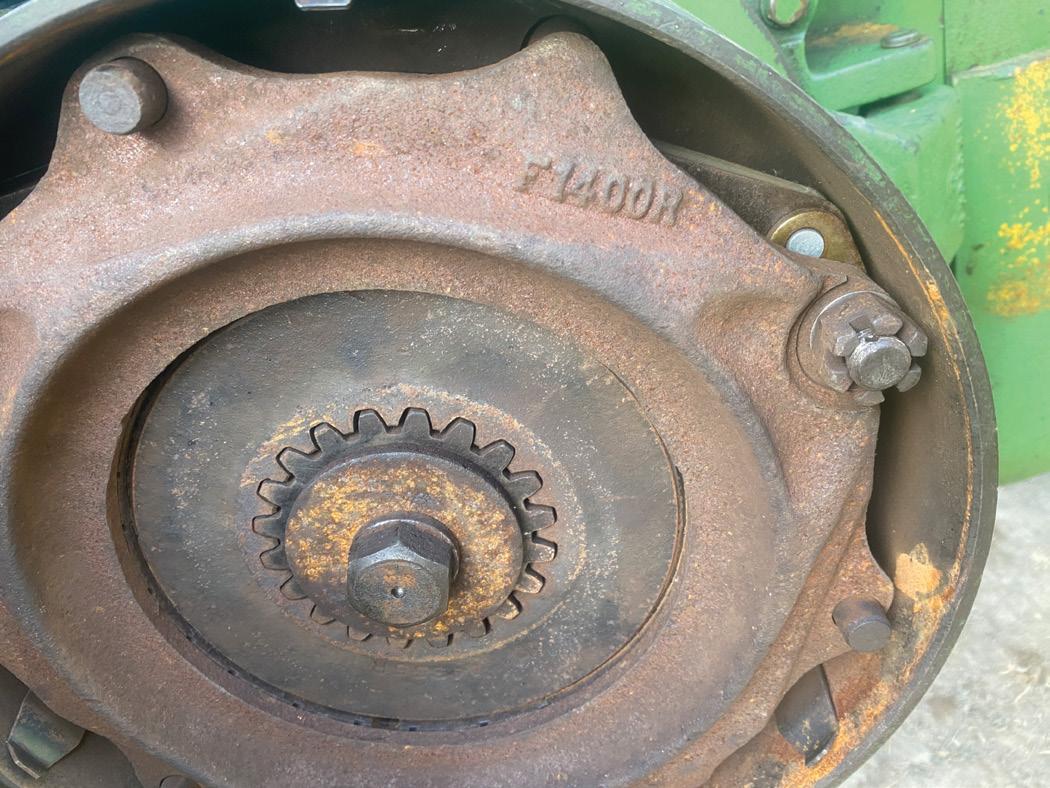
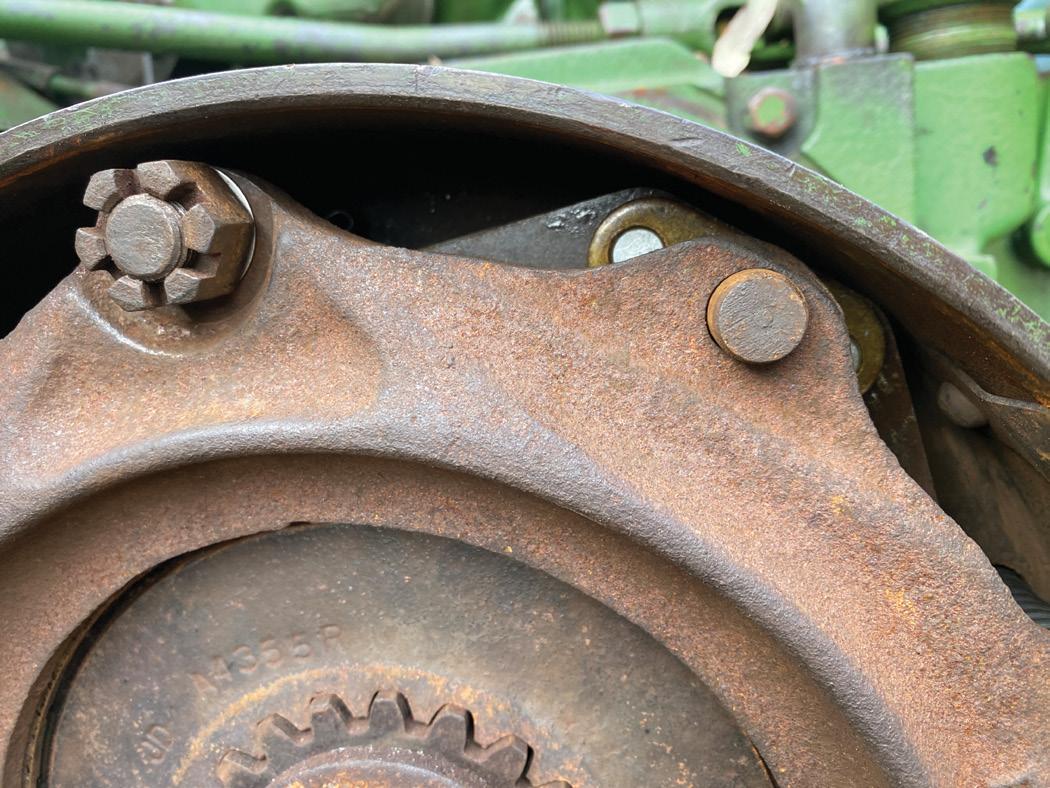
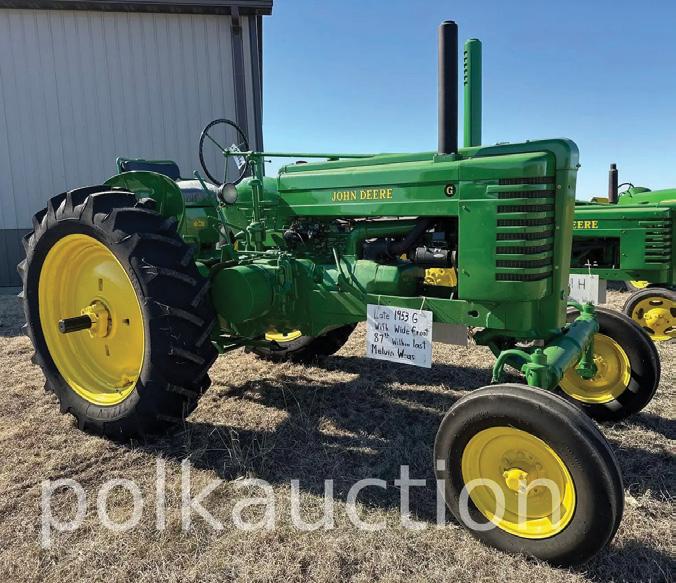
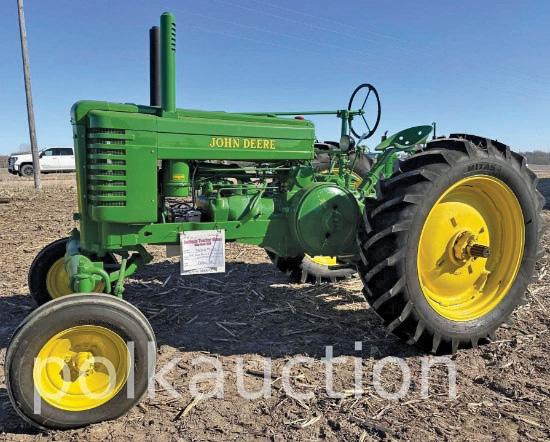
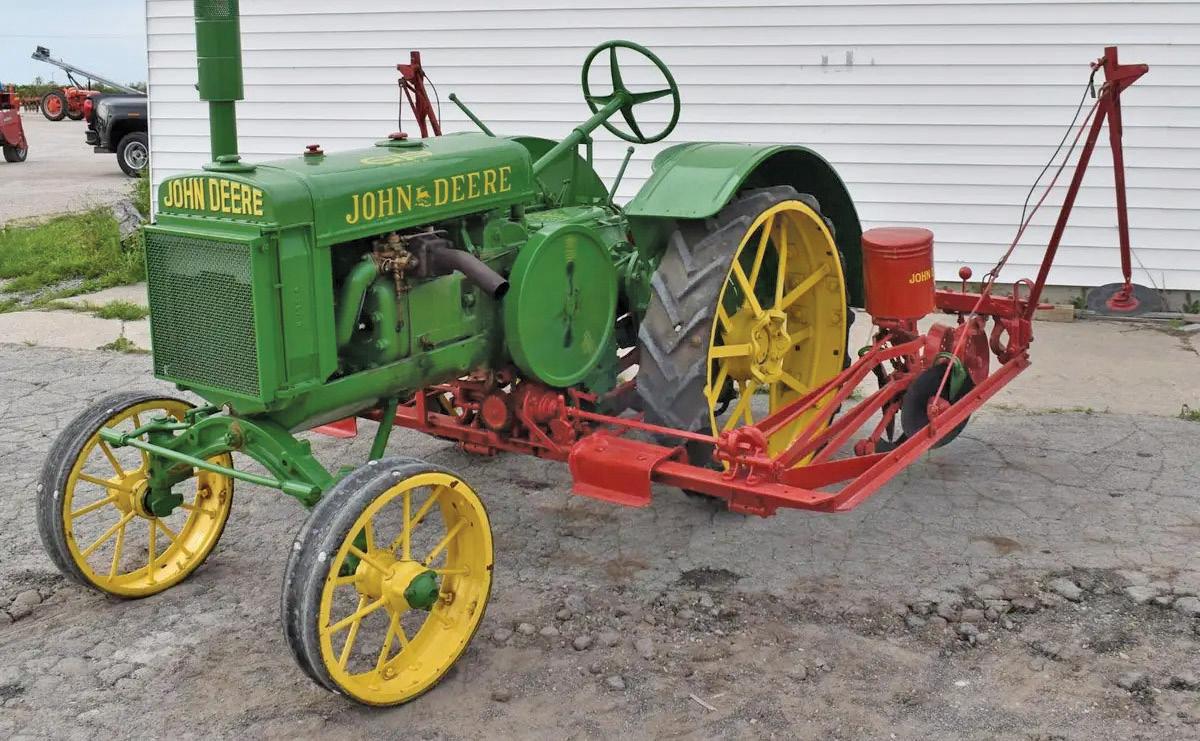
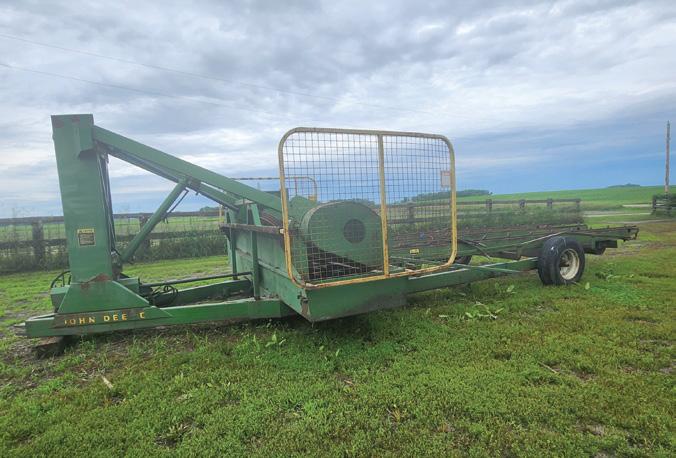
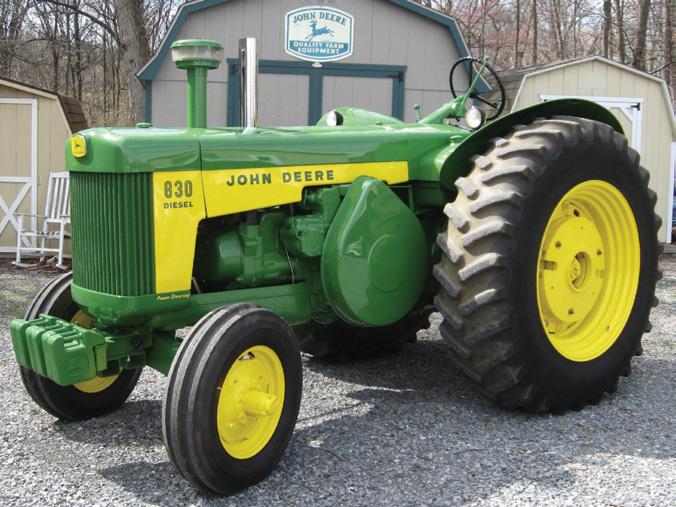
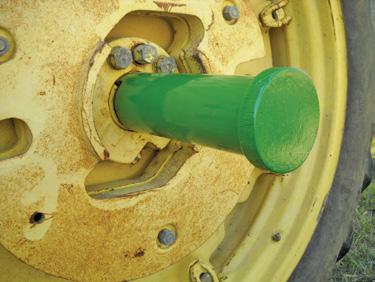
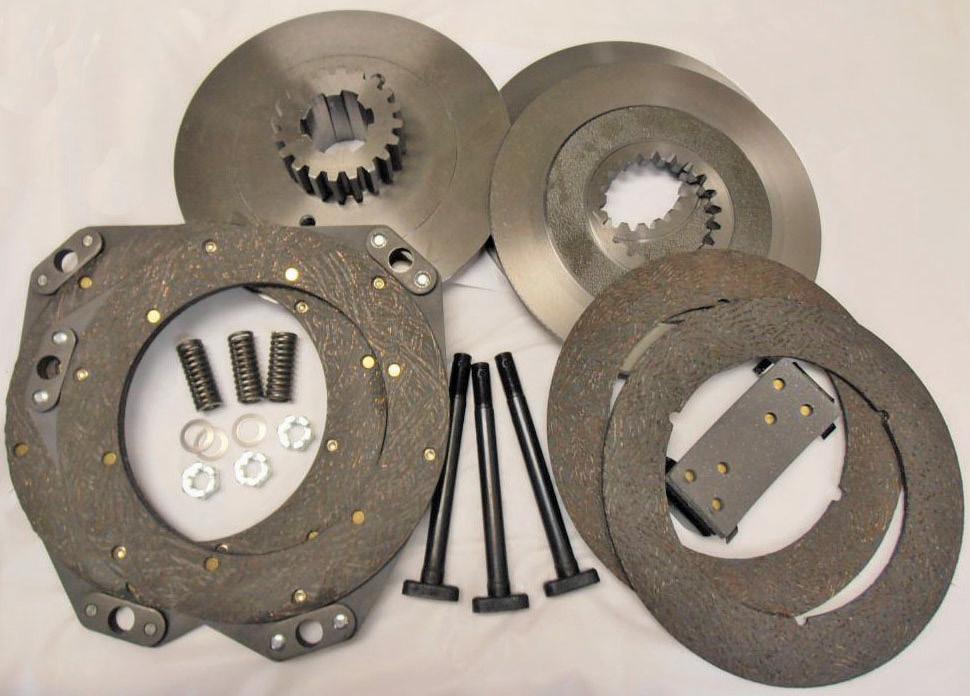
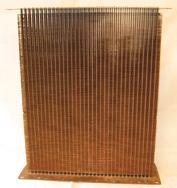
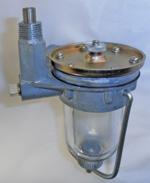
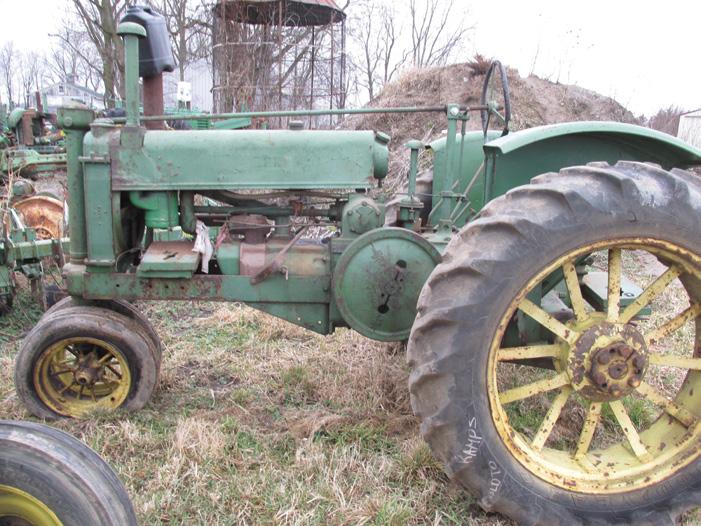
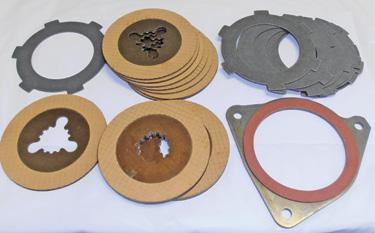
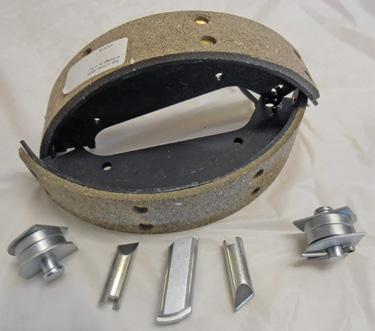
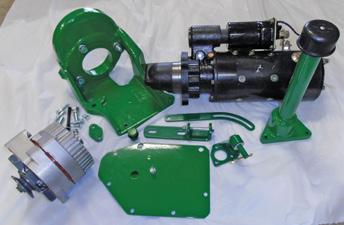
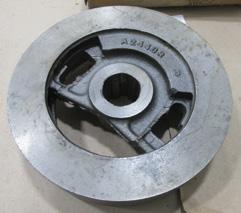
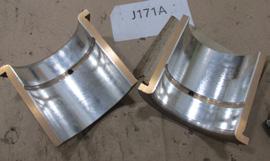
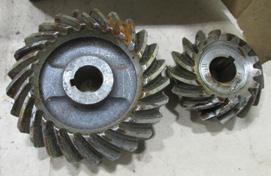
In 1947, the Innes Company of Bettendorf, Iowa introduced their “Constant Power” attachment for Deere models “A” and “B.” As shown in the photos, the machine got its power from a V-belt pulley connected to the flywheel. Power was then transferred to another pulley and clutch, a 90 degree gearbox and then roller chain to a short PTO shaft.
The price of $275 price tag might seem steep, given that it was more than 10 percent of the price of a new tractor at the time, but it would have saved you the price of, say, an “LUC” engine on a 12A combine.
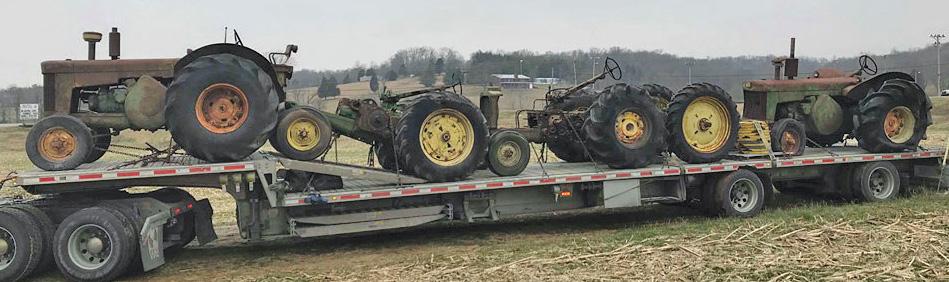
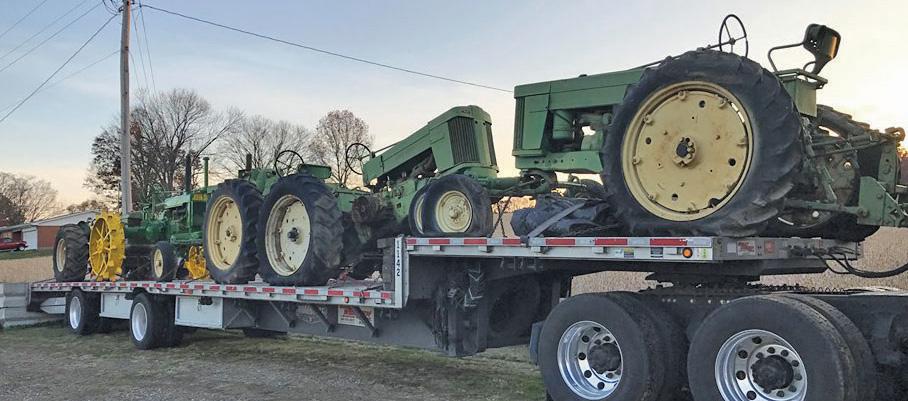
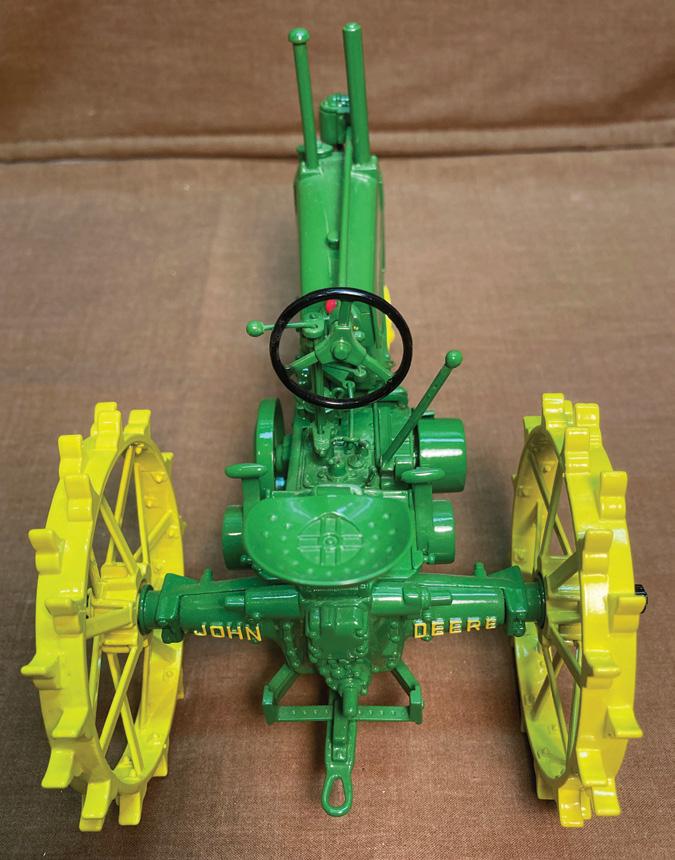
By 1953, Innes was no longer advertising the “Constant Power.” No records are known to exist on how many were sold, but the example shown here mounted on a “BW” and owned by Jake Winn is the only complete one I’ve ever seen.
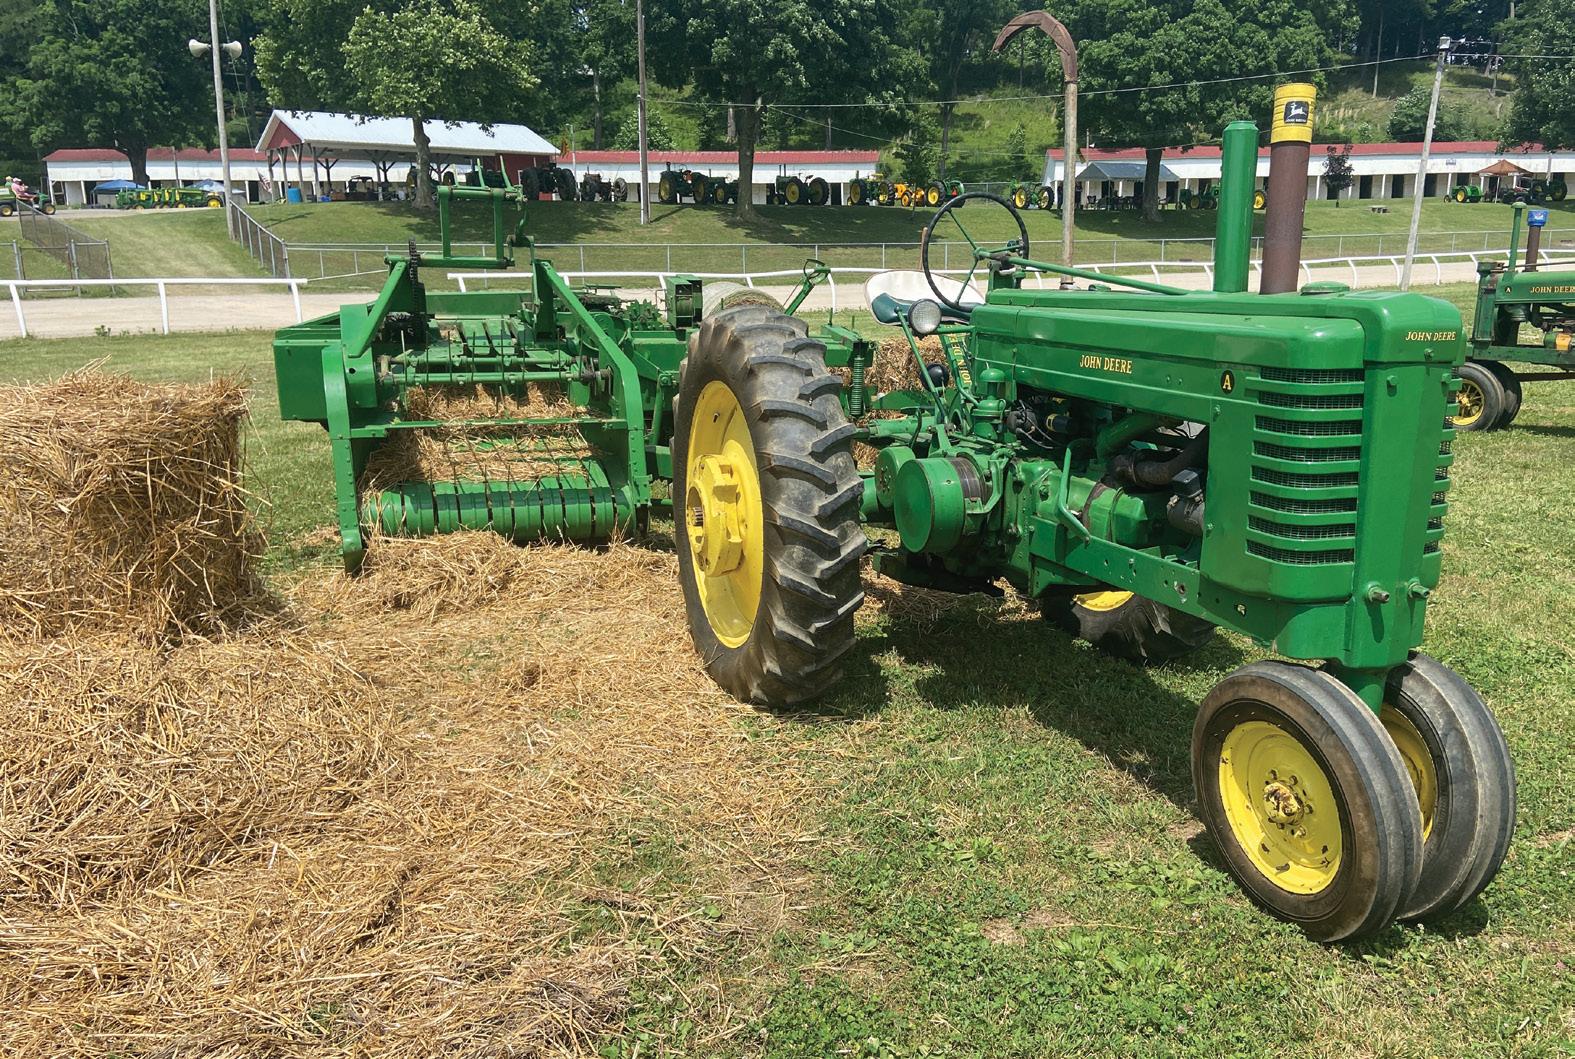
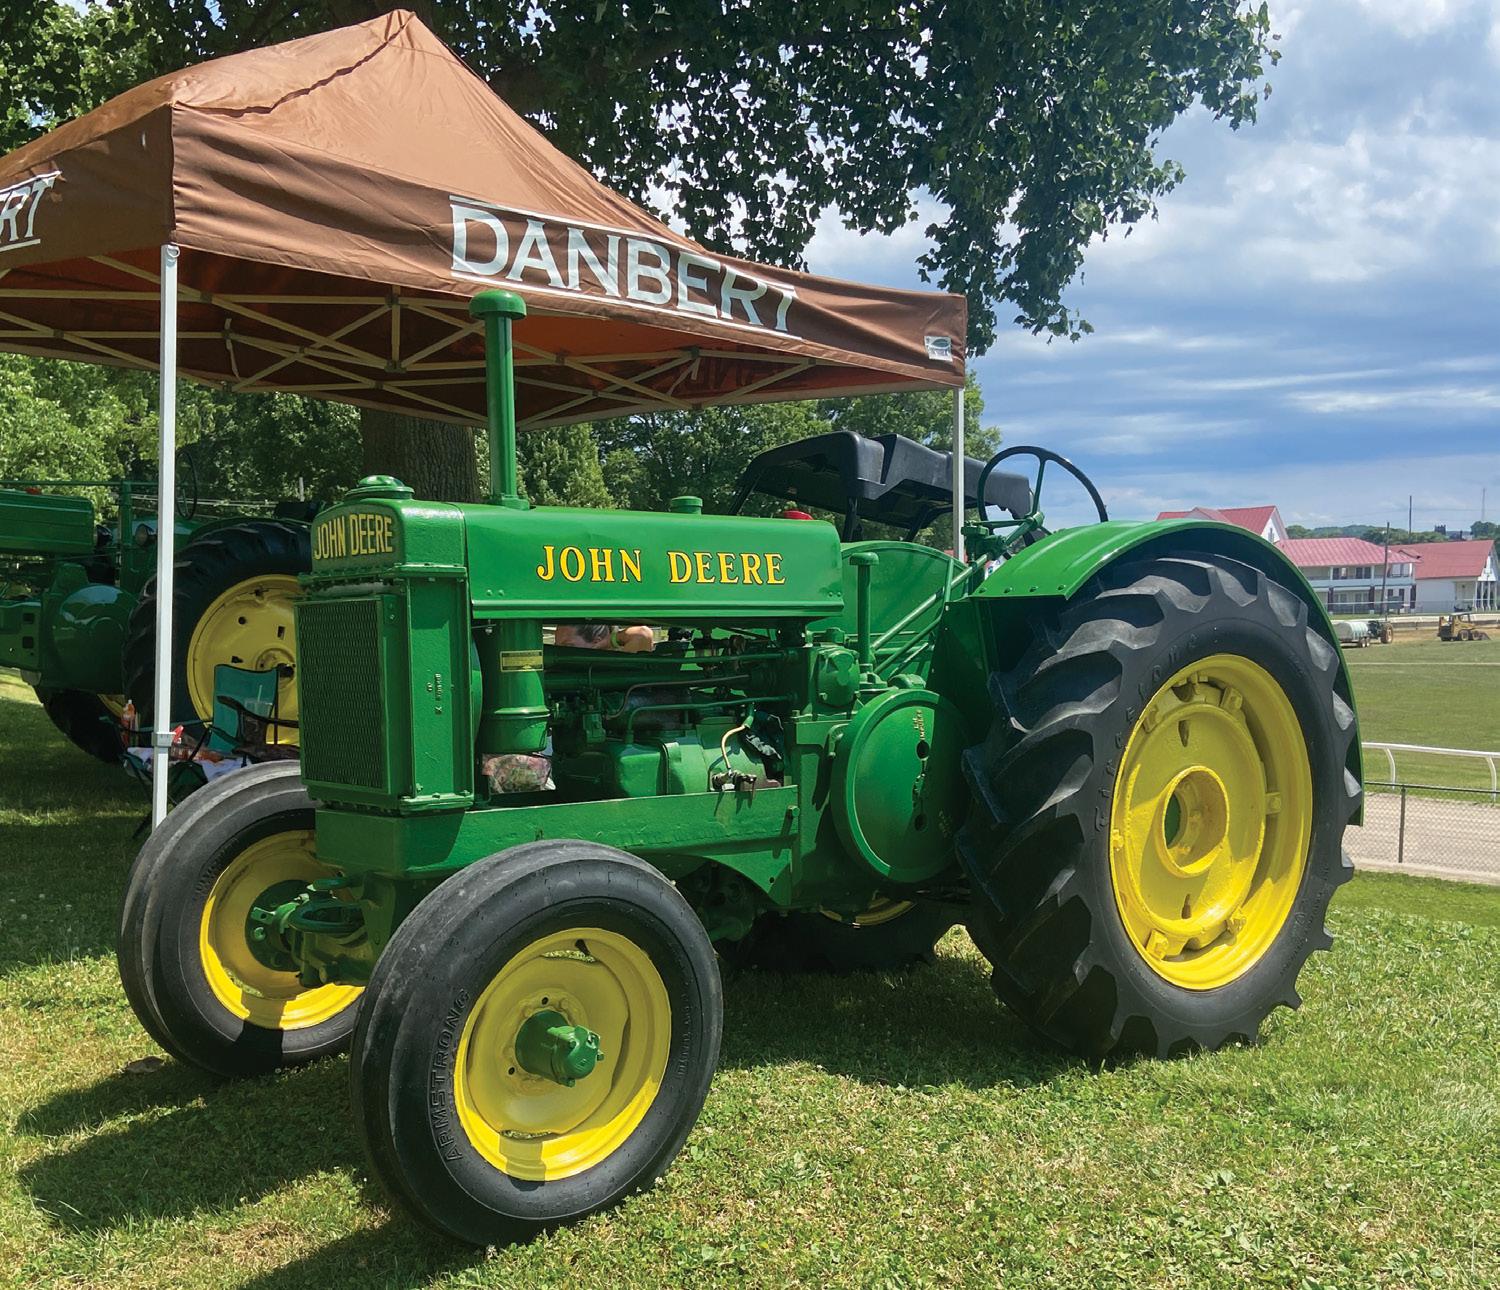
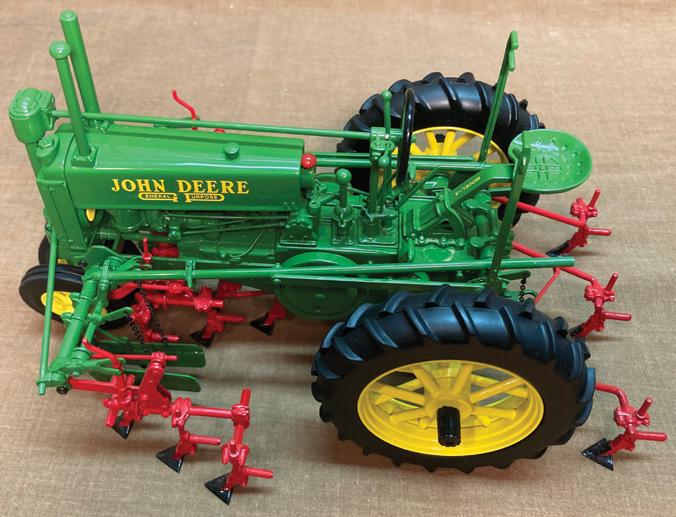
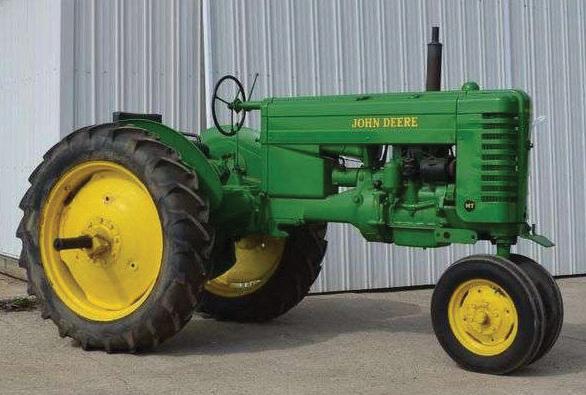
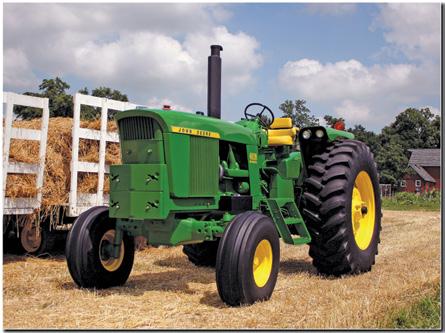
Right: Ready to do some baling is this 1947 “A,” owned by Mike and Kendra Bowers, and 116W baler, owned by Doug Shaw.
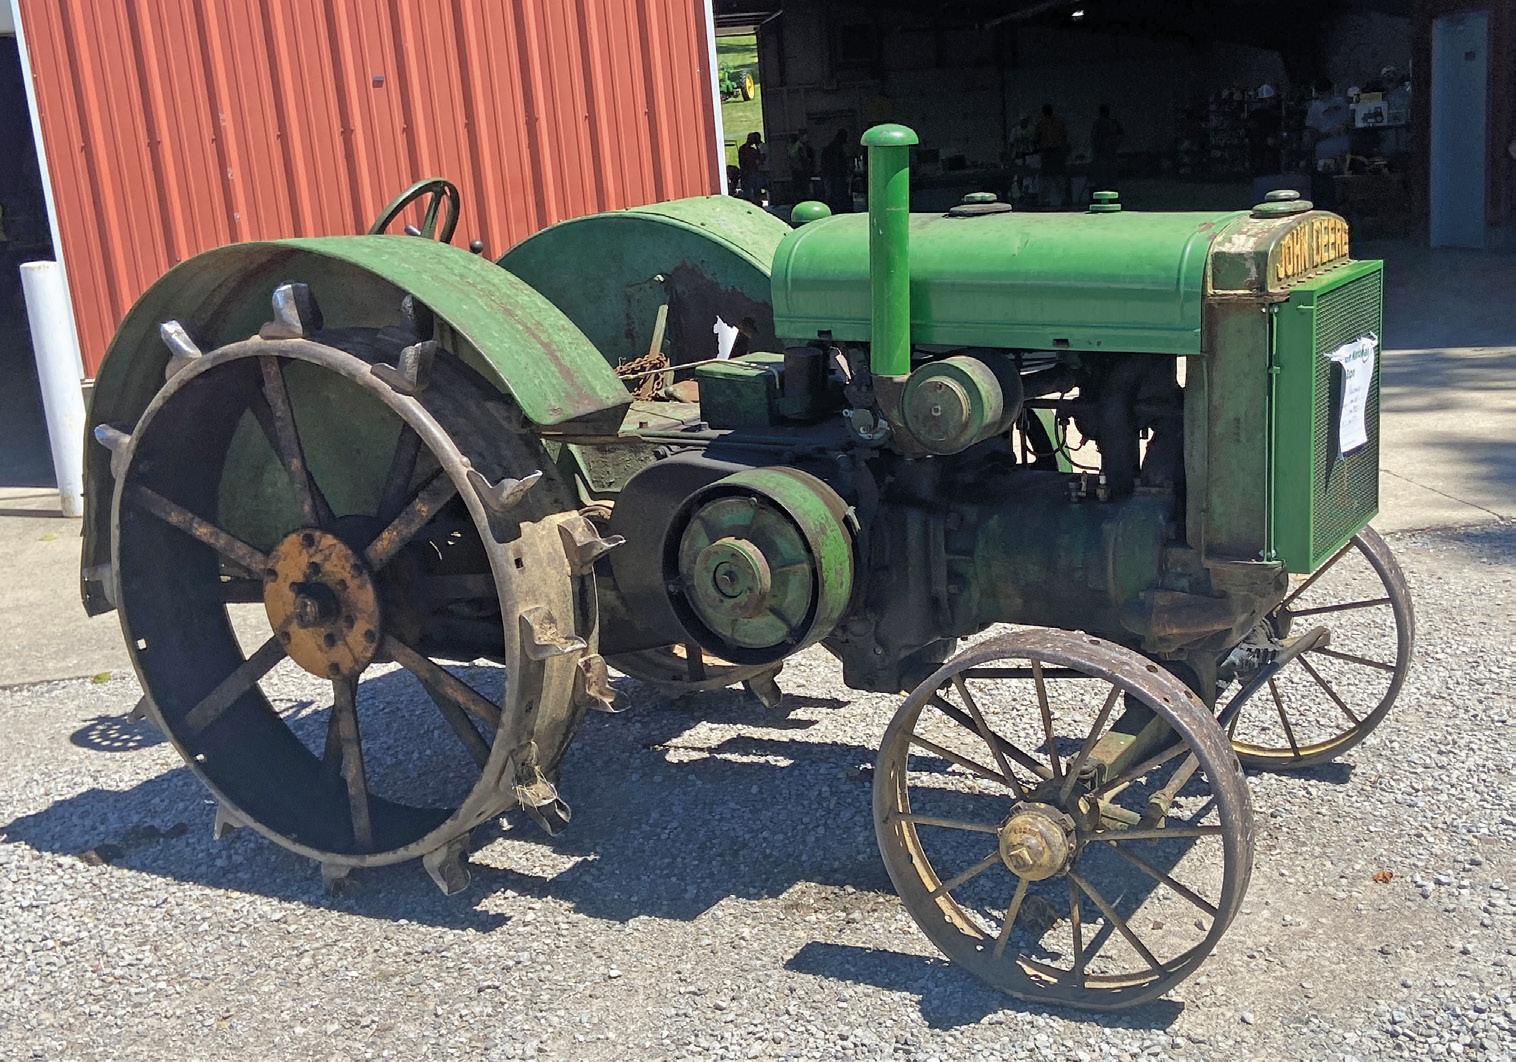
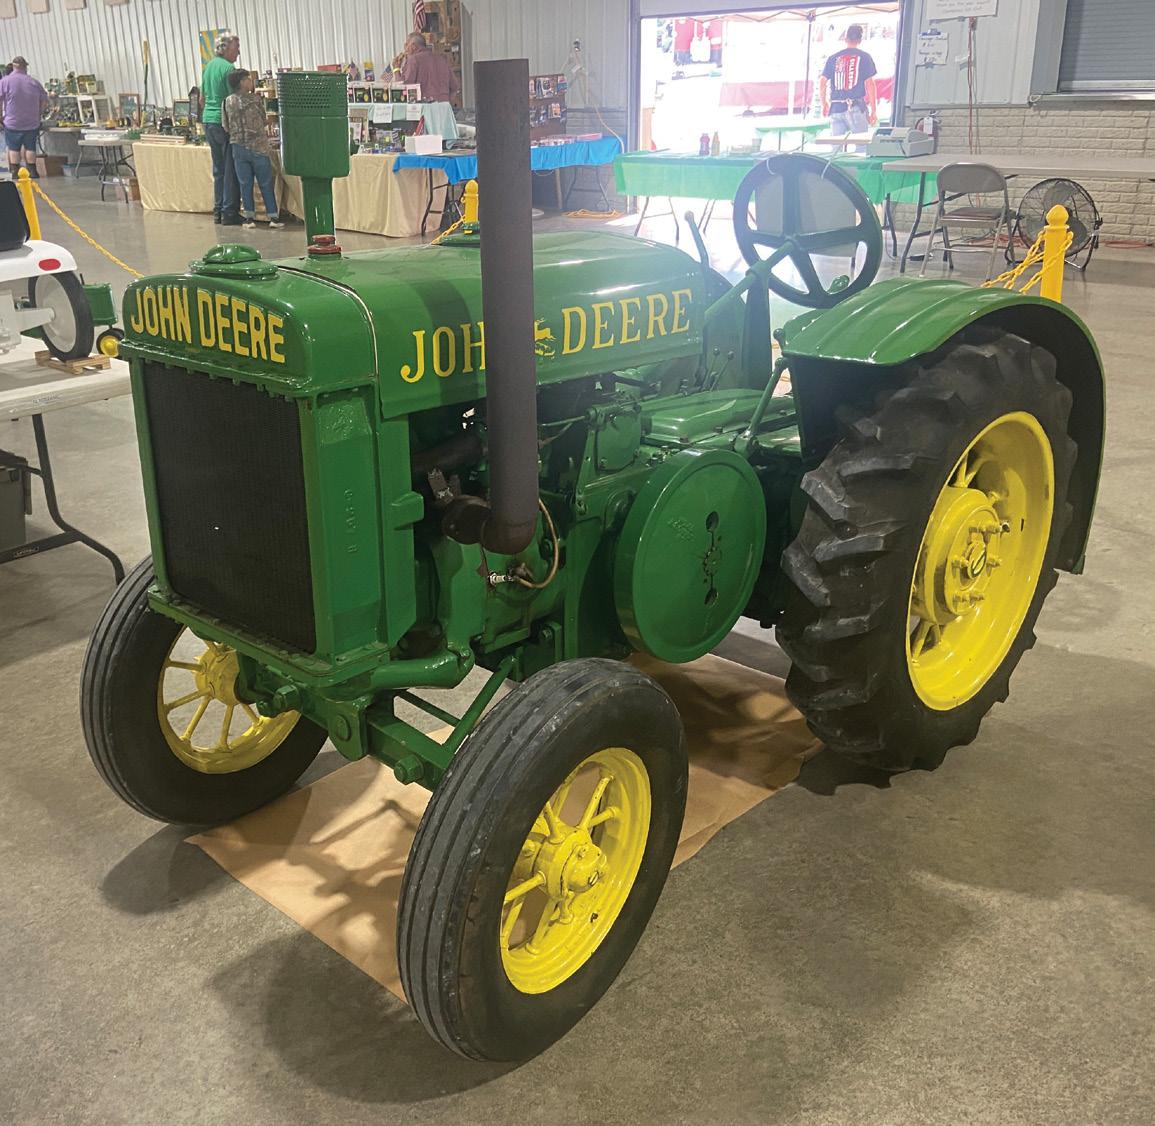
Dustin Haulman of North Lewisburg, Ohio had his 1925 “D” at the show.
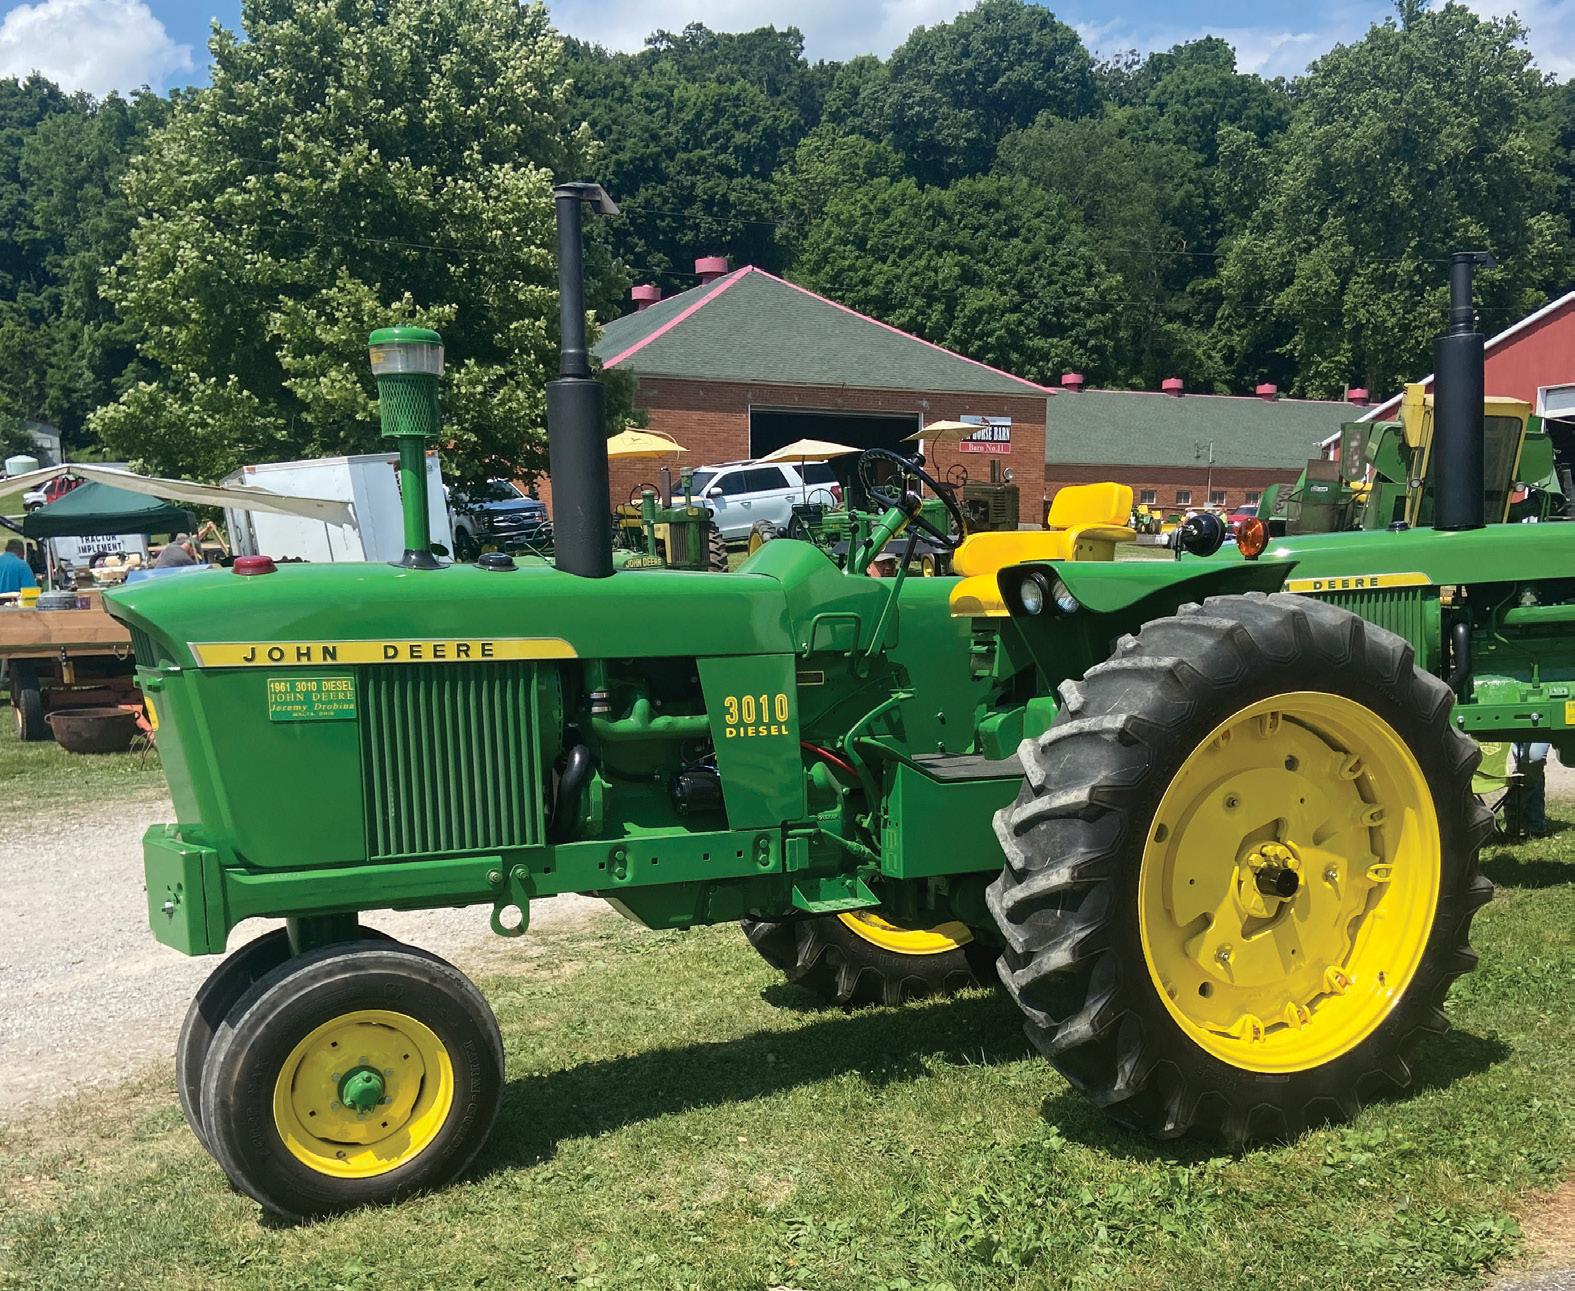
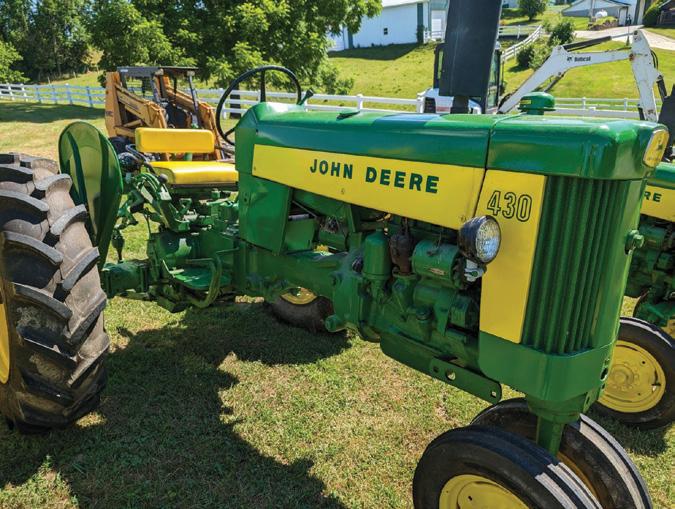
Right: Jeffrey Drobina of Malta, Ohio had this 1961 model 3010 at the show.
This small scale model “D,” which is based on a “B,” is owned by
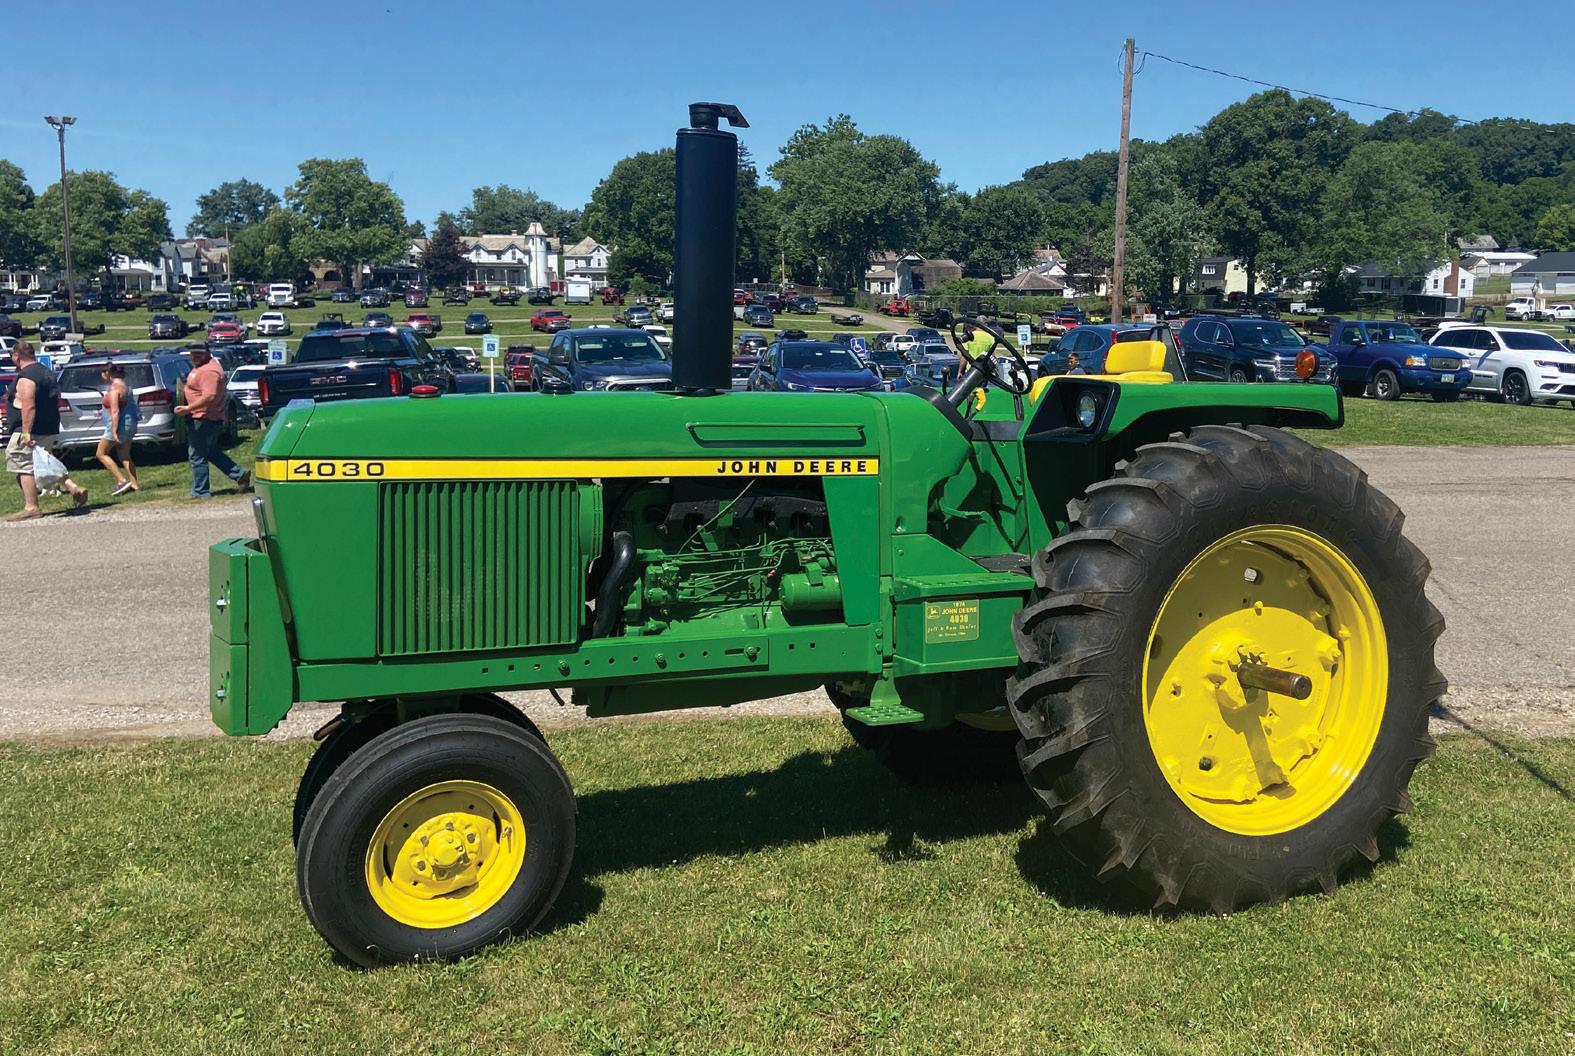
Left: This 4030 was brought to the show by Jeff and Pam Shafer of Mt. Vernon, Ohio.
John Freeland and John Randall.
Left: Here’s a pretty little “BR” owned by Daniel Hurst of Marysville, Ohio.
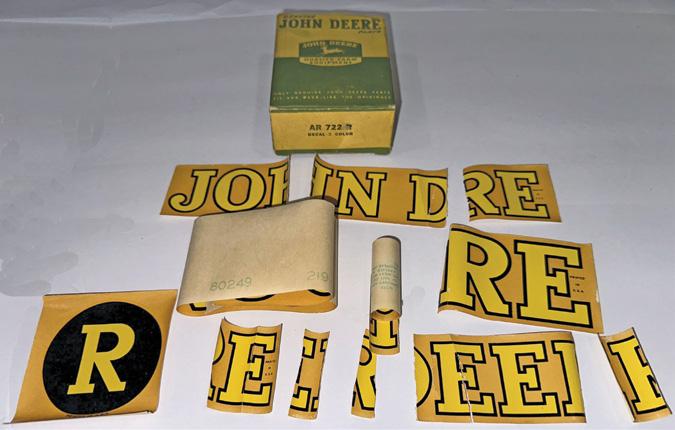
We looked at some very old tractor decal sets last time, specifically model “D” and “GP” decal sets. This time we are going to look at some different sets. If you remember, I had seen these vintage sets pop up on an auction site and as some friends were bidding and, let us be honest, they were wanting them more than I was, so I dropped out. I then asked them if they won the auction, might it be possible for me to borrow them so I could document them so everyone might see and enjoy them. All three said yes! We have looked at the “GP” decal sets I borrowed from Nate Geisert and the model “D” decal sets from pictures sent to me by Hans Knutson already. Thanks, again. This time we will look at a few more lent to me by Mike VanderHart and a few I actually had bid on and won somehow. Here we go.
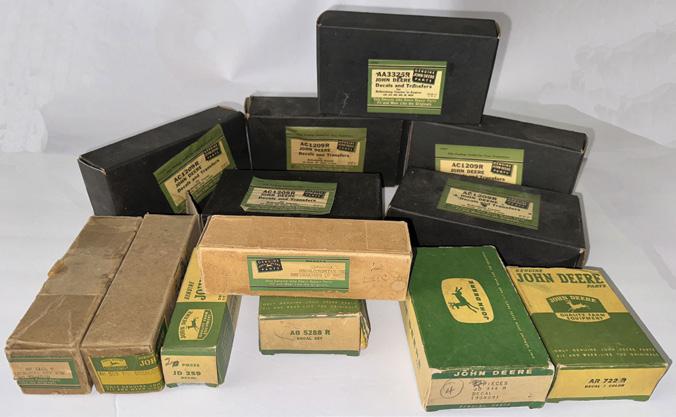
Just to refresh your memory, here are all of the decal sets, minus the model “D” sets Hans sent me pictures of (Photo 1).
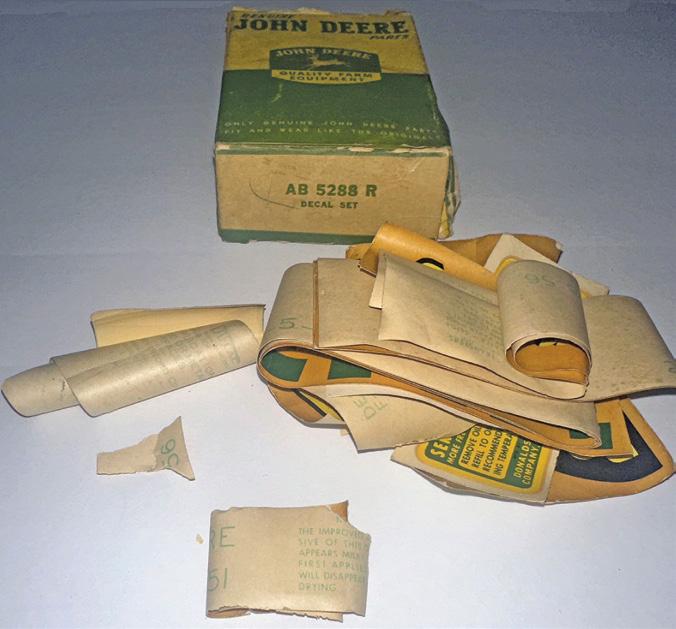
Decal set AB5288R is shown in Photo 2. Look at the decals inside; they are a real mess. Note the broken pieces and cracked decals. As I have said, decals of this age were water applied and after decades of setting in a box are unusable. They are brittle and crack when trying to open them and lay them flat. Often parts of them turn to powder. In this picture, I can see the decals for the side of the hoods, a Roll-O-Matic decal and an air cleaner decal. This set was for the model 520 tractor. It does appear to be mostly complete, which is very unusual for decal sets as old as these are. Most sets
1 2 4 3
have been opened and rifled through for years, some taken out and used and other things.
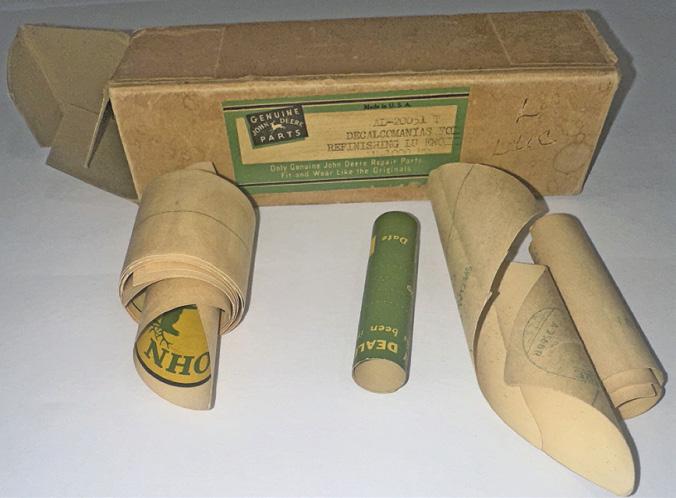
Photo 3 is for decal set AR722R. This set was for the model “R” tractor, which is fairly obvious as the model designation decal is clearly shown. Note the hood decals. Most of them are cracked and in pieces and it’s impossible to straighten the curled one out. There is only one model designation decal and all the other decals that would have been in this set are missing. AL20051 decal set is shown in Photo 4. The box says “Decalomanias for refinishing LU engine.” Basically, these are for “L” series tractors and engines. Comparing the contents of “L” and “LUC” decal kits in the parts
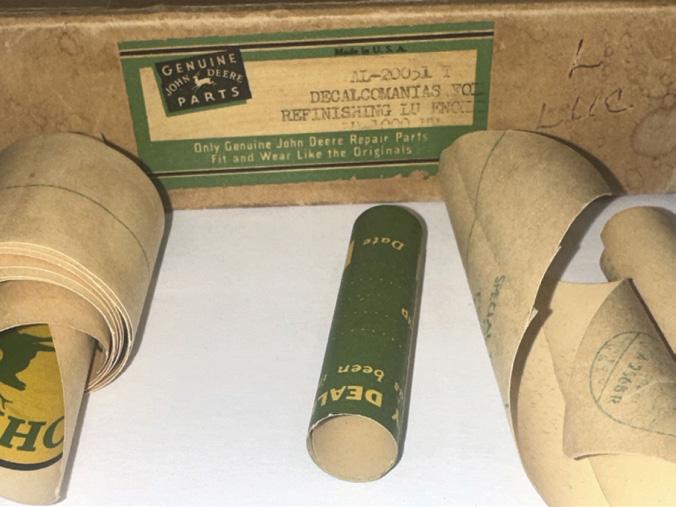
book, it looks like most of the decals are the same. These decals were so brittle, I did not try to unroll them.
Photo 5 is a close up of the green “delivery check” decal we saw in the last article. I had not seen one of those before. Also note the logo decals on the back of the decal to the right; we also looked at those closer in the last article. I like the big leaping deer logo to the left that is rolled up and also the great old vintage parts label on the box.
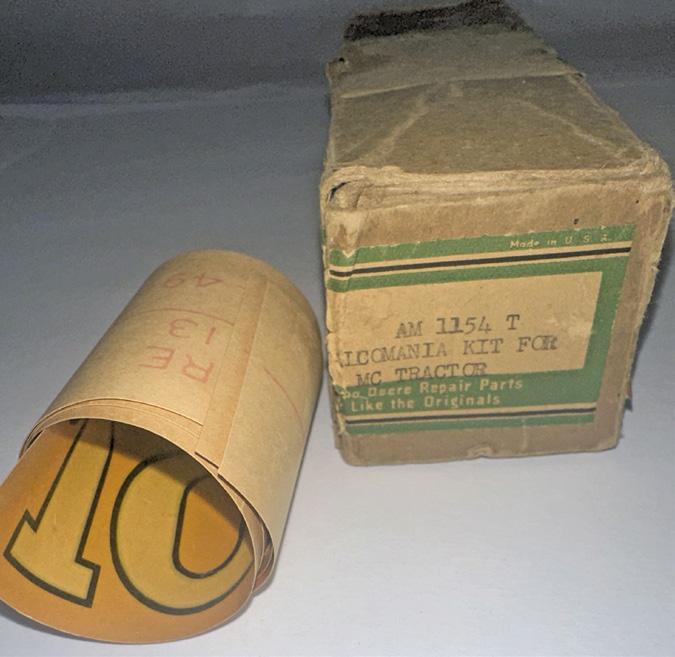
AM1154T decal set is in Photo 6. The label says “Decalamonia kit for ‘MC’ tractor” so I guess we know what it fits. As can be seen, nearly all the decals are missing from this kit—only the two hood decals are left. I tried to open one up but again they were too brittle, so I stopped.
Here is a closer look at the
AM1154T parts label (Photo 7). AM1154T decal kit for the MC tractor was eventually replaced by part AM3737T. This is a general decal kit for the “M” series tractors and model designation decals are included for the “M,” “MC,” “MT,” and “MI” tractors. By doing this, Deere only had to supply one decal kit to fit all of these tractors.
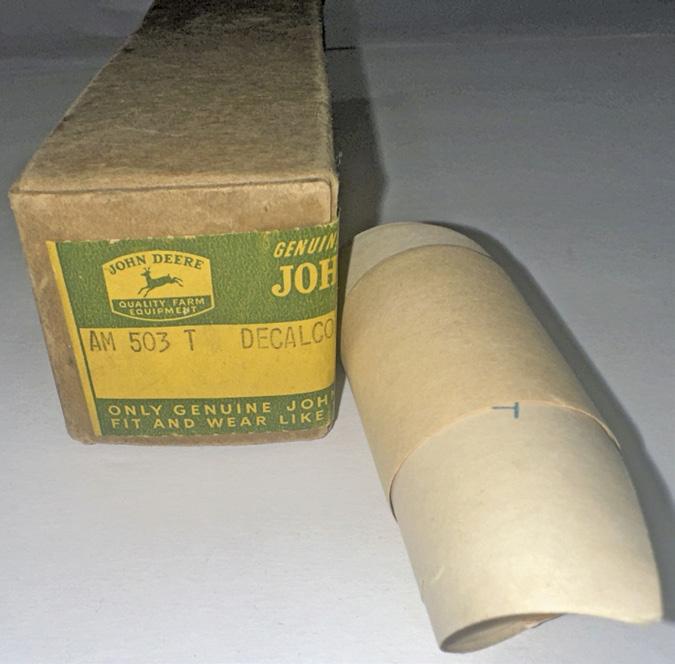
AM503T is another “M” series decal set that was replaced by AM3737T, the “one size fits all” decal set for the “Ms.” This set also is missing most of its decals (Photo 8).
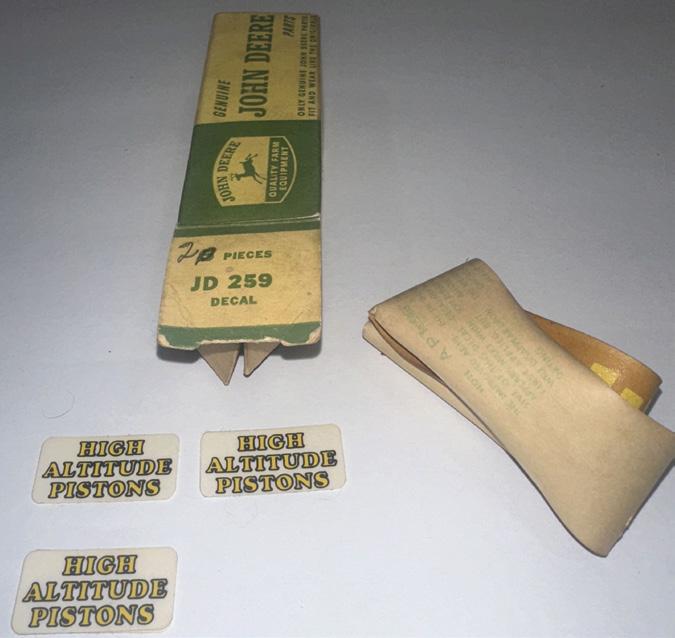
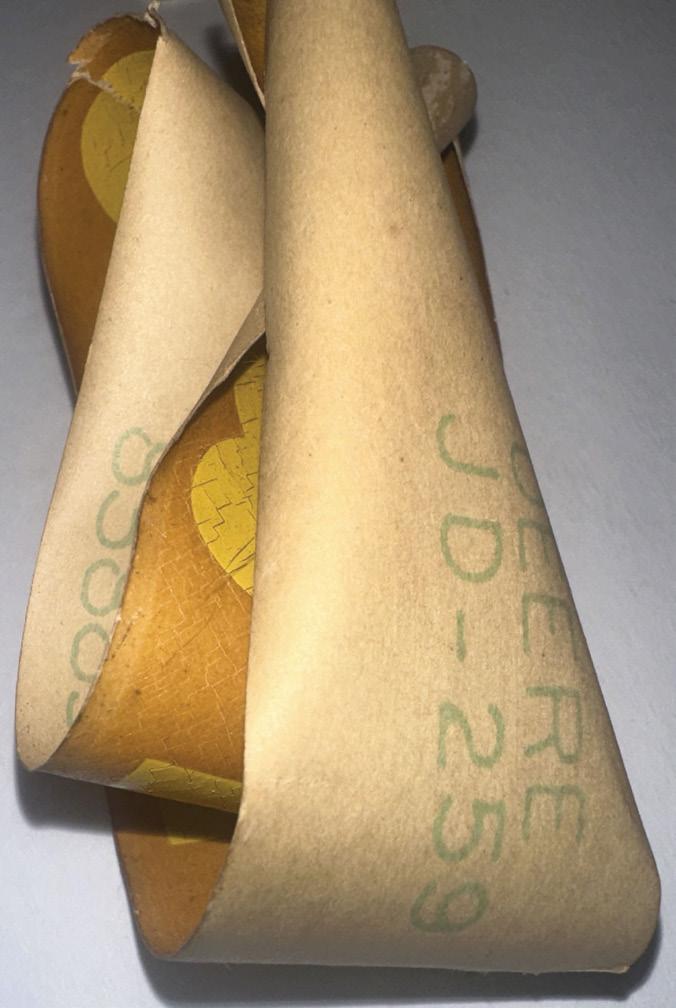
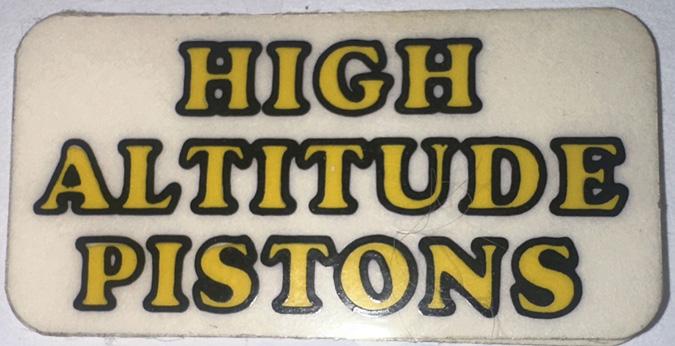
Photo 9 shows decals JD259. These were individual decals rather than a set. In the continuing saga of missing and incorrect decals in sets, this one has three of the “High Altitude Pistons” decals in it, which are in no way related to what is supposed to be in the box—JD259. They are part A5207R, and they were originally used on model 1020, 1520 and 2020 gasoline tractors, as well as industrial models, when equipped with high altitude pistons for units sold to areas in high elevations. As our dealership at Franktown, Colorado is at 6,200 feet in elevation, we had tractors in our area with these pistons and hence
these decals from time to time.
A funny story comes to mind with this high altitude pistons decal. Back in the 1990s, tractor pulling was getting started at our local fairs. As is the case with anytime men and their machines are gathered together in one place, many claims and outright lies were bantered back and forth between those who were competing. When I pulled a tractor, I would usually go out back, find one that ran okay and take it to the fair. This year, I did something different. A 1937 unstyled model “A” had recently been taken in on trade and I of course had laid claim to it and put it out back. It was in decent condition and seemed to run out fine. The old timer who had traded it in told the salesman that it had “racing pistons” in it so we said “yeah, okay, whatever” and completed the deal.
An idea then came to me. I ordered a pair of these high altitude pistons decals, and I installed them on the front edge of the hood on the sides by the radiator. I then proceeded to scuff them and in general tried to age them so they would appear as if they had been on the tractor for many years as well as match the general appearance
of the tractor. I loaded the “A” on the rollback and took it to the fair. Everyone knows that when a new and unknown tractor shows up at a pull, everyone seems to manage to stop by and check it out. It was the same here. I stayed with the tractor and when the inevitable questions about the “A” were asked, I replied “We traded this in. The guy we got it from said he had installed ‘racing pistons’ and all I can say is that it runs very strong and seems pretty hot.” I also took the opportunity to start it and then proceeded to stand there tinkering with the carburetor and I kept revving the engine up so that I would appear to be trying to fine tune it. I let the high altitude pistons decal speak for itself and I saw many people notice them and start talking among themselves.
When the time came for the pull, I hooked up to the sled and the pull began. I did notice a lot of people watching closely. Naturally, it just pulled like a regular stock unstyled model “A,” nothing special, but the looks on the watching faces made me laugh for a long time. I then told them that I was just messing with them the whole time. That was the most fun I ever had with a tractor pull. We took it home and shortly thereafter, someone from California stopped by the dealership looking for an unstyled “A” tractor. It left with him and as far as I know is still in California. The purchaser did send me some pictures some months later of him painting it and in general restoring it. I enjoyed looking at those pictures, but I did notice that the high
altitude pistons were no longer on the tractor. All in all, that was a lot of fun with that tractor. So no, these piston decals do not belong in the JD259 box. JD259 are basic John Deere hood or panel decals.
The JD259 are dried and curled up tightly. In years past, before correct aftermarket decals were available, I had been forced a few times to use a vintage set of decals. I found that if I put a curled-up decal into a pan of warm water and let it sit a bit, I could sometimes get it to flatten out and open up. I even installed a few I had done this to, but I will also say, more often than not, the decal would tear. On one tractor I had painted for resale, I had to install the hood decals in pieces. It came out okay, but I was never happy with that one. It was what is called a “10-footer” in the car world—looks good from 10 feet, not so good up close (Photo 10).
Picture 11 is a close up of the high altitude pistons decals, part A5207R. I believe it may even still be available
from Deere? I have not checked in a while.
The year 1956 can be seen on the back of the hood decal. So, by my math that is 68 years ago (Photo 12).
It would appear that the hood decals are part JD114. If you recall from the last article, parts JD110-JD116 are basically generic John Deere decals that could be used anywhere. They are assorted sizes, but all say John Deere on them. Deere used them as hood decals as well as on wagons and more. I used to stock multiples of each and would sell them to anyone needing a John Deere decal for an old piece of equipment, to use in a project, for a toolbox or really anything (Photo 13).
Photo 14 is an original United air cleaner decal. Excellent reproductions are available today of course; the graphics are faithfully reproduced and are minus the cracking and hazing an original vintage decal has.
The back of the United air cleaner decal does not have a John Deere part number, just a stock number (Photo 15).
This is the end of the decal sets I wanted to share with you. In the last article, I explained what I felt the reasons for the incompleteness of these sets were. The main reason being, I believe, is that these sets came originally from Travis Jorde, who researched and reproduced correct decals for most John Deere equipment and sold them
for many years. I feel that they were examined repeatedly and many of the decals were used to have reproductions made. This resulted in mixed and missing decals from most of the sets.
I had also said that I was beyond surprised to see original decal sets for the model “D,” “GP,” “MC” and others at this late date in the hobby. Remember, the boxes are an integral part of a vintage new old stock part so for me to even see those was very exciting. It made sense, from the corporate view of the world, for John Deere to change and update the sets as years went by, and new generations of tractors were produced. Why should Deere stock individual separate decal set for the model “M,” “MC,” “MI” and “MT” when one master set would take care of all the “M” series? That makes the surviving original separate sets that much more valuable and interesting. This is a perfect example of why I still find John Deere a fascinating study after 40 years in the industry. There is always something new to learn, it seems like.
I once again want to thank the people who allowed me to borrow and use their decals for these two articles—Nate Geisert for the “GP” sets and Hans Knutson for the “D” sets from the last article; Mike VanderHart and myself for the decal sets in this article. Thanks, guys! Until next time!
Write Greg Stephen at The Old Tractor Company, Box 89, Franktown, CO 80116; phone 231-846-8243 or email deeredr@hotmail.com
This month, I am going to take a step back to the early 1990s to look at the first two Precision Classics miniatures produced by Ertl. I have covered both pieces in the past, but this time I am going to add a few of the somewhat subtle, yet notable, differences between them. I relied on Wes Malcolm’s book A Specialized Look Into The Unstyled Model A (which is still available through Green Magazine—see the GM Bookstore on page 70) for these details. I consider the late 1980s and the 1990s to have been the “prime time” of farm toy collecting. The reason is this was when the hobby was really getting started and companies like Ertl were focusing on making miniatures that appealed not only to kids, but collectors as well. In addition, there were fewer new releases on a yearly basis and most of the new items were very different from anything that had been produced beforehand. The reason for that is the simple fact that many of the real tractors had never been produced in miniature. There were many folks specializing in modified or custom built toys, which also added a unique niche to the hobby, but they were very expensive. And until 1990, none of the larger toy companies had ever produced highly detailed miniatures. The time was right for someone to step in and start making very high end miniatures at a price that most collectors could afford. Ertl was the company and the Precision Classics line of miniatures was born in 1990. The first Precision Classics
model was the unstyled “A” tractor on steel wheels. A picture of the actual miniature was featured on the front cover of the 1990 Ertl John Deere toy catalog, and the entire first page inside included several additional pictures. It carried Ertl stock number 560CO and was slated to be available in September of that year. I learned from one of the local John Deere dealers that the retail price was going to be somewhere around $80. For a collector interested in everything John Deere, and not usually willing to spend $200 to $400 for a custom miniature, this was exciting news!
Photo 1 shows the carton for the model “A” tractor. The initial series of Precision Classics miniatures all had fully enclosed card stock cartons
covered with full color photos of the actual miniature. Several of the key features were identified, printed in red letters, and tied back to the pictures with red lines. A special Precision Classics trademark is printed on each corner that includes a circle with a small measuring caliper that has the number one included inside. The caliper is used to suggest “precision” as in high detail and accuracy, and the number one indicates that this is the first model in the series. The round black and gold label shown on the front of the carton in Photo 1 identifies this particular model “A” as a special version produced for the National Agricultural Center and Hall of Fame. This miniature is essentially the same as the regular Precision Classics model “A,” other than this decal and a special plate attached to the side frame of the
Photo 3 • 4, right
Photo 1 • Photo 2, below
tractor. I used this carton for the picture since my regular carton is packed away with many other boxes.
The rear of the carton is shown in Photo 2. A complete right side view of the tractor is shown on a white, rather than black, background. Again, several features of the miniature are pointed out. The inner polystyrene carton and tractor are shown in Photo 3. The carton has a top and bottom, and the top actually has a John Deere trademark “engraved” into it. If you look closely near the top of the picture, you can see it in the center of the carton top. Part of the tractor is covered with thin paper to protect it from rubbing on the carton. Also included is a small die-cast collector’s coin with a gold finish and green and yellow cord. One side features a model “A” tractor, along with the years of manufacture, and the other side has the Precision Classics caliper trademark with the number one in the center.
A collector’s booklet was also included (Photo 4), which has some reprinted pages from early John Deere catalogs and advertising. Note that the years 1933 to 1936 are referenced, meaning that this “A” should be representative of the earliest versions of the real tractor. The Precision Classics trademark is embossed over most of the cover as well.
Photo 5 provides an overall view of the tractor. I think it is a great miniature, and is actually one of my favorite Precision models. All of the components are of die-cast metal construction, and the details are abundant. I think that some of the later Precision
models have even better detail, but given that this was the first one, the team at Ertl did a fantastic job.
So, let’s look at a few of the details. A close-up view of the front of the tractor is provided in Photo 6. Note that there are cast raised letters for the John Deere name in the radiator top tank, and the woven radiator screen is nicely reproduced as part of the overall casting. Mounting hardware for the front pedestal is included as well.
Photo 7 shows some of
the engine details. The radiator fan is a separately cast item that is painted yellow. There is an air cleaner canister, carburetor, and the lower radiator tube with hoses. The intake and exhaust manifolds, spark plug wires, and magneto are also included, and the flywheel and belt pulley rotate. The fuel and gasoline tanks have their respective caps, with the gasoline cap painted red. Photo 8 shows their alignment in relation to the steering shaft; both are located directly beneath the shaft. This made it difficult to refuel the tractor, and changes were made in production to eliminate the issue. More on that a little bit later.
Photos 9 and 10 show the rear and right side of the model “A” respectively. There are individual brake drums with pedals, a swinging drawbar, power take-off shaft, and the John Deere name cast into the rear axle. The crankcase breather is on top of the platform area and has tiny spring-loaded locks as on the real machine. They do not actually operate,
but you can see the hooks and springs in the casting. There are levers for the throttle, gear shift, power take-off, and clutch. The clutch lever moves and operates the belt pulley brake. Turning the steering wheel actually steers the front wheels, and does so through an actual set of gears. It takes a couple of revolutions of the steering wheel to move from full left to full right with the front wheels.
Now let’s switch over to the second John Deere Precision Classics miniature which is the model “A” tractor with a 290 series cultivator (Photo 11). This was released by Ertl
Photo 5
Photo 6, right • 7, below
Photo 8
Photo 9 • Photo 10, below
in 1991 with their stock number 5633. In addition to the obvious bright red cultivator, this tractor differs from the first in that it has different wheels and rubber tires. For the most part, the components on both models are the same, other than a few details that I will point out.
The cultivator itself is amazing, and Photos 12 and 13 show some of the details. The number of pipes, rods, clamps, and brackets required for this machine is unbelievable and I can only imagine what it took to assemble and mount it to a real tractor. Ertl seems to have included everything either cast directly in place or as a unique part. Note that the green shields (Photo 12) are suspended with tiny black chains. Similarly, the power lift is connected to the rear gangs of the cultivator with chains (Photo 13). Very small machine screws secure much of the cultivator to the tractor using mounting bosses provided on the tractor.
The booklet that comes with this tractor and cultivator states that it contains promotional material from 1936 to 1937. To me, that would suggest that there would be differences
in some of the details on this tractor from the first, and there are. Photo 14 provides a top view showing the fuel and gasoline caps on the second model “A.”
Note that the fuel cap is
after the unstyled model “A” tractors were out of production. The tractor that the team at Ertl used for measurements when designing this miniature most likely had a replacement wheel. Again, this is not a big deal.
I added Photo 17 to show one of the interior pages of the two collector’s booklets. Some of the early advertising material is reproduced, which I think adds a nice touch to these Precision Classics models. The pictures and drawings are very interesting and set the stage for
moved to the left slightly and that the gasoline cap has been rotated slightly counter-clockwise. Both of them now clear the steering shaft. Photo 15 is intended to show the differences in the hood graphics. The tractor on the left has the leaping deer between the “JOHN” and “DEERE” while the one on the right does not. In addition, the shape of the “G” and “P” below the John Deere name differs between the two. Technically, the height of the letters in the John Deere name should have been slightly less on the right, and they appear as though they might be taller. That’s one item I am not going to complain about.
A comparison of the steering wheels is provided in Photo 16. The area to note here is the center hub. On the left it is “triangular” shaped and on the right it is round. In addition, the spokes on the left are flat and on the right they are round. Technically, both steering wheels should have flat spokes since round spoke steering wheels were only used as replacement steering wheels
what some of farming was like back in the 1930s.
In general terms, I really like the original Precision Classics series of miniatures which included 25 unique models. The details, fit, and finish are very good to excellent in most cases. I purposely wanted to cover the first two again in this article since, from what I have been seeing at toy shows, both are still very reasonably priced. New in the box model “A” tractors have been priced around $90 to $100, sometimes even less. The “A” with the cultivator is closer to $200. I suppose that the number of current farm toy collectors who can relate to, or have an interest in, the old two-cylinder models is dwindling every year. However, these miniatures represent some of what made Deere and Company what it is today with tractor technology and I don’t think we should lose sight of that. If you have any interest in the iconic model “A” tractor, I recommend having these miniatures in your collection. Enjoy. Contact Bill Proft at N1366 Woodland Dr., Greenville, WI 54942 or email billproft@sbcglobal.net
12, right • 13, below
Photo 16
14, right • 15, below
Photo 17
Photo 11
Patience, perseverance, dollars, and work. That’s what it takes to keep vintage tractors running as they should. Anyone who dives into the heart of an old tractor in an effort to bring it back into specs soon finds this to be true. The 620 sitting in my shop has fought a good fight but its engine is just tired out. The disassembly for its rebuild exposed a cracked cylinder head the likes where repair was not going to be an option as you might remember from my June GM article. My phone calls to a number of salvage yards and vendors looking for a replacement head turned up a big fat nothing. There were several places that expected a 620 to be in soon for salvage and if the cylinder head was usable, it would be for sale, but that was the best that I could do. This disappointing search had one valuable aspect in that it brought me up-to-date regarding what salvage places are getting for a good head casting…IF they had one. Let’s just say that the going rate for a piece such as this is not cheap. Add to this that the head will surely need to have new valves and most likely new seats and springs. The valve-to-seat job will also need to be done. I was determined to find a cylinder head within a reasonable driving distance so that I would be able to SEE it before I bought it and also avoid the shipping cost. But for the time, I had no other option but to wait and keep looking. Being a stubborn Irishman, knowing little of the working of “computerism,” smart phones, and all those other electronic contraptions, going that route was not
Photo 1 • Photo 2, below
an option for me. Why I don’t even know what a “robo-call” is, or give a rip about them. But as the search for a cylinder head lingers on, the internet DID prove to be a GOOD thing. My neighbor and good pal Dan—remember him from a past article called Step on It? He’s the guy with his side line building helper steps for old tractors. He knows his way around the internet and realized my situation for finding a cylinder head, so he spent a little time shopping for me. To my surprise, Dan called me back the very next day to let me know that there was a guy about 30 miles south that had a 620 head for sale. The ad stated that the head had broken manifold studs but was otherwise usable. Of course, I called the fellow and as he stated, the exhaust manifold gasket was leaking and needed to be replaced. During that repair process, the studs broke off in the head and now the head had to come off the tractor. The procedure of removing the broken studs did not go well but he did have access to another usable head (lucky guy). He installed his other head and wanted to get rid of the head that now had broken studs. This could be JUST what old Doc was looking for and the price was right. I kept my fingers crossed as I made the 30-mile
trip. John Deere folks are some of the best on planet earth, including Chuck Bolagik (the white bearded fellow) and his brother-in-law mechanic, Jack, and Chuck’s son, Dave. Chuck owns the cylinder head that I was hoping to purchase. The whole meeting soon turned into a family reunion of sorts, with Chuck talking about his ’38 “B” with cultivator getting a little gas tank repair. I was given a tour of his machine shed that was full of John Deeres and associated machinery (Photo 1). A hello to Chuck’s son, Dave, and his wife, Sarah, and then even a picture with old Doc included (Photo 2).
Enter the star of the story—the 620 head (Photo 3). As far as I could tell, the combustion chambers looked good and the valve seats appear to be in good shape. The broken off studs will of course need to be dealt with (Photo 4), but for the price, I am more than willing to do the work. Needless to say, after some real good chit chat, the cylinder head was on the back of my little S-10. It was a really a pleasant meeting with these friendly folks and I felt a bit like a celebrity when they realized who I was and that they
read my articles in Green Magazine
In parting, Jack gave me a quart of homemade maple syrup…the best I have ever tasted and I realized that Chuck and Jack are part of the event organizers of the 2025 Gathering of the Green Reunion that will be happening right here in West Bend, Wisconsin on June 12-14, 2025. Once again, it was a pleasure meeting these nice folks and I drove away with a good feeling about the cylinder head. So let’s get started at this head project with a magnaflux procedure to check for cracks (Photo 5) that turned out to be negative (no cracks).
Let’s put this head to the test and see if indeed it is worth working with. The magnaflux procedure showed no cracks so we will proceed to dig out those broken exhaust manifold studs. It’s an undesirable task that no one wants to tackle, not even most machine shops because it is very time consuming and tedious. If you get too rough during the procedure and break off a drill bit, you will end up with an even bigger mess and twice the trouble. Get the cylinder head sitting vertical and SECURE on something, preferably on the floor (Photo 6), so that you can drill down over it and be able to put a
Photo 5 • Photo 6, below
Photo 7 • Photo 8, below
Photo 3 • Photo 4, below
lot of download pressure on the drill and its bit to keep it cutting on the hardened stud. Also, use a slow speed on the drill to keep the bit cutting and not heating up.
Starting with a smaller bit, and center punching the top of the broken stud, get a small hole drilled down through the center of the stud until it falls through the lower cavity of the head, where the stud screws into it (Photo 7). There should be a space in the head below the stud. Now start drilling out this starter hole with a slightly larger bit, being careful not to let the bit catch in that starter hole and break off. The broken stud is now drilled out to 23/64 inch, which leaves little of the stud left, and as of yet we have not ruined the head’s threads. Using an air hacksaw (Photo 8), saw a straight groove through the remainder of the drilled stud (Photo 9), stopping as soon as the saw groove reaches through the stud wall. The saw groove through the side of the stud should give a space for what’s left of the drilled stud to collapse into itself, using chisels that are ground to shape their tips as shown in Photo 10. Collapsing what’s left of the thread and then reaching in with a needle nose pliers, the broken stud threads will come out as shown in Photo 11.
Use a “bottoming” tap (Photo 12) to re-tap the head stud threads. Note
that the bottom of such a tap is flat rather than tapered. This will allow the thread tapping procedure to reach the very bottom of the threads in the manifold (Photo 13), allowing for a longer reassembly bolt when the manifold is replaced. There you go; the broken studs are out and the head is ready to be reassembled to the manifold.
As I stated earlier, there is no FAST or EASY way to do a procedure such as this, but patience, perseverance, and a few dulled drill bits, plus some hours of shop time, possibly a Mr. Miller or two as the drill cools off and recharges and you have the problem solved. Would I want to do this kind of thing on a regular basis…NO WAY! But when it needs to be done, just know that it CAN be done. This head was destined for the salvage yard because no one wanted to tackle the job. Mr. Bolagik is an honest man when he told me that the head would be okay to rebuild and use again if you could get those broken studs out!
Now it is on to the fun part for me—that is, doing a valve and seat job to seal up all that reborn compression of those .090 new pistons, rings, and a re-bored block. Coming next month, I will be doing a valve job beginning with some new head parts that just
arrived the other day…new exhaust, and a new set of valve springs (Photo 14). I was not going to open the “flood gates” of cylinder head parts and talk about the cost for them until I was sure that my head casting was worthy of it.
I am pleased to say that (pricey as they are), the valves, both intake and exhaust, and the springs exceed my expectations for tractor parts from Steiner Tractor! This coming from old Doc himself who spent nearly two years doing cylinder head work standing in front of a SERDI head machine. Boy, do I wish I had one of THOSE machines now. I hope that you have enjoyed this article and have possibly learned a thing or two. Next month I will mate all the valves to the head’s valve seats and go through the process of making the valves seal to the head as they should. Stay tuned; perhaps I can “learn you” a thing or two. Just remember—with a piston driven engine, if your cylinder head isn’t RIGHT, the rest won’t matter.
Until we meet again, I guess that I prayed too much for rain last year. Now I need to pray for those sprinklers to be shut off. Happy trails and may God bless.
This column is written by Ron and Jo Anne O’Neill.
Photo 13 • Photo 14, below
Photo 11 • Photo 12, below
Photo 9 • Photo 10, below
G’day, mates,
As I write the article, we are one month into our Australian winter. The temperatures in our area have been great, with lows of 10C/50F to highs of 24C/75F. I have to say I am terribly spoiled here with these winter temperatures. The miserable winters that we sometimes suffered through in Ontario was one of the deciding factors to move here!
I have been busy at my job as training instructor with RDO Australia. My co-trainer Ryan and I hosted a hay equipment technicians’ course in April 2024. Since our Dealer group sells both brands, we had hay equipment from John Deere as well as Kuhn onsite connected to John Deere tractors. I looked after the John Deere machines and installed problems into the machines that the service technicians had to work through and solve.
On the John Deere mower conditioner, I did several adjustments
or alterations to the cutter bar. These alterations were replications of repairs I have been sent out to over the years. Two of the problems I installed on the machine included cutting blades missing and cutting disc bolts installed incorrectly. The bolt problem sounds simple enough, but I was called to a farm one time after the customer had bought new bolts at our parts department for a cutting unit. After the bolts were installed and the mower conditioner was started with the PTO, the tractor stalled dead repeatedly. The bolts installed were too long and the cutting units could turn a short distance until the longer bolts jammed and stalled the machine. I removed the incorrect length bolts and since I did not have the correct bolts onsite either, an angle grinder with a cutting disc was used to cut the extra length off the bolts. Other issues included misaligned cutting discs and cutter bar float, which were also issues I have
seen on the job.
The two John Deere balers onsite were a different story. I will start with the brand new but weathered 348 small square baler. These balers are assembled and tested at the factory. When they are shipped to Australia, they must fit inside a sea shipping container. The baler is then disassembled into large pieces. The bale chamber all stays together, but the hitch, pickup and feed auger assemblies are unbolted to get the baler narrow enough to side into a sea container. Everything is placed on a wooden skid and pushed into a sea container. When the dealership receives the baler, it needs to be reassembled.
The problem comes in that most of the technicians have never been around a square baler or operated one. I have assisted at the Beaudesert shop when I was a technician to assemble these balers. Other technicians have been given the task to assemble the
I fed bale slices into the 348 to rebale them and technicians (left) worked on the 348 baler.
baler, and between my service work, I would show them the correct way as they go. If I was not available, the shop service manager Jeff also helps as he has one of these balers on his farm.
The 348 baler that was delivered to our training course had been reassembled but had never been finished. It had sat an extended period of time in the elements and the paint was faded plus rust was appearing on the new components. I connected the baler to a 5083E tractor, and suspected things were not right. So, before I engaged the PTO, I opened the side cover over the baler flywheel and turned the flywheel by hand. This action turned the baler mechanism, including the reciprocating plunger that makes the slices and forms the bale. I could only turn the flywheel part of a revolution until I heard a “bang” and it stopped dead. I turned the flywheel the opposite way and after part of a revolution, “bang” and it stopped dead in my hands. Something was contacting the plunger in the bale chamber.
I had Ryan look in the bale chamber while I turned the flywheel. He
was able to spot the issue. In the area where the hay enters the bale chamber, the two parts of the baler had been reassembled with the incorrect bolts. The correct bolts are what we refer to as “plow bolts,” flat beveled head and a square shoulder. These bolts sit in the chamfer and when tightened, the head is below flush of the assembly spot. Someone had assembled these pieces with carriage head bolts in backwards and the nuts were hitting the plunger. I was able to find the correct bolts in the toolbox with the “leftover parts” and replace them.
Below: Using rivet tool to install rivets into new brake linings.
There were several other issues with the baler. It was becoming clear that the baler had not been fully reassembled, and never test ran afterwards. I was able to do repairs to the baler so that we were able to get the baler mechanism running with the PTO from the tractor. After the hay course was completed, it was discovered that the baler had been partly reassembled in one store and then transferred to another store, where it sat for a period of time. Then the baler was sent to our course and afterwards was to be delivered to my old shop at Beaudesert for inventory stock. These balers are not huge sellers but are a popular machine.
For the course I had brought along eight hay bales to re-bale with the baler. One of the tasks for the technicians was to thread the bale knotters. They were instructed to feed the plastic twine from the rolls of twine through the eyelets and needles and then tie it off. The baler knotter was tripped and ran through a tying cycle to get the twine into the twine holders. I then started the tractor and fed the hay into the baler several slices
New linings installed.
Below: Clutch driver sitting where it flew from the tractor.
720 brake drum removed.
at a time. The technicians were able to watch the tying and operation of the baler. I then repeatedly stopped the tractor and tied the bale with the baler by turning the flywheel by hand. This way the tying mechanism would turn slow enough that the human eye could watch the whole operation. The technicians thoroughly enjoyed this exercise during the course.
We also had a John Deere V451M round baler delivered to the course. This one also had issues even though it was brand new. I could tell it had been used as a demonstrator as there were remnants of old hay in the chamber as well and a roll of net wrap used for tying the round bales in the holder. We connected a tractor to the baler and tried to start the baler. This style of baler only uses two wide endless rubber belts to form a bale. Terrible screeching noises were emitted from the baler components while they were trying to rotate.
After several attempted starts, I was able to diagnose that two of the rollers that turned the belts were seized solid in the bearings. We were not going to bale hay with the baler at the course, but several of my exercises
Incorrectly installed clutch cover clips.
were geared toward alterations I had done to a running baler. I needed to come up with different “issues” for the technicians to solve. They also got the chance to diagnose the screeching noises from the baler. After the course, it was learned that this baler had sat in inventory for several years exposed to the elements. The baler had not been run before being sent to us at the course either. Anyway, we were able to get some good learning exercises from the John Deere hay equipment.
I will cover a bit more of my 720 diesel repairs that I started in last month’s article. The brakes as I mentioned worked but the pedals traveled almost all the way to the bottom and did not return without me pulling them back up by hand. I got the brake drums off while the brake unit was still installed. The return springs appeared okay, but the brake pedal pivot would not take grease correctly. The adjustment screw and adjusting pins were also seized. Brake linings were not completely worn out, but I had new ones here, so I would replace them. Both brake assemblies were removed, and torch heat was used to free up all
Clutch cover clips now installed correctly.
the seized parts. New linings were riveted onto the brake shoes. Brakes were reassembled with new return springs and reinstalled on the tractor. Now the pedals return to the top when released. The brake pedals rotate on the pedal arm to allow the brakes to lock onto the lock plate. Both brake pedals were worn sloppy in the pivots. I was able to drill the pivot holes to a bigger size, to use a 12 mm diameter metric bolt to connect them. The bolts were put in my steel lathe and the bolt heads were machined down so that they looked like a proper pin.
I then disassembled the clutch as the clutch lever will not engage the clutch correctly since arriving in Australia. I have never done any work to the clutch since I purchased the tractor in 2010. The linings all came out fine, and I took pictures as I went. The old clutch discs were not riveted on to the steel backing plates; they must have been attached with adhesive. The discs had all come loose from the backing plates. The clutch driver was
New clutch fork bushing installed.
Below: Using hydraulic portapower to hold new rivet tightly for reinstalling clips.
very tough coming off. I used a puller as I did not have the long-threaded bolts that the manual describes. The hydraulic puller I have uses grease in an internal piston to apply magnified pressure as the unit is tightened. The clutch driver was showing a lot of resistance. While I had the puller tight, I used the torch to warn the center splined area. A couple hits with the hammer and “bang,” the clutch driver flew off and landed on the ground! I was able to remove the whole pulley after that.
When I was removing the clutch discs, I saw that one of the spring clips that holds the clutch cover on was broken and lying inside. I took pictures of the clips and then removed the old clips by grinding off the rivets. The clutch dogs and tee bolts were all removed and inspected. The tee bolts had a buildup of brake dust and rust, causing them to resist movement inside the clutch. There was a slight bit of wear on the tee bolts, so I decided to reuse them. I replaced the clutch cover clips using a long punch to hole the rivets, and then heated the rivets with a torch to red hot to clinch them. All clutch dogs and tee bolts were reinstalled in the pulley.
The clutch fork assembly was dismantled once the pulley was removed. The 720/730 tractors have bushings for the vertical shaft of the clutch fork. The top bushing was
worn, so I replaced it. I reassembled the clutch fork and installed the clutch pulley back into place. I went to install the clutch cover and I could not get it to install correctly. The locking edge of the clutch cover had to be flattened with a pair of pliers to get it on. I could not work out what the problem was, until several weeks later, I went down to Peter Sands to help him with tractors. We reset the endplay on his “BO” and adjusted the clutch. When I had the cover off the clutch, I could see that the clutch cover clips were installed the opposite way than I had installed my 720 clips. I then realized what I had done wrong with my 720. I had taken pictures before removing the clips, but I had not referred to the pictures! When reinstalling the clips, the clips fit nice into place if you put them on upside down! When I got home from Peter’s, I cut the new rivets off of the new clips. I used a porta power hydraulic mobile press to hold the new rivets tight against the clips’ spring pressure and into place. I heated the rivets and they easily hammered flat. Now the clutch cover went on properly after I re-bent the cover clip back into place!
A month ago, I was finally starting the excavation work on my property for my shed. The 720 was in the way for the work being performed. The morning the excavation work was going to start, I quickly reassembled
the clutch discs using new riveted double and single discs. Once I had the new discs installed, I tried to tighten the clutch. When I had the clutch tightened, the clutch appeared to be working correctly. When I started the tractor, I could not get the clutch to disengage.
I stopped the tractor and loosened the clutch disc so that the clutch would disengage. I was able to back the tractor out of the way, but it barely drove. Again, I referred to the “before” pictures on my phone and realized that I had installed the riveted clutch discs onto the tee bolts and not onto the clutch drive pins. I disassembled the clutch and installed the discs onto the clutch drive pins. Now I could adjust the clutch and then operate the tractor correctly. I am not proud I made these mistakes, and I also tell fellow technicians to take pictures before disassembly. What I have learned is to slow down and take my time and refer to the “before” pictures on reassembly! I will stop there for this month. Next month’s article will cover work I am doing at Peter Sands’ place on his tractors. Peter has decided to sell his collection and I am under the pump to get all of the tractors ready for the auction sale that will be held on October 5, 2024 at his property.
Until next time—cheers, mates! Contact Ken Nicklas by email at kenanicklas@gmail.com
Incorrect assembly of clutch discs onto tee bolts.
Correct assembly of clutch discs onto the clutch drive pins.
Summer is in full swing and, as I write, there are county fairs, tractor pulls, and tractor shows happening all around. Luckily for Grandpa, my son and daughter-in-law had to go out of town for the weekend and who did they ask to babysit—Grandma and Grandpa! Not only that, the Red Eye Tractor Club was having their 2nd Annual Tractor Show at Olson Ag near Sebeka, Minnesota. Guess where we spent our Saturday? You got it!
When Callan and Lola woke up, we had breakfast, did a little shopping, and were off to the tractor show. This year, a few more attractions were added including some for the kids. They had a creatively made gravity box with a couple mounted basketball baskets so when you shot the ball, it would funnel back to you through the gravity box. Fun! Now that Cal is a bit
older, there was also another popular event he could take part in. That was a pedal pull, his first one, and guess what? The three year olds got to use a John Deere pedal tractor! All the three year olds got a ribbon and a juice for their “efforts”! Coming up this week, we have a tractor show at our local club—isn’t summer the best?
I am currently working on an old “G” that my dad bought 35 years ago. My goal is to put a power block in it and try to pull it a little. In my research this month, I ran across a few “Gs.” Some of them came from the Weer’s Collection Auction handled by Polk Auctions. The first one that caught
my eye was a 1953 model “G,” serial number 64443. I believe ours was a 1949 model, but as a kid we had a similar “G” and seeing the picture brought back memories. Like ours, this one featured a wide front and the ever important NEW 13.6 by 38 rears. The tractor was restored and included fenders and was advertised in running condition. I would have loved it, but it
was probably too deep for my pockets at a price of $19,500.
The same sale produced another. This one another wide front “GW.” This one was a 1947 model, serial
number 24691, also restored, runs and drives, and again was on NEW rear rubber. You could have brought this one home with a bid over the selling price of $10,000!
The Weer’s Collection Auction produced even more model “G” tractors. Here is an unstyled “G.” This one was a first year production 1938 tractor, serial number 3217. If you were looking for an original, low radiator “G,”
this was probably the one for you! It had 12.4 by 36 tires on round spokes, shutters, and a flat back. An original running and driving 1938 “G” would have set you back $14,000.
As the sale continued, another “G,” well, actually a “GM,” came up for auction. This 1946 “GM,” serial number 17567, was set up for pulling.
This one had 18.4 by 38 rubber, 4.00 by 15 fronts, and was repainted. Oh yes, did I mention a 9.25 stroke and 6.25 bore…again, selling price $14,000. Since our last two green machines sold for a price of $14,000, let’s add another. Not a “G” this time, in-
stead an unstyled “A,” serial number 410184. This 1934 open fan shaft “A” was the 184th “A” built. In restored condition, it has a RV2A magneto, new 9.5 by 36 rear tires on spoked rims, front and back. Did you get my clue to this one? Yes, it also sold for $14,000—the magic number!
This sale also produced a “big ticket” item—a 1972 low profile model 4000. According to the advertising, it is one of only 25 built. The tractor, serial number B213P263706R, had a Power Shift transmission, front weights, and 1,242 hours showing. What is your
guess? If it was close to $60,000, you would be right in there!
Oh yes, slipping back to the unstyled tractors, I have one more to report, also from the Weer’s Sale. This one was an unstyled “B,” serial number 50251, with a factory wide front, long frame. This “B” was equipped with
9.5 by 36 tires on the back and 5.50 by 16 on the front, round spokes all the way around. It also was converted to electric start. Now I know some collectors frown on this alteration, but as a farmer back in the day, I can see the advantage of converting your tractor. Also in the collector’s world, the ease of starting when taking the tractor to shows may be a plus. You are welcome to form your own opinion, but either way to buy it took a bid of $13,250.
Let’s go to Sheridan Realty and Auction Co. I recently bid on an online auction for a similar tractor, but I came up a little short. This styled “AR” John Deere, serial number 274463, is a tractor that I someday would like to get my hands on. I loved the wide tires on
this one. Someone became the owner of an “AR” with a bid of $3,000.
The same auction produced a 630 with wide front, serial number 6314674. A nice looking 630 with
three-point hitch…SOLD $6,200. If that one didn’t turn your head, how about another one with a narrow front and three-point hitch, serial number on this one 6316812—sold for $5200.
A tractor I am not as familiar with is the model “MT.” To my recollection, there were not a lot of “MTs” in my area. Well, at this Sheridan
sale, you could have had your pick. Four “MTs,” 1949 and 1950 models sold at this sale. Selling prices ranged from $775 to $995. If you were in the market, this would have been the sale for you!
Let’s finish off with (to me) a classic. This one was a 1929 “GP” tractor. I have always had a soft spot for the “GP.” A friend of mine has a basket case that belonged to his grandfather. He
is considering restoring it. My advice is always—YES—a family tractor is always a good candidate for restoration! Well this “GP,” sold by C.A. Tesch Equipment in Brillion, Wisconsin, has an attached planter and sold for $6,720! I sure hope the buyer enjoys this “cool” machine!
Well, that about wraps it up for another month. I want to thank those who message me with sales. If I don’t report on your suggestions,
I just want to let you know I really appreciate it, but sometimes I have had a hard time making contact with the auctioneer or have not received cooperation from them getting results. But, please don’t refrain from sending me a note; I would love to try track it down! If you see something, send an email to mickelsonauctions@gmail. com. Happy auctioning! Email Eric W. Mickelson at mickelsonauctions@gmail.com
Please don’t call about delivery of your Green Magazine until AFTER the 20th of the month.
Although Green Magazine is always mailed by the 1st of the month, delivery date can vary from month to month.
When we left off last month, we had been approached by a couple of Deere representatives who said they wanted to “partner” with Green Magazine or even buy part of our company. Green Magazine would then be an official Deere and Company publication. This would all work to promote the new collector’s group they were planning on starting, which would be run by the Deere Foundation, a nonprofit group that gives away several million dollars to charities every year.
It was time to seek some professional advice from someone in our corner, so I had our local attorney recommend someone more schooled in these types of transactions. While I had been generally optimistic about “partnering” with Deere, she had reservations about it immediately. After the initial consultation with her, we set up a future meeting between me, Carol and the two Dons at her office. Apparently, she didn’t get a good “vibe” from the two Deere gentlemen because after the meeting, she advised us to either sell out completely, or forget the whole deal.
J.R. Hobbs was a nervous wreck about it all and when we took him to lunch one day to discuss it and calm
his fears, he was so anxious he couldn’t even eat. He was apparently worried about either losing his job with us, or becoming an employee of Deere, which he found worrisome.
According to the two from Deere, their consultant told them that there were over 350,000 Deere enthusiasts worldwide, and by becoming their official publication, we would be able to reach a subscription base of 100,000. Who am I to argue with a “consultant” working for a Fortune 100 company? I found out later that 350,000 was a number they had pulled out of their—well, you know. If we did not partner with Deere, we would no longer have access to doing research at the archives. You know all of those production numbers and other information you find in our articles, Mr. Thinker’s Almanac and a thousand other places by now? Most of those were tabulated by me, J.R. Hobbs and a few others in the 1990s. Don II also told us that they were going to have a magazine one way or another, and if it wasn’t Green Magazine, they would start their own and it would be a competitor.
With all of that in mind, and with more optimism than the situation probably warranted, we sent the Deere
Foundation a proposal that would not cause them to have to make any immediate outlay of money, a share in the profits, even from those subscribers we already had for 16 years, some control over editorial content and some free advertising for their projects. However, that wasn’t enough for the two Dons. They also wanted to be able to use our mailing list whenever they wanted, and control who could advertise. Are you reproducing or selling a part that you can still get from Deere? Too bad, you wouldn’t have been able to advertise it in Green Magazine anymore. And remember this was before the Internet was used as commonly, so ways to promote your products were much more limited. They also said they “deserved” a percentage of about a third of the profits from every subscription sold, again even from renewals of subscriptions we had since 1984.
We told the two Dons that we were so far apart on this that there was no chance for a marriage—for the good of us and the hobby, we were going to stay independent. Don II, the one that kept using the word “deserved,” smirked arrogantly as if they would have the last laugh. We will see how that turned out next month.
If you want to feed a large herd of cattle from the controlled environment of your Sound-Gard cab, you could hardly do better than a John Deere stack mover with a 230 shredder/feeder. That is what we began our search for in our June issue. We had two entries.
Vance Bode of Gibbon, Minnesota was the first to get a photo to us. His 230 was sold new by Hahn Implement of Winthrop, Minnesota. He gets one year added to his subscription.
Charlie Dietzel of Cologne, Minnesota came in second.
Deere and Company had been building two-way plows for decades, both the dual beam type and the roll over type, when in 1990 they introduced the new switch bottom plows. Built in sizes ranging from two-bottom to eight, the new plows offered a different concept in one way plowing. Rather than having two beams or one that turned over, it had one that swung from side to side. The bi-directional bottoms pivoted to provide the proper angle for throwing right or left.
Because they have no coulters, these plows don’t do well in sod or heavy trash. They do best in lighter ground and are most popular in the southwestern part of the U.S. Because of the design of the moldboards, they need to be pulled at five miles per hour or more.
Do you have a John Deere switch plow? If so, be the first to get a photo to us and we will add one year to your subscription.
1970s’ keys and bike tire pump FACE OFF
This month for What Brought More?, we are going to compare two objects from around 1970. The first of these is a key for a lawn and garden tractor. The two keys are wrapped onto a piece of cardboard and attached to a keychain with a four-legged deer on it. Deere called it “your key to weekend
retirement.” Having a lawn and garden tractor to help with chores certainly made them more manageable than they were before, making the weekend feel less like work. This is in excellent condition. It’s new old stock, but the plastic lamination is coming off of the cardboard in one corner, and there is a bit of discoloration on the cardboard. For the most part, though, it is in good shape.
The second item in What Brought More? is a tire pump to ride with a John Deere bicycle. This hand pump is a tube nearly 20 inches long. One end contains a short air hose that
you take out and screw into the other side. This hose then attaches to your tire, and you go about the manual process of pumping up your tire. It’ll take time, but it beats being stranded with a flat tire. The pump shows some signs of use and has some marks from wear and age. One thing that is quite clear and clean on it is a silver sticker with the Deere trademark and the part number TY1884. Which do you think brought more between the tire pump and the key? Think about it for a little while. The answer will be at the end of the article.
A nice little bottle and can opener from a Pennsylvania dealership was sold on eBay this month. This is a simple piece dating from about 1971. Pikeville Implement gave these away, and at least one of them has survived to this day. Based on the photos in the listing, it looks like it is in excellent condition with no noticeable wear or yellowing. It sold for $14.99.
A foreign language brochure for a John Deere tractor is a rare sight—at least in this country. This month, two brochures advertising the model 3010 in German, were sold on eBay. These tractors were being sold in Europe before Deere initiated their “Worldwide Trac-
tor” concept. The first Deere tractors marketed in Europe were not very popular there, as they simply did not meet the needs of the farmers in those countries. The seller of these brochures only uploaded a couple of photos, but in one, you can see a photo of a 3010 with unique front lighting and a fender seat. On close inspection, it appears that these were drawn onto the image. Most likely, they were required by German law, and Deere used a stock photo for the brochure and just had the unique parts added by an artist. These brochures were made in the United States and shipped overseas. Later ones would have been made and stayed overseas—each of these two brochures sold for the asking price of $24.99.
A similar vintage brochure for a very different tractor comes next, with a book advertising the mighty 8010. This 1960 piece is a 20-page book with details and specifications for the big tractor and several black and white photos. It was in excellent condition and sold for $375.
Now, we move back to a 1935 brochure for Deere’s combines. Looking at this brochure, it is incredible when you realize the leaps in technology that happened over just 25 years between this brochure and the 8010 book. In that time, Deere went from a model “D” pulling a small combine through a field to a four-wheel drive, 200 horsepower mammoth of a tractor. Even the photography and printing of the book show substantial improvement. At the same time, seeing the cutaway diagram of the combine in this brochure is interesting, as it functions almost identically to how every walker combine would to this day. The brochure shows some wear on the cover, mainly in the corners, but the inside is exceptionally clean and clear. It sold for $119.50.
A water temperature gauge sold on eBay this month. This gauge has a black face, meaning it would be correct starting on very late
styled letter tractors. This gauge shows some wear, but it would get the job done. If you needed a gauge but didn’t need it to look pristine, it was for you. It cost $21.50.
Some believe that Deere tractors were painted in green and yellow so that they would stand out from com-
been affixed. This is nice and certainly makes it look good, but what are the chances that it will match the color of the paint on your tractor? It brought $500. When it comes to lighted signs, I feel like whoever bought this found a bargain. Typically, lighted signs sell for big money, and John Deere Industrial Division materi-
petitors’ tractors, and be obvious even at a distance in a field. In this way, someone using a John Deere tractor would be recognized as doing so and would work as free advertising for the brand. Deere took this concept even further with some of the umbrellas they sold, which were used to shade tractor operators. In giant letters, the canvas on the umbrella had the words “JOHN DEERE” and various items that the company built and sold. One of these umbrellas was on eBay this month. This one had some unfortunate damage. A couple of holes were in one of the six sides, and one of the corners was torn out. A real professional could repair this umbrella, but it won’t be easy. It sold for the asking price of $399.
If you’re restoring a 4620 and happen to be missing the left side panel that sits under the rear of the hood, you could have found one on eBay recently. The part has been repainted, and a new decal has
als sell for high prices, too. This sign is not large, just over two feet long, but it is a 1960s vintage piece advertising John Deere industrial tractors. It looks pretty good, though with a bit of age-related discoloration. But the light works and would display well in a shop or den. The final price of $290 surprises me. I would have guessed it would bring more.
Okay, enough suspense, we’ll get back to What Brought More? The first item was a new old stock lawn and garden tractor key. The key alone probably is not very valuable. There are thousands of those around. But the keychain and, likely even more importantly, the card that it is attached to are rare and more collectible. Twentyseven bids were made on this item, and it brought $711.98. The bicycle tire pump is a much less common item than the key, but it did not come with any rare accessories or packaging. The nine bidders for the pump were willing to put some money down, but it only went as high as $177.50. The key was the clear winner this month.
See something interesting on eBay? Forward it to sawitonebay@ yahoo.com
• Two Cylinder diesels—our speCialTy
• CompleTe Two Cylinder diesel
• Fuel injeCTion repair and CalibraTion
• Cylinder bloCk boring up To 8”
We also have good sources for aftermarket products for two cylinder John Deeres including Taper-Lock flywheels, engine parts, grilles, battery boxes, manifolds, mufflers, pony motor ignition parts, etc.
• 2 cyl. & later JD air cleaner conversions, Lindeman through 430C trunion bushings • 70-830 diesel piston kits in stock, STD, .045, .090, .125 os
Renaissance Tractor
For Sale
1938 JD A, complete tractor including shutters and and radiator screen, runs, smooth back, older paint, new rear tires with flat spokes. $3000. Located near Burnsville, MS. Call Jim after 5 PM. Ph. 865-607-1190. MS
Parting out JD M-MT-40-420-430 and A-B50-60-70 tractors. Call us for new, used and reproduction/replacement 2 cylinder parts. John Shepard, 715-265-4988. WI
Rates: 50¢ per word, minimum charge $5 classifieds limited to 200 words ($100)
Photos: $40 per photo 2-1/4 inches wide or $20 per photo 1-1/4 inches wide
Discounts: 10% off for any ad running in three issues. No material changes allowed; payment must accompany ad
claSSiFied & diSplay ad inFo
•Green Magazine is mailed about the first of each month.
•Only John Deere items will be advertised.
•Positioning of ads is at publisher’s discretion.
•Green Magazine will not print any ads which it considers to be:
•offensive or proven to be dishonest;
•from competing publications or organizations
Phone 402-643-6269
Email: info@greenmagazine.com
Website: www.greenmagazine.com
Mailing address: Green Magazine, PO Box 95, Bee, NE 68314-0095
JD 1969 2520 PS, diesel, 15.5x38 rears and 7.50x16 fronts. Dual remote, roll gard and canopy, 4000 hours. Excellent condition, always inside. $29,500. 1970 JD 3020 gas, 15.5x38 rears and 7.50x16 dual outlets with 148 loader. All new hoses, 7 foot bucket. 4000 hours. $14,500. Orange County, New York. Ph. 845-355-4571. NY
JD 2010 diesel and gas parts, gas sleeve deck, diesel cylinder head, diesel injection pump, $200. Ph. 785-244-6585 office 785713-1993 cell. KS
diSplay ad RateS
Full page: 7-1/4” x 9-1/2” ........... $800
Includes full color • Limit 800 words
Half page: 7-1/4” x 4-1/2” $450 Includes full color • Limit 400 words
Quarter page: 3-1/2” x 4-1/2” $250 Includes full color • Limit 200 words
Business card: 2” x 3-1/2” .......... $125 Includes full color • Limit 100 words
2 column inch: 1/12th pg. $85
Includes full color • Limit 40 words
Bordered ads: per column inch .... $30
Full color, add $25 per photo
Limit 20 words per column inch
Two B1783R blocks $125 each, set of pistons and rods for same. '41-'47 B crankshaft with driver $100. '41-'47 B hood, uncut $200. Some other parts also. Ph. 952-2700993. MN
1954 JD 50, good condition, runs well. Good paint, tires and metal. New coil, muffler, steering wheel, Roll-O-Matic arm, and hub. Well maintained and stored inside. $2000 OBO. Ph 715-6435433. WI
Payment
• All ads are to be paid in advance. Ads sent without payment and needing to be billed will be assessed a $4.00 service charge.
• Classified ads will be taken over the phone, if accompanied by a credit card payment. We are not responsible for errors in ads taken over the phone or for illegible ads received in mail. Display ads will not be taken over the phone.
• We do not send checking copies or tearsheets. Send $6.00 extra for a copy of the issue in which your ad appears.
Discounts
1) 10% discount - for any ad running in three consecutive issues. No material changes allowed. Payment for entire ad run should accompany ad.
2) 5% discount for camera ready - ad must be typeset, clear and at the proper size.
3) 5% cash discount - payment in full by check, without being billed.
Word limits
When preparing display ads, please take note of the word limits. We can place only so many words into a given area and still make a readable ad. If ads exceed word limits, advertiser will be billed for extra space.
ADVERTISING DEADLINES
for upcoming issues of Green Magazine®
September 2024 issue: August 1, 2024 - display ads due August 5, 2024 - classified ads due October 2024 issue: September 1, 2024 - display ads due September 5, 2024 - classified ads due
FOR MORE INFO:
See page 60 of this issue Call 402-643-6269 Email: info@greenmagazine.com
Buddy seat! For 20 and 30 series two cylinders. Will fit float ride seat or bat box. Looks like the original buddy seat! $495 plus S/H, includes cushions. Ph. 260-901-3076. Callaway Restorations, IN. H3X
JD 330S, extremely good condition, 3-pt., $16,000. Ph. 330-806-0145. OH
Used John Deere two-cylinder tractor parts. Wide variety. Also, some New Generation parts. 30 years’ experience. Call or text Darwin Gingerich, 620-386-0071. KS
Parting out 3010D, 70D and 620. Ph. 641228-4282. IA I12X
stack mover. $2500 or
0856. MN
Polymatrix Super Coat is an extraordinary system designed to clean and restore your painted surfaces, while creating a gloss luster and a protective coating on the surfaces, 22 oz. bottle, $44.95. Polymatrix Restore is a blend of selected abrasives, which
remove oxidation, scratches, and water spots. It’s recommended for metallic paint, industrial finishes, older cars and oxidation removal. Clear coat safe, 8 oz. bottle, $29.95. Website: protectivecoatingsystems. com or phone 208-509-9319.
Fuel gauges for John Deere 2 cylinders with original face. Six or 12 volt positive and negative ground comes with new fuel tank sending unit. $135 for the set. See our ¼ page display ad for other gauges. EverGreen Restoration, 715-520-7876; www.evergreengauges.com WI D3X
110 L&G mower hood with original headlights and original brackets, two 110 Kohler engines complete, partial 110 mower deck. All for $410. Ph. 217-762-2422. Monticello, IL.
John Deere 230 shredder on 200
best offer. Ph. 507-828-
H3X
New, used & reproduction
Crawler parts: Lavoy Wilcox
JD CRAWLER PARTS
Steering clutch parts, brake bands, bearings, final drive gears, engine kits, carb kits, radiators, fans, water pumps, battery sheet metal, seat cushions, gauges, light switches and more www.jdcrawlers.com
Lavoy Wilcox • Horace, ND
Phone 701-361-1006 • 8-5 CST No Sunday Calls
1936 JD A, SN 432656. In the family since new. Completely restored, new paint, tires, wheels, fenders. Behlen overdrive. Runs great. $4000. Ph. 319-290-2485. IA
1959 JD 830 2-cyl., excellent condition, recent professional urethane automotive paint job, dual remotes, factory foot throttle. Custom rear rims stepped up to 38”, has 18.4 by 38 radials. Front weights and two sets of rear weights. Strong running pony start, starts quickly. Trophy winner doing both pulls and shows. $22,500. Ph. 717-552-1772. PA
4320, chrome exhaust, new 20"x38" tires, 3-pt., dual hydraulics, $18,250. Unstyled D, on rubber with PTO, excellent, $5100. 12' tandem disc, $1250. Model 110 15' disk,
like new, $1950. 2950 4x4, cab, 7K hours, dual hydraulics, dual PTOs, $18,150. 710B loader, Extend-A-Hoe, 24" bucket, Power Shift, cab, works great, well cared for, $13,950. 290 corn planter, w/ fert, $950. 650 28' tandem disc, excellent condition, nice heavy disk, 23-1/2" blades, $13,950. Ph. 920-878-0005 or 920-878-0288. WI
hours on engine overhaul, good paint and tin, newer style shift transmission, $2500. Please call or text Mike at 515-491-5763, or please call (no texting) Brad after 7 PM at 712-584-6816. IA
Fender grommets – part #R44619 and #R44621, left and right side for JD 4520, 4620, 5020, 6030 with roll bar and fenders. $149.95 per set plus freight. Ph. 712252-0423. IA F3X
Reproduced aluminum WARNING PLATES for 3-pt.
Quick Hitches.
New Generation fuel gauges for 10 and early 20 series tractors, negative or positive ground, comes with new fuel tank sending unit, $160 for set. All our New Generation gauges fit in dash without modifications to the clamp bracket. Also have temperature and pressure gauges for same tractors. EverGreen Restoration, 715-520-7876; www. evergreengauges.com. WI F3X
1946 G, few hours on engine overhaul, all new tires, good paint and decals with F486R high compression head, 55 HP, good tin, $5000. 1946 A, engine runs good, fair tires, slant dash, good tin, $2000. 1936 A, few hours on engine overhaul, fair tires, good paint and tin, $2000. 1950 A, few
Motorola alternator and amp regulator plates, 35-55-72 amp.
Hydraulic cylinder stop pins with chains, spring steel clip, like original, three sizes – 3/8,” 7/16” and ½.” Ph. 712-660-8447 cell. IA H3X
JD Hi-Crops: 4050, 4440, 4230, 3020, 2520, 4010, all from California, excellent condition, JD gas standards: 730, 720, 630, 70, all have new tires, perfect original sheet metal, all manual steer, all from Canada, excellent condition. Ph. 763-434-6547 or 651-238-6830. MN
JD 4230, not running, Sound-Gard cab, needs new back tires, $6000. Ph. 715-5911576. WI H3X
JD 430, 3-pt., like new. $6500. Ph. 330-8060145. OH
John Deere B, one remote, like new 38” tires, excellent sheet metal and paint. $2850. Call 330-806-0145. OH
New Generation seat extended brackets, 4 inches longer than stock, not painted, 4 piece set, $120. ALSO: Axle wedge removal tool, 530-4620, three sizes, $260 each. Brett, 402429-5311. NE F3X
John Deere equipment: 291 two-row cultivator, 296 two-row cultivator for unstyled A, both in excellent shape, nothing missing. 8W 7-foot mower. Ph. 715-865-4732. WI
THREE PIECE FRONT WEIGHTS for JD 520-730. Good reproduction. U.S. made. $1000. Also numbers 4, 5 and 6 are available, $350 each. Detwiler Tractor Parts, Spencer, WI. Call 715-659-4174, 715-6594252 or 715-659-4525 (office) 9-5 M-F. H6X
1924 Spoker D, runs excellent, good paint, $20,000 OBO. Ph 765-720-1071. IL
Recovering original tractor steering wheels for 14, 15 and 17” three spoke flat or round wheels, $95; 19” four spoke wheels, $110. Please send your core or call for information. EverGreen Restoration, W7619 Walnut Dr., Spooner, WI 54801. Ph. 715-520-7876. Made in USA. WI C3X
Electric starter kit for 70/720/730. Includes 12 volt starter, bracket, alternator and brackets, engine cover, breather standpipe, plug and caps for water ports, $1280. Kit for 80/820/830, $1350. Battery box now available. Free shipping. Also battery cable kit now available. Ph. 717-445-9465. PA G3X
Scott’s Tractor Restoration, 14025 Haumesser Road, Shabbona, IL 60550. We offer complete restoration and mechanical repair on all makes and models of tractors. Showroom quality. Ph. 815-762-0851, website: www.scottstractorrestoration.com or email: twocylindersh@aol.com. A12X
WANTED:
Industrial 2010 wheel tractor, gas model only, any restorable condition. Ph. 601-876-5890 MS (H2X)
2520 Hi-Crop Syncro, nice survivor. 3020 Hi-Crop, side console, Power Shift. 4020 Hi-Crop, restored nice, with experimental tag. Ph. 417-425-3202. MO G2X
After 133 model D JD tractors and 44 model Rs and approximately 300 other JD and other makes and models, what I have left needs to go. Will make good deals. A few JD tractors, lots of wheels and tires, lots of model D and R parts, a few late model B parts, some 820 and 80 parts. Bring your truck. We will have fun. Ph. 785-821-2600. KS F3X
Automatic release brake locks for two cylinders. Parts: 420W, 50 and 630 RC; 520-630 LP and A-730: air stacks, 3-points. Hose and breakaway kits for dual hydraulics 520-730;: also Behlen overdrives, round spokes and lugs. 800/801 hitches and parts. Aftermarket parts. 3-16s 825 rollover plow820; rollover plows and plow parts: 820, 825. Marlin Smith, Pine Valley Farm Equipment. Ph. 712-579-9922. IA F3X
158 loader off a 4020, $1450. 4520, 3-pt., dual hyds., 5800 hrs., big wheel weights, $9950. 148 loader, off 3020, $1950. 4 row 3-pt. cultivator, $395. 22 hay conditioner, $1095. 21 hay conditioner, $995. 2550, 4x4, cab w/245 Quik-Tatch loader and QuikTatch bucket, new tires, $21,950. 375 round baler, excellent, $3950. Ph. 920-878-0005 or 920-878-0288. WI
1950 styled AR, many unstyled G parts. 70 diesel just fresh in! Parting out: 70 gas burner, 630, good tin; styled G, also H. Parts for unstyled A, B, GP, D. Styled A, B, D, G, 50, 60, 520 and 620. Some R parts. Can deliver JD parts to Albert City, Iowa. Call Larry Frederick, 308-520-7416. NE F3X
Carr’s Repair: We’ve got you covered! D and R overbore piston kits for sale - D overbore .125-.250, R overbore .045-.125, SPECIAL $595! 720-830 JD diesel .125 overbore piston kits. Restore those JD tractors to original! Ph. 807-487-2548. International Falls, MN. No Sunday calls. Website: www. carrsrepairvintageparts.com (A12X)
John Deere BO Lindeman crawler. Has a serial number tag but is hard to read. Believed to be 333872. Front blade, PTO, older restoration, always on display in a controlled environment, runs. $14,500. Ph. 630-816-3131. IL
John Deere 630, row crop, 3-pt., LPTO, remote, flat fenders, air stack, PS, cushion ride seat, show condition. $8500. Call 330806- 0145. OH
We have clutch covers, grill screens, manifolds, battery boxes, water pumps, steering wheels and more, plus a yard full of used 2 cylinder parts tractors. Over 25 years of experience. We also have battery boxes, grills, steering wheels and other parts for
Fits H, R, 80, 820/830: $35.00 plus S/H
SHEET METAL BOLT SETS
Early styled tractors (pan seated models) A, B hand start • A, B long hood • G, GM & H $35.00 plus S/H
John Reed Antique Tractor Parts
RADIATOR BOLT SETS
Unstyled tractors: $45.00
Styled A, B, G and H + 50, 60 & 70: $40.00 520-up: $30.00 • plus S/H
We specialize in JD model H tractor parts— new, used and reproduction THOUSANDS of model H parts!
New Generation tractors. Call Shepard’s Tractor Parts, 715-265-4988. WI
Berry Cam Service: For your 2, 4 and 6 cylinder camshafts, stock or antique pullers. Ph. 320-395-2377. Location: 1948 175th Street, Lester Prairie, MN 55354. D6X
Currently parting out styled and unstyled A, AR, styled and unstyled B, styled and unstyled D, H, R, 40, 50, 60, 70 gas, 80, 420, 720, 820, 840, 1010, 2010, 3010, 4010, 3020, 4020 and 2030. Countryside Tractor, 618-731-6625. IL H3X
New and used John Deere small square baler parts. Knotter rebuilding service. Our free catalog makes it easy to figure out what your baler needs. Call Finger Lakes Equipment, 585-526-6705. NY C12X
WIRING HARNESSES, battery cables and spark plug wires made to order for restoration or repair. Covering models from the 1930s to the 1980s. Electrical parts including: switches, regulators, lights, relays, alternators. Wiring harness repair/ rebuild service. Worldwide shipping. See our display ad in this issue. Call or email for a free catalog. Agri-Services, 13899 North Road, Alden, NY 14004. Ph. Website: www. wiringharnesses.com. Email: agriserv@ rochester.rr.com. G3X
SERVICE INSTRUCTION CARDS. Reproduced sets of 3 for 3010 RC and RC utility; 4010 RC and standard. $35 postpaid. Green Iron Farms, 1320 Hwy. 92, Keota, IA 52248. Ph. 319-560-9508, tesieren@gmail.com. B6X-ALT
New and used JD two cylinder parts. Specializing in H, M, MT, 40, 420, 430, GP, 800 and 801 3-points and parts. Also: See my eBay store for specials and NOS parts. Some NOS parts, many reproduction parts. Dave Cook Tractor Parts, 715-373-2092. Morning calls are BEST. WI H3X
244 2x16” trailer plow w/cylinder, all new wear parts, $695. 4x16” trailer with cylinder, $395. 10’ wheel disk, $995. 12’ cultimulcher, $1475. 4x16” semi-mounted plow /cylinder, $495. #37 7’ sickle mower w/rear PTO, $795. Plow, 2x14” fits M or MT, like new, $595. Ph. 920-878-0005 or 920-878-0288. WI
JD 430T. Restored from ground up. Very nice and runs great. Have a certificate from John Deere, assembly date 10/12/1959, SN 158240. Can be shipped at buyer’s expense. Also available is a JD fully restored manure spreader for additional funds, $10,000. Ph. 928-368-4971. AZ
Carburetor, water pump, distributor rebuilding. Farmers Service Incorporated. Ph. 330-482-4180, www.farmersserviceinc. com OH F6X
Unstyled D on rubber with PTO, excellent condition, asking $5100. Ph. 920-878-0005 or 920-878-0288, no messages. WI G2X
High-speed road gears for John Deere tractors A, B, D, H, 50, 60, 620, 630, 730 models for tractor rides. Ph. 701-942-3102. ND F3X
1941 AR, electric start, completely restored. Located at zip code 63010. Ph. 636-2963112. MO F3X
Dubuque tractor HOOD BOLTS: Airlock 160 threaded hood bolts, looks like original Airlock ¼ turn fastener. Has same face, but allows you to snug up metal without harming paint. Set includes 11 Airlock bolts, unuts and nylon washers. For all M, 420 and 430 series. $60. Battery box winged Airlock bolt also now available, $15. Both for $70, includes shipping. Ph. 217-502-4504. IL F6X
Just in: Many, many mags and carburetors from big estate sale, including historical mags you won’t find anywhere else. Call for info. Over 30 years’ experience. Call EZ Tractor Shop, ask for Eldon, 785-3325482. KS F3X
PARTS AND DECKS for older Deeres. 110, 140, 200s, 300s, 400s and over 150 lawn tractors for sale. Ph. 219-942-2242, website: tractorsalesandparts.com. IN H6X
We have parts for your 45 combine! www.45combineparts.com. Ph. 417-2592520. MO G6X
John Deere 530 gas, 3-pt., LPTO, show condition, $8500. Ph. 330-806-0145. OH
NEW manufactured parts for John Deere L, LI and LA. Forty-two years of experience making these parts! Grilles, bases, propeller shaft guards and shield assemblies. Ron Brungart, cell 570-660-4573. PA G3X
Canopies for JD 3020, 4020, etc. Powder coated yellow. $1135. Quantity discounts. Ships truck freight. Nelson Horning, 585526-6705. NY C12X
1935 JD model B, SN 8431, with original cast iron, steel wheels, few hours on engine overhaul, good paint and decals, $4000. 1937 JD model A, serial number tag is missing, few hours on engine overhaul, good paint and decals, all new tires, $4000. Call Mike at 515-491-5763 or Brad on Wednesday or Thursday at 712-584-6816. NW Iowa. G2X
Large inventory of good used two cylinder parts. Call for parts needed - casting numbers and/or parts numbers appreciated when you call. Detwiler Tractor Parts, Spencer, WI. Ph. 715-659-4174 or 715-6594252 weekdays 9-5. C6X
ELECTRIC STARTER KIT for R, includes 12 volt starter, bracket with battery box, breather, water manifold, water pipe. Alternator with top and bottom brackets, mounting hardware and battery cables. $1595. Free shipping. Ph. 717-445-9465. PA G3X
New and used parts for JD two cylinder tractors and crawlers and some NOS parts. Models A, B, D, G, H, LA, M, 40, 50, 60, 70, 70D, 440, 520, 620, 720D, 530, 630, 730, etc. A&L Parts, 315-536-0543. NY C12X
3x14” 3-pt. plow, excellent, $695. #43 PTO driven corn sheller, $595. 3 blade disk plow, $325. 3-pt., two section 8’ rotary hoe, $450. Two JD #2 hay fluffers, $495 and $695. 5’ loader bucket, $475. 7’ 3-pt. blade, $595. Ph. 920-878-0005 (Herb) or 920-878-0288 (Jeremy). WI
Gear reduction starter built for 3010 JD through xx60 series. Adaptable to some 8000 series JD tractors and some JD loaders. Starts easier. About $100 cheaper than OEM. No core charge. Call 218-234-6500. NE F3X
John Deere tractor repairs and restorations – all two cylinders and New Generation tractors. Pickup and delivery available. 4177 White Oak Road, Paradise, PA 17562. Ph. 717-687-3761. E6X
The Corn Picker book: 804 pages/over 1500 pictures, all brands. Corn Cribs book: 330 pages/over 1200 illustrations. NOW ALSO in hardcover! COMING SOON: Corn Choppers: Field Corn Forage Harvesters. www.CornPickerBook.com or call Corn Picker Bob at 815-761-3709. Email: mrcornpicker@aol.com IL E8X
TRACTOR MANUALS AND LITERATURE, large selection, ag, industrial, L&G. Jim Robinett, 5141 Kimball Road, Ontario, OR 97914. Ph. 206-713-3441, send email: tractrmnul@aol.com. OR C12X
WANTED: Steel wheels front and back for John Deere R. Also front steel wheels for unstyled A and B. Call David at 260463-2929. IN
Wanted: Two D2535 28 tooth sprockets for DI. Good condition please. All help appreciated. Ph. 580-273-8010. OK G3X
Wanted: 1969 to 1972 4020, propane or diesel, Power Shift. Ph. 620-923-3364. KS F3X
Wanted: JD 5020 diesel for farm use, rear hydraulics, 3-pt., PTO, 1970 or later, not seeking a parade machine. Email: specificneed@gmail.com or text 678-699-3164 (hearing impaired). GA H2X
Wanted: Looking to buy a tractor, prefer one of these models: 4250, 4055, 4255: Power Shift preferred. Ph. 605-352-9788. SD F3X
Wanted: Three row corn head for JD 45 combine, 30 inch spacing, model 313. Ph. 717-331-5470. PA G3X
Wanted: JD 4430, or 4440, open station, in good condition. Ph. 309-256-1100. IL E7X
RESCHEDULED: Announcing: North Texas Antique Tractor and Engine Show: Antique tractor show and pull, antique engines, and kiddie tractor driving. Sept. 14-15 in Ben Gill Park on Hwy 80, Terrell, TX. Contact Lyle at 214-497-1611 or Carol at 214-384-8543, www.north-texas-antiquetractor-and-engine-club.net (H2X)
Announcing: Annual Dacusville, South Carolina Farm Show: August 31st and September 1st. Free parking! $5 admission, (children, military, and exhibitors FREE!) Lots to see and do for the whole family! Brought to you by the Dacusville Heritage Association. Visit our website at this address: dacusvilleheritageassociation. org for more info or call 864-270-4455. SC
The John Deere 20 Series
New Generation Tractors
By Benjamin Hain
Kit Cleans Up Older Deere Hydraulic Mess
Scott Grove cleaned up leaky hydraulic valves on his older Deere tractors with a simple insert. The long-standing problem is one the company has yet to fix. Grove says it forces him and other owners of Deere tractors to replace O-rings on a regular basis, only to have the mess return. Grove’s fix eliminated the mess and the need to replace parts. With the Grove Conversion kit:
• Convert to ISO with easy push-pull connection
• Couplers connect under residual pressure with breakaway feature
• Kits available for 10 through 70 series JD tractors manufactured from 1961 through 1996
• Inserts are made in the USA. This product is protected under US Patent 10,760,725 B2 and other patents pending.
Installation consists of stripping the OEM outlets down to the block, removing the barrels and O-rings, and replacing them with the inserts. Grove then adds the aftermarket ISO coupler that threads into the insert. Installation instructions can be found on the Wapsi website.
Kits for 10 series are priced at $315, kits for 20-40 series are priced at $329, and kits for 50-70 series are priced at $355. Also watch the website for more additions coming soon. Grove suggests checking with local Deere dealers & local repair shops or Wapsi Innovations directly.
2-Cylinder Plus Tractor Salvage, 12
2025/1958 calendar: Green Magazine, 3
Agri-Services, 27
A&L Parts, 27
Auction: Marty Family, 13
Auction: Stan Heinze, 9
Book: Mr. Thinker’s John Deere Almanac, Fourth Edition, 26
Book: The Green Experience, 20
Book: The John Deere Hi-Crop Book, 68
Book: The John Deere 20 Series New Generation Tractors, 66
Book bundle: Green Magazine, 2 Brillman Co, 69
Burrey Carburetor Repair, 8
Central Fuel Injection Service, 26
Countryside Tractor, 12
Crawler parts: Lavoy Wilcox, 62
Decals: QuipCal.com, 61
Detwiler Tractor Parts, 21
Dillner's Tractors, 67
EverGreen Restoration, 20
Fisk Carburetor and Ignition, 27
Garry Power, 62
Green Magazine back issues, 74
Green Magazine binders, 74
Green Magazine Bookstore, 70
GreenLight Products, 8
Iron Bull Mfg., 21
John Reed Antique Tractor Parts, 64
Jorde’s Decals, 67
K&K Antique Tractors, 31
L and LA parts - Ron Brungart, 65
Lakeside Service & Supply, 20
Lind Bros Tractor and Parts, 12
Martin Parts & Repair, 71
Martin Repair, 27
McDonald Carb & Ignition, 26
M&D Reproduction Parts, 61
Miller Tire, 21
Obsolete parts - The Old Tractor Company, 12
Paul's Rod & Bearing, 67
Renaissance Tractor, 60
Ridenours - L parts, 67
Scenic View Engine, 63
Show: Classic Green Reunion 2025, 37
Show: Western Minnesota Steam Threshers Reunion, 8
Steiner Tractor Parts, 75
TP Tools & Equipment, 19
Tractor Girl - exhaust stack covers, 20
Wanted: Industrial 2010, 63 Wapsi Innovations, 67
Bookstore
The place to go for accurate and informative books
A Specialized Look Into The Unstyled Model B: The Handbook of the John Deere Model B 1934-1938 This book should be on the “must read” list of any unstyled “B” owner. Offers the same type of info as the unstyled “A” book (at right). Written by experts who have collected and restored the unstyled version of Deere’s most popular tractor, 84 pages, 11x8-1/2,” soft cover. GM8B - $39.95 US, $47.95 C, $52.95 F
The John Deere 20 Series New Generation Tractors This book is packed with info on the JD 820, 1020, 1520, 2020, 2520, 3020, 4000, 4020, 4320, 4520, 4620, 5020, 6030, 7020, 7520, 8020, WA-14 and WA-17. History and development, specs, production numbers and horsepower ratings. 8-1/2x11,” soft cover, 128 pages. NG20: $28.00 US, $35.00 C/F
A Specialized Look Into The Unstyled Model A: The Handbook of the John Deere A 1934-1938 Now in its fourth printing, no other book goes into so much detail on a single model of tractor. Shows illustrations of nearly every change made in the parts that make up the unstyled “A.” Written by Wes Malcolm, 95 pages, 11x8-1/2,” soft cover. GM7A - $39.95 US, $47.95 C, $52.95 F
THE GREEN EXPERIENCE
Articles first seen in Green Magazine 1984-2000
The John Deere Unstyled Letter Series Covers the JD unstyled GP, D, B, A, L, G, AR, AO, AI, BO, BR, BI, BO Lindeman, DI, 62, Y, W, AOS, Waterloo Boys and predecessors. Production numbers, year/SN breaks, original prices, matched working equipment, magnetos, carbs, wheels, history. 8-1/2 x 11,” soft cover, 160 pages. GM10: $24.00 US/C, $31.00 F NOW ON SALE! $18.00 US, $30.00 C/F
Approximately 96 pages of the best articles taken from Green Magazine’s first 15 years. Every member of the family will enjoy this book of restorations gone awry, trips that didn’t go as planned, cherished memories and sometimes profound situations. Not a technical or historical book, but a book about the lives and experiences of those who enjoy John Deere tractors. 11”x8-1/2,” about 96 pages, soft cover. GREX - $20.00 US, $30.00 Canada, $40.00 Foreign
Mr. Thinker’s John Deere Almanac, Fourth Edition All the same info found in earlier editions plus now Dan Brotzman’s New Gen and Gen II SN guide. For all models built from 1918 to 1972: history, SN/year breaks, accurate production numbers (no 820 three cylinder, 1020, 1520, 2020), notes on some significant changes, charts on tractor fluid capacities, cubic inches, compression ratios, torque specs, list of plow beam numbers. Info on proper colors of mufflers, axles, horse drawn equipment, fuels/lubricants, E/W stationary engines, L&G tractors. Chart on heights, weights and top speeds; SN/year charts for models 45 through 105 combines; tractor/loader application chart; SN/year charts for all tractors built from 1973 to 1990; and production numbers for models 4030 and 4230. 8-1/2”x51/2,” soft cover, black/white. MRT4 - $19.95 US, $28.00 C, $36.00 F US = United States • C = Canada price • F = Foreign price
The John Deere Hi-Crop Book This book provides serial number lists for JD models A, G, 60, 70, 620, 720, 430, 630, 730, 2010, 2510, 4010, 2520, 3020 and 4020. Verify Hi-Crop serial numbers, build dates and shipping locations in a pocket-sized book that’s easy to carry anywhere. Production summaries of two cylinder HiCrop tractors provided, as well as Hi-Crop totals by state and more. 72 pages, 5.5 x 8.5,” paperback, limited quantity. Order GMHC - $19.95 US, $26.95 C/F
A Tractor Goes Farming Author Roy Harrington (co-author of John Deere Tractors & Equipment, Vol. 2) has put together a book that places the child in the driver's seat of a variety of tractor makes and models. Short sentences that kids will be able to read alone or with help and full color photos to please everyone. 32 pages, 7 x 8-1/2, hardbound. AS6T - $10.95 US, $16.95 C/F
Grandpa’s John Deere Tractors This book for kids tells the history of Deere and Company starting with John Deere and his steel plow. Then in 48 pages with 50 color photos, it talks about how farming and JD tractors have changed. Best for kids 5 to 10 years. 7 x 8-1/2, hardbound, written by Roy Harrington. AS8K - $13.95 US, $19.95 C/F
How John Deere Tractors and Implements
Work Kids are always asking questions, especially about big machines. This book will give kids the answers they crave as they step into the field with impressive John Deere tractors and implements. Ages 8 to adult. 8-1/2 x 11, hardbound, 48 pages.
AS9H - $14.95 US, $21.95 C/F
A book is a great gift — for yourself or someone else! Orders can be called in or placed online with a credit card or by mail with a check. For more information, see yellow box in opposite column.
Call or e-mail with
Complete clutch rebuild kits and
PARTS TRACTORS
Uns A, 730G, 5020, Unstyled G, 430T, 2510 gas, 730 LP, 2010D, 530, Late 520, ’39 B, BN, 40U, ’53 AO, ’41 H, ‘46 A, late A’s, ‘46 B, late Bs, slant dash B, unstyled B, sty. D, G, unstyled L, M, MT, R, 40T, 40U, 40W, 70D std., 70G, 420U, 420W, 440 w/reverser and power steering, 440 gas, early & late 50s, early 60, 60 w/power block, 620, 620 LP, 630, 630 single front, 70G, 720G, 720 LP, 720D pony, 730D, 730G, 820, 1010, 2010, 2010D, 2010RU, 2020, 3010D, 3020, 4020D. Most of these tractors are parted out & on the shelf—ready for quick shipment!
Oversize pistons available again for many two cylinder tractors
Tachometers and
Brake rebuild parts
Mr. Thinker,
I would like to know which tractors can run a continuous hydraulic motor? I am looking at getting a newer utility tractor and they told me I couldn’t run a hydraulic auger motor on it. Hydraulic oil gets too hot, ruining something.
T.W., Iowa
It would help to know what you mean by “newer utility tractor” and what you plan on powering with the hydraulic motor. It is possible that “they” are correct as many of the new subcompacts with their hydrostatic transmissions weren’t meant for continuous flow. In some cases, the problem can be bypassed, literally and figuratively, sending the oil returning from the motor directly to the sump, rather than back through the coupler and valves. Mr. Thinker can’t give you a list of every tractor that is capable of running a hydraulic motor but Deere New Generation and Generation II tractors don’t usually have a problem. You are clearly looking at something built in the 21st century though, so it would be best to discuss with your salesman or, better yet, service manager what you are planning to do with the tractor. MT
Mr. Thinker,
Dear Mr. Thinker,
My friend claimed that John Deere made a model “LL” (a special version of the “L” or “LA” designed for cultivating) and an “LO” (“L” orchard). I don’t agree with him. I thought that they were designed for cultivator tractors.
Who is right?
C.M., Pennsylvania
Ask your friend if he is having trouble affording his medication. MT
Mr. Thinker,
I enjoy your magazine and value your opinion and would like it on painting an “A” John Deere, and getting a show room finish, such as primer, what name of paint, J.D. or automotive or something else, how many coats, clear coats, etc. I know a good painter should know, but I would like to check behind him before it is painted.
R.O., South Carolina
After studying this for decades, Mr. Thinker has come to the conclusion that the painter is more important than the paint. There are many who can do a beautiful job with Deere paint, which is a synthetic enamel, while others swear by a two stage acrylic enamel with a clear coat. The editor of this magazine claims that he can’t paint a square foot with Deere paint without getting a drip, but can do a passable job with Dupont Nason. You might go back to our May of 2017 issue and read the article “Painting for a Dummy” for a deeper dive into this subject. MT
I have a “BR” with push button starting, which I know is not original, but I am going to keep it that way. It used to start okay, though I would occasionally get nothing but a click, but when I pushed the button enough, it would eventually turn the starter. One day I couldn’t get it to do anything but click so I had to have someone pull me. I went out and plowed a bit and came back. After I shut it off, I tried it and the starter worked. Went back again later and it didn’t. When it wouldn’t start, I tried crossing the two polls shown on the solenoid with a screwdriver and nothing. Shouldn’t that have made it turn if the starter was okay? Do I need to take the starter off and have it rebuilt? I should add that the battery is a year old and I had a charger on it. Six-volt, positive ground.
D.S., Montana
First of all, the legal disclaimer. Crossing the contacts on the solenoid is dangerous; however, if you insist on doing it, double and triple check that the transmission is in neutral and the clutch is disengaged. Given the intermittent operation of the starter, along with the test via bypassing the push button circuit, odds are that the starter’s mechanical linkages, brushes and sliding parts are just dry, dirty and sticking and need to be taken apart and cleaned and inspected. MT
Mr. Thinker,
About a year ago, I bought a 730 diesel row crop. It has no serial number plate and was originally pony start but is now electric. The unique thing is that it has a two-stick transmission like a 70. I am finding it hard to figure out how to check or fill the transmission oil, since it
doesn’t have a filler near the shift quadrant like a normal 730. What do I have here?
J.E., Minnesota
It would appear that you have a 730 with a 70 transmission case cover, a conversion that is doable. Notice that the 70 diesel single-stick style starting engine lever even came along. You should still be able to check the transmission oil level with the plug on the left side of the case between the brake drum and the gear cover. Since it no longer has the filler opening that sits between your toes on the platform, you may have to fill it, very slowly, through the same hole. Why it has no serial number plate is likely known only to the person who removed it. MT
Dear Mr. Thinker,
This is in reply to G.G. from Pennsylvania in the June 2024 issue of Green Magazine whose 1948 “A” started good when cold but was very difficult to restart when hot. I had the exact same experience with a 1950 “B” that I bought 30 years ago. Once I got it restarted, it ran great. I spoke to the then adult son of the owner and he told me that he operated that tractor when he was a kid and it was hard to restart the hot engine back then, too. I installed a new coil in the Wico magneto and that made no difference. Two years after I bought the tractor, I started it up one day and antifreeze shot out of the exhaust and rained down on my head. I removed the cylinder head and found a crack in the combustion chamber. I also found that the valve stems had some carbon build up on them and, as the valves closed, the stems got tight in the guides right before the valves fully seated. These tractors have rather weak valve springs so my theory was that the valves could have been hanging up and staying open a little bit while cranking the hot engine, thus making it difficult to restart. I also discovered that this tractor is easier to restart when you set the throttle butterfly slightly open from the idle position. If the butterfly was opened wider, then it was again difficult to restart. I hope this gives him a few more things to look into.
C.F., Minnesota
Thank you for the information. When you think about the myriad of things that can go wrong with an engine, it’s a miracle that they run as often and as well as they do. MT
Green Magazine back issues
COST FOR BACK ISSUE S, NOW AVAILABLE PER
Order BIN1
No need to punch holes in those precious magazines to hold them in a three ring binder. These binders have inserts to hold your magazines in place. Magazines are easy to put in, easy to take out and can be read while in the binder.
Order BIN1 • Binders are now available in sets of 2 Each binder comes with 12 inserts • Additional inserts can be ordered—prices listed below
U.S. $48 for set of two binders w/12 inserts each or $88 for set of four binders w/ inserts Additional inserts are $14 per dozen or $34 for three dozen CANADA $68 for set of two binders w/12 inserts each or $128 for set of four binders w/inserts • Additional inserts are $24/dozen or $54 for three dozen ALL OTHER COUNTRIES $88 for set of two binders w/12 inserts each or $168 for set of four binders w/inserts • Additional inserts: $34/dozen or $64 for three dozen
Reuben Swarey of Henry, Tennessee owns this 4840 with over 10,000 hours and 4960 with over 11,000. The first thing he does when he buys a tractor is to turn the RPMs down 300. An old mechanic told him that if you do that, the engines will last forever.