
Dear Customer,
Thank you for buying a Globe-Traveller campervan, and congratulations on your choice.
We hope that our product will meet your expectations and your journeys with it will bring you much satisfaction and joy.
To ensure that your vehicle is free from technical problems and any operational difficulties, please read this manual carefully and follow the instructions it contains.
If in doubt, please contact us. Our contact details are listed on the last page. Have a safe journey - and many unforgettable adventures!
2
3 TABLE OF CONTENTS 1. INTRODUCTION 4 2. MARKINGS - HOW TO READ THIS MANUAL? 5 TECHNICAL DATA - CAMPERVAN DIMENSIONS 6 VOYAGER/ PATHFINDER 6 EXPLORER 7 3. RULES FOR THE USE OF CAMPERVANS 8 CAMPERVAN DRIVING 8 CARRIAGE OF PASSENGERS 8 CARRIAGE OF ITEMS 8 4. EQUIPMENT 10 4.1 ELECTRICAL INSTALLATION 10 4.2 CONTROL PANEL 15 4.3 FUSES 15 4.4 HEATING AND HOT WATER SYSTEM 17 4.5 GAS INSTALLATION 18 4.6 WATER IN THE CAMPER 21 4.7 TOILET 30 4.8 GAS COOKER 31 4.9 REFRIGERATOR 32 4.10 AWNING 32 4.11 SWIVEL SEATS IN THE DRIVER’S CAB 34 4.12 FOLDING TABLE 35 4.13 ADDITIONAL UPPER BED 35 4.14 REAR BED EXTENSION 37 4.15 EXTENDABLE STEP 38 4.16 SIDE AND ROOF WINDOWS 39 5. PREPARATION BEFORE TRAVEL 41 6. DURING TRAVEL 42 7. AFTER TRAVEL 43 8. WINTER STORAGE 45 9. CONTACT 46
1. Introduction
A campervan is a combination of a van and a small heated apartment with its own supply of water, gas and electricity. All this makes travelling by campervan a joy and a way of experiencing freedom, sightseeing and impressions that other ways of tourism and recreation do not bring.
However, in order to operate this vehicle without any problems, the information set out in the following instructions of how to use its equipment must be observed.
This manual describes the operation and maintenance of the campervan in detail. Please kindly familiarise yourself with all points before travelling. A thorough knowledge of the vehicle will ensure its economical and safe operation as well as a pleasant driving experience.
This manual will familiarise you with the general principles of use, the equipment and the operation of its various components. It also contains tips on the principles of daily use of the Globe-Traveller. In this pack of documents you will also find detailed instructions for the various pieces of equipment in the camper, as well as the base van manual. The Globe-Traveller manual focuses mainly on how to use it; for detailed technical information please refer to the manuals of the installed equipment. This manual has details for the vehicle based on its most highly equipped version; therefore, there may be differences depending on the model.
4
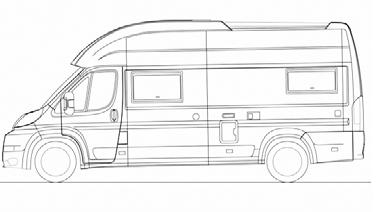
2. Markings - how to read this manual?
Content will appear in this manual together with illustrations. Texts that relate to the illustration will appear immediately to the right of the illustration. Details will be described using cross-references and figures. There will also be explanations on the right-hand side.
EXAMPLE OF DESCRIPTIONS
1 – water inlet
2 – rear side window (bedroom)
In the manual you will encounter symbols that will highlight important information.
This symbol highlights important details that ensure the flawless functioning of the campervan and its equipment. Please note that due to the different versions, the equipment of the vans may vary. The instructions are for the most highly-equipped versions.
Warning signs draw attention to existing hazards. Failure to observe them may result in damage to the material or injury to users
Signs indicating total prohibition or compliance. Failure to comply with the rules may endanger passengers
Information note
5
1 2
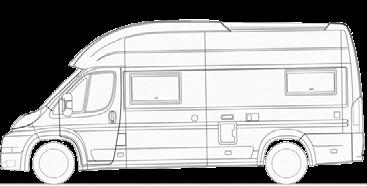
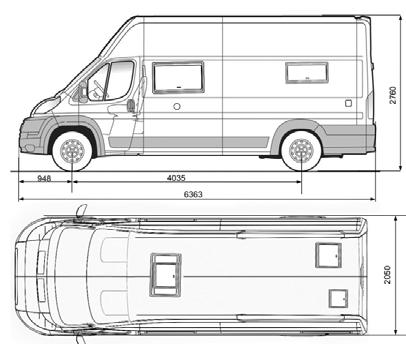
TECHNICAL DATA - CAMPERVAN DIMENSIONS
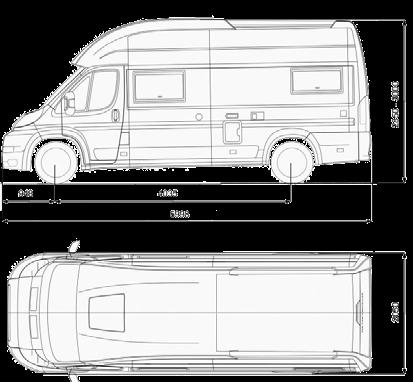
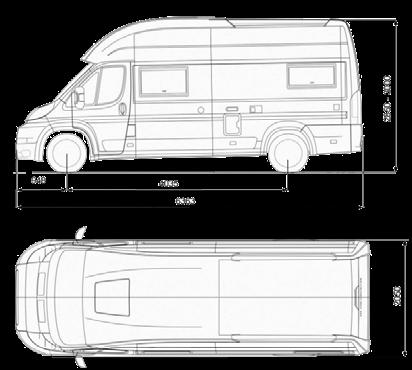
VOYAGER/ PATHFINDER
Z/X versions
XS version
6
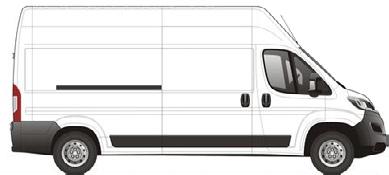
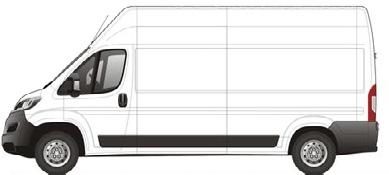
TECHNICAL DATA - CAMPERVAN DIMENSIONS
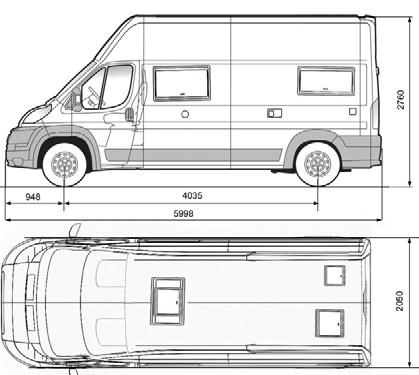
EXPLORER
Z/X versions
XS version
7
3. Rules for the use of campervans
CAMPERVAN DRIVING
A campervan is driven in much the same way as a passenger car. However, a campervan is a larger and heavier vehicle. It is important to remember that a campervan can behave a little differently on the road than a passenger car. Acceleration, braking distance and manoeuvring are not identical.
As size is an important factor in driving safety you need to pay particular attention to the road signs regarding permissible height, width and maximum weight (the campervan weighs over 3 tonnes).
When it comes to width, a simple rule applies: if the side mirrors fit, the whole campervan will fit. Due to the size of the car, special care must be taken when driving through tunnels, entering underground car parks or driving on narrow roads and bridges. Parking and manoeuvring should also be done with special care.
Remember that the braking distance of a campervan is much greater than that of a passenger car.
Before setting off, it is necessary to familiarise yourself with the regulations of the country you are travelling to. Regulations vary from country to country.
It is worth making a note of the exact dimensions and weight of your campervan. In some situations, such as driving under bridges, parking in tight car parks or driving on to a ferry, they can be crucial.
CARRIAGE OF PASSENGERS
The maximum number of people that can travel in a campervan is stated on the vehicle registration certificate. Passengers must travel in a seated position with their seatbelts fastened. Most of the appliances and accessories found in the living area of a campervan are intended for use only when the RV is stationary. Using them while driving can contravene traffic laws and dangerous.
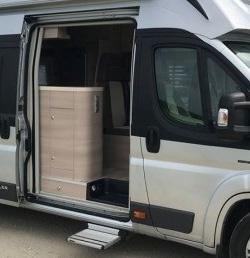
CARRIAGE OF ITEMS
A campervan is a mobile home that anyone can furnish as they please. However, it is important to remember to follow the rules, particularly these key ones:
• Keep the centre of gravity as low as possible. This improves safety and guarantees the stability of the van on the road. All heavy luggage should be placed in lower cabinets and lighter luggage in higher cabinets.
• Compliance with the permissible total weight of the vehicle is essential. This information is specified in the vehicle registration certificate. If necessary, reduce the load, i.e. eliminate anything that is unnecessary.
8
The maximum permitted axle load must not be exceeded and make sure that the loads are distributed as evenly as possible over both axles (when the vehicle is fully loaded with all passengers).
The maximum permissible axle load is stated on the vehicle’s type plate, under the front bonnet and in the vehicle’s type approval documents.
Globe-Traveller campervans are designed to make the most of every space available. We have made sure that there are wardrobes, shelves and other storage spaces for luggage. Putting the loads you carry with you in the designated areas will ensure a safe journey and maximum space for travellers. All clothes and other utensils should be placed in accessible cabinets and lockers.
When driving, everything must be firmly secured, left in the designated place, all cabinet doors closed and their locks locked.
ATTENTION!
The roof rails on Voyager and Pathfinder models only have an aesthetic function. Carrying and mounting of loads on these elements is prohibited.
General safety rules
• Secure all items before you start driving. Make sure all hatches, doors, windows and latches are closed. Store liquids in sealed containers.
• Always open windows or vents while in the vehicle to allow ventilation of the vehicle interior.
• Always have the vehicle and equipment manual in the car and follow the rules described.
• Never leave children unattended in a vehicle.
• Pay attention to the weight of the vehicle when driving.
• Note the height of the vehicle.
• Ensure that the weight is evenly distributed throughout the vehicle..
Following all these rules will ensure that you and your passengers are safe and as comfortable as possible when driving.
9
4. Equipment
4.1 Electrical installation
One of the key installations of a campervan is the electrical system. It allows you to illuminate the interior and use appliances such as the fridge, cooker, various phone and smartphone chargers, watch TV or use the heating or air conditioning in the living area.
Globe-Traveller campervans use two types of electrical installation: 12V and 230V. The former allows you to be independent of external power, while the latter allows you to enjoy all the benefits of traditional domestic electrical appliances.
12V BATTERY
This source of electricity needed for lighting and to power all kitchen appliances, water pump, toilet etc. located in the living area is a 12V battery. It is additional to the vehicle’s main battery. A device is installed between the two batteries to charge the living area battery in the following circumstances:
• when travelling, the electrical system connects both batteries so they can be charged at the same time
• when stationary, the electrical system disconnects the connection between the batteries; in this way, if the living area battery is completely discharged, the vehicle’s engine can still be started
• when connected to an external 230V power supply, both batteries are charged
Globe-Traveller campervans are equipped with modern, completely maintenance-free 12V LiFePO4 batteries. Due to the fact that campervans are often not used for long periods of time, it is natural for the battery to slowly discharge. To prevent this, one of the following recommendations should be followed:
• once the battery has been charged, remove it from the campervan and place it in a place protected from cold
• leave the vehicle connected to a 230V power supply to ensure the constant charging of both batteries
• in the event of short downtimes (1-2 weeks) after charging the batteries, disconnect them from the installation using the main switch
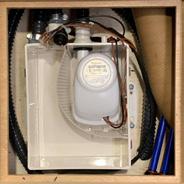
The additional battery to power the living area is located in the electrical cabinet, in the luggage area of the camper.
When replacing the secondary battery, ensure that the new one is of the same type and has the same characteristics as the originally installed one. The battery data can be found on the rating label. Please refer to the battery manual for detailed specifications.
Information about the battery status (buttery level, current energy consumption) can be traced by the application. The name of application can be found in the attached battery manual.
10
Globe-Traveller campervans use LiFePo4 batteries with a BMS system. After the battery is completely depleted, it can only be switched on again by connecting to an external 230V mains.
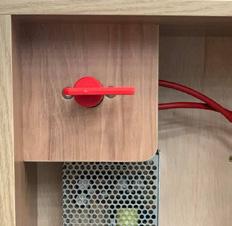
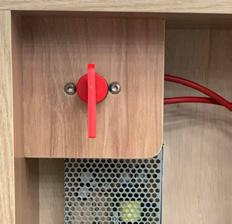
POWER OFF
To cut off the power supply, in the event of an emergency or to save energy, open the electrical cabinet located in the boot, and turn the handle 90° (anticlockwise). In the standard position it faces downwards (this means that the 12V power supply is connected). When the main power supply is switched off, the living area battery will continue to be charged while the motor is running from the photovoltaic panels and the external grid.
230V POWER SUPPLY
The 230V power connection socket is located externally, towards the rear of the campervan either on the driver’s or passenger’s side, depending on the version.
11
Włączone zasilanie Wyłączone zasilanie
1 - passenger’s side socket
2 1
2 - driver’s side socket
In order to connect 230V, you need to lift the cover of the socket and plug in an extension cable with a special plug (the extension cable is not standard equipment).

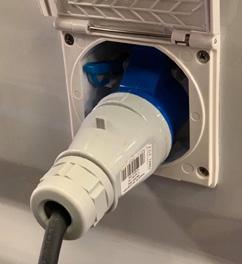
To remove the power cord, press the blue button on the left and pull out the cord plug.
Globe-Travellers are equipped with 230V power sockets, the number of which may differ from the car version and equipment package.
ATTENTION!
If you are caught in a thunderstorm while camping, disconnect the external power supply completely.
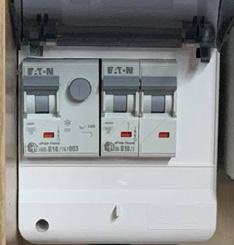
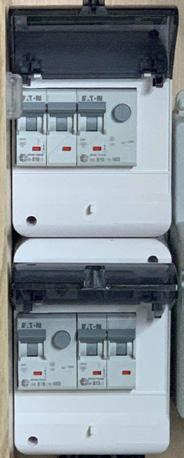
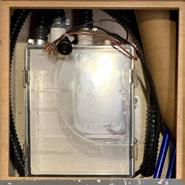
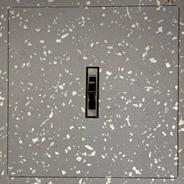
230V POWER SUPPLY PROTECTION
An automatic circuit breaker protects the campervan when using 230V. The breaker is located in the fuse box, which has been installed in the rear luggage compartment, in the electrical box. To switch the power on, push the switch (1) upwards. When the power is on, a red rectangle (2) is visible. Green indicates the power is off.
12
1 2
Power on Power off
USB SOCKET
Globe-Traveller campervans are equipped with double USB sockets. Depending on the version and equipment package, the number of sockets may vary.
Output voltage of USB sockets - 5V: only certain devices can be charged with it
PHOTOVOLTAIC PANELS
An option for Globe-Traveller campervans are photovoltaic roof panels - which provide an alternative power source from the sun.
MONITORING OF PHOTOVOLTAIC PANELS
Solar panels are monitored via an app. The attached manual of the photovoltaic panel controller contains information about the application data that must be downloaded.
SOLAR CHARGE CONTROLLER
The solar charge controller is located in the electrical cabinet in the luggage area of the camper. The regulator is protected by a fuse.
Photovoltaic panels should be cleaned regularly. During winter, snow should be cleared and the panels cleaned regularly so that this device can still generate energy.
• Have the electrical system checked at least once a year by an authorised technician to ensure it is working properly.
• Maintenance and repair work must be carried out by authorised personnel
13
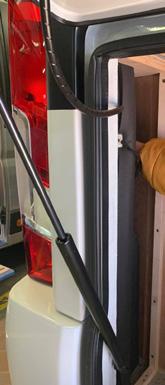
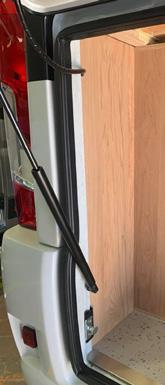
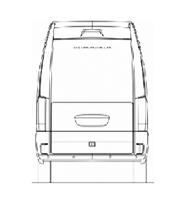
CHANGING LIGHT BULBS IN THE VEHICLE’S REAR LIGHTS
If a bulb needs to be replaced in the rear lamps of a model Z, the lamps can be accessed by opening the tailgate. In the posts on the left and right side, remove the caps (screwed on) and then put your hand in the hole in the corner and unscrew the two wing nuts that hold the lamp in place. Once the lamp unit has been removed, it is simple to access each bulb.
For the model X, the left-hand lamp van be removed in the same way, while access to the lamp on the righthand side requires the removal of the cap located on the back wall in the corner of the bathroom.
14
4.2 Control panel
Globe-Traveller campervans are equipped with a touchscreen control panel. The control panel, also called the central control panel, is located in a prominent position and provides, among other things, information on:
• clean water status
• the level of the grey water tank
• state of charge of the batteries

• outdoor and indoor temperatures
• external power supply connection
In addition, the panel also allows you to control the lighting and the water pump. For details, please refer to the device’s manual included in the starter pack.
4.3 Fuses
MAIN FUSES
15
NO VALUE DESCRIPTION 1 Free 2 2A Trunk lighting fuse
ADDITIONAL FUSES

16 3 2A Gas sensor, inductive chargers fuse 4 20A TRUMA heating, awning lighting fuse 5 20A Satellite antenna fuse 6 15A Fridge fuse 7 15A TV socket fuse 8 3A Gas cooker fuse 9 5A Free 10 10A Water pump, pumping unit, interior lighting fuse 11 1A Awning lighting fuse (control), TRUMA control panel, TRUMA iNet 12 20A 12V socket and USB socket fuse 13 10A Water pump, pumping unit fuse
IDENTIFICATION DESCRIPTION A Step B Interior lighting C Turbovent D USB SOCKET E Awning lighting F Maxxfan G TOW HOOK Additional loads H Uxiliary consumers after ignition I Ontrol module supply I1 Ontrol module supply I2 Control module supply J Energy consumption monitor K Biotoilet
IDENTIFICATION
DESCRIPTION
X Control unit - main power supply
Y Energy consumption monitor
Z Buttner charger
IDENTIFICATION
V Clesana
DESCRIPTION
230V FUSES
OZNACZENIA BEZPIECZNIKÓW
1 –wyłącznik różnicowoprądowy zasilania zewnętrznego
2 – zabezpieczenie nadprądowe ogrzewania elektrycznego
3 – zabezpieczenie nadprądowe klimatyzacji
4 – wyłącznik różnicowoprądowy inwertera
5 – zabezpieczenie nadprądowe gniazdek elektrycznych
4.4 Heating and hot water system
The Globe Traveller is equipped with a Truma Combi heater. This performs two functions at the same time: it heats the water and the interior living area. Depending on the variant, the heating system can be powered with:
• gas
• diesel fuel
• gas + electricity
• diesel + electricity
17
1 2 3 4 5 6
All functions are displayed on a prominently placed, user-friendly display panel. All detailed information and individual functions are included in the manuals for each device included in the starter pack.
NOTE: The TRUMA Combi (space and water heater) can be operated while the vehicle is in motion if it is a version powered by diesel fuel, or, if powered by gas, the system must have a Mono/Duo-Control gas regulator with an additional safety hose.
4.5 Gas installation
Globe-Traveller vans are equipped with gas cookers with 2 burners. Gas cylinders are stored in the boot area, in the gas locker, which is designed to hold one or two 5kg, 7kg or 11kg cylinders.
The intake valves are located - depending on the model - directly under the hob, in the kitchen cupboard or in the luggage compartment, accessible from inside the vehicle.
When you start your gas cooker for the first time, immediately after replacing the gas cylinder, there may be a delay in the flame appearing on the burner because the air in the hoses will escape first.
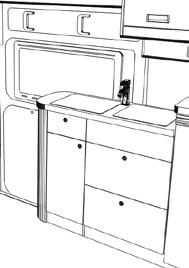
1 – 2-burner gas hob
2 – single sink
Each appliance is fitted with a safety system that cuts off the gas supply in the event of the flame accidentally going out
For a standard gas regulator:
• Check gas valves carefully before setting off - all valves and gas cylinders must be closed while travelling.
• After using and switching off the gas hob burners, close the inlet valves
18
2 1
The basis for safe use of a gas cooker in a campervan is that the system is in good working order and that special care is taken when using it. Do not lower the glass cover of the cooker while the burners are still hot.
It is also necessary to carefully check the tightness of the connection every time the cylinder is replaced.
Never refuel while a heating appliance or cooker is operating. Grilles and ventilation openings must not be obstructed.
GAS VALVE
To unscrew the gas valve, turn it 90°. When the knob is positioned in the same direction as the pip, it is open, and when the knob is across the valve it is closed.

The gas cooker valve is the first valve from the top. Depending on version, there can be a maximum of 3 valves - in the following order: cooker valve, gas heating valve (Truma gas), and external gas connection valve
19
VALVE OPEN VALVE CLOSED
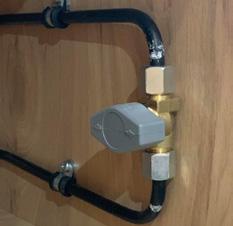
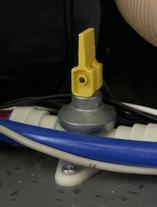
MONO - DUO CONTROL GAS REGULATOR

The gas regulator is located in the gas cabinet and is connected to the gas cylinder by means of a hose (1) with an additional safety device. The regulator automatically cuts off the gas supply in the event of a sudden outflow of gas or even during sudden braking.
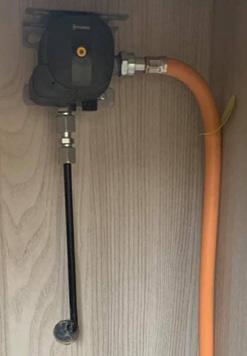
To restart the regulator, press the safety button on the hose and the yellow button (2) and hold for at least 10 seconds.
During sudden braking, the gas supply can be cut off. Regularly check the operation of the safety device
20
2
1
4.6 Water in the camper
The water system in Globe-Traveller campervans consists of two tanks – one for fresh water and one for grey (waste) water.
The fresh water tank holds a maximum of 105 litres or 85 litres (E2XS model) , while the grey water tank holds 85 litres. The status of the individual tanks can be checked at any time on the control panel.
• In order to be supplied with water of the right quality, it should be taken directly from the mains.
• After a prolonged downtime, the entire water supply system must be thoroughly drained and disinfected.
• The drinking water system must be thoroughly flushed before use.
• Any dirt found must be removed and the inside of the tank and pipes must be disinfected with suitable products.
CLEAN WATER TANK
The fresh water tank is located under the passenger seats in the centre of the campervan. Travel with a fresh water tank 20-25% full and refill to 100% when you reach the campsite.
NOTE:
Water should not be consumed directly from the tank.
FILLING THE FRESH WATER TANK
The fresh water tank filler is located outside, on the driver’s side, at the location marked 1
The filler is lockable with a key, which is included with the car keys
To fill the tank with fresh water:
• Open the filler with the key
• Fill with water using a hose or funnel or other suitable accessories
• Close the filler with a key
• Check carefully whether the filler is properly closed (no dirt will get inside)
21
1
The fresh water level can be monitored from the control panel
WATER PUMP
The water pump is powered by 12V.
The pump is powered from the control panel; all taps have built-in switches that automatically activate the water pump when the tap is turned on. The outdoor shower has a pump switch that has to be manually switched each time it is used.
In order to switch on, you need to:
• Turn on the power to the pump using the control panel.
• Bleed the installation of air by opening all hot and cold water taps until the water starts to flow.
• The installation is now ready for operation.
Inadequate
22
bleeding
result in
off the water pump on the control panel before starting to travel.
can
the boiler not heating the water Turn
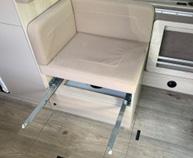
MAINTENANCE OF THE FRESH WATER TANK
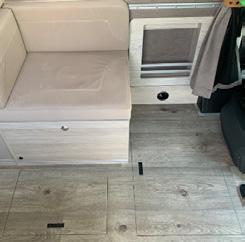
The fresh water tank should be cleaned regularly. Washing should only be carried out with water and a clean cloth or detergent. The fresh water tank is located under the rear seats. This means that the seats must be removed to undertake any operations.
1) For version 1 seats, it is sufficient to remove the left seat (from the window) as there is a tank opening on the left.
2) For version 2 seats, remove the backrest mattresses first, then the seat mattresses.
After removing the seat, unscrew the tank inspection screw cap.
In the case of version 3 (Explorer 2XS and E2X models), the clean water tank is located in the floor, under the seat. Slide the drawer under the mattress and remove it completely from the guide. This will allow direct access to the tank inspection cap.
23
1 2
3
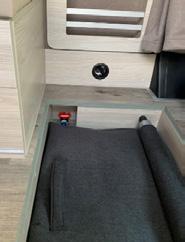
Emptying the clean water tank:
Depending on the seat type, in the rear of the vehicle, to empty the tank: For version 1 seats, open the door located near the floor on the side wall of the seat shell
For version 2 seats, remove the seat cushion as you would when cleaning the tank For seat version 3 - Explorer 2XS and E2X models, open the storage compartment behind the driver’s seat.
24
1 2 3
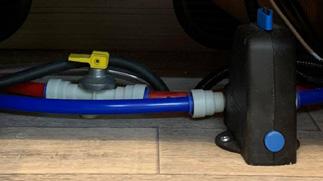
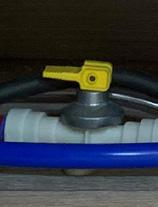
Then turn the butterfly valve on the floor 90 degrees counter-clockwise (align it along the drain hose)
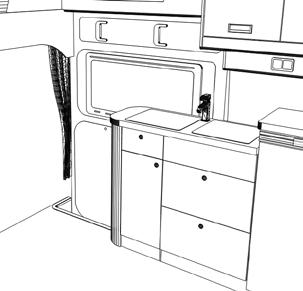
GREY WATER TANK
Care should be taken when emptying the grey water tank. The grey water tank is emptied using a special valve that allows the water to pour out.
The valve is located in the double floor under the kitchen cabinet and is accessible by opening the vehicle’s side door and a small access door.

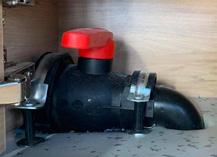
The valve is opened by turning the red lever by 90° and positioning it along the drain pipe.
NOTE: To empty the grey water tank faster, drive over the drain channel so that the left front wheel is slightly higher than the others. If the terrain does not allow for such positioning, levelling ramps could be used for this purpose.
The grey water tank should only be emptied in designated areas.
MAINTENANCE OF THE GREY WATER TANK
Dirty water tanks require periodic cleaning. They can be accessed by opening the round lids (1) in the floor (next to the lower kitchen cabinet). To lift them, tilt the lever (2) and pull upwards. There is a grey water tank screw cap under the lid, which must be unscrewed.
If there is a danger of freezing weather conditions, empty the water tanks. Never pour boiling water into the tank drain. Such action can lead to deformation and the formation of leaks in the drainage system.
Do not travel with a full grey water tank
25
1 2
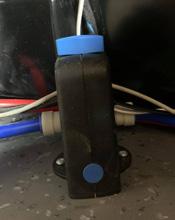
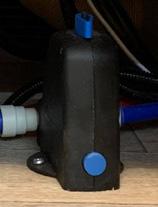
PUMPING UNIT
In order to prevent backflow from the grey water tank into the shower tray, Globe-Traveller double floor campervans use a sump with a pump and non-return valve - a pumping unit. It is located under the floor, next to the bathroom door. It only switches on (automatically) when using the shower.

MAINTENANCE OF THE PUMPING UNIT
This device requires periodic cleaning.
To do so:
• Open the cover (1) - bend the lever (2) and pull it up
• Turn on the switch (0-1) of the pumping unit for a few seconds to pump out the remaining liquid from the pumping unit water
• Remove the plastic cover of the pumping unit (3) (latches, on the opposite sides of the pumping unit)
• Remove the strainer (4) and clean it carefully
• Clean the inside of the well with a wet cloth or sponge to remove any deposits
• Close the cover and lid by pressing them down firmly
Clean the pumping unit screen regularly
Drain the pumping unit before the winter break
For the pumping unit pump to switch on automatically the switch should be set to “0”
26
1 2 4 3 0-1
OUTDOOR SHOWER
The external shower is located, depending on the vehicle model, on the outside wall on the left side (1) or, after opening the tailgate, under the toilet cassette (2).
To prepare to use the outdoor shower, open the cover, plug in the hose with the hand shower into the quick connector.
Then turn the water pump on with the button, and use the shower by adjusting the water temperature with the knob.
After using the shower, turn off the water pump, disconnect the hose with the handset and set the water temperature knob to cold water (by tightening it clockwise) and close the cover.
INSULATION AND WINTER BREAK
It is recommended that the clean and grey water tanks are emptied during sub-zero temperatures. However, with the heating switched on, the tanks can also be used at low temperatures – as both tanks are located internally.
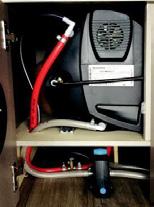
Frost Control drain valve and manual drain valve
The water drain valves are located in a cabinet in the luggage area where the heating unit is located. Frost Control is a cold water drain valve and a safety valve that automatically empties the water boiler in case of danger offrost ortoo high pressure in the water system. The manual drain valve empties the hot water circuit. Note that when opening the valves, water from the system will flow out under the car.

27
1 2
How the Frost Control valve works:
• In case of overpressure, the water is drained through the drain connection by pulsation.
• In case of danger of freezing, the Frost Control valve opens automatically and drains the water from the boiler through the drain connection outside the vehicle.
• The valve can also be opened manually
2
When the yellow lever is vertical (1) – the valve is open; when the yellow lever is horizontal (2) – the valve is closed
To open the valve, turn the knob (a) by 90° and position it along the valve as shown in figure (1), the button (b) should pop out.
To close the valve
• turn the blue knob (a) on top of the valve by 90°, position as shown in fig. 2
• press button (b)
NOTE:
YOU MUST CARRY OUT BOTH OPERATIONS! Rotate + Presse
28
1 2
1 – Manual drain valve (hot water)
2 – Frost Control valve (cold water)
1 2
Opening / closing the water system valves: MANUAL DRAIN VALVE
FROST CONTROL VALVE 1
a b
The Frost Control valve opens itself when the temperature is below 5°C, the manual valve must be opened by yourself
FILLING AND EMPTYING THE BOILER (SYSTEM)
Before filling the water system, both drain valves should be closed
• FILLING
Check that the knob on the drain valve (Frost Control) is in the “operating” position, i.e. parallel to the water connection, and then press the blue button on the floor.
At temperatures below approx. 5º C the Frost Control valve will not be able to be pressed. In this situation, you must first turn on the heating to warm up the interior and the area around the Frost Control valve. After a few minutes, when the temperature rises, the drain valve can be closed.
Switch on the water pump (main switch and pump switch on the control panel).
Turn on all cold water taps and when water starts running from the tap switch it to hot water. Leave the taps open until the boiler fills with water after the air has been displaced and the water flows in a continuous stream.
If the cold water system is used without heating, the boiler tank is still filled with water. To avoid frost damage, the boiler must be emptied via the drain valve, even when not in use.
• EMPTYING
After using the vehicle, the water tank and the water system must be completely emptied. The tank should be emptied by opening the drain valve located under the rear seat. To drain the water system, turn off the water pump on the control panel and open all taps (including the outside shower) in the hot and cold water mixing position. Then open the Frost Control valve and the manual drain valve. When draining the water system, you should also briefly press the flush button on the toilet. The water system will be drained through drain valves directly to the outside.
Damage caused by freezing water is not covered by the guarantee
29
4.7 Toilet
Globe-Traveller vans can be equipped with a chemical toilet or a waterless toilet.
The document set contains a detailed instruction manual for the toilet, which includes data and precise recommendations for use.
A CHEMICAL TOILET
The toilet has its own separate, removable cassette tank. The water for its flushing function is drawn from the fresh water tank, so the water system must be filled before the toilet can be used.
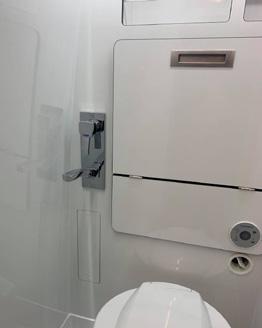
TOILET CASSETTE
Depending on the campervan version, the toilet cassette can be located on the outside wall on the left side of the vehicle - fig.1, or in the rear part of the luggage compartment (accessible after opening the luggage compartment flap) - fig.2
It has its own control panel with a button to press to perform the flush system. It also informs you of when its cassette tank is getting full.
It is recommended that you empty the toilet when the “cassette nearly full” light comes on
NOTE:
When the “cassette full” indicator light comes on, do not use the toilet again..
SOG toilet cassette ventilation
The SOG provides additional ventilation to the toilet cassette to remove unpleasant odours outside the vehicle when using the toilet. The fan operates automatically by switching on and off when the toilet slide is opened and closed.
30
1 2
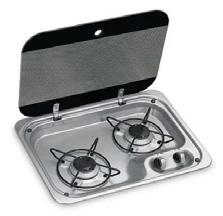
4.8 Gas cooker
Globe-Traveller campervans are equipped with 2-burner gas cookers. The cookers are located on the kitchen unit, next to the entrance.
The gas hob is equipped with a glass cover.
For details, please refer to the device’s separate manual included in the information pack
The glass cover should be kept closed during travel.
Before starting the gas cooker, check the appliance inlet valves and the cylinder valve are open.
To start the gas cooker, press the spark button and then press and turn the knob for a specific burner; after igniting the gas, wait several seconds before releasing the knob as each burner is equipped with a thermocouple safety device. When working properly, the thermocouple, once warmed by the flame, ensures a constant gas supply to the burner and, e.g. in case of flooding or when the burner is extinguished by the wind, closes the gas supply.
It is essential to keep the roof vent open when using the cooker. Failure to open the ventilation when using the cooker may result in carbon monoxide poisoning.
31
4.9 Refrigerator
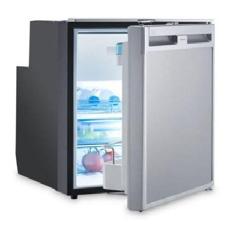
Globe-Traveller campervans are fitted with compressor refrigerators powered by 12 volts.
4.10 Awning
Before using it, we recommend paying attention to the manufacturer’s separate instructions for use. Instructions are included.
• The awning is designed for use as a sunshade and should not be used for protection against other weather conditions.
• Make sure there are no people or obstacles in the way when extending or retracting the awning.
• When extended, the awning should always be supported by the integrated stands.
• Always retract the awning completely and secure it before driving.
In windy weather it is essential to retract the awning.
The awning is extended manually using a crank attached to its mechanism. The crank and an additional strut are mounted in the boot of the vehicle. When extended, remember to position one of the support legs slightly lower, which will make it easier for water to run off. In extreme cases, an accumulation of water can damage the aluminium structure of the awning.
32
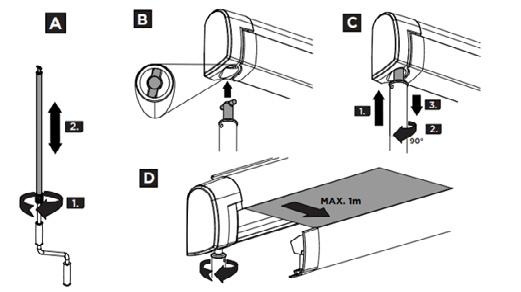
Extending the awning
1) Hook the end of the crank into the mechanism.
2) Firmly grasp the top handle of the crank rod with one hand and the bottom handle of the crank rod with the other. When turning the crank, pull the rod slightly towards you and keep it at right angles to the awning mechanism if possible.
3) Turn the rod clockwise until the awning extends by approx. 1 m.
4) Position the telescopic supports on the inner side of the tube and support the awning.
5) Only now extend the awning further into the required position
6) Remove the rod of the mechanism.
We recommend using 2 people to set up the awning
Retracting the awning
1) Hook the end of the crank into the mechanism.
2) Rotate the rod anticlockwise until the awning is approximately 1 m before its final position.
3) Slide off, fold up and secure the telescopic supports.
4) Only now fully retract the awning and secure it.
5) Remove the crank rod and place it in the campervan.
It is advisable not to fold away the awning when it is wet, but, if necessary, remember to clean the awning of anything that is on it, and at the earliest opportunity roll it out again to dry it.
Before starting to travel it is essential to check that the awning is retracted When retracting the awning, check that there are no leaves or branches on it. If rolled up together with the awning, they can damage the fabric (not just when it is wet).
33
Awning lighting
There is LED lighting directly under the awning. Activate the lighting is on the main panel (above the entrance), then adjust its level using the (supplied) remote control.
The attached documents contain detailed instructions for the device
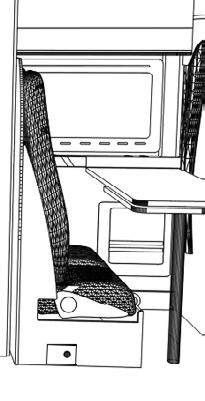
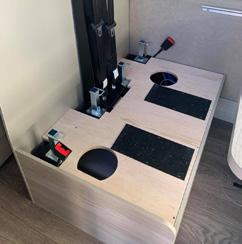
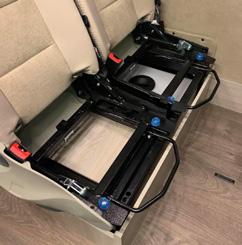
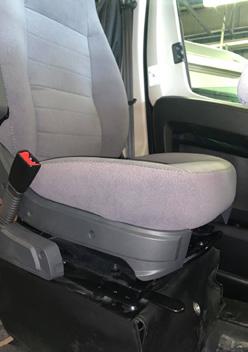
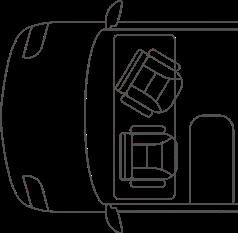
4.11 Swivel seats in the driver’s cab
The Globe-Traveller’s cab features swivel seats for the driver and passenger. For safety reasons, they must be handled with particular care:
1. The rotation of the driver’s seat may only be carried out with the vehicle stopped and the engine switched off.
2. The operation can only be carried out when the car is on level ground
3. Lock the wheels of the car with wedges and put it into 1st gear.
4. Only under these conditions can you release the handbrake, rotate the driver’s seat and immediately reapply the handbrake and shift the gear lever into neutral.
Seats can be rotated by 180°
Turn the seat using the lever (driver’s seat - right side; passenger’s seat - left side) and, leaving the lever pulled to the side, slowly turn the seat to the correct position.
34
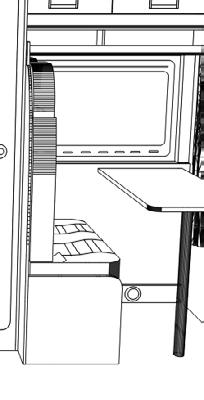
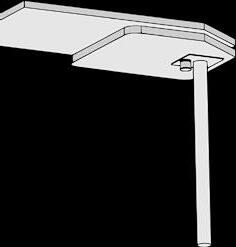
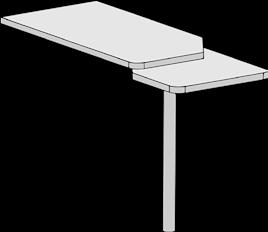
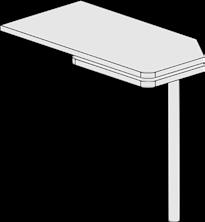
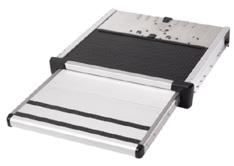
4.12 Folding table
To enlarge the surface area, the additional table top can be freely rotated around the axis of the support leg.
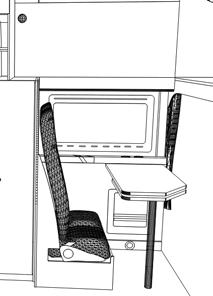
To unfold the table: Pull lock 1 downwards and rotate the lower table top outwards. The lower top can be rotated through 360° degrees. To immobilise it, release the lock, or leave it in its initial position.
4.13 Additional upper bed
The table must be in the closed position when travelling.
Depending on which version has additional or standard equipment, Globe-Traveller campervans can be equipped with a foldout upper bed, above the table, which replaces the cabinets.
Maximum bed load capacity - 150kg (over the whole surface)
35
Setting up the upper bed, step by step:
1) Pull the handle (1), place it in an upright position and turn it by 90°
2) Slowly pull the unit downwards until it completely unfolds
3) Pull out the fold-out part of the bed using the side rail (2)
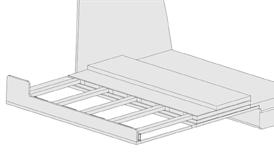
4) Rest the unit on the extended support (3), above the kitchen unit

5) Put on the extra mattress which is located in the recess above the cab
6) Install the access ladder
To assemble the bed, first remove the extra mattress, then place the mattress next to the wall on top of the middle mattress. This is important because of the resilience between the mattresses and the wooden base.
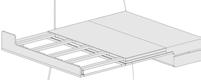
Folding the bed:
1) Remove the add-on mattress and put it in the recess above the cab
2) Lay mattress 4 on top of the centre mattress
3) Slide in the folding part 4), press the bed against the wall, standing it upright 5); turn the handle to the horizontal position and push it into the opening
When travelling, the bed must be folded away
36 2 3
4
1
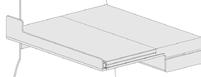
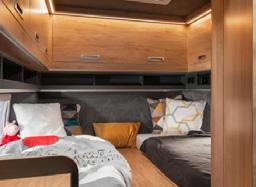
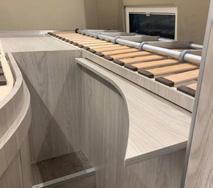
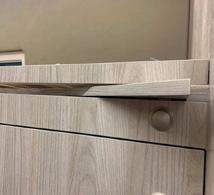
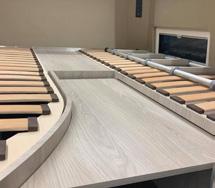
4.14 Rear bed extension
On Z models, the singel beds at the rear can be combined into one large bed.
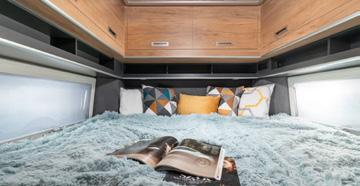
In order to extend the bed:
1) Press the Push-Lock button located on the front of the left side of the bed below the mattress line so that the button protrudes from the wall
2) Slide the extra board out from under the left-hand bed as far as it will go against the bed rail on the opposite side
3) Press the PushLock button again to lock the board in place
4) Add the additional mattress to fill the space
Do not sit down or lean against the bed extension board without fully extending and locking it
To separate the beds:
1) Remove the extra filling mattress
2) Press the Push-Lock button located on the front of the left side of the bed below the mattress line so that the button protrudes from the wall
3) Slide the extra board under the left-hand bed as far as it will go
4) Press the Push-Lock button again to prevent the board sliding out while driving
37
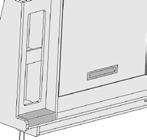
4.15 Extendable step
In the Globe Traveller, an automatic step is fitted which can be extended/retracted manually using the button (1) located on the side wall of the kitchen unit. The step only extends/retracts when the button is pressed.

The step will slide in automatically when the engine is started. However, we recommend that you check the step is fully retracted before moving the vehicle, as the step must be retracted when driving.
38
1
The extension/retraction button for the step are located inside
4.16 Side and roof windows
Details of the windows are contained in the manufacturer’s manual, which is included with the campervan documents.
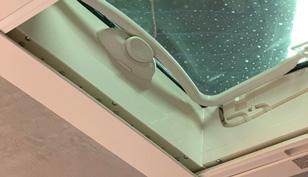
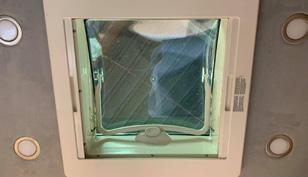
ROOF WINDOWS
Close the roof windows (‘rooflights’) before driving. Also, when leaving the campervan, the roof windows should not be left open. They should also not be left open in strong wind or rain. In winter, remove snow, ice or other dirt before opening the roof windows. In bright sunshine, the roof window blind should only be pulled up to 2/3 as there is a risk of damage if heat builds-up between the blind and the window. If the roof window becomes damaged in any way, please contact a specialist workshop.
ATTENTION
Roof windows must be closed when driving
Roof windows (made of acrylic) may be washed with soapy water or with special agents for acrylic surfaces. Small scratches and dull spots can be removed with a polish and a soft cloth. Use only soapy water to clean the blinds.
ATTENTION
Failure to comply with these rules will result in the loss of the guarantee.
Closing roof windows:
To properly close the roof windows, use the handle to lower the window and then hook it into the middle locking button and the two side buttons.
Ensure that the handle is hooked into both side locks. We recommend using two hands to close roof windows
39
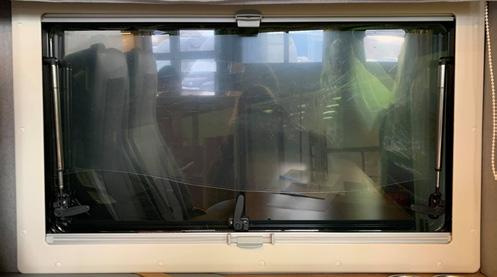
SIDE WINDOWS
The living area is equipped with acrylic side windows. They all open outwards and must therefore be closed when driving.
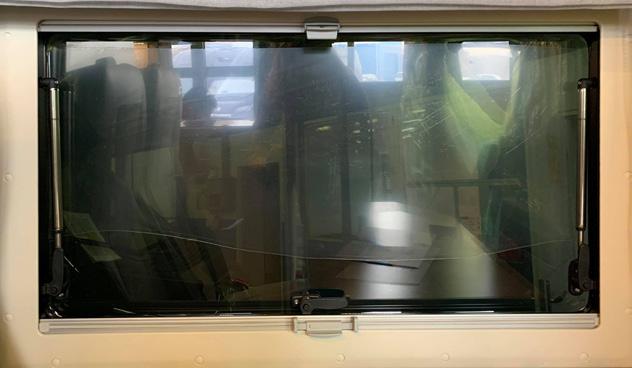
Closing of side windows:
In order to close the side windows, all three levers located on the right and left and in the middle of the window must be pressed and turned 90°. To turn the lever, hold down the button and turn the handle at the same time.
40
5. Preparation before travel
Before setting off on any travels, carefully check all equipment that could compromise safety, then make sure you are comfortable and ready to set off.
Keep yourself and your passengers safe first.
Van preparation
Before every journey, you need to check all the items that are standard on every model..
It is also important to pay attention to the following points that are important for your comfort and safety when travelling.
1. Close the gas cylinders (not applicable to Mono/Duo - Control) and check their fastening straps.
2. Disconnect external power supply
3. Close all luggage compartments and covers for exterior connection
4. Retract the awning.
5. Close all side and roof windows.
6. Secure loose items and close cabinets.
7. Fold away the roof bed.
8. Secure the shower door and put bath products away securely.
9. Turn the front seats in the direction of travel
10. Remove the table.
11. Fasten your seat belts!
41
6. During travel
PASSENGER SAFETY
Remember to ensure passenger safety.
ATTENTION
When driving, passengers are obliged to wear seat belts and children must be transported in child seats. People travelling in a campervan are subject to the same rules and regulations as passengers in passenger cars.
SECURE BELONGINGS
• When driving, secure all items inside so the vehicle so they do not pose a hazard. Ensure that all cabinets are firmly closed
• Close the gas cylinder valve while driving (not applicable to mono - duo control)
• When travelling, make sure your roof windows are properly secured Leave your camper only in safe places, preferably secure car parks, camp sites or proven locations.
WINTER TRAVEL
Globe-Traveller campervans can also be used in winter without any problems. If you’re planning a skiing holiday, you can travel by campervan without having to worry about finding a hotel room. However, you need to remember to leave the heating on while you’re away and make sure you have a sufficient supply of gas (or fuel in the tank).
ATTENTION
The heater must not be turned off when leaving the campervan in winter. Switching off may result in the water system freezing.
42
7. After travel
VENTILATION
Ventilation grilles in the gas cylinder compartment must never be blocked or obstructed in any way.
For safety reasons, the ventilation grilles should be cleaned regularly (at least once a year) and blown and brushed from the outside..
VENTING
A closed campervan encourages the accumulation of unwanted odours. It is therefore advisable to avoid situations when the vehicle remains locked for long periods of time. Whenever possible, try to cook with windows and doors open. Regular ventilation and airing of the van inside also prevents corrosion damage and condensation.
Condensation is caused by:
- small size of rooms
- respiration and sweat of passengers
- bringing in damp clothing
- use of gas cooker and oven
It is advisable to ventilate all spaces after each trip by opening windows and doors. It is also important to systematically put bedding, pillows, blankets and other bedroom accessories outside to air.
CLEANING EXTERNAL CLEANING
The campervan must never be washed in automatic car washes as there is a risk of damaging the external components.
High-pressure water systems must not be used to wash the exterior of the campervan
43
INTERIOR CLEANING
A campervan is a “second home” - to ensure a pleasant atmosphere and to enjoy all its equipment for as long as possible, it is important to take care of its cleanliness.
• Do not use abrasive sponges to clean the furniture in order not to scratch the surface. If possible, avoid bringing sand into the campervan as it can damage the floor surface due to its “abrasive” nature.
• Do not use too much water to clean the floor as the floor is made of wood and water shortens its life span.
• The floor should preferably be cleaned with a hoover.
• Globe-Traveller camper vans have plastic windows that can be cleaned with a soft sponge and soapy water
• Curtains should be dry-cleaned
It is important to clean your campervan regularly, so it is advisable to:
Air the campervan on a regular basis
Even if you have a fairly large vehicle, the enclosed area of the campervan encourages the build-up of unwanted odours. Therefore, avoid situations where the vehicle remains locked for long periods of time. The space of a campervan is quite limited, so taking care of ventilation is a key issue.
Clean the refrigerator regularly
The small refrigerator in the campervan needs frequent cleaning. Even with regular use, you cannot avoid the unpleasant combination of smells.
Take care of the water system and ventilation
Clean the water system before each trip. Use products intended for this purpose. Empty grey water and waste tanks on a regular basis.
Prevent dampness
Regularly clean and control the moisture level in your campervan. Open windows as often as possible. Use moisture absorbers.
Keep your bathroom and kitchen clean
Use chemicals that are designed for touring vehicles. Keep drains clean and clear.
Take care of your campervan in the off-season
When the vehicle stands closed, it can become an ideal environment to create mould, bacteria, dangerous micro-organisms etc. Not only unpleasant, but also dangerous conditions are created. Therefore, take mattresses, pillows, blankets and other textiles out of your campervan before storing it for winter. Leave some moisture absorbers in the vehicle and make sure you air your campervan regularly (at least once a month).
Standing on the roof is strictly forbidden.
44
8. Winter storage
Winter is a period when the campervan is usually used less frequently. Like any other vehicle, it “ages” much faster when not in use. It is therefore important to prepare it properly for this period:
1. Empty the entire water system (fresh and grey water tanks and toilet cassette). In addition, the entire plumbing system can be blown out with compressed air.
2. Leave the water safety drain valves open - Frost Control (cold water) and manual (hot water).
3. Leave all taps open.
4. Close the valves of the gas cylinder (possibly removing it from the camper).
5. Close all ventilation openings.
6. It is very important to disconnect and remove the starter and on-board batteries from the campervan for the winter or, if possible, connect the campervan to a power supply and start the engine from time to time to recharge the batteries.
7. Wash the vehicle thoroughly and then dry it.
When leaving the campervan for the winter, it is advisable to leave all internal doors and cupboards ajar to ensure air circulation.
Also remember not to cover any caravan or campervan with foil, tarpaulin or any other airtight material. There are various types of covers on sale, which ensure that the covered vehicle “breathes” and does not allow the interior to become damp
45
9. Contact
If you have any questions about your campervan or any problems or faults, please contact us by e-mail: https://globe-traveller.eu/ sercive@globe-traveller.eu
GLOBE
46
TRAVELLER
RV ul. Tyniecka 118e 30-376 Cracow Poland Happy travels and unforgettable adventures!
