3 minute read
Project 5. Fan Speed Controller


You will need:
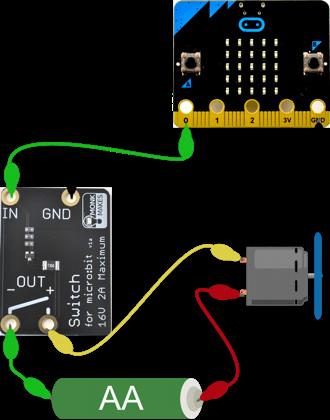
• micro:bit • MonkMakes Switch for micro:bit • AA Battery holder and battery • Motor with fan attached • Program: P5 Fan Speed
Advertisement
Flash the program P5 Fan Speed onto your micro:bit (see page 8). Connect up the components as shown to the right. Note it doesn't really matter which way around the motor leads are connected. Reverse them and the motor direction will reverse. The micro:bit display will show a number between 0 and 9 indicating the fan's speed. Use button B (on the micro:bit) to increase the speed and button A to decrease the speed.
How it Works
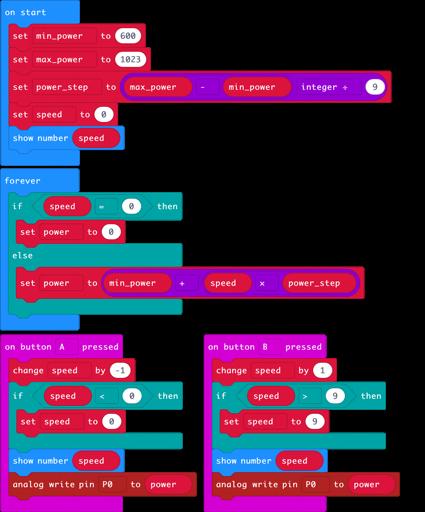
This project uses the MonkMakes Switch to provide pulses of power of varying length to the motor. The code is the most complicated so far. It uses quite a few variables that are defined in the on start block. • min_power – This should be set to the minimum power output value that makes the motor just start to turn. This varies a bit between motors. Try the default value of 600, but if the motor doesn't turn when you press button B to set the speed to 1, you may need to increase this value to perhaps 700 or more. • max_power – This is the maximum power, you can leave this as 1023 • power_step – This is the power range divided by 9 and will be the amount of power change that results from one step more of speed. • Speed – The speed from 0 (off) to 9 (maximum)
Page 20
The forever loop is used to continuously set the power level to match the speed. The case of the speed being 0 is treated as a special case, to set the power to 0, otherwise the motor may buzz without actually turning when the speed is 0.
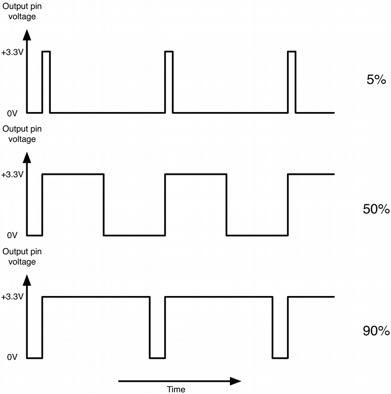
The on button pressed blocks are very similar to each other. The one for button A subtracts 1 from speed while making sure that speed does not fall below zero and then displays the new speed and uses analog write to set the power output of pin 0. The on button pressed for B does the same kind of thing, but adding 1 to speed. The method of controlling the power that analog write uses is called Pulse Width Modulation (PWM). It works by varying the duration of a series of pulses sent to the Switch. If the pulse is only high for a very short time (say 5% of the time) then only a small amount of power is delivered to the motor so it will turn slowly. The more time the
Page 21
pulse is high, the more power is delivered to the motor and the faster it will turn.
MicroPython Code
If you want to use the MicroPython versions of the programs rather than the Block Editor code, then please see the section near the end of this booklet called Using MicroPython for instructions on downloading and using the code. Here is the MicroPython code for this project. from microbit import *
min_power = 600 max_power = 1023 power_step = (max_power - min_power) / 9 speed = 0
def set_power(speed): display.show(str(speed)) if speed == 0: pin0.write_analog(0) else:
Page 22
pin0.write_analog(speed * power_step + min_power)
set_power(speed)
while True: if button_a.was_pressed(): speed -= 1 if speed < 0: speed = 0 set_power(speed) elif button_b.was_pressed(): speed += 1 if speed > 9: speed = 9 set_power(speed) sleep(100)
Page 23