1 Introduction to Histology and Basic Histological Techniques
Histology is the branch of the anatomical sciences that studies tissues of animals and plants. This textbook, however, discusses only animal, more specifically, human, tissues. In its broader aspect, the word histology is used as if it were a synonym for microscopic anatomy because its subject matter encompasses not only the microscopic structure of tissues but also that of the cell, organs, and organ systems.
It should be understood that the body is composed of cells, intercellular matrix, and a fluid substance—the extracellular fluid (tissue fluid)—which bathes these components. Extracellular fluid, which is derived from plasma of blood, carries nutrients, oxygen, and signaling molecules to cells of the body Conversely, signaling molecules, waste products, and carbon dioxide released by cells of the body reach blood and lymph vessels by way of the extracellular fluid. Extracellular fluid as well as much of the intercellular matrix is not visible in routine histological preparations, yet their invisible presence must be appreciated by the student of histology.
The subject of histology no longer deals with merely the microscopic structure of the body; it also concerns itself with the body’s function. In fact, histology has a direct relationship to other disciplines and is essential for their understanding. This textbook, therefore, intertwines the disciplines of cell biology, biochemistry, physiology, embryology, gross anatomy, and, as appropriate, pathology Students will recognize the importance of this subject as they refer to the text later in their careers. An excellent example of this relationship should be evident when the reader learns about the histology of the kidney and realizes it is the intricate and almost sublime structure of that organ (down to the molecular level) that is responsible for the kidney’s ability to perform its functions. Alterations of the kidney’s structure are responsible for a great number of life-threatening conditions. Another example is the microscopic, indeed molecular, structure of muscle cells. The ability to contract is intimately dependent on the microscopic, submicroscopic, and molecular organization of the various components of the muscle cell.
The remainder of this chapter discusses the methods used by histologists to study the microscopic anatomy of the body
LIGHT MICROSCOPY
Tissue Preparation
Steps required in preparing tissues for light microscopy include (1) fixation, (2) dehydration and clearing, (3) embedding, (4) sectioning, and (5) mounting and staining the sections.
Various techniques have been developed to prepare tissues for study so that they closely resemble their natural, living state. The steps involved are fixation, dehydration and clearing, embedding in a suitable medium, sectioning into thin slices to permit viewing by transillumination, mounting onto a surface for ease of handling, and staining so that the various tissue and cell components may be differentiated.
Fixation
Fixation refers to treatment of the tissue with chemical agents that not only retard the alterations of the tissue subsequent to death (or after removal from the body) but also maintain its normal architecture. The most common fixative agents used in light microscopy are neutral buffered formalin and Bouin fluid Both of these substances cross-link proteins, thus preventing them from altering their position, therefore maintaining a life-like image of the tissue.
Dehydration and Clearing
Because a large fraction of the tissue is composed of water, a graded series of alcohol baths, beginning with 50% alcohol and progressing in graded steps to 100% alcohol, are used to remove the water (dehydration). The tissue is then treated with xylene, a chemical that is miscible both with alcohol and melted paraffin. This process is known as clearing because the tissue becomes transparent in xylene.
toluidine blue is said to exhibit metachromasia Examples of tissues stained with common histological stains are presented at the end of the chapter (see Figs. 1–10 to 1–16).
Light Microscope
Compound microscopes are composed of a specific arrangement of lenses that permit a high magnification and good resolution of the tissues being viewed.
The present-day light microscope uses a specific arrangement of groups of lenses to magnify an image (Fig. 1–1). As a result of the use of more than just a single lens, this instrument is known as a compound microscope The light source is an electric bulb with a tungsten filament whose light is gathered into a focused beam by the condenser lens.
The light beam is located below and is focused on the stained specimen. Light passing through the specimen enters one of the objective lenses; these lenses sit on a movable turret located just above the specimen. Usually, four objective lenses are available on a single turret, providing low, medium, high, and oil magnifications. Generally, in most microscopes, the first three lenses
magnify 4, 10, and 40 times, respectively, and are used without oil; the oil lens magnifies the image 100 times.
The image from the objective lens is gathered and further magnified by the ocular lens of the eyepiece. This lens usually magnifies the image by a factor of 10—for total magnifications of 40, 100, 400, and 1000— and focuses the resulting image on the retina of the eye (or on the film of a film camera or on the sensor of a digital camera).
Focusing of the image is performed by the use of knurled knobs that move the objective lens up or down above the specimen. The coarse-focus knob moves the objective lenses in larger increments, and the fine-focus knob moves the objective lens in smaller increments. It is interesting that the image projected on the retina (or film or sensor) is reversed from right to left and is upside down.
The quality of an image depends not only on the capability of a lens to magnify but also on its resolution—the ability of the lens to show that two distinct objects are separated by a distance. The quality of a lens depends on how close its resolution approaches the theoretical limit of 0.25 µm, a restriction that is determined by the wavelength of visible light.
Figure 1–1 Comparison of light, transmission, and scanning electron microscopes.
Image in eye
There are several types of light microscopes, distinguished by the type of light used as a light source and the manner in which they use the light source. However, most students of histology are required to recognize images obtained only from compound light microscopy, transmission electron microscopy, and scanning electron microscopy; therefore, the other types of microscopy are not discussed.
Digital Imaging Techniques
Digital imaging techniques use computer technology to capture and manipulate histologic images.
The advent of computer technology has provided a means of capturing images digitally, without the use of film. Although, in its earlier years, this method of image capturing could not compete with film technology, it is now as good as, if not better than, the film technology. Additionally, digital photomicrography has many advantages that make it a valuable tool, for example:
• Immediate visualization of the acquired image
• Digital modification of the image
• The capability of enhancing the image by the use of commercially available software
In addition, because these images are stored in a digital format, hundreds or thousands of them may be archived on a single CD-ROM/DVD disk and/or removable disk technology, and their retrieval is almost instantaneous. Finally, their digital format permits the electronic transmission of these images by distribution via the Internet.
Interpretation of Microscopic Sections
One of the most difficult, frustrating, and timeconsuming skills needed in histology is to learn how to interpret what a two-dimensional section looks like in three dimensions. If one imagines a garden hose coiled as in Figure 1–2 and then takes the indicated thin sections from that hose, it becomes clear that the threedimensional object is not necessarily discerned from
the different
1–2 Histology requires a mental reconstruction of two-dimensional images into the threedimensional solid from which they were sectioned. In this diagram, a curved tube is sectioned in various planes to illustrate the relationship between a series of two-dimensional sections and the threedimensional structure.
Figure
Cross section
Longitudinal section
Oblique section
Diagram showing
appearances of sections cut through a curved tube at different levels
Fluoresceinated antibody Antigen
Add fluoresceinated antiantibody Antigen
Antibody
Figure 1–3 Direct and indirect methods of immunocytochemistry. Left, An antibody against the antigen was labeled with a fluorescent dye and viewed with a fluorescent microscope. The fluorescence occurs only over the location of the antibody. Right, Fluorescent-labeled antibodies are prepared against an antibody that reacts with a particular antigen. When viewed with fluorescent microscopy, the region of fluorescence represents the location of the antibody.
any one of the two-dimensional depictions. However, by viewing all of the sections drawn from the coiled tube, one can mentally reconstruct the correct threedimensional image.
Advanced Visualization Procedures
Histochemistry
Histochemistry is a method of staining tissue that provides information concerning the presence and location of intracellular and extracellular macromolecules.
Specific chemical constituents of tissues and cells can be localized by the method of histochemistry and cytochemistry. These methods capitalize on the enzyme activity, chemical reactivity, or other physicochemical phenomena associated with the constituent of interest. Reactions of interest are monitored by the formation of an insoluble precipitate that takes on a certain color. Frequently, histochemistry is performed on frozen tissues and can be applied to both light and electron microscopy.
A common histochemical reaction uses the periodic acid–Schiff (PAS) reagent, which forms a magenta precipitate with molecules rich in glycogen and carbohydrate. To ensure that the reaction is specific for glycogen, consecutive sections are treated with amylase. Thus, sections not treated with amylase display a magenta deposit, whereas amylase-treated sections display a lack of staining in the same region. Although enzymes can be localized by histochemical procedures, the product of enzymatic reaction, rather than the enzyme itself, is visualized. The reagent is designed so that the product precipitates at the site of the reaction and is visible either as a metallic or colored deposit.
Immunocytochemistry
Immunocytochemistry uses fluoresceinated antibodies and antiantibodies to provide more precise intracellular and extracellular localization of macromolecules than is possible with histochemistry.
Although histochemical procedures permit relatively good localization of some enzymes and macromolecules in cells and tissues, more precise localization can be achieved by the use of immunocytochemistry. This procedure requires the development of an antibody against the particular macromolecule to be localized and labeling the antibody with a fluorescent dye such as fluorescein or rhodamine.
There are two common methods of antibody labeling: direct and indirect. In the direct method (Fig. 1–3), the antibody against the macromolecule is labeled with a fluorescent dye. The antibody is then permitted to react with the macromolecule, and the resultant complex may be viewed with a fluorescent microscope (Fig. 1–4).
In the indirect method (see Fig. 1–3), a fluorescentlabeled antibody is prepared against the primary antibody specific for the macromolecule of interest. Once the primary antibody has reacted with the antigen, the preparation is washed to remove unbound primary antibody; the labeled antibody is then added and reacts with the original antigen-antibody complex, forming a secondary complex visible by fluorescent microscopy (Fig. 1–5). The indirect method is more sensitive than the direct method because numerous labeled antiantibodies bind to the primary antibody, making them easier to visualize. In addition, the indirect method does not require labeling of the primary antibody, which often is available in limited quantities only.
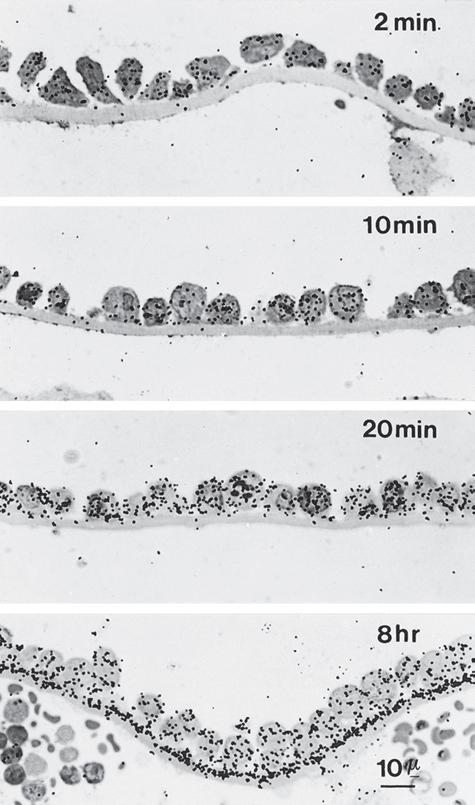
Figure 1–6 Autoradiography. Light microscopic examination of tritiated proline incorporation into the basement membrane as a function of time subsequent to tritiated proline injection. In photomicrographs A to C, the silver grains (black dots) are localized mostly in the endodermal cells; after 8 hours (D), however, the silver grains are also localized in the basement membrane. The presence of silver grains indicates the location of tritiated proline. (From Mazariegos MR, Leblond CP, van der Rest M. Radioautographic tracing of 3H-proline in endodermal cells of the parietal yolk sac as an indicator of the biogenesis of basement membrane components. Am J Anat. 1987;179:79-93. Reprinted by permission of Wiley-Liss Inc., a subsidiary of John Wiley & Sons, Inc.)
specimen that incorporated the radioactive compound.
Autoradiography has been used to follow the time course of incorporation of tritiated proline into the basement membrane underlying endodermal cells of the yolk sac (see Fig. 1–6). An adaptation of the autoradiography method of electron microscopy has been used to show that the tritiated proline first appears in the cytosol of the endodermal cells, then travels to the rough endoplasmic reticulum, then to the Golgi apparatus, then into vesicles, and finally into the extracellular matrix (Fig. 1–7). In this manner, the sequence of events leading to the synthesis of type IV collagen— the main protein in the lamina densa of the basal lamina—was visually demonstrated.
Confocal Microscopy
Confocal microscopy relies on a laser beam for the light source and a pinhole screen to eliminate undesirable reflected light from being observed. Thus, the only light that can be observed is that which is located at the focal point of the objective lens, making the pinhole conjugate of the focal point.
In confocal microscopy, a laser beam passes through a dichroic mirror to be focused on the specimen by two motorized mirrors whose movements are computer controlled to scan the beam along the sample. Because the sample is treated by fluorescent dyes, the impinging laser beam causes the emission of light from the dyes. The emitted light follows the same path taken by the laser beam, but in the opposite direction, and the dichroic mirror focuses this emitted light on a pinhole in a plate. A photomultiplier tube collects the emitted light passing through the pinhole while the plate containing the pinhole blocks all of the extraneous light that would create a fuzzy image. It must be remembered that the light emerging from the pinhole at any particular moment in time represents a single point in the sample, and, as the laser beam scans across the sample, additional individual points are collected by the photomultiplier tube. All of these points gathered by the photomultiplier tube are then compiled by a computer, forming a composite image one pixel at a time. Because the depth of field is very small (i.e., only a thin layer of the sample is observed at any one scan), the scanning may be repeated at deeper and deeper levels in the sample, providing a capability of compiling a very good three-dimensional image (Fig. 1–8).
Electron Microscopy
is developed and fixed by means of photographic techniques, and small silver grains are left over the exposed portions of the emulsion. The specimen then is sealed with a coverslip and viewed with a light microscope. The silver grains are positioned over the regions of the
The use of electrons as a light source in electron microscopy permits the achievement of much greater magnification and resolution than that realized by light microscopy.
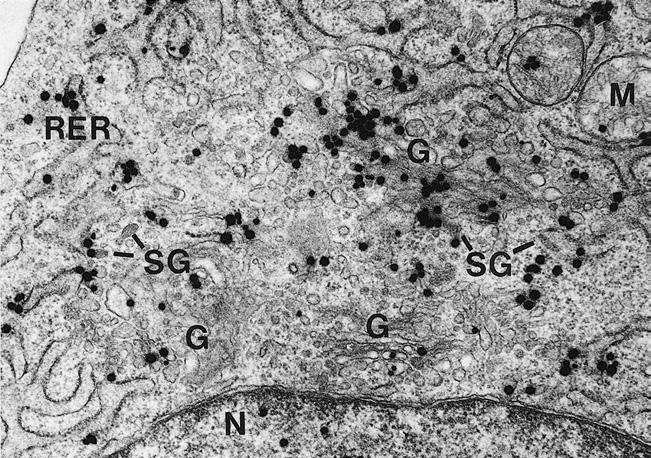
Figure 1–7 Autoradiography. In this electron micrograph of a yolk sac endodermal cell, silver grains (similar to those in Figure 1–6), representing the presence of tritiated proline, are evident overlying the rough endoplasmic reticulum (RER), Golgi apparatus (G), and secretory granules (SG). Type IV collagen, which is rich in proline, is synthesized in endodermal cells and released into the basement membrane. The tritiated proline is most concentrated in organelles involved in protein synthesis. M, Mitochondria; N, nucleus. (From Mazariegos MR, Leblond CP, van der Rest M. Radioautographic tracing of 3H-proline in endodermal cells of the parietal yolk sac as an indicator of the biogenesis of basement membrane components. Am J Anat. 1987;179:79-93. Reprinted by permission of Wiley-Liss Inc, a subsidiary of John Wiley & Sons, Inc.)

Figure 1–8 Confocal image of a metaphase rat kangaroo cell (PtK2) stained with FITC-phalloidin for F-actin (green) and propidium iodide for chromosomes (red). (Courtesy Dr. Matthew Schibler, UCLA Brain Research Institute.)