Preface
Performing orthopedic surgery for children is a wonderfully fulfilling endeavor with great potential benefit for the child. It is also a difficult and challenging field as well, and poorly chosen or performed surgery may produce lasting harm. Children present with complex problems which frequently are unique and not found in textbooks. The child is growing and surgery must enhance and preserve growth whenever possible.
This text includes 69 common and rare surgical procedures in pediatric orthopaedics. The procedures are from Tachdjian’s Pediatric Orthopaedics, Fifth Edition, organized into clear sections so readers can quickly find the procedure they are looking for. This is an ideal text for those new to the operating room who want a clear description of our recommended and preferred techniques; it’s also perfect for those who have been practicing for some time but want a quick refresher before going into surgery or want to see alternative techniques.
The surgeon must carefully consider many factors before proceeding with surgery, including the question of his or her own experience and technical competence to do the needed operation. The surgeon must be open not only to second opinions, but should actively consult colleagues and authorities when the best course for the patient is not clear. It is imperative that parents and children participate fully in the decision making process as much as possible. Thus a monograph devoted to surgical techniques, by definition, leaves out the most important part of the process; the decision making part, the part where a surgery is chosen for a young person. The surgeon must understand the disease process,
its natural history, its prognosis untreated verses the likely response to surgery. The understanding includes preoperative and postoperative planning, consideration of complications, and possible negative outcomes. All of this is covered in scientific publications and textbooks and cannot be considered in depth in this small book. Certainly we would recommend that the surgeon review the relevant chapters in the Tachdjian’s Pediatric Orthopaedics, Fifth Edition text whenever needed.
We, the authors of this work, are more than wellqualified for the task. The Texas Scottish Rite Hospital for Children has been taking care of children with orthopedic problems since 1921. We currently have 19 full-time pediatric orthopedists on our staff. Our group meets twice weekly to discuss surgical indications, techniques, and outcomes of a very large number of surgeries. We continuously review and publish results of analyses of all aspects of our surgical and nonsurgical activities. From this base we are constantly considering new procedures, improving results with existing ones, while realizing that there is no standing still in an advancing medical science.
Our book is well illustrated and we believe that the procedures are well described. The reader is also encouraged to make use of the cases in our video library. These videos are live action recording of operations, carefully edited to present the relevant steps in an efficient manner. Many surgeons around the world have told us how much they value the videos which accompany Tachdjian’s Pediatric Orthopaedics, 5th Edition, and which they often view while performing their surgeries.
VIDEO CONTENTS
1. Closed Reduction Left Hip/Arthrogram 3
2. Open Reduction Capsulorrhaphy Femoral Shortening Pemberton Osteotomy 13
3. Knee Reduction and Femoral Shortening: Infant 13
4. Pemberton Osteotomy 32
5. Salter Osteotomy 37
6. Adductor Tenotomy Hamstring Lengthening Rectus Femoris Transfer 78
7. Dwyer (Closing Wedge) Calcaneal Osteotomy 149
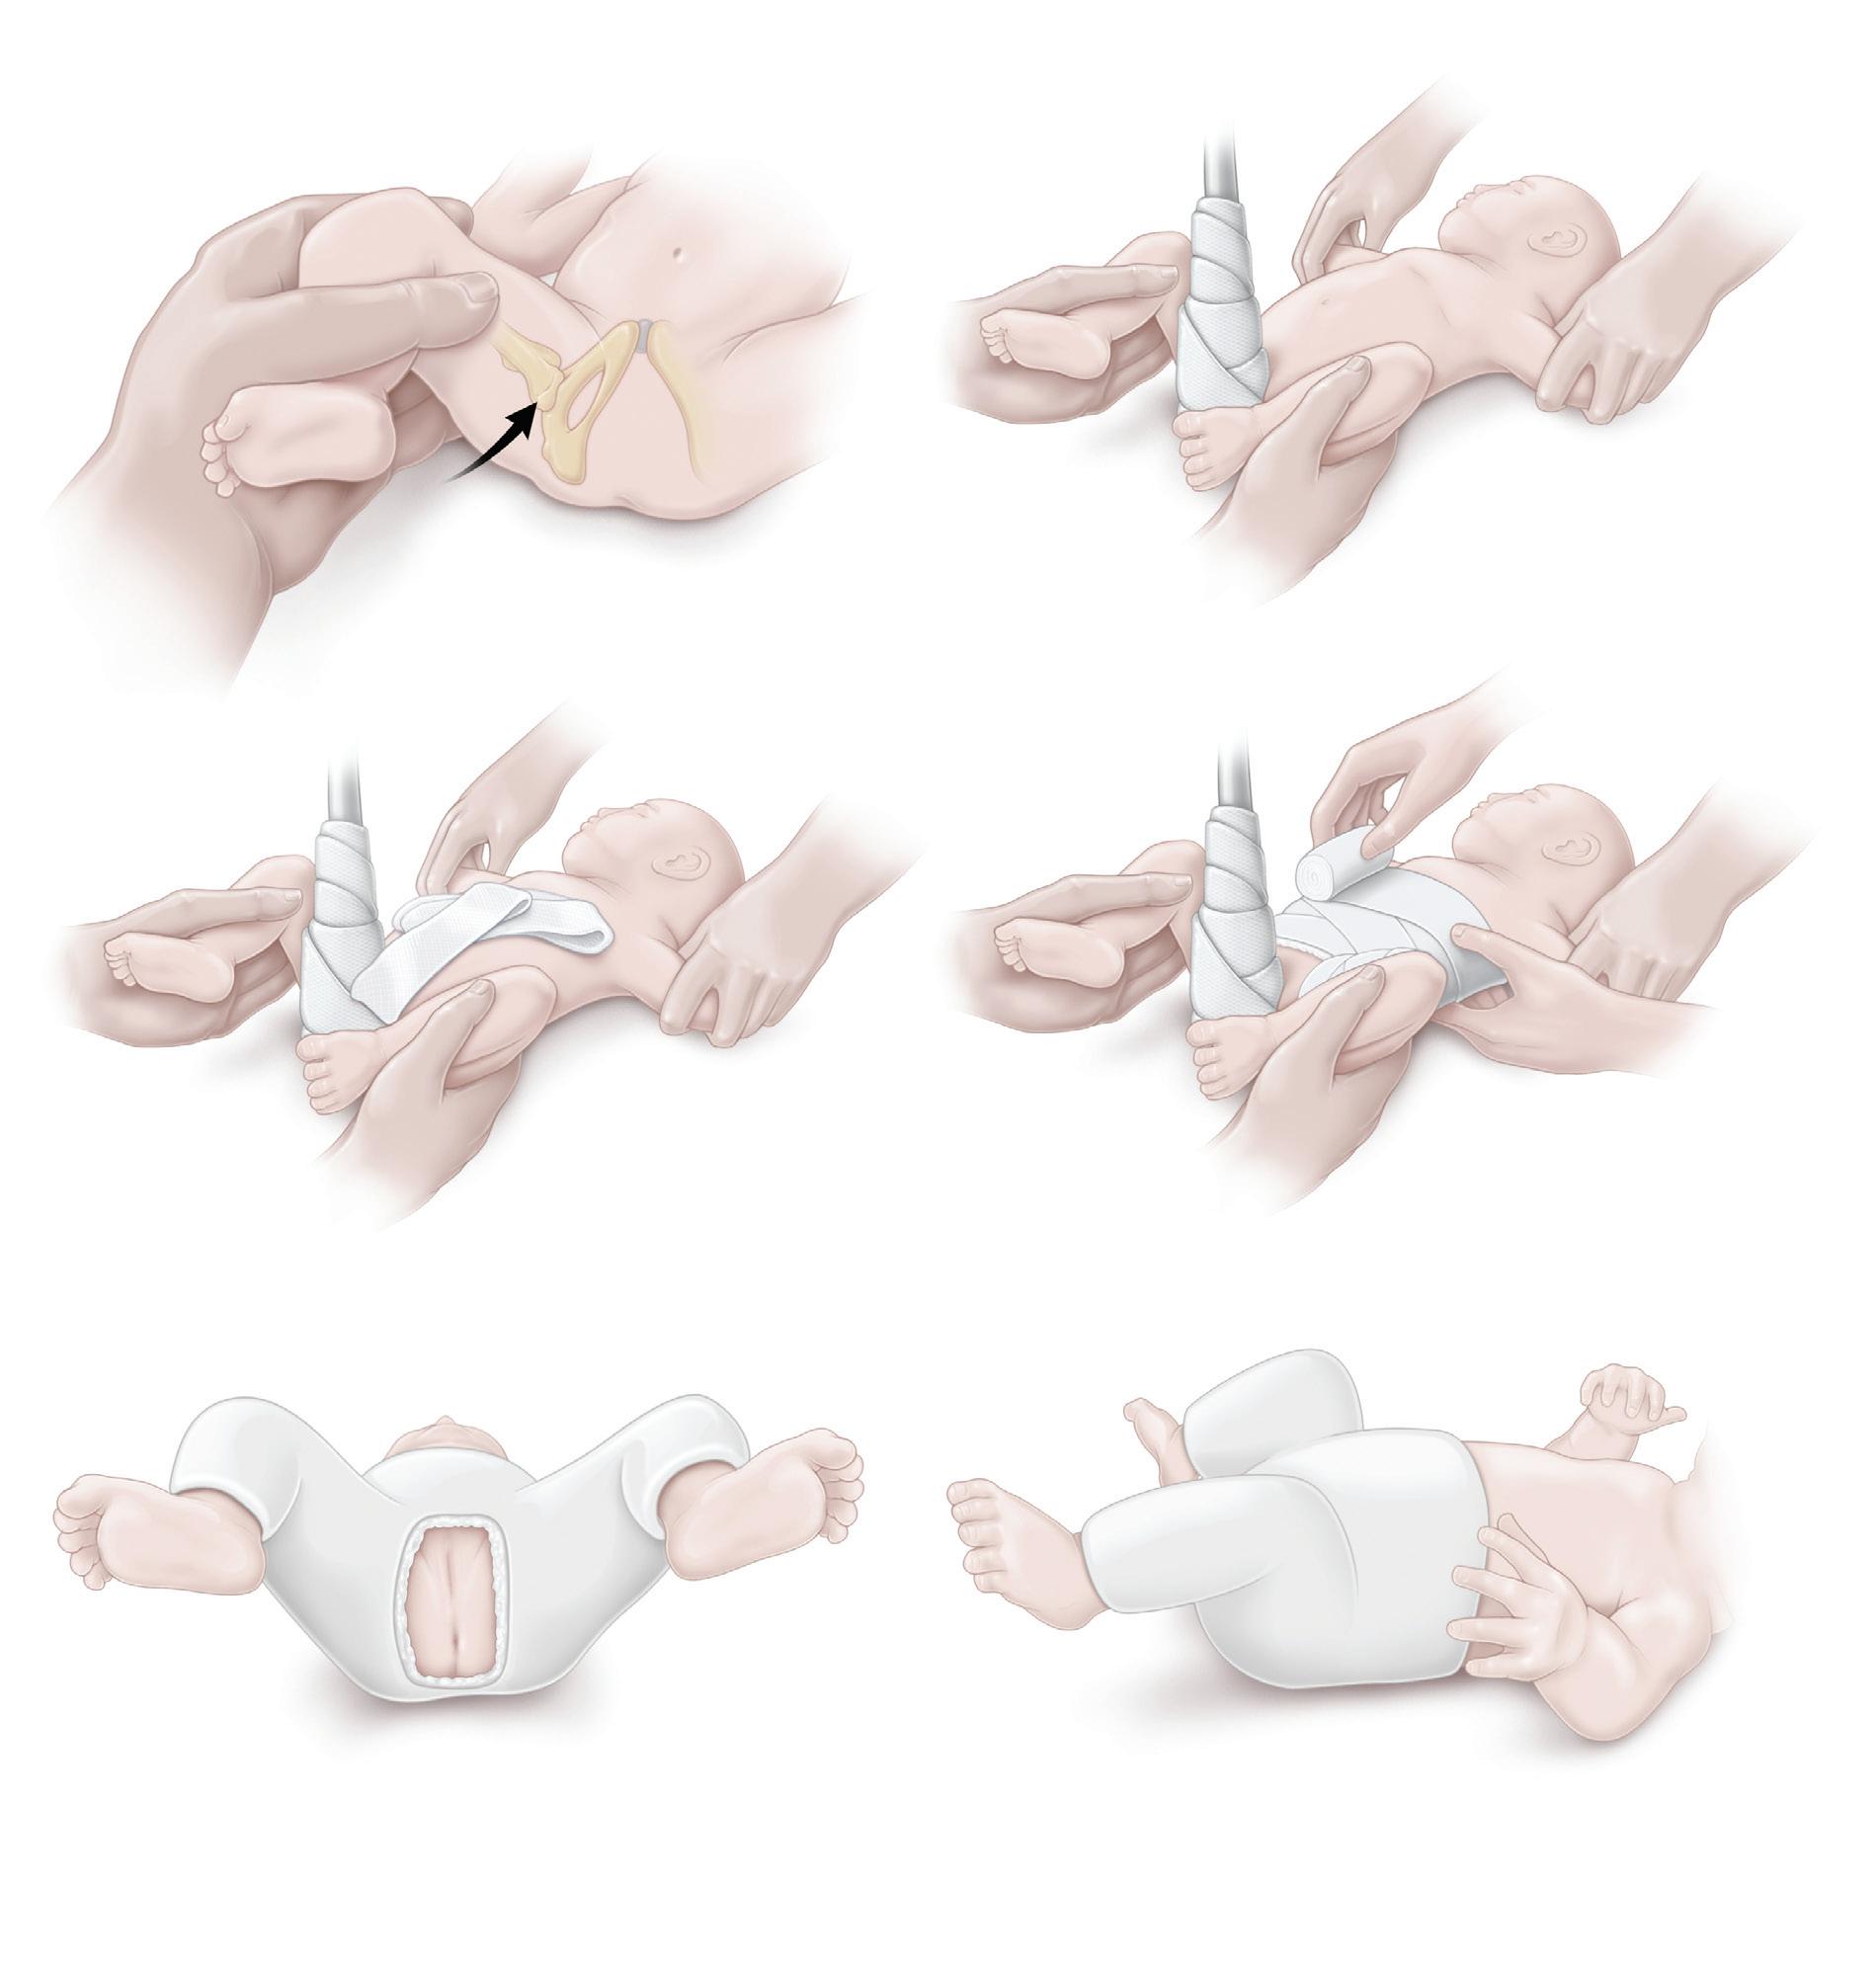
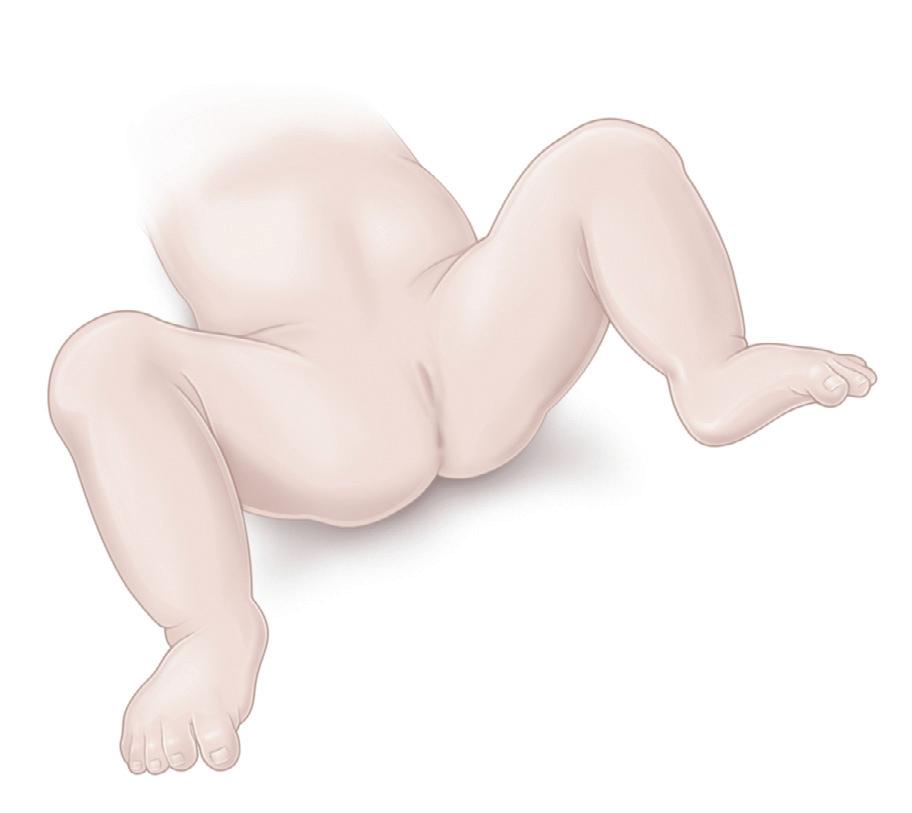
A, The first step of this procedure—evaluating the reduc tion of the hip—is probably the most important. With the infant completely anesthetized, the surgeon gently per forms the Ortolani maneuver by grasping the infant’s thigh, applying mild longitudinal traction, lifting the greater trochanter with the fingers, and abducting the hip to reduce the femoral head. The reduction should be done with the hip flexed approximately 120 degrees. After the patient’s hip reduces, the surgeon evaluates its stability by extending the hip to the point of redislocation and then adducting the hip to the point of redislocation. A reduction is considered stable if the hip can be adducted 20 to 30 degrees from maximal abduction and extended to less than 90 degrees without redislocation. An arthrogram may be obtained at this time to further assess the adequacy of the reduction. If the adductors are tight on palpation with the hip in the reduced position, a tenotomy of the adductor longus may be performed to reduce pressure on the hip.
B, After the reduction is established, the patient is placed on the infant spica table for cast application. The head of the table is raised to assist with keeping the perineum against the center post. At this point, the surgeon should be certain of the reduction of the hip. He or she should
hold the hips to maintain the reduction while avoiding
A rolled towel or stockinette is placed over the child’s abdomen and later removed to allow for breathing room in the cast.
D, Cast padding is applied around the abdomen in a figureeight pattern around the groin and then down the legs. The first cast is usually applied to the middle of the calf of the affected extremity and to above the knee on the contralateral leg. If available, a layer of moisture-control material (e.g., Gore-Tex) may be placed against the skin to prevent wetness. Casting material (usually fiberglass) is then rolled over the areas to be enclosed. During the entire procedure, the surgeon must continually assess the infant’s hip position by abducting the hips maximally and then “backing off” by at least 15 degrees to prevent the hip from sagging into full abduction.
E, The infant is taken off of the table, and the cast is windowed for perineal access. Radiographs are obtained at this point to ensure reduction. If any doubt remains regarding reduction, minimal-cut computed tomography is useful to confirm the hip’s position.
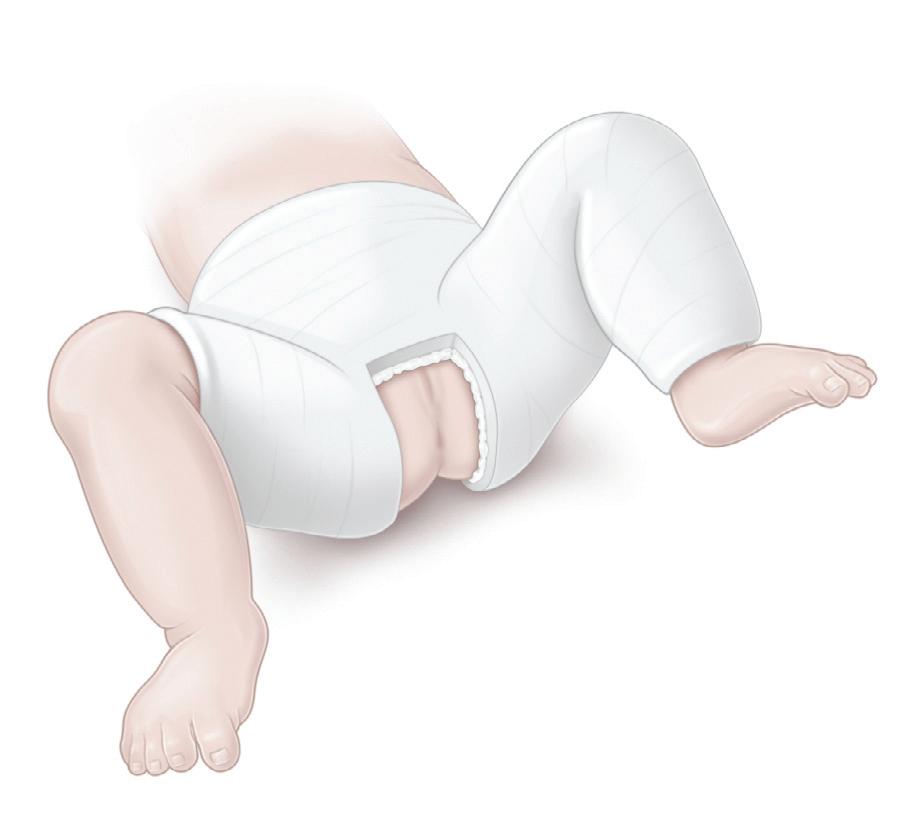
F, Side view of the finished cast.
Procedure 1 Closed Reduction and Casting for Developmental Dislocation of the Hip (see Video 1)
Procedure 2
Medial
Approach for Open Reduction of the Developmentally Dislocated Hip
The patient is placed supine, and the ipsilateral hip, the hemipelvis, and the entire lower limb are prepared and draped in the usual fashion, which allows for the free mobility of the limb during surgery.
We prefer a transverse skin incision because it affords better access to the hip and results in better cosmesis than a longitudinal incision. The hip is approached anterior to the pectineus with the traditional Ludloff technique. An alternative approach—posterior to the pectineus—is also described.
Transverse Skin Incision With Surgical Approach Anterior and Lateral to the Pectineus
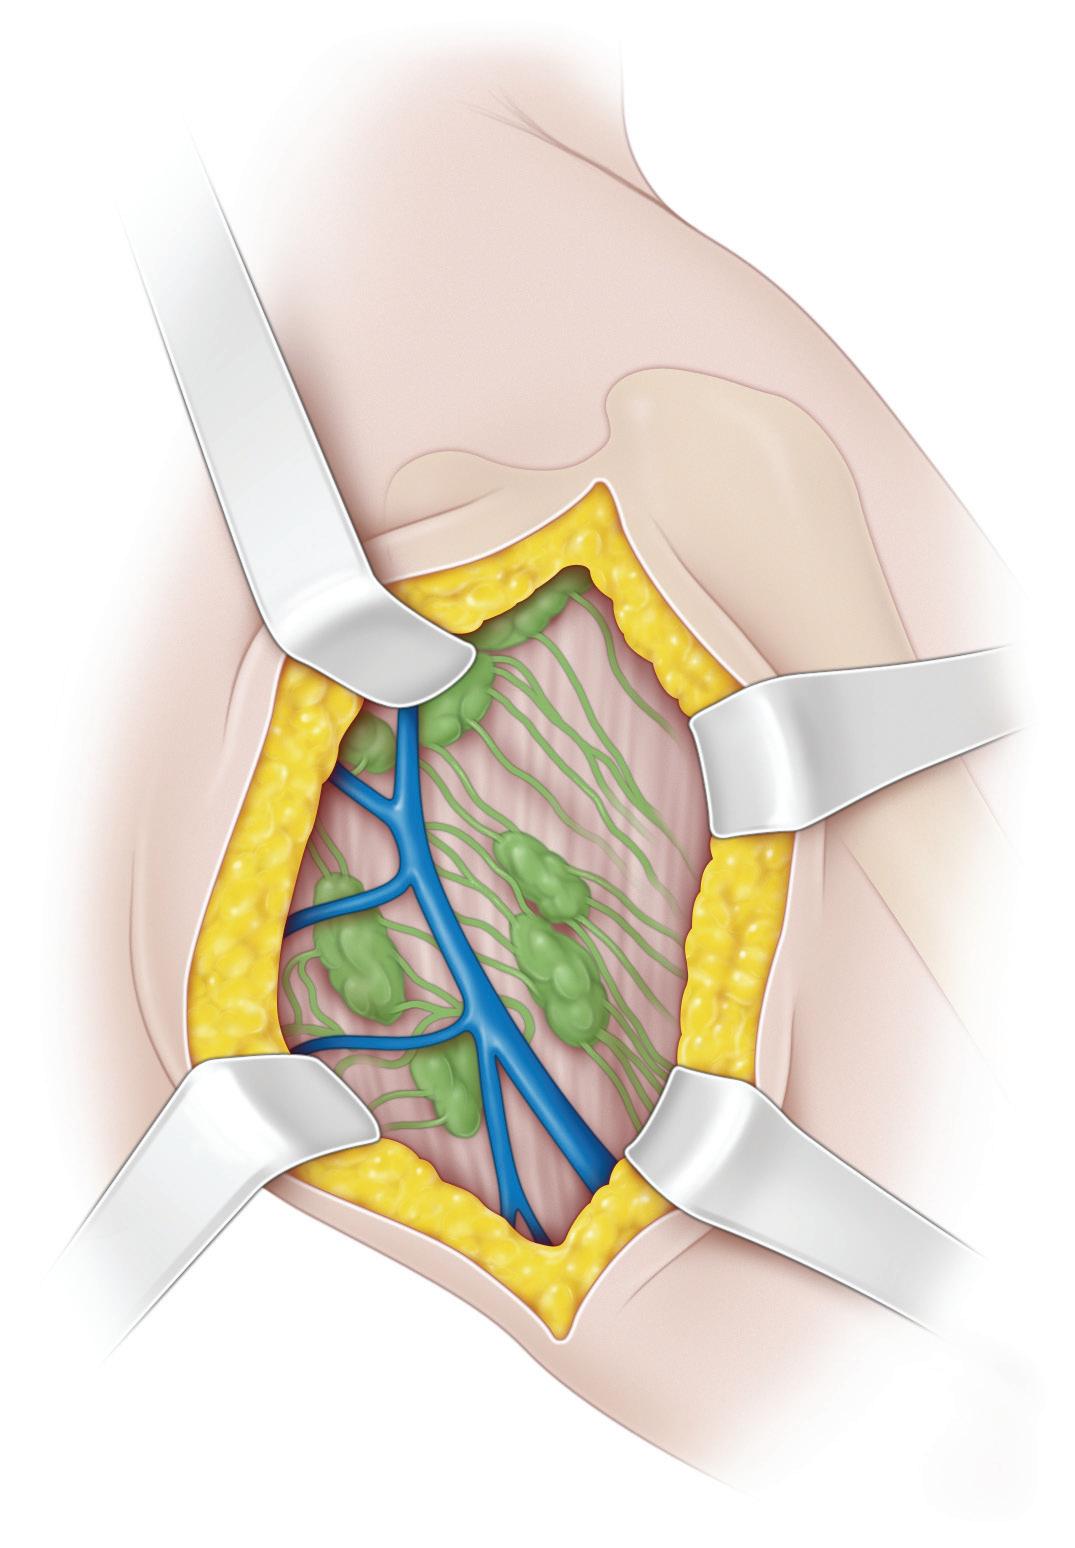
A, The preferred approach is through a transverse oblique skin incision that is 5 to 7 cm long, centered over the anterior margin of the adductor longus, and approximately 1 cm distal and parallel to the inguinal crease.
The deep fascia is divided. The surgeon should be careful not to injure the saphenous vein; however, if necessary, the vein can be ligated and sectioned.
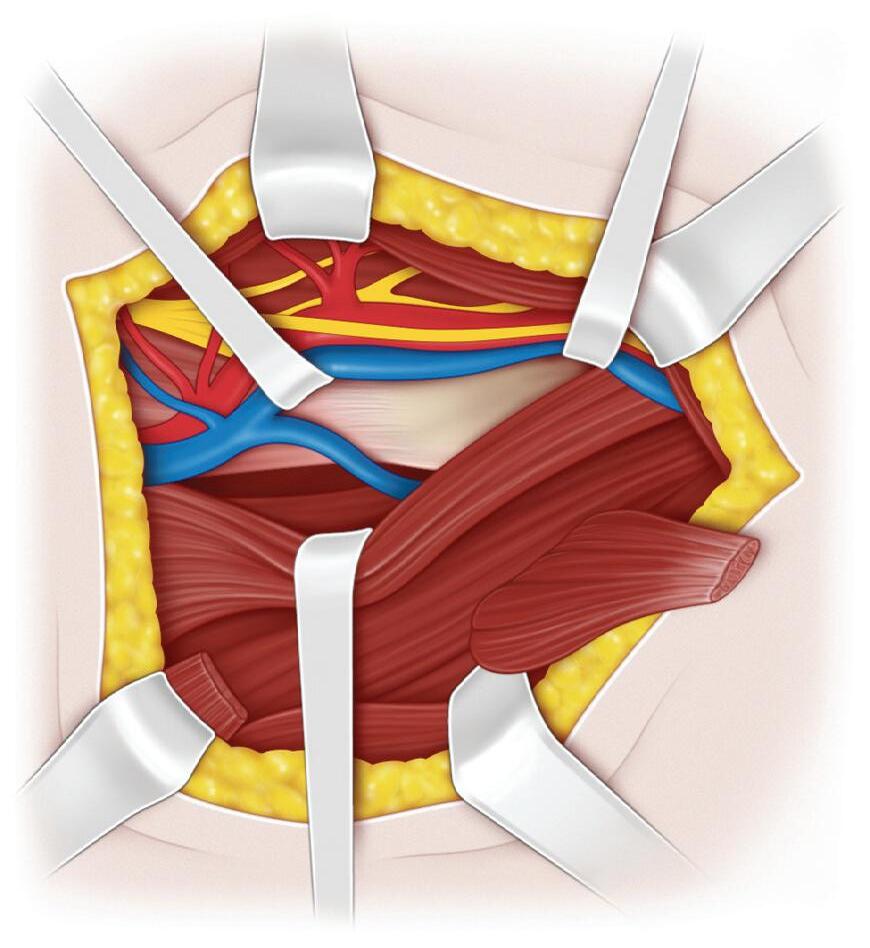
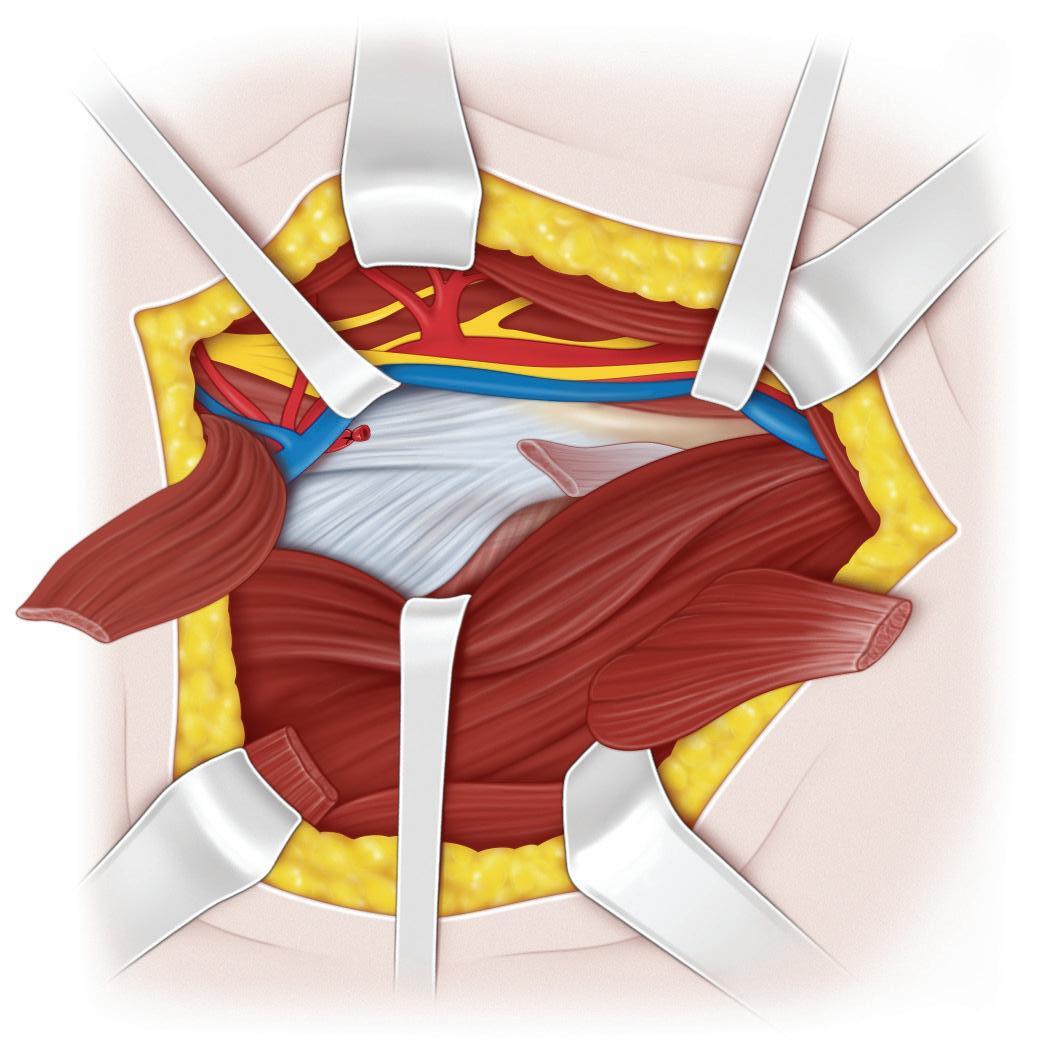
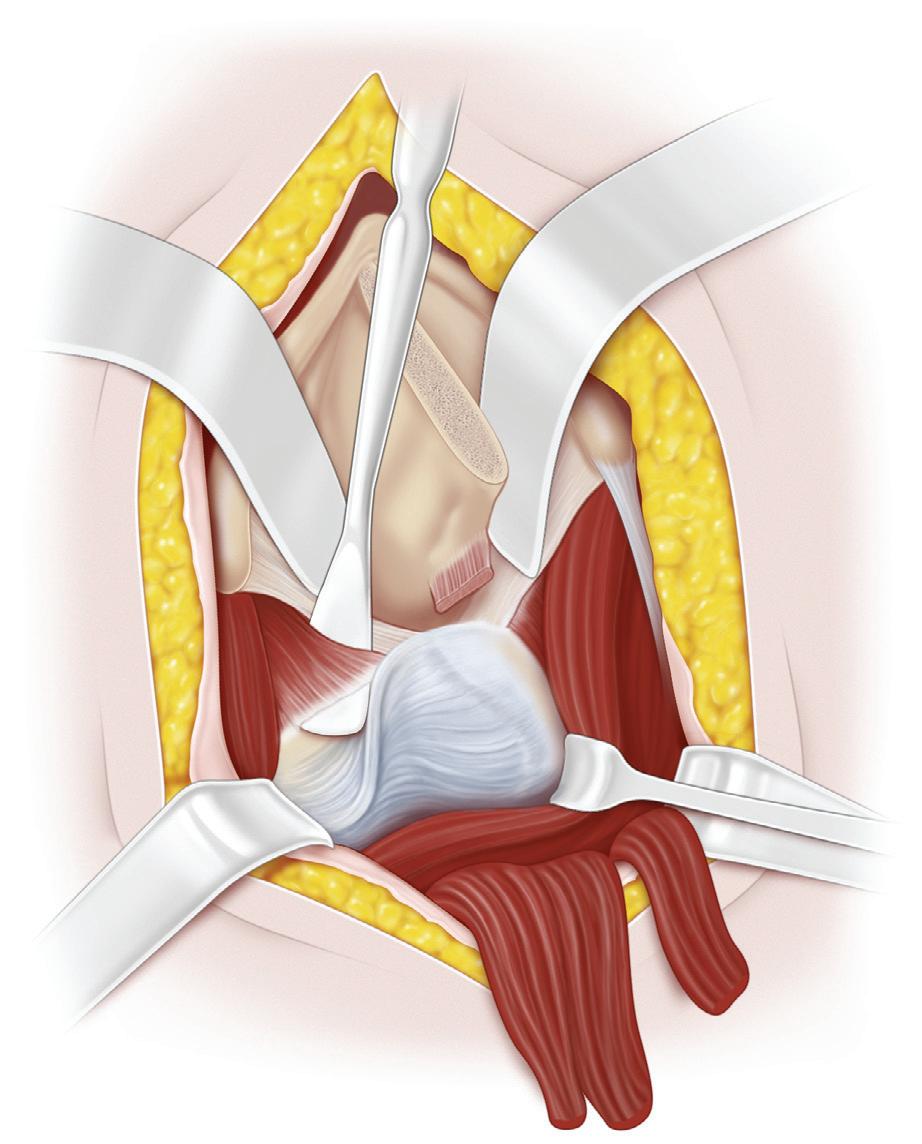
B and C, The hip is approached anterior to the pectineus, between that muscle and the femoral sheath. With this approach, the pectineus muscle is retracted medially and inferiorly and the femoral vessels and nerve are retracted laterally, thereby exposing the iliopsoas tendon as it passes toward the lesser trochanter. The femoral circumflex vessels cross the field and are carefully retracted laterally.
Transverse skin incision
Femoral vessels and ner ve retracted laterally
Line of sectioning of iliopsoas tendon
Pectineus muscle retracted medially
Saphenous vein ligated and sectioned
Lymph nodes
Adductor brevis muscle
Adductor longus muscle detached and retracted
Adductor longus muscle A
Adductor longus muscle detached and retracted
Femoral vessels and nerve retracted laterally
Pectineus muscle retracted laterally
Access route to lesser trochanter anterolateral to pectineus muscle to release iliopsoas tendon
Iliopsoas tendon
Adductor brevis muscle
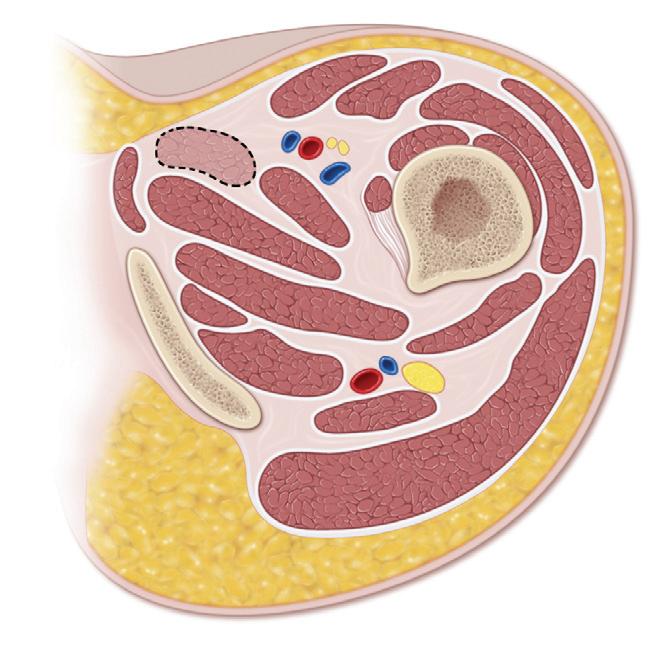
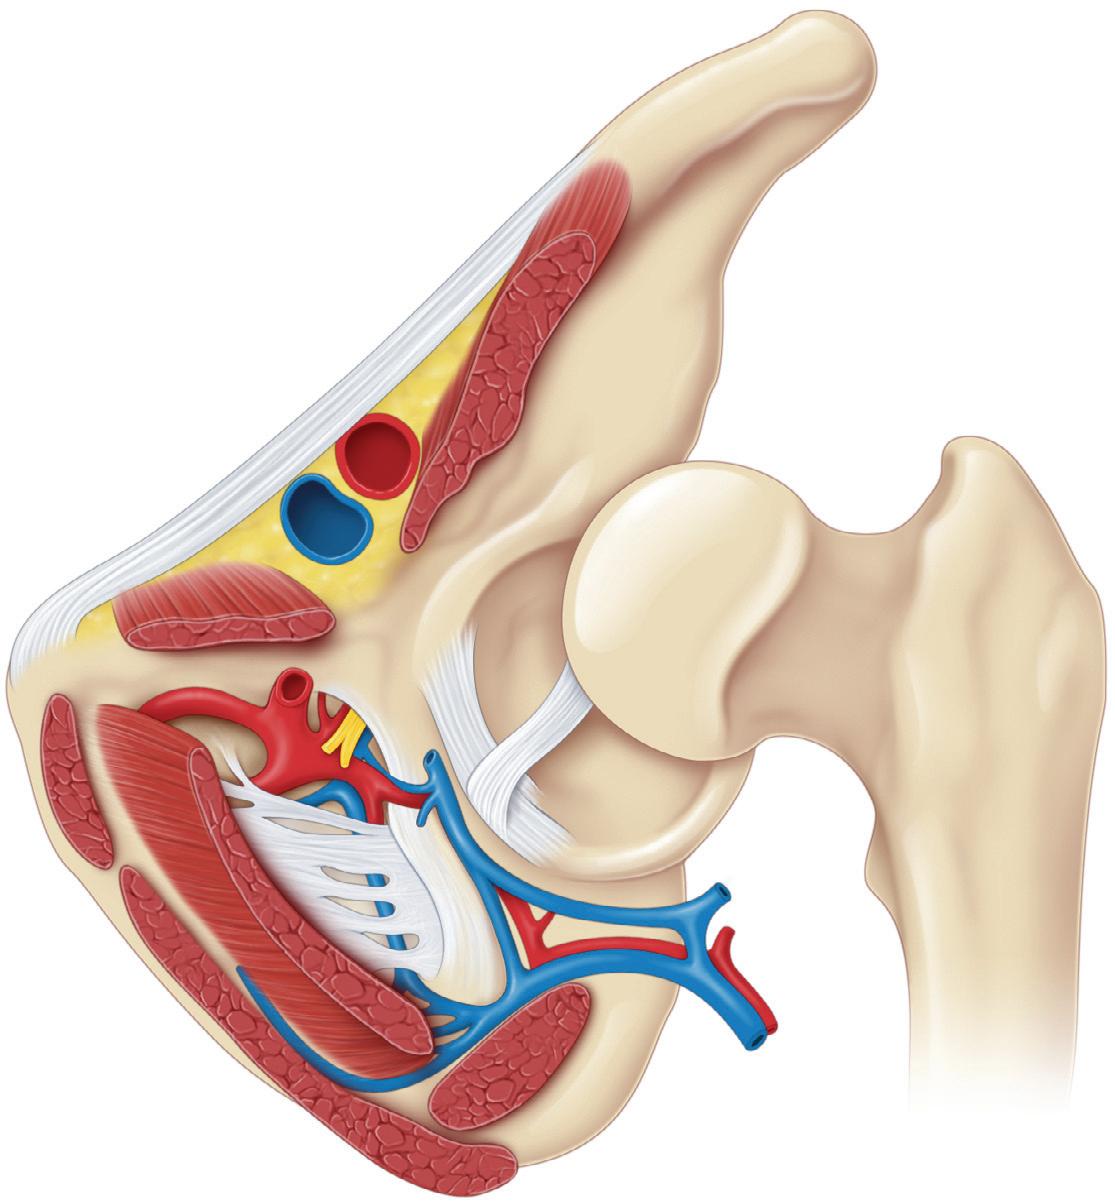
D, Transverse section showing the approach to the hip anterior to the pectineus.
Approach Medial to the Pectineus
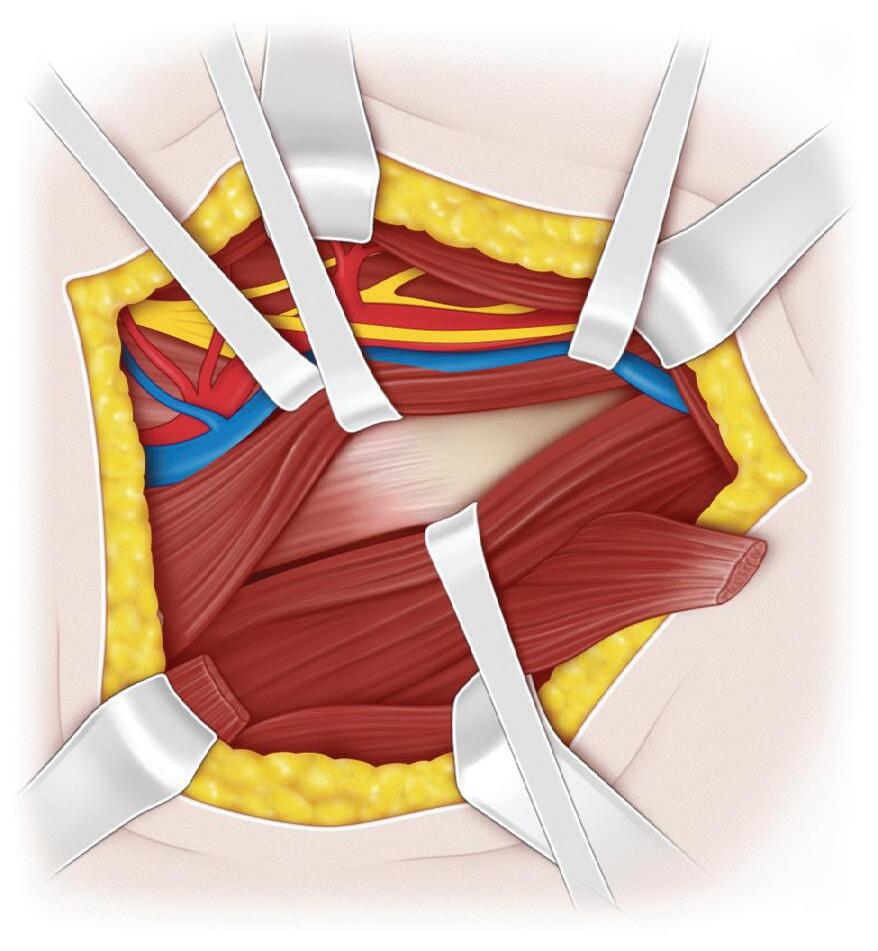
E and F, The hip can also be approached by a route that is posteromedial to the pectineus muscle. The pectineus muscle is retracted laterally to protect the femoral vessels and nerve, and the adductor brevis muscle is retracted
Relation of iliopsoas tendon to capsule
Line of sectioning of iliopsoas tendon
Line of sectioning of iliopsoas muscle
Adductor longus muscle detached and retracted
Adductor brevis muscle
Adductor magnus muscle
Access route to lesser trochanter posteromedial to pectineus muscle to release iliopsoas tendon
Pectineus muscle
Iliopsoas tendon
Lesser trochanter
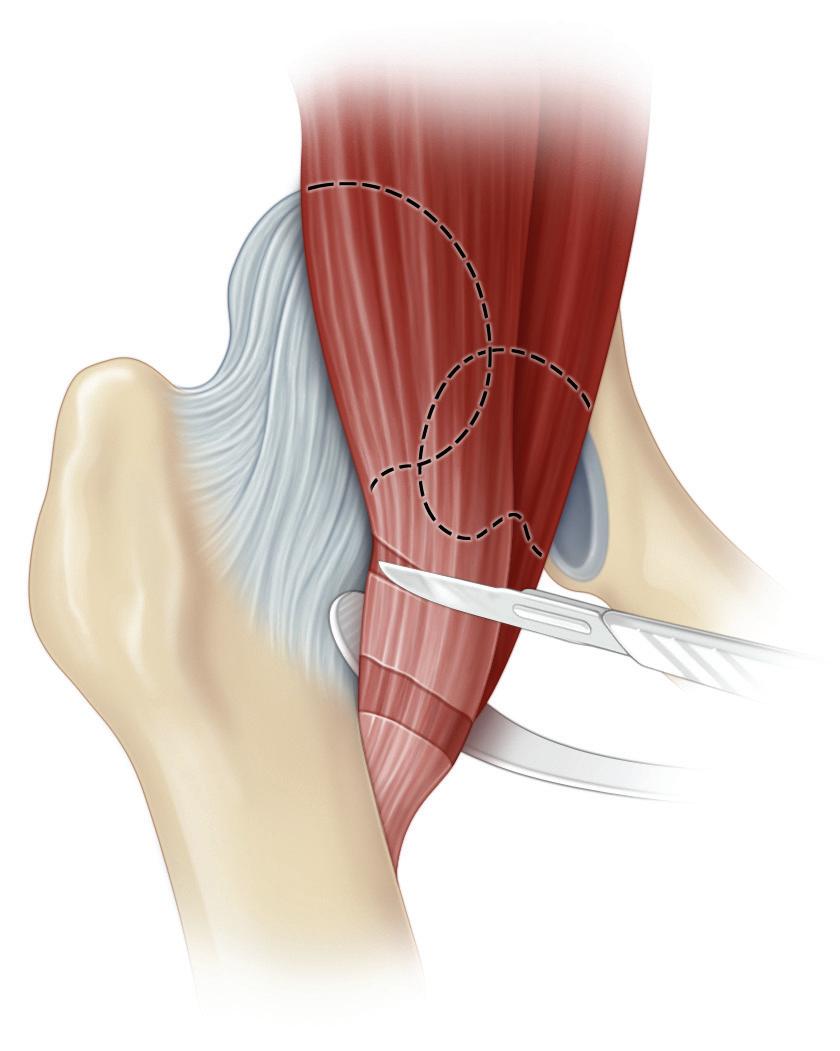
medially, thereby bringing the iliopsoas tendon into view at its insertion to the lesser trochanter. A Kelly clamp is passed under the iliopsoas tendon and opened slightly, and the tendon is sectioned.
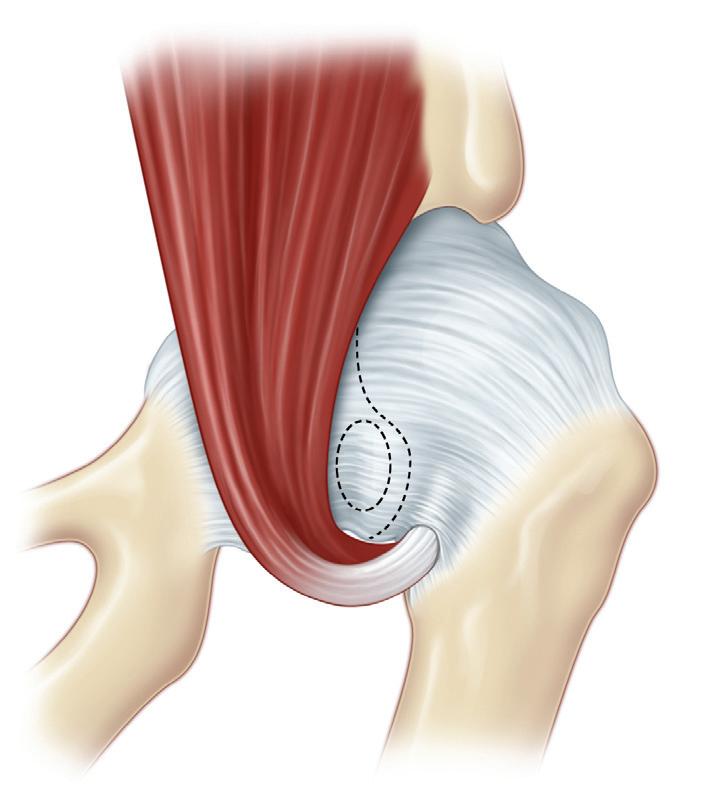
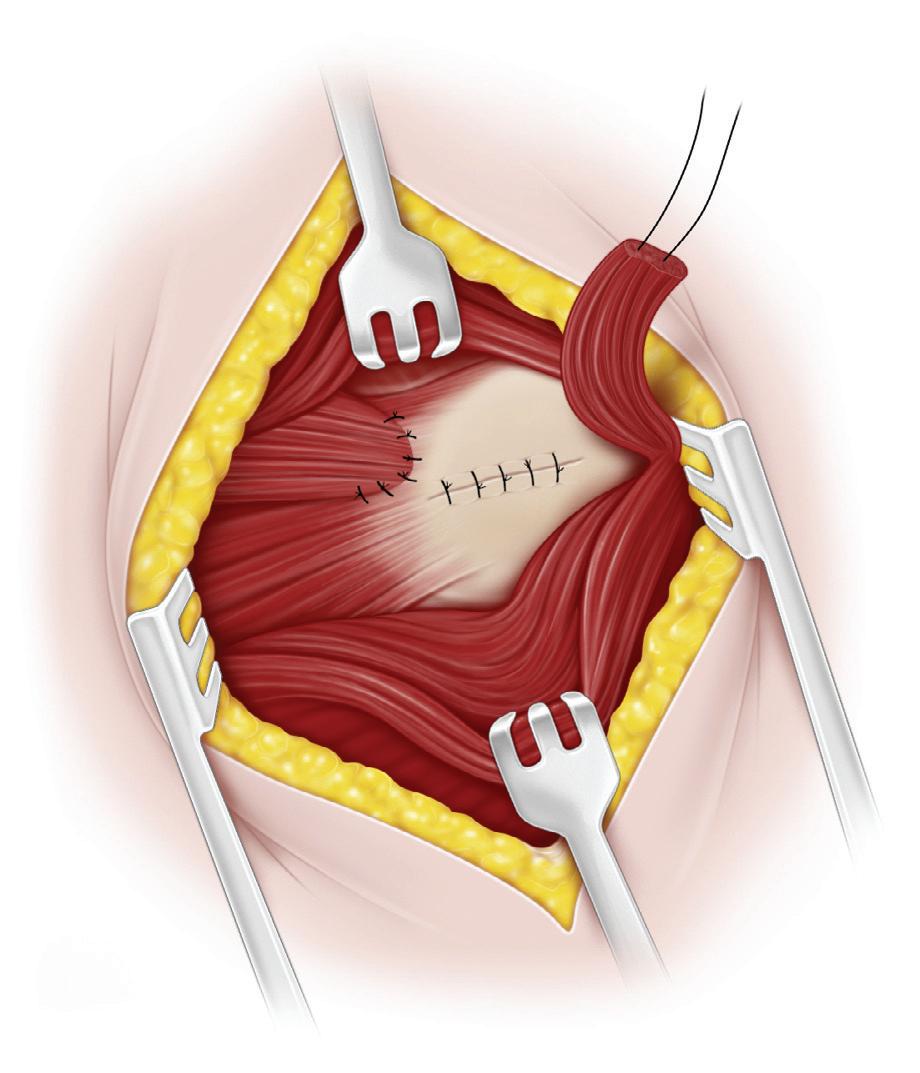
G, With all of the medial approaches, the psoas tendon is sectioned and allowed to retract proximally, and the iliacus muscle fibers are gently elevated from the anterior aspect of the hip joint capsule.
Continued on following page
Adductor brevis muscle
Pectineus muscle
Lesser trochanter
Procedure 2 Medial Approach for Open Reduction of the Developmentally Dislocated Hip, cont’d
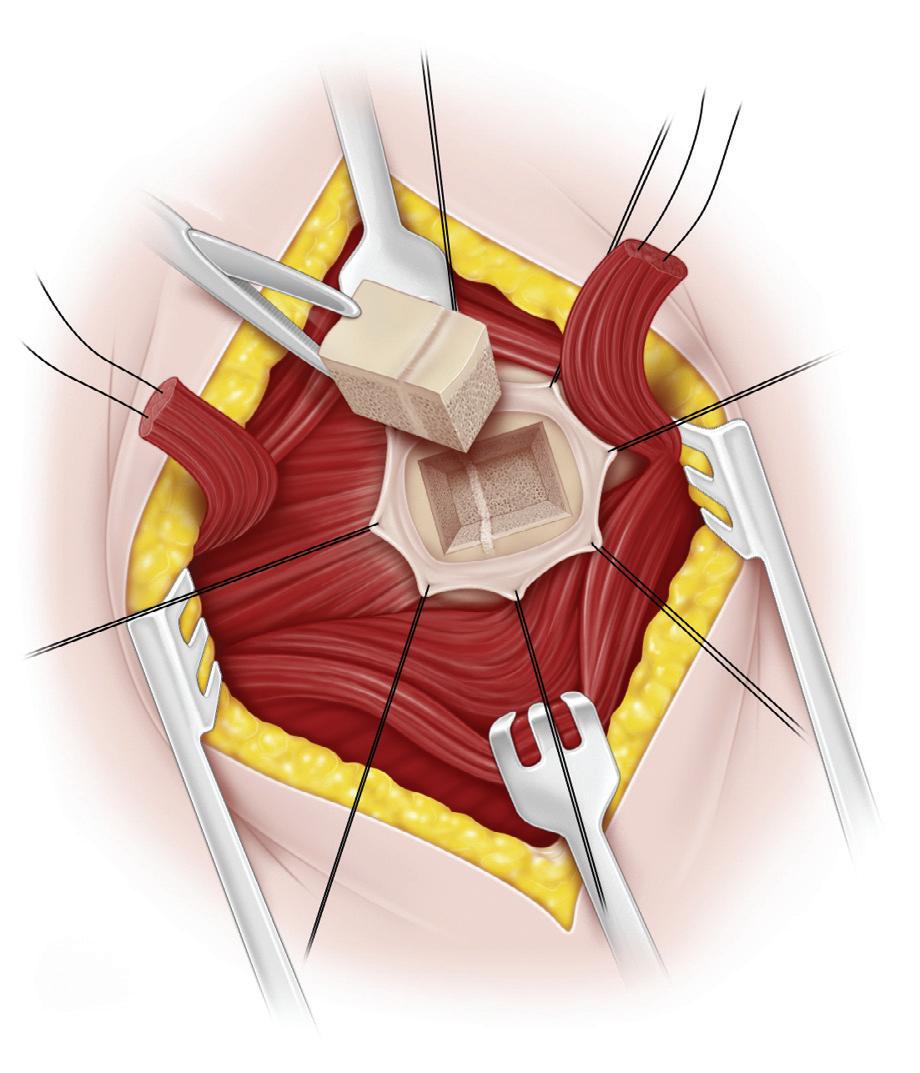
Capsule adhering to floor of acetabulum
Transverse cut (optional) to create cruciate incision
Capsule adhering to floor of acetabulum
Capsule incised along axis of femoral neck
Ligamentum teres excised if large and hypertrophied
Iliospoas muscle elevated and reflected proximally
magnus muscle
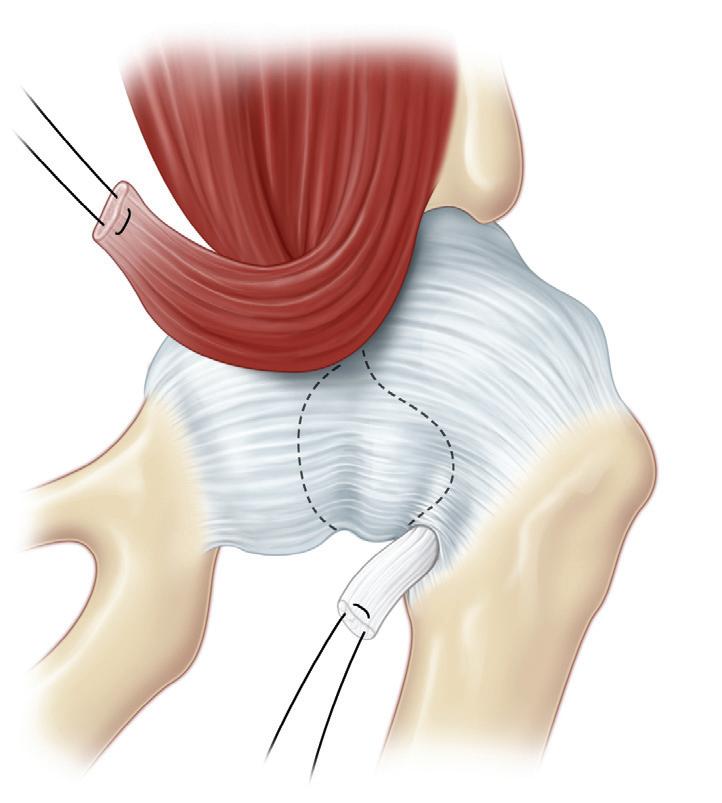
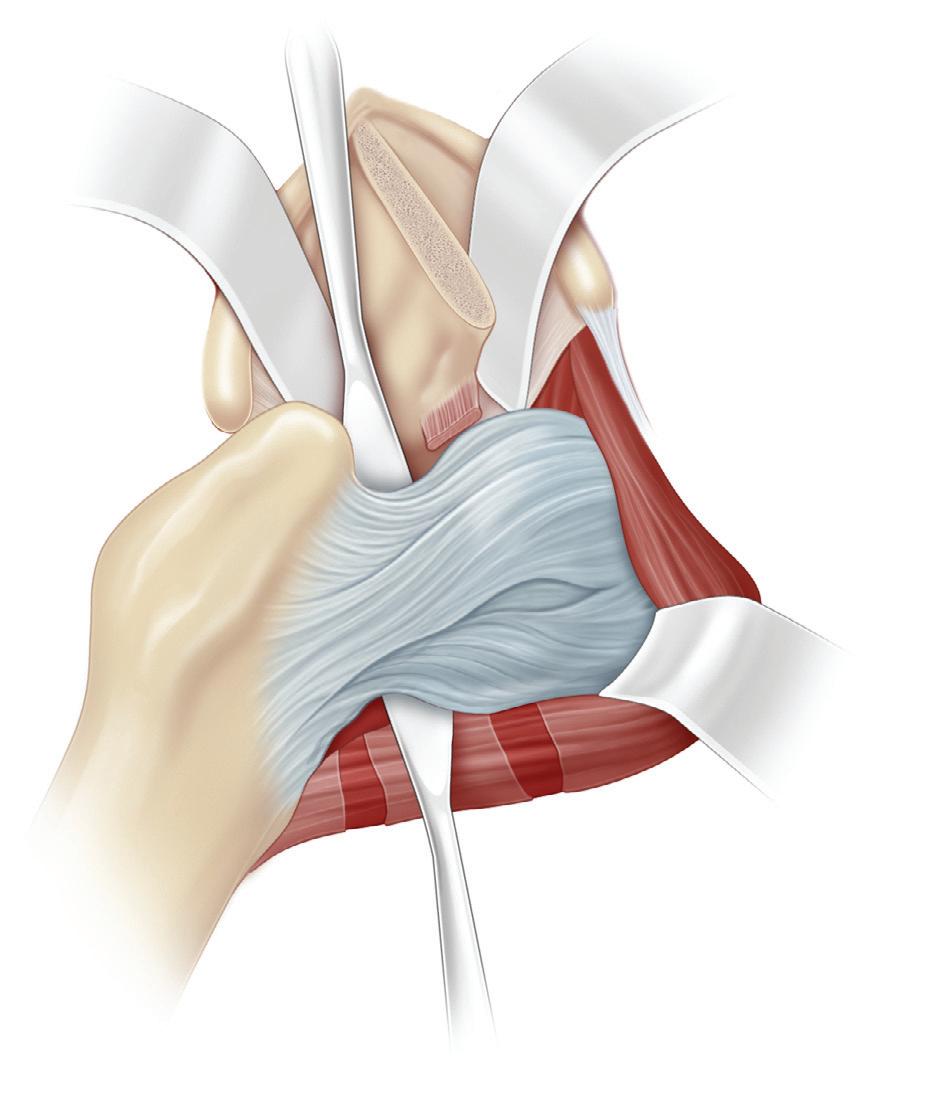
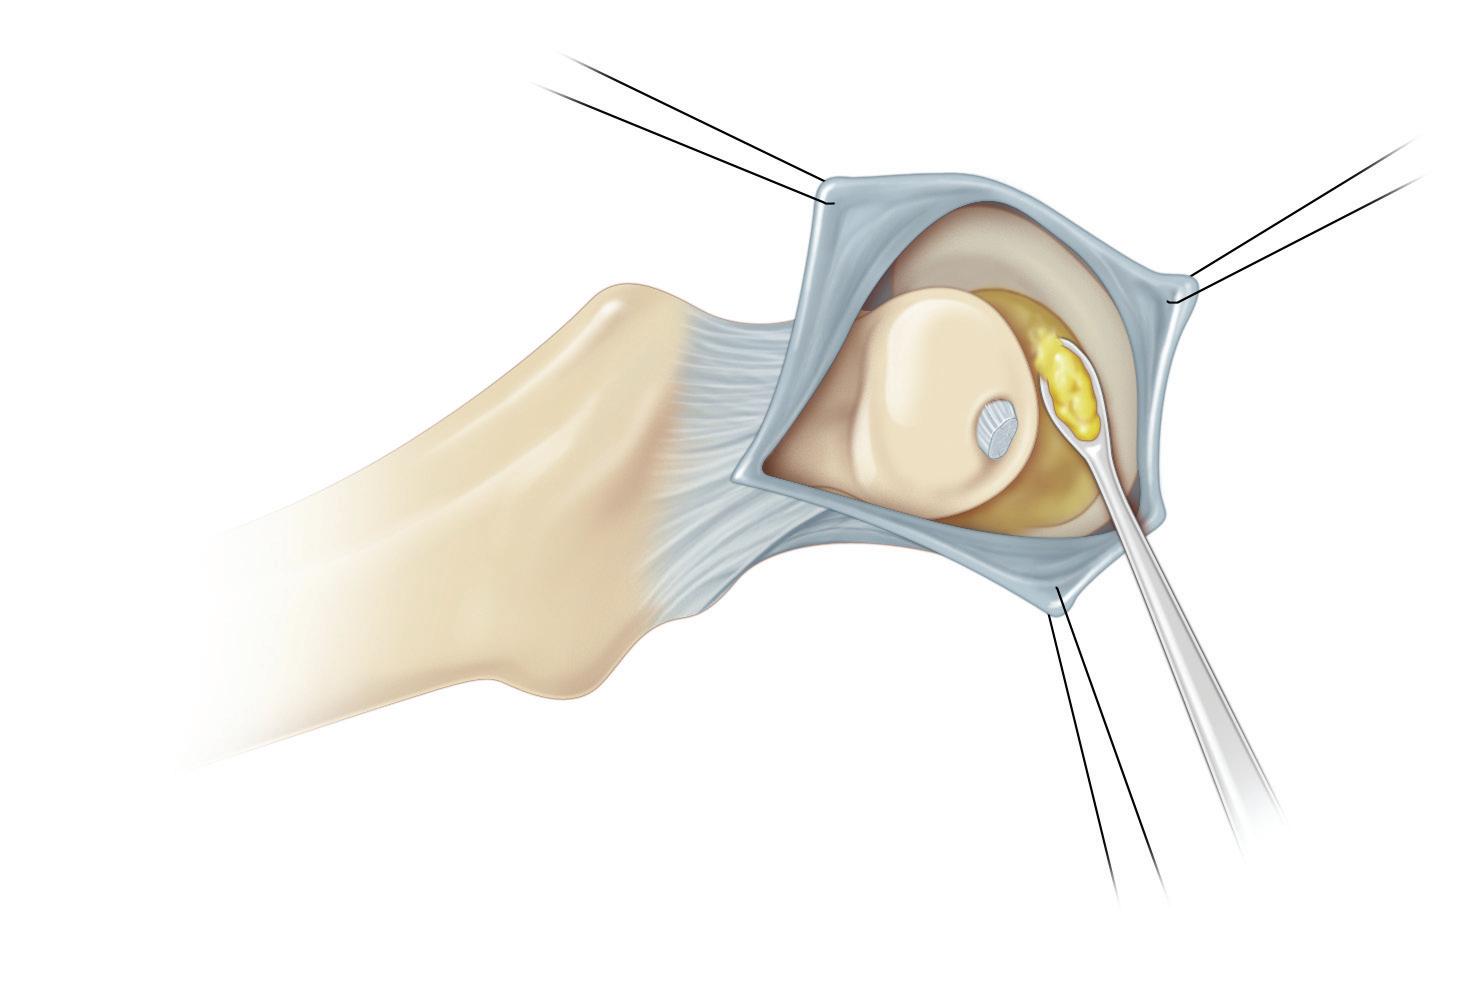
H and I, The inferior part of the capsule and the transverse ligament are pulled upward with the femoral head. The capsule may adhere to the floor of the acetabulum, and the ligamentum teres is enlarged and usually needs to be removed to better visualize and reduce the femoral head.
Femoral vessels and nerve retracted laterally
Adductor longus muscle detached and retracted
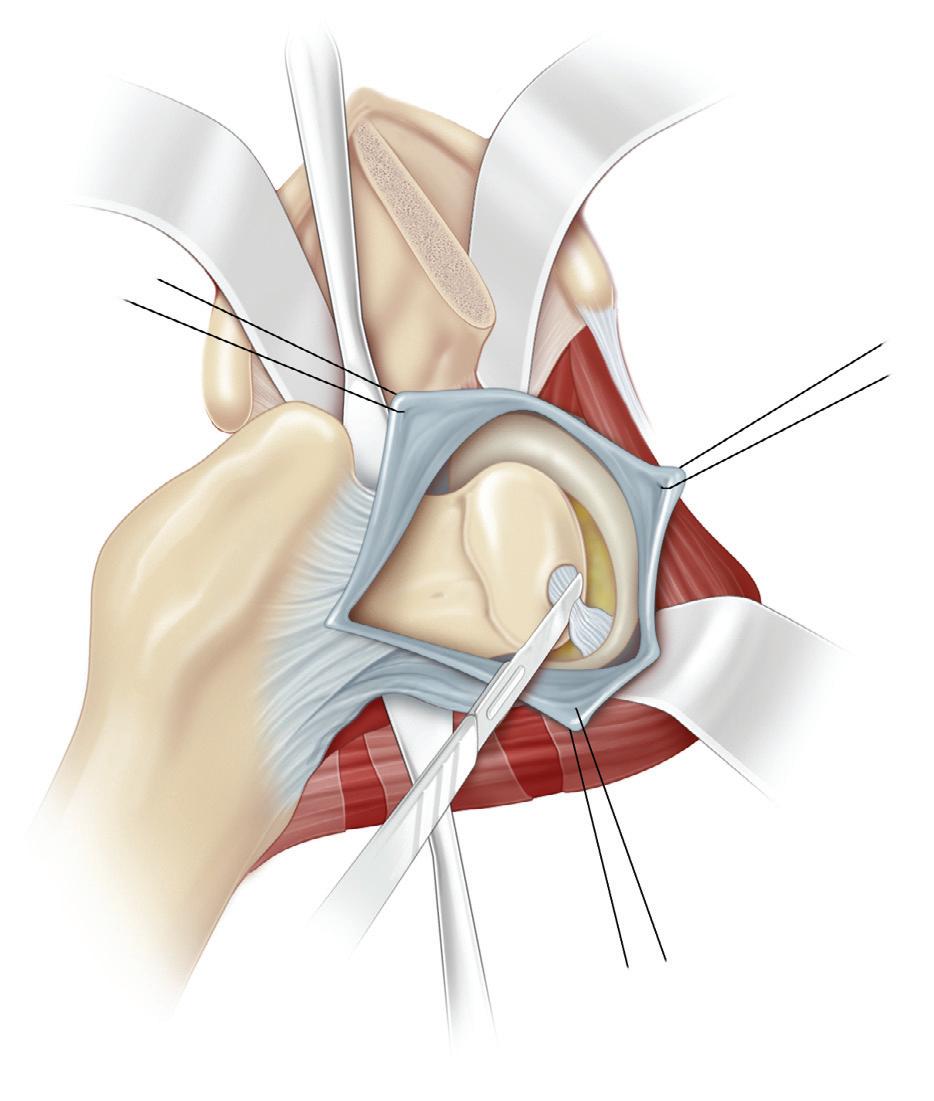
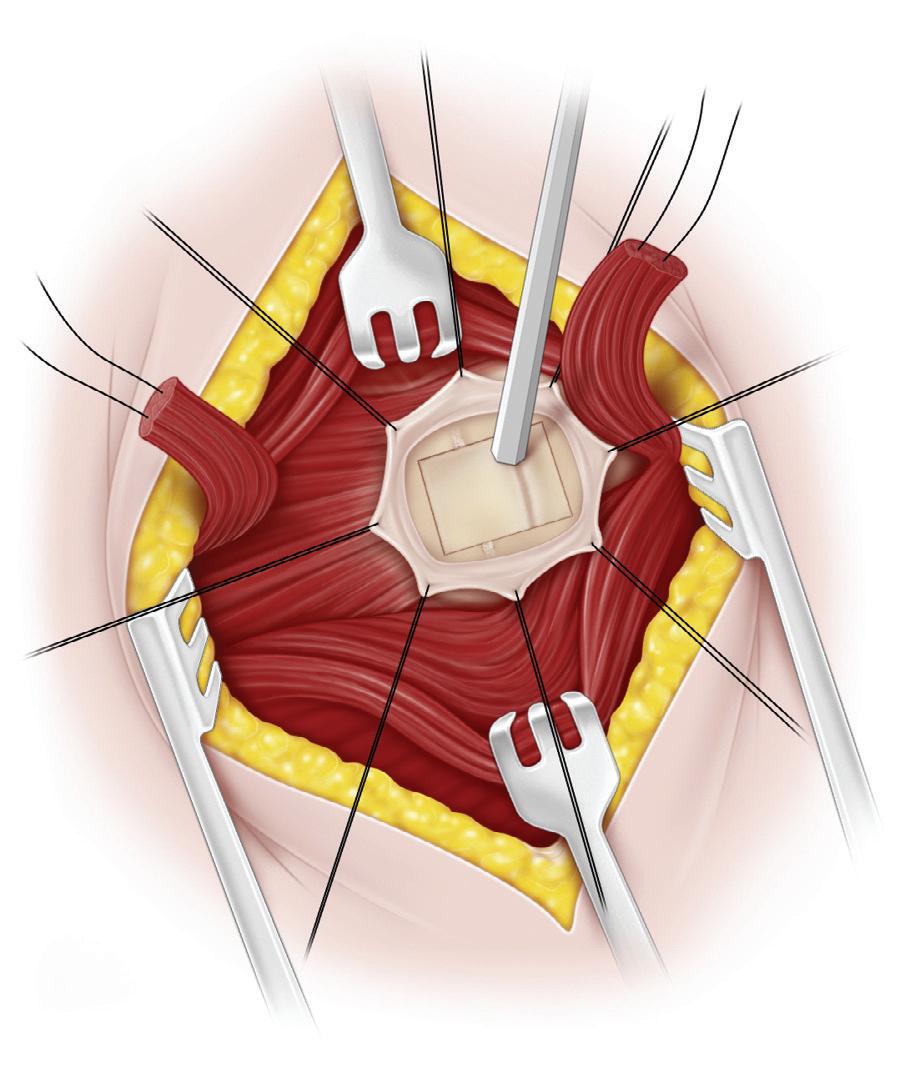
J, The capsule is opened with an incision that is parallel to the acetabular margin. It is best to make a small stab in the capsule, insert a small hemostat, and then complete the incision using the hemostat to protect the femoral head. In the drawing, a cruciate cut is shown; however, a single incision parallel to the acetabular margin is usually sufficient.
Adductor
Transverse acetabular ligament sectioned
Ligamentum teres excised if large and obstructive
K, The transverse acetabular ligament is sectioned, and the ligamentum teres is excised. The hypertrophied pulvinar is also removed.
After this step, the femoral head should be easily reduced underneath the limbus. If the head does not reduce easily, the medial capsule and the transverse acetabular ligament should be released more thoroughly. Reduction can be maintained by holding the hip in 30 degrees of abduction, 90 to 100 degrees of flexion, and neutral rotation. It is not necessary to repair the capsule. The wound is closed in the usual fashion.
L, A one-and-one-half-hip spica cast is applied with the hip in 100 degrees of flexion, 30 degrees of abduction, and neutral rotation. During the application and setting of the cast, medially directed pressure is applied over the greater trochanter with the palm. The surgeon should be certain that the hip is not placed in maximal abduction to avoid excess pressure on the femoral head.
Postoperative Care
The cast is changed at 6-week intervals, with a total duration of cast immobilization of approximately 3 months.
Skin incision
Operative Technique
Anterior inferior iliac spine
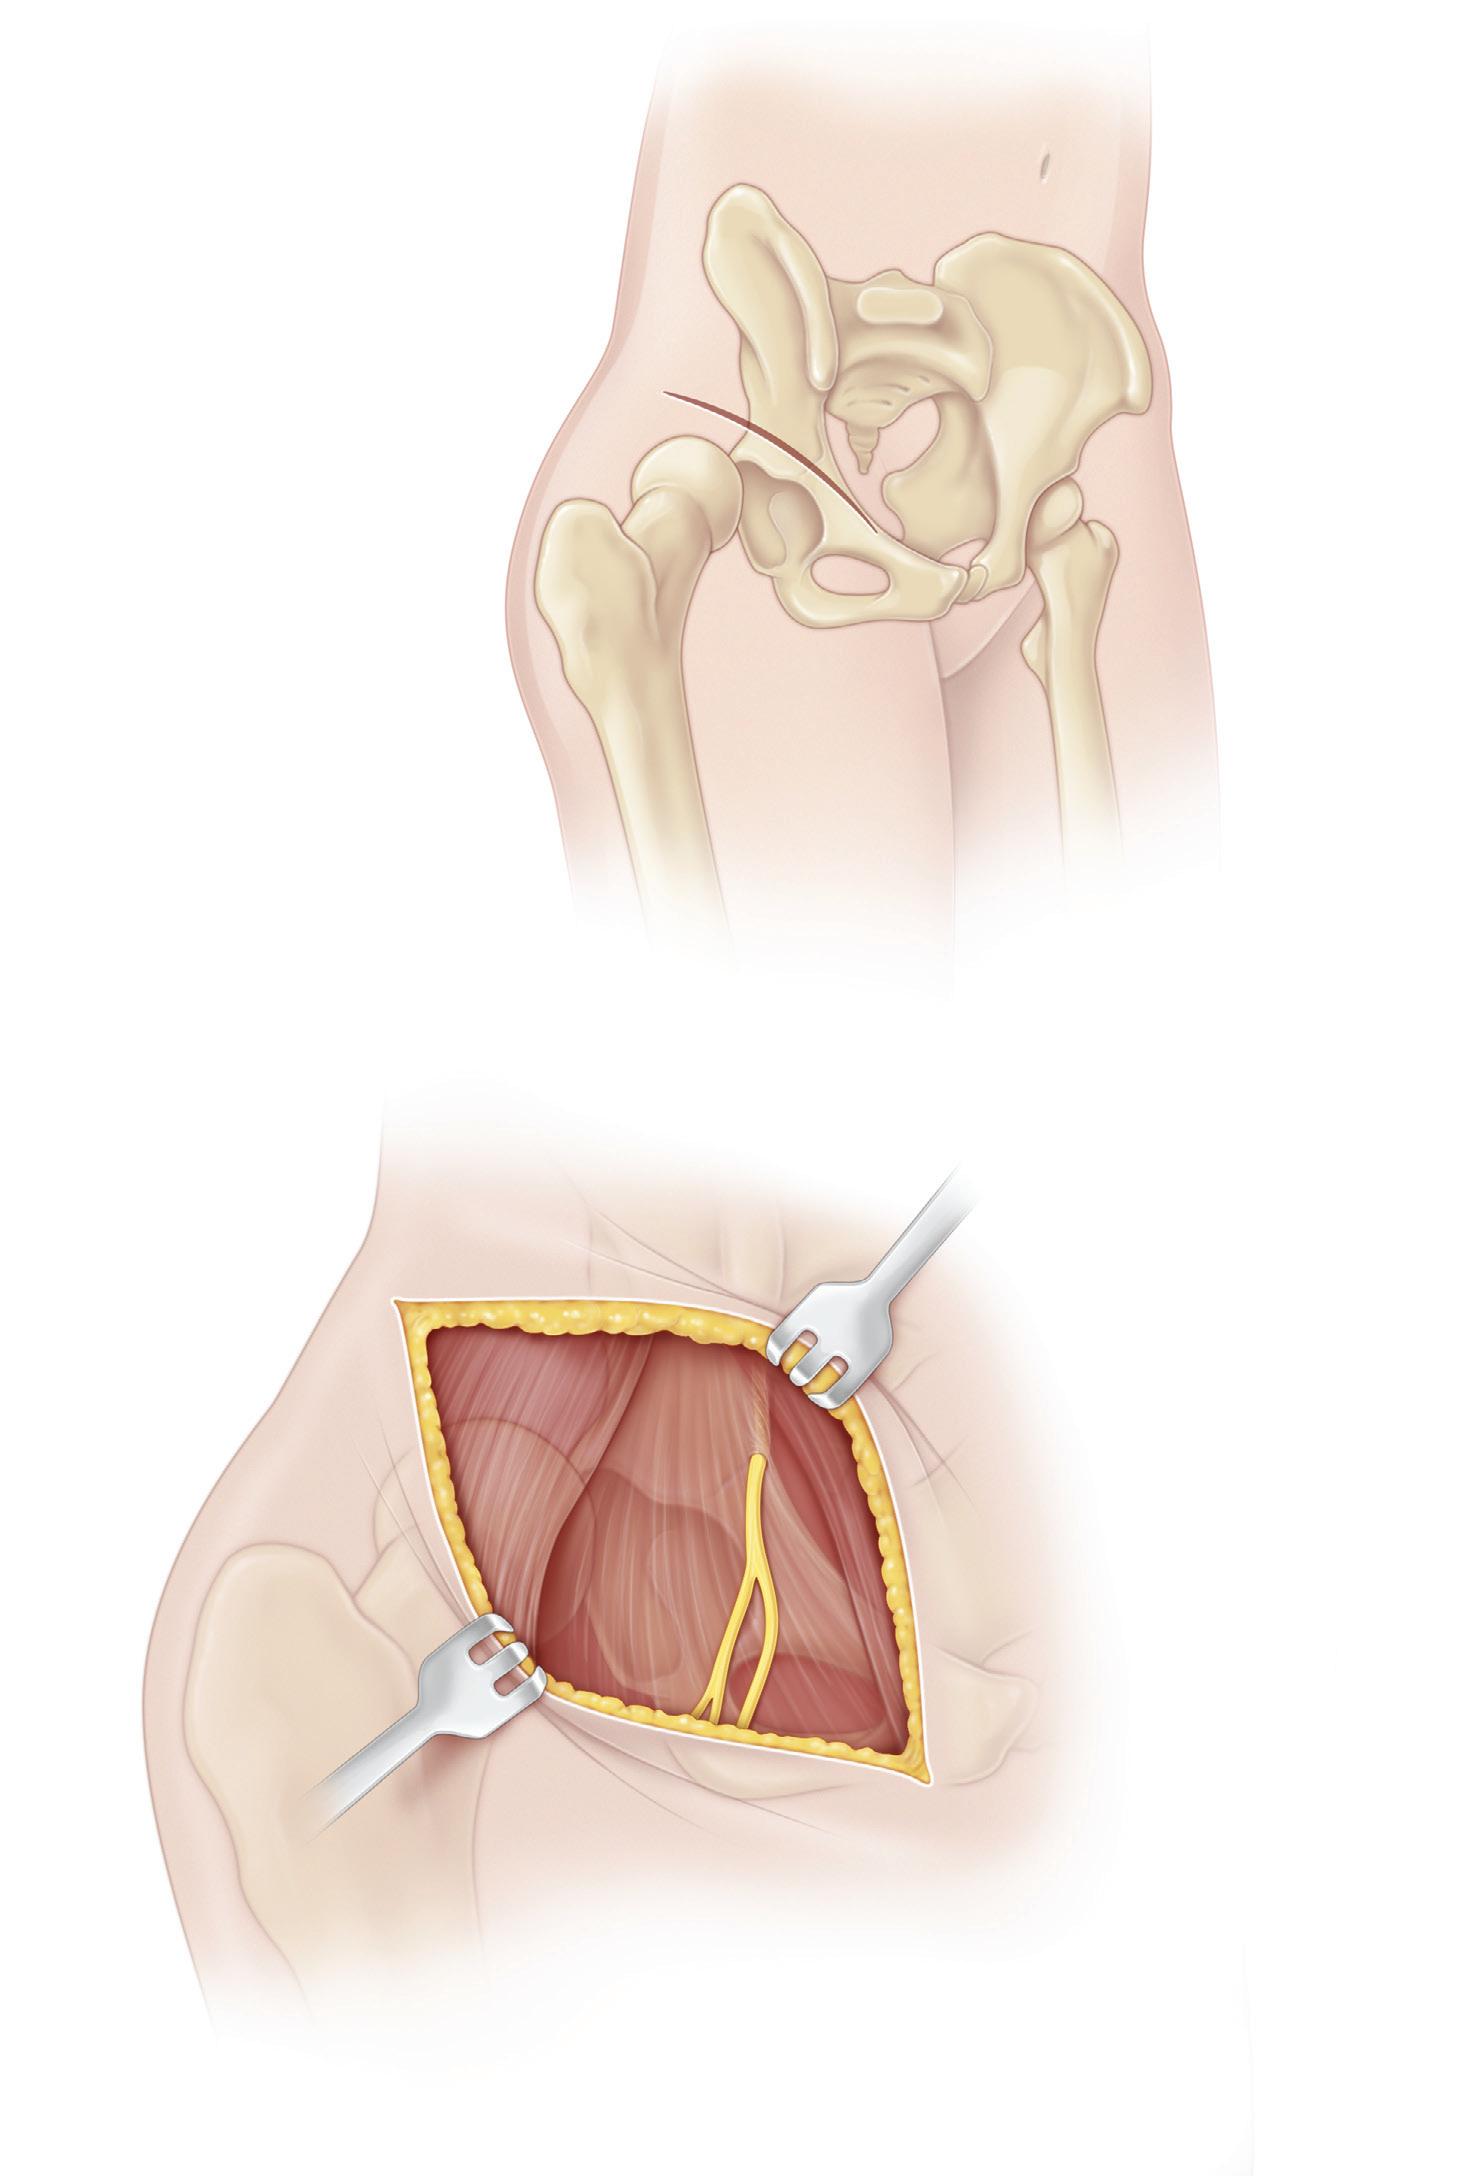
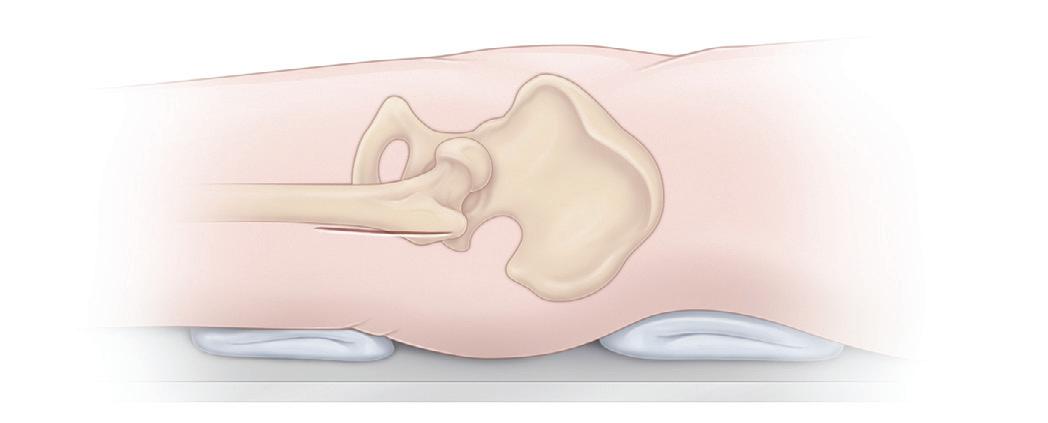
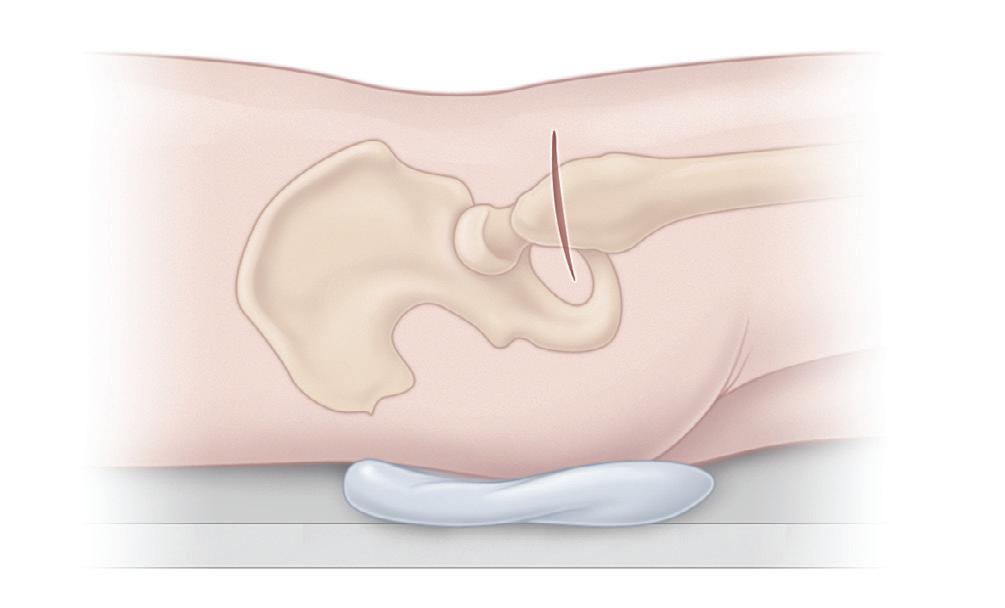
A, The patient is placed supine with a roll under the hip. The entire lower limb and the affected half of the pelvis are prepared and draped to allow for the free motion of the hip.
The skin incision is an oblique “bikini” incision. The incision formerly used over the iliac crest produces an unsightly
Anterior superior iliac spine
Lateral femoral cutaneous nerve
CAUTION: Avoid injury to nerve
scar, whereas the bikini incision affords excellent exposure and cosmesis. The anterior inferior iliac spine is palpated and marked. The incision begins approximately two thirds of the distance from the greater trochanter to the iliac crest, crosses the inferior spine, and extends 1 or 2 cm beyond the inferior spine.
B, The incision is then retracted over the iliac crest, and the dissection is carried down to the apophysis of the crest.
Gluteus medius muscle
Deep incision in cartilaginous iliac apophysis
C, Anteriorly, the tensor–sartorius interval is bluntly dissected beginning distally and working proximally. The lateral femoral cutaneous nerve appears just medial to this interval and just distal to the inferior iliac spine, and it should be protected. The interval is widened with blunt dissection, and the rectus femoris is identified as it inserts on the anterior inferior iliac spine.
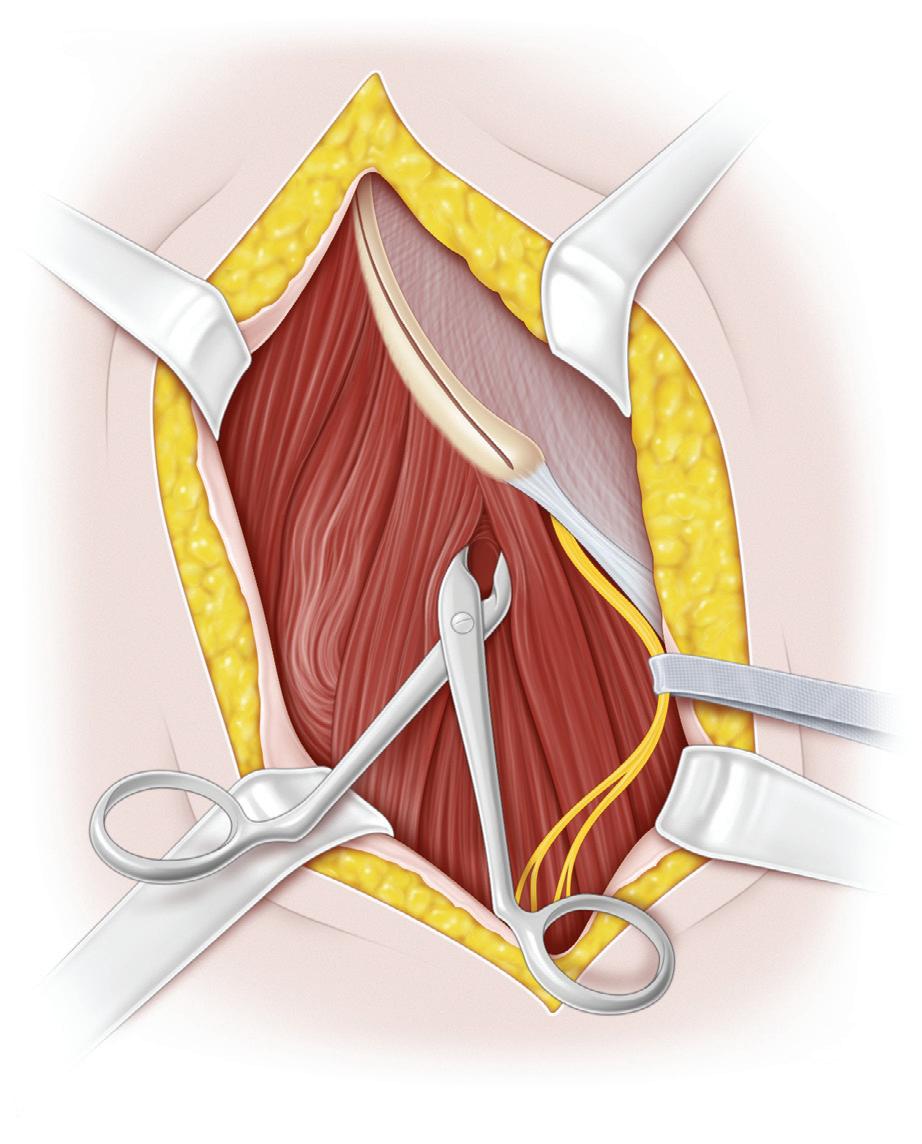
D, The iliac apophysis is now split with a scalpel or cautery down to the bone of the crest. With the help of periosteal elevators, the iliac crest is exposed subperiosteally. The surgeon must be careful to keep the periosteum intact because it protects the iliac muscles and prevents bleeding. Bleeding points on the iliac wings should be controlled with bone wax, even if the bleeding points appear to be small. A dry wound makes subsequent steps in the procedure easier. Further subperiosteal dissection clears the sartorius medially and the tensor laterally, thus exposing the rectus femoris as it arises from the anterior inferior spine.
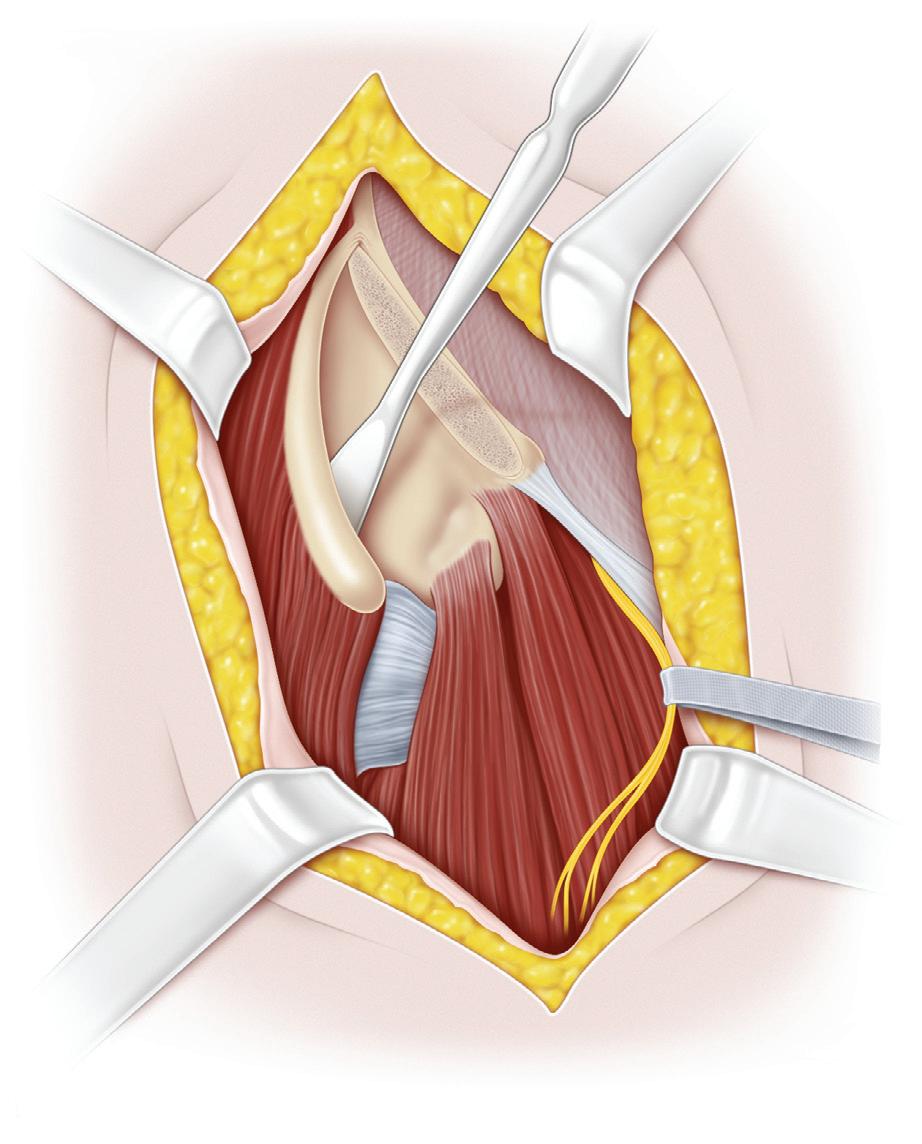
E, The rectus femoris is elevated from the hip capsule, and the straight and reflected heads are identified, tagged, and sectioned. The hip capsule is exposed laterally, first with the aid of a periosteal elevator to clear muscle attachments from the capsule. Next, the medial portion of the capsule is exposed, again by using a periosteal elevator to dissect between the capsule and the iliopsoas tendon. Flexing the hip relaxes the iliopsoas and helps with the gaining of medial exposure. The capsule beneath the iliopsoas is exposed, and strong medial retraction with Army-Navy retractors is necessary to access the true acetabulum.
Gluteus medius and minimus muscles elevated subperiosteally from ilium to level of sciatic notch
Iliac apophysis split
Iliac apophysis split
Continued on following page
Periosteal elevator
Capsule of hip
Sartorius muscle detached and reflected
Rectus femoris muscle detached and reflected
Gluteus medius and minimus muscle attachments freed from capsule with periosteal elevator
Ilium
Periosteal elevator Ilium
Anterior inferior iliac spine
Sartorius muscle
Sartorius muscle
Rectus femoris muscle
Rectus femoris muscle
Hemostat developing groove between muscles
Tensor fasciae latae muscle
Tensor fasciae latae muscle
Capsule of hip
D
F, If the iliopsoas tendon cannot be retracted, it may need to be sectioned.
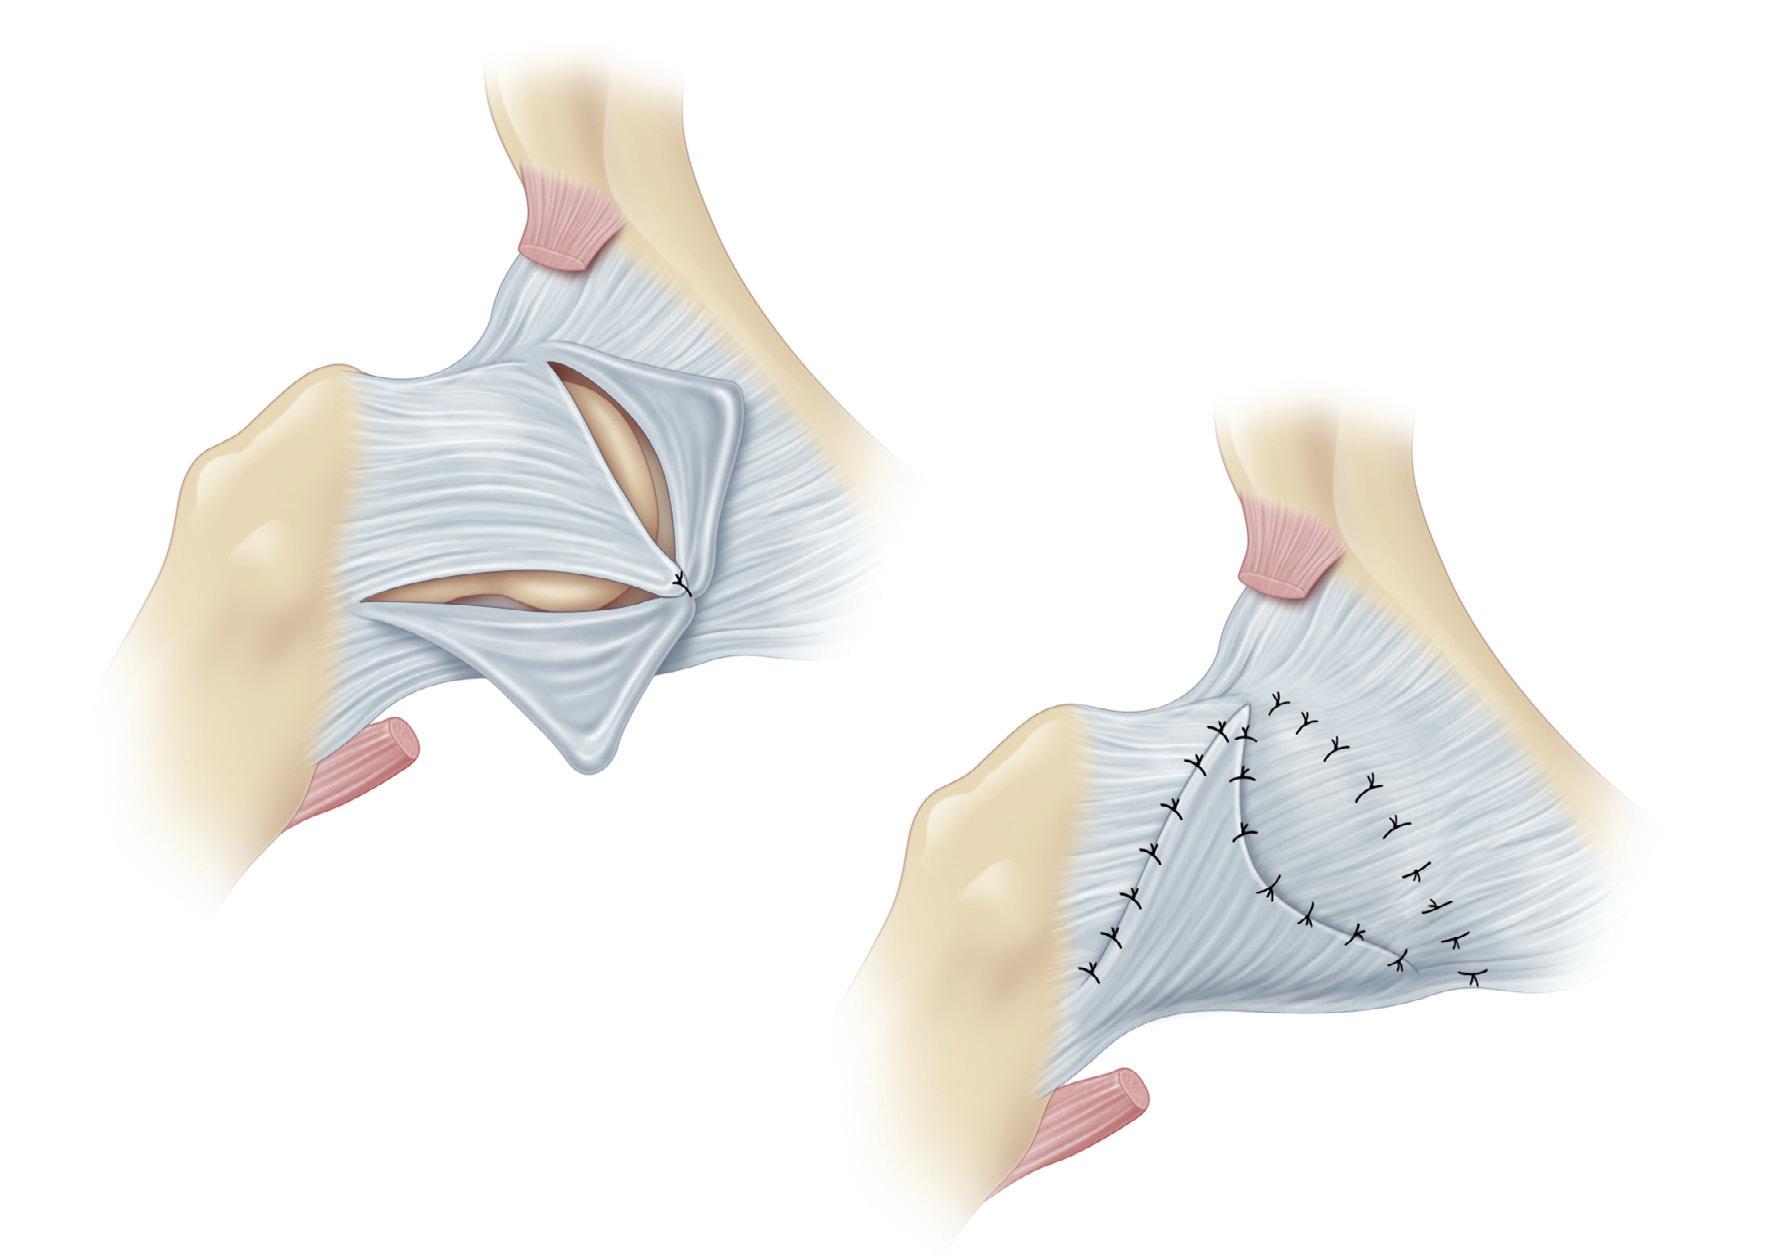
G, When medial exposure is adequate, the capsule is opened with a knife. A hemostat is inserted into the capsule, and the capsule is opened over the instrument and parallel to the acetabular margin, leaving a 5-mm margin of capsule. This incision should extend medially all the way to the transverse acetabular ligament and laterally to above the greater trochanter. A second capsular incision is made down the femoral neck to form a T
H, The capsule edges are grasped with Kocher clamps, and a blunt probe is inserted to visualize the acetabulum. The hip should be flexed and externally rotated to open up the acetabulum. The ligamentum teres is elevated with a rightangle clamp and followed to the depths of the acetabulum. This step is essential; many a surgeon has mistaken a false acetabulum for the true acetabulum.
T-shaped incision of capsule along axis of femoral neck and limbus of acetabulum
Capsule opened
Limbus
Excision of ligamentum teres
Iliopsoas muscle
Iliopsoas muscle elevated off anterior capsule
Transverse incisions to lengthen iliopsoas muscle
I, The ligamentum teres is cut free from its base in the acetabulum with scissors. The labrum of the acetabulum may initially appear to be folded into the acetabulum, especially when the head is reduced. This usually indicates that the medial obstacles to reduction (i.e., the capsule, the iliopsoas, and the transverse ligament) have been inadequately released. After more thorough release medially, the head should be reducible beneath the labrum, which will elevate the labrum out of the acetabulum. The excision of the labrum is almost never necessary.
Next, the surgeon inspects and determines (1) the depth of the acetabulum and the inclination of its roof; (2) the shape of the femoral head and the smoothness and condition of the articular hyaline cartilage covering it; (3) the degree of antetorsion of the femoral neck; and (4) the stability of
the hip after reduction. The femoral head is placed in the acetabulum under direct vision by flexing, abducting, and medially rotating the hip while applying traction and gentle pressure against the greater trochanter. This maneuver is reversed to redislocate the hip. The position of the hip when the femoral head comes out of the acetabulum is determined and noted in the operative report. If necessary, sterile 4-0 or 5-0 suture wire is rolled into a circle and placed against the cartilaginous femoral head to delineate it, the hip is reduced, and radiographs are obtained; the wire is then removed. If the hip joint is unstable or if, after reduction under direct vision, the femoral head is insufficiently covered superiorly and anteriorly, the surgeon should decide whether to perform a Salter innominate osteotomy or a derotation osteotomy of the proximal femur at this time.
Continued on following page
Removal of fibrofatty tissue with curet
J and K, A careful capsuloplasty is performed next. It is very important to keep the femoral head in its anatomic position in the acetabulum. With the femoral head reduced, the hip joint is held by a second assistant in 30 degrees of abduction, 30 to 45 degrees of flexion, and 20 to 30 degrees of medial rotation throughout the remainder of the operation. The degree of medial rotation depends on the severity of antetorsion.
The large, redundant, superior pocket of the capsule should be obliterated via the plication and overlapping of its free edges. The capsule should also be tightened medially and anteriorly with a vest-over-pants closure. If this closure is too lax and redundant, a portion may be excised. With the hip dislocated, nonabsorbable sutures are passed through the medial portion of the capsule, which is still attached above the acetabulum. The needles are left on the sutures and held with clamps. The hip is reduced, and the superolateral segment of the capsule is brought medially and distally with a Kocher clamp; this holds the hip internally rotated and deeply seated in the acetabulum. The sutures are passed through the capsule in this position and tied. Any redundant capsule is imbricated over this closure with nonabsorbable sutures. The two halves of the iliac apophysis are sutured together over the iliac crest. The rectus femoris and sartorius muscles are resutured to
their origins. The wound is then closed in routine manner. An anteroposterior radiograph of the hips is obtained to ensure a concentric reduction before a one-and-one-halfhip spica cast is applied. The roll beneath the patient’s hip should be removed when the radiograph is made to obtain a true anteroposterior view of the pelvis. The cast is applied with the hip in approximately 45 degrees of abduction, 60 to 70 degrees of flexion, and 20 to 30 degrees of medial rotation. The knee is always flexed at 45 to 60 degrees to relax the hamstrings and to control rotation in the cast.
Postoperative Care
The patient is immobilized in a one-and-one-half-hip spica cast for 6 weeks. After 6 weeks, the patient is examined under anesthesia, and a Petrie type of cast is applied. This consists of long-leg plasters that are connected by one or two bars, with the hips abducted 45 degrees and internally rotated 15 degrees. The cast allows for the flexion and extension of the hips while the reduction is maintained by the abduction and internal rotation. The cast is removed in the clinic after 4 weeks. Weight bearing is allowed while the child is in the cast. If stability is uncertain, a second spica cast may be appropriate.
Repair of capsule
4 Femoral Shortening and Derotation Osteotomy Combined With Open Reduction of the Hip
A femoral shortening and derotation osteotomy procedure is performed through a separate lateral longitudinal incision, although other surgeons may use different approaches. The exposure of the upper femoral shaft through a separate longitudinal incision of the upper thigh is technically simpler; there is less bleeding, and the scars are aesthetically more attractive. It is vital to expose a sufficient length of the upper femoral shaft subperiosteally.
With an irreducible dislocation, femoral shortening facilitates reduction; when reduction is difficult because of increasing pressure on the femoral head, it also decompresses the hip.
Operative Technique
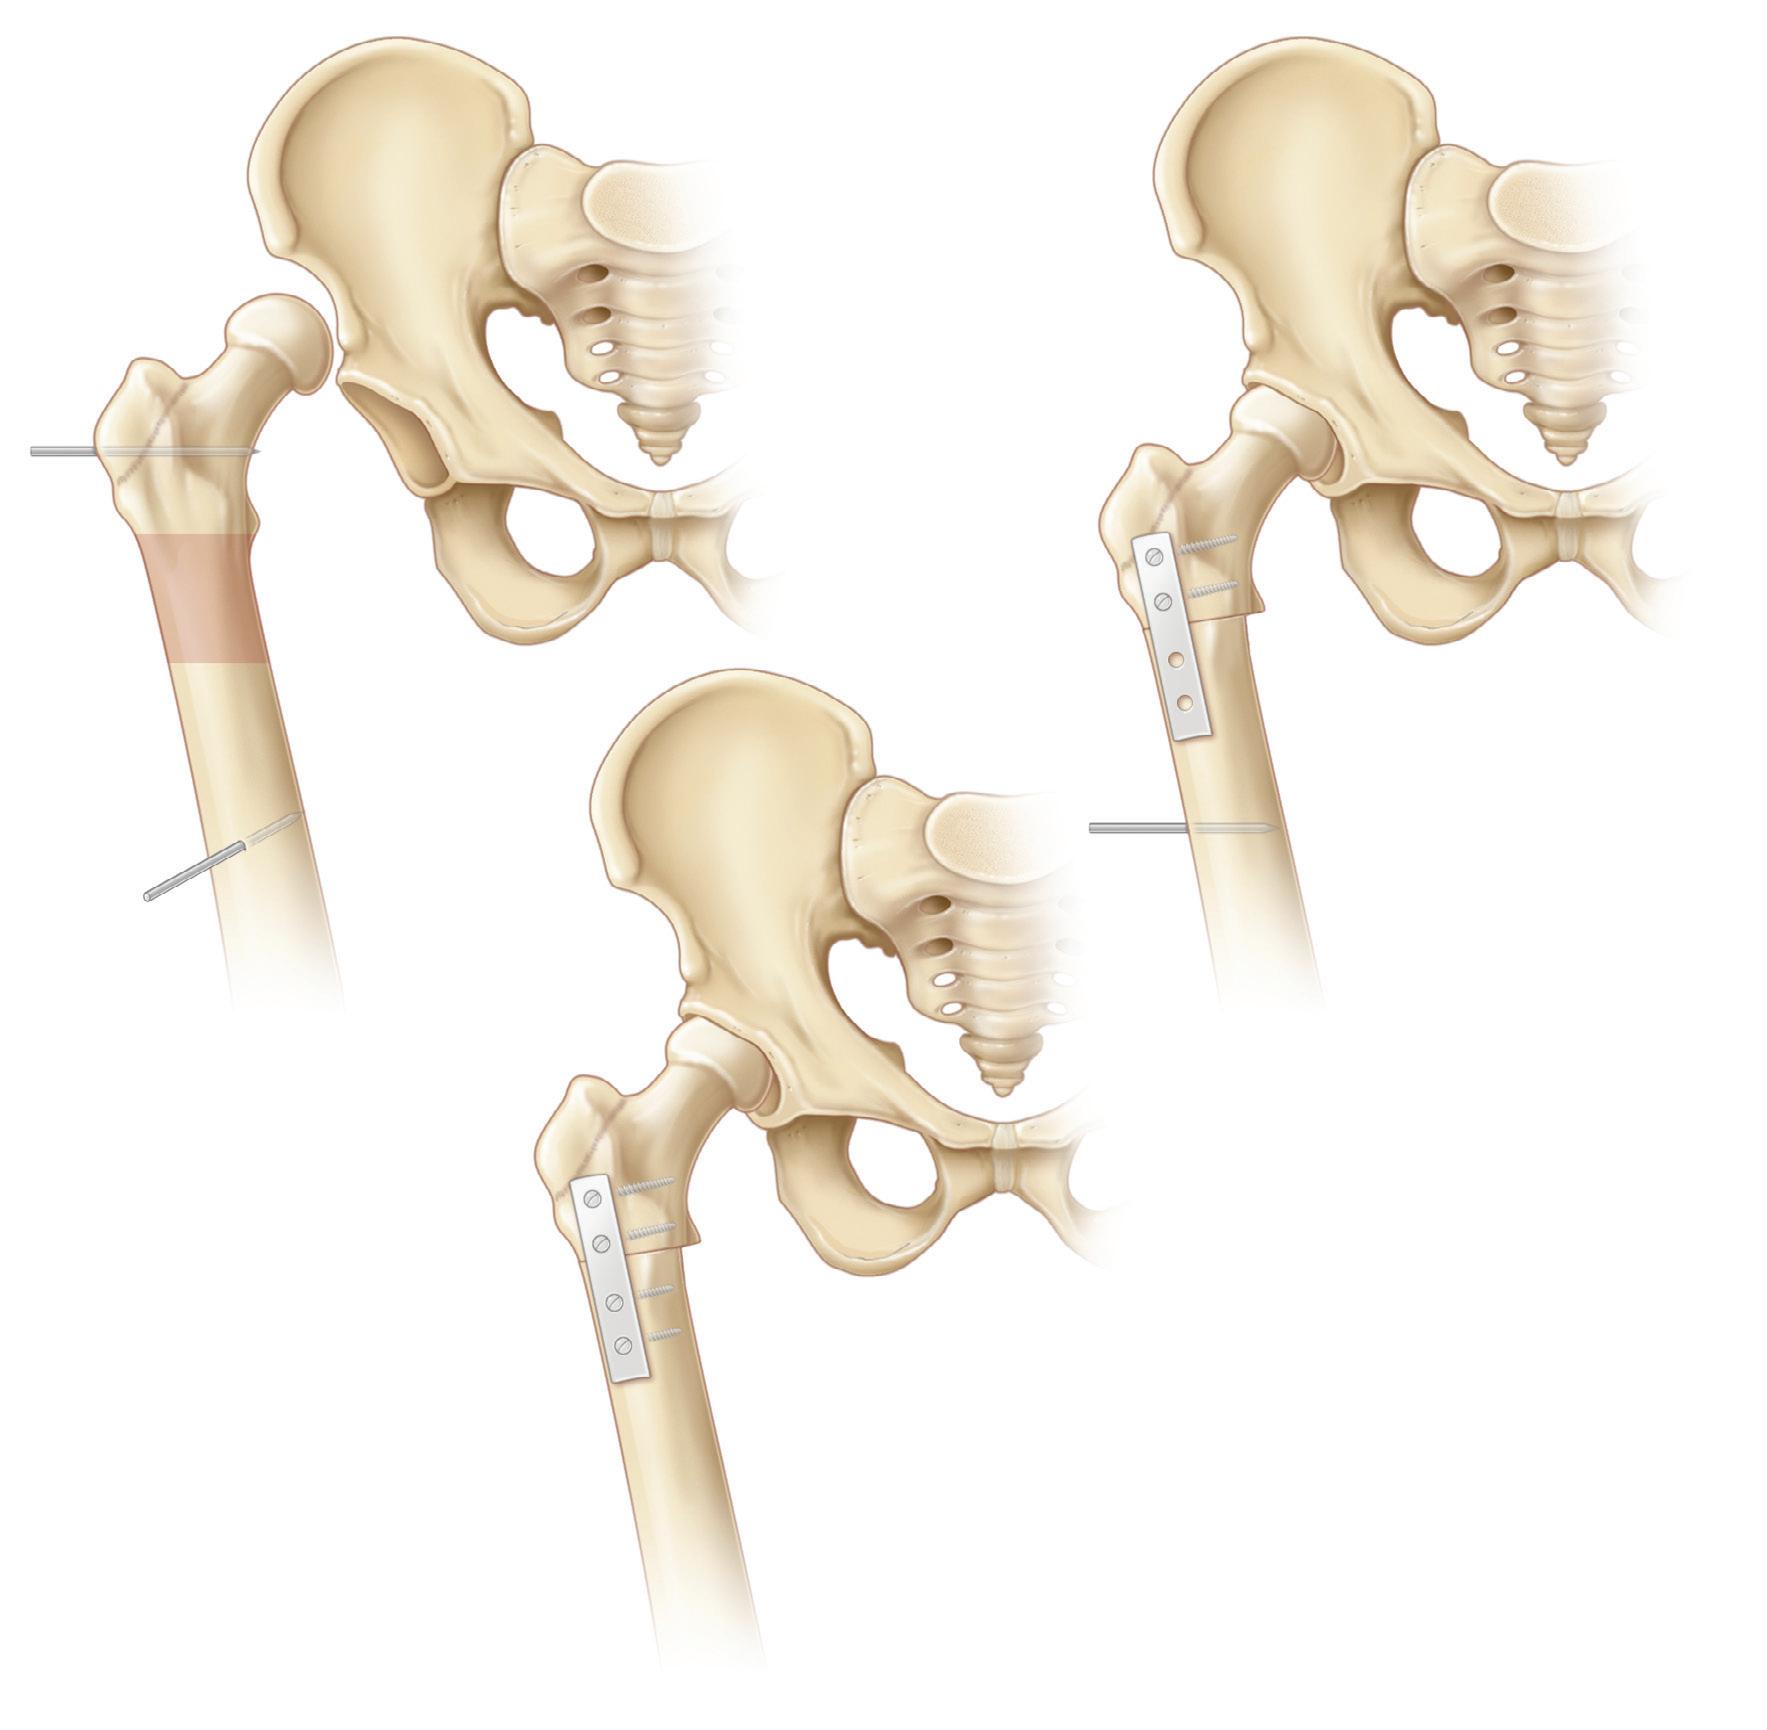
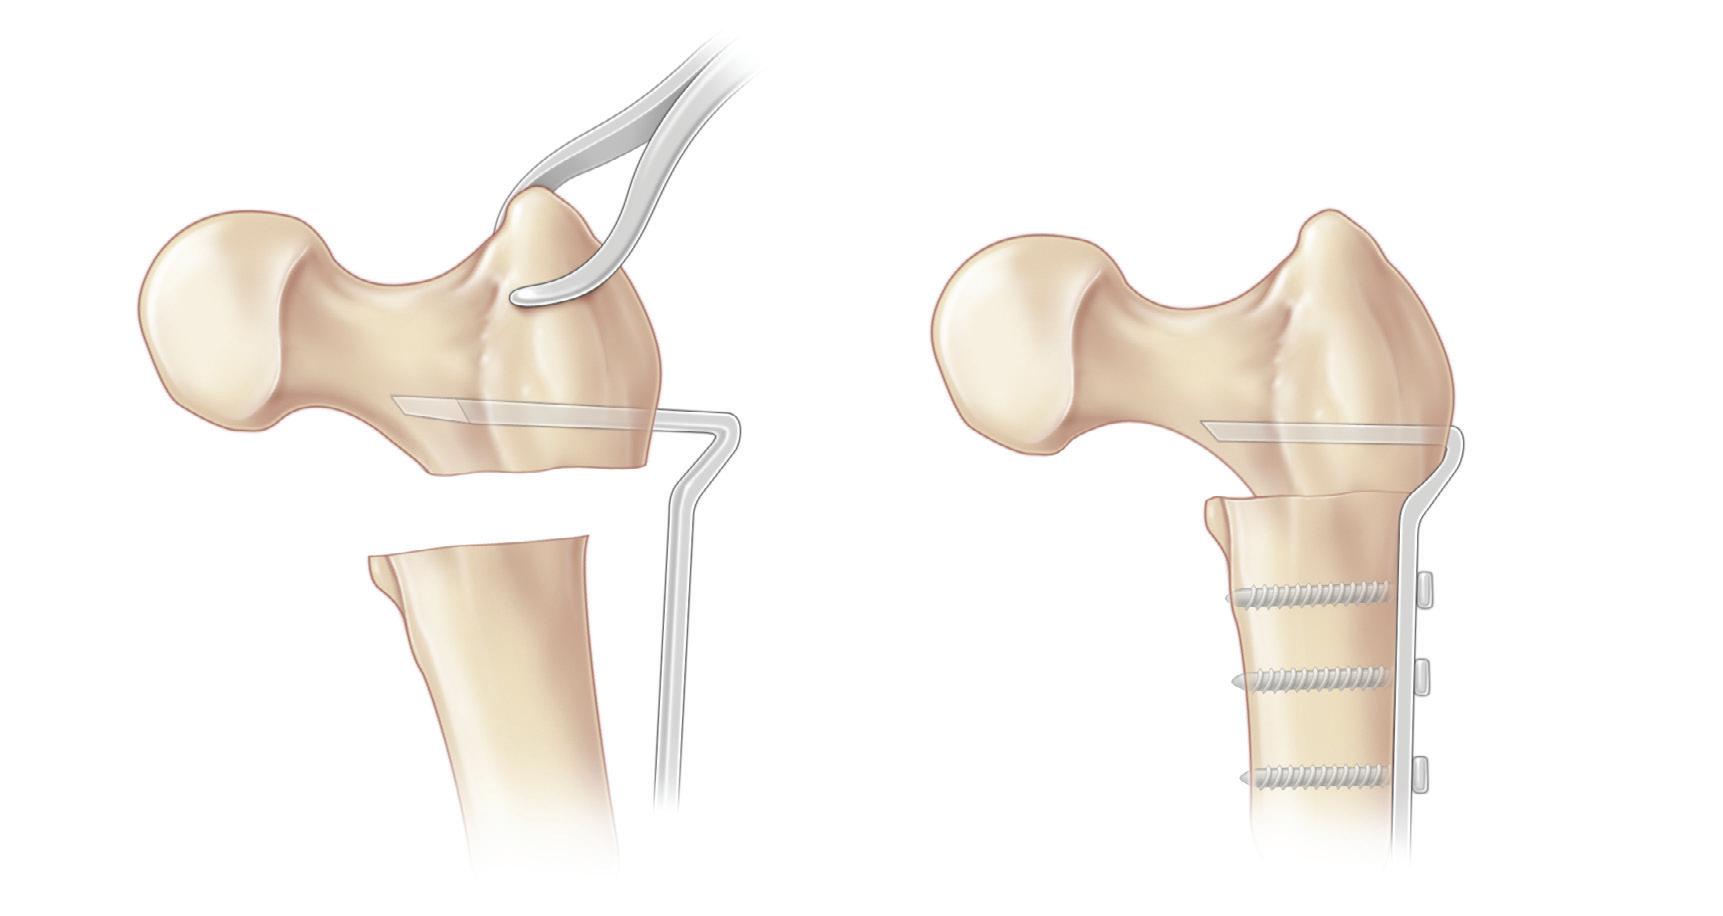
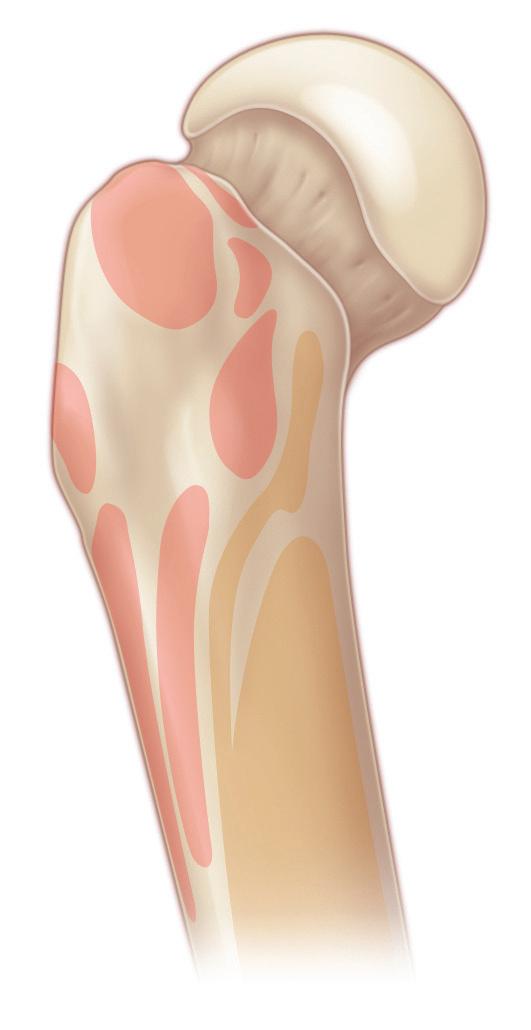
A, Femoral shortening is necessary to reduce pressure on the reduced femoral head, which is known to cause avascular necrosis of the hip. The amount of shortening may be estimated from the preoperative supine radiograph by measuring the distance from the bottom of the femoral head to the floor of the acetabulum (a to b). The distance from b to c must equal the distance from a to b. With higher dislocations, however, this may overestimate the needed shortening. The dissection for the open reduction, including clearing the acetabulum, is performed before the transection of the femur. A trial reduction gives the surgeon a feel for the tightness of the muscles and other foreshortened structures, thus allowing for another estimate of the amount of shortening needed.
A longitudinal mark is made with the saw along the anterior aspect of the femoral shaft. This serves as an
orientation mark for femoral rotation. Steinmann pins may also be placed transversely through the femur above and below the proposed osteotomy.
B, The femur is transected just below the lesser trochanter. The hip is reduced, and the distal femoral shaft is aligned with the proximal shaft. The amount of overlap is noted, which gives the surgeon the final estimate of shortening necessary; this is usually between 1 and 2 cm. This overlap is marked on the distal fragment, and the femoral shaft is transected again at that level. A four-hole plate is attached to the proximal fragment, and the distal shaft is held to the plate with a Verbrugge clamp.
C, The reduction is completed and assessed with regard to femoral rotation and adequacy of shortening. As a rule, the degree of hip decompression is adequate if the surgeon can, with a moderate force, distract the reduced femoral head 3 or 4 mm from the acetabulum. With the rotation marks aligned, the position of the lower extremity should be in moderate internal rotation. Derotation is done only when the internal rotation position is severe. The remaining screws are placed to fix the plate to the distal fragment.
The lateral thigh wound is closed in the usual manner. The repair of the hip capsule as well as other steps are illustrated in Procedure 3 on page 8.
Postoperative Care
Postoperative care is similar to that which occurs after open reduction of the hip. The plate can be removed after 6 months, when the osteotomy has solidly healed.
Steinmann pin
Steinmann pin
Plate applied with top two screws placed, engaging medial cortex
Bottom two screws inserted
Lesser trochanter
Bone to be removed
Procedure
(see Video 2 and Video 3)
Operative Technique
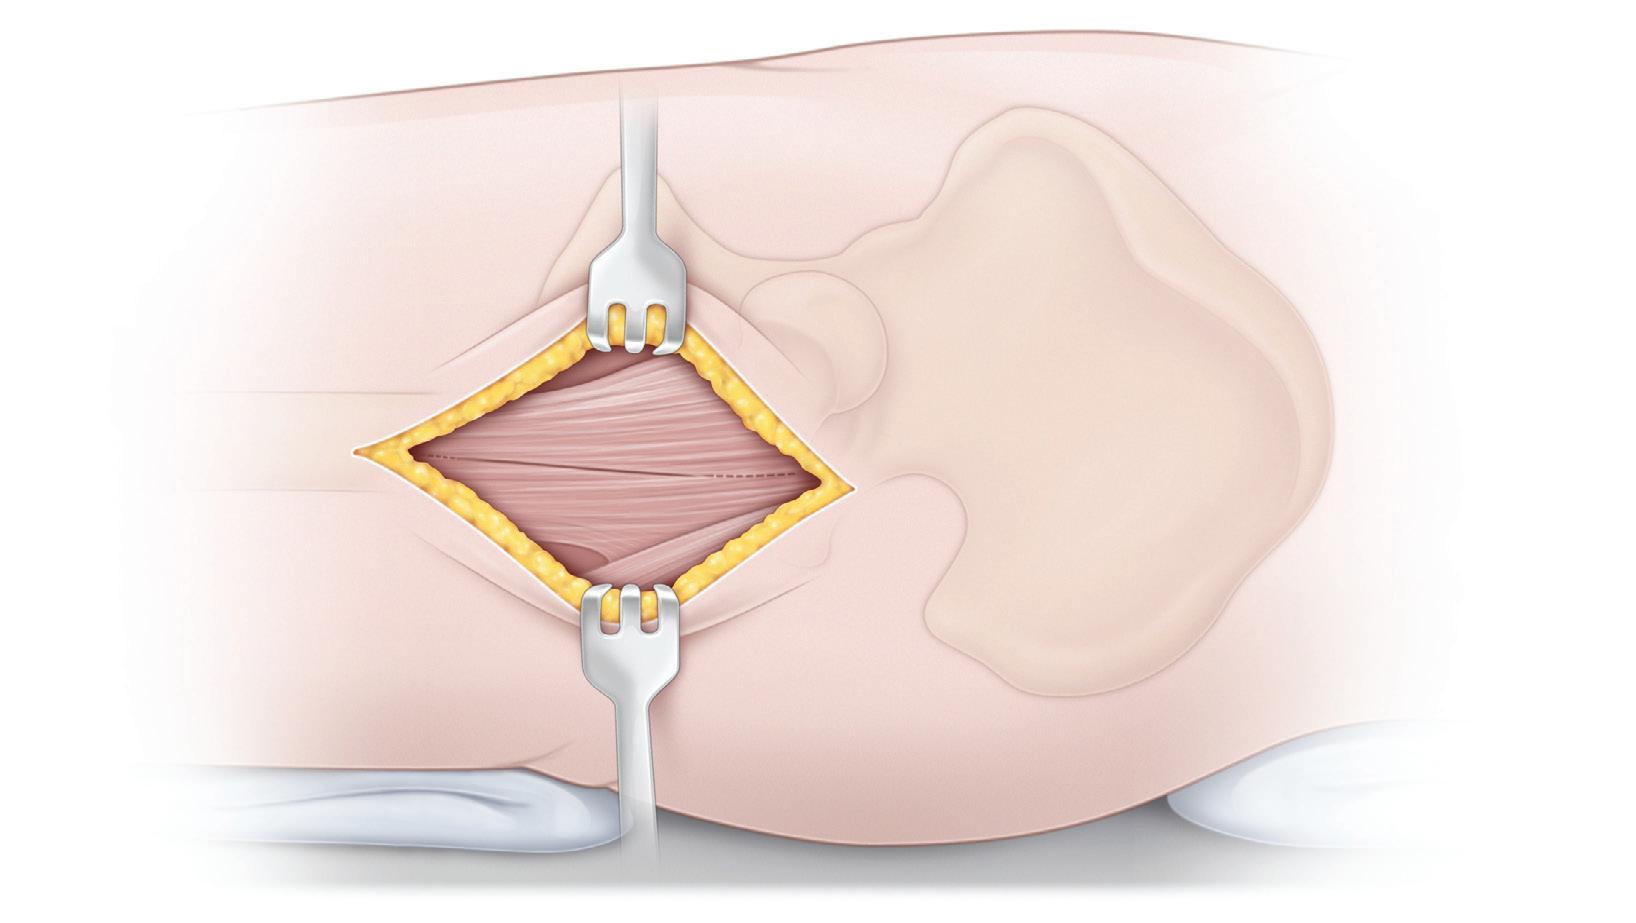
A, The operation is performed with the child supine on a radiolucent operating table. It is imperative to have imageintensifier radiographic control. Some surgeons prefer to operate on an older child on a fracture table because it is technically easier to obtain a lateral radiograph of the hip. A straight, midlateral, longitudinal incision is made beginning at the tip of the greater trochanter and extending
distally parallel to the femur for a distance of 10 to 12 cm. The subcutaneous tissue is divided in line with the skin incision.
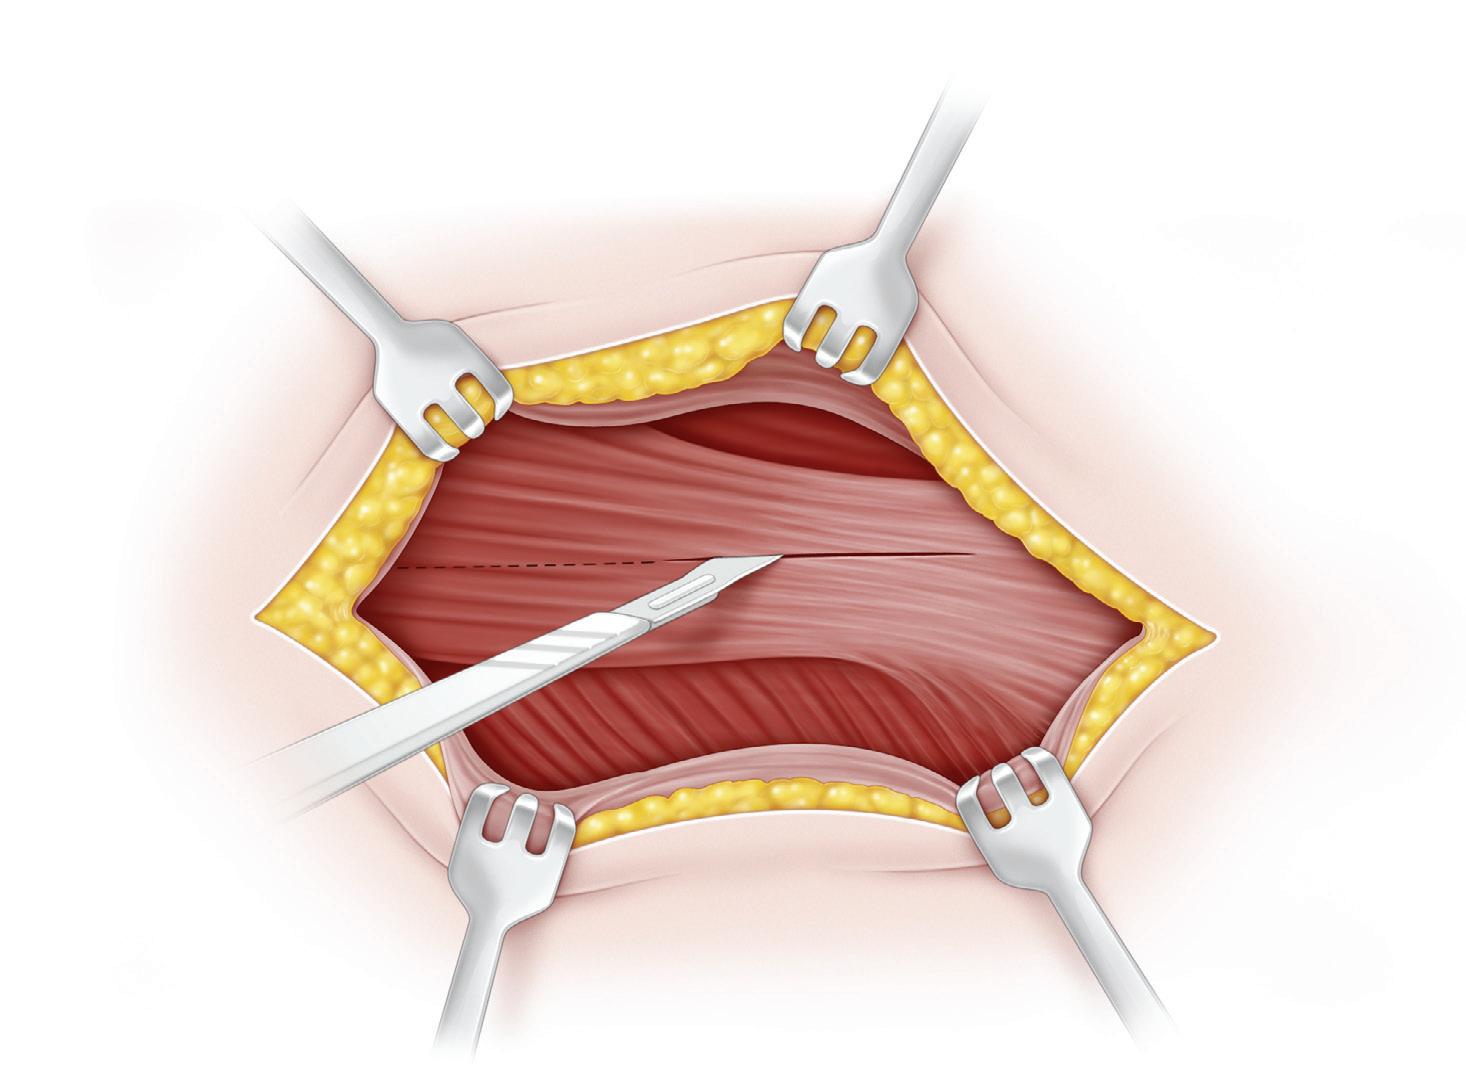
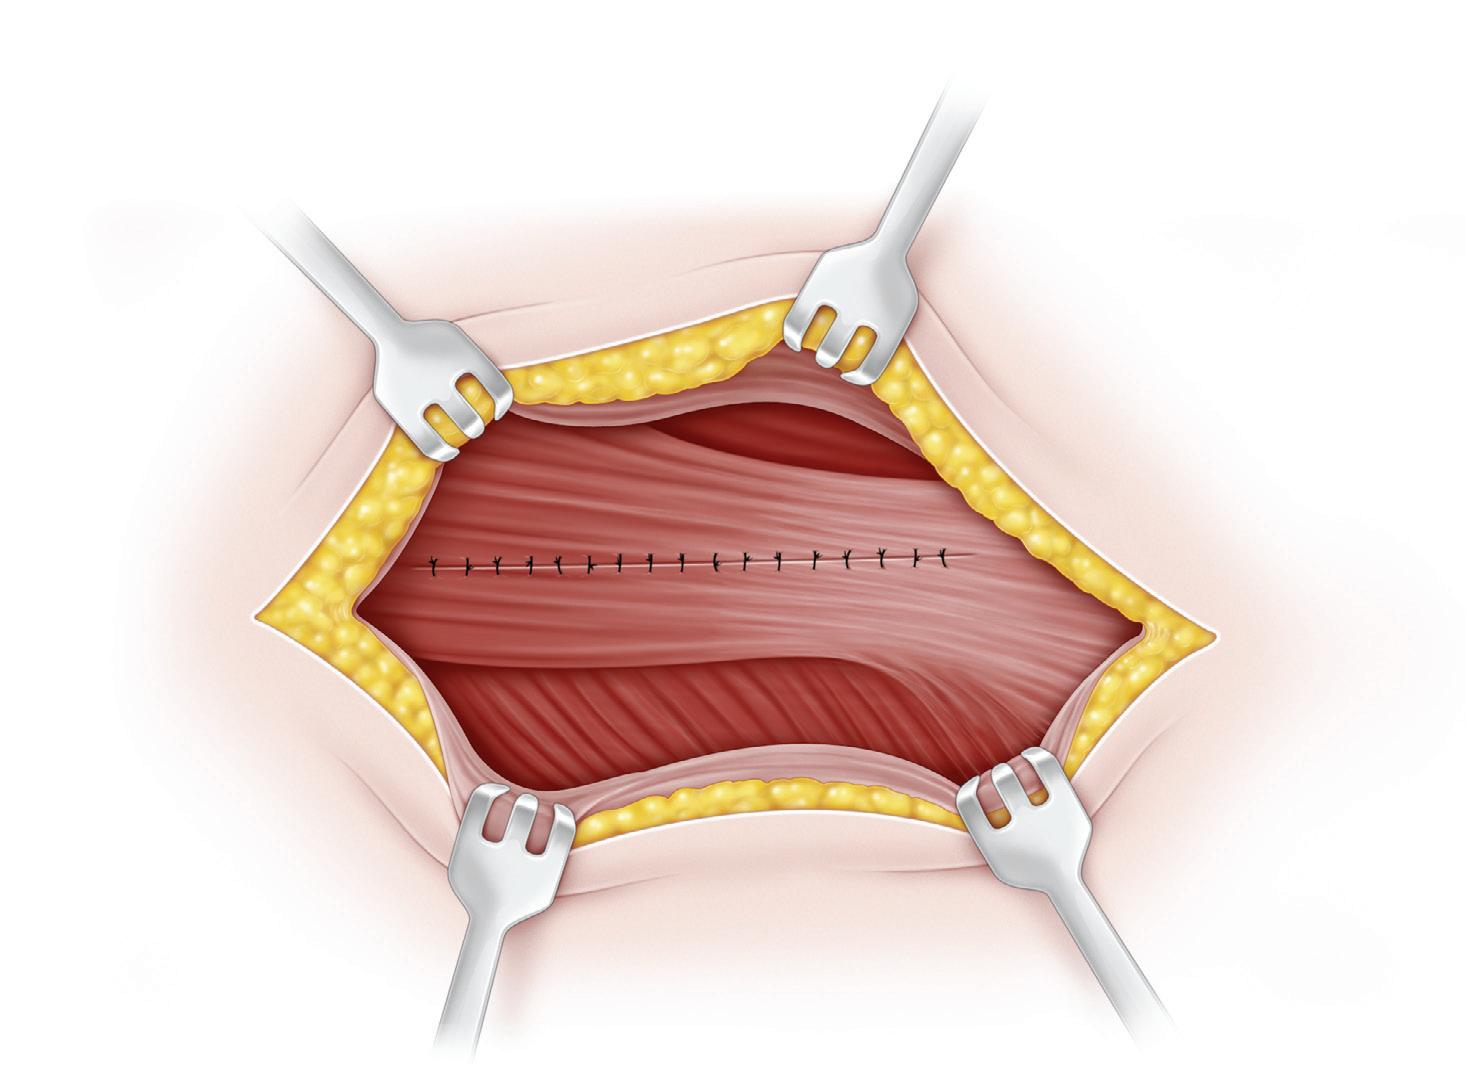
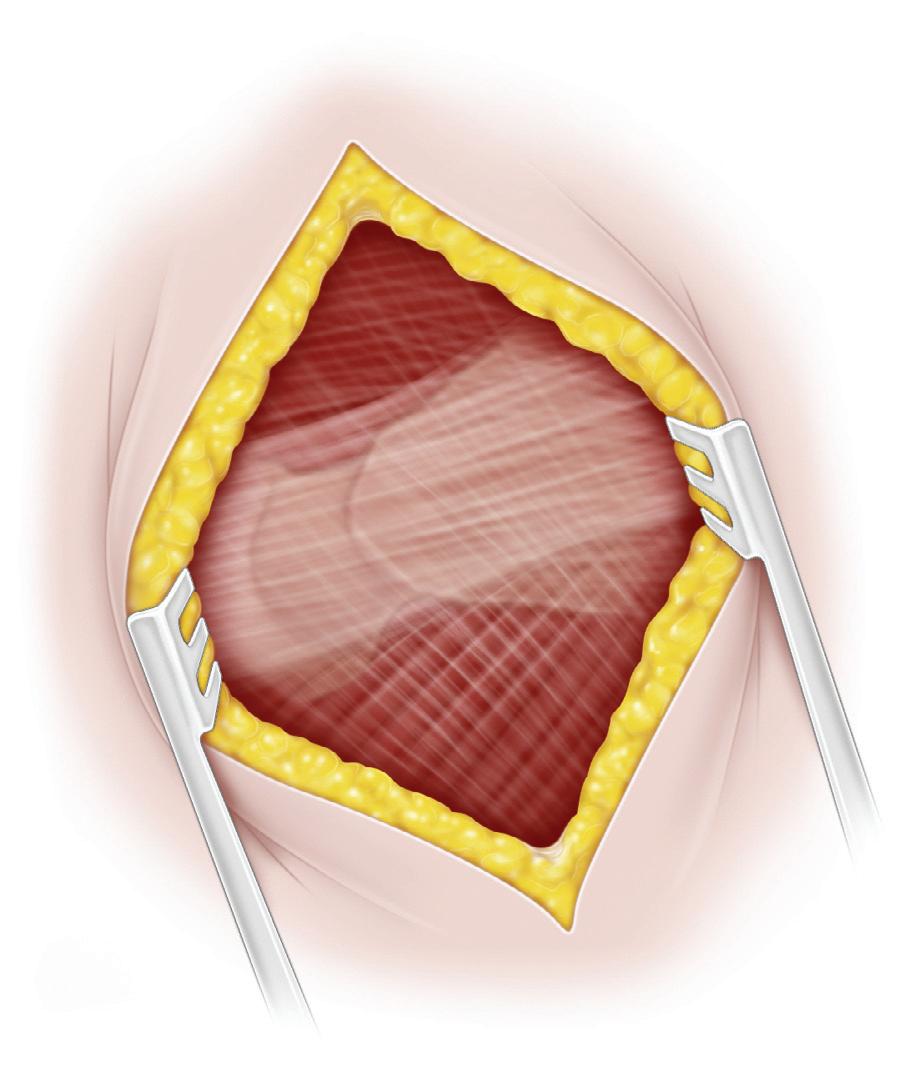
B, The fascia lata is exposed by deepening the dissection. It is first divided with a scalpel, and it is then split longitudinally with scissors in the direction of its fibers. The fascia lata should be divided posterior to the tensor fasciae latae to avoid splitting the muscle.
Skin incision
Tensor fasciae latae muscle
Division of fascia lata
Greater trochanter
Procedure 5 Intertrochanteric Varus Osteotomy and Internal Fixation With a Blade Plate
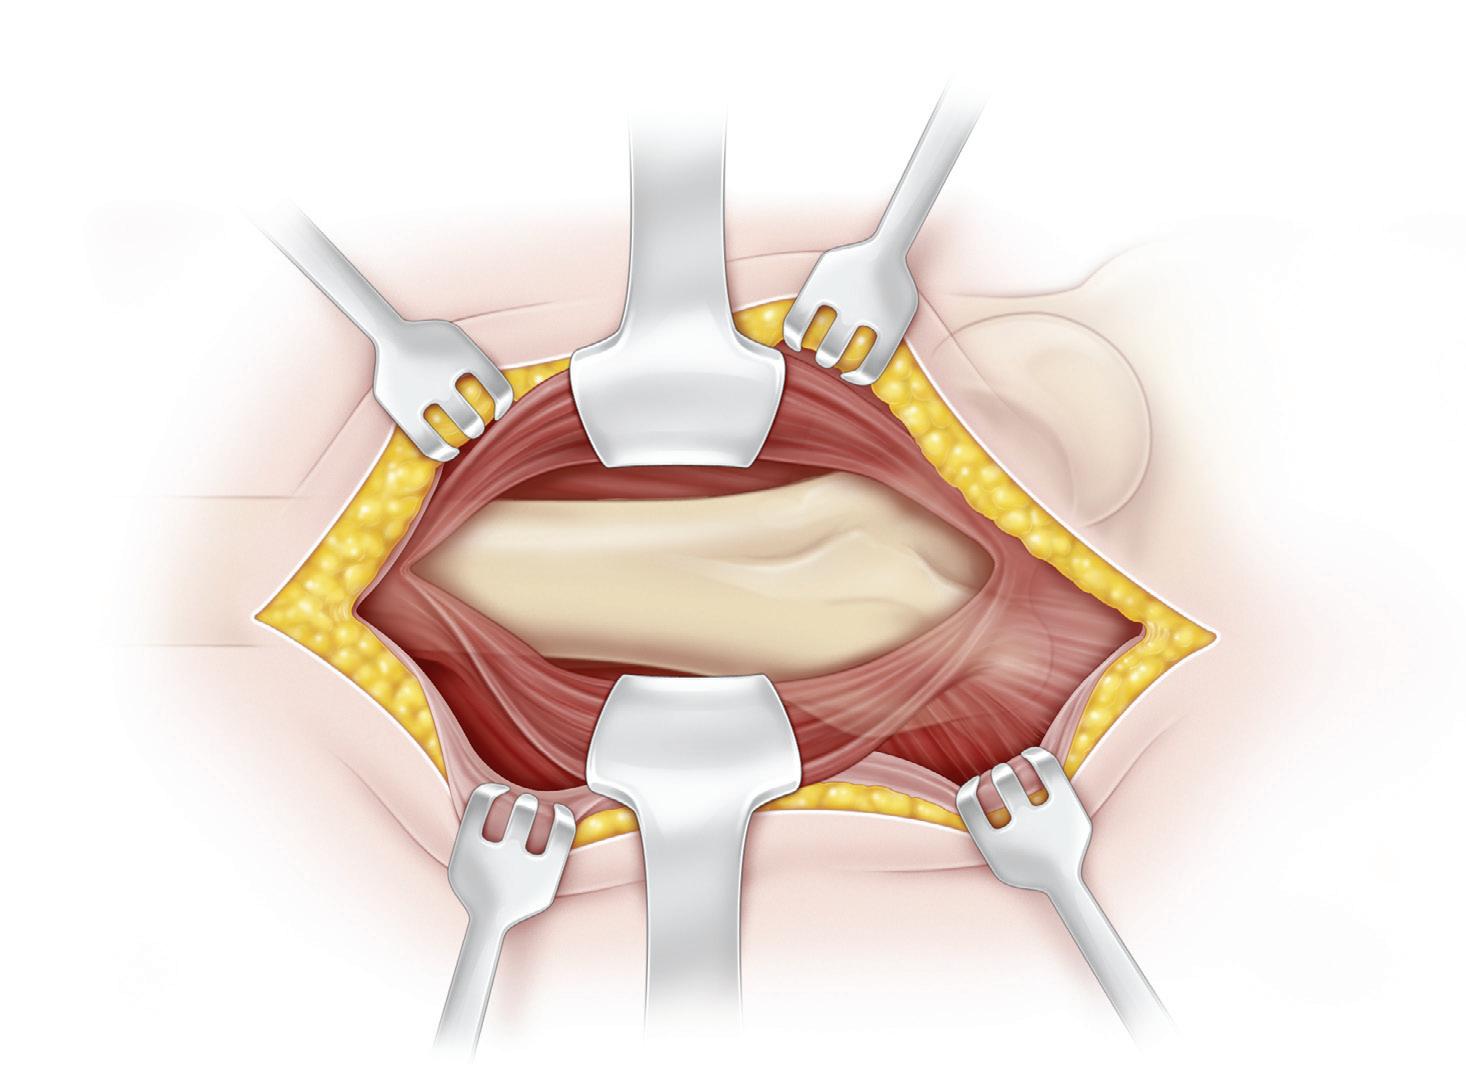
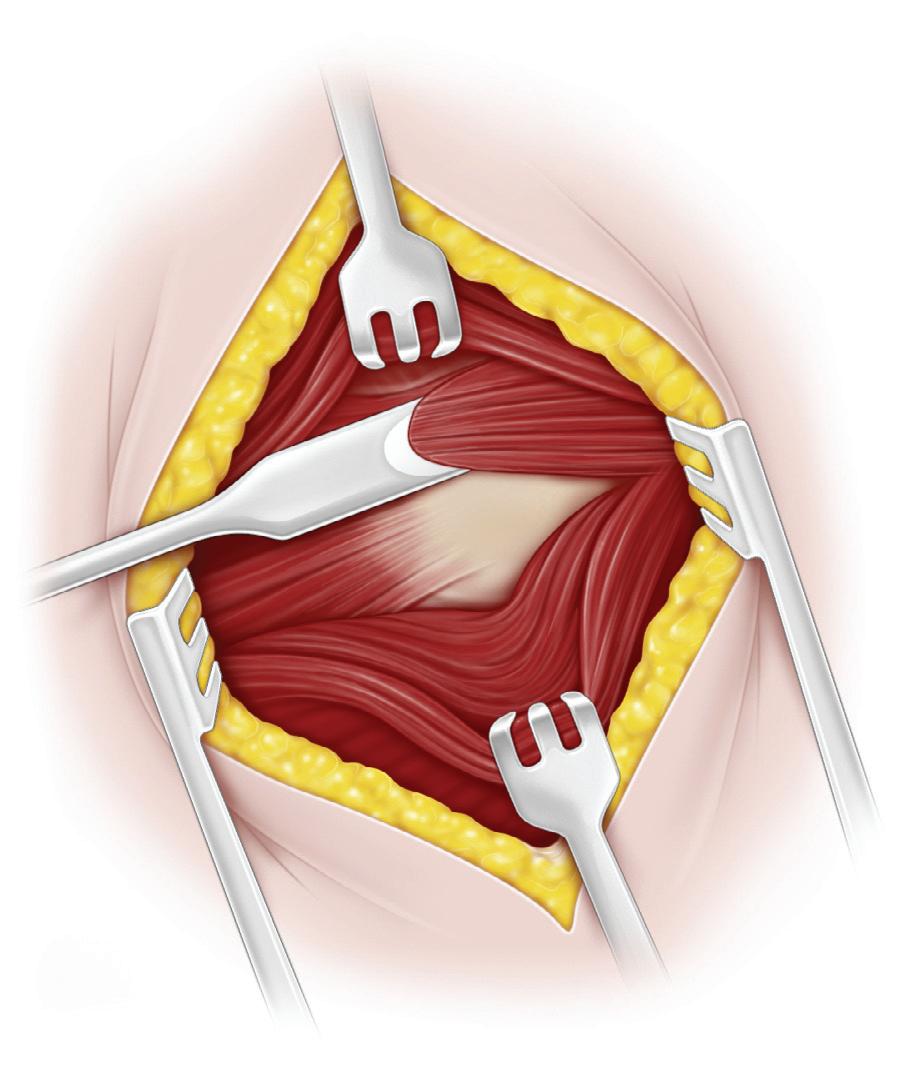
C, With retraction, the vastus lateralis muscle is visualized. Next, the anterolateral region of the proximal femur and the trochanteric area are exposed. It is vital to not injure the greater trochanteric growth plate. The origin of the vastus lateralis muscle is divided transversely from the inferior border of the greater trochanter down to the
Greater trochanteric apophysis
posterolateral surface of the femur. The vastus lateralis muscle fibers are elevated from the lateral intramuscular septum and the tendinous insertion of the gluteus maximus.
D, The lateral femoral surface is exposed by subperiosteal dissection. The greater trochanteric apophysis should not be disturbed.
Continued on following page
D
Exposed femoral shaft
C
Splitting of vastus lateralis muscle
Procedure 5 Intertrochanteric Varus Osteotomy and Internal Fixation With a Blade Plate, cont’d
Head of femur uncovered
Greater trochanteric apophysis
15°
Physis of femoral head
Guide pin along axis of neck
Leg adducted and medially rotated
Chisel placed 15° off axis of neck
Head of femur concentrically reduced in acetabulum (head is covered)
Pin in center of femoral neck and stopped short of capital femoral epiphysis
Steinmann pin
Line of osteotomy
Leg abducted and medially rotated
Proximal osteotomy parallel to chisel
Chisel removed
Distal osteotomy perpendicular to femoral shaft
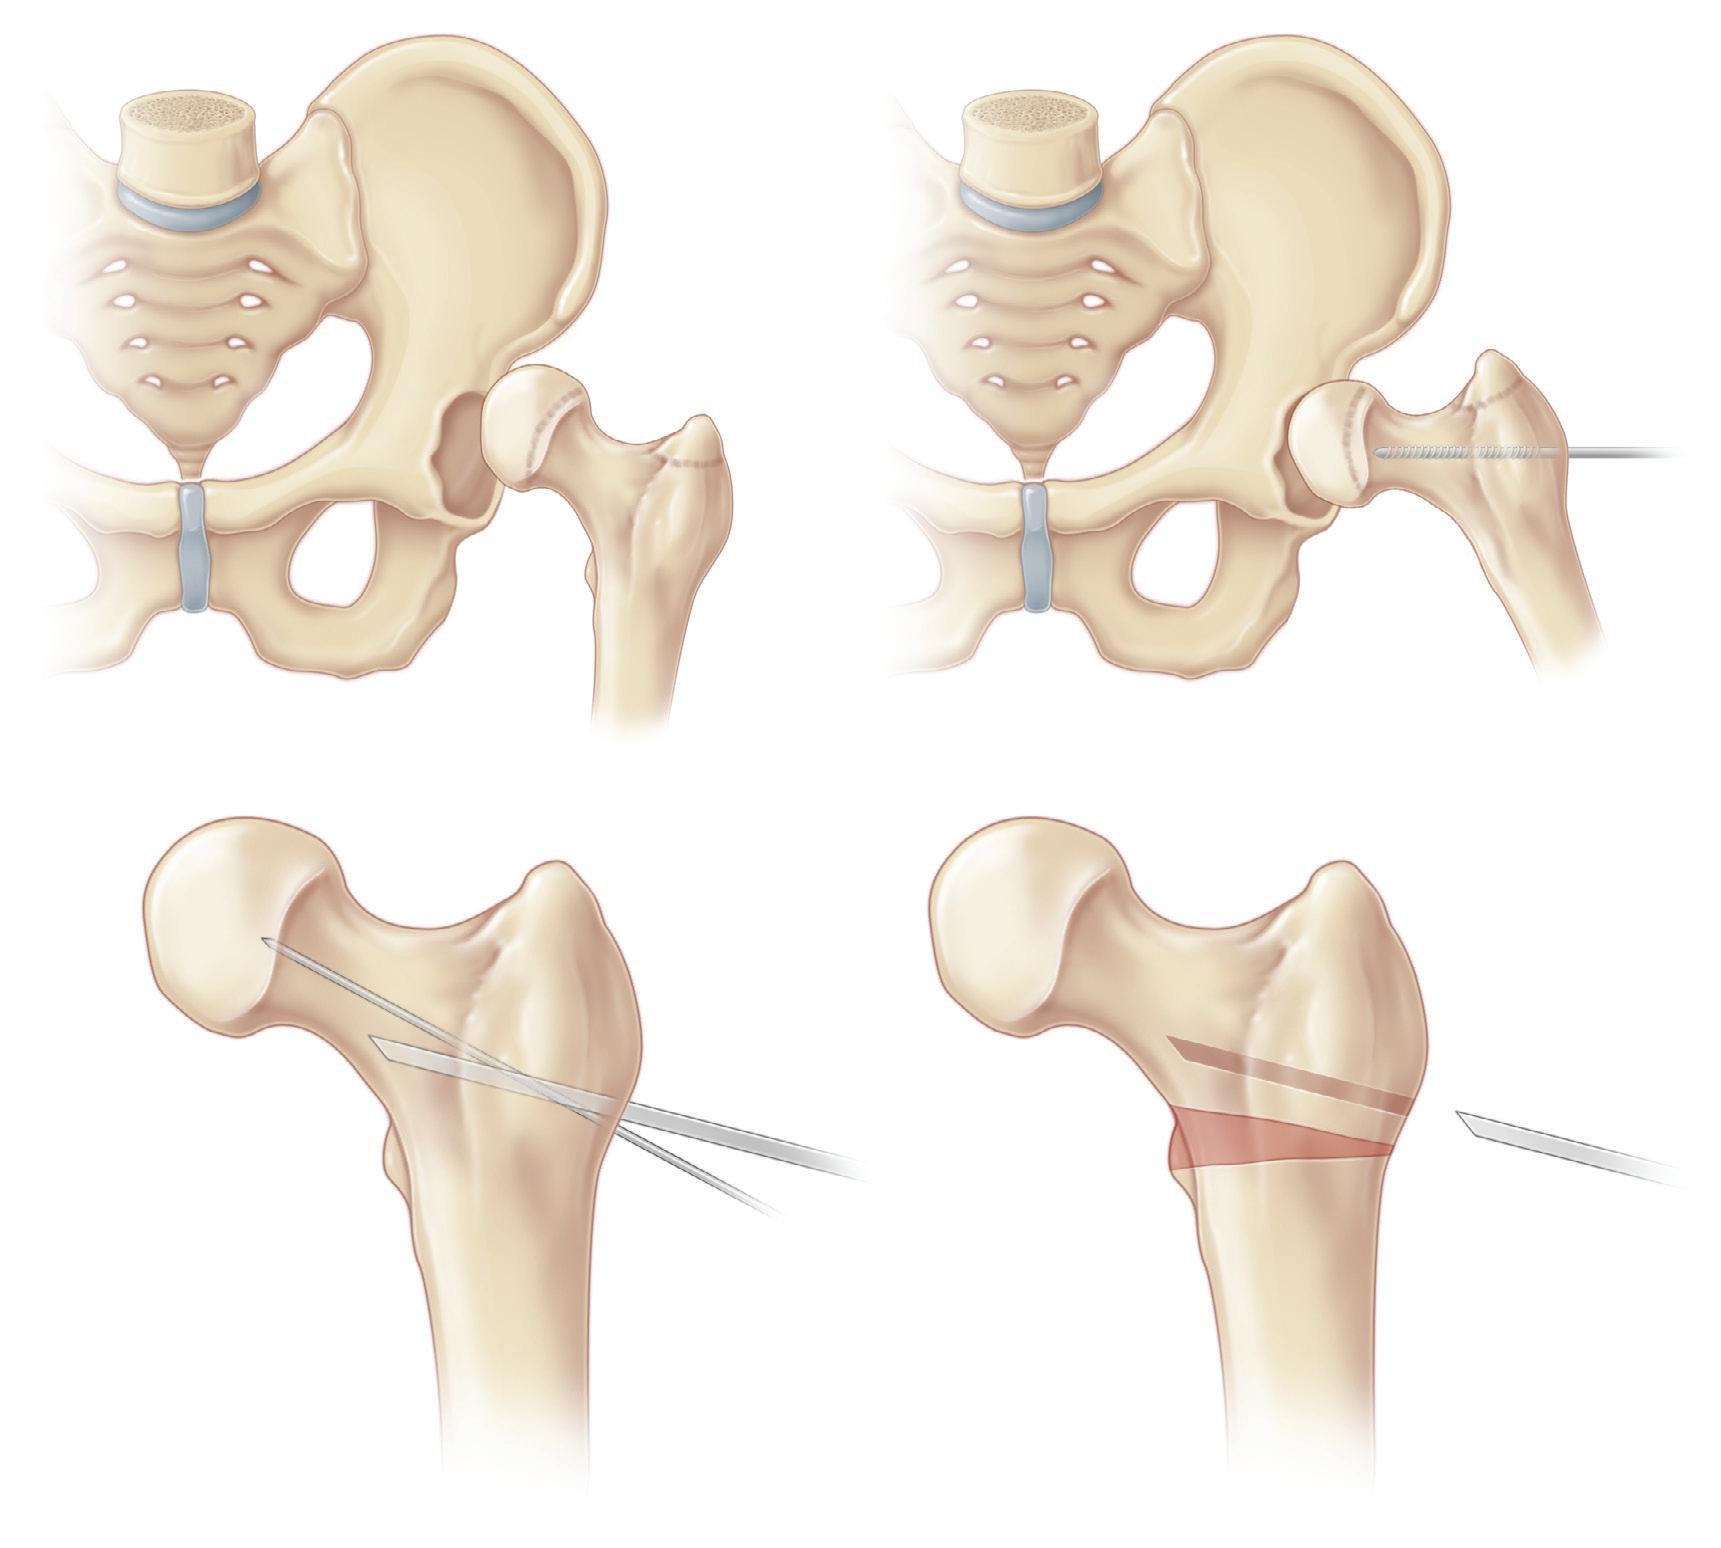
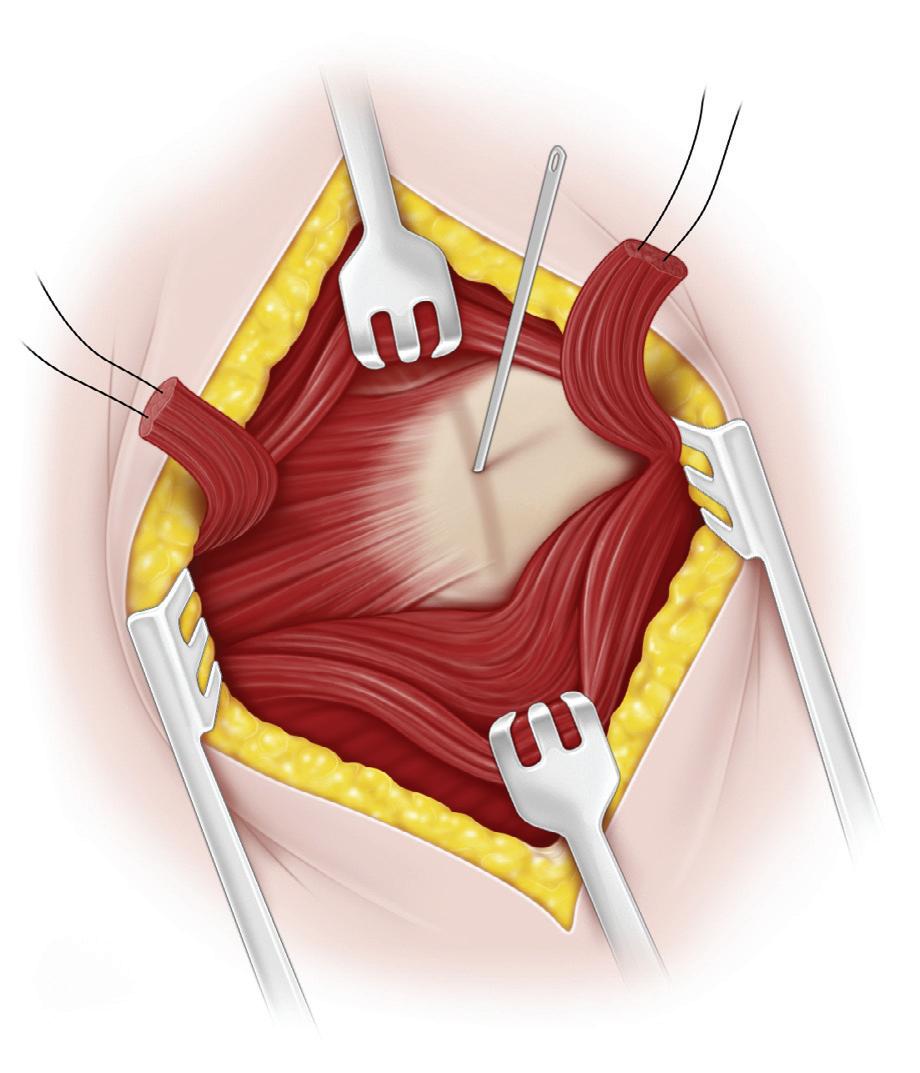
E and F, The femoral head is centered concentrically in the acetabulum by abducting and medially rotating the hip, and its position is checked with an image intensifier. Immediately distal to the apophyseal growth plate of the greater trochanter, a 3-mm Steinmann pin is inserted through the lateral cortex of the femoral shaft parallel to the floor of the operating room and at a right angle to the median plane of the patient. The pin is drilled medially along the longitudinal axis of the femoral neck and stops short of the capital femoral physis. This position of the proximal femur can be reproduced at any time during the operation by placing the Steinmann pin horizontally parallel to the floor and at 90 degrees to the longitudinal axis of the patient. This is a very dependable and simple method for properly orienting the proximal femur.
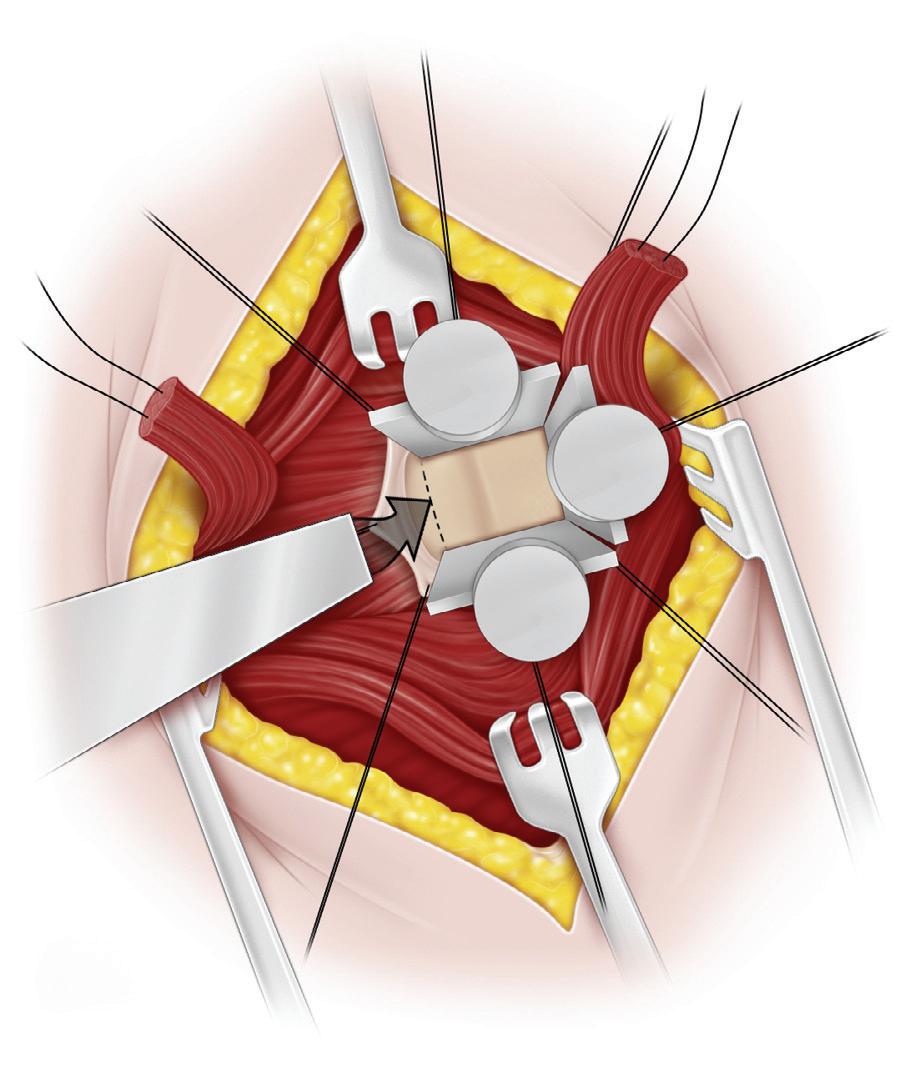
G, The chisel for the blade plate is placed at an angle that is determined as follows: if the chisel paralleled the guide pin, the 90-degree blade plate would produce a 90-degree neck–shaft angle. In this case, we sought to produce a neck–shaft angle of 105 degrees. Thus a chisel placed 15 degrees off of the guide pin’s axis adds 15 degrees to a 90-degree neck–shaft angle, thereby resulting in a 105-degree final angle.
H, The osteotomy cuts are made while the chisel is in place. The proximal osteotomy is parallel to the chisel, and the distal osteotomy is perpendicular to the femoral shaft.
I, After the osteotomized triangle is removed, the chisel is removed, and the blade plate is inserted. Careful control of the proximal fragment and clear visualization of the entry site of the chisel facilitate the placement of the blade.
J, The blade plate is fully seated and secured with screws that are drilled and tapped. The angulation of the plate produces medial displacement of the femoral shaft, which is extremely important to the biomechanics of the hip. Failure to displace the distal fragments medially results in the lateral prominence of the plate and the widening of the groin.
K, The vastus lateralis and fascia lata are closed with running sutures. Subcutaneous and skin closure with absorbable sutures completes the procedure.
Postoperative Care
The osteotomy is stable when the bone is of normal strength. In reliable patients, cast immobilization is not necessary. For less reliable children, those with osteopenic bone, and always when an open reduction has been performed, 6 weeks in a spica cast are required.
Blade plate inserted
Medial displacement of distal fragment
Closure of vastus lateralis muscle
Screw fixation
Procedure 6 Greater Trochanteric Epiphysiodesis
Transverse incision centered over greater trochanter
Operative Technique
Longitudinal incision in fascia of
A, The child is placed supine with a sandbag under the ipsilateral hip. The entire lower limb, hip, and pelvis are prepared and draped to permit the free passive motion of the hip. A transverse incision that is 5 to 7 cm long is centered over the epiphysis of the greater trochanter. If desired, a longitudinal incision may be made, especially if the distal transfer of the greater trochanter is anticipated in the future.
B, The site of origin of the vastus lateralis from the upper part of the intertrochanteric line, the anteroinferior border
Piriformis muscle
Gluteus medius muscle
Quadratus femoris muscle
Adductor magnus muscle
Gluteus maximus muscle
Obturator internus muscle
Gemelli muscle
Gluteus minimus muscle
Vastus lateralis muscle
Detachment of vastus lateralis muscle extraperiosteally
Gluteus medius muscle
Greater trochanter
Tensor fasciae latae muscle retracted
Gluteus maximus muscle
of the greater trochanter, the lateral tip of the gluteal tuberosity, and the upper part of the lateral tip of the linea aspera are shown.
C, The subcutaneous tissue is divided in line with the skin incision, and the wound edges are retracted. A longitudinal incision is made in the fascia of the tensor fasciae latae muscle.
D, The tensor fasciae latae muscle is retracted anteriorly, and the origin of the vastus lateralis is detached and elevated extraperiosteally.
A B
tensor fasciae latae muscle
C D
Keith needle inserted into growth plate
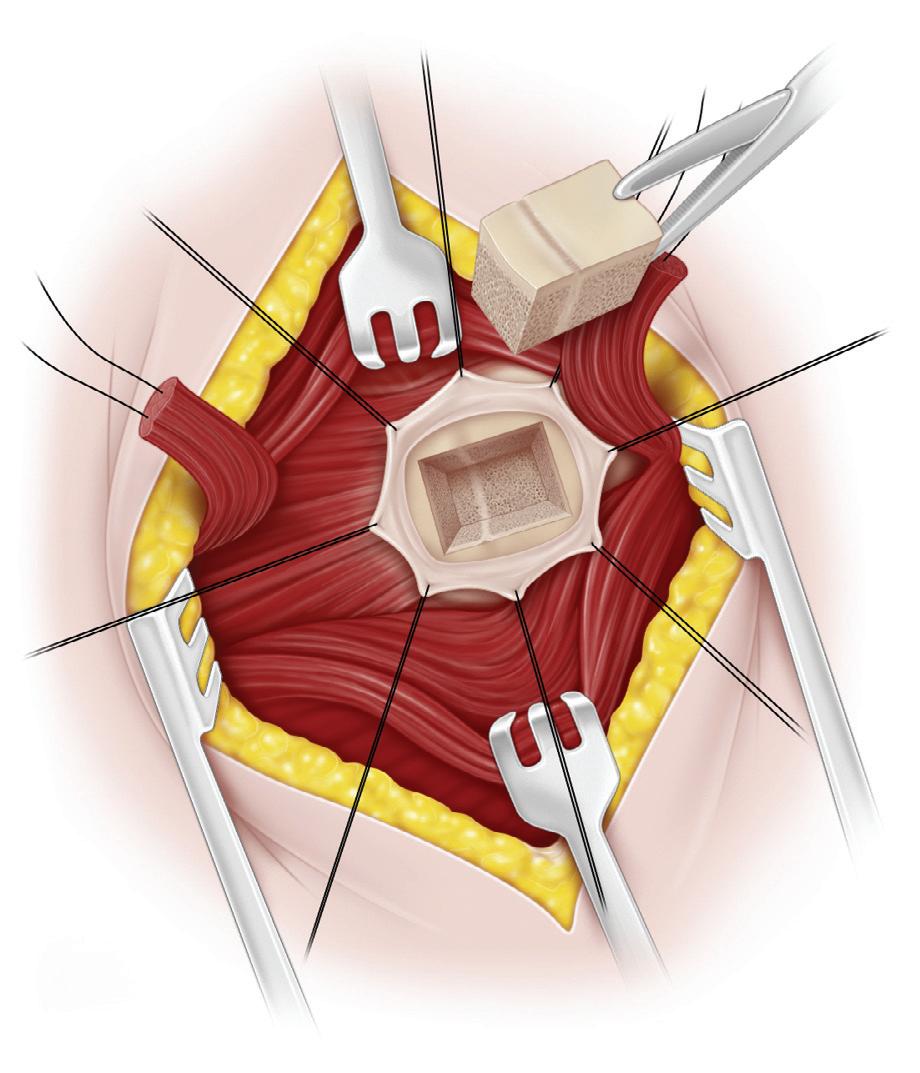
Osteotomes removing rectangular piece of bone plug at site of greater trochanter
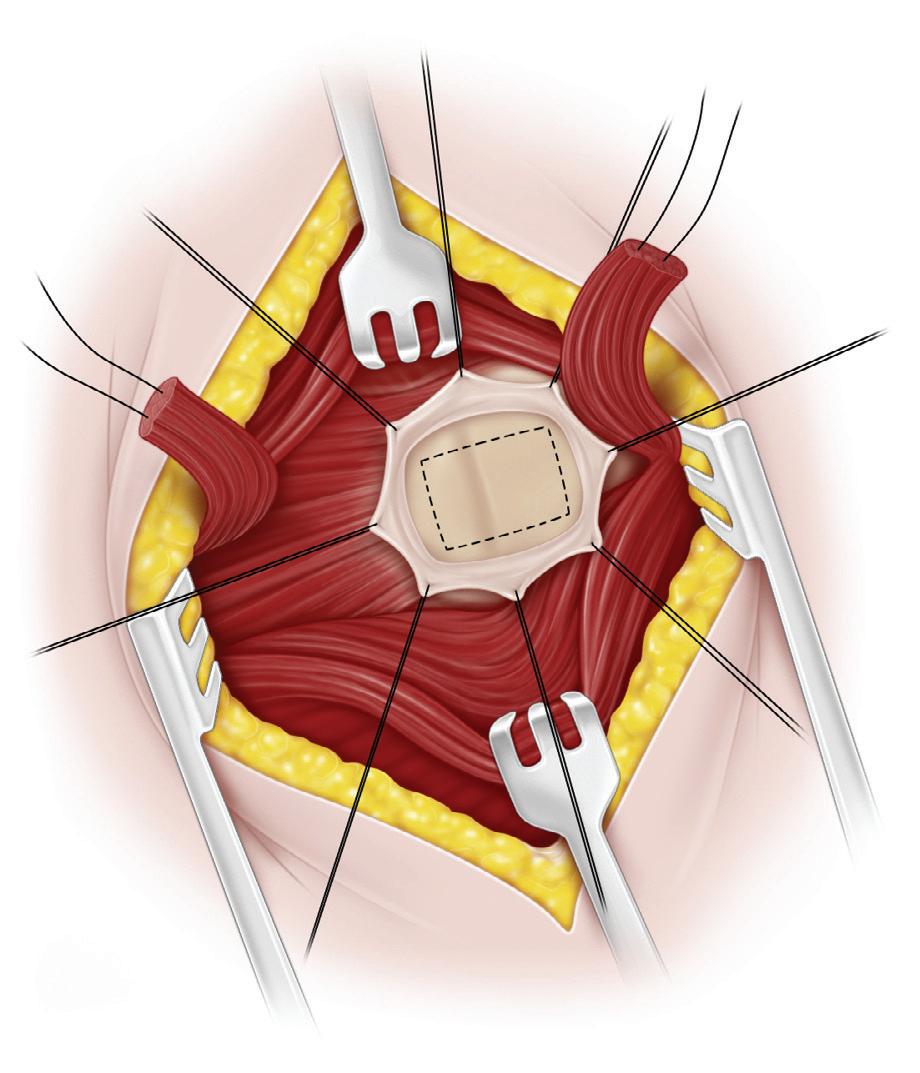
E, A Keith needle is inserted into the soft growth plate of the greater trochanteric epiphysis. Anteroposterior radiographs are obtained to verify the position of the Keith needle and the growth plate. (Many surgeons will perform the arrest by removing the physeal cartilage with a curet that is controlled with radiographic image intensification.)
Periosteum reflected
Apophyseal plate of greater trochanter
Bone plug removed; plug includes part of apophyseal plate
F, The periosteum is divided by one longitudinal and two horizontal incisions. The dotted rectangle marks the bone plug to be removed and turned around. This rectangle is 2 cm long and 1.25 cm wide. In a smaller child, the rectangle is 1 cm ( 2 5 inch) long and 0.6 cm ( 1 5 inch) wide. G and H, With straight osteotomies, the bone plug is removed. Note that the growth plate is in the proximal third of the rectangle.
Continued on following page
Tensor fasciae latae muscle
Vastus lateralis muscle
E F
Procedure 6 Greater Trochanteric Epiphysiodesis, cont’d
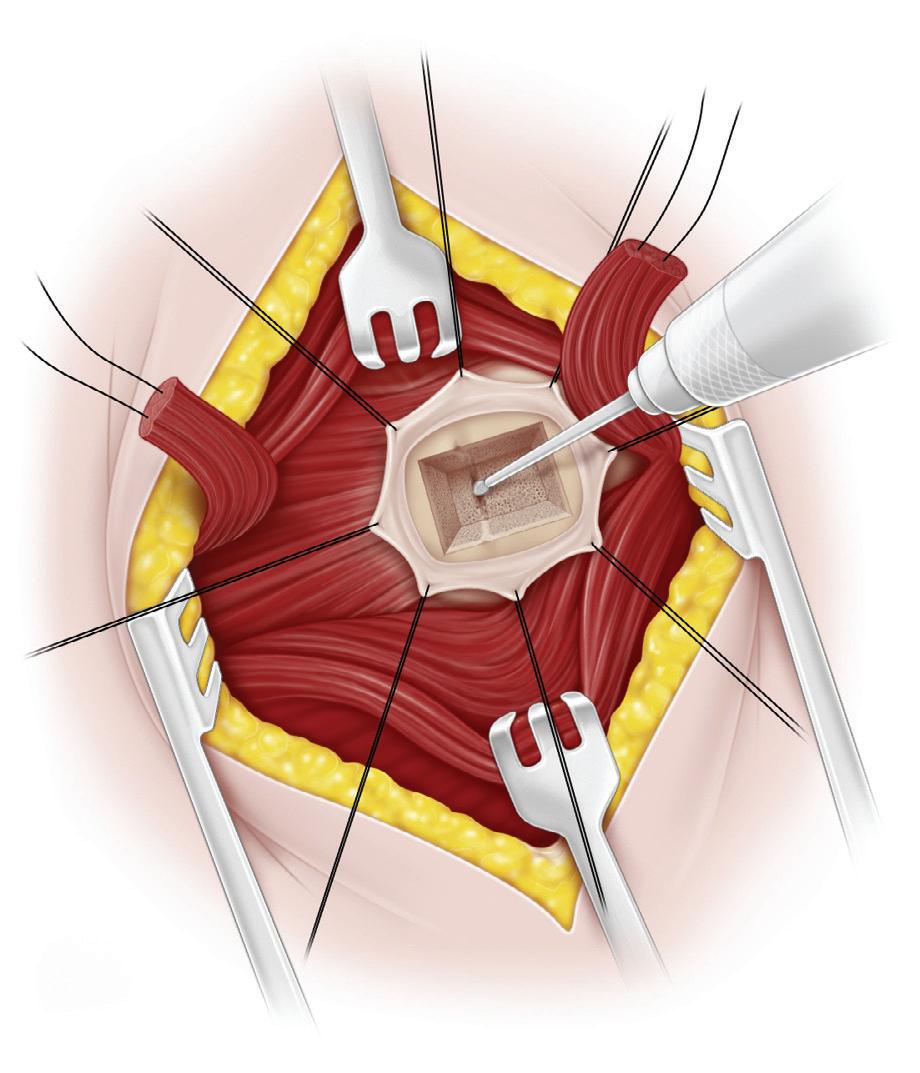
Growth plate destroyed with diamond-shaped drill and curets
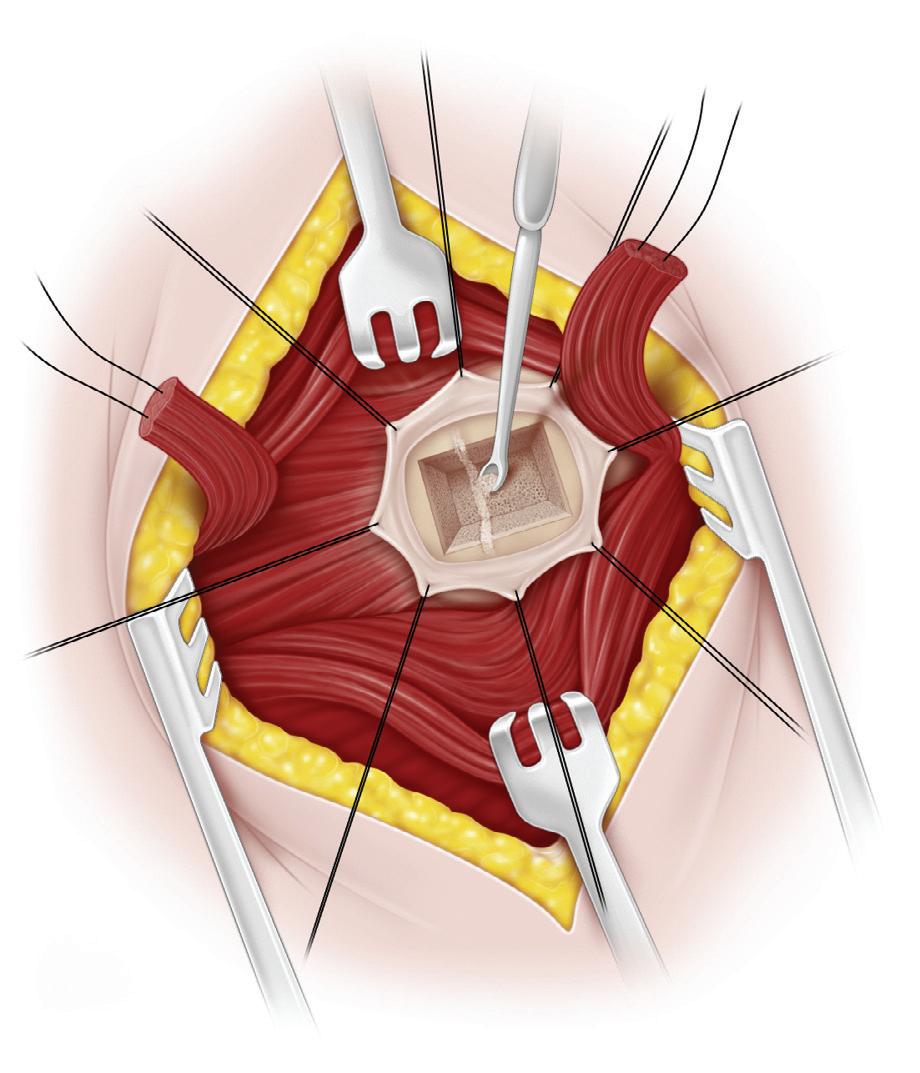
Cancellous bone (from proximal femoral shaft) placed in cleared growth plate defect
Bone plug (rotated 180°) replaced in greater trochanter
I, A diamond-shaped drill and curets are used to destroy the growth plate. The operator should be careful to not enter the trochanteric fossa and injure the circulation to the femoral head.
J, With a curved osteotome, cancellous bone is removed from the proximal femoral shaft and packed into the defect at the site of the growth plate.
Bone plug firmly impacted
K and L, The bone plug is rotated 180 degrees, replaced in the defect in the greater trochanter, and, with an impactor and mallet, securely seated.
K L
Gluteus minimus, obturator, and gemelli muscles resutured to insertion site
sutured
M, The muscles are resutured to their insertion sites, and the vastus lateralis is attached to the gluteus medius and minimus tendons at their insertion sites after the closure of the periosteum. The fascia lata is closed with interrupted sutures, and the wound is closed with interrupted and subcuticular sutures. It is not necessary to immobilize the hip in a cast.
Postoperative Care
The patient is allowed out of bed on the first postoperative day as soon as he or she is comfortable. The patient is discharged to home within a few days and instructed to protect the limb that was operated on by using a three-point crutch gait for 3 to 4 weeks.
Vastus lateralis muscle sutured to insertion of gluteus medius muscle
Periosteum