PHOTOGRAPHIC DISSECTOR OF THE HUMAN BODY
Second Edition
Marios Loukas, MD, PhD
Dean of Basic Sciences
Dean of Research
Professor, Department of Anatomical Sciences
St. George’s University School of Medicine
Grenada, West Indies
R. Shane Tubbs, PhD, MSc, PA-C
Professor, Chief Scientific Officer and Vice President
Seattle Science Foundation
Seattle, Washington;
Professor, Department of Anatomical Sciences
St. George’s University School of Medicine Grenada, West Indies;
Honorary Faculty, California Neuroscience Institute
Professor and Affiliate Faculty, Institute for Systems Biology
Seattle, Washington;
Professor, Centre of Anatomy and Human Identification
University of Dundee
Scotland, United Kingdom;
Adjunct Professor, Department of Neurosurgery
Vanderbilt University
Nashville, Tennessee
Brion Benninger, MD, MSc
Professor of Medical Innovation, Technology & Research
Professor of Clinical Anatomy
Executive Director, Medical Anatomy Center
Western University of Health Sciences
Lebanon, Oregon;
Faculty, Samaritan Orthopaedic and Surgery Residencies
Faculty, Samaritan Sports Medicine Fellows
Samaritan Health Services
Corvallis, Oregon
President, Alps Innovative Medical
Healthcare and Education Futurist
1600 John F. Kennedy Blvd. Ste. 1600 Philadelphia, PA 19103-2899
GRAY’S CLINICAL PHOTOGRAPHIC DISSECTOR OF THE HUMAN BODY, SECOND EDITION
Copyright © 2019 by Elsevier Inc.
ISBN: 978-0-323-54417-7
All rights reserved. No part of this publication may be reproduced or transmitted in any form or by any means, electronic or mechanical, including photocopying, recording, or any information storage and retrieval system, without permission in writing from the publisher. Details on how to seek permission, further information about the Publisher’s permissions policies and our arrangements with organizations such as the Copyright Clearance Center and the Copyright Licensing Agency, can be found at our website: www.elsevier. com/permissions.
This book and the individual contributions contained in it are protected under copyright by the Publisher (other than as may be noted herein).
Notices
Knowledge and best practice in this field are constantly changing. As new research and experience broaden our understanding, changes in research methods, professional practices, or medical treatment may become necessary.
Practitioners and researchers must always rely on their own experience and knowledge in evaluating and using any information, methods, compounds, or experiments described herein. In using such information or methods they should be mindful of their own safety and the safety of others, including parties for whom they have a professional responsibility.
With respect to any drug or pharmaceutical products identified, readers are advised to check the most current information provided (i) on procedures featured or (ii) by the manufacturer of each product to be administered, to verify the recommended dose or formula, the method and duration of administration, and contraindications. It is the responsibility of practitioners, relying on their own experience and knowledge of their patients, to make diagnoses, to determine dosages and the best treatment for each individual patient, and to take all appropriate safety precautions.
To the fullest extent of the law, neither the Publisher nor the authors, contributors, or editors, assume any liability for any injury and/or damage to persons or property as a matter of products liability, negligence or otherwise, or from any use or operation of any methods, products, instructions, or ideas contained in the material herein.
The Publisher
Previous edition copyrighted 2013 by Saunders, an imprint of Elsevier Inc.
Library of Congress Control Number: 2018951822
Senior Content Strategist: Jeremy Bowes
Director, Content Development: Rebecca Gruliow
Publishing Services Manager: Catherine Jackson
Senior Project Manager: John Casey
Senior Designer: Amy Buxton
I would like to dedicate this book to my brilliant and wonderful wife, Joanna, who has been the bright star of my life. Her continuous support, dedication, love, and affection give me the energy and courage to fulfill all of our dreams.
ML
I would like to thank my wife, Susan, and son, Isaiah, for their support and patience during the writing of this dissector. All that I do, I do for them. I also want to dedicate this book in memory of my brother-in-law, Nelson Jones, whose intellect, engagement of others, and curiosity about life have been examples for me.
RST
It’s an honor to dedicate this work to Bill Bryan, Jim McDaniel, and Gail Hendricks, who always fought for what is right. I would also like to extend my gratitude to those who provided me with clinical pearls and critical thinking in my training during medical school and as lifelong learners—Gerald Tressidor, Peter Bell, Chris Colton, Harold Ellis, and Lynn Loriaux. Special thanks to Erik Szeto and his family for always thinking of community service and providing for all. Lastly, I am indebted to my wife, Alison, who supports my passions, my son, Jack, who remains forever inquisitive, my father, Roger, for his engineering mind and love of life, and my mother for her fight for equality and education.
BB
Credits
The following plates are from Drake RL et al: Gray’s Atlas of Anatomy, 2nd edition, Philadelphia, Elsevier, 2015.
Plates 2.1, 2.2, 3.1, 3.2, 4.1, 4.2, 5.2, 7.1, 7.2, 8.1 to 8.3, 9.1, 9.2, 10.1 to 10.3, 11.1, 12.2 to 12.4, 13.2, 13.3, 14.1, 14.2, 15.1, 15.2, 16.1 to 16.3, 17.1, 17.2, 18.2 to 18.5, 19.1, 19.2, 20.1, 20.2, 21.1, 21.2, 22.1, 22.2, 23.1, 23.2, 24.1, 24.2, 25.1, 26.2, 27.1 to 27.3, 28.1, 28.2, 29.1 to 29.4
The following plates are from Drake RL et al: Gray’s Anatomy for Students, 3rd edition, Philadelphia, Elsevier, 2015.
Plates 5.1, 6.1 to 6.4, 12.1, 13.1, 18.1, 22.3, 23.3, 24.3, 24.4, 26.1
Acknowledgments
This dissection book is the work not only of the authors but also of numerous scientific and clinical friends and colleagues who have been so generous with their knowledge and have given significant feedback and help. This book would not have been possible were it not for the contributions of the colleagues and friends listed below.
The following instructors of the Department of Anatomical Sciences, St. George’s University, School of Medicine, Grenada, West Indies for their incredible artistic talents and significant contribution throughout the book to numerous illustrations:
Jessica Holland, MS
Brandon Holt, MS
David Nahabedian, MS
Angelica Ortiz, MS
Charles Price, MS
Xochitl Vinaja, MS
Katie Yost, MS
A very special group of medical students, members of the Student Clinical Research Society in the Department of Anatomical Sciences at St. George’s University, helped enormously with the completion of this project through their comments and criticism:
Theofanis Kollias
Elizabeth Hogan
Frank Scali
We would also like to thank the following colleagues for their technical expertise in dissections and their enormous help with this project:
Alysia Tucker, MD
Kathleen Bubb, MD
Ewarld Marshall, MD
William Merbs
Michael Snosek (PhD candidate)
Benjamin Turner (PhD candidate)
Maira DuPlessis (PhD candidate)
The following St. George’s University alumni and current research fellows of the Department of Anatomical Sciences have been great friends and colleagues. Their continuous support, comments, criticism, and enthusiasm have contributed enormously to the completion of this project:
Denzil Etienne, MD
Alana John, MD
Mitchell Muhlman, MD
Stephen Osiro, MD
Andrew Walters, MD
The following individuals from the Department of Anatomical Sciences at St. George’s University have also been very helpful with their comments and criticisms:
Olufemi Bogunjoko, MBBS
Danny Burns, MD, PhD
Cathleen Bubb, MD
James Coey, MBBS
Maira DuPlessis, MSc
Deon Forrester, MD
Rachel George, MD
Mathangi Gilkes, MBBS MSc
Robert Hage, MD, PhD
Robert Jordan, PhD
Temitope Kehinde, MBChB
Theofannis Kollias, MD
Ahmed Mahgoub, MBBS
Ewarld Marshall, MD
Kazzara Raeburn, MD
Ramesh, Rao
Vish Rao, PhD
Deepak Sharma, MD
Feimatta Sowa, MD
Kristna Thompson, MD
Alana Wade, MD
We are also grateful to the following members of St. George’s University for their photographic and technical expertise and lab assistance:
Joanna Loukas (photography and design)
Rayn Jacobs (design)
Carlson Dominique (laboratory technician)
Rodon Marast (laboratory technician)
Christopher Belgrave (laboratory technician)
Rodon Marrast (laboratory technician)
Seikou Phillip (laboratory technician)
Shiva Mathurin (laboratory technician)
Romeo Cox (laboratory technician)
Nelson Davis (laboratory technician)
Travis Joseph (laboratory technician)
Marlon Jodeph (laboratory technician)
Chad Phillip (laboratory technician)
Simone Lewis (laboratory technician)
Arnelle Gibbs (laboratory technician)
Cheryce Fraser (laboratory technician)
Reviewers
In addition to the reviewers listed below, we would also like to acknowledge the valuable contributions of the reviewers of the first edition.
ARGENTINA
Susana Biasutto, PhD Professor, Anatomical Institute National University of Cordoba Cordoba, Argentina
AUSTRALIA
Fiona Stewart, MBBS, BSc Associate Professor, School of Rural Medicine
University of New England Armidale, NSW, Australia
AUSTRIA
Andreas H. Weiglein, MD Vice Chair, Institute of Anatomy Medical University of Graz Graz, Austria
CANADA
Vid Persaud, MD, PhD, DSc, FRCPath (Lond.) Professor Emeritus and Former Head
Department of Human Anatomy and Cell Science University of Manitoba Winnipeg, Manitoba, Canada
CHINA
Changman Zhou, MD, PhD Professor, Department of Anatomy and Embryology
Peking University Health Science Center
Beijing, China
CZECH REPUBLIC
J. Stingl, PhD
3rd Faculty of Medicine Institute of Anatomy Charles University Prague, Czech Republic
FRANCE
Fabrice DuParc, MD, PhD Professor of Anatomy Department of Medicine and Pharmacy
University of Rouen Rouen, France
GERMANY
Reinhard Putz, MD Professor, Institute of Anatomy Ludwig-Maximilians-University of Munich Munich, Germany
INDIA
Subhash D. Joshi, MBBS, MS Dean, SAIMS Medical College Indore, India
IRAN
Mohammadali M. Shoja, MD Medical Philosophy and History Research Center
Tabriz University of Medical Sciences
Tabriz, Iran
ITALY
Raffaele De Caro, MD
Full Professor, Director of Institute of Human Anatomy University of Padova Padova, Italy
JAPAN
Tatsuo Sato, MD, PhD President
Tokyo Ariake University of Medicine and Health Sciences
Tokyo, Japan
NEW ZEALAND
Helen Nicholson, BSc (Hons), MBChB, MD (Bristol)
Professor and Dean
Otago School of Medical Sciences
University of Otago
Otago, New Zealand
Mark Stringer, BSc (Hons), MBBS, MS (Lond), MRCP (UK)
Professor, Department of Anatomy
Otago School of Medical Sciences
University of Otago
Otago, New Zealand
POLAND
Jerzy Gielecki, MD, PhD
Dean for English Division
University of Warmia and Mazury Olsztyn, Poland
Anna Zurada, MD, PhD
Medical Faculty
Department of Anatomy
University of Warmia and Mazury Olsztyn, Poland
SAUDI ARABIA
Abdullah M. Aldahmash Chairman of Anatomy and Director of Stem Cell Unit
College of Medicine
King Saud University
Riyadh, Saudi Arabia
SOUTH AFRICA
Dr. Albert van Schoor, PhD
Senior Lecturer, Department of Anatomy
University of Pretoria
Johannesburg, South Africa
TURKEY
Nihal Apaydin, MD
Associate Professor, Department of Anatomy
Ankara University Ankara, Turkey
UNITED KINGDOM
Bernard Moxham, BDS, PhD, FHEA, FSB
Professor of Anatomy and Head of Teaching in Biosciences President of the International Federation of Associations of Anatomists (IFAA) Cardiff School of Biosciences Cardiff, United Kingdom
Jonathan Spratt, MA(Cantab), FRCS (Eng), FRCS (Glasg), FRCR Consultant Clinical Radiologist University of North Durham Durham, United Kingdom
UNITED STATES
Anthony V. D’Antoni, MS, DC, PhD
Assistant Professor of Anatomy in Radiology Department of Radiology
Weill Cornell Medicine
New York, New York, United States
Camille DiLullo, PhD
Professor, Department of Anatomy
Philadelphia College of Osteopathic Medicine
Philadelphia, Pennsylvania, United States
Anthony Olinger, PhD
Assistant Professor Department of Anatomy
Kansas City University of Medicine and Biosciences
Kansas City, Missouri, United States
David J. Porta, PhD Professor, Department of Biology
Bellarmine University
Louisville, Kentucky, United States
Kyle E. Rarey, PhD Professor, Departments of Anatomy & Cell Biology and Otolaryngology
University of Florida College of Medicine
Gainesville, Florida, United States
George Salter Jr, PhD
Professor Emeritus of Anatomy
University of Alabama at Birmingham Birmingham, Alabama, United States
Carol E.H. Scott-Conner, MD, PhD Professor, Division of Surgical Oncology and Endocrine Surgery Department of Surgery
University of Iowa Carver College of Medicine
Iowa City, Iowa, United States
Joel Vilensky, PhD Professor Emeritus of Anatomy and Cell Biology
Indiana University School of Medicine
Fort Wayne, Indiana, United States
†Deceased
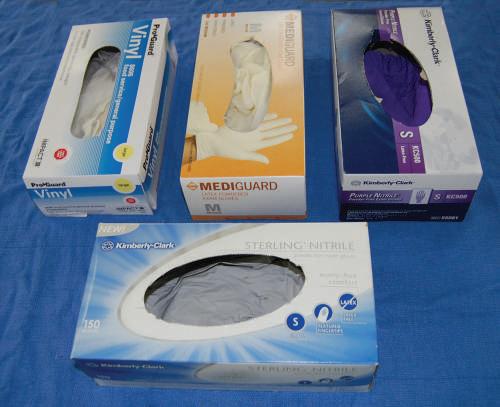
different skin sensitivities. Double gloving helps to prevent contact with cadaver embalming fluids, which may irritate sensitive skin.
• First-aid kit
In a dissection laboratory, nicks and pricks are inevitable, so an up-to-date first-aid kit is essential. It should contain adhesive strips (e.g., Band-Aids), cleansing solutions (e.g., hydrogen peroxide), gauze rolls/pads, and eyewash solution. The phone number of the lab director and/or physician should be posted on a wall inside the lab so that users can contact them to answer any emergency issues that may arise if students are allowed to dissect during nonformal hours.
Dissection Tools
• Cloth/measuring tape
A cloth or paper measuring tape can be invaluable when measuring distances from landmarks of surface anatomy (see Fig. 1.2).
• Skin marker
Marking pens can be helpful tools for tracing out the incision before dissection. Markers can also be used to highlight surface anatomy (Fig. 1.5).
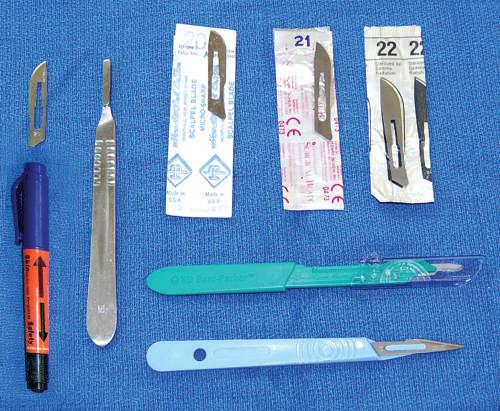
• Disposable scalpels
Disposable scalpels have an advantage because the blade is already secured to the handle. Have a disposable sharps bin in the laboratory (see Fig. 1.5).
• Scalpel handles and blades
Metal scalpel blades are relatively standardized. Many different blade shapes and sizes are available; however, dissectors should experiment to determine which best suits them and the targets to be dissected. The authors prefer larger blades for their students. Scalpels are used primarily to make skin incisions but also can be used to reflect the dermis and areas with dense connective tissue.
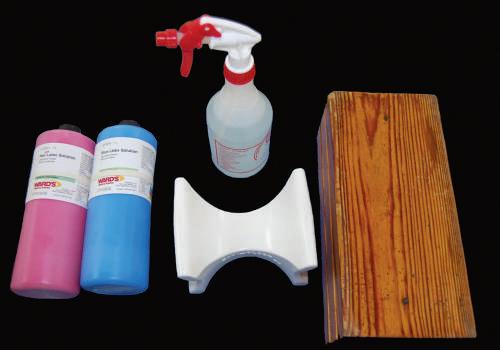
Fig. 1.1 Red and blue latex wrap (to keep cadaver moist); spray bottle; plastic and wooden blocks.
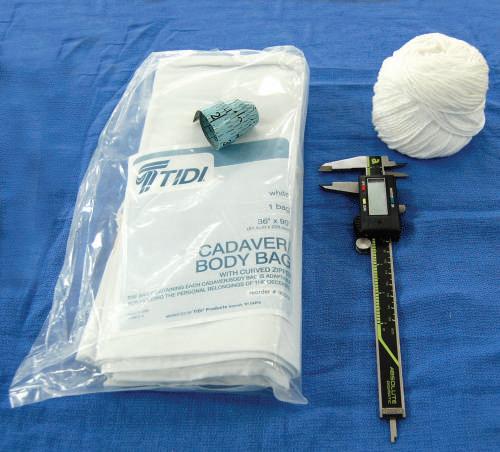
Fig. 1.2 Cadaver bag and cloth measuring tape; ball of string; digital calipers.
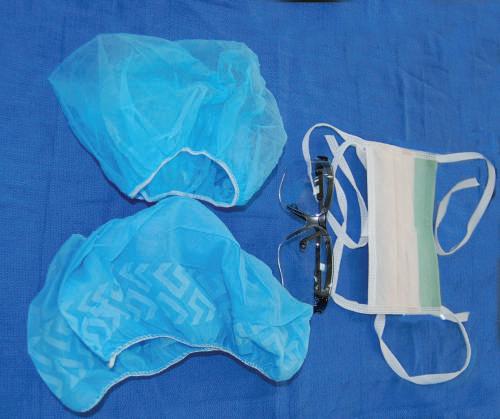
Fig. 1.3 Disposable hair and shoe covers; mask with eye shield; goggles.
Fig. 1.4 Laboratory gloves differentiated by powder and powder free, latex and latex free.
• Sharps bin or container
For safety compliance, all dissection laboratories should have a sharps bin to dispose of scalpel blades, disposable scalpels, pins, and needles.
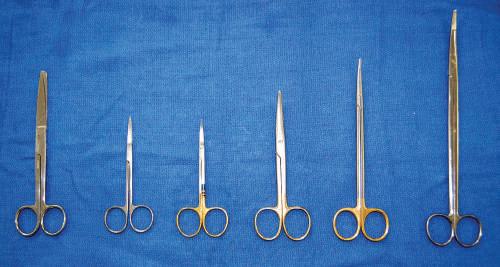
• Scissors
Both 5-inch and 7-inch straight and curved scissors may be used. It is important that the scissors used for each dissection are appropriate in size (Fig. 1.6). Generally, head and neck dissection can be conducted with 5-inch scissors. The remainder of the body can be dissected with 7-inch scissors. The classic scissor dissection technique is a reverse dissection. Straight and curved scissors tend to be user specific.
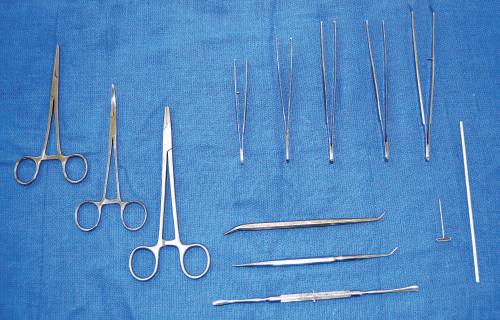
• Hemostat clamps
Corrugated and smooth, 5-inch and 7-inch hemostat clamps are available (Fig. 1.7). The corrugated type can be used to clamp onto the edge of skin incisions to aid in flap removal. Smooth clamps can be used to hold onto delicate structures during dissection. Hemostat clamps can be used when retracting tissue over relatively long dissection periods.
• Needle holders
The needle holder allows the user to secure and remove scalpel blades (see Fig. 1.7).
• Forceps
Toothed and nontoothed forceps are either 5 inches or greater than 5 inches long. Toothed forceps enable the dissector to grip tissue without it sliding out of the hands. Nontoothed forceps allow the dissector to control delicate tissues during meticulous dissection without damaging the tissue (see Fig. 1.7).
• Spatula probe/pointer
Instruments that have a probe or tip on one end and spatula on the other can be used to highlight dissected
Fig. 1.6 Various scissors differentiated by length and blade type (straight or curved, pointed or blunted): 6-inch Deaver, straight fine scissors, curved fine scissors, 5-inch Mayo, 7-inch Metzenbaum, 9-inch Metzenbaum.
Fig. 1.7 Left, Hemostat or artery clamps (straight and curved). Upper, Needle holder; various forceps differentiated by length, toothed and nontoothed. Lower, Probes and dissectors. Right, T-pin and orange stick.
structures. The spatula can aid blunt dissection (see Fig. 1.7).
• T-pins
T-pins (1 1 2 –2 inches) are useful in securing structures away from the desired dissection region. T-pins also can be used when setting up laboratory examinations (see Fig. 1.7).
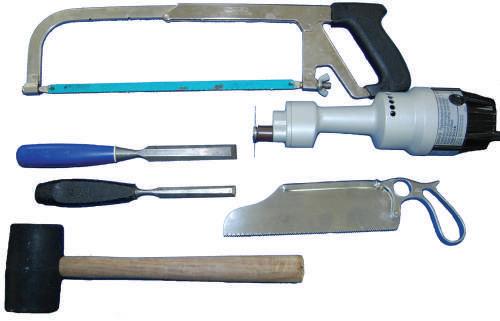
• Chisel (osteotome)
Narrow-blade and broad-blade chisels are important for performing osteotomies and can help dissect, for example, between the occipital condyles and various vertebrae (Fig. 1.8). Chisels can be used to break up a bone surface to view the soft tissue deep to it (e.g., anterior cranial fossa).
• Rubber mallet
A mallet is used when striking the chisel to crack surface areas, such as when performing osteotomies (see Fig. 1.8).
• Electric Stryker saw
Used when cutting bone, the Stryker saw has a safety mechanism that prevents the blade from cutting the user’s skin and soft tissue.
Fig. 1.5 Various scalpel blades and handles (metal and disposable scalpels). An example of a skin marker that can be used for outlining skin incisions is shown.
• Handsaw
A simple bone saw can be used to customize various dissections and amputations for plastination (see Fig. 1.8). A handsaw is important for hemipelvectomy dissections.
DISSECTION TECHNIQUES
Using the proper technique during dissection is important when developing good dissection skills. Initially, holding the instruments correctly and practicing the techniques may not feel natural. The authors believe that cadaver dissection techniques should reflect the techniques used during surgical procedures. Learning to hold forceps and scissors is fundamental during dissection. These techniques also can be used in the operating room and certain office settings during interventional procedures.
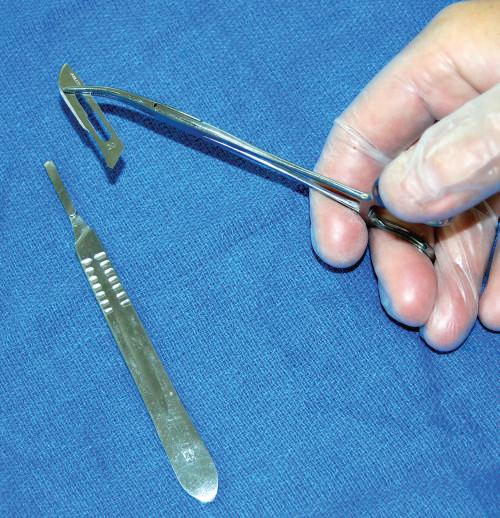
• Scalpel
The technique for placing a blade onto a scalpel handle requires a hemostat to hold the blade and then place it onto the handle while holding the forceps (Figs. 1.9 and 1.10). When cutting with the blade, use the tip and the first centimeter of the blade. Direct the scalpel using smooth, sweeping motions (Fig. 1.11). Avoid “sawing” and “woodpecker” techniques. Dull blades that require “pushing” the scalpel are dangerous; therefore maintain a sharp blade at all times.
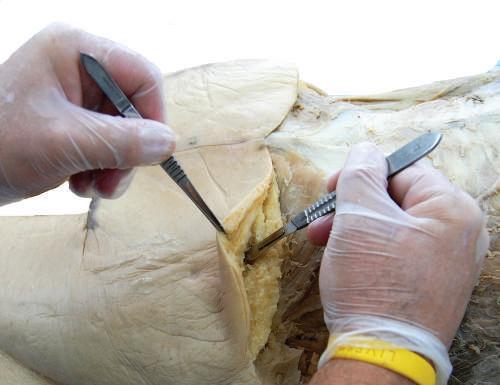
• Forceps
Hold the forceps as you would hold a pencil, with a pincer grip. The classic mistake is holding the forceps in the palm of the hand as if grasping. Hold the forceps vertically and perpendicularly to the target tissue to allow a 360-degree window of use (Fig. 1.12).
• Scissors
The appropriate technique when dissecting with scissors is called reverse dissection (Fig. 1.13). This requires the user to keep the scissor blades closed when entering into the tissue to be dissected, then opening
or replacing scalpel blades onto a scalpel handle. Use hemostat or needle holder to grip the scalpel blade. Line up the base angle of the blade with the tip-ofhandle angle.
the blades to create a splaying of the tissue. This results in natural separation of tissue structures and planes. Cut only tissue that is fully exposed so that the desired tissue can be preserved.
• Buttonhole maneuver
A buttonhole maneuver is helpful when dissecting a flap of dermis. Create a 2-cm parallel incision along the original skin incision, 2 to 3 cm from the edge.
Fig. 1.8 Handsaws (long and short) for bone; electric Stryker bone saw; chisel (broad and narrow blades); rubber mallet.
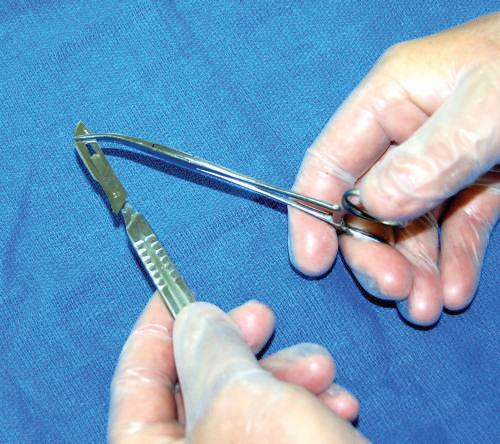
Fig. 1.9 Placing
Fig. 1.10 Placing the blade onto the scalpel handle tip. Generally, a clicking sound confirms the blade is secured correctly.
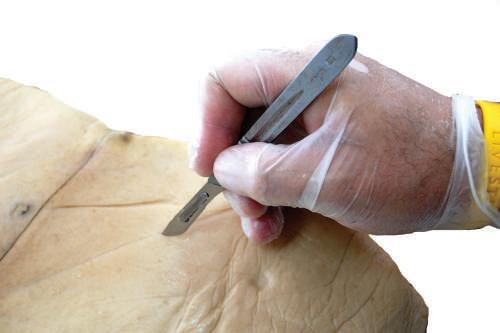
Fig. 1.11 Using the scalpel tip to create skin incisions. Note the grip of the scalpel provides side-to-side and back-to-front blade stability.
Fig. 1.12 Holding toothed forceps with a 360-degree view and using the scalpel tip between tissue layers while maintaining tension of superficial tissue layer.
1.13 Blunt dissection introduces the scissor tips into the tissue, and then reverse dissection opens the tissue planes.
Fig. 1.14 The buttonhole maneuver is helpful when dissecting large skin flaps and provides appropriate tension to expedite dissection. Place your fingertip(s) into the parallel incision and retract with appropriate tension.
Fig. 1.15 The buttonhole maneuver for retraction of the skin allows adequate visualization of the underlying tissue for further dissection.
Repeat this, generally near the corners of the skin flap. Place your index finger into the parallel incision, and retract the skin flap with appropriate tension that would allow either blunt dissection or a sharp edge to cut the apex of the flap (Figs. 1.14 and 1.15).
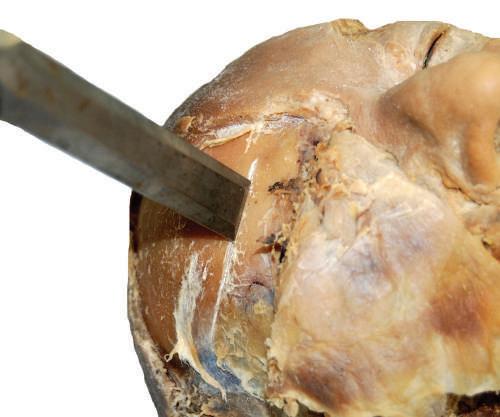
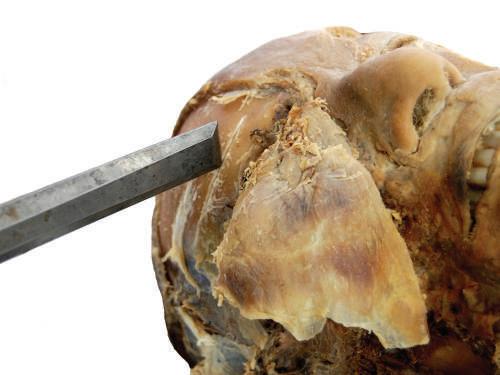
• Surface fracturing technique
The surface fracturing technique requires placing the broad blade of a chisel parallel to the bone and with as much of the blade along the bone. Strike the chisel head with a mallet using a technique that does not follow through once the head is struck. The objective is to direct the energy through the blade onto the
Fig.
bony surface, causing multiple fractured segments while protecting the soft tissue beneath the bone (e.g., fracturing anterior cranial fossa plate before superior orbit dissection) (Fig. 1.16).
• Direct fracturing technique
The direct fracturing technique can be performed using a narrow-bladed chisel or by tilting a broad-bladed chisel so that a direct point touches the bone to be fractured. Strike the chisel head with the mallet as if driving a nail. This technique will fracture through a specific part of outer layer of bone (Fig. 1.17).
• Prying technique
The prying technique requires placing the blade of a chisel into the gap created by a handsaw or electric saw. Once in the gap, rotate the chisel blade using
a circular motion of the wrist while gripping the chisel to pry the two bony edges apart. Prying is especially useful when performing a craniotomy (see Chapter 23).
• Stryker saw
The technique for using the electric bone saw is performed by placing the blade directly perpendicular to the bone. Place enough pressure onto the bony surface until the blade has gone through the thickness of the bone. Once through the bone, remove the blade, and assess whether the prying technique is required.
• Stryker saw scoring
The scoring technique requires using a Stryker electric saw blade to score the surface of the bone region to be removed. Often an “X” pattern of scoring can weaken the bony cortex. Once the scoring is completed, use the surface fracturing technique. This allows fracture of the cortex and removal of bony fragments without damaging soft tissue beneath the cortex (e.g., removing outer cortex of mandibular ramus; see Chapter 22).
SPECIALIZED MATERIALS TO HIGHLIGHT STRUCTURES
• Latex solutions
Use latex solutions as an injection to highlight vessels, especially small vessels that may not be easily dissectible.
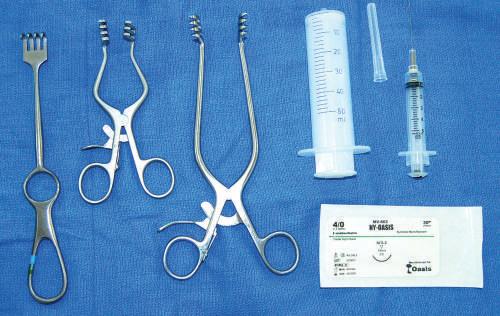
• Needle and syringe
Multiple syringe sizes and needle sizes are used to inject latex or dye into spaces (Fig. 1.18). Injection of the globe (eyeball) with water also may be useful to obtain lifelike qualities.
• Suture material
Multiple sizes of suture material to reattach dissected structures can be useful when demonstrating
Fig. 1.16 Place chisel blade flat and parallel on the desired bone surface. The surface fracturing technique generally results in multiple fragments protecting the deep tissue.
Fig. 1.17 Place chisel blade at an angle on the desired bone surface. The direct fracturing technique creates a specific fracture at the point of the chisel blade.
Fig. 1.18 Left to right, Handheld retractor (Volkmann); dynamic self-retaining retractors (Weitlaner); syringes (50 mL and 5 mL); suture material.
superficial and deep structures after dissection (see Fig. 1.18).
• Retractors
Types include (1) single-handled manual retractor for dynamic traction and (2) self-retractor used to retract two sides simultaneously, allowing the dissector to practice surgical procedures without needing others to retract structures manually (see Fig. 1.18).
• Food coloring
Mix with a solution to inject into the body, to fill up potential spaces and to highlight others.
• Electronic digital calipers
Use to measure specific length, size, and shape of anatomic structures (see Fig. 1.2).
• Plastination
The plastination technique preserves dissected regions or structures to be used as prosected material, with a life span of 6 months to 20 years,
depending on technique, body part, and frequency of use.
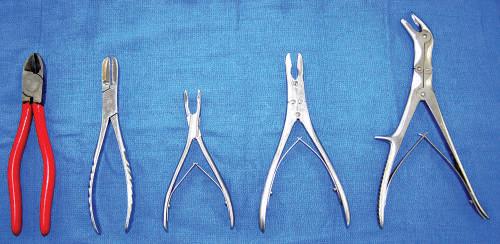
• Rongeur and rib cutters
These can be used to cut through small- to medium-sized bones and to customize cut ends of all bone sizes (Fig. 1.19).
Fig. 1.19 Left to right, Metal wire cutters (2), bone cutter (Liston), 5-inch bone-cutter forceps, 7-inch bone-cutter rongeur (Stille).
CHAPTER 2 MUSCLES OF. mHE BACK AND SCAP.UL~
ATLAS REFERENCES *
Netter: 180-183, 257, 413-418
McMinn: 101-103, 131-136, 144
Gray's Atlas: 20-32, 36-42, 399, 400
BEFORE YOU BEGIN
Make sure that you have palpated the following anatomic landmarks on yourself and classmates:
• Superior nuchal line
• External occipital protuberance (inion)
• Mastoid process
• Spinous process of the 7th cervical vertebra (C7, veritebra prominens)
• Spinous process of the thoracic and lumbar vertebrae, the sacrum, and the coccyx
• Medial and lateral parts of the clavicles
• Iliac crests
• Trapezius muscle
• Latissimus dorsi muscle
• Deltoid muscle
• Triceps brachii muscle
• Acromion
SKIN AND SUPERFICIAL FASCIA
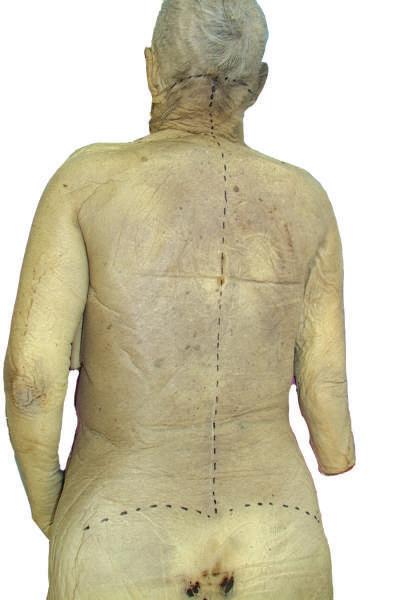
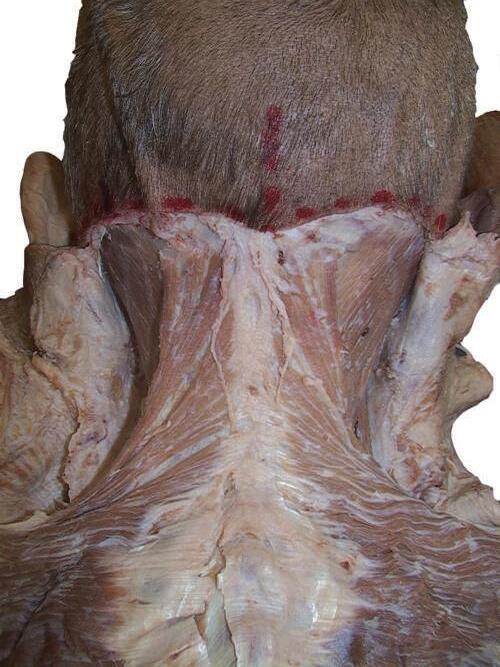
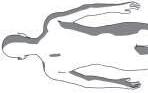
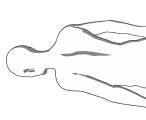
0 Begin by palpating bony landmarks. With a marker, draw the following lines on the skin of the cadaver (Fig. 2.1 ):
1. From the external occipital protuberance, down the midline of the back to the sacrum.
2. Laterally, from the external occipital protuberance to the mastoid process on each side of the cadaver.
*NOTE: This dissection guide is cross-referenced to the following atlases: Netter, Atlas of Human Anatomy, ed 7 (Netter); McMinns Clinical Atlas of Human Anatomy, ed 7 (McMinn); and Grays Atlas of Anatomy, ed 2 (Gray's). Page references from each atlas are provided at the beginning of Chapters 2 through 29 to give you the opportunity to study the relevant anatomy in depth to aid in your dissection
3. Laterally, from the spmous process of the vertebra prominens to the aeromion of each shoulder.
4. Superiorly from the sacrum, curving obliquely over the iliac crests to the midaxillary line on each side of the ho~; that is, to a point about halfway around the pper ecl.ge of each iliac crest.
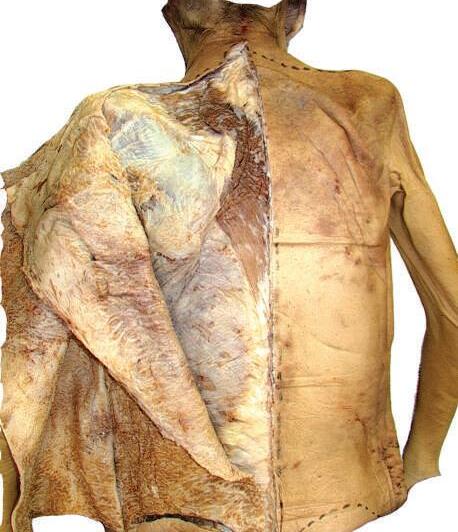
0 Incise tjie skin along the lines just described, beginning at the oint where the incisions for the midline and from the shoulders meet ( Fig. 2.2 ).
0 Retract the skin carefully (with toothed forceps), leaving the fat (superficial fascia) intact (see Fig. 2.2 ).
DISSECTION TIP
Place absorptive cloths at the inferolateral spaces of the iliac crest. Excessive amounts of embalming fluid often accumulate at this location.
DISSECTION TIP
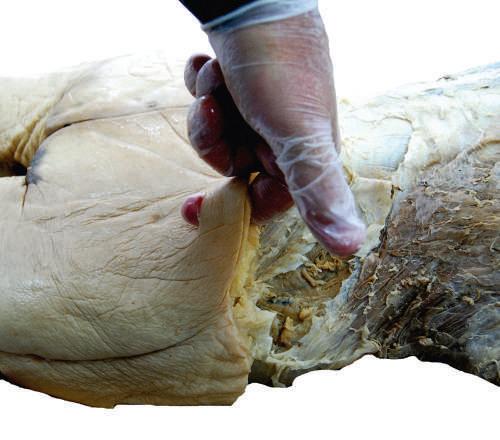
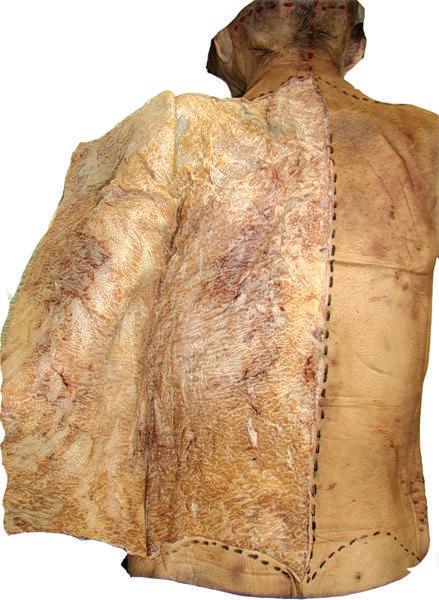
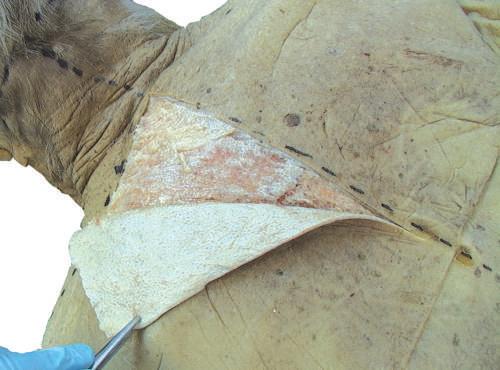
Make necessary "buttonholes" in the skin to facilitate the dissection (Fig. 2.3 ), as indicated in Chapter 1.
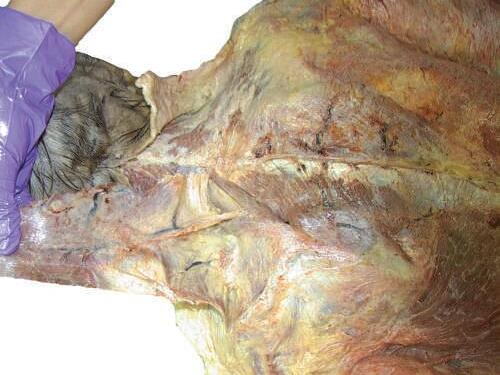
0 On one side of the body, the dissectors should first reflect only the skin, leaving the superficial fascia (tela subcutanea) in place.
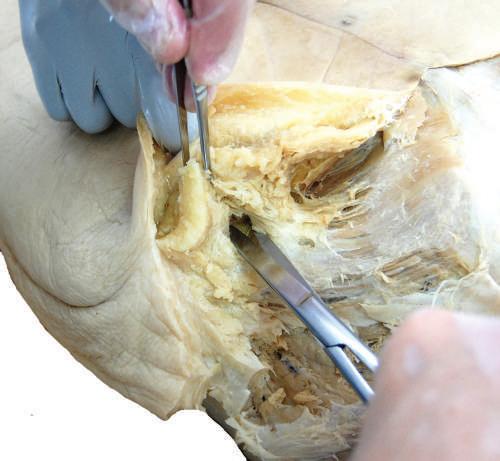
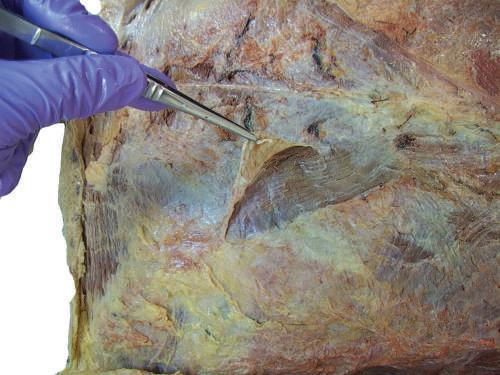
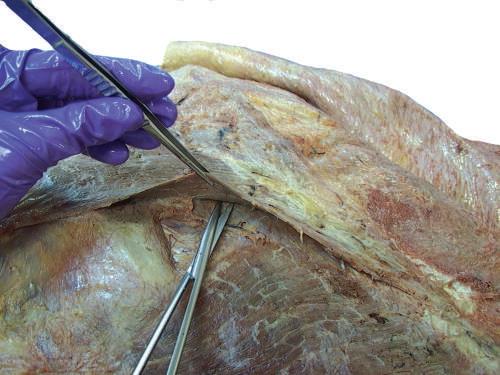
0 Start the separation of the superficial fascia from the underlying deep fascia in the midline, by identifying a small part of the trapezius muscle.
0 Carefully scrape off the superficial fascia from the surface of the muscle with your scalpel (Fig. 2.4 ).
DISSECTION TIP
As the superficial fascia is reflected, watch for the passage of neurovascular bundles from the deep fascia into the deep surface of the superficial fascia. Save short segments of several of these for later demonstration and review.
Mastoid process
External occipital protuberance
2.3 Make “buttonholes” in the skin to facilitate its reflection from the superficial fascia.
Sacrum
Iliac crest
Midline
Vertebra prominens (C7)
Fig. 2.1 Skin markings for incision lines: neck and back.
Fig. 2.2 Reflection of skin from superficial fascia.
Fig. 2.4 Deep skin incisions showing deep fascia and muscle fibers.
Fig.
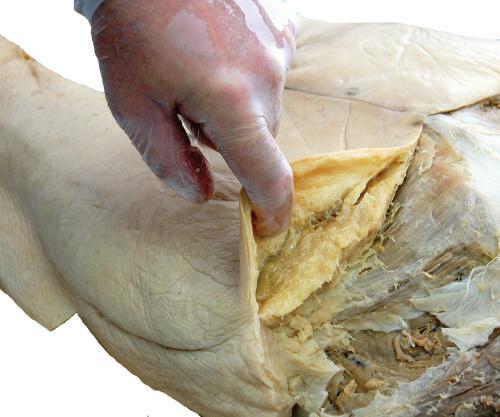
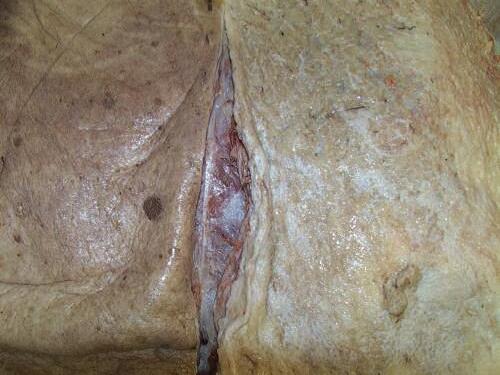
DISSECTION TIP
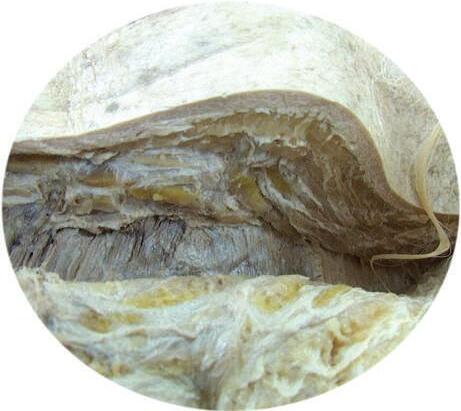
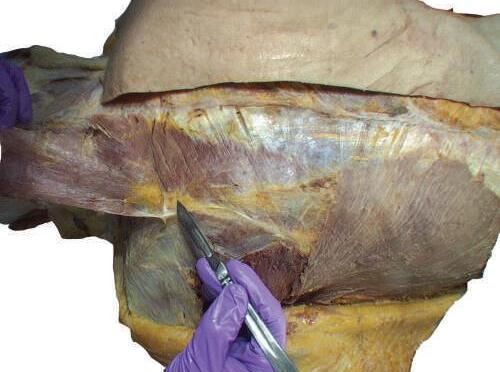
Take precautions to avoid cutting too deeply with the scalpel. In some cadavers, the superficial fascia is very thin, and more deeply situated structures can be cut and destroyed (Figs. 2.5 and 2.6).
o Completely remove superficial fascia over the latissimus dorsi muscle.
o On the other side of the body, the skin and superficial fascia can be reflected together.
DISSECTION TIP
Care must be taken in this latter approach to avoid damage to the underlying muscles, especially the trapezius and latissimus dorsi muscles and their aponeuroses. Identify these before the skin and fascia are reflected more than a few centimeters.
SUPERFICIAL MUSCLES OF THE BACK: PART 1
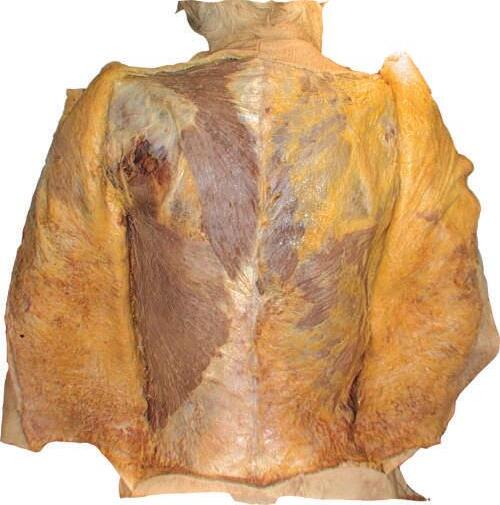
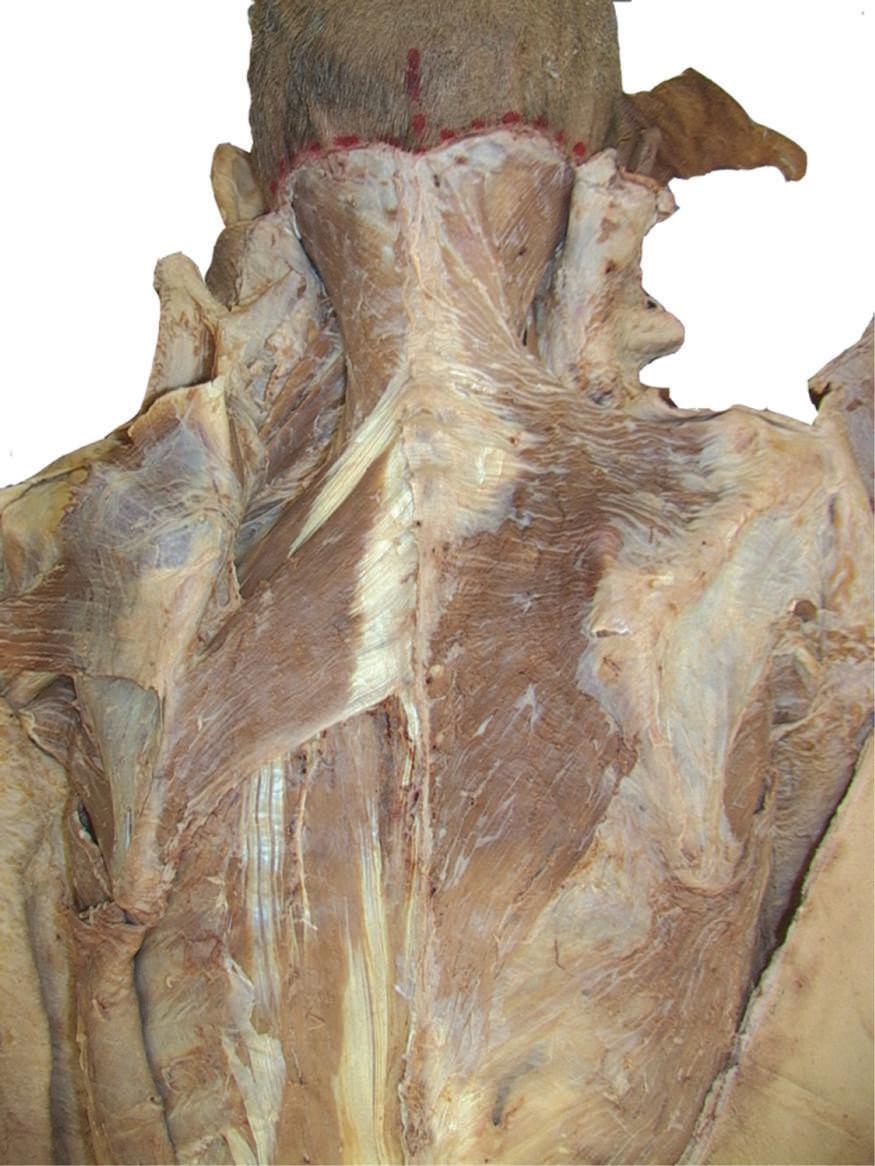
o Remove enough deep fascia to clarify the borders of the two most superficial muscles of the back, the trapezius and latissimus dorsi (Fig. 2.7).
ANATOMY NOTE
Note the diamond-shaped aponeurotic area of the trapezius at the upper middle thoracic region (see Fig. 2.7). The skin, superficial fascia, and deep fascia are relatively thin here. This is in contrast to the lateral lumbar region, where the amount of subcutaneous fat is increased (see Fig. 2.6).
2.5
of deep fascia and appearance of
latissimus dorsi, and thoracolumbar fascia.
Fig. 2.6 Note possible differences in thickness of the skin and fascia. Avoid cutting too deeply with the scalpel to prevent damage to superficial structures when exposing them.
Fig.
Reflection
trapezius,
Trapezius
Infraspinous fascia
Teres major Thoracolumbar fascia
Latissimus dorsi
Fig. 2.7 Complete removal of superficial fascia over trapezius, latissimus dorsi, and posterior layer of thoracolumbar fascia on left side of cadaver. Deep fascia and some adipose tissue have been left intact on right side.
o Identify the teres major muscle and the infraspinous fascia (see Fig. 2.7).
ANATOMY NOTE
This fascia covering the infraspinatus muscle is attached to the margins of the infraspinous fossa and is continuous with the deltoid fascia along the posterior border of the muscle.
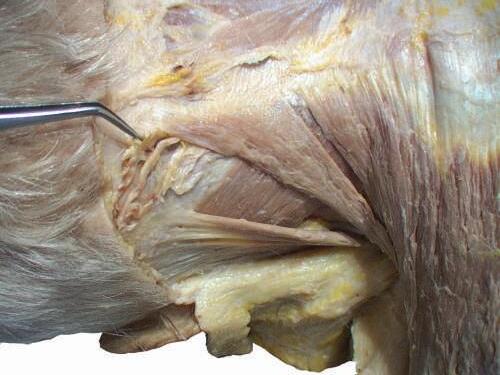
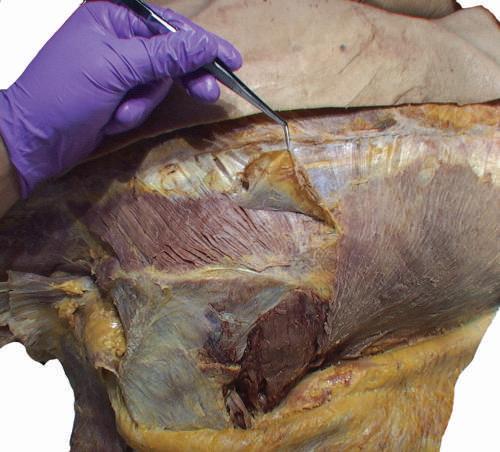
o Carefully separate the deep fascia covering the trapezius muscle (Fig. 2.8).
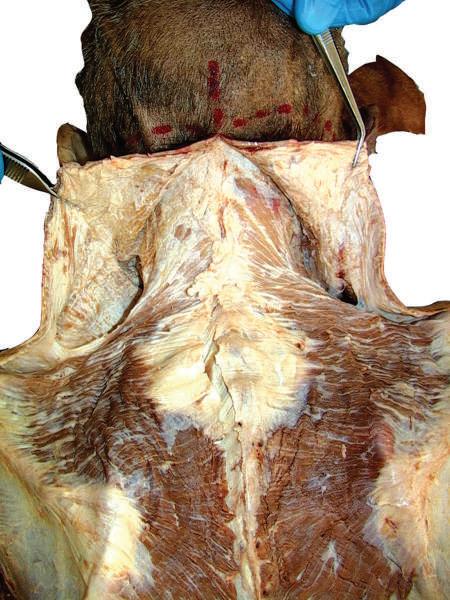
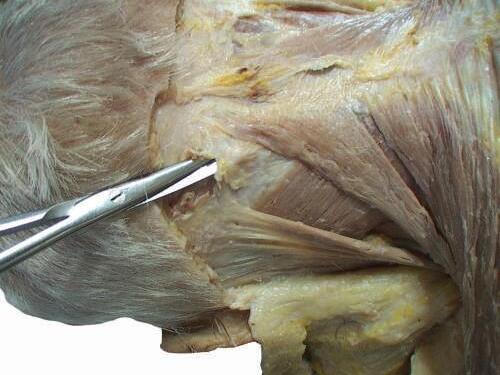
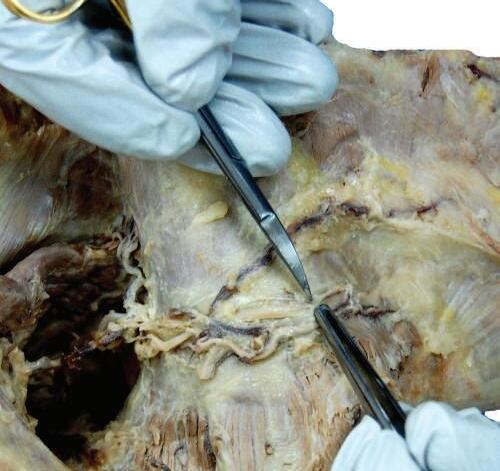
o While cleaning away the fascia that overlies the most cranial portion of the trapezius (Figs. 2.9 and 2.10), look for the greater occipital nerve.
o This nerve usually can be found approximately 1 inch (2.5 cm) from the midline and 1 inch inferior to the superior nuchal line, as the nerve pierces the trapezius (Figs. 2.11 and 2.12).
o Also at this location, locate the occipital artery, and preserve it as the trapezius is reflected (see Fig. 2.12).
Fig. 2.9 Exposure of superior part of trapezius with portions of deep fascia still covering its uppermost portion.
Fig. 2.8 Careful separation of deep fascia covering trapezius muscle.
2.10 Exposure
Fig. 2.11 After identifying the greater occipital nerve, separate and remove the deep fascia; M, midline; H, horizontal line.
DISSECTION TIP
GREATER OCCIPITAL NERVE
To identify the greater occipital nerve, draw a horizontal imaginary line from the external occipital protuberance to the mastoid process. At 3 cm lateral to the external occipital protuberance on the imaginary line, remove the deep fascia to identify this nerve.
3RD OCCIPITAL NERVE
Usually the deep fascia over the trapezius muscle below the superior nuchal line is very thick and difficult to cut until the 7th cervical vertebra (C7) level. Pay special attention to the dissection process. Intermingled with the deep fascia over this area is the 3rd occipital nerve; try to expose and save it (Fig. 2.13).
o To detach the trapezius from its origin, first make a small vertical cut through the lower part of the trapezius at the 12th thoracic vertebra (T12) level as it attaches to the midline.
o Continue the incision to the external occipital protuberance. Define and loosen the trapezius with your fingers or with scissors before you proceed further upward along the midline (Fig. 2.14).
o Detach the trapezius from its origin on the superior nuchal line and the external occipital protuberance, and sever the fibers that arise from the spines and associated ligaments of the cervical and thoracic vertebrae. Reflect the trapezius laterally toward its insertion onto the scapula (Fig. 2.15).
o On the deep surface of the trapezius, near the superior angle of the scapula, look for the nerve that supplies the trapezius, the accessory nerve.
Fig. 2.12 Deep fascia is cut, and the greater occipital nerve and occipital artery are visible.
o Note the artery that supplies the trapezius muscle, the ascending branch of the transverse cervical artery.
o Identify the levator scapulae, rhomboid minor and major muscles, and neurovascular bundle (Fig. 2.16).
o Clean the fascia from these muscles so that their fibers can be seen clearly.
Fig.
of deep fascia covering the upper portion of trapezius.
Fig. 2.13 Complete exposure and detachment of the superior part of the trapezius from the deep fascia. Observe the 3rd occipital nerve.
Fig. 2.14 Dissection of lateral trapezius muscle facilitated by a separation technique using dissecting scissors.
Fig. 2.15 Separation of the connective tissue on the deep surface of trapezius.
Fig. 2.16 Complete reflection of the trapezius and appearance of the underlying levator scapulae and rhomboid muscles, and neuromuscular bundle.
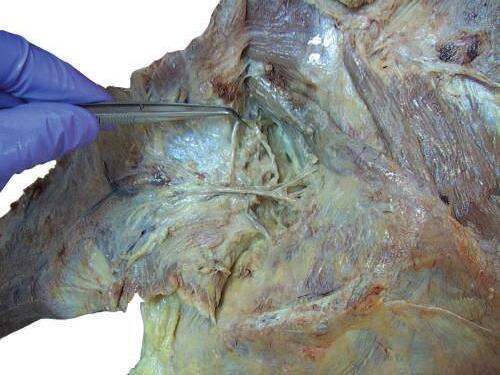
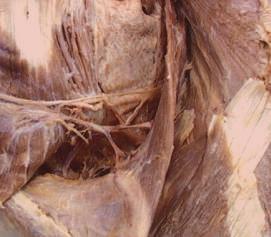
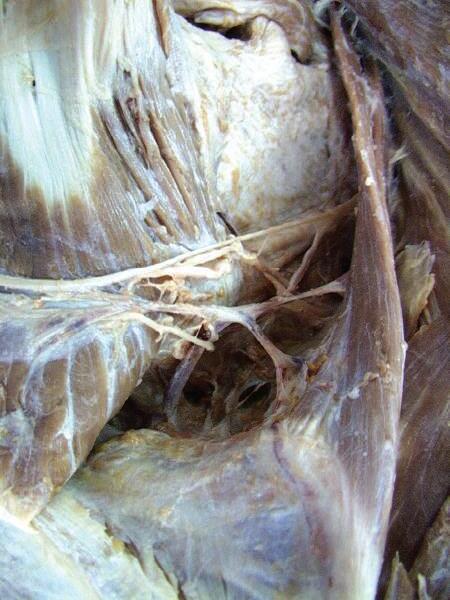
o Gently retract the levator scapulae muscle medially. At the midpoint of the levator, you will see the accessory nerve exit and run on the internal surface of the trapezius muscle (Figs. 2.17 and 2.18).
o Carefully separate the neurovascular bundle to identify the accessory nerve, ascending branch of the transverse cervical artery, and tributaries of transverse cervical vein (Figs. 2.19 and 2.20).
o Carefully expose the deep fascia over the rhomboid major and minor muscles. In some specimens the line
Fig. 2.17 Identification of accessory nerve, emerging deep from medial side at midpoint of levator scapulae muscle.
Ascending branch of transverse cervical artery and vein
Fig. 2.18 Careful separation of neurovascular bundle to identify accessory nerve, ascending branch of transverse cervical artery, and tributaries of transverse cervical vein.
Fig. 2.19 After careful dissection of connective tissue, trapezius muscle is reflected and accessory nerve identified.
Accessory nerve
Levator scapulae
Accessory nerve
Trapezius reflected
Rhomboid major
Splenius capitis
2.21 Carefully expose deep fascia over the rhomboid major and minor muscles.
Fig. 2.20 Trapezius muscle is reflected and the accessory nerve identified.
of cleavage between the rhomboid muscles may be unclear (Figs. 2.21 and 2.22).
o Reflect the rhomboid muscles laterally toward their insertion onto the medial border of the scapula (Fig. 2.23) (Plate 2.1).
o Deep to the rhomboids, identify the serratus posterior superior muscle, which inserts onto the ribs rather than onto the scapula. (This fact will assist you in its identification.)
o On the deep surface of the rhomboids, try to identify the dorsal scapular nerve and dorsal scapular artery (Fig. 2.24).
ANATOMY NOTE
The dorsal scapular nerve innervates the rhomboid and levator scapulae muscles (in addition to branches from C3 and C4). The dorsal scapular nerve arises from C5, one of the two nerves that arise directly from the ventral rami of the brachial plexus.
ANATOMY NOTE
In about 50% of the specimens, the dorsal scapular artery is absent, and the deep branch of the transverse cervical artery replaces it. The dorsal scapular artery typically arises from the 3rd part of the subclavian artery and runs posteriorly through the brachial plexus.
MUSCLES OF THE SCAPULA
ANATOMY NOTE
The infraspinous fascia is attached to the scapula around the boundaries of the attachments of the infraspinatus, teres minor and major, long head of triceps brachii, and deltoid muscles.
o Clean the teres major muscle (Fig. 2.25).
o Identify the teres minor and deltoid muscles and the long head of triceps brachii (Fig. 2.26).
ANATOMY NOTE
The fibers of the teres minor muscle run more or less parallel to the fibers of the teres major and are medial to the long head of the triceps brachii and deltoid muscles (see Fig. 2.25).
o Beginning superiorly, reflect the infraspinous fascia to expose the long head of triceps and deltoid muscles (Figs. 2.27 and 2.28).
Fig.
Fig. 2.22 Trapezius and latissimus dorsi muscles are reflected. Underlying intermediate extrinsic muscles of the back are exposed.