‘This excellent account of those who underpinned the fighters in the Arab Revolt reminds us of the hardships and challenges of war in early twentiethcentury Arabia. By looking behind the lines,Walker shows us the real scale of Lawrence’s achievement and the achievements of those who supported him.’
Sir Mark Allen, ex-Foreign Service
‘After another round of books on T. E. Lawrence ‘of Arabia’, published on the war’s centennial, it seems scarcely credible that anything new can be said on the subject. But Philip Walker has discovered an astonishing wealth of new material in private collections. The Forgotten Few peers beneath the Lawrence legend to reveal the seamy underbelly of the Arab Revolt.’
Sean
McMeekin, Professor of History, Bard College
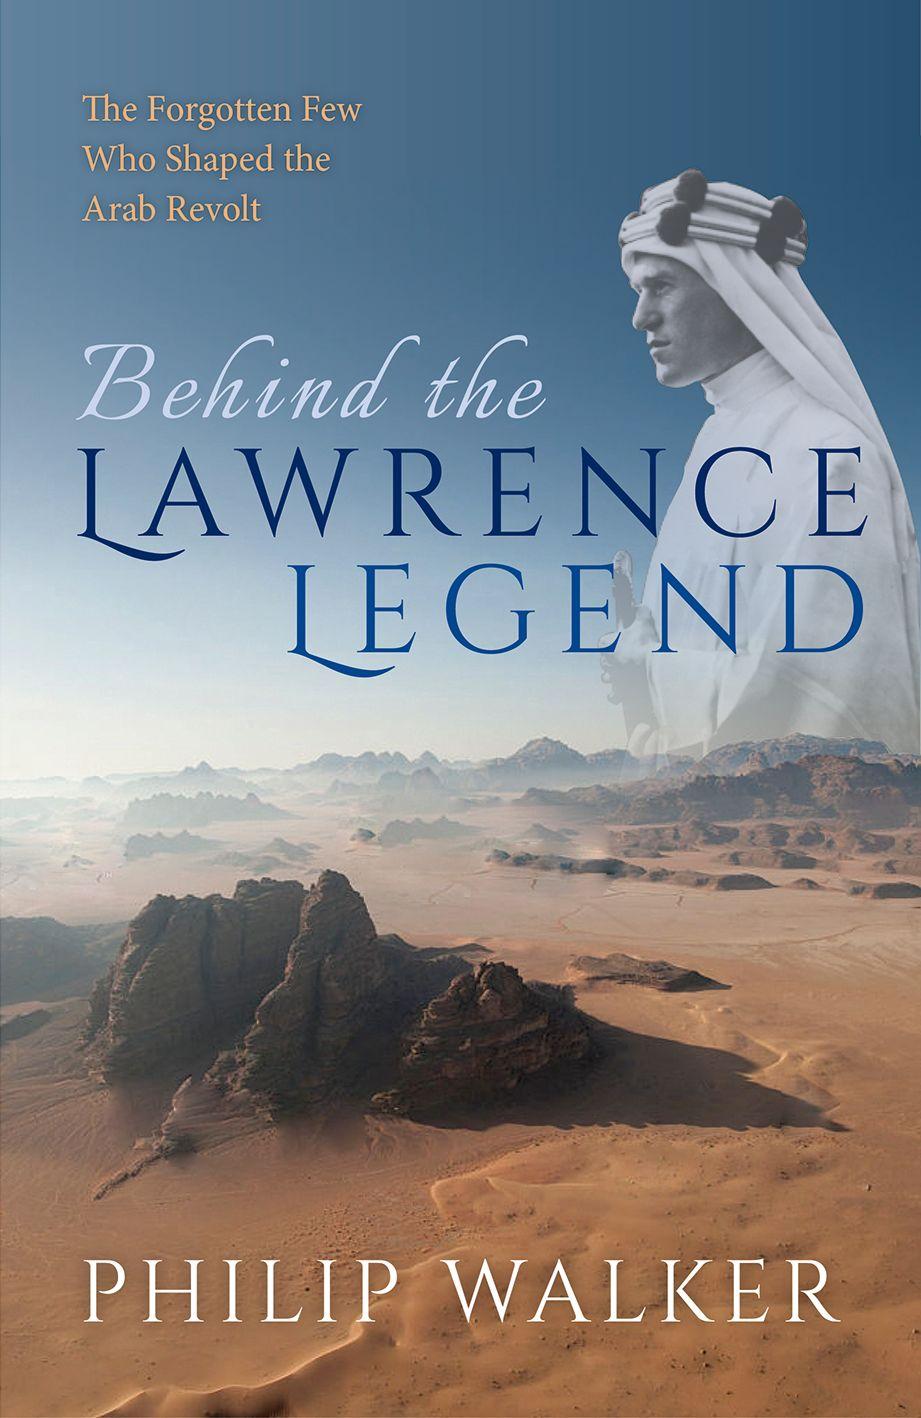
BEHINDTHE LAWRENCE LEGEND
The Forgotten Few Who Shaped the Arab Revolt
PHILIP WALKE R
1
Great Clarendon Street, Oxford, ox2 6dp, United Kingdom
All rights reserved. No part of this publication may be reproduced, stored in a retrieval system, or transmitted, in any form or by any means, without the prior permission in writing of Oxford University Press, or as expressly permitted by law, by licence or under terms agreed with the appropriate reprographics rights organization. Enquiries concerning reproduction outside the scope of the above should be sent to the Rights Department, Oxford University Press, at the address above
You must not circulate this work in any other form and you must impose this same condition on any acquirer
Published in the United States of America by Oxford University Press 198 Madison Avenue, New York, NY 10016, United States of America
British Library Cataloguing in Publication Data
Data available
Library of Congress Control Number: 2017933788
ISBN 978–0–19–880227–3
Printed and bound by CPI Group (UK) Ltd, Croydon, cr0 4yy
Links to third party websites are provided by Oxford in good faith and for information only. Oxford disclaims any responsibility for the materials contained in any third party website referenced in this work.
Acknowledgements
Alarge number of people over many years have helped me in the research and writing of this book, and I am very grateful to all of them. They include:
Michael Adam; Rosemary Adam; Scott Addington; Professor Ali Allawi; Patricia Aske, Pembroke College Library, Cambridge University; John Barnard; James Barr; Sarah Baxter, Society of Authors; Julian Beaumont OAM for information on Colonel John Bassett; John Bellucci; Shirley Bose; Frank Bowles, Cambridge University Library; Colin Boyes; Roger Bragger; Axel Bray; Howard Bray; Professor Carol Brayne; Mark Brayne; Sophie Bridges, Churchill Archives Centre, Churchill College, Cambridge; Jim Brown; Norman Brown; Gary Bryan; Peter Card; Michael V. Carey; Julie Carrington, Royal Geographical Society Library, for information on George Wyman Bury; Greville Cavendish; Piers Cavendish; Rebecca Child; Anthony Cochrane; Susanne Cochrane; James Cochrane; Lindon Cornwallis; George Cruddas; Neil Dearberg; Brian Dobson; Barbara Duce; Mary Duffy; John Edmonds CMG, CVO; Sam Eedle; Charles Eilers; David Elliott; Wynne Evans; Rebecca Fellows; Sarah Felton; Dr Simon Fielding; Peter Finch; Ray Foster; Dennis Garrood; Gregory Gilbert; Tony Gilbert; Valerie Gilman; Jenny Glazebrook; Katherine Godfrey, Liddell Hart Centre for Military Archives, King’s College, London; Adam Gotch; Francis Gotto, Sudan Archive, Durham University Library; Cynara de Goutiere;Tony de Goutiere; Howard Hamilton QC; Michael Hammerson; Fred Hancock; Jennifer Haynes; Richard Heywood; Dale Hjort; Jane Hogan, formerly of the Sudan Archive, Durham University Library; Raymond Holland; Professor Brian Holden Reid; Pauline Homeshaw; Keith Hopwood; Diane Horsfield; Michael Hughes, Bodleian Library, for information on the Marconi Archive; Amanda Ingram, Pembroke College, Cambridge University; Kenneth Jacob; Professor Salah Jarar; Clifford Jones, Christ’s Hospital School, for information on Lieutenant Leslie Bright; Christopher Kennington; Harriet
King; Hugh Kirkbride; Yvett Klein, Bonham’s, Sydney, Australia, for information on Colonel John Bassett; Dennis Lalor; Vincent Landon; Zoe Lawson; Christophe Leclerc; Alice Lock; Andrew Lownie for information on Colonel John Bassett; Katharine Lumsden; Nicholas Lumsden; Nigel Lutt; Ian Mackenzie; Keith Mackenzie; Bridget McCrum; Catherine McIntyre; Henrietta McCausland; Christopher McKibbin; Stuart McKibbin; Alistair Massie, National Army Museum; Mohamed Mekabbaty; John Millensted; Polly Mohs; Claire Morgan-Jones; Michael Morrogh; Dr David Murphy; Peter Murphy; Dr Fiona Nash, Royal Geographical Society; Valerie Neill; John O’Brien, British Library; Simon Offord, Imperial War Museum; Dr Carol Palmer; Dr Suzanne Paul, Cambridge University Library; Helen Pearson; Mark Pearson; Ian Petrie; Richard Piggott; Rosamunde Pilcher; Robin Pilcher; Patricia Popkin; Gregory Pos; Michael Powell; Stephen Powell; John Price; Jean Proffitt; Carole Qureshi; Jonathan Rashleigh; Ian Reid; Anthony Richards, Imperial War Museum; Richard Ridler; David E. Roberts; Martin Robertson; Eugene Rogan; David Sarsfield, Microform Academic Publishers; Sir Patrick Macdonnell Salt; Reg Saville; Alister Scott; Mark Scott; Desmond Seward; Fred Sharf; Jenny Shore; Mandy Stephens; Andrew Shepherdson; Sir Robert Sherston-Baker Bart; Lianne Smith, King’s College London Archives; Paul Smith; Piers Smith-Creswell; Colonel Carron Snagge; Caroline Stone; John Storrs; Marietta Crichton Stuart; Ninian Crichton Stuart; Katharine Thomson, Churchill Archives Centre, Churchill College, Cambridge; Charles Tilbury; Michael Tilling; Debbie Usher, Middle East Centre Archive, St Antony’s College, Oxford; Johnny Van Haeften; Simon Vickers; Professor David Walker; Laura Walker, British Library; Christine Walker-Kelley; Miriam Walton; Alixe Wallis; Alan Weeks; Hugo White;Vicki White; George Willey; Simon Wilson, Hull University Archives, Hull History Centre; Jeremy Wilson; John Winterburn; Patrick Wyman; Mohamed Zuber.
My particular thanks go to my outstanding agent Andrew Lownie, for his expertise, drive, and encouragement. He is truly the bee’s knees, and it has been a pleasure to work with him and to learn from him. Anthea Gray was unfailingly helpful and hospitable in the face of all my requests and her often poor health. It is a matter of deep regret to me that she died while this book was in the production stage: she wanted so much to hold the book in her hands and to read of the wartime activities of her father, Lieutenant Lionel Gray. Joe Berton has been a constant source of information, advice, encouragement, and friendship. He, Sir Mark Allen, and James Stejskal read early drafts, and gave many useful comments for which I am very grateful.
My thanks are also due to Jacob Rosen and Professor Yigal Sheffy, who read parts of the typescript and also made helpful suggestions. Any mistakes are solely my responsibility.
For permission to quote from copyright published and unpublished records, and for advice on records not needing copyright clearance, I would like to thank: Professor Carol Brayne, for the Brayne Papers on loan at the British Library; British Online Archives provided by Microform Academic Publishers for the papers of Sir Mark Sykes; the National Archives; the Australian War Memorial; The Seven Pillars of Wisdom Trust for T. E. Lawrence; the British Library for India Office Records; the Syndics of Cambridge University Library for the Hardinge Papers and the Letters of Hugh Drummond Pearson; the Middle East Centre Archive, St Antony’s College, Oxford for the collections of J. W. A. Young and Thomas Edward Lawrence; the Master and Fellows of Pembroke College, Cambridge for the Sir Ronald Storrs papers; the Churchill Archives Centre, Churchill College, Cambridge for the George Lloyd Papers; the provost and scholars of King’s College, Cambridge and the Society of Authors as their representative, for the E. M. Forster quotation; the trustees of the Liddell Hart Centre for Military Archives for the Joyce Papers; Hull University Archives, Hull History Centre for the papers of Sir Mark Sykes; the Council of the National Army Museum for the papers of Captain Leslie Lionel Bright; the Imperial War Museum for the Private Papers of Major-General Sir Arthur LyndenBell; the Society of Authors, on behalf of the Bernard Shaw Estate.
Every effort has been made to contact copyright holders of material in the book, but the publishers will be pleased to make amends if anything has been inadvertently overlooked.
I am especially grateful to the staff at Oxford University Press, whose experience and diligence have helped to improve the shape and narrative flow of the book: Luciana O’Flaherty (publisher), Matthew Cotton (original Commissioning Editor), Kizzy Taylor-Richelieu (Assistant Commissioning Editor), and Terka Acton (editor). I am grateful too to Jen Moore who copy edited the book with such skill and insight, to Sally Evans-Darby, and to Vaishnavi Ananthasubramanyam who steered the book through the production phase.
I must also thank my wife, Janet, for her forbearance, advice, and support, while for more than seven years I told stories about Cyril, Lionel, Norman, and the others as if they were long-lost family members; and John Ette for his helpful comments.
Preface
The grave of Captain Thomas Goodchild at the British Protestant Cemetery at Alexandria, Egypt is derelict, the headstone missing. Like most people he has fallen through the cracks of the historical record. Not one of the more than one hundred books on T. E. Lawrence and the Arab Revolt of 1916–18 mentions the small part Goodchild played in those dramatic events during the First World War. This is hardly surprising: Goodchild was an affable veterinary officer who had no combat experience with Lawrence or his colleagues. While Lawrence used his powers of persuasion, his flair for guerrilla warfare, and his political nous to try to help some Arabs win independence from the Turks, Goodchild was worrying about how to prevent the spread of camel mange.Yet there was much more to Goodchild than met the eye.
We know about Goodchild’s work because of a chance discovery at a garage sale.The fairly brief factual entries in his battered 1916 diary conceal a bizarre story. When I carried out detailed archival research, it became clear that Goodchild led a sensitive and totally forgotten mission to Jeddah in Arabia to buy baggage camels from the family of the region’s leading camel breeder, who just happened to be the revolt’s leader, Sherif Hussein of Mecca.
The overarching importance of Goodchild’s mission was that it was part of a key British intelligence objective to deny baggage camels to the Turks and to improve the sometimes fragile relationship between the British and Hussein. Unlikely as it may seem, camels were a key strategic asset because they were so important for the mobile desert operations that the British were planning in Turkish-held Palestine.
The question then arose: what if there were other forgotten chapters of the Arab Revolt that, pieced together, might add something substantial to the narrative of this iconic campaign; perhaps even lead to a different perspective seen through a new lens? A counter-argument took shape almost immediately: given the bookshelves are groaning with an abundance of books on the subject, was there really anything new and important left to
say about Lawrence and the Arab Revolt? Nevertheless, more in hope than expectation, I decided to hunt for other ‘unknown unknowns’ of the Arab Revolt. I spent seven years tracking down the descendants of twenty forgotten British officers, to ask whether diaries or memoirs, letters or photographs had been passed down to them.The hunt led to Panama, Jamaica, the USA, Canada, Australia, Denmark, Ireland, and all over the United Kingdom.
Perhaps surprisingly, thirteen families still had a wealth of Arab Revolt material that had stayed hidden for a century, and they were happy to let me examine it. One huge private collection in a suburban house was crammed into two large metal chests. There were hundreds of photographs taken in Arabia by a cipher officer in intelligence, Lieutenant Lionel Gray, together with hundreds of letters sent by him to his fiancée and family, as well as a captured Turkish pistol given to him by T. E. Lawrence and private confidences from Lawrence himself. There were also Arab robes and a headdress, secret cable message notebooks, and many more intelligence documents. I interviewed Gray’s daughter and the descendants of many other men: their insights breathed personality and character into the mere names I had begun with. At Gray’s daughter’s ninetieth birthday lunch at a London hotel, I felt the eerie illusion of being within touching distance of the Arab Revolt.
The new evidence was intriguing but a key question had to be addressed. Was the evidence merely footnote material or was it likely to enlarge our understanding of the Arab Revolt and the British role in it? A pattern to the research soon emerged, which offered hope of an answer. A number of the forgotten or little-known men I had uncovered were based, like Gray, at the port of Jeddah. This town was strategically important for the delivery of supplies, weapons, and gold from the British to their ally, Sherif Hussein. Thousands of Muslims arrived by sea, many British Indians, who passed through on their way to Mecca for the annual Hajj or pilgrimage. The officers based at Jeddah worked for Colonel Cyril Edward Wilson, who was given the bland title of ‘pilgrimage officer’ by British intelligence, as a cover for his military and diplomatic duties helping Hussein’s revolt.
Wilson was a rather stiff and correct figure, something of a Colonel Blimp—jingoistic, unimaginative, a stereotypically British officer. He was the antithesis of the brilliant and mercurial T. E. Lawrence. Wilson is portrayed as having a secondary role in the revolt and, like so many, came to be overshadowed by Lawrence’s dazzling leadership and railway demolition skills—and by the Lawrence legend that turned the shy maverick with a
touch of genius into an international icon after the war. Wilson stoically endured chronic dysentery and attacks from his own colleagues at General Headquarters in Cairo, who thought supporting the revolt was a waste of money, supplies, and effort, and that the real battle should be fought against the Turks in Palestine rather than in the backwater of the Hejaz, Hussein’s province.
Yet there were tantalizing pointers to Wilson and his core team at Jeddah having made a key contribution to the Arab Revolt that has been overlooked. Wilson was given high praise by two senior officers who had wide experience of all the major players in the revolt. General Reginald Wingate, who as governor-general of the Sudan sent weapons and supplies across the Red Sea to Sherif Hussein, and then became British High Commissioner for Egypt, wrote to Wilson in 1936:
I always feel that ‘Little Lawrence’, much as I valued and appreciated his wonderful qualities and powers of leadership, did not know or estimate at their true value, the marvellous work done by yourself . . . and other officers without whose knowledge, experience and self-sacrifice, the Revolt could never have succeeded and he could never have acquired the title of ‘Lawrence of Arabia’! he sailed in really to fame largely on the shoulders of men like yourself.1
This is rather hard, in one sense, on Lawrence, who did in fact acknowledge Wilson’s role to Wilson privately, but the recognition of the pilgrimage officer’s vital role could not be clearer.
The second endorsement of Wilson is from Captain William ‘Ginger’ Boyle, who commanded the Red Sea Patrol of the Royal Navy. The Red Sea Patrol played a crucial role in the Arab Revolt through its firepower, its supply ships, and its political role in boosting Hussein’s morale. Boyle was at the heart of all these interventions and, after the revolt, as admiral of the fleet, wrote of Wilson: ‘To the ability, tact, and energy of this self-effacing but able officer the ultimate success of the Arab rising was largely due.’2 That a man as perceptive as Boyle should single out Wilson for such praise is significant. Boyle also referred to Wilson as ‘the uncrowned King of Jeddah’. Wingate’s and Boyle’s comments seem never to have been investigated in detail—perhaps they were seen as the rather overblown compliments of friends. Lawrence’s famous book about his personal role in the campaign, Seven Pillars of Wisdom, made no mention of any key role for Wilson. This was not surprising since Lawrence also downplayed the role of other officers who are known to have made important contributions to the revolt. Yet the enigmatic Lawrence, so adept at smoke and mirrors, also lists, in his
preface to Seven Pillars of Wisdom, the names of forty of his colleagues who, he states, ‘could each tell a like tale’ to his own.3 Those names include Wilson and Gray. Lawrence could be perverse and loved toying and teasing: this seems to be false modesty and probably he did not really believe that so many officers could tell a story as well as he could, but that short preface gives a hint of hidden alternative narratives.
The search for other narratives was at the heart of my research. It became an investigation of what lay concealed in shadows—the shadows that were inevitably created around the limelight that has fallen on Lawrence for four generations. I began a lengthy trawl through the publicly available archives in London, Durham, Cambridge, Oxford, and Hull, and cross-referenced them to the fresh evidence in the private collections. The two classes of records complemented each other: the significance of each was enhanced through that association. The key findings were, first, that Wilson had a core team of four officers at Jeddah, the true hub of the revolt, who helped him stabilize the revolt on several occasions when it was at imminent risk of collapse— both before and during Lawrence’s involvement in Arabia. The imperturbable Colonel John Bassett and the eccentric, half-deaf Major Hugh Pearson, both with a background in intelligence, were his able deputies. The highly strung Captain Norman Bray, a bloodhound on the trail of anti-British jihadists, was another intelligence officer. Lieutenant Lionel Gray was the fourth member of the team. There was also a colourful supporting cast based at or near Jeddah, including a resourceful Persian spy and a forgotten officer who lived with Bedouin tribes collecting important intelligence.
The second major factor was the extent to which the relationship between Wilson and Sherif Hussein underpinned the rickety edifice of the revolt, from before it broke out until its final weeks in September 1918. This relationship was crucial to the survival and, ultimately, to the hollow ‘victory’ of the revolt. Hussein ran a corrupt regime and was irascible, suspicious, and controlling, prone to fits of despair and suicide threats, yet for over three years Wilson kept the trust and respect—it was something akin to friendship—of the old ruler.Wilson managed this because of his honourable and principled behaviour, which was patently free from double-dealing. Wilson’s undervalued influence over Hussein during critical phases of the revolt was at least as important as the well-known influence of Lawrence over Hussein’s son, the Emir Feisal. Without the quiet diplomacy and intelligence work of
the unlikely hero, Wilson, and his men, the revolt would have collapsed and the world would never have heard of ‘Lawrence of Arabia’.
Gray’s story is exceptional because it throws light on so many aspects of the revolt. This amiable and long-suffering cipher specialist, who was to be parted from his fiancée, Mabel, for about five years, was a junior officer who at first sight had less influence than his comrades at Jeddah. Yet he knew almost all the key British players in Arabia, where he served for over two and a half years. Furthermore, Gray helped Wilson by gaining the trust of Sherif Hussein himself and was even invited to Hussein’s palace to take some stunning photographs of the old leader. He had intriguing discussions with Lawrence and, in his detailed commentary, Gray conjures up the sights, sounds, and smells of the strange world of Jeddah, rife with corruption, where spies jostled with jihadists bent on subverting the revolt and destabilizing British India with its seventy million Muslims. Mining the rich seam of Gray’s remarkable images, letters, and other documents offers a unique insight into the twists and turns of the revolt. Gray’s lost story holds a mirror to important overarching themes of the campaign, in particular the hidden world of intelligence and the role of the Royal Navy.
The story of Wilson and his men is interwoven with the bigger picture of the military campaign in the desert and with the familiar saga of T. E. Lawrence’s role, but with new insights into Lawrence’s deceptions and complex motivations, as well as into his achievements and writings. The narrative provides depth of field for the revolt by including the lost stories of other officers who were mostly at the large supply base at Aqaba: the link with Jeddah is provided by Gray who served at Aqaba too. This book offers a fresh interpretation of the Arab Revolt through a new lens and presents Colonel Cyril Wilson as a key figure of history.
List of Illustrations
1. General Fatmi Pasha (centre foreground) on HMS Hardinge, which brought the Holy Carpet from Suez to Jeddah for the 1917 Hajj pilgrimage. Colonel Cyril Wilson is in darker army uniform to right of centre.
2. Arrival of the Holy Carpet under the Mahmal (tented covering) at Jeddah, 1917. Escort of Egyptian soldiers in white pilgrim clothing.
3. Presentation photograph signed in person at the bottom by Sherif Hussein, accompanying the Hejazi Order of Al Nadha (Renaissance) awarded to Captain William Cochrane in 1920.
4. From left: unknown officer, Fatmi Pasha (Emir el Hajj), and Colonel Cyril Wilson.
5. Emir Abdullah, Sherif Hussein’s second son, seated at the British Consulate, Jeddah, on 17 October 1916. Standing from left: Hussein Ruhi, Said Ali (Egyptian Army artillery officer), Colonel Cyril Wilson, Aziz Ali al-Masri (former officer in Ottoman Army and Arab nationalist).
6. British Consulate, Jeddah. Meetings were held on the large projecting balcony on the third floor (side elevation, to the left). The commandeered Austrian Consulate is to the right.
7. Colonel Edouard Brémond (centre, looking at camera), head of French Military Mission, Jeddah. Captain Norman Bray to right.
8. House of Sherif Mohsen, Hussein’s representative at Jeddah. Mohsen is on the horse to the left; General Bailloud, chief of French forces in the Middle East, is on his horse to the right.
9. Sherifian soldiers disembarking from a British ship at Rabegh, early 1917.
10. T. E. Lawrence at Wejh, probably early 1917. Lieutenant Gray was given the photograph, probably by the officer who took it (unknown, but perhaps the supplies officer Captain Raymond Goslett). The same image is at the Imperial War Museum (Q60912).
31
32
33
34
44
45
52
53
70
73
11. 44 Smith & Wesson revolver given to Lieutenant Gray by T. E. Lawrence. Gray’s contemporary inscription records that the weapon was taken from a senior Ottoman officer, Ashraf Bey, when Lawrence captured him and £15,000 in Turkish gold. In fact, it was Emir Abdullah who seized Ashraf; Lawrence’s role was probably to interrogate him.
12. Lieutenant Norman Hopwood playing golf on the nine-hole course laid out at Jeddah by Major Hugh Pearson. The course lay partly over the Royal Flying Corps’ emergency landing ground, abandoned when the Rabegh crisis ended in January 1917, and partly over the defensive trenches near the captured Ottoman barracks.
75
79
13. Sherifian bodyguard. 86
14. Mahmas, one of T. E. Lawrence’s Ageyl bodyguards. The Ageyl were often outlaws but were fiercely loyal to Lawrence.
15. Captured Ottoman flag paraded in triumph through the streets of Jeddah, early 1918. Photograph taken by Lieutenant Lionel Gray from his Consulate balcony after he heard the celebrations.
16. Sherifian soldiers drinking tea at Jeddah.
17. The house at Wejh of Nasib al-Bakry (Emir Feisal’s influential Syrian adviser) is one of those behind the Arab.
18. House of the Kaimakam (Governor) of Wejh, who is standing in the centre at the back, talking to Colonel John Bassett (in white topee) and Colonel Edouard Brémond (only his helmet is visible). With Cousse (foreground) and Pisani (wearing fez) of the French Military Mission.
19. Arab Regular Army, part of which was trained by Major Hugh Pearson in Egypt, under the Hejaz flag at Aqaba.
87
88
89
95
103
114
20. Jafar al-Askari, former Ottoman Army officer and chief of the Arab Regular Army, with Lieutenant Lamotte of the French Military Mission at Jiddah oasis, inland from Wejh. 114
21. On board HMS Hardinge off Jeddah, January 1918, following Bassett’s and Hogarth’s crisis talks with a wavering Hussein. From third left: Captain Linberry, Suleiman Qabil, Sherif Hussein, Commander David Hogarth, Colonel John Bassett, Hussein Ruhi. This image illustrates both the vital importance of diplomatic work at Jeddah and the political value of Red Sea Patrol ships and captains.
22. Sherif Hussein firing a large gun on HMS Hardinge, with Commander Linberry watching on anxiously.
23. Sherif Hussein’s house at Jeddah, with guard of honour for Lieutenant Lionel Gray who had been invited by Hussein to photograph him.
24. A recently unladen dhow at Yenbo, with Red Sea Patrol vessel in the background.
130
131
133
141
25. Bedouin forces at the port of Yenbo, 1917. 141
26. Lieutenant Gray’s pet gazelle at Yenbo with his Sudanese servant, Yahya. The gazelle had a commendable sense of security: Gray recorded that it ate the screwed-up balls of paper that he discarded on the floor during his painstaking enciphering and deciphering work. 142
27. Lieutenant Leofric Gilman, leader of the Hejaz Armoured Car Battery, which offered mobility and offensive power both alone and in joint special forces operations.
153
28. Lieutenant Leofric Gilman, far right, and the remains of the many-culverted bridge blown up near the Hejaz Railway station at Mudawwara, April 1918. 154
29. Hejaz Armoured Car Battery, with the odd man out Lawrence looking to his right (standing to the left). 154
30. Major Robert Scott, commandant of the Aqaba base from February 1918. Scott kept a diary that documented the comings and goings of Lawrence and other officers, the many supply ships, and the American Lowell Thomas whose post-war shows turned Lawrence into an international hero and icon.
164
31. Fort at Aqaba, used by the British, French, and Arab forces to store supplies. 164
32. Sheikh Youssef, Emir Feisal’s quartermaster, keeping a watchful eye on the entrance to the fort at Aqaba, where supplies for the Northern Arab Army were stored. 165
33. Royal Flying Corps/Royal Air Force landing ground at Disi, north-east of Aqaba. 165
34. Captain Boyle (left) and Commander Linberry of the Red Sea Patrol. 178
35. Lieutenant Lionel Gray (far left) on board a ship of the Red Sea Patrol with two unidentified colleagues. The officer on the far right gives the inadvertent impression of auditioning for a film part. 179
A Note on the Text
Transliterating Arabic words was difficult for the British involved in the Arab Revolt, and they spelt individuals’ names, the names of tribes, and place names in a variety of ways. In quotations from archives and from T. E. Lawrence’s and others’ post-war writings, I have kept the actual spelling used—hence, for example, both ‘Jeddah’ and ‘Jidda’, ‘Aqaba’ and ‘Akaba’. Elsewhere, to prevent unwieldiness for the general reader, I have employed Anglicized place names in the form most often used in contemporary British diplomatic and military sources. Examples are Mecca instead of Makka and Medina instead of Madina.
The terms ‘Ottoman Empire’ and ‘Turkey’ were used interchangeably by the Allied powers and often too, interestingly enough, by the nations they were fighting. I have followed this practice. Whenever I refer to a particular religious or ethnic group, to distinguish it from the Turkish majority, I mention, for example, ‘Ottoman Arabs’, ‘Ottoman Armenians’, or ‘Arab prisoners of war from the Ottoman Army’.
List of Maps
1. The Middle East at the time of the Arab Revolt, showing the territories of Arab leaders and some of the main tribes.
2. The early stages of the Arab Revolt.
3. The later stages of the Arab Revolt and Allenby’s advance through Palestine.
Smyr na
Constantinople
Angora
TURKEY
Alexandretta
Aleppo
SYRI A
Homs
MEDITERRANEAN SEA
Alexandr ia
Tr ipoli
Beir ut
Gaza
Pt. Said
Cairo Suez Nekhl
EGYPT
R. Nile
Nisibin
Tadmur (Palmyra)
Damascus DRUSES NURI
Jerusalem SHALAAN
Ismailia Sinai Maan
Aqaba
Wejh Jauf
Yenbo H
Ti is
Batumi P ERSIA
Baku
Tabr iz
Mosul
R . Euphrates R .T i gri s
Baghdad
IBN RASHID RUALLA
SUDAN Nef u d Deser t A T I Y EH
ANGLO-EGYPTIAN
Khar toum
Basra
Kuwait
SHAMMAR IBN SA UD
Mecca Medina Jeddah
Sudan Port
S HERIF H USSEIN
Taif
IDRISSI ASIR
Riyadh
WAHHABIS
IMAM OF YEMEN
Railway
Aden Hadramaut Ye me n
Map1. The Middle East at the time of the Arab Revolt, showing the territories of Arab leaders and some of the main tribes.