AutodeskFusion360:APowerGuideforBeginners andIntermediateUsers(2nd

https://ebookmass.com/product/autodesk-fusion-360-a-powerguide-for-beginners-and-intermediate-users-2nd/
Instant digital products (PDF, ePub, MOBI) ready for you
Download now and discover formats that fit your needs...
The Market Research Toolbox: A Concise Guide for Beginners
https://ebookmass.com/product/the-market-research-toolbox-a-conciseguide-for-beginners/
ebookmass.com
Mastering Autodesk Inventor 2016 and Autodesk Inventor LT 2016: Autodesk Official Press 1st Edition, (Ebook PDF)
https://ebookmass.com/product/mastering-autodesk-inventor-2016-andautodesk-inventor-lt-2016-autodesk-official-press-1st-edition-ebookpdf/
ebookmass.com
Coding for Kids 5 Books in 1: Javascript, Python and C++ Guide for Kids and Beginners (Coding for Absolute Beginners) Mather
https://ebookmass.com/product/coding-for-kids-5-books-in-1-javascriptpython-and-c-guide-for-kids-and-beginners-coding-for-absolutebeginners-mather/ ebookmass.com
Awaken: The Path to Purpose, Inner Peace, and Healing
Rajendra Sisodia
https://ebookmass.com/product/awaken-the-path-to-purpose-inner-peaceand-healing-rajendra-sisodia/
ebookmass.com


Educational Journeys, Struggles and Ethnic Identity: The Impact of State Schooling on Muslim Hui in Rural China 1st Edition Xinyi Wu (Auth.)
https://ebookmass.com/product/educational-journeys-struggles-andethnic-identity-the-impact-of-state-schooling-on-muslim-hui-in-ruralchina-1st-edition-xinyi-wu-auth/
ebookmass.com
Oxford handbook of nutrition and dietetics Second Edition, Reprinted (With Corrections) Edition Gandy
https://ebookmass.com/product/oxford-handbook-of-nutrition-anddietetics-second-edition-reprinted-with-corrections-edition-gandy/
ebookmass.com
Nutrition Concepts and Controversies : 14th Edition Frances Sizer
https://ebookmass.com/product/nutrition-concepts-andcontroversies-14th-edition-frances-sizer/
ebookmass.com
Corruption, Ideology, and Populism: The Rise of Valence Political Campaigning 1st Edition Luigi Curini (Auth.)
https://ebookmass.com/product/corruption-ideology-and-populism-therise-of-valence-political-campaigning-1st-edition-luigi-curini-auth/
ebookmass.com
Drugs, Society, and Human Behavior 18th Edition Carl L. Hart.
https://ebookmass.com/product/drugs-society-and-human-behavior-18thedition-carl-l-hart/


ebookmass.com
Farreras Rozman. Medicina Interna 18th Edition Ciril Rozman Borstnar
https://ebookmass.com/product/farreras-rozman-medicina-interna-18thedition-ciril-rozman-borstnar/
ebookmass.com

Dedication
Preface
Table of Contents
Chapter 1: Introducing Fusion 360
Installing Fusion 360
Getting Started with Fusion 360
Working with User Interface of Fusion 360
Application Bar
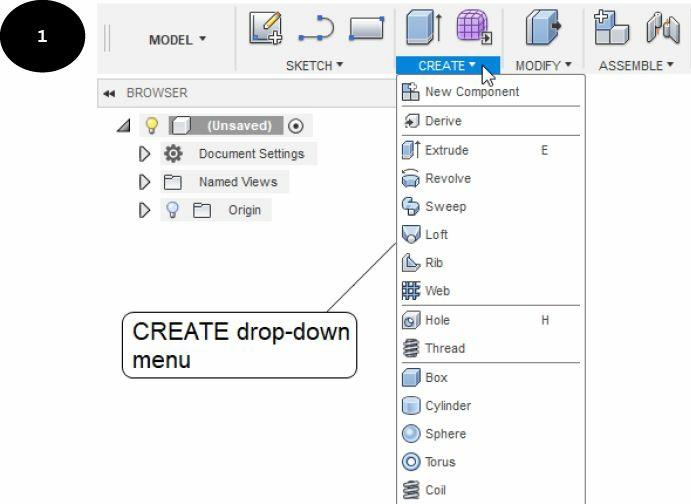
Toolbar
BROWSER
Profile and Help Menus
ViewCube
Timeline
Navigation Bar and Display Settings
Invoking a New Design File
Working with Workspaces
MODEL
PATCH
SHEET METAL
RENDER
ANIMATION
SIMULATION
MANUFACTURE
DRAWING
SCULPT
Managing Data by Using the Data Panel
Creating a New Project Folder and Sub-Folders
Uploading Existing Files in a Project
Collaborating with Other Users
Saving a Design File
Exporting Design to Other CAD Formats
Opening an Existing Design File
Opening an Existing File from the Data Panel
Opening an Existing File from the Open dialog box
Opening an Existing File from the Local Computer
Working in the Offline Mode
Recovering Unsaved Data
Sharing Design
Sharing Design Using a Link
Sharing Design to Fusion 360 Gallery
Sharing Design to GrabCAD
Sharing Design by Recording Screen
Invoking a Marking Menu
3D Printing
Exporting a Design in .STL File Format for 3D Printing
Summary
Questions
Chapter 2: Drawing Sketches with Autodesk Fusion 360
Invoking a New Design File
Creating Sketches
Working with Selection of Planes
Specifying Units
Specifying Grids and Snaps Settings
Drawing a Line Entity
Tutorial 1
Hands-0n Test Drive 1
Drawing a Tangent Arc by Using the Line Tool
Tutorial 2
Hands-0n Test Drive 2
Drawing a Rectangle
2-Point Rectangle Tool
3-Point Rectangle Tool
Center Rectangle Tool
Drawing a Circle
Center Diameter Circle Tool
2-Point Circle Tool
3-Point Circle Tool
2-Tangent Circle Tool
3-Tangent Circle Tool
Drawing an Arc
3-Point Arc Tool
Center Point Arc Tool
Tangent Arc Tool
Drawing a Polygon
Circumscribed Polygon Tool
Inscribed Polygon Tool
Edge Polygon Tool
Drawing an Ellipse
Drawing a Slot
Center to Center Slot Tool
Overall Slot Tool
Center Point Slot Tool
Three Point Arc Slot Tool
Center Point Arc Slot Tool
Drawing Conic Curves
Drawing a Spline
Fit Point Spline Tool
Control Point Spline Tool
Editing a Spline
Adding Fit/Control Points in a Spline
Controlling the Curvature Display of a Spline
Creating Sketch Points
Inserting Text into a Sketch
Tutorial 3
Tutorial 4
Hands-0n Test Drive 3
Hands-0n Test Drive 4
Summary
Questions
Chapter 3: Editing and Modifying Sketches
Trimming Sketch Entities
Extending Sketch Entities
Offsetting Sketch Entities
Creating Construction Entities
Mirroring Sketch Entities
Patterning Sketch Entities
Rectangular Pattern Tool
Circular Pattern Tool
Creating a Sketch Fillet
Scaling Sketch Entities
Breaking Sketch Entities
Tutorial 1
Tutorial 2
Tutorial 3
Hands-0n Test Drive 1
Summary
Questions
Chapter 4: Applying Constraints and Dimensions
Working with Constraints
Applying Constraints
Controlling the Display of Constraints
Applying Dimensions
Applying a Horizontal Dimension
Applying a Vertical Dimension
Applying an Aligned Dimension
Applying an Angular Dimension
Applying a Diameter Dimension
Applying a Radius Dimension
Applying a Linear Diameter Dimension
Modifying/Editing Dimensions
Working with Different States of a Sketch
Under Defined Sketch
Fully Defined Sketch
Working with SKETCH PALETTE
Look At
Slice
Show Profile
Show Points
Show Constraints
3D Sketch
Tutorial 1
Tutorial 2
Tutorial 3
Hands-0n Test Drive 1
Hands-0n Test Drive 2
Summary Questions
Chapter
5: Creating Base Feature of Solid Models
Creating an Extrude Feature
Creating a Revolve Feature
Navigating a 3D Model in Graphics Area
Controlling the Navigation Settings
Pan
Zoom
Zoom Window
Fit
Free Orbit
Constrained Orbit
Look At
Navigating a 3D Model by Using the ViewCube
Changing the Visual Style of a Model
Shaded
Shaded with Hidden Edges
Shaded with Visible Edges Only
Wireframe
Wireframe with Hidden Edges
Wireframe with Visible Edges Only
Tutorial 1
Tutorial 2
Tutorial 3
Hands-0n Test Drive 1
Hands-0n Test Drive 2
Summary Questions
Chapter 6: Creating Construction Geometries
Creating a Construction Plane
Creating a Plane at an Offset Distance
Creating a Plane at an Angle
Creating a Plane Tangent to a Cylindrical or Conical Face
Creating a Plane at the Middle of Two Faces/Planes
Creating a Plane Passing Through Two Edges
Creating a Plane Passing Through Three Points
Creating a Plane Tangent to a Face and Aligned to a Point
Creating a Plane Along a Path
Creating a Construction Axis
Creating an Axis Passing Through a Cylinder/Cone/Torus
Creating an Axis Perpendicular at a Point
Creating an Axis Passing Through Two Planes
Creating an Axis Passing Through Two Points
Creating an Axis Passing Through an Edge
Creating an Axis Perpendicular to Face at Point
Creating a Construction Point
Creating a Point at Vertex
Creating a Point at the Intersection of Two Edges
Creating a Point at the Intersection of Three Planes
Creating a Point at the Center of Circle/Sphere/Torus
Creating a Point at the Intersection of an Edge and a Plane
Tutorial 1
Tutorial 2
Hands-0n Test Drive 1
Hands-0n Test Drive 2
Hands-0n Test Drive 3
Summary Questions
Chapter 7: Advanced Modeling - I
Using Advanced Options of the Extrude Tool
Using Advanced Options of the Revolve Tool
Working with a Sketch having Multiple Profiles
Projecting Edges onto a Sketching Plane
Creating 3D Curves
Creating a Projected Curve
Creating an Intersection Curve
Creating a Curve by Projecting Intersecting Geometries
Editing a Feature and its Sketch
Editing the Sketching Plane of a Sketch
Applying Physical Material Properties
Customizing Material Properties
Calculating Mass Properties
Measuring the Distance between Objects
Tutorial 1
Tutorial 2
Hands-0n Test Drive 1
Hands-0n Test Drive 2
Summary Questions
Chapter 8: Advanced Modeling - II
Creating a Sweep Feature
Creating a Sweep Feature with Single Path
Creating a Sweep Feature with Path and Guide Rail
Creating a Sweep Feature with Path and Guide Surface
Creating a Loft feature
Creating a Loft Feature with Profiles
Creating a Loft Feature with Profiles and Guide Rails
Creating a Loft Feature with Profiles and Centerline
Creating Rib Features
Creating Web Features
Creating Holes
Creating a Single Hole on a Face
Creating Multiple Holes on Points
Creating a Thread
Creating a Rectangular Box
Creating a Cylinder
Creating a Sphere
Creating a Torus
Creating a Helical and a Spiral Coil
Creating a Pipe
Creating 3D Sketches
Tutorial 1
Tutorial 2
Tutorial 3
Tutorial 4
Hands-0n Test Drive 1
Hands-0n Test Drive 2
Summary
Questions
Chapter
9:
Patterning and Mirroring
Creating a Rectangular Pattern
Creating a Circular Pattern
Creating a Pattern along a Path
Mirroring Features/Faces/Bodies/Components
Tutorial 1
Tutorial 2
Hands-0n Test Drive 1
Hands-0n Test Drive 2
Hands-0n Test Drive 3
Summary
Questions
Chapter 10:
Editing and Modifying 3D Models
Working with the Press Pull Tool
Offsetting a Face by Using the Press Pull Tool
Filleting an Edge by Using the Press Pull Tool
Extruding a Sketch Profile by Using the Press Pull Tool
Creating Fillets
Creating a Constant Radius Fillet
Creating a Variable Radius Fillet
Creating a Fillet by Specifying the Chord Length
Creating Rule Fillets
Creating Chamfers
Creating Shell Features
Adding Drafts
Scaling Objects
Combining Solid Bodies
Splitting Faces of a Model
Splitting Bodies
Tutorial 1
Tutorial 2
Hands-0n Test Drive 1
Hands-0n Test Drive 2
Summary Questions
Chapter 11: Working with Assemblies - I
Working with Bottom-up Assembly Approach
Working with Top-down Assembly Approach
Creating an Assembly by Using Bottom-up Approach
Inserting Components in a Design File
Fixing/Grounding the First Component
Working with Degrees of Freedom
Applying Joints
Applying a Rigid Joint
Applying a Revolute Joint
Applying a Slider Joint
Applying a Cylindrical Joint
Applying a Pin-slot Joint
Applying a Planar Joint
Applying a Ball Joint
Editing Joints
Defining Joint Limits
Animating a Joint
Animating the Model
Locking/Unlocking the Motion of a Joint
Driving a Joint
Defining Relative Motion between Two Joints
Grouping Components Together
Enabling Contact Sets between Components
Capturing Position of Components
Tutorial 1
Hands-0n Test Drive 1
Hands-0n Test Drive 2
Summary Questions
Chapter 12: Working with Assemblies - II
Creating an Assembly by Using Top-down Approach
Creating Components within a Design File
Procedure for Creating an Assembly by Using the Top-down Approach
Fixing/Grounding the First Component
Applying As-built Joints
Defining a Joint Origin on a Component
Editing Assembly Components
Tutorial 1
Hands-0n Test Drive 1
Summary Questions
Chapter 13: Creating Animation of a Design
Invoking the ANIMATION Workspace
Capturing Views on the Timeline
Capturing Actions on the Timeline
Transforming Components (Move or Rotate)
Creating an Exploded View of an Assembly
Toggling on or off the Visibility of Components
Creating a Callout with Annotation
Customizing Views and Actions on the Timeline
Deleting Views and Actions of a Storyboard
Creating a New Storyboard
Toggling On or Off Capturing Views
Playing and Publishing Animation
Tutorial 1
Hands-0n Test Drive 1
Summary Questions
Chapter 14: Working with Drawings
Invoking the DRAWING Workspace
Creating the Base View of a Design
Creating Projected Views
Working with Angle of Projection
Defining the Angle of Projection
Defining Drawing Preferences
Editing Annotation and Sheet Settings
Editing and Inserting New Title Block
Creating Section Views
Creating Full Section Views
Creating Half Section Views
Creating Offset Section Views
Creating Aligned Section Views
Creating Detail Views
Creating an Exploded Drawing View
Invoking DRAWING Workspace From Animation
Editing Properties of a Drawing View
Editing Hatch Properties of a Section View
Moving a Drawing View
Rotating a Drawing View
Deleting a Drawing View
Adding Geometries in Drawing Views
Adding Centerlines
Adding Center Marks
Adding Center Mark Pattern
Adding Edge Extension between Two Intersecting Edges
Applying Dimensions
Applying Linear, Aligned, Angular, Radius, and Diameter
Dimensions
Applying Ordinate Dimensions
Applying Baseline Dimensions
Applying Chain Dimensions
Editing a Dimension
Breaking Dimension Lines
Adding Text/Note
Adding Text/Note With Leader
Adding the Surface Texture Symbol
Creating the Bill of Material (BOM)/Part List
Adding Balloons Manually
Renumbering Balloons
Adding Drawing Sheets
Creating a New Drawing Template
Creating Outputs of a Drawing
Creating Output of a Drawing as a PDF File
Creating Output of a Drawing as a DWG File
Creating Output of the Drawing Part List as a CSV File
Tutorial 1
Hands-0n Test Drive 1
Summary Questions
Preface
Autodesk Fusion 360 is a product of Autodesk Inc., one of the biggest providers of technology for engineering, architecture, construction, manufacturing, media, and entertainment industries. It offers robust software tools for 3D design, engineering, and entertainment industries that let you design, visualize, simulate, and publish your ideas before they are built or created. Moreover, Autodesk continues to develop a comprehensive portfolio of state-of-the-art CAD/CAM/CAE software for the global market.
Autodesk Fusion 360 delivers a rich set of integrated tools that are powerful and intuitive to use. It is the first cloud-based 3D CAD/CAM/CAE software that combines the entire product development cycle into a single cloud-based platform. It allows you to design feature-based, parametric mechanical designs by using simple but highly effective 3D modeling tools. Fusion 360 provides a wide range of tools that allow you to create real-world components and assemblies. These components and assemblies can be converted into 2D engineering drawings for production, used for validating designs by simulating their real world conditions, and assessing the environmental impact of your products. It also enables you to create photorealistic renderings, animations, and toolpaths for CNC machines, in addition to creating rapid prototypes of your design by using the 3D printing workflow.
Autodesk Fusion 360: A Power Guide for Beginners and Intermediate Users (2nd Edition) textbook has been designed for instructor-led courses as well as self-paced learning. It is intended to help engineers and designers, interested in learning Fusion 360, to create 3D mechanical designs. This textbook is a great help for new Fusion 360 users and a great teaching aid for classroom training. This textbook consists of 14 chapters, total 734 pages covering major workspaces of Fusion 360 such as MODEL, ANIMATION, and DRAWING. The textbook teaches you to use Fusion 360 mechanical design software for building parametric 3D solid components and assemblies as well as creating animations and 2D drawings. This textbook has been developed using software version: 2.0.5519.
This textbook not only focuses on the usages of the tools/commands of Fusion 360 but also on the concept of design. Every chapter in this textbook contains tutorials that provide users with step-by-step instructions for creating mechanical designs and drawings with ease. Moreover, every chapter ends with hands-on test drives that allow users to experience for themselves the user friendly and powerful capacities of Fusion 360.