No part of this publication may be reproduced or transmitted in any form or by any means, electronic or mechanical, including photocopying, recording, or any information storage and retrieval
system, without permission in writing from the publisher. Details on how to seek permission, further information about the Publisher’s permissions policies and our arrangements with organizations such as the Copyright Clearance Center and the Copyright Licensing Agency, can be found at our website: www.elsevier.com/permissions.
Notice
Practitioners and researchers must always rely on their own experience and knowledge in evaluating and using any information, methods, compounds or experiments described herein. Because of rapid advances in the medical sciences, in particular, independent verification of diagnoses and drug dosages should be made. To the fullest extent of the law, no responsibility is assumed by Elsevier, authors, editors or contributors for any injury and/or damage to persons or property as a matter of products liability, negligence or otherwise, or from any use or operation of any methods, products, instructions, or ideas contained in the material herein.
Although all advertising material is expected to conform to ethical (medical) standards, inclusion in this publication does not constitute a guarantee or endorsement of the quality or the value of such product or the claims made of it by its manufacturer.
Content Strategist: Ruchi Mullick
Content Project Manager: Anand K Jha
Sr Production Executive: Ravinder Sharma
Sr Graphic Designer: Milind Majgaonkar
Typeset by GW Tech India
Printed in India by . . .
Dedication
Dedicated to
My beloved teachers from the Department of Oral Pathology and Microbiology Mahatma Gandhi Postgraduate Institute of Dental Sciences, Puducherry
Harikrishnan Prasad
Dedicated to
My dear parents, Usha and Krishnamurthy, my dear husband, Abinandan and to my guru, Dr Pratibha Ramani
Krishnamurthy Anuthama
Preface to the Second Edition
Harikrishnan Prasad, Krishnamurthy Anuthama
We are humbled and thankful for the support and encouragement we received after the first edition of Atlas of Oral Histology was published 4 years ago. It has motivated us to put in more effort to ensure that this book would find good use among students and faculty alike. Some phase contrast microscopy and polarizing microscopy images have been added. Every chapter now includes a new section that provides Useful Points to Remember. A few errors that had escaped our scrutiny in the first edition have now been corrected.
A major addition to this edition is the audiovisual guide for oral histology slides. We have made an attempt to show the various microscopic structures related to oral histology through these videos. An audio narration of the videos and on-screen annotations also point out the structures being described, so that students find it easy to follow and understand the concept. We hope the readers find this useful.
Thank you.
Preface to the First Edition
Harikrishnan Prasad, Krishnamurthy Anuthama
“One look is worth a thousand words”, it is said. And it is so true. Seeing and understanding has always proven to be more effective to retain information than reading and memorizing. It is with this idea that we started preparing the manuscript for this atlas. Oral histology, as a subject, can be very simple and very complex at the same time. Young undergraduate students, who are introduced to oral histology for the first time, can feel overwhelmed with the amount of information, especially so when they have to imagine everything. Although textbooks carry numerous good photomicrographs, it is very difficult to understand which is what in these pictures, unless the student is guided by a good teacher who can patiently explain each. Our atlas aims to be such a good teacher. Almost every photomicrograph in this atlas is accompanied with a schematic diagram that makes identifying different features easy. We have closely adhered to Orban’s Oral Histology and Embryology in terms of
content arrangement. We would advise our readers to use this atlas in conjunction with the textbook to understand better.
We have tried to incorporate as many pictures as possible at this point of time. Being in its first edition, we feel there is sufficient scope for improvement, especially in terms of quantity of content. Readers are the best critics, and comments, criticisms or suggestions are always welcome. They will only help us improve and make this book better. It is our hope that staff and students alike will benefit from this book.
Thank you.
List of videos
Dev of tooth.mp4
Enamel full.mp4
Dentin full.mp4
Pulp and alveolar bone.mp4
Cementum.mp4
Periodontal ligament.mp4
Pulp and alveolar bone.mp4
Salivary glands.mp4
Oral mucous membrane.mp4
Maxillary sinus.mp4
Chapter 2 - Page 10 - Advanced bell stage
Video for full Chapter 3 - Enamel
Video for full Chapter 4 - Dentin
Video for full Chapter 5 - Pulp (same video file also to be used for chapter 8)
Video for full Chapter 6 - Cementum
Chapter 7 - Page 47 - Principal fiber groups of periodontal ligament
Video for full Chapter 8 - Bone (same video file as used for chapter 5)
Video for full Chapter 9 - Salivary glands
Video for full Chapter 10 - Oral mucous membrane
Video for full Chapter 11 - Maxillary sinus
CHAPTER 1
Introduction
Oral histology encompasses the microscopic study of tissues that form the oral cavity. It is the basis on which our knowledge of the physiology of oral cavity, and the pathologies that afflict it, are built upon. Therefore, an understanding of the histology of oral tissues becomes very significant.
Preparing tissues for microscopic study
Oral cavity is made up of both hard tissues and soft tissues. Each of these tissue types requires a specific method of preparation, so that it can be viewed under a microscope.
Soft tissues
Soft tissues do not contain hard mineralized components. Hence, they can be easily cut with a knife. However, to maintain their architecture, they are subjected to a series of processes before being cut into thin sections.
After removal for examination, the soft tissue is first fixed to prevent degradation and decomposition. Neutral buffered formalin (10% concentration) is the routinely used fixative for this purpose. This is followed by complete removal of its water content and replacement of the same by alcohol. To achieve this, the tissue is
immersed in a series of increasing grades of ethyl alcohol, so that water in the tissue is gradually replaced by the alcohol. The next step involves removal of the alcohol in the tissue and its replacement by xylene. At the end of this step, the fixed tissue now contains no trace of water in it; instead it is filled with xylene.
Following this, the tissue is immersed in molten paraffin wax, which will replace the xylene completely. This step completes tissue processing. The end result is that we now have a tissue that contains wax instead of water; therefore, it is rigid and firm enough to be cut into thin sections using an instrument called microtome. The microtome allows sections as thin as 4 µm (4/1000 of a millimeter) to be cut. These sections are placed on glass slides, the wax removed by heat, and then subjected to different staining processes.
Hard tissues
Different methods are employed to study hard tissues like bone and teeth because these cannot be cut into thin sections using routine microtomes. The simplest method to study hard tissues is using ground sections. Another frequently used method is decalcified sections.
I. Ground section
Ground sections are made by grinding the specimen into thin slices that can allow light to pass through them. Initially grinding is done on a lathe or similar mechanical device. Later on, it can be done manually on an abrasive stone (like Arkansas stone), and finally polished on fine sandpapers. Such sections, which are about 25–50 micrometers thick, are then dehydrated and mounted directly on glass slides using a mounting medium and then observed under the microscope. It has to be stressed however that the thinner the ground section, the better it is to appreciate many structures without much overlap. One major
disadvantage of ground sections is that most of the tooth or bone is wasted during the grinding process. Ground sections are useful for visualizing the mineralized components and hypomineralized structures of hard tissues. Pulp, however, cannot be seen in ground sections.
II. Decalcified section
Hard mineralized structures can also be studied by making decalcified sections. This works on the premise that most mineralized structures also have a substantial organic component. When the mineral portion is removed, these tissues attain properties similar to soft tissues and can be treated akin to them. Bone, dentin, and cementum have a considerable amount of organic matter and hence can be studied after decalcification. Enamel however, being made up of by 96% inorganic substance will be completely lost during decalcification process.
Decalcification is usually done using acids like nitric acid, formic acid and ethylenediaminetetraacetic acid (EDTA). Depending on the acid used, the decalcification process can take anywhere between few days and several weeks. Once decalcification is complete, the tissue loses its hardness. It can then be processed and sections can be made just like any other soft tissue. Decalcified sections are used to study hard tissues, as mentioned earlier. Dental pulp, a soft tissue that is safely enclosed inside dentin, also can be studied by decalcified sections only. Although the pulp can be removed separately and processed like a soft tissue, its tiny volume usually makes this extremely difficult.
III. Sectioning using hard tissue microtome
Specialized microtomes that can cut hard tissues like bone and teeth into thin sections are available in the market. These offer many
advantages over other methods of studying hard tissues. However, they are very expensive and not readily available.
Staining
In general, tissues have very little contrast when viewed unstained. To impart contrast to the tissue, and thereby identify and observe the different structures and cells, sections from soft tissues and decalcified hard tissues are subjected to staining. The commonest used histological stain is hematoxylin and eosin (H&E). Hematoxylin is a basic dye that gives a blue colour to acidic structures like nucleus and rough endoplasmic reticulum. Eosin, being acidic in nature, stains basic structures like cytoplasm and imparts a pink color. Other special stains can also be used to selectively appreciate and identify specific cells and tissues like skeletal muscle, elastic fibers, basement membrane and microorganisms.
Microscopy
Study of histology necessitates the use of specialized equipment called microscopes to magnify the tissues several hundred or thousand times. Routine compound light microscope uses a system of lenses and light source to achieve this. Usually light is allowed to pass through the specimen (transmitted light). Certain structures are better visible when using reflected light in which light is allowed to reflect from the top of the specimen being studied. Various other types of microscopes offering specific advantages are also available. This atlas includes photomicrographs obtained from compound light microscopes only, unless otherwise specified.
Points to remember
There are a few important points that need to be carefully considered while viewing histological slides under the microscope:
• Setting up the microscope properly is a very essential step that is frequently overlooked. Even a high-end microscope that has been improperly set up will perform worse than a properly set basic microscope.
• The various components of the microscope, especially the ones that come in the light path, and the slides have to be clean and free of dust.
• Transmitted light source is usually built-in, although some basic microscopes require external light source. In such cases, be sure to orient the reflecting mirror in such a way that adequate light passes through the specimen being observed.
• For viewing structures under reflected light, transmitted light source has to be switched off. If the ambient light in the room is inadequate, additional light using a torch or a mobile phone flash can be shone on top of the slide, and viewed.
• Although one structure is being highlighted upon in each photomicrograph in this atlas, it is to be remembered than any particular field can show multiple structures of interest. Students appearing in undergraduate practical examinations are usually expected to identify all such features and label them in the diagrams.
Useful hints
• Commonly used fixative for tissues 10% neutral buffered formalin.
• A microtome is used to cut tissues into thin sections.
• Hard tissues can be studied using ground sections, decalcified sections, or sections obtained by hard tissue microtomy.
• Ground sections can be helpful to study the histology of enamel, dentin, cementum, bone, and other hard tissues. Staining is not
needed.
• Much of the tooth or bone is lost during grinding for ground sections.
• Decalcified sections are useful to study the histology of dentin, cementum, bone, and dental pulp. Enamel cannot be observed with decalcified sections.
• Routinely used stain in histology and pathology is H&E stain.
• Hematoxylin basic dye stains acidic structures like nucleus, RNA.
• Eosin acidic dye stains basic structures like cytoplasm and its organelles.
CHAPTER 2
Development of tooth
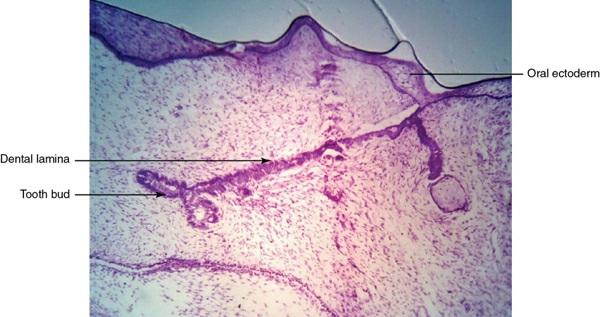
In early fetal life, basal cells in some areas of the primitive oral cavity proliferate more rapidly and result in the formation of a primary epithelial band in each arch. This band later divides into a buccal vestibular lamina and a lingual dental lamina. It is from this dental lamina that the ectodermal portions of teeth develop.
Each tooth arises from a tooth germ, which is made up of three parts: enamel organ, dental papilla, and dental sac. The enamel organ is purely ectodermal in nature and derives from dental lamina. As the name indicates, enamel organ plays the primary role in enamel formation. Dental papilla is mesenchymal in origin, and gives rise to dentin and pulp. Dental sac or dental follicle helps in the formation of cementum, alveolar bone, and periodontal ligament.
Various stages in the development of tooth can be appreciated, based on the morphology or shape of the enamel organ.
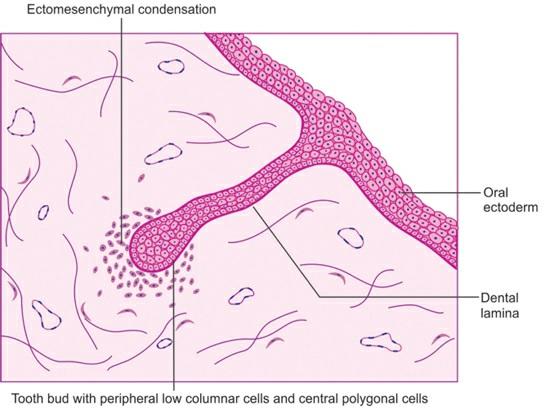
Bud stage (figs 2.1 and 2.2)
• Due to increased proliferation, tooth buds form at specific areas of the dental lamina corresponding to the location of future deciduous teeth.
• These buds grow downward into the underlying ectomesenchyme.
• Two types of cells can be recognized at this stage: outer low columnar cells and inner tightly packed polygonal cells.
• Cells of the ectomesenchyme surrounding the bud begin to come close together and condense.
FIGURE 2.1 Development of tooth at bud stage (H&E stain). Source: (Image courtesy: Dept of Oral Pathology, Saveetha Dental College and Hospital, Chennai).
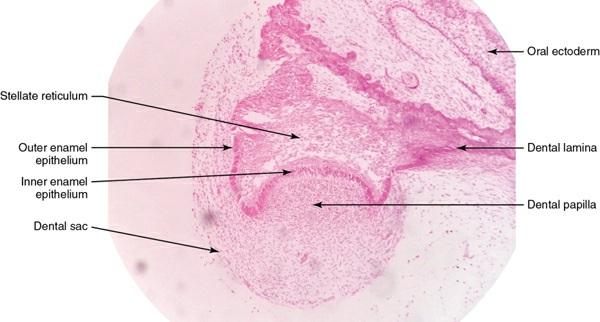
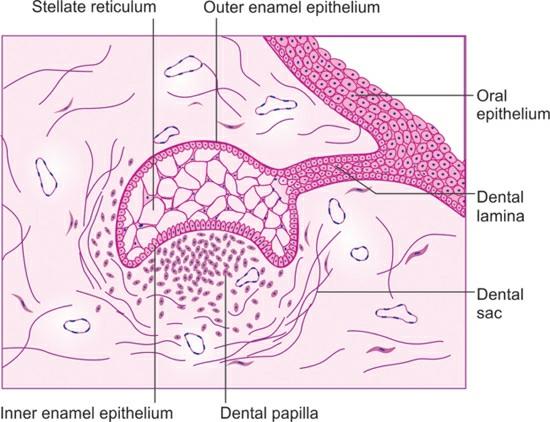
Cap stage (figs 2.3–2.5)
• The cells of the tooth bud do not grow equally. Few cells proliferate at a faster rate than the rest, and this results in a change of shape in the bud.
• The enamel organ assumes a cap shape, with a convex exterior surface, and an invaginated or concave interior surface.
• The cells lining the concave surface also become elongated and obtain a columnar shape. These are the inner enamel epithelial (IEE) cells.
• The cells on the exterior are low cuboidal in shape and constitute the outer enamel epithelium (OEE).
• Meanwhile, the central cells of enamel organ begin to separate
FIGURE 2.2 Schematic representation of bud stage of tooth development.
from each other due to extracellular fluid accumulation and become star shaped. They are attached to each other only at their desmosomes. Hence, they are called stellate reticulum (stellate – star shaped; reticulum – interconnected network).
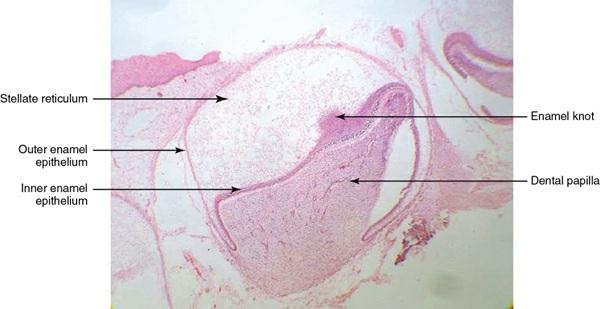
• Sometimes, the inner enamel epithelial cells in the center of the enamel organ become very closely packed. This dense structure is called enamel knot, and is considered to provide signaling that determines and controls the morphology of the crown.
• In this stage, condensed ectomesenchyme located within the concavity of inner enamel epithelium is called dental papilla.
• Dental papilla is demarcated from the rest of the ectomesenchyme by accumulation of collagen fibers, which are oriented almost in the form of a circle enclosing the dental papilla. This is the dental sac.
2.3 Development of tooth at cap stage (H&E stain). Source: (Image courtesy: Dept of Oral Pathology, Manipal College of Dental Sciences, Mangalore).
FIGURE
FIGURE 2.4 Schematic representation of cap stage of tooth development.
2.5 Enamel knot (H&E stain). Source: (Image courtesy: Dept of Oral Pathology, Manipal College of Dental Sciences, Mangalore)
Early bell stage (figs 2.6 and 2.7)
• As the cells continue to proliferate at different rates, the invagination of IEE deepens and begins to assume the shape of the future crown.
• OEE and stellate reticulum are seen similar to cap stage.
• Between stellate reticulum and IEE, two to three layers of tightly packed flattened cells are noticed. This is called the stratum intermedium.
• The region where the IEE is continuous with the OEE is called cervical loop.
• The inner enamel epithelial cells, especially near the tip of the future crown, begin to differentiate into ameloblasts. The cells become more columnar in shape, and a reversal of polarity of the nucleus is noticed.
• The cells of the dental papilla in the periphery, near the ameloblasts, begin to differentiate into odontoblasts. Elsewhere, a small acellular zone is seen separating the dental papilla from IEE.
• Dental sac is more prominently noticed.
• The continuity of the tooth bud with the dental lamina gradually begins to disintegrate.