No part of this publication may be reproduced or transmitted in any form or by any means, electronic or mechanical, including photocopying, recording, or any information storage and retrieval system, without permission in writing from the publisher. Details on how to seek permission, further information about the Publisher’s permissions policies and our arrangements with organizations such as the Copyright Clearance Center and the Copyright Licensing Agency, can be found at our website: www.elsevier.com/ permissions
This book and the individual contributions contained in it are protected under copyright by the Publisher (other than as may be noted herein).
Notices
Practitioners and researchers must always rely on their own experience and knowledge in evaluating and using any information, methods, compounds or experiments described herein. Because of rapid advances in the medical sciences, in particular, independent verification of diagnoses and drug dosages should be made. To the fullest extent of the law, no responsibility is assumed by Elsevier, authors, editors or contributors for any injury and/or damage to persons or property as a matter of products liability, negligence or otherwise, or from any use or operation of any methods, products, instructions, or ideas contained in the material herein.
ISBN: 978-0-7020-7311-3
E-ISBN: 978-0-323-56884-5
Printed in China
Last digit is the print number: 9 8 7 6 5 4 3 2 1
Content Strategist: Michael Houston
Content Development Specialist: Joanne Scott
Project Manager: Andrew Riley
Designer: Renee Duenow
CONTENTS
Preface xi
Acknowledgements 1
1 Chest
2
1.1 Chest wall and pleura 4
Chest wall: bony and soft tissue lesions 4
Diseases of the pleura 8
Pleural effusion 12
Pneumothorax 14
Diaphragmatic hernia/eventration 16
1.2 Mediastinum 18
Mediastinitis 18
Anterior mediastinal masses 20
Middle mediastinal masses 26
Posterior mediastinal masses 32
Miscellaneous mediastinal masses 34
Pericardial conditions 36
1.3 Pulmonary infection 38
Lobar pneumonia 38
Bronchopneumonia, anaerobic and atypical pneumonia 40
Pulmonary tuberculosis 42
Fungal infections 44
Metazoal and protozoal diseases 48
Pulmonary complications of HIV infection 50
1.4 Large airway disease 52
Tracheal disorders 52
Bronchiectasis 56
Congenital airway disorders 58
Emphysema 60
Chronic bronchitis and asthma 62
Miscellaneous airway disorders 64
1.5 Pulmonary lobar collapse 66
Mechanisms and radiographic appearances 66
Patterns of lobar collapse 68
1.6 Pulmonary neoplasms 72
Evaluation of the solitary pulmonary nodule 72
Lung cancer: radiological features 74
Lung cancer: pearls 76
Lymphoproliferative disorders 78
Benign pulmonary tumours 80
Miscellaneous pulmonary malignancies 82
1.7 High-resolution computed tomography (HRCT) 84
Hrct patterns of diffuse lung disease 84
Idiopathic interstitial pneumonias 86
Sarcoidosis 90
Connective tissue diseases 92
Systemic vasculitides 98
Drug-Induced lung disease 100
Silicosis/coal workers’ pneumoconiosis 102
Asbestos-related disease 104
Miscellaneous interstitial lung diseases 106
1.8 Chest trauma 110
Chest wall and lung trauma 110
Trauma to the diaphragm 112
Mediastinal trauma 114
1.9 Airspace disease 116
Airspace disease 116
1.10 Paediatric chest 122
Congenital chest abnormalities 122
Causes of neonatal respiratory distress 128
Normal paediatric chest and problems with mechanical ventilation 132
1.11 Miscellaneous ITU chest conditions 134
Lung transplantation 134
Acute respiratory distress syndrome (ARDS) 136
Itu chest imaging 138
2 Cardiovascular System 143
2.1 Congenital heart disease 144
Introduction 144
Cyanotic congenital heart disease 146
Acyanotic congenital heart disease 156
Anomalies of the aortic arch (vascular rings) 158
Septal defects 160
Other anomalies 162
2.2 Non-ischaemic acquired heart disease 166
Acquired mitral valve disease 166
Acquired aortic valve disease 168
Tricuspid and pulmonary valve disease 170
Prosthetic valves 172
Cardiomyopathies 174
Cardiac tumours 178
Cardiac trauma 180
CONTENTS
2.3 Pulmonary circulation and thromboembolism 182
Pulmonary thromboembolic disease 182
Pulmonary vascular patterns 186
2.4 The aorta 192
Aortic rupture 192
Aortic dissection 194
Aortic aneurysms 200
Mid-aortic syndrome and Takayasu’s disease of the aorta 204
Aortic occlusive disease 206
Interventional endovascular management 208
2.5 Peripheral vascular disease 210
Gastrointestinal vascular disorders 210
Carotid artery stenosis 212
Peripheral vascular disease of the lower extremities 214
Disorders of the venous system 216
Miscellaneous vascular disorders 218
2.6 Ischaemic heart disease 220
Conventional coronary angiography and echocardiography 220
CT imaging in ischaemic heart disease 222
MR imaging in ischaemic heart disease 224
Nuclear cardiac imaging 226
Manifestations of atheromatous coronary artery disease 230
12.3 Pearls in musculoskeletal imaging and pathology 958
Pearls in pathology 958
Pearls in musculoskeletal imaging 960
12.4 Patterns of tumour spread 964
12.5 Tnm staging of common cancers 970
Index 987
PREFACE
This second edition of Grainger & Allison’s Diagnostic Radiology Essentials is the culmination of one year’s hard work on the part of the editors to update and extensively revise the original first edition. There are now new sections on functional imaging and interventional radiology as well as the latest 8th edition of TNM staging for cancers.
This book is based on the current sixth edition of Grainger & Allison’s Diagnostic Radiology. Again, the overriding vision is to provide a unique single volume general radiology textbook, which attempts to encapsulate all the core information provided in its parent book, but presents it in an easy to read format. With this in mind, we have again made use of standardized headings throughout the book and have again directly linked images with the relevant text by placing them on the facing page. We have again made use of colour formatting throughout the book, to make it more accessible to the reader and facilitate quicker referencing. Inevitably due to limitations of space not every detail or as many figures could be included as we would have liked. However, we hope we have achieved, within space limitations, what we set out to do.
As with the first edition, the aim of this textbook is to provide as close as is possible a ‘one-stop reference guide’ for both trainees and practising consultants. Since the first edition was published we have continually received enthusiastic feedback from radiology trainees as to how this book has become an essential study aid in helping them successfully pass their FRCR part 2A examinations.
We are extremely grateful to Michael Houston for giving us the opportunity to build on the success of our first edition and the continuing support given to us by the editors of the Grainger & Alison’s Diagnostic Radiology series. We would like to acknowledge the important groundwork that Joannah Duncan put in to creating the first edition, and single out Joanne Scott for special praise in working tirelessly with us in helping create this second updated and improved edition.
Lee Grant BA FRCR Nyree Griffin MD FRCR 2018
ACKNOWLEDGEMENTS
Listed below are the sources for borrowed and adapted material. Due to space limitations within the book symbols have been used instead of full citations after figure and table legends. Below is a list of the symbols and their corresponding citations.
¶¶ Kaufman J, Lee M. Vascular and interventional radiology: The requisites. Mosby, 2003
§ Blickman J, Parker B, Barnes P. Pediatric radiology: The requisites. Mosby, 2009
§§ Ziessman HA, O’Malley JP, Thrall JH. Nuclear medicine: The requisites. Mosby, 2006
∫ Zagoria R. Genitourinary radiology: The requisites. Mosby, 2004
∫∫ Weissleder R, Wittenberg J, Harisinghani M, Chen J. Primer of diagnostic imaging, 4th edn. Mosby, 2007
• Miller S. Cardiac imaging: The requisites. Mosby, 2004
•• Halpert R. Gastrointestinal imaging: The requisites, 3rd edn. Mosby, 2006
+ Grossman R, Yousem D. Neuroradiology: The requisites. Mosby, 2003
++ Soto J, Lucey B. Emergency radiology: The requisites. Mosby, 2009
Naidich T, Castillo M, Cha S, Raybaud C, Kollias S, Smirniotopoulos J. Imaging of the Spine. Saunders, 2011
1.1 CHEST WALL AND PLEURA
RIB LESIONS
Benign
Congenital abnormalities The upper ribs are commonly bifid, splayed, fused, or hypoplastic ▸ they are occasionally associated with syndromes (e.g. basal cell naevus syndrome) or other anomalies (e.g. Sprengel’s deformity)
• Cervical rib: this arises from C7 (affecting 1–2% of the population) and consists of an initially downward sloping rib just lateral to the spine (cf. an initially upward sloping normal rib) ▸ it can cause a thoracic outlet syndrome and is often bilateral and asymmetrical
Callus Post fracture this can mimic an intrapulmonary opacity
Rib notching This is due to external pressure on a rib (e.g. coarctation of the aorta, neurofibromatosis type I (NF2))
Benign primary tumours These are infrequent ▸ they are most commonly cartilaginous tumours (e.g. a chondroma or osteochondroma) ▸ they are predominantly found in an anterior location and may show characteristic cartilaginous calcification
DIFFERENTIAL OF RIB NOTCHING
Inferior rib notching
Other benign rib lesions Fibrous dysplasia ▸ histiocytosis X ▸ haemangioma ▸ aneurysmal bone cyst
Aggressive
Destructive rib lesions These are most commonly an osteomyelitis or a neoplastic disease
• Malignant rib tumours: these are commonly metastatic deposits or myeloma ▸ primary malignant tumours are rare (but usually a chondrosarcoma)
• Osteomyelitis: this is uncommon ▸ it may be due to haematogenous spread (e.g. staphylococcal or tuberculous), or it may be caused by direct spread from the lung or pleural space (e.g. actinomycosis)
These can spread from the lung to a rib ▸ MRI can determine the extent of a Pancoast’s tumour (and assess the relationship between the tumour and the plexus brachialis)
Superior rib notching
Arterial: Coarctation of the aorta, aortic thrombosis, subclavian obstruction, any cause of pulmonary oligaemia
Definition Together with the spine the medial clavicular heads can assess rotation ▸ the joints at both ends are synovial and may be eroded in any synovitis appearing more ill defined (e.g. rheumatoid arthritis, hyperparathyroidism)
Pearl Neoplasms of the clavicle are usually malignant (myeloma or metastatic)
• Other primary tumours/tumour-like conditions:
• Osteosarcoma ▸ Ewing’s sarcoma ▸ post radiation sarcoma ▸ aneurysmal bone cyst ▸ histiocytosis X ▸ intersternocostoclavicular hyperostosis
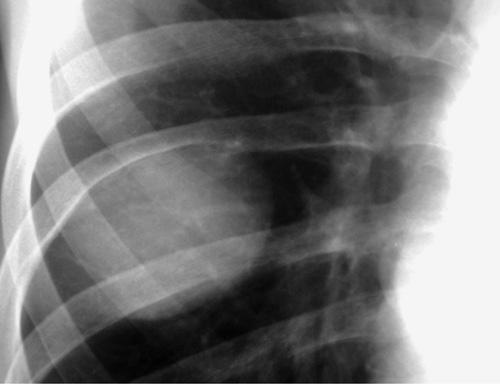
Fibrous dysplasia in a rib. CXR detail of the left lung. Compared with the other ribs the 9th rib shows an increase in density and is slightly broadened.*
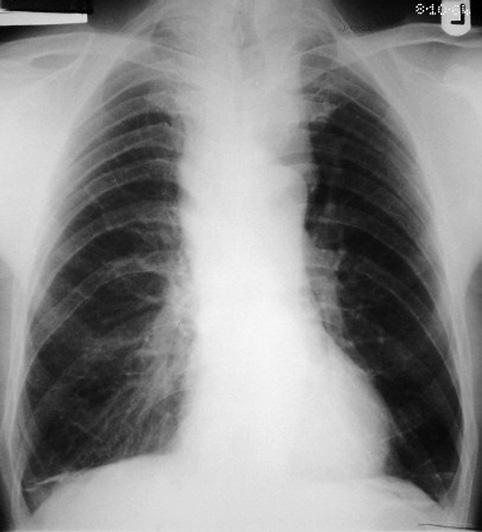
Chest radiograph in a patient with coarctation. There is rib notching and enlargement of the left subclavian artery, causing a ‘3’ sign.
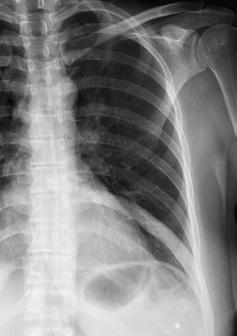
Neurofibromatosis type 1 (NF-1): skeletal findings. Pressure erosion of a rib due to a neurofibroma. (Most rib deformities in NF-1 are due to the skeletal dysplasia, not pressure erosion.)
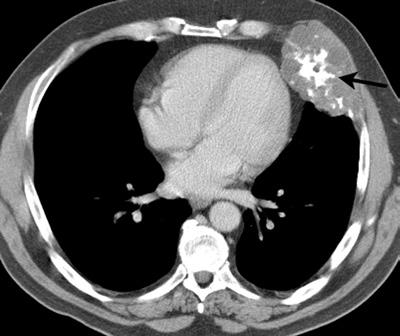
Axial CT. Chondrosarcoma of an anterior left rib demonstrating a large soft tissue component with internal punctuate calcification (arrow).
Another random document with no related content on Scribd:
SCHIMMELBUSCH METHOD.
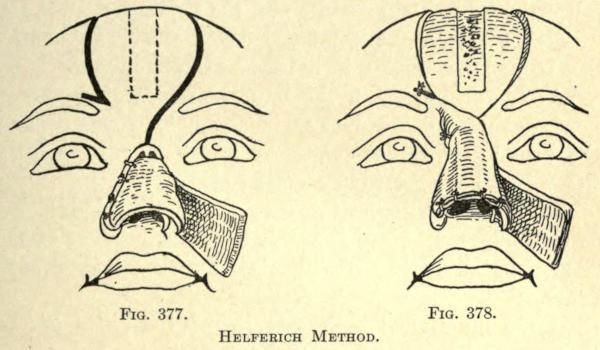
Helferich Method.—A lining flap is made, according to the French method, from the one cheek, which is dissected up and turned over to bridge most of the loss of nasal tissue, and sutured to the opposite freshened margin, as showed in Fig. 377.
A frontal flap, as outlined in the same illustration, is now cut from the forehead, leaving a pedicle as shown, and containing a section of bone at its median line. This is rotated downward and into place, and sutured along the same margin to which the genian flap is fixed, as shown in Fig. 378.
When the frontal and genian flaps have become well united, the latter’s pedicle is cut when the freshened lateral margin of the frontal flap is sutured into place.
A subseptum is now made or deemed necessary by this surgeon.
At a later period the pedicle of the frontal flap is cut, and fixed by suture and some cutting, to reduce the resultant prominence thereof.
FIG. 377.
FIG. 378.
HELFERICH METHOD.
Preidesberger Method.—This author cuts away the skin surrounding the arch of the old nose, and turns this flap downward to form the lining to the flap made from the forehead made in the same manner as Helferich.
The bone section is made in the median line, and is one centimeter wide and four long.
The frontal flap should be made long enough to permit of building a subseptum and the nostrils.
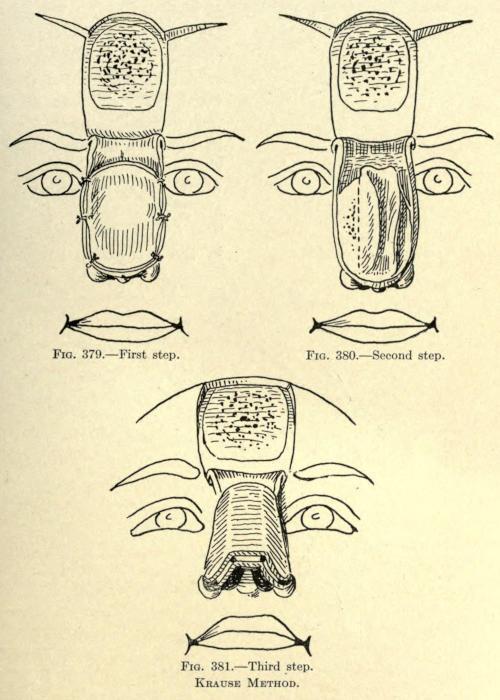
Krause Method. This frontal cutaneo-osteo-periostitic flap is made according to the method of König.
After turning down the flap it was covered with a nonpedunculated skin flap taken from the upper part of the arm by transplanting after its subcutaneous fatty tissue had been removed. (See Fig. 379.)
This method necessitates a long-continued dressing of the forehead before the pedicle is cut, because of the needed nutrition to make the two flaps heal upon each other.
After union has been established the sides of the transplanted flaps are raised by dissection, as shown in Fig. 380, to expose the bone plate of the frontal flap. A median strip is left intact.
With a fine saw the bony plate is cut into three sections, making the narrowest the median.
The margins of the old nose are now freshened, and the combined flap is sutured along the sides, preserving what tissue the surgeon can use to add support to the nose, which is done by dissection and turning or folding, as heretofore described.
The lower or forehead flap is sutured to the soft parts of the old nose, and the transplanted lateral margins to the marginal skin of the cheeks, giving to the nose the appearance as shown in Fig. 381.
At a later period the pedicle is cut and the wound that cannot, at this time, be overcome by sliding of the adjacent skin, is covered by skin grafting.
FIG. 379. First step.
FIG. 380. Second step.
FIG. 381. Third step.
KRAUSE METHOD.
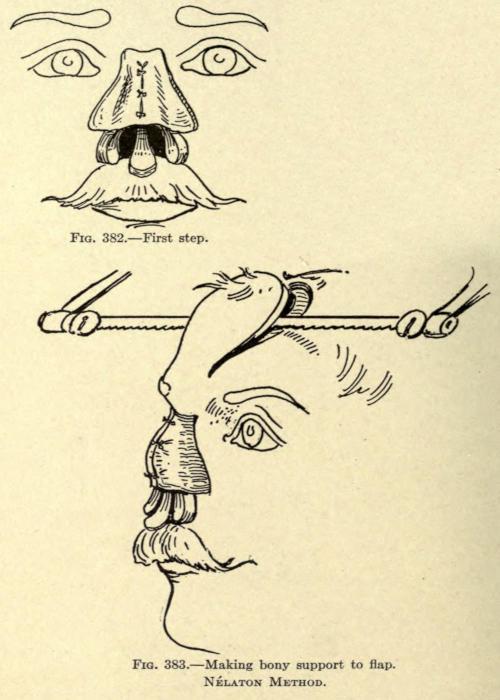
Nélaton Method. A lateral flap of skin is taken from the cheeks, beginning on a line with the root of the nose and as low as a point two thirds of its normal length. These flaps are made wide enough, so that when dissected up and folded inward they will meet on the median line, as shown in Fig. 382, having their raw surface facing outward. They are sutured along the median line. The frontal flap was cut in the form of a horse-shoe having its pedicle at the root of the nose just above the eyebrows, and being about three centimeters wide and six long.
The skin at the outer margins was dissected up from the bone, leaving sufficient attachment at its center to allow for a bony plate.
With a fine saw, and in the manner shown in Fig. 383, this plate was made from the frontal bone, being about two and a half centimeters wide and four long.
FIG. 382. First step.
FIG. 383. Making bony support to flap.
NÉLATON METHOD.
There is some difficulty associated with the making of the flap, which ends at the superior border of the frontal, leaving the pedicle
composed only of skin.
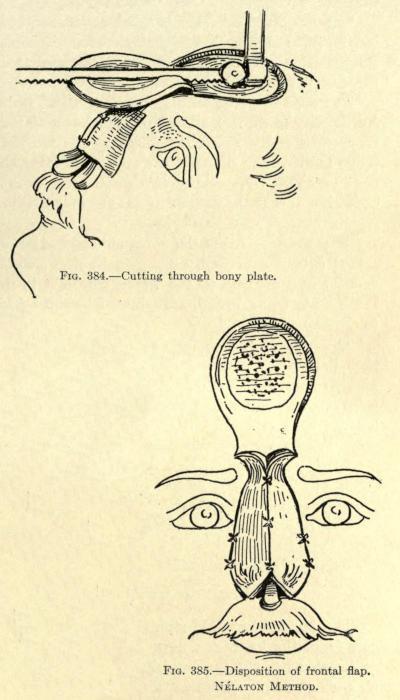
The flap is now turned down, exposing its raw surface. The bony plate is sawed through at the median line, as shown in Fig. 384, and the skin of the flap is also divided along this line, giving two partly bone-lined flaps.
The two flaps are now rotated downward before the lost nose, so that their raw surfaces face inward, and in this position they are sutured along the median line and the sides, as shown in Fig. 385.
The method gives an angular dorsum of satisfactory consistency to the new nose, but furnishes a serious drawback, in that the cicatrization along the median line is liable to affect the shape of the organ and leaves a prominent scar line. The use of two small pedicles is another objection in that the danger of gangrene is greater as the nourishment to each flap is less.
FIG. 384. Cutting through bony plate.
FIG. 385. Disposition of frontal flap.
NÉLATON METHOD.
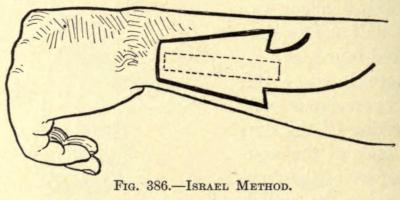
Israel Method.—From the ulnar side of the left forearm Israel cuts a skin flap, as shown in Fig. 386, with its smaller end nearest to
the wrist, where it is detached, the pedicle being broad, assuring of better nourishment to the flap.
The narrow end of the flap is cut down to the bone, then the sides are dissected up until the borders of the ulna are reached on both sides, reserving an adherent strip about eight millimeters wide and six centimeters long.
The bone below this strip is now removed with the saw from the lower end upward, and ending about one centimeter beyond the base line of the flap, where the strip so made is left connected to the bone proper.
The flap is now raised gently and bent upward without breaking the bone. It is sawed half through, transversely, at a point corresponding to the lobule of the nose.
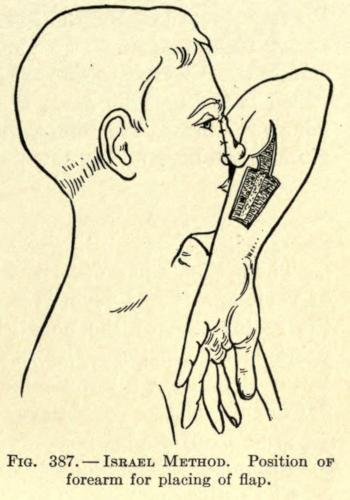
The flap is then enveloped in iodoform gauze, and the head, forearm, and arm are fixed in plaster of Paris, the forearm being bent at a right angle to the arm (see Fig. 387).
FIG. 386. ISRAEL METHOD.
FIG. 387. ISRAEL METHOD. Position of forearm for placing of flap.
After nine days the osseous connection still remaining is severed, and the nose is modeled upon the forearm, as heretofore described in these operations, this surgeon using silver wire to retain the parts. The raw skin surfaces are allowed to heal upon each other and the flap is permitted to come in contact with the wound on the forearm temporarily, to which it might adhere, the gauze being now removed.
After twelve days the newly modeled nose is freed from such adhesions and kept from healing to the parts by using dressings between the flap and wound.
Five days after, the margins of the old nose are freshened in the form of an inverted V. If there be sufficient cicatricial tissue it is turned down, raw surface out, to line the new nose.
A prolongation of the pedicle is now cut, widening out toward the radial side of the arm, made obliquely, as shown, so that its pedicle now corresponds to a width of seven centimeters.
The whole flap except this newly formed pedicle is cut free of this forearm. The arm is put into the position shown in Fig. 387, and the freshened flap margins at the root, the whole length of the left side, and part of the upper right lateral. The plaster dressing to hold the arm in the proper position until complete union is established is used. This done, the pedicle is cut, and such minor operations are done to fix the remaining free margin and the base of the new nose.
CARTILAGINOUS SUPPORT OF FLAP
The methods just described in which an osseous plate of various size and form is included with skin flaps for the restoration of the nose give undoubtedly the best rhinoplastic results. The new nose is given not only better shape, but a permanency of such form that skin flaps of themselves could never give.
The unfortunate factors in these osteo-cutaneous operations are the many difficulties experienced.
The cutting or making of the bony plate is no simple task.
The skin is an uncertain agent to employ, because of the peculiar contour of the bony surface from which the plate is to be removed. The chisel, no matter how dexterously used, is liable to cut through the entire bone thickness, which has occurred in several recorded cases.
There is also the possibility of necrosis of a part or all of the bony plate thus obtained, and where the latter is not lined interiorly there is the added danger of infection.
Furthermore, the secondary wound is more extensive; the bone exposed requires about a month’s time to granulate over before skin grafts can be successfully applied over it.
With the employment of a cheek-flap lining there is the added objection of cicatrization. The use of a flap from the arm is complicated and requires considerable time for the completion of the operation, and there is always the added danger of infection and consequent death of the osseous plate.
To overcome these many difficulties von Mangold advocates the use of a section of cartilage to support the anterior prominence of the nose.
It has been found, since the first attempt of and the successful result obtained in 1897 by this surgeon, that cartilage to be used for this purpose should be taken from the costal cartilage, where a strip of the required length and width can be obtained.
The results thus far recorded are excellent, and much is hoped for from this method, especially in the reconstruction of loss about the wing of the nose in partial rhinoplasties, where the convexed contour may be reproduced to a nicety.
The first attempt to support the flap for a total rhinoplasty by this method was made in 1902 by Charles Nélaton.
The use of cartilaginous supports may be combined with any of the methods given heretofore. The flap containing the cartilage may be lined or unlined. All tissue found about the old nose should, of course, be utilized to give added support and to reduce as far as possible extensive secondary cicatrization.
The combined Hindu and Italian methods give splendid results, the frontal flap and its support being brought down from the forehead, raw surface outward, and the arm or forearm flap being placed immediately in front of it.
The frontal flap with the support requires a preliminary operation to permit of the attachment of the cartilage. Fortunately, this step
requires but little time and shows a very slight disfigurement during this period.
The secondary wound at the site of the cartilage excision requires little attention and heals readily, and the cicatrix involved is very small.
Steinthal proposes taking the flap and cartilage from the thoracic region, grafting it during the preparatory period to the forearm, from which it is transplanted to the face at a second sitting.
There is the objection to this method that it requires the arm to be retained in position for a very long time.
The author advocated the use of an arm flap made by the Italian method to line the one to be brought down from the forehead in cases of total rhinoplasty where little or no tissue can be obtained from the remains of the old nose. Such procedure reduces the time required by the Steinthal method to one half, and therefore greatly lessens the discomfort to the patient.
The fundamental principles as laid down by Nélaton are excellent, and may be applied to any modification of method the surgeon may decide upon where a section of costal cartilage is employed to support the flap, whether this be taken from the forehead, other parts of the face, or remote places.
The procedure of Nélaton is as follows:
Nélaton Method. The method involved a preparatory and a final operation.
The preparatory operation has to do with obtaining and placing in position the section of cartilage under the skin flap wherever located.
The final operation may or may not consist of two sittings, the first being necessitated by the bringing upon the remains of the nose a flap of skin to line the one brought down in front of it and containing the support.
Preparatory Operation.—To begin properly, the frontal flap to be utilized is marked out on the forehead with nitrate of silver the day before the operation, so that its outline will be plainly discernible, and act as a guide for the placing of the cartilage. The shape of the flap is fashioned as shown in Fig. 388.
In the illustration is also shown the incisions later made to utilize the borders of the remaining nose to line the frontal flap. This is done by making an inverted V incision at a distance from the inner borders, corresponding to the lateral line of union of the frontal flap with the face. The resultant flap is turned down, raw surface outward, curtainlike, and is sutured to the frontal flap, where it falls into position.
FIG. 388. NÉLATON METHOD. Outlining of frontal flap.
The flap outline shows that its pedicle lies between the outer end of the inner third and above the right eyebrow and a little to the left of the median line at the root of the old nose. This will avoid considerable tension at this point, the rotation as made being ninety degrees.
Nearly horizontally, as shown in the figure, a line is drawn through the center of the flap, showing the position the strip of cartilage is to occupy.
This done, a pattern of the outline is cut from stiff paper or oiled silk to preserve as a guide for the making of the flap, it being understood that the outlining has been made to the measurement of the required nose, allowance being given for cicatricial contraction.
This done, the surgeon having prepared the skin about the costal prominences of the left thorax, he proceeds as follows:
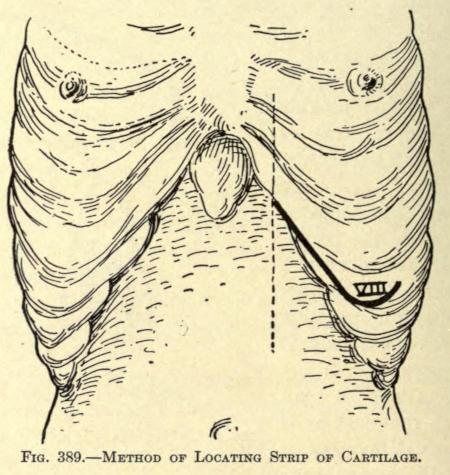
A vertical line is drawn the width of two fingers to the right of the nipple, as shown in Fig. 389, the length of the line being obvious.
Where the vertical crosses the eighth costal cartilage an incision is made downward over and not under the border of the cartilage.
The incision extends downward for a distance of eight centimeters, where it is turned upward at an angle, as shown, to a distance of three centimeters.
By separating the muscular aponeurosis made visible by this incision the lower edge of the eighth costal cartilage is exposed. The knife is moved along the lower edge of the cartilage, dividing the fibers of the insertion of the transverse muscle from without inward. The cartilage can now be grasped between the thumb and forefinger and be forced out of its normal position after a slight anterior dissection.
FIG. 389. METHOD OF LOCATING STRIP OF CARTILAGE.
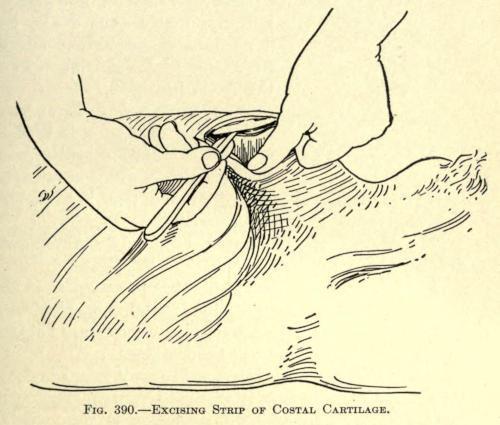
The union between cartilage and bone is exposed. The chisel is used to divide the cartilage about one centimeter from the rib, after the costal or inner extremity has been made.
The position of the hands and the exposed cartilage is shown in Fig. 390.
FIG. 390.—EXCISING STRIP OF COSTAL CARTILAGE.
This accomplished, the wound is temporarily dressed. The cartilage is then fashioned to suit the required size and shape.
It is thinned down on its lower surface to about three millimeters in diameter. This thickness is maintained to a length of two and a half centimeters, the part being intended for the subseptum.
A notch is made on the upper surface at this distance from the end, which marks the point at which it must be eventually bent to form the point of the nose. This notch is cut to two thirds of the entire thickness.
The required length, that of the nasal line and its added septal length, is preserved.
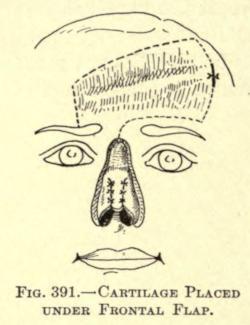
The cartilage being prepared is now ready for the insertion under the frontal periosteum at the site already marked.
For this purpose a vertical incision one and a half centimeters, extending down to the bone, is made, as shown in Fig. 391.
The periosteum is peeled away from the bone with the dull or rounded handle of a knife.
The cartilage is now thrust into the tunnel thus made, the thinned-down, notched-off section facing forward and lying toward the vertical incision.
The skin wound is sutured and a gentle compress is used to keep the cartilage in contact with the periosteum, which requires at least two months. A longer interval of time is advocated to give greater vitality to the cartilage.
FIG. 391. CARTILAGE PLACED UNDER FRONTAL FLAP.
The wound of the thorax is simply sutured and dressed as any surgical wound.
FinalOperation.—The part cut is prepared as in the Hindu method. A lining for the frontal is made of such tissue as remains, and its freshened borders are sutured where possible, as shown in the last figure.
When this cannot be done, a flap may be taken from the arm, as already suggested, or a Krause nonpedunculated skin flap may be used, according to the methods given heretofore.
The epidermis is made to face inward. If either of these methods is used, the frontal lap is not brought down until healthy granulation has been established.
The frontal flap is made to include the periosteum, from which it is separated with a blunt instrument. The cartilaginous strip will be found to be attached to the periosteum.
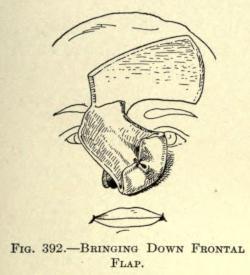
The freed flap is now brought before the nasal defect and fitted into place. The cartilaginous strip should occupy the anterior median line.
The subseptal cartilage is bent inward and downward and the skin of the flap is sutured to it with catgut to form the subseptum, as shown in Fig. 392.
The free margins of skin remaining at the septal bone of the flap are folded inward to line the new nostrils. Catgut sutures are used to keep these folds in position.
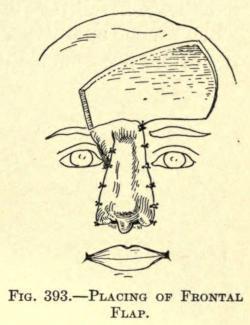
The nose is now ready to be sutured into place. The subseptum is inserted first and fixed into the upper lip, then the nose being held so that its median line occupies the proper position, both wings are sutured to the freshened margins, and lastly the sides (see Fig. 393).
The frontal wound may be drawn together as near as possible by suture.
Rubber drainage-tubes are kept in the nares for a few days, and are thereafter replaced by rolls of gauze.
Dry dressings are preferred for the nasal wounds, which heal in about five days.
A month after, Thiersch grafts are employed to cover the frontal wound remaining. They require about eight days to heal into place.
FIG. 392. BRINGING DOWN FRONTAL FLAP.
FIG. 393. PLACING OF FRONTAL FLAP.
PARTIAL RHINOPLASTY
RESTORATION OF BASE OF NOSE
In this defect there may be a loss of the lobule and both alæ, including the subseptum, or there may be a lateral loss, involving more or less of the base.
There are many types of this deformity, so that to include all would involve considerable space, and at best most of the operations involved would be those utilizing the methods heretofore mentioned.
The earlier operations for the correction of lesions of large extent are founded upon the use of skin flaps, which have been shown to be unsatisfactory because of their consequent cicatrization. Reference is made, however, to several of these to exhibit the disposition of the remaining parts of the old nose.
Later will be considered the methods involving osteo-cartilaginous supports.
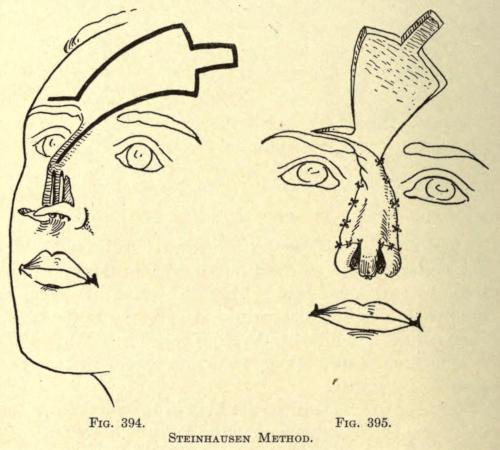
Steinhausen Method.—The inferior remains of the old nose are detached from the margins and brought downward; a Hindu flap is fashioned as shown in Fig. 394, and brought down to form the new nose; the size of the flap is given as being four inches wide and eight inches long.
The distal end of the flap is sutured to the freed flaps obtained from the borders, as shown in Fig. 395.
The method is purely of the Hindu type, and the results are not, therefore, very satisfactory.
FIG. 394. FIG. 395.
STEINHAUSEN METHOD.
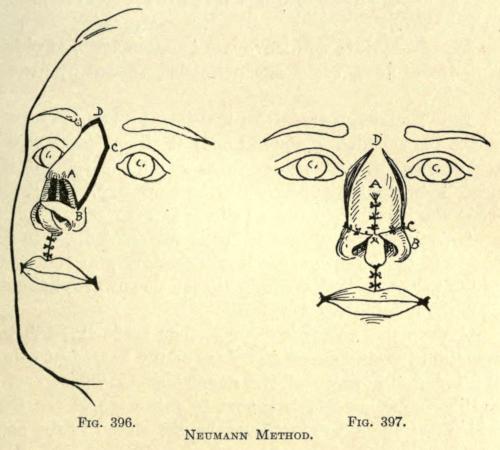
Neumann Method.—This author cuts down the remains of both lower margins of the old nose, as in the Steinhausen operation. A wedge-shaped section is cut from the entire thickness of the upper lid and turned upward to form the subseptum, and is sutured to the lateral parts brought down by the former incisions, to which it is sutured at the median line, as shown in Fig. 396.
Two lateral flaps are now made from the sides of the remaining nose retaining their cartilages, as shown in the illustration, A, B, C, D, showing one of them. The two flaps remain attached, anteriorly along the median line over the bridge of the nose. These two lateral flaps A, B, C, are turned down from the point A, which represents the pedicle, and are sutured at the median line by their lower borders, A, B, the borders B, C, being thus brought down, fall before
the fresh borders taken from the margins of the old nose, to which they are sutured, as shown in Fig. 397.
This procedure will leave two exposed areas at either side of the nose, which are permitted to heal by granulation.
IG. 396. FIG. 397. NEUMANN METHOD.
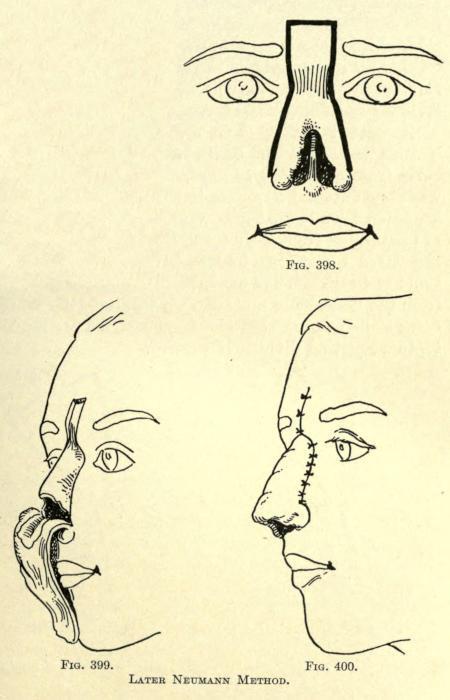
Later Neumann Method.—An incision is made to circumscribe the remains of the old nose at either side, extending upward in rectangular form above the root of the nose, between the inner canthi and upward, and somewhat above the eyebrows, as shown in Fig. 398.
This flap thus outlined is freely dissected down to the bones of the nose, leaving it attached only at the roots of the wings, so that it can be turned downward, hanging over the mouth, like a curtain.
F
A deep transverse incision is then made through the remaining cartilaginous structure of the nose, just below the inferior borders of the nasal bones. This gives a cartilaginous, archlike support to this part of the flap, which is utilized to give firmness and shape to the base of the new nose.
The incision just mentioned is depicted in Fig. 399, in which is also shown the turned-down flap.
After the hemorrhage has been controlled the flap is turned upward and into such position as to form the new nose, utilizing the cartilaginous arch, above referred to, to the best advantage to give the proper contour. This will lower the apex of the flap considerably. The lateral borders are sutured to the freshened margins where possible, but as a rule an opening is left at either side, communicating with the inner nose, which must be healed by granulation.
The wound on the forehead may be brought together completely by suture. The appearance of the nose assumes at this time the form shown in Fig. 400.
The objection to this method lies in the fact that the cartilaginous arch brought down with the flap is usually insufficient to give proper support to the base of the nose, permitting the lobule to contract and sink. In most cases there is an absence of sufficient cartilage to employ the method at all. An osseous arch would, therefore, preferably be incorporated with the flap, taken from the remaining nasal bones.
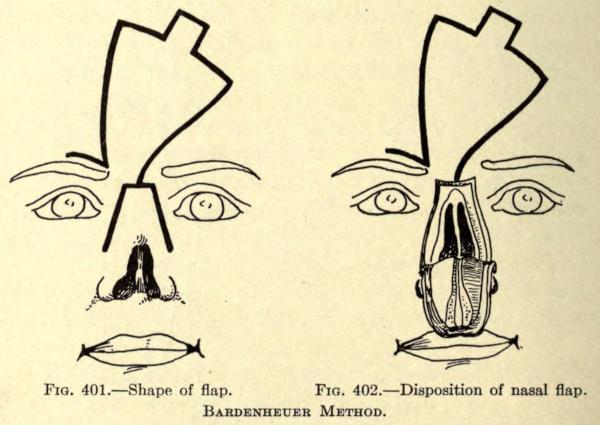
Bardenheuer Method.—This author makes a transverse incision across the root of the nose, and two lateral incisions from either end of the first, carrying them downward and outward, as shown in Fig.
FIG. 398. FIG. 399. FIG. 400.
LATER NEUMANN METHOD.
401. These incisions are made down to the bone. With a chisel the nasal bones are separated from their frontal and superior maxillary attachments, giving an arch of bone to the flap, which is brought downward and outward, the bone being dissected from the underlying mucosa. To facilitate the bringing down of this flap the anterior border of the cartilaginous septum must be divided if present.
The flap thus made is attached only at the two points of skin at the inferior borders, the epidermal surface looking inward. The archlike mass of bone is gently bent backward at either side to practically reverse its convexity. The position of the flap is shown in Fig. 402.
The raw surface of the flap above mentioned is now covered with a flap taken from the forehead in the form shown in the figures.
The resultant nose is entirely lined with skin, and contains sufficient bone to support it. The objection is that there must necessarily be a large secondary wound in the forehead, which must be covered with Thiersch grafts.
FIG. 401. Shape of flap.
FIG. 402. Disposition of nasal flap.
BARDENHEUER METHOD.
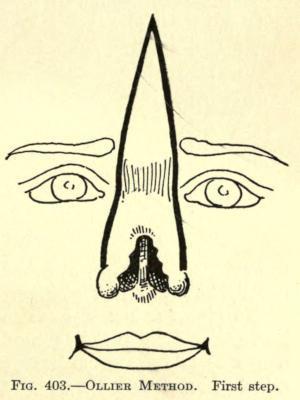
Ollier Method.—This author uses an inverted V incision, beginning on the forehead at a point about three centimeters above the superior margin of the eyebrows. The diverging incisions are carried down to a point just above the base of what remains of the old nose, where it remains attached.
The shape of the flap thus made is shown in Fig. 403.
The flap is dissected up and made to contain the periosteum as far as the juncture of the frontal nasal bones.
The skin over the right nasal bone is now dissected up, without, however, including the periosteum. The left nasal bone, still adherent to the skin, is removed with the chisel, beginning at the median line, then at its frontal attachment, and lastly along its union with the superior maxillary bone.
On the right side what remained of the cartilaginous structure was divided so as to include it in the flap.
This gave a large triangular flap, periosteo-cutaneous above, osteo-cutaneous below that, and ending in a chondro-cutaneous border, attached to the face by a double pedicle, as shown in Fig. 404.
To give further support to this flap at the median line, Ollier divided the septum with the scissors in such a way as to form an
antero-posterior cartilaginous flap attached by its lower base.
The flap was brought downward in the same manner as in the method of Neumann and sutured into position, the parts involved assuming the position shown in Fig. 405, in which the lateral nasal surface is left uncovered to show the space occasioned by the removal of the nasal bone, and in dotted line the position that bone now occupies.
In five weeks the two nasal bones united, end to end, and three months after the operation the space made by the removal of the bone had become filled with hard tissue, that eventually ossified in about seven months.
FIG. 404.—Second step.
FIG. 405. Position nasal bone occupies.
OLLIER METHOD.
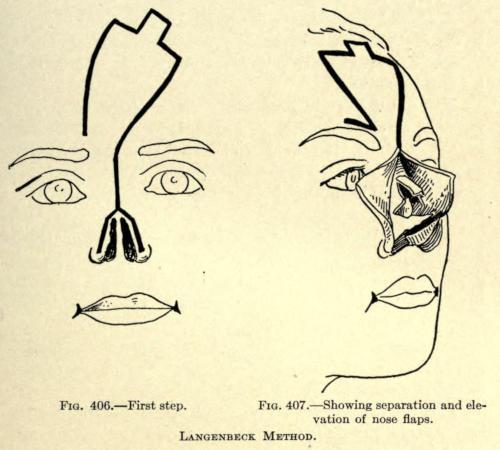
Langenbeck Method.—A median incision is made through the remaining skin of the old nose, dividing it into halves. The incisions about the base and the shape of flap to be brought down from the forehead are shown in Fig. 406.
The skin over the nose is dissected up, moving toward the cheek, exposing the bony frame of the nose.
From the lower border of the pyriform aperture two elongated triangular plates of bone are made, being attached posteriorly to superior maxillary bones. They should be made about one sixth inch wide.
By their subsequent displacement they are made to lie anteroposteriorly. With a saw the nasal bones are separated from their maxillary connection from below upward, making a median bone plate, which is raised with a levator to the height desired for the new nasal bridge, remaining attached to the frontal bone, as shown in Fig. 407.
A frontal flap is taken from the forehead and sutured to the freshened raw margins of the lateral flaps.
The bone plates are fastened to each side of the frontal flap by suture.
The nasal base is preferably made of the tissue remaining of the old nose, as depicted, to prevent closure of the nostrils, the only difficulty being to keep the poorly nourished tissue from dying. When used the raw surface is brought in contact with that of the frontal flap.
The objection in this case is that the median third anterior line usually falls in rapidly, leaving the nose dished or saddled, and unless there be sufficient tissue to construct the base, the objections so often referred to heretofore will occur.
FIG. 406.—First step.
FIG. 407. Showing separation and elevation of nose flaps.
LANGENBECK METHOD.
Ch. Nélaton Method. This author uses an osteo-cutaneous flap taken from the forehead. The shape of the latter is shown in Fig. 408.
The lateral incisions are to be made the width of a finger from the margins of the old nose, extending upward in curved fashion through the inner edge of the eyebrows and meeting at a point on the forehead, becoming slightly oblique near the border of the hair.
The flap is dissected up from the borders inward, including the periosteum, leaving a strip of bony attachment at the median line.
The dissected sides of the flap are held up by an assistant while the operator proceeds to chisel a thin bony plate from the frontal.