SeCtion i teaching Mathematics: Foundations and Perspectives
The fundamental core of effective teaching of mathematics combines an understanding of how students learn, how to promote that learning by teaching through problem solving, and how to plan for and assess that learning on a daily basis. Introductory chapters in this section provide perspectives on trends in mathematics education and the process of doing mathematics. These chapters develop the core ideas of learning, teaching, planning, and assessment. Additional perspectives on mathematics for students with diverse backgrounds and the role of technological tools are also emphasized.
ChAPter 1
teaching Mathematics in the 21st Century 25
Becoming an Effective Teacher of Mathematics 25
A Changing World 26
Factors to Consider 27
The Movement toward Shared Standards 28
Principles and Standards for School Mathematics 29
Common Core State Standards 30
Principles to Actions 33
An Invitation to Learn and Grow 34
Becoming a Teacher of Mathematics 34
Reflections on Chapter 1 36
Writing to Learn 36
For Discussion and Exploration 36
Resources for Chapter 1 36
Recommended Readings 36
ChAPter 2
exploring What it Means to Know and Do Mathematics 37
What Does It Mean to Do Mathematics? 37
Verbs of Doing Mathematics 38
An Invitation to Do Mathematics 39
Searching for Patterns 39
Analyzing a Situation 40
Generalizing Relationships 41
Experimenting and Explaining 42
Where Are the Answers? 44
What Does It Mean to Be Mathematically Proficient? 44
Relational Understanding 45
Mathematical Proficiency 47
How Do Students Learn Mathematics? 50
Constructivism 50
Sociocultural Theory 51
Implications for Teaching Mathematics 51
Connecting the Dots 54
Reflections on Chapter 2 55
Writing to Learn 55
For Discussion and Exploration 55
Resources for Chapter 2 56
Recommended Readings 56
ChAPter 3
teaching through Problem Solving 57
Problem Solving 57
Teaching for Problem Solving 58
Teaching about Problem Solving 58
Teaching through Problem Solving 61
Features of Worthwhile Tasks 61
High Levels of Cognitive Demand 62
Multiple Entry and Exit Points 62
Relevant Contexts 65
Evaluating and Adapting Tasks 67
Developing Concepts and Procedures through Tasks 68
Concepts 68
Procedures 69
What about Drill and Practice? 71
Orchestrating Classroom Discourse 73
Classroom Discussions 73
Questioning Considerations 75
How Much to Tell and Not to Tell 76
Writing to Learn 77
Problem Solving for All 78
Reflections on Chapter 3 80
Writing to Learn 80
For Discussion and Exploration 80
Resources for Chapter 3 80
Recommended Readings 80
ChAPter 4
Planning in the Problem-Based Classroom 81
A Three-Phase Lesson Format 81
The Before Phase of a Lesson 82
The During Phase of a Lesson 85
The After Phase of a Lesson 87
Process for Preparing a Lesson 89
Step 1: Determine the Learning Goals 90
Step 2: Consider Your Students’ Needs 90
Step 3: Select, Design, or Adapt a Worthwhile Task 91
Step 4: Design Lesson Assessments 91
Step 5: Plan the Before Phase of the Lesson 92
Step 6: Plan the During Phase of the Lesson 93
Step 7: Plan the After Phase of the Lesson 93
Step 8: Reflect and Refine 93
More Options for the Three-Phase Lesson 94
Short Tasks 94
Learning Centers 95
Differentiating Instruction 96
Open Questions 96
Tiered Lessons 97
Parallel Tasks 99
Flexible Grouping 99
Planning for Family Engagement 101
Communicating Mathematics Goals 101
Family Math Nights 102
Homework Practices 104
Resources for Families 105
Involving All Families 106
Reflections on Chapter 4 107
Writing to Learn 107
For Discussion and Exploration 107
Resources for Chapter 4 107
Recommended Readings 107
ChAPter 5
Creating Assessments for Learning 108
Integrating Assessment into Instruction 108
What Is Assessment? 109
What Should Be Assessed? 110
Assessment Methods 111
Observations 111
Interviews 113
Tasks 116
Rubrics and Their Uses 119
Generic Rubrics 120
Task-Specific Rubrics 121
Writing as an Assessment Tool 122
Student Self-Assessment 123
Tests 124
Improving Performance on High-Stakes Tests 125
Communicating Grades and Shaping Instruction 125
Reflections on Chapter 5 126
Writing to Learn 126
For Discussion and Exploration 126
Resources for Chapter 5 127
Recommended Readings 127
ChAPter 6
teaching Mathematics equitably to All Children 128
Mathematics for ALL Students 128
Providing for Students Who Struggle and Those with Special Needs 130
Prevention Models 130
Implementing Interventions 131
Teaching and Assessing Students with Learning Disabilities 135
Teaching Students with Moderate/Severe Disabilities 137
Culturally and Linguistically Diverse Students 138
Culturally Responsive Instruction 139
Focus on Academic Vocabulary 140
Facilitating Engagement during Instruction 143
Implementing Strategies for English Language Learners 144
Providing for Students Who Are Mathematically Gifted 145
Using technological tools to teach Mathematics 151
Tools and Technology 151
Technology-Supported Learning Activities 152
Calculators in Mathematics Instruction 154
When to Use a Calculator 155
Benefits of Calculator Use 155
Graphing Calculators 156
Portable Data-Collection Devices 158
Appropriate and Strategic Use of Digital Tools 158
Concept Instruction 159
Problem Solving 159
Drill and Reinforcement 159
Guidelines for Selecting and Using Digital Resources for Mathematics 160
Guidelines for Using Digital Content 160
How to Select Appropriate Digital Content 160
Mathematics Resources on the Internet 162
How to Select Online Resources 162
Emerging Technologies 162
Reflections on Chapter 7 165
Writing to Learn 165
For Discussion and Exploration 165
Resources for Chapter 7 165
Recommended Readings 165
SeCtion ii Development of Mathematical Concepts and Procedures
This section serves as the application of the core ideas of Section I. Here you will find chapters on every major content area in the pre-K–8 mathematics curriculum. Numerous problem-based activities to engage students are interwoven with a discussion of the mathematical content and how students develop their understanding of that content. At the outset of each chapter, you will find a listing of “Big Ideas,” the mathematical umbrella for the chapter. Also included are ideas for incorporating children’s literature, integrations with the mathematical practices, and formative assessment notes. These chapters are designed to help you develop pedagogical strategies and to serve as a resource for your teaching now and in the future.
ChAPter 8
Developing early number Concepts and number Sense 166
Promoting Good Beginnings 167
The Number Core: Quantity, Counting, and Knowing How
Many 168
Quantity and the Ability to Subitize 168
Early Counting 169
Numeral Writing and Recognition 172
Counting On and Counting Back 173
The Relations Core: More Than, Less Than, and Equal To 174
Developing Number Sense by Building Number
Relationships 176
Relationships between Numbers 1 through 10 176
Relationships for Numbers 10 through 20 and Beyond 184
Number Sense in Their World 186
Calendar Activities 186
Estimation and Measurement 187
Data Collection and Analysis 188
Reflections on Chapter 8 189
Writing to Learn 189
For Discussion and Exploration 189
Resources for Chapter 8 189
Literature Connections 189
Recommended Readings 189
ChAPter 9
Developing Meanings for the operations 191
Teaching Operations through Contextual Problems 192
Addition and Subtraction Problem Structures 192
Change Problems 193
Part-Part-Whole Problems 194
Compare Problems 194
Problem Difficulty 195
Teaching Addition and Subtraction 196
Contextual Problems 196
Model-Based Problems 198
Properties of Addition and Subtraction 201
Multiplication and Division Problem Structure 203
Equal-Group Problems 203
Comparison Problems 203
Area and Array Problems 205
Combination Problems 205
Teaching Multiplication and Division 205
Contextual Problems 206
Remainders 207
Model-Based Problems 207
Properties of Multiplication and Division 210
Strategies for Solving Contextual Problems 212
Analyzing Context Problems 212
Multistep Problems 214
Reflections on Chapter 9 216
Writing to Learn 216
For Discussion and Exploration 216
Resources for Chapter 9 216
Literature Connections 216
Recommended Readings 216
ChAPter 10
Developing Basic Fact Fluency 218
Developmental Phases for Learning the Basic Facts 219
Teaching and Assessing the Basic Facts 220
Different Approaches to Teaching the Basic Facts 220
Teaching Basic Facts Effectively 221
Assessing Basic Facts Effectively 222
Reasoning Strategies for Addition Facts 223
One More Than and Two More Than 224
Adding Zero 225
Doubles 226
Combinations of 10 227
Making 10 227
Using 5 as an Anchor 228
Near-Doubles 228
Reasoning Strategies for Subtraction Facts 230
Think-Addition 230
Down Under 10 231
Take from 10 231
Reasoning Strategies for Multiplication and Division Facts 232
Foundational Facts: 2, 5, 0, 1 232
Nifty Nines 234
Derived Multiplication Fact Strategies 235
Division Facts 237
Reinforcing Basic Fact Mastery 238
Games to Support Basic Fact Fluency 238
About Drill 241
Fact Remediation 242
Reflections on Chapter 10 245
Writing to Learn 245
For Discussion and Exploration 245
Resources for Chapter 10 245
Literature Connections 245
Recommended Readings 245
ChAPter 11
Developing Whole-number Place-Value Concepts 246
Pre-Place-Value Understandings 247
Developing Whole-Number Place-Value Concepts 248
Integrating Base-Ten Groupings with Counting by Ones 248
Integrating Base-Ten Groupings with Words 249
Integrating Base-Ten Groupings with Place-Value Notation 249
Base-Ten Models for Place Value 250
Groupable Models 250
Pregrouped Models 251
Nonproportional Models 252
Developing Base-Ten Concepts 252
Grouping Activities 252
Grouping Tens to Make 100 255
Equivalent Representations 255
Oral and Written Names for Numbers 257
Two-Digit Number Names 257
Three-Digit Number Names 258
Written Symbols 259
Patterns and Relationships with Multidigit Numbers 261
The Hundreds Chart 261
Relationships with Benchmark Numbers 264
Connections to Real-World Ideas 265
Numbers Beyond 1000 266
Extending the Place-Value System 266
Conceptualizing Large Numbers 267
Reflections on Chapter 11 269
Writing to Learn 269
For Discussion and Exploration 269
Resources for Chapter 11 270
Literature Connections 270
Recommended Readings 270
ChAPter 12
Developing Strategies for Addition and Subtraction Computation 271
Toward Computational Fluency 272
Connecting Addition and Subtraction to Place Value 273
Three Types of Computational Strategies 278
Direct Modeling 278
Invented Strategies 279
Standard Algorithms 281
Development of Invented Strategies 282
Creating a Supportive Environment 283
Models to Support Invented Strategies 283
Development of Invented Strategies for Addition and Subtraction 285
Single-Digit Numbers 285
Adding Two-Digit Numbers 286
Subtraction as “Think-Addition” 288
Take-Away Subtraction 288
Extensions and Challenges 290
Standard Algorithms for Addition and Subtraction 291
Standard Algorithm for Addition 291
Standard Algorithm for Subtraction 293
Introducing Computational Estimation 294
Understanding Computational Estimation 294
Suggestions for Teaching Computational Estimation 295
Computational Estimation Strategies 296
Front-End Methods 296
Rounding Methods 296
Compatible Numbers 297
Reflections on Chapter 12 299
Writing to Learn 299
For Discussion and Exploration 299
Resources for Chapter 12 299
Literature Connections 299
Recommended Readings 300
ChAPter 13
Developing Strategies for Multiplication and Division Computation 301
Student-Invented Strategies for Multiplication 302
Useful Representations 302
Multiplication by a Single-Digit Multiplier 303
Multiplication of Multidigit Numbers 304
Standard Algorithms for Multiplication 306
Begin with Models 306
Develop the Written Record 308
Student-Invented Strategies for Division 310
Standard Algorithm for Division 312
Begin with Models 312
Develop the Written Record 313
Two-Digit Divisors 315
Computational Estimation in Multiplication and Division 317
Suggestions for Teaching Computational Estimation 317
Computational Estimation Strategies 318
Reflections on Chapter 13 322
Writing to Learn 322
For Discussion and Exploration 322
Resources for Chapter 13 322
Literature Connections 322
Recommended Readings 322
ChAPter 14
Algebraic thinking, equations, and Functions 323
Strands of Algebraic Thinking 324
Structure in the Number System: Connecting Number and Algebra 324
Number Combinations 324
Place-Value Relationships 325
Algorithms 336
Structure in the Number System: Properties 327
Making Sense of Properties 327
Applying the Properties of Addition and Multiplication 330
Study of Patterns and Functions 331
Repeating Patterns 332
Growing Patterns 334
Relationships in Functions 336
Graphs of Functions 337
Describing Functions 339
Linear Functions 340
Meaningful Use of Symbols 343
Equal and Inequality Signs 344
The Meaning of Variables 352
Mathematical Modeling 358
Algebraic Thinking across the Curriculum 359
Geometry, Measurement and Algebra 359
Reflections on Chapter 14 361
Writing to Learn 361
For Discussion and Exploration 361
Resources for Chapter 14 362
Literature Connections 362
Recommended Readings 362
ChAPter 15
Developing Fraction Concepts 363
Meanings of Fractions 364
Fraction Constructs 364
Why Fractions Are Difficult 365
Models for Fractions 366
Area Models 367
Length Models 368
Set Models 369
Fractional Parts 370
Fraction Size Is Relative 371
Partitioning 371
Sharing Tasks 375
Iterating 377
Fraction Notation 380
Equivalent Fractions 382
Conceptual Focus on Equivalence 382
Equivalent Fraction Models 383
Developing an Equivalent-Fraction Algorithm 386
Comparing Fractions 389
Comparing Fractions Using Number Sense 389
Using Equivalent Fractions to Compare 391
Estimating with Fractions 391
Teaching Considerations for Fraction Concepts 392
Reflections on Chapter 15 393
Writing to Learn 393
For Discussion and Exploration 393
Resources for Chapter 15 394
Literature Connections 394
Recommended Readings 394
ChAPter 16
Developing Fraction operations 395
Understanding Fraction Operations 396
A Problem-Based Number-Sense Approach 396
Addition and Subtraction 398
Contextual Examples and Invented Strategies 398 Models 399
Estimation and Informal Methods 402
Developing the Algorithms 403 Fractions Greater Than One 405
Addressing Misconceptions 406 Multiplication 408
Contextual Examples and Models 408
Estimation and Invented Strategies 414
Developing the Algorithms 414 Factors Greater Than One 415
Addressing Misconceptions 415 Division 416
Contextual Examples and Models 417
Answers That Are Not Whole Numbers 421
Estimation and Invented Strategies 422
Developing the Algorithms 422
Addressing Misconceptions 424
Reflections on Chapter 16 425
Writing to Learn 425
For Discussion and Exploration 425 Resources for Chapter 16 426
Literature Connections 426
Recommended Readings 426
ChAPter 17
Developing Concepts of Decimals and Percents 427
Extending the Place-Value System 428
The 10-to-1 Relationship—Now in Two Directions! 428
The Role of the Decimal Point 429
Connecting Fractions and Decimals 431
Say Decimal Fractions Correctly 431
Use Visual Models for Decimal Fractions 431
Multiple Names and Formats 433
Developing Decimal Number Sense 434
Familiar Fractions Connected to Decimals 435
Comparing and Ordering Decimal Fractions 438
Density of Decimals 439
Computation with Decimals 440
Addition and Subtraction 441
Multiplication 442
Division 445
Introducing Percents 446
Physical Models and Terminology 447
Percent Problems in Context 448
Estimation 450
Reflections on Chapter 17 451
Writing to Learn 451
For Discussion and Exploration 451
Resources for Chapter 17 451
Literature Connections 451
Recommended Readings 452
ChAPter 18
ratios, Proportions, and Proportional reasoning 453
Ratios 454
Types of Ratios 454
Ratios Compared to Fractions 454
Two Ways to Think about Ratio 455
Proportional Reasoning 456
Proportional and Nonproportional Situations 457
Additive and Multiplicative Comparisons in Story Problems 459
Covariation 461
Strategies for Solving Proportional Situations 466
Rates and Scaling Strategies 467
Ratio Tables 469
Tape or Strip Diagram 470
Double Number Line Diagrams 472
Percents 472
Equations 473
Teaching Proportional Reasoning 474
Reflections on Chapter 18 475
Writing to Learn 475
For Discussion and Exploration 475
Resources for Chapter 18 475
Literature Connections 475
Recommended Readings 476
ChAPter 19
Developing Measurement Concepts 477
The Meaning and Process of Measuring 478
Concepts and Skills 478
Introducing Nonstandard Units 480
Introducing Standard Units 480
The Role of Estimation and Approximation 482
Length 485
Comparison Activities 486
Using Physical Models of Length Units 487
Conversion 488
Making and Using Rulers 489
Area 491
Comparison Activities 491
Using Physical Models of Area Units 492
The Relationship between Area and Perimeter 494
Developing Formulas for Area 496
Areas of Rectangles, Parallelograms, Triangles, and Trapezoids 497
Circumference and Area of Circles 499
Volume and Capacity 500
Comparison Activities 500
Using Physical Models of Volume and Capacity Units 502
Developing Formulas for Volumes of Common Solid Shapes 503
Weight and Mass 504
Comparison Activities 505
Using Physical Models of Weight or Mass Units 505
Angles 505
Comparison Activities 505
Using Physical Models of Angular Measure Units 505
Using Protractors 506
Time 507
Comparison Activities 507
Reading Clocks 507
Solving Problems with Time 508
Money 509
Recognizing Coins and Identifying Their Values 509
Reflections on Chapter 19 511
Writing to Learn 511
For Discussion and Exploration 511
Resources for Chapter 19 511
Literature Connections 511
Recommended Readings 511
ChAPter 20
Geometric thinking and Geometric Concepts 512
Geometry Goals for Students 513
Developing Geometric Thinking 513
The van Hiele Levels of Geometric Thought 513
Implications for Instruction 518
Shapes and Properties 519
Sorting and Classifying 520
Composing and Decomposing Shapes 520
Categories of Two- and Three-Dimensional Shapes 523
Investigations, Conjectures, and the Development of Proof 529
Transformations 533
Line Symmetry 533
Rigid Motions 534
Congruence 536
Similarity 536
Using Transformations and Symmetries 537
Location 538
Measuring Distance on the Coordinate Plane 543
Visualization 543
Two-Dimensional Imagery 544
Three-Dimensional Imagery 545
The Platonic Solids 547
Reflections on Chapter 20 548
Writing to Learn 548
For Discussion and Exploration 548
Resources for Chapter 20 548
Literature Connections 548
Recommended Readings 548
ChAPter 21
Developing Concepts of Data Analysis 550
What Does It Mean to Do Statistics? 551
Is It Statistics or Is It Mathematics? 551
The Shape of Data 552
The Process of Doing Statistics 553
Formulating Questions 554
Classroom Questions 554
Beyond One Classroom 554
Data Collection 556
Collecting Data 556
Using Existing Data Sources 558
Data Analysis: Classification 558
Attribute Materials 559
Data Analysis: Graphical Representations 561
Creating Graphs 561
Analyzing Graphs 562
Bar Graphs 562
Pie Charts/Circle Graphs 564
Continuous Data Graphs 565
Bivariate Graphs 568
Data Analysis: Measures of Center and Variability 570
Measures of Center 571
Understanding the Mean: Two Interpretations 571
Choosing a Measure of Center 575
Variability 576
Interpreting Results 579
Reflections on Chapter 21 580
Writing to Learn 580
For Discussion and Exploration 580
Resources for Chapter 21 581
Literature Connections 581
Recommended Readings 581
ChAPter 22
exploring Concepts of Probability 582
Introducing Probability 583
Likely or Not Likely 583
The Probability Continuum 587
Theoretical Probability and Experiments 588
Theoretical Probability 589
Experiments 591
Why Use Experiments? 594
Use of Technology in Experiments 594
Sample Spaces and the Probability of Compound Events 595
Independent Events 595
Area Representation 597
Dependent Events 599
Simulations 600
Common Misconceptions about Probability 602
Reflections on Chapter 22 604
Writing to Learn 604
For Discussion and Exploration 604
Resources for Chapter 22 604
Literature Connections 604
Recommended Readings 605
ChAPter 23
Developing Concepts of exponents, integers, and real numbers 606
Exponents 607
Exponents in Expressions and Equations 607
Order of Operations 608
Integer Exponents 612
Scientific Notation 613
Positive and Negative Numbers 616
Contexts for Exploring Positive and Negative Numbers 617
Meaning of Negative Numbers 619
Models for Teaching Positive and Negative Numbers 620
Operations with Positive and Negative Numbers 621
Addition and Subtraction 621
Multiplication and Division 624
Real Numbers 627
Rational Numbers 627
Square Roots and Cube Roots 629
Reflections on Chapter 23 630
Writing to Learn 630
For Discussion and Exploration 630
Resources for Chapter 23 631
Literature Connections 631
Recommended Readings 631
APPenDix A Standards for Mathematical Practice A-1
APPenDix B NCTM Mathematics Teaching Practices: from Principles to Actions A-5
APPenDix C Guide to Blackline Masters A-7
APPenDix D Activities at a Glance A-13
References R-1
index i-1
Credits C-1
Preface
All students can learn mathematics with understanding! It is through the teacher’s actions that every student can have this experience. We believe that teachers must create a classroom environment in which students are given opportunities to solve problems and work together, using their ideas and strategies, to solve them. Effective mathematics instruction involves posing tasks that engage students in the mathematics they are expected to learn. Then, by allowing students to interact with and productively struggle with their own mathematical ideas and their own strategies, they will learn to see the connections among mathematical topics and the real world. Students value mathematics and feel empowered to use it.
Creating a classroom in which students design solution pathways, engage in productive struggle, and connect one mathematical idea to another is complex. Questions arise, such as, “How do I get students to wrestle with problems if they just want me to show them how to do it? What kinds of tasks lend themselves to this type of engagement? Where can I learn the mathematics content I need in order to be able to teach in this way?” With these and other questions firmly in mind, we have several objectives in the ninth edition of this textbook:
1. Illustrate what it means to teach mathematics using a problem-based approach.
2. Serve as a go-to reference for all of the mathematics content suggested for grades pre-K–8 as recommended in the Common Core State Standards (CCSSO, 2010) and in standards used in other states, and for the research-based strategies that illustrate how students best learn this content.
3. Present a practical resource of robust, problem-based activities and tasks that can engage students in the use of significant mathematical concepts and skills.
4. Report on technology that makes teaching mathematics in a problem-based approach more visible, including links to classroom videos and ready-to-use activity pages, and references to quality websites.
We hope you will find that this is a valuable resource for teaching and learning mathematics!
neW to this edition
We briefly describe new features below, along with the substantive changes that we have made since the eighth edition to reflect the changing landscape of mathematics education. The following are highlights of the most significant changes in the ninth edition.
Blackline Masters, Activity Pages and teacher resource Pages
More than 130 ready-to-use pages have been created to support the problems and Activities throughout the book. By accessing the companion website, which lists the content by the page number in the text, you can download these to practice teaching an activity or to use with K–8 students in classroom settings. Some popular charts in the text have also been made into printable resources and handouts such as reflection questions to guide culturally relevant instruction.
Activities at a Glance
By popular demand, we have prepared a matrix (Appendix D) that lists all Section II activities, the mathematics they develop, which CCSS standards they address, and the page where they can be found. We believe you will find this an invaluable resource for planning instruction.
Self-Assessment opportunities for the reader
As we know, learners benefit from assessing their understanding along the way especially when there is a large amount of content to comprehend. To support teacher learning, each chapter begins with a set of learning outcomes that identify the goals of the chapter and link to SelfCheck quizzes. Self-Checks fall at the end of every major text section. Also, at the end of each chapter the popular Writing to Learn section now has end-of-chapter questions.
expanded Lessons
Every chapter in Section II has at least one Expanded Lesson linked to an Activity. You may recognize some of these from the Field Experience Guide. These lessons focus on concepts central to elementary and middle school mathematics and include (1) NCTM and CCSSO grade-level recommendations, (2) adaptation suggestions for English language learners (ELLs) and students with special needs, and (3) formative assessment suggestions.
increased Focus on Common Core State Standards for Mathematics and Mathematical Practices
What began in the eighth edition is even stronger in the ninth edition. The CCSS are described in Chapter 1 along with other standards documents, and the Standards for Mathematical Practices are integrated into Chapter 2. In Section II, CCSS references are embedded in the text and every Activity lists the CCSS content that can be developed in that Activity. Standards for Mathematical Practice margin notes identify text content that shows what these practices look like in classroom teaching.
reorganization and enhancement to Section i
If you are a seasoned user of this book, you will immediately note that Chapters 2 through 4 are dramatically different. Chapter 2 has Activity Pages for each of the tasks presented and the chapter has been reorganized to move theory to the end. Chapter 3 now focuses exclusively on worthwhile tasks and classroom discourse, with merged and enhanced discussion of problems and worthwhile tasks; the three-phase lesson plan format (before, during, and after) has been moved to the beginning of Chapter 4. Chapter 4, the planning chapter, also underwent additional, major revisions that include (1) adding in the lesson plan format, (2) offering a refined process for planning a lesson (now eight steps, not ten), and (3) stronger sections on differentiating instruction and involving families. Chapter 4 discussions about ELLs and students with special needs have been moved and integrated into Chapter 6. Chapter 7, on technology, no longer has content-specific topics but rather a stronger focus on emerging technologies. Content chapters now house technology sections as appropriate.
Major Changes to Specific Chapters
Basic Facts (Chapter 10)
There are three major changes to this chapter. First, there is a much stronger focus on assessing basic facts. This section presents the risks of using timed tests and presents a strong collection of alternative assessment ideas. Second, chapter discussions pose a stronger developmental focus. For example, the need to focus first on foundational facts before moving to derived facts is shared. Third, there is a shift from a focus on mastery to a focus on fluency (as described in CCSS and in the research).
Developing Strategies for Addition and Subtraction (Chapters 11 and 12)
In previous editions there was a blurry line between Chapter 11 on place value and Chapter 12, which explored how to teach students to add and subtract. Although these topics overlap in many ways, we wanted to make it easier to find the appropriate content and corresponding activities. So, many components formerly in Chapter 11 (those that were explicitly about strategies for computing) have been shifted to Chapter 12 on addition and subtraction. This resulted in 15 more activities in Chapter 12, seven of which are new.
Fraction operations (Chapter 16)
Using learning trajectories and a developmental approach, the discussion of how to develop meaning for each operation has been expanded. For example, the operation situations presented in Chapter 9 are now connected in Chapter 16 to rational numbers. In particular, multiplication and division have received much more attention, including more examples and activities. These changes are in response to the many requests for more support in this area!
Developing Concepts of Data Analysis (Chapter 21)
Look for several important changes in Chapter 21. There are 12 new activities that emphasize topics in CCSS. There also is more discussion on the shape of data, variability, and distribution. And, there is a notable increase in middle grades content including attention to dot plots, sampling, bivariate graphs, and, at the suggestion of reviewers, mean absolute deviation (MAD).
Additional important Chapter-Specific Changes
The following substantive changes (not mentioned above) include
Chapter 1: Information about the new NCTM Principles to Actions publication with a focus on the eight guiding principles
Chapter 2: A revised and enhanced Doing Mathematics section and Knowing Mathematics section
Chapter 3: A new section on Adapting Tasks (to create worthwhile tasks) and new tasks and new authentic student work
Chapter 4: Open and parallel tasks added as ways to differentiate
Chapter 5: A more explicit development of how to use translation tasks to assess students’ conceptual understanding
Chapter 6: Additional emphasis on multi-tiered systems of support including a variety of interventions
Chapter 7: Revisions reflect current software, tools, and digital apps as well as resources to support teacher reflection and collaboration
Chapter 8: Addition of Wright’s progression of children’s understanding of the number 10 and content from the findings from the new Background Research for the National Governor’s Association Center Project on Early Mathematics
Chapter 9: An expanded alignment with the problem types discussed in the CCSS document
Chapter 13: Expanded discussion of the written records of computing multiplication and division problems including lattice multiplication, open arrays, and partial quotients
Chapter 14: A reorganization to align with the three strands of algebraic thinking; a revamped section on Structure of the Number System with more examples of the connection between arithmetic and algebra; an increased focus on covariation and inequalities and a decreased emphasis on graphs and repeating patterns, consistent with the emphasis in CCSS
Chapter 15: Many fun activities added (with manipulatives such as Play-Doh, Legos, and elastic); expanded to increase emphasis on CCSS content, including emphasis on number lines and iteration
Chapter 17: Chart on common misconceptions including descriptions and examples
Chapter 18: Major changes to the Strategies section, adding tape diagrams and expanding the section on double number lines; increased attention to graphing ratios and proportions
Chapter 19: An increased focus on converting units in the same measurement system, perimeter, and misconceptions common to learning about area; added activities that explore volume and capacity
Chapter 20: The shift in organizational focus to the four major geometry topics from the precise van Hiele level (grouping by all level 1 components), now centered on moving students from level to level using a variety of experiences within a given geometry topic
Chapter 22: Major changes to activities and figures, an expanded focus on common misconceptions, and increased attention to the models emphasized in CCSS-M (dot plots, area representations, tree diagrams)
Chapter 23: A new section on developing symbol sense, expanded section on order of operations, and many new activities
What You Will Find in this Book
If you look at the table of contents, you will see that the chapters are separated into two distinct sections. The first section consists of seven chapters and covers important ideas that cross the boundaries of specific areas of content. The second section, consisting of 16 chapters, offers teaching suggestions and activities for every major mathematics topic in the pre-K–8 curriculum. Chapters in Section I offer perspectives on the challenging task of helping students learn mathematics. Having a feel for the discipline of mathematics—that is, to know what it means to “do mathematics”—is critical to learning how to teach mathematics well. In addition, understanding constructivist and sociocultural perspectives on learning mathematics and how they are applied to teaching through problem solving provides a foundation and rationale for how to teach and assess pre-K–8 students. You will be teaching diverse students including students who are English language learners, are gifted, or have disabilities. In this text, you will learn how to apply instructional strategies in ways that support and challenge all learners. Formative assessment strategies, strategies for diverse learners, and effective use of technological tools are addressed in specific chapters in Section I (Chapters 5, 6, and 7, respectively), and throughout Section II chapters.
Each chapter of Section II focuses on one of the major content areas in pre-K–8 mathematics curriculum. It begins with identifying the big ideas for that content, and also provides guidance on how students best learn that content through many problem-based activities to engage them in understanding mathematics. Reflecting on the activities as you read can help you think about the mathematics from the perspective of the student. As often as possible, take out pencil and paper and try the problems so that you actively engage in your learning about students learning mathematics. In so doing, we are hopeful that this book will increase your own understanding of mathematics, the students you teach, and how to teach them well.
Some Special Features of this text
By flipping through the book, you will notice many section headings, a large number of figures, and various special features. All are designed to make the book more useful as a long-term resource. Here are a few things to look for.
Developing Fraction Concepts
Learner Out COmes
After reading this chapter and engaging in the embedded activities and reflections, you should be able to:
15.1 Describe and give examples for fractions constructs.
◀ Learning outcomes [neW]
15.2 Name the types of fractions models and describe activities for each.
15.3 Explain foundational concepts of fractional parts, including iteration and partitioning, and connect these ideas to CCSS-M expectations.
15.4 Illustrate examples across fraction models for developing the concept of equivalence.
15.5 Compare fractions in a variety of ways and describe ways to teach this topic conceptually.
15.6 Synthesize how to effectively teach fraction concepts.
To help readers know what they should expect to learn, each chapter begins with learning outcomes. Selfchecks are numbered to cover and thus align with each learning outcome.
Fractions are one of the most important topics students need to understand in order to be successful in algebra and beyond, yet it is an area in which U.S. students struggle. NAEP test results have consistently shown that students have a weak understanding of fraction concepts (Sowder & Wearne, 2006; Wearne & Kouba, 2000). This lack of understanding is then translated into difficulties with fraction computation, decimal and percent concepts, and the use of fractions in other content areas, particularly algebra (Bailey, Hoard, Nugent, & Geary, 2012; Brown & Quinn, 2007; National Mathematics Advisory Panel, 2008). Therefore, it is absolutely critical that you teach fractions well, present fractions as interesting and important, and commit to helping students understand the big ideas.
Big I DEAS
◀ Big ideas
For students to really understand fractions, they must experience fractions across many constructs, including part of a whole, ratios, and division.
Three categories of models exist for working with fractions—area (e.g., 1 3 of a garden), length (e.g., 3 4 of an inch), and set or quantity (e.g., 1 2 of the class).
Partitioning and iterating are ways for students to understand the meaning of fractions, especially numerators and denominators.
Equal sharing is a way to build on whole-number knowledge to introduce fractional amounts.
Equivalent fractions are ways of describing the same amount by using different-sized fractional parts.
Fractions can be compared by reasoning about the relative size of the fractions. Estimation and reasoning are important in teaching understanding of fractions.
Much of the research and literature espousing a student-centered approach suggests that teachers plan their instruction around big ideas rather than isolated skills or concepts. At the beginning of each chapter in Section II, you will find a list of the key mathematical ideas associated with the chapter. Teachers find these lists helpful to quickly envision the mathematics they are to teach.
106 Chapter 6 Teaching Mathematics Equitably to All Children
Self-Check Prompts [neW] ▶
To help readers self-assess what they have just read, a self-check prompt is offered at the end of each significant text section. After answering these quiz questions online and submitting their responses, users can review feedback on what the correct response is (and why).
Activity 17.2
Shifting Units
You may decide instead to break the shape up into two rectangles and ask the student to find the area of each shape and combine. Then have the student attempt the next shape without the modification—you should always lead back to the original task. However, if you decide to begin with rectangular regions and build to compound shapes composed of rectangles, you have scaffolded the lesson in a way to ramp up to the original task. In planning accommodations and modifications, the goal is to enable each student to successfully reach your learning objectives, not to change the objectives. This is how equity is achieved—by reaching equal outcomes, not by equal treatment. Treating students the same when they each learn differently does not make sense.
Complete an accommodation or Modification Needs table to reflect on how you will plan for students in your classroom who have special needs. Record the evidence that you are adapting the learning situation.
Complete Self-Check 6.1: Mathematics for all Students
Providing for students Who struggle and Those with special needs
One of the basic tenets of education is the need for individualizing the content taught and the methods used for students who struggle, particularly those with special needs. Mathematics learning disabilities are best thought of as cognitive differences, not cognitive deficits (Lewis, 2014). Students with disabilities often have mandated individualized education programs (IEPs) that guarantee access to grade-level mathematics content—in a general education classroom, if possible. This legislation also implies that educators consider individual learning needs not only in terms of what mathematics is taught but also how it is taught.
Prevention Models
In many areas, a systematic process for achieving higher levels performance for all students includes a multitiered system of support frequently called response to intervention (RtI). This approach commonly emphasizes ways for struggling students to get immediate assistance and support rather than waiting to fail before they receive help. Multitiered models are centered on the three interwoven elements: high-quality curriculum, instructional support (interventions), and formative assessments that capture students’ strengths and weaknesses. These models were designed to determine whether low achievement was due to a lack of high-quality mathematics (i.e., “teacher-disabled students”) (Baroody, 2011; Ysseldyke, 2002) or due to an actual learning disability. They can also help determine more intensive instructional options for students who may need to have advanced mathematical challenges beyond what other students study. response to Intervention. rtI (https://www.youtube.com/watch?v=nkK1bT8ls0M) is a multitiered student support system that is often represented in a triangular format. As you might guess, there are a variety of RtI models developed by school systems as they structure their unique approaches to students’ needs.
Give students a collection of paper base-ten pieces created from Base-ten Materials, or base-ten blocks. ask them to pull out a particular mix—for example, a student might have three squares, seven strips, and four “tinies.” tell students that you have the unit behind your back; when you show it to them, they are to figure out how much they have and to record the value. hold up one of the units. Observe what students record as their value. ask students to accurately say their quantity aloud. For eLLs and students with disabilities, it is particularly important that you write these labels with the visuals in a prominent place in the classroom (and in student notebooks) so that they can refer to the terminology and illustrations as they participate in the activity. repeat several times. Be sure to include examples in which a piece is not represented so that students will understand decimal values like 3.07. Continue playing in partners with one student selecting a mix of base-ten pieces and the other student deciding which one is the unit and writing and saying the number.
▲ Activities
M06_VAND8930_09_SE_C06.indd 106
The numerous activities found in every chapter of Section II have always been rated by readers as one of the most valuable parts of the book. Some activity ideas are described directly in the text and in the illustrations. Others are presented in the numbered Activity boxes. Every activity is a problem-based task (as described in Chapter 3) and is designed to engage students in doing mathematics.
As you move up the tiers, the number of students involved decreases, the teacher–student ratio decreases, and the level of intervention increases. Each tier in the triangle represents a level of intervention with corresponding monitoring of results and outcomes, as shown in Figure 6.1. The foundational and largest portion of the triangle (tier 1) represents the core instruction that should be used with all students based on a high-quality mathematics curriculum and instructional practices (i.e., manipulatives, conceptual emphasis, etc.) and on progress monitoring assessments. For example, if using a graphic organizer in tier 1 core math instruction, the following high-quality practices would be expected in the three phases of the lesson—before, during, and after:
◀ Adaptations for Students with Disabilities and english Language Learners
• Before: States lesson purpose, introduces new vocabulary, clarifies concepts from needed prior knowledge in a visual organizer, and defines tasks of group members (if groups are being used)
Length models. One of the best length models for decimal fractions is a meter stick. Each decimeter is one-tenth of the whole stick, each centimeter is one-hundredth, and each millimeter is one-thousandth. Any number-line model broken into 100 subparts is likewise a useful model for hundredths.
Empty number lines like those used in whole-number computation are also useful in helping students compare decimals and think about scale and place value (Martinie, 2014). Given two or more decimals, students can use an empty number line to position the values, revealing what they know about the size of these decimals using zero, one-half, one, other whole numbers, or other decimal values as benchmarks. A large number line stretched across a wall or on the floor can be an excellent tool for exploring decimals. set models. Many teachers use money as a model for decimals, and to some extent this is helpful. However, for students, money is almost exclusively a two-place system and is nonproportional (e.g., one-tenth, a dime, does not physically compare to a dollar in that proportion.). Numbers like 3.2 or 12.1389 do not relate to money and can cause confusion (Martinie, 2007). Students’ initial contact with decimals should be more flexible, and so money is not recommended as an initial model for decimals, although it is certainly an important application of decimal numeration.
multiple names and Formats
We acquaint students with the various visual models to help students flexibly think of quantities in terms of tenths and hundredths, and to learn to read and write decimal fractions in different ways. Have students model a decimal fraction, say 65 100 , and then explore the following ideas:
• Is this fraction more or less than 1 2 ? Than 2 3 ? Than 3 4 ? Some familiarity with decimal fractions can be developed by comparison with fractions that are easy to think about.
Formative Assessment notes ▶
• What are some different ways to say this fraction using tenths and hundredths? (“6 tenths and 5 hundredths,” “65 hundredths”) Include thousandths when appropriate.
• Show two ways to write this fraction ( 65 100 or 6 10 + 5 100 ).
with sPeCiaL
Chapter 6 provides detailed background and strategies for how to support students with disabilities and English language learners (ELLs). But, many adaptations are specific to a particular activity or task. Therefore, Section II chapters offer activities (look for the icon) that can meet the needs of exceptional students including specific instructions with adaptations directly within the Activities.
Formative assessment Notes. When are students ready to work on reasoning strategies? When they are able to (1) use counting-on strategies (start with the largest and count up) and (2) see that numbers can be decomposed (e.g., that 6 is 5 + 1). Interview students by posing one-digit addition problems and ask how they solved it. For example, 3 + 8 (Do they count on from the larger?) and 5 + 6 (Do they see 5 + 5 + 1?). For multiplication, 3 * 8 (Do they know this is 3 eights? Do they see it as 2 eights and one more eight?). ■ Complete Self-Check 10.1: Developmental phases for Learning the Basic Facts
Notice that decimals are usually read as a single value. That is, 0.65 is read “sixty-five hundredths.” But to understand them in terms of place value, the same number must be thought of as 6 tenths and 5 hundredths. A mixed number such as 5 13 100 is usually read the same way as a decimal: 5.13 is “five and thirteen-hundredths.” Please note that it is accurate to use the word “and,” which represents the decimal point. For purposes of place value, it should also be understood as 5 + 1 10 + 3 100 . Making these expanded forms with base-ten materials will be helpful in translating fractions to decimals, which is the focus of Activity 17.3.
Assessment should be an integral part of instruction. Similarly, it makes sense to think about what to be listening for (assessing) as you read about different areas of content development. Throughout the content chapters, there are formative assessment notes with brief descriptions of ways to assess the topic in that section. Reading these assessment notes as you read the text can also help you understand how best to assist struggling students.
teaching and assessing the Basic Facts
This section describes the different ways basic fact instruction has been implemented in schools, followed by a section describing effective strategies.
Different approaches to teaching the Basic Facts
Over the last century, three main approaches have been used to teach the basic facts. The pros and cons of each approach are briefly discussed in this section. memorization. This approach moves from presenting concepts of addition and multiplication straight to memorization of facts, not devoting time to developing strategies (Baroody, Bajwa, & Eiland, 2009). This approach requires students to memorize 100 separate addition facts (just for the addition combinations 0–9) and 100 multiplication facts (0–9). Students may even have to memorize subtraction and division separately—bringing the total to over 300 isolated facts! There is strong evidence that this method simply does not work. You may be tempted to respond that you learned your facts in this manner; however, as long ago as 1935 studies concluded that students develop a variety of strategies for learning basic facts in spite of the amount of isolated drill that they experience (Brownell & Chazal, 1935).
A memorization approach does not help students develop strategies that could help them master their facts. Baroody (2006) points out three limitations:
• Inefficiency. There are too many facts to memorize.
• Inappropriate applications. Students misapply the facts and don’t check their work.
• Inflexibility. Students don’t learn flexible strategies for
Another random document with no related content on Scribd:
TO CLEAN GUN.
Mechanism.
Equal parts of G.S. lubricating oil and paraffin should be used, each part being thoroughly dried and slightly oiled with G.S. lubricating oil.
The various parts can easily be got at by “hanging” the lock as follows:—
Turn the crank handle on to buffer spring, raise lock slightly till clear of guides, allow handle to come back a little, and lock to rest on top of guides, when it will be fixed and easily accessible.
Barrel.
Turn crank handle over against buffer spring, open cover, raise lock, and as the crank handle is allowed to come slowly back raise it and let it rest upon the top of the rear crosspiece.
The cleaning rod may then be used from muzzle of barrel.
Daily cleaning is absolutely necessary for at least ten days after using ball ammunition and the bore should at all times be left coated with oil.
(A double-ended pull through may be used to remove hard fouling.)
Treatment in Frosty Weather.
In frosty weather, when water is kept in the barrel casing, a blanket or some other thick covering should be kept wrapped round the barrel casing to prevent the water freezing. The working parts of the gun should only be slightly oiled with a lightly-oiled rag. In climates where the temperature is likely to fall much below freezing
point, not more than about 5 pints of water should be put into the barrel casing (25 per cent. of glycerine mixed with the water will prevent it from freezing so quickly).
MUZZLE ATTACHMENT.
The force of recoil is increased by the use of the muzzle attachment. Defects in the working of the gun are overcome by this means.
It consists of a steel cylinder with a hole bored longitudinally through it, the front end of cylinder being partially closed by a screw. Gases escaping from the muzzle of barrel are partially confined to the interior of attachment, the pressure of the gas acting on the muzzle of barrel giving additional recoil.
It is fitted by unscrewing the packing gland from the barrel casing, and screwing the attachment into the packing gland by means of the steam tube and packing gland key.
The attachment should be removed from the gun and cleaned immediately after firing, all metallic fouling being carefully scraped away.
THE FUSEE SPRING.
On the left of the breech casing, the rear end being connected by the fusee chain and fusee with the crank, the front end is attached to breech casing by means of fusee spring box and adjusting screw which passes through front end of fusee spring box and through the nut at front end of spring.
To Weigh and Adjust.
Cock the lock, place loop of spring balance over knob of crank handle and pull vertically upwards, resting wrist on breech casing, the reading indicated when crank handle commences to move will be the weight of the fusee spring. This should be between 5 and 7 lbs. (for converted Mark I Guns between 10 and 12 lbs.).
If spring is over, or not up to weight, remove fusee spring box and adjust by means of adjusting screw, six turns making a difference of about 1 lb. (Turning screw clockwise increases weight and vice versa.)
The tension should always be kept as high as possible, consistent with maintaining the normal rate of fire (500 rounds per minute).
STRIPPING THE GUN.
The gun is stripped in the following order:—
N���.—All pins are driven in from right to left, and out in the reverse direction.
(i) Lock and Feed Block.
Raise the cover, turn the crank handle on to the buffer spring, see that the extractor drops, place finger between the extractor and stop, raise the lock and allow the crank handle to come slowly back on to the check lever; slide the live cartridges out of the extractor, keeping the latter down. Give the lock ⅛ turn to the left and lift off. Lift the feed block out.
(ii) Fusee Spring Box.
With the right hand at the rear and the left hand at the front, press the box forward until clear of the lugs, and remove. Disconnect the fusee chain and remove the box and the spring. Care should be taken to throw no cross strain on the chain.
(iii) Tangent Sight and Cover Lock.
Lower the cover, putting a screwdriver across the breech casing under the gunmetal block, drive out the axis pin of the stem and remove with its piston and spring. Close the cover, press in the cover lock, and, with the large screwdriver, remove the stop screw; the lock with its piston and spring can then be removed.
(iv) Cover.
Drive out the fixing pin of the cover joint pin, remove the collar and joint pin and take off the cover.
(v) Rear Crosspiece.
Drive out the tapered fixing pin, grasp with the left hand the left handle of the rear crosspiece, slightly raise the casing and, with the mallet, strike the top edges of the casing alternately until the rear crosspiece is clear of the dovetails on the casing. Lift out the trigger bar.
(vi) Slides, Right and Left, and Check Lever.
Pull out the slides. Drive out the fixing pin from the check lever collar, remove the collar and check lever.
(vii) Recoiling Portion.
Fold back the connecting rod on to the crank, turn the crank handle to a vertical position, and draw out to the rear the recoiling portion. Disconnect the side plates by dropping them and springing them outwards. If necessary, by taking out the fixing pin, the crank handle can be driven off with a drift and hammer, and the fusee unscrewed from the left bearing of the crank; but as a rule these parts should not be stripped.
(viii) Foresight.
The position of the foresight should first be carefully marked. Remove the fixing screw and foresight.
(ix) Steam Tube and Packing Gland.
Up-end the barrel casing so that it stands on the rear end of the breech casing. Remove the keeper screw and unscrew the steam tube. Unscrew and remove the packing gland and packing.
(x) Breech and Barrel Casings, and Ejector Tube Spring.
Rest the barrel casing on a table or bench, with the filling hole uppermost, and the breech casing clear of the bench; place the left hand under the breech casing and strike the top edges alternately with a mallet, when the casings will come apart. Lift the ejector tube spring with the point of the screwdriver and tap out the spring with the drift and hammer. (In converted guns remove fixing wire and unscrew fixing screws.)
N���.—The breech and barrel casings should only be separated when repairs are necessary. Care must be taken not to strike the barrel casing, and the blows should be struck as close to the dovetailing as possible.
(xi) Lock.
(a) Release the lock spring, lay the lock on a bench, left side uppermost. Drive out the sear, tumbler, and lock spring axis pins. (b) Remove the keeper bracket, extractor levers, lock spring, tumbler, firing pin, and sear. (c) Drive out the trigger axis pin, extractor stop keeper pin, remove the trigger, extractor stop, and slide the extractor from the face of the lock casing. (d) Push out the gib spring cover, take out the gib spring and gib. (e) Drive out the extractor spring fixing pin, and remove the extractor spring. (In converted guns the extractor spring is riveted to the extractor.)
N���.—(e) should only be done in case of breakage.
(xii) Feed Block.
(a) Drive out the spring fixing pin of the top and bottom levers, drive out the bottom lever and remove the top lever and slide. (b) Drive out the axis pin of the bottom pawls and remove pawls with feed block spring. (In converted guns unscrew fixing screws and remove feed block springs.) (c) Drive out the fixing pin of the band
roller axis pin, remove the collar, axis pin, and band roller. (d) Remove the top pawls from the slide by pressing them outwards. The springs for the pawls, if weak or broken, are only to be removed by an armourer or qualified artificer.
(xiii) Tangent Sight.
(a) Remove the top fixing screw of the graduated plate. (b) Run the slide off the stem. (c) Remove the fixing screw of the milled head, and lift the latter off the slide. (d) Remove the fixing pin, pawl and pinion from the slide. (e) Place the milled head, face upwards, on a bench; then with a drift, applied to the rectangular nib on the spring slide, knock the latter down flush with the face, when it can be lifted out with the pliers.
(xiv) Rear Crosspiece.
(a) Drive out the axis pin of the firing lever, and remove the latter with its spiral spring. (b) Drive out the axis pin of the safety catch, and lift out the latter, also the piston and spring from their seating. (c) Remove the pivot screw and shutter. (d) Unscrew, from the handles, the milled heads with their leather washers and oil brushes.
EXAMINATION AND TESTING.
Before assembling the gun all parts should be tried in their places separately to see that they work freely, and test friction of recoiling portions as follows:—
Cock lock, remove fusee spring box and spring, turn crank handle upwards, hold it with right hand and fusee with left, move recoiling portion, with gun horizontal, backwards and forwards, to see that it works freely and that barrel goes home. Weight necessary to move recoiling portion should not exceed 4 lbs. (converted guns 7 lbs.) tested by placing loop of spring balance over knob of crank handle, and pulling to rear when handle is slightly above the horizontal.
ASSEMBLING THE GUN.
Reverse all the foregoing operations with the exception that the recoiling portions must be replaced before the packing and packing gland. In order to assemble the barrel and breech casings, they will have to be turned upside-down—i.e., the filling hole down, and the bottom plate of breech casing uppermost—they should be positioned by the crosshead joint pin. Care must be taken that the ejector tube spring is in position before joining the casings together. When assembling the feed block the longer of the two bottom pawls must always be placed at the front. When assembling the tangent sight, it will be found convenient to place the slide on the stem before attaching the milled head; in this position the pinion is prevented from turning with the pawl when engaging the arms of the slide spring outside the lugs in the pawl.
REPLACEMENT OF DEFECTIVE PARTS OF THE LOCK.
Should any of the components belonging to the lock become defective they can be replaced from the spare parts, without stripping the lock right down. Proceed as follows:—
(i) Sear.
Fully cock, lift the sear, and let the firing pin engage with the tumbler and trigger; with the lock on the bench, left side up, drive out the sear axis pin, and remove the sear with its spring.
(ii) Tumbler.
Fully cock, thus engaging the firing pin with the sear; drive out the axis pin of tumbler, pull the trigger slightly, and lift out the tumbler. N���.—Care should be taken not to allow the screwed head to lift the sear when once the tumbler has been removed.
(iii) Trigger, Lock Spring or Extractor Levers.
Release the lock spring, drive out the lock spring axis pin, remove the keeper bracket, extractor levers and lock spring; if the trigger is defective, drive out the trigger axis pin and remove the trigger.
(iv) Firing Pin.
Proceed as for (iii), but do not remove the trigger. Remove the tumbler axis pin and tumbler, raise the sear, push the screwed head out of its way, and the firing pin will drop out.
(v) Gib, Gib Spring, or Extractor Spring.
This will necessitate the removal of the extractor from the face of the lock casing. Release the lock spring, drive out the lock spring axis pin, remove the keeper bracket and extractor levers; next drive out the keeper pin of the extractor stop, remove the latter, and slide the extractor off the lock casing: push out the gib spring cover, and remove the spring or gib as the case may be. If the extractor spring requires replacing, drive out its fixing pin and remove.
N���.—The serviceable components are replaced in the reverse order.
STOPPAGES.
1. Temporary.
Due to (a) Failure of some part of the gun of which a duplicate is carried, or faulty ammunition; (b) neglect on the part of member or members of the detachment. A high standard of training will avoid this.
2. Prolonged.
Due to failure of some part of the gun which cannot, as a rule, be put right under fire, or without skilled assistance.
In addition to the instructions in the “stoppage” table, the following points should be observed:—
1. If, when the cover is opened to investigate cause of stoppage, it is seen that extractor is not quite up, no attempt should be made to raise it. It should be first pushed down before the crank handle is turned over to the front, as by this means all risk of firing a cartridge accidentally is avoided.
2. When a temporary stoppage necessitates the employment of the spare lock, feed block, etc., the part which has been removed should be repaired as soon as possible, making it again available as a reserve.
3. Should it ever be necessary to release the lock spring, with the lock out of gear, this should be done with the extractor fully up, and firing pin hole opposite firing pin.
4. As the clearing of a stoppage often knocks the sights off the aiming mark, care should be taken that the gun is immediately relaid.
TABLE OF STOPPAGES.
I. II. III. IV.
Position of crank handle and its indication.
Immediate action. Probable cause. Prevention of recurrence.
FIRST (i) Turn the crank handle on to the buffer spring, pull the belt to the left front, and let go the crank handle. The extractor has not dropped. This may be due to: Indication. The lock is unable to come back far enough to allow the extractor to drop.
(a) Too heavy fusee spring. (ii) If failure recurs, lighten fusee spring by three “turns.”
(b) Excessive friction, due to want of oil; grit or tight pockets in the belt, or excessive packing in cannelure or packing gland. (b) Clean and oil working parts. Examine the belt, which should be dried if damp; or if the stoppage is due to a new or stiff belt, the pockets should be plugged. If due to excessive packing, examine and repack cannelure or packing gland.
(c) Partial loss of the force of the explosion due to (i) Worn barrel. (ii) Defective ammunition. (c) (i) The barrel should be examined at the first opportunity, and if much worn in the lead should be changed.
SECOND. (i) Force the crank handle on to the buffer spring. Open the cover and examine the cartridge on the face of the extractor. If a damaged cartridge, or an undamaged cartridge with the front portion of a separated case adhering to it, clear the face of the extractor and re-load.
Indication. The lock is unable to go fully home after recoil.
THIRD.
(ii) If an undamaged cartridge with no front portion of separated case adhering to it is found on the face of the extractor, clear the face of the extractor and replace the lock, keeping the crank handle on the buffer spring. Take the clearing plug (seeing that the centre pin is back) and insert it into the chamber. Push the pin well home by allowing the lock to go forward. Then keeping a firm pressure on the crank handle, give the clearing plug a rocking motion; withdraw the lock; lever back the handle of the clearing plug, withdraw it (seeing that the front portion of the separated case is on the clearing plug) and re-load.
(i) (a) Damaged cartridge. The cartridge is unable to enter the chamber completely, although it has commenced to do so.
(b) Separated case with front portion adhering to undamaged cartridge.
(ii) Separated case. The front portion of the case causes an obstruction and prevents the next cartridge from going into the chamber.
(b) If a succession of separated cases occur the connecting rod must be lengthened. (See para. 82.)
Indication. The extractor is unable to rise to its highest position. If the feed block slide is jammed, there is a fault in feed.
(i) Strike the crank handle on to check lever by a glancing blow with the palm of the hand. If failure recurs, strengthen the fusee spring by three turns.
(i) (a) Too light fusee spring. (i) (b) Clean and oil working parts.
(b) Excessive friction.
N���. If the continued strengthening of the fusee spring results in the crank handle stopping in the first position, change the lock, putting the fusee spring back to normal; if failure recurs take muzzle attachment into use. (See para. 44.)
(ii) If (i) fails, slightly raise the crank handle, pull the belt to the left front, let go the crank handle, and then strike it down on the check lever.
(ii) A cartridge is fed up slightly crossways, or a long brass strip is bent. (ii) Carefully examine the belt.
(iii) A. If (i) and (ii) fail, examine feed block slide. If jammed, No. 1 holds up the crank handle and opens the cover. No. 2, with the assistance of No. 1, removes the feed block, and replaces it by the spare one. Meanwhile No. 1 forces down the horns of the extractor, and places the crank handle on the buffer spring. As soon as the spare feed block is in position, No. 1 closes the cover and pulls the top cartridge of a fresh belt into position and lets go the crank handle.
(iii) A. (1) Badly filled belt, or a belt with worn or loose pockets. The cartridges projecting unevenly from the belt prevent it entering or passing freely through the feed block.
(iii) A. (2) Belt box not being in line with the feed block; the belt does not lead up correctly to the feed block and becomes jammed.
(iii) A. (1) Carefully examine the new belt.
(iii) A. (2) See that the new belt box is in line.
N���. The effect of a fault in feed is that the top pawls, being engaged behind a cartridge in the belt, are held fast when some obstruction, such as above, prevents the belt from passing freely through the feed block. The recoiling portions, being connected by the top and bottom levers to the slide, are arrested and prevented from going home. The distance they are held back depends upon the point at which the obstruction asserts itself.
(iii) B. If free, No. 1 opens the cover. No. 2 forces down the horns of the extractor. No. 1 clears the face of the extractor, and changes the lock. He removes the cartridge in positioning the feed block and reloads.
(iii) B. (1) Damaged cartridge grooves.
(2) Broken gib spring.
(3) Broken gib. In these cases the extractor is prevented from rising to its highest position. It may be necessary sometimes to slide the cartridge or the empty case upwards, when clearing the face of the extractor.
(4) Thickrimmed cartridge.
N���. If it is apparent that the stoppage is due to a thick-rimmed cartridge, it will not be necessary to change the lock.
FOURTH. (a) Turn the crank handle on to the buffer spring, pull the belt to the left front, and let go the crank handle.
Indication. That there has been no explosion, or, if any, that there has been little or no recoil, the lock remaining in its forward position.
(b) If (a) fails, place the crank handle on to the buffer spring twice, change the lock, and reload.
(a) (1) No cartridge in the chamber.
(2) Defective ammunition.
(b) (1) Broken or damaged firing pin.
(2) Broken lock spring.
N���.—If the continued lightening of the fusee spring results in the crank handle stopping in the third position, take muzzle attachment into use, and put fusee spring back to normal weight (see para. 44).
N���. Worn or damaged side or extractor levers may result in the extractor being unable to rise, or if the side levers are bent, there may either be a succession of separated cases, or the lock may become jammed.
The causes of prolonged stoppages are so varied that they cannot be set out in detail. The following are amongst the most probable, and the detachment should be thoroughly trained to recognize them and to apply such remedy as lies in their power pending a permanent repair:—
(i) Broken Cover Springs.
The extractor may not drop when the lock is drawn back, and the gun will stop with the crank handle in the first position. This may possibly be overcome by liberal oiling of the lock, but in any case single shots can be fired by holding the crank handle forward until the extractor drops by its own weight.
(ii) Broken Ejector Tube Spring,
Causing either a block in the ejector tube or an accumulation of empty cases in the breech casing. It may be found possible to keep the gun in action if care is taken to prevent the latter.
(iii) Cotter working out,
Thus causing the screwed head and connecting rod to become separated. To remedy proceed as follows:—
(a)
(b)
(c)
Take out the cotter. (This will be found either on the crank or at the bottom of the breech casing.)
Press down the screwed head with a large screwdriver to lock the cock.
Turn the screwdriver edgeways and insert it behind the horns of the extractor and between the face of the barrel and front of the lock flange, and force the lock to the rear.
(d)
Turn crank handle on to the buffer spring, press down the extractor, raise the lock and remove the live cartridge, then lift out the lock.
(iv) Damaged Parts of the Lock, no Spare Part being available.
The gun will fire without the sear, or if the bents of the sear or firing pin are badly worn or broken off, but only single shots, and only by pressing and releasing the double button quickly.
The gun will also fire if the nose of the trigger or bent of the tumbler is badly worn or broken off, but only rapid firing. In this case the gun will fire the instant the crank handle reaches the check level, although the double button has not been pressed.
The gun can be worked as follows:—
(a)
(b)
Group the cartridges in the belt, say 20 or 30 rounds each group.
Lay the gun before commencing to load, place crank handle on buffer spring, pull belt to left and let handle go; repeat, but before allowing the handle to reach check lever and the gun to fire, grip the rear crosspiece with left hand to control gun in the ordinary way.
If necessary firing can be stopped by throwing the filled end of the belt over the breech casing to the left.
When the firing has been stopped as described above, hold the crank handle with the right hand, open the cover, press down the
horns of the extractor, draw the lock back, and, if there is a live cartridge on the face of the extractor, remove the feed block and belt, close the cover, and allow the lock to fly forward, when the live cartridge, which is on the face of the extractor, will be fired automatically. The lock can then be changed with safety. On no account should the lock be allowed to fly forward until the feed block has been removed and the cover shut.
If, on drawing the lock back, it is found that there is no live cartridge on its face, the lock may be changed at once, and the necessity for removing the feed block and the subsequent precautions will not arise.
This will prevent the barrel from going home. It may be temporarily remedied by tapping it round with a hammer and punch, but it should be tightened at the earliest opportunity with the gib key, the barrel being removed from the gun.
(v) Gunmetal Valve Working Loose.
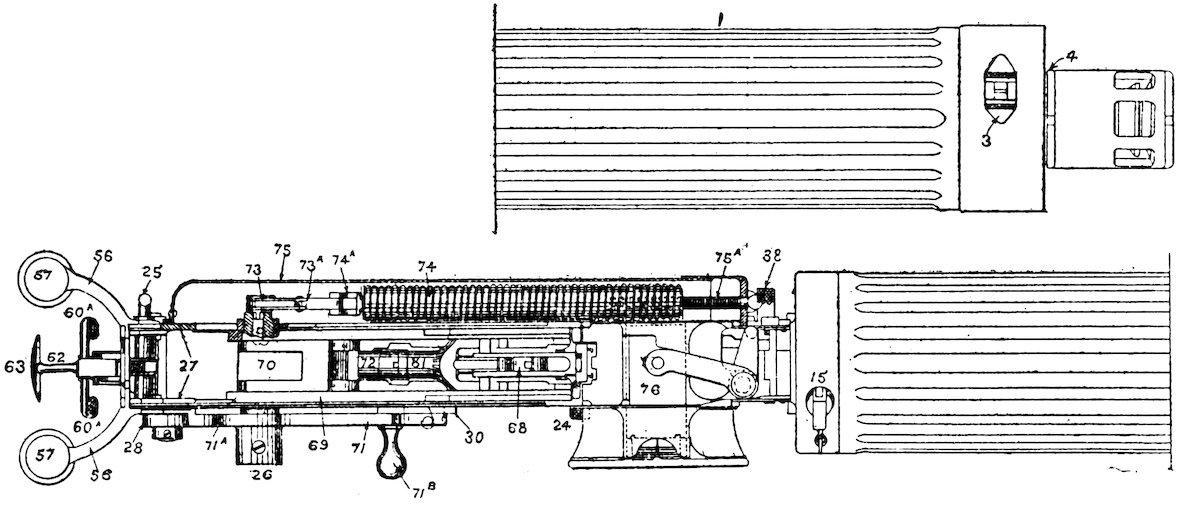
·303–inch
Vickers Gun.
Explanation of Plates IV and V.
Similar numbers indicate corresponding parts in all the plates.
The principal features are as in Maxim with the following exceptions:—
Total weight, ready for firing, is 38½ lbs. (Maxim, 67 lbs.).
Length, width and depth slightly less than Maxim.
Barrel casing is of corrugated steel (affording greater cooling surface).
Rear end of barrel—i.e., chamber—goes back into barrel casing, thus greatly assisting cooling of barrel where it is most essential.
Foresight is blade pattern, with protector.
No ejector tube or spring, there being an opening at bottom of breech casing through which empty cases fall. (Shutter requires to be opened before commencing firing.)
Tangent sight is 2½ in. nearer rear end of breech casing and is U pattern.
There is no buffer spring or resistance piece.
An elevating stop on outside of left-hand plate, this preventing the bracket head of the mounting damaging the fusee spring box.
No stud for the shoulder piece.
Connecting rod has an adjusting nut and washers.
Crank handle revolves in the opposite direction to Maxim.
Lock is inverted and joined to connecting rod by an interrupted flange.
Lock has no extractor spring, as cases fall off extractor when clear of barrel.
Lock can be easily stripped with the hand screw which forms the axis pin of the trigger bar lever.
Top pawls are made with finger pieces, and can be pressed down by hand to allow belt to be released, having only one spring, which is removable.
Fusee spring can be adjusted without removing box, as the vice pin of screw is loose.
Fusee has a clutch fixture, and is easily removable. No tools required to strip lock or change barrel.
Gun cannot be fired unless cover is down.
Greater general strength, especially in recoiling portions.