Another random document with no related content on Scribd:
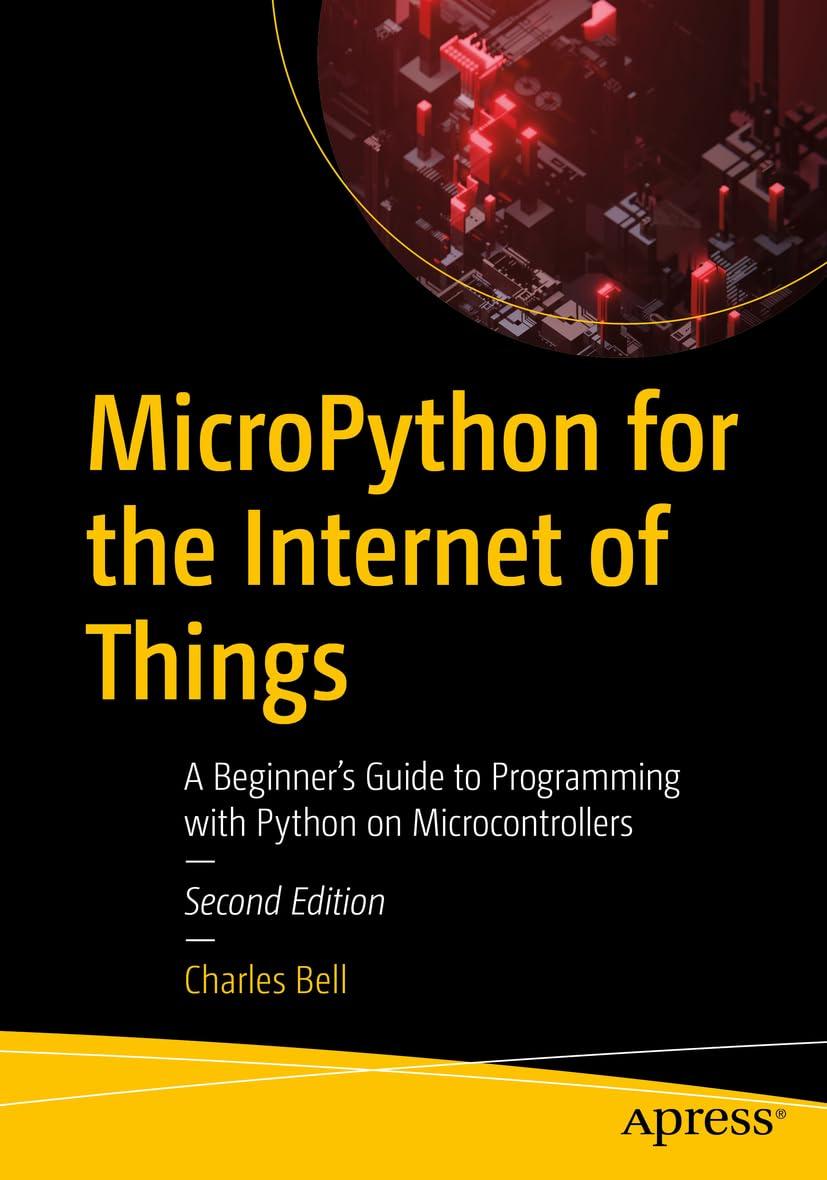
DINING TABLE.
Use a deep box and the cover of another larger box. The cover must be about the same shape, but enough larger to project over the box like the top of a table.
A correspondence card box may be used. Quite deep and strong boxes for this purpose may be got from a drug store or dry goods store.
1. Place the box bottom up.
2. Place the cover on top and put fasteners through it into the box. A piece of cardboard may be used, if you haven’t a cover of the right size.
3. Cut the legs as shown in the picture.
4. Paint to match the other furniture.
Details of Dining Table.
Cover of slightly larger box
“Correspondence card” box
Fastened bottom of box up
Legs and rails cut
THE FAMILY AT DINNER.
Put this arm chair at the head of the table, And into it put father doll;
Before him place the platter for meat, And play that he serves them all.
At the opposite end, where the tea set stands, Of course mother doll should be, And on either side of the table, Their little children you’ll see.
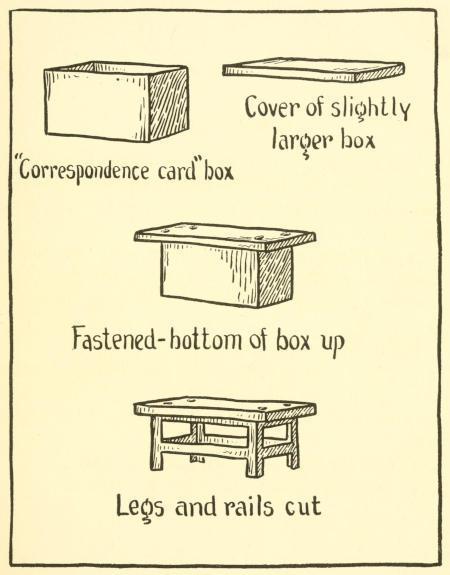
Arm Chair.
ARM CHAIR.
For a large chair, use two shoe boxes without their covers.
For a small chair, use a chocolate peppermint box and its cover.
For a medium sized chair, use a corset box without its cover.
The following directions are for the corset box:
1. From one end cut a piece as high as you wish the seat. From the other end cut a piece at least twice as high, for the back.
2. Fit the seat into the back and fasten together.
3. Cut away the unnecessary “end” at the top.
4. Cut out the pieces to form the arms, the legs and back.
5. Paint to match the other furniture.
If you cut a corset box just in the middle, you can make two chairs. Use the two ends for the two seats, and the other two pieces for the two backs.
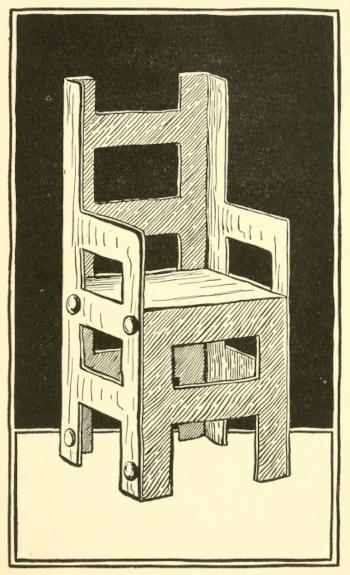
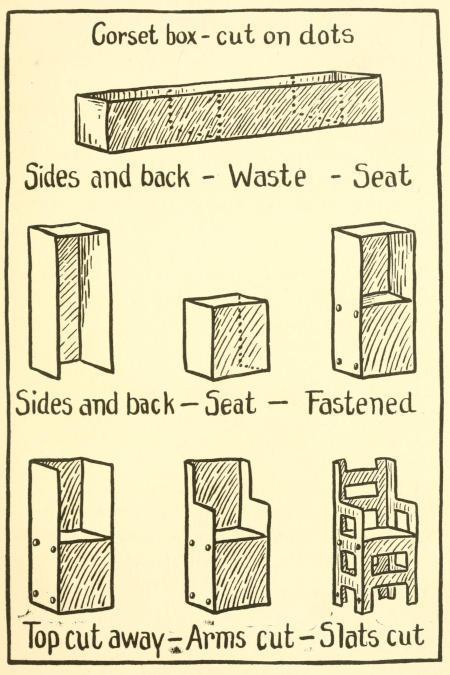
Details of Arm Chair.
Corset box—cut on dots
Sides and back Waste Seat
Sides and back—Seat—Fastened
Top cut away Arms cut Slats cut
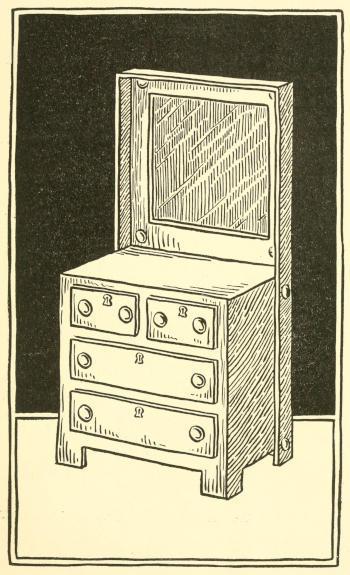
A DAINTY LITTLE DRESSER.
A little girl’s dresser should always be neat, As all little maidens know; And brushes and combs and scissors and files Must all be placed in a row.
So when you arrange dolly’s dresser, Be careful of what you choose; And put on the top, only such things As you’re sure she’ll really use.
Just make a muslin scarf of white Over yellow or pink or blue; Then make a pretty cushion small, Which things will nicely do.
Add a powder puff and mirror, With comb and brush between; She surely can be taught, I know, To keep these neat and clean.
Dresser.
DRESSER.
Use a box, with a cover which overlaps the box only a little.
For a large dresser use a shoe box.
For a medium sized dresser use a candy box, having the right kind of cover, or a corset box of the wide and shallow kind.
For a very small dresser use a jewelry box.
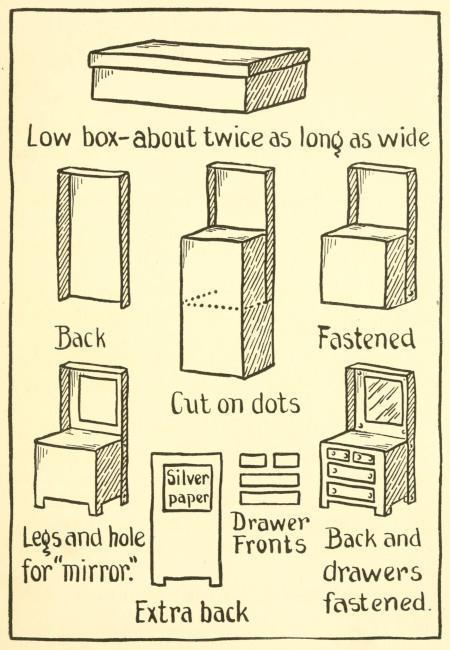
1. Cut the coverthe height you wish the back to be.
2. Fit the box into the cover; hold with both hands, and slide the box up or down until it looks like a dresser.
3. Mark where you wish the bottom of the box to be cut off. Cut it off and fasten the two parts together.
4. Cut a hole for the “mirror” and fasten an extra piece of cardboard behind it. Paste silver paper on the cardboard, or fasten a real piece of looking glass between it and the back.
5. Cut pieces of cardboard for the “drawers,” and fasten them so that the fasteners look like knobs.
6. Paint to match the other furniture. Mark key holes.
Details of Dresser.
Low box about twice as long as wide
Back
Fastened
Cut on dots
Legs and hole for “mirror.”
Silver paper
Drawer Fronts
Extra back
Back and drawers fastened.
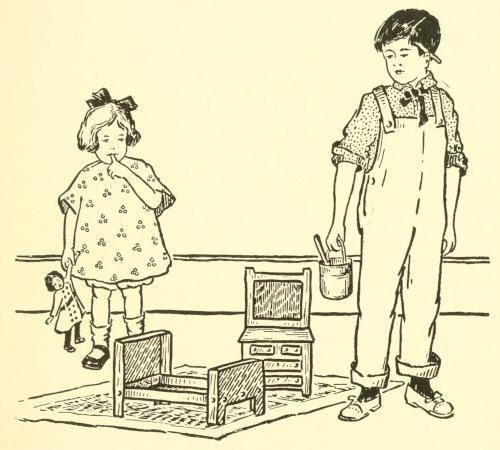
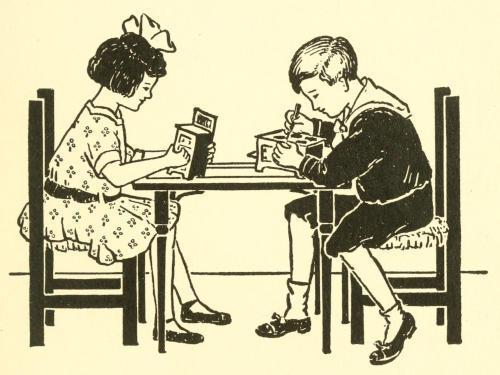
BIG BROTHER.
Mother let me make these toys, And I made them all myself; And all I used was boxes I found upon a shelf.
Now that the cute little things are made, I’ve painted them all as well; Dear little sister is surely pleased, As you from her face can tell.
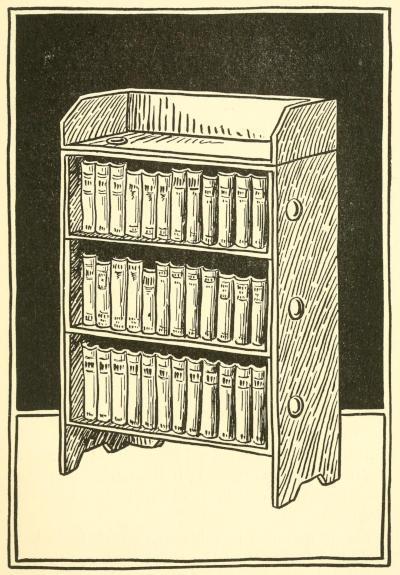
DOLLY’S BOOKS.
Cut small strips of paper, And fold them like a book; Upon the outer covers print, So they’ll quite natural look.
If you would have some fairy tales, Or tales of gnomes and elves, Just make a goodly pile of these, And put them on the shelves.
When dolly dear then learns to read Her tales of fairyland, She’ll find that all the books she loves, Are here right close at hand.
Book Case.
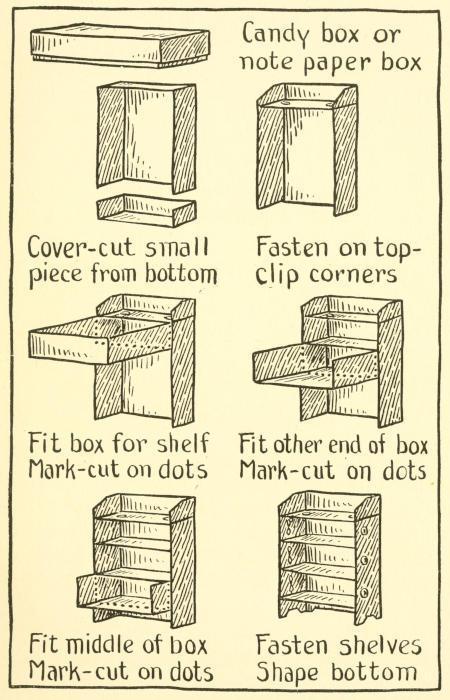
BOOK SHELVES.
Use a shallow box with a cover which entirely overlaps it, like an ordinary candy box or a note paper box. For a very small bookcase, use a box such as druggists use for powders.
1. Study the picture carefully. Notice how one end of the cover is cut off and then fastened on the top to form the little railing.
2. All the shelves are made from the box. If the case is tall enough for threeshelves, use both ends and a piece of the middle.
3. If the case is not tall enough, then make two shelves, using only the ends.
When fitting the shelves, push the box in as far as it will go; then mark where it is to be cut off.
4. For books, use the corrugated cardboard in which bottles are packed. Cut strips of this, making some parts high and some parts low, to look like a row of books. By painting them different colors, and making little marks to suggest the titles, they can be made to look very much like books.
The strips must be cut long enough to be bent back and fastened to the sides.
Details of Book Case.
Candy box or note paper box
Cover cut small piece from bottom
Fasten on top clip corners
Fit box for shelf
Mark cut on dots
Fit other end of box
Mark cut on dots
Fit middle of box
Mark cut on dots
Fasten shelves
Shape bottom
DOLLY’S CORRESPONDENCE
Cut tooth picks up for pencils, And fold small papers, too; Tuck these inside the little desk, As grown up people do.
Fit a piece of mother’s blotter
On the shelf on which you write; Lay on this your doll’s note paper, Choosing dainty blue or white.
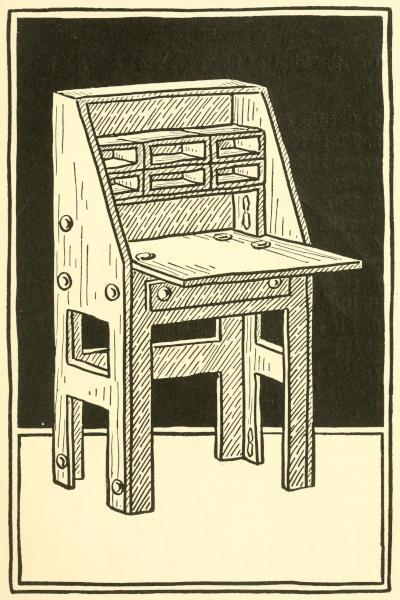
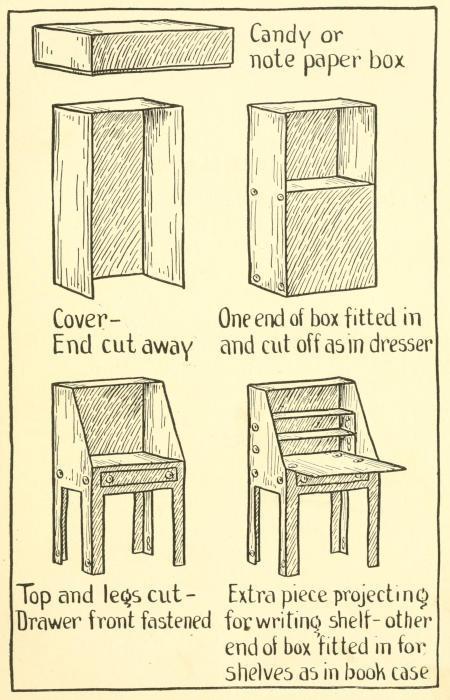
Writing Desk.
WRITING DESK.
Use the kind of box suggested for the bookcase.
1. Cut the coverthe right height for the desk.
2. Fit in the box, and slide it up or down until it seems right in proportions, as in making the dresser.
3. Mark where it is to be cut off. Cut and fasten the parts together.
4. Study the picture; then cut the top and slanting sides.
5. Shape the legs. Fasten the “drawer” with “knobs.”
6. Fit and fasten in the extra cardboard so that it projects and forms the writing shelf.
7. Use the other end of the box for the inside shelves. Cut these narrow and fit them carefully. Real pigeon holes can be made by cutting up penny-in-the-slot caramel boxes, and gluing them into place.
8. Paint to match furniture. Glue a piece of blotter on the writing shelf.
Details of Writing Desk.
Candy or note paper box
Cover End cut away
One end of the box fitted in and cut off as in dresser
Top and legs cut Drawer front fastened
Extra piece projecting for writing shelf other end of box fitted in for shelves as in book case
MAKING FATHER COMFORTABLE.
Haven’t you often noticed,
As father sits in his chair, How he enjoys the cushions As he reads his papers there?
So try to make some cushions
Of velvet or silk, and see If by stuffing them with cotton, Father doll as “comfy” might be.
Then if, with hands that are skillful, You could small “papers” make, And place with his chair by the “fire,” What comfort he could take!
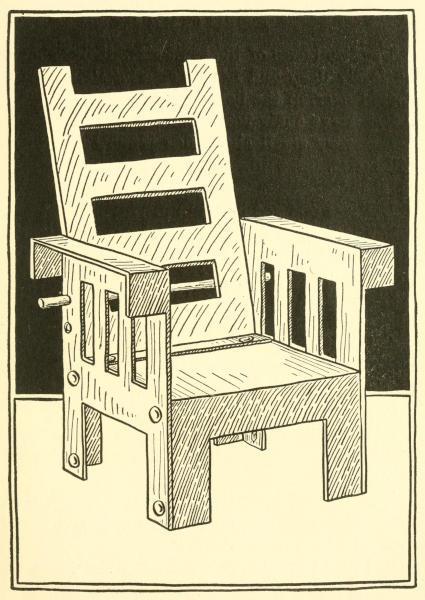
Morris Chair.
MORRIS CHAIR.
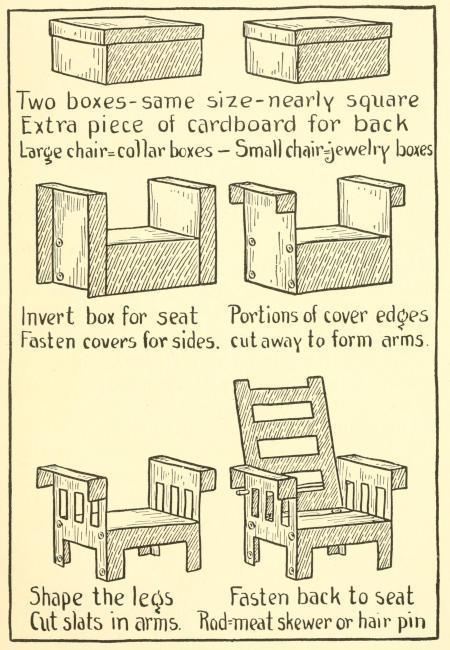
Use two boxes of the same size. They should be fairly deep and nearly square. The covers should overlap the boxes only a little.
For large chair use collar boxes.
For very small chair, use jewelry or square pill boxes.
1. Place one boxbottom up.
2. Place both covers against the sides; hold with both hands and slide up or down until the proportions seem right for arms.
3. Mark where they are to be cut off. Cut and fasten the three parts together.
4. Study the picture to see how the arms are made to look more natural by cutting away parts of the edges of the covers.
5. Shape the legs and cut the slats.
6. Use extra cardboard for the back. “Score” and bend the lower end, so fasteners may be put through it into the seat.
7. Make holes at the proper places. Use a meat skewer or a heavy wire hairpin as the rod against which the back rests.
8. Paint to match furniture. Make cushions.
Details of Morris Chair.
Two boxes same size nearly square
Extra piece of cardboard for back
Large chair = collar boxes Small chair = jewelry boxes
Invert box for seat
Fasten covers for sides.
Portions of cover edges
cutaway to form arms.
Shape the legs
Cut slats in arms.
Fasten back to seat
Rod = meat skewer or hair pin
THE TABLE SCARF.
Your library table you’ll want to keep smooth, And free of all scratches from books; Make a scarf then of velvet or linen or felt, And see how attractive it looks.
You can, if you wish, hem both of the ends, And embroider or stencil them, too; Then, if across the table you lay it, The top will keep shiny and new.
Library Table.
LIBRARY TABLE.
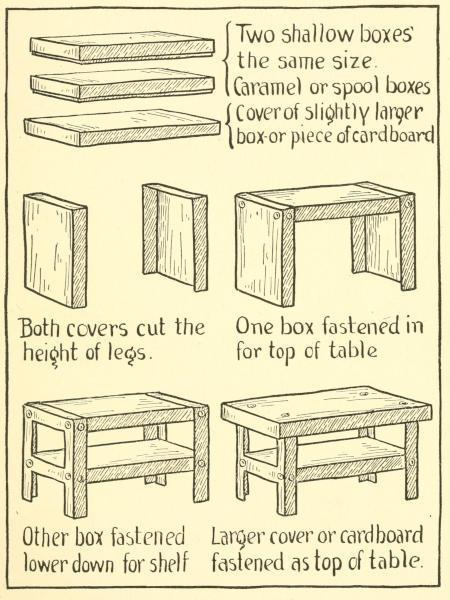
Use two shallow boxes and their covers. Spool boxes might be used, but caramel boxes would be better.
1. Use both coversfor the legs. Cut them the height the table is to be.
2. Turn one boxbottom up; fit the two pieces of the covers on the ends and fasten.
3. Turn the other box bottom up and fit it in from the bottom. Slide it up or down until the proportions look right for the shelf. Fasten the shelf at both ends to the legs.
4. Fasten on the projecting top. This may be the cover of a slightly larger box or of extra cardboard.
5. Shape the legs. You might cut vertical slats in the ends between the shelf and top.
6. Paint to match furniture.
Details of Library Table.
Two shallow boxes the same size.
Caramel or spool boxes
Cover of slightly larger box or piece of cardboard
Both covers cut the height of legs.
One box fastened in for top of table
Other box fastened lower down for shelf
Larger cover or cardboard fastened as top of table.
LITTLE COOKS.
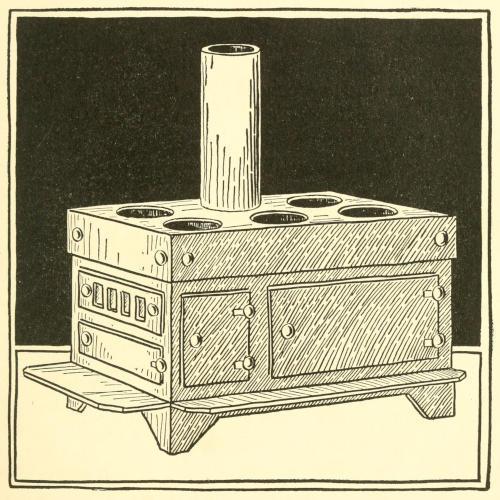
The oven doors won’t really open, But the holes are really there; You can play there’s fire in them, And your dollies’ meal prepare.
If you have some little pans, And pots and skillets as well, And mother lets you have some things, What to do with them, I’ll tell.
Don’t use any water for cooking, For that might make a mess; Just mix up some little dry things, That would be better, I guess.
If you take some rice or barley, Some coffee, beans or tea, A fine make-believe supper you’ll have, Just try it, and you will see.
Stove.
STOVE.
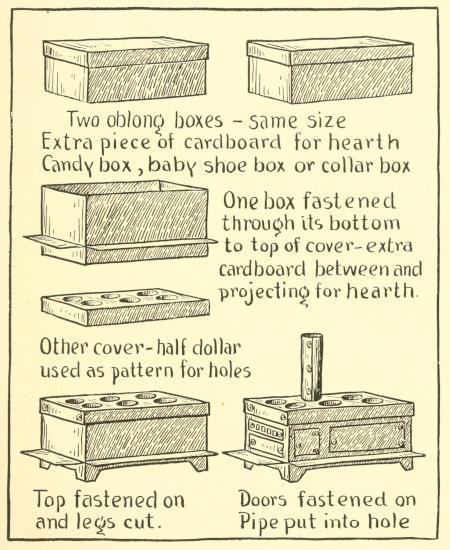
Use two boxes of same size, with covers which overlap only a little, like collar boxes, candy boxes with this kind of cover, babyshoe boxes or jewelry boxes.
1. Place one box right side up on top of its cover. Place between the two an extra cardboard, large enough to project from one end and side. Fasten through the bottom of box and cardboard, into the cover.
2. Shape the projecting cardboard into front and side hearths. Shape the legs.
3. Cut six holes in the other cover. Use silver half dollar or spool for pattern. Fasten on the top.
4. Fasten on the oven “doors,” etc. Study the picture to see how the fasteners have been made to look like hinges, by cutting two little slits for the prongs, and bending one out flat and then down. The “knobs” are put through oneslit as in the dresser.
5. The pipe is made of a roll of stiff paper or a pasteboard mailing tube. Push through one hole; if it fits, it will not need to be fastened.
6. Paint it with black enamel.
Details of Stove.
Two oblong boxes same size
Extra piece of cardboard for hearth
Candy box, baby shoe box or collar box
One box fastened through its bottom to top of cover extra cardboard between and projecting for hearth.
Other cover half dollar used as pattern for holes
Top fastened on and legs cut.
Doors fastened on
Pipe put into hole
FUN ON A RAINY DAY.
When the rain comes down, and the wind does blow, And indoors we must stay, Mother lets us to the nursery go And with our boxes play.
Oh, it’s lots of fun when we’re all alone, To make such lovely toys, Especially, when the rain beats hard And keeps in girls and boys.
BEFORE THE FIRE.
Take some beads of jet and coral, And fuzzy white wool for smoke; Of course ’tis only a make-believe fire,