Get Designing circuit boards with eagle: make high-quality pcbs at low cost matthew scarpino free al
Matthew Scarpino
Visit to download the full and correct content document: https://ebookmass.com/product/designing-circuit-boards-with-eagle-make-high-quality -pcbs-at-low-cost-matthew-scarpino/
More products digital (pdf, epub, mobi) instant download maybe you interests ...
A Low Cost Electrically Tunable Bandpass Filter with Constant Absolute Bandwidth Dwipjoy Sarkar & Tamasi Moyra
ePUB is an open, industry-standard format for eBooks. However, support of ePUB and its many features varies across reading devices and applications. Use your device or app settings to customize the presentation to your liking. Settings that you can customize often include font, font size, single or double column, landscape or portrait mode, and figures that you can click or tap to enlarge. For additional information about the settings and features on your reading device or app, visit the device manufacturer’s Web site.
Many titles include programming code or configuration examples. To optimize the presentation of these elements, view the eBook in single-column, landscape mode and adjust the font size to the smallest setting. In addition to presenting code and configurations in the reflowable text format, we have included images of the code that mimic the presentation found in the print book; therefore, where the reflowable format may compromise the presentation of the code listing, you will see a “Click here to view code image” link. Click the link to view the print-fidelity code image. To return to the previous page viewed, click the Back button on your device or app.
Designing Circuit Boards with EAGLE
MakeHigh-Quality PCBs at Low Cost
Matthew Scarpino
Upper Saddle River, NJ • Boston • Indianapolis • San Francisco
New York • Toronto • Montreal • London • Munich • Paris • Madrid
Cape Town • Sydney • Tokyo • Singapore • Mexico City
Many of the designations used by manufacturers and sellers to distinguish their products are claimed as trademarks. Where those designations appear in this book, and the publisher was aware of a trademark claim, the designations have been printed with initial capital letters or in all capitals.
The author and publisher have taken care in the preparation of this book, but make no expressed or implied warranty of any kind and assume no responsibility for errors or omissions. No liability is assumed for incidental or consequential damages in connection with or arising out of the use of the information or programs contained herein.
For information about buying this title in bulk quantities, or for special sales opportunities (which may include electronic versions; custom cover designs; and content particular to your business, training goals, marketing focus, or branding interests), please contact our corporate sales department at corpsales@pearsoned.com or (800) 382-3419.
For government sales inquiries, please contact governmentsales@pearsoned.com.
For questions about sales outside the U.S., please contact international@pearsoned.com.
All rights reserved. Printed in the United States of America. This publication is protected by copyright, and permission must be obtained from the publisher prior to any prohibited reproduction, storage in a retrieval system, or transmission in any form or by any means, electronic, mechanical, photocopying, recording, or likewise. To obtain permission to use material from this work, please submit a written request to Pearson Education, Inc., Permissions Department,
One Lake Street, Upper Saddle River, New Jersey 07458, or you may fax your request to (201) 236-3290.
ISBN-13: 978-0-13-381999-1
ISBN-10: 0-13-381999-X
Text printed in the United States on recycled paper at Edward Brothers Malloy in Ann Arbor, Michigan.
First printing: April 2014
Executive Editor
Bernard Goodwin
Managing Editor
Kristy Hart
Senior Project Editor
Betsy Gratner
Copy Editor
Apostrophe Editing Services
Indexer
Tim Wright
Proofreader
Kathy Ruiz
Technical Reviewers
John Baichtal
Bryan Bergeron
Rich Blum
Editorial Assistant
Michelle Housley
Interior Designer
Matthew Scarpino
Cover Designer
Chuti Prasertsith
Compositor
Matthew Scarpino
Senior Compositor
Gloria Schurick
Praise for DesigningCircuitBoardswithEAGLE
“Matt Scarpino has succeeded where scores of others have failed—he’s managed to make the formidable EAGLE software understandable and, more importantly, useable. His presentation is not only approachable and logical, but it’s complete. When you’ve finished his book, you’ll be able to do something meaningful with EAGLE. This book belongs on every engineer’s bookshelf or tablet.”
—Bryan Bergeron, Editor, Nuts&VoltsMagazine
“Matt Scarpino’s DesigningCircuitBoardswithEAGLEis a great resource for electronics enthusiasts who are ready to get serious and produce their own circuit boards. Matt’s sensible instructions take readers through the steps to design simple and not-so-simple circuit boards, and you can really tell that he’s been using EAGLE for 10 years and loves it. I’m recommending this book to all my maker friends.”
—John Baichtal, Author of ArduinoforBeginners:EssentialSkills EveryMakerNeeds
“With the rising popularity of open source hardware projects, the EAGLE circuit board software has become a vital tool for both hobbyists and professional engineers alike. Designing CircuitBoardswithEAGLEprovides all the information you’ll need to get up to speed with the EAGLE software, and to start creating your own circuit board designs. Matt Scarpino has provided a great tool for the hobbyist starting out in the circuit board design world, demonstrating all of the features you’ll need to know to create your own circuit board projects. However, the experienced engineer will also benefit from the book, as it also serves as a complete reference guide to all the EAGLE software configuration settings and features. His insightful guidance helps simplify difficult tasks in the EAGLE
software, and his handy tips will help save you hours of trialand-error experimenting in your circuit board designs.”
—Rich Blum, Author of Sam’sTeachYourselfArduino Programmingin24Hoursand SamsTeachYourselfPython ProgrammingforRaspberryPiin24Hours
Preface
Acknowledgments About the Author
Contents
Part I: Preliminary Introduction
Chapter 1: Introducing EAGLE
1.1 A Whirlwind Tour of EAGLE
1.2 Obtaining EAGLE
1.3 Licensing
1.4 Organization of This Book
1.5 More Information
1.6 Conclusion
Chapter 2: An Overview of Circuit Boards and EAGLE Design
2.1 Anatomy of a Printed Circuit Board
2.2 Overview of Circuit Design with EAGLE
2.3 Conclusion
Chapter 3: Designing a Simple Circuit
3.1 An Inverting Amplifier
3.2 Initial Steps
3.3 The Inverting Amplifier Schematic
3.4 Board Layout
3.5 Routing
3.6 CAM Processor
3.7 Conclusion
Part II: Designing the Arduino Femtoduino
Chapter 4: Designing the Femtoduino Schematic
4.1 Initial Steps
4.2 The Reset Switch
4.3 Voltage Regulation
4.4 The ATmega328P Microcontroller
4.5 Header Connections
4.6 Net Classes
4.7 Electrical Rule Check
4.8 Generating the Board Design
4.9 Framing the Schematic
4.10 Attributes and Assembly Variants
4.11 Conclusion
Chapter 5: Layout and Design Rules
5.1 Layers
5.2 Board Layout
5.3 Design Rule Check
5.4 Conclusion
Chapter 6: Routing
6.1 An Overview of Routing
6.2 Manual Routing
6.3 Follow-Me Routing
6.4 The Autorouter
6.5 Home PCB Fabrication
6.6 Conclusion
Chapter 7: Generating and Submitting Output Files
7.1 Jobs and the CAM Processor
7.2 Viewing Gerber Files
7.3 Drill Files
7.4 Submitting Design Files
7.5 Conclusion
Part III: Advanced Capabilities
Chapter 8: Creating Libraries and Components
8.1 Creating the Library
8.2 Creating the SIMPLE-TQFP16
8.3 Creating the VACUUM-TH
8.4 Creating the TW9920
8.5 Conclusion
Chapter 9: Simulating Circuits with LTspice
9.1 Introducing LTspice
9.2 Designing a Schematic
9.3 Simulating the Circuit
9.4 Exchanging Designs with EAGLE
9.5 Conclusion
Part IV: Automating EAGLE
Chapter 10: Editor Commands
10.1 Introducing Editor Commands
10.2 Schematic Editor Commands
10.3 Commands for Board Designs
10.4 Commands for Library Interface
10.5 The Assign, Change, and Set Commands
10.6 Configuration Scripts
10.7 Conclusion
Chapter 11: Introduction to the User Language (UL)
11.1 Overview of UL
11.2 Simple Data Types and Functions
11.3 Builtins
11.4 Control Structures
11.5 The exit Statement
11.6 Conclusion
Chapter 12: Examining Designs with the User Language
12.1 UL-Specific Data Types
12.2 Schematic Designs (UL_SCHEMATIC)
12.3 Board Designs (UL_BOARD)
12.4 Conclusion
Chapter 13: Creating Dialogs and Menu Items
13.1 Predefined Dialogs
13.2 Custom Dialogs and Widgets
13.3 Dialog Layouts
13.4 The Menu Command
13.5 Conclusion
Part V: The BeagleBone Black
Chapter 14: Schematic Design for the BeagleBone Black
14.1 Overview of the BeagleBone Black
14.2 Advanced EAGLE Schematics
14.3 AM3359 Memory/JTAG Connections
14.4 AM3359 I/O Connections
14.5 System Memory
14.6 Power Management
14.7 Ethernet and the Universal Serial Bus
14.8 Graphics Display
14.9 Conclusion
Chapter 15: Board Design for the BeagleBone Black
15.1 Configuring the Stackup
15.2 Creating and Routing Ball Grid Arrays
15.3 Trace Length and Meander
15.4 The BBB Board Design
15.5 Conclusion
Appendix A: EAGLE Library Files
A.1 Anatomy of a Library File
A.2 Settings, Grid, and Layers
A.3 Overview of Library Elements
A.4 Symbols
A.5 Packages
A.6 Devicesets
A.7 Conclusion
Appendix B: The Gerber File Format
B.1 Introducing the Gerber Format
B.2 Setting Global Properties
B.3 Aperture Definitions
B.4 Drawing Shapes
B.5 Custom Apertures
B.6 Conclusion
Index
Preface
As I write this in late 2013, the Maker Movement has flourished from a tiny group of tinkerers into a passionate community of millions. Hobbyists have become entrepreneurs and entrepreneurs have become large-scale manufacturers. 3-D printers have fallen into the price range of the average consumer, and the printers’ capabilities have risen to such an extent that they’re being used to fabricate high-precision aircraft parts and medical equipment. With good reason, many economists and journalists have likened the rise of the Maker Movement to a second Industrial Revolution.
Nothing better illustrates the movement’s success than the popularity of the Arduino platform. The first Arduino board design, the Arduino USB, was released in 2005, giving students and hobbyists a low-cost means of programming Atmel microcontrollers. Since then, hundreds of thousands of Arduino boards have been sold, and the Arduino family has expanded to include a vast array of boards, shields, kits, and accessories. Arduino boards have found their way into robots, musical instruments, game platforms, and even unmanned aerial vehicles. The boards have become so popular that many hobbyists-turned-entrepreneurs use them to build prototypes of new inventions.
But Makers still demand more: more capability, more affordability, and more customization. This means designing new circuit boards, a task that requires specialized knowledge and software. Most professional design tools are beyond the price range of the average Maker, but not EAGLE. Since its release in 1988, EAGLE has grown steadily in features and stability while maintaining a price that even cash-strapped students can afford. EAGLE wins legions of admirers with every new version, and the analogy couldn’t be clearer: What Arduino is to hardware, EAGLE is to software. It’s no wonder that all open-source Arduino designs are released in EAGLE’s format.
In writing this book, my mission is to show Makers how to take full advantage of EAGLE’s capabilities. This requires a basic
understanding of circuit theory, including Ohm’s law and Kirchoff’s laws, but nothing beyond that. You won’t find any transistor analysis or differential equations here. Instead, my goal is to provide a practical, hands-on exploration of EAGLE so that readers can design practical circuit boards, thereby bringing exciting new gadgets to the marketplace and continuing the extraordinary momentum of the Maker Movement.
Matthew Scarpino
Structure of This Book
This book presents EAGLE by walking through a series of circuit design projects, starting with a simple inverting amplifier and proceeding to a six-layer, single-board computer. As the circuits grow in complexity, I’ll explain more advanced features of EAGLE and show how to automate repetitive tasks. This book also includes a great deal of material to help readers understand the fundamentals of circuit boards and the theory behind the example circuits.
Chapters 1, 2, and 3 introduce the topics of EAGLE and circuit board design. Their primary purpose is to familiarize you with EAGLE’s capabilities and present the terminology used throughout the book. Chapter 3 breezes through the complete design of a trivially simple circuit.
Chapters 4 through 7 present the design of a practical circuit board: the Arduino Femtoduino. These chapters take a hands-on approach to explaining the four fundamental steps of circuit board design: drawing a schematic, laying out components, routing connections, and generating Gerber/Excellon files.
Chapters 8 through 13 discuss an assortment of topics related to EAGLE circuit design. These include circuit simulation, the process of creating custom components, and the all-important subject of design automation. Design automation is one of the most powerful aspects of EAGLE, but it’s also one of the most overlooked. For this reason, I highly recommend becoming familiar with editor commands and User Language programs.
Chapters 14 and 15 present the book’s advanced example design: the BeagleBone Black. The name may sound silly but there’s nothing silly about the circuit. It has six board layers, hundreds of components, and thousands upon thousands of routed connections. As I present the design, I’ll discuss EAGLE’s advanced capabilities and ways to take advantage of design automation.
Example File Archive
To supplement the text, all the circuit designs, programs, and support files in this book are provided in a zip file called eaglebook.zip. This can be freely downloaded from http://eaglebook.com. As you follow the discussion, I recommend that you compare the theoretical discussion to the real-world EAGLE designs. In addition, the color figures for this book can be accessed at www.informit.com/title/9780133819991.
Acknowledgments
First and foremost, I’d like to thank Bernard Goodwin of Pearson North America for his support and sage wisdom during the creation of this book. Thanks to his deft handling, the development process was as frictionless as could be asked.
I’d like to express my deep appreciation to San Dee Phillips of Apostrophe Editing Services, who caught so many of my formatting, spelling, and grammar errors. I’d also like to thank Betsy Gratner for her cheerful yet firm masterminding of this book’s production, Gloria Schurick for her painstaking efforts in compositing, Kathy Ruiz for her eagle-eyed proofreading, and Laura Robbins for managing this book’s images.
Last but not least, I’d like to extend my gratitude to Bryan Bergeron of Nuts&VoltsMagazine, Richard Blum, author of Sams TeachYourselfArduinoProgrammingin24Hours, and John Baichtal, author of ArduinoforBeginners. These reviewers bravely made their way through the book in its rough state and provided many useful suggestions. Their comments have improved the book’s accessibility to newcomers and expanded the number of topics.
About the Author
Matthew Scarpino is an engineer with more than 12 years of experience designing hardware and software. He has a Master’s degree in electrical engineering and is an Advanced Certified Interconnect Designer (CID+). He currently resides in Massachusetts where he develops software for embedded systems. In his spare time, he uses EAGLE to design accessories for his Android smartphone and the Google Glass.
Part I: Preliminary Introduction
Chapter 1. Introducing EAGLE
Circuit design applications can be divided into two categories: those intended for large design firms and those intended for everyone else. Applications in the first category provide high reliability, a wide range of features, and responsive technical support. But these advantages come with a hefty price tag. A perpetual license for Altium Designer costs more than $7,000 and Cadence’s OrCad suite costs nearly $10,000.
Applications in the second category are less expensive, and this makes them accessible to students, individuals, and small-to-medium businesses. Unfortunately, they tend to be unreliable and plagued with bugs. Without technical support, there may be no way to work around these difficulties. What’s worse, the companies that release these tools tend to be as flaky as their software and may disappear before their support contracts expire.
But not CadSoft’s EAGLE. The Easily Applicable Graphical Layout Editor provides the best of both worlds: the quality of a first-tier design application for the price of a second-tier application. EAGLE has been around since 1988, and with each year, it has improved in capability and reliability. It provides a complete set of features for designing circuit boards, and despite thousands of hours of use, it has never crashed on me. If problems arise, users can visit multiple online forums or read through the many online articles.
EAGLE has one major drawback: its user interface. If you’re a frequent Windows user, you’re accustomed to applications behaving in a certain manner. You’re used to a common set of toolbar items and mouse gestures. But EAGLE has its own unique behavior, and it’s impossible to simply start the application and figure out how everything works. It takes time to understand the many editors, dialogs, menus, and commands. And because circuit design is such a complex task to begin with, many newcomers to EAGLE give up.
The goal of this book is to ease the process of learning EAGLE. In these chapters, I’m going to walk through the process of designing
circuits, starting with a simple circuit (a noninverting amplifier), proceeding to an intermediate circuit (the Arduino Femtoduino), and finally reaching an advanced circuit (the BeagleBone Black). During the course of this presentation, I’ll describe both the EAGLE interface and the general process of desiging circuit boards.
In addition to point-and-click design, a significant portion of this book is devoted to automation. EAGLE has a rich command language that can be accessed through scripts and User Language programs, or ULPs. When you have a solid grasp of how to create circuit designs in code, you can perform long, repetitive tasks with a single command. With this automation, your errors will decrease and your productivity will skyrocket.
1.1 A Whirlwind Tour of EAGLE
EAGLE is a software application that makes it possible to design circuit boards. Boiled down to its essentials, EAGLE consists of six features:
• Component library—The set of devices that can be inserted into a design
• Schematic editor—An editor that makes it possible to draw the circuit’s preliminary design
• Board editor An editor that defines the circuit board’s physical layout and routing
• Device editors—Editors used to design new components
• Autorouter—A tool that automatically determines how circuit elements can be connected
• CAM (Computer Aided Manufacturing) processor—A tool that reads in a board design and produces files for the board’s fabrication
This section briefly describes each of these features and how they relate to the overall process of circuit design.
1.1.1 The Component Library
One of the most important features of any circuit design tool is the set of available parts. This set of components is called a library, and the larger the library, the less time the designer needs to spend defining new devices.
Thanks to its longevity, EAGLE’s set of libraries has expanded to thousands and thousands of components, from vacuum tubes to field programmable gate arrays. No matter how complex the design, the odds are that EAGLE will have most of the required parts. If it doesn’t, the site http://www.cadsoftusa.com/downloads/libraries provides more libraries for free download. If a part still can’t be found, Chapter 8, “Creating Libraries and Components,” explains how to design custom parts.
One new feature of EAGLE 6 is the format used by the library files. Each library is defined within a *.lbr file, and the format for this file is the eXtensible Markup Language (XML), which is popular throughout the world of computing. Appendix A, “EAGLE Library Files,” describes the XML schema that defines the structure of EAGLE’s library files.
1.1.2 The Schematic Editor
After you verified that your circuit’s components are available, you can select and connect them inside a schematic design, as shown in Figure 1.1.
Figure 1.1: The EAGLE Schematic Editor
As with most schematic editors, this keeps track of four important pieces of information:
• Which components are present in the design
• Connections between the components’ pins
• Names and values associated with the components
• Properties of the components’ connections
EAGLE’s schematic editor makes it easy to design a preliminary circuit. Just select a part from the library, move it to a position, and draw connections between it and other components. Afterward, you may assign names and values to the component, such as a resistor’s resistance in ohms. Chapter 3, “Designing a Simple Circuit,” and Chapter 4, “Designing the Femtoduino Schematic,” discuss the schematic editor in detail.
1.1.3 The Board Editor
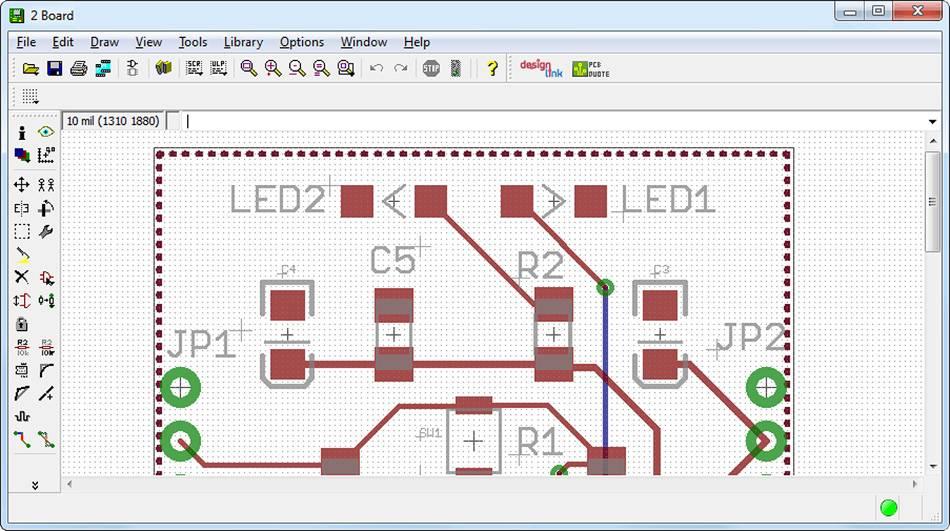
After a schematic design is complete, EAGLE can generate a board file (*.brd) that defines the layout of the actual circuit board. Board files are modified in EAGLE’s board editor, as shown in Figure 1.2.
Figure 1.2: The EAGLE Board Editor
In this editor, the designer positions the real-world devices corresponding to the components in the schematic. This position includes not only x and y coordinates, but also whether the components are on the top or bottom layer.
1.1.4 The Device Editors
If the EAGLE library doesn’t contain a crucial part, the device editors make it possible to design a new one. This process has three steps:
1. Create a design for the schematic editor. This is called a symbol.
2. Create a design for the board editor. This is called a package.
3. Create an association between the symbol and its package. This is called a device.
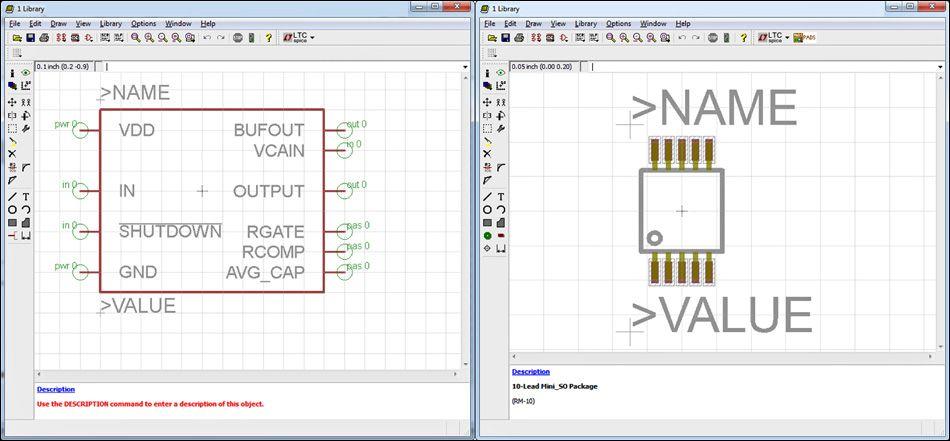
EAGLE provides editors for laying out a component’s symbol and package. These are collectively called the device editors, as shown in Figure 1.3.
Figure 1.3: The EAGLE Device Editors
The left side of the figure displays the symbol for Analog Devices’ SSM2167 component. The right side displays the component’s package, which can be used in the board design.
Don’t be concerned about terms like symbol, package, and device just yet. These topics will be explored throughout this book, and Chapter 8 presents the entire process of designing new components. Appendix A explains the file format used by EAGLE to store these designs.
1.1.5 The Autorouter
After the boards’ devices are in place, the next step is to create the connections between them. This is called routing, and even with high-end design tools, this process can be complex and timeconsuming.
EAGLE’s autorouter simplifies the routing process and provides insight into how circuit components can be connected. But for largescale circuits, it generally isn’t capable of completely routing a board on its own. However, if a designer manually creates initial routes, it will help the autorouter do its job. Chapter 6, “Routing,” explains all the different routing methods supported by EAGLE.
1.1.6 The CAM Processor
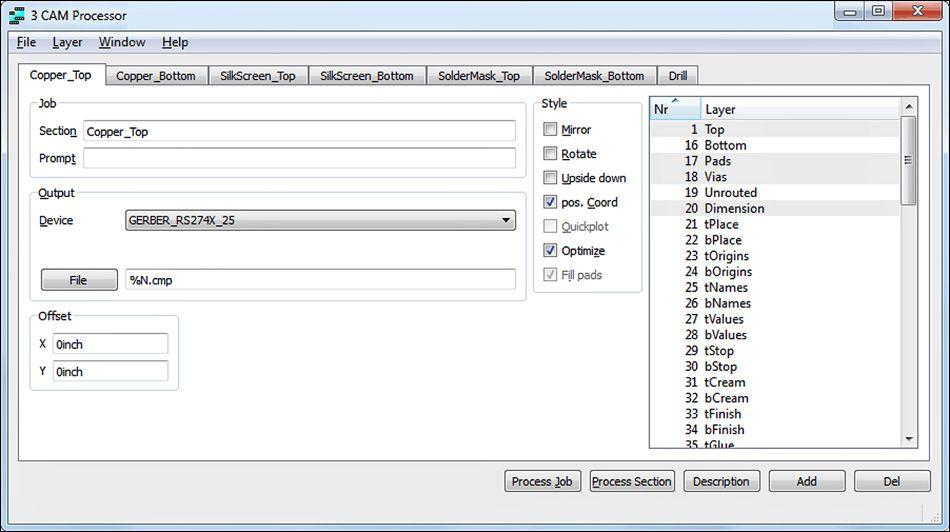
Most fabrication facilities don’t accept EAGLE design files, so EAGLE’s CAM (Computer Aided Manufacturing) Processor converts EAGLE designs into different formats. Figure 1.4 shows the processor’s dialog.
Figure 1.4: The CAM Processor
When the Process Job button is pressed, the processor executes a sequence of tasks called a job. A designer can load a job from a file (*.cam) or create a new job from scratch. As a job executes, each of its tasks reads a portion of the board design and creates a file of the selected type.
To fabricate a circuit board, most manufacturers require two types of files. To define a circuit’s geometry and connections, the accepted file format is RS-274X, also called the Gerber format. To specify drill diameters and drill locations, the accepted format is the Excellon format. The CAM Processor generates files of both types.
1.2 Obtaining EAGLE
CadSoft makes it easy to start with EAGLE. After you download the executable, you can try it out without registering or paying anything. If you’re interested in more features, you can make decisions regarding purchasing, licensing, and registration.
If you run a supported operating system and connect to the Internet, you need to download only a single file. Currently, EAGLE can run on any of the following operating systems:
• Windows 8, Windows 7, Windows Vista, or Windows XP
• Mac OS 10.6, 10.7 on Intel-based processors
• Linux (kernel 2.6, Intel processors, 32-bit runtime environment)
CadSoft’s primary web site is http://www.cadsoft.de but the company can also be accessed at locale-specific sites such as http://www.cadsoftusa.com. At these sites, you can download EAGLE by finding the Downloads link in the upper menu and selecting Download EAGLE. This takes you to a page with download links, and you can choose between the Windows, Linux, and Mac OS offerings.
1.3 Licensing
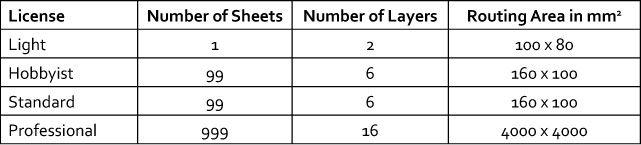
When you first launch EAGLE, a dialog appears and gives you the option of providing a license key or running the tool as freeware. The Freeware option enables you to run EAGLE in a special configuration called the Freeware version of EAGLE Light. This enables you to access EAGLE’s editing and routing for free, but with a limited set of features. In addition, this version can be used only for evaluation or nonprofit purposes. If you intend to make money through your PCB design, CadSoft asks that you purchase a license.
EAGLE provides four types of licenses that appeal to different segments of the PCB design community. Each has a different price and set of features (the higher the price, the more features). Specifically, the license type determines the maximum number of schematic sheets, the maximum number of board layers, and the maximum routing area. Table 1.1 lists the characteristics of the different licenses.
Table 1.1 EAGLE License Features
Looking at this table, you may wonder what the difference is between the Hobbyist and Standard licenses. The Hobbyist license is much, much less expensive but carries the requirement that EAGLE can be used only for noncommerical purposes. CadSoft requires a signed statement to this effect.
Table 1.1 doesn’t list the prices for these licenses for three reasons:
1. EAGLE’s prices change over time and any listed price will prove inaccurate in the near future.
2. For the Standard and Professional licenses, CadSoft doesn’t sell EAGLE as an integrated application. Instead, it splits EAGLE into three parts (schematic editor, autorouter, and board editor), and sells them separately.
3. For the Standard and Professional licenses, pricing depends on how many users can use the tool at once.
For a full presentation of the EAGLE pricing structure, visit the CadSoft web site. For prices in American dollars, the link is http://www.cadsoftusa.com/shop/pricing/?language=en.
In writing this book, I have made no assumptions regarding which license readers have purchased or if any license has been purchased at all. But this book covers every aspect of EAGLE, so if one or more features are unavailable in your installation, skip over the corresponding material. The first and second example circuits can be designed with any of the licenses, but the final design (discussed in Chapters 14, “Schematic Design for the BeagleBone Black,” and 15, “Board Design for the BeagleBone Black”) requires more advanced capabilities.
1.4 Organization of This Book
This book is structured so that the material proceeds from the simple to the complex and from the fundamentally important to the esoteric. More specifically, the chapters in this book can be divided into five parts, each of which focuses on a different task or aspect of EAGLE.
Part I: Preliminary Introduction
The first part of this book provides essential information for readers new to circuit board design and EAGLE. Chapter 2, “An Overview of Circuit Boards and EAGLE Design,” explains what circuit boards are and how they’re manufactured, thereby establishing the vocabulary that will be used throughout this book. It also explains the overall circuit board design process with EAGLE.
Chapter 3, “Designing a Simple Circuit,” expands on this introduction and walks through the schematic design and board design for a simple amplifier circuit. This circuit isn’t intended to be manufactured, but the design process will be helpful to inexperienced readers.
Part II: Designing the Arduino Femtoduino
The second and largest part of this book centers on designing an Arduino Femtoduino. The Arduino family of circuit boards enjoys a great deal of popularity among amateurs and professionals, and Chapters 4 through 7 explain how to design one for yourself. Chapter 4, “Designing the Femtoduino Schematic,” explains how to create the schematic and Chapter 5, “Layout and Design Rules,” explains how to position the packages in the board editor.
Chapter 6, “Routing,” discusses the process of design rule checking and shows how to route the connections on the Arduino Femtoduino. Lastly, Chapter 7, “Generating and Submitting Output Files,” presents the Computer Aided Manufacturing (CAM) processor and explains how to generate the final artwork files for the Femtoduino. It also presents five different fabrication services that accept these files and deliver finished circuit boards.
Part III: Advanced Capabilities
The next part of the book covers two topics that go beyond regular schematic/board design. Chapter 8, “Creating Libraries and Components,” explains how to create custom components for EAGLE and walks through two designs. The first creates a symbol and package for a through-hole component and the second creates a symbol and package for a surface-mount component.
Chapter 9, “Simulating Circuits with LTspice,” delves into one of EAGLE’s newest and most interesting features: circuit simulation with LTspice. LTspice is a freely downloadable simulation tool that makes it possible to draw circuits, assign inputs, and simulate the circuit’s operation. By combining EAGLE and LTspice, designers can test a design before sending it out for fabrication.
Part IV: Automating EAGLE
The fourth part of this book focuses on automating EAGLE using scripts and program files. Chapter 10, “Editor Commands,” presents the EAGLE command language, which executes design operations in text. For example, the add command adds a new component to a schematic or board design, and the auto command launches the autorouter.
Chapters 11 through 13 explain how to write User Language programs (ULPs), which make it possible to examine circuit designs automatically. These chapters provide many useful examples that can simplify EAGLE usage and reduce time associated with the design process.
Part V: The BeagleBone Black
The last two chapters of this book focus on designing the BeagleBone Black. This advanced circuit board has six layers and hundreds of components, some of which have high-density ball grid array (BGA) pins. Though difficult to design, the BeagleBone Black has gained a significant following among programmers because of its extraordinary amount of computing power.