Get Exam ref az-104 microsoft azure administrator 1st edition harshul patel free all chapters
Administrator 1st Edition Harshul Patel
Visit to download the full and correct content document: https://ebookmass.com/product/exam-ref-az-104-microsoft-azure-administrator-1st-ed ition-harshul-patel/
More products digital (pdf, epub, mobi) instant download maybe you interests ...
Exam Ref AI-900 Microsoft Azure AI Fundamentals Julian Sharp
All rights reserved. This publication is protected by copyright, and permission must be obtained from the publisher prior to any prohibited reproduction, storage in a retrieval system, or transmission in any form or by any means, electronic, mechanical, photocopying, recording, or likewise. For information regarding permissions, request forms, and the appropriate contacts within the Pearson Education Global Rights & Permissions Department, please visit www.pearson.com/permissions
No patent liability is assumed with respect to the use of the information cont ained herein. Although every precaution has been taken in the preparation of this book, the publisher and author assume no responsibility for errors or omissions. Nor is any liability assumed for damages resulting from the use of the information contained herein.
ISBN-13: 978-013-680538-0
ISBN-10: 0-136-80538-8
Library of Congress Control Number: 2021936223
ScoutAutomatedPrintCode
TRADEMARKS
Microsoft and the trademarks listed at http://www.microsoft.com on the “Trademarks” webpage are trademarks of the Microsoft group of companies. All other marks are property of their respective owners.
WARNING AND DISCLAIMER
Every effort has been made to make this book as complete and as accurate as possible, but no warranty or fitness is implied. The information provided is on an “as is” basis. The author, the publisher, and Microsoft Corporation shall have neither liability nor responsibility to any person or entity with respect to any loss or damages arising from the information contained in this book or from the use of the programs accompanying it.
SPECIAL SALES
For information about buying this title in bulk quantities, or for special sales opportunities (which may include electronic versions; custom cover designs; and content particular to your business, training goals, marketing focus, or branding interests), please contact our corporate sales department at corps ales@pearsoned.com or (80 0) 382-3419.
For government sales inquiries, please contact governmentsales@pearsoned.com.
For questions about sales outside the U.S., please contact intlcs@pearson.com.
CREDITS
EDITOR-IN-CHIEF
Brett Bartow
EXECUTIVE EDITOR
Loretta Yates
SPONSORING EDITOR
Charvi Arora
DEVELOPMENT EDITOR
Rick Kughen
MANAGING EDITOR
Sandra Schroeder
PROJECT EDITOR
Tracey Croom
COPY EDITOR
Rick Kughen
INDEXER
Cheryl Ann Lenser
PROOFREADER
Donna E. Mulder
EDITORIAL ASSISTANT
Cindy Teeters
COMPOSITOR
codeMantra
COVER DESIGNER
Twist Creative, Seattle
Contents at a glance
This page intentionally left blank
Chapter 4 Configure and manage virtual networking
This page intentionally left blank
Acknowledgments
I would like to acknowledge the flawless support I have received throughout the journey of book by Loretta and Charvi from the Pearson team. They have been very supportive and flexible, knowing the fact that I was dealing with multiple things at my end. I would also like to thank my wife, Divya, for her tremendous support in the making of this book. Despite her pregnancy, she played an instrumental role by encouraging and allowing me to complete the book on time. And last but not the least, the cuddle and cute smile of my little bundle of joy, Rivan, was a real energy booster during breaks in the middle of the night.
This page intentionally left blank
About the Author
HARSHUL PATEL is a technology enthusiast formerly from India who currently lives in Canada. He has been a cloud consultant with Microsoft Services for more than six year. He drives the adoption of Microsoft’s cloud platforms for enterprise customers. He is thoroughly knowledgeable across various virtualization and cloud technologies. Harshul is an experienced author and an early adopter of many Microsoft products. He is a frequent speaker at various user group gatherings and a co-founder of a few global user groups.
Apart from work, Harshul is a happy-go-lucky guy. He loves to travel and spend time with his family and friends. Harshul and his wife, Divya, had a baby boy during the production of this book; they call him Rivan.
This page intentionally left blank
Introduction
The AZ-104 exam focuses on common tasks and concepts that an administrator needs to understand to deploy and manage infrastructure in Microsoft Azure. Manage Azure identities and Azure subscriptions is a key topic on the exam, which includes managing Azure AD objects (users, groups, and devices), use of Azure AD join and self-service password resets; it also covers role based access control, tagging, subscription level policies and resource organization using resource groups, subscription and management groups. Another topic covered is implement and manage storage, which includes creating and configuring storage accounts as well as configuring Azure files and understanding the services for importing and exporting data to Azure. A significant portion of the exam is focused on deploying and managing Azure compute resources, which includes configuring high availability of Azure VMs, creating and configuring virtual machine and their automated deployments as well as creating and configuring container solutions such as Azure Kubernetes Service (AKS) and Azure Container Instances (ACI); it also covers configuring web apps using app service and app service plans. This book also covers the creation and management of virtual networks, DNS, connectivity between virtual networks, configuring network security groups, Azure firewall and Azure bastion service; it also explains the load balancing solutions including configuration of application gateway. The final topic is monitor and backup Azure resources, which includes topics on how to monitor resources using Azure Monitor as well as how to implement back and recovery of Azure VMs including site to site recovery using Azure site recovery.
This book is geared toward Azure administrators who manage cloud services that span storage, security, networking and compute. It explains how to configure and deploy services across a broad range of related Azure services to help you prepare for the exam.
This book covers every major topic area found on the exam, but it does not cover every exam question. Only the Microsoft exam team has access to the exam questions, and Microsoft regularly adds new questions to the exam, making it impossible to cover specific questions. You should consider this book a supplement to your relevant real-world experience and other study materials. If you encounter a topic in this book that you do not feel completely comfortable with, use the reference links provided throughout this book and take the time to research and study the topic. Great information is available on Microsoft Docs.
Organization of this book
This book is organized by the “Skills measured” list published for the exam. The “Skills measured” list is available for each exam on the Microsoft Learning website: https://aka.ms/examlist. Each chapter in this book corresponds to a major topic area in the list, and the technical tasks in
each topic area determine a chapter’s organization. If an exam covers six major topic areas, for example, the book will contain six chapters.
Preparing for the exam
Microsoft certification exams are a great way to build your resume and let the world know about your level of expertise. Certification exams validate your on-the-job experience and product knowledge. Although there is no substitute for on-the-job experience, preparation through study and hands-on practice can help you prepare for the exam. This book is not designed to teach you new skills.
We recommend that you augment your exam preparation plan by using a combination of available study materials and courses. For example, you might use the Exam Ref and another study guide for your ”at home” preparation and take a Microsoft Official Curriculum course for the classroom experience. Choose the combination that you think works best for you. Learn more about available classroom training and find free online courses and live events at http://microsoft.com/learn. Microsoft Official Practice Tests are available for many exams at http://aka.ms/practicetests.
Note that this Exam Ref is based on publicly available information about the exam and the author’s experience. To safeguard the integrity of the exam, authors do not have access to the live exam.
Microsoft certifications
Microsoft certifications distinguish you by proving your command of a broad set of skills and experience with current Microsoft products and technologies. The exams and corresponding certifications are developed to validate your mastery of critical competencies as you design and develop, or implement and support, solutions with Microsoft products and technologies both on-premises and in the cloud. Certification brings a variety of benefits to the individual and to employers and organizations.
MORE INFO ALL MICROSOFT CERTIFICATIONS
For information about Microsoft certifications, including a full list of available certifications, go to http://www.microsoft.com/learn
Quick access to online references
Throughout this book are addresses to webpages that the author has recommended you visit for more information. Some of these links can be very long and painstaking to type, so we’ve shortened them for you to make them easier to visit. We’ve also compiled them into a single list that readers of the print edition can refer to while they read.
Download the list at MicrosoftPressStore.com/ExamRefAZ104/downloads
The URLs are organized by chapter and heading. Every time you come across a URL in the book, find the hyperlink in the list to go directly to the webpage.
Errata, updates, & book support
We’ve made every effort to ensure the accuracy of this book and its companion content. You can access updates to this book—in the form of a list of submitted errata and their related corrections—at:
MicrosoftPressStore.com/ExamRefAZ104/errata
If you discover an error that is not already listed, please submit it to us at the same page. For additional book support and information, please visit MicrosoftPressStore.com/Support
Please note that product support for Microsoft software and hardware is not offered through the previous addresses. For help with Microsoft software or hardware, go to http://support.microsoft.com
Stay in touch
Let’s keep the conversation going! We’re on Twitter: http://twitter.com/MicrosoftPress.
This page intentionally left blank
Manage Azure identities and governance
Microsoft has long been a leader in the identity space. This leadership goes back to the introduction of Active Directory (AD) with Windows 2000 before the cloud even existed. Microsoft moved into cloud identity with the introduction of Azure Active Directory (Azure AD), which is now used by more than 5 million companies around the world. The adoption of Office 365 led to this extended use of Azure AD. These two technologies, however, have very different purposes, with AD primarily used on-premises and Azure AD primarily used for the cloud.
Microsoft has poured resources into making AD and Azure AD work together. The concept is to extend the identity that lives on-premises to the cloud by synchronizing the identities. This ability is provided by Azure AD Connect. Microsoft has also invested in extending those identities to enable scenarios such as single sign-on by using Active Directory Federation Services (ADFS), which is deployed in many large enterprises. (Note that Azure AD Connect is not covered on the AZ-104 exam.)
Microsoft has continued pushing forward by developing options for developers to leverage Azure AD for their applications. Microsoft provides the ability for developers to extend a company ’s Azure AD to users outside of the organization. The first option is known as Azure AD B2C (Business-to-Customer). This allows customers to sign in to applications using their social media accounts, such as a Facebook ID. A complementary technology—Azure AD B2B (Business to Business)—extends Azure AD to business partners.
This area of the AZ-104 exam is focused on the management of identities using Azure Active Directory.
In the latter part of this chapter, you will also learn how to manage role-based access control (formally known as RBAC) for Azure resources, including the following topics:
■ Understand how RBAC works
■ Create a custom role assignment
■ Provide access to Azure resources using different roles
■ Interpret access assignment
■ Manage multiple directories
Finally, you will learn how to manage Azure subscriptions and other resources. This includes how to
■ Configure Azure policies
■ Configure resource locks
■ Apply and manage tags on resources
■ Manage resource groups
■ Manage subscriptions
■ Configure management groups
■ Manage costs
By understanding the controls that are available in Azure for subscription and resource management, you enable your organization for success across your Azure estate.
Skills covered in this chapter:
■ Skill 1.1: Manage Azure Active Directory (Azure AD) objects
■ Skill 1.2: Manage role-based access control (RBAC)
■ Skill 1.3: Manage subscriptions and governance
Skill 1.1: Manage Azure Active Directory (Azure AD) objects
In an Azure AD tenant, there are users, groups, and devices that are controlled through the features of Azure AD discussed in this section. In this section, we focus on managing users and groups throughout their lifecycles, how to manage device settings, how to perform bulk updates to users using automation tooling such as PowerShell, and how to manage guest accounts.
In the latter part of this section, we will also discuss how to manage devices with Azure AD Join and how to configure user experience controls, such as self-service password reset (SSPR).
This skill covers:
■ Create users and groups
■ Manage user and group properties
■ Manage device settings
■ Perform bulk user updates
■ Manage guest accounts
■ Configure Azure AD Join
■ Configure self-service password reset
Create users and groups
There are primarily two types of users in Azure AD – cloud-only users and users synchronized from an on-premises directory. Cloud-only users are created and managed exclusively in Azure AD, and their attributes can be updated directly in Azure AD.
You can create cloud-only users through the Azure portal, Azure PowerShell, and the Azure command-line interface (CLI). When creating new users, you must be assigned to the Global Administrator or User Administrator role. See Skill 1.2 for more details about various roles and their assignments.
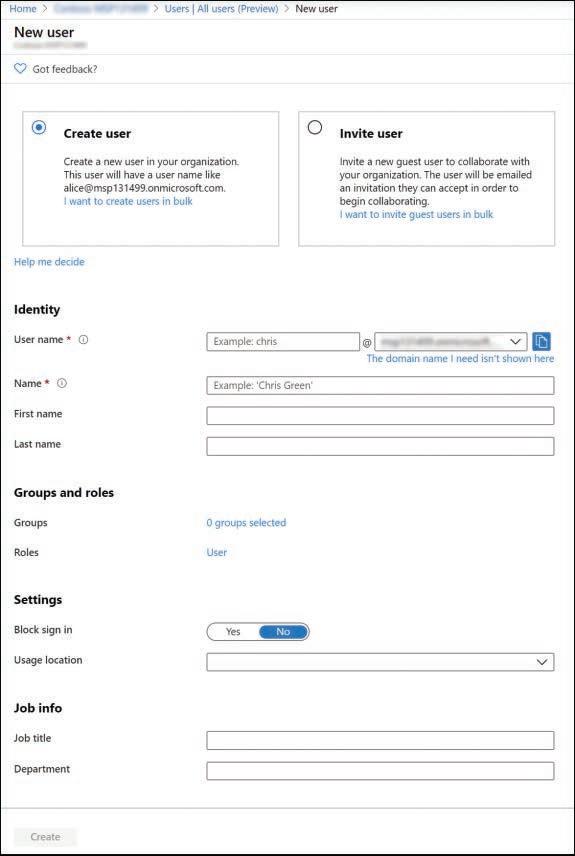
To create users from the Azure portal, search for Azure Active Directory in the search pane, or you can browse to all Azure services and select Azure Active Directory as a user with rights to create users, click Users to access the Users blade, and click +New User. An example of this blade is shown in Figure 1-1. Note that you can also invite users (guest users) to your directory through the Azure portal.
When creating a new user, only the username (sign in address for Azure AD) and the user’s name (given name and surname) are mandatory. You can configure additional settings, such as assigning specific groups and roles, blocking sign-ins from a specific location, and so on.
MORE INFO
For more information, see: https://docs.microsoft.com/azure/governance/blueprints/ tutorials/protect-new-resources.
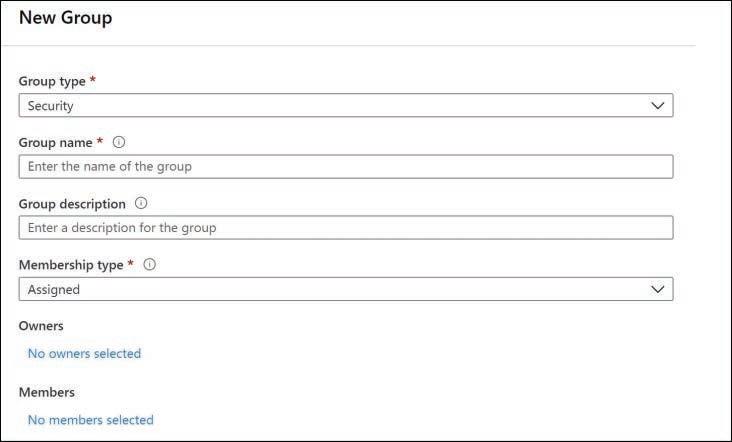
Groups are groups of objects that make role assignments and access permissions easier to manage. A group can contain groups, users, devices, or service principles. When using groups, you eliminate the need to individually assign roles or permissions. Creating groups is a similar experience and can be performed from the Azure portal, Azure PowerShell, the Azure CLI, and Microsoft Graph. To create a group in the Azure portal, search for Azure Active Directory or browse to all Azure services, select Azure Active Directory, click Groups to access the New Group blade, and click +New Group. The New Group blade is shown in Figure 1-2.
When creating a new group, there are several factors that dictate the type of group that is created and how that group behaves in Azure AD and associated workloads, such as Office 365.
MORE INFO
In 2020, Office 365 was renamed as Microsoft 365. The Azure portal UI still shows the old terminology, so it has been referred to as “Office 365” throughout this chapter. You can find details on how Microsoft 365 is integrated with Azure at https://docs.microsoft.com/ microsoft-365/enterprise/azure-integration.
First, you must select the type of group you are creating. You have two options: Security and Office 365. Security groups allow you to share Azure resources access to a group of users , devices, or service principals. An Office 365 group allows access to a shared mailbox, calendar, SharePoint site, and so on. Note that even if you are creating groups in an Azure AD tenant that is not associated with an Office 365 subscription, you will still see the option to create an Office 365 group.
FIGURE 1-1 New user blade in the Azure portal
Also, Group Name is a required field. While filling in a Group Description is not required, it is recommended that you always include a Group Description to make it easier to find and identify the purpose of a group later.
The Membership Type drop-down menu allows you to select from one of three values:
■ Assigned. This value allows you to select one or more users and add them to the group. Adding and removing users is performed manually.
■ Dynamic User. This value allows you to use dynamic group rules to automatically add and remove members.
■ Dynamic Device. This value allows you use dynamic group rules to automatically add and remove devices.
IMPORTANT DYNAMIC GROUP REQUIREMENT
You can only create a dynamic group if you have a Premium AD license. Otherwise, the Membership Type option is unavailable and is set to Assigned .
For both dynamic user and dynamic device-based groups, the rules associated with the group are evaluated on an ongoing basis. If a user or device has an attribute that matches the rule, that user or device is added to the group. If an attribute changes and the user or device no longer matches the criteria for group membership, the entity will be removed. Membership processing is not immediate. If an error occurs while processing a membership rule, an error is surfaced on the Group page in the Azure portal. You can always view the current processing status from the Group page.
FIGURE 1-2 New Group blade in the Azure portal
It is important to note that you can create a dynamic group for users or devices, but you cannot create both at the same time. You also cannot use user attributes in a device-based rule. It is possible to change the membership type of a group after it has been created, which provides an opportunity to transition from a static (or assigned) membership model to a dynamic membership model or vice-versa.
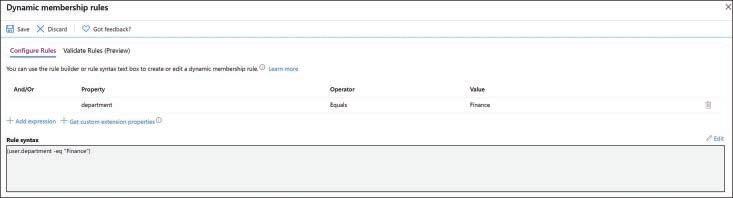
When creating dynamic groups, rules can be edited in the simple rule format, where you will build the query and conditions in the rule builder, where you can build complex rules with conditional logic. In the example shown in Figure 1-3, a dynamic user group is being created, which will automatically update its membership based on the department attribute and its value in Azure AD.
FIGURE 1-3 Dynamic membership rules
Dynamic groups require an Azure AD Premium P1 (or equivalent EM + S) license.
Manage user and group properties
As users and groups are used, they might need updates to their attributes (or properties). For example, you might need to change a users’ job title, or you might need to add or remove members from an existing group.
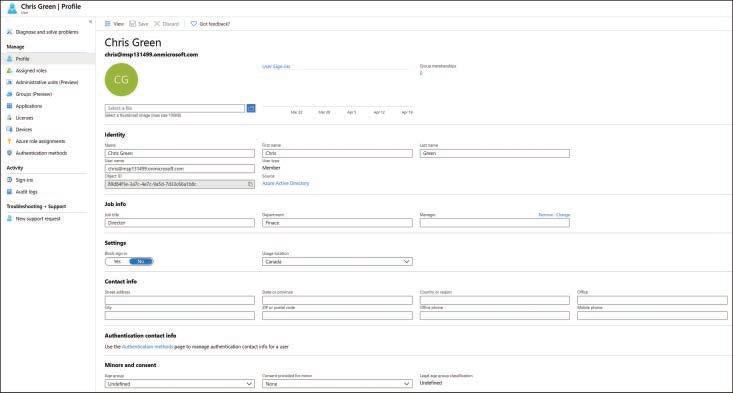
Users and groups can be updated using management tools such as Azure portal, Azure PowerShell, Azure CLI, and Microsoft Graph. Figure 1-4 shows an example of the user profile in the Azure portal that can be accessed by browsing to your Azure AD tenant, selecting Users , choosing a user, and clicking Edit .
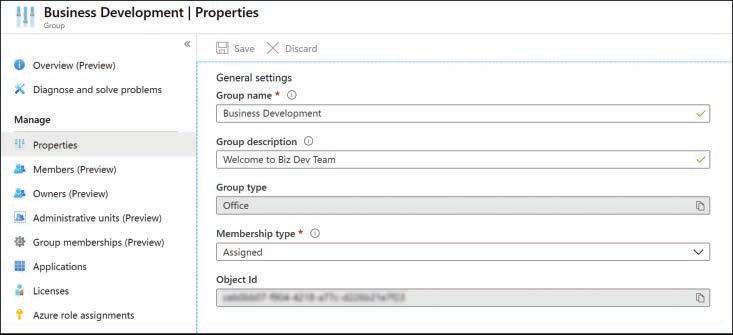
Groups can be managed through the Azure portal by browsing to your Azure AD tenant, selecting Groups , choosing a specific group, and then clicking Properties , Members , or Owners , depending on the type of update you want to make. When editing a group, you will not be able to change the Group Type (such as changing a Security group to an Office 365 group), but you will be able to update the Group Name, Group Description, and the Membership Type, as shown in Figure 1-5. Changing a static group to dynamic group will remove all the members from the static group and apply dynamic membership rules. This change will also affect the access to the resources if the static group has any previously assigned access for its members.
1-4 A user profile in the Azure portal
1-5 Edit group properties blade in the Azure portal
Manage device settings
Registered and joined devices in Azure AD can be managed in two areas in the Azure portal.
■ The first is by browsing to your Azure AD tenant in the Azure portal and selecting Devices. All Devices is the default view, but you can also choose other views, such as Device Settings , BitLocker Keys , and so on).
■ The second is through the Devices blade for an individual user.
FIGURE
FIGURE
With either option, you will be able to search for devices using the device name as a filter, view a detailed overview of any registered and joined devices, and perform common devicemanagement tasks.
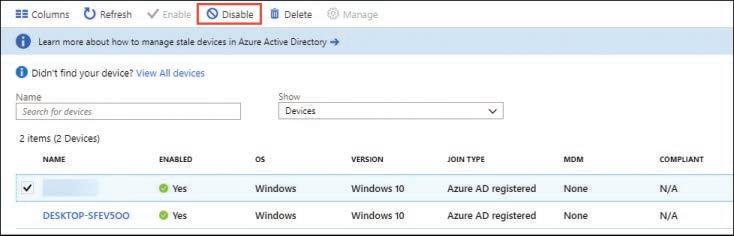
To enable and disable devices, you must be a Global Administrator. Disabling a device prevents it from accessing Azure AD resources. Note that this does not prevent the user from accessing resources in general; it only prevents the user from accessing resources from that disabled device. Figure 1-6 shows the Disable button.
FIGURE 1-6 Disable button from the All Devices blade in the Azure portal
Deleting devices is similar to enabling or disabling a device. Again, the user performing the update must be a Global Administrator. Deleting a device prevents a device from accessing your Azure AD resources and removes all details that are attached to the device (including BitLocker keys for Windows devices). Deleting a device represents a nonrecoverable activity and is not recommended unless it is required for an activity such as device decommissioning.
Perform bulk user updates
Previously, the Azure portal was only helpful for single updates to users, which meant we had to rely on custom automation solutions (mostly using PowerShell) for updating users in bulk. Because of recent updates, you can now perform bulk operations (such as creating, inviting, and deleting users in batches) using the Azure portal.
You can access this functionality by navigating to your Azure AD tenant in the Azure portal and then clicking Users. You will see these functionalities at the top of the blade, as shown in Figure 1-7.
FIGURE 1-7 Bulk updates from the Users blade in the Azure portal
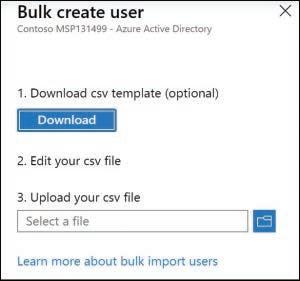
After clicking the Bulk Create button, you will see the Bulk Create User blade, which is shown in Figure 1-8.
Bulk operations are three-step process:
1. Download a CSV (comma-separated values or comma-delimited) template (UserCreateTemplate.csv) by clicking the Download button on the Bulk Create User blade. This is a standard template with mandatory attributes, such as Name, User Name, Initial Password , and Block Sign In. You can also specify optional attributes such as First Name, Last Name, Job Title, and so on.
2. Edit the CSV file with bulk update values. You just need to update appropriate values and save the changes. The sample mandatory values are already included in the template for reference.
3. Upload the updated CSV file and submit the operation.
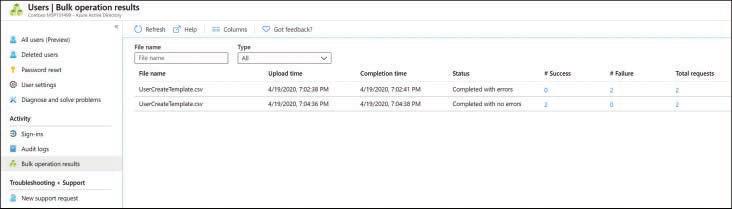
After submitting the operation, you can check the status of the bulk operation by navigating to Bulk Operation Results option under the Activity section of the Users blade (see Figure 1-9).
Manage guest accounts
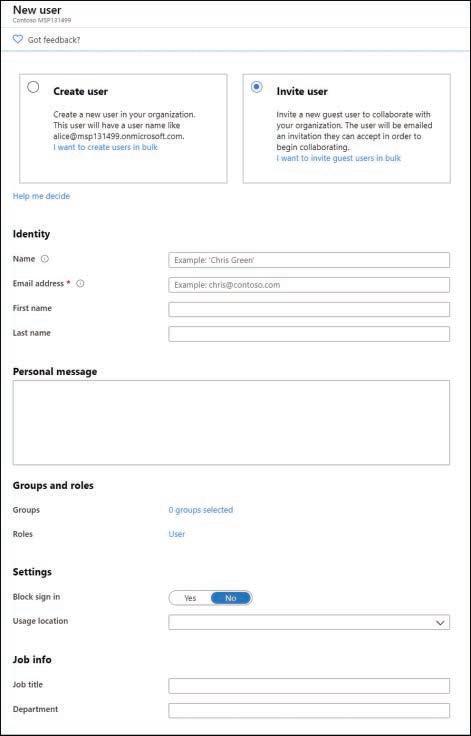
To create guest users from the Azure portal, browse to your Azure AD tenant as a user with rights to create users and select the Users blade and choose +New Guest User. An example of this blade is shown in Figure 1-10. A guest user can be anyone who is invited to
FIGURE 1-8 Bulk create user blade in the Azure portal
FIGURE 1-9 Bulk operation results blade in the Azure portal
collaborate with your organization. Once created, the guest user should receive an invitation in their mailbox.
Guest users can be created and managed similarly to how normal user accounts are created and managed. Guest users can be invited to the directory, group, or application. As soon as we invite the guest user, that account is created in Azure AD with the User Type set to Guest. The guest user will receive an email invitation immediately after creation. The guest user must accept the invitation along with the first-time consent process in order to access the assigned resources.
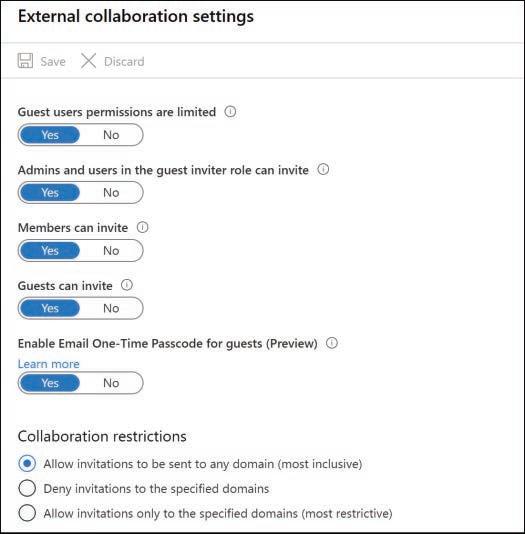
By default, all users and admins can invite guests. You can restrict the way guest users can be invited by accessing the Manage External Collaboration Settings on the Users blade under User Settings . The External Collaboration Settings are shown in Figure 1-11. You can also access these settings from Azure AD tenant by clicking the User Settings on the left menu and then choosing Manage External Collaboration Settings in the External Users section.
FIGURE 1-10 New User blade in the Azure portal
1-11 External Collaboration Settings blade in the Azure portal
When a guest user is added, the guest user has a Consent Status (viewable in PowerShell) as PendingAcceptance. This value will be changed to Accepted immediately after the guest user accepts the invitation. The guest user will appear as an “invited user” in the Azure portal until the user accepts the invitation.
Configure Azure AD Join
Azure Active Directory includes the ability to manage device identity, which enables single sign-in to devices and the applications and services managed through Azure Active Directory that are accessed from that device. Managed devices include both enterprise and bring-yourown-device (BYOD) scenarios. This allows users to work from any device, including personal devices, all while protecting corporate intellectual property with the necessary regulatory and compliance controls.
Azure AD Join allows you to control these devices, the applications installed and accessed from them, and how those applications interact with your corporate data.
When associating devices with Azure AD, you have three options: registering a device, joining a device, and using hybrid AD joined. Registration of devices would be appropriate for personal devices, while joining devices is useful for corporate-owned devices. Hybrid AD joined devices are joined to your on-premises Active Directory and are registered with your Azure AD tenant.