Human anatomy & physiology laboratory manual, main version, 12th edition, global edition elaine mari
Human
Anatomy & Physiology Laboratory Manual, Main Version, 12th Edition, Global Edition Elaine Marieb
Visit to download the full and correct content document: https://ebookmass.com/product/human-anatomy-physiology-laboratory-manual-mainversion-12th-edition-global-edition-elaine-marieb/
More products digital (pdf, epub, mobi) instant download maybe you interests ...
Anatomy and Physiology Laboratory Safety Guidelines*
1. Upon entering the laboratory, locate exits, fire extinguisher, fire blanket, chemical shower, eyewash station, first aid kit, containers for broken glass, and materials for cleaning up spills.
2. Do not eat, drink, smoke, handle contact lenses, store food, or apply cosmetics or lip balm in the laboratory. Restrain long hair, loose clothing, and dangling jewelry.
3. Students who are pregnant, are taking immunosuppressive drugs, or have any other medical conditions (e.g., diabetes, immunological defect) that might necessitate special precautions in the laboratory must inform the instructor immediately.
4. Wearing contact lenses in the laboratory is inadvisable because they do not provide eye protection and may trap material on the surface of the eye. Soft contact lenses may absorb volatile chemicals. If possible, wear regular eyeglasses instead.
5. Use safety glasses in all experiments involving liquids, aerosols, vapors, and gases.
6. Decontaminate work surfaces at the beginning and end of every lab period, using a commercially prepared disinfectant or 10% bleach solution. After labs involving dissection of preserved material, use hot soapy water or disinfectant.
7. Keep all liquids away from the edge of the lab bench to avoid spills. Clean up spills of viable materials using disinfectant or 10% bleach solution.
8. Properly label glassware and slides.
9. Use mechanical pipetting devices; mouth pipetting is prohibited.
10. Wear disposable gloves when handling blood and other body fluids, mucous membranes, and nonintact skin, and when touching items or surfaces soiled with blood or other body fluids. Change gloves between procedures. Wash hands immediately after removing gloves. (Note: Cover open cuts or scrapes with a sterile bandage before donning gloves.)
11. Place glassware and plasticware contaminated by blood and other body fluids in a disposable autoclave bag for decontamination by autoclaving, or place them directly into a 10% bleach solution before reuse or disposal. Place disposable materials such as gloves, mouthpieces, swabs, and toothpicks that have come into contact with body fluids into a disposable autoclave bag, and decontaminate before disposal.
12. To help prevent contamination by needlestick injuries, use only disposable needles and lancets. Do not bend the needles and lancets. Needles and lancets should be placed promptly in a labeled, puncture-resistant, leakproof container and decontaminated, preferably by autoclaving.
13. Do not leave heat sources unattended.
14. Report all spills or accidents, no matter how minor, to the instructor.
15. Never work alone in the laboratory.
16. Remove protective clothing before leaving the laboratory.
*Adapted from:
Biosafety in Microbiological and Biomedical Laboratories (BMBL), Fifth Edition. 2007. U.S. Government Printing Office. Washington, D.C. www.cdc.gov/od/OHS/biosfty/bmbl5/bmbl5toc.htm
Centers for Disease Control. 1996. “Universal Precautions for Prevention of Transmission of HIV and Other Bloodborne Infections.” Washington, D.C. www.cdc.gov/ncidod/dhqp/bp_universal_precautions.html
Johnson, Ted, and Christine Case. 2010. Laboratory Experiments in Microbiology, Ninth Edition. San Francisco: Pearson Benjamin Cummings.
School Chemistry Laboratory Safety Guide. 2006. U.S. Consumer Product Safety Commission. Bethesda, MD. www.cpsc.gov/ CPSCPUB/PUBS/NIOSH2007107.pdf
Your time is valuable. Make the most of your time inside and outside the lab.
To help you manage your time inside and outside the A&P lab classroom, this best-selling manual works hand-in-hand with Mastering A&P, the leading online homework and learning program for A&P. This edition features dozens of new, full-color figures and photos, revamped Clinical Application questions, an expanded set of pre-lab videos, dissection videos, and more.
The Axial Skeleton
Learning Outcomes
Name the three parts of the axial skeleton.
Identify the bones of the axial skeleton, either by examining disarticulated bones or by pointing them out on an articulated skeleton or skull, and name the important bone markings on each.
Name and describe the different types of vertebrae.
Discuss the importance of intervertebral discs and spinal curvatures.
Identify three abnormal spinal curvatures.
List the components of the thoracic cage.
Identify the bones of the fetal skull by examining an articulated skull or image.
Define fontanelle, and discuss the function and fate of fontanelles.
Discuss important differences between the fetal and adult skulls.
Pre-Lab Quiz
Instructors may assign these and other Pre-Lab Quiz questions using Mastering A&P™
1. The axial skeleton can be divided into the skull, the vertebral column, and the: a. thoracic cage b. femur c. hip bones d. humerus
2. The bone allows the passage of the optic and trigeminal nerves. a. occipital b. temporal c. sphenoid
3. The vertebrae contribute to the formation of the pelvis. a. lumbar b. sacral c. coccygeal
4. The , commonly referred to as the breastbone, is a flat bone formed by the fusion of three bones: the manubrium, the body, and the xiphoid process. a. coccyx b. sacrum c. sternum
5. The sagittal suture: a. is between the two parietal bones b. is between the frontal and temporal bones c. is between the parietal and temporal bones d. is between the occipital and parietal bones
TGo to Mastering A&P™ > Study Area to improve your performance in A&P Lab.
> Lab Tools > Bone & Dissection
Instructors may assign new Building Vocabulary coaching activities, Pre-Lab Quiz questions, Art Labeling activities, related bone videos and coaching activities, Practice Anatomy Lab Practical questions (PAL), and more using the Mastering A&P™ Item Library.
Materials
Intact skull and Beauchene skull
X-ray images of individuals with scoliosis, lordosis, and kyphosis (if available)
Isolated cervical, thoracic, and lumbar vertebrae, sacrum, and coccyx
Isolated fetal skull
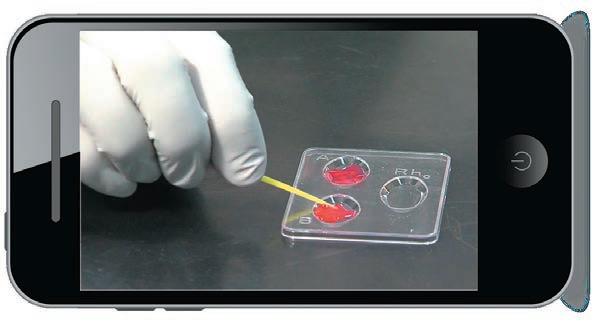
NEW! Mastering A&P study tools are highlighted on the first page of each lab exercise, along with a photo preview of a related pre-lab video, image from Practice Anatomy Lab 3.1 (PAL), or animation.
NEW! Mastering A&P assignments, including NEW Building Vocabulary Coaching Activities, are signaled at appropriate points throughout the manual to help you connect the exercises to relevant assignments that can be auto-graded in Mastering A&P.
Videos
Be Prepared: Learning in A&P Lab is an Active Process.
Before going into the lab, read the background information for the exercise, connect your reading to the figures and photos, complete the pre-lab quiz, and preview the questions in the tear-out Exercise Review Sheet. After lab, review your lab notes to remember important concepts. To improve your performance on lab practical exams, log into Mastering A&P, where you can watch related videos, practice with customized flashcards, and more.
The Fetal Skull
NEW! Dozens of full-color figures and photos have been added to the Exercise Review Sheets, replacing black-and-white line drawings. Selected labeling questions are available as new ArtLabeling assignments in Mastering A&P
Muscles of the Head and Neck
3. Using choices from the key at the right, correctly identify muscles provided with leader lines on the illustration.
Key:
22. Are the same skull bones seen in the adult also found in the fetal skull? _______________________________________________
a. buccinator
b. depressor anguli oris
c. depressor labii inferioris
d. frontal belly of the epicranius
23. How does the size of the fetal face compare to its cranium? _________________________________________________________ How does this compare to the adult skull? ________________________________________________________________________
e. levator labii inferioris
f. masseter
g. mentalis
h. occipital belly of the epicranius
i. orbicularis oculi
j. orbicularis oris
k. risorius
l. sternocleidomastoid
24. What are the outward conical projections on some of the fetal cranial bones? ___________________________________________
4. Using the key provided in question 3, identify the muscles described next.
1. used in smiling
________ 2. used to suck in your cheeks
NEW! Building Vocabulary Coaching Activities are a fun way to learn word roots and A&P terminology while building and practicing important language skills. See p. 242
m. zygomaticus minor and major
25. What is a fontanelle? _________________________________________________________________________________________
________ 6. used to form the vertical frown crease on the forehead
What is its fate? ______________________________________________________________________________________________
Compare to Previous Edition
________ 3. used in blinking and squinting
________ 7. your kissing muscle
________ 8. prime mover of jaw closure
________ 4. used to pout (pulls the corners of the mouth downward) ________ 5. raises your eyebrows for a questioning expression
________ 9. tenses skin of the neck during shaving
What is the function of the fontanelles in the fetal skull? ____________________________________________________________
26. + Craniosynostosis is a condition in which one or more of the fontanelles is replaced by bone prematurely. Discuss the rami fications of this early closure.
NEW! Clinical Application Questions have been added to the Exercise Review Sheets to help you connect lab concepts with real-world clinical scenarios.
27. + As we age, we often become shorter. Explain why this might occur. ______________________________________________
See p. 159
28. + The xiphoid process is often missing from the sternum in bone collections. Hypothesize why it might be missing. __________
Get 24/7 videos, coaching, and practice with Mastering
A&P.
EXPANDED! 8 new Pre-Lab Video
Coaching Activities in Mastering A&P (for a total of 18) focus on key concepts in the lab activity and walk you through important procedures. New pre-lab video topics include Preparing and Observing a Wet Mount, Examining a Long Bone, Initiating Pupillary Reflexes, Palpating Superficial Pulse Points, Auscultating Heart Sounds, and more.
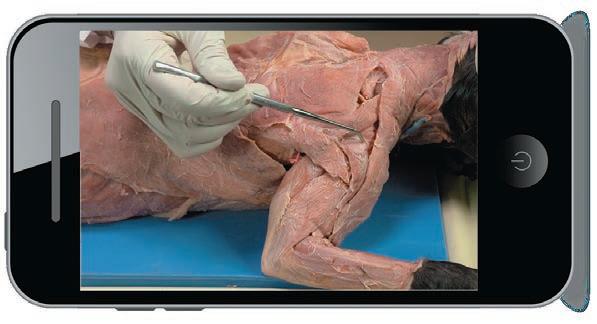
NEW! Cat and Fetal Pig
Dissection Video Coaching Activities help you prepare for dissection by previewing key anatomical structures. Each video includes one to two comparisons to human structures.
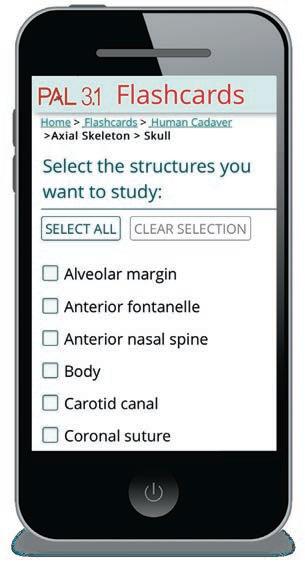
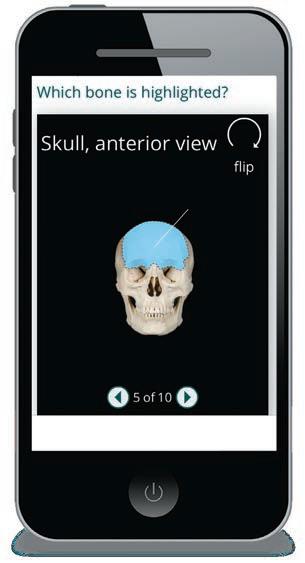
NEW! Customizable Practice
Anatomy Lab (PAL) Flashcards allow you to create a personalized, mobile-friendly deck of flashcards and quizzes using images from PAL 3.1. You can generate flashcards using only the structures that your instructor has emphasized in lecture or lab.
IMPROVED! The Pearson eText mobile app allows you to access the complete lab manual online or offline, along with all of the videos described above.
Additional Support for Students & Instructors
Mastering A&P offers thousands of tutorials, activities, and questions that can be assigned for homework and practice. Highlights of popular assignment options include the following:
PhysioEx™ 10.0 is an easy-to-use lab simulation program that consists of 12 exercises containing 63 physiology lab activities that can be used to supplement or substitute for wet labs.
IMPROVED! Practice Anatomy Lab 3.1 is now accessible on all mobile devices to give students 24/7 access to the most widely used lab specimens, including human cadaver, anatomical models, histology slides, cat, and fetal pig.
Dynamic Study Modules are manageable, mobile-friendly sets of questions with extensive feedback for students to test, learn, and retest until they master basic concepts.
• NEW! Instructors can select or deselect specific questions to customize assignments.
• EXPANDED! The Lab Manual Mastering A&P course now offers over 3,000 Dynamic Study Module questions, shared with Marieb/Hoehn’s Human Anatomy & Physiology, 12th Edition, Global Edition
The Mastering A&P Instructor Resources Area includes the following downloadable tools:
• Customizable PowerPoint® lecture outlines include customizable images and provide a springboard for lab prep.
• All of the figures, photos, and tables from the manual are available in JPEG and PowerPoint® formats, in labeled and unlabeled versions, and with customizable labels and leader lines.
• Test bank provides thousands of customizable questions across Bloom’s taxonomy levels and includes all lab practical and quiz questions from Practice Anatomy Lab 3.1. Each question is tagged to chapter learning outcomes that can also be tracked within Mastering A&P assessments. Available in Microsoft® Word and TestGen® formats.
• Animations and videos bring A&P concepts to life and include pre-lab videos, bone videos, and dissection videos.
• A comprehensive Instructor’s Guide, co-authored by Elaine Marieb and Lori Smith, includes prep instructions for each exercise, along with answer keys for all of the Exercise Review Sheets.
Human Anatomy & Physiology Laboratory Manual
TWELFTH EDITION
Elaine N. Marieb, R.N., Ph.D. Holyoke Community College
Lori A. Smith, Ph.D. American River College PhysioEx™ Version 10.0 authored by
Peter Z. Zao North Idaho College
Timothy Stabler, Ph.D. Indiana University Northwest
Lori A. Smith, Ph.D. American River College
Andrew Lokuta, Ph.D. University of Wisconsin–Madison
Edwin Griff, Ph.D. University of Cincinnati
Product Management: Gargi Banerjee and K K. Neelakantan
Content Strategy: Shabnam Dohutia, Amrita Naskar, and Shahana Bhattacharya
Product Marketing: Wendy Gordon, Ashish Jain, and Ellen Harris
Supplements: Bedasree Das
Production and Digital Studio: Vikram Medepalli, Naina Singh, and Niharika Thapa
Rights and Permissions: Anjali Singh
Please contact https://support.pearson.com/getsupport/s/ with any queries on this content.
The rights of Elaine N. Marieb and Lori A. Smith to be identified as the authors of this work have been asserted by them in accordance with the Copyright, Designs and Patents Act 1988.
Acknowledgments of third-party content appear on page C-1, which constitutes an extension of this copyright page.
All rights reserved. No part of this publication may be reproduced, stored in a retrieval system, or transmitted in any form or by any means, electronic, mechanical, photocopying, recording or otherwise, without either the prior written permission of the publisher or a license permitting restricted copying in the United Kingdom issued by the Copyright Licensing Agency Ltd, Saffron House, 6–10 Kirby Street, London EC1N 8TS. For information regarding permissions, request forms and the appropriate contacts within the Pearson Education Global Rights & Permissions department, please visit www.pearsoned.com/permissions/
PEARSON, ALWAYS LEARNING, Mastering™ A&P, and PhysioEx™ are exclusive trademarks owned by Pearson Education, Inc. or its affiliates in the U.S. and/or other countries.
Unless otherwise indicated herein, any third-party trademarks that may appear in this work are the property of their respective owners and any references to third-party trademarks, logos or other trade dress are for demonstrative or descriptive purposes only. Such references are not intended to imply any sponsorship, endorsement, authorization, or promotion of Pearson’s products by the owners of such marks, or any relationship between the owner and Pearson Education, Inc. or its affiliates, authors, licensees, or distributors.
Albustix®, Clinistix®, Clinitest®, Hemastix®, Ictotest®, Ketostix®, and Multistix® are registered trademarks of Bayer. Chemstrip® is a registered trademark of Roche Diagnostics.
Parafilm® is a registered trademark of Pechiney Incorporated.
Porelon® is a registered trademark of IDG, LLC.
Sedi-stain™ is a registered trademark of Becton, Dickinson and Company.
VELCRO® is a registered trademark of VELCRO Industries B. V.
Microsoft and/or its respective suppliers make no representations about the suitability of the information contained in the documents and related graphics published as part of the services for any purpose. All such documents and related graphics are provided “as is” without warranty of any kind. Microsoft and/or its respective suppliers hereby disclaim all warranties and conditions with regard to this information, including all warranties and conditions of merchantability, whether express, implied or statutory, fitness for a particular purpose, title and noninfringement. In no event shall Microsoft and/or its respective suppliers be liable for any special, indirect or consequential damages or any damages whatsoever resulting from loss of use, data or profits, whether in an action of contract, negligence or other tortious action, arising out of or in connection with the use or performance of information available from the services. The documents and related graphics contained herein could include technical inaccuracies or typographical errors. Changes are periodically added to the information herein. Microsoft and/or its respective suppliers may make improvements and/or changes in the product(s) and/or the program(s) described herein at any time. Partial screen shots may be viewed in full within the software version specified.
Microsoft® Windows® and Microsoft Office® are registered trademarks of the Microsoft corporation in the U.S.A. and other countries. This book is not sponsored or endorsed by or affiliated with the Microsoft corporation.
This eBook may be available as a standalone product or integrated with other Pearson digital products like MyLab and Mastering. This eBook may or may not include all assets that were part of the print version. The publisher reserves the right to remove any material in this eBook at any time.
ISBN 10 (print): 1-292-44225-5
ISBN 13 (print): 978-1-292-44225-9
ISBN 13 (eBook): 978-1-292-44226-6
British Library Cataloguing-in-Publication Data
A catalogue record for this book is available from the British Library
eBook formatted by B2R Technologies Pvt. Ltd.
About the Authors
Elaine N. Marieb
After receiving her Ph.D. in zoology from the University of Massachusetts at Amherst, Elaine N. Marieb joined the faculty of the Biological Science Division of Holyoke Community College. While teaching at Holyoke Community College, where many of her students were pursuing nursing degrees, she developed a desire to better understand the relationship between the scientific study of the human body and the clinical aspects of the nursing practice. To that end, while continuing to teach full time, Dr. Marieb pursued her nursing education, which culminated in a Master of Science degree with a clinical specialization in gerontology from the University of Massachusetts. It was this experience that informed the development of the unique perspective and accessibility for which her publications are known.
Dr. Marieb gave generously to provide opportunities for students to further their education. She funded the E. N. Marieb Science Research Awards at Mount Holyoke College, which promotes research by undergraduate science majors, and underwrote renovation of the biology labs in Clapp Laboratory at that college. Dr. Marieb also contributed to the University of Massachusetts at Amherst, where she provided funding for reconstruction and instrumentation of a cutting-edge cytology research laboratory. Recognizing the severe national shortage of nursing faculty, she underwrote the Nursing Scholars of the Future Grant Program at the university.
In 2012 and 2017, Dr. Marieb gave generous philanthropic support to Florida Gulf Coast University as a long-term investment in education, research, and training for healthcare and human services professionals in the local community. In honor of her contributions, the university is now home to the Elaine Nicpon Marieb College of Health and Human Services.
Lori A. Smith
Lori A. Smith received her Ph.D. in biochemistry from the University of California at Davis. Before discovering her passion for teaching, she worked as a research scientist and project leader in the medical diagnostics industry. In 1999, she joined the faculty at American River College in the Biology Department, where she teaches anatomy and physiology and microbiology to students preparing for nursing or other allied health careers. Since 2005, she has coauthored Pearson’s PhysioEx™: Laboratory Simulations in Physiology and has continued to coauthor several Pearson lab manuals. Dr. Smith has been named Instructor of the Year by the American River College Associated Student Body, and she is a member of the Human Anatomy and Physiology Society (HAPS) and California Academy of Sciences. When not teaching or writing, she enjoys spending time with her family: hiking, cycling, and kayaking.
Preface to the Instructor
The philosophy behind the revision of this manual mirrors that of all earlier editions. It reflects a still developing sensibility for the way teachers teach and students learn, informed by years of teaching the subject and by collecting suggestions from other instructors as well as from students enrolled in multifaceted healthcare programs. Human Anatomy & Physiology Laboratory Manual was originally developed to facilitate and enrich the laboratory experience for both teachers and students. This edition retains those same goals.
This manual, intended for students in introductory human anatomy and physiology courses, presents a wide range of laboratory experiences for students concentrating in nursing, physical therapy, pharmacology, respiratory therapy, and exercise science, as well as biology and premedical programs. The manual’s coverage is intentionally broad, allowing it to serve both one- and two-semester courses, and it is also available in versions that contain detailed guidelines for dissecting a cat or fetal pig laboratory specimen.
Basic Approach and Features
The generous variety of experiments in this manual provides flexibility that enables instructors to gear their laboratory approach to specific academic programs or to their own teaching preferences. The manual remains independent of any textbook, so it contains the background discussions and terminology necessary to perform all experiments. Such a selfcontained learning aid eliminates the need for students to bring a textbook into the laboratory.
Each of the 46 exercises leads students toward a coherent understanding of the structure and function of the human body. The manual begins with anatomical terminology and an orientation to the body, which together provide the necessary tools for studying the various body systems. The exercises that follow reflect the dual focus of the manual—both anatomical and physiological aspects receive considerable attention. As the various organ systems of the body are introduced, the initial exercises focus on organization, from the cellular to the organ system level. As indicated by the table of contents, the anatomical exercises are usually followed by physiological experiments that familiarize students with various aspects of body functioning and promote the critical understanding that function follows structure. The numerous physiological experiments for each organ system range from simple experiments that can be performed without specialized tools to more complex experiments using laboratory equipment, computers, and instrumentation techniques.
are viewed as a loss of homeostasis; these discussions can be recognized by the homeostatic imbalance logo within the descriptive material of each exercise. This holistic approach encourages an integrated understanding of the human body. The homeostatic imbalance icon directs the student’s attention to conditions representing a loss of homeostasis.
A safety icon notifies students that specific safety precautions must be observed when using certain equipment or conducting particular lab procedures. For example, when working with ether, students are to use a hood; and when handling body fluids such as blood, urine, or saliva, students are to wear gloves. All exercises involving body fluids (blood, urine, saliva) incorporate current Centers for Disease Control and Prevention (CDC) guidelines for handling human body fluids. Because it is important that nursing students in particular learn how to safely handle bloodstained articles, the manual has retained the option to use human blood in the laboratory. However, the decision to allow testing of human (student) blood or to use animal blood in the laboratory is left to the discretion of the instructor in accordance with institutional guidelines. The CDC guidelines for handling body fluids are reinforced by the laboratory safety procedures described on the inside front cover of this text, in Exercise 29: Blood, and in the Instructor’s Guide . You can photocopy the inside front cover and post it in the lab to help students become well versed in laboratory safety.
Group Challenge activities are designed to enhance collaborative group learning and to challenge students to think critically, identify relationships between anatomical structures and physiological functions, and achieve a deeper understanding of anatomy and physiology concepts.
BIOPAC ®
The dissection scissors icon appears at the beginning of activities that entail the dissection of isolated animal organs. In addition to the figures, isolated animal organs, such as the sheep heart and pig kidney, are employed to study anatomy because of their exceptional similarity to human organs.
Homeostasis is continually emphasized as a requirement for optimal health. Pathological conditions
The BIOPAC® icon in a relevant exercise materials list signals the use of the BIOPAC® Student Lab System and alerts you to the equipment needed. BIOPAC® is used in Exercises 14, 18, 20, 21, 31, 33, 34, and 37. The instructions in the lab manual are for use with the BIOPAC® MP36/35 and MP45 data acquisition unit. Note that some exercises are not compatible with the MP45 data acquisition unit. For those exercises, the MP45 will not be listed in the Materials section. In this edition, the lab manual instructions are for use with BSL software 4.0.1 and above for Windows 10/8.x/7 or Mac OS X10.9–10.12. Refer to the Materials section in each exercise for the applicable software version. The Instructor Resources area of Mastering A&P provides the following additional support for alternative data acquisitions systems, including exercises that can be distributed to students:
• BIOPAC ® Instructions for the MP36 (or MP35/30) data acquisition unit using BSL software versions earlier than 4.0.1 (for Windows and Mac) for Exercises 14, 18, 20, 21, 31, and 34
• Powerlab ® Instructions for Exercises 14, 21, 31, 33, 34, and 37
• iWorx ® Instructions for Exercises 14, 18, 21, 31, 33, 34, and 37
• Intelitool ® Instructions for Exercises 14i, 21i, 31i, and 37i
• Exercise Review Sheets follow each laboratory exercise and provide space for recording and interpreting experimental results and require students to label diagrams and answer matching and short-answer questions. Selected questions can be assigned and automatically graded in Mastering A&P.
• PhysioEx™ 10.0 Exercises, located in the back of the lab manual and accessible through a subscription to Mastering A&P, are easy-to-use computer simulations that supplement or take the place of traditional wet labs safely and cost-effectively. These 12 exercises contain a total of 63 physiology laboratory activities that allow learners to change variables and test out various hypotheses for the experiments. PhysioEx™ allows students to repeat labs as often as they like, perform experiments without harming live animals, and conduct experiments that are difficult to perform because of time, cost, or safety concerns.
Updated Content in This Edition of the Lab Manual
Throughout the manual, the narrative text has been streamlined and updated to make the language more understandable and to better meet the needs of today’s students. Additional highlights include the following:
• Dozens of new full-color figures and photos replace blackand-white line drawings in the Exercise Review Sheets. Selected labeling questions in the manual can be assigned in Mastering A&P.
• New Clinical Application questions have been added to the Exercise Review Sheets and challenge students to apply lab concepts and critical-thinking skills to real-world clinical scenarios.
• Updated BIOPAC® procedures are included in the manual for eight lab exercises for the BIOPAC® 4.0 software upgrade. Procedures for Intelitool®, PowerLab®, and iWorx® remain available in the Instructor Resources area of Mastering A&P.
• New Mastering A&P visual previews appear on the first page of each lab exercise, highlighting a recommended pre-lab video, a related image from Practice Anatomy Lab 3.1 (PAL 3.1), or a helpful animation.
• New Mastering A&P assignment recommendations are signaled at appropriate points throughout the manual to help instructors assign related auto-graded activities and assessments.
• Extensive updates and improvements have been made to each of the 46 laboratory exercises in the manual to increase clarity and reduce ambiguity for students. Art within the exercises, the narrative, as well as the questions and figures within the Review Sheets have been updated. For a complete list of content updates, please refer to the Instructor’s Guide for Human Anatomy & Physiology Laboratory Manual 13/e (in the Instructor Resources area of Mastering A&P).
Highlights of Updated Content in Mastering A&P
Mastering A&P, the leading online homework, tutorial, and assessment system is designed to engage students and improve results by helping them stay on track in the course and quickly
master challenging anatomy and physiology concepts. Mastering A&P assignments support interactive features in the lab manual, including pre-lab video coaching activities; bone, muscle, and dissection videos; Dynamic Study Modules; Get Ready for A&P ; plus a variety of Art Labeling questions, Clinical Application questions, and more. Highlights for this edition include the following:
• 8 new Pre-Lab Video Coaching Activities in Mastering A&P (for a total of 18) focus on key concepts in the lab activity and walk students through important procedures. New pre-lab video titles include Preparing and Observing a Wet Mount, Examining a Long Bone, Initiating Pupillary Reflexes, Palpating Superficial Pulse Points, Auscultating Heart Sounds, and more.
• New Cat and Fetal Pig Dissection Video Coaching Activities help students prepare for dissection by previewing key anatomical structures. Each video includes one to two comparisons to human structures.
• IMPROVED! Practice Anatomy Lab™ (PAL™ 3.1) is now fully accessible on all mobile devices, including smartphones, tablets, and laptops. PAL is an indispensable virtual anatomy study and practice tool that gives students 24/7 access to the most widely used lab specimens, including human cadaver; anatomical models from leading manufacturers such as 3B Scientific, SOMSO, DenoyerGeppert, Frey Scientific/Nystrom, Altay Scientific, and Ward’s; histology; cat; and fetal pig. PAL 3.1 is easy to use and includes built-in audio pronunciations, rotatable bones, and simulated fill-in-the-blank lab practical exams.
• New Customizable Practice Anatomy Lab (PAL) Flashcards enable students to create a personalized, mobilefriendly deck of flashcards and quizzes using images from PAL 3.1. Students can generate flashcards using only the structures that their instructor emphasizes in lecture or lab.
• New Building Vocabulary Coaching Activities are a fun way for students to learn word roots and A&P terminology while building and practicing important language skills.
• Expanded Dynamic Study Modules help students study effectively on their own by continuously assessing their activity and performance in real time. Students complete a set of questions and indicate their level of confidence in their answer. Questions repeat until the student can answer them all correctly and confidently. These are available as graded assignments prior to class and are accessible on smartphones, tablets, and computers.
• The Lab Manual Mastering A&P course now offers over 3000 Dynamic Study Module questions, shared with Marieb/Hoehn’s Human Anatomy & Physiology , 12th Edition, Global Edition.
• Instructors can now remove questions from Dynamic Study Modules to better fit their course.
• Expanded Drag-and-Drop Art Labeling Questions allow students to assess their knowledge of terms and structures in the lab manual. Selected Exercise Review Sheet labeling activities in the manual are now assignable.
Acknowledgments
Continued thanks to our colleagues and friends at Pearson who collaborated with us on this edition, especially Editor-inChief Serina Beauparlant, Acquisitions Editor Lauren Harp, Editorial Assistant Dapinder Dosanjh, and Rich Content Media Producers Kimberly Twardochleb and Lauren Chen. We also thank the Pearson Sales and Marketing team for their work in supporting instructors and students, especially Senior A&P Specialist Derek Perrigo and Director of Product Marketing Allison Rona.
Special thanks go out to Amanda Kaufmann for her leadership and expertise in producing the 18 pre-lab videos that support this edition, and to Mike Mullins of BIOPAC®, who helped us update the instructions for consistency with the upgraded software.
We’re also grateful to Michele Mangelli and her superb production team, who continue to cross every hurdle with
TWELFTH EDITION REVIEWERS
We wish to thank the following reviewers, who provided thoughtful feedback and helped us make informed decisions for this edition of both the lab manual and Mastering A&P resources:
Matthew Abbott, Des Moines Area Community College
Lynne Anderson, Meridian Community College
Penny Antley, University of Louisiana, Lafayette
Marianne Baricevic, Raritan Valley Community College
Christopher W. Brooks, Central Piedmont Community College
Jocelyn Cash, Central Piedmont Community College
Christopher D’Arcy, Cayuga Community College
Mary E. Dawson, Kingsborough Community College
Karen Eastman, Chattanooga State Community College
Jamal Fakhoury, College of Central Florida
Lisa Flick, Monroe Community College
Michele Finn, Monroe Community College
Juanita Forrester, Chattahoochee Technical College
Larry Frolich, Miami Dade College
uncommon grace and skill, including Janet Vail, production coordinator; David Novak, art and photo coordinator; Kristin Piljay, photo researcher; Gary Hespenheide, interior and cover designer; and Sally Peyrefitte, copyeditor.
Last but not least, we wish to extend our sincere thanks to the many A&P students who have circulated through our lab classrooms and have used this lab manual over the years—you continue to inspire us every day! As always, we welcome your feedback and suggestions for future editions.
Michelle Gaston, Northern Virginia Community College, Alexandria
Tejendra Gill, University of Houston
Abigail M. Goosie, Walters State Community College
Karen Gordon, Rowan Cabarrus Community College
Jennifer Hatchel, College of Coastal Georgia
Clare Hays, Metropolitan State University
Nathanael Heyman, California Baptist University
Samuel Hirt, Auburn University
Alexander Ibe, Weatherford College
Shahdi Jalilvand, Tarrant County College–Southeast
Marian Leal, Sacred Heart University
Geoffrey Lee, Milwaukee Area Technical College
Tara Leszczewiz, College of Dupage
Mary Katherine Lockwood, University of New Hampshire
Francisco J. Martinez, Hunter College of CUNY
Bruce Maring, Daytona State College
Geri Mayer, Florida Atlantic University
Tiffany B. McFalls-Smith, Elizabethtown Community & Technical College
Melinda A. Miller, Pearl River Community College
Todd Miller, Hunter College of CUNY
Susan Mitchell, Onondaga Community College
Erin Morrey, Georgia Perimeter College
Jill O’Malley, Erie Community College
Suzanne Oppenheimer, College of Western Idaho
Lori Paul, University of Missouri - St. Louis
Stacy Pugh-Towe, Crowder College
Suzanne Pundt, The University of Texas at Tyler
Jackie Reynolds, Richland College
Anthony Rizzo, Polk State College
Jo Rogers, University of Cincinnati
James Royston, Pearl River Community College
Connie E. Rye, East Mississippi Community College
Mark Schmidt, Clark State Community College
Jennifer Showalter, Waubonsee Community College
Teresa Stegall-Faulk, Middle Tennessee State University
Melissa Ann Storm, University of South Carolina–Upstate
Bonnie J. Tarricone, Ivy Tech Community College
Raymond Thompson, University of South Carolina
Anna Tiffany Tindall-McKee, East Mississippi Community College
Allen Tratt, Cayuga Community College
Khursheed Wankadiya, Central Piedmont Community College
Diane L. Wood, Southeast Missouri State University
Elaine N. Marieb & Lori A. Smith
Acknowledgments for the Global Edition
Pearson would like to acknowledge and thank the following for the Global Edition:
CONTRIBUTORS
Rene Human-Baron, University of Pretoria
Peace Mabeta, University of Pretoria
Craig Johnson, University of Bristol
REVIEWERS
Puspha Sinnayah, Victoria University
Carine Smith, Stellenbosch University
Eva Strandell, Halmstad University
This page is intentionally left blank
A Pre-Lab video is available in Mastering A&P™ for selected activities.
THE HUMAN BODY: AN ORIENTATION
The Language of Anatomy 19
1 Locating Body Regions 21
2 Practicing Using Correct Anatomical Terminology 22
3 Observing Sectioned Specimens 24
4 Identifying Organs in the Abdominopelvic Cavity 27
5 Locating Abdominopelvic Surface Regions 28 Review Sheet 29
Organ Systems Overview 33
1 Observing External Structures 35
2 Examining the Oral Cavity 35
3 Opening the Ventral Body Cavity 35
4 Examining the Ventral Body Cavity 36
5 Examining the Human Torso Model 40 Review Sheet 41
THE MICROSCOPE AND ITS USES
The Microscope 43
1 Identifying the Parts of a Microscope 44
2 Viewing Objects Through the Microscope 45
3 Estimating the Diameter of the Microscope Field 48
4 Perceiving Depth 49
5 Preparing and Observing a Wet Mount 49 Review Sheet 51
THE CELL
1 2 3 4
The Cell: Anatomy and Division 55
1 Identifying Parts of a Cell 56
2 Identifying Components of a Plasma Membrane 57
3 Locating Organelles 58
4 Examining the Cell Model 58
5 Observing Various Cell Structures 59
6 Identifying the Mitotic Stages 61
7 “Chenille Stick” Mitosis 61 Review Sheet 65
The Cell: Transport Mechanisms and Cell Permeability 69
1 Observing Diffusion of Dye Through Agar Gel 71
2 Observing Diffusion of Dye Through Water 72
3 Investigating Diffusion and Osmosis Through Nonliving Membranes 72
4 Observing Osmometer Results 74
5 Investigating Diffusion and Osmosis Through Living Membranes 74
6 Observing the Process of Filtration 77
7 Observing Phagocytosis 78 Review Sheet 79
HISTOLOGY: BASIC TISSUES OF THE BODY
Classification of Tissues 83
1 Examining Epithelial Tissue Under the Microscope 85
2 Examining Connective Tissue Under the Microscope 91
3 Examining Nervous Tissue Under the Microscope 97
4 Examining Muscle Tissue Under the Microscope 98 Review Sheet 101
THE INTEGUMENTARY SYSTEM
5 6 7
The Integumentary System 107
1 Locating Structures on a Skin Model 108
2 Identifying Nail Structures 111
3 Comparing Hairy and Relatively Hair-Free Skin Microscopically 112
4 Differentiating Sebaceous and Sweat Glands Microscopically 114
5 Plotting the Distribution of Sweat Glands 114
6 Taking and Identifying Inked Fingerprints 115 Review Sheet 117
THE MUSCULAR SYSTEM
Overview of the Skeleton: Classification and Structure of Bones and Cartilages 121
1 Examining a Long Bone 125
2 Examining the Effects of Heat and Hydrochloric Acid on Bones 126
3 Examining the Microscopic Structure of Compact Bone 127
4 Examining the Osteogenic Epiphyseal Plate 128 Review Sheet 129
The Axial Skeleton 133
1 Identifying the Bones of the Skull 134 Group Challenge Odd Bone Out 143
2 Palpating Skull Markings 144
3 Examining Spinal Curvatures 145
4 Examining Vertebral Structure 149
5 Examining the Relationship Between Ribs and Vertebrae 151
6 Examining a Fetal Skull 152 Review Sheet 153
The Appendicular Skeleton 161
1 Examining and Identifying Bones of the Appendicular Skeleton 161
2 Palpating the Surface Anatomy of the Pectoral Girdle and the Upper Limb 164
3 Observing Pelvic Articulations 167
4 Comparing Male and Female Pelves 169
5 Palpating the Surface Anatomy of the Pelvic Girdle and Lower Limb 173
6 Constructing a Skeleton 174 Review Sheet 175
Articulations and Body Movements 183
1 Identifying Fibrous Joints 184
2 Identifying Cartilaginous Joints 184
3 Examining Synovial Joint Structure 186
4 Demonstrating the Importance of FrictionReducing Structures 186
5 Demonstrating Movements of Synovial Joints 188
6 Demonstrating Actions at the Hip Joint 191
7 Demonstrating Actions at the Knee Joint 191
8 Demonstrating Actions at the Shoulder Joint 193
9 Examining the Action at the TMJ 194 Review Sheet 197 8 9 10 11
Microscopic Anatomy and Organization of Skeletal Muscle 201
1 Examining Skeletal Muscle Cell Anatomy 204
2 Observing the Histological Structure of a Skeletal Muscle 204
3 Studying the Structure of a Neuromuscular Junction 206 Review Sheet 207
Gross Anatomy of the Muscular System 211
1 Identifying Head and Neck Muscles 213
2 Identifying Muscles of the Trunk 213
3 Identifying Muscles of the Upper Limb 227
4 Identifying Muscles of the Lower Limb 232
5 Review of Human Musculature 236
6 Making a Muscle Painting 238 Review Sheet 241
Skeletal Muscle Physiology: Frogs and Human Subjects 249
1 Observing Muscle Fiber Contraction 250
2 Inducing Contraction in the Frog Gastrocnemius Muscle 252
3 Demonstrating Muscle Fatigue in Humans 257
4 Electromyography in a Human Subject Using BIOPAC® 258 Review Sheet 265
THE NERVOUS SYSTEM
Histology of Nervous Tissue 269
1 Identifying Parts of a Neuron 272
2 Studying the Microscopic Structure of Selected Neurons 274
3 Examining the Microscopic Structure of a Nerve 276
Review Sheet 277
Neurophysiology of Nerve Impulses: Frog Subjects 281
1 Stimulating the Nerve 284
Instructors may download two additional lab activities: Inhibiting the Nerve and Visualizing the Compound Action Potential with an Oscilloscope. Instructors, please go to Mastering A&P™ > Instructor Resources > Additional Resources > Additional Exercises Review Sheet 285
Gross Anatomy of the Brain and Cranial
Nerves 287
1 Identifying External Brain Structures 289
2 Identifying Internal Brain Structures 291
3 Identifying and Testing the Cranial Nerves 296
Group Challenge Odd (Cranial) Nerve Out 304
Review Sheet 305
Electroencephalography 311
1 Observing Brain Wave Patterns Using an Oscilloscope or Physiograph 312
2 Electroencephalography Using BIOPAC® 313 Review Sheet 317
The Spinal Cord and Spinal Nerves 319
1 Identifying Structures of the Spinal Cord 320
2 Identifying Spinal Cord Tracts 323
3 Identifying the Major Nerve Plexuses and Peripheral Nerves 330 Review Sheet 331
The Autonomic Nervous System 335
1 Locating the Sympathetic Trunk 336
2 Comparing Sympathetic and Parasympathetic Effects 338
3 Exploring the Galvanic Skin Response (Electrodermal Activity) Within a Polygraph Using BIOPAC® 338 Review Sheet 345
Human Reflex Physiology 347
1 Initiating Stretch Reflexes 349
2 Initiating the Crossed-Extensor Reflex 351
3 Initiating the Plantar Reflex 351
4 Initiating the Corneal Reflex 352
5 Initiating the Gag Reflex 352
6 Initiating Pupillary Reflexes 352
7 Initiating the Ciliospinal Reflex 353
8 Initiating the Salivary Reflex 353
9 Testing Reaction Time for Intrinsic and Learned Reflexes 354
10 Measuring Reaction Time Using BIOPAC® 355 Review Sheet 357
General Sensation 361
1 Studying the Structure of Selected Sensory Receptors 363
2 Determining the Two-Point Threshold 364
3 Testing Tactile Localization 365
4 Demonstrating Adaptation of Touch Receptors 365
5 Demonstrating Adaptation of Temperature Receptors 365
6 Demonstrating the Phenomenon of Referred Pain 366
Review Sheet 367
23
Special Senses: Anatomy of the Visual System 369
1 Identifying Accessory Eye Structures 371
2 Identifying Internal Structures of the Eye 371
3 Studying the Microscopic Anatomy of the Retina 372
4 Predicting the Effects of Visual Pathway Lesions 376
Review Sheet 377
24
25
Special Senses: Visual Tests and Experiments 381
1 Demonstrating the Blind Spot 382
2 Determining Near Point of Vision 383
3 Testing Visual Acuity 384
4 Testing for Astigmatism 384
5 Testing for Color Blindness 385
6 Testing for Depth Perception 385
7 Demonstrating Reflex Activity of Intrinsic and Extrinsic Eye Muscles 386
8 Conducting an Ophthalmoscopic Examination 387 Review Sheet 389
Special Senses: Hearing and Equilibrium 391
1 Identifying Structures of the Ear 392
2 Examining the Ear with an Otoscope (Optional) 394
3 Examining the Microscopic Structure of the Cochlea 395
4 Conducting Laboratory Tests of Hearing 396
5 Audiometry Testing 398
6 Examining the Microscopic Structure of the Crista Ampullaris 399
7 Conducting Laboratory Tests on Equilibrium 400 Review Sheet 403
26
Special Senses: Olfaction and Taste 407
1 Microscopic Examination of the Olfactory Epithelium 409
2 Microscopic Examination of Taste Buds 410
3 Stimulating Taste Buds 410
4 Examining the Combined Effects of Smell, Texture, and Temperature on Taste 410
5 Assessing the Importance of Taste and Olfaction in Odor Identification 412
1 Working Out Crosses Involving Dominant and Recessive Genes 685
2 Working Out Crosses Involving Incomplete Dominance 685
3 Working Out Crosses Involving Sex-Linked Inheritance 686
4 Exploring Probability 687
5 Using Blood Type to Explore Phenotypes and Genotypes 688
6 Using Agarose Gel Electrophoresis to Identify Normal Hemoglobin, Sickle Cell Anemia, and Sickle Cell Trait 688 Review Sheet 691
SURFACE ANATOMY
Surface Anatomy Roundup 695
1 Palpating Landmarks of the Head 696
2 Palpating Landmarks of the Neck 698
3 Palpating Landmarks of the Trunk 700
4 Palpating Landmarks of the Abdomen 702
5 Palpating Landmarks of the Upper Limb 704
6 Palpating Landmarks of the Lower Limb 707
Review Sheet 711
The Language of Anatomy
Learning Outcomes
Describe the anatomical position, and explain its importance.
Use proper anatomical terminology to describe body regions, orientation and direction, and body planes.
Name the body cavities, and indicate the important organs in each.
Name and describe the serous membranes of the ventral body cavities.
Identify the abdominopelvic quadrants and regions on a torso model or image.
Pre-Lab Quiz
Instructors may assign these and other Pre-Lab Quiz questions using Mastering A&P™
1. Circle True or False. In anatomical position, the fists are clenched.
2. Circle the correct underlined term. With regard to surface anatomy, abdominal / axial refers to the structures along the center line of the body.
3. The term superficial refers to a structure that is:
a. attached near the trunk of the body
b. toward or at the body surface
c. toward the head
d. toward the midline
4. The ________ plane runs longitudinally and divides the body into right and left sides.
a. frontal
b. sagittal
c. transverse d. ventral
5. Circle the correct underlined terms. The ventral body cavity is made up of three / four smaller cavities. Each of these cavities is lined by a thin, fluid-secreting membrane called a serous / visceral membrane.
Astudent new to any science is often overwhelmed at first by the terminology used in that subject. The study of anatomy is no exception. But without specialized terminology, confusion is inevitable. For example, what do over , on top of , above , and behind mean in reference to the human body?
Anatomists have an accepted set of reference terms that are universally understood. These allow body structures to be located and identified precisely with a minimum of words.
This exercise presents some of the most important anatomical terminology used to describe the body and introduces you to basic concepts of gross anatomy, the study of body structures visible to the naked eye.
Go to Mastering A&P™ > Study Area to improve your performance in A&P Lab.
Instructors may assign new Building Vocabulary coaching activities, Pre-Lab Quiz questions, Art Labeling activities, and more using the Mastering A&P™ Item Library.
Materials
Human torso model (dissectible)
Human skeleton
Demonstration: sectioned and labeled kidneys (three separate kidneys uncut or cut so that [a] entire, [b] transverse sectional, and [c] longitudinal sectional views are visible)
Gelatin-spaghetti molds
Scalpel
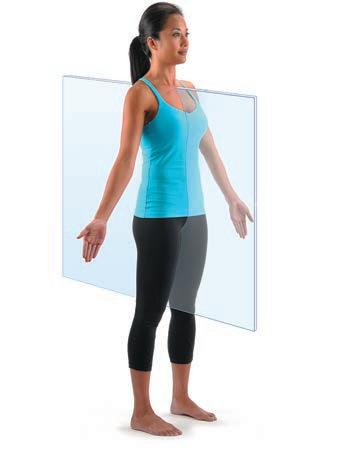
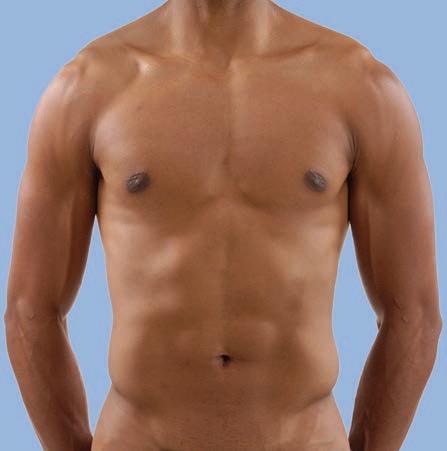
Anatomical Position
When anatomists or doctors refer to specific areas of the human body, the picture they keep in mind is a universally accepted standard position called the anatomical position. In the anatomical position, the human body is erect, with the feet only slightly apart, head and toes pointed forward, and arms hanging at the sides with palms facing forward (Figure 1.1a). It is also
Cephalic (head)
Frontal
Orbital
Nasal
Buccal
Oral Mental
Cervical
Thoracic
Sternal
Axillary
Mammary
Abdominal
Umbilical
Pelvic
Inguinal
Pubic (genital)
Thorax
Abdomen
Back (Dorsum)
important to remember that “left” and “right” refer to the sides of the individual, not the observer.
• Assume the anatomical position. The hands are held unnaturally forward rather than hanging with palms toward the thighs. Check the box when you have completed this task.
Cephalic Otic
Occipital
Upper limb
Acromial
Brachial
Antecubital
Olecranal
Antebrachial
Carpal
Manus (hand)
Palmar
Pollex
Digital
Lower limb
Coxal
Femoral
Patellar
Popliteal
Crural
Sural
Fibular or peroneal
Pedal (foot)
Tarsal
Calcaneal
Digital
Plantar
Hallux
(a) Anterior/Ventral
Cervical (neck)
Back (dorsal)
Scapular
Vertebral
Lumbar
Sacral
Gluteal
Perineal (between anus and external genitalia)
(b) Posterior/Dorsal
Figure 1.1 Anatomical position and regional terms. Heels are raised to illustrate the plantar surface of the foot, which is actually on the inferior surface of the body. Instructors may assign this figure as an Art Labeling Activity using Mastering A&P™
Regional Anatomy
The body is divided into two main regions, the axial and appendicular regions. The axial region includes the head, neck, and trunk; it runs along the vertical axis of the body. The appendicular region includes the limbs, which are also
called the appendages or extremities. The body is also divided up into smaller regions within those two main divisions. Table 1.1 summarizes the body regions that are illustrated in Figure 1.1.
Table
Regions of the Human Body (Figure 1.1)
RegionDescription
AbdominalLocated below the ribs and above the hips
AcromialPoint of the shoulder
AntebrachialForearm
Antecubital Anterior surface of the elbow
AxillaryArmpit
BrachialArm (upper portion of the upper limb)
Buccal Cheek
CalcanealHeel of the foot
Carpal Wrist
CephalicHead
CervicalNeck
Coxal Hip
Crural Leg
Digital Fingers or toes
FemoralThigh
Fibular (peroneal)
Side of the leg
Frontal Forehead
GlutealButtocks
Hallux Great toe
InguinalGroin
LumbarLower back
MammaryBreast
Manus Hand
MentalChin
RegionDescription
NasalNose
OccipitalBack of the head
OlecranalBack of the elbow
OralMouth
OrbitalBony eye socket
OticEar
PalmarPalm of the hand
PatellarKneecap
PedalFoot
PelvicPelvis
PerinealBetween the anus and the external genitalia
PlantarSole of the foot
PollexThumb
PoplitealBack of the knee
PubicGenital
SacralPosterior region between the hip bones
ScapularShoulder blade
SternalBreastbone
SuralCalf
TarsalAnkle
ThoracicChest
UmbilicalNavel
VertebralSpine
Activity 1
Locating Body Regions
Locate the anterior and posterior body regions on yourself, your lab partner, and a human torso model.
Directional Terms
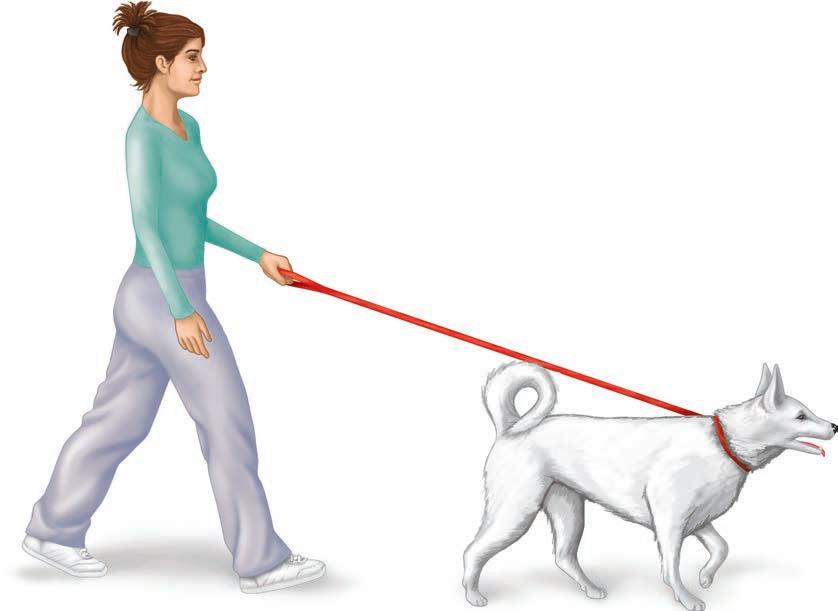
Study the terms below, referring to Figure 1.2 for a visual aid. Notice that certain terms have different meanings, depending on whether they refer to a four-legged animal (quadruped) or to a human (biped).
Superior/inferior (above/below): These terms refer to placement of a structure along the long axis of the body. The nose, for example, is superior to the mouth, and the abdomen is inferior to the chest.
Anterior/posterior (front/back): In humans, the most anterior structures are those that are most forward—the face, chest, and
abdomen. Posterior structures are those toward the backside of the body. For instance, the spine is posterior to the heart.
Medial/lateral (toward the midline/away from the midline or median plane): The sternum (breastbone) is medial to the ribs; the ear is lateral to the nose.
The terms of position just described assume the person is in the anatomical position. The next four term pairs are more absolute. They apply in any body position, and they consistently have the same meaning in all vertebrate animals.
1.1
Cephalad (cranial)/caudal (toward the head/toward the tail): In humans, these terms are used interchangeably with superior and inferior, but in four-legged animals they are synonymous with anterior and posterior, respectively.
Ventral/dorsal (belly side/backside): These terms are used chiefly in discussing the comparative anatomy of animals, assuming the animal is standing. In humans, the terms ventral and dorsal are used interchangeably with the terms anterior and posterior, but in four-legged animals, ventral and dorsal are synonymous with inferior and superior, respectively.
Superior (cephalad)
Distal
Posterior (dorsal)
Anterior (ventral)
Proximal
Posterior (caudal)
Proximal/distal (nearer the trunk or attached end/farther from the trunk or point of attachment): These terms are used primarily to locate various areas of the body limbs. For example, the fingers are distal to the elbow; the knee is proximal to the toes. However, these terms may also be used to indicate regions (closer to or farther from the head) of internal tubular organs. Superficial (external)/deep (internal) (toward or at the body surface/away from the body surface): For example, the skin is superficial to the skeletal muscles, and the lungs are deep to the rib cage.
Superior (dorsal)
Anterior (cephalad)
Inferior (ventral) (b) (a)
Inferior (caudal)
Figure 1.2 Directional terms. (a) With reference to a human. (b) With reference to a four-legged animal.
Activity 2
Practicing Using Correct Anatomical Terminology
Use a human torso model, a human skeleton, or your own body to practice using the regional and directional terminology.
1. The popliteal region is ________________. (anterior or posterior)
2. The acromial region is ________________ to the otic region. (medial or lateral)
Instructors may assign this figure as an Art Labeling Activity using Mastering A&P™
3. The femoral region is ________________ to the tarsal region. (proximal or distal)
4. The bones are ________________ to the skin. (superficial or deep)
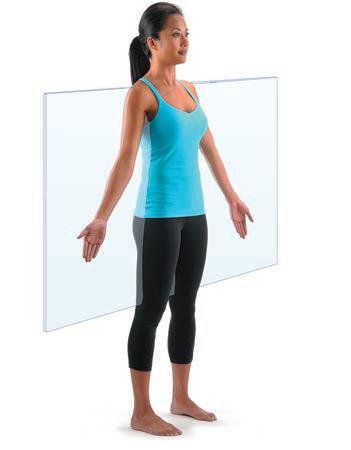
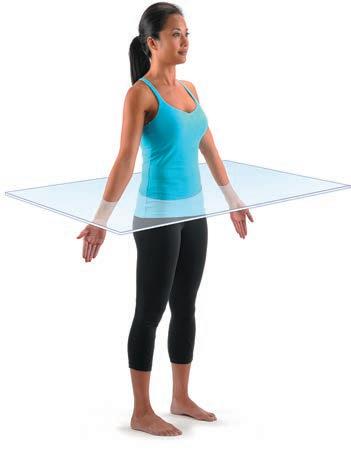
Body Planes and Sections
The body is three-dimensional, and in order to observe its internal structures, it is often necessary to make a section , or cut. When the section is made through the body wall or through an organ, it is made along an imaginary surface
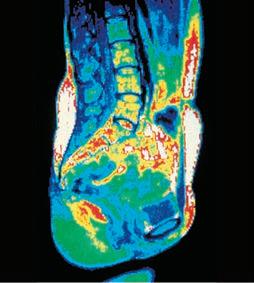
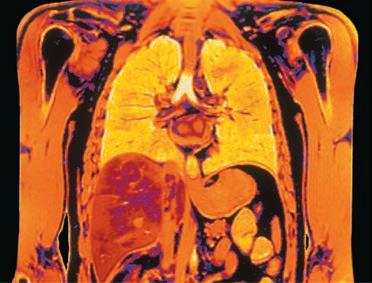
or line called a plane . A section is named for the plane along which it is cut. Anatomists commonly refer to three planes ( Figure 1.3), or sections, that lie at right angles to one another.
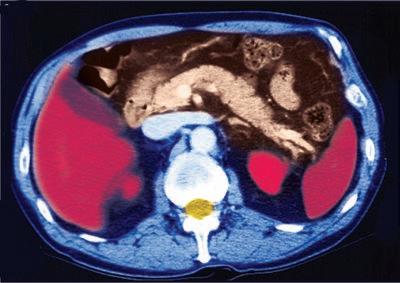
Figure 1.3 Planes of the body with corresponding magnetic resonance imaging (MRI) scans. Note the transverse section is an inferior view.
Instructors may assign this figure as an Art Labeling Activity using Mastering A&P™
Aorta
Spinal cord
Liver Pancreas
Vertebral column
RectumIntestines
Subcutaneous fat layer
Spleen
(c) Transverse plane
(b) Frontal (coronal) plane
(a) Median (midsagittal) plane
LiverStomachSpleen
Sagittal plane: A sagittal plane runs longitudinally and divides the body into right and left parts. If it divides the body into equal parts, right down the midline of the body, it is called a median, or midsagittal, plane
Frontal plane: Sometimes called a coronal plane, the frontal plane is a longitudinal plane that divides the body (or an organ) into anterior and posterior parts.
Transverse plane: A transverse plane runs horizontally, dividing the body into superior and inferior parts. When organs are sectioned along the transverse plane, the sections are commonly called cross sections.
On microscope slides, the abbreviation for a longitudinal section (sagittal or frontal) is l.s. Cross sections are abbreviated x.s. or c.s.
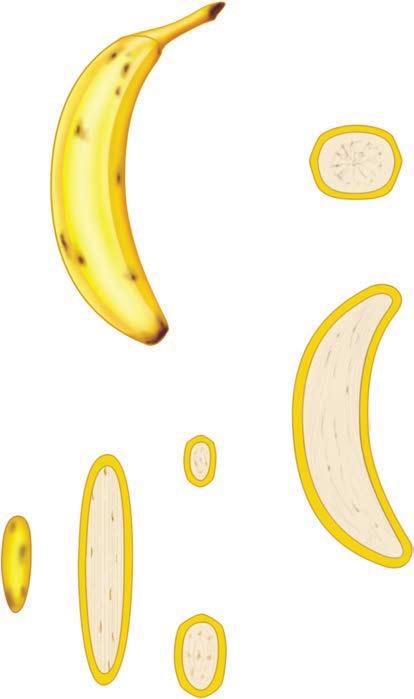
A median or frontal plane section of any nonspherical object, be it a banana or a body organ, provides quite a different view from a cross section (Figure 1.4).
Activity 3
Observing Sectioned Specimens
1. Go to the demonstration area and observe the transversely and longitudinally cut organ specimens (kidneys).
2. After completing instruction 1, obtain a gelatin-spaghetti mold and a scalpel, and take them to your laboratory bench. (Essentially, this is just cooked spaghetti added to warm gelatin, which is then allowed to gel.)
3. Cut through the gelatin-spaghetti mold along any plane, and examine the cut surfaces. You should see spaghetti strands that have been cut transversely (x.s.) and some cut longitudinally (a median section).
4. Draw the appearance of each of these spaghetti sections below, and verify the accuracy of your section identifications with your instructor.
Figure 1.4 Objects can look odd when viewed in section. This banana has been sectioned in three different planes (a–c), and only in one of these planes (b) is it easily recognized as a banana. If one cannot recognize a sectioned organ, it is possible to reconstruct its shape from a series of successive cuts, as from the three serial sections in (c)
Transverse section Median section
(c) Frontal sections
(b) Median section
(a) Transverse (cross) section
Body Cavities
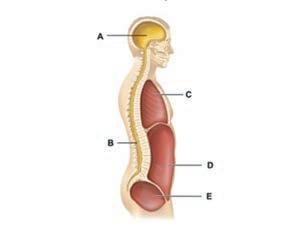
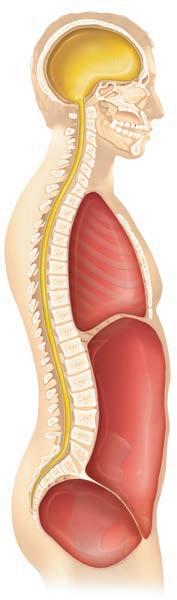
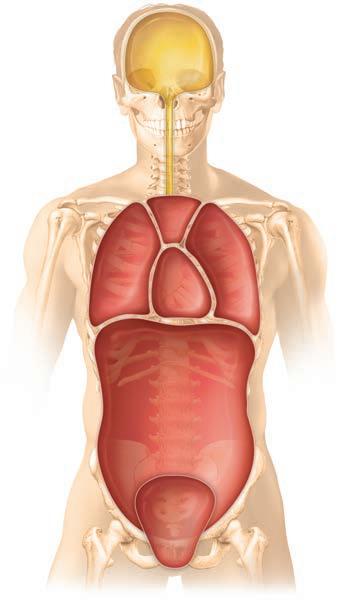
The axial region of the body has two large cavities that provide different degrees of protection to the organs within them ( Figure 1.5 ).
Dorsal Body Cavity
The dorsal body cavity can be subdivided into the cranial cavity, which lies within the rigid skull and encases the brain, and the vertebral (or spinal) cavity, which runs through the bony vertebral column to enclose the delicate spinal cord.
Ventral Body Cavity
Like the dorsal cavity, the ventral body cavity is subdivided. The superior thoracic cavity is separated from the rest of the ventral cavity by the dome-shaped diaphragm. The heart and lungs, located in the thoracic cavity, are protected by the bony rib cage. The cavity inferior to the diaphragm is referred to
as the abdominopelvic cavity. Although there is no further physical separation of the ventral cavity, some describe the abdominopelvic cavity as two areas: a superior abdominal c avity, the area that houses the stomach, intestines, liver, and other organs, and an inferior pelvic cavity, the region that is partially enclosed by the bony pelvis and contains the reproductive organs, bladder, and rectum.
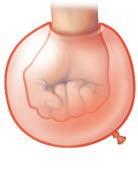
Serous Membranes of the Ventral Body Cavity
The walls of the ventral body cavity and the outer surfaces of the organs it contains are covered with a very thin, doublelayered membrane called the serosa, or serous membrane. The part of the membrane lining the cavity walls is referred to as the parietal serosa, and it is continuous with a similar membrane, the visceral serosa, covering the external surface of the organs within the cavity. These membranes produce a thin lubricating fluid that allows the visceral organs to slide over one another or to rub against the body wall with minimal
Dorsal body cavity
Cranial cavity (contains brain)
Vertebral cavity (contains spinal cord)
Dorsal body cavity
Ventral body cavity
Thoracic cavity (contains heart and lungs)
Cranial cavity
Vertebral cavity
Pleural cavity
Mediastinum
Pericardial cavity
Diaphragm
Abdominal cavity (contains digestive organs)
Pelvic cavity (contains urinary bladder, reproductive organs, and rectum)
(a) Lateral view (b) Anterior view
Figure 1.5 Dorsal and ventral body cavities and their subdivisions.
Abdominopelvic cavity
Ventral body cavity (thoracic and abdominopelvic cavities)
Instructors may assign this figure as an Art Labeling Activity using Mastering A&P™
Lung
Anterior
Liver
Parietal peritoneum
Posterior
Ribs
Parietal pleura
Pleural cavity with serous fluid
Visceral pleura
Diaphragm
Heart
Parietal pericardium
Pericardial cavity with serous fluid
Visceral pericardium
Visceral peritoneum
Peritoneal cavity (with serous fluid)
Stomach
Kidney (retroperitoneal)
Wall of body trunk
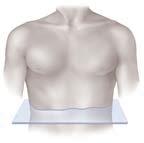
(d) Model of the
Outer balloon wall (comparable to parietal serosa)
Air (comparable to serous cavity)
Inner balloon wall (comparable to visceral serosa)
friction. Serous membranes also compartmentalize the various organs to prevent infection in one organ from spreading to others.
The specific names of the serous membranes depend on the structures they surround. The serosa lining the abdominal
membranes and serous cavity
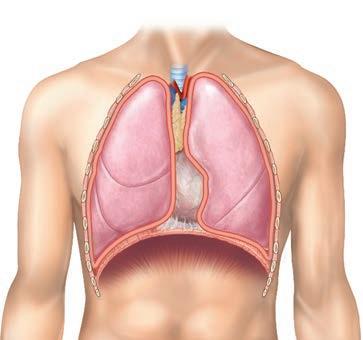
cavity and covering its organs is the peritoneum, the serosa enclosing the lungs is the pleura, and the serosa around the heart is the pericardium (Figure 1.6). A fist pushed into a limp balloon demonstrates the relationship between the visceral and parietal serosae (Figure 1.6d).
serous
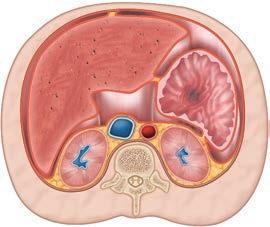
(c) Serosae associated with the abdominal viscera: peritoneum
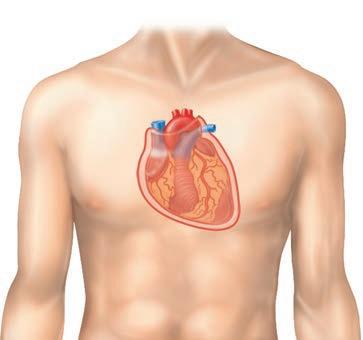
(b) Serosae associated with the heart: pericardium
(a) Serosae associated with the lungs: pleura
Figure 1.6 Serous membranes of the ventral body cavities.
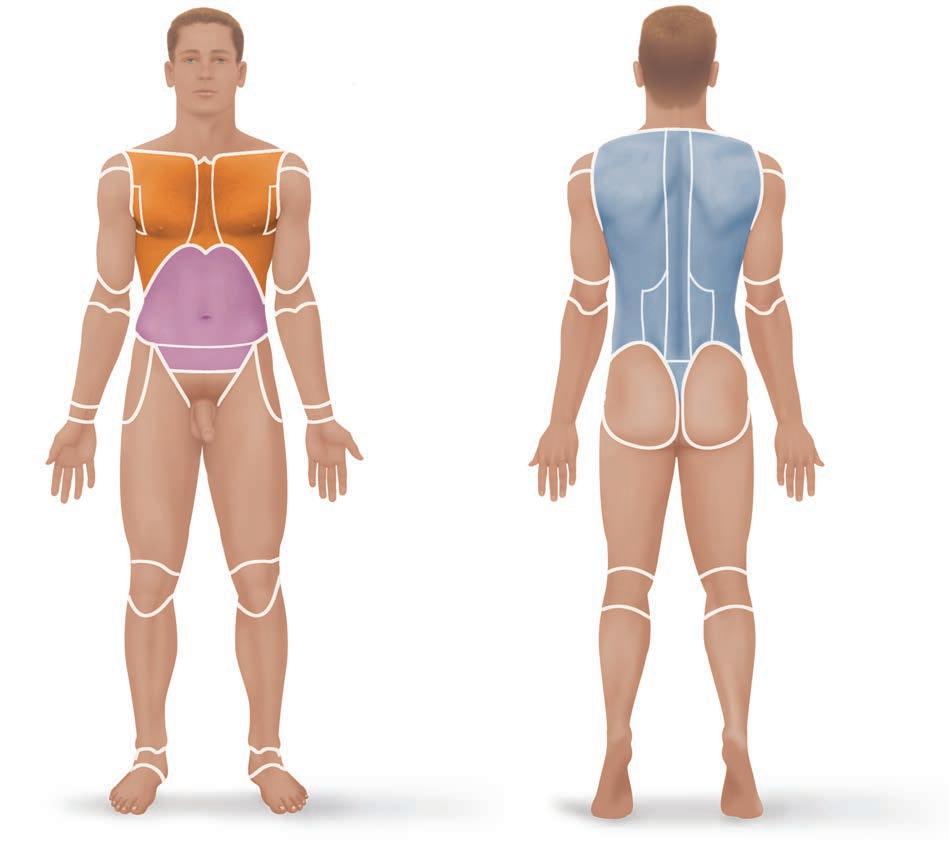
Right upper quadrant (RUQ)
Right lower quadrant (RLQ)
Left upper quadrant (LUQ)
Left lower quadrant (LLQ)
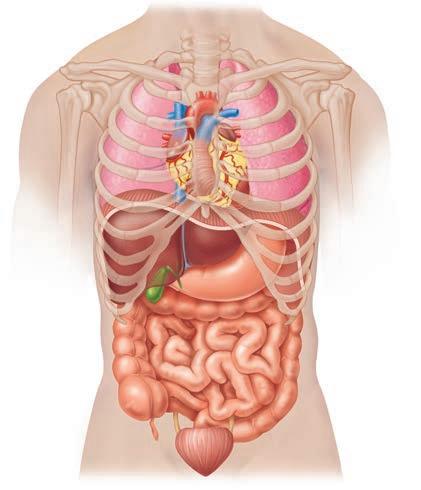
Activity 4
Identifying Organs in the Abdominopelvic Cavity
Examine the human torso model to respond to the following questions.
Name two organs found in the left upper quadrant. ________________ and ________________
Name two organs found in the right lower quadrant. ________________ and ________________
What organ (Figure 1.7) is divided into identical halves by the median plane? ________________
Figure 1.7 Abdominopelvic quadrants. Superficial organs are shown in each quadrant.
Abdominopelvic Quadrants and Regions
Because the abdominopelvic cavity is quite large and contains many organs, it is helpful to divide it up into smaller areas for discussion or study.
Most physicians and nurses use a scheme that divides the abdominal surface and the abdominopelvic cavity into four approximately equal regions called quadrants. These quadrants
are named according to their relative position—that is, right upper quadrant, right lower quadrant, left upper quadrant, and left lower quadrant (Figure 1.7). Note that the terms left and right refer to the left and right side of the body in the figure, not the left and right side of the art on the page.
A different scheme commonly used by anatomists divides the abdominal surface and abdominopelvic cavity into nine separate regions by four planes (Figure 1.8). As you read
Ascending colon of
Figure 1.8 Abdominopelvic regions. Nine regions delineated by four planes. (a) The superior horizontal plane is just inferior to the ribs; the inferior horizontal plane is at the superior aspect of the hip bones. The vertical planes are just medial to the nipples. (b) Superficial organs are shown in each region.
Diaphragm
Spleen
Stomach
Transverse colon of large intestine
Descending colon of large intestine
Initial part of sigmoid colon
Urinary bladder
Instructors may assign this figure as an Art Labeling Activity using Mastering A&P™
through the descriptions of these nine regions, locate them in Figure 1.8, and note the organs contained in each region.
Umbilical region: The centermost region, which includes the umbilicus (navel)
Epigastric region: Immediately superior to the umbilical region; overlies most of the stomach
Pubic (hypogastric) region: Immediately inferior to the umbilical region; encompasses the pubic area
Inguinal, or iliac, regions: Lateral to the hypogastric region and overlying the superior parts of the hip bones
Lateral (lumbar) regions: Between the ribs and the flaring portions of the hip bones; lateral to the umbilical region
Hypochondriac regions: Flanking the epigastric region laterally and overlying the lower ribs
Activity 5
Locating Abdominopelvic Surface Regions
Locate the regions of the abdominopelvic surface on a human torso model.
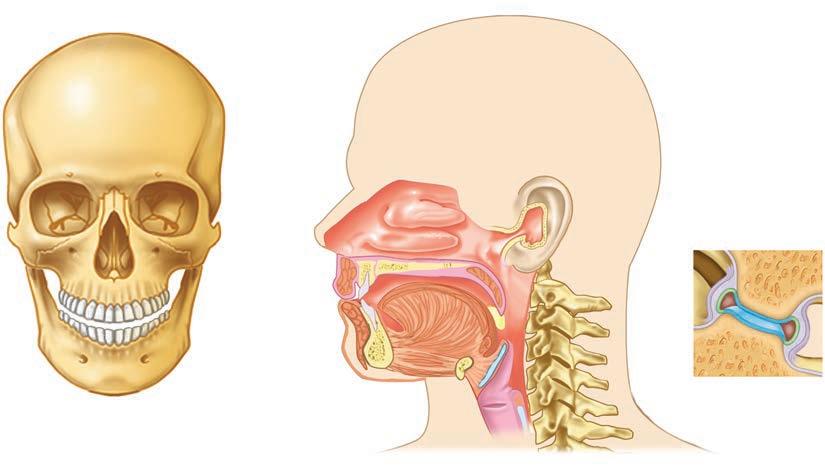
Other Body Cavities
Besides the large, closed body cavities, there are several types of smaller body cavities (Figure 1.9). Many of these are in the head, and most open to the body exterior.
Oral cavity: The oral cavity, commonly called the mouth , contains the tongue and teeth. It is continuous with the rest of the digestive tube, which opens to the exterior at the anus.
Nasal cavity: Located within and posterior to the nose, the nasal cavity is part of the passages of the respiratory system.
Orbital cavities: The orbital cavities (orbits) in the skull house the eyes and present them in an anterior position.
Middle ear cavities: Each middle ear cavity lies just medial to an eardrum and is carved into the bony skull. These cavities contain tiny bones that transmit sound vibrations to the hearing receptors in the inner ears.
Synovial cavities: Synovial cavities are joint cavities—they are enclosed within fibrous capsules that surround the freely movable joints of the body, such as those between the vertebrae and the knee and hip joints. Like the serous membranes of the ventral body cavity, membranes lining the synovial cavities secrete a lubricating fluid that reduces friction as the enclosed structures move across one another.
Figure 1.9 Other body cavities. The oral, nasal, orbital, and middle ear cavities are located in the head and open to the body exterior. Synovial cavities are found in joints between bones, such as the vertebrae of the spine, and at the knee, shoulder, and hip.