Microsoft Office 365 : Office 2016 : introductory Freund
https://ebookmass.com/product/microsoftoffice-365-office-2016-introductory-freund/ Microsoft Office 365. Power Point 2021. Comprehensive. 1st Edition Jennifer T. Campbell
No part of this publication may be reproduced, stored in a retrieval system or transmitted in any form or by any means, electronic, mechanical, photocopying, recording, scanning or otherwise, except as permitted under Sections 107 or 108 of the 1976 United States Copyright Act, without either the prior written permission of the Publisher, or authorization through payment of the appropriate per-copy fee to the Copyright Clearance Center, 222 Rosewood Drive, Danvers, MA 01923, (978) 750-8400, fax (978) 646-8600. Requests to the Publisher for permission should be addressed to the Permissions Department, John Wiley & Sons, Inc., 111 River Street, Hoboken, NJ 07030, (201) 748-6011, fax (201) 748-6008, or online at www.wiley.com/go/permissions.
Limit of Liability/Disclaimer of Warranty: The publisher and the author make no representations or warranties with respect to the accuracy or completeness of the contents of this work and specifically disclaim all warranties, including without limitation warranties of fitness for a particular purpose. No warranty may be created or extended by sales or promotional materials. The advice and strategies contained herein may not be suitable for every situation. This work is sold with the understanding that the publisher is not engaged in rendering legal, accounting, or other professional services. If professional assistance is required, the services of a competent professional person should be sought. Neither the publisher nor the author shall be liable for damages arising herefrom. The fact that an organization or Web site is referred to in this work as a citation and/or a potential source of further information does not mean that the author or the publisher endorses the information the organization or website may provide or recommendations it may make. Further, readers should be aware that Internet websites listed in this work may have changed or disappeared between when this work was written and when it is read.
For general information on our other products and services please contact our Customer Care Department within the United States at (877) 762-2974, outside the United States at (317) 572-3993 or fax (317) 572-4002.
Wiley publishes in a variety of print and electronic formats and by print-on-demand. Some material included with standard print versions of this book may not be included in e-books or in print-ondemand. If this book refers to media such as a CD or DVD that is not included in the version you purchased, you may download this material at booksupport.wiley.com. For more information about Wiley products, visit www.wiley.com.
Library of Congress Control Number: 2020951445
Trademarks: Wiley and the Wiley logo are trademarks or registered trademarks of John Wiley & Sons, Inc. and/or its affiliates, in the United States and other countries, and may not be used without written permission. Microsoft 365 is a trademark of Microsoft Corporation. All other trademarks are the property of their respective owners. John Wiley & Sons, Inc. is not associated with any product or vendor mentioned in this book.
About the Author
An author,
trainer, and content expert, Lisa A. Bucki has been educating others about computers, software, business, and personal growth topics since 1990. She has written and contributed to dozens of books and multimedia works, in addition to providing marketing and training services to her clients and writing online tutorials. Bucki is co-founder of 1x1 Media, LLC (www.1x1media.com), an independent publisher of books and courses focused on how-to topics for entrepreneurs, startup founders, makers, and other business professionals.
Acknowledgments
up the writing of Excel® Portable Genius and this book, my husband and I were deeply grieving the loss of two of our beloved dogs, Jack Black and Tucker, in a little more than three months’ time. Associate Publisher Jim Minatel, Senior Managing Editor Pete Gaughan, Project Manager Kezia Endsley, and Technical Editor Joyce Nielsen—all of whom I consider both friends and colleagues—reacted with kindness, patience, support, and professionalism. I thank them for being wonderful human beings in addition to top professionals.
As I wrapped
I would like to also thank additional team members for their excellent work on this project, including Copy Editor Kim Wimpsett, Content Refinement Specialist Saravanan Dakshinamurthy, Proofreader Louise Watson, and all the other Wiley employees or partners who had a direct or indirect role in this undertaking.
My gratitude also eternally flows to my excellent and patient husband, Steve Poland, and all of our beloved furry dog children.
chapter
Introduction
Suites of
apps designed to work together, such as Microsoft 365, offer many pros, including a common user interface, similar commands and features, and a robust set of tools that enables you to communicate effectively and explore your creativity to the max. Even so, some users can find the hundreds—if not thousands—of choices and features to be a little intimidating.
Microsoft 365 Portable Genius aims to help you answer 11 key questions you may come up against when using the top four Microsoft 365 apps—Word, Excel, PowerPoint, and Outlook. The book covers the features that you need to know, along with some others that you should want to know. I try to get right to the point in describing features and steps so you can power through, problem-solve on your own, and free up time for other activities.
A few special elements provide guardrails and inspiration. Notes help you delve a bit deeper into some topics, Cautions give advice and help you steer clear of problems, and Genius icons convey the pro tips that will make you more efficient, more productive, and (I daresay) more impressive in the results that you crank out from the Microsoft 365 apps.
I need to mention one last item from the “need to know” category before you dive in to Chapter 1. The screenshots for the figures in this book were shot at a low 1024 x 768 resolution to enhance their final appearance within the book’s format. Most users now have their screens set to a much higher resolution, so you may see differences between the figures on your screen and those in the book, particularly with regard to the appearance of the ribbon. Also, users with touchscreen systems may see additional screen options and features not shown in the book’s figures. Finally, there may be variations in screen features, depending on the type of Microsoft 365 subscription you have and your update cycle.
Thank you, reader, for adding Microsoft 365 Portable Genius to your library. You can find more bonus material in the Online Bonus Appendix for this book, available at www.wiley.com/go/ms365portablegenius
How Do I Start Using
The Microsoft 365 applications, or apps, are easy to navigate yet loaded with powerful features designed to save you time and work. The core apps this book covers—Word, Excel, PowerPoint, and Outlook—share similar commands and procedures, meaning skills learned in one app translate smoothly to the other apps. Dialing in on all the basics will enable you to spend more time developing content. This chapter introduces you to the “must know” skills for your work in Microsoft 365, including essential command and interface navigation features, key techniques for creating and working with files, making selections, copying and moving information, and proofing content.
Starting and Exiting an App
Windows 10 gives you a few options for starting a program so that you can get to work. You may already have your preference for how to start up, but if not, you can try one of these methods:
Start button . Click the Start button at the left end of the Windows taskbar. Move the mouse pointer over the right edge of the list of programs in the Start menu so that a scroll bar expands, and then use the scroll bar or the scroll wheel on your mouse to scroll down until you see the Microsoft 365 app that you want to start, such as Word, in the list. Then choose the app name. You also can pin a larger tile for starting an app to the right side of the Start menu. Right-click the app name in the list of Start menu programs, and choose Pin to Start. Then you can open the Start menu and click the large tile. If you need to remove the tile later, right-click it, and choose Unpin from Start.
Windows logo key . Press the Windows logo key on your keyboard. Press the down arrow on your keyboard as needed until the app name is selected, and then press Enter.
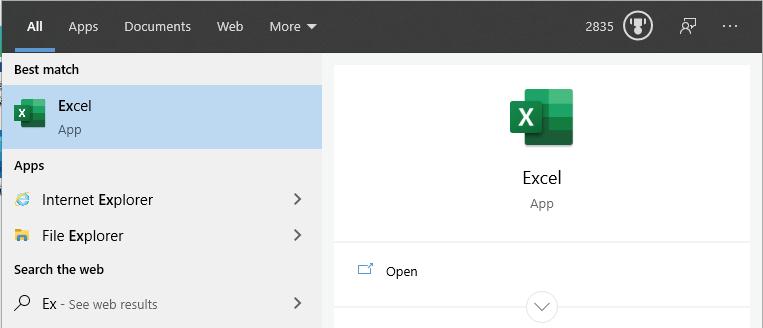
Search box . Click in the Search box to the right of the Start button on the taskbar. If a tile for the app appears in the Top Apps section, click it. If not, start typing the app name, such as Excel, and then choose the app when it appears under Best Match, as shown in Figure 1.1.
1 .1 Choose the app name when using Windows Search to start a Microsoft 365 app.
Chapter: 1 How Do I Start Using Microsoft 365?
Additionally, if you choose Office from the Start menu, an Office window with icons for all your apps opens. You can click an app’s icon to be prompted to create a document and open the app, and you can leave this window open to launch other Microsoft 365 apps as needed.
If using the Start menu to launch a Microsoft 365 app isn’t for you, then you can pin a button for the app to the taskbar. With the app open, right-click its button on the taskbar, and then choose Pin to Taskbar. Click the pinned button on the taskbar to start the program. If you decide you want to unpin the button, right-click it on the taskbar and choose Unpin from Taskbar.
When Word, Excel, or PowerPoint open, they prompt you to create a new document or open an existing one. (Outlook works a little differently when you start it.) The later section called “Working with Files” provides more details about those choices. For now, you could just click the Blank Document, Blank Workbook, or Blank Presentation thumbnail to create a new file.
When you’ve finished all your work for the day, you should close or exit the program. You could shut down Windows without closing open apps, but it’s better to close the app first to ensure you’ve saved all your work. As when starting an app, you have these options for closing or exiting the program:
Click the Close (X) button at the upper-right corner of the screen. Press Alt+F4.
To close the current file without exiting the app, click the File tab near the upper-left corner of the window, and then choose Close. If you have a file with unsaved work open and exit the app or close the file, a message box asks whether you want to save changes to the file. You can click the Save or Don’t Save button as needed.
If you have multiple Word, Excel, or PowerPoint files open or multiple Outlook windows open, closing one of them doesn’t close down the program overall. You have to close every open file or window to make sure you’ve completely exited the program. Caution
Taking a Look Around
You interact with the Microsoft 365 apps through their user interfaces or UIs. Microsoft specifically designs the user interface in each of the Microsoft 365 apps to have similar features, making it easier to perform similar tasks from app to app. The apps still have their differences, which I’ll highlight in the areas where I cover the individual apps. Let’s start first, however, with the UI features that the apps have in common.
Note
The Account (or Office Account in Outlook) choice on the File tab takes you to a screen where you can sign in and out of your Microsoft 365 subscription and manage updates to the apps, among other choices. The Options choice on the File tab opens an Options dialog box where you can change settings affecting how the app appears and behaves.
Reviewing key screen features
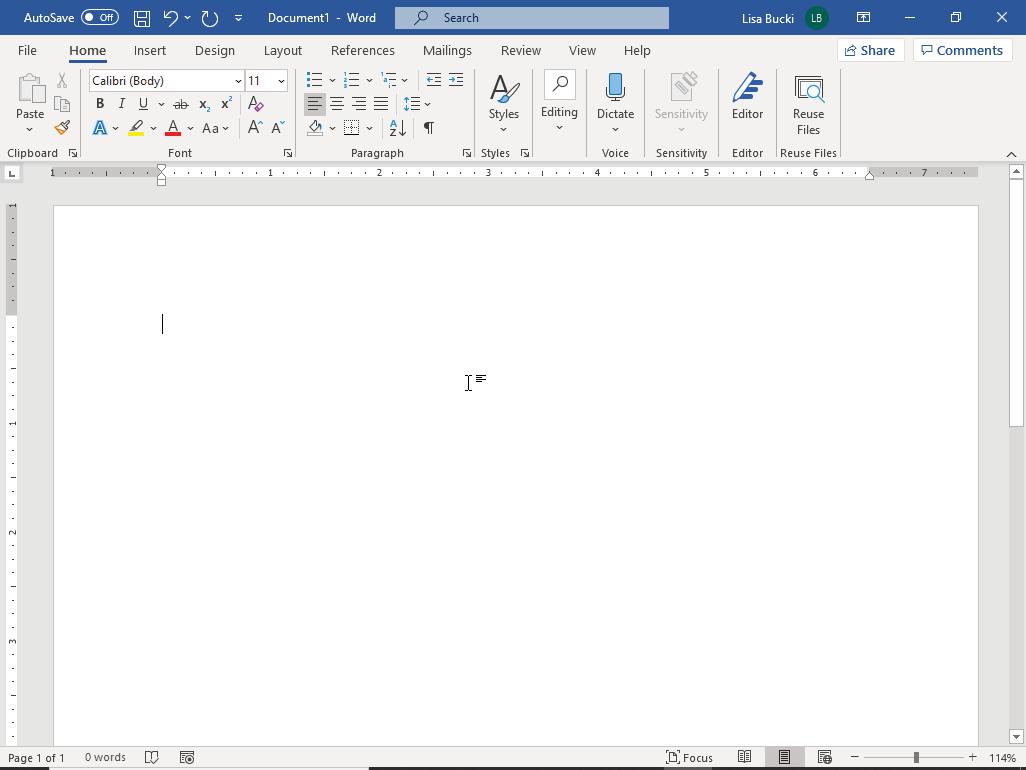
The common interface features in the Microsoft 365 apps enable you to identify the file, give commands, work with the content in your documents, view status information, and change the document view. Figure 1.2 illustrates these common features. (I’ll cover screen features specific to the individual apps throughout the book as needed.)
Here’s what you need to know about the screen features shown in Figure 1.2:
Title bar . The title bar identifies the name of the current file and holds other tools.
Quick Access Toolbar . Found at the left end of the title bar, the Quick Access Toolbar (QAT) offers Save, Undo, and Redo buttons by default. The Undo and Redo buttons become active after you start performing actions. Clicking the down arrow at the right end of the QAT opens the Customize Quick Access Toolbar menu, where you can choose the name of another button that you want to add to the QAT.
Ribbon . The ribbon below the title bar uses tabs to organize the majority of the commands that you’ll use in your apps. Click a ribbon tab to see its commands. The names along the bottom of the ribbon identify commands that are grouped together because they have related or similar functions. In most cases, you click a button on the ribbon to choose a command, though clicking a button with a drop-down list arrow on it opens a list of additional choices. Still other ribbon buttons are split, with both a regular button on the top and a down arrow on the bottom part of the button. Clicking the top half of a split button executes the command immediately, while clicking the bottom part with the arrow opens a list of choices. Other buttons are split the other way, with the main button on the left and a drop-down list arrow on the right. Pressing the Alt key displays letters and numbers, sometimes called keytips, that you can press to choose a ribbon tab and then a command.
Chapter: 1 How Do I Start
1 .2 You will work with these tools in Microsoft 365 apps.
Note
I’ll use a type of shorthand throughout the book to tell you which ribbon command to choose, giving the tab, group, and specific button. For example, if I say “Choose Review ➔ Proofing ➔ Thesaurus,” it means to click the Review tab on the ribbon, look for the Proofing group of commands, and in that group, click Thesaurus. Some command sequences can be longer if a list or menu appears.
Dialog box launcher . Some groups on the ribbon include a small button called a dialog box launcher in the lower-right corner. Clicking one of these buttons opens a dialog box with more detailed choices, such as the Font or Format Cells dialog box.
Mouse pointer . When you’re using the mouse in various apps, the mouse pointer changes shape often to cue you when it’s in the correct position to perform a particular action. By default, when the mouse pointer is over the document in Word, the pointer resembles an I-beam with lines of text beside it, as shown in Figure 1.2. However, it may change to a white arrow, a two-headed arrow, and other shapes. The default mouse pointer in Excel is a bold white plus, but at other times it changes to a black plus, a split black arrow, and more. PowerPoint and Outlook use the white arrow and a plain I-beam as the main app pointers, but you may see other mouse pointers in those apps, too.
Status bar . This area below the main work area displays status information and has tools for changing the zoom that I’ll cover shortly.
Note
The more recent Microsoft 365 app versions have made it easier to get help about a feature or task. Make sure your computer is connected to the Internet to receive the maximum results, and then press F1 or choose Help ➔ Help ➔ Help to open a Help pane at the right. Enter a command name, task, or other search keywords, and then press Enter to see matching results. You also can use Microsoft Search (Alt+Q) in the title bar to search for help.
Changing views
The View tab on the ribbon enables you to change the view and turn some view features on and off. The default view for Word, Print Layout, was shown in Figure 1.2. The default view in Excel, PowerPoint, and Outlook is called Normal. Figure 1.3 shows the View tab in Excel as an example.
1 .3 Use the View tab choices to adjust screen appearance.
Generally speaking, the View tab in each of the apps has a main group with the overall view choices, plus additional groups with other settings. Here’s the name of the group with the overall view choices for each app, plus a briefing on the available views:
Views group in Word . Word’s default Print Layout view approximates how the document will look when printed in hard copy, showing margins, spacing between pages, headers and footers, and so on. It also includes Web Layout view so you can
Chapter: 1 How Do I Start
see how the document would look when published as a web page. Outline view, which you will learn more about in Chapter 2, enables you to organize or reorganize a document. Draft view shows just the text, without any of the features in Print Layout view. Finally, Read Mode hides most of Word’s screen features, so you can read a document more easily.
Workbook Views group in Excel . In addition to the default Normal view, which is shown later in this chapter, Excel offers Page Break Preview view. Use it when you want to print and think you might need to adjust how the contents break between separate pages. The Page Layout view not only shows page breaks, but also shows how headers and footers will appear when printed.
Presentation Views group in PowerPoint . Beyond the default Normal view, this group in the PowerPoint View tab has an Outline View choice, like Word. It also has a Slide Sorter view for rearranging the order of the slides, or pages, in the file. The Notes Page view enables you to see a speaker notes layout for presentation slides. As in Word, you can choose the Reading View to see the presentation without app tools getting in the way.
Current View group in Outlook . Even though Outlook has a Normal view and a Reading view, this group doesn’t offer those choices. Instead, you can choose Change View to adjust aspects of how messages are displayed, or View Settings to change details such as which columns of message information display.
The buttons near the right end of the status bar (refer to Figure 1.2) also enable you to change between views. In Outlook, these buttons are the only way to change between Normal View and Reading View. Note
You also can tinker with whether the ribbon is fully visible. The small up arrow button in the lower-right corner of the ribbon is called the Collapse the Ribbon button. You can click it or press Ctrl+F1 to hide everything but the ribbon tabs, allowing more of the file’s contents to appear on-screen. When you need to choose a command, just click a tab to expand the ribbon temporarily, choose the desired button or item, and then continue working. The ribbon will collapse again on its own. To return the ribbon to its normal appearance and function, click a ribbon tab, and then click the Pin the Ribbon button—it has a pushpin on it—in the lower-right corner of the ribbon or press Ctrl+F1 again. You also can double-click a ribbon tab to collapse the ribbon or pin it back open.
The button in the lower-right corner of the Outlook ribbon looks like the Collapse the Ribbon button in the other apps, but its name is Switch Ribbons. Clicking the button toggles between a one-line Simplified Ribbon or the Classic Ribbon that looks like the ribbon in Word, Excel, and PowerPoint.
Zooming
Today’s trend of computers offering ever-higher screen resolutions has its pros and cons. While graphics and video look gorgeous in hi-res, screen features and content in business-oriented programs can look small and difficult to read. Whether you’ve forgotten your glasses or just have eyestrain from a full day of screen time, increasing the zoom or zooming in can make screen contents easier to read. On the other hand, decreasing the zoom or zooming out allows more of the file’s contents to appear on-screen at once, which can be handy in some situations. For example, you might want to zoom out when working in Excel to show more rows and columns, which would make it easier to select a large set of data for a chart. Or, you might want to zoom in when performing design tasks in Word or PowerPoint, such as aligning graphic objects, and then zoom back out to see how your changes look in context with the rest of the contents.
The Zoom group of the View tab holds choices for changing the zoom. Word offers the most preset zoom choices, enabling you to zoom to One Page, Multiple Pages, or Page Width size. In Excel, you can select an area on the worksheet and then click the Zoom to Selection button in that group so the selection will fill the screen, usually by zooming in. PowerPoint has a Fit to Window choice that zooms the slide in or out as needed to fill the available space on-screen. To return to the normal zoom in Word and Excel, click the 100% button in the group. Clicking the Zoom button in Word, Excel, or PowerPoint opens the Zoom dialog box, which enables you to choose a preset zoom percentage or enter your own setting in the Percent text box (Word and PowerPoint) or Custom text box (Excel); click OK to apply your choice and close the dialog box. Outlook’s View tab doesn’t really have zoom settings per se, but you can choose the Use Tighter Spacing button in the Layout group to see more messages on-screen.
All four apps have the Zoom slider shown in Figure 1.2. Use it to change the zoom on the fly. You can drag the slider “thumb” to the left to zoom out or to the right to zoom in. Or, you can click the Zoom Out (-) or Zoom In (+) buttons at either end of the slider to zoom out or in at preset 10% increments. When you change the zoom using any method, the change applies to the current file only, and normally only to the current sheet in Excel.
A zoom setting of 120–125% strikes a good compromise between increasing the zoom enough to reduce eyestrain and allowing plenty of the work area to appear on-screen at once. Genius
Working with Files
Now that you’ve had an overview of how the Microsoft 365 apps tick, it’s time to turn to the practical business of starting to work with files in Word, Excel, and PowerPoint. But what does the term file mean when it comes to the various apps, anyway? Generally speaking, you can refer to any Microsoft 365 file as a document. And in fact, Word files are called documents. However, an Excel file is called a workbook, with the name stemming from how Excel enables you to organize your data in an orderly fashion on separate worksheets. Because PowerPoint files are intended for a speaker to use while giving a presentation, PowerPoint files are called presentations, each holding individual slides of information.
When you click the File tab on the ribbon, a screen loaded primarily with choices for working with files appears. This screen is sometimes called Backstage or Backstage view. You can use the choices on the File tab to create, save, export, and print files, among other actions.
Note
While Outlook has a File tab and you can save messages as files, using the app to create and manage email messages differs substantially from how you use the other three apps covered in this book. If you’re eager to learn more about Outlook, skip ahead to Chapter 10.
Creating a blank file
You learned at the start of the chapter that when you start Word, Excel, or PowerPoint, the app prompts you to open or create a file. You can click the Blank Document, Blank Workbook, or Blank Presentation thumbnail to create a new blank file at that point. If you’ve already started the app and opened a file (blank or otherwise), you can click the File tab and then choose Blank Document, Blank Workbook, or Blank Presentation (Figure 1.4) to create another blank file. But for my money, it’s fastest to press Ctrl+N to create a new file. No matter the method, the app assigns a placeholder name to each blank file you create until you save it under a new name. The placeholder names reflect the app’s file type, so Word assigns Document1, Document 2, and so on; Excel assigns Book1, Book2, and so on; and PowerPoint assigns Presentation1, Presentation2, and so on.
1 .4 Click the File tab and then choose Blank Document, Blank Workbook, or Blank Presentation to create a new blank file.
Caution
If you work in Word, Excel, or PowerPoint for the web, the cloud-based versions of the apps, you might have gotten very comfortable with how the cloud apps automatically save the file for you as you work. Unfortunately, the desktop versions of the apps aren’t as helpful, so you should make sure you save your work frequently. See the later section called “Saving and Closing a File” to learn how to save.
Exploring templates
If starting from a blank slate sounds like too much work, if you’re looking for design or content ideas, or if you’re fairly certain someone else has already created just the type of file you’re looking for, then you might find what you need in the huge selection of templates offered through the apps. A template is simply a pre-made file that typically includes section or slide titles and labels, placeholder content or prompts, formulas, and formatting. When you use a template file, which has a slightly different file format than a regular file, it creates a new file with the same contents as the template. You fill it out with your own content from there and save the copied file. Thousands of business and personal templates are available for download, including resumes, flyers, brochures, planners, calendars, budgets, invoices, inventory lists, sales pitches, and financial or scientific results presentations. PowerPoint also enables you to download a new presentation theme and create a file from it. “Understanding Themes” in Chapter 6 covers themes in more detail.
Chapter: 1 How Do I Start Using
To find and download a template after starting an app, follow these steps:
1 . Choose File ➔ New . The options for creating a new file appear. To display only themes and not templates in PowerPoint, you also need to click Themes under the Search for Online Templates and Themes text box.
2 . Scroll down to see thumbnails for suggested templates .
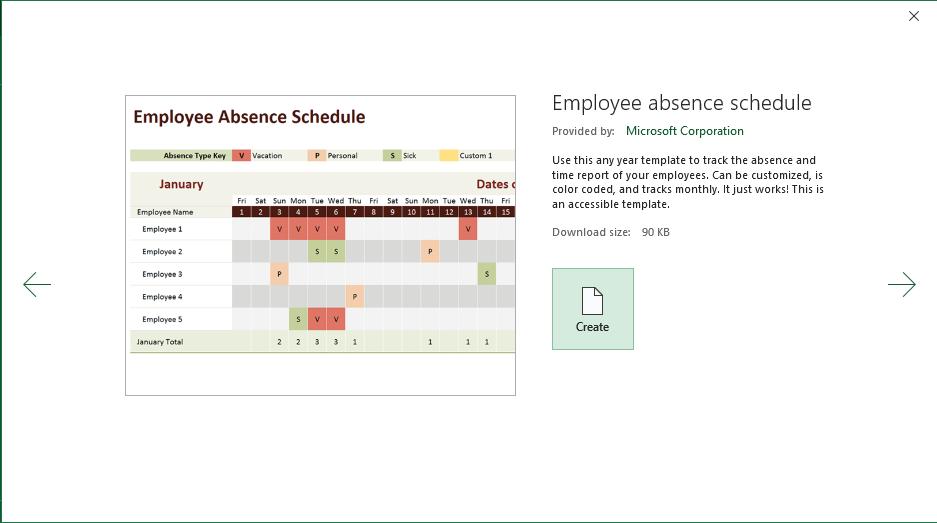
3 . Click a template thumbnail to select it . As shown in Figure 1.5, a larger preview of the template appears, along with a description and the download size information.
1 .5 You get to preview a template before downloading it.
4 . If the template looks like what you want, click the Create button . The template downloads to your computer, and a new file based on the template opens in the app. You can then add your own content and save the copy of the template file.
If you didn’t see a template that looked promising in Step 2, you can scroll back up and click one of the Suggested Searches choices under the Search for Online Templates text box (called Search for Online Templates and Themes in PowerPoint). Or, you could click in that text box, type a search term or brief description, and press Enter. The screen displays thumbnails for matching templates in the search results. At that point, continue with Step 3 to select and download a template.
The templates you download through the Microsoft 365 apps are from a trusted source, so they should be free from viruses. If you obtain a template from another source, make sure to check it for viruses and other malware. Caution
Each app automatically stores each template you download into a subfolder of your Windows 10 user folder so that you can reuse it. The next time you choose File ➔ New, downloaded templates will appear at the top of the screen to the right of the Blank Document, Blank Workbook, or Blank Presentation thumbnail. If you’ve downloaded numerous templates, you may have to click an arrow button to scroll right to find the one that you’d like to reuse. To remove a template from the choices at the top of the screen, right-click it and choose Remove from List.
Opening an existing file
When you start one of the Microsoft 365 apps or click the File tab, the initial screen that appears includes a Recent list, which includes previously saved files you’ve worked on during the not-too-distant past. Click a file in that list to open it immediately.
If the file to open is not on the Recent list, click the Open choice at the left (below New). Toward the middle of the screen, a list of locations appears. Depending on the type of Microsoft 365 subscription you have, there might be OneDrive and Sites locations for cloud-based storage. You can choose a location like that to look for files.
Lower, under Other Locations, the This PC and Browse choices appear. If you click This PC, the list at the right changes to show the files in the same folder as the currently opened file (if any). You can use the up arrow button to the left of the folder breadcrumb trail at the top to navigate a bit and display different files.
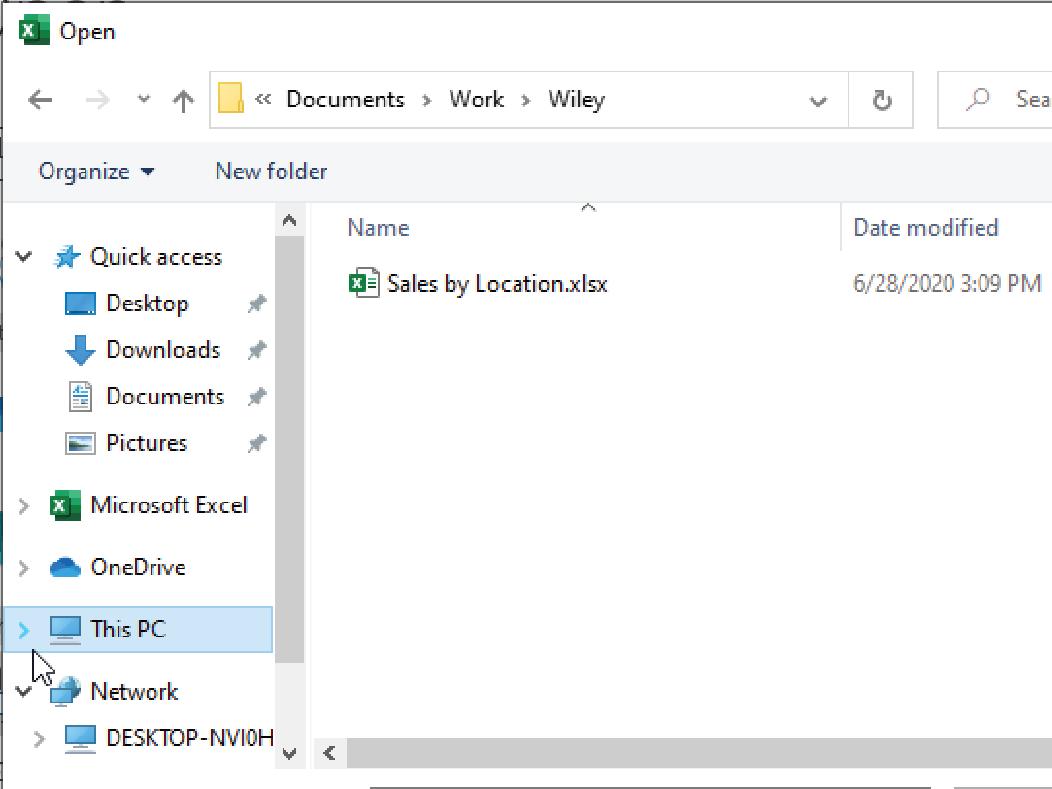
I prefer to click Browse and use the good old Open dialog box (Figure 1.6) to navigate to the location holding a file and open it. As shown in Figure 1.6, when you move the mouse pointer over the Navigation pane at the left, arrows appear to the left of the listed locations so that you can expand and collapse the listing. Clicking the right arrow beside This PC would show all the storage locations under This PC, including available disk drives on your computer. Double-click an item in the Navigation pane to show its contents in the file list at the middle of the dialog box. If you need to open a folder from the file list, double-click it. The Address box at the top of the dialog box shows the path to the current folder. When the file you want to open appears in the file list, either double-click it or click it and click the Open button.
1 .6 Use the Open dialog box to locate and open an existing file.
Glitches happen. Your laptop might lose power and shut down before you save your file, or the system might restart on you after a Windows update installed in the background. To try to recover an unsaved file in an app, choose File ➔ Open. Below the list of files at the right, click the Recover Unsaved Documents, Recover Unsaved Workbooks, or Recover Unsaved Presentations button. The Open dialog box that appears lists any unsaved files. Click the file to reopen it, and then click the Open button.
Switching to another file
You may encounter situations where you need to be working with two or more files at once. With multiple files open, you can use the View tab shown in Figure 1.3 to switch to another file in the same app. On the View tab, click the Switch Windows button in the Window group, and then click the name of the file. If you like using the taskbar, you can move the mouse pointer over the app’s button. When a thumbnail for each open file appears, click the desired thumbnail.
Genius
To use the keyboard to display another file, press and hold the Alt key, briefly press the Tab key while still holding Alt, use the arrow keys to select the thumbnail for the file to display, and then release the Alt key. This is one of the methods you can use to switch between open files in different apps. Alternatively, you can move the mouse pointer over the other app’s taskbar button, and then click the thumbnail for the desired file. If only one file is open in the other app, click its taskbar button.
Another method is not really “switching” files exactly. You can change the size and position of windows on-screen, such as when you might want to be able to see contents from two files at the same time. The Minimize and Restore Down/Maximize buttons sit to the left of the Close (X) button in the upperright corner of each file window, as shown in Figure 1.7.
Minimize Close
Restore Down/Maximize
1 .7 You can also work with a window’s size and position to facilitate working with multiple files.
Here’s how those buttons work and come into play when working with multiple files:
Minimize . Clicking this button collapses the file down to the app taskbar button, effectively switching you to the next open file.
Restore Down/Maximize . A window is maximized when it fills the computer screen, and clicking this button on a maximized window reduces the window to a smaller (but still visible) size. The button changes from Restore Down to Maximize when the window is not maximized. When you need to see information in two separate files at the same time, click the Restore Down button for each window. To resize each window, move the mouse pointer over the window border so that it changes to a white double-headed arrow, and then drag until the window reaches the dimensions you want. Then drag each window by its title bar to position it on-screen as desired. Click the Maximize button to return a window to full screen size.
Note
The Window group of the View tab offers additional choices for viewing and sizing file windows, such as Arrange All, which opens a dialog box with choices for arranging the open windows. You also can right-click the Windows taskbar and use some of its choices, such as Show Windows Side by Side, to arrange the open windows. Keep in mind, though, that the taskbar shortcut menu choices apply to open windows from all programs.
Typing
in a Word Document
Whether you are a two-finger hunt-and-peck typist or a fluid touch typist, Word makes it fairly easy to create content in a document. If anything, many people overthink how to type in text and cling to outdated ways of doing things. For example, if you’re old enough to have learned touch typing on a relic called a typewriter, like (yikes!) me, you may have learned to press the typewriter space bar twice between sentences and the carriage return twice between paragraphs. Modern proportional fonts (letter styles) and the inclusion of extra spacing between paragraphs in Word’s default paragraph style have rendered those manual double spacing and lines obsolete. Additionally, many professional writing style guides also call for single spacing between sentences.
The upshot is, just start typing in the document. As you type, a blinking vertical line called the insertion point appears to indicate where the next typed character will appear. Press the Spacebar once between words and sentences. Press the Enter key once to start a new paragraph. When you type enough content to fill the current page, Word creates a new page for you automatically. Keep it simple for now.
Caution
Ongoing confusion surrounds the terms insertion point, mouse pointer, and cursor. Decades ago, before the invention of the mouse and similar input devices, cursor referred to a blinking box or line on-screen, similar to the insertion point described here. Windows settings use cursor for the blinking vertical line. However, in some instances, Microsoft (and other) online documentation calls the mouse pointer a cursor. For the record, I’m using insertion point for the blinking vertical line and mouse pointer or pointer for the mouse.
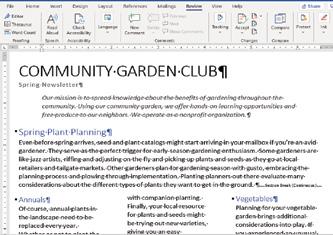
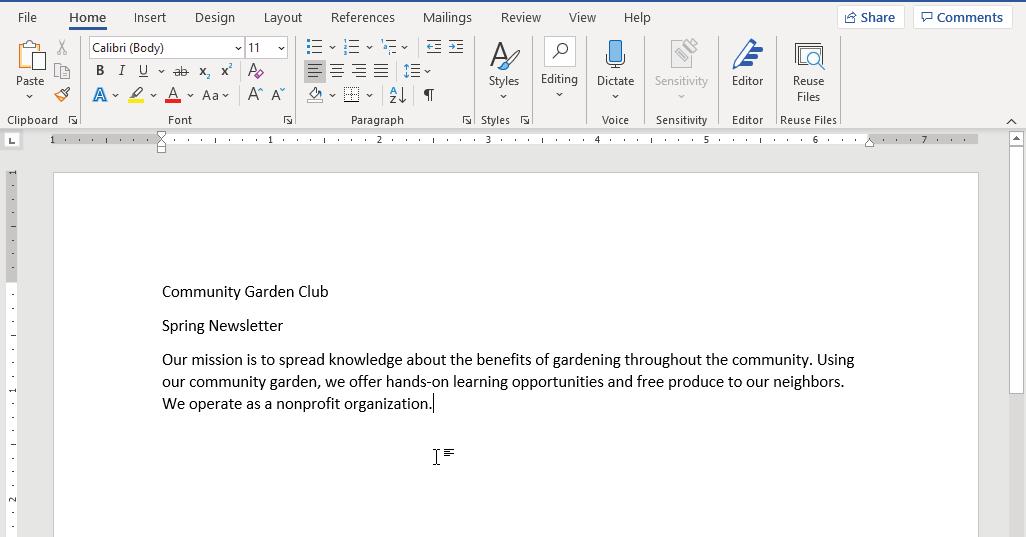
Figure 1.8 shows a basic document with some text in Word’s Print Layout view. Even though it’s not obvious, even a blank Word document uses a default template called Normal.dotm that defines some document basics like the page size, margins, and document styles. Text you type uses the default Normal style, which uses the Calibri font, 11 pt. size, 1.08 spacing between lines, and 8 pt. spacing after paragraphs. (Later chapters explain more about settings like these.) This is why you don’t need to overthink while typing. The Normal.dotm template applies attractive and legible settings for you.
Beyond just typing, Word includes a feature called Click and Type that enables you to add text anywhere on a page. Move the mouse pointer over the blank area where you want to place the text. When lines of text appear with the I-beam mouse pointer, as shown in Figure 1.8, double-click to place the insertion point there, and then start typing. Be advised that using this method sometimes inserts a tab stop for the newly created paragraph. Once you have text in the document, you may need to move around by changing
the location of the insertion point. If the area where you want to place the insertion point is visible, just click that spot with the mouse. You also can use numerous other keyboard shortcuts to move around, changing the location of the insertion point. Table 1.1 lists the main ones that I use.
Mouse pointer
Inser tion point
1 .8 Word’s default formatting settings make attractive, legible text.
Table 1 .1 Word Keyboard Shortcuts
Key(s) Description
Arrow keys
Home and End
PgUp and PgDn
Ctrl+Home and Ctrl+End
Ctrl+left arrow and Ctrl+right arrow
Ctrl+up arrow and Ctrl+down arrow
Moves the insertion point one character or line in the direction of the arrow.
Moves the insertion point to the beginning or end of the line currently holding the insertion point.
Moves the insertion point up or down by one screenful.
Moves the insertion point to the beginning or end of the document.
Moves the insertion point by one word in the direction of the arrow.
Moves the insertion point up or down by one paragraph. If the insertion point is within a paragraph, Ctrl+up arrow moves the insertion point to the beginning of the paragraph.