Veterinary
Arthroscopy for the Small Animal Practitioner
Edited By Timothy C. McCarthy, DVM, PhD
Diplomate, American College of Veterinary Surgeons
ACVS Founding Fellow, Minimally Invasive Surgery (Small Animal Soft Tissue)
ACVS Founding Fellow, Minimally Invasive Surgery (Small Animal Orthopedics) Veterinary Minimally Invasive Surgery Training (VetMIST) Beaverton, OR, USA
This edition first published 2021 © 2021 John Wiley & Sons, Inc.
All rights reserved. No part of this publication may be reproduced, stored in a retrieval system, or transmitted, in any form or by any means, electronic, mechanical, photocopying, recording or otherwise, except as permitted by law. Advice on how to obtain permission to reuse material from this title is available at http://www.wiley.com/go/permissions.
The right of Timothy C. McCarthy to be identified as the author of this work has been asserted in accordance with law.
Registered Office
John Wiley & Sons, Inc., 111 River Street, Hoboken, NJ 07030, USA
Editorial Office
111 River Street, Hoboken, NJ 07030, USA
For details of our global editorial offices, customer services, and more information about Wiley products visit us at www.wiley.com.
Wiley also publishes its books in a variety of electronic formats and by print-on-demand. Some content that appears in standard print versions of this book may not be available in other formats.
Limit of Liability/Disclaimer of Warranty
The contents of this work are intended to further general scientific research, understanding, and discussion only and are not intended and should not be relied upon as recommending or promoting scientific method, diagnosis, or treatment by veterinarians for any particular patient. In view of ongoing research, equipment modifications, changes in governmental regulations, and the constant flow of information relating to the use of medicines, equipment, and devices, the reader is urged to review and evaluate the information provided in the package insert or instructions for each medicine, equipment, or device for, among other things, any changes in the instructions or indication of usage and for added warnings and precautions. While the publisher and authors have used their best efforts in preparing this work, they make no representations or warranties with respect to the accuracy or completeness of the contents of this work and specifically disclaim all warranties, including without limitation any implied warranties of merchantability or fitness for a particular purpose. No warranty may be created or extended by sales representatives, written sales materials or promotional statements for this work. The fact that an organization, website, or product is referred to in this work as a citation and/or potential source of further information does not mean that the publisher and authors endorse the information or services the organization, website, or product may provide or recommendations it may make. This work is sold with the understanding that the publisher is not engaged in rendering professional services. The advice and strategies contained herein may not be suitable for your situation. You should consult with a specialist where appropriate. Further, readers should be aware that websites listed in this work may have changed or disappeared between when this work was written and when it is read. Neither the publisher nor authors shall be liable for any loss of profit or any other commercial damages, including but not limited to special, incidental, consequential, or other damages.
Library of Congress Cataloging-in-Publication Data
Names: McCarthy, Timothy C., author.
Title: Veterinary arthroscopy for the small animal practitioner / Timothy C. McCarthy.
Description: First edition. | Hoboken, NJ : Wiley-Blackwell, 2021. | Includes bibliographical references and index.
Identifiers: LCCN 2020035416 (print) | LCCN 2020035417 (ebook) | ISBN 9781119548973 (hardback) | ISBN 9781119549017 (adobe pdf) | ISBN 9781119549024 (epub)
Subjects: LCSH: Veterinary arthroscopy. | Veterinary orthopedics. | Joints–Examination. | Veterinary diagnostic imaging. | Pet medicine.
Classification: LCC SF910.5 .M33 2021 (print) | LCC SF910.5 (ebook) | DDC 636.089/705–dc23
LC record available at https://lccn.loc.gov/2020035416
LC ebook record available at https://lccn.loc.gov/2020035417
Cover Design: Wiley
Cover Image: © Courtesy of Timothy C. McCarthy
Set in 9.5/12.5pt STIXTwoText by SPi Global, Pondicherry, India
10 9 8 7 6 5 4 3 2 1
I dedicate this book to all my patients. Without their participation, this would not have been possible
Contents
Preface xi
Acknowledgments xiii
About the Companion Website xiv
1 Introduction and Instrumentation 1
1.1 Introduction 1
1.2 Instrumentation and Equipment 3
1.2.1 Arthroscopes 3
1.2.2 Sheaths and Cannulas 5
1.2.2.1 Telescope Sheaths 5
1.2.2.2 Operative Cannulas 6
1.2.2.3 Egress Cannulas 8
1.2.3 Operative Hand Instruments 8
1.2.4 Power Instruments 12
1.2.4.1 Power Shavers 12
1.2.4.2 Radiofrequency/Electrocautery Instrumentation 14
1.2.5 Irrigation Fluid and Management Systems 15
1.2.5.1 Irrigation Fluids 15
1.2.5.2 Gravity Flow 16
1.2.5.3 Pressure Assisted Flow 16
1.2.5.4 Mechanical Arthroscopy Fluid Pumps 16
1.2.6 Video System Tower 17
1.2.6.1 Video Camera 18
1.2.6.2 Video Monitor 19
1.2.6.3 Light Source 19
1.2.6.4 Documentation Equipment 20
References 20
2 General Technique 23
2.1 Anesthesia, Patient Support, and Pain Management 23
2.2 Postoperative Care 23
2.3 Patient Preparation, Positioning, and Operating Room Setup 24
2.3.1 Shoulder Joint 24
2.3.2 Elbow Joint 26
2.3.3 Radiocarpal Joint 28
2.3.4 Hip Joint 29
2.3.5 Stifle Joint 29
2.3.6 Tibiotarsal Joint 31
2.4 Portal Placement-General 31
References 34
3 Shoulder Joint 36
3.1 Patient Preparation, Positioning, and Operating Room Setup 36
3.2 Portal Sites and Portal Placement 37
3.2.1 Telescope Portals 37
3.2.2 Operative Portals 39
3.2.3 Egress Portals 40
3.3 Nerves of Concern with Shoulder Joint Arthroscopy 40
3.4 Examination Protocol and Normal Arthroscopic Anatomy 41
3.5 Diseases of the Shoulder Diagnosed and Managed with Arthroscopy 47
3.5.1 Osteochondritis Dissecans (OCD) 47
3.5.1.1 OCD Lesion Removal and Management 59
3.5.2 Bicipital Tendon Injuries 73
3.5.3 Soft Tissue Injuries of the Shoulder with or Without Shoulder Instability 81
3.5.4 Ununited Caudal Glenoid Ossification Center (UCGOC) 95
3.5.5 Ununited Supraglenoid Tubercle (USGT) 100
3.5.6 Arthroscopic-Assisted Intra-Articular Fracture Repair 100
3.5.7 Arthroscopic Biopsy of Intra-Articular Neoplasia 101
3.5.8 Glenoid Cartilage Defects 102
3.5.9 Chondromalacia 104
3.5.10 Infraspinatus Muscle Contracture 104
References 106
4 Arthroscopy of the Elbow Joint 108
4.1 Patient Preparation, Positioning, and Operating Room Setup 108
4.2 Portal Sites and Portal Placement 109
4.2.1 Telescope Portals (Medial, Craniolateral, Caudomedial, and Caudal) 109
4.2.2 Operative Portals (Craniomedial, Lateral, Craniolateral, and Caudal) 111
4.2.3 Egress Portals 113
4.3 Nerves of Concern with Elbow Joint Arthroscopy 113
4.4 Examination Protocol and Normal Arthroscopic Anatomy 114
4.5 Diseases of the Elbow Diagnosed and Managed with Arthroscopy 122
4.5.1 Elbow Dysplasia 122
4.5.2 Osteochondritis Dissecans (OCD) 167
4.5.3 Ununited Anconeal Process (UAP) 176
4.5.4 Degenerative Joint Disease (DJD) 180
4.5.5 Assisted Intra-Articular Fracture Repair 180
4.5.6 Biopsy of Intra-Articular Neoplasia 181
4.5.7 Immune-Mediated Erosive Arthritis 182
4.5.8 Incomplete Ossification of the Humeral Condyle (IOHC) 182
4.5.9 Medial Enthesiopathy 183
References 184
5 Radiocarpal Joint 187
5.1 Patient Preparation, Positioning, and Operating Room Setup 187
5.2 Portal Sites and Portal Placement 187
5.3 Nerves of Concern with Radiocarpal Joint Arthroscopy 187
5.4 Examination Protocol and Normal Arthroscopic Anatomy 188
5.5 Diseases of the Radiocarpal Joint Diagnosed and Managed with Arthroscopy 189
5.5.1 Fractures 189
5.5.2 Soft Tissue Injuries 190
5.5.3 Immune-Mediated Erosive Arthritis 190
References 191
6 Hip Joint 192
6.1 Patient Preparation, Positioning, and Operating Room Setup 192
6.2 Portal Sites and Portal Placement 192
6.3 Nerves of Concern with Hip Joint Arthroscopy 193
6.4 Examination Protocol and Normal Arthroscopic Anatomy 193
6.5 Diseases of the Hip Diagnosed and Managed with Arthroscopy 196
6.5.1 Hip Dysplasia 196
6.5.2 Arthroliths 202
6.5.3 Soft Tissue Injuries of the Hip Joint 203
6.5.4 Assisted Intra-Articular Fracture Repair 205
6.5.5 Biopsy of Intra-Articular Neoplasia 206
6.5.6 Aseptic Necrosis of the Femoral Head 206
References 206
7 Stifle Joint 207
7.1 Patient Preparation, Positioning, and Operating Room Setup 210
7.2 Portal Sites and Portal Placement 210
7.2.1 Telescope Portal 210
7.2.2 Operative Portals 211
7.2.3 Egress Portal 211
7.3 Nerves of Concern with Stifle Joint Arthroscopy 213
7.4 Examination Protocol and Normal Arthroscopic Anatomy 213
7.5 Diseases of the Stifle Joint Diagnosed and Managed with Arthroscopy 221
7.5.1 Cranial Cruciate Ligament Injuries 221
7.5.2 Caudal Cruciate Ligament Injuries 258
7.5.3 Isolated Meniscal Injuries 258
7.5.4 Osteochondritis Dissecans(OCD) 259
7.5.5 Stifle Stabilization Failures 264
7.5.6 TPLO Second Look 264
7.5.7 Patellar Fracture Management 266
7.5.8 Long Digital Extensor Tendon Injuries 268
7.5.9 Popliteal Tendon Avulsion 268
7.5.10 Intra-articular Neoplasia 269
7.5.11 Patellar Luxation 270
7.5.12 Degenerative Joint Disease, Chondromalacia, and Synovitis 270
7.5.13 Discoid Meniscus 273
7.5.14 Osteochondromatosis 274 References 274
8 Tibiotarsal Joint 276
8.1 Patient Preparation, Positioning, and Operating Room Setup 276
8.2 Portal Sites and Portal Placement 276
8.2.1 Telescope Portals 276
8.2.2 Operative Portals 277
8.2.3 Egress Portal 278
8.3 Nerves of Concern with Tibiotarsal Joint Arthroscopy 278
8.4 Examination Protocol and Normal Arthroscopic Anatomy 278
8.5 Diseases of the Tibiotarsal Joint Diagnosed and Managed with Arthroscopy 279
8.5.1 Osteochondritis Dissecans (OCD) 279
8.5.2 Intra-Articular Fracture Management 286
8.5.3 Soft Tissue Injuries 287
8.5.4 Immune-Mediated Erosive Arthritis 287
8.5.5 Osteoarthritis 289
References 291
9 Problems and Complications 292
9.1 Actual and Potential Complications of Arthroscopy 292
9.1.1 Failure to Enter the Joint 292
9.1.2 Articular Cartilage Damage 292
9.1.3 Soft Tissue Damage 296
9.1.4 Bone Fragment Displacement 298
9.1.5 Operative Debris 298
9.1.6 Red Out 299
9.1.7 Peri-articular Fluid Accumulation 300
9.1.8 Infection 300
9.1.9 Vascular Injury 301
9.1.10 Nerve Injury 301
9.2 Instrument Damage 301
9.2.1 Intra-articular Instrument Breakage 301
9.2.2 Telescope Breakage 302
9.3 Contraindications 303
9.3.1 Patient Size 303
9.3.2 Septic Arthritis 303
9.3.3 Anesthesia Risk 303
References 304
Index 305
Preface
While writing this book, my 50 year anniversary of graduation from Veterinary School occurred. Fifty years! This has been an incredible journey! Beyond my wildest dreams. I never thought that I would be where I am today and would have done the things that I have done. I never dreamed that the first edition of this book would be translated into Russian or that I would be invited to Russia to launch its sale and teach Russian Veterinarians. I never dreamed that I would travel to teach in 14 countries and 23 states. That I would publish books about my professional work.
It is amazing that I was even able to become a Veterinarian. I am so dyslexic that I struggled to learn to read. When I started the fifth grade, I was reading at a second grade level. Spelling was impossible. In the third grade, I was able to get 49 out of 50 words WRONG on a review spelling test even after spending uncountable hours with my parents trying to learn spelling using flash cards. People with really bad handwriting are probably dyslexic and with really bad handwriting no one can tell how the word was spelled. I think that I got into Veterinary School with the lowest grades in the history of Veterinary Medicine, but Baxter Black and I debate who’s was worst. If it were not for Dr. Don Bailey, I would not have been accepted. He worked for Dr. Davis, who was head of the admission committee when I applied, all through Veterinary School and graduated at the top of this class. I managed to not flunk out and graduated at the bottom of the class, again Baxter Black and I argue about who was really “last in class.” And they call the person who graduates last in class “Dr.” It was obvious in my first job out of school that I wanted to do surgery. Residency programs for advanced training were a new entity 50 years ago and they were few and far between. Then how does someone with grades barely above 2.0 get into a residency program? NOT! I finally thought that I needed to try CSU, my “amalater.” They did not have a residency program, but there was the graduate program at the Surgery Lab. I
interviewed with the head of the program and, during the interview, it was obvious that if I applied for the masters degree program there was no chance that I would be accepted but if I applied for the PhD program I was guaranteed to be accepted. Interesting but it worked. Six years later I passed the ACVS examination and became a board-certified surgeon and, in a few years later, won my PhD. ACVS recently initiated fellowship training in minimally invasive surgery, and I was selected as a founding fellow in this program for both small animal soft tissue surgery and small animal orthopedics, the only veterinarian to qualify for both categories.
At my 25 year class reunion, I was informed that at a previous time I had been unanimously selected as the classmate least likely to go back to school AND they were “Stunned” that I was board certified. My reply was that no one is more stunned than I.
Getting into endoscopy happened totally by chance. I got a call from a local veterinarian asking if I wanted to buy a used gastroscope that he had. As a surgeon, I had never really thought about doing GI endoscopy but thought, “hey why not” since no one in the area was providing this service. I did not buy that endoscope but bought another one that was in better shape for $550 with a light source and all the instruments that I needed. A little later, I bought a laparoscope to do liver biopsies and then an arthroscope. I never thought that I would pay for this equipment, but I thought it would be fun, I might be able to practice better medicine, and I could afford the expense.
I started putting endoscopes everywhere and added to the list of procedures that could be performed by trying new things on my patients. Many of the endoscopic first ever procedures were performed on patients with clinical problems. Using the axiom of “Above all do no harm” and combining endoscopy with transition to traditional approaches, there were an unbelievingly low number of problems or complications. Very few firsts
were planned or thought about ahead of time and many were spur of the moment events added to an already ongoing procedure or immediately before surgery by asking the question, can I do this with a scope? In cases where the question was asked before surgery the discussion with the client was, I would like to try this with minimally invasive technique, I have never done this before or this has never been done before, if I cannot do this with minimally invasive technique I will do it the traditional old way, and the cost will by the same how matter how it gets done. I never had a client say no to this plan. Sure, I had to eat some of the cost on many early cases, but this is the easiest, most effective, cheapest continuing education I have ever gotten and has benefitted the patients, clients, my practice, my happiness, plus my pocketbook thousands of times over the cost. Sixty endoscopes and over 7000 procedures later I am writing the second edition of this book.
I know that I am different and do not follow the book. I am so dyslexic that I cannot read about what I am not supposed to be able to do. I also never learned to come in out of the rain because my mother took me out in the rain. In the first grade, when we had art class all the class got coloring books, but the teacher did not give me one. Being a typical first grader, I was devastated and did not understand why I did not get a coloring book. The teacher then brought me a large blank piece of paper and told me that my mother did not want me to have a coloring book but wanted me to make my own drawings. So, I never learned to color between the lines. In fact, I never learned that there were lines. When someone says something about thinking outside the box my question is, what is a box?
As I said at the beginning, my career has been an incredible journey. But it has not all been easy or fun. There have been times of miserable struggle. I belong to the face book group; “Not one more vet,” because I am a suicide survivor. Twice in my life I have been at the edge. Fortunately, I never acted on my thoughts of suicide and am here to tell about the experience. If I can get through this so can you. I looked for and got help from my friends and great help from some great Psychologists. I also have to admit that I am really stubborn and wasn’t going to let the b’s win. If you are in trouble, get help! Working with a psychologist has changed my life. It does not mean that if you see a Psychologist that there is something wrong with you. Get over this mental block. Unburden yourself to them, that is what they are there for. At my first visit
with my first Psychologist, I unloaded everything that was bothering me, things that I never thought I would ever tell anyone, at the end of the session she said that I saved about nine months of therapy because I was ready and she did not have to spend that time breaking down my resistance. We went from there. I am a much happier person, I have eliminated my anger issues, and I am much more resilient to the stresses in life.
Early in this saga, I made the statement in my lectures: “Endoscopy is a quantum leap forward in our diagnostic and therapeutic armamentarium.” This was and still is true. Now I say “A patient comes into every veterinary practice every day who would benefit from a minimally invasive procedure” This is also true or when I get pushy: “Every patient who comes into every veterinary practice every day would benefit from a minimally invasive procedure” and this is almost true.
Enjoy your endoscopes. They are the best burnout protection that you can buy.
Acknowledgments
This work would not have been accomplished without a great number of people and animals who collectively made this possible. I simply put it to paper.
First to my parents for bringing me into this world and for their unending support, encouragement, and love.
To Dr. Don and Betty Bailey for introducing me to Veterinary Medicine, for getting me into Veterinary School, and for their continued support throughout my career.
To all my teachers and professors, from my first-grade teacher Mrs. Mathews, through high school and college for their efforts to educate and stimulate me but especially to Drs Jim Creed, Glenn Severin, Pat Chase, Harry Gorman, and Henry Swan.
To my colleagues who referred the cases that provided me with the material for learning these techniques. And to the clients who entrusted me with their beloved pets.
To Dr. Karl Storz, his daughter Ms. Sible Storz, and his grandson Mr. Karl-Christian Storz for their interest in Veterinary Medicine and support of our profession. To all the staff of the Veterinary Division of the Karl Storz Endoscope Company for their educational endeavors and instrumentation development for our profession. Especially to Dr. Christopher Chamness for his support, encouragement, and friendship.
To all the younger veterinarians who have picked up the reins and are driving all aspects of endoscopy forward at an ever-increasing rate. I am thrilled that I now only see smoke and taillights. This is a thrill to watch.
And most importantly, to my wife and son for their patience and for allowing me the time to complete this project.
About the Companion Website
This book is accompanied by a companion website: www.wiley.com/go/mccarthy/arthroscopy
The website includes:
O Videos
Note: The videos are clearly signposted throughout the book. Look out for .
Introduction and Instrumentation
1.1 Introduction
Arthroscopy is the most significant advance in small animal orthopedics that has occurred during my 50 years of professional lifetime.
Arthroscopy provides more information about intraarticular pathology than any other diagnostic technique. The most important advantages of arthroscopy are visual access to more joint area, magnification produced by the telescopes and video systems, excellent illumination, and a clear visual field when continuous irrigation is employed. Arthroscopy is also minimally invasive, reduces trauma, shortens operative times, and decreases recovery times. The small sizes of telescopes available today allow placement into the deepest parts of joints and combined with angulation of the field of view, 30° for most arthroscopes, provide visual access to more area of joints than can be achieved with open surgery. Arthroscopes magnify intra-articular structures allowing visualization of anatomical details and pathologic changes that are beyond the resolution of radiographs, CT, MRI, or what can be seen with open surgery (Video 1.1). Submacroscopic lesions that elude us with open surgical exploration can be easily seen with arthroscopy. High-intensity lighting is passed directly through the arthroscope providing perfect illumination of everything in the field of view of the telescope. Irrigation employed with arthroscopy maintains a clear field of view by continuously flushing blood and debris away from the end of the telescope. This is all done with minimally invasive technique and far less tissue trauma than with an arthrotomy. Speed is not the most important criteria or the most important advantage of arthroscopy over open arthrotomy, but for the experienced arthroscopic surgeon, anesthesia and procedure times are significantly shorter than with conventional open surgery. Postoperative recovery after arthroscopy is also much faster than following an open arthrotomy. This time comparison is an important
advantage of arthroscopy. Most dogs recover to their preoperative status of lameness and pain within a few hours after arthroscopy. Many dogs are better than their preoperative level of function by the time they are released from the hospital on the day after arthroscopy. Arthroscopy is commonly performed as an outpatient procedure with a release on the same day as surgery. Activity restriction is not needed for portal site healing. The time required for healing of intra-articular structures after arthroscopy for conditions such as OCD and medial coronoid process disease (MCPD) has not been studied or effectively compared with healing after open surgery.
There are few disadvantages of arthroscopy. The most significant disadvantage is that arthroscopy is the most difficult of all endoscopies to learn. Arthroscopy’s technical difficulty with its long slow learning process for both diagnostic applications and for performing corrective surgical procedures makes it a challenge to gain proficiency. Arthroscopy requires considerable practice, patience, and persistence to master. Reasons for arthroscopy’s difficulty are related to the small space involved, confinement by rigid bony structures, and the anatomic complexity of some joints such as the stifle. Even with its difficulties, developing proficiency with arthroscopy is within the grasp of most who are willing to make the effort and put in the time to learn. Expense of instrumentation is a relative disadvantage as the cost of the equipment and instrumentation for arthroscopy is significant but is no more than other sophisticated instrumentation used in small animal practice today. The limitation of small patient size is shrinking as instrument size decreases and as our skill level and experience increase.
Arthroscopy is indicated whenever there is a history, physical findings, imaging changes, or laboratory result suggestive of joint disease. A history of lameness, stiffness, difficulty or reluctance to get up, reluctance to go up or downstairs, reluctance to get up and
down off the couch or the favorite chair, and inability to get in and out of the car or truck; combined with joint pain, swelling or thickening, crepitus, reduced range of joint motion, or joint instability on physical examination are definite reasons to perform arthroscopy. Radiographic, CT, MRI, or ultrasound abnormalities of increased joint fluid or joint capsule thickening, periarticular osteophytes, periarticular sclerosis, OCD lesions, ununited anconeal processes, ununited caudal glenoid ossification center, intra-articular fractures or chips, periarticular bone lysis, tendon and ligament abnormalities, or any other changes involving a joint are also indications for arthroscopy. Normal radiographic, CT, MRI, or ultrasound findings do not preclude arthroscopy as a diagnostic technique if history and physical findings point to joint involvement. Arthroscopy is indicated whenever we need more information about a joint than can be obtained with any less invasive technique.
Arthroscopy is most commonly performed in the shoulder, elbow, and stifle in dogs. Arthroscopy is less commonly performed on the radiocarpal, hip, and tibiotarsal joints. Arthroscopy is easier to perform in large dogs but has been done effectively in dogs as small as seven pounds. Arthroscopy has also been performed in the shoulder, elbow, and stifle of cats but its use is largely unexplored in this species. The same positioning, procedures, techniques, and portals that are used in dogs are used for cats.
Conditions that have been diagnosed with arthroscopy (Table 1.1) include osteochondritis dissecans (OCD) of the shoulder, stifle, elbow, and tibiotarsal joints (Van Bree and Van Ryssen 1998); partial and complete cranial and caudal cruciate ligament ruptures; meniscal injuries; medial coronoid processes disease (MCPD); ununited caudal glenoid ossification center (UCGOC), ununited anconeal process (UAP), ununited supraglenoid tubercle, degenerative joint disease (DJD); intra-articular fractures; immune-mediated arthritis; synovitis; partial or complete bicipital tendon rupture; injury to other intra-articular soft tissues of the shoulder, soft tissue injury of intra-articular structures of the elbow, radiocarpal, stifle, and hip joints; septic arthritis; and neoplasia. Arthroscopic assessment of femoral head and acetabular articular cartilage condition in young dysplastic dogs have been used for case selection and to predict results with pelvic osteotomy surgery. Cartilage injury or chondromalacia secondary to instability, deformity, or inflammatory processes is more easily identified and the extent of damage scored more accurately than with open surgery.
Table 1.1 Diagnoses with arthroscopy.
All jointsDegenerative joint disease
Chondromalacia
Neoplasia
Synovitis/villus synovial proliferation
Intra-articular Fractures
Immune-mediated polyarthropathies
Septic arthritis
Shoulder joint
OCD of the humeral head
Bicipital tendon ruptures – partial and complete
Medial glenohumeral ligament and subscapularis tendon injuries
Lateral glenoid labrum separations
Ununited caudal glenoid ossification center
Ununited supraglenoid tubercle
Supraspinatus tendon injuries
Glenoid cartilage defects
Elbow jointMedial coronoid process pathology/ fragmentation
Lateral coronoid process pathology/ fragmentation
OCD of the humeral condyle
Ununited anconeal process
Joint incongruity/growth deformity
Incomplete humeral condyle ossification
Radiocarpal joint
Radial carpal bone fractures
Chip fractures of the dorsal margin of the distal radius
Ligament and joint capsule tears
Hip jointHip dysplasia
Dorsal joint capsule tears
Aseptic necrosis of the femoral head
Stifle jointCranial cruciate ligament ruptures – partial and complete
Caudal cruciate ligament ruptures – partial and complete
Meniscal injuries
OCD of the femoral condyle
Medial patellar luxation/lateral patellar
ligament rupture
Long digital extensor tendon injuries
Popliteal tendon avulsion
Cruciate stabilization failure
Hock jointOCD of the talus
Operative procedures currently being performed with arthroscopy (Table 1.2) include removal of OCD cartilage flaps and debridement of the cartilage defects in the shoulder, elbow, stifle, and tibiotarsal joints (Bertrand et al. 1997; Bilmont et al. 2018; Cook et al. 2001; Gielen et al. 2002; McCarthy 1999; Miller and Beale 2008; Olivieri
Table 1.2 Operative procedures performed with arthroscopy.
Shoulder joint
OCD cartilage flap removal and lesion debridement
Bicipital tendon transection
Ununited caudal glenoid ossification center fragment removal
Ununited supraglenoid tubercle fragment removal
Intra-articular soft tissue injury stabilization
Intra-articular or assisted fracture repair
Elbow jointMedial coronoid process fragment removal/process revision
OCD cartilage flap removal and lesion debridement
Anconeal process removal
Osteophyte resection
Intra-articular or assisted fracture repair
Radiocarpal joint Carpal chip removal
Intra-articular or assisted fracture repair
Stifle jointCruciate ligament debridement/removal
Meniscectomy – partial/total
OCD cartilage flap removal and lesion debridement
Meniscal release
Intra-articular or assisted fracture repair
Hock jointOCD cartilage flap removal and lesion debridement
Free joint body and tarsal chip fracture fragment removal
Intra-articular or assisted fracture repair
et al. 2007; Person 1989; Rochat 2001; Van Bree and Van Ryssen 1998); coronoid process fragment removal (McCarthy 1999; Rochat 2001) and coronoid process revision or subtotal coronoidectomy (McCarthy 1999), free joint body (arthrolith) removal (Smith et al. 2012), bicipital tendon transection (Bergenhuyzen et al. 2010; Cook et al. 2005; Rochat 2001), carpal chip removal (McCarthy 2005), partial and total meniscectomy (Ertelt and Fehr 2009; Ridge 2006; Ritzo et al. 2014; Rochat 2001), cruciate ligament debridement (Rochat 2001), meniscal release (Austin et al. 2007; Kim et al. 2016; McCarthy 1999), ununited caudal glenoid ossification center removal (McCarthy 2005), ununited supraglenoid tubercle removal (McCarthy 2005; Serck and Wouters 2019), ununited anconeal process removal (McCarthy 2005), screw fixation of ununited anconeal process fragments, osteophyte removal in chronic degenerative joint disease of the elbow and tarsus (McCarthy 2005), intra-articular repair of ruptured cranial cruciate ligaments (Bolia and Böttcher 2015; Person 1987; Winkels et al. 2010), fixation
of avulsed ligament attachments, medial patellar luxation management (Bevan and Taylor 2004), assisted repair of intraarticular fractures (Beale and Cole 2012; Bright and May 2011; Cole and Beale 2020; Cusack and Johnson 2013; Deneuche and Viguier 2002; Perry et al. 2010), intra-articular management of shoulder instability (Franklin et al. 2013; Mitchell and Innes 2000; Ridge et al. 2014), neoplasia management (Arias et al. 2009; Scherrer et al. 2005), septic arthritis management (Fearnside and Preston 2002; Luther et al. 2005), and more. The majority of procedures and publications relate to application of arthroscopy in dogs, but this technique has also been performed in cats (Bardet 1998; Beale and Cole 2012; Bright 2010; Cole and Beale 2020; Cusack and Johnson 2013; Mindner et al. 2016; Ridge 2009; Serck and Wouters 2019; Staiger and Beale 2005).
1.2 Instrumentation and Equipment
1.2.1 Arthroscopes
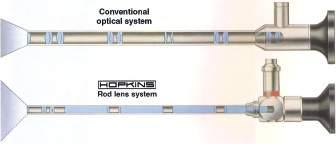
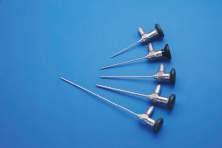
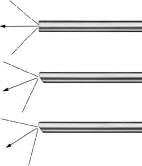
Rigid telescopes used for arthroscopy range in size from 1.9 to 5.0 mm diameter. Telescopes in use today are designed using what is termed a Hopkins rod lens system (Figure 1.1) for image transmission that has dramatically improved image quality over previous lens systems. Telescopes commonly used for small animal arthroscopy (Table 1.3) include a long 2.7 mm arthroscope also called the 2.7 mm multipurpose rigid telescope (MPRT), a 4.0 mm arthroscope, a short 2.7 mm arthroscope, a 2.4 mm arthroscope, and a 1.9 mm arthroscope (Figure 1.2). These telescopes all have a 30° visual angle, but other angles are available (Figure 1.3). Each has advantages, disadvantages, and specific best applications.
The 2.7 mm MPRT was for years promoted as the telescope of choice for arthroscopy in small animals because it had the best optics of all the small telescopes and its length allows it to be used for multiple endoscopic techniques. This recommendation has changed with improvement of the optics of the 2.4 mm arthroscope, which now equals or exceeds those of the 2.7 mm MPRT. The 2.4 scope is shorter, 11 cm vs 18 cm, smaller, with a better blunt obturator design making it much easier to insert and use in the small joints of our patients. This size and design allow procedures to be performed with less joint damage.
One of the previous arguments for recommendation of the 2.7 mm MPRT was that it can be used for many endoscopic techniques commonly performed in small
Figure 1.1 A diagram of the Hopkins rod lens system shown in the telescope at the bottom and a conventional lens system in the telescope at the top. Hopkins rod lenses are the standard design for arthroscopes in current use today. Source: Photo courtesy of KARL STORZ: © KARL STORZ SE & Co KG, Germany.
Table 1.3 Telescopes used for small animal arthroscopy. Arthroscope diameterTelescope length (cm)Telescope angle (°)Telescope part number (Karl Storz)
(Variable)28731
a Shown in Figure A I 2.
Figure 1.2 Arthroscopes commonly used in small animal practice from bottom to top: the long 2.7 mm multipurpose rigid telescope (MPRT), 4.0 mm arthroscope, short 2.7 mm arthroscope, 2.4 mm arthroscope, and 1.9 mm arthroscope. These telescopes all have a viewing angle of 30°. The 2.7 mm multipurpose telescope has a working length of 18 cm; the 4.0 mm, short 2.7 mm, and 2.4 mm arthroscopes have a working length of 11 cm; and the 1.9 mm arthroscope with 6.5 cm working length. These telescopes are all autoclavable. Source: Photo courtesy of KARL STORZ: © KARL STORZ SE & Co KG, Germany.
Figure 1.3 A diagram showing the angle of view of telescopes used for arthroscopy. Thirty degrees is the angle of view of all commonly used telescopes for arthroscopy. Zero degree and seventy degrees arthroscopes are available but are rarely used. Source: Photo courtesy of KARL STORZ: © KARL STORZ SE & Co KG, Germany.
animal practice and is why this endoscope is termed the MPRT. The larger size of this telescope and the design of the blunt obturator increase the difficulty of establishing a telescope portal for arthroscopy. The other major disadvantage of this telescope is its length, which makes manipulations more difficult for arthroscopy with the finite movements needed for maneuvering the visual field within small joints combined with the long fulcrum produced by a video camera on the end of the telescope. The demands of arthroscopy for effective application in small animals today combined with the need for continued improvement in technique and results no longer allow us to substitute a multipurpose telescope, when a better single application instrument is available. The 2.4 mm arthroscope is currently the telescope of choice for small animal practice.
A 2.7 mm arthroscope is available with a working length of 11 cm. Its shorter length is an advantage over the 2.7 mm MPRT for arthroscopy making handling the telescope in small joints much easier. The only other advantage of this telescope over the 2.4 mm arthroscope is that it is more robust with less chance of breakage, especially when used by a beginner. Disadvantages are that the optics are not as good as either the 2.4 mm arthroscope or the 2.7 mm MPRT and the blunt obturator design makes portal placement more difficult.
The 1.9 mm arthroscopes are available in 10 mm and 6.5 mm lengths. The smaller size of these telescopes is an advantage for use in smaller joints such as the radiocarpal joint, tibiotarsal joint, and for use in small dogs or cats. Their disadvantages are that they are fragile breaking more easily, the field of view is significantly smaller increasing the difficulty of joint visualization, and the optics are not as good making them less effective for documentation purposes.
Four-millimeter diameter telescopes are also available for use in small animals but are too large for most joints in most patients. A 4 mm arthroscope has been used in the stifle joint of larger dogs and in the shoulder joint in giant breeds. Four-millimeter telescopes are available in lengths of 18 cm and a shorter 12 mm version. A 4.0 Endocameleon arthroscope is a new addition to the armamentarium for large joint arthroscopy with a variable direction of view from 15° to 90°.
The shorter length arthroscopes have another advantage in that they can be held in a pistol grip fashion with the surgeon’s index finger on the skin at the portal site to accurately and easily maintain a constant depth of telescope insertion. This greatly reduces the number of times the field of view is lost because the telescope is inserted too deep or the telescope is inadvertently pulled
out of the joint. This is particularly important for beginners.
A significant advance in telescope technology is that most telescopes are now autoclavable. The autoclavable telescopes are labeled as autoclavable. This greatly facilitates instrument turnaround and practice efficiency.
1.2.2 Sheaths and Cannulas
1.2.2.1
Telescope Sheaths
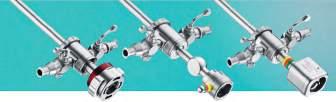
Arthroscopes are used with a cannula or sheath to protect the telescope and provide a channel for fluid inflow (Figure 1.4 and Table 1.4). A specifically matched sheath is required for each specific telescope size. Telescope sheaths come with a sharp trocar and a blunt obturator. The blunt obturator is preferred because it causes less damage to joint cartilage when establishing the telescope portal. Sheaths for the smaller telescopes used in small animal practice typically have a single fixed stopcock with a Luer lock connector used for fluid inflow. Cannulas are also available with two stopcocks and stopcocks that rotate on the cannula. All sheaths have a locking mechanism that fixes the cannula to the telescope. This locking mechanism is very important as it protects the telescope from being damaged. When locked in place, the distal tip of the telescope is aligned with the distal tip of the sheath and this protects the distal lens of the telescope. More importantly, when the telescope is locked in place, the sheath protects against excessive bending stresses along the telescope shaft. This locking mechanism also creates a watertight seal at the proximal end of the sheath so that irrigating fluid flows into the joint. It is very important that the telescope is properly locked in place for fluid flow, to prevent interference of the tip of the cannula with the visual field, and most importantly, to prevent telescope damage.
The locking mechanism of telescope cannulas has evolved over time from a rotating ring to a sliding box and, more recently, to a snap-in design with springloaded locks (Figure 1.5). The rotating ring is the traditional coupling mechanism being the oldest and simplest configuration for locking the telescope to the cannula. This design works well, has withstood the test of time for dependability, and is easy to use. The sliding box or automatic lock design is slightly easier to use, is more secure than the traditional coupling mechanism, but can become hard to slide over time eventually sticking and becoming inoperable. The snap-in coupling is the most recent locking mechanism, is the easiest to use, and provides secure attachment of the telescope to the cannula.

Figure 1.4 Arthroscope sheaths with blunt obturators from left to right: blunt obturator for the 2.7 mm long arthroscope or MPRT, sheath for the 2.7 mm long arthroscope or MPRT telescope with a single rotatable stopcock and with a blunt obturator inserted, blunt obturator for the 2.4 mm telescope, sheath for the 2.4 mm arthroscope with a single fixed stopcock, blunt obturator for the short 2.7 mm arthroscope, sheath for the short 2.7 mm arthroscope with a single rotatable stopcock, an operating cannula with a blunt obturator in place, sheath for the1.9 mm arthroscope with a single fixed stopcock and with a blunt obturator inserted, and an egress cannula with a blunt obturator in place. The telescope cannulas in this image all have the snap-in coupling design. Source: Photo courtesy of KARL STORZ: © KARL STORZ SE & Co KG, Germany.
Table 1.4 Telescope sheaths used for small animal arthroscopy.
Arthroscope
Sheaths part number (Karl Storz)Obturators part number (Karl Storz)
4.0 mm/18 cm/30° (64 230 BWA) 64124AR 65127BS/BT
4.0 mm/12 cm/30° (64 728 BWA) 64126KR 64129BT
4.0 mm Endocameleon/18 cm (28 731 AE)28 136 EC 28126 BC/BT
2.7 mm/18 cm/30° (64 029 BA) a64128 AR 63122 AS/AB
Snap in 28132S 28132BC/BT
2.7 mm/11 cm/30° (67 208 BA) a64147 BN 64147 BS/BT
Snap in 26133DS 28133BC
2.4 mm 10 cm/30° (64 300 BA) a64303 BN 64303 BU/BV
Snap in 28303BN 28302BU/BV
1.9 mm/11 cm/30° (64 301 BA) 64 302 BN 64302 BS/BT
1.9 mm/6.5 cm/30° (28 305 BA) a28306 BN 64306 BS/BT
Snap in 64306BN 64306BS/BT
a Shown in Figure A I 4.
1.2.2.2 Operative Cannulas
Operative portals are established with a cannula (Figure 1.6 and Table 1.5) or using a free passage technique where instruments are placed through the soft tissues overlying the joint without using a cannula. Conflicting opinions exist about which technique is
best, but both are effective with each having its indications, advantages, and disadvantages. When a cannula is used, access for instrumentation is established and maintained by placing the cannula into the joint at the operative portal site. This technique has the advantage of facilitating reinsertion of instruments.
Figure 1.5 Locking mechanism designs for attaching sheaths to telescopes. From left to right: A snap-in coupling mechanism with spring-loaded locks, a traditional rotating ring locking mechanism, and an automatic lock. Source: Photo courtesy of KARL STORZ: © KARL STORZ SE & Co KG, Germany.
Figure 1.6 Operating cannulas for arthroscopy from left to right: a 5.5 mm operating cannula with its blunt obturator in place, a 4.5 mm operating cannula with a blunt obturator, a 2.5 mm operating cannula with a sharp trocar in place, and a 3.5 mm operating cannula with a blunt obturator. Rubber gaskets for these cannulas are used when indicated. Source: Photo courtesy of KARL STORZ: © KARL STORZ SE & Co KG, Germany.
The disadvantages of operative cannulas are that they limit the size of instruments that can be placed into the joint and the size of tissue fragments that can be removed. Operative cannulas can interfere with instrument manipulation because of small joint size with very short distances between the joint capsule and operative sites. Operative cannulas are also
Table 1.5 Operating cannulas used for small animal arthroscopy.
difficult to keep in place tending to come out with instrument and tissue removal.
For free passage of instruments without a portal cannula, joint access is created with a sharp incision into the joint using a no. 11 blade followed by blunt dissection through tissues overlying the joint using a curved mosquito hemostat. Instruments are passed into the joint directly through the tissues. This technique has the advantages of allowing passage of larger instruments, removal of larger pieces of tissue, eliminating interference of the cannula during operative instrument manipulation, and eliminating the problem of the cannula being displaced by removal of instruments and tissues. The primary disadvantage of this technique is increased difficulty of instrument reinsertion through the operative portal. A combination of the two techniques has been employed using the one that best fits the current procedure or stage of the procedure.
Operative cannulas that have been used for small animal arthroscopy are 2.5 mm diameter for 2.0 mm instruments, 3.5 mm diameter for 2.8 mm instruments, 4.5 mm diameter for 3.5 mm instruments, and 5.5 mm diameter for 4.8 mm instruments. Cannulas come with sharp trocars or blunt obturators for insertion and are supplied with rubber gaskets to prevent fluid leakage when instruments are in place. If increased pressure in the joint is needed for a specific procedure, the gaskets are used. There are no valves or stopcocks in these cannulas,
Cannula diameter ( mm)Instrument size ( mm)Cannula part number (Karl Storz)Obturator part number (Karl Storz)
5.5
a64146 X 64146 XS/XT 4.5 3.5 a64169 X 64169 XS/XT
3.5 2.8 a64183 X 64183 XS/XT
2.5 2.0 a64302 X 64302 XS/XT a Shown in Figure A I 6.
so they do not hold fluid in the joint when an instrument is not in place. Gaskets increase the resistance of instrument insertion or removal and increase the tendency for cannulas to be removed when instruments are withdrawn.
Operative cannulas are positioned under observation with the arthroscope to prevent intra-articular damage.
1.2.2.3 Egress Cannulas
A site for outflow of fluid from joints is required. Fluid flow is necessary to maintain a clear visual field during arthroscopy, to provide joint distension, and for removal of debris created with operative procedures. Low outflow resistance achieved with an egress cannula will maintain adequate fluid flow without excessive pressure. Egress cannulas for small animal arthroscopy are 2.2, 3.2, and 4.5 mm in diameter (Figure 1.7 and Table 1.6). The larger two sizes have multiple side holes in the distal 1–2 cm of the cannula. This allows free access of fluid to the cannula and minimizes the possibility of occlusion. A Luer connector at the proximal or outside end of the cannula allows connection of an outflow line to direct fluid away from the operative field. The two larger sizes have a stopcock to control the rate of fluid egress. The two larger egress cannulas come with either a sharp trocar or a blunt obturator for inserting the cannula into the joint. Intra-articular tissue damage is minimized by observing cannula placement with the arthroscope.

1.7
for
animal arthroscopy from bottom to top: a 2.2 mm
without a stopcock, a 3.2 mm egress cannula with a stopcock, and a 4.5 mm egress cannula with a stopcock. The 3.2 mm cannula is shown with a blunt obturator, and the 4.5 cannula is shown with a sharp trocar. Source: Photo courtesy of KARL STORZ: © KARL STORZ SE & Co KG, Germany.
Table 1.6 Egress cannulas used for small animal arthroscopy.
Cannula diameter ( mm) Cannula part number (Karl Storz) Obturator part number (Karl Storz)
4.5 a64146 TT28146 TO/TS
3.2 a64146 T64146 QO/28146QB
2.2 a64146 R64146RO a Shown in Figure A I 7.
Placement of an egress cannula is difficult in some smaller joints because of inadequate space within the joint or inadequate room for portal placement sites. In these cases, and for simple diagnostic procedures in larger joints, a 20-gauge hypodermic needle is used for an egress site. Egress through operative portals is used in many joints for many operative procedures. This has the advantage of simplifying the procedure by eliminating the step of egress cannula placement. Another advantage of using operative portals for egress is that when egress is close to the operative site debris from the procedure flows directly out of the joint rather than through the joint to a distant egress portal. This decreases the potential for leaving operative debris in the joint.
1.2.3 Operative Hand Instruments
The number and variety of hand instruments available for arthroscopy are extensive, but fortunately very few hand instruments are needed to perform operative arthroscopy for most of the common conditions seen in small animals. A basic set of arthroscopic hand instrumentation (Table 1.7 and Figure 1.8a) includes 2.0, 2.5, 3.5, 4.0, and 5.0 mm arthroscopic rongeurs (Figure 1.8b); 2.3 and 3.5 mm arthroscopic grasping forceps (Figure 1.8c); 0°, 30°, and 70° microfracture chisels (Figure 1.8d); 0, 2–0, 3–0 and 4–0 straight curettes (Figure 1.8e); 3–0, 4–0, and 5–0 curved/angled curettes; 1 and 2 mm hook probes (Figure 1.8f); and changing rods or switching sticks (Figure 1.8g). Standard surgical instrumentation and supplies used for arthroscopy (Table 1.8) include curved mosquito hemostats with and without teeth; 20 gauge 1″ and 1.5″ hypodermic needles; 20 gauge 2.5″ or 3.5″spinal needles; no. 11 scalpel blades; 3 and 12 cc syringes; a 3-way stopcock; liter containers of saline or Ringers solution; IV administration sets; IV extension sets; pressure cuffs for fluid bags, and a set of standard orthopedic operative instruments. This set of instruments is adequate for performing OCD surgery in all joints, for coronoid process revision,
Figure
Egress cannulas
small
egress cannula


Figure 1.8 Operative hand instruments for small animal arthroscopy: (a) A set of small animal arthroscopy hand instruments that are sufficient for the majority of operative procedures being performed today. On the top row from left to right: 2.0 mm grasping forceps, 2.8 mm SilGrasp cartilage grasping forceps with straight spoon-shaped jaws, 2.8 mm SilGrasp straight Alligator grasping forceps, 3 mm SilGrasp straight Alligator grasping forceps, 3.5 mm Blakesley rongeurs, and 4.0 mm Blakesley rongeurs. On the bottom row from left to right: 30°, 0°, and 70° microfracture chisels; 0, 2–0, 3–0, and 4–0 curettes; 1.0 mm and 2.0 mm graduated probes; a 5–0 delicate curette, and two switching sticks or changing rods. Instrument details are presented in individual groups. (b) Rongeurs and grasping forceps from left to right, Blakesley 4.0 mm rongeurs, Blakesley 3.5 mm rongeurs, 2.8 mm SilGrasp cartilage grasping forceps with straight spoon-shaped jaws, and 2.0 mm grasping forceps with spoon-shaped jaws. (c) Grasping forceps from left to right: 2.8 mm SilGrasp alligator grasping forceps and 3.5 mm SilGrasp alligator grasping forceps. (d) Microfracture chisels from top to bottom: 0°, 30°, and 70°. (e) Straight curettes from left to right: 0, 2–0, 3–0, 4–0, and 2.3 mm straight curettes. (f) Graduated probes: a 2.0 mm graduated hook probe at the top and 1.0 mm graduated hook probe at the bottom. (g) Changing rods or switching sticks: a 2.8 mm diameter × 23 cm long changing rod on top and a 3.5 mm diameter × 23 cm long changing rod on the bottom. A 2.0 mm diameter × 15 cm changing rod is also available. Source: Photo courtesy of KARL STORZ: © KARL STORZ SE & Co KG, Germany.


1.8 (continued)
Figure
(e)
(f)
(g)
(d)
Table 1.7 Hand instruments used for small animal arthroscopy.
Instruments Part number (Karl Storz)
Hook probes
1.0 mm 28145SN
2.0 mm 64145S
Arthroscopic rongeurs
2.0 mm 64302 L
2.5 mm 634824
4.0 mm 456502
5.0 mm 64149 RL
SilGrasp alligator grasping forceps (Figure A I 8C)
2.8 mm 28572AG
3.5 mm 28571AG
Straight curettes
2-0 64620
3-0 64630
4-0 64640
5-0 Miltex 19-700
Curved curettes
3-0 Miltex 26-1737
4-0 Miltex 26-1738
5-0 Miltex 26-1739
Exchange rods or switching sticks
2.0 mm × 15 cm 64302 W
2.8 mm × 23 cm 64124 BZ
Micro fracture chisels
0° 64728 CF
30° 64728 CG
70° 64728 CH
Leipzig stifle retractor 64820 LSD
bicipital tendon transection, anconeal process removal, meniscal release, and bone chip removal. Additional hand instruments that are helpful include larger rongeurs and grasping forceps, open curettes, a selection of arthroscopic knives, and curved meniscal resection forceps. When starting arthroscopy where minimally invasive completion of procedures may not always occur, a set of standard operative instruments is needed including all those needed for completion of the surgical procedure should conversion to open arthrotomy be indicated.
Operative procedures in the stifle joint, especially meniscectomy, are greatly facilitated with stifle distrac-
Table 1.8 Additional supplies used for small animal arthroscopy
No. 11 scalpel blades
20 gauge 1″ and 1.5″ hypodermic needles
20 gauge 2.5″ or 3.0″ spinal needles
3 cc syringes
12 cc syringes
3-way stopcock
Liter containers of saline or Ringers solution
IV administration sets (Hespera life shield 12672-28)
IV extension sets (Hespera life shield 12656-28)
Pressure cuffs for fluid containers
Curved mosquito hemostats without teeth
Curved mosquito hemostats with teeth
A basic set of orthopedic surgery instruments
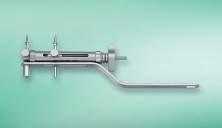
tion to open the joint space providing more room for instrument placement and tissue manipulation. The Leipzig stifle distractor (Figure 1.9 and Table 1.7) was designed specifically for this purpose. It is typically not needed for diagnostic examination of the stifle. Some minor surgical procedures in loose joints can be performed without the distractor, but its application is indicated for most operative procedures. It is attached to the distal femur and proximal tibia with fixation screws supplied with the distractor or bone pins can be used. This instrument provides for distal distraction of the tibia from the femur to open the joint space and cranial displacement of the tibial plateau to increase exposure of the menisci.
Source: Photo courtesy of KARL STORZ: © KARL STORZ SE & Co KG, Germany.
Figure 1.9 The Leipzig stifle distractor.
1.2.4 Power Instruments
1.2.4.1 Power Shavers
Power-operated shavers are a great asset to operative arthroscopy and are used to remove cartilage, bone, and soft tissues (Figure 1.10 and Table 1.9). These units greatly speed operative procedures, produce a better result with a smoother surface after tissue removal, and decrease the amount of debris left in joints. Shavers are not absolutely necessary for some of the basic operative procedures in small animals which can be performed effectively with hand instruments. Using a powered shaver when first learning to perform arthroscopy is not recommended because the potential for severe joint and instrument damage is greatly increased by putting power tools in the hands of the inexperienced operator. Extensive damage can be caused by a single rotation of the shaver when the blade is inappropriately placed. Any surgeon getting into arthroscopy needs to consider purchasing a power shaver at the time of acquiring initial instrumentation or as a planned addition. Complex procedures performed by experienced surgeons are greatly facilitated with a shaver and an appropriate selection of blades.

Figure 1.10 The Unidrive S III SCB
Table 1.9 Power instruments used for small animal arthroscopy.
Instrumentation
Power shaver
SE & Co KG, Germany.
Part number (Karl Storz)
Unidrive SL III Arthro(Console)287230 2
Drillcut-X Arthro(Handpiece) 28200 DX
Multifunction Handpiece 287210 36
Shaver blades(70 mm Length)
Aggressive cutter 3.5 mm 28206 ABS
Aggressive cutter 2.5 mm 28206 AAS
Full radius resector 3.5 mm 28206 CBS
Full radius resector 2.5 mm 28206 CAS
Aggressive full radius resector 3.5 mm28206 DBS
Aggressive full radius resector 2.5 mm28206 DAS
Small round burr 3.5 mm 28206 FBS
Small Round Burr 2.5 mm 28206 FAS
Two pedal foot switch 200168 31
Three pedal foot switch 200128 32
Bipolar radiofrequency
MITEK VAPR/VAPR VUE
Fluid pumps
Endomat select UP210
Vet software (must be specified or device does not function) UP609
Irrigation tubing set 031523-10
An example of damage caused by an inexperienced arthroscopic surgeon was in a training session with surgery residents at an academic institution. This was their first exposure to arthroscopy and the instrumentation was new. During this training session, the end of the telescope was ground off with the shaver destroying the instrument before it was ever placed in a patient. Caution is required in the use of power tools by all of us but particularly for beginners.
A series of small shavers originally designed for maxillofacial surgery was initially applied for small animal arthroscopy. These shaver handles were much smaller than available human “small joint” shavers and their size was much more suitable for small animal arthroscopy. Small joint shaver handles have evolved into more suitable instruments for our use. These small handpieces have less torque than the standard larger handpieces which has been a complaint from some surgeons, but this lower torque is actually an advantage in the small spaces where we work. The newest small handpiece, the Drillcut-DX ARTHRO shaver handpiece
Console with the multifunction orthopedic handpiece for orthopedic surgery and the Drillcut-X Arthro handpiece for arthroscopy. Both of these handpieces are appropriate for use in small animal practice. Source: Photo courtesy of KARL STORZ: © KARL STORZ
(Figure 1.11) is smaller and lighter with improved ergonomics, with a maximum speed of 8000 rpm, more torque, and an easier to clean design. Larger handpieces have greater maximum speeds of up to 15 000 rpm and are more difficult to use in our small joints. They also have significantly more torque which is a disadvantage as the blade can catch sending the shaver across the joint potentially causing damage to the joint or telescope.
A wide variety of blade types and sizes are available for the Drillcut-DX ARTHRO shaver handpiece for different applications. Shaver blades include burrs (2.5–6.5 mm diameter and 70–180 mm long) for removing bone and cartilage, aggressive cutters, and full radius aggressive cutters (2.5–5.5 mm diameter and 70–180 mm long) for removing soft tissue and cartilage, and full radius resectors with smooth cutting edges (2.5–5.5 mm diameter and 70–180 mm long) for removing soft tissue. These shaver blades come in reusable and disposable versions. Reusable versions are not recommended as they become dull too fast, break too easily, and are far more expensive than disposable blades. Disposable versions are recommended because they are less expensive, are still reusable several times, and can be autoclaved. Lengths of 70, 120, and 180 mm are available with some types in curved versions. A limited selection of 70 mm long shaver blades is available in 2.5 and 3.5 mm diameters (Figure 1.12). These short small diameter blades are ideal for the small size of the joints encountered in our patients. The longer blades can be used with the Drillcut-DX ARTHRO handpiece with much wider selection types but are more cumbersome to use. Shaver blades are cannulated so that debris from the cutting process is aspirated out through the blade as shaving is performed. Suction is used with shavers to facilitate debris removal and to pull soft tissues into the blade to enhance the soft tissue cutting process. Larger sized blades speed soft tissue removal in procedures such as cruciate ligament debridement but are more difficult to use in small joints. Smaller blades are easier to use, are needed to access small joint spaces such as for meniscus debridement, but remove tissue more slowly, and are more susceptible to occlusion with tissue debris.


1.12 Single-use shaver blade types commonly used in small animal arthroscopy: The blades shown here are those available in 70 mm length, 2.5 mm and 3.5 mm diameters, which are ideal for use in the small joints of our patients. (a) A full radius resector with smooth blades on both cutting surfaces. (b) An aggressive full radius resector with a serrated blade on the inner cutting surface and a smooth blade on the outer cutting surface. (c) An aggressive cutter with both blades serrated. (d) A round burr. Source: Photo courtesy of KARL STORZ: © KARL STORZ SE & Co KG, Germany.
A selection of blade sizes and types is recommended to maximize shaver function.
The shaver control unit has the capability to drive all the arthroscopy shaver units, from 6000 to 15 000 rpm, and also to power a multifunction handpiece for open orthopedic surgery applications. The console has a large multicolor touchscreen providing easy determination of instrument settings, intuitive instrument management for changing speeds or rotation direction, and allows changing settings from hand switch to foot switch control.
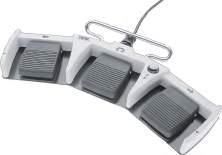
With the small size of the joints that we operate, foot switch control is recommended. Using a foot switch rather than hand controls on the handpiece allows the shaver to be started and stopped without changing grip position on the handpiece. Having to change hand or finger position is difficult to do without moving the handpiece or especially the tip of the shaver blade. Inadvertent movement of the shaver tip by only a few millimeters or a few degrees rotation can cause damage to the tissues or to the arthroscope. Foot switches are available in three-pedal (Figure 1.13a) and two-pedal
Figure 1.11 The Drillcut-X ARTHRO shaver handpiece.
Source: Photo courtesy of KARL STORZ: © KARL STORZ SE & Co KG, Germany. (a) (b) (c)
Figure
Figure 1.13 Foot switches for use with the shaver system. (a) The three pedal shaver foot switch. The left pedal is for unidirectional rotation to the left (counterclockwise), the right pedal is for unidirectional rotation to the right (clockwise), and the center pedal is for oscillating rotation. (b) The two pedal shaver foot switch. The left pedal is for unidirectional rotation to the left (counterclockwise), and the right pedal is for unidirectional rotation to the right (clockwise). To achieve oscillating rotation, both pedals are depressed. Source: Photo courtesy of KARL STORZ: © KARL STORZ SE & Co KG, Germany.
versions (Figure 1.13b). The three-pedal system is larger but is easier to use because each pedal has one function with the left pedal running the shaver in one direction, the right pedal running the shaver in the other direction, and the center pedal activating the oscillating rotation function. With the two pedals system, each direction of rotation is controlled by depressing one of the foot pedals but to achieve oscillating rotation both pedals need to be depressed at the same time making control of this function more difficult.
Another issue with power shavers is balancing liquid inflow and outflow. Inflow is controlled with
gravity, pressure cuffs on fluid bags, or with a mechanical arthroscopy pump. Outflow is controlled with the level of suction applied to the system and with a lever on the shaver handpiece. The shaver blades are hollow and are designed to have suction applied so that fluid is aspirated through the blade and handpiece to remove bony debris from the joint. With soft tissues in the joint suction through the shaver, in addition to removing debris, also functions to pull tissue into the shaver blade facilitating cutting and removal. Too little flow allows shaver produced bone fragments to accumulate in the joint (Video 1.2) interfering with the visual field and increasing debris that can be left in the joint. Too much suction pulls air into the joint that can interfere with the visual field (Video 1.3). When inflow and suction are balanced neither occurs and shaver function is optimized (Video 1.4). Many cases proceed with little problem, but others require constant adjustment.
1.2.4.2 Radiofrequency/Electrocautery
Instrumentation
Monopolar or bipolar radio-frequency instrumentation is used to cut tissue, cauterize bleeding vessels, and for removal of tissue by vaporization. The most common use of radio-frequency is for ablation of the fat pad and villus synovial reaction to improve visualization in the cruciate compromised stifle joint, for cranial cruciate ligament debridement or removal, for medial meniscal release by transection of the caudal meniscotibial ligament, and for partial or complete meniscectomy. Radiofrequency was used in the shoulder joint for thermal modification of medial soft tissue structures, but this application has fallen into disfavor and is no longer recommended. Radiofrequency is also used for transection of the bicipital tendon when indicated. Ablation of villus synovial proliferation with radiofrequency is beneficial in any joint to improve the visual field by removal of excessive synovial tissue.
Specific instrumentation designed for arthroscopy is available in bipolar configuration (Figure 1.14 and Table 1.9). Multiple handpiece tip configurations and sizes are available to facilitate access to structures within joints and for different tissue effects (Figure 1.15). The power settings of these units are automatically set for the handpiece employed but are also manually adjustable for different applications. The original arthroscopy specific bipolar radio-frequency unit is still in use but is no longer supported. Evolution of this system through several generations has occurred with significant improvements including better heat management and integrated suction (Figure 1.16).
(a)
(b)