Lighting for digital video and television fourth edition john jackman all chapter instant download
Lighting for digital video and television Fourth Edition John Jackman
Visit to download the full and correct content document: https://ebookmass.com/product/lighting-for-digital-video-and-television-fourth-edition-j ohn-jackman/
More products digital (pdf, epub, mobi) instant download maybe you interests ...
Digital Compositing for Film and Video: Production Workflows and Techniques 4th Edition, (Ebook PDF)
Television Production in Transition: Independence, Scale, Sustainability and the Digital Challenge (Palgrave Global Media Policy and Business) 1st ed. 2021 Edition Gillian Doyle
This book gives a comprehensive overview of lighting equipment and techniques for digital production. Suitable for either beginners or more advanced users, the fully updated fourth edition covers human sight vs. film or video, the basic issues of contrast and exposure, with explanation of how exposure of digital video differs from analog video or film, electrical connectors, requirements, electrical load management, safety issues, and the latest LED systems.
A variety of basic lighting setups for different situations are explained, with clear diagrams and photos showing the “look” of each approach. Techniques for shooting in available light and dealing with color problems in mixed lighting situations is examined. More advanced film-style lighting is covered, especially techniques in creating a convincing realistic look. A special section deals with solutions to common problems, ranging from reflections on glasses and dealing with white walls, to lighting very lightskinned and very dark-skinned subjects in the same shot. Special lighting situations, such as lighting night scenes or bluescreen sets, are covered in detail, with studio lighting covered in a dedicated separate chapter. The book is also peppered with anecdotes and trivia about lighting techniques and the lighting trade.
It is the ideal text for both beginners studying lighting and cinematography, as well as more advanced practitioners.
John Jackman is an author and filmmaker who has been involved in dramatic and video production since the mid-1970s. He has produced several feature films and documentaries and has contributed to numerous industry magazines.
Lighting for Digital Video and Television
Fourth Edition
John Jackman
Fourth edition published 2020 by Routledge
52 Vanderbilt Avenue, New York, NY 10017
and by Routledge
2 Park Square, Milton Park, Abingdon, Oxon, OX14 4RN
The right of John Jackman to be identifed as author of this work has been asserted by him in accordance with sections 77 and 78 of the Copyright, Designs and Patents Act 1988.
All rights reserved. No part of this book may be reprinted or reproduced or utilized in any form or by any electronic, mechanical, or other means, now known or hereafter invented, including photocopying and recording, or in any information storage or retrieval system, without permission in writing from the publishers.
Trademark notice: Product or corporate names may be trademarks or registered trademarks, and are used only for identifcation and explanation without intent to infringe.
First edition published 2004
Third edition published by Focal Press 2010
Library of Congress Cataloging-in-Publication Data
Names: Jackman, John, 1957- author.
Title: Lighting for digital video and television / John Jackman.
Description: Fourth edition. | London ; New York : Routledge, 2020. | Includes index.
Identifers: LCCN 2019046131 (print) | LCCN 2019046132 (ebook) | ISBN 9781138937963 (hardback) | ISBN 9781138937956 (paperback) | ISBN 9781315676005 (ebook)
Subjects: LCSH: Video recording—Lighting. | Digital video—Lighting. | Television—Lighting.
LC record available at https://lccn.loc.gov/2019046131
LC ebook record available at https://lccn.loc.gov/2019046132
ISBN: 978-1-138-93796-3 (hbk)
ISBN: 978-1-138-93795-6 (pbk)
ISBN: 978-1-315-67600-5 (ebk)
Typeset in ITC Stone Serif by Apex CoVantage, LLC
Acknowledgements viii
Introduction ix
Chapter 1 Why Is Lighting Important for Television and Video? 1
Exposure and Contrast 3
Beyond Basic Exposure 6
Chapter 2 Human Vision, the Camera, and Exposure 12
What You See 12
What the Audience Sees 14
Fitting in the Window 19
So What Happens If We Don’t? 20
Inside the Legal Video Signal 21
Proper Exposure 30
Controlling Contrast 35
Controlling Color 41
The Kelvin Scale 41
Chapter 3 Volts, Amps, and Watts 45
Standard Connectors 52
Power Tie-Ins and Contractor Connections 57
Electrical Safety 57
Chapter 4 Lighting Instruments 60
Open-Faced Instruments 60
Lensed Instruments 64
Fluorescent Instruments 68
HMI Instruments 73
Ceramic Discharge Metal Halide 75
Plasma 76
Soft Lights 76
Specialty Instruments 80
LED Instruments 83
LED = Battery Power! 84
Cookies and Snack Boxes Aren’t for Lunch 86
Chapter 5 Lighting Controls and Uses
Gels 87
Diffusion 93
Chapter 6 Basic Lighting Techniques
A Sense of Depth 102
Basic Lighting Setups 107
Lighting Jiu-Jitsu, or the Art of the Reflector 113
Using a Kicker for Modeling 114
Using Soft Lights 115 Hard or Soft? 117
Chapter 7 Interview Setups
Basic Three-Point Interview Setup 120 Hard or Soft? 125
Simplifying the Soft Look 128 But Wait, There’s More! 131
Chapter 8 Solving Common Problems
Hot Spots: Film Folks, Be Vigilant! 132
Eyeglasses 134
Practicals and Light Sources in Frame 138
Lighting Dark Complexions 140
Too Much Light in All the Wrong Places! 144
Different Color Temperatures in the Scene 146
Chapter 9 Studio Lighting
Power System and Grid 153
Fluorescent Instruments 159
LED Lighting 160
Designing a Lighting Plan With Flos or LEDs 161
Flat Lighting 162
Chapter 10 Advanced Lighting Setups
Establishing Mood 178
Lighting Darkness: Interiors 179
Lighting Darkness: Exteriors 183
Daytime Exterior Contrast Management 191
Light Surgery 194
Chapter 11 Lighting Low-Budget Locations 197
Make Location Lemonade 198
Low-Budget Lighting Principles 199
Low-Budget Lighting Process 200
Using Light and Improvised Cheap Lighting 209
Chapter 12 Specialized Lighting 211
Product Shots 211
Food Shots 215
Lightning and Fire 218
Automobile Interiors 222
Blue- and Greenscreen 225
Church and Wedding Lighting 233
Live Theatre Taping 238
Chapter 13 Imagination and Invention
appendix 1 Using a Light Meter for Video
252
Acknowledgements
Dedicated to my amazing wife Debbie, who has had to listen to me criticize the lighting of movies and television for donkey’s years, and without whose help and support my production work – and this book – would not have been possible. And to my kids, Andrew and Abby – and “extra daughter” Laurel Clabaugh – who have put up with being involuntary subjects more often than they wanted. Special thanks also to my technical editor, DP Arledge Armenaki, who helped make sure that even the most technical stuff was both correct and understandable. Similar thanks to DP Richard Clabaugh, a friend who is always interested in talking “shop,” and who always has a good idea to make the show better! Special thanks also to Nic Morris, BSC, who helped us make sure that we included European and British terminology instead of only American slang. And a special tip of the hat to the late Bob Collins, SOC, who was going to be our original technical editor. You are much missed, Bob!
Introduction
Over the years, I have participated in or moderated a number of Internet forums related to video production, and often field questions about lighting issues. After a thread where several of us explained to a beginner why he needed to light his videos, one wag posted:
“Remember, without lighting all you have is a black picture.”
Facetious, tongue-in-cheek, but true! The most common mistake beginning video shooters do is to overlook the importance of good lighting.
I’ve always been interested in lighting. In my earlier days it was theatrical lighting; I just loved playing with the light boards (built one myself) and figuring out dramatic lighting effects. Then I became interested in video production. That was back in the days of the Sony PortaPak®, the genesis of “guerilla video,” however, and we didn’t do no stinkin’ lighting. Pointand-shoot was pretty much all we did outside of the studio. The PortaPaks® ran ½" reel-to-reel tape, black and white only, about 150 lines of resolution on a good day. The tape deck was about the size of a mini-tower computer today, with a shoulder strap and batteries that seemed to last about ten minutes. Then along came ¾" U-Matic® and then ¾" SP. And then came the day when a great program I had done was rejected for network broadcast because of poor lighting in some critical interview scenes.
I got back “into” lighting with a vengeance. My earlier fascination with theatrical lighting effects was reawakened, and I started to experiment. When the first 3D programs came out (anyone remember DKBTrace, the original Caligari, and Turbo Silver?), everyone else was playing with reflective surfaces –but I was playing with the lights! I’ve been playing with lights ever since.
Once you discover the difference great lighting can make, you’ll be playing along with me!
John
Jackman Lewisville, NC Summer, 2019
CHAPTER 1
Why Is Lighting Important for Television and Video?
If you’re fairly new to television, video, and digital movie production, you may not really have a sense of why lighting is so important. After all, today’s cameras are so light sensitive you can often get away without any additional lighting. The only thing you don’t understand is why sometimes your shots are overexposed or contrasty; and you may not be able to figure out why one shot will look like a Hollywood film and the next will look like a really bad YouTube video.
If, on the other hand, you’re more experienced in television and event video production, you may understand a lot about the basic issues of controlling contrast and exposure – but would find it challenging to light a realistic night scene or simulate natural lighting in a living room for a dramatic movie. These situations are very different from flat studio lighting and a classic three-point interview setup.
Whether you’re a rank beginner with a video camera or a moderately experienced video user who wants to get into the more advanced world of dramatic moviemaking, I hope this book will prove to be a helpful guide to understanding lighting and how it contributes to effective image making.
The real key to fine lighting is not only to simulate reality, but to communicate the proper mood and feeling to the viewer. You need to know more than just basic techniques or tricks, it’s best to have an understanding of how certain looks will communicate to your viewers. You need to develop an artist’s eye for light and shadow and color, and the techniques for reproducing them. Ultimately, great lighting is an ongoing learning experience that can graduate from craft and technique to the realm of art.
In this book, we’re going to travel through the world of television, video, and digital movie lighting in a fairly methodical way, so that you build an understanding of the “why” behind the “how to.” If you’ll come along for the journey (rather than cheating and just flipping through to
Like a magician, we’re trying to convince the viewer of something that isn’t quite true.
find a setup diagram or two), by the time we’re finished you’ll understand the principles behind the techniques. At that point, you’ll be able to improvise, to create new techniques for unique situations, rather than having to fall back on some textbook diagrams; and it means you’ll be able to do a better job at any lighting scenario.
Why is lighting so important to great video? There are a number of different reasons, some of which have to do with the camera itself and the way the imaging system translates light into an electrical signal, and some of which have to do with the fundamentals of human perception. But just as important is the fact that we’re creating an illusion. Like a magician, we’re trying to convince the viewer of something that isn’t quite true. We’re trying to make it seem as if colored plasma flickering across a flat glass screen are actually lions and tigers and bears and people, the great outdoors, the grandeur of space, and the depths of the sea. We’re trying to create the illusion of depth and size in a tiny flat plane. And, even more difficult, we’re not really trying to capture what the eye sees. We’re trying to capture the mind’s interpretation of what the eye sees, which can be a wholly different thing. But more on that later!
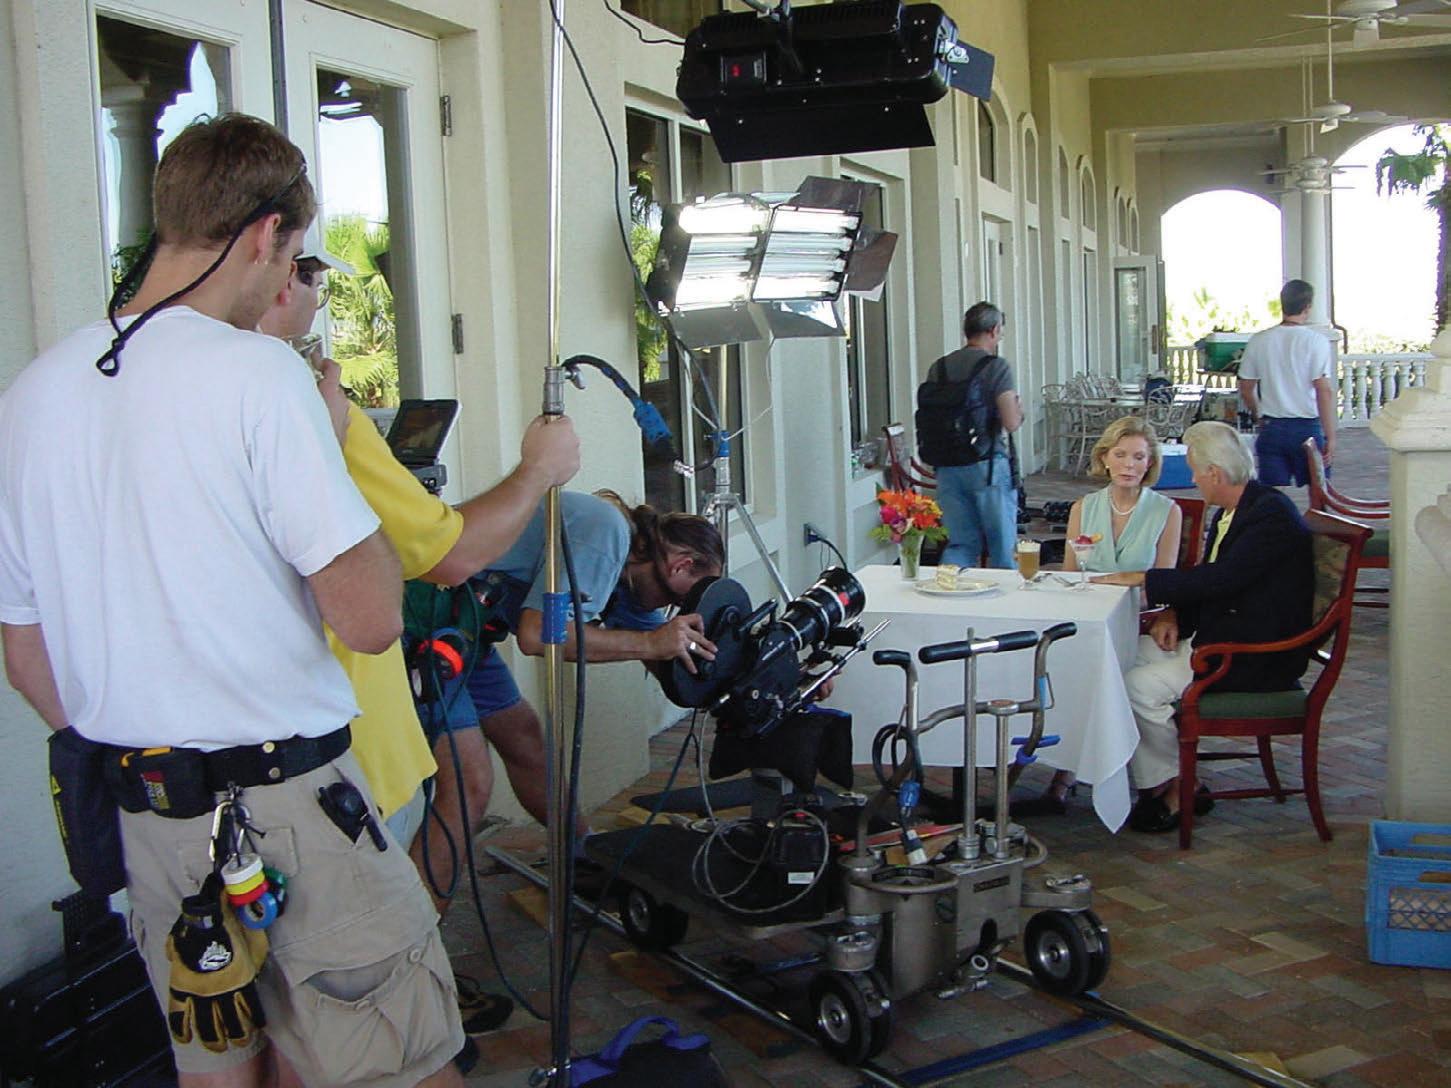
Figure 1.1 Owen Stephens, Society of Operating Cameramen (SOC), lights an intimate lunch in Naples, Florida, with his Pampa portable fluorescent instruments.
Good lighting is important for quality video in three different ways:
• First, you have to have proper exposure, enough light to generate a signal from the imaging device and raise the signal to a proper level, but not exceed the limits.
• Second, you have to create the illusion of depth through use of highlights and shadows so that they viewer forgets they are watching a 50" × 29" rectangle of glass with LED illumination behind it.
• Third, you have to use tricks and illusions to create mood and feeling with the lighting, just as the music director will create mood and feeling with the music.
exposure and Contrast
The most obvious way in which lighting is important for video is in basic exposure. Like the wag said, “without lighting all you have is a black picture!” You have to have enough light on your subject to excite the electrons in the camera’s imaging chips to a certain level. It doesn’t matter that you can see it – if the camera can’t see it, your video is toast. You’d think this would be obvious, but it’s amazing how many people will try to create a night scene by just shooting in the dark.
1.2 The Sony VX-1000 revolutionized digital moviemaking, but had very poor low-light characteristics.
Figure
This is probably one of the most common “postmortems” that I do, when folks bring me their video and ask what went wrong. One producer of an independent short brought me some raw camera footage to review of a scene they had shot out in a field at night with a Sony VX-1000 (the first popular DV camcorder – and one that was notorious for its poor low-light performance). They had (almost) all the right equipment, but really had no idea how to use it, and the result was dreadful. They’d shot in a field with no easily available power, so they brought a small generator and several lights. Unfortunately, they didn’t bring enough “stingers” (extension cords), so when they got the generator far away enough to not interfere with the audio, they couldn’t get the lights very close to the subjects. Then, rather than concentrating the light all on one side (which might have just barely worked), they distributed them around to create a flood of weak, flat lighting. Then they turned on the AUTO EXPOSURE control on the VX-1000 – a true beginner’s mistake. Since the VX-1000 was very poor at low-light situations to begin with, the AUTO circuits kicked in full gain to try and make the scene look like a fully lit room, rather than a dark night scene. With the gain all the way up to +18 db, the result was a flat, grainy picture that looked like surveillance video. The one thing it didn’t look like was a night scene. “What can we do?” wailed the producer, who had now wasted a whole day on this scene.
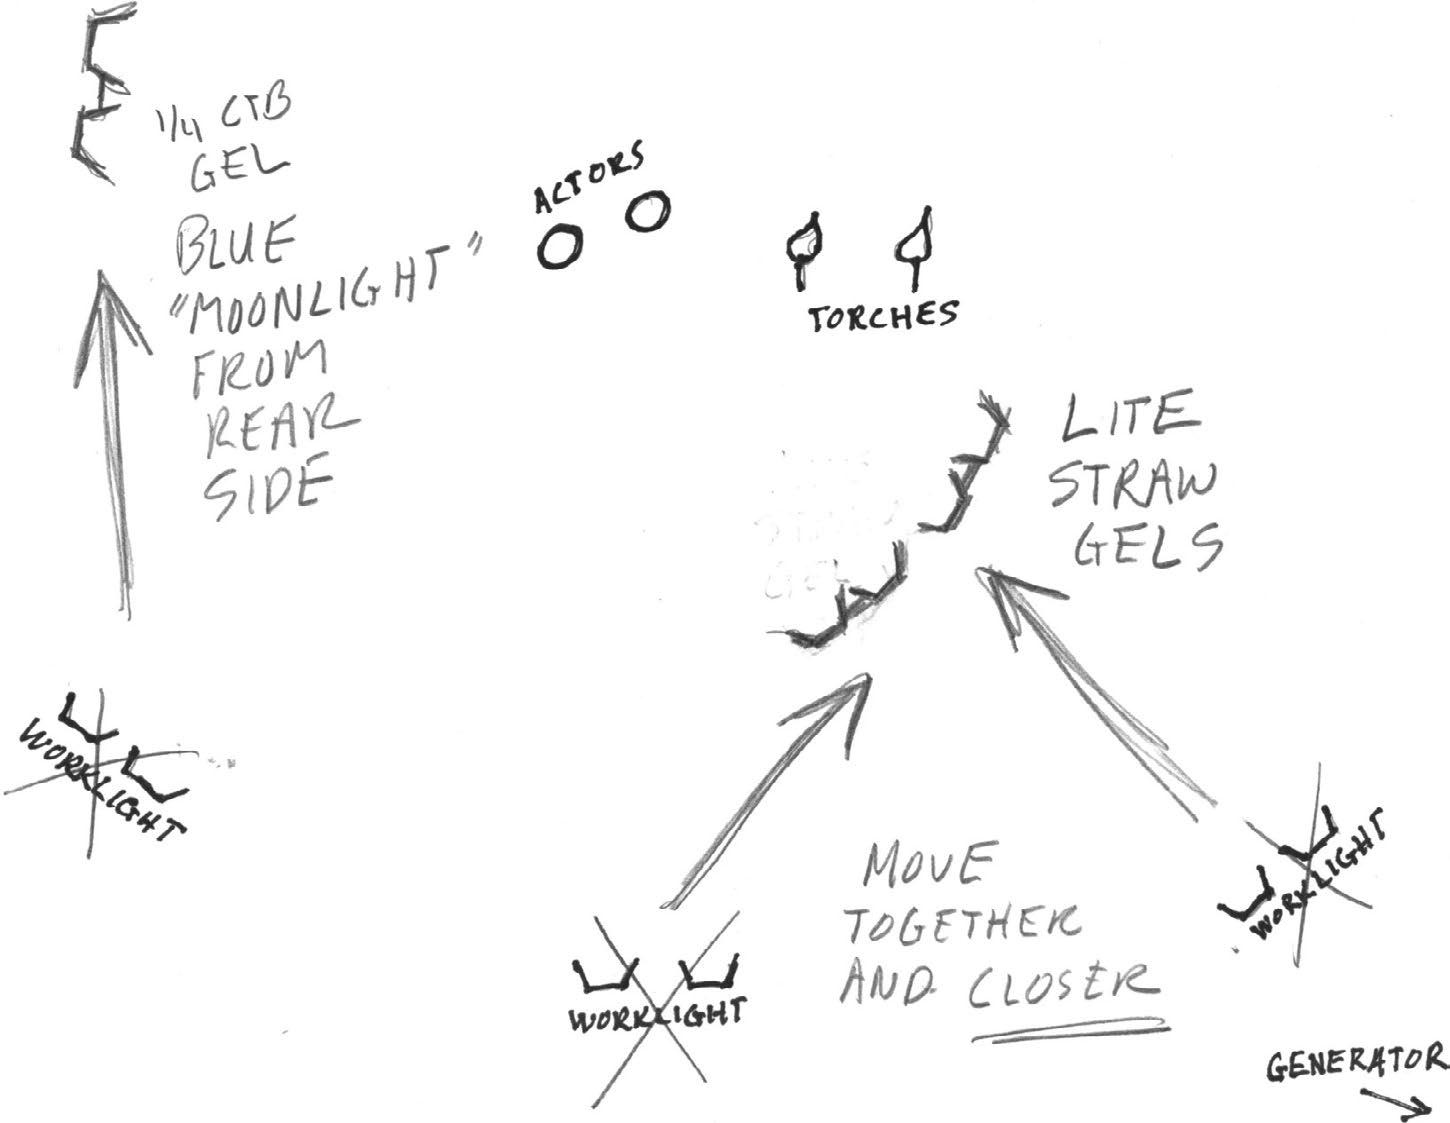
Figure 1.3 Lighting diagram for the VX1000 night shoot.
I drew a diagram, using the same lights they had used but lots more stingers to bring the lights closer to the subjects. I put most of the lights in a group on one side with quarter-blue gels. I used one ungelled light as a kicker from the rear on the other side, leaving the camera side unlit. Then I showed their young shooter how to expose manually. The results were pretty good, giving a feeling of a moonlit night. I think they even gave me a credit in the roll!
But just as you must have enough light, too much light or too much contrast can be a problem as well. If a backlight is too intense compared to the key, the highlights will be “hot” – over the electronic definition for full white – and may “clip” so there is no detail in that area of picture. If the camera operator stops down to expose for the backlight, then the rest of the subject will be underexposed and the picture will seem too contrasty.
Overexposing causes worse problems than underexposure, because sometimes the result can’t be repaired. There’s a local station where I live (whose call letters shall remain anonymous) where nearly all the location news footage is grossly overexposed. I don’t mean a little bit, I mean grossly. Large portions of the picture are clipped white, the dark areas are medium gray. When they interview a person of color, it’s not uncommon for the person to look almost Caucasian. When they interview a Caucasian, the face is a white blob with little detail. The studio (though I don’t like the lighting
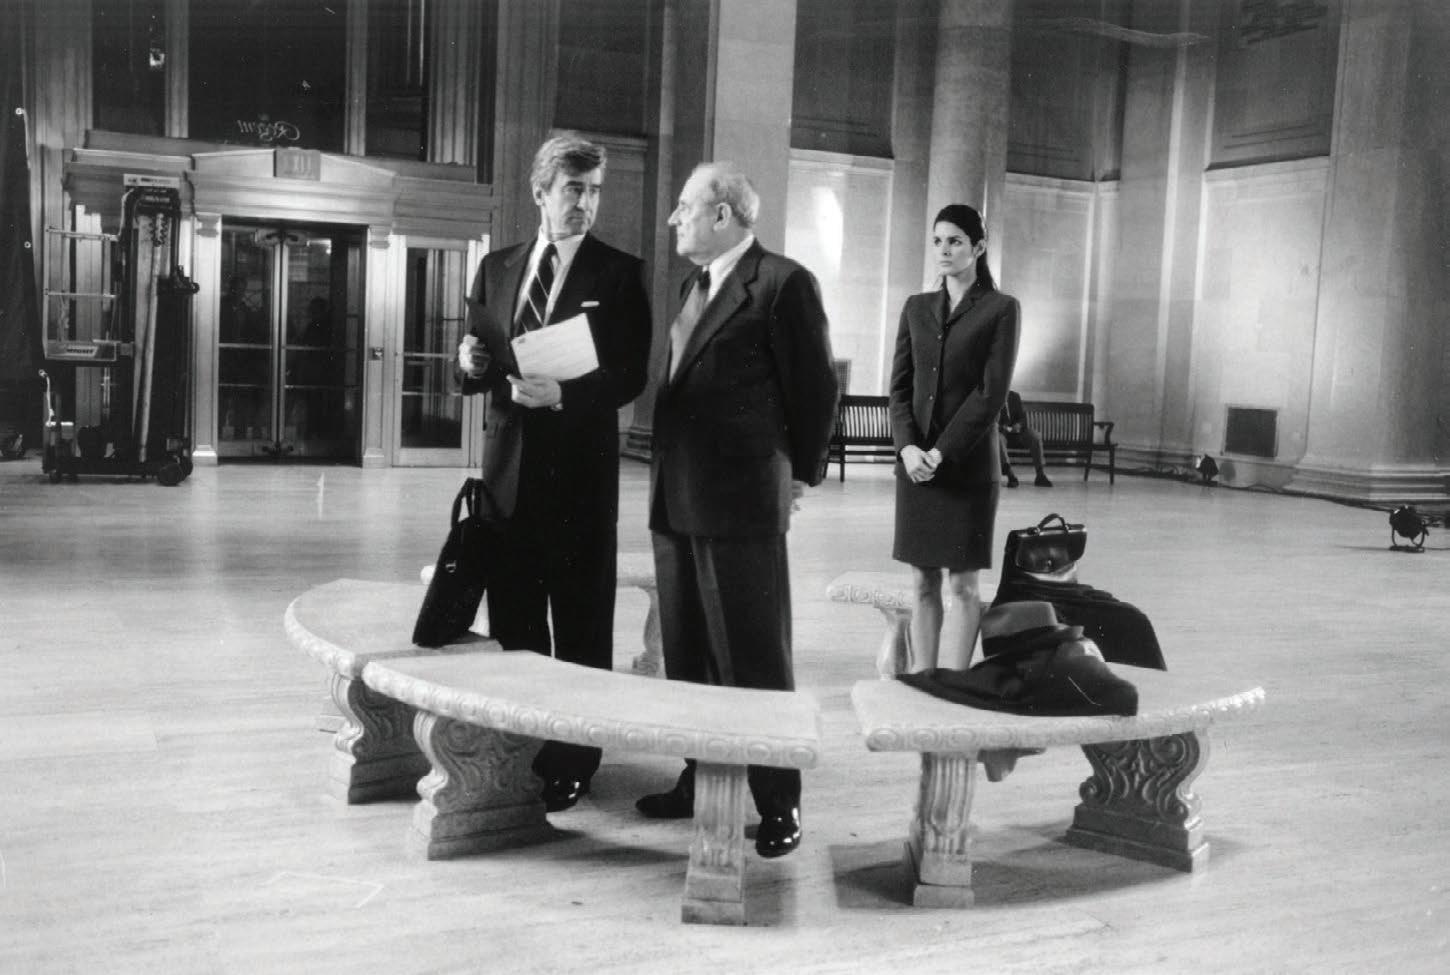
Figure 1.4 Sam Waterston, Steven Hill, and Angie Harmon in the original Law and Order series, which ran from 1990 to 2010. This show set new standards for filmic-style lighting in a television series. Photo courtesy of Jessica Burstein.
esthetically) is at least properly exposed, accentuating the difference in the location footage.
But once you have a basic level of exposure, what do you do with it? It’s fairly easy to blast several thousand watts on a scene so that it gets the electrons in the camera hopping, and then stop down until the viewfinder’s zebra indicator goes away and you’re not overexposed. But it’s much harder to find the nuances that will really convince the viewer’s eye and mind of texture, of feeling, of mood. This is where the acceptable gets separated from the great.
Beyond BasiC exposure
Great lighting begins with the creation of an illusion of depth. Keep in mind that no matter how much television is a part of our lives, the TV screen is still just a flat piece of glass with flickering colored lights. Though it has height and width, a television screen is fundamentally two-dimensional: it has no depth. No amount of great acting or wonderful music will create that illusion of the third dimension; it’s entirely up to the lighting designer to create the feeling of depth. This is done through careful crafting of highlights and shadows, the visual cues that the brain uses to interpret depth. In fine art, the use of light and shadow to create a sense of depth is known as
Figure 1.5 This chiaroscuro woodcut of The Virgin and Child by Bartolomeo Coriolano, created between 1630 and 1655, uses light and dark lines to create the impression of dimension.
chiaroscuro. Together with the refinement of perspective, it is an essential element of great Renaissance art.
Most local news studios, talk shows, and soap opera sets are flat lit with loads of light and almost complete elimination of shadows. This is done for convenience and economy. The result is a very flat, two-dimensional feeling. The eye doesn’t find the cues that help the brain interpret depth, so it’s hard to figure out how deep the set is and how far the anchors (or actors) are from one another. We’re used to the look from seeing the evening news regularly, so it doesn’t bother us, but boy does it telegraph “LOCAL NEWS” to the viewer. Use that lighting scheme for a drama, and it just won’t work.
Contrast this to the realistic lighting used in many TV dramas of the last three decades, which have moved further into filmic lighting that captures a sense of reality. Though earlier shows such as Hill Street Blues (1981–1987) broke new ground in camera work, the lighting was not much different from earlier television series. Dick Wolf’s Law and Order (1990–2010) or Aaron Sorkin’s West Wing (1999–2006) moved to much more filmic lighting. These shows make very heavy use of light and shadow, often lighting closeup subjects heavily from one side with a large, diffused lighting source, and leaving the other side in near darkness. The standards for television drama lighting have increased dramatically in recent years. Shows such as Breaking Bad (2008–2013) often use very dark interior scenes with extremely
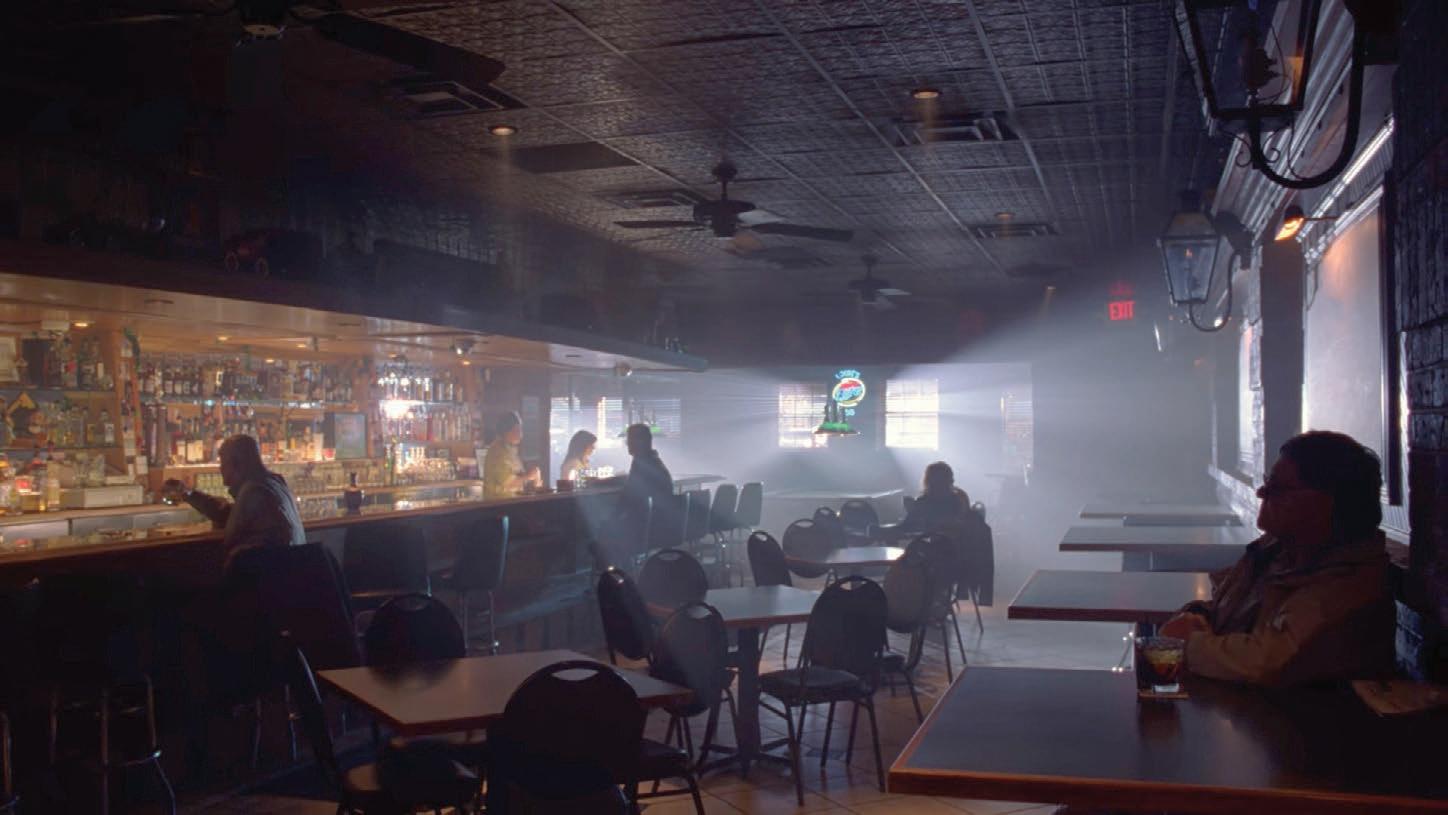
Figure 1.6 This scene from Breaking Bad (2008–2013) shows the very dark interior lighting used on the show, which conveys the series’ stark and dark feeling. Here fog is used in the scene to make light rays visible and give them substance. Michael Slovis was the cinematographer.
limited key light, a style which would never have been used in earlier television series – and perhaps not even in most theatrical films. Despite intense production schedules, the production teams on these shows work hard on their lighting to convey the feeling of depth and dimension. Light patterns on walls, mixed color temperatures, shadows, the use of fog on set to give shape to light, all create a feeling of the depth of the scene – but also clearly cue the viewer as to an off-screen light source that is appropriate to the set.
While some of these shows write new rules for lighting, most films and dramatic programs borrow heavily from what I call Hollywood visual vernacular, the peculiar set of visual cheats and shortcuts that have developed over the last hundred years of filmmaking. Vernacular, of course just refers to “common language.” These tricks are part and parcel of the common visual language of movies. Many of these aren’t very realistic at all, but are a type of visual shorthand that we have been indoctrinated to by years of watching Hollywood films. It’s important to have a sense of these cheats and what they are associated with in the minds of viewers. Why? Because they work. They are much like the tried-and-true cheats of the theatre, techniques that work, that the audiences are used to and accept without question.
In the live theatre, there’s an expression that’s quite important: “suspension of disbelief.” The phrase, which originates with Coleridge(he was talking about poetry), has come to mean the state where the audience is fully engaged in the illusion of the drama.* In practice, it is a balance where the actors, director, and crew use techniques and conventions to create a certain semblance of reality – and then the audience meets them halfway by “suspending disbelief” in the patent fakery. It’s a delicate balance, easily broken; the audience will only go so far. If an actor drops out of character, or does something utterly incongruent, the spell will be broken. The audience’s attention will be focused on the fact that this is an actor pretending to be Romeo, not Romeo himself. If the tech crew makes a gross mistake (the phone rings long after it has been answered or the gunshot sounds before the policeman has gotten the pistol out of his holster) so too the spell will be broken. The audience will go so far, but no farther.
But those tried-and-true “cheats” that I mentioned above are, in a way, a part of the unconscious contract between audience and play actors. They are a set of conventions everyone accepts more or less willingly, cheats that the audience will accept, obvious artifices that still will not break the all-important suspension of disbelief. That’s what the Hollywood visual vernacular is about – artificial devices that work without interrupting or unduly jostling the audience’s suspension of disbelief.
* Samuel Taylor Coleridge, Biographia Literaria (1817), Chapter 14.
A great example of “stock” Hollywood vernacular lighting occurs in one of Elvis’s films, G.I. Blues (1960). It’s a scene where he sings a lullaby to Marla’s baby. This room was lit pretty much in Hollywood formula fashion, effective, but certainly not breaking any new ground in lighting design. The bed and Elvis are intensely lit with thousands of watts of studio lights, while the rest of the bedroom is broken into a pattern with several blue-gelled lights with cookies. I think I even recognize the pattern of the standard Mole-Richardson cookie! This broken pattern of blue light on the walls is Hollywood code for “this is nighttime.” The light level in the room is actually quite excessive for what the scene portrays, and it really doesn’t actually look like any dimly lit real bedroom I’ve ever seen. But, with the exception of DPs, lighting designers, and gaffers, no one notices! Most viewers accept the scene without question, their “suspension of disbelief” fully engaged.
As unrealistic as some of these tricks are, they are effective. The viewer will watch the scene and accept the effect and the mood without question. While it may be exciting to rewrite the rule book and create new techniques that speak to the viewer, let’s face it: it’s not always going to work. Sometimes it will; other times, it will flop or call such self-conscious attention to itself that it disrupts the viewer’s involvement in the story. But, even more to the point, most of the time you don’t have the luxuries of either time or
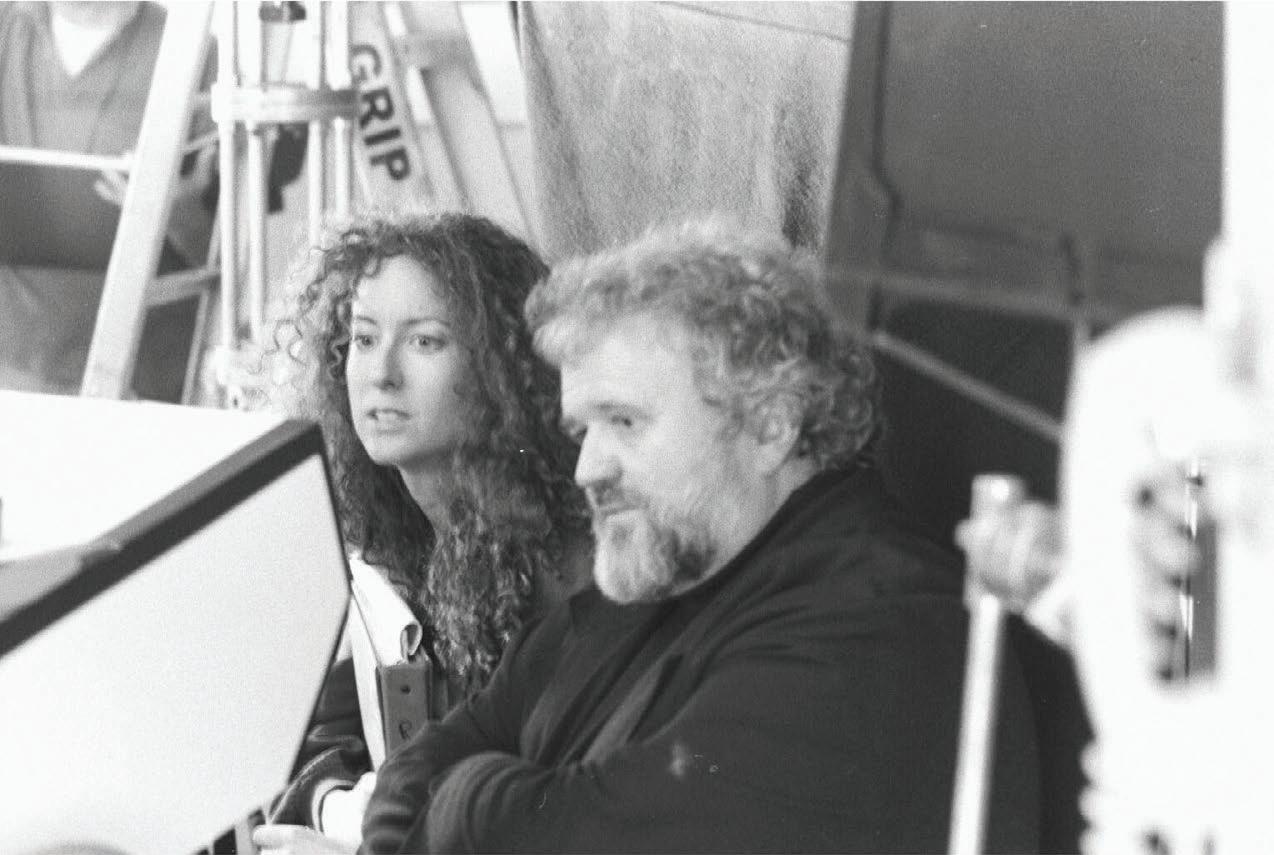
Figure 1.7 Filmmaker Elyse Couvillion and DP Allen Daviau ASC used light to help convey storyline to the viewer in the independent short Sweet. Photo courtesy of Bruce Coughran.
budget to mess around and experiment. It’s often more effective (and realistic) to simply use the old rule book to convey the right effect.
The real key here is to communicate the proper mood and feeling to the viewer. I’m always a bit bothered by the folks who seem to feel that filmmaking is some kind of personal experience that they are allowing the audience witness. As far as I’m concerned, the art is in creating an experience that communicates to the viewer. If you fail to connect to the viewer, if you are so completely about your own experience or vision that you don’t consciously accommodate the perceptions of the viewer, your art will likely flop. Lighting that calls attention to itself, that sets the wrong mood, or focuses the eye on the wrong part of the picture is lighting that has failed. It’s like a soundtrack that uses obviously artificial sound effects, or an actor that makes the viewer turn to their neighbor and say, “What wonderful acting!” Truly wonderful acting immerses the viewer so much in the character and the story that the viewer would never think to make such a comment.
Whether you use a hackneyed Hollywood trick to create that mood or come up with a new and creative technique of your own, the important point is to create an illusion that will fool the eye – or rather the mind – of the viewer. Great lighting, like great music, will reinforce the emotional or psychological impact of what is happening onscreen.
Suppose for a minute a scene of tension in which the main character is hiding in a darkened room when suddenly the door slams open and a mysterious new player enters the scene. We don’t know who he is or what his intentions are; he might be an axe murderer or he might be the good guy. It could be effective to use a strong dramatic backlight, silhouetting the new player in the doorway. A bit of mist floating around makes the light beams visible, creating a sort of nimbus around the silhouetted figure. Tie this in with a dramatic chord in the background music, possibly a dolly forward, and you’ve got a great scene that will have the audience on edge.
Now imagine a very different scene: the first kiss of a teenage couple. Unsure of themselves, that spark has crossed like an electric shock between them as their eyes met; both move tentatively toward one another, hesitant, sensitive to any cue of withdrawal or rejection. Now apply the same lighting, the same music, the same dolly move. Yuck.
While I suppose that I can stretch my imagination to find a spikey, edgy storyline with tense characters where it might work, it’s really not too likely. You want soft lighting, you want the rest of the scene to fade away a bit to convey the way that the young lovers’ attention has collapsed in until only the two of them exist.
Now, these may seem to be extreme examples, and in fact they are. The extreme example is there to make a point. You need to decide what feeling you are trying to convey, and have an understanding of how certain looks
will communicate to the viewers. We are all trained by a hundred years of movies into certain perceptions. You need to think out how to create that feeling, that sense of place, mood, or circumstance before you even set up the first light. With a little practice, some tricks and techniques, and an understanding of how all this works, you’ll be able to set up the proper mood quickly and with only a few instruments.
Of course, there is room for experimentation, for new effects, for lighting that breaks the rules and makes the audience uncomfortable without understanding why – rather like Hitchcock’s combination of zooming in and dollying out at the same time, which created a creepy feeling that most people couldn’t put their finger on. But my message to ambitious students especially is this: you have to learn how to do it by the rules before you can know how to break the rules!
In the next chapters, we’re going to walk through the basics, the tricks, and techniques so that we can get to the ultimate point of the book, the creative artistry of truly fine lighting. This will give you the foundation from which you can springboard – perhaps into new lighting visions that no one else has tried!
CHAPTER 2
Human Vision, the Camera, and Exposure
What you see
The human eye is a truly astounding piece of biological engineering. It is able to pick up images both in near-darkness and in blazing sunlight. Overall, the human eye can perceive light in a range light to darkness of almost a billion to one. Unfortunately, when shooting video or film, the critical visual receptor is not your eye but the camera. And the camera perceives light differently from your eye and in a much more restricted range. The differences in this perception are critical to your understanding of how to light and expose video or film, because the camera simply can’t see the extended range of light the way the human eye can.
Bear with me for a moment while we take a look at the whole system of human vision and how it differs from the camera. Light in certain wavelengths is reflected off of objects; some of this reflected light finds its way into the eye. There, the light beams are focused on a multilayered receptor called the retina, where 125 million rods and 6 million cones translate the photons into neural impulses. The rods, spread all around the retina, are responsible for dim light and peripheral perception and really do not perceive color. The cones, which are concentrated in a central area called the macula, are responsible for color perception and see in the most detail. They require a higher light level to perceive color and detail.
But the eye is not the most amazing instrument of vision; that really is the human brain – the place where the neural impulses from rods and cones in the back of the eye are assembled and interpreted. What we glibly call “vision” is an incredibly complex event that involves the entire brain and is much more than sight. There are at least 32 centers for visual processing distributed throughout the brain. And the visual experience we normally have every waking minute is a multilayered integration of two different sets of peripheral vision and the detailed vision of the macula, the concentration of cones near the center of the retina. The neural impulses
from these two sets of rods and cones are transmitted to the brain, where they are integrated and interpreted to assemble an understanding of the objects around us. When you think this process through, this is the part that is truly amazing. The brain keeps track of position, motion, and orientation, and integrates the signals from two separate receptors to perceive depth. With the merest glance and without conscious thought, you know that the variation in reflected light is a pencil on the table, and that it is about 2' away from you. Again without conscious thought, you could reach over and pick it up – without even looking at it directly. It’s really pretty amazing.
The brain uses a huge variety of very subtle details and cues to interpret and understand what the two eyes are registering. And because of this, the brain is quite forgiving. It can utilize existing knowledge to fill in blanks that are poorly perceived; through depth perception and slight motion, the brain can piece together what an object is even when it is just on the edge of visibility. Slight motions of the head and eyes apparently play a huge role in supplying the brain with enough data to accurately interpret the world “out there,” outside of ourselves.
This is actually quite important for our topic of Watching a two-dimensional image, study because when we translate that complex, 3D the brain loses several of the subworld of trees and rocks and dust bunnies under beds tle cues that it uses to interpret the into a two-dimensional representation, the brain sud- world. denly loses several of the subtle cues that it uses to interpret the world. In particular, we find that it does not fill in blanks or vague areas in the same way. So whether the twodimensional representation is a television screen or a photographic print or a line drawing, the creator of the representation must compensate for what is missing. In short, the representation needs to be better drawn and more carefully crafted than the reality would have to be. The important elements must be clear and well defined. Sometimes it is effective even to blur out nonessential elements to help focus the eye (and the mind) on what is essential.
Let me give an example of what I’m talking about here. Suppose you’re sitting in a dimly lit room you are unfamiliar with. Something in the corner catches your eye; you can’t quite tell what it is. So you’ll move your head a little bit, giving the brain extra data about the dimly perceived object; you may squint or shield your eyes from the light source to allow you a little better dim light perception. The little bit of extra information gained from this movement may allow you to figure out what the object is. If it’s not enough, you always have the option of getting up and walking over there, or of turning on another light. And if that fails, you can still touch the object to find out more about it!
What the audienCe sees
When you are composing a television picture, remember that your viewer has lost all those subtle controls to enhance perception. Moving the head a little won’t give them additional information, since they are looking at a flat piece of glass with flickering colored lights. Squinting won’t help. Getting up and getting closer may only reveal that the picture is actually red, green, and blue pixels. Turning on an extra light won’t help, and touch will only reveal a cold, smooth surface.
The appearance of depth and texture in a television picture is entirely artificial. The only perception of depth that the viewer has in your picture is controlled by lighting and camera motion. The only way the viewer can perceive the texture of an object is through the subtle pattern of reflections, highlights, and shadows on the object’s surface. Poorly lit objects may be overlooked altogether or become indecipherable blobs, even if they are clearly perceptible in actual reality. Richly textured surfaces recede into bland obscurity unless they are lit in a manner that makes the texture visible to the viewer. In creating pictures, you must be aware of how much control the viewer has lost and you, the image creator, have gained.
Add to this the fact that people are much more forgiving of reality than they are of a two-dimensional image of the same thing. If you have the opportunity of videotaping in a church or synagogue, you’ll often find a perfect example of this. Most of these buildings are very poorly lit for video, and it’s not uncommon to have lights shining down on the clergy person from a very high angle. The eyes are cast into shadow, glasses cast odd shapes on the cheeks, the nose casts a horrific shadow that extends over mouth and chin. Week after week, the congregation will watch the clergy person teach or read in this horrible lighting, and won’t mind it a bit. They overlook the odd shadows; they don’t really notice them even if their attention is called to them. Now take a videotape of the same situation and show it on a television. Right away, the same people will complain about the ugly shadows.
Part of this phenomenon is in fact that the camera does exaggerate the contrast between shadow and highlight – more on that in a minute. But the part of this phenomenon I want to emphasize here is that the viewer is more demanding and critical of the twodimensional, flickering picture. The loss of extra per- realistic lighting is often not good ceptual cues and personal control means that the brain enough for video and television! cannot do the hoop-jumping tricks it often does to “see”
through perceptual problems. What you see is what you’ve got. So here’s a rule to engrave on your forehead: Realistic lighting is often not good enough for video and television!
And that’s aside from the contrast issues that we now have to tackle. Remember that you have to be supplying the viewers’ brains with all the visual cues they need to figure out depth and texture as well as color and placement; you also have to do it in a somewhat blunt and unequivocal way.
Add to this the very real problem that most cameras can’t see as wide a range of brightness as the eye, and the issue gets more complex. What you see with your eye isn’t exactly what you are going to get on your screen. The contrast range that the camera can handle is likely to be less than a quarter of the range that the eye can perceive. The range of brightness that a camera (or film stock) can expose is known as latitude.
To understand this, let me go back to my earlier assertion that the eye can perceive a range of a billion to one. Actually, that wasn’t quite true, since it cannot perceive the darkest object and the lightest object in that range at the same time; and it cannot perceive all light levels equally well. The eye has a number of adaptations that allow it to perceive a contrast range of between 2000:1 and 1000:1 at any given time. Changes in pupil diameter work just like the iris in a camera to physically restrict the amount of light that is admitted to the retina. Neural adaptation actually changes the activity of the neurons in the optic nerve. And there is a fundamental photochemical shift that actually gives the eye two discrete ranges of light perception.
We’re all familiar with this photochemical shift. When you leave a brightly lit area and enter a darkened room, you can’t see very well at first. Then, gradually, your eyes “adjust” to the lower light level, and you can begin to perceive detail in what moments earlier seemed like Stygian darkness. After a while, you can see pretty well. What has happened is much more than the change of iris size or neuron activity. In darkness, the retina regenerates a chemical called rhodopsin, which is bleached out by bright light. This chemical allows the rods in the retina to perform at much lower light levels. The entire chemical shift will typically take about seven to eight minutes, with low-light sensitivity increasing during the entire period. Of course, once the rhodopsin has reached full level, your eyes are very light sensitive, and going back out into the sunshine will be a blinding experience – until the rhodopsin is bleached out and your retina chemically “adjusts” to high-light-level mode. So the eye really can’t perceive that huge range all at once, but it has an amazing ability to adjust to a wide range of lighting levels.
note:
Contrast range isn’t the only thing the eye does vastly better than video or flm. according to most estimates, the average human eye is the equivalent of a picture sensor 11,000 pixels by 11,000 pixels, with pixels only 2 microns in size. that’s an equivalent of about 120 megapixels – talk about “hi defnition”! the best 35mm flm frame is reputed to be 3000 pixels × 3000 pix-
els on the best day. a standard defnition Itur-B 601 video frame is 720 × 486, or 0.35 megapixel. full hd is 1920 × 1080, just over 2 megapixels; ultra high defnition tV (uhd) is 3840 × 2160, or 8.3 megapixels. this means that one of your eyes registers a picture that is about 350 times as detailed as a standard defnition television picture and about 60 times as detailed as a high-defnition picture, with a contrast range that is six to eight times larger.
I can hear the griping now. “That’s more than I ever wanted to know about eyes.” “What’s all this got to do with cameras and lighting and taping the evening news or a dramatic love scene?” Quite a lot, actually, because the most common basic mistake made in television and video lighting is to assume that the camera is going to react to a scene the same as the eye. It just ain’t so, and if you don’t grasp the huge difference between your camera and your eye, your lighting will never look right.
The eye is so adaptive to different light levels that we almost don’t notice subtle changes in light. In fact, it’s generally accepted that the light level must halve or double before it will represent a noticeable change to the human eye. That’s quite a change! In fact, it is that “halving” that is behind the designation of f-stops on a lens. Each progressively higher stop number halves the amount of light passing through the lens and hitting the objective.
Even after you understand the subtle complexities of how human vision differs from the picture on a screen, it’s essential to understand the dramatic differences in dynamic range as well. Dynamic range is the zone in which an instrument can operate effectively. In audio, it’s the softest sound the microphone can register (above the noise floor) up to the loudest sound it can register without distortion. In video, it’s the lowest reflected light that can register detail up to the highest level of reflected light that can register detail before turning to solid, blown-out white. The ratio between these two light levels is known as the contrast ratio.
The human eye is remarkably adaptable, and when all variations are taken into account, can cover an amazing 24 f-stops of contrast. However, that includes the chemical changes I mentioned above that take place when our eyes “adjust” to darkness. In a given lighting situation, leaving out those changes, the average human eye can register between 10 and 14
f-stops, or somewhere between 1000:1 and 16,000:1. Even the lower end of this spectrum is better than most film or digital cameras.
Many film stocks can now achieve contrast ratios of 500:1; Kodak VISION3 film has a range of 13 stops, or 8000:1. But remember that this is an ideal on the camera original; you’ll never get a distribution print with that range! Most video cameras haven’t reached that far yet. A good prosumer camera may be able to reach seven stops, or 128:1. Pro cameras like the Sony EX-1 can record 11 stops, or 2000:1. The actual range may be much less than this in real-world situations. The Arri Alexa comes in very close to Kodak VISION3 film at 14 stops; the Red Dragon sensor is supposed to be able to record 18 stops, or a staggering 260,000:1 contrast ratio! Out here in the irritating zone of reality, most DPs will be quick to point out that the practical usable dynamic range of any camera is dramatically less than its theoretical capacity – though technology is rapidly closing in on being able to duplicate the amazing detail of the human eye.
F-stops and t-stops:
exposure in video cameras is measured by the f-stop. this is a measure of the exposure factor (hence the “f”) of the lens and iris opening. f-stops are calibrated from the aperture of the iris; f/1.4 on most lenses is wide open, f/2 is one-half the area, f/2.8 is one-half the area of f/2, and so on. some lenses (usually for flm) will also be marked in t-stops. t-stops will be marked in red, while f-stops will be marked in white. t-stops are actually calibrated to the measured amount of light falling on the flm or CCd rather than from the area of iris opening.
It is generally accepted that the super-fexible human eye does not notice a signifcant change in light levels, much less than halving or doubling; that’s why the system is set up the way it is.
Higher-end video cameras are now performing at a contrast range similar to or exceeding that of many film stocks. The ARRI Alexa in HDR mode is getting very close to the range of the human eye. Much of the popular idea that “film is always better than video” is simply outdated, received wisdom from an earlier era when even broadcast TV cameras only achieved contrast ratios of 30:1. Much of that assumed gap in performance has eroded and now is nearly gone. George Spiro Dibie, six-time Emmy Award-winning
Hollywood DP, says that today he can “light for my video cameras exactly the way I light for film cameras.” Today, the choice of film or digital video is more based on esthetics rather than performance – and, even there, filmlook techniques can bring the same esthetic to digital production.
By the time you read this book, the latest great thing may be doing much better – but I seriously doubt that the best film stock or state-ofthe-art UHD camcorder will be up to the amazing performance of the eye – partially because it is not backed up by the fantastic flexibility of the interpretive human brain.
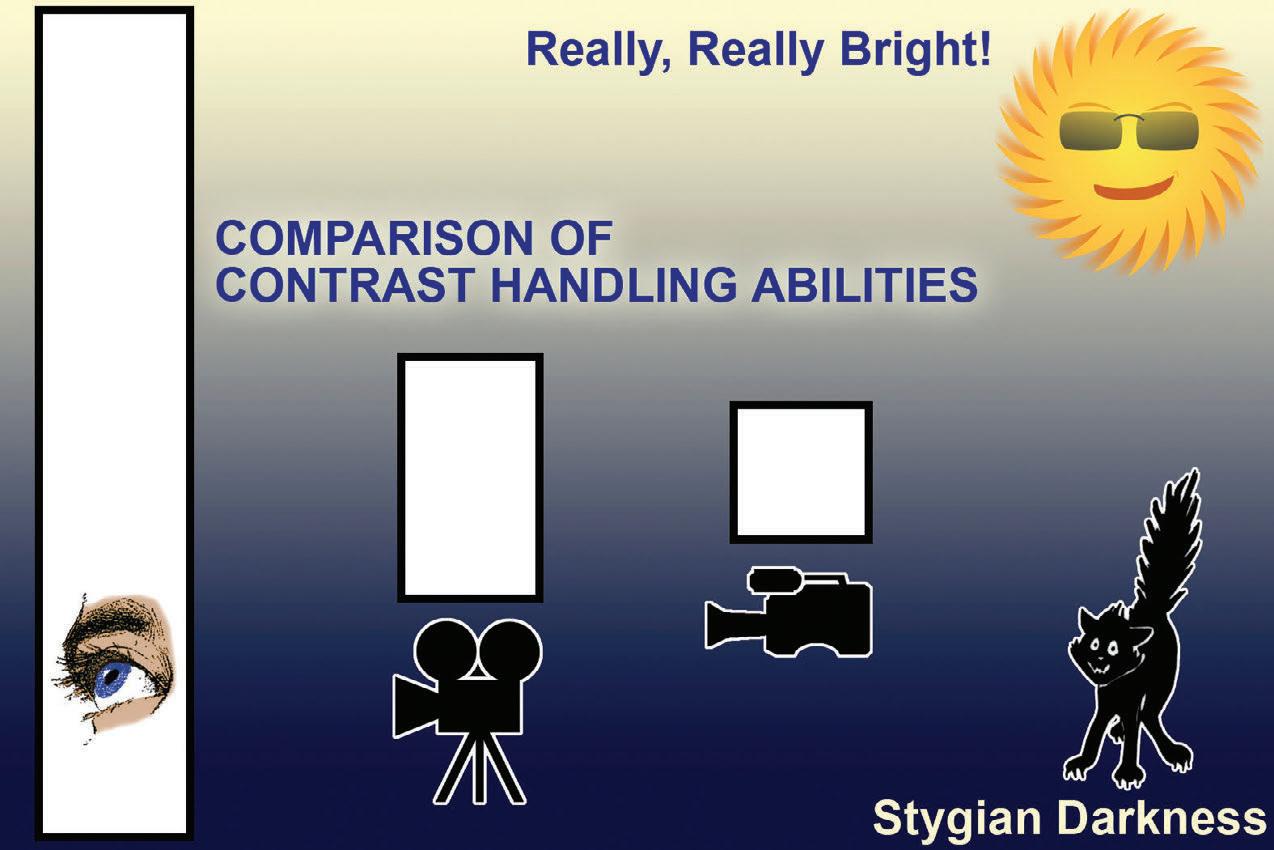
I hope you didn’t just quickly skim over those last paragraphs! Look at those figures again, comparing the human eye to a common prosumer unit. The likelihood is that your camcorder has a usable contrast range that is less than one-tenth that of your eye! Look at the chart in Figure 2.1 that approximates a comparison. Bear in mind that changing the exposure by opening or closing the iris doesn’t expand this range at all; it just moves the “window” up and down the scale.
This issue is incredibly important if you are to do really fine lighting. It is essential that you understand how limited the contrast range of your specific camera is and that you learn to judge the effect of your lighting by watching the monitor. Experience will enable you to “eyeball” lighting better, but even the most experienced DP will always check the effect on the monitor because it is there that you will be “seeing” through the camera rather than your baby blues.
Figure 2.1 Comparing the relative contrast handling of the eye, film, and video.
Fitting in the WindoW
Understanding that your camera can “see” only a limited slice of what your eye can perceive and your brain interpret, we can think of this slice as if it were a window – a well-defined window of contrast range within which the camera can produce a good image. This is an incredibly important and fundamental idea for practical lighting. The size of the window doesn’t change for a given camera, though we can adjust external factors (amount of light on scene, amount of fill light in shadowed areas) and internal factors (camera exposure, including iris, gain, and accessories like filters) to match the window to the scene as closely as possible. The final image created in the camera is a combination of both these internal and external factors.
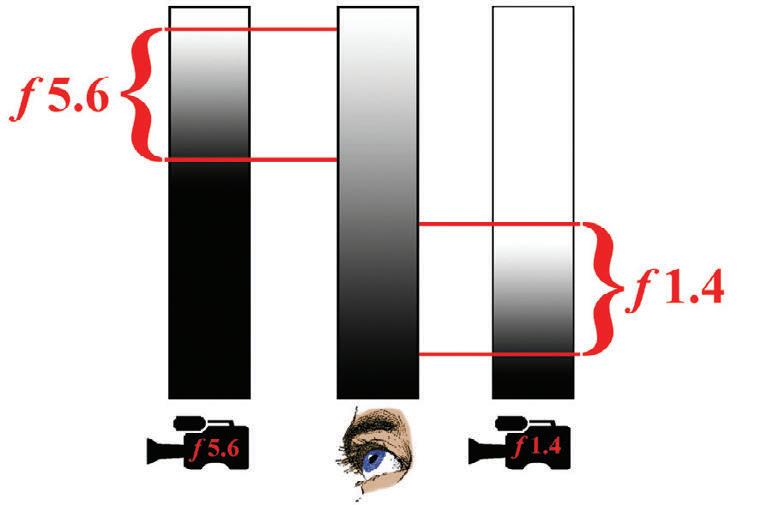
Take a look at Figure 2.2, which is a graphic representation of this “window” idea. Out of the normal range of lighting levels (measured in lux or footcandles) the camera can effectively “see” (or reproduce) only a limited slice that falls within that window. Whatever light level is at the bottom of that window will be reproduced as pure black, and whatever is at the top of the window will be reproduced as pure white – no matter what your eye can see on the set! The particular position of the window is determined by camera filters (which limits light entering the lens), the camera iris (which limits the amount of light passing through the lens), and the camera’s internal gain setting (which is used to artificially boost the signal coming from the imaging chips in very dark situations).
If the iris is set at f/1.4 (wide open) to admit the most light for a dimly lit scene, the camera will reproduce a fairly low light level – say 25 lux – as pure white. Anything lit brighter than that will appear to be the same pure white. If the iris is set to a middle range such as f/5.6, then the window of the camera’s ability to “see” moves up the scale, and something illuminated at the same 25 lux would appear to be pure black, while a portion of the scene illuminated at 300 lux would be reproduced as pure, untinted white. If we close down the iris even more to f/16 (which is a tiny pinhole, almost closed) for a very bright situation such as exterior daylight, the same
Figure 2.2 Opening or closing the lens iris does not expand the exposure range. It simply selects a different “slice” of the visible light range.