Laboratory manual for anatomy and physiology 7th edition connie allen all chapter instant download
Laboratory Manual for Anatomy and Physiology 7th Edition Connie Allen
Visit to download the full and correct content document: https://ebookmass.com/product/laboratory-manual-for-anatomy-and-physiology-7th-e dition-connie-allen/
More products digital (pdf, epub, mobi) instant download maybe you interests ...
Laboratory Manual for Anatomy & Physiology (Anatomy and Physiology) 5th Edition, (Ebook PDF)
This book is dedicated to my husband Jim, who showed me love, motivation, and patience when I worked long hours; and to our three children Burke, Brittany, and Michaela; and to our six grandchildren Michael, Jaxton, Jaden, Gianna, Taralyn, and Cassidy.
—Connie Allen
To my husband Chuck, thank you for your love, support, and all the dinners you made while I was working. To my children Scott and Kate, thank you for your support and the text messages that made me laugh.
This book was typeset in 10/12 Times LT Std at Lumina Datamatics.
Founded in 1807, John Wiley & Sons, Inc. has been a valued source of knowledge and understanding for more than 200 years, helping people around the world meet their needs and fulfill their aspirations. Our company is built on a foundation of principles that include responsibility to the communities we serve and where we live and work. In 2008, we launched a Corporate Citizenship Initiative, a global effort to address the environmental, social, economic, and ethical challenges we face in our business. Among the issues we are addressing are carbon impact, paper specifications and procurement, ethical conduct within our business and among our vendors, and community and charitable support. For more information, please visit our website: www.wiley.com/go/citizenship.
Evaluation copies are provided to qualified academics and professionals for review purposes only, for use in their courses during the next academic year. These copies are licensed and may not be sold or transferred to a third party. Upon completion of the review period, please return the evaluation copy to Wiley. Return instructions and a free-of-charge return shipping label are available at: www. wiley.com/go/returnlabel. If you have chosen to adopt this textbook for use in your course, please accept this book as your complimentary desk copy. Outside of the United States, please contact your local representative.
Student Edition: 978-1-119-66255-6
Evaluation Copy: 978-1-119-74062-9
The inside back cover will contain printing identification and country of origin if omitted from this page. In addition, if the ISBN on the back cover differs from the ISBN on this page, the one on the back cover is correct.
Library of Congress Cataloging-in-Publication Data
LC record available at https://lccn.loc.gov/2020043246
LC ebook record available at https://lccn.loc.gov/2020043247
United States
Preface
Anatomy and physiology is a challenging course, and this laboratory manual is written to help students meet that challenge. It is written for students interested in allied health fields, such as nursing; physical, respiratory, cardiovascular, or occupational therapy; radiology; and dental hygiene. This manual may be used with any two-semester anatomy and physiology textbook.
The design of this laboratory manual is based on the authors’ experience as anatomy and physiology instructors and uses three learning preferences: visual, auditory, and kinesthetic. When students label diagrams, they focus on the structure rather than just the dot at the end of a line. Writing out the structure’s name and pronouncing it reinforces learning. Also, having students become subjects of laboratory exercises personalizes the learning process. Animal dissections give students an opportunity to physically manipulate structures, comparing location and texture, and to observe how structures are supported, protected, and attached by connective tissue.
Special Features Incorporated in this Laboratory Manual Include:
• This lab manual can be used for online anatomy and physiology classes. Many lab activities can be performed by students at home or used in the laboratory. Online students can also use the Real Anatomy Virtual Dissection program and PowerPhys simulated lab activities to enhance their learning.
• Just enough text is provided to introduce concepts in each section and to set up and support the laboratory section. The exercises are written so students do not need their textbooks to complete the laboratory activities.
• New material is divided into small segments, starting with simple diagrams, illustrating the basic concepts and building up to more complex diagrams. Subsequent activities add to the students’ knowledge in a stepwise fashion. This is especially noticed in the skeletal and muscular exercises.
• Each exercise contains a list of objectives, materials needed for the exercise, and easily identifiable laboratory activity sections.
• Unlabeled four-color drawings, photographs, and photomicrographs are included for students to label either at home or in the laboratory. Students first write out the name of the structure to help learn it. Then the completed diagrams will be used to identify structures on models.
• Physiology experiments use students as subjects and can be completed with either simple, inexpensive equipment and materials or more complex lab setups.
• Experimental report sections after physiology experiments ask students to make predictions, collect and analyze data, and write simple lab reports.
• Discussion Questions are within the activities to make the students think about the material presented.
• An Answer Key is provided at the end of the laboratory manual for the activities in each exercise. Students receive immediate feedback, and they are not dependent on the instructor for the correct answers.
• “Reviewing Your Knowledge” and “Using Your Knowledge” sections follow the activities at the end of each exercise. “Reviewing Your Knowledge” provides a thorough review of the material in the exercise, whereas “Using Your Knowledge” requires students to apply information learned. Either or both of these sections may be handed in to the instructors for a grade, because neither section has answers in the back of the laboratory manual.
• Biopac Laboratory Guide Experiments are available online for several exercises.
New Features to the Seventh Edition
• Revised Exercise 5: New Osmosis and Diffusion experiment
• Revised Exercises 9 and 10: New bone photos
• Updated drawings in many exercises
• Updated terminology
• 3D interactives where students can manipulate structures, interact with images, and listen to narrated explanations of physiological concepts to dive deeper into complex physiologic processes.
Lastly, our lab manual was written to accompany any textbook, but it has been carefully revised concurrently with Tortora/ Derrickson’s Principles of Anatomy and Physiology 16th Edition. Tortora and Derrickson’s focus on homeostasis has always been our favorite hallmark feature of their book, which is also published by Wiley. The 16th edition contains many new 3D Interactives, updated terminology, and numerous new “Clinical Connections” – which link the relevance of anatomy and physiology to professional, clinical, and everyday life.
Instructor Resources
• Text Illustrations & Tables in JPEG
• Text Illustrations in PowerPoint (Editable)
• Animation Worksheet Answer Keys
• Real Anatomy Worksheet Answer Keys
• PowerPhys Lab Report Answer Keys
• Reviewing Your Knowledge Answer Keys
• Using Your Knowledge Answer Keys
• Anatomy and Physiology Visual Library
• Anatomy Overviews and Animations PowerPoint Slides
• Discussion Questions and Answers
• Differential White Blood Cell Activity
• Study Objectives
For instructor access to these valuable resources, please contact your Wiley sales representative.
Acknowledgments
We deeply appreciate the support, instruction, and encouragement from the members of our editorial, production, and marketing team at Wiley: Natalie Ruffatto, Patrick Farace, Linda Muriello, Trish McFadden, Lauren Freestone, Laura Byrnes, Brittany Hammond, Georgia Larsen, Samantha Hart, and Lumina Datamatics, Inc. We would like to express our special thanks to Amanda Rosenzweig of Delgado Community College for her keen eye, her suggestions that made the lab manual better, and her invaluable assistance during the development and production of this book. We have truly enjoyed working with her! We also wish to thank Gerard Tortora and Bryan Derrickson for producing a wonderful textbook that provided many illustrations and ideas for our laboratory manual. A special thank you to Susan Baxley for reviewing all the exercises and making suggestions and to Bob Clemence for allowing us to use his figure of the Respiratory Volumes and Capacities. A special thanks to Charles Harper for answering many clinical questions.
We also wish to thank Wynne Au Yeung at Imagineering Art for the artwork she provided for our laboratory manual. Thank you to our colleagues at Edison State College: Bob Clemence, Colleen Swanson, Jody Gootkin, Richard McCoy, Jeff Davis, Dick Felden, Lyman O’Neil, Kitty Gronlund, Tony Contino, Cheryl Black, Jed Wolfson, Jay Koepke, and Roy Hepner who encouraged us, answered our questions, and provided critiques of exercises. We also wish to thank Nicole Yarbrough George for her critique of the skeletal muscle chapter. Thank you to Chaim Jay Margolin of Regional Radiology Associates and David Michie of Clinical Physiology Associates for providing images for this manual. Special thanks to SOMSO for providing images for our online Anatomy Drill and Practice: Anatomical Models section. Thanks to contributors Jerri Lindsey, Tarrant County College, and Terry Thompson, Wor-Wic Community College.
Additionally, we are grateful to the following colleagues who provided their valuable feedback by reviewing our 7th edition manuscript:
Pat Clark, Indiana University-Purdue University Indianapolis
Gary Glaser, Genesee Community College
James J. Bolton, Odessa College
Ann Caplea, Walsh University
Zoe Soon, University of British Columbia Okanagan
Victor Alvarez, Delaware Technical Community College
Kristen Hutchins, Howard Payne University
Javanika Moody, Anne Arundel Community College
Jeanine Page, Lock Haven University
Shannon McNew, Southeast Missouri State University
Eric Sun, Middle Georgia State University
Contents
Preface v
INTRODUCTION
EXERCISE 1 Anatomical Language 1
EXERCISE 2 Organ Systems and Body Cavities 13
CELL AND TISSUES
EXERCISE 3 Compound Light Microscope 25
EXERCISE 4 Cell Structure and Cell Cycle 33
EXERCISE 5 Transport Across the Plasma Membrane 43
EXERCISE 6 Tissues 53
INTEGUMENTARY SYSTEM
EXERCISE 7 The Integumentary System Structure and Function 85
SKELETAL SYSTEM AND JOINTS
EXERCISE 8 Bone Structure and Function 97
EXERCISE 9 Axial Skeleton 107
EXERCISE 10 Appendicular Skeleton 139
EXERCISE 11 Joints and Synovial Joint Movements 161
MUSCULAR SYSTEM: SKELETAL MUSCLES
EXERCISE 12 Skeletal Muscle Structure 175
EXERCISE 13 Contraction of Skeletal Muscle 187
EXERCISE 14 Skeletal Muscles and Their Actions 199
SURFACE ANATOMY
EXERCISE 15 Surface Anatomy 241
NERVOUS SYSTEM
EXERCISE 16 Nervous Tissue 263
EXERCISE 17 Spinal Cord Structure and Function 277
EXERCISE 18 Spinal Nerves 287
EXERCISE 19 Somatic Reflexes 299
EXERCISE 20 Brain Structure and Function 309
EXERCISE 21 Cranial Nerves 333
EXERCISE 22 Autonomic Nervous System Structure and Function 343
EXERCISE 23 General Senses 355
EXERCISE 24 Special Senses 369
ENDOCRINE SYSTEM
EXERCISE 25 Endocrine Structure and Function 401
CARDIOVASCULAR SYSTEM
EXERCISE 26 Blood Components and Blood Tests 421
EXERCISE 27 Heart Structure and Function 441
EXERCISE 28 Cardiac Cycle 461
EXERCISE 29 Blood Vessel Structure and Function 473
EXERCISE 30 Blood Vessel Identification 489
LYMPHATIC AND IMMUNE SYSTEMS
EXERCISE 31 Lymphoid System and Immunity 517
RESPIRATORY SYSTEM
EXERCISE 32 Respiratory System Structure and Function 537
EXERCISE 33 Pulmonary Ventilation 555
DIGESTIVE SYSTEM
EXERCISE 34 Digestive System Structure and Function 571
EXERCISE 35 Mechanical and Chemical Digestion 599
URINARY SYSTEM
EXERCISE 36 Urinary System Structure and Function 607
EXERCISE 37 Urine Formation and Urinalysis 625
REPRODUCTIVE SYSTEMS
EXERCISE 38 Male Reproductive System Structure and Function 637
EXERCISE 39 Female Reproductive System Structure and Function 653
HUMAN DEVELOPMENT AND HEREDITY
EXERCISE 40 Human Development 671
EXERCISE 41 Heredity 685
Answer Key to Activities 699
APPENDIX A: Word Roots 719
APPENDIX B: Skeletal Muscle Origins and Insertions 721
APPENDIX C: Measurements 727
Index 729
Anatomical Language 1
OBJECTIVES
1 Describe the anatomical position
2 Use anatomical and directional terms correctly
3 Identify the various body planes and sections
MATERIALS
• human models or anatomical charts
• apples (1 per group) and plastic knives or scalpels
• plastic tubing (eight-inch piece per group) or plastic straw
• 5 sheep brains (for class demonstration)
Anatomical terms describe body positions, body regions, specific body areas, and landmarks. Most of these words are derived from Latin or Greek and are often part of the names of muscles, bones, nerves, and blood vessels. Learning these terms at this time will help you throughout the course.
A. Body Position
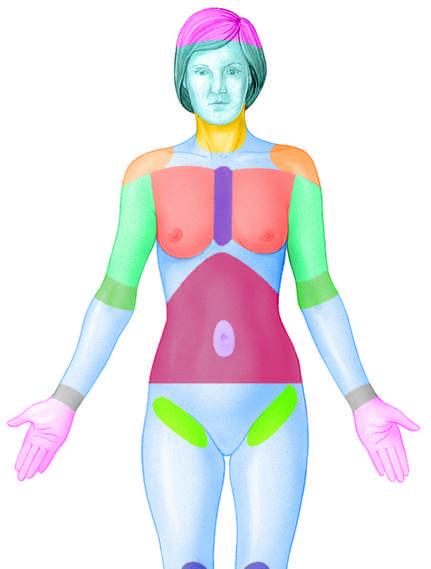
The anatomical position is the reference position anatomists and people in medical fields use to describe the location of body parts or regions. In the anatomical position, the body is erect (vertical) and facing forward; the arms are straight and at the sides of the body with the palms facing forward; the legs are straight with the feet facing forward and flat (Figure 1.1).
In the supine position, the body is horizontal and lying on the back. In the prone position, the body is horizontal and lying on the stomach.
B. Body Regions
Body regions refer to specific areas of the body. It is important that you learn the correct boundaries for each region. The main body regions are the head, neck, trunk, upper limbs, and lower limbs. The head consists of the
skull (cranial and facial bones), and face (anterior portion of the head comprised of the forehead, eyes, nose, mouth, cheeks, and chin). The neck connects the head to the trunk.
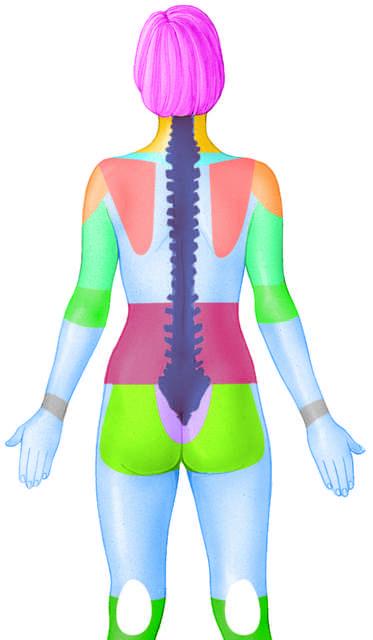
The trunk consists of the chest (area between neck and diaphragm) that contains the heart and lungs, the abdomen (area between the diaphragm and hip bones) that contains digestive organs, the pelvis (area below abdomen that contains internal reproductive organs and urinary bladder), and the back (posterior portion of trunk between neck and buttocks).
The upper limb consists of the shoulder (curved area where arm attaches to upper border of trunk), arm (area between shoulder and elbow), forearm (area between elbow and wrist), and hand (wrist, palm, fingers).
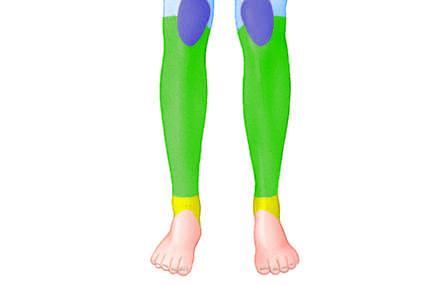
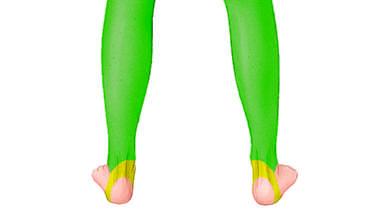
The lower limb consists of the buttocks (rounded area on posterior surface where thigh attaches to trunk), groin (area on anterior surface where lower limb attaches to pelvis), thigh (area of lower limb between the groin anteriorly, buttocks posteriorly, and knee), leg (area of lower limb between knee and ankle), and foot (includes ankle, sole, toes).
Many anatomical terms have one or more word roots with a prefix and/or a suffix added. For example, in the word antecubital, ante- is a prefix meaning before or in front of, the word root cubit- means elbow, -al is a suffix meaning pertaining to. Table 1.1 contains anatomical terms with four different suffixes, all of which mean pertaining to. These suffixes are -al, -ic, -ar, and -ary. When suffixes like these are added to word roots they form adjectives, whereas nouns have different endings such as -um, -us, -is,
and -a. For example, stern- is a word root meaning chest; sternum is the noun and sternal is the adjective. Anatomical terms and their definitions are found in Table 1.1. Word roots and their definitions are found in Appendix A, as well as nouns and adjectives formed from the word roots.
Before Going to Lab
1 Label Figure 1.1 with the appropriate anatomical terms for each body region or area. Refer to Table 1.1.
2 Refer to Appendix A to review how word roots, suffixes, and prefixes are combined to form nouns and adjectives.
TABLE 1.1 Anatomical Terms
TERM
AXIAL
Cephalic (se-FAL-ik)
• Cranial
• Facial
• Frontal
• Orbital
• Otic (OH-tik)
• Nasal
• Buccal (BUCK-al)
• Oral
• Mental
• Occipital (ox-SIP-i-tal)
Cervical
Thoracic
• Sternal
• Pectoral
• Mammary
Abdominal
• Umbilical (um-BIL-ih-cal)
• Coxal (COX-al)
Pelvic
• Pubic (PYOO-bik)
Dorsal
• Scapular
• Vertebral (ver-TEE-brul)
• Lumbar
DEFINITION
Pertaining to the central part of the body, the head and trunk
Pertaining to the head
Pertaining to the portion of the skull surrounding the brain
Pertaining to the face
Pertaining to the forehead
Pertaining to the eye
Pertaining to the ear
Pertaining to the nose
Pertaining to the cheek
Pertaining to the mouth
Pertaining to the chin
Pertaining to the back of head
Pertaining to the neck
Pertaining to the chest
Pertaining to the breast bone
Pertaining to the chest
Pertaining to the breast
Pertaining to the abdomen
Pertaining to the navel
Pertaining to the hip
Pertaining to the pelvis
Pertaining to the genital area
Pertaining to the back
Pertaining to the shoulder blade region
Pertaining to the spinal column
Pertaining to the area of the back between the lowest rib and buttocks.
LAB ACTIVITY 1 Anatomical Terms
1 Use anatomical and common terms to identify the specific body regions or areas on models, anatomical charts, or yourself. ■
TERM
APPENDICULAR
Upper Limb (Appendage)
• Acromial (a-KROM-ee-al)
• Axillary (AX-il-ary)
• Brachial (BRAY-key-ul)
• Antecubital (an-tehKYOO-bi-tul)
• Olecranal (oh-LEK-ra-nul)
• Antebrachial
• Carpal
• Manual
• Palmar
• Digital
Lower Limb (Appendage)
• Inguinal (ING-won-ul)
• Gluteal (GLUE-tee-ul)
• Femoral (FEM-or-ul)
• Patellar (pa-TEL-ur)
• Popliteal (pop-lih-TEE-ul)
• Crural (CROO-rul)
• Fibular (FIB-you-lur) or peroneal (peh-RONE-ee-ul)
• Sural (SIR-ul)
• Tarsal (TAR-sul)
• Pedal
• Plantar
• Calcaneal (kal-KANE-ee-ul)
• Digital
DEFINITION
Pertaining to the extremities or limbs
Pertaining to the highest point of the shoulder
Pertaining to the armpit
Pertaining to the arm
Pertaining to the anterior (front) surface of the elbow
Pertaining to the posterior (back) surface of the elbow
Pertaining to the forearm
Pertaining to the wrist
Pertaining to the hand
Pertaining to the palm of the hand
Pertaining to the digits (fingers)
Pertaining to the groin where the thigh attaches to the pelvis
Pertaining to the buttocks
Pertaining to the thigh
Pertaining to the anterior (front) surface of the knee
Pertaining to the posterior (back) surface of the knee
Pertaining to the anterior (front) surface of the leg
Pertaining to the lateral side of the leg
Pertaining to the posterior (back) surface of the leg
Pertaining to the ankle
Pertaining to the foot
Pertaining to the sole of foot
Pertaining to the heel
Pertaining to the digits (toes)
1.1 Anatomical terms.
FIGURE
C. Directional Terms
Directional terms are used to describe the location of body structures relative to other structures. An example of a directional term is inferior, which means below. It would be correct to say that the neck is inferior to the head but incorrect to say that the neck is inferior. The directional terms are listed in Table 1.2, along with an example of how they are used. Note that opposite terms are paired.
The directional terms proximal and distal apply to the point of attachment of a limb to the torso or the point of origin of a structure such as a blood vessel or nerve. These terms refer to the location of structures relative to the point of attachment or point of origin, whether they are closer (proximal) or farther away (distal).
More than one directional term can apply to describe the location of a body structure. For example, the ears are posterior and lateral to the nose.
Before Going to Lab
1 Label Figure 1.2 with the directional terms from the bulleted list by writing the term in the appropriate numbered blank.
LAB ACTIVITY 2 Directional Terms
1 With your partner, complete the sentences using the appropriate directional term from Table 1.2. Refer to the anatomical terms in Table 1.1 and Appendix A as needed.
TABLE 1.2
Directional Terms
DIRECTIONAL TERM DEFINITION
Superior Above
Inferior Below
Anterior (Ventral) Closer to front of body
Posterior (Dorsal) Closer to back of body
Medial Closer to midline of body
Lateral Farther from midline of body
Intermediate Between two structures
Ipsilateral On same side of body
Contralateral On opposite sides of body
Proximal Nearer to point of attachment of
a. The sternum is ______________ to the vertebrae.
b. The nose is ___________ and __________ to the eyes.
c. The heart is ______________ to the lungs.
d. The wrist is ______________ to the arm.
e. The right lung and right kidney are _____________ .
f. The skin is ______________ to the bones. ■
FIGURE 1.2 Directional terms.
EXAMPLE OF USE
The head is superior to the neck.
The neck is inferior to the head.
The lips are anterior to the teeth.
The teeth are posterior to the lips.
The nose is medial to the eyes.
The eyes are lateral to the nose.
The elbow is intermediate between the shoulder and wrist.
The right arm and right leg are ipsilateral.
The right arm and left arm are contralateral.
The elbow is proximal to the wrist. limb to trunk or nearer to the The small intestine is proximal to the large intestine. origin of a structure
Distal Farther from point of attachment
The wrist is distal to the elbow. of limb to trunk or farther from The small intestine is distal to the stomach. the origin of a structure
Superficial Closer to surface of body
Deep Farther from surface of body
The skin is superficial to the muscles.
The muscles are deep to the skin.
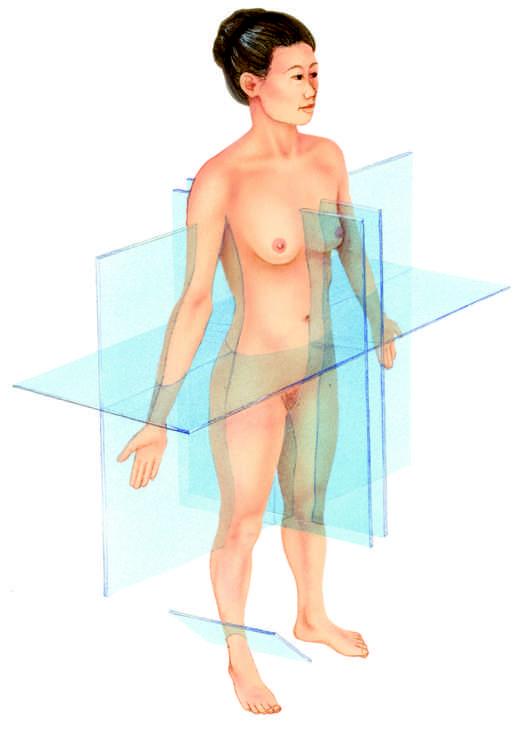
D. Body Planes and Sections
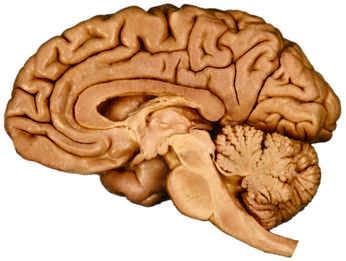
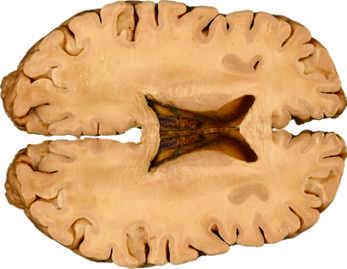
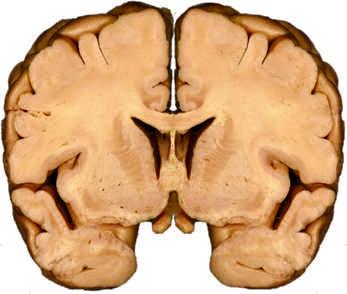
Planes are flat surfaces that divide the body or organs in order to expose internal structures (Figure 1.3). The exposed surfaces produced by planes are called sections. Sagittal (sagitta = arrow) planes pass vertically through the body or organs and divide them into right and left sections (sagittal sections).
If a plane passes vertically through the midline and divides the body into equal right and left halves, the plane is a midsagittal plane, but if a plane divides the body into unequal right and left portions, it is a parasagittal plane.
A frontal or coronal plane passes vertically through the body or organs and produces anterior and posterior sections (frontal sections). A transverse plane passes horizontally through the body and produces superior and inferior sections (transverse sections or cross-sections). Oblique planes pass through the body at an angle forming oblique sections.
We often look at sections of individual organs, such as blood vessels, intestines, or long bones. Sections that are produced by a plane running along the long axis of a long narrow structure are called longitudinal sections. Sections that are produced by a plane running perpendicular to the long axis are called cross-sections. Because blood vessels and intestines twist and bend, one body plane may produce longitudinal sections, cross-sections, and oblique sections of these structures. (a) Right anterolateral view
CLINICAL NOTE: Transverse sections observed with computed tomography (CT) scans or magnetic resonance imaging (MRIs) are called axial sections
Before Going to Lab
1 Label the planes in Figures 1.3(a) and the sections in Figure 1.3(b) with the terms in the accompanying bulleted list by writing the term in the appropriate numbered blank.
2 Identify the type of sections of the human brain in Figure 1.4.
• cross-section
• frontal plane
(b) Longitudinal and cross-sections
• longitudinal section
• midsagittal plane
• oblique plane
• parasagittal plane
• transverse plane
FIGURE 1.3 Body planes and sections.
LAB ACTIVITY 3 Body Planes and Sections
1 Observe sagittal, frontal, and transverse sections using an apple.
• Working in a group, draw a face on the apple.
• Cut sagittal, frontal, and transverse planes through the apple to make sagittal, frontal, and transverse sections.
• Compare the appearance of the apple core in each section. Describe any difference in shape, size, and number of seed chambers.
• Keep sections together to form a whole apple to show to your instructor.
2 Observe longitudinal sections and cross-sections using plastic tubing or plastic straw.
• Observe a demonstration provided by your instructor of a tube cut along its longitudinal axis to produce a longitudinal section and a tube cut perpendicular to its longitudinal axis to produce a cross-section.
• Obtain an eight-inch piece of plastic tubing or plastic straw and twist it so you can visualize one plane that would simultaneously divide one area of the tube
• frontal
• midsagittal
• transverse
into a longitudinal section and another area into a cross-section.
• Do not cut the tube unless instructed to do so.
• Show your instructor where a cut would produce both a longitudinal section and a cross-section.
3 Identify sagittal, frontal, transverse, and oblique sections on sheep brains.
• Your instructor will display five sheep brains—one whole brain and four brains that have been cut into different sections.
• Determine the anterior, posterior, superior, and inferior surfaces of the brains.
• Decide which brain has been cut into sagittal, frontal, transverse, or oblique sections.
• Compare the appearance of the different sections.
Brain 1—Whole brain
Brain 2 section
Brain 3 section
Brain 4 section
Brain 5 section ■
(a)
Mark Nielsen
(b)
Mark Nielsen
(c)
Mark Nielsen
FIGURE 1.4 Human brain sections.
Reviewing Your Knowledge
1
A. Body Regions
Identify the body regions using common terms.
1. The area between the groin and knee.
2. The area between the shoulder and elbow.
3. The area between the elbow and wrist.
4. The area between the knee and ankle.
5. The area of the trunk between the neck and diaphragm.
6. The area of the trunk between the diaphragm and hip bones.
7. The area of the trunk inferior to the hip bones.
8. Posterior trunk that is located between the neck and buttocks.
9. Curved area where upper limb attaches to upper border of trunk.
10. Area on anterior surface where lower limb attaches to pelvis.
11. Rounded area on posterior surface where lower limb attaches to pelvis.
12. Under arm area where upper limb attaches to trunk.
13. The leg is to the lower limb as the ____ is to the upper limb.
14. The arm is to the upper limb as the ____ is to the lower limb.
15. The armpit is to the upper limb as the ____ is to the lower limb.
16. The ankle is to the lower limb as the ____ is to the upper limb.
17. The elbow is to the upper limb as the ____ is to the lower limb.
18. The shoulder is to the upper limb as the ____ is to the lower limb.
19. True or False. The hand includes the wrist and fingers and the foot includes the ankles and toes.
20. True or False. The bones of the face are also part of the skull.
B. Anatomical Terms
Write the anatomical terms that the phrase or word describes. Phrases or words referring to nouns are indicated. All other phrases refer to adjectives.
1. Navel (noun)
2. Pertaining to the area between the neck and abdomen
3. Pertaining to the ear
4. Pertaining to the palm of hand
5. Pertaining to the high point of the shoulder
6. Pertaining to the anterior surface of the elbow region
7. Pertaining to the face; anterior portion of the head
8. Pertaining to the nose
9. Pertaining to the neck
10. Pertaining to the posterior surface of the knee
11. Wrist (noun)
12. Pertaining to the area between the elbow and wrist
13. Back (noun)
14. Armpit area (noun)
15. Pertaining to the mouth
16. Pertaining to the anterior surface of the knee
17. Breast bone (noun)
18. Pertaining to the hip
19. Pertaining to the lateral side of the leg
20. Pertaining to the calf
21. Pertaining to the area between the shoulder and elbow
22. Pertaining to the fingers or toes
23. Pertaining to the hand
24. Pertaining to the breast
25. Pertaining to the cheek
26. Pertaining to the heel
27. Pertaining to the sole of the foot
28. Pertaining to the groin where the thigh attaches to the pelvic region
29. Pertaining to the head
30. Pertaining to the chin
31. Pertaining to the foot
32. Pertaining to the eye
33. Pertaining to the genital area
34. Pertaining to the area between the hip and knee
35. Pertaining to the area that includes the bones enclosing the brain
36. Pertaining to the forehead
37. Pertaining to the spinal column
38. Pertaining to the inferior back of the head
39. Pertaining to the anterior surface of the leg
40. Pertaining to the area of the lower back or loin
41. Pertaining to the trunk below the abdomen
42. Pertaining to the area of the back that contains the shoulder blades
43. Pertaining to the posterior surface of the elbow
44. Arm (noun)
45. Two terms pertaining to the chest
C. Body Planes and Sections
Write the name of the plane that the phrase describes.
1. Divides body or organ into unequal right and left sections
2. Divides body or organ into anterior and posterior sections
3. Divides body or organ into superior and inferior sections
4. Divides body into right and left halves
5. Which two planes when passed through the body would result in two sections, with each section containing a piece of the heart and a piece of each lung?
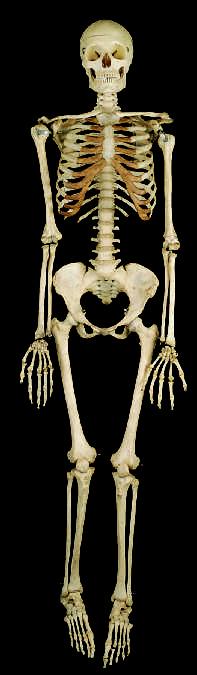
SUPERIOR SUPERIOR
Skull
Cranial por tion
Facial por tion
Pectoral (shoulder) girdle
Clavicle
Scapula
Thorax
Ster num
Ribs
Upper limb (extremity)
Humerus
Ulna
Radius
Car pals
Metacar pals Phalanges
Lower limb (extremity)
Femur
Patella
Tibia
Fibula
Tarsals Metatarsals Phalanges
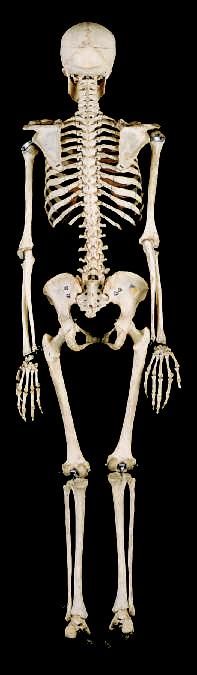
D. Directional Terms
Complete the sentences using directional terms. Use Figure 1.5 for reference.
1. The clavicle is to the ribs.
2. The ribs are to the sternum.
3. The humerus is to the radius.
4. The ulna is to the radius.
5. The tibia is to the femur.
6. The right humerus and the right radius are
7. The pelvic girdle is to the ribs.
8. The sternum is to the vertebral column.
9. The scapula is to the clavicle.
10. The right fibula and left fibula are
Vertebral column
Pelvic (hip) girdle
Vertebral column
Pelvic (hip) girdle
(b) Posterior view
(a) Anterior view
Mark Nielsen
Mark Nielsen
FIGURE 1.5 Human skeleton.
Using Your Knowledge
1
A. Body Regions, Anatomical Terminology, and Directional Terms
1. A 55-year-old male presented with an irregularly shaped and abnormally pigmented mole in the left scapular region, just lateral to the vertebrae. Indicate on Figure 1.6 where this mole is likely to be found.
2. A 37-year-old female presented to the emergency room with a severe burn (3rd degree) on the right brachial region just proximal to the antecubital region. Indicate on Figure 1.6 where the laceration is likely to be found.
3. A 19-year-old female was identified by a tattoo on the fibular surface of the right leg just proximal to the tarsal region. Indicate on Figure 1.6 where the tattoo is likely to be found.
(a) Anterior view (b) Posterior view
FIGURE 1.6 Body regions, anatomical language, and directional terms.
Questions 4-7 each contain an italicized word. These words are derived from the word roots that are also used to form the adjectives in Table 1.1. Using the locations suggested by the italicized words, answer questions 4–7.
4. Is the popliteal artery proximal or distal to the femoral artery?
5. Is the pectoralis major muscle anterior or posterior to the subscapularis muscle?
6. Is the sternocleidomastoid muscle superior or inferior to the rectus abdominis muscle?
7. Are the thoracic vertebrae medial or lateral to the scapulae?
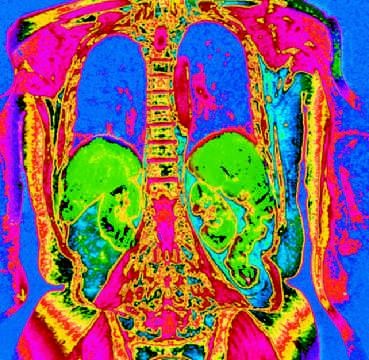
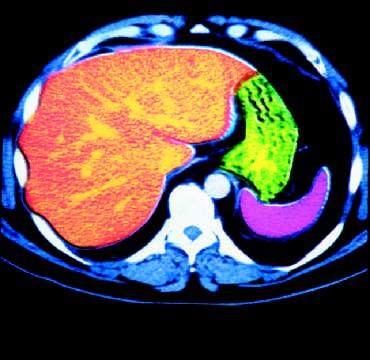
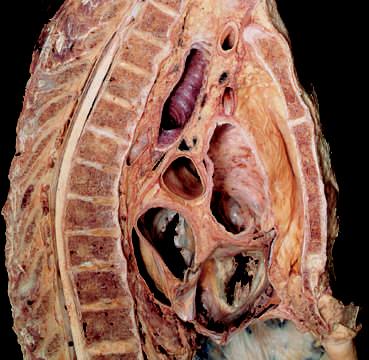
B. Body Planes and Sections
Figure 1.7 contains three different sections through the thorax. Indicate which section (view a, b, or c) is a
8. Frontal section ______
9. Sagittal section ______
10. Transverse (axial) section ______
FIGURE 1.7 Sections through the thorax.
Right lung
Liver Vertebral column Left kidney
Small intestine Stomach
(a)
Royal Victoria Infirmary, NewcastleUpon Tyne/Science Source
Spinal cord Vertebral column Trachea Hear t Ster num
(c)
Mark Nielsen
Liver VertebraStomach Spleen
(b)
Alfred Pasieka/Science Source
Organ Systems and Body Cavities 2
OBJECTIVES MATERIALS
1 Name the organ systems and describe the functions of each
2 Name and identify the major organs of each organ system
3 Describe the location of the body cavities and name the organs they contain
4 Describe the structure, location, and function of the serous membranes
5 Identify the abdominopelvic quadrants and regions and the major organs found in each
Organ systems are like different departments within a company. Within a company, departments work together to keep the company functioning. Within the body, organ systems work together to keep the body alive. In this exercise, you will learn the basic function and location of each organ system.
A. Overview of Organ Systems and Major Organs
An organ system is a group of organs performing a common function. All organ systems cooperate to maintain an optimal environment for body cells through a process called homeostasis (homeo- = same; stasis = standing). Failure to maintain homeostasis results in disorders, disease, and possibly death.
• human torso models or charts
• male and female human reproductive models or charts
• paper or plastic large enough to outline student torsos, markers
• articulated skeleton
• one-gallon zippered plastic bags (1 per group)
• masking tape
• rat dissection video in the Wiley Student Companion Site
Before Going to Lab
1 Review organ system functions and major organs in Table 2.1
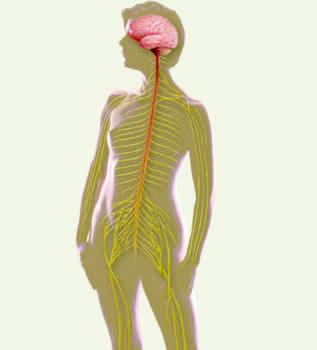
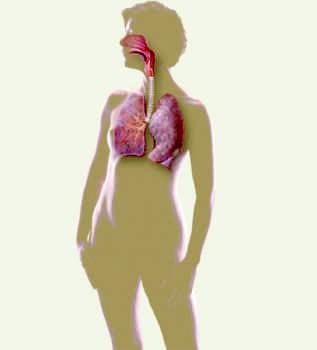
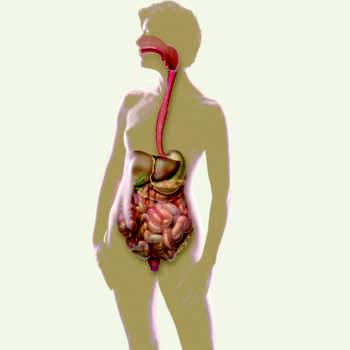
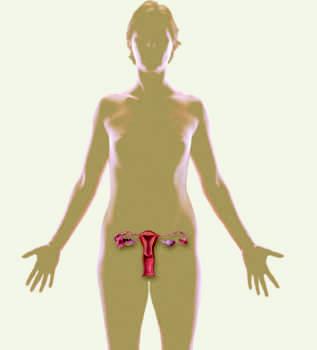
2 Label the organ systems in Figure 2.1. Refer to Table 2.1.
TABLE 2.1 Functions and Major Organs of the Organ Systems
ORGAN SYSTEM FUNCTION AND MAJOR ORGANS
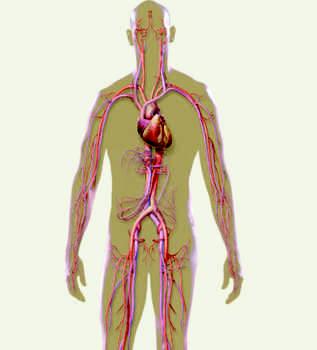
Cardiovascular Transports nutrients, chemical messengers, gases, and wastes in blood
Major organs: heart and blood vessels
Respiratory Adds oxygen to blood and removes carbon dioxide from blood; produces sound; maintains body fluid pH
Major organs: nose, pharynx (throat), larynx, trachea, bronchi, lungs
Digestive Breaks down food into units that can be absorbed into the body, eliminates wastes and non-digestible fiber in food
Urinary Removes nitrogenous wastes; maintains body fluid volume, pH, and electrolyte levels through urine production
Major organs: kidneys, ureters, urinary bladder, urethra
Integumentary Provides a protective barrier for the body and aids in production of vitamin D; eliminates some waste; contains sensory receptors for pain, touch, and temperature; fat provides insulation
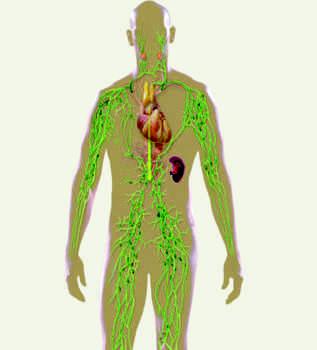
Lymphatic and Immune
Major organs: skin and skin structures (hair, nails, sweat glands, oil glands)
Returns fluid to blood; carries dietary lipids from GI tract to blood; detects and eliminates disease-causing organisms
Major organs: lymphatic vessels, lymph nodes, spleen, thymus, bone marrow, tonsils
Skeletal Protects major organs; provides levers and support for body movement; bone marrow contains stem cells that produce blood cells, and is site for maturation of lymphocytes
Major organs: bones and cartilage
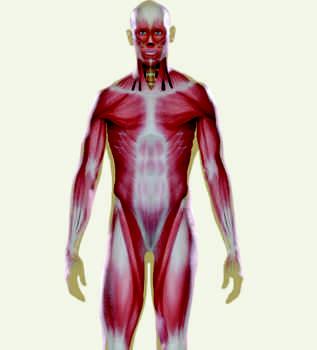
Muscular Moves bones and maintains posture; major source of body heat
Major organs: skeletal muscles and tendons
Nervous Controls cell function with electrical signals; helps control body homeostasis
Major organs: brain, spinal cord, nerves, and special sense organs
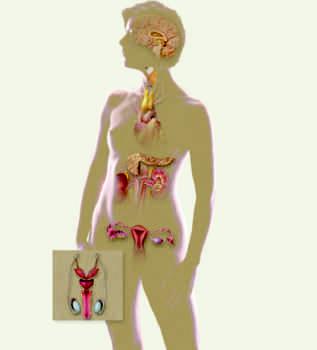
Endocrine Controls cell function with hormones; helps control body homeostasis
Reproductive Produces gametes and sex hormones; female uterus provides environment for development of fetus
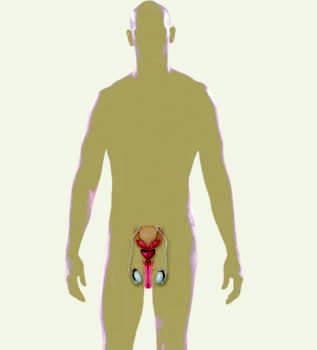
Major organs in male: testes, ductus deferens, penis
Major organs in female: ovaries, uterine tubes, uterus, vagina
FIGURE
Blood vessels:
Ar tery Vein
Hear t
Pituitar y gland
Pineal gland Thymus
Thyroid gland
Pancreas
Adrenal gland
Testis
Ovar y
Kidney
Ureter
Spleen
Lymph node
Lymphatic vessel
Lar ynx (voice box) Phar ynx
Trachea (windpipe)
Bronchus
Lung
Mouth
Esophagus
Liver
Gallbladder
Large intestine
Small intestine
Anus
Salivar y gland
Phar ynx
Stomach
Pancreas (posterior to stomach)
Uterine (fallopian) tube
Urinar y bladder
Urethra
Uterus
Vagina
2.1 Selected organs and organ systems, continued .
Mammar y gland
Ovar y
Penis
Testis
Ductus (vas) deferens
Prostate
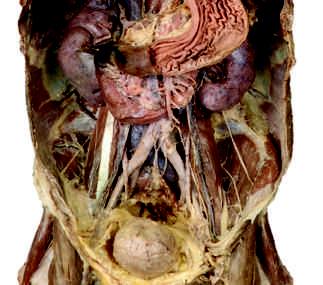
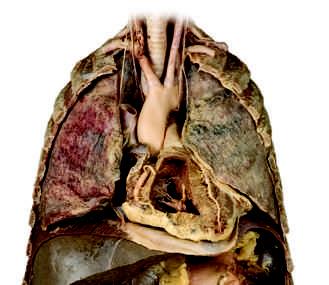
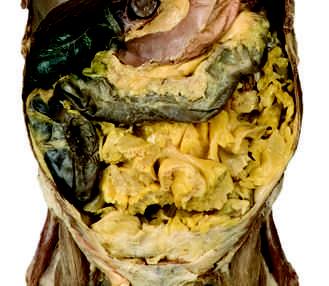
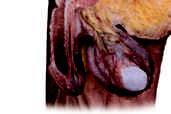
FIGURE
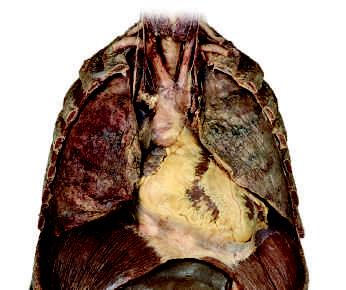
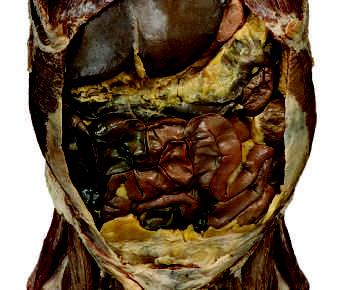
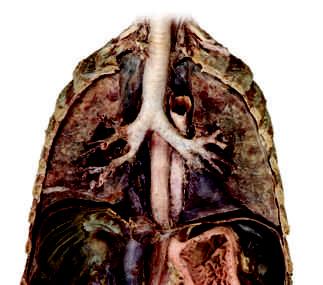
FIGURE 2.2 Selected organs in cadaver dissection.
Superficial organs
(b) Intermediate organs
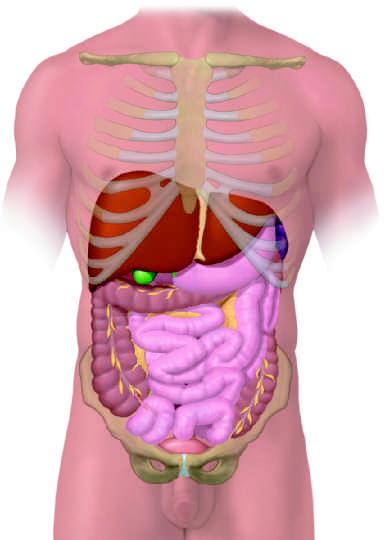
LAB ACTIVITY 1 Identification of Organs on Torso
1 Identify the organs in Figure 2.2. Note which organs must be removed to see deeper organs.
2 Identify the following organs on the anterior surface of a torso model. Identify all the organs without removing any organs from the model.
• trachea
• heart
• lungs
• liver
• stomach (torso’s left side)
• small intestine
• large intestine (colon)
3 Remove the lungs, heart, liver, and stomach. Locate the gallbladder on the inferior surface of the liver.
4 Identify the following organs on a torso model:
• esophagus
• bronchi (right and left)
• inferior vena cava
• pancreas (posterior to stomach)
• spleen
5 Remove the small intestine and large intestine. Locate the appendix at the inferior right end of the large intestine.
6 Identify the following organs on a torso model:
• abdominal aorta
• adrenal glands (superior surface of kidneys)
• kidneys
• ureters
• urinary bladder
7 Identify the female reproductive organs on a female reproductive model. Observe the position of the urinary bladder relative to the uterus.
• ovaries
• uterus
• urinary bladder
8 Identify the male reproductive organs on a male reproductive model.
• penis
• scrotum (skin covering testes)
• testes
Key for Organs in Figure 2.2
1 trachea
2 lungs
3 heart
4 diaphragm
5 liver
6 stomach
7 colon (large intestine)
8 small intestine
9 gallbladder
9 Answer the following questions about the position of each organ on the torso model or in Figure 2.2.
1. The stomach is _______ to the small intestine.
a. superior b. inferior c. medial d. lateral
2. The liver is _______ to the lungs.
a. superior b. inferior c. medial d. lateral
3. The lungs are _______ to the heart.
a. superior b. inferior c. medial d. lateral
4. The trachea is _______ to the esophagus.
a. medial b. inferior c. anterior d. posterior
5. The pancreas is _______ to the stomach.
a. superior b. anterior c. lateral d. posterior
6. The large intestine is _______ to the stomach.
a. superior b. inferior c. posterior d. lateral
7. The stomach is _______ to the spleen.
a. lateral b. medial c. superior d. inferior
8. The abdominal aorta and inferior vena cava are _______ to the kidneys.
a. medial b. lateral c. superior d. inferior
9. The kidneys are _______ to the small intestine.
a. anterior b. posterior c. superior d. inferior
10. The urinary bladder is _______ to the kidneys.
a. posterior and superior b. medial and inferior
c. medial and superior d. lateral and posterior ■
LAB ACTIVITY 2 Organ Location
1 Draw the outline of a full-size torso on paper or plastic.
2 Using a marker, draw life-size outlines of all superficial organs in the appropriate place on the paper or plastic torso. ■
B. Body Cavities
Many of the body’s organs are found within body cavities. The cranial cavity contains the brain, and it is continuous with the vertebral (vertebra = back) canal that contains the spinal cord.
The thoracic cavity is a space enclosed by the ribs, sternum, and vertebral column. This cavity contains three small cavities: the pericardial cavity (peri- = around; -cardia = heart) and two pleural cavities (pleuro- = side or rib). The pericardial cavity contains the heart, and each pleural cavity contains a lung. The mediastinum (media= middle; -stinum = partition), a central area within the thoracic cavity, extends from the neck to the diaphragm and from the sternum to the vertebral column. The organs located in the mediastinum are the heart, thymus gland, esophagus, trachea, blood vessels, and bronchi. The pleural cavities are located on either side of the mediastinum. The diaphragm separates the thoracic cavity from the abdominopelvic cavity.
The abdominopelvic cavity consists of two continuous cavities: the abdominal cavity and the pelvic cavity. The abdominal cavity is the superior portion located between the diaphragm and the brim of the pelvis (hip bones). This cavity contains the stomach, liver, gallbladder, pancreas, spleen, small intestine, kidneys, appendix, and part of the large intestine. Within the abdominal cavity is the
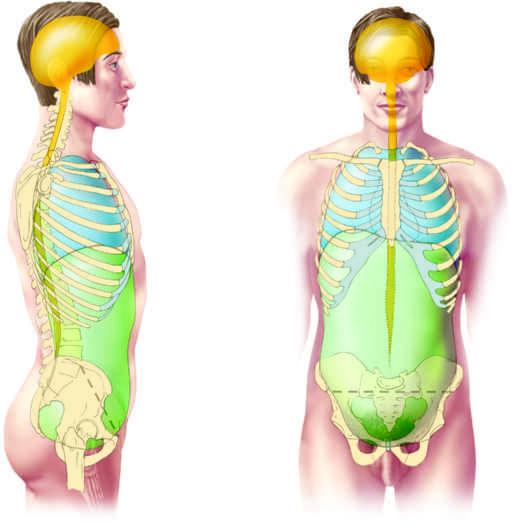
2.3
peritoneal cavity, which contains most abdominal organs. A few organs are retroperitoneal (retro = backward), or located posterior to the peritoneum. These organs are the pancreas, kidneys, adrenal glands, and portions of the large intestine, small intestine, aorta and inferior vena cava. The pelvic cavity is the inferior portion of the abdominopelvic cavity. The pelvic cavity contains part of the large intestine, rectum, urinary bladder, female reproductive organs (ovaries, uterine tubes, uterus, vagina), and male reproductive organs (prostate, and part of ductus deferens). It is important to note that the testes and penis are not located in the pelvic cavity but are located inferior to it.
Before Going to Lab
1 Label the major body cavities and the diaphragm on Figure 2.3(a) and (b).
LAB ACTIVITY 3 Body Cavities
1 Locate the major body cavities on a skeleton and torso model. Identify the organs located in each body cavity.
2 Locate the mediastinum (meed-ee-uh-STINE-um) on a torso model or on Figure 2.1. Identify the organs located within the mediastinum. ■
abdominal cavity
cranial cavity
C. Serous Membranes
Most of the organs in the ventral body cavity are covered with thin serous (serum = any clear, watery fluid) membranes, which are composed of two layers: a visceral layer and a parietal layer. The visceral (viscera = internal organs) layer covers the organ, whereas the parietal (paries = wall) layer attaches to and covers the ventral body wall. These two layers make up one continuous sheet that folds to form a sac. Between the two layers is a potential cavity containing a small amount of serous fluid secreted by the membranes. The clear, watery serous fluid prevents friction as the organs move within the ventral body cavity. For example, the heart has movement within the thoracic cavity as it fills with and ejects blood.
Serous membranes are named for the cavities they surround. Thoracic serous membranes include the pleura, which covers the lungs, and the pericardium, which covers the heart. The serous membrane that covers abdominal organs in the peritoneal cavity is the peritoneum ( peri- = around; teinein = to stretch). Although most abdominal organs are positioned within the peritoneal cavity, a few organs are retroperitoneal (retro- = backward), or located posterior to the peritoneum.
Before Going to Lab
1 In Figure 2.4, observe how the serous pericardium folds to form a double layer.
2 Label the two layers of the serous pericardium in Figure 2.4.
• parietal
• visceral 1
FIGURE 2.4 Serous pericardium folds to surround the heart.
LAB ACTIVITY 4 Serous Membranes
1 Make a replica or model of a serous membrane with your lab group.
• Obtain a 1-gallon zippered plastic bag.
• Push all the air out of the bag and zip the bag.
• Have a lab partner place a fist (simulating an organ) on the bottom edge of the bag and push up into the bag so the bag surrounds the fist.
• Remove the fist, unzip the bag, and add about 40 to 50 mL of water to the bag. Push out the extra air before rezipping the bag.
• Now have the same lab partner place a fist (simulating an organ) on the bottom edge of the bag and push up into the bag so the bag surrounds the fist.
2 Clean up as directed by your instructor.
3 Answer the Discussion Questions with your lab group.
DISCUSSION
QUESTIONS
Serous Membranes
1 In the bag with water, what is the name of the simulated serous membrane layer that is touching the fist (organ)?
2 In the same bag, what is the name of the simulated outer serous membrane layer?
3 What does the water represent?
4 Was it easier to push a fist into the bag with no water or into the bag with water?
5 Based on your observations, does the presence of serous fluid make it easier for organs to move? Explain.
D. Organ Systems, Body Cavities, and Serous Membranes in the Rat
The organ systems, body cavities, and serous membranes of the rat are similar to those of humans. The rat dissection will allow you to see the relationship of organs to each other, organ location within body cavities, and serous membranes.
LAB ACTIVITY 5 Rat Dissection Video
Go to the Wiley Student Companion Site to view the rat dissection video. ■
E. Abdominopelvic Regions and Quadrants
Anatomists divide the abdominopelvic cavity into nine regions using two vertical and two horizontal lines in a tic-tac-toe grid so that the location of any organ is simple to describe. The two vertical lines are drawn mid-clavicular (mid-collar bone) and just medial to the nipples, beginning at the diaphragm and extending inferiorly through the pelvic area. The upper horizontal line is drawn across the abdomen, inferior to the ribs and across the inferior portions of the liver and stomach. The lower horizontal line is drawn slightly inferior to the superior portion of the pelvic bones. These nine regions from the top right to the lower left are right hypochondriac (hypo- = under; chondro- = cartilage), epigastric (epi- = upon; gastro- = stomach), left hypochondriac, right lumbar (lumbar = loin), umbilical, left lumbar, right inguinal or iliac (inguinal = groin), hypogastric or pubic, and left inguinal or iliac. Clinicians are more apt to divide this cavity into four quadrants that are formed by transverse and sagittal planes running through the umbilicus (navel). These quadrants are useful clinically when one is trying to describe abnormalities or to determine which organ may be the cause of pain. The four quadrants are right upper quadrant (RUQ), left upper quadrant (LUQ), right lower quadrant (RLQ), and left lower quadrant (LLQ).
NOTE: Right and left always refer to the model’s or specimen’s own right and left.
Before
Going to Lab
1 Draw lines on Figure 2.5(a) separating the abdominopelvic cavity into quadrants and label the quadrants.
2 Draw lines on Figure 2.5(b) separating the abdominopelvic cavity into regions and label the regions.
LAB ACTIVITY 6 Abdominopelvic Quadrants and Regions
1 Using a piece of masking tape, mark the location of the diaphragm on a human torso or on yourself.
2 Using two pieces of masking tape, divide the abdominopelvic cavity into quadrants on a human torso or on yourself.
3 Using the torso model or your textbook, identify in which abdominopelvic quadrant(s) each organ is primarily located. Use the abbreviations RUQ, LUQ, RLQ, and LLQ.
a. appendix
b. large intestine or colon
c. liver
d. ovaries
e. pancreas
f. small intestine
g. spleen
h. stomach
4 Using four pieces of masking tape, divide the abdominopelvic cavity into regions on a human torso or on yourself.
5 Using the torso model or your textbook, identify in which abdominopelvic region each organ is primarily located.