No part of this publication may be reproduced, stored in a retrieval system or transmitted in any form or by any means, electronic, mechanical, photocopying, recording, scanning or otherwise, except as permitted under Sections 107 or 108 of the 1976 United States Copyright Act, without either the prior written permission of the Publisher, or authorization through payment of the appropriate per-copy fee to the Copyright Clearance Center, 222 Rosewood Drive, Danvers, MA 01923, (978) 750-8400, fax (978) 646-8600. Requests to the Publisher for permission should be addressed to the Permissions Department, John Wiley & Sons, Inc., 111 River Street, Hoboken, NJ 07030, (201) 748-6011, fax (201) 748-6008, or online at www.wiley.com/go/permissions.
Limit of Liability/Disclaimer of Warranty: The publisher and the author make no representations or warranties with respect to the accuracy or completeness of the contents of this work and specifically disclaim all warranties, including without limitation warranties of fitness for a particular purpose. No warranty may be created or extended by sales or promotional materials. The advice and strategies contained herein may not be suitable for every situation. This work is sold with the understanding that the publisher is not engaged in rendering legal, accounting, or other professional services. If professional assistance is required, the services of a competent professional person should be sought. Neither the publisher nor the author shall be liable for damages arising herefrom. The fact that an organization or Web site is referred to in this work as a citation and/or a potential source of further information does not mean that the author or the publisher endorses the information the organization or website may provide or recommendations it may make. Further, readers should be aware that Internet websites listed in this work may have changed or disappeared between when this work was written and when it is read.
For general information on our other products and services please contact our Customer Care Department within the United States at (877) 762-2974, outside the United States at (317) 572-3993 or fax (317) 572-4002.
Wiley publishes in a variety of print and electronic formats and by print-on-demand. Some material included with standard print versions of this book may not be included in e-books or in print-ondemand. If this book refers to media such as a CD or DVD that is not included in the version you purchased, you may download this material at booksupport.wiley.com. For more information about Wiley products, visit www.wiley.com.
Library of Congress Control Number: 2020949809
Trademarks: Wiley and the Wiley logo are trademarks or registered trademarks of John Wiley & Sons, Inc. and/or its affiliates, in the United States and other countries, and may not be used without written permission. iPhone is a registered trademark of Apple, Inc. in the United States and other countries. All other trademarks are the property of their respective owners. John Wiley & Sons, Inc. is not associated with any product or vendor mentioned in this book. iPhone Portable Genius is an independent publication and has not been authorized, sponsored, or otherwise approved by Apple, Inc.
This book is dedicated to my beautiful wife, Karen, who is wise, funny, and smart, even in texts.
About the Author
Paul
McFedries
is a full-time technical writer. Paul has been authoring computer books since 1991 and has nearly 100 books to his credit. Paul’s books have sold more than four million copies worldwide. These books include the Wiley titles Windows Portable Genius; iPad Portable Genius, Fourth Edition; Teach Yourself VISUALLY Windows 10, Third Edition; and G Suite for Dummies. You can visit Paul on the web at www. mcfedries.com or on Twitter at www.twitter.com/paulmcf.
Acknowledgments
a great time writing this book because it’s just pure fun to write about what’s new and noteworthy in the iPhone, particularly the lesserknown features that can make your life easier and more efficient. More than that, however, I got to work with a great bunch of professionals at Wiley. There’s a long list of people who contributed to the making of this book, and I extend a hearty thanks to all of them for their hard work and competence. A few of those people I had the pleasure of working with directly included Associate Publisher Jim Minatel, Project Editors Maureen and Scott Tullis, Copy Editor Kim Wimpsett, and Content Refinement Specialist Barath Kumar Rajasekaran. Many thanks to each of you for the skill, professionalism, sense of humor, and general niceness that made my job infinitely easier and made this a better book.
I had
chapter 3
chapter 4
chapter 7
chapter 8
How Do I Use My iPhone to
Introduction
is a success not because more than 2 billion of them have been sold (or, I should say, not only because over 2 billion of them have been sold; that’s a lot of phones!), but because the iPhone has reached the status of a cultural icon. Even people who don’t care much for gadgets in general and cell phones in particular know about the iPhone. For those of us who do care about gadgets, the iPhone elicits a kind of technological longing that can be satisfied in only one way: by buying one.
Part of the iconic status of the iPhone comes from its gorgeous design and remarkable interface, which makes all the standard tasks — surfing, emailing, texting, scheduling, and playing — easy and intuitive. But just as an attractive face or an easygoing manner can hide a personality of complexity and depth, so too does the iPhone hide many of its most useful and interesting features.
When you want to get beyond the basics of iPhone and solve some of its riddles, you might know some iPhone geniuses in person or online. Ideally, you’ll get good advice on how to get your iPhone to do what you want it to do. Asking a genius is a great thing, but it isn’t always a convenient thing because geniuses often have better things to do with their time.
What you really need is a “genius” of your own that’s easier to access, more convenient, and doesn’t require pleading emails or bribery. What you really need is a portable genius that enables you to be more productive and solve problems — wherever you and your iPhone happen to be.
Welcome, therefore, to iPhone Portable Genius, Sixth Edition. This book is kind of a genius all wrapped up in an easy-to-use, easy-to-access, and eminently portable format. In this book, you learn how to get more out of your iPhone by accessing all the powerful and timesaving features that aren’t obvious at a casual glance. In this book, you learn about all
The iPhone
the amazing new features found in the latest iPhones and the latest version of iOS. In this book, you learn how to prevent iPhone problems from occurring and (just in case your preventative measures are for naught) how to fix many common problems.
This book is for iPhone users who know the basics but want to take their iPhone education to a higher level. It’s a book for people who want to be more productive, more efficient, more creative, and more self-sufficient (at least as far as the iPhone goes). It’s a book for people who use their iPhone every day but would like to incorporate it into more of their day-to-day activities. It’s a book I had a blast writing, so I think it’s a book you’ll enjoy reading.
How Do I Start Using My iPhone?
When you first look at your iPhone, you notice its sleek, curvaceous design, and then you notice what might be its most remarkable feature: It’s nearly button-free! Unlike your garden-variety smartphone bristling with keys and switches and ports, your iPhone has very few physical buttons. This makes for a stylish, possibly even sexy, design, but it also leads to an obvious problem out of the box: How do you work the darn thing? This chapter solves that problem by giving you the grand tour of your iPhone. You learn about the few physical buttons on the phone, and then I show you the real heart of the iPhone, the remarkable touchscreen.
Working with the Side Button
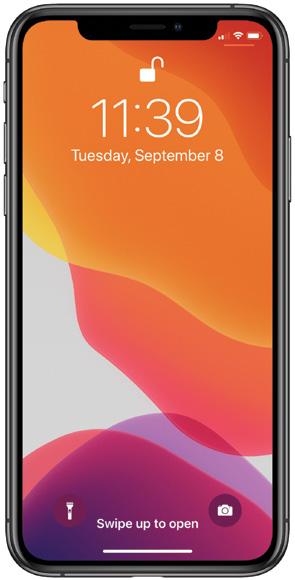
If your iPhone is on but you’re not using it, the phone automatically goes into standby mode after one minute. This is called Auto-Lock, and it’s a handy feature because it saves battery power when your iPhone is just sitting there. However, you can also put your iPhone into standby mode at any time by using the Side button (also called the Sleep/ Wake button). As pointed out in Figure 1.1, you find this button on the right side of your phone, assuming you’re holding the phone as shown in Figure 1.1 (this is called portrait orientation). (On older iPhones, the Side button is on the top of your phone.)
Ring/Silent switch
Volume Up
Volume Down
Side button
1 .1 On all recent iPhone models, the Side button appears on the right side.
As I describe in the following sections, the Side button has four main functions: sleeping and waking, powering on and off, handling incoming calls, and authorizing purchases.
Sleeping and waking the iPhone
If you’re currently using your iPhone, you put the phone in standby mode by pressing the Side button once. You can still receive incoming calls and texts, but the screen powers down, which drops the power consumption considerably. Tap the Side button again to wake your iPhone (or just tap the screen). You’re prompted with the Swipe Up to Open message shown in Figure 1.1, and you slide your finger up from the bottom of the screen to unlock the phone (or enter your passcode).
Press the Side button to put your phone in standby whenever you’re not using the screen. This not only conserves battery power but also prevents accidental screen taps. If you have a program such as the Music app running, it continues to run even while the phone is in standby.
Powering the iPhone on and off
You can also use the Side button to turn off your iPhone so that it uses no power. This is a good idea if your battery is getting low and you don’t think you’ll be able to charge it any time soon. You can still periodically check your messages or make an outgoing call when needed, but as long as you turn off the phone when you’re done, you minimize the chance that your battery will drain completely. You might also want to turn off your iPhone if you won’t be using it for a few days.
Follow these steps to turn off your iPhone:
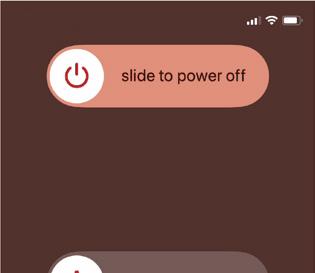
1 . Press and hold both the Side button and either the Volume Up or Volume Down button (pointed out in Figure 1 .1 ) for a couple of seconds . The Slide to Power Off slider appears on the screen, as shown in Figure 1.2. For the record, note that this screen also comes with three other features of note:
Medical ID . Drag this slider all the way to the right to open the Medical ID page, which shows your name, your date of birth, and your medical conditions, allergies, medications, blood type, and more. To configure your Medical ID page, open Settings, tap Health, and then tap Medical ID.
Emergency SOS . Drag this slider all the way to the right to place a call to your local emergency service (such as 911) and, once the call ends, to optionally send an emergency text to each person listed in the Health app’s Emergency Contacts list. To configure Emergency SOS, open Settings and tap Emergency SOS.
Cancel . Tap this button if you change your mind and decide to leave your iPhone on.
2 . Use your finger to drag Slide to Power Off all the way to the right . The iPhone shuts down after a few seconds.
1 .2 Press and hold the Side button and a Volume button to display this screen.
When you’re ready to resume your iPhone chores, press and hold the Side button until you see the Apple icon. The iPhone powers up and then a few seconds later displays the unlock screen.
Silencing or declining a call
The Side button has another couple of tricks up its electronic sleeve, and these features give you quick ways to handle incoming calls:
Silence an incoming call . Press the Side button once. This temporarily turns off the ringer, which is great in situations where you don’t want to disturb the folks around you. You still have the standard four rings to answer, should you decide to. If you don’t answer, your iPhone sends the call to your voicemail.
Decline an incoming call . Press the Side button twice. This sends the call directly to voicemail, which is useful in situations where you don’t want the ringing to disturb your neighbors and you don’t want to answer the call. Note that, in this case, you don’t have the option of answering the call.
Making a purchase
If your iPhone has Face ID, you also use the Side button to make purchases:
Use Apple Pay in a store . Doubleclick the Side button to use your default Apple Pay card. For more about Face ID and setting up Apple Pay, see Chapter 2.
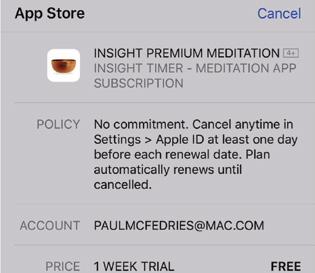
Confirm an app or in-app purchase . Wait until you see the Double Click to Confirm prompt shown in Figure 1.3; then doubleclick the Side button to authorize the purchase.
1 .3 Double-click the Side button to authorize an app or in-app purchase.
Working with the Ring/Silent
Switch
When a call comes in and you press the Side button once, your iPhone silences the ringer. That’s great if you’re in a meeting or a movie, but the only problem is that it may take you one or two rings before you can tap the Side button, and by that time the folks nearby are already glaring at you.
To prevent this phone faux pas, you can switch your iPhone into Silent Mode, which means it doesn’t ring, and it doesn’t play any alerts or sound effects. When the sound is turned off, only alarms that you’ve set using the Clock application will sound. The phone will still vibrate unless you turn this feature off as well.
You switch the iPhone between Ring Mode and Silent Mode using the Ring/Silent switch, which is located on the left side of the iPhone, near the top (assuming you’re holding the phone in portrait orientation), as shown earlier in Figure 1.1.
Use the following techniques to switch between Silent Mode and Ring Mode:
Put the phone in Silent Mode . Flick the Ring/Silent switch toward the back of the phone. You see an orange stripe on the switch, the iPhone vibrates briefly, and you see a brief notification telling you that Silent Mode is on.
Return to Ring Mode . Flick the Ring/Silent switch toward the front of the phone. You no longer see the orange stripe on the switch, and the iPhone displays the current ringer volume setting.
Operating the Volume Controls
The volume controls are on the left side of the iPhone (again, when you’re holding the phone in portrait orientation), right below the Ring/Silent switch (see Figure 1.1). The button closer to the top of the iPhone is Volume Up, and you press it to increase the volume; the button closer to the bottom of the iPhone is Volume Down, and you press it to decrease the volume. As you adjust the volume, a slider appears on-screen representing the volume level.
You use these buttons to control the volume throughout your iPhone:
If you’re on a call, the volume controls adjust your speaker volume.
If you’re using the Music app, the volume controls adjust the music volume.
In all other situations, the volume controls adjust the output of sounds such as alerts and effects.
Inserting a SIM Card
Before you can use your iPhone to make and receive calls over the cellular network, you need to insert a SIM (subscriber identity module) card, which your cellular provider includes with your phone (or which you can purchase separately as a prepaid card).
With your SIM card at hand, follow these steps to insert it into your iPhone:
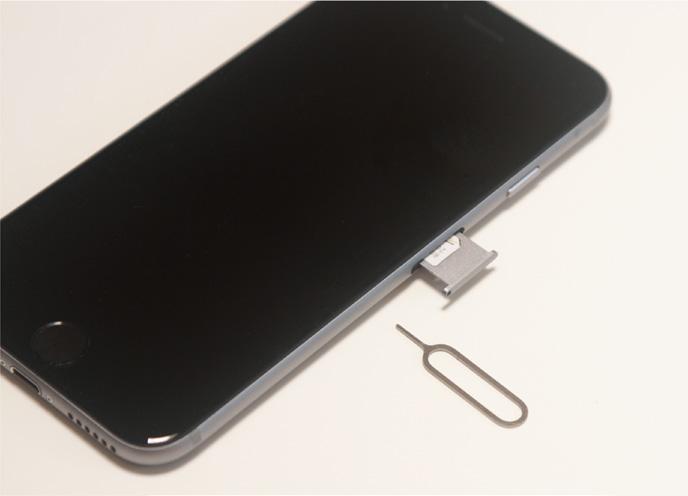
1 . Locate the SIM removal tool that came with your phone . Figure 1.4 points out this tool. If you can’t find the SIM removal tool, you can use any object with a similarly narrow end, such as a small paperclip or a safety pin.
1 .4 Push a SIM removal tool or pin into the hole to eject the tray.
2 . Push the SIM removal tool into the hole that appears on the SIM card tray . This tray appears just below the Side button, as shown in Figure 1.4. Insert the tool until the tray ejects.
SIM card tray
SIM removal tool
3 . Carefully lay the SIM card into the SIM card tray . To ensure you insert the card correctly, match the notch in one corner of the SIM card with the corresponding notch in the tray.
4 . Reinsert the SIM card tray until you feel a soft click as the tray slides into its correct position . Your SIM card is ready to use.
Operating the Touchscreen
The most distinctive feature of the iPhone is its versatile touchscreen. You can zoom in and out, scroll through lists, drag items here and there, and even type messages. Amazingly, the touchscreen requires no external hardware to do all this. You don’t need a stylus or digital pen, and you don’t need to attach anything to the iPhone. Instead, the touchscreen requires just your finger (or, for some operations, a couple of fingers).
Navigating the touchscreen
There are a few maneuvers that you need to be familiar with to successfully use the touchscreen in all its glory. Take some time to try these now. I’ll refer to these gestures throughout the rest of the book, so play around and make sure you understand them:
Tap . This means you use your finger to quickly press and release the screen where desired. This gesture is what you use to initiate just about any action on the iPhone. This opens applications, activates options, enters text boxes, and much more.
Press . This means you apply pressure to the screen to activate the 3D Touch feature available on some iPhones. A light press on a screen object (such as a Home screen icon) activates that object’s Peek feature, which either gives you a sneak peek of the object or displays commands that you can run on the object. If you then release the screen, iOS takes you back to where you were. Otherwise, a slightly harder press on the screen object activates the object’s Pop feature, which takes you into the object’s app.
Note
3D Touch is available on iPhone models 6s, 6s Plus, 7, 7 Plus, 8, 8 Plus, X, XS, and XS Max. iPhone models XR, SE (2nd edition), 11, 11 Pro, 11 Pro Max, 12, 12 mini, 12 Pro, and 12 Pro Max all replace 3D Touch with Haptic Touch, which recognizes a long press (that is, a press that lasts a few seconds) instead of actual screen pressure.
Double-tap . This is what it sounds like: two quick taps with your finger. In applications such as Photos or Safari, it zooms in on images or chunked parts of web pages. A second double-tap zooms back out.
Swipe and flick . To swipe means to drag your finger across the screen. You use this technique to scroll through lists, drag items to different spots, and unlock the iPhone. Flicking is just an exaggerated swipe. This rapidly scrolls through lists. Flick your finger up and down (or sometimes left and right) on the screen and the iPhone rapidly scrolls through the list. The faster the flick, the faster the scroll. Touch the screen to stop the scrolling process.
Spread and pinch . You use these techniques to zoom in on or out of the screen. To spread means to move two fingers apart, and you use it to zoom in; to pinch means to move two fingers closer together, and you use it to zoom out. This is especially useful when viewing web pages because the text is often too small to read. Spread to zoom in on the text, making it readable, and pinch to return to the full screen for easy scrolling and navigation.
Searching your iPhone
Parkinson’s Law of Data pithily encapsulates an inescapable fact of digital life: “Data expands to fill the space available for storage.” With each new iteration of the iPhone, the space available for storage keeps getting larger: from 4GB in the original phone to 512GB in a top-of-the-line iPhone 12. So, following Parkinson’s Law, we keep adding more data to our iPhones: music, photos, videos, email messages, Safari bookmarks, and on and on.
That’s cool because it means you can bring more of your digital world with you wherever you go, but there’s another law that quickly comes into play; call it The Law of Digital Needles in Electronic Haystacks: “The more data you have, the harder it is to find what you need.” Fortunately, iOS rides to the rescue by adding welcome search features to the iPhone.
If you use a Mac, then you probably know how indispensable the Spotlight search feature is. It’s just a humble text box, but Spotlight enables you to find anything on your Mac in just a blink or two of an eye. It’s an essential tool in this era of massive hard drives. (Windows users get much the same functionality with taskbar searches.)
The size of your iPhone storage might pale in comparison to your desktop’s drive, but you can still pack an amazing amount of stuff into that tiny package, so you really need a way to search your entire iPhone, including email, contacts, calendars, bookmarks, apps, and much more. And, best of all, Spotlight on the iPhone is just as easy to use as Spotlight on the Mac:
1 . Return to any Home screen .
2 . Swipe right to navigate the Home screens until you can’t go any farther . You should now see a screen that includes a Search box at the top.
An often-quicker way to get to the Search box is to swipe down from the topleft corner to display the Notification Center and then swipe right.
Genius
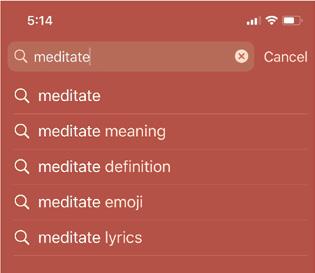
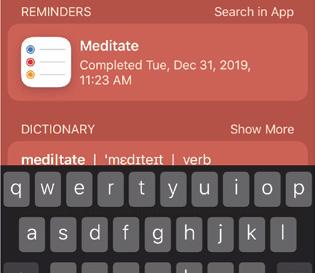
3 . Tap in the Search box and then enter your search text . Your iPhone immediately begins displaying items that match your text as you type, as shown in Figure 1.5.
1 .5 Flick down on the Home screen and then type your search text.
Chapter 1: How Do I Start Using My iPhone?
4 . Tap Search to see the complete results . If you see the item you’re looking for, tap it to open it.
Genius
Spotlight looks for a wide variety of items not only on your iPhone, but also on the Internet, iTunes, the App Store, and more. If you find you’re getting too many results, you can configure Spotlight to not show results from certain apps. Tap Settings and then tap Siri & Search. In the Siri & Search screen, tap an app you want to remove from Search. Then tap the Show App in Search switch to Off and the Show Content in Search switch to Off.
Switching between running apps
Your iPhone is capable of multitasking, which enables you to run multiple apps at the same time. This is useful if, say, you’re playing a game and an email message comes in. You can switch to the message, read it, respond to it, and then resume your game right where you left off.
So how do you switch from one app to another? It depends on your iPhone model:
If your iPhone has a notch at the top of the screen (pointed out later in Figure 1.11), slide a finger up from the bottom edge of the screen and then pause about halfway up the screen.
For all other iPhone models, double-press the Home button (that is, press the Home button twice in succession).
Either way, you end up at the multitasking screen, which displays thumbnail versions of your running apps. Flick left or right to bring the app thumbnail into view and then tap the app to switch to it.
To help you navigate the list of running apps, shut down any apps you won’t be using for a while. Display the multitasking screen and then drag any app you want to shut down to the top of the screen. Genius
Typing on the keyboard
You can type on your iPhone, although don’t expect to pound out the prose as easily as you can on your computer. The on-screen keyboard (see Figure 1.6) is a bit too small for rapid and accurate typing, but once you get used to it (which doesn’t take all that long), you’ll be able to tap text fast enough to get the job done.
1 .6 Trust the touchscreen even though the keys may be small.
To use the keyboard, tap into an area that requires text input, and the keyboard appears automatically. Tap the keys that you want to enter. As you touch each key, a magnified version of the letter pops up. If you touch the wrong key, slide your finger over to the correct one. The keyboard does not enter a key until your finger comes off the screen.
If you find yourself trying to type on your iPhone using one hand, you might find it hard to reach all the keys unless you have an exceptionally long thumb. To make things easier on yourself, tap and hold the Emoji keyboard icon (pointed out in Figure 1.6) and then choose either the Right keyboard (if you’re right-handed) or the Left keyboard (if you’re left-handed). These keyboards shift the keys right and left, respectively, for easier one-handed typing.
Using special keys
The keyboard has a few specialty keys that allow you to do some tricks:
Shift . This key is a little upward-pointing arrow to the left of the Z key. Tap this key once to engage Shift. The letter keys change to uppercase, and the Shift key changes to a black arrow on a white background. The next letter you type will be a capital letter, at which point the Shift key returns to normal automatically (and the letter keys return to their lowercase versions).
123 . Tap this key to display the numeric keyboard, which includes numbers and most punctuation marks. The key then changes to ABC. Tap ABC to return to the standard keyboard.
Emoji keyboard
Genius
Chapter 1: How Do I Start Using My iPhone?
#+= . This key appears within the numeric keyboard. Tap this key to enter yet another keyboard that contains more punctuation marks as well as a few symbols that aren’t used frequently.
Backspace . This key is shaped like a left-pointing arrow with an X inside it, and it appears to the right of the M key. This key deletes at three different speeds:
The first speed deletes in response to a single tap, which deletes just a single letter.
The second speed deletes in response to being held. If you hold the delete key, it begins moving backward through letters and won’t stop after a single letter.
The third speed kicks in if you hold the delete key long enough. This deletes entire words.
Return . This key moves to the next line when you’re typing text. However, this key often changes names and functions, depending on what you’re doing. For example, you saw earlier (see Figure 1.5) that this becomes the Search key when you invoke the Search screen.
Editing text
Everyone asks me how you’re supposed to move throughout the text to edit it. The only obvious option is to delete all the way back to your error, which is impractical to say the least. The solution is in the touchscreen, which enables you to zoom in on the specific section of text you want to edit. Follow these steps:
1 . Press and hold your finger on the line you want to edit . iPhone displays the text inside a magnifying glass, and within that text you see the cursor (you might need to angle your iPhone just so to see the cursor).
2 . Slide your finger along the line . As you slide, the cursor moves through the text in the same direction.
3 . When the cursor is where you want to begin editing, remove your finger .
Understanding predictive typing
As you type, the iPhone often tries to predict which word you want to use, and it displays its suggestions in a bar that appears just above the keyboard. (In earlier versions, a single suggestion appears in a little bubble underneath the current word.) This is called predictive typing, and the suggestions you see depend on the context of your writing.
First, the suggestion feature shows up with misspelled words. iPhone selects the text that it thinks you misspelled and then offers suggested alternatives. You have three ways to handle these suggestions:
To accept the highlighted suggestion, tap the spacebar or any punctuation.
To use another suggestion, tap it.
To keep your typing as is, tap the suggestion that appears in quotation marks.
Second, as you type, the iPhone guesses what the next word might be. For example, if you type happy, iPhone suggests (among others) “Birthday” for the next word. If any of the suggested words is the one you want, tap it to enter the suggestion.
Selecting and copying noneditable text
How you select and then either cut or copy text depends on whether that text is editable or noneditable.
The simplest case is noneditable text, such as you get on a web page. In that scenario, when the text you want to use is on the screen, tap and hold anywhere within the text. After a second or two, your iPhone selects the text and displays blue selection handles around it, as shown in Figure 1.7. If necessary, tap and drag the selection handles to select more or less of the text and then tap Copy.
Selecting and then cutting or copying editable text
1 .7 For text you can’t edit, tap and hold within the text to select it and then tap Copy to copy it.
If the text is editable, such as the text in a note, an email message you’re composing, or any text box, then the process is more involved, but only ever so slightly:
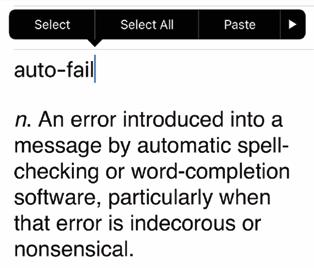
1 . Tap and hold anywhere within the text . After a short pause for effect, your iPhone displays a couple of buttons above the text, as shown in Figure 1.8 (if you’ve previously copied some text, you’ll also see a Paste button; more on this follows).
2 . Tap one of the following options: Select . Tap this button if you want to select only some of the text. Your iPhone displays blue selection handles around the word you tapped.
1 .8 For editable text, tap and hold within the text to see these options.
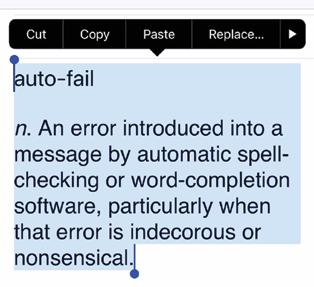
Select All . Tap this button if you prefer to select all the text. The iPhone displays the buttons shown in Figure 1.9; if you don’t need to adjust the selection, skip to Step 4.
3 . Tap and drag the selection handles to select the text you want to work with . The iPhone displays a new set of buttons above the text, as shown in Figure 1.9.
1 .9 Select your text and then choose what you want to do with it.
4 . Tap the action you want iPhone to take with the text: Cut . Tap this button to remove the text and store it in the memory of your iPhone.
Copy . Tap this button to store a copy of the text in the memory of your iPhone.
On larger iPhones, rotate the phone into landscape mode to see an extended keyboard that includes dedicated buttons for Cut (the scissors icon), Copy (the letter A in a square), and Paste (a glue bottle). Genius
Pasting text
With your text cut or copied and residing snugly in the memory of your iPhone, you’re ready to paste the text. If you want to paste the text into a different app, open that app. Position the cursor where you want the text to appear, tap the cursor, and then tap Paste (see Figure 1.9). Your iPhone dutifully adds the cut or copied text.
Copying and pasting a photo
If you want to make a copy of a photo, such as an image shown on a web page, the process is more or less the same as copying noneditable text:
1 . Tap and hold the photo . After a second or two, your iPhone displays a pop-up menu of image options.
2 . Tap Copy . The iPhone copies the photo into its memory.
3 . Open the app where you want the copy of the photo to appear .
4 . Position the cursor where you want the photo to appear and then tap the cursor .
5 . Tap Paste . The iPhone pastes the photo.
Undoing a paste
The Cut, Copy, and Paste commands make the iPhone feel even more like a computer. That’s good, but it also means you can make the same pasting errors that you can with your regular computer. For example, you might paste the text or photo in the wrong spot, or once you’ve performed the paste, you might realize that you selected the wrong data.
Frustrating? Yes. A big problem? Nope! Slap your forehead lightly in exasperation and then perform one of the coolest iPhone tricks: Shake it. Your iPhone displays the options shown in Figure 1.10. Tap Undo Paste to reverse your most recent paste and then move on with your life.
1 .10 Reverse an imprudent paste by shaking the iPhone and then tapping Undo Paste.