ADOBE CREATIVE CLOUD ALL-IN-ONE FOR DUMMIES. 3rd Edition Jennifer Smith https://ebookmass.com/product/adobe-creative-cloud-all-in-onefor-dummies-3rd-edition-jennifer-smith/ Perspective Warps and Distorts with Adobe Tools: Volume 2: Putting a New Twist on Illustrator Jennifer Harder
No part of this publication may be reproduced, stored in a retrieval system or transmitted in any form or by any means, electronic, mechanical, photocopying, recording, scanning or otherwise, except as permitted under Sections 107 or 108 of the 1976 United States Copyright Act, without the prior written permission of the Publisher. Requests to the Publisher for permission should be addressed to the Permissions Department, John Wiley & Sons, Inc., 111 River Street, Hoboken, NJ 07030, (201) 748-6011, fax (201) 748-6008, or online at http://www.wiley.com/go/ permissions.
Trademarks: Wiley, For Dummies, the Dummies Man logo, Dummies.com, Making Everything Easier, and related trade dress are trademarks or registered trademarks of John Wiley & Sons, Inc. and may not be used without written permission. Adobe and Illustrator are trademarks or registered trademarks of Adobe, Inc. All other trademarks are the property of their respective owners. John Wiley & Sons, Inc. is not associated with any product or vendor mentioned in this book.
LIMIT OF LIABILITY/DISCLAIMER OF WARRANTY: THE PUBLISHER AND THE AUTHOR MAKE NO REPRESENTATIONS OR WARRANTIES WITH RESPECT TO THE ACCURACY OR COMPLETENESS OF THE CONTENTS OF THIS WORK AND SPECIFICALLY DISCLAIM ALL WARRANTIES, INCLUDING WITHOUT LIMITATION WARRANTIES OF FITNESS FOR A PARTICULAR PURPOSE. NO WARRANTY MAY BE CREATED OR EXTENDED BY SALES OR PROMOTIONAL MATERIALS. THE ADVICE AND STRATEGIES CONTAINED HEREIN MAY NOT BE SUITABLE FOR EVERY SITUATION. THIS WORK IS SOLD WITH THE UNDERSTANDING THAT THE PUBLISHER IS NOT ENGAGED IN RENDERING LEGAL, ACCOUNTING, OR OTHER PROFESSIONAL SERVICES. IF PROFESSIONAL ASSISTANCE IS REQUIRED, THE SERVICES OF A COMPETENT PROFESSIONAL PERSON SHOULD BE SOUGHT. NEITHER THE PUBLISHER NOR THE AUTHOR SHALL BE LIABLE FOR DAMAGES ARISING HEREFROM. THE FACT THAT AN ORGANIZATION OR WEBSITE IS REFERRED TO IN THIS WORK AS A CITATION AND/OR A POTENTIAL SOURCE OF FURTHER INFORMATION DOES NOT MEAN THAT THE AUTHOR OR THE PUBLISHER ENDORSES THE INFORMATION THE ORGANIZATION OR WEBSITE MAY PROVIDE OR RECOMMENDATIONS IT MAY MAKE. FURTHER, READERS SHOULD BE AWARE THAT INTERNET WEBSITES LISTED IN THIS WORK MAY HAVE CHANGED OR DISAPPEARED BETWEEN WHEN THIS WORK WAS WRITTEN AND WHEN IT IS READ.
For general information on our other products and services, please contact our Customer Care Department within the U.S. at 877-762-2974, outside the U.S. at 317-572-3993, or fax 317-572-4002. For technical support, please visit https://hub.wiley.com/community/support/dummies
Wiley publishes in a variety of print and electronic formats and by print-on-demand. Some material included with standard print versions of this book may not be included in e-books or in print-on-demand. If this book refers to media such as a CD or DVD that is not included in the version you purchased, you may download this material at http://booksupport.wiley.com. For more information about Wiley products, visit www.wiley.com.
Library of Congress Control Number: 2019956417
ISBN 978-1-119-64153-7 (pbk); ISBN 978-1-119-64154-4 (ebk); ISBN 978-1-119-64155-1 (ebk)
Manufactured in the United States of America
10 9 8 7 6 5 4 3 2 1
Part 3: Applying Color, Patterns,
CHAPTER 11: Designing in Living Color
CHAPTER 12: Bringing Graphics to Life with Gradients, Blends, and Transparency
13: Designing with Patterns
Part 4: Designing with Type
Part 5: Handing off Graphics for Print and Screen
Part 6: The Part of Tens
Aligning and Spacing Objects
Styling with Adobe color themes
Getting
Choosing
Scaling
Laying
PART 6: THE PART OF TENS
Introduction
In Adobe Illustrator CC For Dummies, I draw on my “long strange trip” (to borrow from the Grateful Dead) with Illustrator. I’ve drawn bus maps in Los Angeles (yes, they have buses in LA), designed infographics, and created architectural renderings for commercial real-estate developers. I’m not an artist, but I’ve collaborated with fine artists to port their work to giclée prints. I’ve conducted seminars for commercial printers and artists, and designed logos and icons for app and web navigation. And every day I discover or explore some new way to use Adobe Illustrator in the rapidly evolving world of illustration and design.
Along the way, I’ve written or co-authored more than a dozen books on Illustrator and other apps in Adobe Creative Suite, and created course materials on Illustrator for Adobe. Still, I’m fully aware that my own experience only scratches the surface of everything Illustrator can do.
I’ve learned from colleagues, competitors, and experts in different realms of Illustrator. Most of all, I’ve learned from decades of teaching Illustrator at community colleges, university extension schools, online courses syndicated around the world, and boutique design consulting agencies. More than anything, I’ve drawn on my teaching experience in putting together this book.
About This Book
Illustrators use Illustrator for an incredibly wide range of projects, but they all experience one thing in common: Illustrator is not easy to get your head around.
Illustrator’s massive array of tools is both a treasure chest and a treasure hunt. Even with the substantial online documentation that Adobe provides, finding your way to understanding and wielding Illustrator requires a guide.
That’s where this book comes in.
This book is a reference book, not a tutorial, but I’ve endeavored to weave in a variety of examples and from-the-trenches experiences that I think readers will find helpful.
I spent a lot of time and thought on organizing the material here so that you can find the buried treasure in Illustrator that will unlock your creativity and enhance your ability to solve whatever illustration and design challenges you confront.
I haven’t included a lot of links to websites, but I have a few. Some web addresses break across two lines of text. If you’re reading this book in print and want to visit one of these web pages, simply key in the web address exactly as it’s noted in the text, pretending that the line break doesn’t exist. If you’re reading this as an e-book, you have it easy: Just click the web address to be taken directly to the web page.
Foolish Assumptions
I’ve written Adobe Illustrator CC For Dummies for three levels of Illustrator users: those who are new to Illustrator, those who have been using it for a while, and those who are experts in some realm of the Illustrator universe but need a guide to other realms.
How do I juggle all three audiences? I don’t assume any starting point as far as your knowledge of Illustrator. But I do assume that you’re no dummy, so this book is fast-paced, covers a lot of ground in under 400 pages, and emphasizes problem-solving methods in Illustrator over memorizing specific techniques. I also point you towards resources where you can dig deeper into areas that are a particular focus for your work.
Icons Used in This Book
I scatter tips, reminders, and an occasional warning throughout this book.
When you see a tip, I’m sharing a time-saving or stress-saving technique that might help you complete a project more quickly or easily.
I use this icon to emphasize meta-concepts and points that are widely applicable in Illustrator.
To my knowledge, no one has ever died by choosing an unfortunate and inappropriate tool or menu option in Illustrator. But when the stakes are high, such as when you might ruin your project and not be able to restore it, I issue a warning with this icon.
Beyond the Book
An online cheat sheet provides quick, basic answers to some of the most frequently asked questions about handing off Illustrator files to game coders, animators, and digital designers. Even though the material is drawn from the book, you may find it valuable as a quick guide to Illustrator-to-web problem-solving.
To see the cheat sheet, simply go to www.dummies.com and type Adobe Illustrator CC For Dummies in the search box.
Where to Go from Here
The chapters are non-sequential, so you can dive in anywhere. That said, I’ve arranged the chapters so that starting at the beginning and ending at the end is a good pathway for beginners. If you know what you’re looking for, go to the table of contents or index. And keep the book handy for the next challenge you encounter.
1 Creating, Navigating, and Saving Projects
IN THIS PART . . .
Getting started with Illustrator, navigating the interface, and creating artwork
Creating, saving, and printing Illustrator documents and objects
Adding artwork from other sources — including your scanner, photos, and sketches from Adobe Draw or other apps
Drawing, arranging, and creating artwork using lines and shapes
Organizing larger projects into layers, and applying styling to entire layers
IN THIS CHAPTER
» Launching and configuring Illustrator
» Using and customizing the toolbar
» Accessing and organizing panels
» Using the Control panel and the Properties panel
Chapter 1
Navigating Illustrator’s Interface
Adobe Illustrator’s interface can seem complicated, confusing, and sometimes redundant. Here’s why: It is complicated, confusing, and sometimes redundant. But there are good reasons why.
One reason is that people use Illustrator in so many different ways. Illustrator really is a jack-of-all-trades, and so the folks who develop it need to provide alternative pathways to get things done. For example, an artist designing a logo and an engineer sketching an electrical system have different needs and likely different approaches to drawing, and demand different ways to access Illustrator’s features.
The second reason why Illustrator’s interface is daunting is that there’s so much in this application! A quick perusal of this book’s Table of Contents will give you a sense of how many different things Illustrator is used for.
Finally, and perhaps ironically, some of the complexity of Illustrator’s interface comes from the very complexity of the app. The hard-working and creative team of developers who make Illustrator powerful and contemporary have their finger on the pulse of users like you! And as new generations of illustrators enter the Adobe Illustrator community, the development team endeavors to provide different alternatives to make the interface more inviting and accessible. For example, Illustrator’s toolbar now contains more than 80 tools. Displaying all those tools
would make the entire set overwhelming and inaccessible, so Illustrator provides a basic version of the toolbar with a small subset of tools. This approach makes life easier if you need one of those tools but more complex if you need a tool that was left out of the basic box.
All that said, relax! In this chapter, I provide a guide to the key features in Illustrator and how to access them.
Surveying the Illustrator Universe
In the bulk of this book, I focus on documenting how to get things done: for example, how to create, save and print illustrations (Chapter 2); how to draw lines and shapes (Chapter 4); and how to select and assign color (Chapter 11). The book is non-linear, so you’re invited to jump to just what you need. If you’re like me, you want to find out how to solve a problem, not understand how something works — at least at first. Other people, with more orderly minds I suspect, like to immerse themselves in the how before they get to the what.
If you have started with this chapter, you might be just entering into the Illustrator universe with a rational impulse to find out how to navigate your way around an interface that includes over 80 tools, hundreds of menu options, and at least two distinct but significantly overlapping options for accessing the most commonly used features: the Control panel and the Properties panel. These two panels provide similar sets of options, and which panel you use is really a matter of which one you find more comfortable to work with.
My mission in this opening chapter is not to present encyclopedic documentation of everything in the byzantine Illustrator interface. Instead, I provide a basic guide to where to find what, along with a curated documentation of features you will almost certainly need.
Launching Illustrator
Although people use Illustrator in different ways, a large section of designs travel through a few workflows. When you launch Illustrator, the opening home screen provides access to these frequently traveled express lanes to get you on your way:
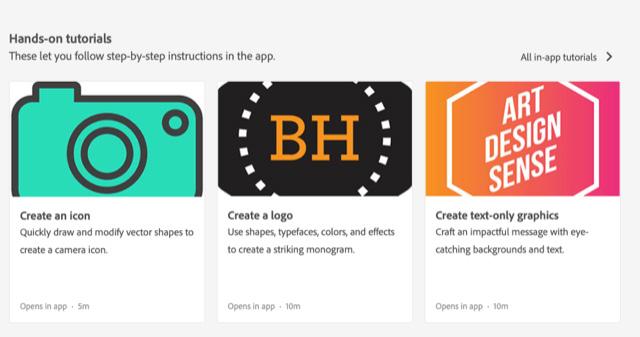
» Learn tab: The Learn tab, shown in Figure 1-1, provides access to a set of helpful video tutorials. You can watch them in sequence as a continuous learning experience, or choose a topic to help you solve a pressing challenge.
» Start a New File Fast section: Because there are a number of frequently traveled pathways to creating files, the options in the Start a New File Fast section of the home screen allow easy access to basic settings for print and screen projects. These are not templates; they are packaged sets of properties such as units of measurements (points, pixels, inches, and more) and color modes (such as RGB or CMYK). Choosing one of these options can jump-start a project. I zoom in on these options in Chapter 2.
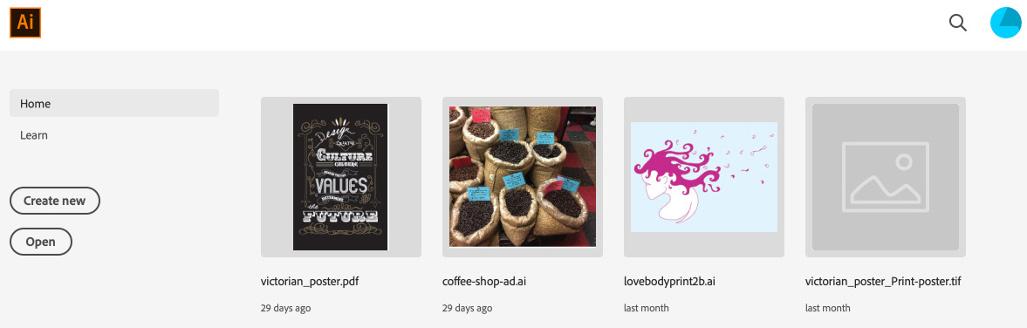
» Open button: When you want to open an existing file, Illustrator kindly presents you with a set of template thumbnails — types of projects, such as a letterhead, a poster, a website, or an app prototype. If you can’t find the file in the thumbnails, use the Sort and Filter options, shown in Figure 1-2, to search for the file.
FIGURE 1-1: Illustrator tutorials accessible from the home screen.
FIGURE 1-2: Choosing from recently opened files.
Using and Customizing Toolbars
After you open or create a document, Illustrator’s toolbar is the single most essential element in creating illustrations. Illustrator provides two toolbars, Basic and Advanced. The Basic toolbar is highly customizable.
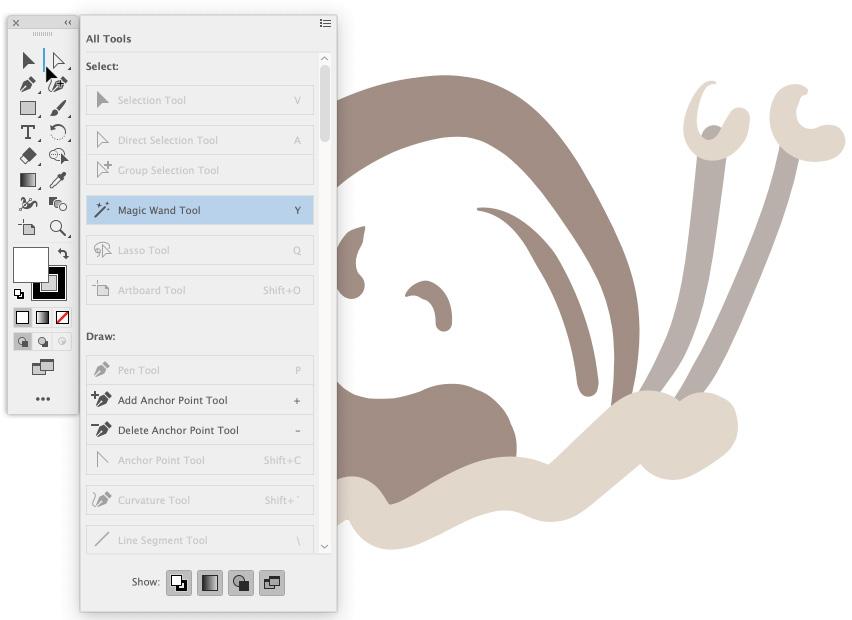
The Basic toolbar, which is displayed by default when Illustrator is launched, includes a curated set of frequently used tools. The Basic toolbar is highly customizable. To add tools to the Basic toolbar, click the ellipses (edit toolbar)) icon at the bottom of the Basic toolbar. The tools drawer appears. You can display or hide tools using the four Show options at the bottom of the tools drawer. Or you can drag any tool into the Basic toolbar, as shown in Figure 1-3.
FIGURE 1-3: Adding the Magic Wand to the Basic toolbar.
The Advanced toolbar includes every tool available in Illustrator. You can toggle from the Basic to the Advanced toolbar by choosing Windows ➪ Toolbars ➪ Advanced. You can’t change the tools that appear there.
Accessing and Arranging Panels
You use features in panels to tweak, tune, touch up, and transform artwork. Every chapter in this book, and every substantial Illustrator project, involves using features available through panels. But here I want to focus on a couple features of panels above and beyond how any specific panel works.
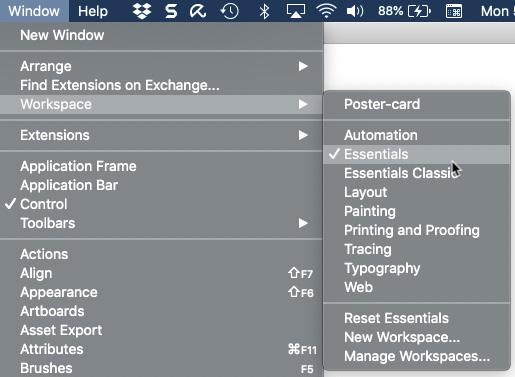
You can also quickly set up a work environment for typical workflows such as print, web, or typography by choosing Window ➪ Workspace and then selecting a type of project from the submenu. I’m choosing the Essentials workspace in Figure 1-4.
FIGURE 1-4: Using a workspace to populate the screen with selected sets of panels.
An Illustrator workspace is defined by which panels are displayed. You can configure your own workspace by adding and arranging panels, or you can use one of the presets. The contradiction is that the more panels you display, the more features you have quick access to but the less space you have to draw something! So, if you find your workspace cluttered with too many panels, you have a few options:
» Temporarily hide all panels by tapping the Tab key. A second tap restores the panels.
» Clear the workspace of extraneous panels and revert to a minimalist workspace with just the Basic toolbar by choosing Window ➪ Workspace ➪ Essentials.
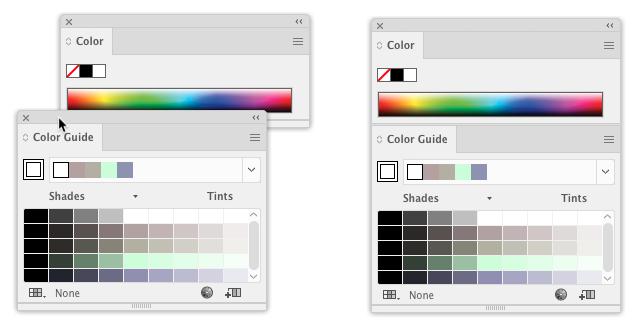
» Dock one panel by dragging it by its tab to another panel. (You can dock it in the top or bottom of a panel or group it in the panel.) In Figure 1-5, I’m dragging the Color Guide panel to the bottom of the Color panel. The image on the right shows the docked Color Guide panel.
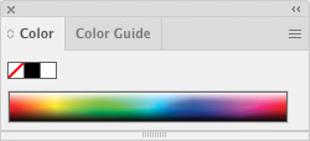
» Group panels by dragging the tab of one panel into the title bar of another panel. In Figure 1-6, I grouped the Color and Color Guide panels.
» Collapse panels (including groups of panels) into icons by clicking the << (double arrows) in the upper-right of the panel or panel group.
Panels are your friend. But like any friend, they can become a bit too much at times. So when you find your workspace overwhelmed by panels, use any of the tips just listed to reduce clutter and free up space for designing!
Using the Control Panel or the Properties Panel
The two most robust panels in Illustrator are the Control panel and the Properties panel. Both panels have many features that overlap. And both panels are contextsensitive, meaning the options they display depend on what you’re doing and what objects you select.
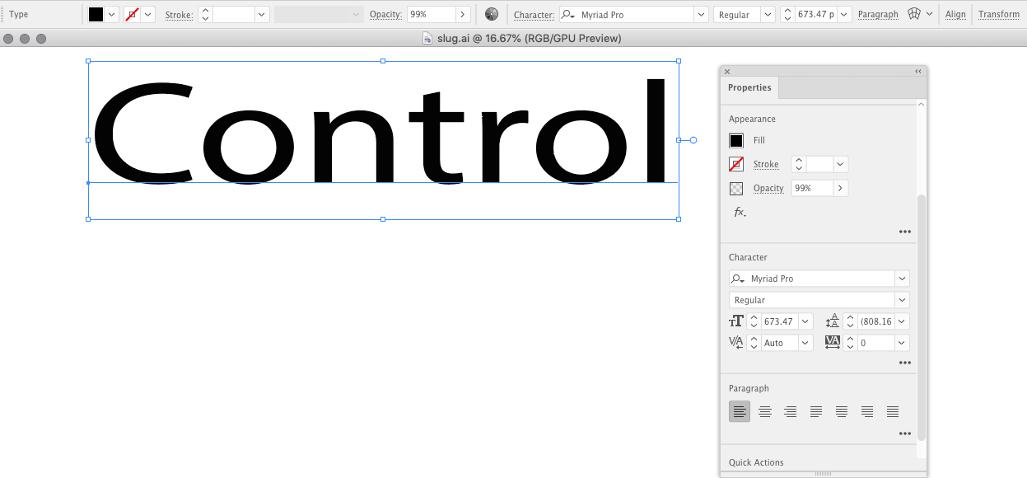
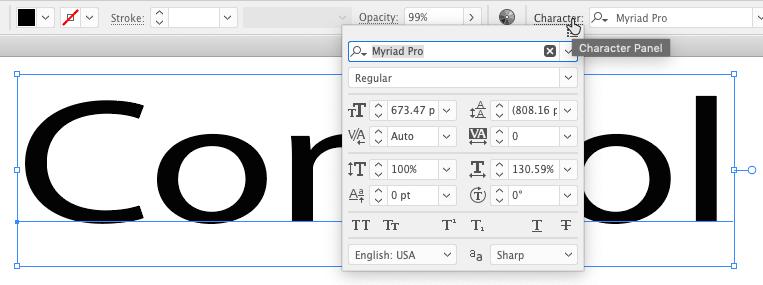
For example, in Figure 1-7, I selected a box of type (the word Control). Both the Control panel (at the top of the screen) and the Properties panel (on the right) provide access to fill and stroke color, character and paragraph style options, font, font size, and opacity.
FIGURE 1-5: Docking a panel.
FIGURE 1-6: Grouped panels.
Properties panels.
The differences, essentially, are that the Properties panel has more options for selected objects and the Control panel takes up less space.
Choosing between the Control and Properties panels
Because many features in the Control and Properties panels overlap, which panel should you use?
I know Illustrator experts who fall out on all sides of this argument: Control panel! Properties panel! Both? My opinion: I think the extra design space that the Properties panel occupies isn’t worth its extra features.
Again, the choice is yours, and I explain how to set up and use both panels.
Options on the Control and Properties panels
The Control and Properties panels share the following features:
» When text is displayed as a link, you can click the link text to display a related panel or dialog box. For example, in Figure 1-8, I’ve accessed the Character panel from the Control panel. That frequently used option (accessing the Character panel) is available in the Control panel but not the Properties panel.
FIGURE 1-7: Option for styling type in the Control and
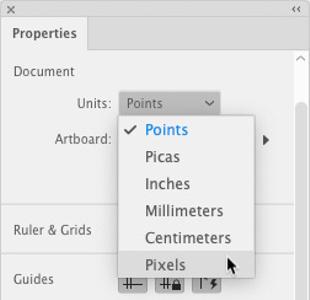
» When nothing is selected, the panels provide options for defining document properties. In Figure 1-9, I’m changing the unit of measurement for my document in the Properties panel.
One difference between the Control and Properties panels is that you can resize, dock, or group the Properties panel just like other panels, but the Control panel usually sits atop the workspace. However, you can drag the Control panel (by the left edge) down the screen to any other vertical position.
As you explore Illustrator’s features in this book or on your own, you’ll come to form your own views and feelings about how much to rely on the Properties panel and how much to depend on the Control panel.
FIGURE 1-8: Opening a panel from linked text in the Control panel.
FIGURE 1-9: Configuring document properties in the Properties panel.
IN THIS CHAPTER
» Setting up documents
» Accessing tools and panels
» Organizing project with artboards
» Handing off Illustrator graphics
Chapter 2
Creating, Saving, Exporting, and Printing Files
My number one rule for Illustrator projects is this: Work backward. If a project is headed for a print shop, start with a call to the printer to find out what specs you need to meet. If your artwork is to be handed off to a web developer, check in with the developer to find out what kind of resolution he needs. If an animator needs a vector graphic, find out what kind of code she needs.
That said, you don’t really create Illustrator graphics backward! You start by defining a document. Then you define artboards — the discrete elements in a document that can be easily shared in any combination (you can hand off all of a document’s artboards, some of them, or just one to a web developer or print project). And you can gather and share content in other ways, such as selections and library items.
But that said, even in the earliest stages of creating a graphic in Illustrator, it pays — literally in terms of time and energy expended — to work with as clear a picture as possible of where your project will end up. On a website? In a print ad? On a poster? In a digital animation? Each of these outcomes requires a specific color mode, is defined with different units of measurement, and will have other constraints that should be built into the project as early as possible to avoid having to tear up the work and start over.
In this chapter, I sketch out the basic process of identifying your output, and then creating a document; organizing your content into artboards; exporting and saving documents, artboards and selections; and sharing objects that produce the kind of output you need.
Creating Documents
The first step in doing anything in Illustrator is to create a document. But right away you are confronted with important initial choices. Why? Essentially because Illustrator graphics can take two pathways: print and screen. The way colors are defined and objects are measured varies greatly between these two paths.
Am I saying that when you conceive of a project you need to know whether or not the output is aimed at print output or screen output or both? Basically, yes. Although you can change horses in the middle of the stream, you might create unnecessary complications in sizing and coloring objects. It’s best to anticipate the output and — to repeat my mantra — work backward from there.
Making basic choices for a document
Shortly I walk you through my curated set of options for creating a document, but all the options boil down to three essential choices: color mode, units of measurement, and dimensions:
» Print color or web color: Projects destined for commercial printing should probably be created with CMYK color. That said, even high-quality personal printers, and some commercial print workflows, accept or prefer RGB color. CMYK (cyan, magenta, yellow, and black) is referred to as subtractive color because these four colors are printed on top of each other to create a full range of colors. RGB (red, green, blue) is referred to as additive color because red, green, and blue dots of varying intensity are combined on a screen to generate a spectrum of color.
» Units of measurement: You use pixels for web and other increments (such as inches, centimeters, or points) for print projects.
» Dimensions (height and width): Because vector graphics are infinitely scalable, sometimes dimensions are not that relevant. But when illustrations are aimed at a specific device with a set width and height (such as a mobile phone app), viewport (a defined website width), or print output (such as a poster or postcard), you want to define an artboard (or multiple artboards)