No part of this publication may be reproduced, stored in a retrieval system or transmitted in any form or by any means, electronic, mechanical, photocopying, recording, scanning or otherwise, except as permitted under Sections 107 or 108 of the 1976 United States Copyright Act, without either the prior written permission of the Publisher, or authorization through payment of the appropriate per-copy fee to the Copyright Clearance Center, 222 Rosewood Drive, Danvers, MA 01923, (978) 750-8400, fax (978) 646-8600. Requests to the Publisher for permission should be addressed to the Permissions Department, John Wiley & Sons, Inc., 111 River Street, Hoboken, NJ 07030, (201) 748-6011, fax (201) 748-6008, or online at http://www.wiley.com/go/permissions.
Limit of Liability/Disclaimer of Warranty: The publisher and the author make no representations or warranties with respect to the accuracy or completeness of the contents of this work and specifically disclaim all warranties, including without limitation warranties of fitness for a particular purpose. No warranty may be created or extended by sales or promotional materials. The advice and strategies contained herein may not be suitable for every situation. This work is sold with the understanding that the publisher is not engaged in rendering legal, accounting, or other professional services. If professional assistance is required, the services of a competent professional person should be sought. Neither the publisher nor the author shall be liable for damages arising herefrom. The fact that an organization or Web site is referred to in this work as a citation and/or a potential source of further information does not mean that the author or the publisher endorses the information the organization or website may provide or recommendations it may make. Further, readers should be aware that Internet websites listed in this work may have changed or disappeared between when this work was written and when it is read.
For general information on our other products and services please contact our Customer Care Department within the United States at (877) 762-2974, outside the United States at (317) 572-3993 or fax (317) 572-4002.
Wiley publishes in a variety of print and electronic formats and by print-on-demand. Some material included with standard print versions of this book may not be included in e-books or in print-ondemand. If this book refers to media such as a CD or DVD that is not included in the version you purchased, you may download this material at http://booksupport.wiley.com. For more information about Wiley products, visit www.wiley.com.
Library of Congress Control Number: 2020947534
Trademarks: Wiley and the Wiley logo are trademarks or registered trademarks of John Wiley & Sons, Inc. and/or its affiliates, in the United States and other countries, and may not be used without written permission. Excel is a registered trademark of Microsoft Corporation. All other trademarks are the property of their respective owners. John Wiley & Sons, Inc. is not associated with any product or vendor mentioned in this book.
About the Author
An author,
trainer, and content expert, Lisa A. Bucki has been educating others about computers, software, business, and personal growth topics since 1990. She has written and contributed to dozens of books and multimedia works, in addition to providing marketing and training services to her clients and writing online tutorials. Bucki is co-founder of 1x1 Media, LLC (www.1x1media.com), an independent publisher of books and courses focused on how-to topics for entrepreneurs, startup founders, makers, and other business professionals.
Acknowledgments
Associate Publisher Jim Minatel reached out to me to ask if I was still writing, I was thrilled. I had been off in the wilderness working on other types of projects, so signing on with Wiley felt like a return to my publishing roots. It even got better from there. When he and Senior Managing Editor Pete Gaughan brought Project Manager Kezia Endsley and Technical Editor Joyce Nielsen on board, it was (as Jim put it) “fun getting the band back together.” All of us have worked together in various capacities and projects going back decades. And all of my colleagues on this project are still at the top of their game.
When
I thank all of them for their excellent work on this project, as well as Copy Editor Kim Wimpsett, Content Refinement Specialist Saravanan Dakshinamurthy, Proofreader Nancy Carrasco, and all the other Wiley employees or partners who had a direct or indirect role in this undertaking.
My gratitude also eternally flows to my excellent and patient husband, Steve Poland, and all of our beloved furry dog children.
Introduction
If having
hundreds of millions of users or more constitutes success, then Excel meets that test. In my decades as a tech writer and editor, Excel has led the competition in providing powerful yet accessible computational and data capabilities. “Accessible” can be a relative term, however. For some people, the hundreds of features in Excel can be intimidating. Others may wrestle with the best ways to create formulas or manage lists of data.
Excel Portable Genius aims to help you answer nine key questions you may come up against when using Excel. The book covers the Excel features that you need to know, along with some others that you should want to know. I try to get right to the point in describing features and steps, so you can power through, problem-solve on your own, and free up time for other activities.
A few special elements provide guardrails and inspiration. Notes help you delve a bit deeper into some topics, Cautions give advice and help you steer clear of problems, and Genius icons convey the pro tips that will make you more efficient, more productive, and (I daresay) more impressive in the results that you crank out from Excel.
I need to mention one last item from the “need to know” category before you dive in to Chapter 1. The screenshots for the figures in this book were shot at a low 1024 x 768 resolution to enhance their final appearance within the book’s format. Most users now have their screens set to a much higher resolution, so you may see differences in your screen versus the figures, particularly with regard to the appearance of the ribbon. Also, users with touch screen systems may see additional screen options and features not shown in the figures.
Thank you, reader, for adding Excel Portable Genius to your library.
How Do I Start Using Excel?
1 2 3 4 5 6 7 8 9
Excel has a lot in common with other programs you may have used, including the other Microsoft 365 applications. Its interface is easy to navigate yet loaded with powerful features designed to save you time and work. Getting dialed in on all the basics will enable you to spend more of your time analyzing the meaning of your data, which is the important thing, right? This chapter introduces you to the “must know” skills for kicking off your work in Excel. It covers essential command and navigation features of the user interface, reviews key techniques for creating and working with files, and guides you through getting data into sheet cells and making selections.
Starting and Exiting Excel
Windows 10 gives you a few options for starting a program so that you can get to work. You may already have your preference for how to start up, but if not, you can try one of these methods:
Start button . Click the Start button at the left end of the Windows taskbar. Move the mouse pointer over the right edge of the list of programs in the Start menu so that a scroll bar expands, and then use the scroll bar or the scroll wheel on your mouse to scroll down until you see Excel in the list. Then choose Excel. You also can pin a larger tile for starting Excel to the right side of the Start menu. Right-click Excel in the list of Start menu programs, and choose Pin to Start. Then you can open the Start menu and click the large tile. If you need to remove the tile later, rightclick it and choose Unpin from Start.
Windows logo key . Press the Windows logo key on your keyboard. Press the down arrow on your keyboard as needed until Excel is selected, and then press Enter.
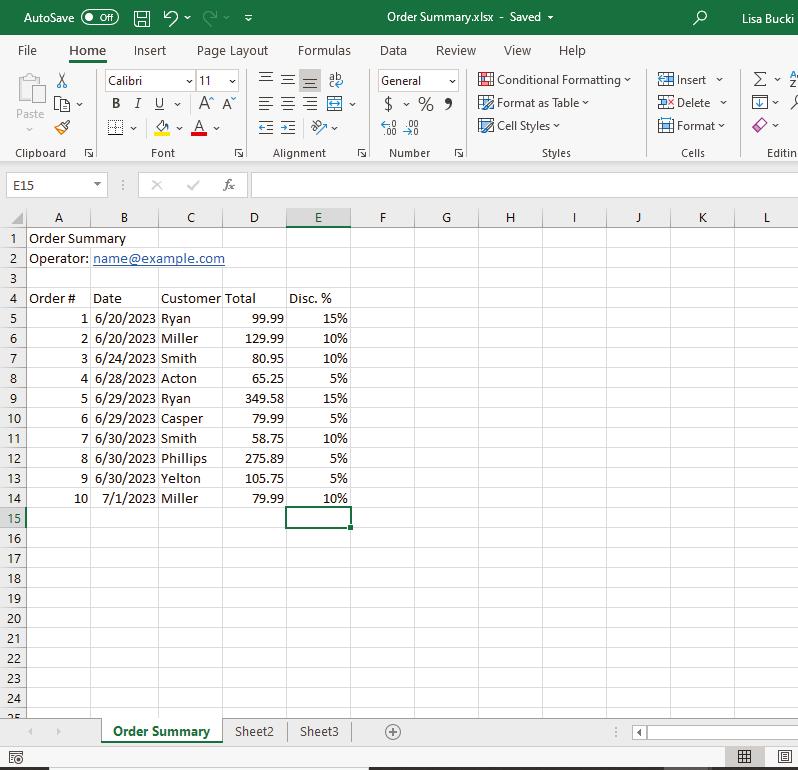
Search box . Click in the Search box to the right of the Start button on the taskbar. If a tile for Excel appears in the Top Apps section, click it. If not, start typing Excel, and then choose Excel App when it appears under Best Match, as shown in Figure 1.1.
1 .1 Select Excel App when using Windows Search to start Excel.
If using the Start menu to launch Excel isn’t for you, then you can pin an Excel button to the taskbar. With Excel open, right-click its button on the taskbar, and then choose Pin to Taskbar. Click the pinned Excel button on the taskbar to start the program. If you decide you want to unpin the button, right-click it on the taskbar and choose Unpin from Taskbar.
When Excel opens, it prompts you to create a new document or open an existing one. The later section called “Working with Files” provides more details about those choices. For now, you could just click the Blank Workbook thumbnail to create a new file.
When you’ve finished all your work in Excel for the day, you should close or exit the program. You could shut down Windows without closing Excel, but it’s a better practice to close Excel first to ensure you’ve saved all your work. As when starting Excel, you have these options for closing or exiting the program:
Click the Close (X) button at the upper-right corner of the screen.
Press Alt+F4.
To close the current file without exiting Excel, click the File tab near the upper-left corner of the Excel window, and then choose Close. If you have a file with unsaved work open and exit Excel or close the file, a message box asks whether you want to save changes to the file. You can click the Save or Don’t Save button as needed.
Caution
If you have multiple Excel files open, closing one of them doesn’t close down Excel overall. You have to close every open Excel file to make sure you’ve completely exited the program.
Taking a Look Around
When you’re writing a document in a word processor, you can get away with just typing a lot and not knowing the nuances of how to get around. Excel is trickier than that. Some of the features of its interface are important to being able to work accurately in the program, especially when it comes to creating formulas that calculate or organizing data effectively. While some of what this section covers may seem familiar based on your work with other programs, especially other Microsoft 365 programs, you might learn about a few unique Excel interface features that offer powerful shortcuts.
Reviewing key screen features
At first glance, the Excel screen can look a bit busy with an extreme number of buttons and letters and numbers and boxes. Each sheet in an Excel file has more than 16,000 columns and 1,000,000 rows, for a total of more than 17 billion cells! That sounds overwhelming, so I’m going to zero in on the key screen features you need to know to work in Excel, which are shown in Figure 1.2. Later parts of the book will cover other features of the Excel interface in discussions about particular tasks and actions.
Quick Access
Toolbar (QAT) Ribbon tabs
Title bar
Dialog box launcher
Formula bar
Column letters
Active cell
Row numbers
Ribbon group
Mouse pointer
Status bar Sheet tab
1 .2 You will work with these tools in Excel.
Here’s what you need to know about the screen features shown in Figure 1.2:
Title bar . The title bar identifies the name of the current file and holds other tools at its left and right end.
Quick Access Toolbar . Found at the left end of the title bar, the Quick Access Toolbar (QAT) offers Save, Undo, and Redo buttons by default. The Undo and Redo buttons become active after you start performing actions in cells. Clicking the down arrow at the right end of the QAT opens the Customize Quick Access Toolbar menu, where you can choose the name of another button that you want to add to the QAT.
Chapter 1: How Do I Start Using Excel?
Ribbon . The ribbon below the title bar uses tabs to organize the majority of the commands that you’ll use in Excel. Click a ribbon tab to see its commands. The names along the bottom of the ribbon identify commands that are grouped together because they have related or similar functions. In most cases, you click a button on the ribbon to choose a command, though clicking a button with a dropdown list arrow on it opens a list of additional choices. Still other ribbon buttons are split, with both a regular button on the top and a down arrow on the bottom part of the button. Clicking the top half of a split button executes the command immediately, while clicking the bottom part with the arrow opens a list of choices. Other buttons are split the other way, with the main button on the left and a drop-down list arrow on the right. Pressing the Alt key displays letters and numbers, sometimes called keytips, that you can press to choose a ribbon tab and then a command.
Note
I’ll use a type of shorthand throughout the book to tell you which ribbon command to choose, giving the tab, group, and specific button. For example, if I say “Choose Data ➔ Sort & Filter ➔ Filter,” it means to click the Data tab on the ribbon, look for the Sort & Filter group of commands, and in that group, click Filter. Command sequences can be longer if a list or menu appears.
Dialog box launcher . Some groups on the ribbon include a small button called a dialog box launcher in the lower-right corner. Clicking one of these buttons opens a dialog box with more detailed choices, such as the Format Cells dialog box.
Formula bar . You will use this area to enter and edit cell contents. The Formula bar also displays the contents of the active cell. Or, if the active cell contains a formula, the formula appears in the Formula bar, while the formula results appear in the cell itself.
Row numbers and column letters . The working area in Excel is organized into rows and columns of cells. The column letters across the top of the grid and the row numbers down the left side identify the address or location of a cell or range. The bands with the letters and numbers are also called row and column headers.
Active cell . A bold outline, sometimes called the cell selector, identifies the active or currently selected cell. When more than one cell is selected, the bold box surrounds the entire selection.
Mouse pointer . When you’re using the mouse in Excel, the mouse pointer changes shape often to cue you when it’s in the correct position to perform a particular action. By default, the pointer shape is a bold white plus, as shown in Figure 1.2, but at times it may change to a black plus, a two-headed arrow, and other shapes.
Sheet tab . A tab appears for each worksheet in the file. The later section “Working with Sheets” explains how to add and work with sheets.
Status bar . This area below the worksheet displays status information and has tools for changing the zoom that I’ll cover shortly.
Note
The more recent subscription versions of Excel have made it easier to get help when you’re stuck with a feature or task. Make sure your computer is connected to the Internet to receive the best possible results, and then press F1 or choose Help ➔ Help ➔ Help to open a Help pane at the right side of Excel. Enter a command name, task, or other search keywords, and then press Enter to see matching results.
Workbooks versus worksheets
Excel files are called workbook files, though you may see them called documents like the files created using other Microsoft 365 applications. The more specific name, workbook, stems from how Excel enables you to organize your data in an orderly fashion on separate worksheets or sheets, each of which is represented by a sheet tab at the bottom-left corner of Excel. Just as it’s easier to organize and find information in a booklet with pages rather than a long, continuous scroll, placing sets of data on separate worksheets gives you faster access to your data.
Before you make your first entries in a new workbook file, take a few extra minutes to plan in your mind how you’d like to organize the data in the file. For example, you typically wouldn’t want to combine both sales and inventory data on a single sheet. More typically, you would place the sales data on one worksheet, and the inventory data on another. For large datasets, sales and inventory might even be tracked in separate workbook files. Let the type of data dictate how you organize it. In a workbook file tracking weather data, each month’s data could be placed on a separate sheet. A workbook file with real estate listings might have the listings for each ZIP code on a separate tab. A construction business might place each project estimate for a client on a separate sheet.
Changing views
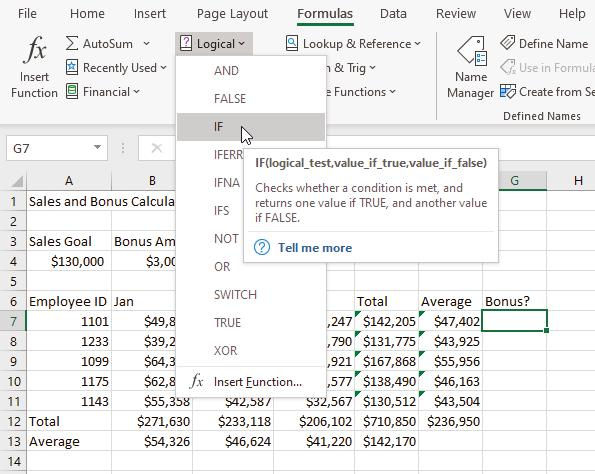
The View tab on the ribbon (Figure 1.3) enables you to change the view in Excel and turn some view features on and off. The default view, Normal, was shown in Figure 1.2. If you have a sheet that you want to print and think you might need to adjust how it breaks between separate pages, change to the Page Break Preview view. The Page Layout view not only shows page breaks, but it also shows how headers and footers will appear when printed. The Workbook Views group of the View tab holds the buttons for changing to
1 .3
Use the View tab choices to adjust screen appearance.
The Show group of the View tab has Formula Bar, Gridlines, and Headings check boxes that you can use to toggle those screen features on and off. (Headings is another name for row and column headers.) When you want to finalize a workbook file and discourage other people from making edits, you might click the Formula Bar check box to uncheck it, thus hiding the Formula bar. It’s common to turn off the gridlines and headings displays for some types of worksheets, such as an executive dashboard that shows summary information and a few charts. In particular, hiding the gridlines makes some sheets more readable and attractive. Keep in mind that these settings in the Show group of the View tab control only on-screen display of gridlines and headers. If you want to control whether gridlines and headers print, you’ll have to adjust the page setup, which is covered in Chapter 9.
Note
Another aspect of Excel’s on-screen appearance that you might want to tinker with is whether the ribbon is fully visible. The small up arrow button in the lower-right corner of the ribbon is called the Collapse the Ribbon button. You can click it or press Ctrl+F1 to hide everything but the ribbon tabs, allowing more sheet rows to appear on-screen. When you need to choose a command, just click a tab to expand the ribbon temporarily, choose the desired button or item, and then continue working. The ribbon will collapse again on its own. To return the ribbon to its normal appearance and function, click a ribbon tab, and then click the Pin the Ribbon button—it has a pushpin on it—in the lower-right corner of the ribbon or press Ctrl+F1 again. You also can double-click a ribbon tab to collapse the ribbon or pin it back open. one of these views. Three buttons near the right end of the status bar also enable you to change between the views.
The tools in the Sheet View group of the View tab only become active when you’re working on a workbook file stored in a OneDrive, OneDrive for Business, and SharePoint location. You can use the New Sheet View button to create a custom view of a shared workbook file. The custom view enables you to work without disruption, no matter what someone else working on the shared file does.
Zooming
Today’s trend of computers offering ever-higher screen resolutions has its pros and cons. While graphics and video look gorgeous in hi-res, screen features and content in business-oriented programs can look small and difficult to read. Whether you’ve forgotten your glasses or just have eyestrain from a full day of screen time, increasing the zoom or zooming in can make sheet data easier to read. On the other hand, decreasing the zoom or zooming out allows more rows and columns to appear on-screen at once, which can be handy in some situations, such as when you need to select a large set of data for a chart.
The Zoom group of the View tab holds choices for changing the zoom. You can select an area on the worksheet, and then click the Zoom to Selection button in that group so the selection will fill the screen, usually by zooming in. To return to the normal zoom, click the 100% button in the group. Clicking the Zoom button opens the Zoom dialog box, which enables you to choose a preset zoom percentage or enter your own setting in the Custom text box; click OK to apply your choice and close the dialog box.
You also can use the Zoom slider shown in Figure 1.4 to change the zoom on the fly. You can drag the slider “thumb” to the left to zoom out or to the right to zoom in. Or, you can click the Zoom Out (-) or Zoom In (+) buttons at either end of the slider to zoom out or in at preset 10% increments. When you change the zoom using any method, the change normally applies to the current sheet only. Note that Figure 1.4 also shows the status bar buttons for changing the view.
1 .4 These controls at the right end of the status bar enable you to change the view and zoom.
A zoom setting of 120–125% strikes a good compromise between increasing the zoom enough to reduce eyestrain while still allowing plenty of rows and columns to appear on-screen at once.
Working with Files
Now that you’ve had an overview of how Excel ticks, it’s time to turn to the practical business of starting to work with files. When you click the File tab on the ribbon, a screen loaded primarily with choices for working with files appears. This screen is sometimes called Backstage or Backstage view. You can use the choices on the File tab to create, save, export, and print files, among other actions.
Creating a blank file
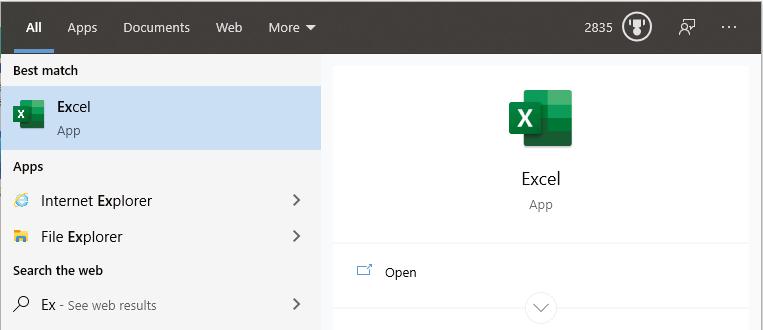
You learned at the start of the chapter that when you start Excel, it prompts you to open or create a file. You can click the Blank Workbook thumbnail to create a new, blank file at that point. If you’ve already started Excel and opened a file (blank or otherwise), you can choose File ➔ Blank Workbook (Figure 1.5) to create another blank file. But for my money, it’s fastest to press Ctrl+N to create a new file. No matter the method, Excel assigns a placeholder name (Book1, Book2, and so on) to each blank file you create until you save it under a new name.
1 .5 Choose File ➔ Blank Workbook to create a new, blank workbook file.
If you work in Excel for the web, the cloud-based version of Excel, you might have gotten very comfortable with how it automatically saves the file for you as you work. Unfortunately, the desktop version of Excel isn’t as helpful, so you should make sure you save your work frequently. See the later section called “Saving and Closing a File” to learn how to save.
Exploring templates
If starting from a blank slate sounds like too much work, if you’re looking for worksheet design ideas, or if you’re fairly certain someone else has already created just the type of file you’re looking for, then you might just find what you need in the huge selection of templates offered through Excel. A template is simply a pre-made file that typically includes labels, placeholder content or prompts, formulas, and formatting. When you use a template file, which has a slightly different file format than a regular workbook file, it creates a new workbook file with the same contents as the template for you. You fill it out with your own content from there and save the copied file. Thousands of business and personal templates are available for download, including planners, calendars, budgets, invoices, and inventory lists.
To find and download a template, follow these steps:
1 . Choose File ➔ New . The options for creating a new file appear.
2 . Scroll down to see thumbnails for suggested templates .
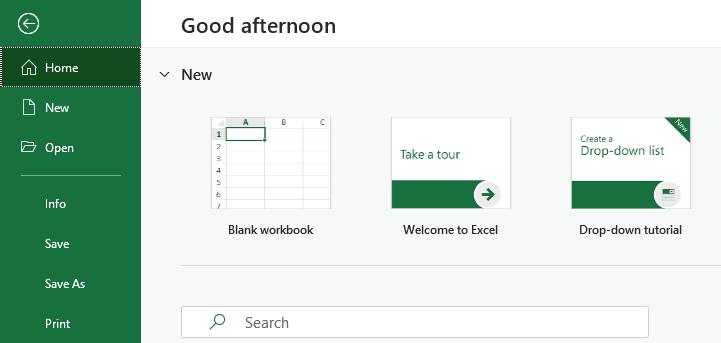
3 . Click a template thumbnail to select it . As shown in Figure 1.6, a larger preview of the template appears, along with a description and the download size information.
1 .6 You get to preview a template before downloading it.
4 . If the template looks like what you want, click the Create button . The template downloads to your computer, and a new file based on the template opens in Excel. You can then add your own content and save the copy of the template file.
Chapter 1: How Do I Start Using Excel?
If you didn’t see a template that looked promising in Step 2, you can scroll back up and click one of the Suggested Searches choices under the Search for Online Templates text box. Or, you could click in that text box, type a search term or brief description, and press Enter. Excel displays thumbnails for matching templates in its search results. At that point, you could continue with Step 3 to select and download a template.
Caution
The templates you download through Excel are from a trusted source, so they should be free from viruses. If you obtain a template from another source, make sure to check it for viruses and other malware.
Excel automatically stores each template you download into a subfolder of your Windows 10 user folder so that you can reuse it. The next time you choose File ➔ New, downloaded templates will appear at the top of the screen to the right of the Blank Workbook thumbnail. If you’ve downloaded numerous templates, you may have to click an arrow button to scroll right to find the one that you’d like to reuse. To remove a template from the choices at the top of the screen, right-click it and choose Remove from List.
Opening an existing file
When you start Excel or click the File tab, the initial screen that appears includes a Recent list, which includes previously saved files you’ve worked in during the not-too-distant past. Click a file in that list to open it immediately.
If the file to open is not on the Recent list, click the Open choice at the left (below New). Toward the middle of the screen, a list of locations appears. Depending on the type of Microsoft 365 subscription you have, there might be OneDrive and Sites locations for cloud-based storage. You can choose a location like that to look for files.
Lower, under Other Locations, the This PC and Browse choices appear. If you click This PC, the list at the right changes to show the files in the same folder as the currently opened file (if any). You can use the up arrow button to the left of the folder breadcrumb trail at the top to navigate a bit and display different files.
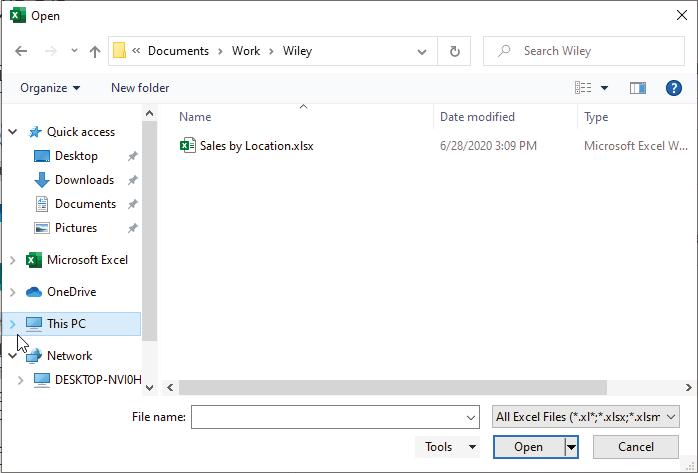
I prefer to click Browse and use the good old Open dialog box (Figure 1.7) to navigate to the location holding a file and open it. As shown in Figure 1.7, when you move the mouse pointer over the Navigation pane at the left, arrows appear to the left of the listed locations so that you can expand and collapse the listing. Clicking the right arrow beside This PC would show all the storage locations under This PC, including available disk drives on your computer. Double-click an item in the Navigation pane to show its contents in the file list at the middle of the dialog box. If you need to open a folder from the file list,
double-click it. The Address box at the top of the dialog box shows the path to the current folder. When the file you want to open appears in the file list, either double-click it or click it and click the Open button.
1 .7 Use the Open dialog box to locate and open an existing file.
Glitches happen. Your laptop might lose power and shut down before you saved your file, or the system might restart on you after a Windows update installed in the background. To try to recover an unsaved file in Excel, choose File ➔ Open. Below the list of files at the right, click the Recover Unsaved Workbooks button. The Open dialog box that appears lists any unsaved files. Click the file to reopen, and then click the Open button.
Switching to another file
While it’s possible for a huge amount of data to “live” in a single Excel workbook file, in practice you’d make life a bit rough on yourself to jam a file so full of sheets and cell