The right of John Emms, Tony Kosten and John Cox to be identified as the authors of this work has been asserted in accordance with the Copyrights, Designs and Patents Act 1988.
All rights reserved. No part of this publication may be reproduced, stored in a retrieval system or transmitted in any form or by any means, electronic, electrostatic, magnetic tape, photocopying, recording or otherwise, without prior permission of the publisher.
British Library Cataloguing-in-Publication Data
A catalogue record for this book is available from the British Library.
ISBN: 978 1 78194 007 5
Distributed in North America by The Globe Pequot Press, P.O Box 480, 246 Goose Lane, Guilford, CT 06437-0480.
All other sales enquiries should be directed to Everyman Chess, Northburgh House, 10 Northburgh Street, London EC1V 0AT tel: 020 7253 7887; fax: 020 7490 3708 email: info@everymanchess.com : website: www.everymanchess.com
Everyman is the registered trade mark of Random House Inc. and is used in this work under licence from Random House Inc.
Everyman Chess Series
Chief Advisor: Byron Jacobs
Commissioning editor: John Emms
Assistant Editor: Richard Palliser
Typeset and edited by First Rank Publishing, Brighton. Cover design by Horatio Monteverde.
About the Authors
Grandmaster John Emms has played for England in two Chess Olympiads and was captain of the team at the 2002 Olympiad in Bled. He is an experienced coach who has worked with World Championship finalist Michael Adams and some of the UK’s top junior players. He is also a highly respected chess writer, with many outstanding works to his name. As commissioning editor for Everyman Chess, he developed the extremely successful Move by Move series of books.
Grandmaster Tony Kosten is an experienced tournament player, with dozens of international victories to his credit. He played for England and won an individual bronze medal at the 1989 European Team Championship in Haifa. He has lived in France since 1990, and has captained and coached the French national team. He is Managing Director of ChessPublishing.com, the renowned chess opening theory website. He has written many books, including the highly acclaimed opening repertoire book The Dynamic English.
John Cox is an International Master and a former British Junior Champion. His books for Everyman Chess, including Dealing with d4 Deviations, Starting Out: 1 d4! and Starting Out: Alekhine’s Defence, have established him as a writer with impressive credentials.
The Ruy Lopez enjoys a long and distinguished history, and one would be forgiven for thinking that, by now, its theory would have almost settled. Recent evidence, however, suggests that the opposite is true; its theory is still developing rapidly and no doubt there are many discoveries yet to be made. These days Black players are less likely to choose the ‘main lines’ –there are a greater number of options for Black that are now recognized as fully acceptable. Perhaps the most obvious example is the Berlin Defence, which Kramnik used so effectively to frustrate Kasparov in their 2000 World Championship match, but there are many other possibilities too. In turn, White players have been forced to fight back. No longer can White expect to apply the Spanish Torture, game after game. Lopez players must be more flexible and prepared to take on a wider variety of positions, or employ a system-type approach with d2-d3, a choice which has become noticeably popular in recent times. I would like to thank my co-authors Tony Kosten and John Cox, for all their hard work and enthusiasm in researching and writing their chapters. I very much hope that readers are inspired to try out the ideas discussed in this book, whether they are playing the Ruy Lopez or fighting against it.
John Emms, Kent, November 2012
Series Introduction
The original concept behind Dangerous Weapons was to take a major chess opening and to approach it in a completely different way: to concentrate on variations that are ambitious, sharp, innovative, disruptive, tricky, enjoyable to analyse; ones not already weighed down by huge mountains of theory, and ones unfairly ignored or discredited. To me this seemed like an author’s paradise, which I’m sure contributed somewhat towards the inspiration behind this series!
The main motivation behind studying major openings in such a way is to be able to present the reader (not forgetting the author!) with a considerable number of fresh, hard-hitting opening weapons for both White and Black; in some cases to create repertoires and in others to enhance and rejuvenate existing ones.
What is a Dangerous Weapon?
For the purpose of choosing opening variations for this series, usually a Dangerous Weapon fits into one or more of these overlapping categories:
1. Moves that create complex, original positions full of razor-sharp tactics or rich positional ideas where creative, attacking play is rewarded; moves which are new, rare or very fresh, leaving plenty of scope for research. It should be pointed out that even though mainline theory produces a vast number of wonderfully complicated positions, these opening variations lose out heavily in the ‘danger’ stakes. No matter how sharp and difficult the position, the opening phase is nowhere near as hazardous for your opponent
if he is able to fall back on that comfort blanket known as theory. I’ve played plenty of incredibly sharp lines without any real fear simply because of reasonable book knowledge and some solid home preparation. Apart from a few exceptions, in Dangerous Weapons the emphasis has generally been on non-theoretical lines, where your opponent is left to his own devices at a very early stage.
2. Moves that are highly ambitious; ones which aim for total domination. Perfect for those not satisfied with a quiet theoretical edge as White and eager to search for a big advantage or even a direct refutation, albeit at some risk; or for those as Black who prefer to strive for the initiative at any cost, preferring this over a manageable disadvantage or sterile equality.
3. Moves that have been previously ignored, discarded or discredited by theory, perhaps unfairly so or maybe for the wrong reasons. Discredited lines can be especially dangerous – the psychological element cannot be ignored. Facing an opening like this, I find myself asking the question, ‘Why is he playing this variation if it is meant to be bad?’ Often there is a very good reason (a logical improvement, perhaps, which overturns a previous assessment), and in any case how are you supposed to remember a hypothetical 15-move refutation when you only browsed it in a book once, and that was a few years ago?
4. Moves that are visually shocking; moves which seem to contradict the laws of the game.
Disregarding the question of objective merit for the moment, there’s no doubt that a crazy-looking move has at the very least some psychological value. Unleashed on an opponent, it can produce a range of emotions: uncontrolled laughter, perhaps followed by over-confidence; anger (at being insulted by such a move) followed by over-aggression; or perhaps discomfort, followed by timidity. Of course you may instead encounter understanding followed by objectivity – you have to pick and choose your opponents.
Dangerous for Whom?
It would be difficult, probably impossible, to guarantee that every single variation in this book is 100% sound. You have to understand that in some cases ‘dangerous’ can mean ‘dangerous for both sides’. What I do expect, or
at least hope, is that your opponent’s ride throughout the opening should be far bumpier than yours!
Guiding You Through
Throughout the book there are some icons together with explanatory notes to emphasize significant points. They should be fairly self-explanatory, but here’s a brief summary:
DANGEROUS WEAPON! This signifies a game, variation, sub-variation or position where the Dangerous Weapon has obviously produced the desired effect.
BEWARE! Pointing out immediate danger for the player using the Dangerous Weapon.
ROLL THE DICE! Signifying a variation or sub-variation which is perhaps more suited for games with short time-limits or for players who enjoy taking risks.
TRICKY TRANSPOSITION: This indicates a transposition to a different opening variation. Using different move orders to reach a desirable position or to trick your opponent into something with which he is unfamiliar is becoming a weapon of increasing value.
As the title suggests, Dangerous Weapons may not be for the faint-hearted! More than anything, it is aimed at players of all levels who like to be entertained, those who are happy to try out fun-to-play openings at their local chess club, on the Internet, in tournaments, wherever they choose to play. Good luck studying and playing your Dangerous Weapons!
John Emms Everyman Chess
Chapter One
The Aronian Variation
Tony Kosten
1 e4 e5 2 Nf3 Nc6 3 Bb5 a6 4 Ba4 Nge7 (Diagram 1)
Diagram 1 (W)
I first became aware of this line when I saw Aronian playing it a lot, and getting good results with it (although mostly in quick games I should add). Of course, Aronian is incredibly strong, but this must be one of very few lines where Black has a big plus score in the Ruy Lopez.
Game 1
P.Leko-L.Aronian
World Blitz Championship, Moscow 2009
1 e4 e5 2 Nf3 Nc6 3 Bb5 Nge7
Defending the c6-knight and so dissuading White from taking it.
TRICKY TRANSPOSITION: I prefer to play 3 ... a6 first myself, but Aronian’s move is a good choice against players who like to play the Exchange Variation (4 Bxc6).
4 0-0
4 c3 a6 5 Ba4 g6 6 d4 exd4 7 cxd4 b5 8 Bb3 Bg7 9 0-0 0-0 10 Nc3 d6 11 h3 transposes to the game. 4 ... d5!? 5 Nxe5 dxe4 is also possible with this particular move order, transposing to a sort of Ponziani.
BEWARE! Black should be aware of 4 Nc3 with this move order, as then if 4 ... g6 5 d4 exd4 6 Nd5 is annoying.
4 ... g6 5 c3 a6
5 ... Bg7 6 d4 exd4 7 cxd4 a6 8 Ba4 b5 9 Bb3 0-0 would also transpose.
6 Ba4 Bg7 7 h3
7 d4 first is more usual: 7 ... exd4 8 cxd4 b5 9 Bb3 0-0 10 Nc3 when 10 ... d6 11 h3 reaches the game position.
Aronian often prefers this way of playing, to stop Bg5, possibly as it leads to a complicated struggle.
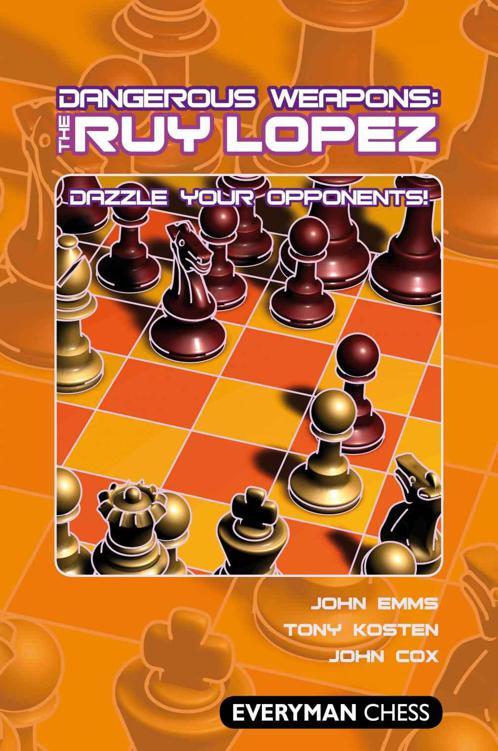
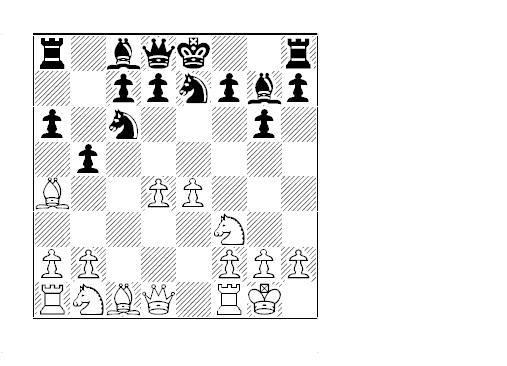
My recommendation throughout this chapter is to prefer a more open game, and so I would play 13 ... cxd4 here, aiming for the active backward d-pawn position: 14 Nxd4 Bb7 15 Bg5 h6 16 Bf4 (or16 Bh4, S.VelickovicI.Martic, Valjevo 2012, 16 ... Rc8 and then ... Re8 and ... Qb6) 16 ... Rc8 (Diagram 3)
Diagram 3 (W)
(Black’s pieces come easily to active posts) 17 Nce2 d5!? (now the epawn advances and the game gets a bit messy; 17 ... Nec6! is more natural –18 Nxc6 Bxc6!? as on 19 Bxd6 Re8 White cannot defend both b2 and e4) 18 e5 Nc4 19 e6! Nxb2 20 Qb1 Nc4 21 exf7+ Kxf7 (21 ... Rxf7!? 22 Bxg6 Nxg6 23 Qxg6 Qf6 would be safer) 22 a4! Qb6 23 axb5! (White grabs his chance to play for the attack, and is not afraid to sacrifice material) 23 ... Bxd4 24 Nxd4 Qxd4 25 Bxh6 axb5 26 Bxf8 Rxf8 (26 ... Kxf8!?) 27 Qxb5 was unclear but unpleasant for Black in I.Chirila-A.Shabalov, Richardson 2011. 14 Rb1 Nec6!? 15 d5
Ambitious – Leko heads for a Benoni-style position, which most 1 e4 players are loath to do.
15 dxc5 dxc5 16 Nd5 is nothing special for White: 16 ... Be6 17 Be3 Bxd5 18 exd5 Nd4.
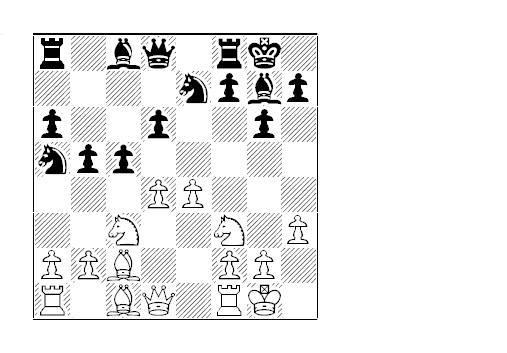
15 ... Nb4 16 a3 Nxc2 17 Qxc2 Re8 (Diagram 4)
Diagram 4 (W)
Black has a nice Benoni position – his queenside pawns are already advanced and White’s central majority is ineffective.
18 b4 Nc4
The ‘offside’ knight is rather useful too, and will now hop around causing havoc wherever it lands.
19 Nd2 Ne5 20 f4 Ng4!? 21 Nf3
21 hxg4?? is impossible: 21 ... Bd4+ 22 Kf1 Qh4 23 Ke2 Qxg4+ 24 Kd3 Qxg2 with a devastating attack.
21 ... cxb4 22 axb4 Qc7!? 23 Bd2
23 hxg4 was the safest: 23 ... Qxc3 24 Qf2 Bxg4 25 Bb2 when White is not worse.
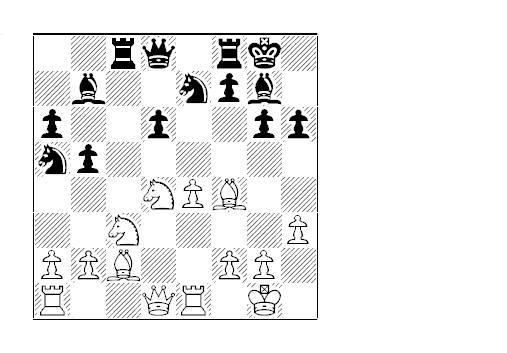
23 ... Qa7+ 24 Kh1 Nf2+ 25 Kh2 Nxh3! (Diagram 5)
Diagram 5 (W)
No let-up! It is difficult to believe that this was only a blitz game.
26 Be3
Certainly not 26 gxh3?? Qf2+ 27 Kh1 Qxf3+.
But 26 Nd1! would force 26 ... Nf2 when 27 Nxf2 Qxf2 28 f5 would have been messy.
26 ... Qd7! 27 Qd2 Qg4 28 Rf1?
White was in a difficult position anyway, and even after a better move such as 28 Rbc1 (to defend the c3-knight) 28 ... Qh5 29 Kg3 Bf6 he would have to find some good moves to hang on. Still, the black knight on h3 does look a bit strange.
28 ... Nxf4
Aronian wants to play all his moves with either his knight or queen! Otherwise he could have moved a bishop – 28 ... Bxc3 29 Qxc3 Qh5 and White is quite lost: neither 30 Kg3 Rxe4 nor 30 gxh3 Bxh3 31 Rf2 Bg4+ 32 Kg2 Qh3+ 33 Kg1 Bxf3 will save him.
TRICKY TRANSPOSITION: The beauty of this line is that it can arise from so many different move orders (see below).
For example, 3 ... g6 (Diagram 6) and now:
Diagram 6 (W)
b) Or 4 0-0 Bg7 5 c3 a6 6 Ba4 (6 Bxc6 dxc6 7 d4 exd4 8 cxd4 Ne7 9
Nc3 Bg4 10 Be3 0-0 is comfortable for Black; 11 h3 Bxf3 12 Qxf3 f5!, M.Chandler-B.Spassky, Vienna 1986) 6 ... Nge7 7 d4 exd4 8 cxd4 b5 9 Bb3 etc.
c) Or even 4 d4 exd4 5 c3 a6 6 Ba4 Bg7 7 cxd4 b5 8 Bb3 Nge7 9 0-0.
However, playing 3 ... g6 you should be ready for 4 d4 exd4 5 Bg5 Be7 6 Bxe7 Qxe7 7 Bxc6 dxc6 8 Qxd4 with an Exchange-type position which is more comfortable for White.
4 d4 exd4 5 Nxd4 is common, but not very good here: 5 ... Bg7 6 Be3
Nf6 7 Nc3 0-0 8 0-0 Ne7! an idea played by Steinitz a few times, Black plans ... d5 with at least equality.
Finally, 3 ... Nge7 4 0-0 g6 5 c3 was the move order in our introductory game Leko-Aronian.
4 Ba4 Nge7
This particular move order might be the most accurate, but that would probably depend on whether you were happy allowing the Exchange Spanish – if your opponent is an expert on the Exchange then you could choose 3 ... g6 or 3 ... Nge7 instead.
Of course, whichever line you choose you will need to examine the early move alternatives for White in greater depth – Ivan Sokolov’s recent book The Ruy Lopez Revisited has chapters on both third moves (and a lot more besides).
4 ... g6 5 c3 Bg7 6 d4 exd4 7 cxd4 b5 8 Bb3 Nge7 9 0-0 is yet another possible move sequence.
5 0-0
Another move order is 5 c3 g6 6 d4 exd4 7 cxd4 b5 (note that Black should play this before White can advance his d-pawn to d5!) 8 Bb3 Bg7 9 0-0 0-0.
BEWARE! If you use the 3 ... a6 4 Ba4 Nge7 move order, be aware of the tricky 5 Nc3!? g6 6 d4 exd4 7 Nd5, although Black can defend with care: 7 ... Bg7 8 Bg5 h6 9 Bf6 Bxf6 10 Nxf6+ Kf8 11 0-0 Kg7 12 Nd5 b5 13 Bb3 Nxd5 14 Bxd5 Bb7 15 Nxd4 Qf6 16 c3 Rab8, M.Sebag-Zhu Chen, Ulaanbaatar 2010.
Note that many strong players prefer to avoid this and play 5 Nc3 d6 (Diagram 7).
Diagram 7 (W)
For example:
a) 6 d4 allows 6 ... b5 7 Bb3 Nxd4 8 Nxd4 exd4 9 Qh5 (9 Qxd4? falls into the well-known trap 9 ... c5 and ... c4, winning the b3-bishop) 9 ... Ng6, S.Das-G.Pap, Chennai 2011, when White could (and probably should) have played for a repetition by 10 Qd5 Be6 11 Qc6+ Bd7 12 Qd5 although Black would certainly have tried to keep the game alive by 12 ... Ne5 13 f4 c6 14 Qxd4 Ng4.
b) 6 0-0 Bd7 when the natural 7 d4 is once again met by 7 ... b5 8 Bb3 Nxd4 9 Nxd4 exd4 10 Qh5 (10 Qxd4?! is not quite so bad now: 10 ... c5 11 Qxd6 c4, A.Schroeder-D.Janowski, New York 1916, 12 Be3 and White gets a couple of pawns and some play for the trapped bishop) 10 ... Ng6 11 Nd5!? (11 Qd5 Be6 12 Qc6+ Bd7 13 Qd5 repeats) 11 ... c6 12 Bg5 Qc8 13 Rfe1 (M.Fierro Baquero-V.Raineri, Fermo 2010) 13 ... Bg4 14 Nc7+ Qxc7 15 Qxg4 Be7.
c) 6 a3 h6 7 h3 (to stop ... Bg4) 7 ... g6 8 d4 b5 9 Bb3 exd4 10 Nxd4 Na5 11 Ba2 Bg7 12 Bf4 0-0 13 0-0 Nc4 14 Rb1 c5!? 15 Nde2 Be6 16 Bxc4 Bxc4 with good play for Black, E.Berg-S.Ernst, Maastricht 2011, as after 17 Bxd6 Bxc3 18 Nxc3 Bxf1 19 Kxf1 Re8 20 Bxc5 Rc8 White has enough for the exchange, but no more.
BEWARE! 5 Bb3!? (Diagram 8) threatens the not-too-subtle Ng5!
Diagram 8 (B)
5 ... Ng6 is the safest response to 5 Bb3, but 6 d4 exd4 7 0-0 is a little uncomfortable for Black, K.Kulaots-A.Kosten, Belfort 2012.
5 ... h6!? plans ... g6, ... Bg7 and ... 0-0: 6 0-0 (6 d4 exd4 7 Nxd4 Nxd4 8 Qxd4 d6 9 Nc3 Nc6 10 Qd3 g6 11 Be3 Bg7 12 0-0-0 0-0 is dangerous for Black, O.Kanmazalp-D.Hristodorescu, Plovdiv 2012; 7 ... d6 is better) 6 ... g6 7 c3 Bg7 8 d4 exd4 9 cxd4 Na5 10 Bc2 0-0 11 Nc3 d6 12 h3 b5 13 d5 Bb7 14 Re1 (B.Starke-A.Proudian, Sao Paulo 2012) 14 ... Rc8 and ... c6 reaches positions similar to the later material with ... h6 played (which is sometimes useful).
5 ... g6 6 c3
The most popular and strongest move. White plans to construct a centre and put pressure on e5.
6 d4 exd4 7 Nxd4 Bg7 8 Be3 0-0 9 Nc3 isn’t very effective here: 9 ... b5 (or 9 ... Na5!? 10 Nde2 b5 11 Bb3 Nxb3 12 axb3 Bb7, A.KovalevL.Keitlinghaus, Ostrava 1993) 10 Bb3 Na5 with a threat of ... c5–c4 trapping the bishop.
6 ... Bg7 7 d4 exd4
This is a positional concession according to classical thinking; normally in the Lopez Black attempts to hold on to his e5 strong point in the centre.
Here, in return for allowing White a mobile centre and c3-square for his queen’s knight Black will develop quickly and well, and will then pressure the white centre with classic flanking blows, mostly ... c5 but sometimes ... f5.
8 cxd4 b5 (Diagram 9)
Diagram 9 (W)
Once again notice that Black might as well play this move before White gets the chance to play d5, as the knight would then be short of decent squares.
Still, 8 ... 0-0 is fine, as 9 d5 b5 transposes to 9 d5 bxa4 below, after 10 dxc6 bxa4 11 Qxa4 Nxc6.
After 8 ... b5 we reach the basic position and the question is whether White retreats his bishop to b3 (the most common as he will want to control d5 and maybe attack f7) or c2.
A: 9 Bc2
B: 9 Bb3
Alternatively, 9 d5 Na5 10 Bc2 0-0 transposes to Variation A (9 Bc2 0-0 10 d5 Na5) but 9 ... bxa4 10 dxc6 Nxc6 11 Qxa4 0-0 can’t be bad either: 12 Bg5 f6 (12 ... Qe8 13 Nc3 Ne5 14 Nxe5 Qxe5 15 Be3 Rb8 is also possible) 13
Bf4 Rb8 14 Nc3, V.Yemelin-A.Dokutchaev, Finland 2012, when 14 ... Rb4 15 Qc2 f5 16 a3 fxe4 looks like fun for Black.
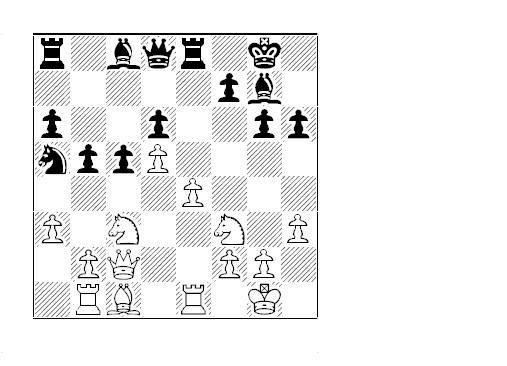
Before we move on to the nitty-gritty, a quick word about a common position-type which will occur in the theoretical section should White either play d5, Black respond with ... c6 and White capture on c6 (occasionally Black will play ... c5 instead and White will capture en passant) or where Black plays ... c5 and then captures on d4, and this will happen a lot!
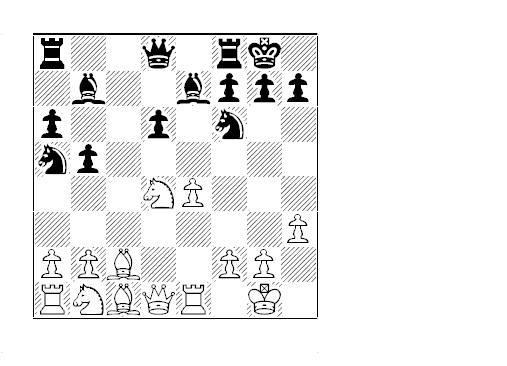
Na5 10 Bc2 c5 11 d4 when there are many different lines where Black captures twice on d4, for instance 11 ... cxd4 12 cxd4 exd4 13 Nxd4 Bb7 (Diagram 10):
Diagram 10 (W)
Black will continue ... Re8, ... Bf8, ... g6 and ... Bg7 during which White will have plenty of time to put his pieces on good squares. But now look at the position after 14 moves of I.Chirila-A.Shabalov, say (Diagram 11) (and there are many similar positions):