No part of this publication may be reproduced, stored in a retrieval system or transmitted in any form or by any means, electronic, mechanical, photocopying, recording, scanning or otherwise, except as permitted under Sections 107 or 108 of the 1976 United States Copyright Act, without the prior written permission of the Publisher. Requests to the Publisher for permission should be addressed to the Permissions Department, John Wiley & Sons, Inc., 111 River Street, Hoboken, NJ 07030, (201) 748-6011, fax (201) 748-6008, or online at http://www.wiley.com/go/permissions.
Trademarks: Wiley, For Dummies, the Dummies Man logo, Dummies.com, Making Everything Easier, and related trade dress are trademarks or registered trademarks of John Wiley & Sons, Inc. and may not be used without written permission. Microsoft and Excel are registered trademarks of Microsoft Corporation. All other trademarks are the property of their respective owners. John Wiley & Sons, Inc. is not associated with any product or vendor mentioned in this book.
LIMIT OF LIABILITY/DISCLAIMER OF WARRANTY: WHILE THE PUBLISHER AND AUTHORS HAVE USED THEIR BEST EFFORTS IN PREPARING THIS WORK, THEY MAKE NO REPRESENTATIONS OR WARRANTIES WITH RESPECT TO THE ACCURACY OR COMPLETENESS OF THE CONTENTS OF THIS WORK AND SPECIFICALLY DISCLAIM ALL WARRANTIES, INCLUDING WITHOUT LIMITATION ANY IMPLIED WARRANTIES OF MERCHANTABILITY OR FITNESS FOR A PARTICULAR PURPOSE. NO WARRANTY MAY BE CREATED OR EXTENDED BY SALES REPRESENTATIVES, WRITTEN SALES MATERIALS OR PROMOTIONAL STATEMENTS FOR THIS WORK. THE FACT THAT AN ORGANIZATION, WEBSITE, OR PRODUCT IS REFERRED TO IN THIS WORK AS A CITATION AND/OR POTENTIAL SOURCE OF FURTHER INFORMATION DOES NOT MEAN THAT THE PUBLISHER AND AUTHORS ENDORSE THE INFORMATION OR SERVICES THE ORGANIZATION, WEBSITE, OR PRODUCT MAY PROVIDE OR RECOMMENDATIONS IT MAY MAKE. THIS WORK IS SOLD WITH THE UNDERSTANDING THAT THE PUBLISHER IS NOT ENGAGED IN RENDERING PROFESSIONAL SERVICES. THE ADVICE AND STRATEGIES CONTAINED HEREIN MAY NOT BE SUITABLE FOR YOUR SITUATION. YOU SHOULD CONSULT WITH A SPECIALIST WHERE APPROPRIATE. FURTHER, READERS SHOULD BE AWARE THAT WEBSITES LISTED IN THIS WORK MAY HAVE CHANGED OR DISAPPEARED BETWEEN WHEN THIS WORK WAS WRITTEN AND WHEN IT IS READ. NEITHER THE PUBLISHER NOR AUTHORS SHALL BE LIABLE FOR ANY LOSS OF PROFIT OR ANY OTHER COMMERCIAL DAMAGES, INCLUDING BUT NOT LIMITED TO SPECIAL, INCIDENTAL, CONSEQUENTIAL, OR OTHER DAMAGES.
For general information on our other products and services, please contact our Customer Care Department within the U.S. at 877-762-2974, outside the U.S. at 317-572-3993, or fax 317-572-4002. For technical support, please visit https://hub.wiley.com/community/support/dummies
Wiley publishes in a variety of print and electronic formats and by print-on-demand. Some material included with standard print versions of this book may not be included in e-books or in print-on-demand. If this book refers to media such as a CD or DVD that is not included in the version you purchased, you may download this material at http://booksupport.wiley.com. For more information about Wiley products, visit www.wiley.com.
In its broadest sense, a macro is a sequence of instructions that automates some aspect of Excel so that you can work more efficiently and with fewer errors. You might create a macro, for example, to format and print a month-end sales report. After you develop the macro, you can execute it to perform many timeconsuming procedures automatically.
Macros are written in VBA, which stands for Visual Basic for Applications. VBA is a programming language developed by Microsoft and a tool used to develop programs that control Excel.
Excel programming terminology can be a bit confusing. For example, VBA is a programming language but also serves as a macro language. What do you call something written in VBA and executed in Excel? Is it a macro or is it a program? Excel’s Help system often refers to VBA procedures as macros, so this is the terminology used in this book.
You also see the term automate throughout this book. This word means that a series of steps are completed automatically. For example, if you write a macro that adds color to some cells, prints the worksheet, and then removes the color, you have automated those three steps.
You’re probably aware that people use Excel for thousands of different tasks. Here are just a few examples:
» Keeping lists of things, such as customer names and transactions
» Budgeting and forecasting
» Analyzing scientific data
» Creating invoices and other forms
» Developing charts from data
The list could go on and on. The point is simply that Excel is used for a wide variety of tasks, and everyone reading this book has different needs and expectations regarding Excel. One thing most readers have in common, however, is the need to automate some aspect of Excel, which is what macros (and this book) are all about.
About This Book
This book approaches the topic of Excel macros with the recognition that programming VBA takes time and practice — time that you may not have right now. In fact, many analysts don’t have the luxury of taking a few weeks to become expert at VBA. So instead of the same general overview of VBA topics, this book provides some of the most commonly used real-world Excel macros.
Each section in the book outlines a common problem and provides an Excel macro to solve the problem — along with a detailed explanation of how the macro works and where to use it.
Each section presents the following:
» The problem
» The macro solution
» How the macro works
After reading each section, you’ll be able to
» Immediately implement the required Excel macro
» Understand how the macro works
» Reuse the macro in other workbooks or with other macros
The macros in this book are designed to get you up and running with VBA in the quickest way possible. Each macro tackles a common task that benefits from automation. The idea here is to learn through application. This book is designed so that you can implement the macro while getting a clear understanding of what the macro does and how it works.
Foolish Assumptions
I make three assumptions about you as the reader:
» You’ve installed Microsoft Excel.
» You have some familiarity with the basic concepts of data analysis, such as working with tables, aggregating data, creating formulas, referencing cells, filtering, and sorting.
» You have an Internet connection so you can download the sample files.
Icons Used in This
Book
Tip icons cover tricks or techniques related to the current discussion.
Remember icons indicate notes or asides that are important to keep in mind.
Warning icons hold critical information about pitfalls you will want to avoid.
The icons marks particuarly geeky parts of Excel and VBA. If you’re into the technical aspects, read on. If you’re not, you can completely skip paragraphs marked with this paragraph and still get your macros to work.
Beyond the Book
In addition to the material in the print or e-book you’re reading, this product comes with more online goodies:
» Sample files: Each macro in this book has an associated sample file that enables you to see the macro working and to review the code. You can use the sample files also to copy and paste the code into your environment (as opposed to typing each macro from scratch). Download the sample files at:
www.dummies.com/go/excelmacrosfd3e
Each macro in this book has detailed instructions on where to copy and paste the code. In general terms, you open the sample file associated with the macro, open the Visual Basic Editor (by pressing Alt+F11), and copy the code. Then open your workbook, open the Visual Basic Editor, and paste the code in the appropriate location.
Note that in some macros, you need to change the macro to suit your situation. For example, in the macro that prints all workbooks in a directory (see Chapter 4), you point to the C:\Temp\ directory. Before using this macro, you must edit it to point to your target directory.
If a macro is not working for you, most likely a component of the macro needs to be changed. Pay special attention to range addresses, directory names, and any other hard-coded names.
» Cheat sheet: The cheat sheet offers shortcut keys that can help you work more efficiently in Excel’s Visual Basic Editor. You can find the cheat sheet by visiting www.dummies.com and searching for “Excel Macros Cheat Sheet.”
Where to Go from Here
If you’re completely new to Excel macros, start with Part 1 (Chapters 1–3) to get the fundamentals you need to understand the macros in this book. There, you gain a concise understanding of how macros and VBA work, along with the basic foundation you need to implement the macros provided in this book.
If you’ve got some macro experience and want to dive right into the macro examples, feel free to peruse Chapters 4–9 and search for the task or macro that looks interesting to you. Don’t worry. Each macro example stands on its own within its own section that gives you all the guidance you need to understand and implement the code in your own workbook.
Visit Part 2 if you’re interested in macros that automate common workbook and worksheet tasks to save time and gain efficiencies.
Explore Part 3 to find macros that navigate ranges, format cells, and manipulate the data in your workbooks.
If you want to find macros that work with PivotTables, charts, and emails, thumb through the macros in Part 4 where you discover macros that automate redundant PivotTable and chart tasks, as well as macros that send emails and connect to external data sources.
Don’t forget to hit Part 5 for some useful tips and advice on how to get the most out of your new macro skills.
Here are some final things to keep in mind while working with the macros in this book:
» Any file that contains a macro must have the .xlsm file extension. See the section on macro-enabled file extensions in Chapter 1 for more information.
» Excel does not run macros until they are enabled. As you implement these macros, you and your customers must comply with Excel’s macro security measures. See the section in Chapter 1 on macro security in Excel for details.
» You cannot undo macro actions. When working in Excel, you can often undo the actions you’ve taken because Excel keeps a log (called the undo stack) recording your last 100 actions. However, running a macro automatically destroys the undo stack, so you can’t undo the actions you take in a macro.
» You need to tweak the macros to fit your workbook. Many of the macros reference example sheet names and ranges that you may not have in your workbook. Be sure to replace references such as “Sheet 1” or Range (“A1”) with the sheet names and cell addresses you are working with in your own workbooks.
1 Holy Macro Batman!
IN THIS PART . . .
Build a foundation for your macro skills with fundamental macro recording concepts.
Get a solid understanding of the ground rules for using and distributing macros in Excel.
Explore Excel’s coding environment with a deep-dive of the Visual Basic Editor.
Explore how to leverage the Excel object model to start writing your own macros from scratch.
Understand the roles played by variables, events, and error handling in macro development.
IN THIS CHAPTER
» Choosing macros
» Recording macros
» Understanding macro security
» Finding out where to store and how to run macros
» Exploring macro examples
Chapter 1 Macro Fundamentals
Amacro is essentially a set of instructions or code that you create to tell Excel to execute any number of actions. In Excel, macros can be written or recorded. The key word here is recorded.
Recording a macro is like programming a phone number into your smartphone. You first manually dial and save a number. Then when you want, you can redial those numbers with the touch of a button. With macro recording, you can record your actions in Excel while you perform them. While you record, Excel gets busy in the background, translating your keystrokes and mouse clicks to code (also known as Visual Basic for Applications or VBA). After a macro is recorded, you can play back those actions anytime you want.
In this chapter, you explore macros and find out how you can use macros to automate your recurring processes to simplify your life.
Choosing to Use a Macro
The first step in using macros is admitting you have a problem. Actually, you may have several problems:
» Problem 1— repetitive tasks: As each new month rolls around, you have to make the donuts (that is, crank out those reports). You have to import that
data. You have to update those PivotTables. You have to delete those columns, and so on. With a macro you could have those more redundant parts of your monthly process processes done automatically.
» Problem 2 — you’re making mistakes: When you go hand-to-hand combat with Excel, you’re bound to make mistakes. When you’re repeatedly applying formulas, sorting, and moving things around manually, there’s always that risk of catastrophe. Add to that the looming deadlines and constant change requests, and your error rate goes up. Or you could calmly record a macro, ensure that everything is running correctly, and then forget it. The macro performs every action the same way every time you run it, reducing the chance of errors.
» Problem 3 — awkward navigation: You often create reports for an audience that probably has a limited knowledge of Excel. It’s always helpful to make your reports more user-friendly. Macros can be used to dynamically format and print worksheets, navigate to specific sheets in your workbook, or even save the open document in a specified location. Your audience will appreciate these little touches that help make perusal of your workbooks a bit more pleasant.
Macro Recording Basics
To start recording your first macro, you need to first find the Macro Recorder, which is on the Developer tab. Unfortunately, Excel comes out of the box with the Developer tab hidden — you may not see it on your version of Excel at first. If you plan to work with VBA macros, you’ll want to make sure that the Developer tab is visible. To display this tab
1. Choose File ➪ Options.
2. In the Excel Options dialog box, click Customize Ribbon.
3. In the list box on the right, place a check mark next to Developer.
4. Click OK to return to Excel.
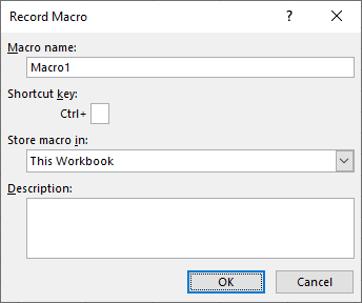
Now that you have the Developer tab showing in the Excel Ribbon, you can start up the Macro Recorder by selecting Record Macro from the Developer tab. This activates the Record Macro dialog box, as shown in Figure 1-1.
Here are the four parts of the Record Macro dialog box:
» Macro Name: Excel gives a default name to your macro, such as Macro1, but you should give your macro a name more descriptive of what it actually does. For example, you might name a macro that formats a generic table as FormatTable.
You have to follow a few rules when naming a macro. The first character must be a letter. Generally, special characters other than underscore aren’t allowed. And the total number of characters can’t be more than 255, although hopefully you don’t get close to that limit.
» Shortcut Key: Every macro needs an event, or something to happen, for it to run. This event can be a button press, a workbook opening, or if you use this field, a keystroke combination. When you assign a shortcut key to your macro, entering that combination of keys triggers your macro to run. This is an optional field.
» Store Macro In: This Workbook is the default option. Storing your macro in This Workbook simply means that the macro is stored along with the active Excel file. The next time you open that particular workbook, the macro is available to run. Similarly, if you send the workbook to another user, that user can run the macro as well (provided the macro security is properly set by your user — more on that later in this chapter). You can also choose New Workbook to tell Excel to create a new workbook to store the macro or Personal Macro Workbook, a special workbook used to store macros you want access to all the time. See “Storing and Running Macros” later in this chapter for more on the Personal Macro Workbook.
» Description: This field is optional, but it can come in handy if you have numerous macros in a workbook or if you need to give a user a more detailed description about what the macro does.
FIGURE 1-1:
The Record Macro dialog box.
With the Record Macro dialog box open, follow these steps to create a simple macro that enters your name into a worksheet cell:
1. Enter a new single-word name for the macro to replace the default Macro1 name.
A good name for this example is MyName.
2. Assign this macro to the shortcut key Ctrl+Shift+N. You do this by entering uppercase N in the edit box labeled Shortcut Key.
3. Click OK.
This closes the Record Macro dialog box and begins recording your actions.
4. Select cell B3 on your worksheet, type your name into the selected cell, and then press Enter.
5. Choose Developer ➪ Code ➪ Stop Recording (or click the Stop Recording button in the status bar).
Examining the macro
The macro was recorded in a new module named Module1. To view the code in this module, you must activate the Visual Basic Editor. (See Chapter 2 to find out more about the Visual Basic Editor.) You can activate the VB Editor in one of three ways:
» Press Alt+F11.
» Choose Developer ➪ Code ➪ Visual Basic.
» Choose Developer ➪ Code ➪ Macros, select a macro, and click Edit.
In the VB Editor, the Project window displays a list of all open workbooks and addins. If the Project Explorer isn’t visible, choose View ➪ Project Explorer. This list is displayed as a tree diagram, which you can expand or collapse. The code that you recorded previously is stored in Module1 in the current workbook. When you double-click Module1, the code in the module appears in the Code window.
The macro should look something like this:
MyName()
MyName Macro
Keyboard Shortcut: Ctrl+Shift+N
Range("B3").Select
ActiveCell.FormulaR1C1 = "Dick Kusleika"
Range("B4").Select End Sub
The macro recorded is a Sub procedure named MyName. The statements tell Excel what to do when the macro is executed.
Notice that Excel inserted some comments at the top of the procedure. These comments are some of the information that appeared in the Record Macro dialog box. These comment lines (which begin with an apostrophe) aren’t really necessary, and deleting them has no effect on how the macro runs. If you ignore the comments, you’ll see that this procedure has three VBA statements, the second of which is:
ActiveCell.FormulaR1C1 = "Dick Kusleika"
The first statement is selecting cell B3. The last statement is pressing Enter after you enter your name, which moves the active cell down one row. The middle statement, the one that does all the work, causes the name you typed while recording to be inserted into the active cell.
Editing the macro
After you record a macro, you can make changes to it. The macro you recorded in the previous section always inserts your name into cell B3. Edit the macro so that it enters your name in whatever cell you happen to be in when you run it. To do that, delete the first and third lines of the macro. The edited macro appears as follows:
MyName()
MyName Macro
Keyboard Shortcut: Ctrl+Shift+N
ActiveCell.FormulaR1C1 = "Dick Kusleika" End Sub
This macro inserts text into the active cell because the first Select statement was removed. That same cell remains active because the second Select statement was removed.
Testing the macro
Before you recorded this macro, you set an option that assigned the macro to the Ctrl+Shift+N shortcut key combination. To test the macro, return to Excel by using either of the following methods:
» Press Alt+F11.
» Click the View Microsoft Excel button on the VB Editor toolbar.
When Excel is active, activate a worksheet. (It can be in the workbook that contains the VBA module or in any other workbook.) Select a cell and press Ctrl+Shift+N. The macro immediately enters your name into the cell.
Comparing Absolute and Relative Macro Recording
Excel has two modes for recording — absolute reference and relative reference. These modes affect what statements Excel generates when you select cell while recording. In this section, I discuss the two modes and when to use them.
Recording macros with absolute references
In the example in the preceding section, you selected cell B3 while recording a macro and Excel dutifully recorded a statement that selects cell B3. This is an example of an absolute reference and it’s the default mode when recording macros. The term absolute reference is often used in the context of cell references found in formulas. When a cell reference in a formula is an absolute reference, it does not automatically adjust when the formula is pasted to a new location.
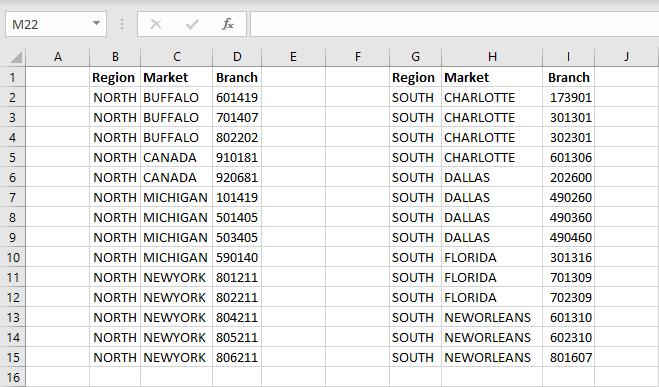
The best way to understand how this concept applies to macros is to try it. Open the Chapter 1 Sample File.xlsx file and record a macro that counts the rows in the Branchlist worksheet. (See Figure 1-2.)
The sample dataset used in this chapter can be found on the book’s companion website.
FIGURE 1-2:
Your pre-totaled worksheet containing two tables.
Follow these steps to record the macro:
1. Before recording, make sure cell A1 is selected.
2. Select Record Macro from the Developer tab.
3. Name the macro AddTotal.
4. Choose This Workbook for the save location.
5. Click OK to start recording.
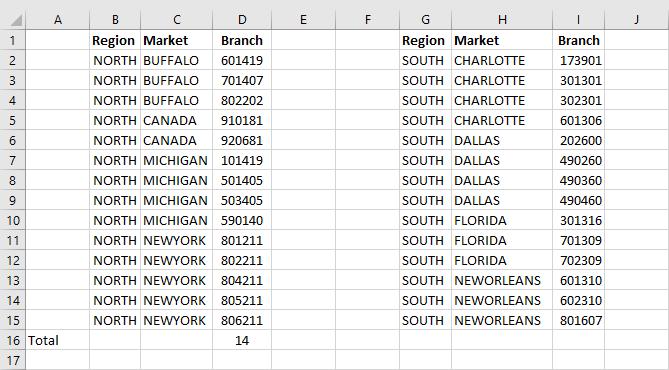
At this point, Excel is recording your actions. While Excel is recording, perform the following steps:
1. Select cell A16 and type Total in the cell.
2. Select the first empty cell in Column D (D16) and enter = COUNTA(D2:D15).
This gives a count of branch numbers at the bottom of column D. You need to use the COUNTA function because the branch numbers are stored as text.
6. Click Stop Recording on the Developer tab to stop recording the macro. The formatted worksheet should look something like the one in Figure 1-3.
To see your macro in action, delete the total row you just added and play back your macro by following these steps:
1. Click Macros on the Developer tab.
2. Find and select the AddTotal macro you just recorded.
3. Click the Run button.
FIGURE 1-3: Your post-totaled worksheet.
If all goes well, the macro plays back your actions to a T and gives your table a total. Now here’s the thing: No matter how hard you try, you can’t make the AddTotal macro work on the second table (G1:I15 in Figure 1-3). Why? Because you recorded the macro using absolute references.
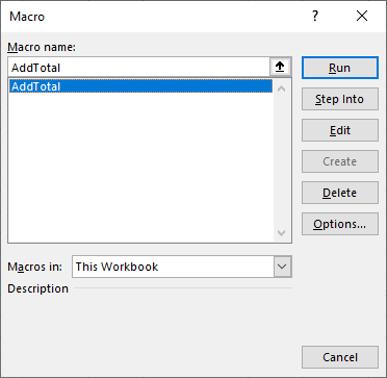
To understand what this means, examine the underlying code. To examine the code, click Macros on the Developer tab to open the Macro dialog box, as shown in Figure 1-4.