Immediate download Microsoft office for seniors for dummies 1st edition faithe wempen ebooks 2024
Visit to download the full and correct content document: https://ebookmass.com/product/microsoft-office-for-seniors-for-dummies-1st-edition-f aithe-wempen/
More products digital (pdf, epub, mobi) instant download maybe you interests ...
Laptops For Seniors For Dummies 6th Edition Faithe
No part of this publication may be reproduced, stored in a retrieval system or transmitted in any form or by any means, electronic, mechanical, photocopying, recording, scanning or otherwise, except as permitted under Sections 107 or 108 of the 1976 United States Copyright Act, without the prior written permission of the Publisher. Requests to the Publisher for permission should be addressed to the Permissions Department, John Wiley & Sons, Inc., 111 River Street, Hoboken, NJ 07030, (201) 748-6011, fax (201) 748-6008, or online at http://www.wiley.com/go/permissions.
Trademarks: Wiley, For Dummies, the Dummies Man logo, Dummies.com, Making Everything Easier, and related trade dress are trademarks or registered trademarks of John Wiley & Sons, Inc. and may not be used without written permission. Microsoft is a registered trademark of Microsoft Corporation. All other trademarks are the property of their respective owners. John Wiley & Sons, Inc. is not associated with any product or vendor mentioned in this book.
LIMIT OF LIABILITY/DISCLAIMER OF WARRANTY: WHILE THE PUBLISHER AND AUTHORS HAVE USED THEIR BEST EFFORTS IN PREPARING THIS WORK, THEY MAKE NO REPRESENTATIONS OR WARRANTIES WITH RESPECT TO THE ACCURACY OR COMPLETENESS OF THE CONTENTS OF THIS WORK AND SPECIFICALLY DISCLAIM ALL WARRANTIES, INCLUDING WITHOUT LIMITATION ANY IMPLIED WARRANTIES OF MERCHANTABILITY OR FITNESS FOR A PARTICULAR PURPOSE. NO WARRANTY MAY BE CREATED OR EXTENDED BY SALES REPRESENTATIVES, WRITTEN SALES MATERIALS OR PROMOTIONAL STATEMENTS FOR THIS WORK. THE FACT THAT AN ORGANIZATION, WEBSITE, OR PRODUCT IS REFERRED TO IN THIS WORK AS A CITATION AND/OR POTENTIAL SOURCE OF FURTHER INFORMATION DOES NOT MEAN THAT THE PUBLISHER AND AUTHORS ENDORSE THE INFORMATION OR SERVICES THE ORGANIZATION, WEBSITE, OR PRODUCT MAY PROVIDE OR RECOMMENDATIONS IT MAY MAKE. THIS WORK IS SOLD WITH THE UNDERSTANDING THAT THE PUBLISHER IS NOT ENGAGED IN RENDERING PROFESSIONAL SERVICES. THE ADVICE AND STRATEGIES CONTAINED HEREIN MAY NOT BE SUITABLE FOR YOUR SITUATION. YOU SHOULD CONSULT WITH A SPECIALIST WHERE APPROPRIATE. FURTHER, READERS SHOULD BE AWARE THAT WEBSITES LISTED IN THIS WORK MAY HAVE CHANGED OR DISAPPEARED BETWEEN WHEN THIS WORK WAS WRITTEN AND WHEN IT IS READ. NEITHER THE PUBLISHER NOR AUTHORS SHALL BE LIABLE FOR ANY LOSS OF PROFIT OR ANY OTHER COMMERCIAL DAMAGES, INCLUDING BUT NOT LIMITED TO SPECIAL, INCIDENTAL, CONSEQUENTIAL, OR OTHER DAMAGES.
For general information on our other products and services, please contact our Customer Care Department within the U.S. at 877-762-2974, outside the U.S. at 317-572-3993, or fax 317-5724002. For technical support, please visit https://hub.wiley.com/community/support/dummies
Wiley publishes in a variety of print and electronic formats and by print-on-demand. Some material included with standard print versions of this book may not be included in e-books or in print-on-demand. If this book refers to media such as a CD or DVD that is not included in the version you purchased, you may download this material at http://booksupport.wiley.com. For more information about Wiley products, visit www.wiley.com.
Library of Congress Control Number: 2021950992
ISBN 978-1-119-84457-0 (pbk); ISBN 978-1-119-84458-7 (ebk); ISBN 978-1-119-84459-4 (ebk)
Introduction
Microsoft Office is by far the most popular suite of productivity applications in the world, and with good reason. Its applications are powerful enough for business and professional use, and yet easy enough that a beginner can catch on to the basics with just a few simple lessons.
Depending on how you purchased Office, your version may be called Office 365 or Office 2021. If you made a one-time purchase, it’s Office 2021. If you are using Microsoft’s subscription service, paying monthly or yearly for Office, it’s Office 365.
Which is better? That depends on your needs. Over the long run, the cost is similar. Using Office 365 provides some extra benefits, though, such as automatic software updates. Whenever Microsoft has new features to add to Office, it rolls them out automatically to Office 365 subscribers over the Internet. Office 2021 users don’t get those new features; their version remains static.
If you’re new to Office, this book can help you separate the essential features you need from the obscure and more sophisticated ones you don’t. For the four major Office applications I cover in this book — Word, Excel, Outlook, and PowerPoint — I walk you through the most important and common features, showing you how to put them to work for projects in your job, everyday life, and home.
About This Book
This book is written specifically for mature people like you, who are relatively new to using Office applications and want to master the basics. In this book, I tried to take into account the types of activities that might interest you, such as investment planning, personal finance, email, and documents and presentations that you might need to prepare for work, clubs, volunteer opportunities, or other organizations that you participate in.
Part 1 begins by familiarizing you with Office and showing you how to perform basic tasks. Here I explain some basics that apply to all the Office applications generically, such as saving, opening, and printing files. I also show you some features that all Office applications have in common, such as selecting and formatting text, using the Clipboard, and applying formatting themes.
Then we cover each of the four main applications:
Word (Chapters 4–6): Part 2 explores the most popular application in the Office suite, Microsoft Word. This word processing program helps you create letters, reports, envelopes, and myriad other textbased documents. You’ll see how to format text, change page size and orientation, insert graphics, and more.
Excel (Chapters 7–10): In Part 3, you can read about Excel, the Office spreadsheet application. See how to enter text and numbers in a worksheet, write formulas and functions that perform calculations, and format worksheets attractively. You can also find out how to create charts and use Excel to store simple databases.
Outlook (Chapters 11–13): Outlook is the email, contact management, and calendar application in Office. In Part 4, discover how to send and receive email in Outlook, and also how to use Outlook to track appointments and store your personal address book.
PowerPoint (Chapters 14–17): In Part 5, I show you the basics of PowerPoint, the Office presentation application. You can read how to create presentations that include text and graphics, create cool animation and transition effects, add a musical soundtrack, and share your presentation with others, either in a live-action show or on CD.
Part 6 provides some more advanced tips and tricks for getting the most out of Office. You’ll learn how to integrate Office with other applications, how to customize Office applications, and how to troubleshoot some common problems.
This book uses certain conventions to help you find your way:
» Wherever possible, I use labels on figures to point out what you should notice on them. These labels reinforce something I say in the text or contain extra tips and hints.
» When you have to type something, I put it in bold type.
» For menu and Ribbon commands, I use the ➪ symbol to separate the steps. For example, if I say to choose Home ➪ Clipboard ➪ Copy, that means you click the Home tab, find the Clipboard group, and then click the Copy button in that group. In most cases, I provide the group name as part of the path to help you find the command more quickly. (Each tab has a lot of different commands on it.)
Foolish Assumptions
This book assumes that you can start your computer and use the keyboard and mouse (or whatever device moves the pointer on-screen). It also assumes your computer’s operating system is Windows 10, and that you have either Office 2021 or Office 365.
If you’re using a computer for the first time, my book Computers For Seniors For Dummies shows you the essential skills that all computer applications use.
Icons Used in This Book
Tip icons point out extra features, special insights and help, or things to look out for.
If you don’t get anything else out of a particular chapter or section, remember the material marked by this icon. This text usually contains an essential process or a bit of information that you must know to use Office successfully.
Technical Stuff icons mark paragraphs where I “geek out” a bit, providing a behind-the-scenes look at how something works.
Warning icons indicate potential problems to avoid, problems that are difficult to fix or that make bad things happen.
Beyond the Book
In addition to the material in the print or ebook you’re reading right now, this product comes with some goodies on the web that you can access anywhere. No matter how well you understand the concepts of Office, you’ll likely come across a few questions where you don’t have a clue. To get this material, simply go to www.dummies.com and search for “Office 2021 For Seniors For Dummies Cheat Sheet” in the Search box.
Where to Go from Here
This is your book; use it how you want. You can start at the beginning and read it straight through, or you can hop to whatever chapter or topic you want. For those of you who are pretty new to computers, you might want to start at the beginning. If you’re new to Office, the beginning part will give you a good foundation on what features work similarly in all the programs.
1 Getting Started with Office
IN THIS PART . . .
Learn what applications make up the Microsoft Office suite and what each one does
Get familiar with the Office features that are common to all the applications
Find out how to open, save, and print files
IN THIS CHAPTER
» Start an Office Application
» Start a New Document
» Explore the Office Ribbon and Tabs
» Understand the File Menu (Backstage View)
» Create a Document
» Type Text
» Insert a Picture
» Move Around in a Document
» Select Content
» Zoom In and Out
» Change the View
Chapter 1
The Two-Dollar Tour
Step right up for a tour of Microsoft Office, the most popular suite of applications in the world!
Here are some of the things you can do with Office:
» Write letters, reports, and newsletters.
» Track bank account balances and investments.
» Create presentations to support speeches and meetings.
» Send and receive email.
The Office suite consists of several very powerful applications (programs), each with its own features and interface, but the applications also have a lot in common with one another. Learning about one application gives you a head start in learning the others.
In this chapter (and Chapter 2), I take you on a quick tour of some of the features that multiple Office applications have in common, including the tabbed Ribbon area. I also show you how to insert text and graphics in the various applications, and how to move around and zoom in and out.
In these first few chapters, I use Microsoft Word, PowerPoint, and Excel as the example applications because all of them work more or less the same way: They let you open and save data files that contain your work on various projects. Microsoft Outlook works a bit differently, as I show you in chapters 11 through 13.
Start an Office Application
Follow these steps to start an Office application:
1. Click the Start button in the lower-left corner of the Windows desktop, opening the Start menu.
2. Do any of the following (your choice!):
• Look for a shortcut tile for the application on the right side of the Start menu. If you see one, click it.
• Scroll down in the Start menu’s left pane until you get to the section for the letter of the alphabet for the desired application (for example, P for PowerPoint) and click the application name.
• Start typing the first few letters of the application name (for example, po for PowerPoint) and then click the application name on the filtered list that appears.
Start a New Document
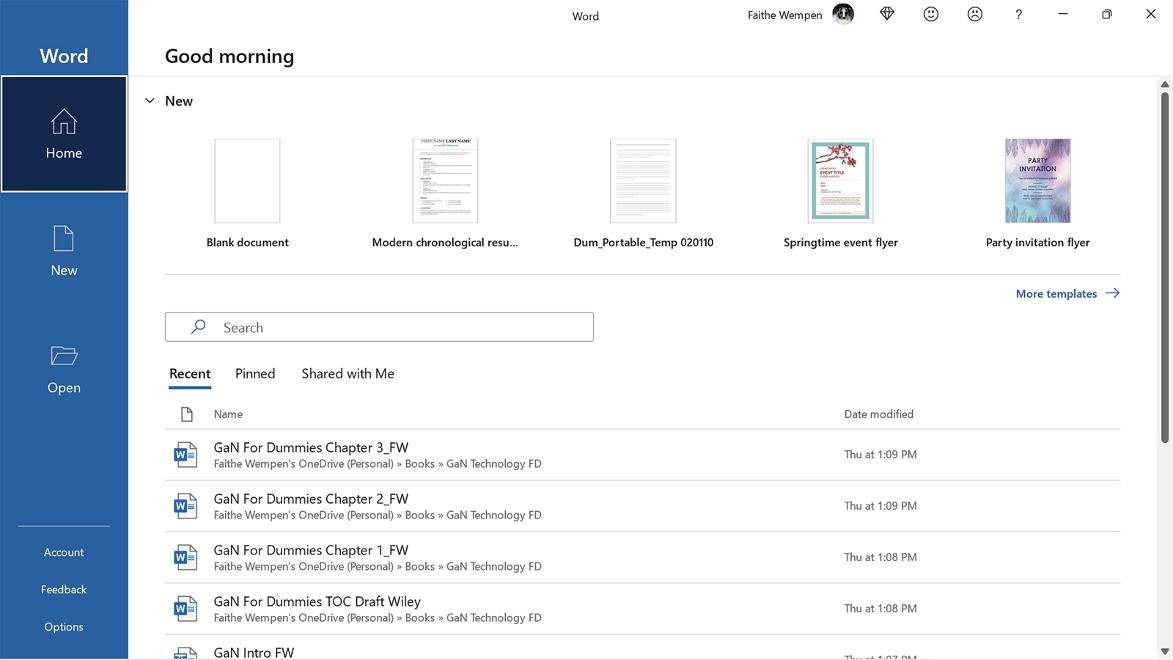
When you open Word, Excel, or PowerPoint, a Start screen appears (no relation to the Windows Start menu), containing a list of recently used documents and thumbnail images of templates you can use to start new documents. To start a new blank document (which you’ll want to do in order to follow along with this chapter), you can press the Esc key, or you can click the Blank template. The template has a slightly different name depending on the application; in Word it is called Blank document, in Excel it’s Blank workbook, and so on.
Figure 1-1 shows the Start screen for Microsoft Word, for example.
FIGURE 1-1
To create an additional new blank document after the application is already up and running, press Ctrl+N at any time.
Office 2010 and earlier started a blank document automatically in Word, Excel, and PowerPoint, without having to go through a Start screen. If you want that old-style behavior back, click File and then click Options. On the General page, scroll down to the bottom and deselect the Show the Start Screen When This Application Starts check box.
Explore the Office Ribbon and Tabs
All Office applications have a common system of navigation called the Ribbon, which is a tabbed bar across the top of the application window. Each tab is like a page of buttons. You click different tabs to access different sets of buttons and features.
Figure 1-2 shows the Ribbon in Microsoft Word with the Home tab displayed. Within a tab, buttons are organized into groups. In Figure 1-2, the Home tab’s groups are Clipboard, Font, Paragraph, Styles, Editing, Voice, and Editor.
FIGURE 1-2
Each Office application has a set of tabs for the tasks it performs. For example, Word has a Mailings tab that holds the commands for doing mail merges. Excel has a Formulas tab that holds the commands for setting up calculations.
If you run Office applications on a device that has a touchscreen, you get an extra tab on the Ribbon: Draw. This contains tools for drawing with a finger or a stylus. You can also manually enable this tab by customizing the Ribbon, as explained in Chapter 19.
You might find tabs that were added by third-party (nonMicrosoft) software. For example, if you have a program called Adobe Acrobat installed, you might have an Acrobat tab in each of the Office applications. Certain templates also add custom tabs and buttons to the Ribbon.
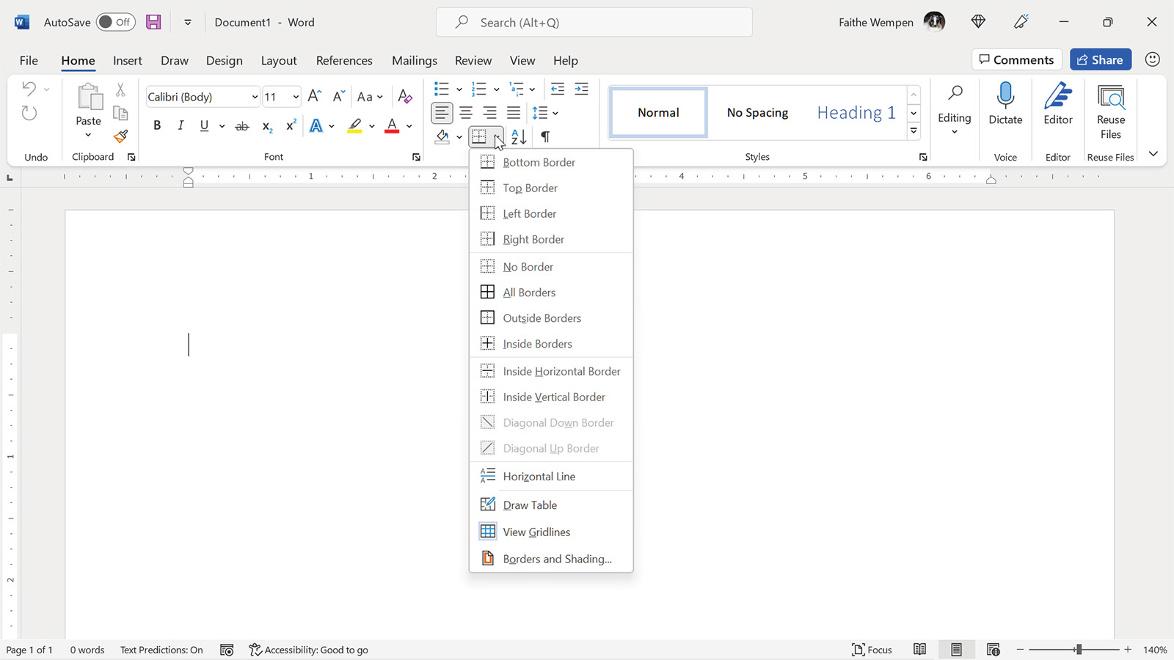
The buttons and controls on the tabs operate in different ways. Figure 1-3 points out some examples on Word’s Home tab.
» On/off toggles: Each time you click the button, it switches between on and off. When a feature is on, the button’s appearance changes (for example, it might look shaded in comparison to the other buttons).
» Command buttons: When you click the button, the command executes. If you click a command button again, the command repeats.
» Connected button sets: In connected sets of buttons, selecting a button deselects (cancels) the previous selection in the set.
For example, Figure 1-3 has four buttons in the bottom row for paragraph alignment. The leftmost one is selected; if you click one of the others, it’s automatically canceled.
» Menu buttons: Buttons with arrows on them open menus or color palettes.
» Galleries: A gallery is like a permanently open menu or palette; click a selection directly from a gallery. Most galleries also have a More button that shows more choices.
You can hover the mouse pointer over a button to see a pop-up box, called a ScreenTip, which tells the button’s name and/or purpose.
With some buttons that contain arrows, you can click anywhere on the button face — directly on the arrow or not — to open the menu or palette (an array of colored squares from which you can choose a color). With others, the button face and the arrow are separate clickable areas. Clicking the arrow opens the menu, but clicking the button face applies whatever setting was most recently chosen from the menu.
FIGURE 1-3
To tell the difference between the two types of menu buttons, point the mouse at the button. If the button face and the arrow are different colors or if there is a thin line between them, it’s the type where you have to click directly on the arrow to get the menu. If there’s no separation, you can click anywhere on the button.
In the bottom-right corner of many of the groups is a small square with an arrow. Clicking this square (called a dialog box launcher or a properties button) opens a dialog box related to that group. For example, the one for the Font group in Figure 1-3 opens the Font dialog box, which contains controls for every button in that group plus more options not available on the Ribbon.
Not sure which tab contains the command you want, or what the command is called? The Search box (shown in Figure 1-2) enables you to ask questions in plain English. Just type your question in the box and press Enter to see a list of relevant commands and help information, and then click the one you want to issue that command.
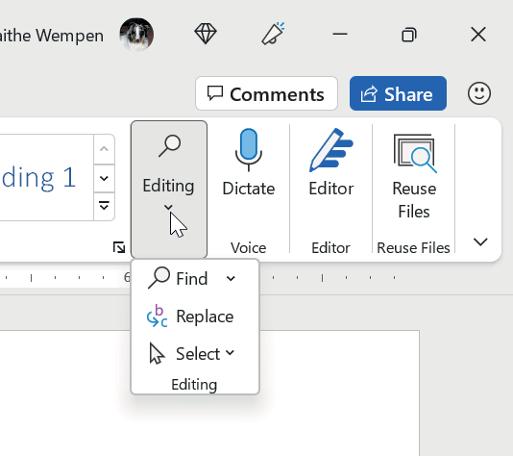
When you resize the application’s window so the window is narrower than normal, or when you run the application on a computer that has low-resolution video settings, the controls on the Ribbon compress (squeeze together). Some of the groups turn into single buttons with drop-down lists for accessing the individual controls within that group. For example, in Figure 1-4, the Editing group is compressed, and has been opened as a drop-down list.
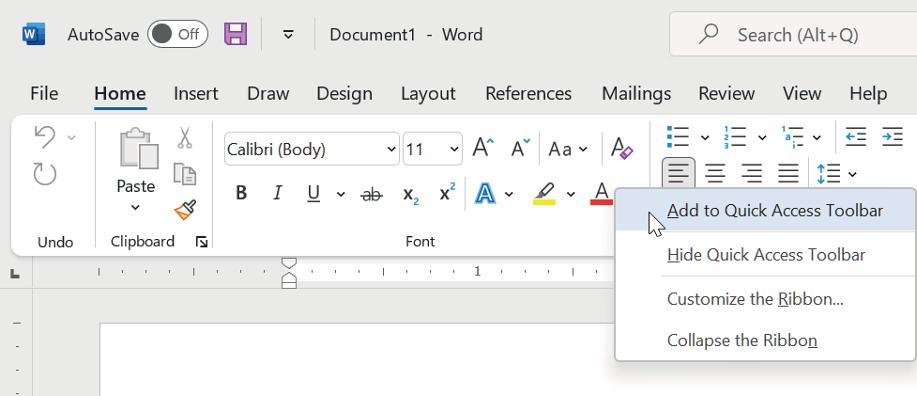
Above the main part of the Ribbon is a small toolbar called the Quick Access Toolbar (QAT). You can add buttons for frequently used commands here (as many as you can fit). To add a button to the QAT, right-click any control from any tab and choose Add to Quick Access Toolbar, as shown in Figure 1-5. To change the position of the Quick Access Toolbar, right-click it and choose Show the Quick Access Toolbar Below the Ribbon (or Above, if it’s already below).
Depending on how your system is set up, it’s possible that the QAT might be below the Ribbon rather than above it. If it appears below the Ribbon and you want it above, click the down arrow at the right end of the QAT and choose Show Above the Ribbon.
FIGURE 1-5
FIGURE 1-4
Check out Chapter 19 to learn more about customizing the QAT, as well as the Ribbon itself.
In some Office apps, the QAT might not appear at all. If you don’t see it but you want to, click the down arrow at the far right end of the Ribbon to open a menu and choose Show Quick Access Toolbar.
Understand the File Menu (Backstage View)
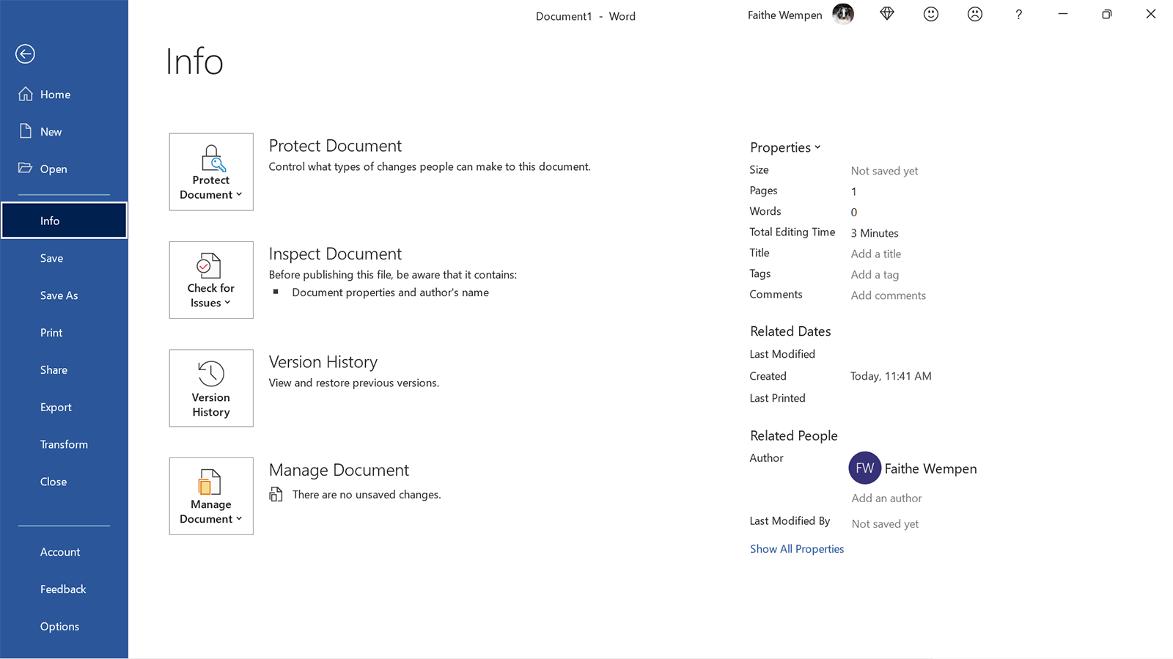
Clicking the File tab opens the File menu, also known as Backstage view. Backstage view provides access to commands that have to do with the data file you are working with — things like saving, opening, printing, mailing, and checking its properties. The File tab is a different color in each application. In Word, for example, it is blue. To leave Backstage view, click some other tab or press the Esc key.
Backstage view lists top-level categories in a navigation pane at the left; click one to see the commands available. The content to the right of the category list depends on what you have chosen.
When a document is open and you enter Backstage view, the Info category appears. It provides information about the current document, and offers commands for protecting the document, checking for issues, and managing versions. See Figure 1-6. In addition, if the document uses a different file format than the latest one, a Convert button appears, enabling you to upgrade to the newest format. (It doesn’t appear in Figure 1-6.)
The bottom-most command in the navigation pane in Backstage view is Options, which opens a dialog box from which you can control the settings for the application. Chapter 19 explains some of the settings you can change.
Create a Document
In Word, Excel, and PowerPoint, the Start screen appears when you start the application, and from there you can create a new document (or workbook, or presentation) by pressing the Esc key or clicking the Blank template. You can then just start typing or inserting content into it.
You can also create additional new documents at any time. An easy shortcut is to press Ctrl+N. You can also choose File ➪ New. That latter method has the advantage of opening a selection of templates you can use to jumpstart your work if you don’t want a totally blank document to start with. Choose one of the templates that appears, or click in the Search for Online Templates box, type a keyword, and then press Enter to look for a certain kind of template. Let’s forego the templates for now, though, and keep working in this chapter with a blank document.
FIGURE 1-6
Type Text
Putting text on the page (or on-screen) is a little different in each of the three major Office applications: Word, Excel, and PowerPoint.
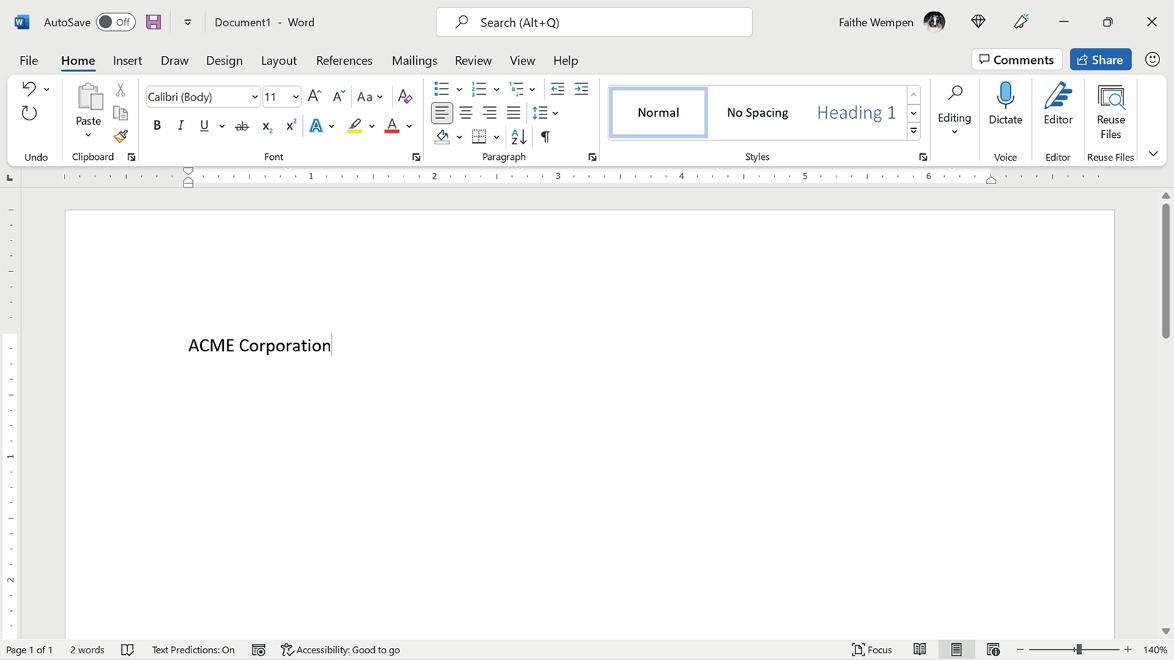
» Word: The main work area of the program is a blank slate on which you can type directly. Just click in the work area and start typing! Chapter 2 explains more about typing and editing text. See Figure 1-7.
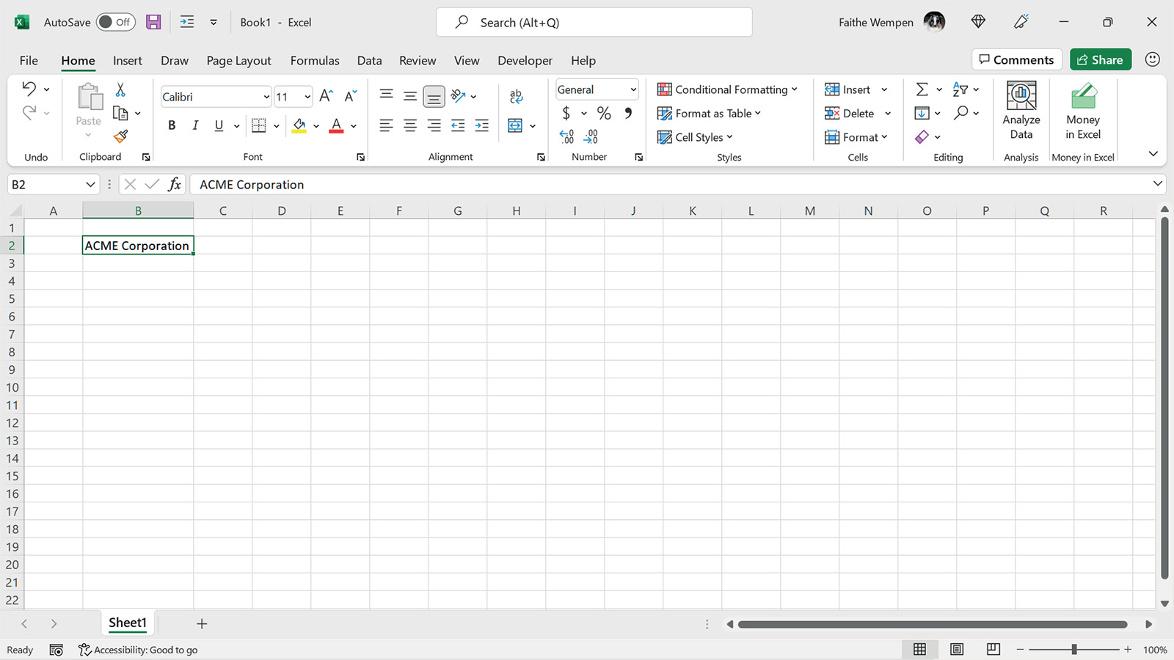
» Excel: The work area is divided into a grid of cells. Click any cell to make it active, and type to place text into it, as in Figure 1-8. Chapter 7 shows how to work with text in Excel cells.
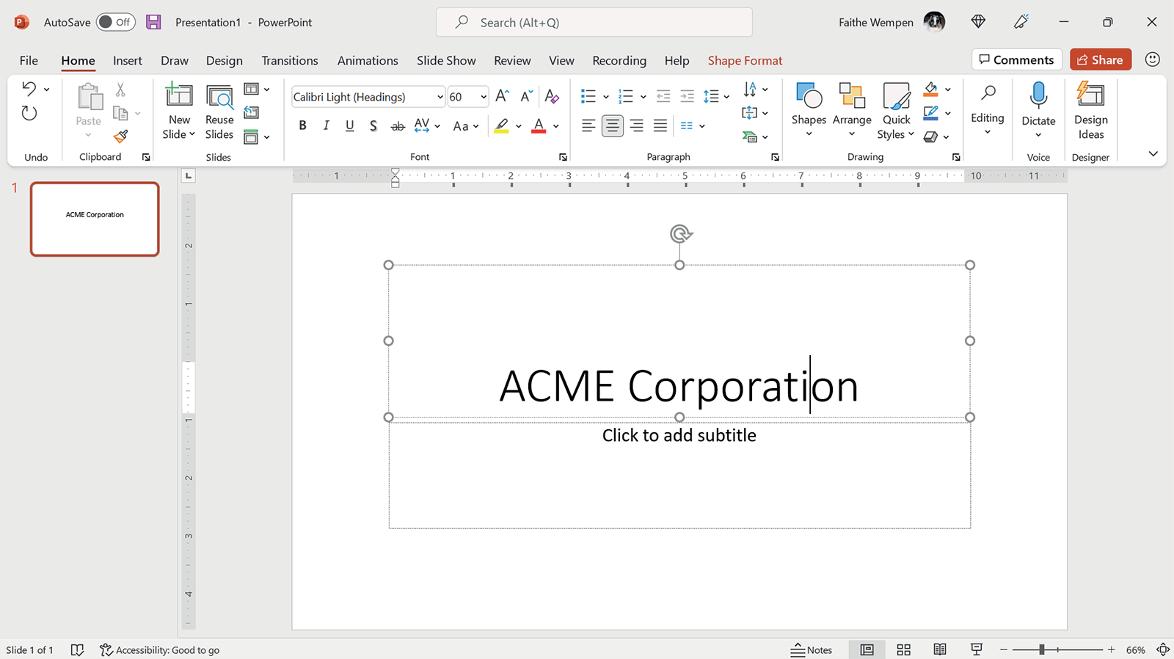
» PowerPoint: The work area is divided into two panes. The larger one, on the right, is where you insert content on a slide.
• If a slide has a text placeholder on it, you can click in the placeholder and type, as in Figure 1-9.