Download ebooks file Ti-84 plus ce graphing calculator for dummies, 3rd edition jeff mccalla all cha
Plus CE
Visit to download the full and correct content document: https://ebookmass.com/product/ti-84-plus-ce-graphing-calculator-for-dummies-3rd-edi tion-jeff-mccalla/
More products digital (pdf, epub, mobi) instant download maybe you interests ...
No part of this publication may be reproduced, stored in a retrieval system or transmitted in any form or by any means, electronic, mechanical, photocopying, recording, scanning or otherwise, except as permitted under Sections 107 or 108 of the 1976 United States Copyright Act, without the prior written permission of the Publisher. Requests to the Publisher for permission should be addressed to the Permissions Department, John Wiley & Sons, Inc., 111 River Street, Hoboken, NJ 07030, (201) 748-6011, fax (201) 748-6008, or online at www.wiley.com/go/permissions.
Trademarks: Wiley, For Dummies, the Dummies Man logo, Dummies.com, Making Everything Easier, and related trade dress are trademarks or registered trademarks of John Wiley & Sons, Inc. and may not be used without written permission. All other trademarks are the property of their respective owners. John Wiley & Sons, Inc. is not associated with any product or vendor mentioned in this book.
LIMIT OF LIABILITY/DISCLAIMER OF WARRANTY: WHILE THE PUBLISHER AND AUTHOR HAVE USED THEIR BEST EFFORTS IN PREPARING THIS WORK, THEY MAKE NO REPRESENTATIONS OR WARRANTIES WITH RESPECT TO THE ACCURACY OR COMPLETENESS OF THE CONTENTS OF THIS WORK AND SPECIFICALLY DISCLAIM ALL WARRANTIES, INCLUDING WITHOUT LIMITATION ANY IMPLIED WARRANTIES OF MERCHANTABILITY OR FITNESS FOR A PARTICULAR PURPOSE. NO WARRANTY MAY BE CREATED OR EXTENDED BY SALES REPRESENTATIVES, WRITTEN SALES MATERIALS OR PROMOTIONAL STATEMENTS FOR THIS WORK. THE FACT THAT AN ORGANIZATION, WEBSITE, OR PRODUCT IS REFERRED TO IN THIS WORK AS A CITATION AND/OR POTENTIAL SOURCE OF FURTHER INFORMATION DOES NOT MEAN THAT THE PUBLISHER AND AUTHORS ENDORSE THE INFORMATION OR SERVICES THE ORGANIZATION, WEBSITE, OR PRODUCT MAY PROVIDE OR RECOMMENDATIONS IT MAY MAKE. THIS WORK IS SOLD WITH THE UNDERSTANDING THAT THE PUBLISHER IS NOT ENGAGED IN RENDERING PROFESSIONAL SERVICES. THE ADVICE AND STRATEGIES CONTAINED HEREIN MAY NOT BE SUITABLE FOR YOUR SITUATION. YOU SHOULD CONSULT WITH A SPECIALIST WHERE APPROPRIATE. FURTHER, READERS SHOULD BE AWARE THAT WEBSITES LISTED IN THIS WORK MAY HAVE CHANGED OR DISAPPEARED BETWEEN WHEN THIS WORK WAS WRITTEN AND WHEN IT IS READ. NEITHER THE PUBLISHER NOR AUTHOR SHALL BE LIABLE FOR ANY LOSS OF PROFIT OR ANY OTHER COMMERCIAL DAMAGES, INCLUDING BUT NOT LIMITED TO SPECIAL, INCIDENTAL, CONSEQUENTIAL, OR OTHER DAMAGES.
For general information on our other products and services, please contact our Customer Care Department within the U.S. at 877-762-2974, outside the U.S. at 317-572-3993, or fax 317-572-4002. For technical support, please visit https://hub.wiley.com/community/support/dummies
Wiley publishes in a variety of print and electronic formats and by print-on-demand. Some material included with standard print versions of this book may not be included in e-books or in print-on-demand. If this book refers to media such as a CD or DVD that is not included in the version you purchased, you may download this material at http://booksupport.wiley.com. For more information about Wiley products, visit www.wiley.com.
Library of Congress Control Number: 2022942903
ISBN 978-1-119-88760-7 (pbk); ISBN 978-1-119-88761-4 (ebk); ISBN 978-1-119-88762-1 (ebk)
CHAPTER 7: The Angle and Test Menus
Part 4: Working with Probability and Statistics
Part 5: Doing More with Your Calculator
Part 6: The Part of Tens
Part 7: Appendices
APPENDIX A: Creating Calculator Programs
APPENDIX B: Controlling Program Input and Output
APPENDIX C: Controlling Program Flow
APPENDIX D: Introducing Python Programming
APPENDIX E: Mastering the Basics of Python Programming
Editing a function in a table
Using
Viewing the Table of a
Taking
PART 4:
CHAPTER 15: Probability
Constructing
regressions
Graphing a regression model
Graphing
Using statistics commands on the Home screen
PART 6:
Storing a variable
Graphing a Function
Finding the Intersection Point
Graphing a Scatter Plot
Performing a
Using ¹ Instead of k to Indicate That a Number Is Negative
Indicating the Order of Operations Incorrectly by Using Parentheses
Accidentally
Entering an Angle in Degrees in Radian Mode
APPENDIX B: Controlling Program Input and Output
The If . . . Then . . . End Command
While . . . End command
The Repeat . . . End Command
The For . . . End
Introduction
Do you know how to use the TI-84 Plus or TI-84 Plus CE family of calculators to do each of the following?
» Access hidden shortcut menus
» Graph functions, inequalities, or transformations of functions
» Copy and paste expressions
» Insert an image as the background of a graph (TI-84 Plus CE only)
» Write calculator programs (including Python for the TI-84 Plus CE)
» Transfer files between two or more calculators
» Create stat plots and analyze statistical data
» Graph scatter plots, parametric equations, polar equations, and even piecewise functions
If not, then this is the book for you. Contained within these pages are straightforward, easy-to-follow directions that show you how to do everything listed here — and much, much more.
About This Book
The TI-84 Plus CE calculator is capable of doing a lot of things, and this book shows you how to utilize its full potential.
It covers more than just the basics of using the calculator, paying special attention to warn you of the problems that you could encounter if you know only the basics of using the calculator.
This is a reference book. It’s process-driven, not application-driven. You won’t be given a problem to solve and then be told how to use the calculator to solve that particular problem. Instead, you’re given the steps needed to get the calculator to
perform a particular task, such as constructing a histogram or graphing a scatter plot.
When I refer to “your calculator,” I am referring to any calculator from the TI-84 Plus and TI-84 Plus CE family of calculators because the keystrokes on these calculators are almost the same. When I want you to press a key on the calculator, I use an icon for that key. For example, if I want you to press the ENTER key, I say press Í. If I want you to press a series of keys, such as the Stat key and then the right-arrow key, I say (for example) press …~. All keys on the calculator are pressed one at a time — there is no such thing as holding down one key while you press another key.
It’s tricky enough to get familiar with the location of the keys on the calculator, and even more of a challenge to remember the location of the secondary functions, such as the blue functions that appear above the key. So when I want you to access one of those functions, I give you the actual keystrokes. For example, if I want you to access the Angle menu, I tell you to press yŒ. This is a simpler method than that of the manual that came with your calculator — which would say press y; and then make you hunt for the location of the secondary function ANGLE. The same principle holds for using key combinations to enter specific characters; for example, I tell you to press ƒÊ to enter a space.
When I want you to use the arrow keys, but not in any specific order, I say press the ~|}† keys or use the arrow keys. If I want you to use only the up- and downarrow keys, I say press }†.
All of the screenshots in this book were taken using the TI-84 Plus CE calculator. Of course, you will only be able to see color screenshots in the color insert pages.
Foolish Assumptions
My nonfoolish assumption is that you know (in effect) nothing about using the calculator, or you wouldn’t be reading this book. My foolish assumptions are as follows:
» You own, or have access to, a calculator from the TI-84 Plus or TI-84 Plus CE family of calculators.
» If you want to transfer files between your calculator and your computer, I assume that you have a computer and know the basics of how to operate it.
Icons Used in This Book
This book uses four icons to help you along the way. Here’s what they are and what they mean:
The text following this icon tells you about shortcuts and other ways of enhancing your use of the calculator.
The icon alerts you to keystroke and functionality differences between the TI-84 Plus and the newer TI-84 Plus CE calculators.
The text following this icon tells you something you should remember because if you don’t, it may cause you problems later. Usually the Remember icon highlights a reminder to enter the appropriate type of number so you can avoid an error message.
There is no such thing as crashing the calculator. But this icon warns you of those few times when you can do something wrong on the calculator and be totally baffled because the calculator is giving you confusing feedback — either no error message or a cryptic error message that doesn’t really tell you the true location of the problem.
This is the stuff you don’t need to read unless you’re really curious.
Beyond the Book
In addition to what you’re reading right now, this product also comes with a free access-anywhere Cheat Sheet that lists some important TI-84 Plus keystrokes and explains the basics of graphing, among other things. To get this Cheat Sheet, simply go to https://www.dummies.com/ and enter TI-84 Plus CE Graphing Calculator For Dummies Cheat Sheet in the Search box.
Where to Go from Here
This book is designed so you do not have to read it from cover to cover. You don’t even have to start reading at the beginning of a chapter. When you want to know how to get the calculator to do something, just start reading at the beginning of the appropriate section. The Index and Table of Contents should help you find whatever you’re looking for.
1 Making Friends with the Calculator
IN THIS PART . . .
Get up and running with your TI-84 Plus CE.
Figure out how to access the fraction tools using the shortcut menu.
Find out how to evaluate expressions and store variables.
See how to use Numeric Solver to solve equations.
Discover how you can use the PlySmlt2 app to find the roots of a polynomial and solve a system of equations.
IN THIS CHAPTER
» Turning the calculator on and off
» Using the keyboard
» Utilizing the menus
» Setting the mode of the calculator
» Using the Catalog
Chapter 1
Starting with the Basics
The most popular calculator in the world just got a makeover! In this book, you find out how to take advantage of the improvements that have been made to the TI-84 Plus, as well as all of the built-in functionality that has not changed. The best way to use your calculator to the fullest is to read this book and start playing with the device.
The TI-84 Plus CE graphing calculator is loaded with many useful features. With it, you can solve equations of all types. You can graph and investigate functions, parametric equations, polar equations, and sequences. You can use it to analyze statistical data and to manipulate matrices.
What if you own the TI-84 Plus and not the TI-84 Plus CE? No worries! The vast majority of the steps will be exactly the same for both calculators. You’ll see a difference in the appearance of the graph screen — the TI-84 Plus CE has a higher resolution color screen. If you own the TI-84 Plus, ignore any steps referencing color and skip Chapter 22 (about inserting color images) altogether.
Look for this TI-84 Plus Tip icon to point out differences between the TI-84 Plus and the TI-84 Plus CE.
If you’ve never used a graphing calculator before, you may at first find it a bit intimidating. After all, it contains about two dozen menus, many of which contain three or four submenus. But it’s really not that hard to get used to using the
calculator. After you get familiar with what the calculator is capable of doing, finding the menu that houses the command you need is quite easy. And you have this book to help you along the way.
Why Didn’t I Think of That?
You may have the same reaction that I did to some of the changes that have been made to the calculator: “Why didn’t I think of that?” It’s possible that you did actually! Many of the changes to the TI-84 Plus are a direct result of feedback received from teachers and students. After all, Texas Instruments is committed to providing the best tools for the teaching and learning of mathematics and science.
CE is short for color enhancement. Having a color screen is a game-changer! Say goodbye to having trouble distinguishing functions when you’re graphing more than one function on the same screen. Although some of the improvements are subtle, you’ll notice others the first time you pick up your new calculator. Here’s a small sampling of the changes:
» New menu options: I love that all additional menu options have been strategically placed at the end of menus. For example, a new option in the Stat CALC menu, QuickPlot & Fit–EQ, as illustrated in the first screen in Figure 1-1. Have you memorized keystrokes, like q¸ for ZStandard? No problem! The functionality you know hasn’t changed.
» Status Bar: A quick glance at the top of your screen informs you of the mode settings (like Radian or Degree) as well as a battery status icon. See the top of any of the screens in Figure 1-1. The Status Bar is always there whether you’re working on the current line of the Home screen, graph, or table!
FIGURE 1-1: Improvements to the TI-84 Plus.
» Higher resolution LCD backlit screen: Not quite HD quality, but the new screen has more than twelve times as many graph area pixels as the original (320 × 244 versus 96 × 64)! Plus, you can work on problems at night on a screen that’s backlit.
» Sleek design: 30 percent thinner and lighter than the TI-84 Plus. It measures 7.59 × 3.42 inches; similar dimensions to an oversized cell phone, which makes it easy to fit in your pocket. Is it ever a bad idea to have your calculator with you?
» More memory: Gone are the days of worrying about whether you have enough memory to store your programs! TI-84 Plus CE has three times as much RAM and about six times as much ROM.
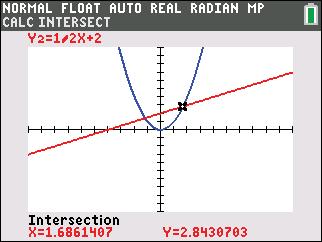
» Border on graph screen: Helpful info like function names and coordinates of intersection points are kept separate from the graph, as shown in the second screen in Figure 1-1. Whoever thought of this is brilliant!
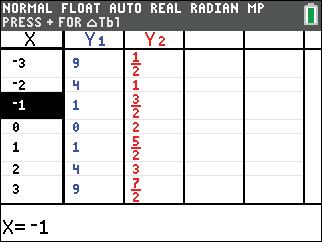
» Table enhancements: Separator lines and color-coded lists (matching the functions) are more pleasing to the eye. Built-in tips called Context Help are located at the top of the screen, including hints like Press + for ∆Tbl. Check out the new table look in the third screen in Figure 1-1.
Think you’ve seen it all? Not even close. I explain these improvements and much more — just keep reading.
Charging the Battery
The TI-84 Plus CE uses a Li–ion battery, similar to the one in your cellphone, which holds a charge for up to two weeks. Texas Instruments (TI) recommends charging your battery for at least four hours for peak performance. On the right side of your calculator, an LED light lights up during the recharging process. An amber color indicates your calculator is charging, and a green color indicates your calculator is fully charged. There are three ways to recharge your calculator battery:
The TI-84 Plus does not have a rechargeable battery. You must open the back panel and insert four new AAA batteries.
» TI Wall Adapter: Simply plug in the adapter that came bundled with your calculator.
FIGURE 1-2: Battery status icon battery levels.
» USB computer cable: Use the USB computer cable that came with your calculator and a computer to charge your calculator. Plug the USB hub into the computer and plug the mini-USB hub into your calculator.
Your computer may not recognize the USB computer cable you are using to charge your calculator. If this happens, download TI-Connect software from http://education.ti.com. For more details on downloading and installing TI-Connect, see Chapter 18.
» TI-84 CE Charging Station: If your classroom has one of these, simply place your calculator in one of the slots of the charging station.
In the top-right part of the screen, a battery status icon indicates the battery level. There are four different battery levels plus a charging icon, as shown in Figure 1-2.
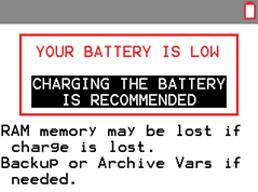
If your battery loses its charge, the RAM memory on your calculator may be cleared. If you have programs or data that you don’t want to lose, back up your calculator (see Chapter 21 for more details). Your calculator gives you a warning message, as shown in Figure 1-3.
FIGURE 1-3: Battery level warning screen.
Turning the Calculator On and Off
Press É to turn the calculator on. To turn the calculator off, press y and then press É. These keys are in the left column of the keyboard. The É key is at the bottom of the column, and the y key is the second key from the top of this column.
To prolong the life of the batteries, the calculator automatically turns itself off after five minutes of inactivity. But don’t worry — when you press É, all your work will appear on the calculator just as you left it before the calculator turned itself off.
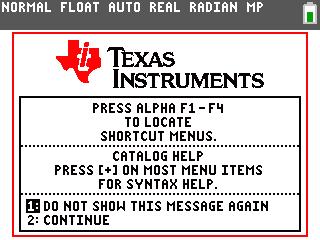
The first time you turn on your calculator, you’re greeted by an information screen, as shown in Figure 1-4. A few helpful reminders are displayed on the information screen. If you want to see this screen the next time you turn on your calculator, press Á. Otherwise, press À or Í.
FIGURE 1-4: Information screen.
In some types of light, the screen can be hard to see. To increase the contrast, press and release y and then hold down } until you have the desired contrast. To decrease the contrast, press y and hold †.
Using the Keyboard
The row of keys under the calculator screen contains the keys you use when graphing. The next three rows, for the most part, contain editing keys, menu keys, and arrow keys. The arrow keys (~|}†) control the movement of the cursor. The remaining rows contain, among other things, the keys you typically find on a scientific calculator.
Keys on the calculator are always pressed one at a time; they are never pressed simultaneously. In this book, an instruction such as yÉ indicates that you should first press y and then press É
Accessing the functions in blue
Above and to the left of most keys is a secondary key function written in blue. To access that function, first press y and then press the key. For example, π is in blue above the › key, so to use π in an expression, press y and then press ›.
Because hunting for the function in blue can be tedious, in this book I use only the actual keystrokes. For example, I make statements like, “π is entered into the calculator by pressing y›.” Most other books would state, “π is entered into the calculator by pressing yB.
When the y key is active and the calculator is waiting for you to press the next key, the blinking $ cursor symbol is replaced with the Þ symbol.
Using the ƒ key to write words
Above and to the right of most keys is a letter written in green. To access these letters, first press ƒ and then press the key. For example, because the letter O is in green above the ¬ key, to enter this letter, press ƒ and then press ¬.
Because hunting for letters on the calculator can be tedious, I tell you the exact keystrokes needed to create them. For example, if I want you to enter the letter O, I say, “Press ƒ¬ to enter the letter O.” Most other books would say “Press ƒ [O]” and leave it up to you to figure out where that letter is on the calculator.
You must press ƒ before entering each letter. However, if you want to enter many letters, first press yƒ to lock the calculator in Alpha mode. Then all you have to do is press the keys for the various letters. When you’re finished, press ƒ to take the calculator out of Alpha mode. For example, to enter the word TEST into the calculator, press yƒ¶˜μ¶ and then press ƒ to tell the calculator that you’re no longer entering letters.
When the calculator is in Alpha mode, the blinking $ cursor symbol is replaced with the Ø symbol. This symbol indicates that the next key you press will insert the green letter above that key. To take the calculator out of Alpha mode, press ƒ.
Using the Í key
The Í key is used to evaluate expressions and to execute commands. After you have, for example, entered an arithmetic expression (such as 5 + 4), press Í to evaluate that expression. In this context, the Í key functions as the equal sign. Entering arithmetic expressions is explained in Chapter 2.
Using the „ key
„ is the key you use to enter the variable in the definition of a function, a parametric equation, a polar equation, or a sequence. In Function mode, this key produces the variable „. In Parametric mode, it produces the variable T; and in Polar and Sequence modes, it produces the variables θ and n, respectively. For more information, see the “Setting the Mode” section later in this chapter.
Using the arrow keys
The arrow keys (~, |, }, and †) control the movement of the cursor. These keys are in a circular pattern in the upper-right corner of the keyboard. As expected, ~ moves the cursor to the right, | moves it to the left, and so on. When I want you to use the arrow keys — but not in any specific order — I refer to them all together, as in “Use the ~|}† keys to place the cursor on the entry.”
Keys to remember
The following keystroke and keys are invaluable:
» yz: This is the equivalent of the Escape key on a computer. It gets you out of whatever you’re doing (or have finished doing) and returns you to the Home screen. See the next section for more about the Home screen.
» Í: This key is used to execute commands and to evaluate expressions. When evaluating expressions, it’s the equivalent of the equal sign.
» ‘: This is the “erase” key. If you enter something into the calculator and then change your mind, press this key. If you want to erase the contents of the Home screen, repeatedly press this key until the Home screen is blank.
» {: If you only want to erase one character at a time and not the whole line, use this key.
What Is the Home Screen?
The Home screen is the screen that appears on the calculator when you first turn it on. This is the screen where most of the action takes place as you use the calculator — it’s where you evaluate expressions and execute commands. This is also the screen you usually return to after you’ve completed a task such as entering a matrix in the Matrix editor or entering data in the Stat List editor.
Press yz to return to the Home screen from any other screen. This combination of keystrokes, yz, is the equivalent of the Escape key on a computer. It always takes you back to the Home screen.
If you want to clear the contents of the Home screen, repeatedly press ‘ until the Home screen is blank.
The Busy Indicator
If you see a moving dotted ellipse in the upper-right corner of the screen, this indicates that the calculator is busy graphing a function, evaluating an expression, or executing a command.
If it’s taking too long for the calculator to graph a function, evaluate an expression, or execute a command, and you want to abort the process, press É. If you’re then confronted with a menu that asks you to select either Quit or Goto, select Quit to abort the process.
Editing Entries
The calculator offers four ways to edit an entry:
» Deleting the entire entry:
Use the ~|}† keys to place the cursor anywhere in the entry and then press ‘ to delete the entry.
» Erasing part of an entry:
To erase a single character, use the ~|}† keys to place the cursor on the character you want to delete and then press { to delete that character.