No part of this publication may be reproduced, stored in a retrieval system or transmitted in any form or by any means, electronic, mechanical, photocopying, recording, scanning or otherwise, except as permitted under Sections 107 or 108 of the 1976 United States Copyright Act, without the prior written permission of the Publisher. Requests to the Publisher for permission should be addressed to the Permissions Department, John Wiley & Sons, Inc., 111 River Street, Hoboken, NJ 07030, (201) 748-6011, fax (201) 748-6008, or online at http://www.wiley.com/go/permissions.
Trademarks: Wiley, For Dummies, the Dummies Man logo, Dummies.com, Making Everything Easier, and related trade dress are trademarks or registered trademarks of John Wiley & Sons, Inc. and may not be used without written permission. AutoCAD is a registered trademark of Autodesk, Inc. All other trademarks are the property of their respective owners. John Wiley & Sons, Inc. is not associated with any product or vendor mentioned in this book.
LIMIT OF LIABILITY/DISCLAIMER OF WARRANTY: WHILE THE PUBLISHER AND AUTHORS HAVE USED THEIR BEST EFFORTS IN PREPARING THIS WORK, THEY MAKE NO REPRESENTATIONS OR WARRANTIES WITH RESPECT TO THE ACCURACY OR COMPLETENESS OF THE CONTENTS OF THIS WORK AND SPECIFICALLY DISCLAIM ALL WARRANTIES, INCLUDING WITHOUT LIMITATION ANY IMPLIED WARRANTIES OF MERCHANTABILITY OR FITNESS FOR A PARTICULAR PURPOSE. NO WARRANTY MAY BE CREATED OR EXTENDED BY SALES REPRESENTATIVES, WRITTEN SALES MATERIALS OR PROMOTIONAL STATEMENTS FOR THIS WORK. THE FACT THAT AN ORGANIZATION, WEBSITE, OR PRODUCT IS REFERRED TO IN THIS WORK AS A CITATION AND/ OR POTENTIAL SOURCE OF FURTHER INFORMATION DOES NOT MEAN THAT THE PUBLISHER AND AUTHORS ENDORSE THE INFORMATION OR SERVICES THE ORGANIZATION, WEBSITE, OR PRODUCT MAY PROVIDE OR RECOMMENDATIONS IT MAY MAKE. THIS WORK IS SOLD WITH THE UNDERSTANDING THAT THE PUBLISHER IS NOT ENGAGED IN RENDERING PROFESSIONAL SERVICES. THE ADVICE AND STRATEGIES CONTAINED HEREIN MAY NOT BE SUITABLE FOR YOUR SITUATION. YOU SHOULD CONSULT WITH A SPECIALIST WHERE APPROPRIATE. FURTHER, READERS SHOULD BE AWARE THAT WEBSITES LISTED IN THIS WORK MAY HAVE CHANGED OR DISAPPEARED BETWEEN WHEN THIS WORK WAS WRITTEN AND WHEN IT IS READ. NEITHER THE PUBLISHER NOR AUTHORS SHALL BE LIABLE FOR ANY LOSS OF PROFIT OR ANY OTHER COMMERCIAL DAMAGES, INCLUDING BUT NOT LIMITED TO SPECIAL, INCIDENTAL, CONSEQUENTIAL, OR OTHER DAMAGES.
For general information on our other products and services, please contact our Customer Care Department within the U.S. at 877-762-2974, outside the U.S. at 317-572-3993, or fax 317-572-4002. For technical support, please visit https://hub.wiley.com/community/support/dummies
Wiley publishes in a variety of print and electronic formats and by print-on-demand. Some material included with standard print versions of this book may not be included in e-books or in print-on-demand. If this book refers to media such as a CD or DVD that is not included in the version you purchased, you may download this material at http://booksupport.wiley.com. For more information about Wiley products, visit www.wiley.com.
Library of Congress Control Number: 2022930466
ISBN 978-1-119-86876-7 (pbk); ISBN 978-1-119-86877-4 (ebk); ISBN 978-1-119-86878-1 (ebk)
Degenerating and Regenerating
CHAPTER 15: Down the Hatch!
Creating
Hatching
Using
Scaling
PART 4: ADVANCING WITH AUTOCAD
Drawings to Models
Gaining a solid foundation
Drawing solid primitives
Adding the Third Dimension to 2D Objects
Adding thickness to a 2D object
Extruding open and closed objects
Pressing and pulling closed boundaries
Lofting open and closed objects
Sweeping open and closed objects along a path
Revolving open or closed objects around an axis
Modifying
PART 6: THE PART OF TENS
Introduction
Welcome to the wonderful world of AutoCAD and to the fame and fortune that awaits you as an AutoCAD user. (Would I lie to you?)
Believe it or not, AutoCAD is around 40 years old, having been born in December 1982, when most people thought that personal computers weren’t capable of industrial-strength tasks like CAD. The acronym stands for Computer-Aided Drafting, Computer-Aided Design, or both, depending on who you talk to. What’s equally surprising is that many of today’s hotshot AutoCAD users, and most of the readers of this book, weren’t even born when the program first hit the street and when the grizzled old-timer writing these words began using it.
AutoCAD remains the king of the PC computer CAD hill by a tall margin, and, on top of that, is one of the longest-lived computer programs ever. It’s conceivable that the long-term future of CAD may belong to special-purpose, 3D, webconnected software such as the Autodesk Fusion and Forge programs. Until then, AutoCAD’s DWG file format is the de facto standard, and a lot of design software works with that file format. For the foreseeable future, AutoCAD is where the action in CAD will be.
You may have heard that AutoCAD is complex and therefore difficult to learn and use. Yes, the user interface includes about 1,300 icons. But it has been my observation that the easier any software is to learn and use, the sooner you bump up against its limitations. A simple car with no accelerator, one forward gear, no steering, and no brakes would be easy to use until you reach a hill, a curve, or a stop sign, or you need to back out of a parking space.
Yes, AutoCAD is complex, but that’s the secret to its success. Some claim that few people use more than 10 percent of AutoCAD’s capabilities. Closer analysis reveals that most people use the same basic 5 percent and everyone else uses a different 5 percent after that. The trick is to find your 5 percent, the sweet spot that suits your particular discipline. If you follow my advice, I think you’ll find that using AutoCAD is as simple and intuitive as driving a car.
It should be perfectly clear that if your career path has put you in a position where you need to know how to use AutoCAD, you’re no dummy!
About This Book
Unlike many other For Dummies books, this one often tells you to consult the official software documentation. AutoCAD is just too big and powerful for a single book to attempt to describe it completely. The book that ultimately covers every AutoCAD topic would need a forklift to move it. Literally. Autodesk stopped shipping paper instruction manuals with the software somewhere around 1995, when the full documentation package grew to about a dozen volumes and more than 30 pounds.
In AutoCAD For Dummies, I occasionally mention differences from previous releases so that everyone gains some context and so that upgraders can more readily know what has changed; plus, you’re bound to encounter a few of the billions and billions of drawings created using methods that predominated in older releases of the software. I mention the important differences between AutoCAD and AutoCAD LT. In particular, AutoCAD LT has no programming language and has extremely limited support for parametrics (see Chapter 19) and 3D (see Chapter 21).
This book is not Mechanical Drafting For Dummies, or Architectural Drafting For Dummies, or even Crash Testing For Dummies. It doesn’t cover traditional drafting principles and procedures, but it does cover the AutoCAD commands necessary to create and edit drawings. Remember, though, that knowing AutoCAD’s commands won’t make you a great designer, just as knowing how to touch-type with a word processor doesn’t necessarily make you a great author. The job title CAD operator doesn’t exist, but almost all drafters and designers use CAD.
In addition, the book does not cover the discipline-specific features found in vertical market products that run on top of AutoCAD, such as AutoCAD Electrical or AutoCAD Mechanical, although most of the information in this book applies to the general-purpose features of those programs as well.
This book covers AutoCAD 2015 through 2023. The obvious major differences between these versions and 2014 and earlier are the initial startup screen and the format of the Ribbon. The underlying principles remain the same. I draw your attention to differences where appropriate.
Late in 2010, Autodesk released the first non–Microsoft Windows version of AutoCAD in 20 years. Although AutoCAD for Mac is available, AutoCAD For Dummies covers only the Windows version. The two versions are file-compatible but differ in how they look and what they can do. If you have AutoCAD for Mac, you can get a grasp of basic concepts from this book, but you might be better off with a Macspecific book such as AutoCAD 2022 For Beginners (For Mac Users), by CADfolks.
Foolish Assumptions
AutoCAD has a large, loyal, dedicated group of longtime users. If you’ve been using AutoCAD for a decade or more, if you plan your vacation time around Autodesk University, if you used AutoCAD to create your wedding invitations, if you tell police officers that you can walk a straight line if they will press F8 first, or if you read 1,200-page technical tomes about AutoCAD for pleasure, AutoCAD For Dummies is not for you. This book is for you if you want to get going quickly with AutoCAD and understand the importance of developing proper CAD techniques right from the beginning.
However, you do need to have an idea of how to use your computer before tackling AutoCAD and this book. And you must have a computer system running AutoCAD or AutoCAD LT (preferably the 2023 version but at least 2015 or newer). A printer or plotter and a connection to the internet are helpful, too.
You also need to know how to use your version of Windows to copy and delete files, create folders, and find files. You need to know how to use a mouse to select (highlight) or to choose (activate) commands, how to close a window, and how to minimize and maximize windows. You should be familiar with these basics of your operating system before you start using AutoCAD.
Conventions Used in This Book
Here are some conventions that you’ll run across in this book.
Using the command line
The command line is that gray rectangle near the bottom of the AutoCAD screen that says Type a command. One way of using AutoCAD is to type the names of commands in this area. In addition, this is where AutoCAD talks back to you when it needs more information. Examples of AutoCAD prompts appear in this book with a special typeface, as does any other text in the book that replicates a message, a word, or text that appears on the screen. Sequences of prompts that appear at the AutoCAD command line have a shaded background in this book, like this:
Specify lower left corner or [ON/OFF] <0.0000,0.0000>:
When there is a specific action that I want you to take at one of these prompts, look for the italic passage at the end of the line, such as when I want you to press the Enter key on the keyboard:
Specify ending width <5.0000>: Press Enter
Text that I want you to type into the program at the command line, in a dialog box, in a text box, or elsewhere appears in boldface type, like the 3 at the end of the following line.
Specify starting width <0.0000>: 3
Many figures in this book also show AutoCAD command-line sequences that demonstrate AutoCAD’s prompts and sample responses.
Using aliases
Many AutoCAD commands have aliases — shortcut versions of commands that have fewer letters than the full command names, in case you like typing commands at the AutoCAD command line. In this book, I show aliases in uppercase as part of the command names. To start a command with an alias, you have to type only that uppercase letters that I show you. For example, to draw a line, type either Line (the official command) or L (its alias) and then press Enter to execute the command. When I tell you to start a command, I spell it out in full (such as Line, Circle, or COpy), but you need to enter only the letters I show in uppercase (L, C, or CO, respectively). Note also that the uppercase letters aren’t always the initial letters nor are they always adjacent. For example, the eXit command can be entered as the full word or as just the letter X and DimANgular can be entered as DAN.
As you begin to type a command name at the keyboard, the program will try to guess the ones you might want by displaying a list of suggestions. You can click the name you want or keep typing until your choice rises to the top, at which point you simply press Enter or the space bar.
Icons Used in This Book
Throughout this book, I point out certain morsels of particularly important and useful information by placing handy icons in the margin. Naturally, different icons indicate different types of information.
The Tip icon points to insights that can save you time and trouble as you use AutoCAD. In many cases, Tip information acts as a funnel on AutoCAD’s impressive but sometimes overwhelming flexibility: After telling you many of the ways that you can do something, I tell you the way that you should do it, in most cases.
The Technical Stuff icon points out places where I delve a little more deeply into AutoCAD’s inner workings or point out information that most people don’t need to know most of the time. These paragraphs definitely are not required reading, so if you see one at a point when you’ve reached your techie-detail threshold, feel free to skip it.
The Warning icon tells you how to stay out of trouble when working close to the edge. Failure to heed its messages may have unpleasant consequences for you or your drawing — or both.
The Remember icon knows that you have a lot to remember when you’re using AutoCAD, so I’ve remembered to remind you not to forget about some of those things that you should remember.
Beyond the Book
I have written a lot of extra content that you won’t find in this book. Go online to find
» AutoCAD drawings: Drawings that you can use with this book are at www.dummies.com/go/autocadfd19. The drawings, which are on the Downloads tab, are in Zip format; download and unzip them to a folder, and they’ll be ready to open in AutoCAD. The Zip files are named according to chapter and contain one or more drawing files. For example, afd03.zip contains the drawings for Chapter 3. Note that not all chapters have drawing files associated with them.
» Cheat sheet: The cheat sheet for this book has a roadmap for setting up new drawings, as well as a list of keyboard shortcuts. To get to the cheat sheet, go to www.dummies.com and type AutoCAD For Dummies in the Search box.
» Updates: If I have any updates to the book, you can find them at www.dummies.com/extras/autocad19.
Where to Go from Here
Because you’re reading this Introduction, you are like me — you like to read. (The cut-to-the-chase people tend to flip to the index right away and look up what they need to know at that instant.) If you’re a total AutoCAD newbie, you might want to read this book in order, from front to back; it follows a straightforward route from setting up the drawing environment to outputting your masterworks on paper to sharing your work with others.
If you’re an experienced user, you’ll probably be an index-flipper who looks for the missing information needed to complete a specific task. You can probably find the index on your own, but I encourage you to browse through this book anyway, with a highlighter or sticky notes in hand, so that you can find those particularly important places when you need them again.
Whichever route you choose, I hope that you enjoy your time with AutoCAD For Dummies. A-a-and, you’re off!
1 Getting Started with AutoCAD
IN THIS PART . . .
Find your way around the AutoCAD screen.
Discover the half-dozen commands that will account for much of your AutoCAD activities.
See the big picture: from how to start a drawing to printing it.
Correctly set up AutoCAD and create templates for drawing success.
Navigate through your drawing by panning and zooming.
IN THIS CHAPTER
» Launching AutoCAD
» Creating your first drawing in AutoCAD
» Seeing the complete picture
» Understanding the difference between pixels and vectors
» Comprehending the Cartesian coordinate system
Chapter 1
Introducing AutoCAD and AutoCAD LT
This chapter helps ease you into using AutoCAD to create engineering drawings. Although it’s not uncommon to feel overwhelmed the first time you see AutoCAD, rest assured that you don’t need to learn all the controls that you see in the default environment to be an efficient user of the program.
After a brief introduction to the program, I take you through an exercise to show you just how easy it can be to use AutoCAD. The exercise is followed up with some key concepts that you should understand when using AutoCAD, including how it differs from most other computer applications.
When you’re starting out with AutoCAD, heed this quote from The Hitchhiker’s Guide to the Galaxy:
Don’t panic!
Launching AutoCAD
The first thing you need to do to start using AutoCAD is to launch the AutoCAD program (well, duh!) and, if necessary, maximize its screen display. AutoCAD has so many tools and palettes that you’ll almost always want to use it in full-screen mode. Follow these steps:
1. Launch AutoCAD.
As indicated in the Introduction, I assume that you have a working knowledge of how to use your version of Windows, including how to launch applications. Depending on your version of Windows and how it is set up, you might have to double-click a desktop icon or find a suitable entry in the Start → [All] Programs menu or Start → All Apps menu on the start screen. The wording of the selections varies depending on the version of AutoCAD and Windows.
2. Start a new drawing.
Click the rectangular New button towards the upper-left corner of the screen.
3. If necessary, expand AutoCAD to full-screen mode.
Click the middle Windows button in the upper-right corner of the application window.
4. If necessary, expand the graphic area (the big, gray area in the middle) to full-screen size.
Click the middle button in the upper-right corner, near the compass rosette.
5. Place the cursor in the gray graphics area (midscreen), and then press the Esc key twice to make sure that no commands are active.
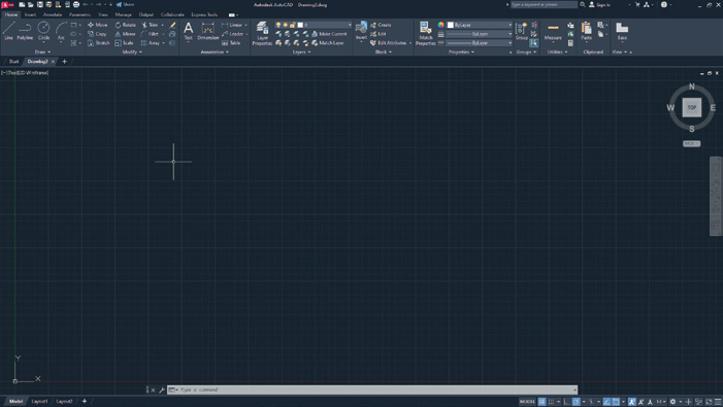
Now you’re ready to start drawing in AutoCAD, as shown in Figure 1-1.
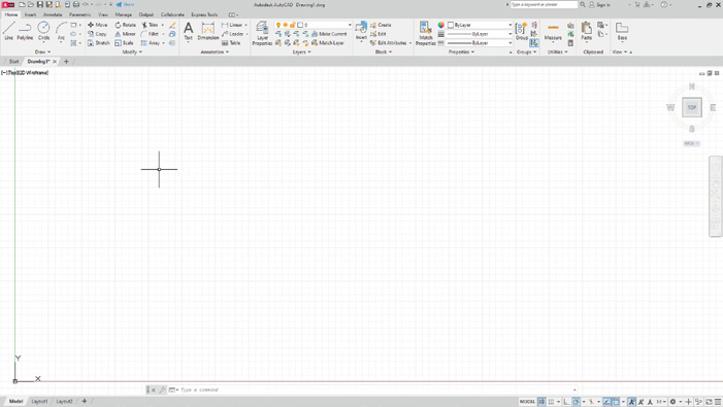
Your screen may look a little different from Figure 1-1 depending on your version of AutoCAD and Windows and your screen resolution. Note too that although you’ll draw using white on dark gray (refer to Figure 1-1), I drew using black on white (see Figure 1-2), and my menu icons have a white background compared to your gray background. I made the color change so that the figures would be clearer on the printed page.
FIGURE 1-1: Your AutoCAD, ready to draw!
FIGURE 1-2: My AutoCAD, ready to draw!
Drawing in AutoCAD
AutoCAD offers a wide range of commands to create, modify, and annotate 2D and 3D designs. Don’t feel as though you need to learn and master every one of the approximately 1,300 (and counting) commands and options that AutoCAD offers to be a proficient drafter; most veteran drafters probably use only 20 or so commands for most basic drafting tasks.
The following simple exercise introduces a few of the commonly used commands to establish the size of your drawing area as well as the commands for creating straight line segments and circles.
You can start a command by clicking its button on the Ribbon menu, which is across the top of the screen, or by entering the command’s name in the command line, which is the light-gray text-entry area at the bottom of the screen that reads Type a command
In this exercise and others in this book, AutoCAD’s command line entries look like this, and you type the commands and responses shown in bold. Press Enter or the spacebar after each command or response that you type.
You don’t even have to move the cursor to the command line. As you type, AutoCAD tries to guess which command you want and displays a list of possibilities at the command line, even when the cursor is on the Ribbon menu area. When you see the command you want, simply click it in the list.
In the following exercise, don’t add spaces on either side of a comma! In most situations, AutoCAD treats pressing the spacebar the same as pressing Enter, which makes keyboard entry fast and easy but messes things up when you do it at the wrong time. In addition, make sure you use a comma as the X,Y separator and the period (.) as the decimal delimiter, and don’t use a thousands separator (,). Some parts of the world use the comma as the decimal separator and the space as the thousands delimiter, either of which confuses AutoCAD to no end.
In this first exercise I ask you to do things without explaining why. Trust me; all will become clear in later chapters:
1. Set up an appropriate size for the drawing:
LIMITS
Reset Model space limits:
Specify lower left corner or [ON/OFF] <0.0000,0.0000>: 0,0
Specify upper right corner <12.0000,9.0000>: 60,40
Now, to be able to see the entire drawing area, type the letters Z A and press Enter. Note that there must be a space between the Z and the A.
2. Disable Dynamic Input mode to work with the command line:
DYNMODE
Enter new value for DYNMODE <3>: -3
3. Draw the frame:
Line
Specify first point: 26,12
Specify next point or [Undo]: 13,12
Specify next point or [Undo]: 22,24
Specify next point or [Close Undo]: 40.5,24
Specify next point or [Close Undo]: 41,22
Specify next point or [Close Undo]: 26,12
Specify next point or [Close Undo]: 20.6667,28
Specify next point or [Close Undo]: 25,28
Specify next point or [Close Undo]: Enter
4. Draw a bit more:
Line
Specify first point: 45,12
Specify next point or [Undo]: 42.87,14.53
Specify next point or [Undo]: 39.38,28.5
Specify next point or [Close Undo]: 35.3,30
Specify next point or [Close Undo]: Enter
5. Draw a round thing:
Circle
Specify center point for circle or [3P 2P Ttr (tan tan radius)]: 13,12
Specify radius of circle or [Diameter]: 8
6. Draw another round thing:
Circle
Specify center point for circle or [3P 2P Ttr (tan tan radius)]: 45,12
Specify radius of circle or [Diameter]: 8
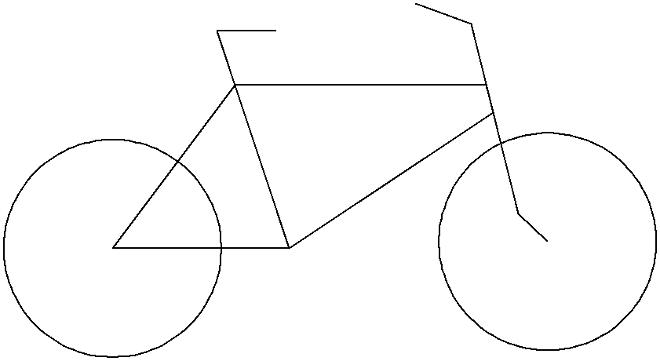
Figure 1-3 shows the bicycle you’ve drawn, and you didn’t even need training wheels!
It has been claimed that Line and Circle are the second- and third-most-used commands after UNDO. You should now SAVE your drawing as an historic artifact. That was easy, wasn’t it?
FIGURE 1-3: Your first AutoCAD drawing.
Understanding Pixels and Vectors
To use AutoCAD effectively (or even at all) you need to understand how an image is displayed on your computer screen, and how the image is stored when it is not being displayed.
» An image on a computer screen is made up of pixels. When you look closely at the screen with a strong magnifying glass, you’ll see that the image is formed from a large number of small dots of light, as shown in Figure 1-4, called pixels. This has nothing to do with Tinker Bell, except that an onscreen image of her would indeed be made up of pixels.
FIGURE 1-4: Pixels.
» All programs that display a graphic image simply turn on or off suitable spots to build the picture. This is a raster image. A straight line in a raster image is just a fortuitous alignment of appropriate dots, and after it’s been created, it can’t be edited as a single object.
» A major difference between CAD programs and computer graphics programs (such as Microsoft Paint) lies in how they save the image to disk. When the image from a Paint-type program is saved to disk, it’s stored as a bitmap that simply lists the color of each pixel. It’s simply a snapshot of what you see onscreen.
» All CAD programs work with and store on a vector file on disk. A vector file is a big collection of numbers and words that list the type, size, and location of every entity in the drawing. When a CAD program displays your drawing
onscreen, it analyzes the vector data and calculates which pixels to turn on or off, depending on which portion of the drawing you’re viewing. CAD programs understand that a circle is a closed curve with a center point and a constant radius. If you change its radius, the CAD program redraws the image onscreen to show the new size.
» AutoCAD doesn’t limit you to working only with what you can see onscreen. You can include as much detail in a drawing as needed. You can zoom in to see more detail and zoom out to see the big picture. At any time, the screen shows only those entities and their detail that the screen is capable of showing.
Some screens can show more pixels than others can. The number ranges from the 320 per row by 200 rows (320 x 200) of the very old Color Graphics Adapter (CGA) of the 1980s to 3840 x 2160 and beyond for today’s 4K monitors. However, the drawing file always contains the same information. If it were moved to a computer with a higher resolution graphics adapter and monitor, then greater detail would show without you having to zoom in as far. Conversely, a drawing file moved to a computer with a lower screen resolution does not lose any detail, but you’ll need to zoom in more closely to see details clearly.
How big is “the big picture”? AutoCAD can draw a circle with a radius of 1099 (a 1 followed by 99 zeros) units, but the observable part of the universe is “only” about 5 x 10²³ miles in diameter, depending on how you measure and whose numbers you use (subject to change without notice). Check out en. wikipedia.org/wiki/Observable_universe for the latest number.
Conversely, AutoCAD can draw a circle with a with a radius as small as 10-99 (which equals 0.00000[plus 90 more zeros plus]0001) units in diameter, as opposed to the classical radius of an electron, which is positively huge at 2.8179403267 x 10⁻¹³ cm.
» It’s possible for a drawing file to contain much more than you can see at any one time. The computer screen is not really the drawing; it is just a viewer that lets you look at all or part of the drawing file.
The Cartesian Coordinate System
AutoCAD uses the Cartesian coordinate system to define all locations in the drawing. This includes things such as the starting and ending points of lines, the centers of circles, the locations of text notes, and so on. Cartesian coordinates are named for French philosopher René Descartes, who is famous for statement “I think, therefore I am,” although today he might say, “I tweet, therefore I am” — although tweeting doesn’t always involve thinking.
In his Discourse on Method, Descartes, wearing his mathematician’s hat, came up with the idea of locating any point on a planar surface by measuring its distance from the intersection of a pair of axes (called, by convention, the X-axis and the Y-axis). (That’s axes as in more than one axis, not several tools for chopping wood.) By convention, the intersection of these axes are perpendicular to one another, and their intersection point is identified as 0,0 — or the origin.
For example, if your address is 625 East 18th Street in a typical town, you live 6¼ blocks east of First Avenue and 18 blocks north of Main Street.
AutoCAD also uses the notation that the origin is at point 0,0. Positive values are to the right of and above this point, and negative values are to the left of and below it. You can identify any location on a drawing by its horizontal distance from the origin, followed by its vertical distance from the same starting point.
AutoCAD shows Cartesian coordinates as a pair of numbers separated by a comma. The number to the left of the comma is the X (horizontal) coordinate, and the value to the right is the Y (vertical) coordinate. You used this convention when creating your bicycle drawing. When working in three dimensions (see Chapter 21), AutoCAD adds a third coordinate: Z.
It’s worth repeating my earlier warning: Make sure you use a comma as the X,Y separator and the period (.) as the decimal delimiter, and don’t use a thousands separator.