CHAPTER V
THE PLANT BODY
The Parts of a Plant.—Our familiar plants are made up of several distinct parts. The most prominent of these parts are root, stem, leaf, flower, fruit, and seed. Familiarplants differ wonderfully in size and shape,—from fragile mushrooms, delicate waterweeds and pond-scums, to floating leaves, soft grasses, coarse weeds, tall bushes, slender climbers, gigantic trees, and hanging moss.
The Stem Part.—In most plants there is a main centralpart or shaft on which the other or secondary parts are borne. This main part is the plant axis. Above ground, in most plants, the main plant axis bears the branches, leaves, and flowers; below ground, it bears the roots.
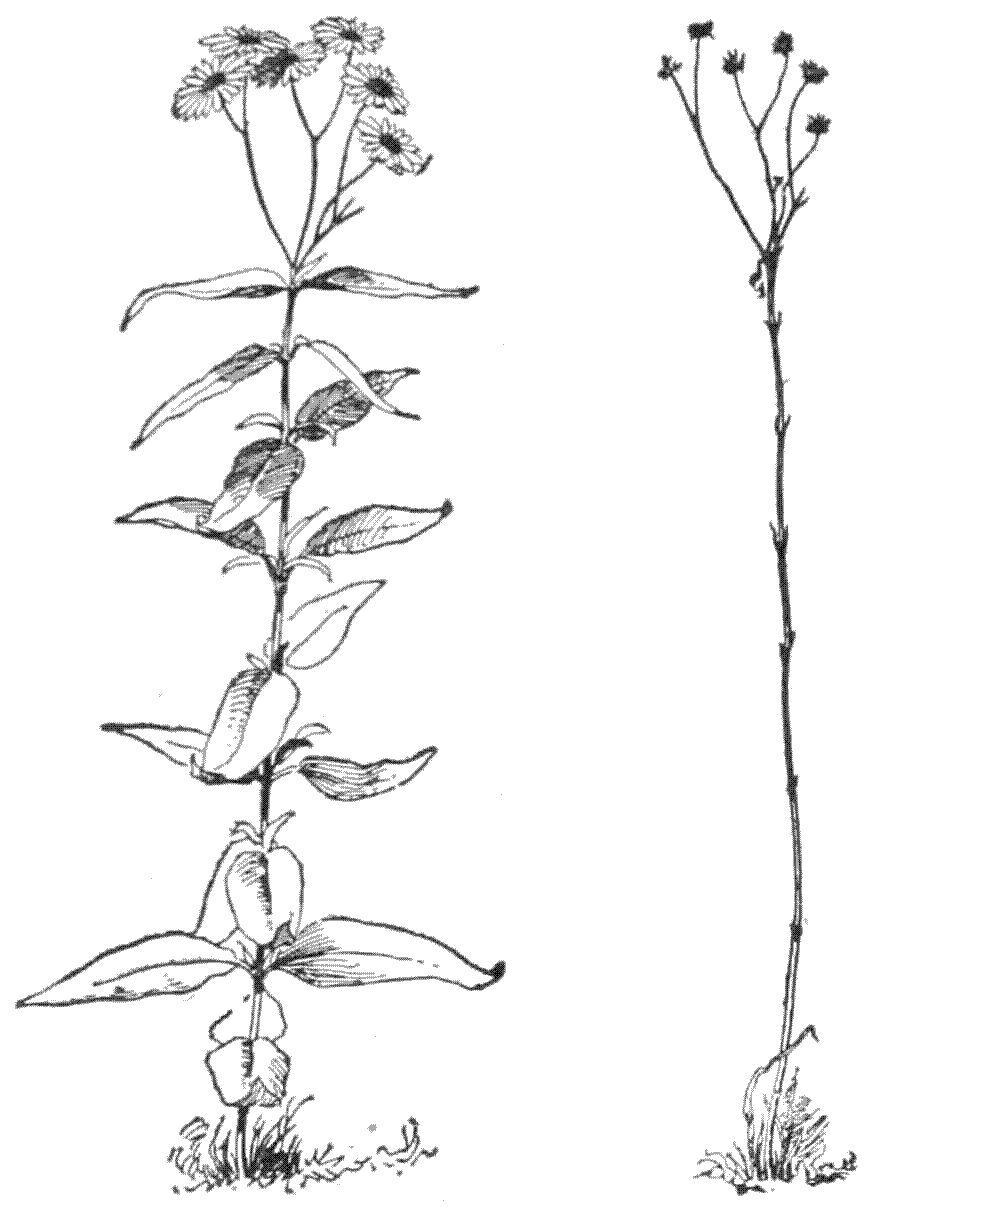
The rigid part of the plant, which persists over winter and which is left after leaves and flowers are fallen, is the framework of the plant. The framework is composed of both root and stem. When the plant is dead, the framework remains for a time, but it slowly decays. The dry winter stems of weeds are the framework, or skeleton of the plant (Figs. 11 and 12). The framework of trees is the most conspicuous part of the plant.
The Root Part.—The root bears the stem at its apex, but otherwise it normally bearsonly root-branches. The stem, however, bears leaves, flowers, and fruits. Those living surfaces of the plant which are most exposed to light are green or highly coloured. The root tends to grow downward, but the stem tends to grow upward towardlightandair. The plant is anchored or fixed in the soil by the roots. Plants have been called “earth parasites.”
The Foliage Part. The leaves precede the flowers in point of time or life of the plant. The flowers always precede the fruits and seeds. Many plants die when the seeds have matured. The whole
mass of leaves of any plant or any branch is known as its foliage.In some cases, as in crocuses, the flowers seem to precede the leaves; but the leaves that made the food for these flowers grew the preceding year.
The Plant Generation. The course of a plant’s life, with all the events through which the plant naturally passes, is known as the plant’s life-history. The life-history embraces various stages, or epochs, as dormant seed, germination, growth, flowering, fruiting. Some plants run their course in a few weeks or months, and some live for centuries.
FIG. 11. PLANT OF A WILD SUNFLOWER. FIG. 12. FRAMEWORK OF FIG. 11.
The entire life period of a plant is called a generation. It is the whole period from birth to normal death, without reference to the various stages or events through which it passes.
A generation begins with the youngseed, not with germination. It ends with death—that is, when no life is left in any part of the plant, and only the seed or spore remains to perpetuate the kind. In a bulbous plant, as a lily or an onion, the generation does not end until the bulb dies, even though the top is dead.
When the generation is of only one season’s duration, the plant is said to be annual. When it is of two seasons, it is biennial. Biennials usually bloom the second year. When of three or more seasons, the plant is perennial. Examples of annuals are pigweed, bean, pea, garden sunflower; of biennials, evening primrose,
mullein, teasel; of perennials, dock, most meadow grasses, cat-tail, and all shrubs and trees.
Duration of the Plant Body.—Plant structures which are more or less soft and which die at the close of the season are said to be herbaceous, in contradistinction to being ligneous or woody. A plant which is herbaceous to the ground is called an herb; but an herb may have a woody or perennial root, in which case it is called an herbaceous perennial. Annual plants are classed as herbs. Examples of herbaceous perennials are buttercups, bleeding heart, violet, water-lily, Bermuda grass, horse-radish, dock, dandelion, goldenrod, asparagus, rhubarb, many wild sunflowers (Figs. 11, 12).
Many herbaceous perennials have shortgenerations. They become weak with one or two seasons of flowering and gradually die out. Thus, red clover usually begins to fail after the second year. Gardeners know that the best bloom of hollyhock, larkspur, pink, and many other plants, is secured when the plants are only two or three years old.
Herbaceous perennials which die away each season to bulbs or tubers, are sometimes called pseud-annuals (that is, false annuals). Of such are lily, crocus, onion, potato, and bull nettle.
True annuals reach old age the first year. Plants which are normally perennial may become annual in a shorter-season climate by beingkilledby frost, rather than by dying naturally at the end of a season of growth. They are climatic annuals. Such plants are called plur-annuals in the short-season region. Many tropical perennials are plur-annuals when grown in the north, but they are treated as true annuals because they ripen sufficient of their crop the same season in which the seeds are sown to make them worth cultivating, as tomato, red pepper, castor bean, cotton. Name several vegetables that are planted in gardens with the expectation that they will bear till frost comes.
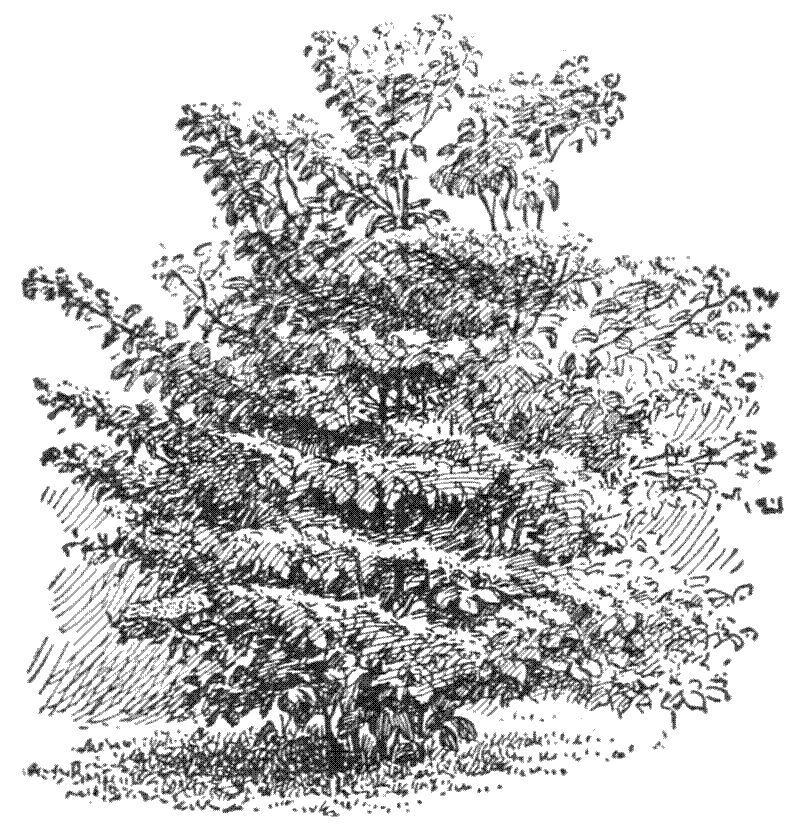
FIG. 13. A SHRUB OR BUSH. Dogwood osier.
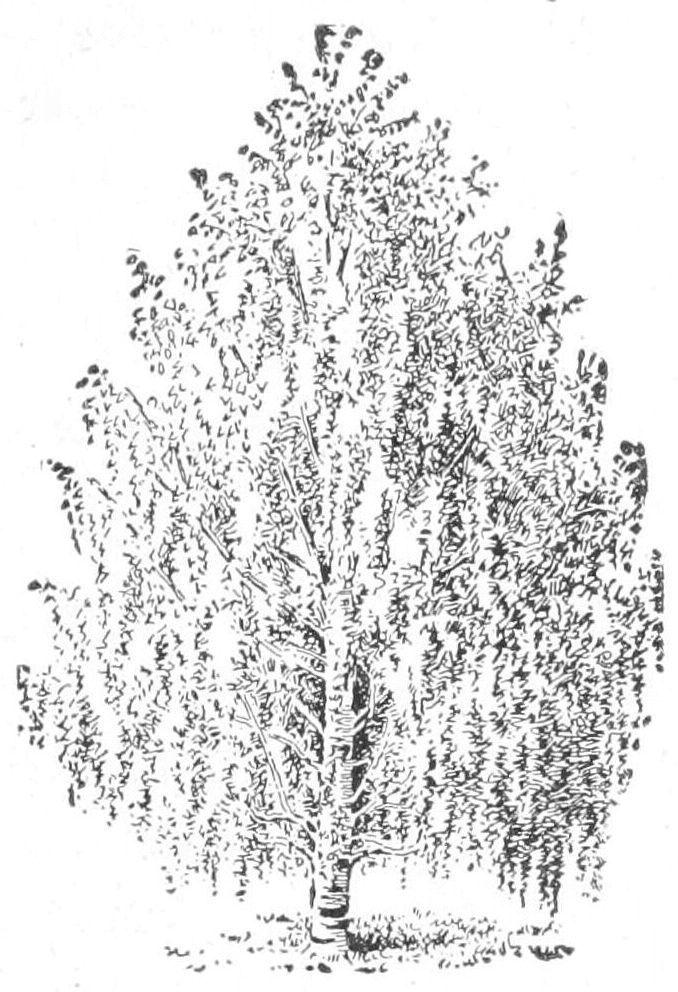
Woody or ligneous plants usually live longer than herbs. Those that remain low and produce several or many similar shoots from the base are called shrubs, as lilac, rose, elder, osier (Fig. 13). Low and thick shrubs are bushes. Plants that produce one main trunk and a more or less elevated head are trees (Fig. 14). All shrubs and trees are perennial.
Every plant makes an effort to propagate, or to perpetuate its kind; and, as far as we can see, this is the end for which the plant itself lives. Theseedorsporeisthefinalproductoftheplant.
SUGGESTIONS. 8. The teacher may assign each pupil to one plant in the school yard, or field, or in a pot, and ask him to bring out the points in the lesson. 9. The teacher may put on the board the names of many common plants and ask the pupils to classify into annuals, pseud-annuals, plur-annuals (or climatic annuals), biennials, perennials, herbaceous perennials, ligneous perennials, herbs, bushes, trees. Every plant grown on the farm should be so classified: wheat, oats, corn, buckwheat, timothy, strawberry, raspberry, currant, tobacco, alfalfa, flax, crimson
clover, hops, cowpea, field bean, sweet potato, peanut, radish, sugar-cane, barley, cabbage, and others. Name all the kinds of trees you know.
FIG. 14. A TREE. The weeping birch.
CHAPTER VI
SEEDS AND GERMINATION
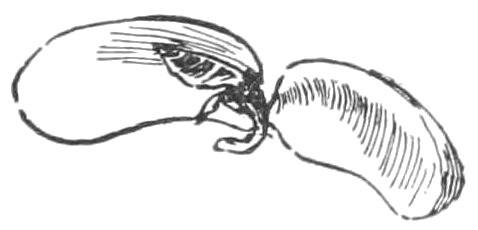
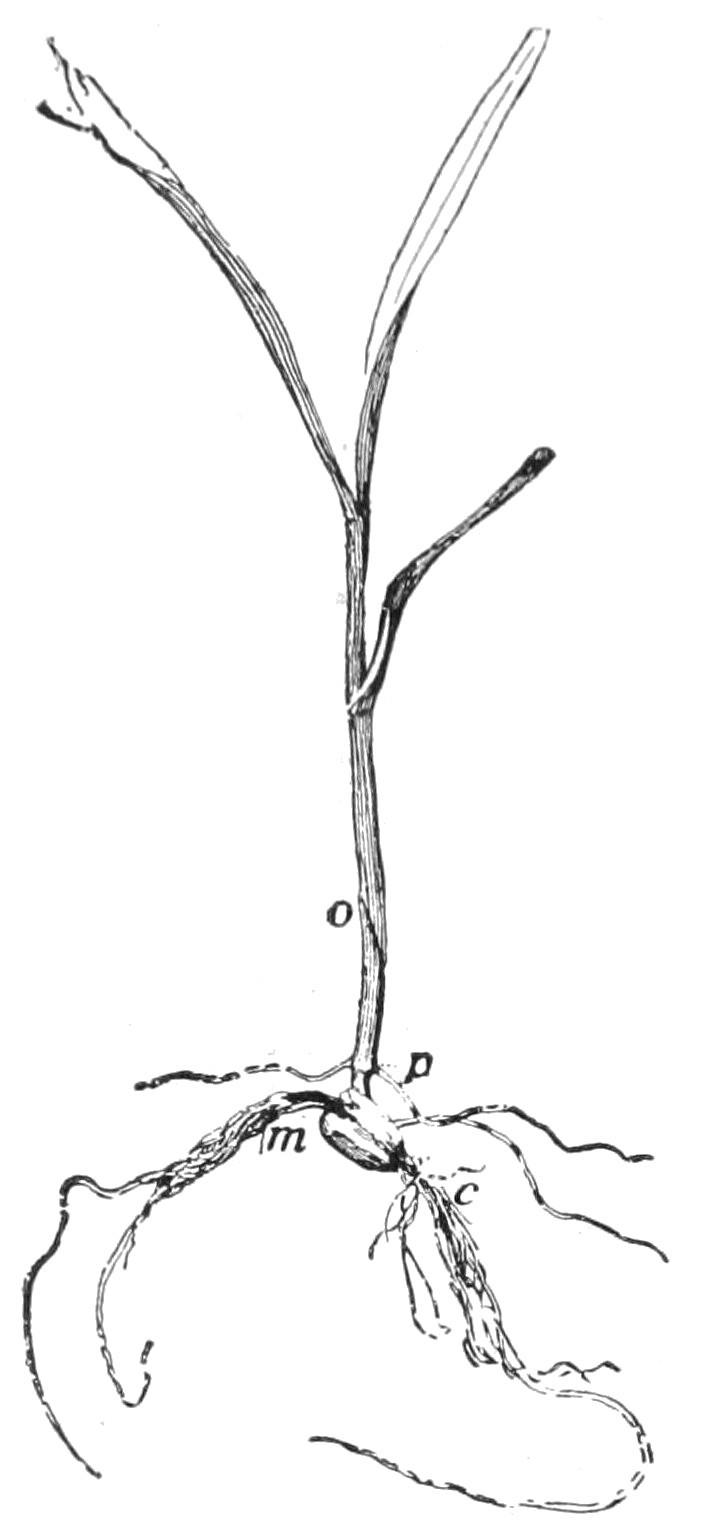
The seed contains a miniature plant, or embryo. The embryo usually has three parts that have received names: the stemlet, or caulicle; the seed-leaf, or cotyledon (usually 1 or 2); the bud, or plumule, lying between or above the cotyledons. These parts are well seen in the common bean (Fig. 15), particularly when the seed has been soaked for a few hours. One of the large cotyledons— comprising half of the bean—is shown at R. The caulicle is at O. The plumule is shown at A. The cotyledons are attached to the caulicle at F: thispointmaybetakenasthefirstnodeorjoint.
FIG. 15.
PARTS OF THE BEAN. R, cotyledon; O, caulicle; A, plumule; F, first node.
The Number of Seed-leaves.
All plants having two seed-leaves belong to the group called dicotyledons. Such seeds in many cases split readily in halves, e.g. a bean. Some plants have only one seed-leaf in a seed. They form a group of plants called monocotyledons. Indian corn is an example of a plant with only one seedleaf: a grain of corn does not split into halves as a bean does. Seeds of the pine family contain more than two cotyledons, but for our purposes they may be associated with the dicotyledons, although really forming a different group.
These two groups—the dicotyledons and the monocotyledons— represent two great natural divisions of the vegetable kingdom. The dicotyledons contain the woody bark-bearing trees and bushes (except conifers), and most of the herbs of temperate climates except the grasses, sedges, rushes, lily tribes, and orchids. The flower-parts are usually in fives or multiples of five, the leaves mostly netted-veined, the bark or rind distinct, and the stem often bearing a pith at the centre. The monocotyledons usually have the
flower-parts in threes or multiples of three, the leaves long and parallel-veined, the bark not separable, and the stem without a central pith.
Every seed is provided with food to support the germinating plant. Commonly this food is starch. The food may be stored inthecotyledons, as in bean, pea, squash; or outside thecotyledons, as in castor bean, pine, Indian corn. When the food is outside or around the embryo, it is usually called endosperm
Seed-coats; Markings on Seed.
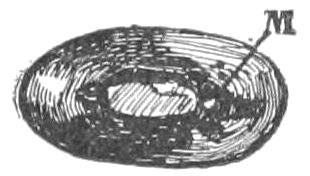
—The embryo and endosperm are inclosed within a covering made of two or more layers and known as the seed-coats. Over the point of the caulicle is a minute hole or a thin place in the coats known as the micropyle. This is the point at which the pollen-tube entered the forming ovule and through which the caulicle breaks in germination. The micropyle is shown at M in Fig. 16. The scar where the seed broke from its funiculus (or stalk that attached it to its pod) is named the hilum. It occupies a third of the length of the bean in Fig. 16. The hilum and micropyle are always present in seeds, but they are not always close together. In many cases it is difficult to identify the micropyle in the dormant seed, but its location is at once shown by the protruding caulicle as germination begins. Opposite the micropyle in the bean (at the other end of the hilum) is an elevation known as the raphe. This is formed by a union of the funiculus, or seed-stalk, with the seed-coats, and through it food was transferred for the development of the seed, but it is now functionless.
Seeds differ wonderfully in size, shape, colour, and other characteristics. They also vary in longevity. These characteristics are peculiartothespeciesor kind. Some seeds maintain life only a few weeks or even days, whereas others will “keep” for ten or twenty years. In special cases, seeds have retained vitality longer than this limit, but the stories that live seeds, several thousand years old, have been taken from the wrappings of mummies are unfounded.
Germination.—The embryo is not dead; it is only dormant. When supplied with moisture, warmth, and oxygen (air), it awakes and grows: thisgrowthis germination. The embryo lives for a time on the stored food, but gradually the plantlet secures a foothold in the soil and gathers food for itself. When the plantlet is finally able to shiftforitself,germinationiscomplete.
Early Stages of Seedling.
—The germinating seed first absorbs water , and swells. The starchy matters gradually become soluble. The seed-coats are ruptured, the caulicle and plumule emerge. During this process the seed respires freely, throwing off carbon dioxide(CO2).
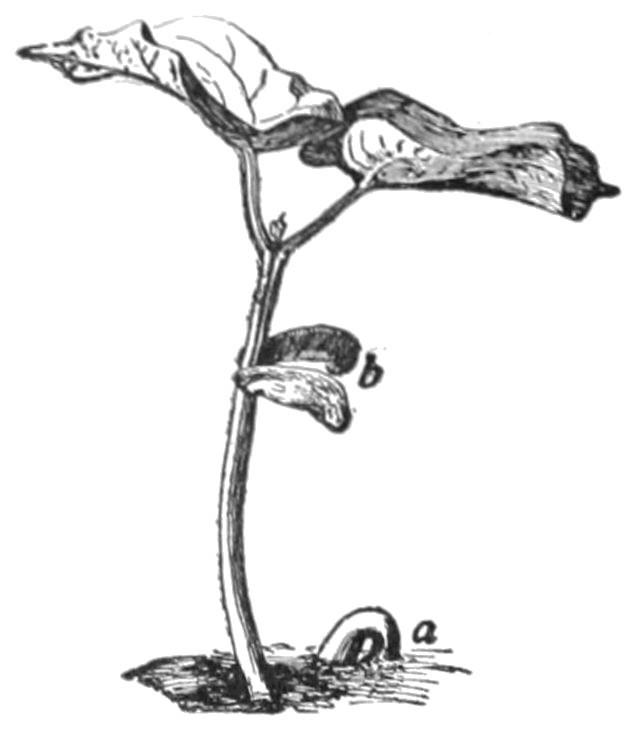
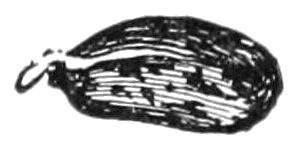
The caulicle usually elongates, and from its lower end roots are emitted. The elongating caulicle is known as the hypocotyl (“below the cotyledons”). That is, the hypocotyl is that part of the stem of the plantlet lying between the roots and the cotyledon. The general direction of the young hypocotyl,or emergingcaulicle,is downwards. As soon as roots form, it becomes fixed and its subsequent growth tends to raie the cotyledons above the ground, as in the bean. When cotyledons rise into the air, germination is said to be epigeal (“above the earth”). Bean and pumpkin are examples. When the hypocotyl does not elongate greatly and the cotyledons remain under ground, the germination is hypogeal (“beneath the earth”). Pea and scarlet runner bean are examples (Fig. 48). When the germinating seed lies on a hard surface, as on closely compacted soil, the hypocotyl and rootlets may not be able to secure a foothold and they assume grotesque forms (Fig. 17). Try this with peas and beans.
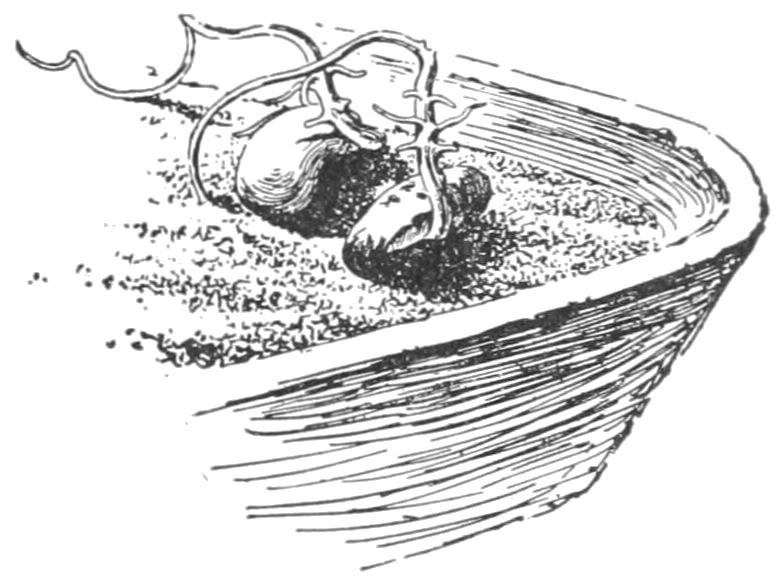
FIG. 17.—PEA. Grotesque forms assumed when the roots cannot gain entrance to the soil.
The first internode (“between nodes”) above the cotyledons is the epicotyl. It elevates the plumule into the air, and the plumule leavesexpandintothefirsttrueleaves oftheplant. These first true leaves, however, may be very unlike the later leaves in shape.
FIG. 18. COTYLEDONS OF GERMINATING BEAN SPREAD APART TO SHOW ELONGATING CAUDICLE AND PLUMULE.
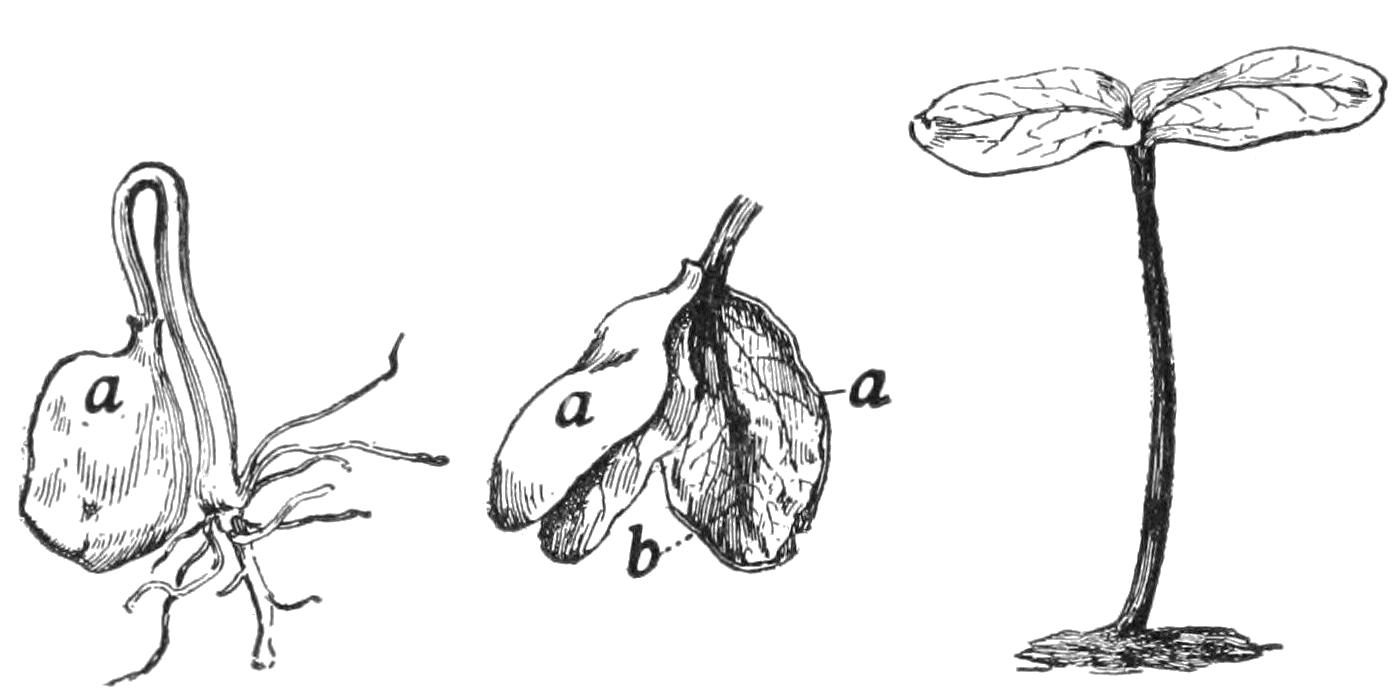
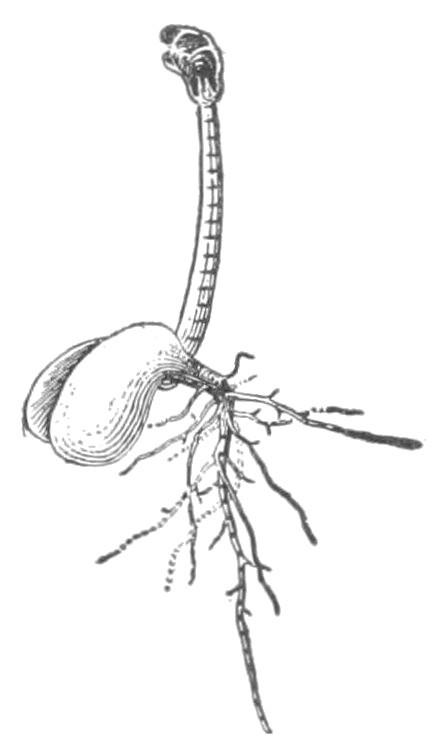
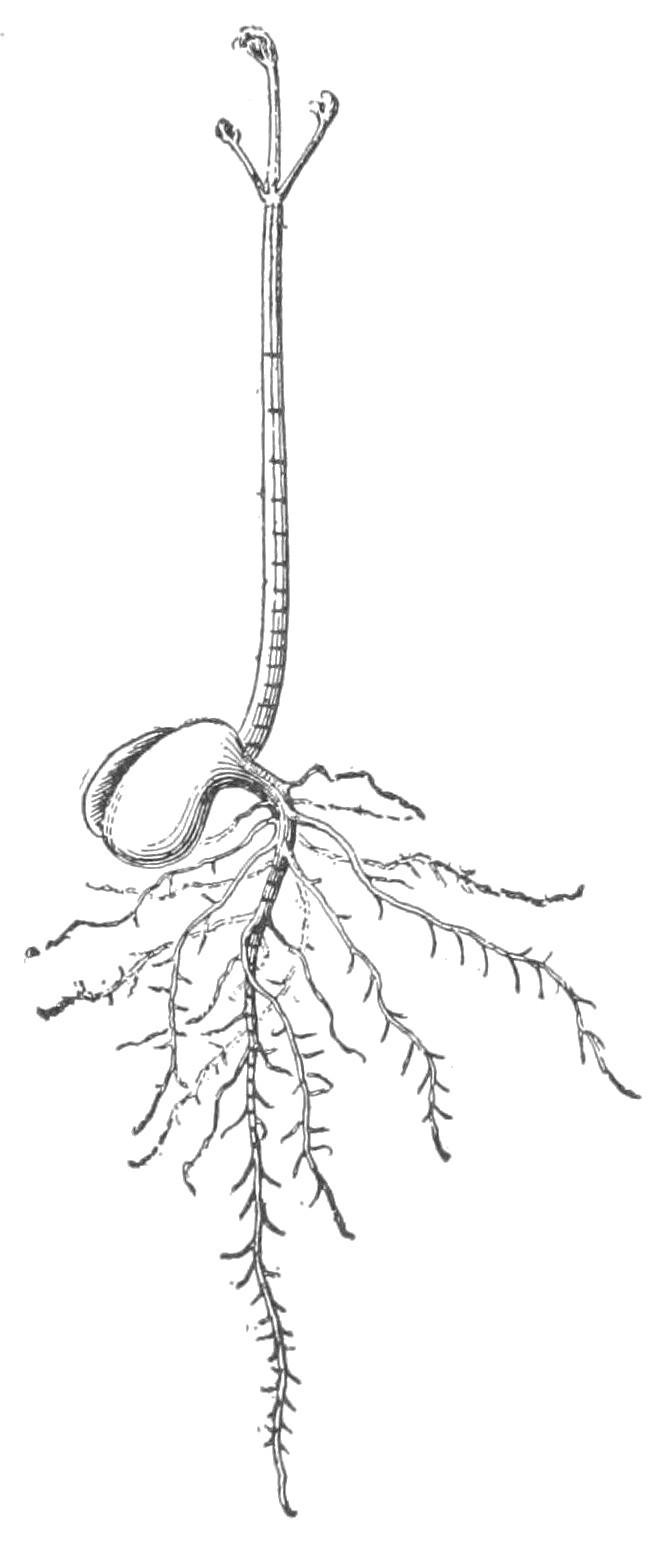
Germination of Bean. The common bean, as we have seen (Fig. 15), has cotyledons that occupy all the space inside the seed-coats. When the hypocotyl, or elongated caulicle, emerges, the plumule leaves have begun to enlarge, and to unfold (Fig. 18). The hypocotyl elongates rapidly. One end of it is held by the roots. The other is held by the seed-coats in the soil. It therefore takes the form of a loop, and the central part of the loop “comes up” first (a, Fig. 19). Presently the cotyledons come out of the seed-coats, and the plant straightens and the cotyledons expand. These cotyledons, or “halves of the bean,” persist for some time (b, Fig. 19). They often become green and probably perform some function of foliage. Because of its large size, the Lima bean shows all these parts well.
FIG. 19.—GERMINATION OF BEAN.
Germination of Castor Bean.—In the castor bean the hilum and micropyle are at the smaller end (Fig. 20). The bean “comes up” with a loop, which indicates that the hypocotyl greatly elongates. On examining germinating seed, however, it will be found that the cotyledons are contained inside a fleshy body, or sac (a, Fig. 21). This sac is the endosperm. Against its inner surface the thin, veiny cotyledons are very closely pressed, absorbing its substance (Fig. 22). The cotyledons increase in size as they reach the air (Fig. 23), and become functional leaves.
FIG. 20.— SPROUTING OF CASTOR BEAN.
FIG. 21. GERMINATION OF CASTOR BEAN. Endosperm at a.
FIG. 22. CASTOR BEAN. Endosperm at a, a; cotyledons at b.
FIG. 23. GERMINATION COMPLETE IN CASTOR BEAN.
Germination of Monocotyledons.—Thus far we have studied dicotyledonous seeds; we may now consider the monocotyledonous group. Soak kernels of corn. Note that the micropyle and hilum are at the smaller end (Fig. 24). Make a longitudinal section through the narrow diameter; Fig. 25 shows it. The single cotyledon is at a, the caulicle at b, the plumule at p. The cotyledon remains in the seed. The food is stored both in the cotyledon and as endosperm, chiefly the latter. The emerging shoot is the plumule, with a sheathing leaf (p, Fig. 26). The root is emitted from the tip of the caulicle, c. The caulicle is held in a sheath (formed mostly from the seed-coats), and some of the roots escape through the upper end of this sheath (m, Fig. 26). The epicotyl elongates, particularly if the seed is planted deep or if it is kept for a time confined. In Fig. 27 the epicotyl has elongated from nto p. The true plumule-leaf is at o, but other leaves grow from its sheath. In Fig. 28 the roots are seen emerging from the two ends of the caulicle-sheath, c, m; the epicotyl has grown to p; the first plumule-leaf is at o.
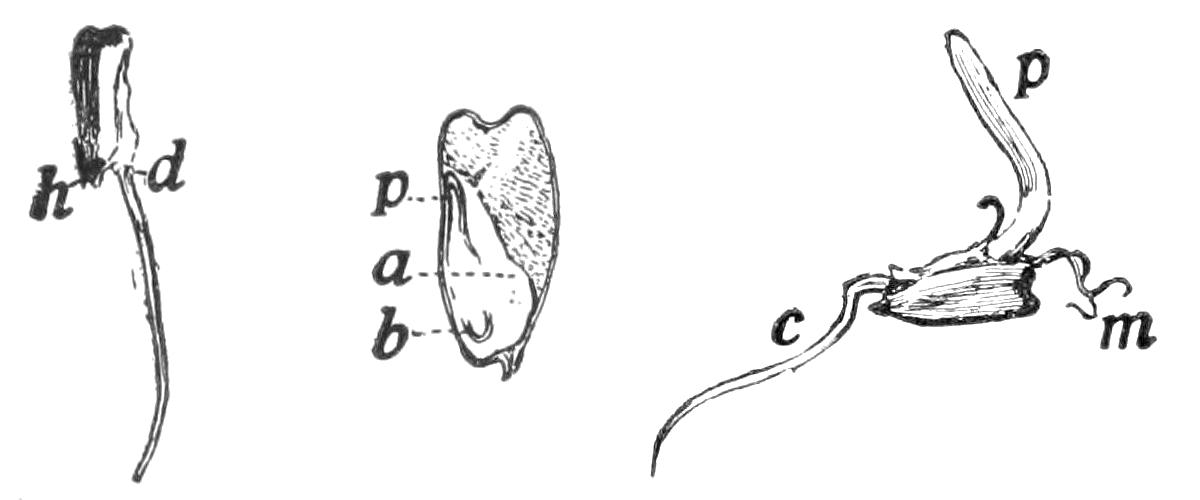
FIG. 24.—
SPROUTING INDIAN
CORN. Hilum at h; micropyle at d
FIG. 25.—KERNEL OF INDIAN CORN.
Caulicle at b; cotyledon at a; plumule at p.
FIG. 26.—INDIAN CORN.
Caulicle at c; roots emerging at m; plumule at p
FIG. 27. INDIAN CORN. o, plumule; n to p, epicotyl
In studying corn or other fruits or seeds, the pupil should note how the seeds are arranged, as on the cob. Count the rows on a corn cob. Odd or even in number? Always the same number? The silk is the style: find where it was attached to the kernel. Did the ear have any coverings? Explain.
Describe colours and markings of kernels of corn; and of peas, beans, castor bean.
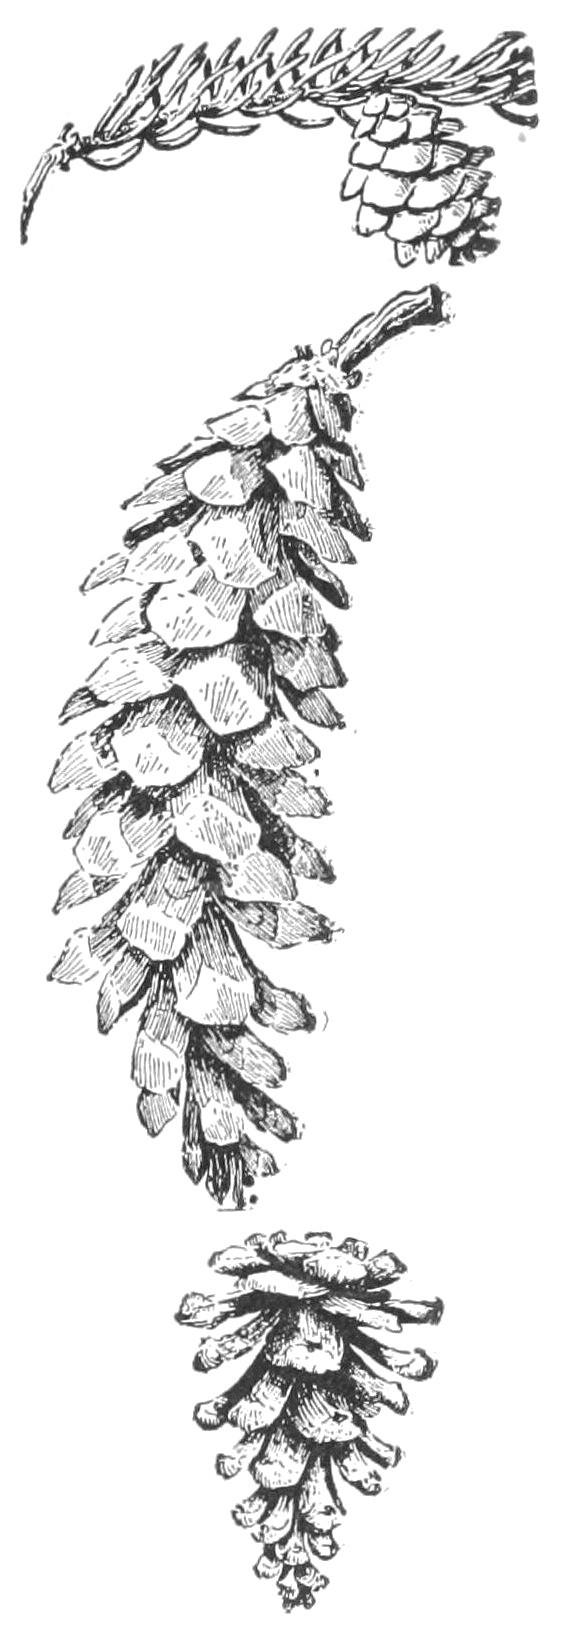
Gymnosperms.—The seeds in the pine cone, not being inclosed in a seed vessel, readily fall out when the cone dries and the scales separate. Hence it is difficult to find cones with seeds in them after autumn has passed (Fig. 29). The cedar is also a gymnosperm.
Remove a scale from a pine cone and draw it and the seeds as they lie in place on the upper side of the scale. Examine the seed,
FIG. 28. GERMINATION IS COMPLETE. p, top of epicotyl; o, plumule-leaf; m, roots; c, lower roots.
preferably with a magnifying glass. Is there a hilum? The micropyle is at the bottom or little end of the seed. Toss a seed upward into the air. Why does it fall so slowly? Can you explain the peculiar whirling motion by the shape of the wing? Repeat the experiment in the wind. Remove the wing from a seed and toss it and an uninjured seed into the air together. What do you infer from these experiments?
SUGGESTIONS.—Few subjects connected with the study of plant-life are so useful in schoolroom demonstrations as germination. The pupil should prepare the soil, plant the seeds, water them, and care for the plants. 10. Plant seeds in pots or shallow boxes. The box should not be very wide or long, and not over four inches deep. Holes may be bored in the bottom so it will not hold water. Plant a number of squash, bean, corn, pine, or other seeds about an inch deep in damp sand or pine sawdust in this box. The depth of planting should be two to four times the diameter of the seeds. Keep the sand or sawdust moist but not wet. If the class is large, use several boxes, that the supply of specimens may be ample. Cigar boxes and chalk boxes are excellent for individual pupils. It is well to begin the planting of seeds at least ten days in advance of the lesson, and to make four or five different plantings at intervals. A day or two before the study is taken up, put seeds to soak in moss or cloth. The pupil then has a series from swollen seeds to complete germination, and all the steps can be made out. Dry seeds should be had for comparison. If there is no special room for laboratory, nor duplicate apparatus for every pupil, each experiment may be assigned to a committee of two pupils to watch in the schoolroom. 11. Good seeds for study are those detailed in the lesson, and buckwheat, pumpkin, cotton, morning glory, radish, four o’clock, oats, wheat. It is best to use familiar seeds of farm and garden. Make drawings and notes of all the events in the germination. Note the effects of unusual conditions, as planting too deep and too shallow and different sides up. For hypogeal germination, use the garden pea, scarlet runner,
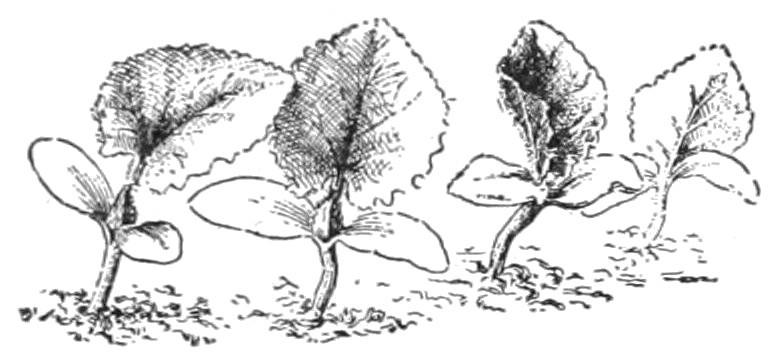
or Dutch case-knife bean, acorn, horse-chestnut. Squash seeds are excellent for germination studies, because the cotyledons become green and leafy and germination is rapid. Onion is excellent, except that it germinates too slowly. In order to study the root development of germinating plantlets, it is well to provide a deeper box with a glass side against which the seeds are planted. 12. Observe the germination of any common seed about the house premises. When elms, oaks, pines, or maples are abundant, the germination of their seeds may be studied in lawns and along fences. 13. When studying germination the pupil should note the differences in shape and size between cotyledons and plumule leaves, and between plumule leaves and the normal leaves (Fig. 30). Make drawings.
FIG. 30. MUSKMELON SEEDLINGS, with the unlike seed-leaves and true leaves.
14. Make the tests describe d in the introduc tory experim ents with bean, corn,
FIG. 29.—CONES OF HEMLOCK (ABOVE), WHITE PINE, PITCH PINE.
the castor bean, and other seed for starch and proteids. Test flour, oatmeal, rice, sunflower, four o’clock, various nuts, and any other seeds obtainable. Record your results by arranging the seeds in three classes, 1. Much starch (colour blackish or purple), 2. Little starch (pale blue or greenish), 3. No starch (brown or yellow). 15. Rate of growth of seedlings as affected by differences in temperature. Pack soft wet paper to the depth of an inch in the bottom of four glass bottles or tumblers. Put ten soaked peas or beans into each. Cover each securely and set them in places having different temperatures that vary little. (A furnace room, a room with a stove, a room without stove but reached by sunshine, an unheated room not reached by the sun). Take the temperatures occasionally with the thermometer to find difference in temperature. The tumblers in warm places should be covered very tightly to prevent the germination from being retarded by drying out. Record the number of seeds which sprout in each
tumbler within 1 day, 2 days, 3 days, 4 days, etc. 16. Is air necessary for the germination andgrowth of seedlings? Place damp blotting paper in the bottom of a bottle and fill it three-fourths full of soaked seeds, and close it tightly with a rubber stopper or oiled cork. Prepare a “check experiment” by having another bottle with all conditions the same except that it is covered loosely that air may have access to it, and set the bottles side by side (why keep the bottles together?). Record results as in the preceding experiment. 17. What is the nature of the gas given off by germinating seeds? Fill a tin box or large-necked bottle with dry beans or peas, then add water; note how much they swell. Secure two fruit jars. Fill one of them a third full of beans and keep them moist. Allow the other to remain empty. In a day or two insert a lighted splinter or taper into each. In the empty jar the taper burns: it contains oxygen. In the seed jar the taper goes out: the air has been replaced by carbon dioxide. The air in the bottle may be tested for carbon dioxide by removing some of it with a rubber bulb attached to a glass tube (or a fountain-pen filler) and bubbling it through lime water. 18. Temperature. Usually there is a perceptible rise in temperature in a mass of germinating seeds. This rise may be tested with a thermometer. 19. Interior of seeds. Soak seeds for twenty-four hours and remove the coat. Distinguish the embryo from the endosperm. Test with iodine. 20. Of what utility is the food in seeds? Soak some grains of corn overnight and remove the endosperm, being careful not to injure the fleshy cotyledon. Plant the incomplete and also some complete grains in moist sawdust and measure their growth at intervals. (Boiling the sawdust will destroy moulds and bacteria which might interfere with the experiment.) Peas or beans may be sprouted on damp blotting paper; the cotyledons of one may be removed, and this with a normal seed equally advanced in germination may be placed on a perforated cork floating in water in a jar so that the roots extend into the water. Their growth may be observed for several weeks. 21. Effect of darkness on seeds and seedlings. A box may be placed mouth downward over a smaller box in which seedlings are growing. The empty box should rest on half-inch blocks to allow air to reach the seedlings. Note any effects on the seedlings of this cutting off of the light. Another box of seedlings not so covered may be used as a check. Lay a plank on green grass and after a week note the change that takes place beneath it. 22. Seedling of pine. Plant pine seeds. Notice how they emerge. Do the cotyledons stay in the ground? How many cotyledons have they? When do the cotyledons get free from the seed-coat? What is the last part of the cotyledon to become free? Where is the growing point or plumule? How many leaves appear at once? Does the new pine cone grow on old wood or on wood formed the same spring with the cone? Can you always find partly grown cones on pine trees in winter? Are pine cones when mature on twoyear-old wood? How long do cones stay on a tree after the seeds have fallen out? What is the advantage of the seeds falling before the cones? 23. Home experiments. If desired, nearly all of the fore-going experiments may be tried at home. The pupil can thus make the drawings for the notebook at home. A daily
record of measurements of the change in size of the various parts of the seedling should also be made.
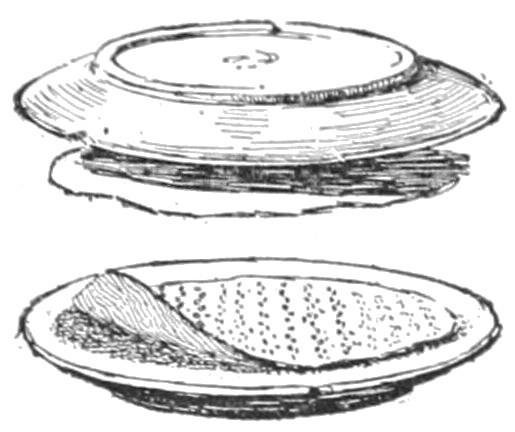
24. Seed-testing.—It is important that one know before planting whether seeds are good, or able to grow. A simple seed-tester may be made of two plates, one inverted over the other (Fig. 31). The lower plate is nearly filled with clean sand, which is covered with cheese cloth or blotting paper on which the seeds are placed. Canton flannel is sometimes used in place of sand and blotting paper. The seeds are then covered with another blotter or piece of cloth, and water is applied until the sand and papers are saturated. Cover with the second plate. Set the plates where they will have about the temperature that the given seeds would require out of doors, or perhaps a slightly higher temperature. Place 100 or more grains of clover, corn, wheat, oats, rye, rice, buckwheat, or other seeds in the tester, and keep record of the number that sprout. The result will give a percentage measure of the ability of the seeds to grow. Note whether all the seeds sprout with equal vigour and rapidity. Most seeds will sprout in a week or less. Usually such a tester must have fresh sand and paper after each test, for mould fungi are likely to breed in it. If canton flannel is used, it may be boiled. If possible, the seeds should not touch one another.
NOTE TO TEACHER. With the study of germination, the pupil will need to begin dissecting.
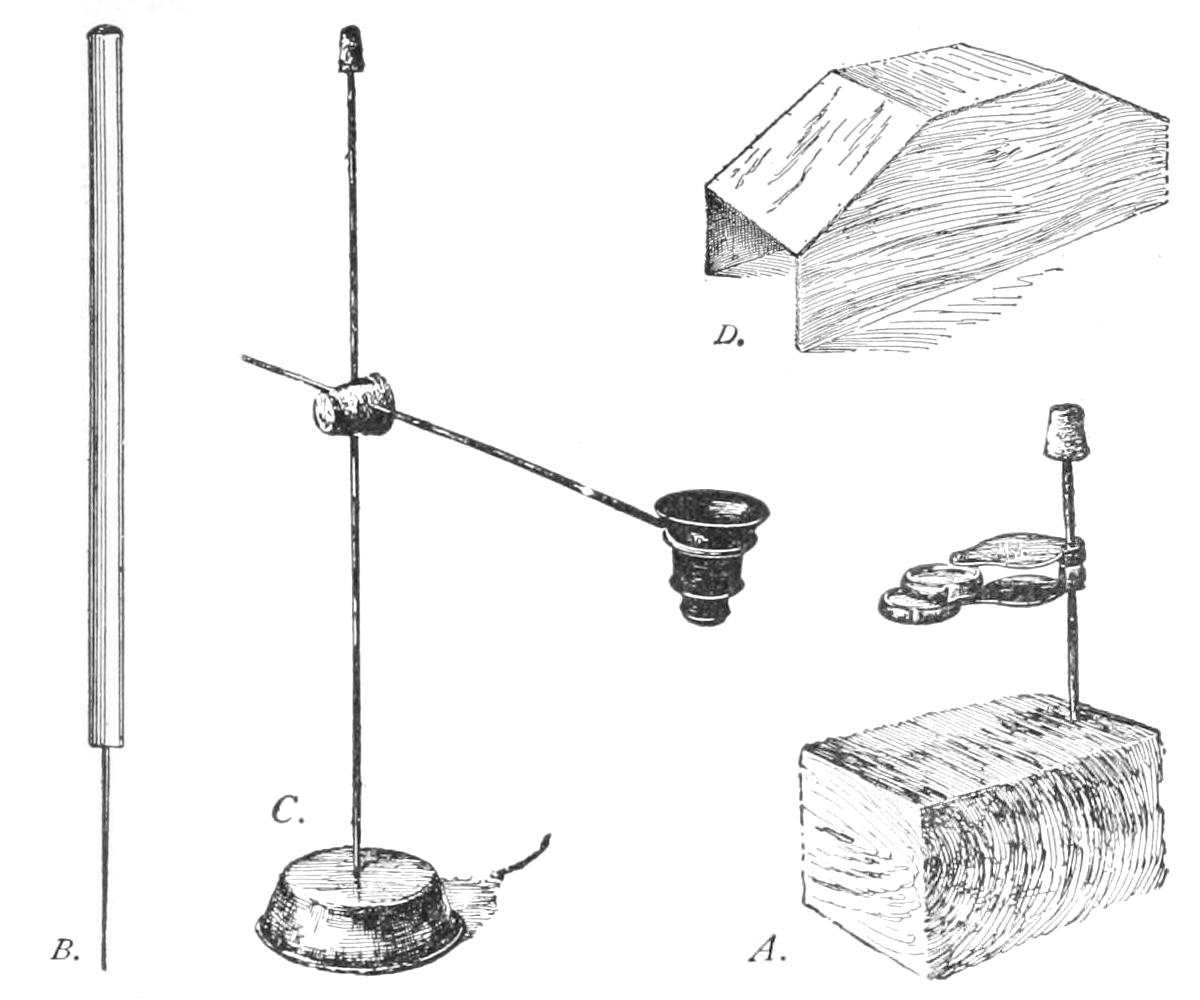
For dissecting, one needs a lens for the examination of the smaller parts of plants and animals. It is best to have the lens mounted on a frame, so that the pupil has both hands free for pulling the part in pieces. An ordinary pocket lens may be mounted on a wire in a block as in Fig. A. A cork is slipped on the top of the wire to avoid injury to the face. The pupil should be provided with two dissecting needles (Fig. B), made by securing an ordinary needle in a pencil-like stick. Another convenient arrangement is shown in Fig. C. A small tin dish is used for the base. Into this a stiff wire standard is soldered. The dish is filled with solder to make it heavy and firm. Into a cork slipped on the standard, a cross wire is inserted, holding on the end a jeweller’s glass. The lens can be moved up and down and sidewise. This outfit can be made for about seventy-five cents. Fig. D shows a convenient hand-rest or dissecting-stand to be used under this lens. It may be 16 in. long, 4 in. high, and 4 or 5 in. broad.
Various kinds of dissecting microscopes are on the market, and these are to be recommended when they can be afforded.
B. DISSECTING NEEDLE ½ natural size.
C. DISSECTING GLASS.
D. DISSECTING STAND.
A. IMPROVISED STAND FOR LENS.
Instructions for the use of the compound microscope, with which some schools may be equipped, cannot be given in a brief space; the technique requires careful training. Such microscopes are not needed unless the pupil studies cells and tissues.
CHAPTER VII
THE ROOT—THE FORMS OF ROOTS
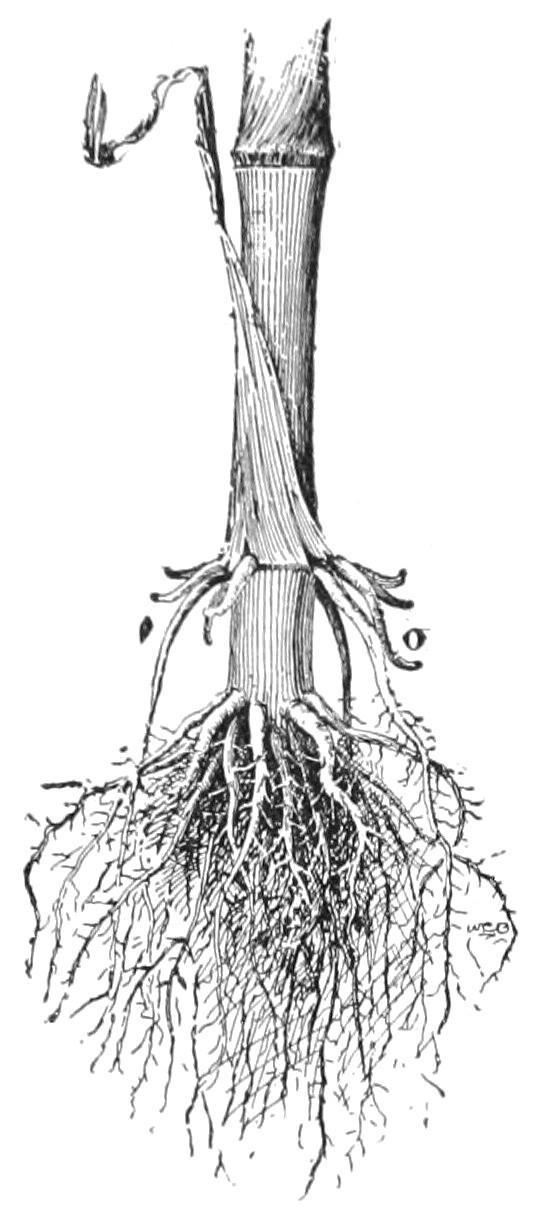
The Root System. The offices of the root are toholdtheplant inplace, and togatherfood. Not all the food materials, however, are gathered by the roots.
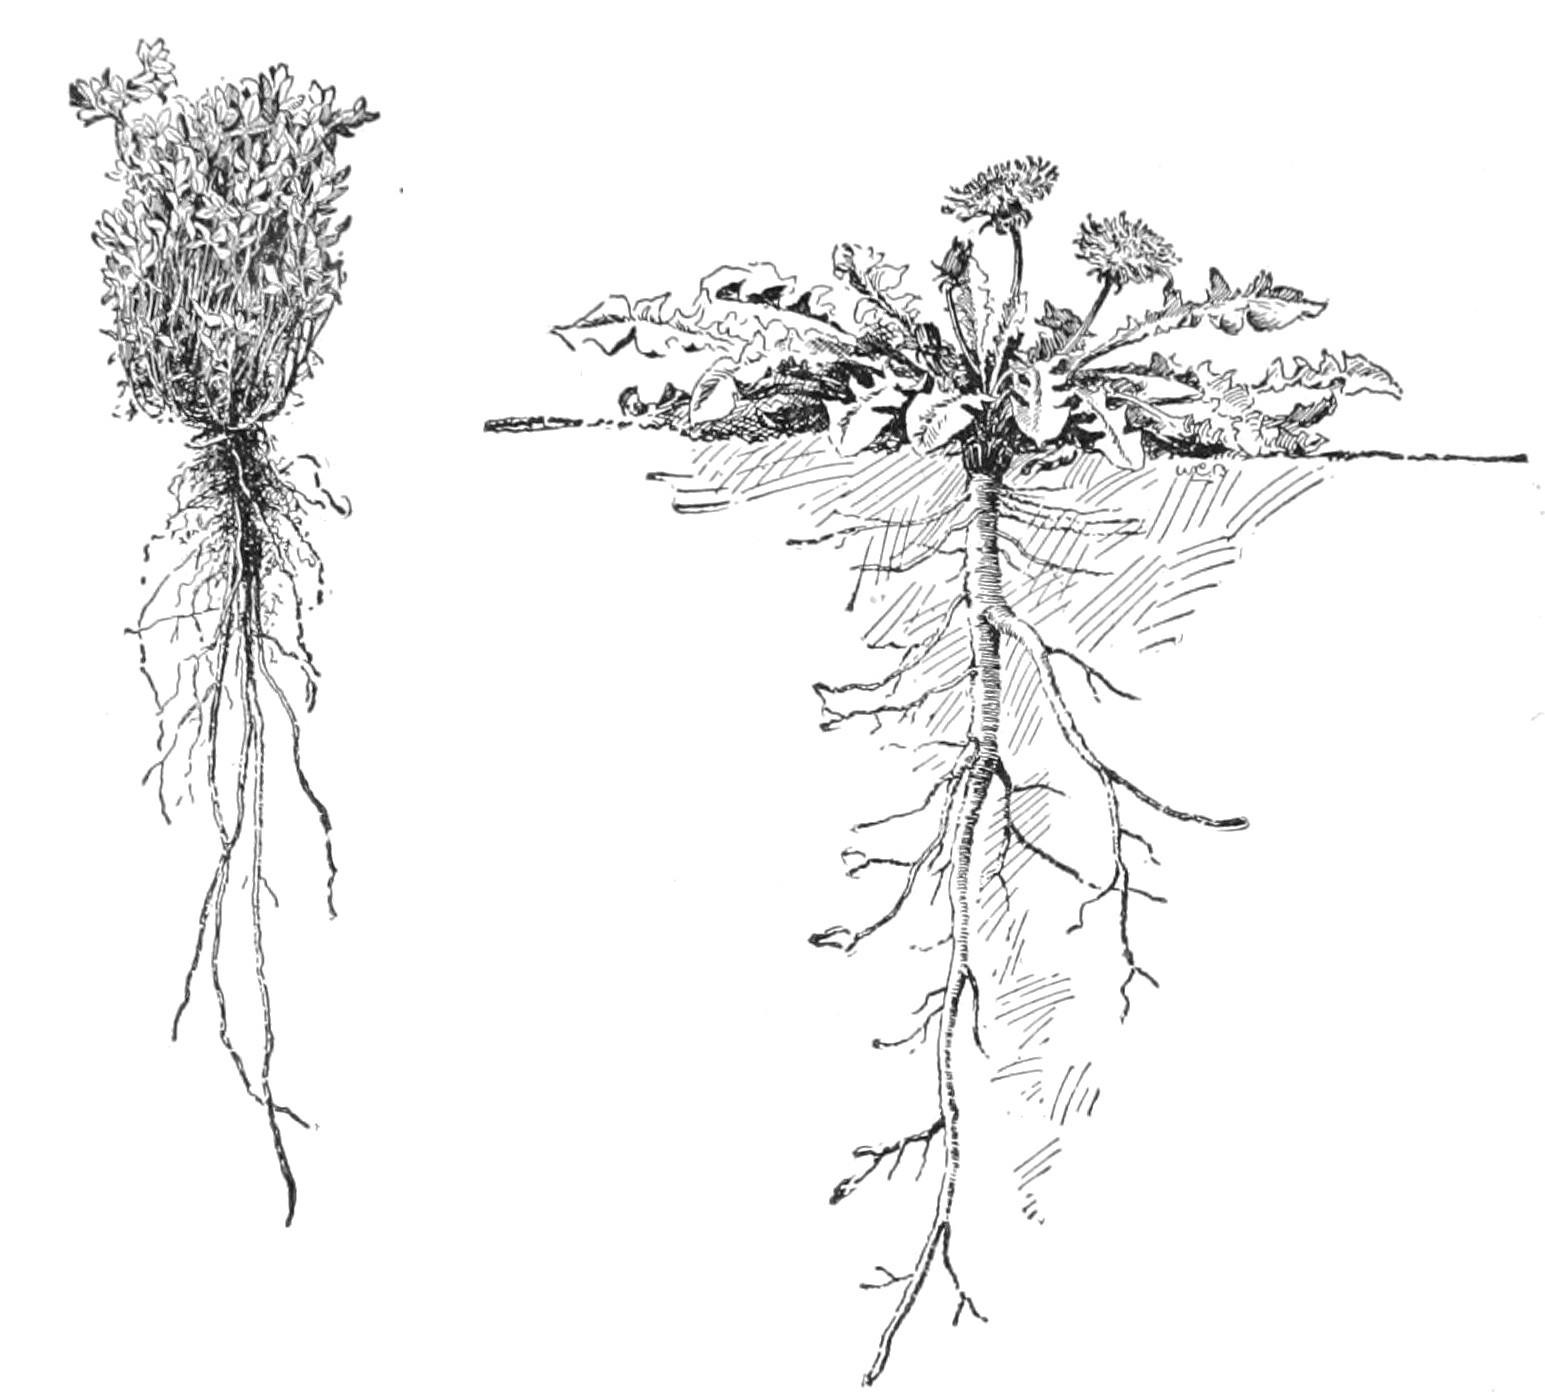
FIG. 32. TAP-ROOT SYSTEM OF ALFALFA. FIG. 33.—TAP-ROOT OF THE DANDELION.
The entire mass of roots of any plant is called its root system. The root system may be annual, biennial or perennial, herbaceous or woody, deep or shallow, large or small.
Kinds of Roots. A strong leading central root, which runs directly downwards, is a tap-root. The tap-root forms an axis from
which the side roots may branch. The side or spreading roots are usually smaller. Plants that have such a root system are said to be tap-rooted. Examples are red clover, alfalfa, beet, turnip, radish, burdock, dandelion, hickory (Figs. 32, 33).
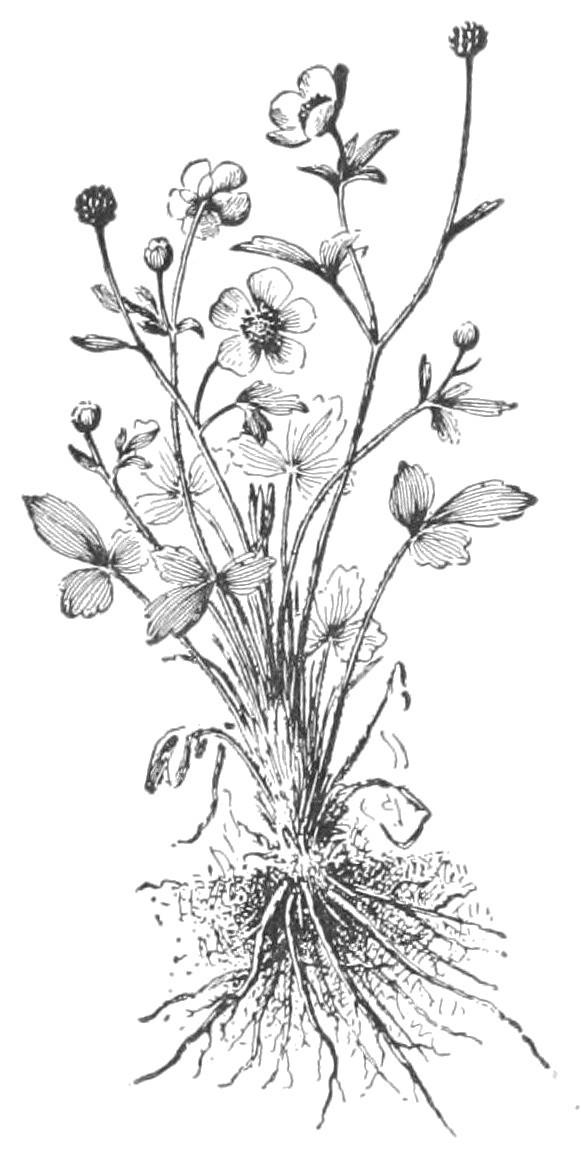
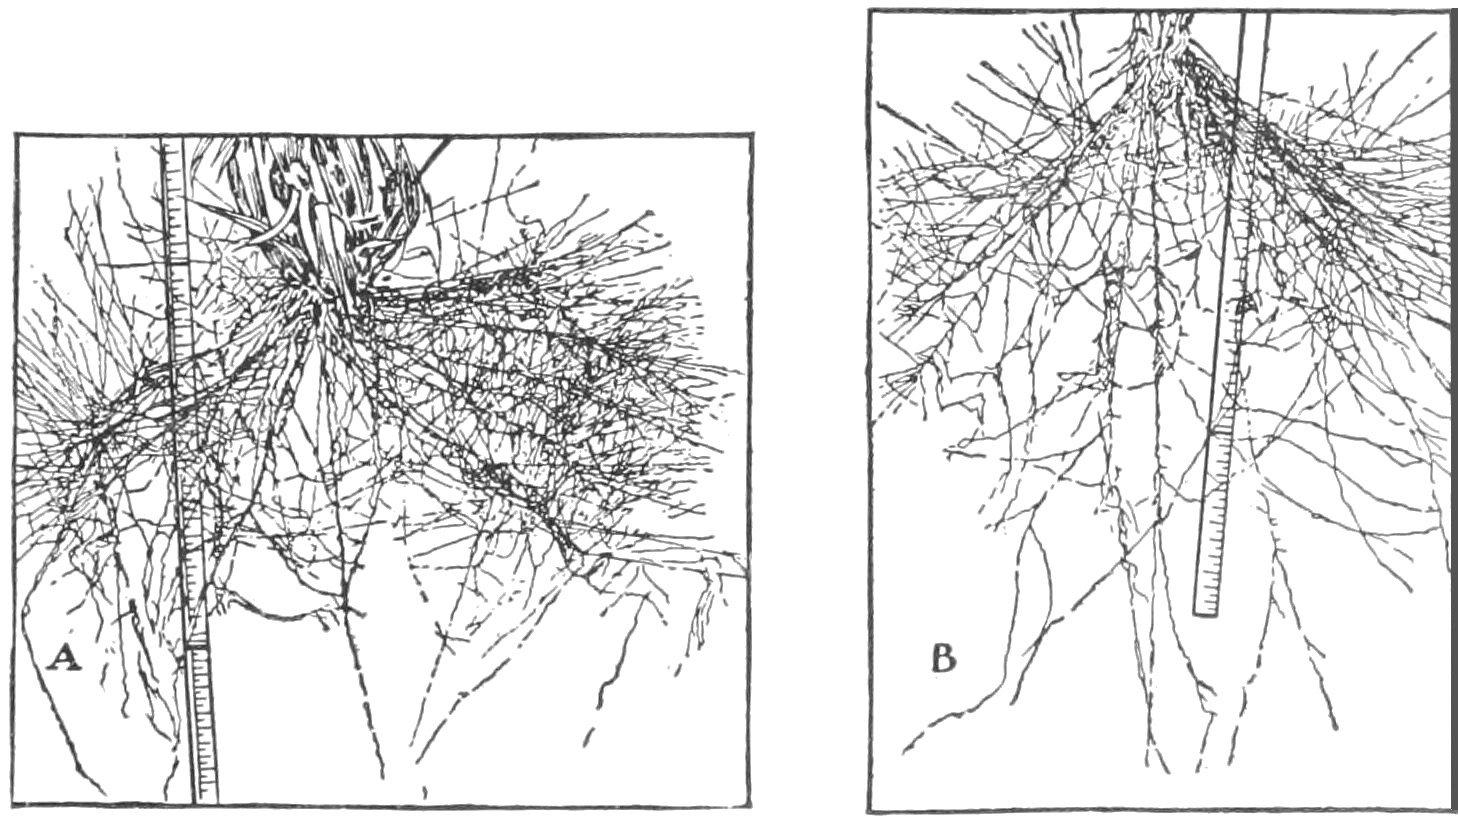
A fibrous root system is one that is composed of many nearly equal slender branches. The greater number of plants have fibrous roots. Examples are many common grasses, wheat, oats, corn. The buttercup in Fig. 34 has a fibrous root system. Many trees have a strong tap-root when very young, but after a while it ceases to extend strongly and the side roots develop until finally the tap-root character disappears.
Shape and Extent of the Root System.—
The depth to which roots extend depends on the kindofplant, and the nature ofthesoil. Of most plants the roots extend far inalldirections and lie comparatively near the surface. The roots usually radiate from a common point just beneath the surface of the ground.
The roots grow here and there in search of food, often extending much farther in all directions than the spread of the top of the plant. Roots tend to spread farther in poor soil than in rich soil, for the same size of plant. The roothas no suchdefiniteform as thestemhas. Roots are usually very crooked, because they are constantly turned aside by obstacles. Examine roots in stony soil.
FIG. 34. A BUTTERCUP PLANT, with fibrous roots.
The extent of root surface is usually very large, for the feeding roots are fine and very numerous. An ordinary plant of Indian corn may have a total length of root (measured as if the roots were placed end to end) of several hundred feet.
The fine feeding roots are mostabundantintherichestpartofthe soil. They are attracted by the food materials. Roots often will completely surround a bone or other morsel. When roots of trees are exposed, observe that most of them are horizontal and lie near the top of the ground. Some roots, as of willows, extend far insearchof water. They often run into wells and drains, and into the margins of creeks and ponds. Grow plants in a long narrow box, in one end of which the soil is kept very dry and in the other moist: observe where the roots grow.
FIG. 35. THE BRACING BASE OF A FIELD PINE.
Buttresses. With the increase in diameter, the upper roots often protrude above the ground and become bracingbuttresses. These buttresses are usually largest in trees which always have been exposed to strong winds (Fig. 35). Because of growth and thickening, the roots elevate part of their diameter, and the washing away of the soil makes them to appear as if having risen out of the ground.
Aërial Roots.—Although roots usually grow underground, there are some thatnaturallygrow aboveground. These usually occur on climbing plants, the roots becoming supportsor fulfilling the office of tendrils. These aërial roots usually turn away from the light, and therefore enter the crevices and dark places of the wall or tree over which the plant climbs. The trumpet creeper (Fig. 36), true or English ivy, and poison ivy climb by means of roots.
In some plants all the roots are aërial; that is, the plant grows above ground, and the roots gather food from the air. Such plants usually grow on trees. They are known as epiphytes or air-plants. The most familiar examples are some of the tropical orchids which
IG. 36. AËRIAL ROOTS OF T
FIG. 37.—AËRIAL ROOTS OF AN ORCHID. are grown in glasshouse s (Fig. 37). Rootlik e organs of dodde r and other parasit es are discus sed in a future chapte r.
Some plants bear aërial roots, that may propagate the plant or may act as braces. They are often called prop-roots. The roots of Indian corn are familiar (Fig. 38). Many ficus trees, as the banyan of India, send out roots from their branches; when these roots reach the ground they take hold and become great trunks, thus spreading the top of the parent tree over large areas. The mangrove tree of the tropics grows along seashores and sends down roots from the overhanging branches (and from the fruits) into the shallow water, and thereby
F
RUMPET CREEPER OR TECOMA.
gradually marches into the sea. The tangled mass behind catches the drift, and soil is formed.
FIG. 38.—INDIAN
CORN, showing the brace roots at oo.
Adventitious Roots.—Sometimes roots grow from the stem or other unusual places as the result of some accident to the plant, being located without known method or law. They are called adventitious (chance) roots. Cuttings of the stems of roses, figs, geraniums, and other plants, when planted, send out adventitious roots and form new plants. The ordinary roots, or soil roots, are of course not classed as adventitious roots. The adventitious roots arise on occasion, and not as a normal or regular course in the growth of the plant.
No two roots are alike; that is, they vary among themselves as stems and leaves do. Each kindofplanthas itsownformor habitofroot(Fig. 39). Carefully wash away the soil from the roots of any two related plants, as oats and wheat, and note the differences in size, depth, direction, mode of branching, number of fibrils, colour, and other features. The character of the root system often governs the treatment that the farmer should give the soil in which the plant or crop grows.
FIG. 39.—ROOTS OF BARLEY AT A AND CORN AT B.
Carefully trace the differences.
Roots differ not only in their form and habit, but also in colour of tissue, character of bark or rind, and other features. It is excellent practice to trytoidentifydifferentplantsbymeansoftheirroots. Let each pupil bring to school two plants with the roots very carefully dug up, as cotton, corn, potato, bean, wheat, rye, timothy, pumpkin, clover, sweet pea, raspberry, strawberry, or other common plants.
Root Systems of Weeds.—Some weeds are pestiferous because they seed abundantly, and others because their underground parts run deep or far and are persistent. Make out the root systems in the six worst weeds in your locality.
CHAPTER VIII
THE ROOT.—FUNCTION AND STRUCTURE
The function of roots is twofold,—to provide support or anchorage for the plant, and to collect and convey food materials. The first function is considered in Chapter VII; we may now give attention in more detail to the second.
FIG. 40. WHEAT GROWING UNDER DIFFERENT SOIL TREATMENTS. Soil deficient in nitrogen; commercial nitrogen applied to pot 3 (on right).
The feeding surface of the roots is near their ends. As the roots become old and hard, they serve only as channels through which food passes and as hold-fasts or supports for the plant. The root hold of a plant is very strong. Slowly pull upwards on some plant, and note how firmly it is anchored in the soil.
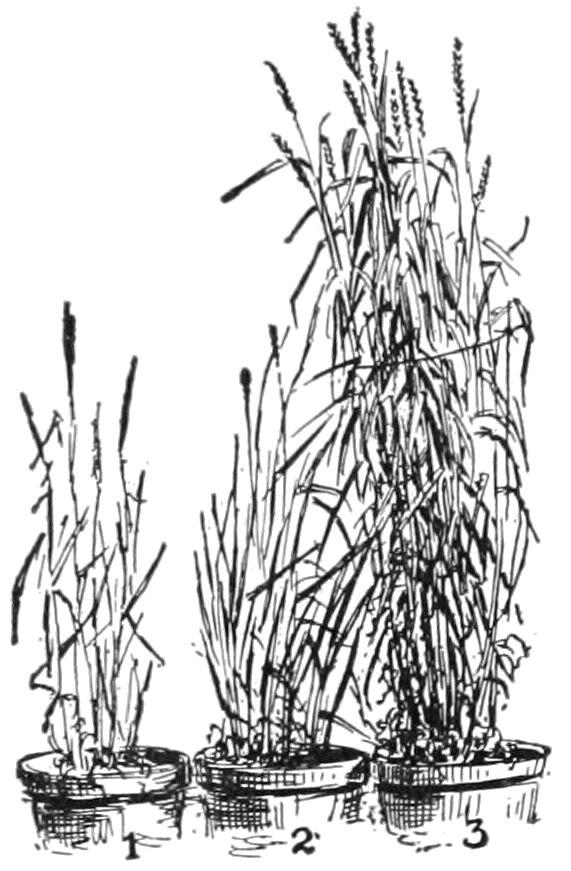
Roots have power to choose their food; that is, they do not absorb all substances with which they come in contact. They do not take up great quantities of useless or harmful materials, even though these materials may be abundant in the soil; but they may take up a greater quantity of some of the plant-foods than the plant can use to advantage. Plants respond very quickly to liberal feeding,—that is, to the application of plant-food to the soil (Fig 40).
The poorer the soil, the more marked are the results, as a rule, of the application of fertilizers. Certain substances, as common salt, will kill the roots.
Roots absorb Substances only in Solution.
Substances cannot be taken in solid particles. These materials are in solution in
the soil water, and the roots themselves also have the power to dissolve the soil materials to some extent by means of substances that they excrete. The materials that come into the plant through the roots are water and mostly themineralsubstances, as compounds of potassium, iron, phosphorus, calcium, magnesium, sulphur, and chlorine. These mineral substances compose the ash when the plant is burned. The carbon is derived from the air through the green parts. Oxygen is derived from the air and the soil water.
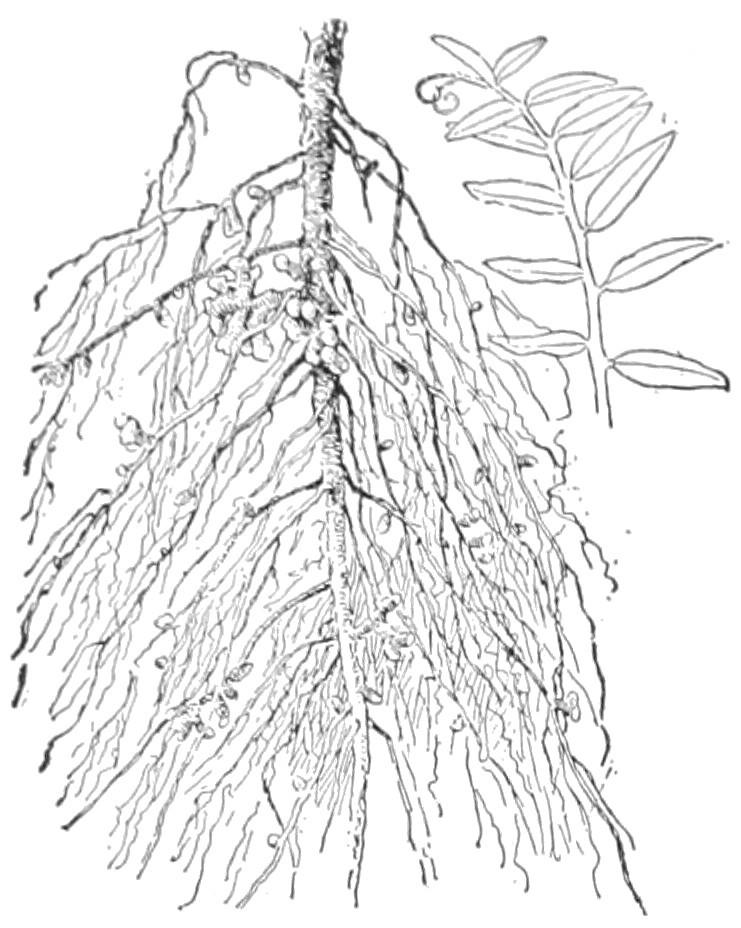
Nitrogen
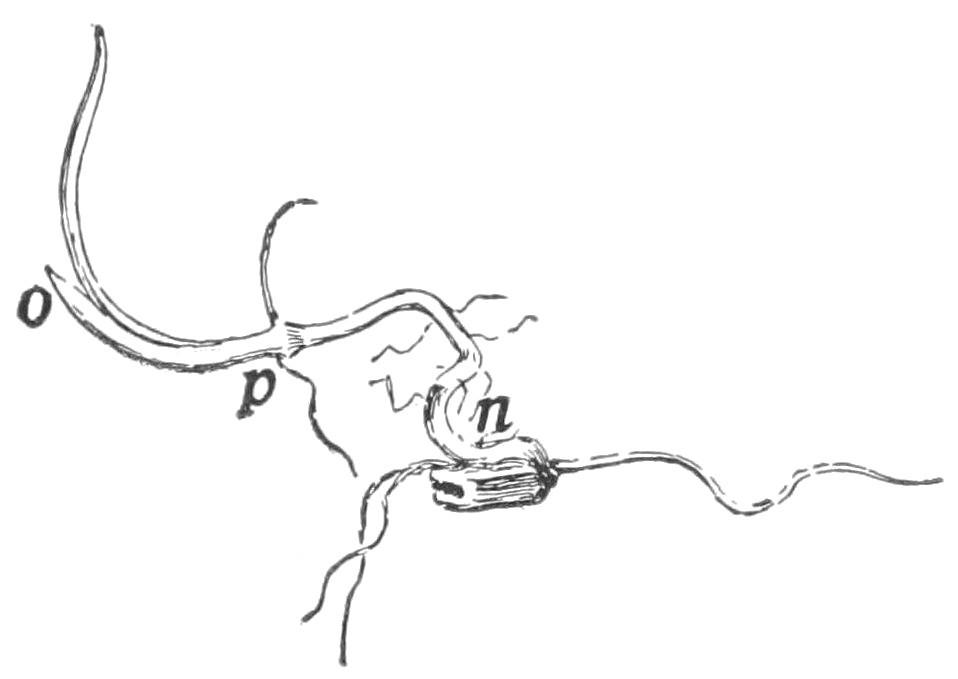
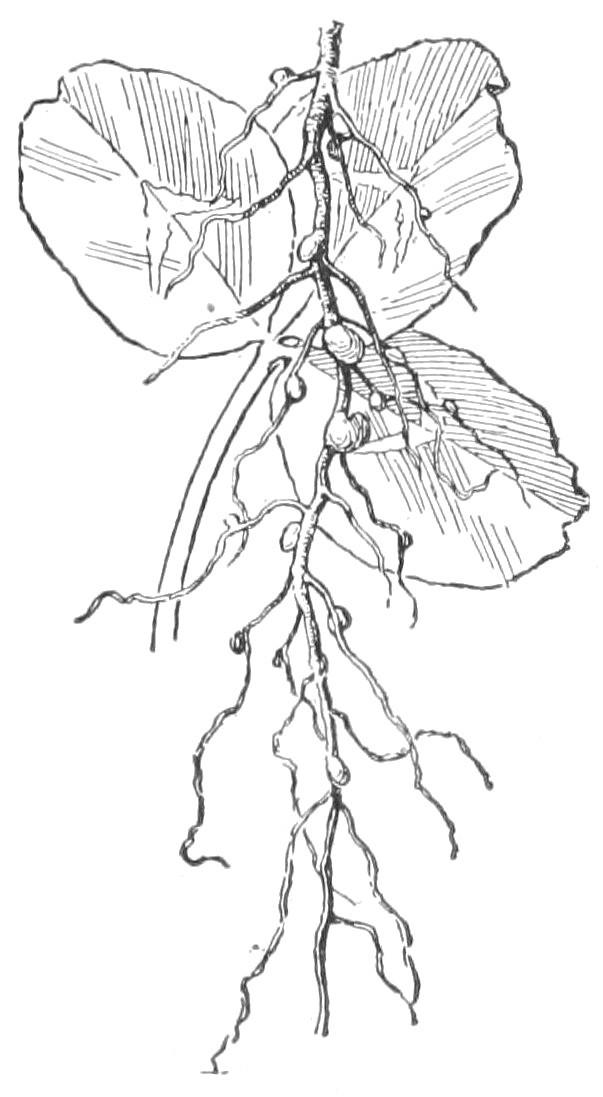
enters through the Roots.—All plants must have nitrogen; yet, although about four-fifths of the air is nitrogen, plants are not able, so far as we know, to take it in through their leaves. It enters through the roots in combination with other elements, chiefly in the form of nitrates (certain combinations with oxygen and a mineral base). The great family of leguminous plants, however (as peas, beans, cowpea, clover, alfalfa, vetch), use the nitrogen containedintheairinthesoil. They are able to utilize it through the agency of nodules on their roots (Figs. 41, 42). These nodules contain bacteria, which appropriate the free or uncombined nitrogen and pass it on to the plant. The nitrogen becomes incorporated in
FIG. 41. NODULES ON ROOTS OF RED CLOVER.
FIG. 42. NODULES ON VETCH.
the plant tissue, so that these crops are high in their nitrogen content. Inasmuch as nitrogen in any form is expensive to purchase in fertilizers, the use of leguminous crops to plough under is a very important agricultural practice in preparing the land for other crops. In order that leguminous crops may acquire atmospheric nitrogen more freely and thereby thrive better, thelandissometimessownor inoculatedwiththenodule-formingbacteria.
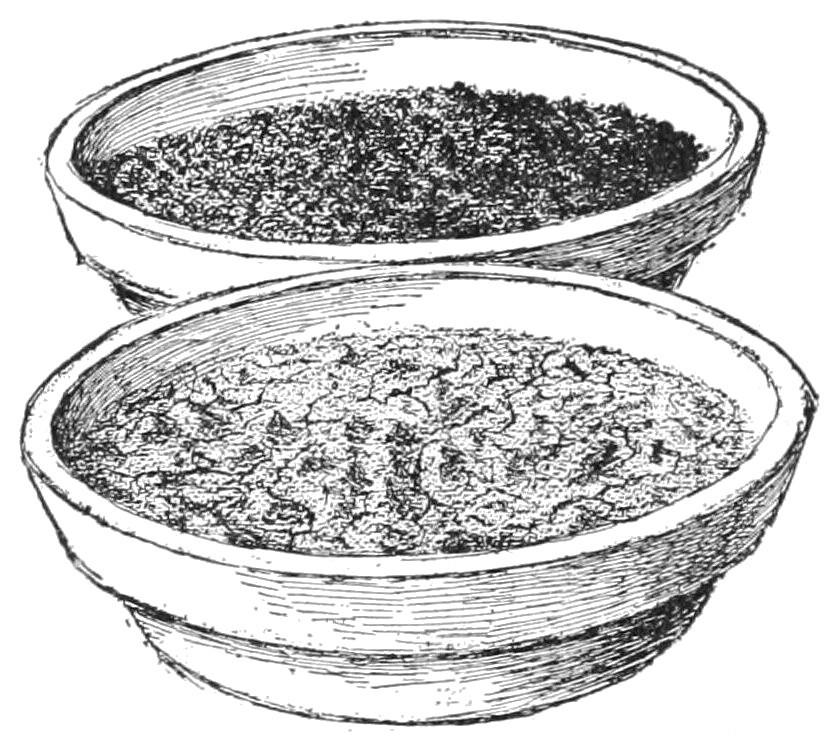
Roots require moisture in order to serve the plant. The soil water that is valuable to the plant is not the free water, but the thin film of moisture which adheres to each little particle of soil. The finer the soil, the greater the number of particles, and therefore the greater is the quantity of film moisture that it can hold. This moisture surrounding the grains may not be perceptible, yet the plant can use it. Root absorption may continue in a soil which seems to be dust dry. Soils that are very hard and “baked” (Fig. 43) contain very little moisture or air,—not so much as similar soils that are granular or mellow.
FIG. 43. TWO KINDS OF SOIL THAT HAVE BEEN WET AND THEN DRIED. The loamy soil above remains loose and capable of growing plants; the clay soil below has baked and cracked.
Proper Temperature for Root Action.—The root must be warm in order to perform its functions. Should the soil of fields or greenhouses be much colder than the air, the plant suffers. When in a warm atmosphere, or in a dry atmosphere, plants need to absorb much water from the soil, and the roots must be warm if the roothairs are to supply the water as rapidly as it is needed. Iftheroots arechilled,theplantmaywiltordie.
Roots need Air.—Corn on land that has been flooded by heavy rains loses its green colour and turns yellow. Besides dilutingplant-food, the water drives the air from the soil, and this suffocation of the roots is very soon apparent in thegeneral ill health of theplant. Stirring or tilling the soil aërates it. Water plants and bog plants have adapted themselves to their particular conditions. They get their air either by special surface roots, or from the water through stems and leaves.
Rootlets. Roots divide into the thinnest and finest fibrils:therearerootsandtherearerootlets.The smallest rootlets are so slender and delicate that they break off even when the plant is very carefully lifted from the soil.
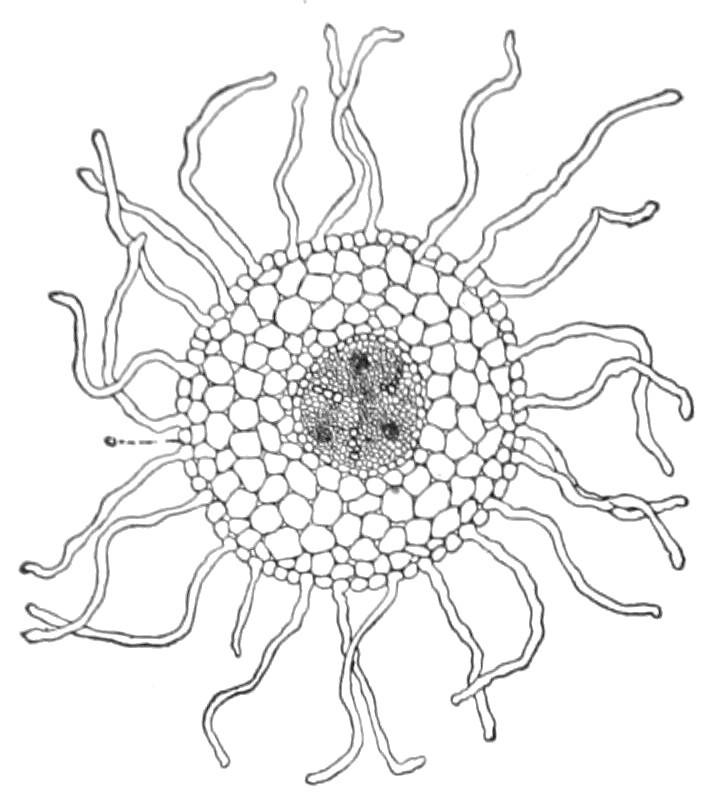
The rootlets, or fine divisions, are clothed with the root-hairs (Figs. 44, 45, 46). These root-hairs attach to the soil particles, and a great amount of soil is thus brought into actual contact with the plant. These are very delicate prolonged surface cells of the roots. They are borne for a short distance just back of the tip of the root.
FIG. 45.—CROSS-SECTION OF ROOT, enlarged, showing root-hairs.
Rootlet and root-hair differ. The rootlet is a compactcellularstructure. Theroot-hairisa delicatetubularcell (Fig. 45), within which is contained living matter (protoplasm); and the protoplasmic lining membrane of the wall governs the entrance of water and substances in solution. Being long and tube-like, these root-hairs are especially adapted for taking in the largest quantity of solutions; and they are the principal means by which plant-food is absorbed from the soil, although the surfaces of the rootlets themselves do their part.
FIG. 44.— ROOT-HAIRS OF THE RADISH.
Water plants do not produce an abundant system of root-hairs, and such plants depend largely on their rootlets.
The root-hairs are very small, often invisible. They, with the young roots, are usually broken off when the plant is pulled up. They are best seen when seeds are germinated between layers of dark blotting paper or flannel. On the young roots they will be seen as a mould-like or gossamer-like covering. Root-hairs soon die: they do not grow into roots. New ones form as the root grows.
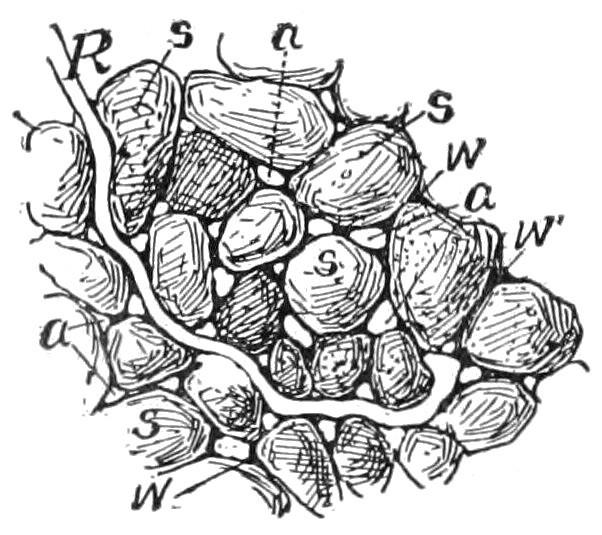
FIG. 46.—ROOT-HAIR, much enlarged, in contact with the soil particles (s). Airspaces at a; water-films on the particles, as at w.
Osmosis.—The water with its nourishment goes through the thin walls of the root-hairs and rootlets by the process of osmosis. If there are two liquids of different density on the inside and outside of an organic (either vegetable or animal) membrane, the liquids tend to mix through the membrane. The law ofosmosisis that themostrapidflowistowardthedenser solution. The protoplasmic lining of the cell wall is such a membrane. The soil water being a weaker solution than the sap in the roots, the flow is into the root. A strong fertilizer sometimes causes a plant to wither, or “burns it.” Explain.
Structure of Roots. The root that grows from the lower end of the caulicle is the first or primary root. Secondary roots branch from the primary root. Branches of secondary roots are sometimes called tertiary roots. Do the secondary roots grow from the cortex, or from the central cylinder of the primary root? Trim or peel the cortex from a root and its branches and determine whether the branches still hold to the central cylinder of the main root.
Internal Structure of Roots.—A section of a root shows that it consists of a central cylinder (see Fig. 45) surrounded by a layer. This layer is called the cortex. The outer layer of cells in the cortex is called the epidermis, and some of the cells of the epidermis are
prolonged and form the delicate root-hairs. The cortex resembles the bark of the stem in its nature. The central cylinder contains many tube-like canals, or “vessels” that convey water and food (Fig. 45). Cut a sweet potato across (also a radish and a turnip) and distinguish the central cylinder, cortex, and epidermis. Notice the hard cap on the tip of roots. Roots differ from stems in having no real pith.
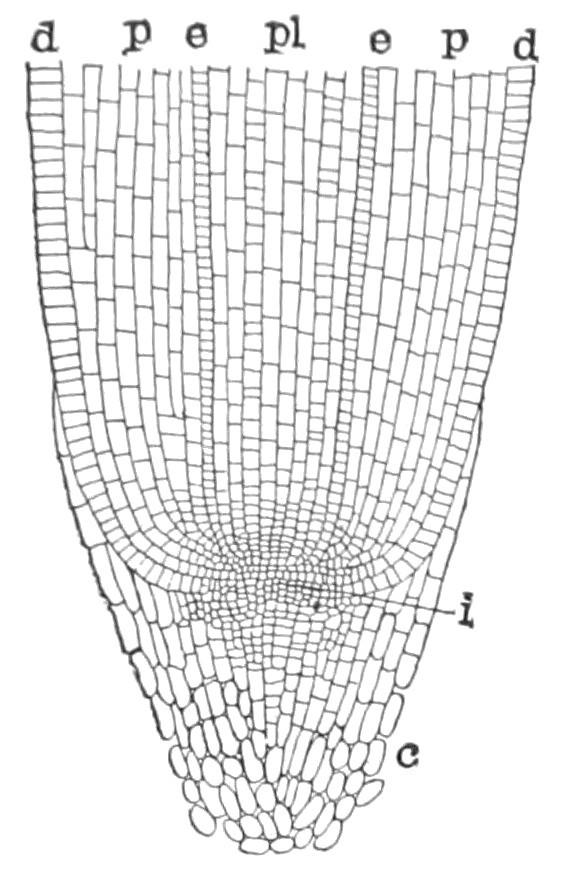
FIG. 47. GROWING POINT OF ROOT OF INDIAN CORN. d, d, cells which will form the epidermis; p, p, cells that will form bark; e, e, endodermis; pl, cells which will form the axis cylinder; i, initial group of cells, or growing point proper; c, root-cap
Microscopic Structure of
Roots.—Near the end of any young root or shoot the cells are found to differ from one another more or less, according to the distance from the point. This differentiation takes place in the region just back of the growing point. To study growing points, use the hypocotyl of Indian corn which has grown about one-half inch. Make a longitudinal section. Note these points (Fig. 47): (a) the tapering root-cap beyond the growing point; (b) the blunt end of the root proper and the rectangular shape of the cells found there; (c) the group of cells in the middle of the first layers beneath the root-cap,—this group is the growing point; (d) study the slight differences in the tissues a short distance back of the growing point. There are four regions: the central cylinder, made up of several rows of cells in the centre (pl); the endodermis, (e) composed of a single layer on each side which separates the central cylinder from the bark; the cortex, or inner bark, (e) of several layers outside the endodermis; and the epidermis, or outer layer of bark on the outer edges (d). Make a drawing of the section. If a series of the cross-sections of the hypocotyl should be made and studied by the pupil beginning near the growing point and going upward, it would be found that these four tissues become more distinctly marked, for at the tip the tissues
have not yet assumed their characteristic form. The central cylinder contains the ducts and vessels which convey the sap.
The Root-cap.—Note the form of the root-cap shown in the microscopic section drawn in Fig. 47. Growing cells, and especially those which are forming tissue by subdividing, are very delicate and are easily injured. The cells forming the root-cap are older and tougher and are suited for pushing aside the soil that the root may penetrate it.
Region of most Rapid Growth.
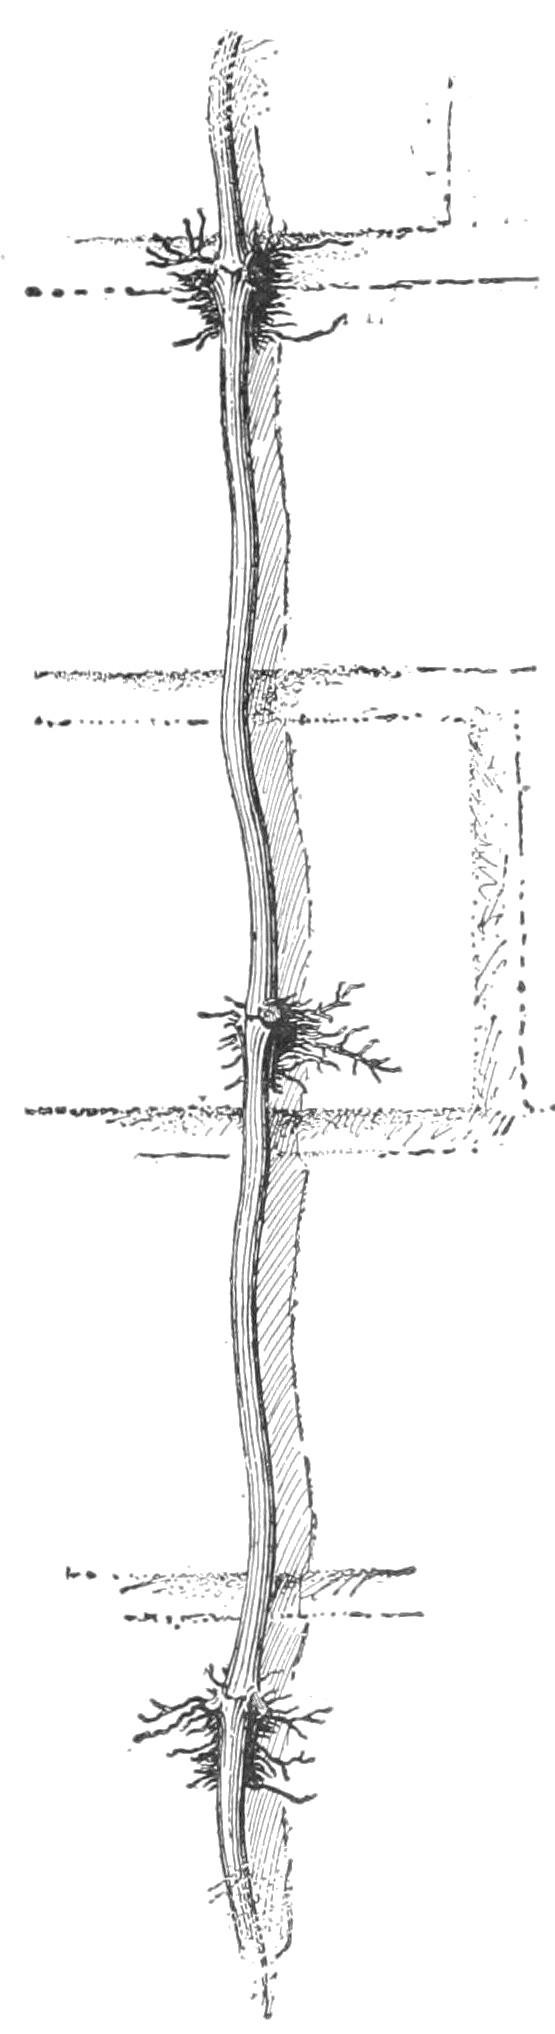
FIG. 48. THE MARKING OF THE STEM AND ROOT.
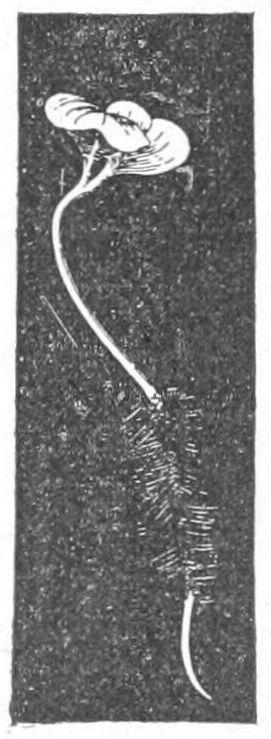
—The roots of a seedling bean may be marked at equal distances by waterproof ink or by bits of black thread tied moderately tight. The seedling is then replanted and left undisturbed for two days. When it is dug up, the region of most rapid growth in the root can be determined. Give a reason why a root cannot elongate throughout its length,—whether there is anything to prevent a young root from doing so.
In Fig. 48 is shown a germinating scarlet runner bean with a short root upon which are marks made with waterproof ink; and the same root (Fig. 49) is shown after it has grown longer. Which part of it did not lengthen at all? Which part lengthened slightly? Where is the region of most rapid growth?
Geotropism.—Roots turn toward the earth, even if the seed is planted with the micropyle up. This phenomenon is called positive geotropism. Stems grow away from the earth. This is negative geotropism.
SUGGESTIONS (Chaps. VII and VIII). 25. Tests for food. Examine a number of roots, including several fleshy roots, for the presence of food material, making the tests used on seeds. 26. Study of root-hairs. Carefully germinate radish, turnip, cabbage, or other seed, so that no delicate parts of the root will be injured. For this purpose, place a few seeds in packing-moss or in the folds of thick cloth or of blotting paper, being careful to keep them moist and warm. In a few days the seed has germinated, and the root has grown an inch or two long. Notice that, except at a distance of about a quarter of an inch behind the tip, the root is covered with
minute hairs (Fig. 44). They are actually hairs; that is, root-hairs. Touch them and they collapse, they are so delicate. Dip one of the plants in water, and when removed the hairs are not to be seen. The water mats them together along the root and they are no longer evident. Root-hairs are usually destroyed when a plant is pulled out of the soil, be it done ever so carefully. They cling to the minute particles of soil (Fig. 46). The hairs show best against a dark background. 27. On some of the blotting papers, sprinkle sand; observe how the root-hairs cling to the grains. Observe how they are flattened when they come in contact with grains of sand.
28. Root hold of plant. The pupil should also study the root hold. Let him carefully pull up a plant. If a plant grows alongside a fence or other rigid object, he may test the root hold by securing a string to the plant, letting the string hang over the fence, and then adding weights to the string. Will a stake of similar size to the plant and extending no deeper in the ground have such firm hold on the soil? What holds the ball of earth in Fig. 50? 29. Roots exert pressure. Place a strong bulb of hyacinth or daffodil on firmpacked earth in a pot; cover the bulb nearly to the top with loose earth; place in a cool cellar; after some days or weeks, note that the bulb has been raised out of the earth by the forming roots. All roots exert pressure on the soil as they grow. Explain.
30. Response of roots and stems to the force of gravity, or geotropism. Plant a fast-growing seedling in a pot so that the plumule extends through the drain hole and suspend the pot with mouth up (i.e. in the usual position). Or use a pot in which a plant is already growing, cover with cloth or wire gauze to prevent the soil from falling, and suspend the pot in an inverted position (Fig. 51). Notice the behaviour of the stem, and after a few days remove the soil and observe the position of the root. 31. If a pot is laid on one side, and changed every two days and laid on its opposite side, the effect on the root and stem will be interesting. 32. If a fleshy root is planted wrong end up, what is the result? Try it with pieces of horse-radish root. 33. By planting radishes on a slowly revolving wheel the effect of gravity may be neutralized. 34. Region of root most sensitive to gravity.