■ CHAPTER TWO Formulas and Functions: Performing Quantitative Analysis 486
■ CHAPTER THREE Charts: Depicting Data Visually
■ CHAPTER FOUR Datasets and Tables: Managing Large Volumes of Data 596
Microsoft Office Access 2016
■ CHAPTER TWO Tables and Queries in Relational Databases: Designing Databases and Extracting Data 732
CASE STUDY BANK AUDIT
TABLE DESIGN, CREATION, AND MODIFICATION 734
Designing a Table 734
Creating and Modifying Tables and Working with Data
HANDS-ON EXERCISES 1
Table Design, Creation, and Modification
■ CHAPTER THREE Using Queries to Make Decisions: Perform Calculations and Summarize Data Using Queries
■
CHAPTER FOUR Creating and Using Professional Forms and Reports: Moving Beyond Tables and Queries
CASE
Microsoft Office PowerPoint 2016
■ CHAPTER ONE Introduction to PowerPoint: Creating a Basic Presentation 924
■ CHAPTER TWO Presentation Development: Planning and Preparing a Presentation
CHAPTER THREE Presentation Design: Illustrations and Infographics 1042
Acknowledgments
The Exploring team would like to acknowledge and thank all the reviewers who helped us throughout the years by providing us with their invaluable comments, suggestions, and constructive criticism.
Adriana Lumpkin
Midland College
Alan S. Abrahams
Virginia Tech
Alexandre C. Probst
Colorado Christian University
Ali Berrached University of Houston–Downtown
Allen Alexander
Delaware Technical & Community College
Andrea Marchese
Maritime College, State University of New York
Andrew Blitz
Broward College; Edison State College
Angel Norman University of Tennessee, Knoxville
Angela Clark University of South Alabama
Ann Rovetto
Horry-Georgetown Technical College
Astrid Todd
Guilford Technical Community College
Audrey Gillant
Maritime College, State University of New York
Barbara Stover
Marion Technical College
Barbara Tollinger
Sinclair Community College
Ben Brahim Taha
Auburn University
Beverly Amer
Northern Arizona University
Beverly Fite
Amarillo College
Biswadip Ghosh
Metropolitan State University of Denver
Bonita Volker
Tidewater Community College
Bonnie Homan
San Francisco State University
Brad West
Sinclair Community College
Brian Powell
West Virginia University
Carol Buser
Owens Community College
Carol Roberts
University of Maine
Carolyn Barren
Macomb Community College
Carolyn Borne
Louisiana State University
Cathy Poyner
Truman State University
Charles Hodgson
Delgado Community College
Chen Zhang
Bryant University
Cheri Higgins
Illinois State University
Cheryl Brown
Delgado Community College
Cheryl Hinds
Norfolk State University
Cheryl Sypniewski
Macomb Community College
Chris Robinson
Northwest State Community College
Cindy Herbert
Metropolitan Community College–Longview
Craig J. Peterson
American InterContinental University
Dana Hooper
University of Alabama
Dana Johnson
North Dakota State University
Daniela Marghitu
Auburn University
David Noel
University of Central Oklahoma
David Pulis
Maritime College, State University of New York
David Thornton
Jacksonville State University
Dawn Medlin
Appalachian State University
Debby Keen University of Kentucky
Debra Chapman
University of South Alabama
Debra Hoffman
Southeast Missouri State University
Derrick Huang
Florida Atlantic University
Diana Baran
Henry Ford Community College
Diane Cassidy
The University of North Carolina at Charlotte
Diane L. Smith
Henry Ford Community College
Dick Hewer
Ferris State College
Don Danner
San Francisco State University
Don Hoggan
Solano College
Don Riggs
SUNY Schenectady County Community College
Doncho Petkov
Eastern Connecticut State University
Donna Ehrhart
State University of New York at Brockport
Elaine Crable
Xavier University
Elizabeth Duett
Delgado Community College
Erhan Uskup
Houston Community College–Northwest
Eric Martin
University of Tennessee
Erika Nadas
Wilbur Wright College
Floyd Winters
Manatee Community College
Frank Lucente
Westmoreland County Community College
G. Jan Wilms
Union University
Gail Cope
Sinclair Community College
Gary DeLorenzo
California University of Pennsylvania
Gary Garrison
Belmont University
Gary McFall
Purdue University
George Cassidy
Sussex County Community College
Gerald Braun
Xavier University
Gerald Burgess
Western New Mexico University
Gladys Swindler
Fort Hays State University
Hector Frausto
California State University
Los Angeles
Heith Hennel
Valencia Community College
Henry Rudzinski
Central Connecticut State University
Irene Joos
La Roche College
Iwona Rusin
Baker College; Davenport University
J. Roberto Guzman
San Diego Mesa College
Jacqueline D. Lawson
Henry Ford Community College
Jakie Brown Jr.
Stevenson University
James Brown
Central Washington University
James Powers
University of Southern Indiana
Jane Stam
Onondaga Community College
Janet Bringhurst
Utah State University
Jean Welsh
Lansing Community College
Jeanette Dix
Ivy Tech Community College
Jennifer Day
Sinclair Community College
Jill Canine
Ivy Tech Community College
Jill Young
Southeast Missouri State University
Jim Chaffee
The University of Iowa Tippie College of Business
Joanne Lazirko
University of Wisconsin–Milwaukee
Jodi Milliner
Kansas State University
John Hollenbeck
Blue Ridge Community College
John Seydel
Arkansas State University
Judith A. Scheeren
Westmoreland County Community College
Judith Brown
The University of Memphis
Juliana Cypert
Tarrant County College
Kamaljeet Sanghera
George Mason University
Karen Priestly
Northern Virginia Community College
Karen Ravan
Spartanburg Community College
Karen Tracey
Central Connecticut State University
Kathleen Brenan
Ashland University
Ken Busbee
Houston Community College
Kent Foster
Winthrop University
Kevin Anderson
Solano Community College
Kim Wright
The University of Alabama
Kristen Hockman
University of Missouri–Columbia
Kristi Smith
Allegany College of Maryland
Laura Marcoulides
Fullerton College
Laura McManamon
University of Dayton
Laurence Boxer
Niagara University
Leanne Chun
Leeward Community College
Lee McClain
Western Washington University
Linda D. Collins
Mesa Community College
Linda Johnsonius
Murray State University
Linda Lau
Longwood University
Linda Theus
Jackson State Community College
Linda Williams
Marion Technical College
Lisa Miller
University of Central Oklahoma
Lister Horn
Pensacola Junior College
Lixin Tao
Pace University
Loraine Miller
Cayuga Community College
Lori Kielty
Central Florida Community College
Lorna Wells
Salt Lake Community College
Lorraine Sauchin
Duquesne University
Lucy Parakhovnik
California State University, Northridge
Lynn Keane
University of South Carolina
Lynn Mancini
Delaware Technical Community College
Mackinzee Escamilla
South Plains College
Marcia Welch
Highline Community College
Margaret McManus
Northwest Florida State College
Margaret Warrick
Allan Hancock College
Marilyn Hibbert
Salt Lake Community College
Mark Choman
Luzerne County Community College
Maryann Clark
University of New Hampshire
Mary Beth Tarver
Northwestern State University
Mary Duncan
University of Missouri–St. Louis
Melissa Nemeth
Indiana University-Purdue University
Indianapolis
Melody Alexander
Ball State University
Michael Douglas
University of Arkansas at Little Rock
Michael Dunklebarger
Alamance Community College
Michael G. Skaff
College of the Sequoias
Michele Budnovitch
Pennsylvania College of Technology
Mike Jochen
East Stroudsburg University
Mike Michaelson
Palomar College
Mike Scroggins
Missouri State University
Mimi Spain
Southern Maine Community College
Muhammed Badamas
Morgan State University
NaLisa Brown
University of the Ozarks
Nancy Grant
Community College of Allegheny County–South Campus
Nanette Lareau
University of Arkansas Community College–Morrilton
Nikia Robinson
Indian River State University
Pam Brune
Chattanooga State Community College
Pam Uhlenkamp
Iowa Central Community College
Patrick Smith
Marshall Community and Technical College
Paul Addison
Ivy Tech Community College
Paula Ruby
Arkansas State University
Peggy Burrus
Red Rocks Community College
Peter Ross
SUNY Albany
Philip H. Nielson
Salt Lake Community College
Philip Valvalides
Guilford Technical Community College
Ralph Hooper
University of Alabama
Ranette Halverson
Midwestern State University
Richard Blamer
John Carroll University
Richard Cacace
Pensacola Junior College
Richard Hewer
Ferris State University
Richard Sellers
Hill College
Rob Murray
Ivy Tech Community College
Robert Banta
Macomb Community College
Robert Dus˘ek
Northern Virginia Community College
Robert G. Phipps Jr.
West Virginia University
Robert Sindt
Johnson County Community College
Robert Warren
Delgado Community College
Rocky Belcher
Sinclair Community College
Roger Pick
University of Missouri at Kansas City
Ronnie Creel
Troy University
Rosalie Westerberg
Clover Park Technical College
Ruth Neal
Navarro College
Sandra Thomas
Troy University
Sheila Gionfriddo
Luzerne County Community College
Sherrie Geitgey
Northwest State Community College
Sherry Lenhart
Terra Community College
Sophia Wilberscheid
Indian River State College
Sophie Lee
California State University, Long Beach
Stacy Johnson
Iowa Central Community College
Stephanie Kramer
Northwest State Community College
Stephen Z. Jourdan
Auburn University at Montgomery
Steven Schwarz
Raritan Valley Community College
Sue A. McCrory
Missouri State University
Sumathy Chandrashekar
Salisbury University
Susan Fuschetto
Cerritos College
Susan Medlin
UNC Charlotte
Susan N. Dozier
Tidewater Community College
Suzan Spitzberg
Oakton Community College
Suzanne M. Jeska
County College of Morris
Sven Aelterman
Troy University
Sy Hirsch
Sacred Heart University
Sylvia Brown
Midland College
Tanya Patrick
Clackamas Community College
Terri Holly Indian River State College
Terry Ray Rigsby
Hill College
Thomas Rienzo
Western Michigan University
Tina Johnson
Midwestern State University
Tommy Lu
Delaware Technical Community College
Troy S. Cash
Northwest Arkansas Community College
Vicki Robertson
Southwest Tennessee Community
Vickie Pickett
Midland College
Weifeng Chen
California University of Pennsylvania
Wes Anthony
Houston Community College
William Ayen
University of Colorado at Colorado Springs
Wilma Andrews
Virginia Commonwealth University
Yvonne Galusha
University of Iowa
Special thanks to our content development and technical team:
Barbara Stover
Julie Boyles
Lisa Bucki
Lori Damanti
Sallie Dodson
Patti Hammerle
Jean Insigna
Elizabeth Lockley
Joyce Nielsen
Janet Pickard
Linda Pogue
Steven Rubin
Mara Zebest
Preface
The Exploring Series and You
Exploring is Pearson’s Office Application series that requires students like you to think “beyond the point and click.” In this edition, we have worked to restructure the Exploring experience around the way you, today’s modern student, actually use your resources.
The goal of Exploring is, as it has always been, to go farther than teaching just the steps to accomplish a task—the series provides the theoretical foundation for you to understand when and why to apply a skill. As a result, you achieve a deeper understanding of each application and can apply this critical thinking beyond Office and the classroom.
The How & Why of This Revision
Outcomes matter. Whether it’s getting a good grade in this course, learning how to use Excel so students can be successful in other courses, or learning a specific skill that will make learners successful in a future job, everyone has an outcome in mind. And outcomes matter. That is why we revised our chapter opener to focus on the outcomes students will achieve by working through each Exploring chapter. These are coupled with objectives and skills, providing a map students can follow to get everything they need from each chapter.
Critical Thinking and Collaboration are essential 21st century skills. Students want and need to be successful in their future careers—so we used motivating case studies to show relevance of these skills to future careers and incorporated Soft Skills, Collaboration, and Analysis Cases with Critical Thinking steps in this edition to set students up for success in the future.
Students today read, prepare, and study differently than students used to. Students use textbooks like a tool—they want to easily identify what they need to know and learn it efficiently. We have added key features such as Tasks Lists (in purple), Step Icons, Hands-On Exercise Videos, and tracked everything via page numbers that allow efficient navigation, creating a map students can easily follow.
Students are exposed to technology. The new edition of Exploring moves beyond the basics of the software at a faster pace, without sacrificing coverage of the fundamental skills that students need to know.
Students are diverse. Students can be any age, any gender, any race, with any level of ability or learning style. With this in mind, we broadened our definition of “student resources” to include physical Student Reference cards, Hands-On Exercise videos to provide a secondary lecture-like option of review; and MyITLab, the most powerful and most ADA-compliant online homework and assessment tool around with a direct 1:1 content match with the Exploring Series. Exploring will be accessible to all students, regardless of learning style.
Providing You with a Map to Success to Move Beyond the Point and Click
All of these changes and additions will provide students an easy and efficient path to follow to be successful in this course, regardless of where they start at the beginning of this course. Our goal is to keep students engaged in both the hands-on and conceptual sides, helping achieve a higher level of understanding that will guarantee success in this course and in a future career.
In addition to the vision and experience of the series creator, Robert T. Grauer, we have assembled a tremendously talented team of Office Applications authors who have devoted themselves to teaching the ins and outs of Microsoft Word, Excel, Access, and PowerPoint. Led in this edition by series editor Mary Anne Poatsy, the whole team is dedicated to the Exploring mission of moving students beyond the point and click
Key Features
The How/Why Approach helps students move beyond the point and click to a true understanding of how to apply Microsoft Office skills.
• White Pages/Yellow Pages clearly distinguish the theory (white pages) from the skills covered in the Hands-On Exercises (yellow pages) so students always know what they are supposed to be doing and why.
• Case Study presents a scenario for the chapter, creating a story that ties the Hands-On Exercises together.
• Hands-On Exercise Videos are tied to each Hands-On Exercise and walk students through the steps of the exercise while weaving in conceptual information related to the Case Study and the objectives as a whole.
The Outcomes focus allows students and instructors to know the higher-level learning goals and how those are achieved through discreet objectives and skills.
• Outcomes presented at the beginning of each chapter identify the learning goals for students and instructors.
• Enhanced Objective Mapping enables students to follow a directed path through each chapter, from the objectives list at the chapter opener through the exercises at the end of the chapter.
• Objectives List: This provides a simple list of key objectives covered in the chapter. This includes page numbers so students can skip between objectives where they feel they need the most help.
• Step Icons: These icons appear in the white pages and reference the step numbers in the HandsOn Exercises, providing a correlation between the two so students can easily find conceptual help when they are working hands-on and need a refresher.
• Quick Concepts Check: A series of questions that appear briefly at the end of each white page section. These questions cover the most essential concepts in the white pages required for students to be successful in working the Hands-On Exercises. Page numbers are included for easy reference to help students locate the answers.
• Chapter Objectives Review: Appears toward the end of the chapter and reviews all important concepts throughout the chapter. Newly designed in an easy-to-read bulleted format.
• MOS Certification Guide for instructors and students to direct anyone interested in prepping for the MOS exam to the specific locations to find all content required for the test.
End-of-Chapter Exercises offer instructors several options for assessment. Each chapter has approximately 11–12 exercises ranging from multiple choice questions to open-ended projects.
• Multiple Choice, Key Terms Matching, Practice Exercises, Mid-Level Exercises, Beyond the Classroom Exercises, and Capstone Exercises appear at the end of all chapters.
• Enhanced Mid-Level Exercises include a Creative Case (for PowerPoint and Word), which allows students some flexibility and creativity, not being bound by a definitive solution, and an Analysis Case (for Excel and Access), which requires students to interpret the data they are using to answer an analytic question, as well as Discover Steps, which encourage students to use Help or to problem-solve to accomplish a task.
• Application Capstone exercises are included in the book to allow instructors to test students on the entire contents of a single application.
Resources
Instructor Resources
The Instructor’s Resource Center, available at www.pearsonhighered.com, includes the following:
• Instructor Manual provides one-stop-shop for instructors, including an overview of all available resources, teaching tips, as well as student data and solution files for every exercise.
• Solution Files with Scorecards assist with grading the Hands-On Exercises and end-of-chapter exercises.
• Prepared Exams allow instructors to assess all skills covered in a chapter with a single project.
• Rubrics for Mid-Level Creative Cases and Beyond the Classroom Cases in Microsoft Word format enable instructors to customize the assignments for their classes.
• PowerPoint Presentations with notes for each chapter are included for out-of-class study or review.
• Multiple Choice, Key Term Matching, and Quick Concepts Check Answer Keys
• Test Bank provides objective-based questions for every chapter.
• Scripted Lectures offer an in-class lecture guide for instructors to mirror the Hands-On Exercises.
• Syllabus Templates
• Outcomes, Objectives, and Skills List
• Assignment Sheet
• File Guide
Student Resources
Student Data Files
Access your student data files needed to complete the exercises in this textbook at www.pearsonhighered.com/exploring.
Available in MyITLab
• Hands-On Exercise Videos allow students to review and study the concepts taught in the HandsOn Exercises.
• Audio PowerPoints provide a lecture review of the chapter content, and include narration.
• Multiple Choice quizzes enable you to test concepts you have learned by answering auto-graded questions.
• Book-specific 1:1 Simulations allow students to practice in the simulated Microsoft Office 2016 environment using hi-fidelity, HTML5 simulations that directly match the content in the Hands-On Exercises.
• eText available in some MyITLab courses and includes links to videos, student data files, and other learning aids.
• Book-specific 1:1 Grader Projects allow students to complete end of chapter Capstone Exercises live in Microsoft Office 2016 and receive immediate feedback on their performance through various reports.
This page intentionally left blank
1. Investigating in a systematic way: examining. 2. Searching into or ranging over for the purpose of discovery.
Working with an Operating System
LEARNING OUTCOMES:
• You will manage the Windows 10 environment through the desktop and other components.
• You will organize files and folders using Windows 10 features and tools.
Move Tile, Resize Tile, Pin an App to the Taskbar
Create Virtual Desktop; Minimize, Close, Restore Down, Maximize; Snap Windows
3: USE WINDOWS 10 SEARCH
CASE STUDY | Cedar Grove Elementary School
Your good friend recently graduated with a degree in elementary education and now is excited to begin her first job as a fifth-grade teacher at Cedar Grove Elementary School. The school has a computer lab for all students as well as a computer system in each classroom. The school acquired the computers through a state technology grant so they are new models running Windows 10. Your friend’s lesson plans must include a unit on operating system basics and an introduction to application software. Because you have a degree in computer information systems, she has called on you for assistance with the lesson plans. You cannot assume that all students are exposed to computers at home, especially to those configured with Windows 10. Your material will need to include very basic instruction on Windows 10, along with a general overview of file management. Your friend must complete her lesson plans right away, so you are on a short timeline but are excited about helping students learn!
Windows 10 Fundamentals
There are two types of software on your computer: application software and system software. Application software are programs you use for email, gaming, social networking, and digital photo management. Application software also includes productivity software such as word processing, spreadsheet, and presentation applications. As essential as these application programs may be to you for entertainment or for accomplishing a specific task, system software is the essential software that the computer needs. Without system software, your computer could not function. System software includes the operating system and utility programs, and helps to run application software, manage your files, and manage system resources and other computer activities.
In this section, you will learn how to work with the features of the Windows 10 operating system. In particular, you will learn how to set up a Microsoft account if you do not have one established already, and start and shut down Windows. You will also learn how to configure the Start menu and taskbar to manage programs and apps.
Understanding the Windows 10 Interface
Windows 10 is the latest version of Microsoft’s operating system and is available for desktops, laptops, cell phones, and tablet computers. Windows 10 has made changes that facilitate computer use, both on touch and non-touch devices. Because you are likely to encounter Windows 10 on computers and mobile devices at school, work, and home, it is well worth your time to explore and learn how to use it, as well as its computer management and security features.
Sign In to a Microsoft Account
When you start your computer, Windows 10 opens to the Lock screen that displays an image (which you can personalize with your own image) and the date and time. Clicking on the Lock screen brings you to the sign in page where you log in using your Microsoft account username (email address) and password. To use any Microsoft services such as Outlook.com, Xbox Live®, OneDrive®, and Office Online, you need to create a free Microsoft account.
If you already have a OneDrive, Xbox Live, or Outlook.com account, use that account to sign in. If you do not have a Microsoft account, you will need to create one to use Windows 10. A Microsoft account gives you a consistent experience across any device you sign into with your Microsoft account. In addition, you get access to Office Online and OneDrive (with free cloud storage), and all your information syncs across all your devices.
To sign up for a Microsoft account, complete the following steps:
1. Open any Web browser, type signup.live.com as the URL, and then click Sign up now.
2. Fill out the form by typing your first and last name. Your user name will be an email address. You can use an existing email address, or you can get a new email address by clicking Or get a new email address
3. Create a password that has at least 8 characters. To create a strong password, use a combination of upper and lowercase letters, at least one number and one other character (such as an asterisk or exclamation point).
4. Fill out the rest of the form, and then click Create account.
Access Sleep and Power Settings
To save battery life on your laptop, tablet, or smartphone, or for more energy efficiency, Windows will go to sleep after a pre-determined period of inactivity. Sleep is a powersaving state that puts your work and settings in memory and draws a small amount of power that allows your computer to resume full-power operation quickly.
To manage the Sleep settings, complete the following steps:
1. Click the Start icon or press the Windows key to open the Start menu.
2. Click Settings on the Start menu, click System, and then click Power & sleep.
3. Select the desired level of inactivity from either of the following options:
• Screen: to determine when the Screen turns off on battery power or when plugged in
• Sleep: to determine when the PC goes to sleep on battery power or when plugged in
Eventually, you will want to shut down Windows and turn off your computer. To do so, from the Start menu, click Power. Selecting Restart will turn off and immediately restart Windows. This is a “warm boot.” To power down completely, click Power and then select Shut down.
Explore the Windows 10 Start Menu
After signing in, you should see the same screen configuration no matter what Windows 10 device you are using, because your Microsoft account stores your preferences and settings for your Start menu on the Internet. For instance, your laptop computer, your home computer, and even your Windows smartphone should look the same.
Initially, your computer displays the primary working area: the desktop. If you were used to working on a system running Windows 8, you will notice that there is not a Start screen and a desktop. Instead, the desktop is the primary working area of Windows 10, and the Windows 10 Start menu provides the main access to all programs and features on your computer.
There are three different ways to accomplish tasks in Windows 10:
• Use a mouse
• Touch the screen (on touch-enabled devices)
• Use keystrokes
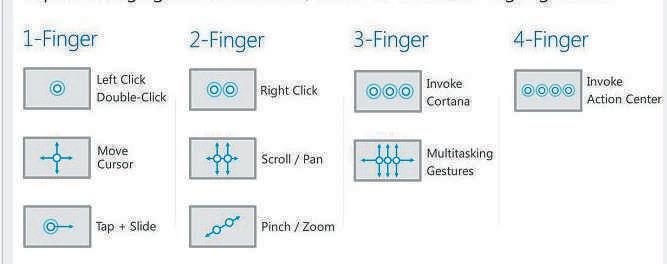
The method you use depends on the type of device you are using and, largely, on your personal preferences. In this text, we will focus mainly on mouse and keystroke commands. If you are using a touch-screen device, you should refer to the new touch gestures shown in Figure 1. 2. For instance, when an instruction in this text says to click a screen element, you would tap the screen element with your finger on a touchscreen device.
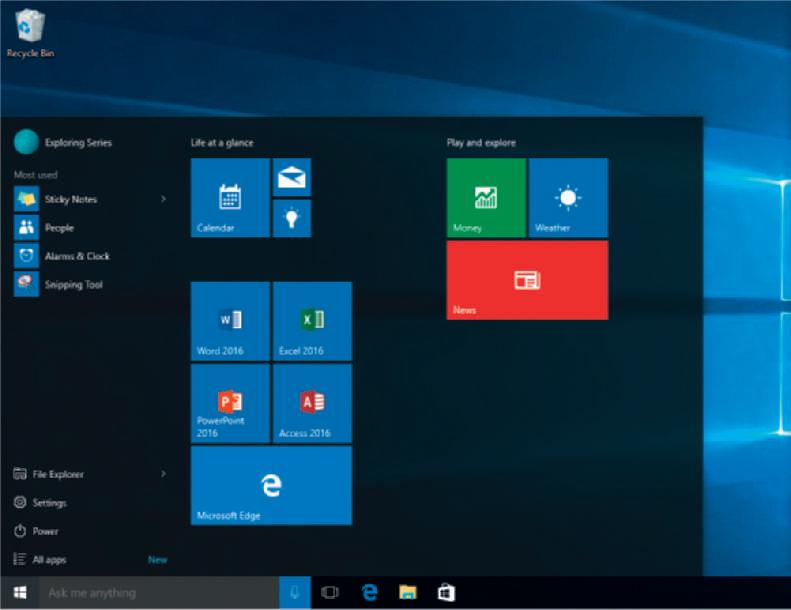
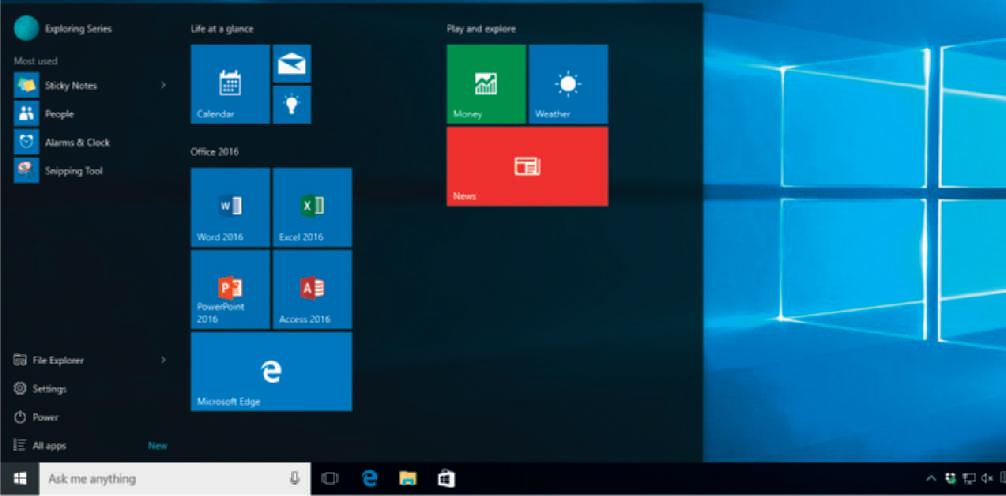
Open the Start menu by clicking the Start icon in the bottom left corner of the desktop or by pressing the Windows key on the keyboard. The Start menu, as shown in Figure 1.3, has two areas. The right side has the same look as the metro (or modern) view first introduced in Windows 8 with block icons, called tiles. Tiles represent installed programs and Windows apps (such as Weather, Skype, and Money). Tiles can also represent files, folders, or other items related to your computer. If there are more tiles on the Start menu than displayed, use the scroll bar on the right. You can launch Windows 10 apps and programs by clicking or tapping a tile on the Start menu.
TIP: STICKY NOTE APP
Sticky Notes is a useful Windows accessory application. Use Sticky Notes as you would a paper sticky note, recording to-do lists, phone numbers, or anything else. Your notes display on the desktop. Sticky Notes is found in the Windows Accessories folder in All apps. Click New Note to add another note, click Delete Note to delete a note, and right-click a note to change the color.
FIGURE 1.2 Touch Gestures in Windows 10
Most used program list
Program tiles and tile groups
File Explorer, Settings, Power, All apps
FIGURE 1.3 Windows 10 Start Menu
The left side of the Start menu provides access to File Explorer, Settings, and Power. These features are discussed later in this chapter. There is also a separate Most used section that contains a list of apps and programs you use every day. However, you can remove a program from the Most used list by right-clicking the icon and selecting Don’t show in this list. Click All apps at the bottom of the left pane, and the left pane changes to display a list of all installed apps and programs on your computer, in alphabetical order.
Configure the Start Menu
You may want to customize the Start menu so you can use it most efficiently. It is easy to add and remove, resize, and move application tiles on the Start menu, as well as to group tiles, and name the groups. You can also display tiles to access folders or other areas of the computer that you use frequently. You pin, or add, a tile to the Start menu to make it easier to access the application.
To pin an application to the Start menu, complete the following steps:
1. Display the Start menu by clicking the Start icon or by pressing the Windows key on your keyboard.
2. Click All apps and find the application that you want to pin to the Start menu.
3. Right-click the app name and select Pin to Start. (You may also choose Pin to taskbar. The taskbar is discussed later in this chapter.)
A tile for the app displays on the Start menu. The new tile is added to the very end of your app tiles, so you may have to scroll down to find the tile you added. Once on the Start menu, the size of a tile can be modified.
To resize a tile on the Start menu, complete the following steps:
1. Right-click the tile and point to Resize.
2. Select from the list of available sizes: Small, Medium, Wide, or Large.
You may also have some tiles that you do not want on the Start menu. These might be programs or applications that appear on the Start menu by default, or tiles you added but now want to remove. Removing (or unpinning) an application is just as easy as adding one.
To unpin an application from the Start menu, complete the following steps:
1. Right-click the tile you want to remove from the Start menu.
2. Click Unpin from Start.
Tiles on the Start menu are organized in groups separated by a small amount of dividing space, as shown in Figure 1.3. You can easily move tiles from one group to another by clicking a tile and dragging it into another group. You can reorder groups by clicking the group name and dragging the group to its new location. You can also give any group of tiles a meaningful name.
To create a new group of tiles, complete the following steps:
1. Click and drag the first tile for the new group to the space above or below an existing tile group. An empty bar displays, indicating where the new group will be located.
2. Release the mouse button, and the tile will now be in its own new group.
To assign a new name to a group of tiles, complete the following steps:
1. Point near the top of the tile or group of tiles you want to name.
2. Click in the box that displays.
3. Type a new group name. Note, if a name exists, you can delete the existing name and then type a new name.
Explore the Taskbar
At the bottom of the Windows desktop is the taskbar. The taskbar is the horizontal bar that displays open application icons, the Notification area, the search box, and any pinned apps or programs. The Notification area, at the far right of the taskbar, includes the clock and a group of icons that relate to a status of a setting or program. The search box, located on the left side of the taskbar, can be used to search your computer for programs, folders and files saved on your computer, as well as to get results from the Web. The search box is also home to Cortana, the personal digital assistant. Cortana is discussed later in this chapter.
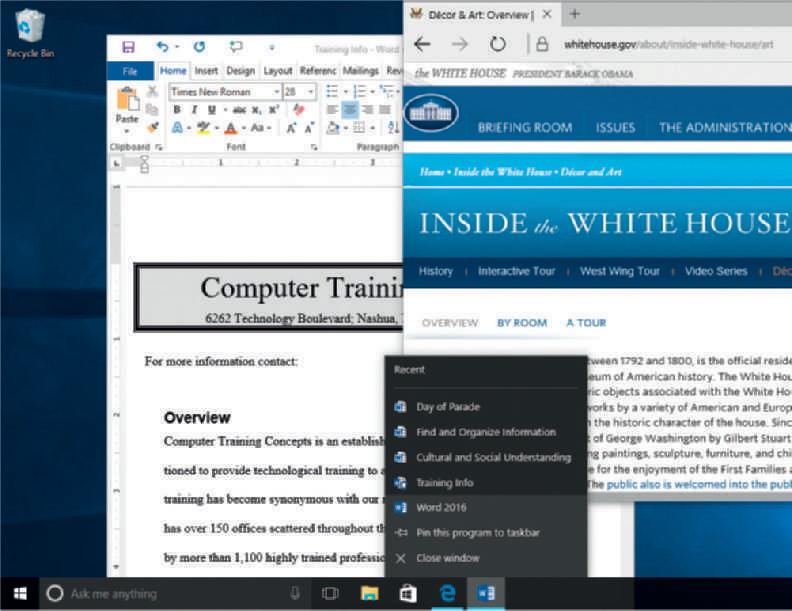
Every open program has a corresponding icon on the taskbar. You can move from one program to another by clicking the program’s icon on the taskbar. Figure 1.4 shows two windows open on the desktop, with corresponding taskbar program icons. A blue line displays under the open program icons. Although several windows can be open at one time, only one is active. The active program icon is shaded with a lighter blue background. When you right-click a program icon, you open the Jump List (see Figure 1.4). A Jump List is a list of program-specific shortcuts to recently opened files, the program name, an option to pin or unpin an item, and a Close windows option.
Jump List
Open windows
Open window icons
window icon
FIGURE 1.4 Desktop with Open Windows
TIP: HIDE THE TASKBAR
Although it is very helpful, the taskbar can occupy space on your work area that you may need. To temporarily hide the taskbar, right-click an empty area of the taskbar. Click Properties. In the Taskbar and Start Menu Properties dialog box, click the check box to select Auto-hide the taskbar, and then click OK. The taskbar immediately disappears. When you move the pointer to the previous location of the taskbar, it will appear, but only until you move the pointer away. To return the taskbar to view, reverse the process described above, clicking the check box to deselect Auto-hide the taskbar
Similar to pinning an app or program to the Start menu, you can place, or pin, icons of frequently used programs or websites on the taskbar for faster access. When you pin a program or website to the taskbar, its associated icon becomes a permanent part of the taskbar. You can then open the program or website by clicking its icon.
To pin to the taskbar a program that is not already open, complete the following steps:
1. Locate the program in All apps.
2. Right-click the program name.
3. Click Pin to taskbar.
To pin to the taskbar a program that is already open, complete the following steps:
1. Right-click the program icon on the taskbar.
2. Click Pin this program to taskbar.
You will find the Notification area (refer to Figure 1.4) on the right side of the taskbar. This area contains system icons, including Clock, Volume, OneDrive, and Action Center. The Notification area and what icons display in the Notification area are discussed later in this chapter.
Identify Desktop Components
The desktop in Windows 10 looks very much like the desktop in previous versions of Windows. On the desktop, icons represent links to programs, files, folders, or other items related to your computer (see Figure 1.5). Although the Start menu is meant to provide quick access to programs, files and folders you use most often, you can easily add and remove icons so that the desktop includes items that are important to you or that you access often.
The Recycle Bin icon displays by default on the Windows 10 desktop. The Recycle Bin is temporary storage for deleted files from the computer’s hard drive or OneDrive. Files in the Recycle Bin are not permanently erased from the system until you right-click the Recycle Bin icon and select Empty Recycle Bin. Therefore, if you delete a file by mistake, it can be restored. The exception is if the file was from an external storage device such as a flash drive. When you delete files from an external storage device, they are permanently deleted.