Streamlined ID: A Practical Guide to Instructional Design presents a focused and generalizable approach to instructional design and development—one that addresses the needs of ID novices as well as practitioners in a variety of career environments. Emphasizing the essentials and “big ideas” of ID, Streamlined ID presents a new perspective that aims to produce instruction that is sustainable, optimized, appropriately redundant, and targeted at continuous improvement.
The book features an enhanced version of the classic ADDIE model (Analysis, Design, Development, Implementation, and Evaluation) that emphasizes the iterative nature of design and the role of evaluation throughout the design/development process. It clearly lays out a systematic approach that emphasizes the use of research-based theories, while acknowledging the need to customize the process to address a variety of pedagogical approaches: Instructivist, Constructivist, and Connectivist.
The book opens with an overview of the basics of ID and each subsequent chapter describes major activities in the ID process with step-by-step instructions and tips for streamlining the process. Numerous job aids serve to maximize the efficiency and effectiveness of your design efforts. Each chapter highlights key concepts and provides additional exercises and assignments based on the work of Benjamin Bloom. Streamlined ID is an ideal reference guide for optimizing professional practice.
Miriam B. Larson is an Adjunct Assistant Professor who teaches courses in instructional design and technology for the University of Tennessee, Knoxville, and for Virginia Tech. She has over 30 years of experience designing instruction for organizations in a variety of career environments.
Barbara B. Lockee is Professor of Instructional Design and Technology and Associate Director of Educational Research and Outreach in the School of Education at Virginia Tech.
This page intentionally left blank
STREAMLINED ID
A Practical Guide to Instructional Design
MIRIAM B. LARSON
UNIVERSITY OF TENNESSEE, KNOXVILLE & VIRGINIA TECH AND
BARBARA B. LOCKEE VIRGINIA TECH
WITH ILLUSTRATIONS BY
MIKAELA L. FUCHS
First published 2014 by Routledge
711 Third Avenue, New York, NY 10017
Simultaneously published in the UK by Routledge 2 Park Square, Milton Park, Abingdon, Oxon OX14 4RN
The right of Miriam B. Larson and Barbara B. Lockee to be identified as authors of this work has been asserted by them in accordance with sections 77 and 78 of the Copyright, Designs and Patents Act 1988.
All rights reserved. No part of this book may be reprinted or reproduced or utilized in any form or by any electronic, mechanical, or other means, now known or hereafter invented, including photocopying and recording, or in any information storage or retrieval system, without permission in writing from the publishers.
Trademark notice: Product or corporate names may be trademarks or registered trademarks, and are used only for identification and explanation without intent to infringe.
Library of Congress Cataloging in Publication Data
Larson, Miriam B.
Streamlined ID : a practical guide to instructional design / by Miriam B. Larson and Barbara B. Lockee. pages cm
Includes bibliographical references and index. 1. Instructional systems—Design. I. Title.
LB1028.38.L37 2013 371.3—dc23 2012042463
ISBN: 978–0–415–50517–8 (hbk)
ISBN: 978–0–415–50518–5 (pbk)
ISBN: 978–0–203–11875–7 (ebk)
Typeset in Minion by Swales & Willis Ltd, Exeter, Devon
Dedication
This book is dedicated to my husband, my children, and my parents, who supported and encouraged me throughout the long process.—Miriam
To Chase, who graciously accepted my “homework” alongside of his. Thank you for your understanding and your never-ending patience.—Barbara
This page intentionally left blank
This Book: At a Glance
Why Streamlined ID?
This book presents a simplified, yet detailed approach to designing instruction for a wide range of purposes and career environments. It includes step-by-step instructions to aid novices in designing learning experiences, as well as detailed job aids that will serve as a reference for more experienced designers as they practice their craft. We’ve made an effort to incorporate what we believe to be the most commonly used methods and theories from the field, as well as those on the horizon that appear promising.
We do, however, agree with others in the field of Instructional Design and Technology (IDT) who’ve called for a more responsive and rapid process for designing learning experiences and environments. We’ve noted that many books on instructional design are geared for a specific career environment (higher education, K-12, business and industry, health care, and/or government/military) and often do not provide globally applicable guidelines for the practice of ID. Therefore, this book presents a global and streamlined approach to instructional design and development—one that we believe meets the needs of ID novices and practitioners in a variety of work settings by emphasizing designs that are:
Sustainable—Sustainable instruction is designed and developed with the future in mind. The resources and time devoted to the design/development effort is planned and adjusted to reflect the expected lifespan of the instruction, its importance and complexity, its need for future updating and maintenance, and the possible future need to scale the instruction up or down in size and scope to meet demand.
Optimized—Optimized instruction is efficient and useful. It does what it is supposed to do in the most efficient manner possible, and it maximizes functionality, usability, and productivity. Ideally, optimized instruction is designed so that it can be reused for different purposes and audiences.
Appropriately Redundant—While too much redundancy can frustrate or annoy a learner, appropriate redundancy refers to providing the content in multiple formats so that it is accessible to all learners. Redundancy also refers to provisions that allow the learner to review the instruction again whenever necessary, and at a pace that meets his or her needs.
Right-Sized—Instructional project “creep” is the well-known problem that evolves when you try to design instruction that is everything to every learner, or when multiple stakeholders make requests that end up “supersizing” the learning experience. When you practice right-sized ID, you stick to the essential content, and use techniques that give
learners options for accessing additional, nice-to-know, or remedial content if and when it is needed.
Continuously Improving—The IDT field has always emphasized review and revision to improve the quality of instruction and learning. An iterative approach that features frequent formative and usability testing throughout design and development serves to help designers “get it right” earlier in the process. It also helps to focus all stakeholders on the need to continuously improve.
How Is This Book Organized?
We’ve chosen to stick with a classic model of instructional design that is familiar to those in the field—with a twist. The classic ADDIE model—an acronym for “Analysis, Design, Development, Implementation, and Evaluation” (Allen, 2003)—has a simplicity that underscores the streamlined approach we’ve taken. That said, we emphasize throughout the book that the ADDIE ID process is iterative, not linear, and that it should be used in a way that reflects responsiveness to the surrounding contexts of instruction. We also emphasize that evaluation is not merely one piece of the model, but that you should consider how you evaluate your instruction throughout the design/development process, since this approach promotes continuous improvement. To that end, we briefly describe evaluation in the first chapter and then highlight how it should be factored into the process in subsequent chapters.
Each chapter contains items that exemplify key design principles:
• Inquiring Minds Want to Know … provides questions about the chapter contents to focus your attention on items you should be sure to remember and understand.
• Jargon Alerts! highlight potentially confusing and duplicate terms used in the field of Instructional Design and Technology (IDT).
• Notable Non-Examples feature stories of what not to do in your design practice, and immediately precede a section on …
• … What’s Involved? providing step-by-step instructions based on best practices. We’ve placed as much of the content for each chapter in handy job-aid-type tables that we hope you will be able to use frequently in your professional practice.
• Streamlining suggestions follow the content for each activity in design and development.
• Evaluation factors applicable to each activity are addressed, as well as examples of how ID activities vary between Different Career Environments
• Bloom Stretch exercises are included to help you monitor and extend your own learning. We use Bloom’s Revised Taxonomy of Educational Objectives (Anderson & Krathwohl, 2001; Krathwohl, 2002) as a framework with exercises that address four levels of Bloom’s thinking skills taxonomy: Apply, Analyze, Evaluate, and Create. (We address the first two levels, Remember and Understand, at the beginning of each book chapter.)
Test Your Understanding
With a Bloom Stretch <
x
• This Book: At a Glance
• At the close of each chapter, a Diving Deeper section refers to the resources available on the book website.
• As you read, you may find it helpful to refer to the Glossary of IDT terms and the References cited at the back of the book.
To keep this book as streamlined as possible, we’ve placed some of the resources online at www.routledge.com/cw/larson, where they can be more easily updated:
• Practical Exercises and Examples, including additional Bloom Stretch suggestions, worked examples, case studies, and problems to check your understanding of the chapter concepts;
• Job Aids, including worksheets for major activities in the ID process and process charts; and
• Recommended Resources, including current trends and issues, books, articles, and Internet links for further information on the topics addressed in the chapter.
Who Might Use This Book and How?
I’m … I have to … I will use this book
An Instructor in Higher Education or K-12
• Move some of my courses to an online format.
• Adjust my courses to better address the needs of those who will employ my students.
• Quickly develop several new courses.
• Teach students to design instruction or training.
A Course Developer or Technology Coordinator in Higher Education or K-12
A Trainer in Business and Industry, Health Care, Government, or Military
• Support others in the design of face-to-face, blended, and/or fully online courses.
• Help others use technology effectively to support learning.
• Provide materials to help others design and develop instruction.
• Produce and/or deliver instruction that will improve the performance of employees.
• Rapidly produce instruction on new products, services, procedures, or processes.
• Produce instruction to respond to applicable standards, regulations, or certification requirements.
• Justify training development and implementation efforts.
An Independent IDT Consultant
• Produce instruction quickly and in a costeffective manner to maintain an acceptable profit margin.
• Either do all steps in the design/development process myself, or work with SMEs or an ID team or subcontractors.
• As a guide to adjust my instruction for an online environment.
• To determine what future employers need from my students.
• To help me streamline the course development process, and/or work more effectively with faculty course development experts.
• To provide my students with a solid resource for learning instructional design and an easy-to-use reference for their future ID practice.
• To provide a basis and guide for collaborating with others in the design of instruction.
• As a source of best practices to share with others as they design and implement technology-supported instruction.
• As a source of job aids for designing instruction.
• As a quick reference guide for producing instruction that improves performance in measurable ways.
• To help me streamline the ID process so I can keep my organization competitive and employees current with just-in-time instruction or job aids.
• To help me produce instruction that prepares others to meet standards, regulations, or certification requirements.
• As a guide for using theory, evaluation results, and/or cost-benefit analyses to justify training.
• To streamline my design/development process.
• As a reference for best practices and ideas.
• As a guide for effective collaboration and contribution to IDT team efforts, or to work successfully with stakeholders and subcontractors in the IDT process.
Who Are Erma and Ernest?
There are several “big ideas” in IDT that should be internalized by everyone practicing in the field. There are also many common misconceptions that can hamper the effectiveness of designers, and that, if known, can prevent mistakes and avoid delays in the design/development process. Erma and Ernest will serve as guides throughout this book to highlight these big ideas and misconceptions (or, in ID talk, to provide an “advance organizer”).
Acknowledgments
We would like to thank the graduate students from the University of Tennessee’s IT570 and IT578 instructional design and development classes for their helpful feedback on the book, as well as those who read through draft versions of the book, including Rhonda Phillips, Susan Sutton, and Jeanne Anderson. Many thanks to Ireta Ekstrom, who provided insights on instructional design practice in health-care environments. We also thank Kibong Song for his assistance with compiling and reviewing our References and the development of our Glossary; both tasks were of significant help to us.
Many thanks go to Alex Masulis and Madeleine Hamlin at Taylor & Francis/Routledge for their support and assistance through the writing process—we greatly appreciate the opportunity to share our work with the many practitioners of instructional design, thanks to you!
Finally, a big thank you to Miriam’s daughter, Mikaela Fuchs, whose incredible artwork makes this volume complete and hopefully conveys the sense of pragmatism and levity that reflect the authors’ perspectives.
MO,MOM'. iW\ AM INSTRUCTIONAL T fCHNOLOGIST ANO I USB rue ADPIF MODEL; A COMMON OCCUPATIONAL. HAZARD: »p explanation frustration
You are wired to learn, and that’s good, because learning helps you adapt and survive in a world that is changing at an ever-increasing rate. In this era of information overload, the new currency is the ability to learn. As a result, learning is a key concern for:
• Businesses with changing products, services, competitors, and business conditions;
• Governments struggling to ensure an adequate quality of life for its citizenry, while adjusting to changing economic, political, and societal factors;
• Military organizations faced with global political changes, and new technologies and methods for securing populations;
• Institutions of higher learning tasked with anticipating and communicating an evolving knowledge base and meeting the changing needs of society and students;
• Health-care organizations challenged by changing health needs, demands for research, the application of new knowledge, and the implementation of new methods; and
• K-12 educators who must not only learn new knowledge and methods, but must also prepare future generations to learn and adapt in a constantly changing world.
Change characterizes every aspect of life in the 21st century. As a result, lifelong learning is crucial to the survival of individuals and societies, and therefore there is an ongoing, critical need for effective learning experiences and environments. Well-designed instruction captures the attention of learners and prompts them to interact with the content. It also helps learners focus on what’s important, aids them in organizing new information and making connections to previously learned material, and provides memorable experiences that help them apply new knowledge. The field of Instructional Design and Technology (IDT) has evolved to address this critical need for well-designed learning environments and instruction. Yet, instructional designers do more than just design. They also:
• analyze problems to determine if instruction is a valid solution;
• identify and limit the scope of instruction to ensure its relevance and ability to meet critical needs;
• select appropriate media and delivery modes; and
• develop, implement, and evaluate the success of instruction.
With such a broad range of responsibilities, it’s easy for instructional designers to become mired in complexity and discouraged from taking a creative approach. That’s why it’s important to know how to design effective instruction, and when and how to streamline the process.
Inquiring Minds Want to Know …
• Where did the field of Instructional Design and Technology originate?
• What does it mean to be a competent instructional designer?
• What is the Kirkpatrick four-level model of evaluation and how is it used to improve an instructional design?
• What factors and processes are involved in designing instruction, and how can the process be streamlined?
• What do I need to remember and understand from this chapter?
⇒ The distinction between systematic design and systemic design;
⇒ The difference between “hard skills” and “soft skills”;
⇒ The range of meaning for the terms: learning, instruction, technology, design, grounded design, competency, asynchronous and synchronous learning, media comparison studies, stakeholders, formative and summative evaluation;
⇒ The difference between a well-structured and an ill-structured problem;
⇒ Different career environments where IDT is practiced;
⇒ The range of competencies expected of proficient instructional designers;
⇒ The principles of streamlined instructional design;
Another random document with no related content on Scribd:
Now you must know that when I first was a goldsmith’s apprentice in the 15th year of the century, which was my 15th year too, the art of engraving in niello had quite fallen into disuse. It was only because a few old men still living did nothing else but talk of the beauty of the art and of the great masters who had wrought in it, & above all of Finiguerra, that I was seized with a mighty desire to learn it; so I set to diligently to master it, & with the examples of Finiguerra before me, made many good pieces.
My difficulty, however, was how to find out after I had engraved the intaglio how the niello that was to fill it ought to be made. So I went on trying ever so hard until I not only mastered the difficulties of making the material, but the whole art became a mere child’s play to me. Here, then, is the way in which niello work is done.
FOOTNOTES:
[8] Cellini had of course never heard of Theophilus, the monk of the 11th century, and his great treatise ‘Diversarum Artium Schedula.’
[9] Baccio Bandinelli, the sculptor, one of Cellini’s bitterest enemies.
[10] Grosseria. Cellini uses this term for all large ware as distinguishedfrom ‘minuteria’or smallware.
[11] Dicesello: what we shouldcallrepoussé.
[12] Martin Schongauer.
[13] Marcantonio Raimondi.
CHAPTER I. ON THE ART OF NIELLO.
Take an ounce of the finest silver, two ounces of copper well purified, and three ounces of lead as pure as you can possibly get it. Then take a little goldsmiths’ crucible sufficiently big to melt the three in together. You must first take the one ounce of silver & the two ounces of copper and put the two together in the crucible, and the crucible in a goldsmiths’ blast-furnace, and when the silver and the copper are molten & well mixed together, add the lead to them. Then quickly draw the crucible out, and with a bit of charcoal held in your tongs, stir it round till it is well mixed. The lead, according to its wont, will make a little scum, so with your charcoal try and take this off as much as possible, until the three metals are fully & cleanly blended. At the same time have ready a little earthenware flask about as big as your fist, the neck of which should, however, not be wider than might hold one of your fingers. Fill this flask about half full with very finely ground sulphur, & empty into this your molten mass, while quite fluid & hot. Then quickly stuff it up with moist earth, and holding it in your hand wrapped up in a stout bit of canvas, say for instance an old sack, shake it to & fro while it is cooling. As soon as it is cold, break the flask and take out the stuff, and you will see that by virtue of the sulphur it will have got the black colour you want. But mind you take care that the sulphur is the blackest you can get.[14] As for the flask, you may take one of those which are generally used for separating gold from silver. Take then your niello, which will now be in a number of little grains,—for you must know that the object of all this shaking up and down whilst cooling in the sulphur is to make it combine,—& put it anew into a crucible, then melt it in a moderate fire, adding to it a grain of borax. When you have recast it two or three times, and after each casting broken up your niello, take it out, for you will see it will now be
splendidly broken up,[15] and that is as it ought to be,—and that will do.
Now I’ll show you how to apply and make up your niello; but first a word or two about the plate on which your intaglio is to be engraved, whether in silver or in gold, for niello is used only on these metals. If you want to get the plate on which you have cut your work nice and smooth & without holes,[16] you must boil it in a solution of clean water mixed with a deal of very clean charcoal, the best for this purpose being charred oak. When your work has cooked in the pot for about a quarter of an hour or so, transfer it to a beaker of clean fresh water, and scrub it for a long time with a clean brush till every particle of dirt be rubbed off it. Then see that you have ready a bit of iron long enough to hold the work to the fire: its length should be about three or four palms, more or less in accordance with what the nature of your work may seem to you to need. But mind you look out that the iron to which your work is fixed be neither too thick nor too thin; for it should be of such sort that when you put both to the fire they should heat equally; for if either the iron or the plate become heated first, you’ll make a mess of it, so pay great attention to this. Next take your niello, & crush it on an anvil, or on a porphyry stone, & do this with a pair of pliers or a copper rod, and so that it does not spring aside. Take care, too, that it is crushed to grains and not to a powder, & these grains should be as equal as possible, and about the size of a grain of millet or sago, if not less. After this put the niello grains into some sort of vase or glass bottle, and with fresh clean water wash it out well till it be quite purified from any dust or dirt that may have got into it during the pounding. This done, take a spatula of brass or copper, and spread the niello evenly over your engraved plate to about the thickness of the back of a table-knife. Then powder over it a little well-ground borax, but mind it be not too much. Put a few pieces of wood or charcoal so that you can blow them into flame with your bellows, and this done, put your work very slowly to the wood fire & subject it to the heat very dexterously till you see the niello beginning to melt. But look out that, when it does begin to melt, you
don’t get it too hot, or into a red heat, for if it gets too hot, it will lose its natural character and become soft, because, the principal component of niello being lead, this lead will begin to corrode the silver, or even the gold of which your work is made; in this way you might have all your pains for nothing. Have great heed to this, therefore, which is as important as your good engraving to begin with.
Now before we follow the work through to the end, we will pause and consider things a bit. I advise you when you are holding your work over the fire and see the niello begin to disintegrate, to have at hand a fairly stout iron rod, with a flatted end: this end hold in the fire, and when the niello begins to run, rapidly put your hot iron over it, and, treating it as if it were wax, spread it well, until it has quite filled all the graven part of your intaglio. After this, when your work has got cold, take a delicate file, and file off your niello, & after you have removed a certain quantity, not so as to graze your intaglio, but sufficient to lay it bare, take your work and put it on the hot ashes or the live charcoal.
When it is a little hotter than the hand can bear, or even a bit hotter still, but before it gets too hot, take your steel burnisher, welltempered, & with a little oil burnish your niello as firmly as the work would seem to admit of, and with due discretion in every case. The only object of this burnishing, is to stop up certain bubble holes[17] that sometimes come during the process. You’ve only got to have patience enough, and with a little practice you’ll find this burnishing stops all the holes up beautifully.
After this, take your knife & touch up the intaglio. Then to finish with take some Tripoli powder and pounded charcoal, & with a reed peeled down to the pith, scrub your work till it is smooth and beautiful.
Oh thou discreetest of readers, marvel not that I have given so much time in writing about all this, but know that I have not even said half of what is needed in this same art, the which in very truth would engage a man’s whole energies, and make him practise no
other art at all. In my youth from my 15th to my 18th year I wrought a good deal at this art of niello, always from my own designs, and was much praised for my work.
FOOTNOTES:
[14] This is obscure, as thepurestyellow sulphur wouldanswer.
[15] Perhaps: ‘have a fine fracture.’
[16] Bucolini. Perhaps: ‘specks.’
[17] Spugnuzze.
CHAPTER II. ON FILIGREE WORK.
Though I don’t work much in filigree myself, I have none the less done one or two very difficult and very beautiful pieces of work in this line, and so I’ll say something about it. The art is a charming one, and when well executed & well understood is as pleasing to the eye of man as anything done in goldsmithing. Those who did the best work in filigree were the men who had a good grip of drawing, especially designing from foliage & pierced spray work, for everything that you set to work upon requires first of all that you think it out as a design. And though many have practised the art without making drawings first because the material in which they worked was so easily handled and so pliable; still, those who made their drawings first did the best work. Now give ear to the way the art is pursued.
Innumerable are the purposes to which you may apply filigree. So first of all we will begin with some of the ordinary every-day things & then have a look at such other things as will make a man’s mouth water. The more ordinary use to which filigree is applied, is for buckles and pins for belts, such as I told of in the introductory chapter of my book. Then is it used, too, for making crosses & earrings, small caskets, buttons, certain kinds of little charms and divers manner of necklaces; these latter are often worn with fillings of musk, as is also frequently the case with bracelets; & so an endless other variety of things. Now it is necessary that for everything that you want to execute in this line of work, you must to begin with make a gold or silver plate exactly in the way you want your work ultimately to be. After this is done, and of course, after you have made your drawing, have ready all the different kinds of wire of which you will have need, such for instance as thick and thin
& middling, the usual three sizes, in due sequence, and perhaps a fourth size likewise. Then have ready some ‘granaglia’—granulated metal—for so the stuff is called; and in order to make this, you take your gold or silver, melt it, and when it is well melted, pour it into a pot of powdered charcoal. In this way every kind of granulated metal is made.[18] Then, too, you must have your solder prepared and ready to hand, and the right solder to use is the ‘terzo’ solder, so called because you make it with two ounces of silver and one of copper. Now though many are accustomed to make solder with brass, be advised that it is much better to make it with copper, and less risky. Take heed that you file your solder very fine, then put to every three parts of solder one of well ground borax, and, having well mixed them, put them in a borax crucible[19] such as a goldsmith uses. Then have handy some gum tragacanth,[20] a sort of gum which you can buy at any apothecary’s. Dissolve this gum tragacanth in a little cup or vase, or whatever is convenient. When you have all these things in order, you will also need by you two pairs of stout little pliers, and also a small sharp chisel cut angularly,[21] like the wood-engravers use; but its handle ought to be short, the length & size of the handle of a graver. For its object is to cut the wires in accordance as you may wish to twist them either one way or the other, as your design requires, or your taste determines. You will also need a copper plate fairly stout, very smooth, and about the size of the palm of your hand. When you have twisted your wire into the shapes you want, you must place it bit by bit on the copper plate, and so bit by bit with a camel’s-hair brush streak it over with the solution of gum tragacanth, arranging at the same time the little gold & silver beads tastily. During the time that you are piecing together your bits of leaves and other particles, the tragacanth water will hold them together sufficiently to prevent their moving. Then every time that you have composed a part of your spray-work, and before the tragacanth water has got dry, throw a little soldering powder out of your borax upon it, and put just as much as may suffice to solder your spray work, & not more. The object of putting
just enough on, is that the work when soldered shall be graceful and slender, for too much solder makes it look fat.
Hereupon, when it is time for soldering, you will need in readiness a little stove, such as is used for enamelling, but since there is a great difference between the melting of enamel & the soldering of filigree, you will need to heat this furnace with a much smaller fire. Then attach your work to a little iron plate, but so that the work stands free above it, and put it little by little to the heat of the furnace, until the borax shall have fumed away, & done as is its wont. Now too much heat would move the wires you have woven out of place, so it is essential to take the greatest possible care,—really it’s quite impossible to tell it properly in writing: I could explain it all right enough by word of mouth, or better still show you how it’s done— still, come along—we’ll try and go on as we started!
When you are ready to begin soldering, and want to make your solder flow, put your work in the furnace, & place beneath it a few little pieces of well-dried wood, fanning them up a bit with your bellows. Then it is not a bad thing, too, after this to throw a few coarse cinders upon the fire, & this done at the right moment does a deal of good. But it is practice and experience, together with a man’s own discretion, that are the only real ways of teaching one how to bring about good results in this or in anything. When your work is soldered, that is to say if it be silver-work, you must to begin with, cook it in tartar[22] mixed with some salt or other, and cook it so long till all the borax is off it. This ought to last about a quarter of an hour, by which time it will be quite clean, & free from borax. If on the other hand it be made of gold, you must put it in strong vinegar for about 24 hours, until you see a little salt forming upon it. And so, after this manner can you fashion all sorts of rosettes that may be needed in your work, such as I have not only seen, but myself made, and that give much variety to the work, when you have ordered them each in their place, and in accordance with your design.
But now I’ll tell you yet something further about the cunning of this charming art; I’ll tell you of a wonderful and priceless work that was shown me in France, in Paris, their most beautiful & richest city— which the French, according to their language, call ‘Paris simpari,’ that is to say ‘sans peer,’ or without equal. It was in the service of King Francis in the year 1541. This most royal and splendid of Kings retained me in Paris, and gave me of his liberality a castle, standing in the city itself, and called by the name of the ‘little Nello.’ Here I worked for four years, the which will be recounted all in its place when I come to tell of the great works which I made for this most worthy King. Here I will continue my talk as to the way of working in filigree, and as I promised, tell of a work most rare—a work such as may perchance never again be executed—which I saw in this city. One day—a solemn fête day—the King went at Vespers to his ‘Sainte Chapelle’ in Paris. He sent word to me that I was to be at Vespers too, as he had something nice to show me. When Vespers were over the King called me to him through the Constable, who sometimes represents the King himself. This gentleman came, took me by the hand, & led me before the King, who with great kindness and affability began to show me the most beautiful trinkets and jewels, and briefly asked me my opinion on them. After these he showed me a variety of ancient camei about as big as the palm of a large hand, and asked me many things about them, on which I gave him my opinion. They had stood me in the middle of all of them;—there was the King, and the King of Navarre his brother-in-law, and the Queen of Navarre, and all the first flower of the nobility, & of those that came nearest to the crown; & before all of them his Majesty showed me many beautiful & priceless things, about which we talked for a long time to his great delight. Thereupon he showed me a drinking bowl without a foot & of a middling size, wrought in filigree with the choicest spray-work, upon which much other ornamental detail was admirably applied. Now list to my description of it! In among the spray-work and interstices of filigree were settings of the most beautiful enamel of various colours; and when you held it to the light these enamel fillings almost looked as if they were transparent—indeed it seemed impossible that such a piece of work
should ever have been made. Thus at least thought the King, & asked me very pleasantly, since I had thus highly praised the bowl, could I possibly imagine how the work was done. I thereupon answered his question thus: ‘Sacred Majesty,’ quoth I, ‘I can tell you exactly how it is done, even so much so that you, being the man of rare ability that you are, shall know how just as well as the master himself that made it, knew, but the explanation of the methods that underlie its making will take rather a long time.’ At these words of mine all the noble assembly that waited on his Majesty thronged around me, the King declared he had never seen work of so wondrous a kind, and since it was so easy of explanation, bade me tell as I had promised. Then spake I: ‘If you want to make a bowl like this, you must begin by making one of thin sheet iron, about the thickness of a knife back larger than the one you want ultimately to produce in filigree. Then with a brush you paint it inside with a solution of fine clay, cloth shearings & Tripoli clay[23] finely ground; then you take finely drawn gold wire of such a thickness as your wise-minded master may wish that of his bowl to be. This thread should be so thick that if you beat it out flat with a hammer on your clean little cup, it bends more readily in the width than otherwise, in such a way that it may then be flattened out to a ribbon shape, two knife-blades broad, & as thin as a sheet of paper. You must be careful to stretch your thread out very evenly, & have it tempered soft, because it will then be easier to twist with your pliers. Then with your fine design before you, you commence to compose your stretched thread inside the iron bowl, first the principal members, according to their way of arrangement, piece by piece painting them over with solution of gum tragacanth, so that they adhere to the clay-solution with which you pasted the inside. Then when your craftsman has set all his principal members and larger outlines, he must put in the spray work, each piece in its place, just as the design guides him, setting it spray by spray, bit by bit in the way I have told you. And then when all this is in proper order, he must have ready his enamels of all colours, well ground and well washed. It is true you might do the soldering first before you put in the
enamel, & you would do it in the way that I explained above when I considered the soldering of filigree work, but it’s as good one way as the other, soldered or not soldered. And when all the preliminary work is carefully done, and all the interstices nicely filled with the coloured enamels, you put the whole thing in the furnace, in order to make the enamel flow. To begin with you must only subject it to a slight heat, after which, when you have filled up any little openings with a second coat of enamel you may put it in again under a rather bigger fire, & if it appear after this that there are still crannies to be filled up, you put it to as strong a fire as the craft allows and as your enamels will bear. When all this is done you remove it from the iron bowl, which will be easy by reason of the paste of clay to which the actual work and the enamels are attached. Then with a particular kind of stones called “frasinelle,” and with fresh water you begin the process of smoothing it down, and you must go on with this so long till the enamel is polished down to an equal thickness throughout and as may seem good to you. And when you have got as far as the “frasinelle” can take you, you may continue your polishing with still finer stones, and lastly with a piece of reed and tripoli clay (as I explained it in niello work), then the surface of your enamel will be very smooth and beautiful.’ When the admirable King Francis heard all this description of mine, he declared that they who knew so well how to explain, doubtless knew still better how to perform, & that I had so well pointed out to him the whole process of a work that he had erst thought impossible, that now, owing to my description, he really thought he could do it himself. And therewith he heaped great favours upon me, such as you can’t possibly imagine.
FOOTNOTES:
[18] Fine granules of gold are made by cutting gold wire into short lengths, mixing the cut pieces with charcoal, placing the mixture in a crucible and then heating the whole up to the melting point of the metal. Afterwards the charcoal is washed away, and the goldgranules (which have been fused into a round form)sortedaccording to size by sifting.
[19] Borraciere: perhaps a boraxpan.
[20] Dragante.
[21] Uno scarpellettoaugnato.
[22] ‘Gomma dibotte,’ i.e., tartrate ofpotash.
[23] Tripolo.
CHAPTER III. CONCERNING THE ART OF ENAMELLING.
Now let us have a talk about the beautiful art of enamelling, and therewith consider those excellent craftsmen who wrought best therein; and with the knowledge of their lovely creations before us see what is beautiful and what is difficult in this art, and get to understand the difference between what is really good and what is indifferent. As I said in the first chapter of my book, this art was well practised in Florence, and I think too that in all those countries where they used it, and pre-eminently the French and the Flemings, and certainly those who practised it in the proper manner, got it originally from us Florentines. And because they knew how difficult the real way was, & that they would never be able to get to it, they set about devising another way that was less difficult. In this they made such progress, that they soon got according to popular opinion the name of good enamellers. It is certainly true that if a man only works at a thing long enough, all his practising makes his hand very sure in his art: & that was the way with the folk who lived beyond the Alps.
As for the right and proper way about which I intend to talk, it is done in this wise. First you make a plate either of gold or silver & of the size and shape that your work is to be. Then you prepare a composition of ‘pece greca,’[24] and brick ground very fine, and a little wax; according to the season; as for the latter you must add rather more in cold than in hot weather. This composition you put upon a board great or small in accordance with the size of your work, & on this you put your plate when you have heated it. Then you draw an outline with your compasses in depth rather less than a knife back, and, this done, ground your plate anywhere within this outline and with the aid of a four-cornered chisel to the depth which
the enamel is to be, and this you must do very carefully. After this you can grave in intaglio on your plate anything that your heart delights in, figure, animals, legend with many figures, or anything else you like to cut with your graver and your chisels, and with all the cleanness that you possibly can. A bas-relief has to be made about the depth of two ordinary sheets of paper, and this bas-relief has to be sharply cut with finely-pointed steel tools, especially in the outlines, and if your figures are clothed with drapery, know that these folds, if sharply drawn and well projecting, will well express the drapery. It is all a question of how deeply your work is engraved, and the little folds & flowerets that you figure on the larger folds may go to represent damask. The more care you put into this part of your work, the less liable your enamel will be to crack & peel off hereafter, and the more carefully you execute the intaglio the more beautiful your work will be in the end. But don’t imagine that by touching up the surface of your work with punches and hammer, it will gain anything in the relief, for the enamels will either not stick at all, or the surface that you are enamelling will still appear rough. And just as when a man cuts an intaglio he often rubs it with a little charcoal, such as willow or walnut wood, which he rubs on with a little saliva or water, the same you may do here when you cut your intaglio in order to see it stand out better, because the shine made by the metal tools on the plate will make it difficult for you to see your work. But, as owing to this the work gets a bit untidy and greasy, it is necessary, when you have finished it, to boil it out in a concoction of ashes[25] such as was described above for niello work.
Now let us say you want to begin enamelling your work, and that it is in gold. I propose telling you first of how to enamel on gold, and then how to do it on silver. For both gold and silver the same cleanness is necessary, and in either case the same method, but there is a little difference in applying the enamel and also in the actual enamels applied, for the red enamel cannot be put on silver because the silver does not take it. The reasons of this I would explain, were it not too long a business, so I’ll say nothing about it, especially as to do so would take us beyond the scope of our inquiry.
Furthermore I have no intention of talking about how enamels are made, because that in itself is a great art, also practised by the ancients, & discovered by wise men, but as far as we are aware the ancients did not know of the transparent red enamel, which it is said, was discovered by an alchemist who was a goldsmith as well. But all I need tell of it is that this alchemist, while engaged in the search of how to make gold, had mixed together a certain composition, and when his work was done, there appeared among the stuff in the metal rest of his crucible a sediment of the loveliest red glass, just as we see it to this day. After much time and trouble, & by many mixings of it with other enamels the goldsmith finally discovered the process of making it. This enamel is far the most beautiful of all, and is termed in the goldsmiths’ art ‘smalto roggio,’ red enamel, or in French ‘rogia chlero’ (rouge claire) that is to say, and which means in other words, red and clear or transparent. A further sort of red enamel we have also, which is not transparent and has not the splendid colour, and this is used on silver because that metal will not take the other. And though I have not had much practical experience of it, I have tried it often enough to be able to talk about it. As for the other, it lends itself more aptly to gold by reason of its being produced from the minerals and compositions that have been used in the search how to make gold. Now let us return to the process of enamelling.
The method of enamelling is much the same as painting, for you can have as many colours as come within human ken. And just as in painting so in enamelling you have them all ranged in order and all well ground to begin with. We have a proverb in the craft which says: ‘Smalto sottilé e niello grosse.’ ‘Enamel should be fine, niello should be coarse,’ and that’s just what it is. You put your enamel in a little round mortar of well-hardened steel, and about the size of your palm, & then you pound it up with very clean water and with a little steel pestle specially made for the purpose of the necessary size. Some, to be sure, have pounded their enamels on porphyry or serpentine stone, which are very hard, & moreover have done this dry, but I now think that the steel mortar is much better because
you can pound it so much cleaner. The reasons of this we may consider later, but because we want here to be as brief as possible & to avoid any unnecessary difficulties and useless confusion, all we need know is that the particular mortars in question are made in Milan. Many excellent men of this craft came from Milan and its adjacent territory, and I knew one of the best of them. His nickname was Master Caradosso,[26] and he never wanted to be called by any other, and this nick-name was given him once by a Spaniard who was in a great rage because he was kept waiting by the Master for a piece of work which he had promised to get finished by a particular day. When the Spaniard saw that he could not have it in time, he got so fearfully angry that he looked as if he would like to do him an injury, at which Caradosso to appease his wrath, began excusing himself as best he could, and in such a plaintive tone of voice, and such an uncouth Milanese lingo, that the irate nobleman burst out laughing, and looking him straight in the face, cried out in his high & mighty manner: ‘Haicara d’osso,’ that is to say, ‘You bum face.’ The sound of this appellation pleased Caradosso so much that he never would answer to any other. When later on one fine day he found out what it really meant, he would gladly have got rid of it, but he couldn’t, it was too late. I knew him as an old man of 80 in Rome, where he was never called by any other name than Caradosso. He was a splendid goldsmith, especially at enamelling, and I shall have more to say of him later on.
Now let us proceed with the beautiful art of enamelling. As I said above the best way of pounding the enamels is in a little steel mortar with water. I found out from personal experience that the best plan as soon as the enamels are ground is to pour off the water in which you grind them and put the powder in a little glass, pouring upon it just so much aqua fortis as may suffice to cover it; & so let it stand for about one-eighth of an hour. This done, take out your enamel and wash it well in a glass bottle with very clear, clean water until no residue of impurity be left. You must know that the object of the aqua fortis is to clean it of any fatty, just as fresh water is to clean it of any earthy impurities. When your enamels are all well
washed in this way, you should put each in its little jar of glass ware or majolica, but take great care that your water is so contained that it does not dry up, because if you put fresh water to them your enamels will spoil at once. Now pay great attention to what I’m next going to tell you. If you want your enamels to come out properly you must take a nice clean piece of paper, and chew well between your teeth, that’s to say if you’ve got any,—I couldn’t do it because I’ve none left,—so should have to soften it and beat it up with a little hammer of iron or wood, whichever might be best; this done you must wash out your paper putty, and squeeze it till there is no water left in it, because you will have to use it as a sponge and apply it from time to time upon your enamels. The more your colours dry up during the process the better they will look afterwards. Then, too, I mustn’t forget to tell you another important thing which will also affect the good or bad enamelling of your work, and this necessitates your trying a piece of experimental work first.
To this end you take a plate of gold or silver, whichever material you elect to cut your intaglio upon, and on this experimental piece,—let us suppose it is gold,—put all the different colours with which you intend to work, having made as many little hollows with your graver as there are enamels. Thus you take a little bit of each, and the only object of this is to make the necessary preliminary trial, for by this trial you find out which run easy and which run hard, because it is very necessary that they should all run alike; for if some run too slowly and others too fast they would spoil each other, and you would make a mess of your work. All those preliminaries done, you may set to work at your enamelling; lay the nice clean colours over your engraved bas-relief just as if you were painting, always keeping your colours well covered up, and take no more out of one bottle than you can conveniently use at a time. It is usual, too, to fashion an instrument called a ‘palettiere’ (palette holder), this is made out of thin copper plate, & in imitation of fingers, it should not be bigger than your fingers, and there should be five or six of them. Then you take a lump of lead in the shape of a pear, with an iron stem to it, which would correspond to the stalk of the pear, and then you put all
your bits of copper which you have hollowed out somewhat, one over the other on your pear stem. And this little finger-shaped palette you stand beside your work, and you put your enamels upon it, one by one, using due care. How careful you have to be with this cannot be told in words alone—you’ll have to learn that by experience!
As I said above, enamelling is similar to painting; though the mediums in the two sorts of painting in colours are oil & water, while that of painting in enamels is by dissolving them with heat. To begin with then, take your enamels with a little copper palette knife, & spread them out little by little very carefully over your bas-relief, putting on any colour you like, be it flesh colour, red, peacock blue, tawny, azure, grey or capucin colour, for that is what one of the colours is called. I don’t mention yellow, white & turquoise blue, because those colours are not suitable to gold. But one colour I forgot, and that was ‘Aqua Marina,’ a most beautiful colour, which may be used for gold as well as for silver. Then when you have all your enamels of all colours placed in the best of orders, you have to be careful in the first coat, as it is called, to apply them very thin and neatly, and just as if you were painting in miniature you put each in its place, exactly where it is to be. This done, have your furnace in order, & well heated with charcoal. Later on I will tell you further of furnaces and point out which are the best of the many different ones in use; but now let us assume that you have in it a fire sufficient for the purpose of the work you have before you. Then having your furnace as I say, in its place, you must put your gold work on an iron plate a trifle larger than the work itself, so that it can be handled with the tongs. And you must so ply it with the tongs and hold it to the mouth of the furnace, that it gets warm gradually, then, little by little, put it into the middle of the furnace, but you must take the greatest possible care that as soon as the enamel begins to move, you do not let it run, but draw it away from the fire quickly, so, however, that you do not subject it to any sudden cooling. Then, when it is quite cool, apply, just as carefully as before, the second coat of enamel, put it in the furnace in the same way, this time to a
rather stronger fire, and draw it forth in the same manner as before. After this if you see your work need further touching up with enamel in any of its corners, as is often necessary, judgment and care will show you how to do it. For this I advise you to make a stronger and clearer fire, adding fresh charcoal, and so put your work in again, subjecting it to as strong a heat as enamel and gold can stand. Then rapidly take it out, and let your ’prentice be ready, bellows in hand, to blow upon it as quickly as possible and so cool it. This you have to do for the sake of the red enamel, the ‘smaltoroggio’ of which we spoke above, because in the last firing it is wont to fuse with the others, and so to make new colour effects, the red, for instance, going so yellow that you can scarce distinguish it from gold. This fusing is technically called ‘aprire.’ When it has once more cooled you put it in again, but this time with a much weaker fire, until you see it little by little reddening, but take great heed that when it has got the good colour you want, you draw it rapidly from the fire & cool it with the bellows, because too much firing will give it so strong a colour as to make it almost black.
When you have duly carried out all these processes to your satisfaction, take some of your ‘frassinelle’—these were the bits of stones or sand that I described before when I told you about King Francis’ filigree bowl—and with them smooth your work over until you get the proper effect. Then finish by polishing it with tripoli as I showed you above, also in the filigree bowl. This method of finishing, which is by far the best and safest, is called handpolishing, in contradistinction to a second method by which, after you have your work smoothed with the ‘frasinella ’ and then well washed with fresh water so as to remove from it all dirt, you put it again on to the iron plate and into a clear fire and thus slowly heat it. In this method, by which you get the effect of polish much quicker than with the other, you leave the work in the fire till it is hot, and the enamels begin to run; but its disadvantage is that, as the enamels always shrink a bit, and shrink unequally in the firing, you cannot get so even a surface as by the hand-polishing. You have to take the same precautions, too, as you took when firing your
‘roggioclero,’ or red enamel. In the event of your not employing the latter—as would be the case on silver—you must take great care to observe the same precautions in putting your work in, but do just the opposite in taking it out of the fire, that is to say draw it very gradually from the furnace, so that it cools very slowly instead of very rapidly as was the case with the red enamel. Of course you may have to enamel a lot of pieces, such for instance as little pendants, and bits of jewellery, and other such things, where you are not able to use the ‘frasinella ’ at all. Things of this kind, fruit, leaves, little animals, tiny masks and such like, are applied in the same way with well-ground and washed enamels, but cannot be similarly polished because of their relief.
And if by reason of the great time and labour and patience you spend upon the doing of all this your enamels begin to dry up, and thus fall off in turning your work, this you may remedy in this wise: take a few quince seeds, which you get by cutting the fruit through the middle, choose such as are not empty, and let them soak in a vase with a little water; this you should do over night if you want to enamel the next morning, and you should be careful to do it very clean. Then when you want to apply your enamels, having put a morsel of each colour on your palette (the finger palette I described to you above fixed on to the stem of your leaden pear) you mix with every bit of enamel you lay on your work, a tiny drop of this quinceseed-water, the effect of which is to produce a kind of gum which holds the enamels together so that they don’t fall, & no other gum has a like effect. For the rest, all you have to do is to carefully carry out the methods I have so far explained to you, and whether your enamel be on gold or silver, except in so far as I have told, those methods are the same.
FOOTNOTES:
[24] Probably powdered resin; in Hendrie’s ‘Theophilus’ it is given as common white pine resin from which the oil has been evaporatedover hot water.
[25] Bollirlo in una cenerata.
[26] His realname was Ambrogio Foppa.
CHAPTER IV. JEWELLERY.
Now let us discuss jewellery, and of what pertains to precious stones. Of such there are four only, and those four are made by the four elements, the ruby is made by fire, the sapphire most obviously by the air, the emerald by the earth, and the diamond by water. In its due place I shall have something to say of the virtue of each. But what we have before us here is to talk about what pertains to the setting, in pendants, bracelets, rings, tiaras and crowns. We will leave diamonds till the last, because they are the most difficult of all stones to treat, and the reason of this is that while of other stones set in gold each one has its foil, of which more anon, the diamond of certain varieties has a tint which has to be specially prepared at the back of the stone, according to the peculiarities of each; and in their place will I tell you the loveliest things about them.
We will begin with rubies, of which there are various sorts. The first is the oriental ruby, which is found in our side of the Levant and near home; this part of the Levant, indeed, produces rarer and more beautiful jewels than any other lands. These Levant rubies have a mature colour, they are deep and very fiery. The rubies of the West on the other hand, though still red, lean towards peacock colour and are somewhat sharp and crude. Northern rubies are sharper and cruder still, while those of the South are quite different from the others, but so rare that they are very seldom to be met with, so I will mention one of their peculiarities only, they have not the same grand colour as the Levant ruby, but verge somewhat upon that of the ballas,[27] and though this has not the beautiful suffused colour it is none the less fiery, and so grand is it that they seem perpetually to scintillate by day, and by night throw out a gleam akin to that of a glow-worm, or other little creatures that shine in the dark. True it is that these southern rubies do not always possess this wonderful quality, but so delightful are they to the eye, that your good jeweller
easily tells them from the others, the name carbuncle is, however, only applied to the very rare ones, and those that shine in the dark. As soon as we have considered, from personal experience, and from the experience of others, what are the best ways of setting jewels, we will talk of the qualities of the stones themselves. But I have a thing or two to say in order not to scandalize a certain class of men who call themselves jewellers, but may be better likened to hucksters or linen-drapers, pawn-brokers, and grocers; I have seen more than enough of wondrous samples in plenty of them in Rome, and there you may still see them to this day, with a maximum of credit and a minimum of brains. So what I say is out of respect to these dunderheads lest they should be shocked at my affirming that the real stones are of four sorts only, and thus wag their arrogant tongues at me & cry, ‘How about the chrysoprase or the jacynth, how about the spinell, how about the aqua marine; nay, more, how about the garnet, the vermeil, the chrysolite, the plasma, the amethyst, ain’t these all stones and all different?’ Yes, and why the Devil won’t you add pearls, too, among the jewels, ain’t they fish bones? I really don’t think it worth while to try and cope with veritable empty-headed ignoramuses, but I will say that there are many, very many, like them, and that your great princes are mainly to blame for encouraging them, since they quite put themselves in the hands of such men, and so not only do injury to themselves, but undervalue men that walk in the right way and do excellent work. But let us pass from this little digression & consider what is most beautiful and most rare in jewellery; a digression merely entered into because I don’t want ignorant men to jeer at me for having said nothing of the ballas and the topaz. The ballas is a ruby with but little colour, as if it were a kind of feminine form of the stone, called in the West the ballas ruby, but it is of the same hardness, and so a gem of the nature of the ruby, and differing from it only as to cost. The like holds good with the topaz, in its relationship to the sapphire, it is of the same hardness as the sapphire, and though of a different colour must be classified with the sapphire, just as the ballas must be with the ruby—what better classification do you want? hasn’t the air got its sun?
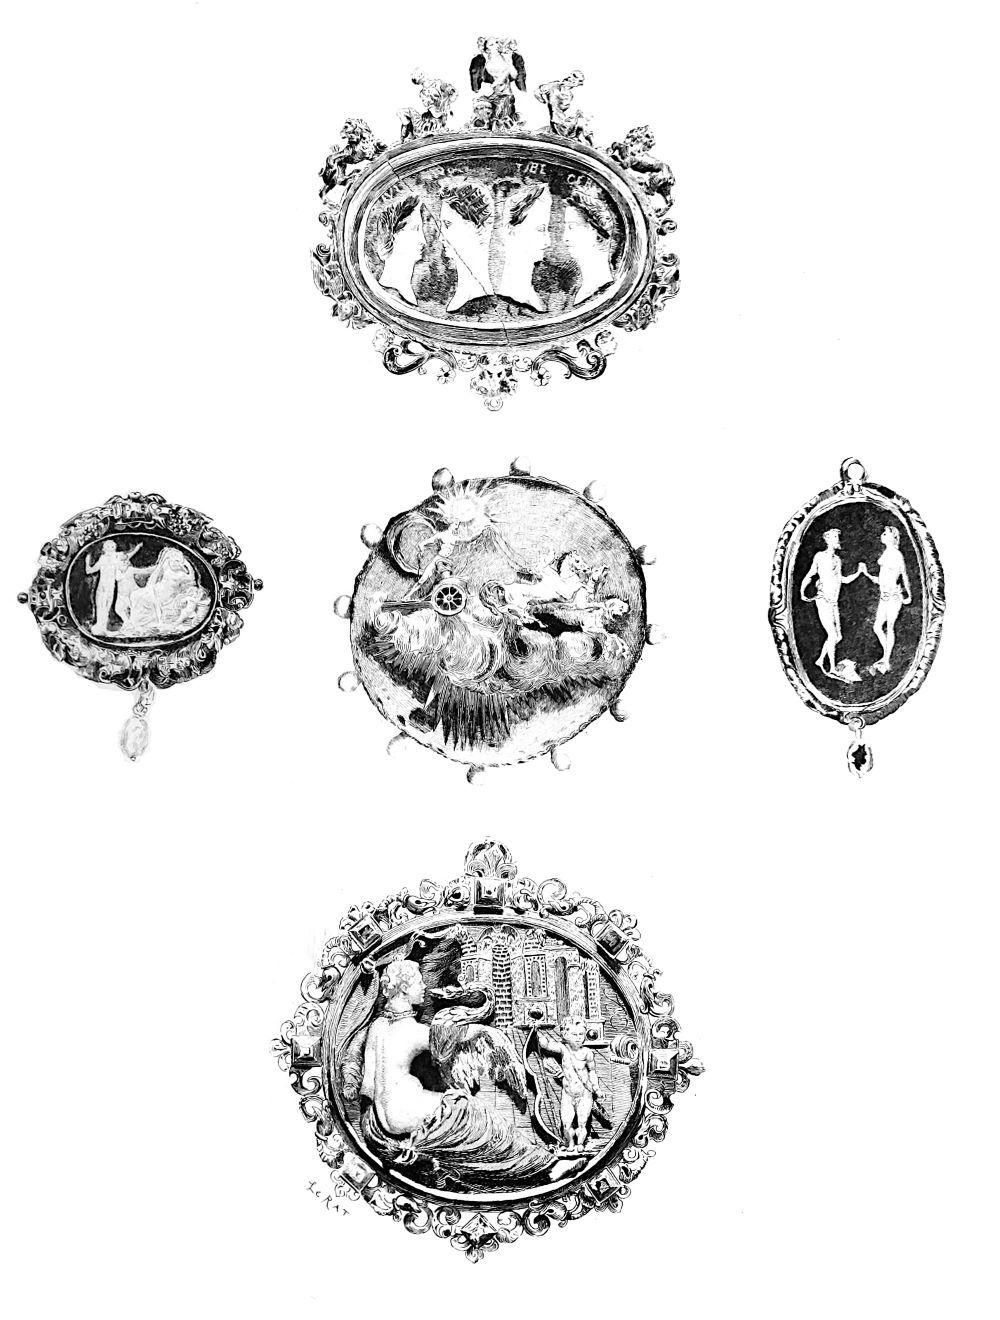
A page of reputed Cellini Jewellery
Of these four sorts of stones, the ruby, the sapphire, the emerald, and the diamond, you must know that the first is far the most costly. A ruby, for instance, of five grains of wheat, & of as fine a fire as you could wish, would be worth about 800 golden scudi, and an emerald of the same size and beauty would run to about 400, similarly a diamond would be worth 100, & no more, while a sapphire would fetch about 10. These few facts I thought might be worth having to all those many youths always springing up and eager to learn the beautiful art of the goldsmith. To be sure, they ought to begin learning as soon as they can toddle, & use that greatest of all opportunities which is afforded by apprenticeship to some Master of renown, whether in Rome, in Venice, or in Paris. In all of them did I sojourn for a long while, and in all of them did I see and handle many and invaluable pieces of jewellery.
FOOTNOTES:
[27] Balaschio.
CHAPTER V. HOW TO SET A RUBY.
We will now continue our talk & consider the way of setting a ruby, and the box of gold in which it has to be fitted. This box, whether in a pendant, a ring, or what not, is always called the bezel. What you have first of all to observe in the setting of the stone in this bezel, is that the former must not be set too deep, so as to deprive it of its full value, nor too high, so as to isolate it from its surrounding detail. I mention this because I have seen mistakes made in both ways, and I am certain that practising jewellers who have a right knowledge of drawing and design would not go wrong in either the one direction or the other.
So let us place our fine ruby into its bezel. In order to what is technically called ‘set’[28] it, we must provide ourselves with four or five ruby foils[29] of which some should be of so deep a glow that they seem quite dark, and others differing in intensity till they have scarce any red in them at all. With all these different specimens of foils before us, we take hold of the ruby with a piece of hard black wax well pointed, pressing the wax upon one of the projections of the stone. Then your good jeweller tries his ruby now upon this foil, now upon that, till his own good taste determines him which foil will give most value to his stone. Sometimes the jeweller will find it may help him to move the stone to and from the foil, but he has to recollect that the air between the foil & the stone will always give an effect different to that afterwards given when the stone is set in the bezel where no air passes behind. Therefore your capable man places the cut foil in the setting, at one time bringing it close, at another interposing a space. Thereupon let him set his jewel with all the care, taste & delicacy of which an able man is master.
FOOTNOTES:
[28] Legare.
[29] Literally leaves thatare ofthemselves red.
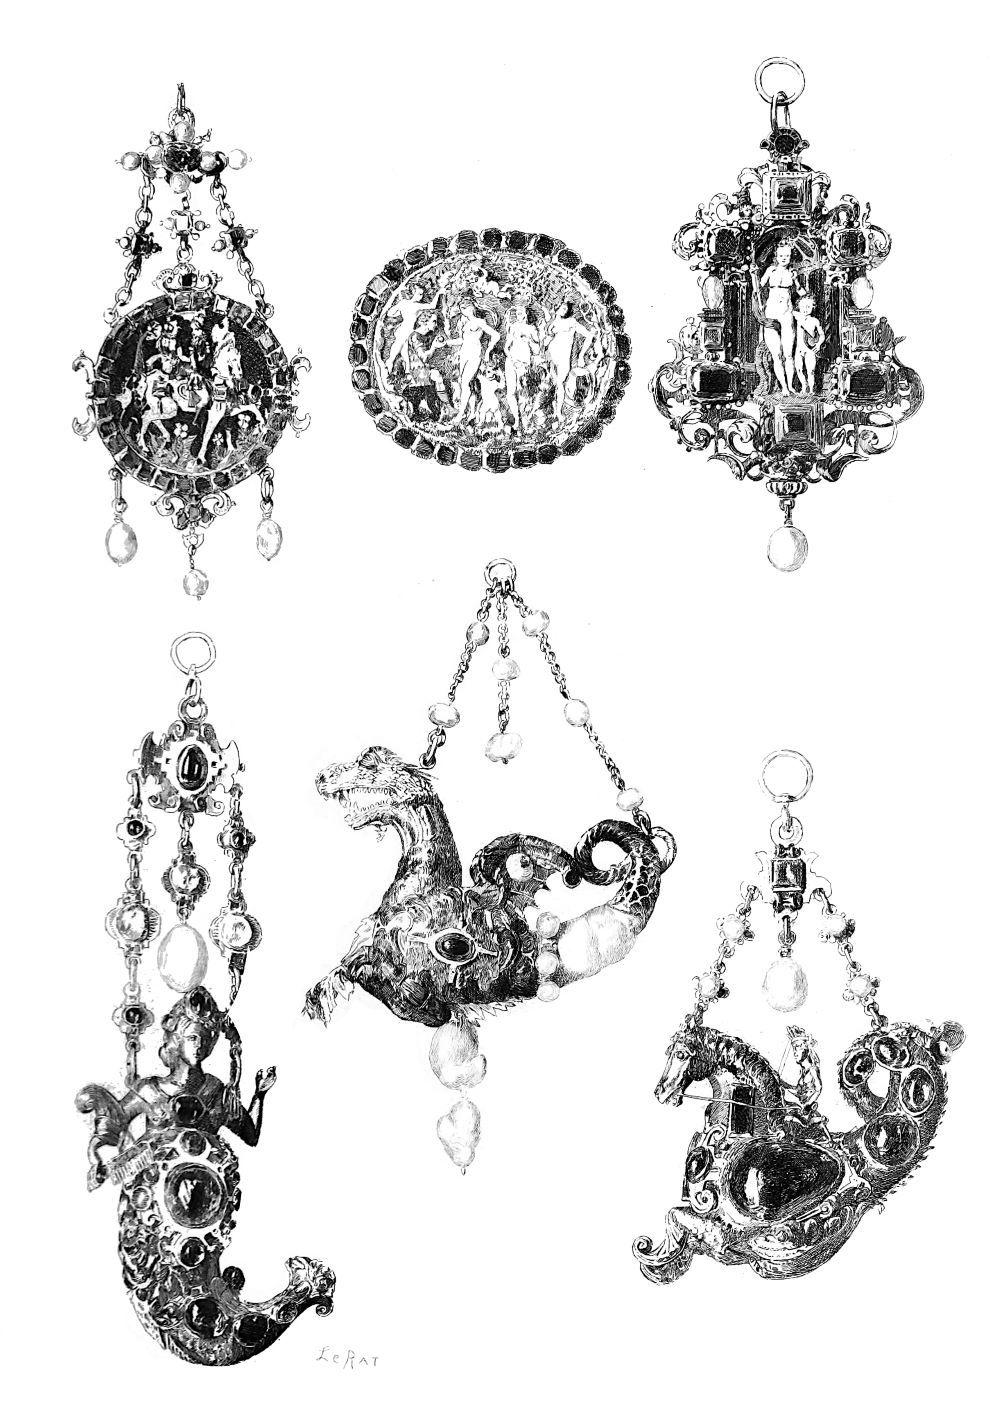
Another page of reputed Cellini Jewellery
CHAPTER VI. HOW TO SET AN EMERALD
AND A SAPPHIRE.
Now, as to the emerald and the sapphire, the same skill must be used with the foils adaptable to them as with those of the ruby. And because I consider that practice always has come before theory in every craft, and that the rules of theory, in which your skillful craftsman is accomplished, are always grafted on to practice afterwards, I will give you a case in point of what once happened to me when I was setting a ruby of about 3000 scudi in value. This ruby had, when it came into my hands, been very well set at different times by some of the best known jewellers of the day. So I was incited to work at it with all possible care. Seeing that I could in no way satisfy myself with the result of my efforts, I locked myself up somewhere where no one could see me; not so much because I did not wish my secret to go further, but because I did not want to be caught trying so mean an experiment upon so goodly and wonderful a gem. I took a little skein of silk stained with Kermes, and with a pair of scissors cut it carefully, having previously spread a little wax in the bezel. Then I took the tiny bit of silk and pressed[30] it firmly on to the wax with the point of a small punch. Then did I put my ruby upon it, and so well did it make, and such virtue did it gain, that all the jeweller folk who had seen it first, suspected me of having tinted it, a thing forbidden in jewellery except in the case of diamonds, of which more anon. But for this ruby, some of the jewellers asked me to say what kind of a foil I had put behind it, upon which I answered that I had put no foil behind it. At this reply of mine, a jeweller who was with the gentleman to whom the ruby belonged, said, ‘If the ruby has no foil, you can’t have done anything else but tint it in some way or other, and that you know is forbidden.’ To which I replied again that I had neither given it a foil, nor done anything forbidden to it. At this the jeweller got a little nasty and
used strong language, at which the gentleman who owned the ruby said, ‘Benvenuto, I pray you, be so good, provided I pay you for it, to open your setting and show it to me only, I promise you I’ll not tell anyone your secret.’ Then said I to him that I had worked several days on the job, and that I had my living to earn, but that I would willingly do it if he paid me the price of the setting, and, moreover, do it in the presence of all of them, because I should be much honoured in thus being able to teach my teachers. When I had said this, I opened the bezel and took out the stone in their presence. They were very much obliged, we parted very good friends, and I got very well paid. The ruby in question was a thick one, & so limpid and luminous that all the foils you put beneath it gave it a sort of uncertain flash, like that which shimmers from the girasol opal, or the cat’s-eye, two kinds of stones to which the dunderheads, of whom I told before, would also give the name of gems.
Now a word about the emerald and the sapphire, in both which gems one meets with the same peculiarities and difficulties as with the ruby, so I know of but little to say about them than that they are stones that are often falsified, which should be a warning to those who delight in gems or buy them, whether to set or to keep. There is a kind of Indian ruby with as little colour as you can possibly imagine, and I once saw a ruby of this nature falsified ever so cleverly by one of these cheats. He had done it by smearing its base with dragon’s blood, which is a kind of composition made of a gum that will melt in the fire, and that you can buy at any apothecary’s in Florence or Rome. Well, the cheat had smeared the base of the stone with dragon’s blood, & then set it in such a way that it showed so well, you would gladly have given 100 golden scudi for it; but without this colour it wouldn’t have fetched 10, and have been much more likely to come out of the setting. But the colour looked so fine, and the stone seemed so cunningly set, that no one unless very careful, would have spotted it.
It happened one day that I was with three old jewellers to whom I had expressed my doubts as to the genuineness of the stone, so they made me unset the ruby and they stood round me greedily