

Operations and Maintenance
The Lorimer range


Lorimer casement window
Lorimer casement windows are our most popular and versatile style. This window is available in side and top hinged variations and opens outwards. By unlocking the handle, pushing the button on the handle and turning it 90o, the window can be opened and closed. The high security multi-point espagnolette rail can also be locked in a ventilated position.
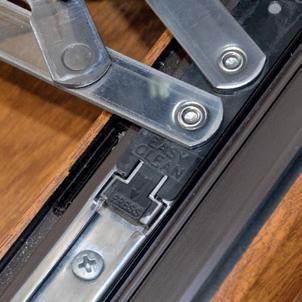
When side opening casement windows are fitted upstairs, special hinges that can open up to 90o are included, providing an escape route in the event of a fire. This hinge also allows the sash to move in order that the outer pane can be cleaned from the inside. Our egress hinges are fully compliant with guidelines detailed in the Scottish Building Regulations.
Egress/easy clean hinge operation


Lorimer reversible window
This window style is always outward opening, hinged at the top and can turn through 180° so it does not interfere with blinds or ornaments and can be cleaned from inside.
It also has a safety restrictor mechanism built in, restricting the opening to approximately 100mm.
Full rotation operation


Unlock and turn the handle to open the window in the normal way so that the sash is perpendicular to the frame.


Look for the ‘EASY CLEAN’ button on the bottom hinge. Press this button and carefully move the sash in the direction of the arrow approximately 1cm and repeat this process on the top hinge.


Gently slide the whole sash to the centre of the frame by applying force evenly at the top and bottom until the outer pane can be safely accessed for cleaning.


Unlock and turn the handle, pushing the window out at the bottom for ventilation.


Whilst pressing and holding the sash release button (pictured above), gently push the window to the second outer ventilation position. Press the sash release button again and push the window open. Hold onto the top of the sash without touching the trickle vents and pull downward until the outside of the sash is facing towards you and the hinges engage into the fully reversed position for safe cleaning.


Once clean, lift the sash upwards and rotate 180o back to it’s normal position. The window includes a restrictor so it can be secured in an open position by simply turning the catch (pictured above).

Lorimer tilt and turn window
These versatile, inward opening windows are capable of two modes of operation to comply with Scottish Building Regulations: tilt mode for ventilation and turn mode for cleaning and emergency exit.
Tilt and turn operation
There are three handle positions: ‘closed’, ‘tilt’ and ‘turn’. The operation sequence starts with the window in the closed position (handle vertically downwards). Note: The window must always be fully shut before changing the handle position. If required, turn the key to unlock the handle.
Re-setting a tilt and turn window
In the unlikely event that your tilt and turn window becomes stuck between both positions at the same time the mechanism will need to be re-set. You can do this by following the instructions below:


Apply pressure to the top hinge corner so it tilts back into place.

2 3
Push and hold the mis-handling lever (this can be found on the edge of the sash just below the handle). Turn the handle downwards to the vertical position then turn it again into the upwards vertical position. Release the mis-handling lever.
The sash should now be in the turn position, and the handle in the vertical position. Shut the window and bring the handle down to the closed position.
To select tilt mode, rotate the handle through 90° and gently pull the window inwards. The bottom will remain hinged to the frame, while the top tilts inwards to allow ventilation.
To close the window from tilt mode, push shut and secure by turning the handle back to the closed position.
To select turn from the tilt mode, close the window and rotate the handle upwards from its horizontal position and pull the window inwards. The side remains hinged to the frame, while the window may be opened inwards to allow cleaning from inside.
To select turn from the closed position, rotate the handle through 180° to the upright position and pull the window inwards to allow cleaning.
To close the window from turn mode, reverse the previous procedure. The turn position is for cleaning only and should not be used for ventilation.
Trickle vent operation
Open and close by tilting the lid on the internal vent. The smaller vent has one lid and the larger vent has two lids. The lid can be tilted to direct the air in the desired direction.


Lorimer sliding sash window
The Lorimer PVCu vertical sliding sash window has been specifically designed both in form and function to replicate a traditional sash and case window, which will enhance the appearance of your home on the inside and outside, while also maintaining its period features such as;
Product specification
Traditional ironmongery, a goal post frame and deep bottom rail
Both sashes can be tilted inwards for cleaning from inside
Double wool pile weather strip and interlocking sash for draught-proofing and security
Torso balances to remove the need for cumbersome sash weights and cords
Decorative sash horns can be specified externally for added authenticity
Two travel Restrictors which are fitted as standard to ensure compliance with Scottish building regulations
‘A’ energy rated as standard, complying with the requirements of Scottish building regulations
Additional insulated reinforcement chambers
Discreet night vent for compliance with Scottish building regulations


Performance notice
By selecting the Lorimer sliding sash window, the main objective is preserving the authentic, traditional aesthetic of the property. While both the sashes and the outer frame are enhanced with a double wool pile weather strip, given the nature of the authentic sliding sashes, an absolute compressive seal required to give complete weather proofing cannot be achieved.
This means that the weather rating and acoustic performance of the Lorimer sliding sash window may be compromised in certain locations and weather
conditions. It must be appreciated/acknowledged that draughts and noise in particular will not be fully eliminated.
If draught proofing or noise reduction are the main priority for your property when replacing your windows, we would advise you to select an alternative style from within the Lorimer range. Please discuss the options available to you with your sales consultant.
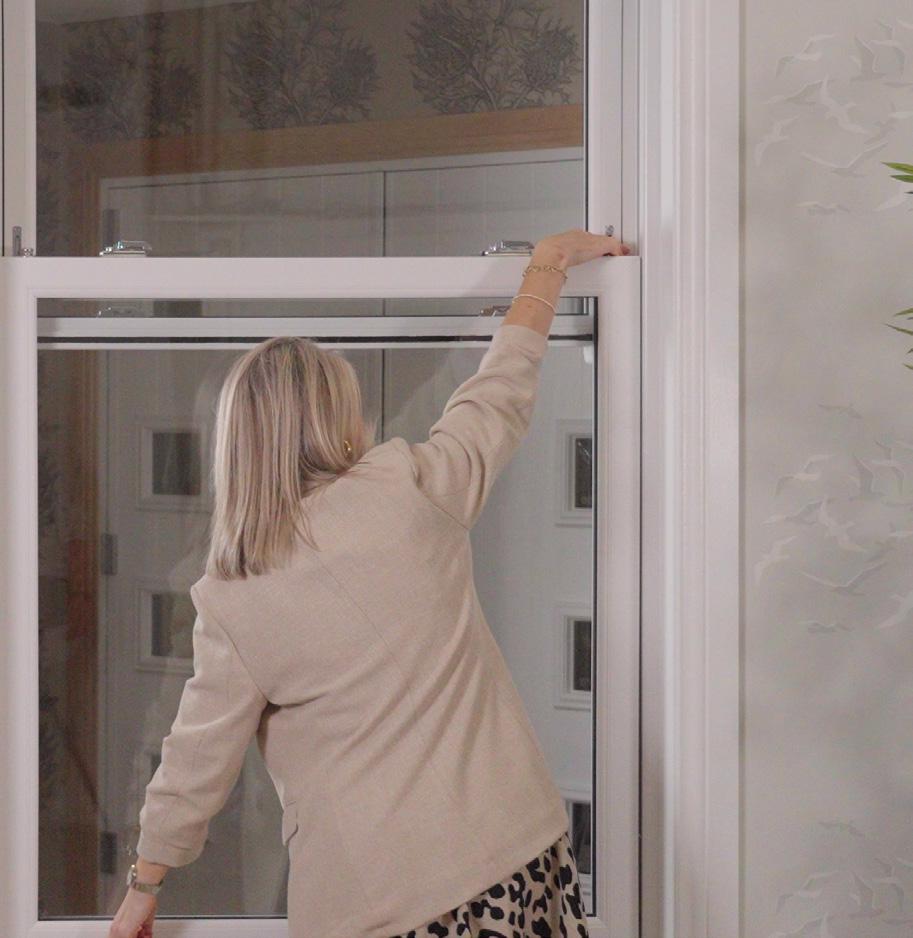
Sliding sash operation
This modern-day sliding sash replacement window not only slides up and down for ventilation but can also tilt inwards to allow for convenient cleaning, please scan the QR code opposite for video instructions. Please note that where a window exceeds 1000mm in width, due to its weight we advise that it’s cleaned from the outside (by a professional window cleaner).


Unlock and turn the fitch catch, lifting the bottom sash up approximately 5cm. Push both bell finger pulls (found on the top of the bottom sash) inwards and pull the sash inwards so it gently rests on the Restrictor arms. Slide the top sash all the way down. Locate the two finger pull buttons (positioned at either end of the top sash) and pull them inwards. Tilt the sash inwards so it gently rests on the Restrictor arms. Please note that the bottom sash must be tilted first before releasing the top one.
To close the sashes, repeat this process ensuring the finger pulls are always engaged so the window is not slammed shut. Depending on the size of the window this process may require two people to carry it out safely.
Sliding sash safety notice
The Lorimer sliding sash window style has a number of unique features in order to comply with the standards set in the Building (Scotland) Regulations 2004 (the “Regulations”). In essence, the window, in normal use, provides a safety barrier to prevent anyone slipping or falling through the window opening but, in the case of an emergency, instead provides a means of escape through the window opening.
To comply with the Regulations, and in the interests of safety, whether in normal use or in the case of an emergency, this window has been designed with two travel restrictors on the upper sash, (the “Restrictors”). In accordance with the Regulations, the Restrictors provide you with a fixed protective barrier, when the window is in normal use, by preventing the opening of the bottom sash further than 100mm. This is to minimise the risk of persons falling or slipping through the window’s opening when one of the Restrictors is in the engaged position.
YOU MUST choose and then ensure one of the Restrictors remains in the engaged position at all times unless in the case of an emergency (e.g. fire) the fully opened window is required as a means of escape from the property.
In the case of an emergency only, press on the engaged spring loaded Restrictor and lift the bottom sash until it passes over both Restrictors. The bottom sash can be lowered at any time and the Restrictor will revert to the engaged position automatically. This action is
demonstrated to you on page 11 and in the Lorimer Sliding Sash Window Safety Video which will be shown to you by CR Smith prior to you entering the contract (please note that a copy of this video is available by scanning the following QR code or on our website at crsmith.co.uk). There is no need to disengage the Restrictors to clean the windows.
After completion of the installation, you should select which of the two Restrictors you wish to remain in the engaged position. At a later date, should you wish to alter this arrangement, you may do so using the tool provided or suitably sized screwdriver. CR Smith will happily supply one or more replacement tools if you ever lose them by emailing service.centre@crsmith.co. uk.
To ensure continued compliance with the Regulations, YOU MUST ensure that a copy of this manual is passed to any future owner, occupier or tenant of the property as part of the sale or letting transaction.
Window restrictor operation
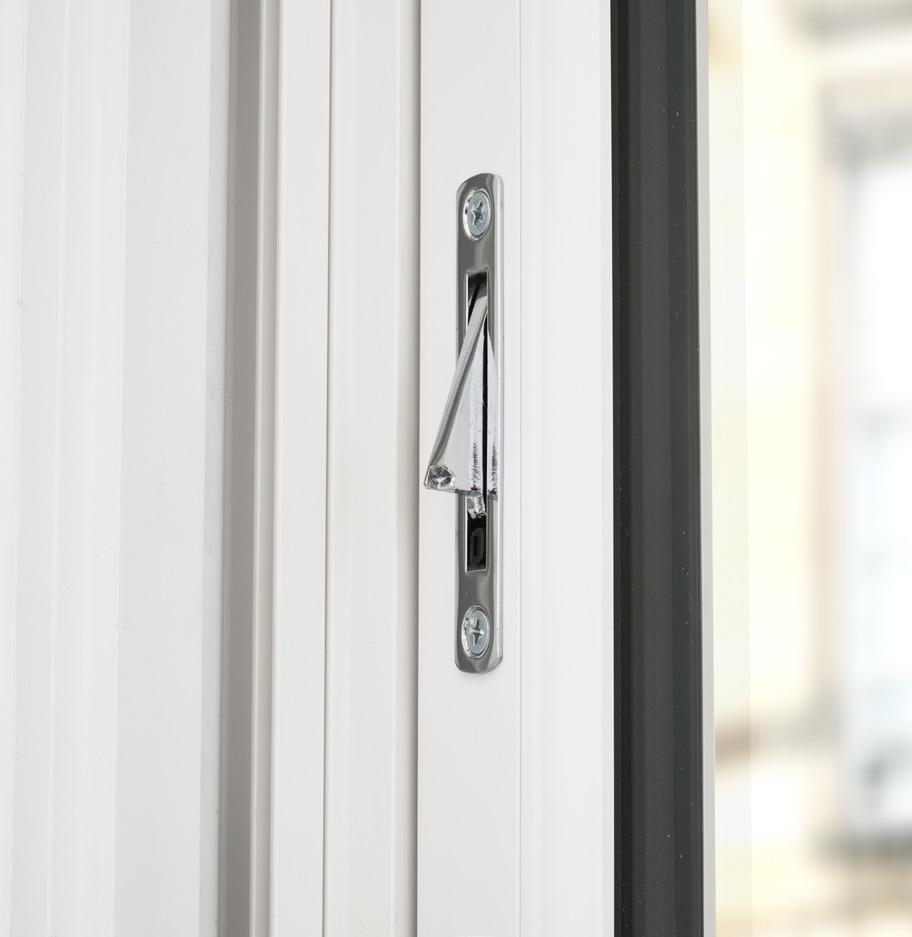
With the bottom sash closed, locate the metal rectangular travel Restrictors positioned on either side of the top sash.
In the case of an emergency only, press on the engaged spring loaded Restrictor and lift the bottom sash until it passes over both Restrictors. The bottom sash can be lowered at any time and the Restrictor will revert to the engaged position automatically.


Travel Restrictor ENGAGED Travel Restrictor DIS-ENGAGED
(Use the tool provided to lock this in position)

To change a disengaged Restrictor to the engaged position, insert the Restrictor tool or, if the tool has been mislaid, a suitably sized screwdriver into the slot at the bottom of the Restrictor and turn in a clockwise direction.

To lock the Restrictor in the disengaged position, insert the Restrictor tool into the slot, push the Restrictor inwards and turn the tool anticlockwise. You will know the Restrictor is in the disengaged position when it sits flush in the sash. Please also note that CR Smith will be happy to supply replacements if you have mislaid the tool originally supplied with each window that requires a safety barrier and a safe escape route.

Single and double doors
Our Lorimer PVCu and TimberLuxe doors are manufactured to provide the highest standard of weather proofing and security.
To lock a Lorimer PVCu or TimberLuxe door (with lever handles), the handle should be pulled upwards to engage the hooks, rollers and, where applicable, shootbolts. This will then allow for the key or thumb turn barrel lock to be turned.
The Lorimer PVCu door key can be removed when it is in the vertical position. The TimberLuxe door key can be removed when in the horizontal position. The multipoint lock should be engaged
at all times when the door is closed to ensure there is always a water tight seal and to prevent the door from bowing.
Please remember that our engineered timber door is constructed using environmentally friendly natural timber. It may move around slightly at the top and bottom as it adjusts to its new surroundings. In order to prevent this, try to keep the temperature as low and consistent as possible around the door for the first eight weeks. After this period, raise the temperature back up to normal levels.
Lorimer PVC patio door
Our Lorimer PVCu in-line patio doors are manufactured to the same standards but only require the lever behind the handle to be lowered to disengage the hook lock and lifted to re-engage.
The patio door key can be removed when in the horizontal position.

Cleaning

We recommend that all PVCu, GRP, ABS or aluminium windows, doors and roof frames are cleaned with mild, soapy water after the initial installation, then every month to remove grime and atmospheric deposits. In coastal or industrial areas this should be carried out more often.
Stubborn stains on white PVCu can be cleaned with a non-abrasive PVCu cream cleaner. Power washers, especially on conservatory roofs should never be used and care always taken not to disturb sealants and gaskets.
Ironmongery

Internal hardware, including handles, letter plates and door knockers etc., should be polished weekly with furniture polish as part of normal household cleaning.
It is recommended that external ironmongery should be cleaned every month, and more often in coastal or industrial areas. Dirt, dust and any surface build up should be gently wiped clean using a soft damp cloth and warm mild soapy water only. Afterwards rinse the surface with warm clean water and dry with a soft clean cloth.
All ironmongery products are coated with a protective lacquer which can be damaged by key chains and jewellery. Chemicals, brass cleaner, wire wool and wire brushes etc. are not to be used under any circumstances as they will damage this coating and replacement parts will not be covered by the guarantee.


Glass Timber
Glass used in most double-glazed units is easily scratched and it is recommended that hand jewellery is removed prior to cleaning.
Glass areas should be cleaned on a monthly basis using either a proprietary glass cleaner or clean water, a dash of vinegar and a soft cloth. For extra shine, buff the glass with newspaper.
Low-emissivity glass is an essential component of energy efficient windows and doors and is used to significantly increase the insulation properties of your windows. It uses a metallic surface coating which under some light conditions can create a hazing, or light tint effect. This has no detrimental effect to the function of the window
and is not deemed to be a defect.
The visual quality of a double glazed unit is assessed by looking through it from the room side, at right angles to the glass and standing at a distance of no less than two metres for a float glass unit and three metres for a toughened or laminated glass unit. It should only be viewed in natural daylight and not direct sunlight, with no visible moisture on the surface of the glass.
Provided that your vision is not disturbed under these conditions, for example by bubbles or scratches, then the glass is deemed to be of good visual quality.
For further information please refer to page 20.
Leaded glass
Lead work detail on double glazed units is typically bonded to the surface and care should be taken as excessive pressure may dislodge the lead from the glass. The use of warm soapy water and a soft cloth moderately applied will prove an adequate cleaning method.
Lead work naturally oxidises over time and is not deemed to be a defect.


To maintain their finish, all internal timber sills and surrounds should be polished weekly using a regular furniture polish as part of normal household cleaning. If exposed to direct sunlight you should consider re-varnishing or waxing them every few years.
The same products used during our installation should be used for maintenance and can be advised on request. External timber will require regular maintenance with a suitable preservative treatment.
Sealants

Internal silicone sealant should be cleaned on a weekly basis to be kept free of condensation and mildew resulting in mould, especially in bathrooms and kitchens. If the silicone begins to discolour, apply a regular mould spray to the soiled area, leave overnight then wipe clean in the morning.
We recommend trying on a small area first, avoiding contact with your surrounds because the mould spray may react, depending on the finish. External sealants can be cleaned with mild soapy water at the same time as the frames.
During cleaning, ensure that any hand fitted gaskets and weather seals do not become dislodged from their grooves. Should this occur, slide back into position immediately to avoid damage when the windows or doors are closed. Following the initial installation, the weather seals may require bedding in, causing a slight resistance during operation. The application of a silicone spray will aid the smooth operation and extend their life.

Smartglass
Smartglass® has been specially designed to remain cleaner for longer than conventional glass. A transparent coating on the surface of the glass harnesses the power of ultra-violet rays and rain water (or water) to break down dirt and organic matter and wash it away.
After installation wait at least a week before cleaning the product for the first time to ensure the sealants used in the conservatory have fully cured. Start by rinsing the roof with a hose at very low pressure. Do not use a pressure washer on your conservatory at any point.
During the week after initial installation the special properties of Smartglass®, that help it stay cleaner for longer, will activate progressively when triggered by exposure to UV light. The length of time required to activate the coating by UV rays can vary depending on the season and the orientation of the glass. When the glass is wet a small border of water droplets may appear around the perimeter surface of the glass. This is perfectly normal.
The more exposure Smartglass® has to both sun and rain, the cleaner it will stay for longer. However, a number of other factors affect the time it takes for a mark to be naturally removed, such as the pitch of the roof, the level of ambient light, pollution, atmospheric conditions (e.g. long periods without rain) etc.
Smartglass® is NOT a 100% maintenance free product. Should the glass require occasional cleaning then a soft, clean, lint free cloth or chamois can be used with clean water, mild glass cleaner or mild soapy water. Never use any abrasive products or chemicals as this may damage the surface coating. For the removal of stubborn marks, white vinegar can be used, but not as a regular cleaning method.
Please visit crsmith.co.uk/smartglass-cleaning for a list of approved agents. These can also be used on standard glass roofs.
Please note that while we apply patination oil to the lead flashing above your roof, due to atmospheric conditions over time some leaching may occur. Should this happen and it drips onto the glass, it must be cleaned using the methods described, otherwise the marks will become permanent.
Security
Your windows and doors have been specifically designed to include a variety of security features to protect your home and family against intrusion. We do however recommend the following sensible precautions:
Never leave a window open when your home is unattended, even in the vented position.
To provide adequate means of escape in the event of any emergency, we recommend that keys to all windows are located adjacent to the window but out of view from the outside and children.
When leaving the house unattended or at night, ensure door handles are fully lifted and that keys are turned to engage the lock and all spare keys are out of view
For added protection, lock all windows in the closed position and remove the keys.

Mechanisms
Hinges, espagnolettes, patio rollers and locking mechanisms should be cleaned and lubricated every month.
We recommend lubricating the moving parts with ‘3 in 1’ oil or a silicone-based lubricant.
Do not use WD40. Ensure that all mechanisms are wiped clean and are free from dirt and grime.
For patio doors, ensure that the bottom track and shoot bolt keepers are clear of debris.
Windows in high moisture areas such as kitchens and bathrooms should be lubricated monthly.
Do not lubricate the key or thumb turn barrel/cylinder.
After 10-years a graphite barrel lubricant can be applied to extend the life of a thumb turn barrel/ cylinder.

Gutters
Aluminium box gutters and PVCu rainwater gutters must be cleaned out regularly to prevent build-up of leaves and debris which can cause overflow and leaks.
Please take care when cleaning gutters and do not walk in the aluminium box gutter or on the conservatory roof. A professional cleaning service may be required for some designs of conservatory roofs.
During winter months it’s important to clear snow from the gutters to ensure the weight doesn’t damage the gutter brackets as these are not covered under the guarantee.
Internal condensation
While condensation cannot be eliminated it can be managed by following these guidelines:
The air surrounding us in our home always contains water vapour which is not visible. Condensation is caused when the air becomes saturated with excess water vapour produced by normal living activities such as cooking, washing up, bathing, laundry and heaters.
In the past, excess water vapour could escape up a chimney, through a door jamb or window joints and other outlets.
However modern home comforts including central heating, double glazing and insulation have created rooms that are warmer but often have less ventilation meaning the excess water vapour has nowhere to go.
When the vapour that is trapped inside comes into contact with a surface area that is at a lower temperature than itself, the air is chilled and the excess water vapour eventually forms as droplets of moisture on that surface, which is commonly on the glass of a window or door.
In cold weather, turn on some form of heating more frequently.
Ensure that wall vents and windows are open and kept clear.
Allow the room’s warmth to reach the windows and use a fixing which holds curtains at least 15-20cm away from the glass to allow free movement of warm air. Please note that blinds can act as a barrier to this.
External condensation
Due to ongoing innovations in the thermal performance of double glazing, along with evolving Scottish Building Regulations (designed to lower carbon emissions from the home), certain weather conditions may allow the formation of external condensation on energy efficient windows and doors.
Windows manufactured with low emissivity glass have enhanced thermal insulation properties which means that heat from your home is reflected back into the room.
As a result heat loss is reduced, not escaping through the glass to warm the outer pane. It therefore remains cooler which can then allow excess water vapour to form as droplets of moisture on the surface.
When cooking or bathing ensure bathroom and kitchen internal doors are closed and windows kept open. Consider the installation of an extractor fan or cooker hood.
Provide natural ventilation by opening a window for at least a few minutes each day to allow a minimum of one complete air change.

Inside your home

External condensation only occurs in certain climatic conditions where there is high relative humidity, clear cold conditions and normally experienced as spring and autumn dew. This is a natural phenomenon and an indication that the window or door is preventing heat loss from your home.

Quality of vision
The following are guidelines from the Glass and Glazing Federation detailing the agreed procedure that should be used to complete a professional quality inspection of a double or triple glazed sealed unit, as well as the visual quality of glass that’s deemed acceptable.
How to do a professional inspection
For standard float (annealed) glass, the inspector should stand no less than 2 metres away from the sealed unit and look directly through it. For toughened, laminated or coated glasses (low emissivity), stand no less than 3 metres away. Furthermore, inspections should be
carried out in natural daylight, but not directly towards the sun and with no visible moisture on the surface of the glass. A 50mm wide band should be excluded around the edge of the glass from the check and the glass must be viewed at an angle of 90º.
Acceptable standards
The obtrusiveness of blemishes is judged by looking through the glass, not at it, under natural light. It must be understood that the glass used in sealed units is a processed glass, and as a consequence, blemishes are to be expected. Flat transparent glass, including laminated, toughened or coated glasses is acceptable if the following are neither obtrusive nor bunched: bubbles, blisters or seeds, fine scratches not more than 25mm long, minute particles. Sealed units with optical
defects such as smears, finger prints or other dirt on the internal cavity faces of the glass, or extraneous material in the cavity are unacceptable, if they are visually disturbing. Viewing sealed units for scratches on the outer faces of the panes must be carried out before any rendering, plastering or other works adjacent to the glazing takes place, and as early as reasonably practicable following installation.
Special glasses
Toughened glass may show visual distortions which are accentuated by reflections in sealed units, such as ‘roll wave’ and ‘Brewster’s fringes’. These are a natural phenomenons and not a fault. Please note that laminated glass may have a few more blemishes due to it being made from several layers and patterned glass is not governed by the above guidelines due to the way it is made.
Some low emissivity coatings may produce transient visual effects. In some lighting conditions the coating may look like a transparent film or produce a haze, i.e. a cloudy look to the surface. When light-coloured objects such as net curtains are placed close to the glazing they may look slightly darker.
External condensation
Under certain atmospheric conditions, especially in Autumn, condensation may appear on the outside of a sealed unit comprising low emissivity glass. This is not a defect and will clear when the temperature rises.