This season, kickstart your creativity with Cricut®. From trending projects for you to personalized gifts for loved ones, see what’s possible. Plus, discover the best deals during our sales event. Save big on cutting machines, heat presses & more craft essentials.
04 Project Inspiration
Trending Projects
Personalized Gifts
Back-to-School Crafts
18 Make It Yours
Sales Event
Product Deals
8 Great Gifts Under $100
PROJECT INSPIRATION
PROJECT INSPIRATION
From seasonal decor to custom tees, cards, and more — see what’s trending.
Abstract Overnight Bag →
Floral Garland →
YAY! Debossed Card →
Astrology Shirt →
Coffee Cup Box →
Sunflower Card →
Watering Can Bugs →
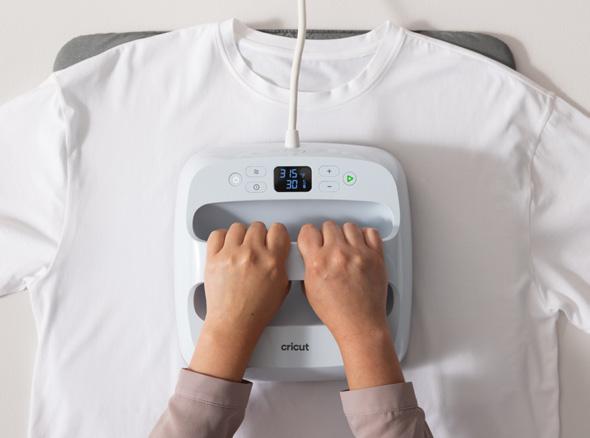
Project Tutorial:
Astrology Shirt
This project uses Value Glitter Iron-On to create a custom T-shirt.
Start making! Click here to open the Design Space® project.
What you need
Materials to Cut
Value Glitter Iron-On, Black
Everything Else
StandardGrip Machine Mat (Green)*
Cricut® Heat Press (or household iron)
Cricut Heat Press Mat (or Towel)
Weeder (or tweezers)
T-shirt
*Smart Iron-On™ does not require a machine mat
Preparation
Cut
Place iron-on (HTV) sheet, liner side down, onto StandardGrip Machine Matt. When you’re ready, select Make. Then follow Design Space prompts.
Assemble
Remove iron-on (HTV) from machine mat.
Place protective cover back on machine mat.
From the dull side of the material, use Weeder tool, tweezers, or your fingers to gently lift and peel away unwanted material from liner. Your cut design should remain on liner. When finished, your design will appear backwards and be free of any unwanted pieces.
Place Heat Press Mat (or towel) on a hard, stable surface. Position design where you want it, clear carrier sheet (shiny side) face up.
Place Cricut Heat Press over entire design for 30 seconds, applying consistent, firm pressure.
Let design cool for 1 minute, then carefully peel liner away from T-shirt. If design lifts, press liner back over design and repeat pressing steps, especially around edges. Repeat as necessary.
Let design cool, then peel liner away again.
TIP: Wait 24 hours before washing. Wash and dry inside out. Do not use fabric softener.
Dog Hoodie →
Veneer Personalized Tea Box →
Bow Phone Case →
Bistro Monogram Stackable Mugs
Customized S’more Themed Cooler
Personalized Retro Roller Skates
Mugs
Family Established Wall Decal →
Cooler Stickers →
Project Tutorial:
Bow Phone Case
This project uses Value Vinyl to create a personalized decal.
Start making! Click here to open the Design Space® project.
What you need
Materials to Cut
Value Vinyl, White
Everything Else
StandardGrip Machine
Mat (Green)*
Transfer Tape
Weeder (or tweezers)
Scraper
Phone Case
*Smart Vinyl™ does not require a machine mat
Preparation
Cut
When you’re ready, select Make. Then follow Design Space prompts.
Assemble
Remove vinyl from machine mat.
Place protective cover back on machine mat.
Use Weeder, tweezers, or your fingers to gently lift and peel away unwanted material from liner. Your cut design should remain on liner.
Peel backer off Transfer Tape and lay the sticky side on top of your cut vinyl design.
Use Scraper to firmly press the Transfer Tape over your decal. Flip to repeat on the backside, too.
Slowly peel back white liner at an angle, making sure the decal adheres to the Transfer Tape. Once removed, carefully place the vinyl in the desired position on your phone case.
Use Scraper to firmly adhere the decal to your phone case.
Slowly peel back Transfer Tape at a 45-degree angle, using a back and forth motion to release the cut vinyl design. If pieces of your decal remain on the Transfer Tape, press back down to adhere again.
It’s back-to-school season and we’ve got all the inspo to customize your classroom or your deck out your kiddo in personalized gear.
Crayon Box →
Calendar Stickers →
Personalized Snackle Box →
Print then Cut Kids Backpack →
Drink Set →
Pencil Holder →
Print then Cut Kids Backpack
This project uses Printable Iron-On and print then cut to create a personalized backpack.
Start making! Click here to open the Design Space® project.
What you need
Materials to Cut
Printable Iron-On For Light Fabrics - US Letter
Everything Else
Cricut® Heat Press (or household iron)
LightGrip Machine Mat (Blue)*
Home Inkjet Printer
Backpack
*Smart Iron-On™ does not require a machine mat
Preparation
Cut
Customize your design in Design Space, then select Make. Follow the instructions in Design Space to print your design. Do not mirror your design.
Place the material on LightGrip Machine Mat, printed side up, and load into your machine. Ensure the page is oriented on the mat as it appears in Design Space.
Select Go to cut the design.
When the cut is complete, select Unload.
Assemble
Use Weeder to remove excess iron-on from in and around your design.
Peel design away from liner by hand and place onto your backpack.
Place the included pressing sheet on top of your design in order to protect the heat press from the printer’s inks, then press.
Press at the time and temperature instructed in the Heat Guide or Cricut Heat app.