


This Service Manual will alert you to certain procedures that should done very carefully. If you ignore this information, you could ...
• Injure yourself or bystanders
• Injure the boat operator, passengers or bystanders
• Damage the outboard or its accessories
This safety symbol appears next to infor- ill mation that, if ignored, could result in injury to you or others. ,
This information symbol appears next to information that, if ignored, could result in damage to the outboard its accessories.
This Service Manual is written for qualified, factorytrained service technicians familiar with the use of Special Tools.
This Service Manual tells you how to correctly maintain and service the outboard and its cessories. When correctly serviced, the outboard and its accessories will reliabIe and safe to use.
When Special Tools called for, use them. Where mentioned, the tools required to form the service procedure.
If you use service procedures tools that not YOU ALONE must decide might injure people damage the accessories.


35 Models

40 Models
E40RCC J40RCC
E40RLCC J40RLCC
J40BACC
E40BALCC J40BALCC
J40ECC
E40ELCC J40ELCC J40TECC
E40TELCC J40TELCC
E40TLCC J40TLCC
45 Models
45RWLE
45RWYE
45RSE
45RSLE
45RSYE
45RCR
45RCLR
48 Models
E48ESLCC J48ESLCC
50 Models
J50BECC
E50BELCC J50BELCC
E50TELCC J50TELCC
E50TLCC J50TLCC
55 Models
55RWLR
55RSH
55RSLH
55RSYH

Outboard
EnjoyabIe boating is the Goal of people who design and build marine products. reach this Goal, manufacturers careful to make sure ....
• Product User is 1nformed
• Products Safe and ReliabIe .. . ..
It's up to You, the people who .....
• Rig 80ats
• Fix Machinery
• Maintain Equipment .... to the products safe and reliabIe .
This section talks about safe boating and how You help make it safe. Some items you know but others you not.
First!
word about parts ..... Plain parts .. . .. Special parts ..... parts!
"They look the but ..... they the same?

Same Size?
Same Strength?
Same Material?
Same
Oon't Substitute unless You Know they the Same in characteristics.
Second!
• Special Locking bolts and nuts often used to hold steering, shift, and throttle remote control cabIes to the motor.
When you take motor off boat, Track of Special Nuts and 801ts. Oon't mix with other parts.
Use Only the Special Nuts and 80lts to hold remote Steering, motor.

The outboard Shift System starts here at the remote control lever and ends here . .... at the propeller. When control lever is in " Forward," "Neutral" "Reverse" position,
Shift linkage must _ match control
lever position
and
propeller still powered unknown to operator, motor will Start in Gear, boat will move suddenly. boat will move Opposite to d i rection wanted operator when Rigging after
I
Follow warnings marked " & " closely . AssembIe Parts Carefully. Make Adjustments Carefully. Test Work. Oon ' t Guess. Make Propeller Ooes Just What the Operator Wants and Nothing Else. Shift Gears When Motor is Stopped. Adjustments Lost Weakened
The outboard Speed Control System starts here at the remote control lever (single lever remote control) and ends here the powerhead.

What's Most Important?
powerhead speed must slow down enough to allow operator to shift into Neutral
Operator must to Stop propeller.
What Could
If Operator can't slow down the motor shift into Neutral gear (stop propeller), Operator could panic and lose control of boat.
How Loss of Speed Control Minimized?
• Read, Understand, and Follow manufacturers Instructions.
• Follow warnings marked 11 & 11 closely. when Rigging after Servicing
• AssembIe Parts Carefully
• Make Adjustment Carefully
• Test Your Work. Don't Guess. Make Sure Motor Changes Speed Smoothly, Quickly
• Make Sure Full Throttle Obtained so Operator Won't Overload
The outboard steering system starts here at the steering wheel ..... and ends here at the Trim What's Most Important? the outboard motor
The Steering System
• must not apart
• must not jam
• must not sloppy loose
What Could
• If steering system comes apart, boat might turn suddenly and circle persons thrown into water could hit.

• If steering jams, operator not to avoid obstacles. Operator could panic.
• If steering is loose, boat weave while operator tries to steer straight course. With some rigs (at high speed) loose steering could lead to loss of boat control.

When
Rigging
after Servicing
Use steering system recommended the motor manufactu wh ich meets Marine industry Safety Standards Read, Understand, and Follow manufacturers Instructions.
Follow warnings marked " & " closely. AssembIe Parts Carefully Make Adjustments Carefully Parts Moving Freely ..... Lubricate Parts as Shown in Manuals Use the bolts, nuts, and washers supplied with steering attachment kits they're Special Locking That Won't Loosen, Rust, Weaken.
• When Transom Mounted steering systems (see picture) used, check to uncover possibIe TroubIe!
During this procedure, steering parts transom mounted steerer
to
• aware that Raising Lowering motor transom change set up which was earlier. If moved up or down even 1/2 inch, run test again to make sure steering parts free and clear.
• Check for Damaged parts Blows to the Motor like this
• Must Not Bind
• Must Not Touch Other boat, motor accessory Parts in Transom Why? hard bIow to the motor's gearcase result in damage to steering parts here
this put Heavy Loads steering parts. Look for
• Cracked parts, including steering parts, swivel brackets transom brackets
• Bent parts
• Loose nuts and bolts parts could fail later

and ends here __ - \ at the carburetor
The Electrical System begins here at the battery and ends here the powerhead.
What's I rnportant?
• Fuel Leakage must eliminated.
• Stray electric sparks must avoided .
What Could
Gasoline ignite and burn easily . Gasoline vapors ignite and explode.
When not boating, fuel leaking in trunk van, place where portabIe tank is stored (basement, cottage) could ignited flame spark (furnace pilot light, etc ) When boating, fuelleaking under the motor cover could ignited damaged deteriorated electrical part loose wire connection making stray sparks .
How Fire and Explosion Minimized?
• Read, Understand, and Follow manufacturers 1nstructions
• Follow warnings marked 11 ffi 11 closely
• not substitute fuel electrical system parts with other parts which look the same. Some electrical parts, like starter motors, of special design to prevent stray sparks outside their cases.
• Replace wires, sleeves, boots which cracked torn look in condition.
• When Mixing and Refueling . .. . . Always Mix gas and oil Outside
Always fill the tank Outside the boat.
Fumes hard to control . .... . . . . . they collect and Hide in the bottom of the boat.
Metal to Ground the spout to the tank.
avoid those Static lectric Sparks
Ground (touchj the spout against the tank
• After Repair part of the fuel system, pressure test engine portion of fuel system as shown: (See Section 2 for testing the fuel tank portion.)
Squeeze till bulb feels

• When Storing:
I f tank has air vent valve, make sure it's closed.
If stored indoors, do not put in having appliance with Pilot Light where electrical appliances switches (which spark) will used.
• When Running:
Whenever possibIe, ... remove Hose from motor And from tank and store arou nd ears of tank.
This way gasoline is trapped in tank and not in the hose where it might leak onto the floor if hose deteriorates.
Carburetor air intake silencer will catch and hold fuel which F lood into motor if carburetor float sticks.
motor And Drain Hose is in place.
lock screws. Use only the special Screws.
• If electrical parts replaced even removed from the motor, check the following:
Wire and High Voltage Lead Routing
• as shown in service manual
• away from moving parts which could cut wires wire insulation
• away from motor cover latches which catch and cut insulation from High Voltage spark plug leads.
Sleeves, Boots, Shields
• in position (to avoid shock hazard) not torn cracked
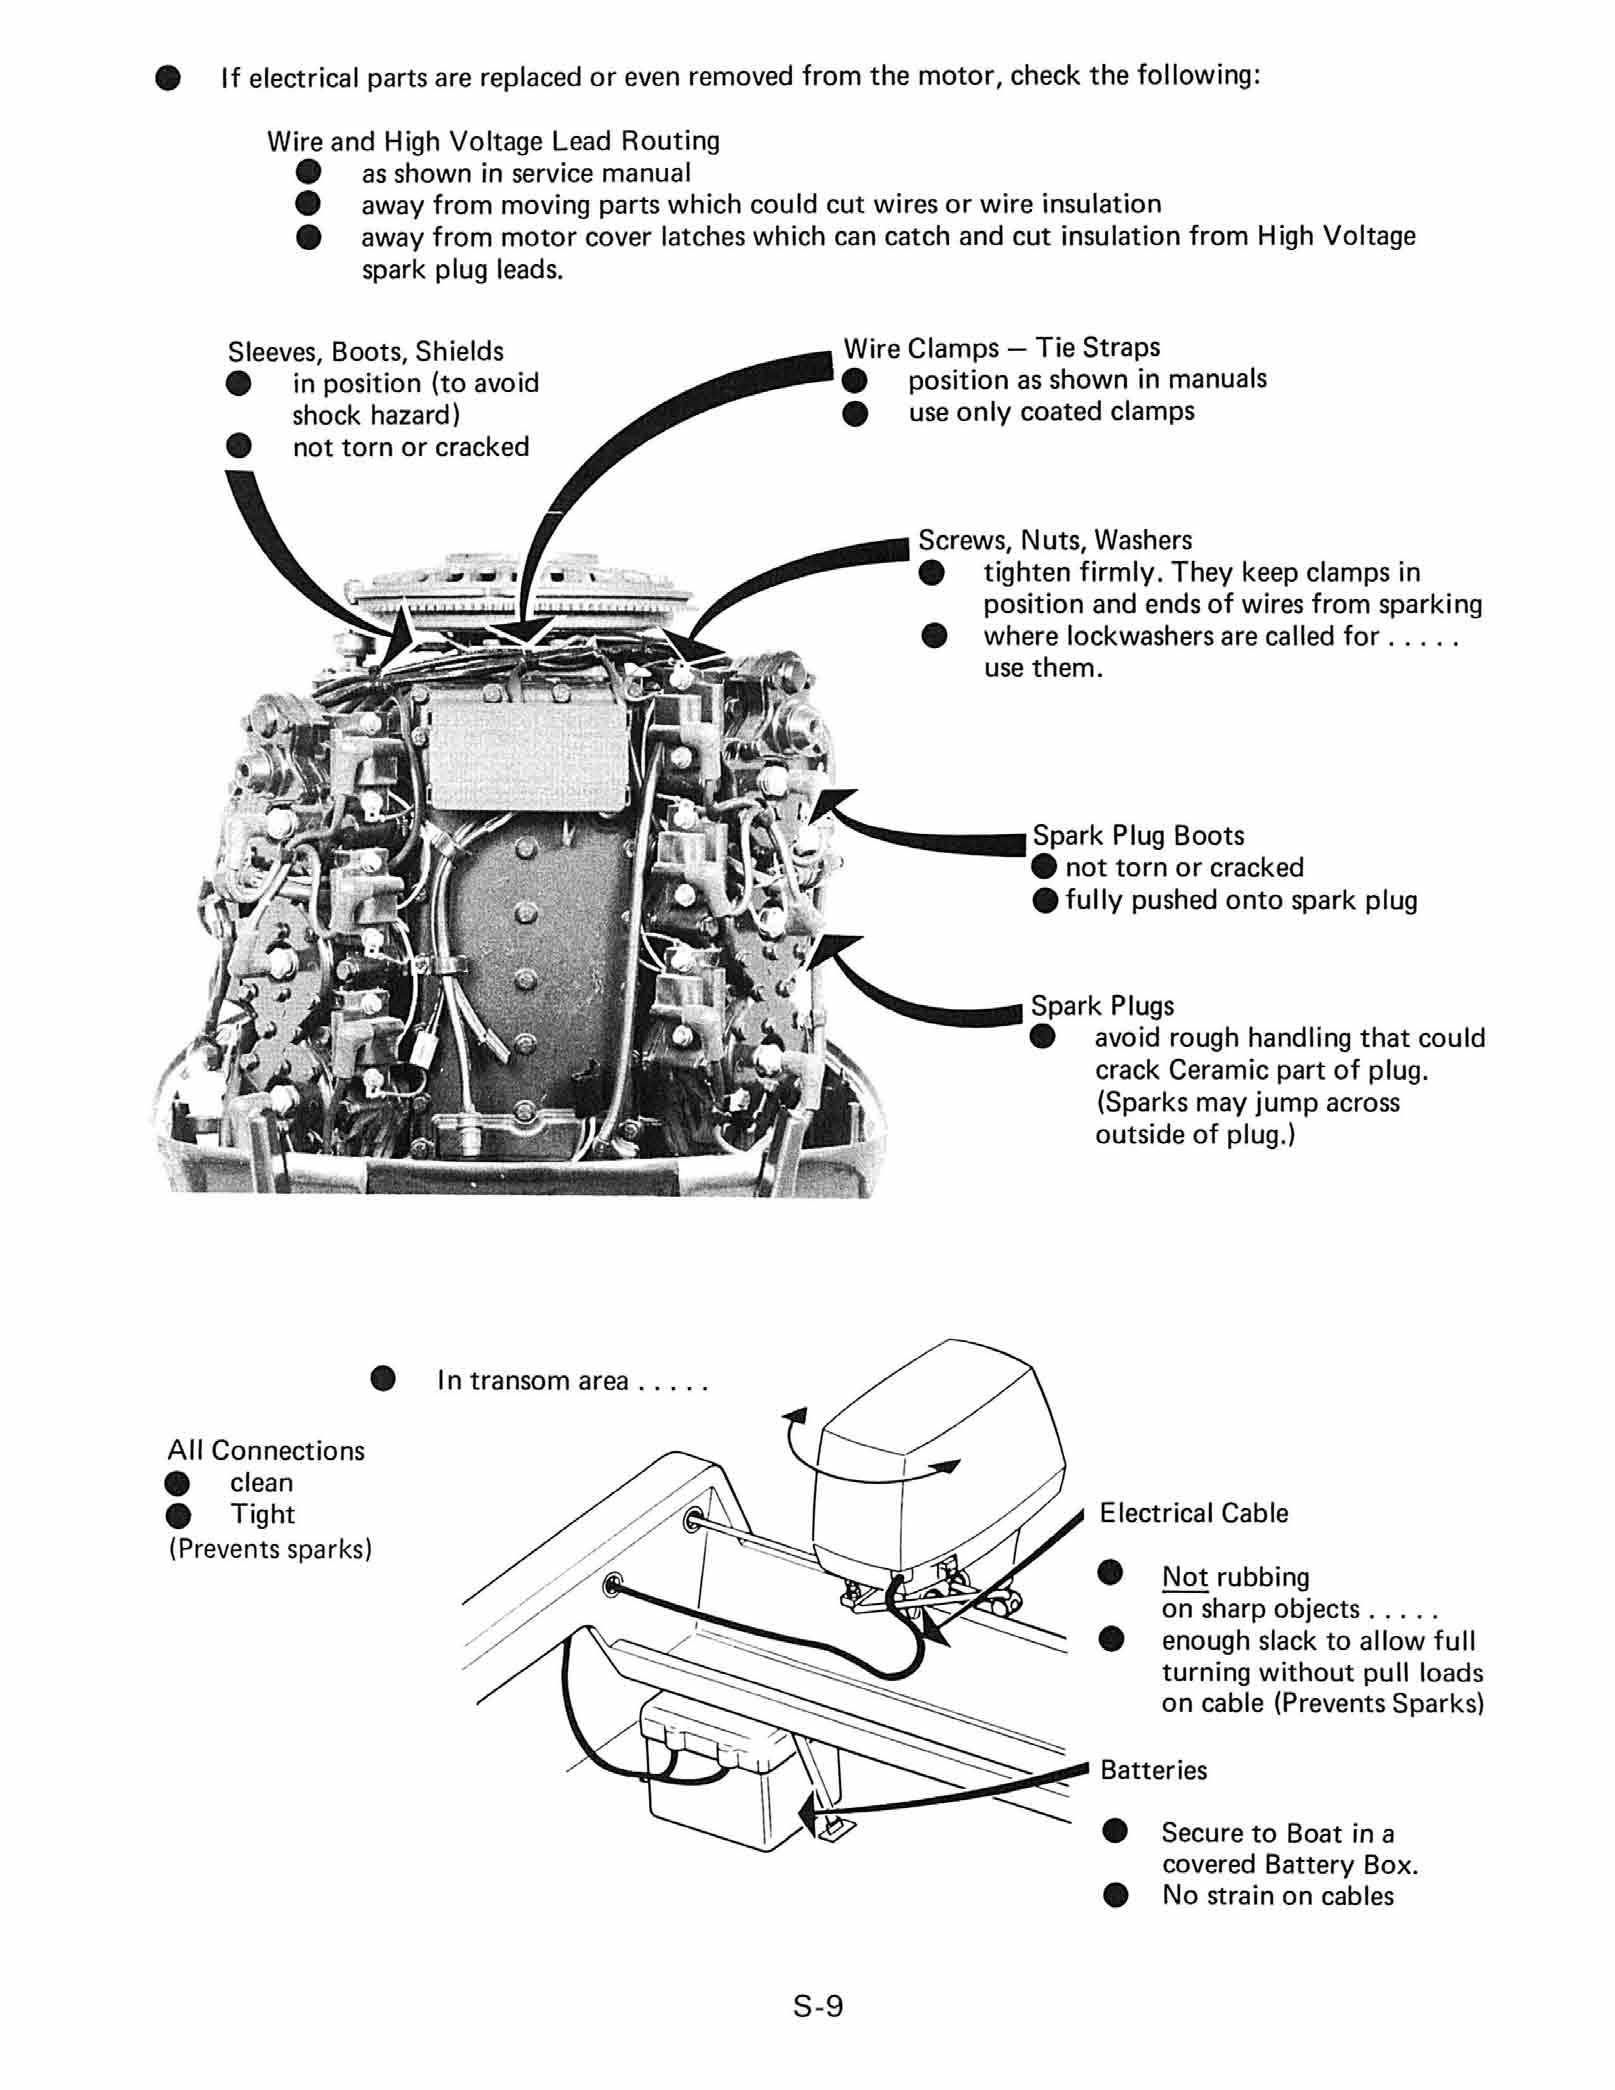
AII Connections
• clean
• Tight (Prevents sparks) I n transom
Wire Clamps - Tie Straps
• position as shown in manuals
• use only coated clamps
Screws, N uts, Washers
-. tighten firmly. They keep clamps in position and ends of wires from sparking
• where lockwashers called for use them _
Spark Plug Boots
• not torn cracked
• fully pushed onto spark plug
• Spark Plugs
• avoid rough handling that could crack Ceramic part of plug. (Sparks jump across outside of plug.)
Electrical
• Not rubbing sharp objects
• enough slack to allow full turning without pull loads (Prevents Sparks)
Batter ies
• Secure to Boat in covered Battery
• No strain cabIes

The Mounting System includes --;--___,-- motor parts
"""" bolts, nuts, washers, and _ _ --# - boat's transom
What's I
Motor must stay in position boat's transom
What Could
• Motor SL ... I ... D ... transom
Boat turn and hard to steer
• Motormay . I . . . L . . . trarisom . . . Boat turn
and hard to steer.
• If motor hits something sol i d
Motor cou Id break boat' s transom could break away.
Motor lost overboard. Boat S
How Loss of
manufacturers mounting Instructions closely
• If 80at Plate shows

• When Rigging Fixing boat if transom looks Weak, tell the owner
If transom is Curved, motor Loose
• Use 801ts, Nuts, and Washers sent with Motor
They're usually Special won't Rust Weaken.
• If owner tells you "1 hit something lIy hard
High speed bIow to lower unit
Mount Flat Surface only. Use Shims to make surface flat
"1 was backing up ... think motor have hit the tree something"
slow, heavy squash to motor
" look for Damaged Parts and Loosened Nuts and 80lts in both the Steering and Mounting Systems Replace damaged parts.
• 5hock Absorption system must always ready to Absorb some Blows to the lower parts of the motor.
• Motor must not Trim "In" too far 5uddenly
What
• Without 5hock protection, Blow like this and Motor could break Transom could break away Motor lost overboard, and Boat 5

• At high boat speeds, 5udden trimming "in" too far and boat dive under water spin around.
How PossibIe Conditions Minimized?
• Read, Understand, and Follow manufacturers I nstructions.
• Follow warnings marked " & " closely.
• Test your work whenever PossibIe.
• If oil Leaks seen in determine 50urce reservoir filled.
• If motor is Hydraulic Tilt/Trim Model, Trimming "In" too Far happen when Angle Adjusting Rod isn ' t in the Right hole is Not in (Lost)
Rod to Hole Position determined earlier Boat Operator Adjusting Rod Retainer is in locked position