SAMPLE DATA PLATES
Sample Data Plates Only. See specific state requirements for Data Plates in QA Manual.
Champion Modular, Inc. - Division 041
APPROVED DATE
7/1/25
FIGURE 3.1
3.1A
Champion Modular, Inc. - Division 270
FIGURE
3.2.1
For Transporter
Ensure that the transportation equipment and home can be safely moved to the site without damage. Fill any holes or soft places in the access road, and make sure there is adequate space and a strong enough surface between the road and the site to support the home. Consideration must be given to any berms, ditches or soft fields that may need to be traversed. Minimum clearance of 15’ high by 18’ wide is required to maneuver the home to the foundation. Remove any overhanging branches, and have a qualified person raise any overhead wires that are in the way. Special transportation permits may be required from LAHJ. Tow-in costs, shuttle trucks or heavy equipment are the responsibility of the builder and include idle crew labor costs while waiting for adequate tow-in equipment to arrive.
3.3 Support Requirements and Soil Capacity
3.3.1
Requirements
A firm foundation is necessary before the home is installed. If the site is filled in soil, it must be compacted to at least 95% of its maximum relative density.
The unloading area (generally in front of the house) should also be level and compacted or undisturbed soil with adequate clearance for the crane and all module units. It should also provide the installation crew with ample room to work in safety.
All access roads to the job site should also be compacted or undisturbed soil, be smoothly graded and have a clearance width of a minimum of 15’ with a clearance height of 14’ and allow maneuvering of the crane and transporter without right angle or sharp turns to prevent damage to the house or lifting crane.
3.3.2
Bearing Capacity
The foundation shall be designed per local soil conditions. Confer with the local building authority for the recommended soil bearing capacity in the area or consult a local geologist or a qualified professional engineer for their analysis to determine the bearing capacity. No responsibility will be assumed by Champion Modular Inc. for damage to basement walls. It is the builder’s obligation to shore (brace) and backfill.
3.3.3
Removal of Organic Material
Removal of all organic material, such as grass, roots, twigs, and wood scraps, from beneath the home is required in areas where footings are to be placed, to minimize settling of footings and insect damage. Remove shrubs and overhanging branches from the immediate vicinity of the home site to prevent windstorm damage.
3.3.4
Trash Removal
Builder to provide an adequately sized dumpster within 50’ of the modules. The builder is responsible for keeping the dumpster compacted or emptied as needed. If a dumpster or compactor is not available, the builder is responsible for all trash removal. The set crew is responsible for placing all disposed material in the dumpster. The set crew is also responsible for running a magnet roller over the site to remove all loose fasteners from the site surface.
3.4 Moisture Protection
Water must not be allowed to accumulate or stand underneath the home. Excessive moisture under the home may cause settling of the foundation, dampness in the home, and structural damage or long term deterioration to the home, including damage to the siding and bottom covering, buckling of the walls and floors, and problems with the operation of doors and windows.
WARNING
3.5.1 Crane Setting
3.4.1 Grading and Elimination of Depressions
Grade the soil to the edge of the home at 5% (1ft. per 20 ft) for a minimum distance of 10 ft, so it slopes away from the perimeter. Depending on the local landscape and local codes, drain tiles, ditches and culverts may be needed to drain surface runoff from the surrounding areas. If so, consult a qualified professional engineer.
3.4.2 Ground Moisture Control
A uniform 6-mil polyethylene or equivalent vapor barrier material installed on the ground surface beneath the home is recommended. A vapor barrier will not correct poor drainage and when used should be in addition to proper drainage and grading. When used, a vapor barrier should cover the entire area under the home with the material overlapped at least 6 inches and sealed or taped at all seams. It is not necessary that the vapor barrier be stretched tight.
3.5 Crane
The crane operator should be contacted prior to delivery to visit the site and assure there are no problems with the equipment operation or its intended use.
Excessive moisture underneath the home can cause structural damage and other moisture-related problems, including the growth of mold and mildew, which may be hazardous to health. APPROVED

Level site to grade. This will allow halves to be spotted at a location that is sufficient to crane the home on the foundation without being repositioned. Individual module weights vary depending on length and amount of finishing material packed in unit. Generally, a 46’ unit weighs from 20-25 tons; thus, a crane of sufficient load requirement is recommended for setting modules. A crane having a maximum safe distance from the boom foot to the lift point center of the spreader bar (measured horizontally) makes backfilling and close transporter placement important. Under ideal conditions, the crane should be positioned near front center of foundation at approximately 90 degrees to foundation. Place transporters at approximately 45 degrees to crane, one each side, exterior walls per drawing, and start with back module first. This will avoid having boom or spreader frame over unit not yet set, and having to lift over any unit. Refer to Figures 3.5A & 3.5B. Remove protective weatherproofing and wood strips from center wall and overhangs (weather permitting), being sure to pull all projecting nails which may keep units apart. Do not remove any Deadman Supports.
“B” side of home is the kitchen, bath side (wet half) unless it is a reverse floor plan. “A” side of house is the living room side. Center bearing wall may be a split bearing wall. Each half has a 2” x 3” wall and simply butt each other. Two story first floor mate walls will be full 2” x 4” construction.
Sill Plate or Mud Sill. 2 x sill plates are builder responsibility with every unit (see foundation drawing for layout). These must be fastened with anchor straps or foundation bolts set by builder. Plates must be put down over sill seal material. Single Sill Plates: Countersinking of nuts and washers is not permitted, so anchor straps shall be used. Bolts shall be located to not interfere with joist. Cut off all bolts that extend past the top of nuts. Double Sill Plates: Bottom plate is to have a hole drilled 1/8” larger than bolt size (1/2” bolt = 5/8” hole). Nuts and washers shall be tightened, but not recessed. Top plate is to have holes drilled 1/8” larger than washer size. Top plate is to be fastened to bottom plate via .131 x 3” corrosion resistant nails, two rows at 12” o.c. per row, staggered. Corner joints and plate ends shall be staggered so seams do
not line up with bottom plate. Sill plate bolts may only be recessed into the top plate if there is a double sill plate on the foundation.
The foundation dimensions should be the same as the rough floor of the actual unit. It is suggested that the sill plates be laid on the foundation square and to the actual dimensions of the rough floor of the unit.
See knee wall details for installation instructions.
Remove small wedges in sill plate with saw approximately 12” wide on small side. The number of wedge cuts will depend on the type of sling and number of straps on sling. The reason for the wedge cuts in sill plate is so that straps can be removed as each half is set.
Type of sling to be used is contractor’s
option.
Superior Wall Instruction for Modular Connection
– Sill Plate / Blocking
The sill plate must be attached to the top of the Superior Walls panel prior to the modular placement.
When sill plate and required blocking are completed during modular construction, refer to Figure 19, Floor Connection: Joists Parallel to Superior Walls Panels and Table 3, Fastening Schedule in the Superior Walls Builder Guideline Booklet to attach the modular construction. Construction adhesive is recommended between the bond beam and the sill plate.
Bolt the sill plate with minimum ½” x 5 ½” bolts using washers tightened to the wood sill plate and the underside of the top bond beam concrete through the precast holes provided; per Table 3, Fastening Schedule in the Superior Walls Builder Guideline Booklet.
When sill plate is attached to the top of the Superior walls panel (separate from the modular), nail each joist securely to sill plate with two 16d nails or according to code, or use Superior Walls Framing Straps where it is difficult to nail the joists to the sill plate.
The Framing Strap lies between the band joist and the sill plate and is fastened with 1 ½” (.148” x 1.500”) galvanized nails provided. Use one nail in every hole of the Framing Strap. Nail the Framing Strap to sill plate before setting the structure. Refer to Table 4, Framing Strap Requirements in the Superior Walls Builder Guideline Booklet.
Nail 2 x 6 end wall braces securely to the sill plate, every 48” on center, using five 10d nails. (Braces must be within 12” from the interior of each corner.) Refer to Figure 19 & Figure 20, Floor Connection: Joists Parallel to Superior Walls Panels in the Superior Walls Builder Guideline Booklet.
Add Solid Blocking per Table 3, Fastening Schedule and Figure 27, Framing Strap Requirements of the Superior Walls Builder Guideline Booklet.
A shear wall may be required in certain uneven backfill or open floor plan conditions.
3.5.2 Lifting Rig (Cradle) Instructions
The cradle used to erect each modular unit should be constructed so that it is capable of telescoping to conform to both width and length of the modular units being set. Straps or cables should be used to undersling the modular unit to the cradle. Straps should be plumb from the notch on the box sill of the modular unit to the point of connection onto the cradle. Outward pressure should be applied to both prevent siding damage and ensure that the modular unit remains centered on the straps. During the craning operation, it is essential that the bottom of each modular unit remain level to avoid lateral stress on exterior walls which can rack the modular unit and prevent proper alignment when the sections are joined together.
FIGURE 3.5A
Bloomsburg, PA 7/1/25
FIGURE 3.5B
shall not be recessed into the sill plate and should not interfere with floor joist. Sill plate bolts may only be recessed into the top plate if there is a double sill plate on the foundation.
5. The foundation code approved columns, piers or bearing plate layouts shall be verified so that the column loads and locations plan are correct for the unit and per the approved plans. All required center girder support materials must be supplied by builder and be on site the day of the set.
6. Bracing and backfilling. The foundation must be adequately braced and backfilled for safety and to avoid delays during the set. The foundation should be exposed a minimum of 18” for a crane set.
4.2 Special Considerations
4.2.1 Flood-Prone
Areas
If the home is intended to be located in a river or coastal flood-prone area, consult a qualified professional engineer to make sure that the foundation design and construction conform to applicable requirements of LAHJ.
4.2.2
Placement in Freezing Climates
To preclude the harmful effects of ground frost heave, footings must be at or below the frost line or otherwise protected from the effects of ground frost heave. Consult local authorities to determine the depth of the frost line.
Notes
1. All design notes and details on this foundation plan are for reference only. The actual foundation design is dependent upon unique site conditions and shall be designed by a professional engineer or architect.
2. See individual floor plan for actual foundation dimensions and loads. Verify all dimensions prior to construction.
3. All aspects of the foundation construction are to be performed on site, and are subject to local building code requirements and approval.
4. Individual plan sizes reflect wood to wood dimensions, allowing sheathing and siding to overhang the foundation. If additional exterior foam insulation is used, increase the foundation in length and width accordingly to maintain proper overhang.
5. Foundation sill plate shall be 2x6 min. pressure treated lumber, placed on foundation walls with a sill sealer.
6. Sill plates shall be anchored with ½” min. anchor bolts that extend 7” min. into masonry or concrete, spaced per individual foundation plan. There shall be a min. of two bolts per plate section with one bolt located not more than 12” or less than 7 bolt diameters from each end of the plate section. An additional anchor bolt shall be installed on both sides of center beam within 12” of beam. Top row of block cores shall be poured full with concrete at anchor bolt locations.
7. The min. compressive strength for all concrete work to be completed on site shall be determined by the professional engineer responsible for foundation design.
8. Type “ M” or “ S” mortar shall be used in all masonry.
9. All footings must extend below the frost line. Exterior footings shall be placed a min. of 12” below finished grade.
10. Foundations may be full basement, crawl space or slab, or a combination thereof.
11. Drainage and waterproofing as required by site conditions shall be provided on site.
12. The finished grade shall be a min. of 8” below top of foundation wall and shall pitch away from structure 6” min for first 10’ (5% grade).
13. All on site support beams shall be designed by a professional engineer or architect.
14. For location and information on basement stairs, see individual floor plan.
15. Full basement foundations shall have an egress opening where required by state and local codes.
16. Unless otherwise specified on individual plans, 16” x 24” min access to crawl space foundation shall be provided by builder through crawl space perimeter in compliance with all state and local codes.
17. Crawl space ventilation of 1/150 of actual enclosed crawl space area shall be provided with one opening within 3’ of each corner.
18. A GFCI protected receptacle, and a switched light fixture shall be provided at the crawl space access for service of all mechanical systems that may be located in the crawl space area.
FIGURE 4.1A
Notes
1. Verify all dimensions and support locations with individual plan prior to construction. Modular manufacturer will not assume any responsibility if column/pier spacing exceeds max. spans shown on individual foundation plan. For specific loads & load points, individual plan must be referenced.
2. Columns, piers and their footings to be sized by a professional engineer or architect per individual floor plan loads.
3. Type “ M” or “ S” mortar shall be used in all masonry.
4. Compressive strength for concrete footings shall be determined by professional engineer responsible for the foundation design.
5. All exterior footings shall be placed 12” min. below undisturbed ground surface and must extend below thefrost line.
6. Interior crawl space footings may have bottom of footing at the finished grade of the under floor surface.
7. Insulation in floors or on foundation walls to be installed by builder per individual Res-Check provided by manufacturer.
8. Provide 4” min gravel with 6 mil polyethylene vapor barrier under crawl space areas.
FIGURE 4.1B
2x6 MIN TREATED SILL PLATE
TREATED MATERIAL
DETAIL A FOUNDATION AT DROPPED FLOOR
1/2" MIN. ANCHOR BOLTS W/7'' MIN EMBEDMENTS IN FOUNDATION, OR APPROVED ALTERNATE UNLESS NOTED OTHERWISE ON APPROVED PLANS
2x6 MIN. PRESSURE TREATED CONTINUOUS SILL PLATE SILL SEALER AND TERMITE SHIELD
CONCRETE OR BLOCK FOUNDATION
PFS CORPORATION Bloomsburg, PA 7/1/25
5. Installation Process
5.1 Pre-Delivery
Checklist
Before transporting the home to the site location, make sure the following items are checked:
1. The home is designed for the proper geographic zone: wind, snow, seismic (Chapter 3).
2. The site is properly prepared (Chapter 3).
3. All foundations and required supports are properly constructed and located. (Chapter 4).
4. Utilities are installed or available.
5. Any trenching for a crossover drain line is complete.
5.2 Pre-Installation Procedures
1. Move the first section of the home into the desired location.
2. Remove the material used to weather proof the module. Failure to do so could affect the ventilation characteristics of the home and result in moisture damage.
3. Drive flush or remove all protruding nails or staples or other objects that could hold the sections apart along the mating surfaces.
4. Refer to Figures 5.6.1 & 5.6.2 to determine if any portion of the roof requires lifting before unit is set in place before proceeding.
5. Before the final positioning of the subsequent mating sections, make sure that mating line gaskets are installed according to Figure 5.2.
a. Material used for this purpose shall not be placed in a position where it could restrict the air ducts of the heating system, supply or return air ducts that might cross at the floor line or through the ridge beam.
b. If there is an internal crossover duct, make certain that a connection seal is in place prior to joining the two sections.
FIRE BLOCKING & INSULATION
(To be completed by Builder)
After the modules are set, the space between the modules should be filled with insulation or approved foam fill at the following locations; (1) at floor between mateline girders, (2) at ceiling between mateline girders, (3) at matewall openings, and (4) at exterior gable wall mating seams. This is necessary to prevent air blowing from the attic between the units and into living areas of the modules. APPROVED
6. Repeat steps 1-5 for all modules.
FIGURE 5.2
5.3 Crane Installation
WARNING!
Homes weigh several tons and can fall during installation.
FAILURE TO USE ADEQUATE SAFETY MEASURES MAY RESULT IN SERIOUS INJURY OR DEATH.
Never allow anyone under the home until the home is safely installed.
Individual module weights vary depending on length, width, and style of home. This, along with the distance the crane has to “reach out” to the foundation, drastically affects the size of the crane needed to erect the home. Consult your local crane companies to determine what size will be needed for your particular situation. Reference details in Section 5.6.1 and 5.6.2 for individual roof pitches. If you have selected the optional factory installation service offered by Champion Modular Inc., the crane company will be contacted by an Champion Modular Inc. representative prior to the installation date. The price estimate for factory installation services includes a crane with site condition assumptions that meet the minimum requirements outlined in this manual. Any site conditions that exceed minimum requirements in this manual may result in additional charges.
5.3.1 Ranch/Cape Set-up Instructions
1. Drill holes 1” diameter, located 2” from the bottom edge. If using straps, straps must be approved for this use and used in accordance with manufacturer’s instructions.
a. For units 50’ and under in length, two lifting points are required, located 20% of the unit length in from each end. See Figure 5.3.1C.
b. For units 50’ to 70’ in length, four lifting points are required, located 20% of the unit length
in from each end and two in the center. See Figure 5.3.1D for recommended pick points.
c. Modules that have bump outs or setbacks may require additional cables for lifting and setting. This requirement should be determined by the crane operator and/or set crew.
Note: Drilling or notching of clear span beams for lifting purposes is not allowed in the center third of the beam span.
2. Spot the section of the house that needs to be set first at a convenient location for the crane.
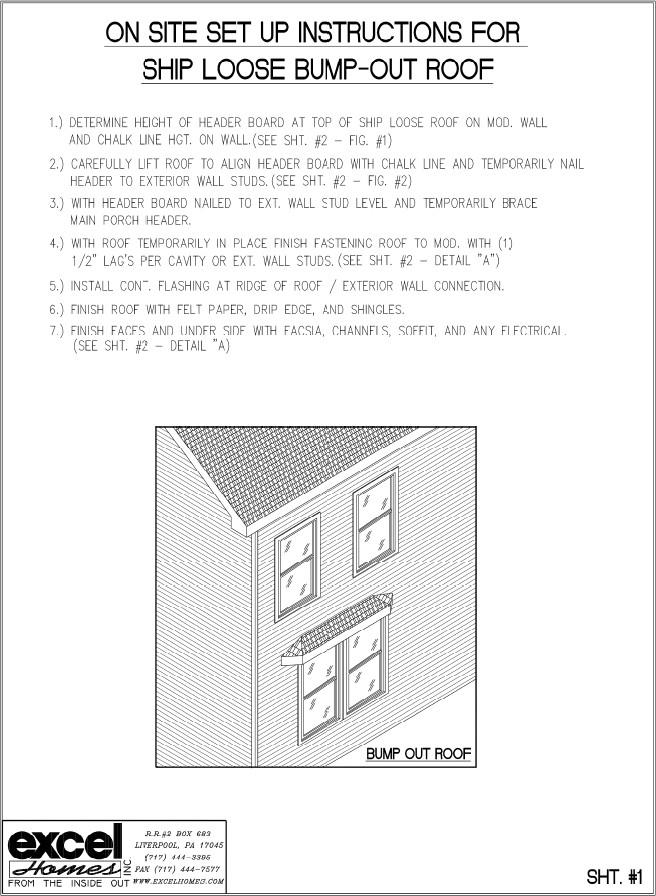
3. If the module has a hinged roof that overhangs the module mate line, the roof may need to be lifted into position at this time. Otherwise, the roof can be lifted after the module is set in place. See Figure 5.6.1 and 5.6.2 for necessary instructions.
4. Unbolt carrier from module.
5. Temporary straps, posts or bracing straps should not be removed until modules are set on the foundation and secure. Removal of temporary framing is builder responsibility.
6. Attach spreaders to the crane and lower over the first module. Now, place the cables to match the spreaders under the home (be sure to place the cables between the heat duct, plumbing and waterlines if installed) and attach to spreader. See Figure 5.3.1A for crane installation. These figures are for reference only, and the final decision & responsibility lies with the installer.
Caution: Before lifting the module, check for cable clearance.
7. If the cables will touch the siding or any part of the module that can be damaged, block them away from the module at the appropriate locations with 2 x 4’s or larger.
8. Module must be lifted at a slight angle, with sidewall side lower than the marriage wall side. This will make it easier to position the module on the foundation.
9. To set the module exactly square on the foundation, mark the centerline of each end wall on the sill plate (or provide a block at this location) and place the first module to these alignment marks.
10. Place basement support columns with half of the support plate under the center beam of each half of the module.
11. Unhook sling and remove cables and repeat steps 1 through 10 for next section.
12. Refer to Section 5.5.1, step #3 regarding use of “come-along”.
FIGURE 5.3.1A
TYPICAL 2 STRAP LIFT FOR BOXES UP TO 50 ft. LONG
FIGURE 5.3.1C
4 POINT LIFT FOR BOXES OVER 50 ft. LONG
5.3.1D
Bloomsburg, PA 7/1/25
TYPICAL
FIGURE
5.3.2 Raised Ranch/Bi-Level Set-up Instructions
The installation of a Raised Ranch / Bi-Level Home follows all the same procedures described for the single story Ranch / Cape Home. Reference Section 5.3.1.
In addition, the following procedures should be followed, and completed by builder:
1. Remove temporary flooring in foyer area and construct landing and stairs. Note: Lower set stair riser height will vary depending on overall foundation height and concrete floor thickness. This must be considered when constructing stairs.
2. Complete construction framing of area surrounding exterior door. Install door.
3. If a cantilever floor system was incorporated into this raised ranch module, the module floor must be insulated in the area extending beyond the foundation. Install blocking to build down soffit area, and then install “J” channel and solid soffit.
4. Install inside and outside exterior corner posts in foyer area, and complete siding installation.
FIGURE 5.3.2.1
VARIES SEE INDIVIDUAL PLAN
FIGURE 5.3.2.2 (completed by builder)
APPROVED DATE PFS
5.3.2.3
Bloomsburg, PA 7/1/25
DOOR R.O.
FIGURE
5.3.3 Two Story Set-up Instructions
In the installation of a two-story home, the steps and field installation work varies with each model, therefore the builder must consult the individual approved building drawings for module connection details and the systems interconnection requirements. These, along with the following procedures, should be used for the setting of two-story modules.
1. Place the bottom modules on the foundation by following “Ranch/Cape Set-up Instructions” outline in Section 5.3.1.
2. First story modules must be leveled, aligned and connected prior to installing second story modules. For mating and securing instructions, follow “Module Aligning, Leveling and InterConnections Procedure” in Section 5.5.
3. Secure the ceiling band joists of the lower modules together per Figure 5.8.4 Detail F. Any gaps must be shimmed solid before bolting or lagging so there is wood-to-wood contact.
4. Check for exhaust fan ducts in ceiling that may need to be run to exterior sidewall for discharge. Hook up as required.
5. Prepare upper story module for installation. Insulate cantilevers, if applicable, or between modules as shown on Figure 5.2.
6. Attach crane and raise roof if required, as outlined in Section 5.5. Raise module into position over first story module.
7. Locate wiring drops and position into area provided to accommodate hookup.
8. Check for proper alignment at marriage wall, corners and clerestory areas, if applicable, and lower into place.
9. Attach upper module floor perimeter to lower module ceiling perimeter with 16d nails, toe-nailed at 6” o.c, unless otherwise noted on approved plan.
10. Repeat steps “5” through “9” for next module.
11. If the home has a flipped overhang along the sidewalls, they should be lowered into position at this time.
12. Builder / siding contractor shall secure top modules to bottom modules by installing an exterior sheathing band that spans the second floor exterior perimeter band and the first floor ceiling perimeter band mate line. The exterior sheathing band shall be a min. of. 7/16” x 6” wide OSB and attached to upper and lower perimeter band with one row of 16d nails or equal, at 6” o.c., unless otherwise noted on approved plan.
13. Fire blocking shall be provided and installed at all ceiling and floor levels by the builder, whenever the fastened modules have gaps. The thickness, type, and installation of material serving as a barrier to the unobstructed movement of flame and products of combustion shall be in compliance with ASTM E136 and approved by the governing code official. The integrity of all fire blocks shall be maintained.
5.3.4
Three Module Wide Set-up Instructions
In the installation of a three modular wide home, the steps and field installation work varies with each model, therefore the builder must consult the individual approved building drawings for module connection details and the systems interconnection requirements. These, along with the following procedures, should be used.
1. Place one of the outer modules on the foundation by following “Ranch/Cape Set-up Instructions” outline in Section 5.3.1. APPROVED
2. Place the inner module on the foundation by following “Ranch/Cape Set-up Instructions” outline in Section 5.3.1.
3. Place the final outer module on the foundation by following “Ranch/Cape Set-up Instructions” outline in Section 5.3.1.
4. If erecting a two story home follow the “Two-Story Set-up Instructions” using the sequence above.
5.5 Fastening
5.5.1 Module Aligning, Leveling, and Interconnection
1. After the sections have been positioned together, check that all modules are aligned with the foundation, and that walls and floors butt as tightly together as possible.
2. Minor gaps between floors, roofs, and column supports, up to 1 ½” max., may be closed with lumber or wood plywood or osb shims fitted for the total length of the gap. When shims are used, fastener lengths shall be increased by 1.5 times the shim thickness.
3. When gaps are too large to shim, use a “come-along”, secured to the perimeter band joists, to draw the units together.
4. Starting at one end, level the floor at the mate line by adjusting the lally columns or shimming the piers. Be sure that door openings, floor, and gable end walls are level and even. Adjustments should be made at this time.
1. Sometimes, a misalignment may occur. Misalignment may show up on the end walls, mate wall archways and/or doorways that are not flush.
2. There are several reasons that misalignments may occur: the foundation was not level, the basement center supports were not adjusted correctly, or there may have been movement of the module framing through transportation or during set-up.
3. The problem can be identified by the following characteristics: The modules will be flush at the end walls and doorways at the floor, but discrepancies start to become evident toward the ceiling or roof.
4. Misalignments can easily be remedied at this time with the use of a “come-along”. Attach “comealong” and chains to ceiling of opposing module and apply pressure to bring them back into alignment. Secure in place with 16d nails and perforated straps before releasing “come-along”
5. Failure to take corrective measures at this time will result in extensive work later in the construction process.
5. After the modules have been aligned and leveled, a floor girder beam connection shall be provided by installing 1/2” thru bolts, 3/8” lag screws, or Big Timber #17 structural lag screws to connect the floors as shown in Figure 5.8.4. If the home has through-the-floor- crossover air ducts, make sure the spacing of the bolts or lags avoids the duct area.
1. 1/2” Thru bolts – Drill 9/16” holes in the center of the girder beam under the mate walls beginning at 24” from each end and continuing at 48” o.c. along the entire length of the girder. If there are any gaps between the girder beams, the gaps must be shimmed solid before bolting so that solid wood-to-wood contact is provided. Install ½” bolts with nuts and washers along the length of the girder beam. Do not use bolts to pull the home sections together.
2. 3/8” Lags or Big Timber #17 structural lag screws – Drill Pilot holes to avoid splitting the girder beam members. Lag length shall be determined by the width of the girder beam so that 1” penetration into last girder member is provided. Lags shall be installed at 32” o.c. along the length of the girder beam.
6. Align the ceiling and the end walls of the sections with each other on the inside of the home.
7. Fasten aligned end walls together with 0.131x3.5” nails, or equivalent, spaced at a max. of 6”o.c.
8. Align interior wall openings. Verify that walls are the same width at the top, bottom, and center of the opening. Shim wall apart or clamp together as needed to align. Secure modules together at interior opening using .131”X2.5” toe nails at 6” o.c.
9. LVL beams projecting below ceiling into living space or above ceiling into attic cavity shall be fastened together with 16d nails or #8 x 2 ½” screws at 16” o.c. along each edge of beam for the length of the beam.
10. Where adjoining modules have gaps, fire stopping shall be provided and installed at all ceiling and floor levels by the builder on site. The thickness, type, and installation of material serving as a barrier to the unobstructed movement of flame and products of combustion shall be in compliance with ASTM E136 and approved by the governing code official. The integrity of all fire blocks shall be maintained.
11. Builder shall repeat steps 1-7 for multiple story structures. Access to upper story bolt or lag locations shall be provided by openings in the ceiling of the story below or floor sheathing cut outs in the story above. All access openings shall be closed and repaired on site after connections are completed.
12. When the end walls directly below the roof are secured, make sure the roofs are aligned and the ceilings line up. If they are misaligned, the section may be racked to bring the roofs and ceilings into alignment.
13. Secure adjoining roof sections together per approved plan.
14. Remember that the fasteners are used to secure the sections together and must NOT be used as a way to pull the roofs together.
15. Adjustments to be completed by builder. After completing the leveling of the home, check the door and window operation. Minor adjustment of the shims at some support columns or piers may be needed to improve the operation of a door or window.
5.5.2 Securing to the Foundation
1. Typical module to foundation connection to consist of 16d toenails angled through modular perimeter into sill plate at 12” o.c. unless noted otherwise on approved plan. Check for additional local code requirements.
2. Center floor beam support shall be provided by steel columns with 1/2”x6”x9” min. steel plates or masonry piers. See approved plan for required locations. Check local codes for compliance.
3. Basement models - Secure floor center girder to column plates with (4) 3/8”X 3” lag screws. Crawl space models – Attach floor center girder to pier plate with .131”x3” nails @ 4” o.c. both sides of girder.
4. Fasteners for treated wood sills shall be of hot-dipped zinc-coated galvanized steel, stainless steel, silicone bronze or copper.
5.6 Roof Set-up Instructions
5.6.1 3/12 thru 7/12 Pitch Hinged Roof Set-Up Instructions
The following procedure is designed to set the 3/12 thru 7/12 pitch hinged roof system.
1. After home has been set and secured to the foundation as described in Section 5.5.2, continue with the following procedures.
2. Lift top hinged portion of roof to same angle as lower portion. Use extreme care not to raise roof too high or truss / sheathing damage may occur.
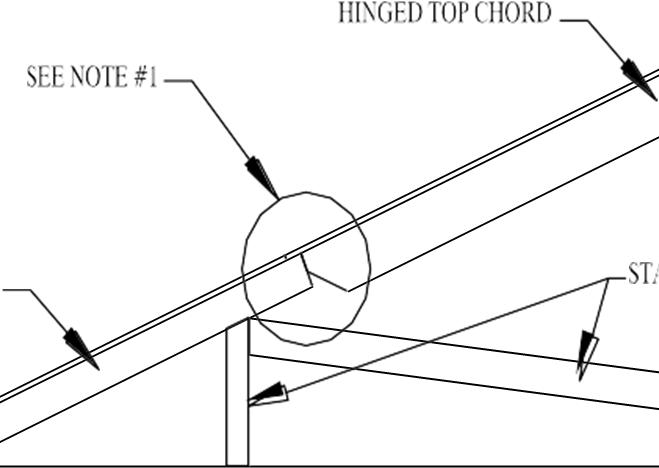
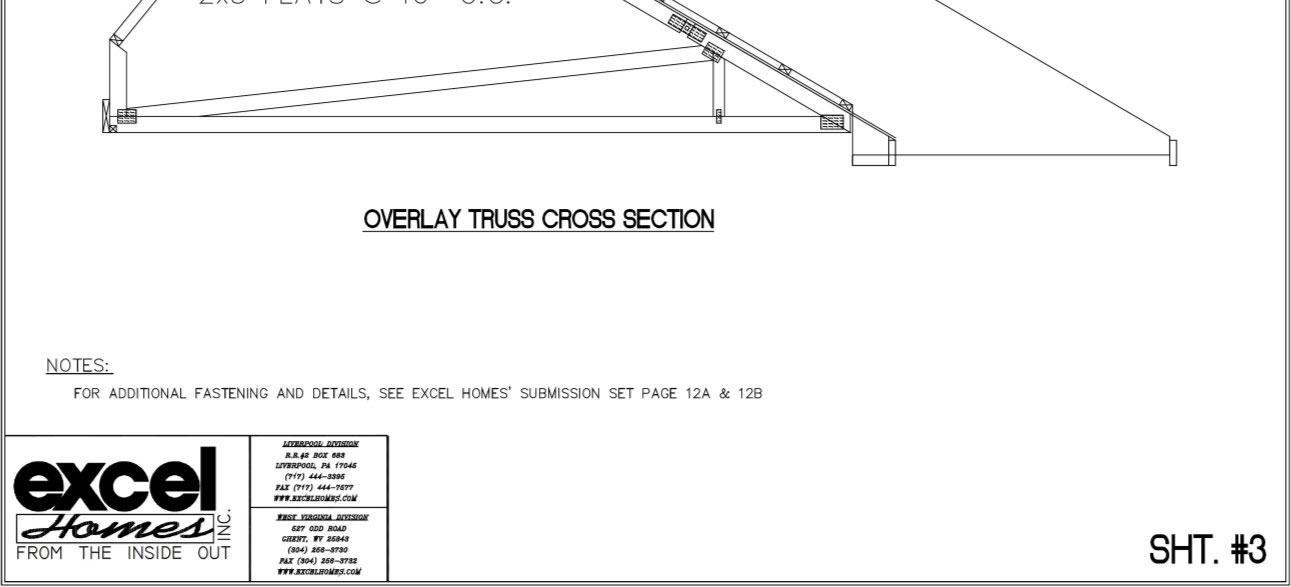
3. Swing hinged knee wall down into place. The 2x truss knee wall plate should rest on the 2x truss king post plate. Secure knee wall plate to king post plate per truss manufacturer’s instructions. Also refer to individual approved plan for required fasteners and connections
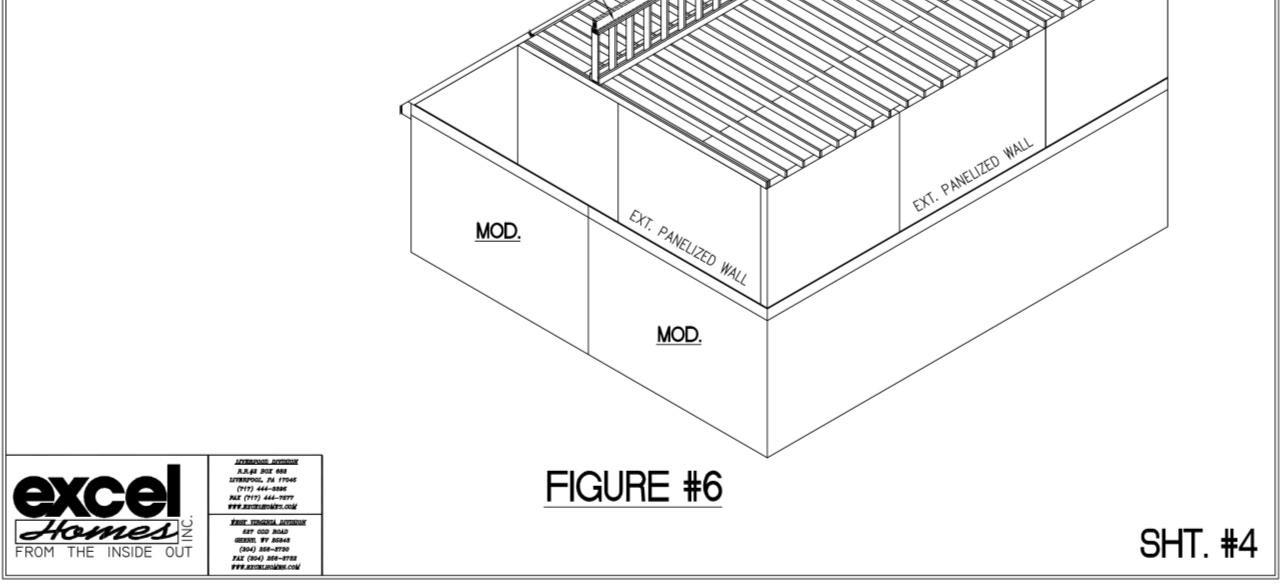
4. Where applicable, flip hinged top ridge into position. Secure flip rail to hinged top chord rail per approved fastening on individual plan. Check that the roof is straight and level. Shim knee wall or ridge if necessary. Secure ridge to ridge per individual approved plan. Fasten all field installed sheathing as per individual approved plan. Once both flipped ridges are installed, there shall be a 1” recess from upper tip of rafter to top edge of ridge boards to allow proper attic ventilation.
5. Lift up the shingles at the hinged area and nail overlapping roof sheathing to bottom portion of truss or rafter as per individual approved plan. Failure to properly perform this step will allow the roof sheathing to warp in this area over a period of time, resulting in a “wavy” look.
6. Complete shingle installation at hinge area and at peak. Install ridge vent. See Section 5.7.1 for procedures.
7. Install gable end wall sections with sheathing applied on each end of home with 16d nails at 4”o.c. around the entire perimeter, unless noted otherwise on individual approved plan.
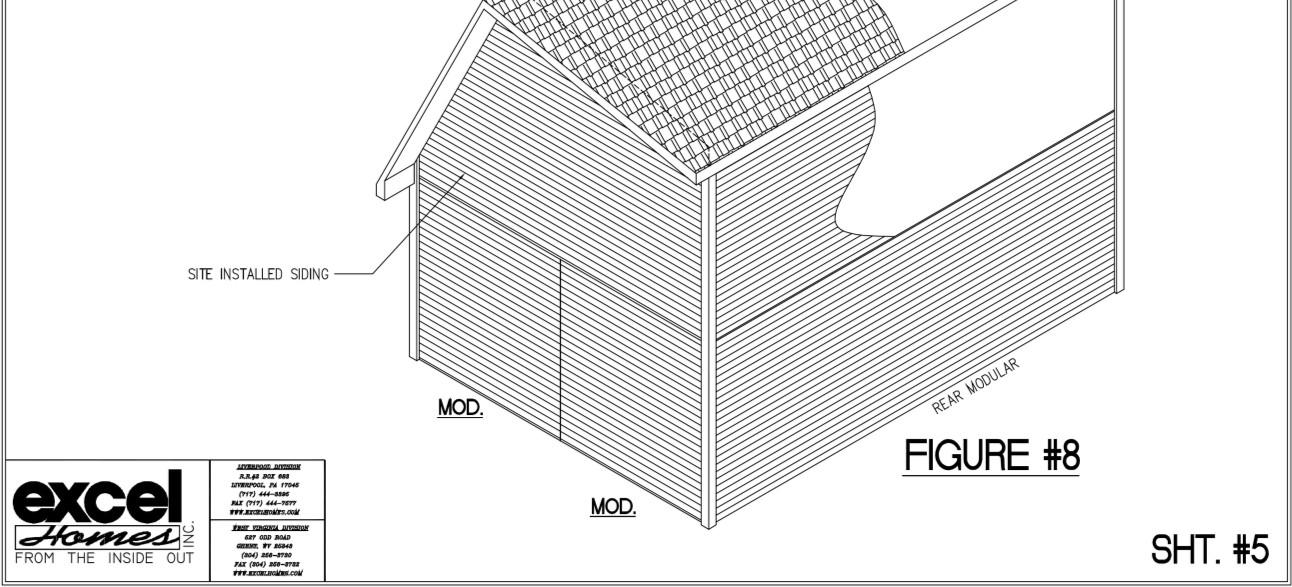
8. Builder shall install exterior siding, soffit, fascia, “J” channel and drip edge to overhangs.
The complete roof system may be site installed by builder per all applicable state and local codes.
Some homes may have top ridge extensions shipped loose due to height restrictions.
FIGURE
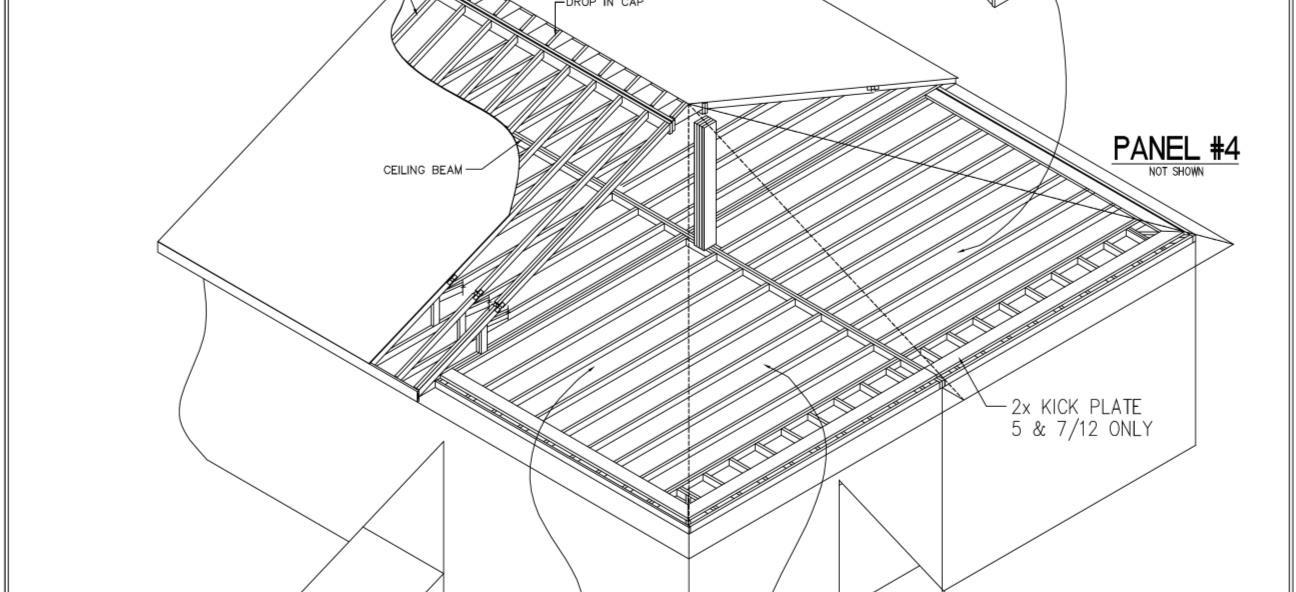
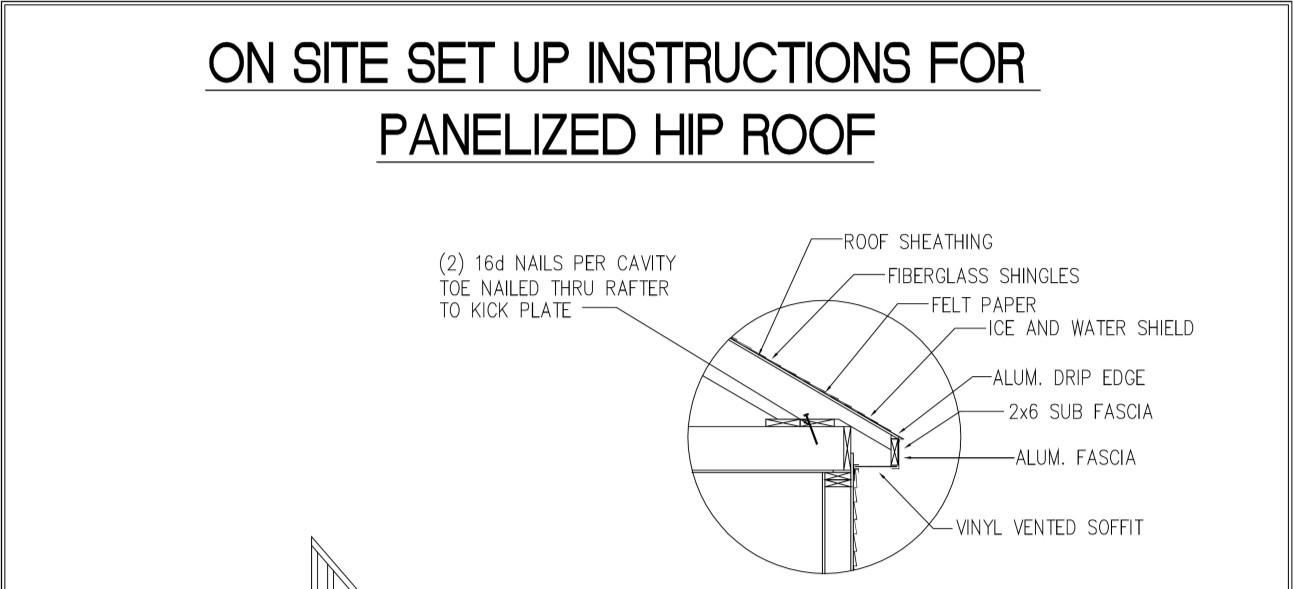
5.6.2 8/12 thru 12/12 Roof Pitch Set-up Instructions
The following procedure is designed to set 8/12 thru 12/12 roof systems. In addition, the builder is required to review the individually approved building drawings and instructions shipped with each house.
1. After home has been set and secured to the foundation, as described in previous sections, continue with the following procedures.
2. Lower hinged overhangs into position. Lift top hinged portion of roof to same angle as lower portion. Use extreme care not to raise roof too high or truss / sheathing damage may occur.
3. As the roof is being raised into position, the hinged knee wall should be somewhat self-aligning. Check to insure that there are no obstructions that will prevent proper knee wall positioning.
4. Adjust the knee wall so it is straight and plumb. If a sheathing stop or alignment plate has been fastened to the roof bottom chord by the manufacturer, align the knee wall with the sheathing or plate.
5. Secure the knee wall in place with the required connectors and/or fasteners per individual approved plan.
6. Check to insure the height from top of bottom chord, to bottom of top chord is consistent.
7. Repeat steps “1” through “6”: for additional modules.
8. Check distance from module to module at various points to verify consistency.
9. Secure marriage wall perimeter rails per Figure 5.8.4 Detail F. The gaps must be
shimmed solid before bolting, so there is wood-to-wood contact.
10. Builder shall install any required floor decking that was not installed by the manufacturer. Fastening shall be per individual approved plan.
11. Install the gable end walls, sheathing side out and flush with lower level wall sheathing.
12. If a gap is apparent between the center gable wall and the knee walls and/or top chord, shim as necessary.
13. Flip hinged top ridge into position, fasten flip rail to rafter rail per manufacturer’s instructions and per approved plan. Check that roof is straight and level. Fasten sheathing per approved plan. Secure ridge to ridge per individual approved plan. Fasten all field installed sheathing as per individual approved plan. Once both flipped ridges are installed, there shall be a 1” recess from upper tip of rafter to top edge of ridge boards to allow proper attic ventilation.
14. Lift up the shingles at the hinged area and nail overlapping roof sheathing to bottom portion of truss or rafter as per individual approved plan. Failure to properly perform this step will over a period of time, allow the roof sheathing to warp in this area over a period of time, resulting in a “wavy” look.
15. Builder shall install gable end wall window(s) or doors, if applicable.
16. Install roof dormers, if applicable. APPROVED
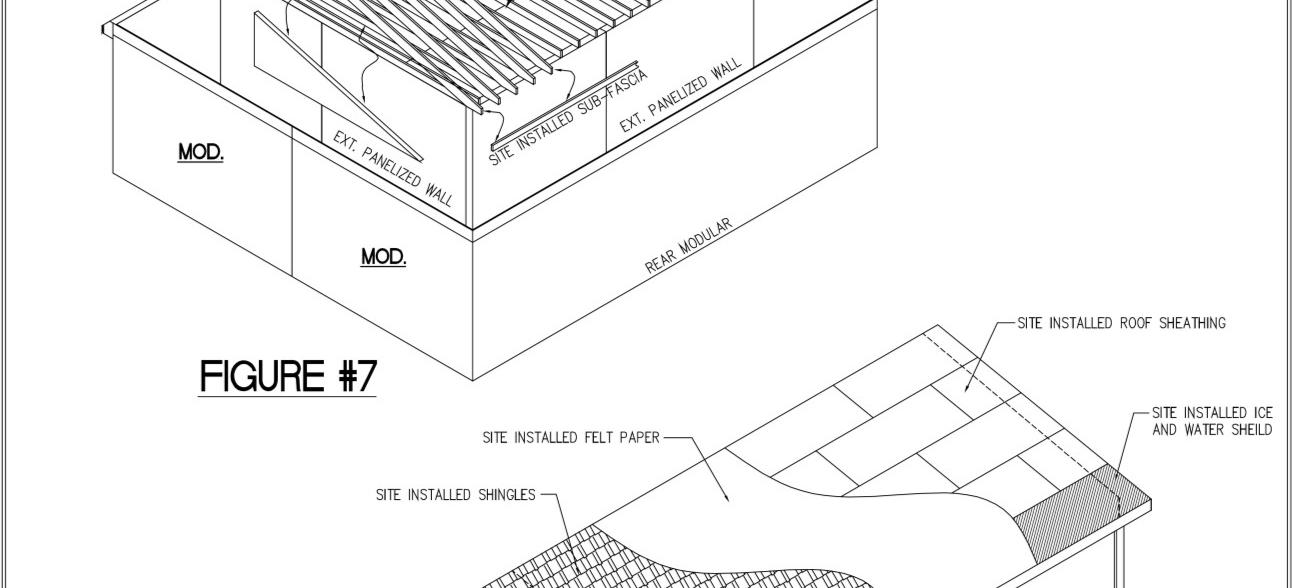
17. Check all exterior roof sheathing to be sure all sheets are secure and that seams have not loosened. Apply ice guard, shingles and ridge vent.
18. Builder shall locate plumbing waste vents and exhaust fan ducts and extend through roof. Install appropriate flashing and caps.
19. Builder to install exterior siding, soffit, fascia, “J” channel and drip edge to overhangs.
The complete roof system may be site installed by builder per all applicable state and local codes.
FIGURE 5.6.2
Bloomsburg, PA 7/1/25
FIGURE 5.6.2A
DATE PFS CORPORATION Bloomsburg, PA 7/1/25
FIGURE 5.6.2B
Bloomsburg, PA 7/1/25
FIGURE 5.6.2C
Bloomsburg, PA 7/1/25
FIGURE 5.6.2D
FIGURE 5.6.2E
5.6.3 Dormer Installation
Dormers are constructed by Champion Modular Inc. and are shipped with the home as an option. Do Not
install dormers until the roof has been properly erected and completed as described in Sections 5.6.1 thru 5.6.2.
The following general procedures should be followed:
1. Remove all protective and necessary shipping material from the dormer.
2. Remove roof sheathing and/or protective covering in area framed out to accommodate dormer.
3. Utilizing a crane, lift dormer into position with bottom of front dormer wall resting on sill in roof designed to accommodate.
4. Secure dormer to floor/roof by nailing with 16d nails at 6” o.c. on both sides and front of dormer walls, unless otherwise noted on individual approved plan.
5. On the exterior, secure flashing, installed under dormer siding, to roof.
6. Install “valley” flashing from dormer roof to house roof.
7. Complete shingle installation on dormer and house roof.
FIGURE 5.6.3A
FIGURE 5.6.3B
DATE PFS CORPORATION Bloomsburg, PA 7/1/25
FIGURE 5.6.3C
5.7 Closure
5.7.1 Exterior Roofs
1. Verify that ridge to ridge connection has been completed. Reference approved plans for connection requirements.
2. Install shingles at roof peak per manufacturer’s instructions, taking care not to cover ridge peak (Covering peak will prevent air flow required in attic space).
3. Install continuous ridge vent per manufacturer’s instructions. Check that felt paper and roof shingles do not cover the ridge peak. See Figure 5.7.1A.
4. Cover any remaining joints between sections at roof peak with 8” wide roofing felt or underlayment, nailed to the underlying roof decking with 6” o.c. roofing nails. Use 36”x12” shingles cut into 3 sections for the ridge cap. Overlap each ridge shingle per manufacturer’s instructions and secure with roofing nails.
5. Flash any valley joints per Figure 5.7.1B.
Other roofing materials may be used in accordance with their manufacturer’s installation instructions.
5.7.1.1 Optional Tiered Roof Set-Up
Before joining the halves of the house together:
1. Raise tiered (high) sections first, and properly secure all kingposts.
2. Raise non-tiered sections and properly secure all kingposts as in Step 1. NOTE: DO NOT attempt to perform ANY work inside the roof until ALL
kingposts are properly secured and double-checked.
3. The gap between the tiered roofs and standard roof at the hinged portion must be properly closed-up using manufacturer supplied 3/8” OSB minimum sheathing cut into 16” strips. Sheathing must be notched to provide clearance for overhang supports. Now join the halves of the home and close it up per standard installation instructions.
4. Cut off shipping straps flush with drip edge and raise the porch section. Note: the porch roof will require substantial temporary support through the use of jacks or other means.
5. Gauge the porch roof level by using a straight 2x4, 10’0” in length, placed on edge of the roof. Check for porch roof level at 4’0” increments and adjust temporary support heights accordingly.
6. If supplied, cut the treated 4x4 posts or temporary posts to the proper length and install per following attached porch detail (Note 64” o.c. up to 60# ground snow load and 48” o.c. up to 120# ground snow load).
7. Attach posts to the header using the supplied brackets. Use a minimum of (4) #8x2” screws to fasten “U” bracket to header and then post to “U” bracket. Posts at floor must be connected to concrete piling per local codes.
8. Porch floor may be concrete or treated joists constructed per local codes.
9. Builder shall finish off corner of main roof that protrudes into porch area using the supplied angle block, 1x6 fascia board, and decking per following detail.
APPROVED
10. Step flashing must now be installed where main roof meets tiered area. See Figure 5.7.1.1A.
11. Builder shall finish and shingle all hinged areas, including the installation of any ridge, plumbing or appliance vents.
12. Builder shall finish the area between the tiered and main roof sections using manufacturer supplied siding and finish materials. Take special care not to “trap” the siding under the fasteners.
13. Builder shall finish the porch ceiling using manufacturer supplied materials.
5.7.2 Interior Closure (to be completed by builder)
Interior trim should follow this sequence after insulation and adhesive seal has been complete at all center doorway cracks between modules (jamb, header, threshold) and modules are structurally tied together at floor and ceiling.
1. Draw center wall sections of each cube together with “C” clamps or gluing clamps. Tie doorway cripple studs together using ¾” perforated banding to achieve correct wall thickness.
2. Fold carpet back from threshold of common wall doorways and build up threshold to level of module floor decks. This may require slight jacking of center beam of one module and shims over piers to level out decks. Therefore, be sure that decks are level before bolting of units is complete. To close the small crack, use strips of felt paper, adhesive, shim shingles or plywood strips as appropriate to get proper level.
3. If carpeting is on both sides of doorway, it should be stretched with “knee kicker” and tacked to floor with small nails 6” from doorway threshold. Overlap two pieces of carpet and, using sharp carpet knife or razor knife with a straight edge, cut through both segments of carpet at once to give a neat butt joint
in the center of threshold. Cut proper length of carpet seaming tape and, using seaming iron, tape carpet together from underside. Do not remove nails until tape has been allowed to cool and set. Leave this operation until final cleanup.
4. If vinyl-to-vinyl opening is trimmed, metal thresholds are installed. In closet or bedroom doorways, carpet is turned under and tacked securely. Metal thresholds should be installed at top of basement stairs and on vinyl-to-vinyl seams between modules.
5. Door units are shimmed against cripple studs for level and square door jamb installation. CAUTION: Be sure that casing trim at door headers lines up with plant-installed door trim. This is a special problem when installing doorways in carpeted areas since pad and carpet will force doorways higher than doors over vinyl area. In these cases, force jambs tightly against carpet to minimize header differences. Never change the reveal at headers to compensate for these differences.
6. Door openings at marriage walls are shipped loose as pre-hung with jamb extensions. Reference individual floor plan for door type.
7. Finish drywall cracks by raking 1/8” groove out of all cracks, applying drywall joint compound and, in some instances, drywall tape. Top all cracks and feather edges at least 4” on either side of crack. After drying, sand and paint to match wall texture. CAUTION: Special paint is sprayed and rolled on walls during plant finishing. This creates a unique pattern wall paint finish. Touch up carefully. Corner cracks can, in some instances, be corrected with the application of caulking and repainted. NOTE: Sufficient paint from the dye lot used in plant finishing is shipped with the house. If this paint is allowed to freeze, matching paint will be difficult. Age and accumulated airborne dirt on paint will make matching of paint difficult in later repairs and entire walls may have
to be painted for correct appearance. Therefore, be sure to retain all paint left from finishing operations.
8. Some models require wood trim boxing at openings or ceiling and walls. This trim is painted. After insulation, caulk nail heads with latex caulk, then touch up. Arches are to have jambs set and cased.
9. Basement and split models require site installation of stairs. Be sure to install basement stair light for proper lighting of stairwell. Install the vinyl threshold at top of stairs and install handrail.
10. All doors and windows should be checked to be sure they open and close correctly. If doors will not latch, striker plates may need to be adjusted. If bi- fold doors bind on carpet, adjusting and leveling screws need to be adjusted. Cracks between bi-fold doors and other doors and jambs should be equal at any point. Bi-fold door track pin adjustments and hinge screw adjustment must be made for proper appearance and function.
5.7.3 Exterior Trim
Builder shall install exterior trims and siding per the manufacturer’s installation instructions.
RIDGE VENT
(SEE MANUFACTURES INSTALLATION INSTRUCTIONS)
RIDGE VENT INSTALLATION
FIGURE 5.7.1A
PREP AND FINISH VALLEY PER NORMAL CONSTRUCTION
PRACTICE AND ARMA OR SHINGLE MANUFACTURE'S GUIDELINES
VALLEY FLASHING
FIGURE 5.7.1B
TIERED ROOF FLASHING
FIGURE 5.7.1.1A
Bloomsburg, PA 7/1/25
FIGURE 5.7.1C
7/1/25
Bloomsburg, PA
FIGURE 5.7.1D
Bloomsburg, PA 7/1/25
FIGURE 5.7.1E
5.8 Cross Sections & Details
5.8.1
Detail Limitations
1. The details in this section have been provided as a guide for typical construction and on site connections. Not all specific connections are detailed, the builder must reference individual approved drawings to insure that all on site connections are completed correctly.
Bloomsburg, PA 7/1/25
2. Connections indicated in this section apply only to 115 mph (Vult) wind zones, and code prescriptive designs. All connections for areas over 115 mph (Vult) or outside code prescriptive design must be taken from the individual approved plan set. FIGURE 5.8.1
CAPE CROSS SECTION
FIGURE 5.8.2
APPROVED DATE
PFS CORPORATION
Bloomsburg, PA 7/1/25
TYPICAL
Bloomsburg, PA 7/1/25
TYPICAL TWO STORY CROSS SECTION
FIGURE 5.8.3
Bloomsburg, PA 7/1/25
FIGURE 5.8.3A
FASTENERS INTO TREATED WOOD SILL SHALL BE OF HOT-DIPPED ZINC COATED GALVANIZED STEEL, STAINLESS STEEL, SILICONE BRONZE OR COPPER
FIELD INSTALL
7/16" MIN STRUCTURAL SHTG STRIP USED AS UPLIFT RESISTANCE CONNECTION
FASTENED W/(2) ROWS OF .131" x 2.5" NAILS @ 6" O.C. ALONG TOP EDGE OF SHTG STRIP
FIELD INSTALL .148" X 3" TOE NAILS @ 6" O. C.
FIELD INSTALL (1) ROW .131" X 2.5" NAILS @ 6" O. C. UPLIFT CONNECTION SHEATHING TO SILL PLATE
½” MIN ANCHOR BOLTS TO BE 72" O.C. (MAXIMUM 1'-0" FROM CORNERS) DETAIL A
1/2" DIA. THRU-BOLTS @ 48" O.C., 3/8" LAGS FROM ALTERNATING SIDES @ 32" O.C., OR BIG TIMBER #17 STRUCTURAL LAG SCREW FROM ALTERNATING SIDES @ 32” O.C., FASTENERS ALONG LENGTH OF MATE WALL (LAGS TO HAVE MIN. 1" PENETRATION IN LAST BAND)
FIELD INSTALL .148" X 3" NAILS TOENAILS @ 6" O. C. FROM 2ND FLOOR PERIMETER TO 1ST FLOOR CLG PERIMETER
FIELD INSTALL 7/16" MIN STRUCTURAL SHTG STRIP ACROSS MATE LINE USED AS UPLIFT RESISTANCE CONNECTION
FASTENED W/(2) ROWS OF .131" x 2.5" NAILS @ 6" O.C. ALONG TOP AND BOTTOM EDGES OF SHTG STRIP
D
1/2" DIA. THRU-BOLTS @ 48" O.C., 3/8" LAGS FROM ALTERNATING SIDES @ 32" O.C., OR BIG TIMBER #17 STRUCTURAL LAG SCREW FROM ALTERNATING SIDES @ 32” O.C., FASTENERS ALONG LENGTH OF MATE WALL (LAGS TO HAVE MIN. 1" PENETRATION IN LAST BAND)
SEE INDIVIDUAL APPROVED PLAN FOR CONNECTION ACROSS MATE LINETHIS LOCATION
1/2" DIA. THRU-BOLTS @ 48" O.C., 3/8" LAGS FROM ALTERNATING SIDES @ 32" O.C., OR BIG TIMBER #17 STRUCTURAL LAG SCREW FROM ALTERNATING SIDES @ 32” O.C., FASTENERS ALONG LENGTH OF MATE WALL (LAGS TO HAVE MIN. 1" PENETRATION IN LAST BAND)
1/2" DIA. THRU-BOLTS @ 48'O.C. OR 3/8" LAGS @ 32" O.C. ALONG MATE WALL (MIN. 1" PENETRATION IN LAST BAND)
(2) .131"x3" NAILS THRU PLATE INTO CLG. JOIST
(3) .131"x3" TOE NAILS THRU LEG INTO PLATE
1/2" DIA. THRU-BOLTS @ 48" O.C. OR 3/8" LAGS FROM ALTERNATING SIDES @ 32" O.C.ALONG MATE WALL (MIN. 1" PENETRATION IN LAST BAND)
1/2" DIA. THRU-BOLTS @ 48" O.C., 3/8" LAGS FROM ALTERNATING SIDES @ 32" O.C., OR BIG TIMBER #17 STRUCTURAL LAG SCREW FROM ALTERNATING SIDES @ 32” O.C., FASTENERS ALONG LENGTH OF MATE WALL (LAGS TO HAVE MIN. 1" PENETRATION IN LAST BAND)
DETAIL E ALTERNATE DETAIL E
FIGURE 5.8.4
DETAILS A-E
FACTORY FABRICATED RAFTER
PRE-MANUFACTURED TRUSS SEE INDIVIDUAL APPROVED PLAN FOR REQUIRED FIELD CONNECTION THIS LOCATION
SHEATHING LAP ACROSS JOINT STAPLES OR NAILS (IN PLANT) (4) .131"x2.5" NAILS (IN FIELD) PER FRAMING MEMBER
.131"X3" FACE NAILS @8" O.C. FLIP BOARD TO FLIP BOARD
.128" x 3" FACE NAILS PER INDIVIDUAL RAFTER REQMT COLLAR TIE TO TOP CHORD
DETAIL F
DETAIL F - ALTERNATE 1
.131"X3" FACE NAILS FROM ALTERNATING SIDES @8" O.C. RIDGE BOARD TO RIDGE BOARD (1) 1.5" X 20 GA STRAP W/(7) .131" X 2.5" NAILS EA END OF STRAP
DETAIL G
DETAIL I
FIGURE 5.8.4
DETAILS F-J
7/1/25
DETAIL H
SEE INDIVIDUAL APPROVED PLAN FOR CONNECTION THIS LOCATION
DETAIL J
SEE INDIVIDUAL APPROVED PLAN FOR CONNECTION THIS LOCATION
FILLER WEDGE DETAIL
THIS DETAIL MAY NOT BE USED IN HIGH WIND AREA CONSTRUCTION
GENERAL NOTES:
1. TYPICAL ROOF TRUSS OR RAFTER ABOVE END-WALLS
2. TYPICAL FILLER WEDGE - VERTICALS OVER 60" IN LENGTH SHALL BE LATERALLY BRACED.
3. FASTEN FILLER WEDGE TO TRUSS TOP CHORD AND TRUSS WEB WITH 7 /16"x 2-1 /2"x 15 GA STAPLES AT 6"O.C.
WALL TOP EDGE MAY BE LOWERED TO ACCOMODATE OVERHANG OUTLOOKERS
7/16" EXTERIOR SHEATHING FASTENED W/ .!13"x2f' NAILS @ 6" O C. EDGE 12"O.C. FIELD VIEW"A"
FULL GABLE WALL DETAIL
GENERAL NOTES:
1. TYPICAL INTERMEDIATE HINGED ROOF TRUSS OR RAFTER
2. TYPICAL FULL GABLE END WALL PANEL
3. FASTEN GABLE END WALL PANEL TO WALL BELOW WITH .131"x3" NAILS THRU BOTTOM PLATE TO TOP PLATES @6" O.C.
2x SPF#2
Bloomsburg, PA 7/1/25
FIGURE
PA 7/1/25
FIGURE
Bloomsburg, PA 7/1/25
FIGURE 5.8.7C
Bloomsburg, PA 7/1/25
5.9A
FIGURE
Bloomsburg, PA 7/1/25
FIGURE 5.9B
Bloomsburg, PA 7/1/25
FIGURE
Bloomsburg, PA 7/1/25
5.9D
FIGURE
Bloomsburg, PA 7/1/25
5.10A
FIGURE
Bloomsburg, PA 7/1/25
FIGURE 5.10B
Bloomsburg, PA 7/1/25
FIGURE 5.10C
7/1/25
Bloomsburg, PA
APPROVED DATE PFS CORPORATION
5.10D
FIGURE
PFS CORPORATION Bloomsburg, PA 7/1/25
5.10E APPROVED
FIGURE
Bloomsburg, PA 7/1/25
FIGURE
7/1/25
Bloomsburg, PA
FIGURE 5.11.1A
Bloomsburg, PA 7/1/25
FIGURE 5.11.1B
DATE PFS CORPORATION
Bloomsburg, PA 7/1/25
FIGURE 5.11.1C
APPROVED DATE
PFS CORPORATION
Bloomsburg, PA 7/1/25
5.11.1D
FIGURE
7/1/25
PA
5.11.2A
FIGURE
Bloomsburg,
7/1/25
Bloomsburg, PA
FIGURE 5.11.2B
DATE PFS CORPORATION
Bloomsburg, PA 7/1/25
FIGURE 5.11.2C
DATE
Bloomsburg, PA 7/1/25
PFS CORPORATION
FIGURE 5.11.2D
APPROVED
DATE
Bloomsburg, PA 7/1/25
PFS CORPORATION
FIGURE 5.11.2E
APPROVED DATE PFS CORPORATION Bloomsburg, PA 7/1/25
FIGURE 5.11.2F
Bloomsburg, PA 7/1/25
FIGURE 5.11.2G
Bloomsburg, PA 7/1/25
FIGURE 5.11.2H
FIGURE 5.11.3A
FIGURE 5.11.3B
Bloomsburg, PA 7/1/25
FIGURE 5.11.3C
Bloomsburg, PA 7/1/25
FIGURE
CORPORATION Bloomsburg, PA 7/1/25
FIGURE 5.11.3E
Bloomsburg, PA 7/1/25
FIGURE 5.11.3F
6. Optional Features
6.1 Installation of On-Site
Attached Structures
Any structures, devices, accessories, etc. added by others are not the responsibility of the home manufacturer. Design all attached buildings and structures to support all their own dead, live and wind loads, and to have fire separation as required by LAHJ.
6.1.1 Garages and Carports
A garage or carport must be supported independently of the factory-built portion of the home and conform to LAHJ requirements. Electrical circuits in garages shall be provided with ground fault interruption.
6.1.2
Porches & Decks
Site-constructed porches and decks must be self-supporting and must be constructed and inspected per LAHJ requirements.
6.1.3 Steps, Stairways and Landings
Steps, stairways and landings must be constructed and inspected per LAHJ requirements.
LIVING SPACE
THE GARAGE SHALL BE SEPARATED FROM LIVING SPACE ABOVE BY NOT LESS THEN 5/8" TYPE X GYPSUM BOARD APPLIED TO GARAGE SIDE. THE STRUCTURE SUPPORTING THE CEILING SHALL BE PROTECTED BY NOT LESS THAN 1/2" GYPSUM BOARD (5/8" GYPSUM-NEW YORK) OR EQUIVALENT.
THE GARAGE SHALL BE SEPARATED FROM THE LIVING SPACE AND IT'S ATTIC BY NOT LESS THEN 1/2" GYPSUM BOARD (5/8" TYPE X GYPSUM BOARD - NEW YORK & MASS.) APPLIED TO GARAGE SIDE, AND 1/2" TYPE X GYPSUM APPLIED TO THE OPPOSITE SIDE.
GARAGE OR CARPORT
APPROVED NON COMBUSTIBLE MATERIAL. IF USED FOR PARKING AUTOMOBILES OR VEHICLES SHALL BE SLOPED TO DRAIN OR TOWARD VEHICLE ENTRY DOORWAY.
LIVING AREA
ASSEMBLY MUST BE CONTINUOUS FROM FLOOR TO ROOF DECKING. OR A HORIZONTAL ASSEMBLY WILL BE REQUIRED. IF LIVING SPACE IS OVER THE GARAGE SPACE 5 8" GYPSUM IS TO BE APPLIED TO THE CEILING UNDER THE LIVING SPACE.
OPENINGS FROM A PRIVATE GARAGE DIRECTLY IN TO A ROOM USED FOR SLEEPING PURPOSES SHALL NOT BE PERMITTED. OTHER OPENINGS BETWEEN THE GARAGE AND RESIDENCE SHALL BE EQUIPPED WITH A 20 MIN. (NEW YORK - 45 MIN DOORS PROTECTED WITH SELF-CLOSING DEVICES) FIRE RATED PROTECTION DOOR ASSEMBLY.
FLR OF LIVING SPACE
FIGURE 6.1.1
Bloomsburg, PA 7/1/25
FIGURE 6.1.2.1A
Bloomsburg, PA 7/1/25
FIGURE 6.1.2.1B
FIGURE 6.1.2.1C
DATE PFS CORPORATION
Bloomsburg, PA 7/1/25
FIGURE 6.1.2.1D
FIGURE 6.1.2.2A
Bloomsburg, PA 7/1/25
FIGURE 6.1.2.2B
DATE
PFS CORPORATION Bloomsburg, PA 7/1/25
FIGURE 6.1.2.2C
Bloomsburg, PA 7/1/25
FIGURE 6.1.2.3A
DATE PFS CORPORATION
Bloomsburg, PA 7/1/25
FIGURE 6.1.2.3B
7/1/25
PFS CORPORATION
Bloomsburg, PA
FIGURE 6.1.2.3C
Bloomsburg, PA 7/1/25
FIGURE 6.1.2.4A
DATE PFS CORPORATION Bloomsburg, PA 7/1/25
6.1.2.4B
FIGURE
Bloomsburg, PA 7/1/25
FIGURE 6.1.2.4C
6.2 Miscellaneous Lights And Fixtures (to be completed by builder)
Some exterior lights, ceiling fans and chain-hung fixtures may not yet be installed when the home is delivered. All of these fixtures must be grounded by a fixture- grounding screw or wire. For chain-hung fixtures, use both methods. When fixtures are mounted on combustible surfaces such as hardboard, install a noncombustible ring to completely cover the combustible surface exposed between the fixture canopy and the wiring outlet box. If siding has not been installed at a fixture location, remove the outlet box and install the siding with a hole for the outlet box. Then reinstall the outlet box and proceed as for other fixtures.
6.2.1
Exterior Lights
Remove any junction box covers and make wire- to-wire connections using wire nuts. Connect the wires as follows: black-to-black, white-to-white, and ground-to-ground. Push the wires into the box and secure the light fixture to ensure a watertight seal to the sidewall. Install the light bulb and attach the globe.
6.2.2
Ceiling Fans
To reduce the risk of injury, install ceiling fans with the lowest edges of the blades at least 76 inches above the floor. Follow the manufacturer’s instructions for installation.
6.3
Optional Panels, Siding And Molding (to be completed by builder)
If the home came equipped with optional panels, siding, or molding, refer to any special installation procedures provided with the materials.
6.4 Exterior Coverings (to be completed by builder)
Install exterior coverings (e.g. stucco, metal, vinyl, plywood, hardboard exterior siding,
and shingled roofs, etc.) according to the material manufacturer’s instructions. Reference Champion Modular Inc. approved systems package for specific siding and installation details.
Vinyl Lap Siding – Make sure the seams at the marriage joint of the end walls for the entire height of the walls have air barriers installed to the mate line and are completely sealed (by a manufacturer specific house wrap sealant or overlap per manufacturer’s installation procedures). Apply the sealant or overlap directly over the sheathing.
The siding panels should be attached using 7/16 x 1 ½” x 16 gauge galvanized steel or aluminum staples. (6d galvanized nails may also be used.) Staples should be driven so that there is a 1/32” clearance between the siding and staple crown to allow some lateral movement. Fasten to each stud.
Snap the bottom course of siding into the starter strip and fasten to the wall. Leave a ¼” space at corner posts and ‘J’ channels around window and door openings to allow for expansion. Do not fasten within 4” of an accessory. Vertical butt joints in panels should overlap 1”. Do not fasten the panel within 4” of the joint. Install vinyl, aluminum, felt or other suitable material for flashing at bottom corners of doors and windows per manufacturer’s approved systems package for specific siding and installation details. Apply caulk around siding and light blocks, water faucets, or other small penetrations.
Install successive courses similarly to the first. Butt joints in adjacent courses should be offset by at least 24”. Joints in alternate courses should be aligned vertically.
Panels will have to be cut at headers and sills. A single panel should extend without joints across the width of the opening. When cutting a panel at a sill, measure the distance between the bottom of the opening and the top lock of the lower course, then deduct ¼”.
Slide the cut panel into the undersill trim and install. Note that the undersill trim piece may have to be furred to maintain the proper pitch of the siding.
Measure and cut the header panel in the same manner as indicated above. The top
sections at the gable will need to be angle cut. Use two scrap pieces of siding to make a pattern. Interlock one piece with the siding panel below. Hold the other piece on top against the gable. Mark a line on the bottom piece and cut. Use this piece as a pattern for cutting gable pieces. Install the gable pieces by interlocking with the lower course, sliding into the gable ‘J’ rail and fastening.
EXT. SHEATHING
INCORRECTLY APPLIED CORRECTLY APPLIED
INCORRECTLY APPLIED
STAGGER PANELS AS SHOWN
6.4A (to be completed by builder)
Exterior Painting – Painting of raw surfaces is the last sequence for completing exterior finish. If a garage is included in the unit package, exterior painting is generally done after garage erection and completion.
The following points will need painting or touchup.
1. Decorative porch posts and porch soffit.
2. Front door jambs and brick mold trim adjustment. Nail holes should be puttied before painting.
3. Siding frieze or band boards around house (special elevations).
4. Doors need to be caulked at siding gap next to trim mold.
5. General touchup on spots bruised during erection and delivery.
6. Soffit under floor of overhang, i.e., floor overhang of split entry model.
6.5 Telephone And Cable Television
The walls and floors of the modular home contain electrical circuits, plumbing and ductwork. Avoid contact with these systems when drilling through and placing cables within the cavities. Only trained professionals shall perform telephone crossover connection in multisection homes. Failure to follow these instructions may result in serious personal injury or death.
Bloomsburg, PA 7/1/25
FIGURE
7. Appliances
(to be completed by builder)
7.1 Heating Appliance
Install heating appliances and all utility connections per the appliance manufacturer’s installation instructions. Make sure the heating system being installed matches or exceeds the BTUH heating requirements listed on the manufacturer’s data plate, but keep in mind that the manufacturer’s data plate will only include modular built portions of the home. Additional requirements may have to be considered such as living areas in the lower portion of a split level and unfinished 2nd floor living spaces of a cape. Make certain the heating system installed in the home is sized properly for all habitable areas of the completed home.
7.2 Clothes Dryer Vent
The clothes dryer must exhaust outside the exterior of the home or outside any perimeter foundation, through a moisture-lint exhaust system, as specified in the dryer manufacturer’s installation instructions. If flex duct is installed on site, hold the duct in place with metal straps spaced 2’ on center secured to the bottom of the floor joists or frame. Vent openings are located in either the wall or the floor. After the duct is installed, seal the openings, both inside and outside. Follow the dryer manufacturer’s instructions for installing the exhaust system. Gas supply piping and adequate venting must be provided as specified by the gas dryer manufacturer. Only a trained and experienced person shall install a gas dryer. Cutting major structural elements (such as trusses or floor joists) to allow for a gas dryer installation is not permitted.
WARNING!
Termination of the dryer exhaust underneath the home can cause condensation and moisture damage to the home. Lint and dust accumulation can ignite, causing a fire. A FIRE MAY RESULT IN SERIOUS INJURY OR DEATH.
Periodically check for and remove accumulated lint and dust.
7.3 Comfort Cooling Systems
Only qualified personnel may install any comfort cooling system not provided with the home. Follow the manufacturer’s installation instructions and conform to LAHJ requirements.
7.3.1 Air Conditioners
The home’s electrical distribution panel may contain optional factory-installed circuits for air conditioning. The maximum full load ampere draw for the desired air conditioning unit must not exceed the circuit rating shown.
The Electrical distribution panel in the home may not have been sized for the additional load of non-factory-installed air conditioning, and a separate outside electrical supply may have to be provided. Any field- installed wiring beyond the junction box must include a fused disconnect located within sight of the condensing unit. The maximum fuse size is marked on the condenser data plate. Local codes will determine the acceptability of the air conditioning equipment, rating, location of disconnect means, fuse-type branch circuit protection, and connections to the equipment.
Follow the air conditioner manufacturer’s installation instructions to install a remote (self-contained) air conditioner (with cooling coil and blower located outside the home).
7.4 Heat Pumps
Install heat pumps according to the heat pump manufacturer’s instructions and all state and local requirements.
Bloomsburg, PA 7/1/25
7.5 Chimneys And Air Inlets
Fireplaces, wood stoves and gas water heaters may require on-site installation of combustion air inlets and on-site installation of additional section(s) of approved, listed chimney pipe, spark arrestor and rain cap assembly. Site installations of vents, shall conform to the appliance manufacturer’s installation instructions.
7.5.1
Fireplace Chimney Extensions Above the Roof (Non-power Vented)
The fireplace chimney shall extend at least three feet above the part of the roof through which it passed and at least two feet above the highest elevation of any part of the home within 10 feet of the chimney.
APPROVED
DATE
PFS CORPORATION
Bloomsburg, PA 7/1/25
If the horizontal distance from the peak of the roof is less than 10 feet, the top of the chimney must be at least 2 feet above the peak of the roof. If the horizontal distance from the chimney edge to the peak of the roof is more than 10 feet, a chimney height reference point is established on the roof surface 10 feet from the chimney edge. The top of the chimney must be at least 2 feet above this reference point. In all cases, the chimney cannot be less than 3 feet above the roof at the edge of the chimney.
If the site has obstructions within 10 feet of the chimney, the installer may have to provide an additional section of chimney pipe. Refer to Figure 7.5.1.
FIGURE 7.5.1
7.5.2 Assembly and Sealing Sequence
When a fireplace is factory installed such that the firebox is in one section of a multisection home and the hearth in the adjacent section, the hearth cannot be factory-installed. Therefore, the hearth must be shipped with the unit and field installed in strict compliance with the fireplace manufacturer’s installation instructions.
WARNING!
Chimneys and hearths that are incomplete could cause a fire if they are used prior to completion.
A FIRE MAY RESULT IN SERIOUS INJURY OR DEATH.
7.5.3 Combustion Air Duct Inlets
Completion of ducts and vents are the responsibility of the builder when applicable. Combustion air-intake ducts end just below the bottom covering of the floor. They must be extended to the outside when the home has a basement or crawl space. These ducts must be installed per fireplace manufacturer’s installation instructions. Do not allow the combustion air inlet to drop material from the hearth beneath the home. Locate the inlet damper above the expected snow level.
7.6 Range, Cook-Top And Oven Venting
If the home is equipped with a combination range, cook-top/grill or oven that contains its own exhaust system, route the exhaust so that it does not discharge under the home. Connect metallic duct between the elbow protruding from the floor and the termination
fitting, and support it according to the manufacturer’s installation instructions.
The chimney, combustion air ducts and hearth must be installed before the fireplace is used. APPROVED
8. Utilities
(to be completed by builder)
Utility system connection and testing - Consult the local authority before connecting any utilities. Only qualified installers, familiar with local codes and licensed where required, shall make utility connections and conduct tests.
8.1 Water Supply
8.1.1 Maximum Supply
Pressure
The water system for the home was designed for a maximum inlet pressure of 80 psi. The minimum pressure at the entrance shall be 40 psi. If the home is located where the local water supply pressure exceeds 80 psi, install a pressurereducing valve.
8.1.2 Connection Procedures
Qualified personnel shall complete the water supply system on site.
1. Individual Fixtures - Supply lines to individual fixtures may be stubbed through the floor. Site hook-up of horizontal runs underneath the floor between those fixtures may be necessary.
2. Crossovers – Homes with plumbing in multiple modules may have horizontal supply lines that have been plant installed. Connection of all horizontal supply lines is required on site.
3. To supply main – Connect the home’s water system to the water source inlet.
8.1.3
Protection from Freezing
In areas subject to freezing temperatures, protect exposed sections of water supply piping, shut-off valves, pressure reducers, and pipes in a water heater compartment. Failure to do so may result in burst pipes and costly damage.
1. Use of heat tape – Heat tape is an electrical heating element designed to protect exposed plumbing from freezing, and is certified by UL, CSA or FMRC. Install heat tape in strict conformance with the tape manufacturer’s instructions.
2. Freezing protection for unoccupied homes – If the home is to be left unheated in cold weather turn off the water heater, drain the water lines and blow clear with compressed air to prevent damage from freezing.
8.1.4 Testing
Although the manufacturer, prior to shipment, performed testing of the water supply system, leaks may sometimes occur as a result of shipment, set-up, and on-site plumbing connections. The system must be rechecked per LAHJ requirements at the installation site after all on site system hookups have been completed.
APPROVED


