YardMachine700SeriesRidersRepairManual

Professional Shop Manual
700 Series Riding Tractors
NOTE: These materials are for use by trained technicians who are experienced in the service and repair of outdoor power equipment of the kind described in this publication, and are not intended for use by untrained or inexperienced individuals. These materials are intended to provide supplemental information to assist the trained technician. Untrained or inexperienced individuals should seek the assistance of an experienced and trained professional. Read, understand, and follow all instructions and use common sense when working on power equipment. This includes the contents of the product’s Operators Manual, supplied with the equipment. No liability can be accepted for any inaccuracies or omission in this publication, although care has been taken to make it as complete and accurate as possible at the time of publication. However, due to the variety of outdoor power equipment and continuing product changes that occur over time, updates will be made to these instructions from time to time. Therefore, it may be necessary to obtain the latest materials before servicing or repairing a product. The company reserves the right to make changes at any time to this publication without prior notice and without incurring an obligation to make such changes to previously published versions. Instructions, photographs and illustrations used in this publication are for reference use only and may not depict actual model and component parts.
© Copyright 2010 MTD Products Inc. All Rights Reserved

MTD Products Inc. - Product Training and Education Department FORM NUMBER - 769-06667 11/2010

YardMachine700SeriesRidersRepairManual
YardMachine700SeriesRidersRepairManual
Table of Contents Chapter 1: Introduction 1 Professional Shop manual intent 1 Fasteners........................................................................................................ 1 Assembly......................................................................................................... 2 Description of the 700 series 2 Model and Serial Numbers 3 Chapter 2: Engine Related Parts 5 Muffler 5 Fuel tank removal/replacement 6 Chapter 3: Steering and Front Axle 9 Front wheel removal and axle bearing inspection.......................................... 10 Left Front Axle Removal................................................................................ 10 Right Front Axle Removal 11 General Information....................................................................................... 11 Pivot Bar........................................................................................................ 11 Installation notes 13 Steering Gear Inspection............................................................................... 14 Steering Shaft Replacement.......................................................................... 15 Steering Gear Replacement 16 Steering Link Rod Replacement 18 Front wheel alignment 20 Chapter 4: Body Panels 23 What is covered by this chapter .................................................................... 23 Hood Removal............................................................................................... 23 Hood components 25 Seat and Fenders.......................................................................................... 25 Seat Removal................................................................................................ 26 Seat bracket removal 27 Fender Removal............................................................................................ 28 Dash Panel.................................................................................................... 31 To remove the lower dash 32
YardMachine700SeriesRidersRepairManual I
YardMachine700SeriesRidersRepairManual
Chapter 5: Auto-drive CVT Drive and Brake System 35 About this chapter......................................................................................... 35 About the variable speed drive system.......................................................... 36 Externally repairable drive system problems: 37 Indications that a transaxle is not warrantable............................................... 39 Brake............................................................................................................. 39 Brake adjustment 40 Gear selector 41 Adjusting Gearshift Lever.............................................................................. 42 Adjusting the variable speed pulley control rod 43 Linkage: pedal shaft 45 Drive pedal and brake pedal shaft assembly removal.................................... 46 Linkage: Cobra head to control rod tie plate and hex bushing 49 Belt control: Upper drive belt idler arm 50 Belt control: Servicing the variable speed pulley ........................................... 51 Belt control: Double idler tensioner pulleys 53 Drive belt replacement 57 Transaxle removal and replacement ............................................................. 60 Transaxle Repair - Bench Work .................................................................... 62 Chapter 6: Hydrostatic Transaxle 75 Purging the system ....................................................................................... 76 Brakes 77 Transaxle control linkage 78 Cross-shaft and control lever......................................................................... 79 Drive Belt 81 Clutch/Brake linkage 83 Brake pedal assembly................................................................................... 85 Parking brake 86 Parking brake adjustment 87
YardMachine700SeriesRidersRepairManual II
YardMachine700SeriesRidersRepairManual
Chapter 7: Electrical System 89 Introduction.................................................................................................... 89 OCR Module ................................................................................................. 90 Key switch 91 OCR Module ................................................................................................. 94 Identifying a faulty OCR module..................................................................... 95 PTO switch 98 Brake switch 98 Park Brake Switch......................................................................................... 99 Reverse Safety Switch 100 Seat Safety Switch 101 Starter solenoid........................................................................................... 102 Lighting circuit 103 Start Circuit 104 Run Circuit................................................................................................... 106 Run Circuit / Reverse Caution mode 108 Safety circuits 109 Charging circuit............................................................................................ 111 Testing the charging system 114 Electrical diagnosis 119 Electronics................................................................................................... 119 Electrical environment: AC Vs. DC 120 Ohm’s Law 121 Kirchhoff’s current law.................................................................................. 121 Kirchhoff’s voltage law ................................................................................. 122 How the system is wired together 122 Types of circuits .......................................................................................... 123 Series.......................................................................................................... 123 Parallel 123 Series/parallel.............................................................................................. 124 Shorts.......................................................................................................... 124 Opens 124 Increased resistance 124 The Tools.................................................................................................... 125 Digital Multi-meter 126 Wiring diagram or schematic 127 Fused jumper wires..................................................................................... 127 Test lights.................................................................................................... 127 Self-powered continuity lights 127 Ammeters and specialized charging system testers.................................... 128 Batteries...................................................................................................... 129 Charging the battery 129 Checking battery condition .......................................................................... 130 Battery Testers.............................................................................................131 Adjustable load testers 131 Fixed load testers........................................................................................ 132
YardMachine700SeriesRidersRepairManual III
YardMachine700SeriesRidersRepairManual
Conductance testers.................................................................................... 132 Battery discharge test 133 Storage of batteries..................................................................................... 133 Electrical Troubleshooting ........................................................................... 134 Voltage Drop Test 136 Testing switches.......................................................................................... 139 Diodes......................................................................................................... 140 Schematic ................................................................................................... 142 Chapter 8: Cutting Decks 149 Cutting decks 149 Deck Wash Features 149 Deck removal.............................................................................................. 150 Cleaning the Deck....................................................................................... 152 To clean the deck while it is removed 152 Cutting Blades............................................................................................. 152 Blade Removal............................................................................................ 153 PTO Belt 154 To replace the PTO belt.............................................................................. 155 Deck with a Timing Belt............................................................................... 158 Pulleys and Spindles 160 Blade Brake System.................................................................................... 162 Leveling the deck 164 Side to Side Leveling 164 Front To Rear Leveling................................................................................ 165 Deck Wheel Adjustment.............................................................................. 166 Deck lift shaft assembly bushings 167 Deck lift shaft assembly removal/replacement............................................. 167 Deck lift links ............................................................................................... 169 Manual PTO Blade Engagement Lever 169 Cutting Deck Engagement Lever Replacement........................................... 170 Replacing the cutting deck engagement cable 171 Chapter 9: Maintenance Intervals 173 Lubrication................................................................................................... 173 Engine maintenance 173 General maintenance tips 174 The spark plug(s)........................................................................................ 174 Air filter and foam pre cleaner 175 Oil change 176 Oil filter........................................................................................................ 177 Fuel system................................................................................................. 178 Servicing the fuel system 178 Fuel filter ..................................................................................................... 178 Clean the engine......................................................................................... 179 Lubricate the pedal shaft 179
YardMachine700SeriesRidersRepairManual IV
YardMachine700SeriesRidersRepairManual
CHAPTER 1: INTRODUCTION
Professional Shop manual intent
This Shop Manual is intended to provide service dealers with an introduction to the mechanical aspects of the 700 series tractor.
• Detailed service information about the engine will be provided by the engine manufacturer, in most cases.
Disclaimer: The information contained in this shop manual is correct at the time of writing. Both the product and the information about the product are subject to change without notice.
About the text format:
NOTE: is used to point-out information that is relevant to the procedure, but does not fit as a step in the procedure.
DANGER
Danger indicates an imminently hazardous situation that, if not avoided, will result in death or serious injury. This signal word is to be limited to the most extreme situations
Warning indicates a potentially hazardous situation that, if not avoided, could result in death of serious injury.
Caution is used to point out potential danger to the technician, operator, bystanders, or surrounding property. CAUTION
Bullet points: indicate sub-steps or points.
Disclaimer: This Professional Shop Manual is intended for use by trained, professional technicians.
• Common sense in operation and safety is assumed.
• In no event shall MTD or Cub Cadet be liable for poor text interpretation, or poor execution of the procedures described in the text.
• If the person using this manual is uncomfortable with any procedures they encounter, they should seek the help of a qualified technician or Cub Cadet Technical Support.
Fasteners
• Most of the fasteners used on the tractor are sized in fractional inches. Some are metric. For this reason, wrench sizes are frequently identified in the text, and measurements are given in U.S. and metric scales.
• If a fastener has a locking feature that has worn, replace the fastener or apply a small amount of releasable threadlocking compound such as Loctite® 242 (blue).
• Some fasteners like cotter pins are single-use items that are not to be reused. Other fasteners such as lock washers, retaining rings, and internal cotter pins (hairpin clips) may be reused if they do not show signs of wear or damage. This manual leaves that decision to the judgement of the technician.
! DANGER ! WARNING ! CAUTION
Introduction
YardMachine700SeriesRidersRepairManual 1
YardMachine700SeriesRidersRepairManual

700 Series Lawn Tractor Assembly

Torque specifications may be noted in the part of the text that covers assembly, they may also be summarized in tables along with special instructions regarding locking or lubrication. Whichever method is more appropriate will be used. In many cases, both will be used so that the manual is handy as a quick-reference guide as well as a step-bystep procedure guide that does not require the user to hunt for information.
The level of assembly instructions provided will be determined by the complexity and of reassembly, and by the potential for unsafe conditions to arise from mistakes made in assembly.
Some instructions may refer to other parts of the manual for subsidiary procedures. This avoids repeating the same procedure two or three times in the manual.
Description of the 700 series
1. Description: A new step-through rider platform was introduced for the ‘05 mowing season. It was designated as the 700 series rider. It is seen across many of the MTD brands and private labels. There are also several hood configurations.The serial number and date codes are the keys to obtaining proper parts and service information. Since that date, several drive systems have been used on this series.
2. Variations: Drive Systems The 700 series is currently available with three basic drive systems. The 700 refers to the 5th through 7th characters of the model number found under the seat.
• 13AN772G000 is a “770” series - 7 speed shift-on-the-go transmission
NOTE: There is also a 760 series with a 6 speed shift-on-the-go transmission
• 13WX78KS011 is a “780” series - autodrive variable speed CVT tractor
• 13AR791G790 is a “790” series - Hydrostatic drive tractor
The 760-770 series is a shift-on-the-go system that uses a simple forward/neutral/reverse transaxle driven by two belts in a variable speed pulley. A dash mounted speed range control (sets speed of rider). A foot operated brake on the left side of the rider engages the drive when it is released.
The 780 series uses a Autodrive system with the same transmission as the 770 series. The 780, like the 770, has the brake pedal on the left side of the tractor. A drive pedal on the right side of the tractor controls a variable-speed pulley (CVT) system that controls the ground speed of the tractor.
The 790 series uses a hydrostatic transaxle. A pedal on the left side of the tractor operates the brake/clutch pedal while the ground speed and direction of the tractor is controlled by a fender mounted hand control lever.
YardMachine700SeriesRidersRepairManual 2
YardMachine700SeriesRidersRepairManual
Introduction
3. Variations: Cutting Decks Three decks sizes are currently available on the 700 series platform: 38”, 42” and 46” with twin blades. Within the different deck sizes you may find different configurations of belt routing, blade brakes, Idlers, spindles and blades. The eighth letter in the serial number indicates the deck used on the rider. Refer to the correct illustrated parts list when working on the deck and ordering parts.
4. Variations: Other The 700 series platform will accommodate a variety of single and twin cylinder engines, and a range of styles and brands will be applied to it. The steel dash panel is common to all 700 series, and plastic inserts will be used to match the different hoods used.
5. Spotter’s Guide: The 700 series is visibly similar to the existing step-through platform 600 and 610 series lawn tractors, but there are substantial differences.
• Deck Engagement: The PTO belt is engaged on the 700 series using a lever on the right fender.
Model and Serial Numbers
The model and serial number tag can be found under the seat.

The serial number is located to the right of the model number as shown above.
The model number is 13AN772G000 The break down of what the number mean is as follows:
13. lawn tractor
...A. .....................sales level
......N. engine code
........7. tractor series
..........7. drive system ............2. hood style ...............G deck
...................000. customer number
The serial number is 1C259B40136. The serial number reads as follows:


1 engineering level
..C month of production (C = March)
.....25................... day of the month .........9. last digit of the year
...........B. plant it was built in
..............4. assembly line number
.................0136..... number of unit built
Model number
Serial number
YardMachine700SeriesRidersRepairManual 3
YardMachine700SeriesRidersRepairManual
700 Series Lawn Tractor
YardMachine700SeriesRidersRepairManual 4
YardMachine700SeriesRidersRepairManual
Engine Related Parts
CHAPTER 2: ENGINE RELATED PARTS
This manual will cover the engine accessories that are manufactured by MTD Products.

IMPORTANT: Refer to the engine manufacturer’s manual for engine specific service information.
Muffler
The engine style on the rider will determine the steps needed to replace the muffler. Refer to the parts manual that came with the rider for an illustration of the parts on the rider you are servicing. Remove the muffler by following these steps:

NOTE: The muffler and the exhaust pipes are welded together. They are replaced as one assembly.
1. Remove the hood and bumper by following the steps described in Chapter 4: Body/Chassis.
2. Remove the two screws on each side of the frame that secure the muffler guard to the hood support bracket. See Figure 2.1.
3. Remove the muffler guard.
NOTE: These steps may vary slightly depending upon the type of engine on the rider.

Disconnect the muffler from the engine. For single cylinder engines:
1. Remove the two screws that secure the exhaust pipe to the cylinder head. See Figure 2.2.
2. Remove the screw that fastens the muffler support bracket to the cylinder head. See Figure 2.2.
Figure 2.1
Figure 2.2
Hood support bracket
Muffler guard
Screws attaching muffler guard
Muffler flange screws
Muffler support screw
YardMachine700SeriesRidersRepairManual 5
YardMachine700SeriesRidersRepairManual
700 Series Lawn Tractor
For twin cylinder engines:
1. Remove the two nuts that secure each exhaust pipe to the cylinder head. See Figure 2.3.
2. Remove the muffler from the engine.
3. Install the muffler by following the above steps in reverse order.

4. Install the muffler guard and hood.
5. Test run the tractor before returning to service.
Fuel tank removal/replacement
Remove/replace the fuel tank by following these steps:
! CAUTION
The following steps involve working with gasoline. Gasoline is flammable, and steps should be taken to avoid fire hazard;. ! CAUTION

• Work in a well-ventilated area.
• Allow the engine to cool fully before starting work on the tractor.
• Eliminate any sources of possible ignition from the work area, including but not limited to: heat sources, open flame, potential sparks.
• Clean-up any spilled fuel quickly and properly, disposing of cleaning materials in a way that will not produce a further fire hazard.
• Hold any drained fuel in an approved and safe container.
1. Open the hood.
2. Drain the fuel in the fuel tank into an approved container or clamp the fuel line. The steps below demonstrate removal by clamping off the fuel line.
NOTE: The tank may be drained by mechanical syphon or by disconnecting the fuel line from the fuel filter.
Figure 2.3
Remove these nuts
YardMachine700SeriesRidersRepairManual 6
YardMachine700SeriesRidersRepairManual
Engine Related Parts
3. Cut the plastic tie that secures the fuel tank to the gas tank support bracket. See Figure 2.4.


4. If you did not drain the fuel, raise the fuel tank up off the support bracket high enough to allow you to clamp the fuel line above the support bracket. See Figure 2.5.
NOTE: This will allow you to remove the tank and fuel line up and out of the support bracket.
5. Using pliers slide the fuel line clamp away from the fuel filter. See Figure 2.6.
6. Remove the fuel line from the fuel filter nipple.
7. Remove the fuel tank and line from the support bracket.
8. Install the fuel tank by following the above steps in reverse order.

9. Test run the tractor and check for leaks before returning to service.
 Figure 2.4
Figure 2.5
Figure 2.6
Fuel tank plastic tie
Fuel line clamped above support bracket
Fuel filter
Fuel line clamp moved away from filter
Figure 2.4
Figure 2.5
Figure 2.6
Fuel tank plastic tie
Fuel line clamped above support bracket
Fuel filter
Fuel line clamp moved away from filter
YardMachine700SeriesRidersRepairManual 7
YardMachine700SeriesRidersRepairManual
700 Series Lawn Tractor
YardMachine700SeriesRidersRepairManual 8
YardMachine700SeriesRidersRepairManual
Steering and Front Axle
CHAPTER 3: STEERING AND FRONT AXLE
STEERING
This section will cover:
• Inspection of steering components
• Changing the front wheel bearings
• Inspecting and removing the axles
• Replacing a stamped steel pivot bar
• Replacing a cast iron pivot bar
• Replacing the steering shaft and steering gear
• Replacing a damaged steering link
• Front end alignment
GENERAL INFORMATION
The toe angle is not adjustable. The front wheels are kept pointed in the same direction (except for the Ackerman effect) by a tie-rod with fixed ends. There is an adjustable end on the steering link that connects the steering gear to the steering arm on the right front axle.
NOTE: The front wheels should exhibit 1/16” to 5/16” (1.6mm - 7.9mm) toe-in.


If the tie-rod is visibly bent, its effective length is shortened, and toe-out will result. Very minor bends may be straightened. Substantial bends should be repaired by replacing the tie-rod.
A toe-angle problem may also be caused by worn axle bushings or worn wheel bearings: inspect the wheel bearings and axle bushings.
The wheel bearings may be easily examined for play:
1. Safely lift and support the end of the pivot bar that the wheel is attached to. See Figure 3.1.
2. Attempt to wiggle the wheel on a horizontal axis.
• Excessive play indicates worn wheel bearings. Rocking play (as distinguished from just slipping in and out on the axle) that exceeds the range of acceptable toe angle adjustment (5/16” - 1/16” = 1/ 4”) is considered excessive.
 Figure 3.1
Spacer Pivot Bar Bearing Axle
Steering Arm
YardMachine700SeriesRidersRepairManual 9
YardMachine700SeriesRidersRepairManual
700 Series Lawn Tractor
Front wheel removal and axle bearing inspection
The wheel bearings are accessible by prying-off the hub-cap, then removing the cotter pin and flat washer that retain the front tires. See Figure 3.2.
1. Raise the tractor and support it with a jack stand
2. Pry the hubcap from the axle.
3. Remove the cotter pin that holds the wheel to the axle.
4. Remove the washer.

5. Slide the wheel off the axle.
6. The wheel bearing can be driven out of the rim. See Figure 3.3.
7. Replace the bearing and install the wheel in the reverse order of disassembly.
NOTE: On installation, using a new cotter pin, the pin must be bent tightly around the axle so that it does not interfere with hub-cap installation.


Left Front Axle Removal
1. Raise the tractor and support it with a jack stand.
2. Remove the wheel and tire as described above.
3. Remove the cotter pin that holds the fixed tie rod to the axle. See Figure 3.4.


4. Pry off the cap that holds the axle to the pivot par. Discard the cap and replace it with a new one during assembly.
NOTE: This cap holds the left axle in place. Removing the axle allows access to the upper and lower flange bearing and side axle cap. Inspect these components for wear or damage and replace if necessary. Assemble in reverse order of disassembly.
Figure 3.2
Figure 3.3
Figure 3.4
Cotter Pin
Flat Washer
Wheel Bearing
Grease Fitting
Axle Cap
Cotter Pin
YardMachine700SeriesRidersRepairManual 10
YardMachine700SeriesRidersRepairManual
Steering and Front Axle
Right Front Axle Removal
1. Raise the tractor and support it with a jack stand.
2. Remove the wheel and tire as described above.


3. Remove the cotter pin that fastens the fixed tie rod to the axle. See Figure 3.5.

4. Loosen the clamp bolt that secures the steering arm to the square-section at the top of the axle using a pair of 1/2” wrenches, and lifting the arm off.
NOTE: Note the spacer below the steering arm. Slide the axle from.pivot bar.
Removing the axle allows access to the upper and lower flange bearing and side axle cap. Inspect these componentsforwearordamageandreplaceifnecessary. See Figure 3.6.
Assemble in reverse order of disassembly.
General Information
Continued operation with worn bearings will cause rapid tire wear. If the bushing wears through completely, the pivot bar will be damaged.
Replace any single-use fasteners (push-on caps and cotter pins) with new ones on reassembly.
Lubricate all friction surfaces with grease such as MTD P/N 737-0300A upon reassembly.
Tighten the steering arm clamp bolt to a torque of 200260 in-lb. (22.6 Nm-29.4 Nm). Replace the nylon ring lock nut if it has lost its retaining capabilities.
Pivot Bar

Pivot bars are not normally replaced in the service life of a tractor. The most common reasons for replacing a pivot bar are:


• Damage caused by dropping the tractor (e.g. while loading or unloading from a truck), or collision with an object.
• Damage caused by continued use after the axle bushings have deteriorated.
NOTE: Various hood and engine combinations may require using slightly different procedures than listed below. The most common deviations will be on the muffler and muffler guard removal and the hood pivot bracket removal. These instructions demonstrate removal of a stamped steel pivot used on most riders. Procedures for replacing cast iron pivot bars are similar.
Figure 3.5
Figure 3.6
Steering Arm
Clamp Bolt
Spacer
Cotter Pin
Flange Bearing
Side Axle Cap
Flange Bearing
YardMachine700SeriesRidersRepairManual 11
YardMachine700SeriesRidersRepairManual
700 Series Lawn Tractor
To replace the pivot bar:
1. Remove the hood and any side panels.
NOTE: Although it is not strictly necessary, pivot bar removal may be easier if the hood, side panels, and front grill assembly are removed prior to servicing the pivot bar. Refer to the body panel section for removal information. Also consider removing the cutting deck to ease removal of the pivot bar. Refer to the deck removal section for procedures.
2. Raise and secure the front of the frame to allow removal of the front wheels.
NOTE: Do not use the pivot bar as a means to suspend the front of the lawn tractor. Place jack stands under the frame, just behind the pivot bar.
3. Remove the front wheels. Refer to the wheel removal section in this chapter.
4. Remove the cotter pins that secure the tie rod to the axles. Set the tie rod aside. See Figure 3.7.
NOTE: Discard the cotter pins and replace with new hardware during assembly.
5. Remove the muffler guard and the muffler. Refer to the muffler removal section in Chapter 2.
6. Remove both axles from the pivot bar. Refer to the axle removal sections of this chapter.
7. Remove the two hex screws that fastens the hood pivot bracket to the frame. Repeat for the other hood bracket. See Figure 3.8.
 Figure 3.7
Figure 3.8
Remove these two hex screws
Figure 3.7
Figure 3.8
Remove these two hex screws
YardMachine700SeriesRidersRepairManual 12
YardMachine700SeriesRidersRepairManual

Steering and Front Axle
8. Remove the shoulder bolts that pass through the front hanger bracket, front pivot bracket, pivot bar, and frame. See Figure 3.9.

Remove shoulder bolts and hex nuts
Remove these three hex screws Loosen this hex screw
9. Remove the hex screws on the left side of the tractor that secure the front pivot bracket. See Figure 3.10.
10. Remove the front screw on the right side of the pivot bracket. Loosen the rear screw. This will allow the bracket to rotate forward, allowing the pivot bar to be removed from the frame.
NOTE: Support the pivot bar during this procedure. Failure to do so may allow it to drop from bracket to the ground.
1. Install in reverse order of disassembly.
Installation notes
• Apply anti-seize compound liberally to all of the friction surfaces of the pivot bar, particularly the round boss that serves as the central pivot point.


• Replacing all of the plastic bushings while the pivot bar is disassembled makes economic and mechanical sense.
• Grease all moving parts on reassembly, using MTD P/N 737-0300A (Benelene), or similar grease.
Figure 3.9
Figure 3.10
YardMachine700SeriesRidersRepairManual 13
YardMachine700SeriesRidersRepairManual
700 Series Lawn Tractor
Steering Gear Inspection
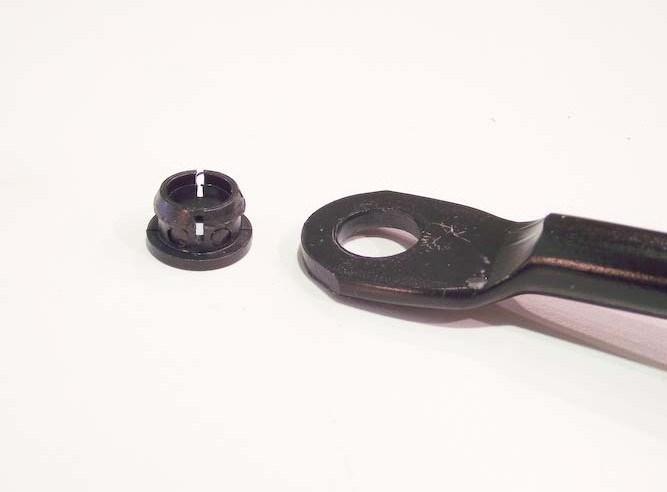
It is good practice to check the steering gear whenever a tractor is in for repair: See Figure 3.11.
• Check the alignment in the straight-ahead position. Alignment procedures will be covered later in this chapter.

• Turn the wheel to full lock in both directions with enough force to confirm that the pinion gear is not slipping.
• Make a visual inspection of the steering gear and pinion gear, paying particular attention to the condition of the teeth. If either are worn or damaged, replace the damaged gear and any suspect bushings and hardware.

NOTE: You can replace either the steering shaft or steering gear independently if needed.
 Figure 3.11
Steering Shaft Pinion Gear
Steering Gear
Steering Link Rod
Figure 3.11
Steering Shaft Pinion Gear
Steering Gear
Steering Link Rod
YardMachine700SeriesRidersRepairManual 14
YardMachine700SeriesRidersRepairManual
Steering and Front Axle
Steering Shaft Replacement
1. Remove the steering wheel cap using a screwdriver
2. Remove the hex bolt and bell washer that holds the steering wheel to the steering shaft using a 1/2” wrench. Remove the steering wheel
3. Raise the hood and cut the plastic tie securing the fuel tank to the dash panel. Move the tank slightly to gain access to the hex screws that fastens the steering shaft support to the dash panel.
4. From under the dash remove the three hex screws and remove the steering shaft support. See Figure 3.12.
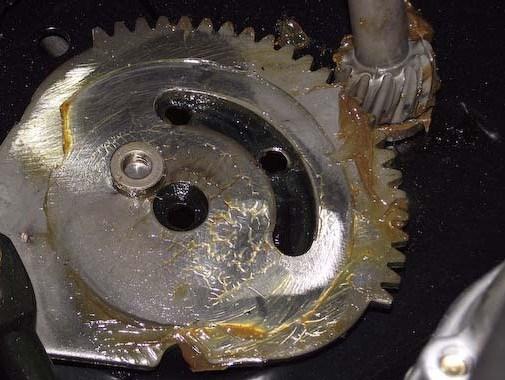
5. From underneath the rider use a #4 phillips driver to remove the screw and cap that fastens the steering shaft to the frame of the tractor. See Figure 3.13.
NOTE: This screw is typically installed with Loctite. The preferred method of removal is with an impact screwdriver.


6. Raise the steering shaft slightly to allow removal of the hex bushing that centers it in the frame. See Figure 3.14.


NOTE: The root cause of many steering shaft failures is a worn bushing. Replace this bushing if it shows any sign of wear.
7. Remove the steering shaft from the rider. If the pinion gear teeth are worn or damaged, replace the shaft.
8. Assemble the new steering shaft in the reverse order of disassembly.
Figure 3.12
Figure 3.13
Figure 3.14
Steering shaft support hex screws
Steering shaft end cap
Steering shaft screw
Steering Shaft
Hex Bushing
YardMachine700SeriesRidersRepairManual 15
YardMachine700SeriesRidersRepairManual
700 Series Lawn Tractor
Steering Gear Replacement
If the steering gear teeth are damaged or missing, the steering gear will need to be replaced. To make the repair easier, consider moving the fuel tank out of the way and removing the fuel tank brace prior to starting the job. Also consider disconnecting the wiring harness at the engine connector and moving it out of the way.


To replace the steering gear:
1. If desired, cut the plastic tie and move the fuel tank out of the way.
2. If desired, remove the four hex screws (two on each side) that fastens the fuel tank support bracket to the lower dash panel. Move the bracket out of the way.
3. Optional: Remove the hex screw that fastens the lower portion of the dash brace to the frame and remove the brace. See Figure 3.15.
NOTE: Some older model riders do not have this brace installed. Note that the upper end of the brace is held in place between the left dash panel and the fuel tank support bracket.
4. Remove the flange lock nut that fastens the steering link rod to the steering gear. Lift the rod up and out of the way. See Figure 3.16.
5. To remove the steering gear, loosen and remove both bolts that hold it in place using a pair of 1/2” wrenches.
NOTE: The bolt near the center of the steering gear comes-up from the bottom, with the nut on top. The shoulder bolt that passes through the curved slot near the steering shaft installs from the top with the nut on the bottom.
6. Lift away the steering gear stabilizer plate.
NOTE: The two holes near the corners of the stabilizer plate should be oriented away from the steering shaft.
Shoulder bolt through gear
Steering link rod removed
Figure 3.15
Figure 3.16
Dash Brace
Nut on top
YardMachine700SeriesRidersRepairManual 16
YardMachine700SeriesRidersRepairManual
Steering and Front Axle
7. With the stabilizer plate removed, the steering gear, and spacer can be removed. See Figure


There is a removable bushing between the stud on the steering gear and the steering link rod. One side of the bushing is a flat shoulder, the other side is tapered and barbed. The flat shoulder faces the gear when installed correctly. See Figure 3.18.
 3.17.
Figure 3.17
Figure 3.18
Spacer
Bushing Steering Link Rod
3.17.
Figure 3.17
Figure 3.18
Spacer
Bushing Steering Link Rod
YardMachine700SeriesRidersRepairManual 17
YardMachine700SeriesRidersRepairManual
700 Series Lawn Tractor
Assembly notes:
• Replace any locking fasteners that show signs of wear or reduced locking function. In some cases, the parts may be thoroughly cleaned and locked with re leasable thread locking compound such as Loctite 242 (blue).
• Replace the hex bushing that locates the steering shaft, the spacer at the center of the steering gear, and the bushing on the end of the drag link to tighten-up sloppy steering, in addition to confirming that the gears, wheel bearings, and axle bushings are in good condition.
• Apply grease such as MTD P/N 737-0300A (Benelene), or anti-seize compound, to the friction surfaces and teeth of the steering gear on assembly.
• Make a visual inspection of the steering gear and pinion gear, paying particular attention to the condition of the teeth. If either are worn or damaged, replace both gears and any suspect bushings and hardware.
• Apply anti-seize compound to the bearing surface at the base of the steering shaft.
• The screw that secures the bottom of the steering shaft should be thoroughly cleaned and locked with re leasable thread locking compound such as Loctite 242 (blue). Tighten it to a torque of 17-20 ft.-lbs (23-27 Nm).
• The screw that secures steering wheel to the steering shaft should be thoroughly cleaned. Re leasable thread locking compound such as Loctite 242 (blue) should be applied to the threads. Tighten it to a torque of 17-20 ft.-lbs (23-27 Nm).
• Tighten the steering gear shoulder bolt (passes through the curved slot in the steering gear) before tightening the steering gear pivot bolt (passes through the spacer at the center of the steering gear).
• The steering gear shoulder bolt should be tightened to a torque of 200-260 in-lb. (22.6-29.4 Nm).
• The steering gear pivot bolt should be tightened to a torque of 200-260 in-lb. (22.6-29.4 Nm).
• The ball joint nuts should be tightened to a torque of 150-250 in-lb. (17-28 Nm) after removal or adjustment.
7.1. Thoroughly test the steering before returning the tractor to service:
• Test for ease and freedom of movement.
• Check for loose operation or hardware.
• Turn to full-lock in both directions to check linkage travel and steering gear.
YardMachine700SeriesRidersRepairManual 18
YardMachine700SeriesRidersRepairManual
Steering and Front Axle
If the right wheel strikes an object hard enough, the steering link could bend. If the steering link rod is bent, inspect the other components for damage and replace as necessary.
To replace the steering link rod:
1. Raise the hood to gain access to the steering components behind the engine.
2. If desired, move the fuel tank and the fuel tank support bracket out of the way. See instructions in the steering gear replacement section of this chapter.
3. Remove the flange lock nut that fastens the steering link rod to the steering gear. Lift the rod up and out of the way. See Figure 3.19.
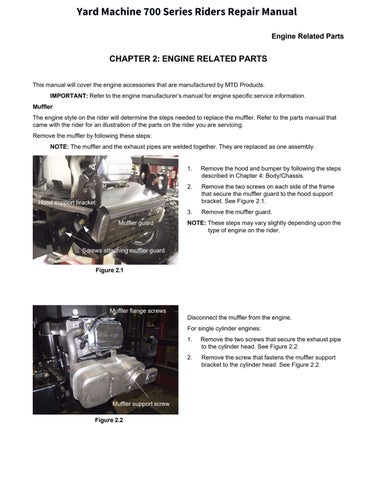
NOTE: There is a flange bushing inserted through the hole in the rod. Inspect for wear and replace if needed. Note the orientation of the steering rod and bushing.
4. Loosen the jam nut that locks the ball joint in position on the steering arm at the front axle. Hold the ball joint using a 1/2” wrench, and loosen the nut using an 11/16” wrench. Back the jam nut away from the ball joint a few turns.

5. Remove the steering arm from the axle as described in the axle bushing replacement procedure.
NOTE: This is preferable to separating the ball joint from the steering arm because the center-locking nut that secures the ball joint to the steering arm distorts the threads on installation. If you choose to remove the ball joint from the steering arm you will need to replace it.
6. Unscrew the ball joint from the steering link rod. NOTE: Make note of the orientation of the rod during disassembly.

7. Install a new flange bushing in the new steering arm. See Figure 3.21.

8. Install the rod in the reverse order of disassembly.
NOTE: The end of the steering link is off-set and coined flat. The side of the off-set end that is steppeddown faces away from the steering gear. Otherwise the drag link will interfere with the steering gear when connected to the steering arm and axle.
9. Perform a front wheel alignment as described in the next section.
 Steering Link Rod Replacement
Figure 3.19
Figure 3.20
Figure 3.21
Flanged Lock Nut
Loosen jam nut Remove steering arm
Bushing
Steering Link Rod
Steering Link Rod Replacement
Figure 3.19
Figure 3.20
Figure 3.21
Flanged Lock Nut
Loosen jam nut Remove steering arm
Bushing
Steering Link Rod
YardMachine700SeriesRidersRepairManual 19
YardMachine700SeriesRidersRepairManual
700 Series Lawn Tractor
Front wheel alignment
Normally a tractor will only be out of alignment if it has been in a accident and a component has been bent or damaged. Another need for an alignment would be when steering or front end components are being serviced.
The toe-in is set in a fixed position due to the fixed length of the rod connected between the right and left axles.
During assembly at the factory the steering gear is assembled with an equal number of teeth showing on both sides of the steering shaft pinion gear. There is a centering hole in the bottom of the steering gear that is lined up with a hole in the frame. The steering shaft and pinion gear are then installed.The steering wheel is then attached with the steering wheel spokes centered.
NOTE: A mis-adjusted steering link may leave the steering gear off-center, giving the tractor a maximum turning radius that is shorter in one direction and longer in the other.
View the steering gear from behind the engine and below the fuel tank. Turn the steering wheel until and equal number of steering gear teeth are on each side of the steering shaft pinion gear.

The steering gear is now centered and the front wheels should be facing straight ahead.
If the front wheels are not facing straight ahead, the steering link will need to be adjusted to bring the front wheels into alignment.
To adjust the steering link:
1. Center the steering gear as described above.

2. Loosen the jam nut that locks the ball joint in position. Hold the ball joint using a 1/2” wrench, and loosen the nut using an 11/16” wrench. See Figure 3.22.
3. After the jam nut is loosened, remove the steering arm from the axle as described in the axle bushing replacement procedure.
NOTE: This is preferable to separating the ball joint from the steering arm because the centerlocking nut that secures the ball joint to the steering arm distorts the threads on installation.
4. Manually position the front wheels until they are pointing straight ahead.
5. Rotate the steering arm and ball joint to thread them up or down the steering link as necessary to align the steering arm with the axle.
6. Test-fit the steering arm to confirm alignment.
7. Once positioned tighten the steering arm clamp bolt to a torque of 200-260 in-lb. (22.6 Nm-29.4 Nm).
NOTE: Replace the nylon ring lock nut if it has lost its retaining capabilities.
8. Center the ball joint in its travel, so it does not bind, and tighten the jam nut that secures it.
9. Inspect the steering wheel and determine that it is pointing straight ahead.
Figure 3.22
Loosen jam nut
Remove steering arm
YardMachine700SeriesRidersRepairManual 20
YardMachine700SeriesRidersRepairManual
Steering and Front Axle
If the steering wheel needs adjustment:
1. Remove the steering wheel cap with a screwdriver. See Figure 3.23.
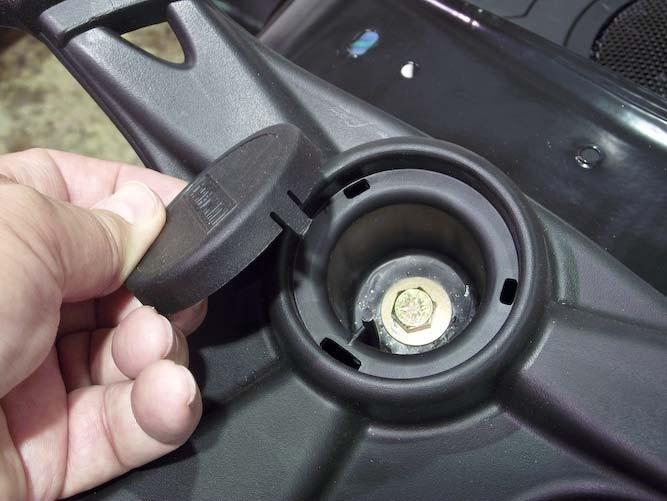
2. Using a socket remove the hex nut and bell washer that fastens the steering wheel to the shaft.
3. Remove the steering wheel and turn it until the spokes are centered.
4. Reinstall the steering wheel onto the splined shaft.
5. Install the bell washer, hex nut, and steering wheel cap, in that order.
• Test the operation of the steering system before returning the tractor to service.
Figure 3.23
YardMachine700SeriesRidersRepairManual 21