
Removal and installation of engine assembly 1
Removal
k Stop the machine on level ground and set the frame lock bar.
k Lower the work equipment to the ground completely and stop the engine. Apply the parking brake and put the blocks under the wheels.
k Disconnect the negative terminal (–) of the battery before starting with the work.
1.Remove the radiator assembly, referring to “Removal and installation of radiator assembly”.
q Overall view of machine right side

201 Engine and cooling system, Part 1 Removal and installation of engine assembly
3.Remove air hose (2). [*1]
4.Remove komaclone hose and tube assembly (3). [*2]
5.Disconnect dust indicator hoses (4).
6.Remove air cleaner (5). [*3]
7.Disconnect connector E15 (6).
8.Disconnect wiring harness (7).
9.Remove air cleaner bracket (8).


11.Disconnect drive shaft (10). [*4]
a Remove the bottom mounting bolt as shown below.
1)Pull pin (11) out of a location near the engine mount, which is situated in the front right side, and th en push in forcing screw (B).
2)Turn forcing screw (B) for deburring and then remove the bottom mounting bolt of the drive shaft.

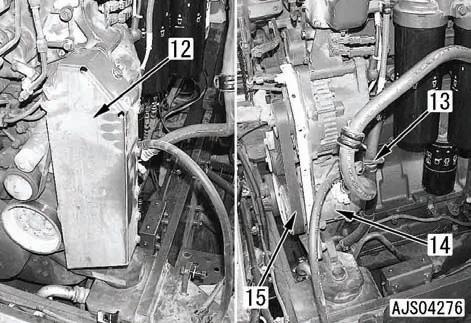
12.Remove cover (12).
13.Disconnect connector E16 (13).
14.Loosen the adjustment bolt of air conditioner compressor (14) and then remove air conditioner compressor belt (15). [*5]
15.Remove air conditioner compressor (14).
a Don't disconnect the air conditioner hose.
16.Disconnect fuel supply hose (16).

17.Disconnect connector EP1 (17) and EP2 (18).
18.Disconnect clamps (19) and (20).
19.Disconnect 2 fuel hoses (21).

20.Disconnect torque converter cooler (TC) coolant tubes (22) and (23).
a Connection: O-ring
21.Disconnect coolant tube (24).
a Replacement of gasket (G)
22.Disconnect heater hose (25).

Removal and installation of radiator assembly 1
Removal
k Park the machine on flat ground and set the safety bar to the frame.
k Lower the work equipment to the ground completely and stop the engine. Apply the parking brake and put the blocks under the wheels.
k Loosen the filler cap of the hydraulic tank gradually to release the residual pressure from the hydraulic tank.
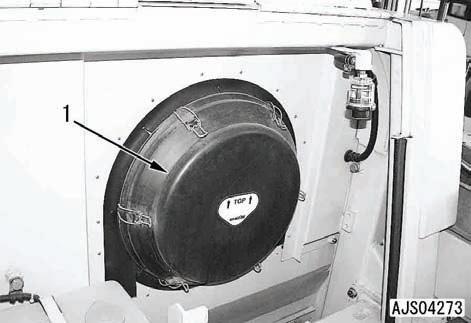
1.Remove cover (1).

2.Drain the engine coolant.
6 Coolant: 160 l
3.Remove the engine hood and covers, referring to “Removal and installation of engine hood assembly”.
4.Remove cover (2).
5.Disconnect cover (3).
6.Disconnect 2 hoses (4) from the reservoir tank.

201 Engine and cooling system, Part 1 Removal and installation of radiator assembly
7.Disconnect connector G05 (5) and disconnect the clip of the wiring harness.

8.Disconnect right and left chains (6).
9.Disconnect hoses (7) and (8).
10.Remove reservoir tank (9).

11.Disconnect hoses (10).
12.Remove covers (11) and (12).
a Take care in this operation not to damage the aftercooler core.


NOTE: If there is no response to click on the link above, please download the PDF document first and then clickonit.
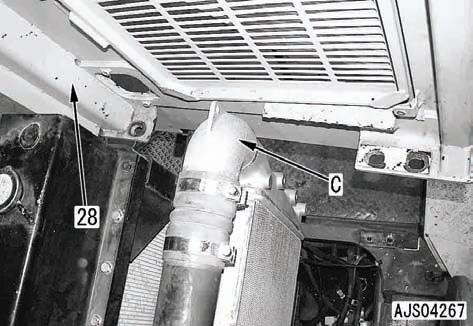
27.Lift radiator guard and fan assembly (28) slowly.
28.Take out radiator guard and fan assembly (28) while avoiding contact against tube (C) of the aftercooler.

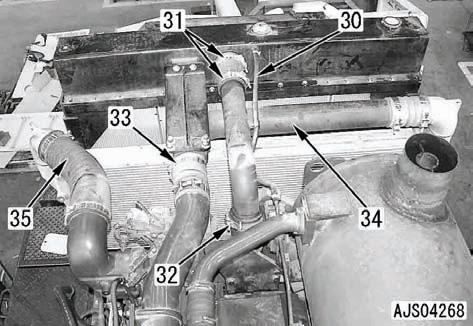
29.Disconnect aeration hose (30).
30.Loosen radiator hose clamps (31) and (32). [*2]
31.Loosen air hose clamp (33). [*3]
32.Disconnect air tube (34).
33.Remove air hose (35). [*4]
34.Disconnect connectors (36) from the radiator outlet.
a Replacement of gasket (G)
a When disconnecting the outlet at the connection with radiator hose (38) (it takes more than an hour)
1)Loosen right and left side clamps (37) and then push radiator hose (38) all the way in the radiator. [*5] a Hose (38) is disconnected later (as the radiator assembly is lifted up).

35.Disconnect air conditioner condenser assembly (40) directing bracket (39) outward.
a Remove the air conditioner hose clamp prior to the above operation.
36.Lift radiator assembly (41) temporarily and remove right and left side mounting bolts (42). [*6]
37.Disconnect hose (38) (noted in the foregoing) while the radiator assembly being lifted up.
