
Document Title: Function Group: Information Type: Date:
Description 200 Service Information 2014/4/16
Profile: CEX, EC45 [GB]
Description
Engine, description and external views
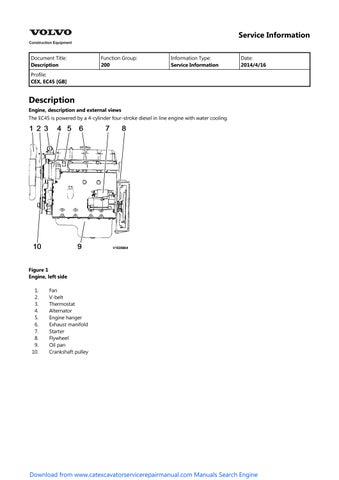
The EC45 is powered by a 4-cylinder four-stroke diesel in line engine with water cooling.

Fan V-belt
Thermostat Alternator
Engine hanger
Exhaust manifold
Starter
Flywheel Oil pan
Crankshaft pulley
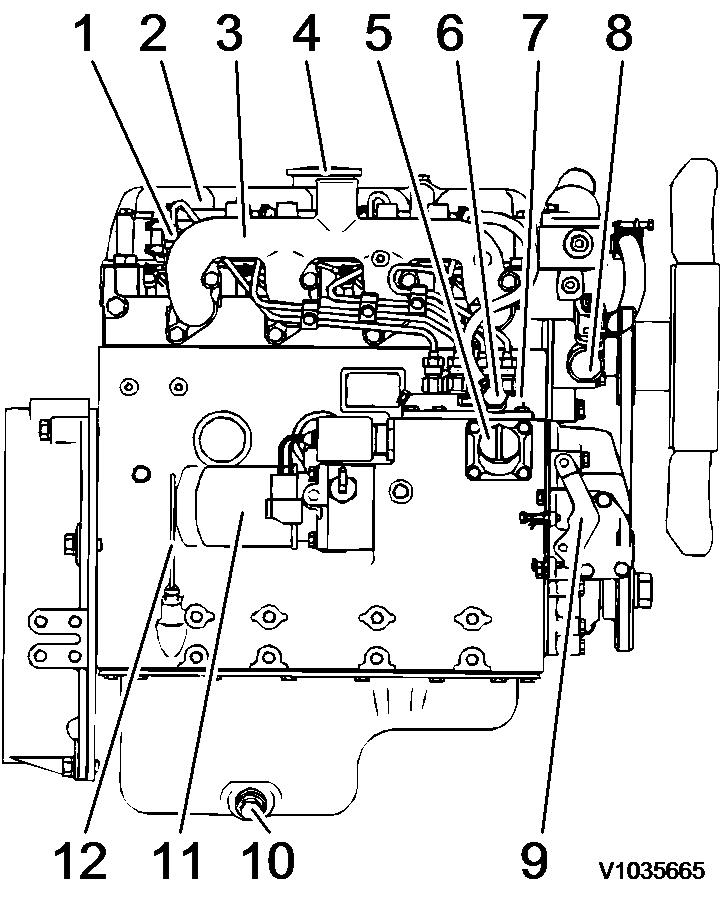
2 Engine, right side
Fuel injection nozzle
return
manifold
filler
filter Fuel inlet Injection pump Water pump Governor
drain plug Oil filter
Disptick
Document Title: Function Group: Information Type: Date: Precautions 200 Service Information 2014/4/16
Profile: CEX, EC45 [GB]
Precautions
Make preparation as follows before starting engine inspection and service.
Fix the engine on a horizontal base.
Remove the coolant hoses, fuel oil pipes, wire harness, control wires etc. connecting the driven machine and engine, and drain coolant, lubricating oil and fuel.
Remove soil, oil, dust, etc. from the engine by washing with solvent, air, steam, etc. Carefully operate so as not to let any foreign matter enter the engine.
Any part which is found defective as a result of inspection or any part whose measured value does not satisfy the standard or limit shall be replaced.
Any part predicted to dissatisfy the standard or limit before the next service as estimated from the state of use should be replaced even when the measured value then satisfies the standard or limit.
Service Information
Document Title: Function Group: Information Type: Date:
Troubleshooting chart 200
Profile:
CEX, EC45 [GB]
Troubleshooting chart
Service Information 2014/4/16
The following table summarizes the general trouble symptoms and their causes. If any trouble symptom occurs, take corrective action before it develops into a serious problem so as not to shorten the engine service life.
Engine troubleshooting chart
Trouble symptoms Causes
Engine does not start
Improper clearance of inlet/exhaust valve
Seizure of inlet/exhaust valve
Seized or broken piston ring
Worn piston ring, piston or cylinder
Seized crankpin metal or bearing
Foreign matter trapped in combustion chamber
Improper open/close timing of intake/exhaust valves
Improper properties of lubricating oil
Water entrance in fuel system
Clogged fuel filter
Air entrance in fuel system
Clogged or cracked fuel pipe
Insufficient fuel supply to fuel injection pump
Priming failure (foreign matter trapped in the valve inside the priming pump)
Starting motor defect
Alternator defect
Open circuit in wiring harness
Battery voltage drop
Engine starts, but stops soon.
Exhaust smoke none.
Engine starts, but stops soon.
Exhaust smoke excessive.
Improper clearance of inlet/exhaust valve
Seized crankpin metal or bearing
Improper arrangement of piston rings joint
Defective governor
Improper properties of lubricating oil
Insufficient lubricating oil level
Clogged fuel filter
Air entrance in fuel system
Clogged or cracked fuel pipe
Insufficient fuel supply to fuel injection pump
Seizure of inlet/exhaust valve
Seized or broken piston ring
Worn piston ring, piston or cylinder
Water entrance in fuel system
Corrective actions
Adjust the valve clearance
Correct or replace
Replace the piston ring
Perform honing and use oversize parts
Repair or replace
Disassemble and repair
Adjust the valve clearance
Use proper lubricating oil
Perform draining from the fuel filter
Clean or replace
Perform air bleeding
Clean or replace
Check the fuel tank cock, fuel tank, fuel pipe and fuel feed pump
Disassemble and clean
Repair or replace
Repair or replace
Repair
Inspect and charge the battery
Adjust the valve clearance
Repair or replace
Correct the ring joint positions
Make adjustment
Use proper lubricating oil
Add proper lubricating oil
Clean or replace
Perform air bleeding
Clean or replace
Check the fuel tank cock, fuel tank, fuel pipe and fuel feed pump
Correct or replace
Replace the piston ring
Perform honing and use oversize parts
Perform draining from the fuel filter
Insufficient engine output.
Exhaust color : ordinary
Insufficient engine output.
(Exhaust color : white)
Clogged air filter
Improper clearance of inlet/exhaust valve
Compression leakage from valve seat
Seizure of inlet/exhaust valve
Blowout from cylinder head gasket
Worn crankpin and journal bearing
Improper properties of lubricating oil
Improper properties of fuel oil
Clogged fuel filter
Air entrance in fuel system
Clogged or cracked fuel pipe
Insufficient fuel supply to fuel injection pump
Clogged strainer at fuel feed pump inlet
Seized or broken piston ring
Worn piston ring, piston or cylinder
Improper arrangement of piston rings joint
Reverse assembly of piston ring
Worn inlet/exhaust valve guide
Improper open/close timing of intake/exhaust valves
Timing of fuel injection pump too late
Improper properties of fuel oil
Water entrance in fuel system
Uneven injection volume of fuel injection pump
Poor spray pattern from fuel injection nozzle
Clean
Adjust the valve clearance
Lap the valve seat
Correct or replace
Replace the gasket
Measure and replace
Use proper lubricating oil
Use proper fuel oil
Clean or replace
Perform air bleeding
Clean or replace
Check the fuel tank cock, fuel tank, fuel pipe and fuel feed pump
Clean the strainer
Replace the piston ring
Perform honing and use oversize parts
Correct the ring joint positions
Reassemble correctly
Measure and replace
Adjust the valve clearance
Check and adjust
Use proper fuel oil
Perform draining from the fuel filter
Check and adjust
Check and adjust
Insufficient engine output.
(Exhaust color : black)
Poor exhaust color : white (During work)
Compression leakage from valve seat
Seizure of inlet/exhaust valve
Improper open/close timing of intake/exhaust valves
Insufficient cooling effect of radiator, Defective thermostat (kept opened) or slipping fan belt
Insufficient coolant level
Slackened fan belt
Defective thermostat
Timing of fuel injection pump too late
Improper properties of fuel oil
Uneven injection volume of fuel injection pump
Poor spray pattern from fuel injection nozzle
Clogged air filter
Engine used at high temperature or at high altitude
Clogged exhaust pipe
Seized or broken piston ring
Worn piston ring, piston or cylinder
Reverse assembly of piston ring
Improper open/close timing of intake/exhaust valves
Excessive cooling effect of radiator,
Lap the valve seat
Correct or replace
Adjust the valve clearance
Repair or replace thermostat and fan belt
Check leakage from cooling system
Adjust the belt tension
Check or replace
Check and adjust
Use proper fuel oil
Check and adjust
Check and adjust
Clean
Study output drop and load matching
Clean
Replace the piston ring
Perform honing and use oversize parts
Reassemble correctly
Adjust the valve clearance
Repair or replace
Poor exhaust color : black
(During work)
Defective thermostat (kept closed)
Defective thermostat
Timing of fuel injection pump too early
Timing of fuel injection pump too late
Improper properties of fuel oil
Water entrance in fuel system
Uneven injection volume of fuel injection pump
Poor spray pattern from fuel injection nozzle
Compression leakage from valve seat
Seizure of inlet/exhaust valve
Improper open/close timing of intake/exhaust valves
Timing of fuel injection pump too early
Timing of fuel injection pump too late
Improper properties of fuel oil
Uneven injection volume of fuel injection pump
Excessive fuel injection volume
Poor spray pattern from fuel injection nozzle
Clogged air filter
Engine used at high temperature or at high altitude
Clogged exhaust pipe
High knocking sound during compression
Abnormal engine sound
Uneven combustion sound
Timing of fuel injection pump too early
Improper clearance of inlet/exhaust valve
Compression leakage from valve seat
Seizure of inlet/exhaust valve
Seized or broken piston ring
Seized crankpin metal or bearing
Worn crankpin and journal bearing
Loosened connecting rod screw
Foreign matter trapped in combustion chamber
Excessive gear backlash
Improper open/close timing of intake/exhaust valves
Improper properties of fuel oil
Water entrance in fuel system
Uneven injection volume of fuel injection pump
Poor spray pattern from fuel injection nozzle
Clogged air filter
Clogged exhaust pipe
Hunting during idling
Seized or broken piston ring
Seized crankpin metal or bearing
Worn crankpin and journal bearing
Defective governor
Water entrance in fuel system
Uneven injection volume of fuel injection pump
Poor spray pattern from fuel injection nozzle
Check or replace
Check and adjust
Check and adjust
Use proper fuel oil
Perform draining from the fuel filter
Check and adjust
Check and adjust
Lap the valve seat
Correct or replace
Adjust the valve clearance
Check and adjust
Check and adjust
Use proper fuel oil
Check and adjust
Check and adjust
Check and adjust
Clean
Study output drop and load matching
Clean
Check and adjust
Adjust the valve clearance
Lap the valve seat
Correct or replace
Replace the piston ring
Repair or replace
Measure and replace
Tighten to specified torque
Disassemble and repair
Adjust gear and repair
Adjust the valve clearance
Use proper fuel oil
Perform draining from the fuel filter
Check and adjust
Check and adjust
Clean
Clean
Replace the piston ring
Repair or replace
Measure and replace
Make adjustment
Perform draining from the fuel filter
Check and adjust
Check and adjust
Hunting during work
Seizure of inlet/exhaust valve
Correct or replace
Large engine vibration
Seized crankpin metal or bearing
Worn crankpin and journal bearing
Defective governor
Water entrance in fuel system
Uneven injection volume of fuel injection pump
Poor spray pattern from fuel injection nozzle
Seizure of inlet/exhaust valve
Seized or broken piston ring
Seized crankpin metal or bearing
Worn crankpin and journal bearing
Loosened connecting rod screw
Defective governor
Timing of fuel injection pump too early
Uneven injection volume of fuel injection pump
Poor spray pattern from fuel injection nozzle
Repair or replace
Measure and replace
Make adjustment
Perform draining from the fuel filter
Check and adjust
Check and adjust
Correct or replace
Replace the piston ring
Repair or replace
Measure and replace
Tighten to specified torque
Make adjustment
Check and adjust
Check and adjust
Check and adjust
Difficulty in returning to low speed
Excessive fuel consumption
Excessive lubricating oil consumption
Defective governor
Compression leakage from valve seat
Excessive cooling effect of radiator,
Defective thermostat (kept closed)
Timing of fuel injection pump too late
Excessive fuel injection volume
Poor spray pattern from fuel injection nozzle
Engine used at high temperature or at high altitude
Seized or broken piston ring
Worn piston ring, piston or cylinder
Improper arrangement of piston rings joint
Reverse assembly of piston ring
Foreign matter trapped in combustion chamber
Worn inlet/exhaust valve guide
Improper properties of lubricating oil
Leakage from lubricating oil piping system
Excessive fuel injection volume
Lubricating oil diluted by fuel
Seizure of inlet/exhaust valve
Seized or broken piston ring
Worn piston ring, piston or cylinder
Lubricating oil mixed with water
Low lubricating oil pressure
Excessive blow-by gas
Blowout from cylinder head gasket
Cracked water jacket
Worn crankpin and journal bearing
Loosened connecting rod screw
Cracked water jacket
Improper properties of lubricating oil
Leakage from lubricating oil piping system
Insufficient delivery capacity of trochoid pump
Clogged lubricating oil filter
Defective pressure regulating valve
Insufficient lubricating oil level
Compression leakage from valve seat
Make adjustment
Lap the valve seat
Repair or replace
Check and adjust
Check and adjust
Check and adjust
Study output drop and load matching
Replace the piston ring
Perform honing and use oversize parts
Correct the ring joint positions
Reassemble correctly
Disassemble and repair
Measure and replace
Use proper lubricating oil
Repair
Check and adjust
Correct or replace
Replace the piston ring
Perform honing and use oversize parts
Replace the gasket
Repair or replace
Measure and replace
Tighten to specified torque
Repair or replace
Use proper lubricating oil
Repair
Check and repair
Clean or replace
Check, adjust or replace
Add proper lubricating oil
Lap the valve seat
Overheating of coolant
Seizure of inlet/exhaust valve
Seized or broken piston ring
Worn piston ring, piston or cylinder
Seized crankpin metal or bearing
Improper arrangement of piston rings joint
Reverse assembly of piston ring
Foreign matter trapped in combustion chamber
Worn inlet/exhaust valve guide
Improper properties of lubricating oil
Clogged lubricating oil filter
Excessive fuel injection volume
Blowout from cylinder head gasket
Seized or broken piston ring
Insufficient cooling effect of radiator, Defective thermostat (kept opened) or slipping fan belt
Insufficient coolant level
Cracked water jacket
Slackened fan belt
Defective thermostat
Excessive fuel injection volume
Engine used at high temperature or at high altitude
Correct or replace
Replace the piston ring
Perform honing and use oversize parts
Repair or replace
Correct the ring joint positions
Reassemble correctly
Disassemble and repair
Measure and replace
Use proper lubricating oil
Clean or replace
Check and adjust
Replace the gasket
Replace the piston ring
Repair or replace thermostat and fan belt
Check leakage from cooling system
Repair or replace
Adjust the belt tension
Check or replace
Check and adjust
Study output drop and load matching
Low coolant temperature
Air inlet pressure drop
Air inlet pressure rise
Exhaust temperature rise
Excessive cooling effect of radiator, Defective thermostat (kept closed)
Defective thermostat
Improper clearance of inlet/exhaust valve
Compression leakage from valve seat
Seizure of inlet/exhaust valve
Clogged air filter
Engine used at high temperature or at high altitude
Excessive fuel injection volume
Improper clearance of inlet/exhaust valve
Compression leakage from valve seat
Seized or broken piston ring
Insufficient cooling effect of radiator, Defective thermostat (kept opened) or slipping fan belt
Insufficient coolant level
Slackened fan belt
Timing of fuel injection pump too late
Uneven injection volume of fuel injection pump
Excessive fuel injection volume
Clogged exhaust pipe
Repair or replace
Check or replace
Adjust the valve clearance
Lap the valve seat
Correct or replace
Clean
Study output drop and load matching
Check and adjust
Adjust the valve clearance
Lap the valve seat
Replace the piston ring
Repair or replace thermostat and fan belt
Check leakage from cooling system
Adjust the belt tension
Check and adjust
Check and adjust
Check and adjust
Clean
Document Title: Function Group:
Engine trouble shooting 210
Profile:
CEX, EC45 [GB]
Engine trouble shooting
Information Type: Date:
Service Information 2014/4/16
Engine faults must be detected and rectified as quickly as possible in order to avoid more expensive repairs. The following table summarizes the most important faults and their rectification.
Problem/fault Possible cause of fault
Engine does not start
Starter switch defective
Starter power too low
Air in fuel system
Air filter dirty
Wrong oil viscosity
Engine too cold
Injection valves defective
Incorrect injection timing
Compression pressure too low
Engine shuts down automatically
Fuel tank empty
Air in fuel system
Fuel filter dirty
Fuel pump defective
Exhaust system clogged
Erratic running of engine
Fuel pump defective
Fuel filter dirty
Air filter dirty
Injection valves defective
Engine overheating
Cooling system elements defective
Fan not running
Lubrication system elements defective
Engine overheating
Incorrect injection timing
Oil level too low
Governor incorrectly adjusted
Coolant level not correct
Engine develops black smoke
Air cleaner soiled
Poor fuel quality
Fault remedy
Tighten connections. Replace the switch.
If the starter is OK, check condition of battery and electric connections.
Bleed the system.
Replace the air filter.
Check viscosity and fill in correct oil.
Check the function of the preheater plug.
Check and adjust the injection valves
Replace defective valves.
Adjust the injection timing. Check the valve clearance.
Check condition of cylinder head gasket, valves and piston rings.
Fill in fuel.
Bleed the fuel system.
Clean or replace the fuel filter.
Check connection of fuel pump or replace fuel pump.
Clear or replace the exhaust system.
Replace the pump.
Clean or replace the fuel filter.
Bleed the fuel system.
Clean the air filter. Check the intake air.
Check and adjust the injection valves
Replace defective valves.
Check elements (water pump, radiator, thermostat, cylinder head gasket, coolant hoses).
Check presence, tension and cleanliness of V-belt.
Check elements (oil filter, oil pump, suction filter) and replace defective parts.
Adjust the injection timing. Check the valve clearance.
Fill in oil. Check whether the oil in the engine meets the operating conditions.
Adjust the governor.
Correct the coolant level. Check whether the coolant meets the operating conditions.
Clean or replace the air filter.
Check quality of fuel and suitability for climatic
Irregular idle speed
Valve clearance and injection timing not correct
Compression pressure not O.K.
Injection pressure not O.K.
Injection pump defective
Engine control cable incorrectly adjusted
Poor engine oil quality
Poor fuel quality
Valve clearance and injection timing not correct
Opening pressure of injection valves not correct
Compression pressure not O.K.
Injection pump defective
Unusual engine noise
Poor fuel quality
Air cleaner soiled
Incorrect injection timing
Engine shut-down solenoid not O.K.
Injection pressure not O.K.
Compression pressure not O.K.
Injection pump defective
Oil pressure too low
Oil level and oil quality not correct
Oil pressure switch defective
Battery charge condition too low
Fan V-belt too loose
Generator defective
Battery defective
Wiring not O.K.
Regulator defective
Engine cannot be shut down
Starter switch defective
Engine shut-down solenoid not O.K.
conditions.
Adjust valve clearance and injection timing.
Check condition of cylinder head gasket, valves and piston rings.
Check and adjust the injection valves
Check injection pump, replace if necessary.
Adjust the control cable.
Fill in oil as required for the operating conditions.
Check quality of fuel and suitability for climatic conditions.
Adjust valve clearance and injection timing.
Check opening pressure and injection valves.
Check condition of cylinder head gasket, valves and piston rings.
Check injection pump, replace if necessary.
Check quality of fuel and suitability for climatic conditions.
Clean or replace the air filter.
Adjust the injection timing.
Check the engine shut-down solenoid.
Adjust the injection valves.
Check condition of cylinder head gasket, valves and piston rings.
Replace the injection pump.
Check oil level and oil quality and fill in specified oil.
Check and replace the oil pressure switch.
Tighten the V-belt or replace, if defective.
Check and replace the generator.
Replace the battery.
Check correct connection of cables.
Check regulator, replace if necessary.
Tighten connections. Replace the switch.
Check engine shut-down solenoid, replace if necessary.
Document Title: Function Group: Information Type: Date: Compression pressure inspection Service Information 2014/4/16
Profile:
CEX, EC45 [GB]
Compression pressure inspection
Compression pressure drop is one of major causes of increasing blow-by gas (lubricating oil contamination or increased lubricating oil consumption as a resultant phenomenon) or starting failure. The compression pressure is affected by the following factors:
Degree of clearance between piston and cylinder
Degree of clearance at intake/exhaust valve seat
Gas leak from nozzle gasket or cylinder head gasket
In other words, the pressure drops due to increased parts wear and reduced durability resulting from long use of the engine. A pressure drop may also be caused by scratched cylinder or piston by dust entrance from the dirty air cleaner element or worn or broken piston ring. Measure the compression pressure to diagnose presence of any abnormality in the engine.
Compression pressure measurement method

After warming up the engine, remove the fuel injection nozzle from the cylinder to be measured. Crank the engine before installing the compression gauge adapter.
Perform cranking with the stop handle at the stop position (no injection state).
Install the compression gauge and compression gauge adapter at the cylinder to be measured.
NOTE!
Do not forget to install a gasket at the tip end of the adapter.
Crank the engine by the starting motor until the compression gage reading is stabilized.
Standard compression pressure
Standard: 30 kgf/cm2 (427 psi)
Limit: 26 kgf/cm2 (370 psi)
Dispersion among cylinders: 3 kgf/cm2 (43 psi)
Document Title: Function Group: Information Type: Date: Valves, adjusting Service Information 2014/4/16
Profile: CEX, EC45 [GB]
Valves, adjusting
Adjusting the valves

1
nbr 21412
NOTE!
Clean the area around the rocker cover before starting adjustment work.
1. Pull off the hose for crankcase ventilation.
2. Remove the cylinder head cover.
3. Crank the engine until the valves are overlapping.
NOTE!
Overlapping of valves means: Exhaust valve not yet closed, intake valve starts to open. In this situation the push rods cannot be turned.

4. Adjust the valve clearance on the respective cylinder using a feeler gauge.
5. Tighten the counter nut. Check the adjustment again with the feeler gauge.
6. Attach the gasket to the rocker cover.
7. Install the rocker cover. Tighten the screws with a torque of 11.3 Nm.
8. Push on the crankcase ventilation hose.
Intake: 0.25 mm (0.01 in)
Exhaust: 0.25 mm (0.01 in)
Valve clearance values
Document Title: Function Group: Information Type: Date: Lubricating system, description 220 Service Information 2014/4/16
Profile:
CEX, EC45 [GB]
Lubricating system, description
The oil pump delivers pressurized engine oil to lubricate the contact faces of moving parts, such as crankshaft, camshaft, intake/exhaust valves, rockers and engine timing gears.

Document Title: Function Group: Information Type: Date: Removing the oil filter 222 Service Information 2014/4/16
Profile: CEX, EC45 [GB]
Removing the oil filter
Op nbr 22202
Filter wrench
Remove oil filter
1. Place a bowl under the oil filter to catch running out oil.
2. Unscrew the oil filter from the engine block using the filter wrench.
Document Title: Function Group: Information Type: Date:
Installing the oil filter 222 Service Information 2014/4/16
Profile: CEX, EC45 [GB]
Installing the oil filter
Op nbr 22202

1
1. Slightly oil the seal on the new oil filter with engine oil.
2. Screw on the new filter cartridge by hand. When the seal touches the contact face turn further for another 1/2 of a turn.
3. Fill in 0.5 litres of oil.
4. Start the engine and check for leaks in the vicinity of the filter.
5. Shut the engine down. Check the oil level, fill up oil if necessary.
Document Title: Function Group: Information Type: Date: Removing the oil pressure switch 222 Service Information 2014/4/16
Profile:
CEX, EC45 [GB]
Removing the oil pressure switch
Oil pressure switch
Op nbr 22205
Socket wrench for oil pressure switch
1. Unscrew oil pressure switch using a socket wrench for oil pressure switch.
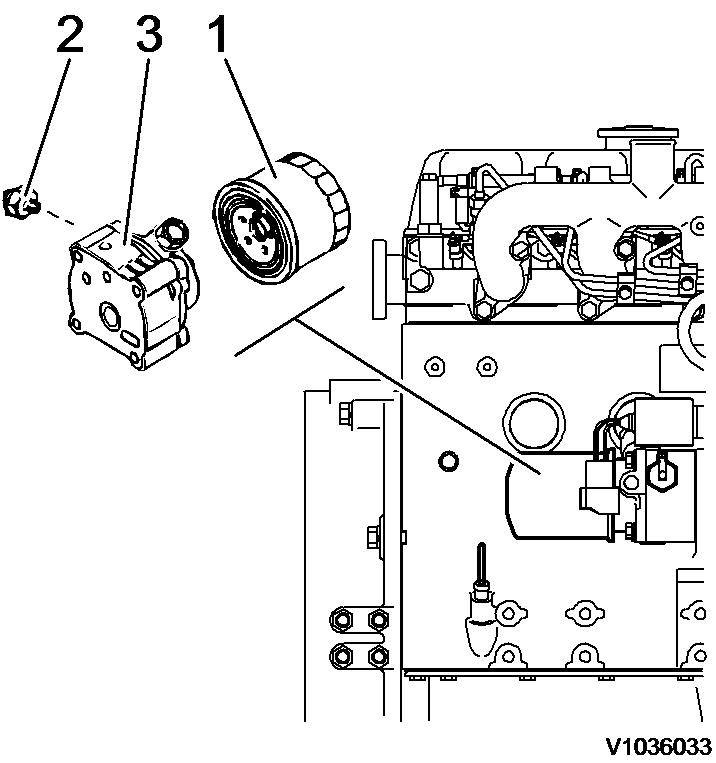
Figure 1 remove oil pressure switch
Oil filter Pressure switch Oil pump
Oil pressure test
Op nbr
Ohmmeter
1. Check the current flow between terminal and housing with an ohmmeter, as shown in the illustration. If this current flow is not assured replace the pressure switch.

2. Insert a small diameter rod into the oil bore of the pressure switch and push slightly in to check, whether current flow is applied (see illustration). If this is the case, replace the pressure switch.
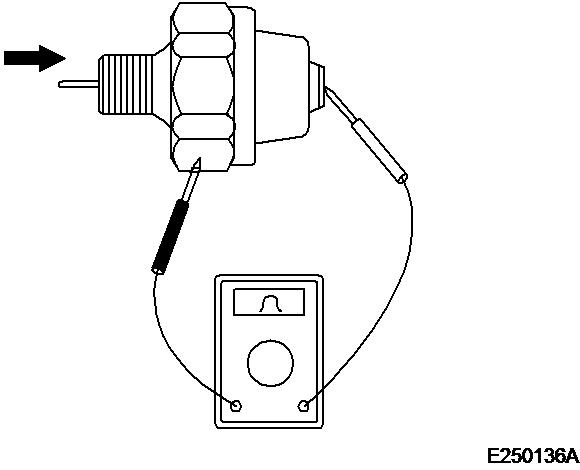
3. Blow with compressed air of 0.5 bar into the oil bore (arrow) to check whether current flow is present. If this is the case, replace the pressure switch. Check the switch also for air leaks. An air leak may be caused by a broken orifice. In this case the oil pressure switch must also be replaced.
Document Title: Function Group: Information Type: Date: Installing the oil pressure switch 222 Service Information 2014/4/16
Profile: CEX, EC45 [GB]
Installing the oil pressure switch
Op nbr 22205
Socket wrench for oil pressure switch
1. Cover the thread on the oil pressure switch with sealing compound. Turn in the oil pressure switch and tighten with the socket wrench to 10 ± 2 Nm.