DIAL UP COLOUR AND PATTERN FOR WARM AND WONDERFUL INTERIORS factor! Wow Autumn 2023 MAGAZINEFREE New Zealand Dreamy reno DIY pendant light WINTER CHECKLIST: DIY a glam rug + find a fab bath + fix the kitchen for under $1000 + propagate and paint like a pro EASY JOBS TO TICK OFF THIS WEEKEND 10


LED
T he magazine team
Editor Lisa Green
Associate editors
Caroline Botting, Helen Martin (AU)
Art director Bridie Mahoney
Creative services manager
Katharine McKinnon
Senior designer Carol Baldas
Style editor Samantha Pointon
Chief subeditors
Catherine Sanders, Frances Pearson
Senior subeditor Lorna Gow
Digital producer
Amanda Ghalaini Yacoub
Editorial co-ordinator
Caitlin Olsen-Ludlow
Junior accountant
Carina Law
Contributors Judie Siu, Shelley
Tustin, Harriet Upjohn
Advertising sales Kerry McKenzie, Hawkhurst Media Services
+64 27 5969979
Advertising production manager
Yulia McKenzie +64 21 969091
National advertising manager
Alek Jovanoski
Campaign manager Deanna Kane
General enquiries +61 3 8831 9777; bunningsmag@bunnings.com.au
Managing director
Nick Smith
Chief commercial officer
Fiorella di Santo
NZ general manager Sido Kitchin
Head of sales Annii Hirst
Head of content, Food & Homes
Julie Lee
Head of audience intelligence
Catherine Ross
Digital strategy director
Karla Courtney
Finance controller Leslie To
Every effort has been taken to ensure instructions for DIY projects are correct. However, before you undertake any DIY activity, please ensure that you have the appropriate skills for the task at hand, use the correct tools and that you wear the appropriate safety equipment. Any professional installations must be undertaken by a licensed tradesperson. Editorial content is general in nature and is not intended to be a substitute for legal or professional advice.
Published by Medium

Rare Content Agency NZ
Ltd. for Bunnings Warehouse, ABN 26 008 672 179, Botanicca 3 – Level 2 East Tower, 570 Swan St, Burnley, VIC 3121, Australia.


© 2023. All rights reserved.
For any queries or feedback, please call the magazine team on +61 3 8831 9777 or forward to the attention of Bunnings
Dream
Plan it
Do it
Magazine Team, Botanicca 3 – Level 2 East Tower, 570 Swan St, Burnley, VIC 3121. Products featured in the magazine are on offer while stocks last. Some products are not available at all Bunnings stores, but may be ordered. Colours may vary slightly from images shown due to the printing process. Prices shown are Bunnings prices at the time of publication and some prices may vary in regional areas. Pricing is to be used as a guide only. This publication is not for sale. pinterest.co.nz/bunnings
AUTUMN
Change it up
TO MUM WITH LOVE
your special someone with the perfect pressie from our Mother’s Day gift guide 15 MAXIMUM IMPACT
inspired by ‘more is more’ decor – bold, bright and very beautiful 27 MAKEOVER MAGIC!
the transformation of a suburban home from dated to delightful
it 12
Spoil
Be
Follow
36 FABULOUS FOR LESS
your kitchen renovation plans with money-saving DIY fixes in mind 43 COATED IN GLORY
your technique with our beginner’s guide to painting 47 SNIP, SNIP, HOORAY!
how easy – and economical –propagating new plants can be
53 10 FAST FIXES Get that bothersome little job done this weekend and tick it off your list 58 SOAKING HOT
a tour of the latest bathroom tub trends and types
Rethink
Perfect
Learn
Update it
Take
62 CIRCULAR SAW Learn all about this must-have in the first of our Tool Talk series 65 VROOM FOR IMPROVEMENT
your garage door some TLC for smooth operation 69 THREE OF A KIND
from this trio of satisfying DIY projects you can complete in a weekend
WHAT’S HAPPENING IN AUTUMN News, special buys and great ideas 74 FANTASTIC FOLIAGE Use striking leaves for garden drama 27 See how this hub of the home was updated Be brave and embrace a new interiors trend 15 53 Knock off a niggly task – or three! CONNECT WITH US Share your DIY creations with us or get inspiration for your next project. Use the hashtag #Bunningsmag
Give
Choose
Regulars 7
youtube.com/bunningswarehouse bunnings | bunningsnz | bunnings.co.nz 5
instagram.com/bunningsnz


Achange of season is the ideal time to tackle or plan home improvements. And this Autumn the to-do lists might be a little longer than usual. This issue serves up timely home maintenance tasks and beautification projects, with budget in mind. You can tick off pesky jobs (p53, p65) or flex your home stylist’s muscle (p15), bringing relief and satisfaction.


What I love about a trip to Bunnings is the inevitable discovery in a random aisle of something to inspire joyful updates (textured paints, door hardware) or solve a niggle (storage racks or door seals, anyone?). Even better is the expert guidance and services to support every home goal. With so many in mop-up mode after the recent weather events, there is plenty to do. And whether you’re shoring up your home or contemplating a major renovation, we all want the same outcome: a job well done. Seek advice when you need it, and stay safe.
PAINT POWER

Craving a change? Brighten your space – and your mood – with new paint. A fresh coat cleans up your surrounds and provides an easy atmosphere boost. Create wow with one feature wall or update a whole room. Turn to page 43 for a beginner’s guide to painting.


Healthy rentals
Every tenant is entitled to a home that meets a minimum standard for heating, insulation, ventilation, draught proofing, moisture ingress and drainage. A Bunnings Healthy Home Standards Assessment can determine whether a rental property complies with minimum legal requirements*. To book your assessment, visit bunnings. co.nz/services/in-home/healthy-homes-standards-assessment.

NEWS AUTUMN
Be inspired to go bold with your interior decor (page 15)
Some products are not available at all Bunnings
Printed by Webstar. Paper fibre is from well-managed forests and other controlled sources.
stores, but may be ordered.
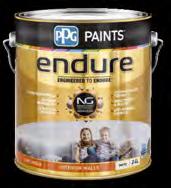
1 PPG Paints ‘Endure’ low sheen interior wall paint in White, $72.57/2L, I/N: 0055648. 2 Dulux ‘Wash & Wear’ low sheen interior paint in Duck Egg Blue, I/N: 1370192. 3 Porter’s Paints ‘Eggshell Finish’ washable broadwall paint in Newport Blue, $115/2L, I/N: 0163057. Some products are not available at all Bunnings stores, but may be ordered. 1 2 3
Editor’s letter Welcome! bunnings | bunningsnz | bunnings.co.nz 7 Words Caroline Botting, Caitlin Olsen-Ludlow. Photography (editor) Cath Muscat, (dining room) Belinda Merrie, styling Sam van Kan, (rental) Getty Images. *The Healthy Homes Standards Assessment costs $175 and is available in Auckland, Waikato, Bay of Plenty and Canterbury. Paint colours may vary on application.
AUTUMN OUTDOOR FUN
Extend your alfresco season into the cooler weather with outside heating options, a cosy seating and bar area plus a place to prepare a feast 3


Just spray it!
0177380
0172778
1 8 7 6
2 4 9
Bunnings Workshop community member Mariana (@lifestylebymari) executed a fantastic fix in her bathroom using just four products. Thanks to Dulux ‘Metalshield’ spray paint, 240-grit abrasive paper, Scotch Blue painter’s tape and some paper to protect surrounding areas, Mariana gave her tapware a modern transformation. “It elevated the bathroom without having to change too much and it has lasted so long without scratches,” she says. Her quick tip is to ensure everything is well protected – spray paint can get messy.
“It always amazes me how much spray paint can do!” says Mariana. For a similar finish, try Dulux ‘Metalshield’ in Ebony


5


PRICE UP YOUR PLAN
Ever wondered how to work out exactly the quantity of paint or the number of tiles you need for a DIY project? Bunnings has a number of online calculators to streamline your project, saving you time and money. The calculators provide cost estimates and quantities for flooring, tiling, deck oil, staining and painting. There are also tips on what to consider before embarking on a project. Calculators can be accessed via the website’s DIY advice section: bunnings.co.nz/DIY-calculators.

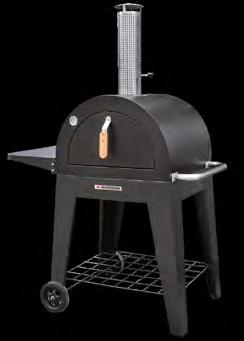
 Mimosa ‘Helsinki’ sofa set, $1,298, I/N: 0352947
Mimosa ‘Malibu’ 160cm x 80cm bar table, $395, I/N: 0256331, and bar stool with cushion, $179, I/N: 0256329
Matador woodfired pizza oven, $699, I/N:
Lytworx festoon chandelier indoor/outdoor battery operated LED party lights in Warm White, $25.30/5 bulbs, I/N: 0118286
Jumbuck brazier/ barbecue fire pit combo, $89, I/N: 3170945
Jumbuck ‘Stardom II’ 4 burner outdoor kitchen, $749, I/N: 0256477
Pit Boss ‘850G Navigator’ pellet smoker, $999, I/N:
Waxworks ‘Patio’ glass jar candle, $7.93, I/N: 0465064
Some products are not available at all Bunnings stores, but may be ordered.
Mimosa ‘Bronte’ 200cm x 100cm GRC dining table in Black Lava, $499, I/N: 0177365
Mimosa ‘Helsinki’ sofa set, $1,298, I/N: 0352947
Mimosa ‘Malibu’ 160cm x 80cm bar table, $395, I/N: 0256331, and bar stool with cushion, $179, I/N: 0256329
Matador woodfired pizza oven, $699, I/N:
Lytworx festoon chandelier indoor/outdoor battery operated LED party lights in Warm White, $25.30/5 bulbs, I/N: 0118286
Jumbuck brazier/ barbecue fire pit combo, $89, I/N: 3170945
Jumbuck ‘Stardom II’ 4 burner outdoor kitchen, $749, I/N: 0256477
Pit Boss ‘850G Navigator’ pellet smoker, $999, I/N:
Waxworks ‘Patio’ glass jar candle, $7.93, I/N: 0465064
Some products are not available at all Bunnings stores, but may be ordered.
Mimosa ‘Bronte’ 200cm x 100cm GRC dining table in Black Lava, $499, I/N: 0177365
8 bunnings.co.nz | bunningsnz | bunnings
Photography (top right)
@lifestylebymari; (bottom right) Larnie Nicolson, styling Sam van Kan.
When spray-painting, wear eye protection, a mask and gloves and work in a well-ventilated area, covering surrounding areas with a drop sheet or tape to avoid overspray. †Available to order at the Special Orders Desk.

GARDEN DIARIES
Try sprouting broccoli to bridge the gap between summer and winter veges. An easy option is seed tape – just plant it and watch the veg grow! See below for more brassicas to try in autumn.


Protect those brassicas from cabbage white butterfly. Insert stakes or hoops around plants and cover them with netting.


1
2
BROCCOLI
This cool-season vege has firm heads and thick green stems. Plant in full sun and rich, well-drained soil.
3
Plant hardy perennial herbs such as thyme and rosemary, ready for winter roasts! If short on space, use a balcony or decking rail herb planter.

Prepare tulip bulbs for planting. These need chilling to initiate flowering, especially in warmer areas, so place the bulbs in a paper bag in the fridge,

away from fruit and veges, for 8-12 weeks before planting.
Feed your lawn –autumn is an ideal time. Use a slow-release fertiliser especially for lawns to encourage a strong root system and thicker, greener, grass.

sooty mould on leaves. Spray with an organic solution.

5 6 4

Check citrus trees for sap-sucking insects such as scale, mealy bugs and aphids. A tell-tale sign is a
1 Mr Fothergill’s ‘Italian Sprouting’ broccoli seed tape, $5.32, I/N: 2961601. 2 Cyclone ‘Backyard Farmer’ 4m x 4m x 7mm crop protection net, $48.83, I/N: 0331903. 3 Whites ‘Garden Up’ herb planter, $13.50, I/N: 2940995 (plants not included). 4 Fiesta
Flower Bulbs ‘Purple Passion’ mixed tulip bulbs, $13.18/10 bulbs, I/N: 0310319. 5 Scotts Lawn Builder ‘Extreme Green’ slow release fertiliser, $49.89/4kg, I/N: 2961974. 6 Yates ‘Nature’s Way’ organic citrus, vegie and ornamental insect spray, $42.98/3L, I/N: 0066998. Some products are not available at all Bunnings stores, but may be ordered.

CAULIFLOWER

Large white (or purple) heads or ‘curds’ are usually ready to harvest in 90-120 days from planting.
After applying fertiliser around edible plants, delay harvesting for a few days and rinse well before cooking and eating. If using products to deal with pests, diseases or weeds, or when handling compost or mulch, follow any instructions carefully and wear gloves and suitable protective equipment. Store all garden chemicals out of reach of children and pets.
KALE
A culinary favourite that’s easy to grow in garden beds or pots. Harvest outer or lower leaves as needed.
CABBAGE
This versatile kitchen ingredient needs room to grow. Plant in full sun with well-drained soil and liquid feed regularly.
Scan the QR code
For more on what to do in the garden during autumn, go to bunnings.co.nz/gardendiaries

10 bunnings.co.nz | bunningsnz | bunnings
Words Jane Wrigglesworth, photography Getty Images.


1
Under $50 Lastminute gift DREAM IT GIFT GUIDE


TO MUM WITH love


I/N: 3192650.
, $60, I/N: 2940996. 3


‘Seville’
I/N: 0139013. 4 Dremel ‘4300-5/50’ 175W 55 piece rotary tool kit, $249, I/N: 6280100. 5 Marquee ‘Bayfield’ 3 piece wicker corner sofa, $449, I/N: 0177356. 6 Ozito 30W 11mm glue gun kit, $32.48, I/N: 0098549. 7 Boyle ‘Crafty Resin’ 2 part epoxy resin kit, $46.80/500ml (250ml+250ml), I/N: 0322568. 8 Pinnacle Hardware 950mm x 800mm x 350mm raised mobile garden planter in Charcoal, $74.83, I/N: 3321764. 9 Craftright 460mm tool box with 5 trays in Red, $39, I/N: 5820735. 10 Jumbuck double burner portable barbecue, $259, I/N: 0173343. 11 Mother’s Day gift cards and e-gift cards, from $10. 12 Triple plant propagation station, $23.98, I/N: 0269227. 13 Ryobi ‘ONE+’ 18V 4.0Ah 8 piece combo kit, $887, I/N: 0344372. 14 Mojo ‘Marrakesh’ 45cm cushion in Blue and White, $39, I/N: 0285775. All plants sold separately. Some products are not available at all Bunnings stores, but may be ordered.


(hearts) Getty Images.

1 13 14 2 3 4 5 6 9 7 8 10 12
Two Trees reversible cotton hammock, $89.98/king,
2 Whites ‘Garden Up Herb Up’ vertical garden kit
Northcote Pottery
31cm x 12cm bird feeder in Teal, $45.87,
DELIGHT HER THIS MOTHER’S DAY WITH A STYLISH OR PRACTICAL PRESENT SHE’LL ENJOY FOR YEARS TO COME 11 Photography
under $100 12 bunnings.co.nz | bunningsnz | bunnings


MAXIMUM IMPACT
THROW CAUTION TO THE WIND AND UNCOVER THE JOYS OF COLOUR, PATTERN AND TEXTURE

Words LORNA GOW Photography BELINDA MERRIE Styling and projects SAM VAN KAN
Moody, romantic and with the look of antique handpainted wallpaper, Superfresco Easy’s ‘Isabelle’ design in Teal takes floral to the next level!
ABOVE Superfresco Easy ‘Isabelle’ 52cm wallpaper in Teal, $72.90/10m, I/N: 0235720. DIY picture frames made using Hume Pine ‘Pinetrim’ 30mm x 15mm untreated clear pine bolection, $30.24/2.4m, I/N: 0293512•, 43mm x 21mm untreated clear pine picture frame timber, $8.87/0.9m, I/N: 0292906•, 45mm x 20mm untreated clear pine picture frame timber, $15.18/1.8m, I/N: 0292918•, and 35mm x 25mm untreated clear pine picture frame timber, $18.81/1.8m, I/N: 0292900•, in Dulux Port Ohope, French Bay, Hāwai, High Street and Coatesville paints. All other products, stylist’s own. Some products are not available at all Bunnings stores, but may be ordered.
bunnings | bunningsnz | bunnings.co.nz 15 Styling assistant Sophie Heyworth. Artworks (photography) Getty Images. • Timbers vary by region; contact your local store for further information. Paint colours may vary on application. DREAM IT BOLD DECOR
Let us introduce you to the latest interiors buzzword: maximalism, which celebrates the aesthetics of excess – or put simply, more is more. Balanced selection and placement lets you confidently display all the colours, patterns, art, accessories and textures you love, from the eclectic to the downright eccentric. So let’s say, “Thank you, and goodbye,” to minimalist, spartan spaces and live life to the max!
GALLERY WALL
Prints, postcards, even photos from magazine pages can be curated and displayed to dazzling effect. The vintage images we chose work beautifully with the classic print of the wallpaper, while breaking the rules with sizes, centring and heights creates visual interest. We took it further by painting the frames in colours that complement the floral design, and rendering the photograph subjects incognito with cheeky brushstrokes. Our frames were made using various sizes and profiles of finishing timber and 3mm MDF, but you could just as easily mend and upcycle old frames for an even greater array of shapes.
SQUIGGLE RUG


Create a unique floor covering, and repeat with the offcuts for two reverse-twin pieces of practical art!

1 Sketch your design out to scale on paper. In a wellventilated workspace, lay rugs face-down. Transfer your design onto the backs, marking cut lines with black pen.

You will need…
n Safety equipment (mask, eye protection, disposable gloves)
n Two identical rugs in different colours
n Black marker pen
n Utility knife
n Carpet seaming tape

n 230mm grout squeegee
n Carpet adhesive
n Anti-slip rug backing
n Paint roller
3 Swap out alternating rug pieces and arrange together to create a contrasting design. Keeping the joins neat and as close together as possible, tape into place with specialist carpet seaming tape.
2 Wearing a mask and eye protection (fibres may cause irritation), use a sharp utility knife to make the cuts through the backs of the rugs.
4 Wearing gloves, a mask and eye protection, use a squeegee to spread adhesive over the back. When tacky, smooth rug backing over, pressing with a dry paint roller, and trim edges. Once dry, turn rug right-side up to cure for two days before use.
Designer rugs are lust-worthy items beyond most budgets, but you can craft your own bespoke textiles with a little creative flair, a sharp knife and specialty tape

16 bunnings.co.nz | bunningsnz | bunnings • Timbers vary by region; contact your local store for further information. †Available to order at the Special Orders Desk.
DIY dado rail made using Hume Pine 62mm x 18mm untreated pre-primed HMR MDF colonial scotia, $33.82/5.4m, I/N: 0315684•, painted in Dulux ‘Aquanamel’ low sheen paint in Tūrangi, I/N: 0140188. DIY skirting made using Hume Pine 85mm x 18mm untreated pre-primed HMR MDF NZ colonial skirting, $44.78/5.4m, I/N: 0315678• Loropetalum ‘Plum Delight’ plant in Tuscan Path ‘Harper’ 35cm cylinder pot in White, $149.90, I/N: 0252506. Zebra plant in Lotus Collection 33cm x 25cm small indoor ceramic pot with stand in White, $35, I/N: 0200332, in Dulux Hāwai (pot) and Coatesville (stand) paint. Mimosa ‘Suna’ 140cm x 84cm x 70cm rustic 2 seater lounge in Grey Teak, $1,699, I/N: 0287104† DIY rug made using Ritz 2100mm x 1500mm plush rugs in Raspberry, $169, I/N: 0275667, and Ivory, $169, I/N: 0275670, Capitol carpet seaming tape, $18.50/5m, I/N: 6650122, Cemix carpet adhesive, $40.04/1L, I/N: 8904575, and Slipstop ‘Deluxe’ 230cm x 160cm rug grip, $54.98, I/N: 0074091. Senso Lifestyle ‘Nordic’ 3m wide vinyl flooring sheets in White, $25.24/sqm, $75.72 each, I/N: 6610225. All other products, stylist’s own. Some products are not available at all Bunnings stores, but may be ordered.

bunnings | bunningsnz | bunnings.co.nz 17
Superfresco Easy ‘Urban Brick’ 52cm paintable wallpaper, $52/10m, I/N: 1662880† , in Dulux ‘Wash&Wear’ low sheen interior paint in Coatesville, I/N: 1370182.

DIY chain light made using pendant light suspension kit, for similar try Brilliant ‘Maggie’ plug-in DIY shade holding suspension pendant in Black, $31.98, I/N: 0195409, Zenith 8mm plastic chain in White, $18.69/4m, I/N: 0389014, painted in Rust-Oleum ‘Ultra Matte’ 2X ultra-cover paint and primer in Golden Leaf, $13.84/340g, I/N: 0182708, Pinnacle 25mm magnetic hooks in Black, $30/pack of 6, I/N: 0147733, and globes, for similar try Luce Bella ‘Amber’ 4W 470lm G125 LED ES globes in Warm White, $18.25 each, I/N: 0019568.
DIY table made using Tuscan Path ‘Harper’ 42cm cylinder pots in White, $220.90 each, I/N: 0252509, painted in Dulux ‘Aquanamel’ semi gloss paint in French Bay, I/N: 0563354, and panel, for similar try Selex 2200mm x 600mm x 26mm laminated beech worktop panel, $171.50, I/N: 8330041. Dining chairs, for similar try Mimosa ‘Rope’ dining chairs, $69 each, I/N: 0033123. Arlo 290cm x 190cm woven rug in Cream, $169, I/N: 0253409. HanWood 61cm x 30.5cm hybrid vinyl tiles in Alpine Marble, $35.81/sqm, $79.86 each, I/N: 0177388. All other products, stylist’s own. Some products are not available at all Bunnings stores, but may be ordered.
18 bunnings.co.nz | bunningsnz | bunnings
STATEMENT TABLE
Top two upturned planter pots with a timber panel for a wow-factor table just asking for colour. Best of all, the only power tool required is a drill!
Tools & materials
n Safety equipment (mask, ear and eye protection)
n Tape measure and pencil
n Drill with 2.5mm and driver bits
n Cloth
n Mini microfibre roller with spare covers and tray
n 2100mm x 900mm x 30mm pine panel
n Eight 50mm x 50mm round angle brackets
n 8G x 30mm button-head timber screws
n Two 420mm x 650mm cylinder pots
n 8G x 20mm button-head metal screws (most suitable for fibreglass)
n 180-grit abrasive paper with sanding block

n Drop cloth
n Three-in-one primer
n Water-based enamel paint

1 With the panel flat on the ground, mark a line down the centre lengthways and 720mm in from each end. Position an angle bracket at the 720mm marks, facing inwards toward the centre of the panel, pre-drill through the holes using a 2.5mm bit and secure with 30mm timber screws.

Keep in mind…
n Always wear a mask when sanding and work in a wellventilated area when painting. Keep all paint and chemicals out of the reach of children and pets.
n Enlist a second pair of hands to move the table and flip it into place, lifting it high enough to avoid sideways pressure on the pots.

n The table is designed as an interior piece and not for use outside, exposed to the weather.
n Set the pot legs on flat, even ground for maximum stability and don’t jump or climb on the table.
LEFT Bring character to a blank expanse with textured wallpaper. This brick-look design lends the space an on-trend warehouse edge, with a bold paint colour elevating the effect. RIGHT There’s no electrician required to install these DIY pendant lights to existing standard batten fixtures. We dressed ours up with plastic chain spray-painted a jaunty yellow, simply suspended from magnetic hooks on the pendant canopies. Too easy!

2 Centre the pot bases on the panel, against the secured brackets. Position remaining brackets against the front and sides of the pots, pre-drilling into the pine, and secure with timber screws. Pre-drill into the pots by 2mm to start the holes and secure with 20mm metal screws. Turn the table right-side up to sand, rounding over the edges.
3 Wipe away dust with a damp cloth, then use a mini microfibre roller to apply primer all over, leaving to dry. Change the roller cover to apply three coats of water-based enamel all over, leaving to dry after each. Tip: Position the table on a drop cloth to paint the top and sides first, then the base, running the roller around the edges to catch any drips.
bunnings | bunningsnz | bunnings.co.nz 19 Project editing Natasha Dickins. †Available to order at the Special Orders Desk.
Make your study nook a place for play as well as work! This smart LED strip light offers 16 million colour combinations and is totally flexible, so you can shape it to create any look
Superfresco Easy ‘Geo’ 52cm wallpaper in Grey Myrtle, $72.90/10m, I/N: 0106454† Alcove painted in Dulux ‘Wash&Wear’ low sheen interior paint in High Street, I/N: 1370193. Lytworx ‘Smart Neon Flex’ RGB wi-fi voice control indoor/outdoor LED light set, $93.45, I/N: 0349389. Prayer plant in Lotus Collection 14cm ceramic egg pot in Black, $10.98, I/N: 0258679. Mimosa ‘Suna’ 78cm x 65cm x 57cm teak dining chair in Rustic Grey, $649, I/N: 0287108†. Senso by Gerflor ‘Prime’ 305mm x 305mm x 1.3mm self adhesive vinyl tiles, $18.34/sqm, in Black, I/N: 8916165, and White, I/N: 8916162. All other products, stylist’s own. Some products are not available at all Bunnings stores, but may be ordered.

20 bunnings.co.nz | bunningsnz | bunnings †Available to order at the Special Orders Desk.
decorate in half the time!

Wallpaper is Superfresco Easy! It’s easy to choose with a variety of designs.

Superfresco Easy’s Paste the Wall Technology is easy to use, reduces decorating time and covers uneven surfaces. It’s even easy to remove, when you fancy a change!


superfrescoeasy.co.nz


HANG Dry From The Roll MATCH & Trim PASTE The Wall
@superfrescoeasy_au
When it comes to creating crisp stripes, good-quality painter’s tape is your friend! We painted these walls in paler low sheen first, then once completely dry, masked up our stripes ready to be applied in darker gloss. Using contrasting finishes is a subtle detail that adds to the sense of luxury

22 bunnings.co.nz | bunningsnz | bunnings
LEFT AND BELOW DIY striped walls painted in Dulux ‘Wash&Wear’ low sheen interior paint in French Bay, I/N: 1370191, and Dulux ‘Aquanamel’ gloss enamel paint in Ocean View Beach, I/N: 0279932. Brilliant ‘Bloomsbury’ vintage style DIY wall light, $79.90, I/N: 0277204. Sandleford 550mm round mirror in Black, $75, I/N: 0339860. Capi Europe ‘Groove’ 12cm x 10cm indoor plant pot in Black and Gold, $11.98, I/N: 0266741. DIY mantelshelf covered in Graham & Brown ‘Marbled’ 52cm wallpaper in Black/Rose Gold, $109/10m, I/N: 1662890†. All other products, stylist’s own. Some products are not available at all Bunnings stores, but may be ordered.


SAFETY TIP
TO SECURE THE MANTELSHELF, USE A STUD FINDER TO CHECK FOR WIRING OR PIPEWORK, THEN TURN OFF THE POWER BEFORE USING FIXINGS
SUITABLE FOR YOUR WALL TYPE
MAGIC MANTEL
Make the most of a compact bedroom by custom-building a narrow mantelshelf along the wall behind the bed, rather than installing a bulky headboard. Ours is constructed from 12mm MDF on 40mm x 32mm dressed pine framing and is 200mm deep, which is perfect for perching reading glasses, a good book or just pretty objects. To counter the bold striped walls, we covered our mantelshelf with opulent black and rose gold wallpaper, which emulates the beautiful marbled endpapers of expensive hardback books. This bold pattern-on-pattern treatment gives this small room loads of personality.
†Available to order at the Special Orders Desk.
bunnings | bunningsnz | bunnings.co.nz 23
Power play
Take charge of all your projects around the house and garden with the power and flexibility of Ozito’s PXC 18V/36V range
Across the yard and the workshop, from quick maintenance tasks to the toughest jobs around the home, the Ozito PXC range makes it easier to get the job done. And best of all, no matter how much power you need (18V or 36V for the bigger tasks), all your Ozito PXC tools can be run off the same battery platform!
POWER ON THE GO
The days of being tethered by a power cord are over, with lithium-ion technology enabling you to enjoy the flexibility, safety and ease of use of a cordless tool, but with the get-the-job-done power of a corded device. And with Ozito PXC, you won’t

have to fork out for a pricey battery for each tool – just one PXC battery can power every tool in your kit! Charge up your battery and pop it in your tool, then when you switch jobs – say, from cultivating the soil to trimming the hedges – you can change the battery over to the next tool and keep on working without missing a beat.
36V – DOUBLE OR NOTHING
You might have started out with a core kit of 18V essentials but, as your needs change – maybe you’ve upgraded to a bigger house or garden, or taken your woodworking hobby to the next level – so, too, does your need to power up to a selection of 36V tools. Now, thanks to Ozito’s innovative
PXC Twin Pack technology, you can do it without having to shell out for a whole new set of batteries. This ingenious system offers double the power in the one platform, allowing you to pair two 18V batteries to deliver 36V power, giving you extra grunt for the toughest jobs.
36V POWER FROM 2 X 18V BATTERIES
The Ozito PXC 18V/36V battery system is the backbone of your toolshed. Building on the basic battery and charger kit, you can add more skins (tools sold without the battery and charger), as your DIY needs expand.
Picture this: you’ve got an Ozito PXC 36V Mower already, but you’re ready to take your lawn look to golf-green gorgeous. Using the same PXC 18V batteries, you can give your lawn some professional-grade TLC with the Ozito PXC 36V Brushless Scarifier, or banish leaf litter with the Ozito PXC 36V
*Skin only; battery and charger sold separately. †Available to order at the Special Orders Desk. Some products are not available at all Bunnings stores, but may be ordered. When using power tools, always wear the recommended safety gear.
The PXC 36V cultivator combines cordless convenience with plenty of grunt – just what you need when working the soil
The PXC 36V sliding mitre saw is a super-handy tool with serious cutting power


Brushless Jet Blower. In the workshop, you can use your two existing PXC 18V batteries to take your timber tinkering from novice to next level with a PXC 36V Table Saw or PXC 36V Sliding Mitre Saw. There are more than 80 PXC tool and garden products, all operated from the one battery platform so, no matter what project you’ve got planned around the home and
Make light work of even the toughest garden jobs with the PXC 36V brushless chainsaw

garden, Ozito has got you covered – and they all come with a five-year replacement warranty.
YOU HAVE THE POWER
The Ozito PXC 18V battery system gives you the power to run an entire shed of compatible tools, but there are even more ways to play it your way. With a range of different size batteries
and chargers available – all of which are compatible with PXC tools – you can build your base kit around your needs and budget. Batteries range from 2.0Ah to 5.2Ah – larger batteries mean a longer working time – while charger options include standard, fast charging and multi-battery chargers. All batteries and chargers are covered by a three-year replacement warranty.
1 Ozito PXC 36V cordless telescopic lawn mower kit, I/N: 0207446. 2 Ozito PXC 36V cordless hedge trimmer, I/N: 0179976*. 3 Ozito PXC 36V


brushless jet blower, I/N: 0293761*.

4 Ozito PXC 36V cordless line trimmer, I/N: 0167719*. 5 Ozito PXC 36V
brushless scarifier, I/N: 0410872†*.


6 Ozito PXC 36V brushless chainsaw, I/N: 0080956*. 7 Ozito PXC 36V cordless cultivator, I/N: 0293758†*.

8 Ozito PXC 36V 210mm sliding mitre saw, I/N: 0412275*. 9 Ozito PXC 36V 210mm table saw, I/N: 0412281* (available from April).
To find out more about Ozito’s PXC range, scan the QR code or go to ozito.com.au.


Advertising promotion
@OzitoDIY
@Ozito_DIY


MC
MAKEOVER MAGIC!
THE LATEST BUNNINGS HOUSE PROJECT IS ALL WRAPPED UP! TAKE A TOUR FOR UP-TO-THE-MINUTE RENOVATION INSPIRATION Words HOLLY BYRNE Photography ALEX REINDERS Styling SHARON

 TIM CLARK Builder
MEET THE TEAM
Interior stylist Jono has a knack for transforming spaces with his creative and innovative ideas.
@jono.fleming
A horticulturist, qualified landscape designer and landscaper, Inge has the outdoors totally covered.

@ingejabaralandscapes
Jono and Inge had a secret weapon for this reno – Tim! He helped turn design dreams into reality.
@timmatau

Have you ever doubted the power of DIY? Then doubt no more! With interior designer and stylist Jono Fleming, landscape designer and landscaper Inge Jabara and builder Tim Clark, we’ve taken a so-last-century suburban home and transformed it into a modern haven in our Make It Happen: The House Project series. Be amazed by the rooms on the following pages, and watch the team at work online on our YouTube channel.

Scan the QR code
Make It Happen: The House Project in action: youtube.com/ bunningswarehouse
 ABOVE Custom-made bench seats capitalise on a corner space for dining and do double duty as added storage
DREAM IT EXPERT INSIGHTS
BEGG
INGE JABARA
Landscape designer and landscaper
JONO FLEMING
Interior designer and stylist
it!
Watch
bunnings | bunningsnz | bunnings.co.nz 27 Artwork prints (top left) Adairs; (centre) The Dancer by Brittany Ferns; (top right) Poplars at the River Epte by Claude Monet; (bottom left) Still Life with Pumpkin by Rachel Stevens; (bottom right) Treble Soft Breeze by Chanel Sohier.
ABOVE Strategically positioned spotlights are directed at task areas as well as the decorative niche
KITCHEN & DINING AREA
A new floor plan and colour palette plus slimline profiles have brought the cooking, eating and socialising zones back to life

The heart of this home was a dark and awkwardly shaped space. “By opening up the entry wall and getting rid of the peninsula bench, I was able to transform it into a large family kitchen,” says Jono. He grounded the new floor plan with a central island, and personalised Kaboodle Kitchen cabinetry with paint and simple trims. “It gives the look of custom joinery and a bespoke designer kitchen, but all done with DIY,” says Jono.
Restaurant quality
To maximise the space left for dining, Jono created bespoke banquette seating in the corner. “This way, I was able to push the seating right up against the wall, allowing a thoroughfare between the dining and kitchen, with direct access to the bi-fold doors and back deck,” he explains. What’s the secret ingredient in the groovy wallmounted back rests? Pool noodles! Jono upholstered the foam water toys by wrapping them in wadding and fabric, stapling to thin MDF boards and screwing in position to the walls. They provide added comfort and a hint of high-end design without the expense. A curated gallery wall injects personality, while an extendable lamp offers quirky mood lighting.

Before
“Both kitchen and dining spaces have a great flow between them while having their own distinct personalities”
Jono Fleming, interior designer and stylist
28 bunnings.co.nz | bunningsnz | bunnings
DIY IDEA
A hanging rack Jono made from timber, sturdy mesh and chain doubles as storage and a herb garden! Builder Tim ensured its hooks are securely supported in the ceiling
RIGHT and OPPOSITE
Kaboodle Kitchen ‘Paint Your Own’ cabinetry in ‘Modern’ profile was customised with square timber trim
Touch of luxe

The marble look of the benchtops and splashback introduces a little opulence, while seamlessly coordinating with the Porter’s Paints Volcanic Ash colour on the cabinetry. Walls and trims are painted in Dulux Cardrona.

Finer details
A gooseneck sink mixer is a sparkling addition to the space. Overhead, the factory-style black pendant light adds balance and industrial chic, connecting to the sink, oven and window frame colour.

Keep in mind...
n Before undertaking any DIY activity, be sure you have the necessary skills, use the correct tools and wear the appropriate safety equipment.
n All professional plumbing, electrical and building work must be carried out by licensed trades.
Behind closed doors
A six-tier pull-out from Kaboodle Kitchen ensures there’s no space going to waste in the pantry, while everyday appliances are hidden next door. The tiled backdrop creates an easy-clean breakfast station.

Arch genesis
In a nod to the home’s original architecture, Jono designed this arch-shaped recess. It’s a sweet spot to display cherished items without cluttering bench space.
bunnings | bunningsnz | bunnings.co.nz 29
DIY I DEA
BeforeBarn doors can transform a room from open plan to privacy protected, and track hardware kits are straightforward to install

MAIN BEDROOM

Style abounds in the new and improved parents’ retreat, where all design elements make the most of the compact size
Sliding doors moment
“The goal in this space was to really give it that main suite energy it deserves,” says Jono. The first step? Installing the same flooring as the kitchen/dining zone throughout the bedroom and walk-in wardrobe.
“Having one consistent floor makes it feel bigger,” he explains. Timber hues were also a considered choice. “This is a family home in the suburbs, and I wanted it to feel warm so I chose deeper tones.” The archway entry into the wardrobe was kept in place, but the mirrored wardrobes were replaced with large open storage that extends all the way to the ceiling. Barn doors provide extra privacy. “Now, when you shut those, you have a full dressing area that can be closed off from the bedroom,” explains Jono.
FACADE & GARDEN
INGE JABARA Landscape designer and landscaper
TOP 3 TIPS FOR A FACADE FIX

Before“If it ain’t broke, don’t fix it! This house had a good-quality driveway. Giving it a lick of paint made it look like a brand-new pour.”
“A new fence has an instant impact on the street appeal of the home.”
“Use the pathway to take guests on a journey through the garden, instead of just straight to the front door.”
A front-of-house face lift has turned this home from boring to beguiling, and added energy-saving benefits

Make an entrance
Setting the tone for the rest of the house was essential for landscape designer and landscaper Inge Jabara, who made sweeping changes to the front garden. The old brick-post fence was removed, along with overgrown hedges. “The new 1500mm-high white picket fence is an ideal height for privacy – but you can still chat to your neighbours over it,” says Inge. On the front facade, new smaller doubleglazed modern windows were installed along with James Hardie fibre-cement cladding over the brick. “This allowed extra insulation to go between the cladding and the house,” says Jono. He chose muted-green Dulux Martins Creek for the external paint colour. A new front door was installed, with neat timber panels concealing the old-fashioned ‘fancy’ columns.
30 bunnings.co.nz | bunningsnz | bunnings
Artwork Ghost Gum by Albert Namatjira.

James Hardie ‘Axon’ 2450mm x 1200mm x 9mm cladding in 133mm ‘Smooth’ profile, I/N 0113916†. 2 Brilliant ‘Fairwind’ 132cm ceiling fan in White, $129, I/N: 0226072. 3 Brilliant ‘Orb’ DIY glass pendant light in Satin Brass, $75.98, I/N: 0137652 (globe sold separately). 4 Arlec ‘Bristol’ 60W outdoor farm wall light in Black, $69, I/N: 0315111 (globe sold separately). 5 HanWood 6mm hybrid rigid vinyl plank with 2mm EVA foam in Reclaimed Oak, $44.59/sqm, $117.72/2.64sqm, I/N: 0028173. 6 Metalique ‘Aquatica’ gooseneck sink mixer in Bronze, $288, I/N: 0207862†. 7 Sandleford 700mm x 480mm oval framed mirror in Black, $98, I/N: 0339862. 8 Mondella ‘Resonance’ single bowl rectangular sink in Matte Black, $299, I/N: 0367210†. 9 Brilliant ‘Orson’ 35cm classic industrial style DIY pendant light in Matte Black, $99.90, I/N: 0277231 (globe sold separately). 10 Sandleford ‘Matilda’ fence letterbox in Black, $117, I/N: 0284690. 11 Flexi Storage Studio oak and mirror 2 door sliding wardrobe and 3 drawer kit, $449.21, I/N: 0336730. 12 Meyer lemon tree in Tuscan Path 54cm studded glazed pot in White, $128.40, I/N: 2800979 (plant sold separately). 13 Click ‘Vintage’ 35.5cm 8lm solar LED pathway light, $12, I/N: 0180262. 14 Duratile 60cm x 30cm wall tile in White, $25.92/pack of 8, I/N: 6661134. 15 Kaboodle ‘Salento’ 96mm kitchen handle in Worn Gold, $11.34, I/N: 0175893†. 16 Kaboodle ‘Kitset’ 450mm country frontal drawer panel in Antique White, $165.54/pack of 4, I/N: 2662417†. 17 Rolltrak 2000mm x 40mm x 6mm smooth finish side fix barn door track set in Matte Black, $167.45, I/N: 0011861. 18 White Knight ‘Ultra Pave’ quick dry paving paint in Medium Grey, $135.45/4L, I/N: 1540640. Some products are not available at all Bunnings stores, but may be ordered.


GET THE LOOK 1 4 5 6 2 7 3 10 9 15 17 18 14 11 12 13 8 16
32 bunnings.co.nz | bunningsnz | bunnings †Available to order at the Special Orders Desk. Paint colours may vary on application.
1
feel like a goose?


Our new Good Job Guarantee means if you make a painting mistake we’ll replace your paint, free*


Scan for painting tips and support


*See conditions at BritishPaints.co.nz


REFRESH YOUR KITCHEN WITH A CLEVER MAKEOVER FOR UNDER $1,000 Words CAROLINE BOTTING
Emulate the charm of ‘VJ’ (vertical join) panelling on cabinetry with affordable decorative linings. Browse the range by Surround by Laminex 36 bunnings.co.nz | bunningsnz | bunnings
Fabulous for less
So your kitchen is dated and dysfunctional, but you have limited cash for an expensive remodel? Don’t fret! Restoring, refreshing and reorganising your existing kitchen can transform the space for much less than you might think. While a full renovation could cost tens of thousands of dollars, these savvy updates can give you instant impact for only hundreds.
Surface spr uce-up
Whether you’re looking for a cosy farmhouse style or a sleek modern look, vertical-join lining is a fantastic way to DIY some character into a plain space. It’s easy to install over existing surfaces and is hard-wearing, with pre-primed and moisture-resistant panels available.

For changing up tired flooring, self-stick vinyl tiles are a go-to, noskill solution. Available in a variety of styles, they are designed for hightraffic areas like kitchens at a fraction of the cost of retiling. Literally, just peel and stick these over shabby areas.
Paint ed love
One quick way to upgrade your kitchen is with paint, and not just on walls – specialist paints such as the Dulux Renovation Range
Dulux Puhoi Half


can be used to transform cabinets and tiled splashbacks, with great ‘bang for your buck’ impact. To up the ambience, Dulux colour expert Davina Harper recommends using darker tones on feature walls and cabinetry in the kitchen. “This can result in a striking focal point for your home,” she says. “If it is already fairly minimalistic and sleek, choose a bright Scandinavian-inspired look by blending soft, neutral hues to ensure your space stays warm and inviting.”

For a more dramatic effect, select two distinct tones. “To create a striking contrast, consider bolder colours such as blues and greens for cabinetry and trims, while sticking to neutrals and whites for the walls and benchtops,” suggests Davina.
Easy wins
Handles and drawer pulls are vital details in kitchen design, and also one of the easiest and most costeffective elements to replace.

COOK-ZONE COLOUR TRENDS

 ABOVE A drab but useful flat-fronted cabinet got a Shaker-style upgrade using primed MDF trim to form panel-look doors, painted using products from the Dulux Renovation Range
PPG Paints Oak Buff Porter’s Paints Laguna Dulux Five Fingers Peninsula Dulux Franz Josef Quarter
Porter’s Paints Popcorn British Paints Ocean Charm British Paints Dark Velvet PPG Paints Ionic British Paints First Eden Dulux Cossack Rock Quarter NEUTRAL GREENS SUBTLE GREYS WARM, SOFT TONES OCEANIC HUES DARK AND MOODY bunnings | bunningsnz | bunnings.co.nz 37
PLAN IT BUDGET RENO
Photography James Moffatt, styling Samantha Pointon; (right) Michelle Holden. Paint colours may vary on application. Some photographs feature products from suppliers other than Bunnings.


Made in the USA BONUS INSINKERATOR BRUSH’N’PUSH SINK TOOL IN BOX
John Harrison of Kaboodle Kitchen says handles are like jewellery for your kitchen. “They are a small piece but can make a huge impact on the overall aesthetic,” he explains. “Swapping out polished chrome handles for a streamlined matt-black option or a brushed-brass finish will instantly elevate the space.”


Before making a final decision, pop in store and see what you like the look and feel of. If you’re unsure how they will match with existing cupboard and drawer colours, create a moodboard to get a better impression.
While you’re focused on kitchen bling, another easy switch is the kitchen tap. A new and modern mixer will give your space a huge lift for little cost – plus you can match it to your new hardware, with an on-trend brass, black or white finish.
Storage satisfaction
Blank wall space presents a chance to install open shelving – a chic addition to any kitchen. “Floating shelves will add dimension and give you an opportunity to style them with decorative objects or use the area for more storage,” says John. “Benchtop offcuts work really well, if you’re thinking about updating your benchtops at the same time.”
If your surfaces are cluttered with appliances, utensils and cookbooks, they can impair the way you work in your kitchen. Make a practical update by improving storage. “Retrofitting wireware systems, such as pull-out pantries and rotating corner baskets, will help improve the functionality of your space without committing to an entire renovation,” says John.

Benchtop revival
The layout and size might be just fine but, if a benchtop is looking worse for wear, it can bring a whole kitchen down. Transform it with benchtopspecific specialist paint. “Adding an interesting lighter colour to benchtops can immediately brighten up the area and make it appear more light and airy,” says Davina Harper. She suggests a shade such as Dulux Te Kaha, a pale neutral with more warmth and interest than plain white. Is granite on your wish list but not within your budget? Rust-Oleum has a granite-look DIY paint kit in white or black, to transform dated or worn benchtops in a weekend.
If the surface is truly beyond repair, replacing it does require moderate DIY skills but not extensive work or outlay, says John. “A timber or timber-look benchtop will instantly add warmth and texture, whereas a stone-look option will brighten your space and give it a sense of luxury,” he explains.

Light appeal
The right kind of lighting will enhance both the functionality and ambience of a space. A few tweaks or additions can make a big difference, often for less than $100. “Lighting adds the perfect accessory to your decor, much like adding shoes to an outfit,” says Brilliant Lighting’s Debbie Paice. Available in a vast array of styles, pendants can bring design flair and brighten dark islands or help define kitchen and dining zones. DIY pendants have the added advantage of not requiring an electrician for installation.
Under-cabinet LED bars lend an upmarket feel, says Debbie, while colour-changing lighting can switch the vibe of the space, turning it from a functional family area to an entertaining zone in an instant.
Scan the QR code
 The finish of the brackets supporting these timber open shelves echoes the cabinet handles
Kaboodle Kitchen 2 tier rotating corner baskets, $205, I/N: 2667709
The finish of the brackets supporting these timber open shelves echoes the cabinet handles
Kaboodle Kitchen 2 tier rotating corner baskets, $205, I/N: 2667709
Watch it!
Give your benchtop a whole new look with specialty paint: bunnings.co.nz/paint-a-benchtop bunnings | bunningsnz | bunnings.co.nz 39 Photography (top) Jonno Rodd, styling Lucy Glade-Wright; Kaboodle Kitchen. †Available to order at the Special Orders Desk.
Kaboodle Kitchen ‘Salento’ 192mm kitchen handles in Worn Gold, $16.13 each, I/N: 0175899†. Some products are not available at all Bunnings stores, but may be ordered.
Lighting
SHOP
Engage an electrician to install new hardwired lighting, or DIY a pendant
Verve Design ‘Alcor’ wall light in Black, $46.33, I/N: 0147333


Handles
Tapware
Brilliant Lighting ‘Harbour’ 35cm DIY plug rattan pendant light, $165, I/N: 0089054 (globe sold separately)

Brilliant ‘Kota’ 20cm frost glass sconce wall light with matte black details, $45.90, I/N: 0230866 (globe sold separately)

Arlec smart LED white and colour changing strip light with remote and Grid Connect, $48.06/2m, I/N: 0208822*
Brilliant ‘Balos’ 60cm 20W LED CCT batten light in White, $45.90, I/N: 0147390


Give cabinetry a fresh look in a flash, simply by upgrading the door hardware
Sylvan ‘Upton’ 28mm knob in Black, $5.29, I/N: 0154830

Sylvan convex knob in Tawa, $5.98, I/N: 0957113

Kaboodle Kitchen ‘Turbo’ kitchen knob/handle in Brushed Nickel, $7.99, I/N: 0175945†
Sylvan ‘Warwick’ 3" pull in Brass, $9.59, I/N: 0039709

Have a plumber bring the sink up to date with a modern, efficient gooseneck mixer
Dorf ‘Vixen’ WELS
4-star 7.5L/min sink mixer in White, $404, I/N: 0316315†
Surfaces
Rust-Oleum benchtop transformation kit in Diamond White, $247.50, I/N: 0295816

Mondella ‘Resonance’ WELS
5-star 6L/min curved sink mixer in Stainless Steel, $182.62, I/N: 0204805

Aquatica ‘Metalique’ WELS 3-star 9L/min gooseneck sink mixer in Bronze, $288, I/N: 0207862†


Mondella ‘Resonance’ WELS 5-star 6L/min pin side lever sink mixer in Matte Black, $171.88, I/N: 0204777
Estilo WELS 5-star 6L/min tall vege spray coil sink mixer in Chrome, $114, I/N: 0018950
Install a new benchtop – or paint the existing one – and cover problem floors and walls
Gerflor ‘Senso Prime’ 305mm x 305mm self-adhesive
vinyl tile in Granite Grey, $18.34/carton of 11, I/N: 0308190


Kaboodle Kitchen 2400mm x 600mm x 35mm bamboo benchtop, $654.19, I/N: 2662191

Some products are not available at all Bunnings stores, but may be ordered.
n All hardwired electrical work and most plumbing work must be carried out by licensed tradespeople. n When using power tools, always wear the recommended safety gear.
Keep in mind...
n When painting, always wear safety equipment (eye protection and mask) and ensure the room is well ventilated. Keep all paint and chemicals out of the reach of children and pets.
Surround by Laminex ‘Batten 25’ 2400mm x 1200mm x 25mm pre-primed MDF panel in White, $244.62, I/N: 0281888†

BGC Fibre Cement ‘I/Groove’ 2700mm x 1200mm x 7.5mm panel, I/N: 0086967†
n If drilling into walls, use a stud finder to check for wiring or pipework, and turn off the power before working. If unsure, call a professional.
Kaboodle Kitchen 64mm cup handle with brushed nickel finish, $8.98, I/N: 2667727
40 bunnings.co.nz | bunningsnz | bunnings
†Available
*This product uses a coin/cell battery. Keep out of reach of children.
to order at the Special Orders Desk.
A whole new look
Transform your space in a weekend with the right tools from 3M Scotch and Command


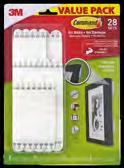
It’s the season of long weekends, which means it’s also the season of mini home makeovers! Giving a tired room a fresh new look can be as simple as applying a lick of paint and some wall décor – and with 3M Scotch painter’s tape and 3M Command adhesive strips and hooks, you’ve got a kit of essential tools to make it happen.
1. PREP FOR SUCCESS
A spectacular paint job starts with careful preparation. Clean and dry your surface, then apply tape around the edges.


ScotchBlue Original Painter’s Tape is the ultimate all-rounder, while ScotchBlue Sharp Lines Painter’s Tape uses Edge-Lock Technology to seal out paint like no other. For uneven masonry or timber, opt for Scotch Rough Surface Painter’s Tape, or use Scotch Exterior Surface Painter’s Tape for weather-resistant hold outdoors.


For best results, press – don’t stretch – the tape in place, then firmly stick it down with a putty knife, or even a credit card. Leave to set for 30-60 minutes before painting.


2. PAINTED PERFECTION

@ScotchANZ
@scotchanz


To find out more information on how to use Scotch tape for your painting projects, scan this QR code.


Brush and roll on your paint – it’s looking amazing already! But now for the most satisfying part: removing the tape. ScotchBlue tape can stay in place for up to 14 days after application without leaving residue, so when you peel it off, you’re left with nothing but impeccable definition.
3. MAKE IT YOURS

Hanging family photos and curated artworks is the best way to break up blank walls and mark a space as your own, and it’s so easy to do with Command picture hanging strips! The strips lock securely, holding up to 1.8kg for a small set and 7.2kg for a large set –that’s a 61cm x 91cm frame. Best of all, they leave no residue, holes or marks behind, so you can easily change up your space again when the mood strikes.

4. KEEP IT ORDERED
Scan here for further inspiration, and for more information, visit 3mnz.co.nz

An organised space is a calming space, and finding a home for everything can be transformative. Command adhesive wall hooks get all your practical essentials, from brooms to keys, ordered and accessible – and they can be used for decorative purposes too! Try using Command hooks to hang practical items that deserve to be displayed, from beautiful baskets to hats or your favourite necklaces.

Some products are not available at all Bunnings stores, but may be ordered.
Get room makeover ready with Scotch® painter’s tape and Command strips and hooks
Advertising promotion
1 Command adhesive hanging strips value pack in White, $38.50/28 pack, I/N: 0180144. 2 Command adhesive mixed wall hooks value pack in White, $30.80/22 pack, I/N: 0180143. 3 Scotch ‘Rough Surface’ 24mm x 55m extra strength painter’s masking tape, $10.15, I/N: 0726743. 4 ScotchBlue ‘Original’ 24mm x 55m multi-surface painter’s masking tape, $19/pack of 3, I/N: 1662423. 5 ScotchBlue ‘Original’ 24mm x 55m multi-surface painter’s masking tape, $9.45, I/N: 0142426. 6 ScotchBlue ‘Sharp Lines’ 24mm x 55m multi-surface painter’s masking tape, $12.65, I/N: 0257839.
Comfort zone
Make your home energy efficient and keep warm and snug this winter
Whether building from scratch or renovating, make Earthwool® glasswool insulation an essential part of your plans


Make your home drier and warmer this winter, while keeping your cooling costs to a minimum, thanks to energy efficient Earthwool® glasswool insulation
If you’re building a new home or planning an extension, you’ll need to meet updated requirements from the Ministry of Business, Innovation and Employment (MBIE) for energy efficiency. The new range of Earthwool® glasswool insulation batts makes it incredibly simple for DIYers and tradies alike to comply with the changes to the H1 Building Code.
The updates become mandatory in May, so get ahead of the game and start saving energy now. There’s never been a better time to invest in Earthwool® glasswool insulation and keep your home refreshingly cool in summer. And once the weather turns colder, you’ll save stacks on heating bills as well.

ABOVE AND BEYOND
Install a single-layer solution in your ceiling that actually meets the new H1 Building Code requirement for thermal efficiency (listed as an R-value) of R6.6 for ceilings in all climate zones. The new R7.0 Earthwool® glasswool ceiling batt is quicker – and less hassle – to install than two layers of insulation.
If you’ve reclaimed the loft as a living space, you’ll need to insulate between the rafters. The new Earthwool® glasswool skillion batt has an exceptionally efficient R7.4 rating and is designed specifically for this purpose.
CALM AND COLLECTED
With Earthwool® glasswool wall batts nestling between the studs of a timber-framed home, you’ll be enveloped in acoustic insulation as well as R4.4 thermal efficiency for the ultimate in peace and quiet.
FROM THE GROUND UP
Enjoy fuss-free compliance with updated requirements when you install R2.6 Earthwool® glasswool Floorshield batts. They are made with a wind-wash barrier to prevent air movement under the house from reducing their thermal performance, and DriTherm® Technology for extra moisture resistance.
Manufactured using up to 80 per cent recycled glass, Earthwool® glasswool is backed by a 50-year warranty


1 Earthwool® glasswool R7.0 1200mm x 460mm x 330mm ceiling insulation batt, I/N: 0410680
2 Earthwool® glasswool ‘Floorshield’ R2.6 1160mm x 420mm x 90mm underfloor insulation batt, I/N: 0365528. 3 Earthwool® glasswool R7.4 1160mm x 430mm x 265mm skillion insulation batt I/N: 0410678. 4 Earthwool® glasswool R4.4 1160mm x 580mm x 140mm wall insulation batt, I/N: 0410679.
For more information about Earthwool ® glasswool insulation, scan the QR code

Some products are not available at all Bunnings stores, but may be ordered. When installing insulation, follow the instructions and wear long sleeves and trousers, eye protection and a mask.
Advertising promotion
Coated in glory
NEVER TACKLED A PAINT JOB BEFORE? HERE’S WHAT YOU NEED TO KNOW TO TAKE YOU FROM AMATEUR TO PRO IN NO TIME
 Words LYNNE TESTONI
Open a magazine or watch a home renovation show and it’s amazing to see what a difference paint makes – it transforms a space with the stroke of a brush. But while the results may look instant on the page or screen, painting requires time, patience and practice – and the right products. Once you have all these, it is a rewarding and fast way to update your home.
Before you start
While an experienced painter might be able to get a good result with inexpensive paint, Craig Nielson of PPG Paints says novices need to have high-quality tools and paint to make sure the finished job lasts the
distance. With better and more even coverage, premium paint is easier to apply – beyond the price tag, you can spot a top-quality paint by the balance of solids and solvents. Premium paints have more solids (such as pigments and binders) and fewer solvents than their budget counterparts, resulting in a thicker, more durable layer when dry. Goodquality brushes and rollers also contribute to a smoother job.
“An ultra-premium interior paint, such as PPG Paints ‘Endure’, will do anything,” says Craig. “It’s super scrubbable and you won’t have to repaint. It won’t look dirty. If you get muck on the wall or marks from kids and dogs it’ll clean off beautifully. It will actually stay looking good until you’re sick of the colour.”
bunnings | bunningsnz | bunnings.co.nz 43 PLAN IT COLOUR CHANGE
Striking paint effects create a moody dining atmosphere
Photography James Moffat, styling Samantha Pointon. Some photographs feature products from suppliers other than Bunnings.
Types of paints
Before you break out the rollers and brushes, you need to know your water-based from your oilbased paints and choose the right type for your needs. As Tayler Zouch of Dulux explains, there are some important differences. “Water-based paints are fast drying and simply require water for washing up, whereas oil-based paints take longer to dry, and require turps for cleaning your brushes,” she says.
Traditionally, oil-based paints are used for high-traffic areas such as doorframes, skirting boards and staircases. But, with increasing demand for more sustainable products, oil-based paints are on the way out, says Craig Nielson. For most applications, he says the industry is moving towards waterbased paints (also known as acrylics) with new formulas that are not only as tough as oil-based products but more convenient and better for the environment, particularly in terms of volatile organic compounds (VOCs).
Sheens and shine
Paint comes in a variety of sheen levels, including matte, satin, gloss, semi-gloss, low-gloss and low-sheen. Varying in shine level as well as reflectivity and durability, each serves a different purpose.
Low-sheen paint is ideal for interior walls. With minimal light reflection, it helps to hide imperfections; being hard wearing and easy to clean it suits walls that need a regular wipe-down, such as in high-traffic areas. Matte paint gives a velvety reflectionless surface and also hides imperfections, but may be harder to clean. High-gloss paints are often the go-to choice for bathrooms, kitchens and laundries as they’re a great match for the hard, reflective surfaces found in these

TIME THE TASKS
On a deadline? Once you start painting, allow one hour per seven square metres to apply the first coat. It’s important to let it dry before starting a second coat. You’ll find a drying time guide on your paint can, but waterbased paint typically takes about 4-5 hours to dry, while oil-based formulas are best left overnight.
spaces. The shine factor of gloss paint is also an effective way to highlight architectural features such as trim, doorframes and windowsills. On ceilings, Tayler recommends a product that gives a flat finish, such as Dulux Ceiling White, to minimise reflection and help hide surface imperfections.
How tints work
For consistent colour, most paints are mixed in store using tints and bases. As Dulux colour expert Davina
Harper explains, tints are simply the colour pigments that go into paint to create colours. “Each colour has its own tint formulation, which is held in a database that is linked
Scan

How to achieve a smooth and professional finish: bunnings.co.nz/ prepare-a-wall-for-painting

“ It’s more difficult to get a good finish out of a budget paint – it’ll be hard to clean off fingerprints and there won’t be as many bells and whistles in the product”
Craig Nielson, PPG Paints
Watch it!
the QR code
44 bunnings.co.nz | bunningsnz | bunnings
to the tint machine,” she says. “This ensures your chosen colour will look the same every time.”
Different paint colours are mixed using a variety of bases depending on the shade and vibrancy of your chosen hue. These bases are clearly printed on both the colour chip and the front label of paint cans for efficient and accurate mixing.
Coverage rates
Before you buy paint, you need to have an idea of the surface area to cover. To work out the amount required, Bunnings has a handy online paint calculator (bunnings.co.nz/paintcalculator). Enter room measurements and details to work out your quantities.
Premium paints generally have better coverage – about 15sqm/litre. It’s best to get a little more than you think so you don’t have to mix batches. Most quality products need two coats, unless you are radically altering the colour.
Prep and prime
A lack of relevant preparation is the most common mistake made by novice painters, says Tayler. “Before applying the top coat, it’s always best to properly prepare the wall,” she advises. “This will ensure the best results and help your paint last longer.”
Start by using a pre-mixed fastdrying filler to cover any cracks, chips or scratches, and sugar soap to scrub off stains, spots and stubborn dirt marks. Allow the wall to dry completely before sanding. “Sand as needed to free the surface of contamination and loose, flaking paint,” says Tayler.


Use a soft brush or broom to remove any remaining dust, then apply primer or paint. If you’re unsure of the original paint composition or using a waterbased product over oil-based paint, you’ll need to apply a primer. A good timesaving option is a 3-in-1 primer, which locks onto all types of surfaces, including oil-based enamels.

8 9
1 Zinsser ‘Cover Stain’ undercoat primer-sealer stain blocker, $34.83/1L, I/N: 0749502. 2 Dulux ‘Ceiling White’ paint, I/N: 8905425. 3 Pro Renovator 100mm plastic scraper, $2.80, I/N: 1660095. 4 Selleys ‘Spakfilla Rapid’ filler, $13.50/180g, I/N: 1231864. 5 Paint Partner 3.6m x 2.6m canvas drop sheet with PE back, $23.65, I/N: 1660308.

6 Selleys ‘Professional’ sugar soap, $5.14/1L, I/N: 0222766. 7 Monarch wooden paint stirrer, $2.15, I/N: 1660993. 8 Dulux ‘Wash&Wear’ low sheen interior paint in Vivid White, I/N: 1370158. 9 PPG Paints ‘Endure’ low sheen interior wall paint in White, $105.63/4L, I/N: 0055654. Some products are not available at all Bunnings stores, but may be ordered.


Keep in mind…

4 5 6 3 2 7
SHOP 1
ABOVE and RIGHT
Invest in quality paint and tools. Time spent prepping areas will give a professional finish
n When painting, always wear safety equipment (eye protection and mask) and ensure the room is well ventilated.
n Keep all paint and chemicals out of the reach of children and pets.
bunnings | bunningsnz | bunnings.co.nz 45
Photography
PPG Paints, (opposite) Dulux Australia. Paint colours may vary on application.
Save our birdsong
Play your part in protecting our iconic wildlife from introduced predators
Kiwicare is on a mission to help make New Zealand predator free by 2050, but we all need to play our part. Its Predator-Free Kit, launching in April, has been designed to help ensure our collective backyard remains filled with birdsong.


SAVE OUR FEATHERED FRIENDS
Every year, an estimated 25 million native birds are killed by introduced predators ranging from rats and mice to possums and hedgehogs*. These intruders also destroy native vegetation and compete for sources of food that many beloved – but endangered –birds, depend on. Take action to guard your backyard with the Predator-Free Kit, which aims to safely combat these unwanted pests.
PACKED WITH VALUE

The Predator-Free Kit contains five products to help eliminate pests, including rodent detector cards to help identify and alert you to the culprits that could be picking off native wildlife, with No Rats & Mice bait blocks, and a trapping tunnel with pegs to keep it in place. There’s also a Victor Modified Rat Trap, approved by the National Animal Welfare Advisory Committee (NAWAC), and a packet of wildflower seeds you can plant to encourage

bees who help to keep the ecosystem healthy. The contents add up to $59 worth of product, but the kit is available for just $39.99.
DONATING TO NATURE
Kiwicare is donating a portion of the profits from sales of Predator-Free Kits to the Predator Free NZ Trust**. By investing in a Predator-Free Kit, you can
Help keep our native species safe with Kiwicare’s easy-to-use Predator-Free Kit
also make a meaningful difference to help protect our irreplaceable wildlife by combating introduced predators in your own backyard. Together, we can make New Zealand a protected haven and allow iconic native birds – and other species of wildlife – to flourish.
1 Kiwicare ‘Predator-Free’ rodent elimination kit

The kit includes: 2 McGregor’s ‘Wildflower’ seeds 3 Kiwicare

‘NO Rats & Mice’ bait blocks/ pack of 5. 4 Kiwicare ‘Predator-Free’ rodent detector kit 5 Victor modified rat trap 6 Kiwicare pegs for trapping tunnel.


KiwicareHomeAndGarden
kiwicare_nz

kiwicare.co.nz/predatorfree2050/ Scan the QR code to find out more about Predator Free 2050, or visit kiwicare.co.nz Some products are not available at all Bunnings stores, but may be ordered. Always read and follow the manufacturer’s instructions for use and store pest control products out of the reach of children and pets. *www.stuff.co.nz **kiwicare.co.nz
Advertising promotion
SNIP, SNIP, HOORAY!
 Words TAMMY HUYNH

PLAN IT GROW YOUR OWN
YOUR PLANTS AND KEEN TO MULTIPLY YOUR FAVOURITES? DISCOVER THE MAGIC – AND MONEY-SAVING JOY – OF PROPAGATING
LOVE
T a m myHuynh Get your veges going before the planting season by growing from seed indoors in Jiffy pots bunnings | bunningsnz | bunnings.co.nz 47 Photography Gap Photos. Some photographs feature products from suppliers other than Bunnings.
Are there gaps in your garden that need filling? For most gardeners, there’s always room for more plants – and the good news is you can boost your collection using what you already have.


Propagation is a way of creating new plants from existing ones. As gardening editor Rachel Clare explains, propagating is enjoyable and economical, allowing you to share your plants with friends and family for free. “You end up with more plants, including types of plants that can be harder to find, plus it makes you think of the person who gave it to you or the place it came from,” she says. There are several different ways to do this – read on to find out how.
Sowing from seed
Mr Fothergill’s recommends following the instructions on the back of each seed pack to get the best results.
You can also collect and use your own seed from most plants. Seed heads are produced once flowers are finished – don’t deadhead blooms if you want to collect seed. The process varies between plants, so it’s best to do a little research first – for example, you can harvest seed from ripe tomatoes, but you need to wait for the seedpods to dry on coriander.
Ideally, seed should be collected from open-pollinated varieties, that is, plants pollinated by natural means, as opposed to hybrid plants. Hybrids have been artificially crossed to produce plants with desirable traits, but seeds from hybrids won’t always grow ‘true-to-type’ and resulting plants may be different to the parents.
best with evergreen and herbaceous perennials that have a clumping habit, such as hostas, clivias, salvias, asters, Phormium and ornamental grasses. Over time, as these plants spread, they can become crowded and won’t perform or flower as well as they used to. So dividing them gives you more stock to fill gaps and keeps the parent plants looking their best.
TOP PICKS
Seeds are one of nature’s wonderful gifts, containing everything needed to grow a plant from scratch, all bundled into a tiny package. Most plants can be grown from seed, although some may require extra measures such as soaking or scarification (weakening the seed coating) to encourage germination. Sowing requirements vary according to plant type, too, so
Bianca Boman of
Plant division
Dividing plants involves removing and replanting a section of the parent plant that has its own roots. It works
To divide a clump, dig around the edge of the plant and use a garden fork to gently lift it out of the ground or pot. Gently tease apart the root ball; if it’s difficult to work with, use a sharp knife or spade to divide it, ensuring each section has viable roots and shoots. “Replant or repot each plant in a good-quality mix and water regularly to keep the mix moist,” says Bianca. Most perennials and some ornamental grasses should be divided in winter or early spring, before new growth has started.
TOP PICKS
“There are many ways to propagate. You can grow from seed, divide roots or tubers and take cuttings of stems or even leaves”
Bianca Boman, Mr Fothergill’s
lamb’s ear, mondo grass, dianthus, dahlia, iris
sunflower, cosmos, heirloom veges, sweet pea, billy buttons
With plants that produce offshoots, such as primula auricula, propagation is a simple case of lift and separate
Seeing a beautiful bloom – like this cosmos – grow from a tiny seed can be one of gardening’s greatest joys
Photography (far left) Anna Robinson, Wild Violet Flower Farm; (left) Gap Photos/Lynn Keddie; (opposite) Cath Muscat.
TOP PICKS


Stem cuttings

Many indoor and perennial plants can be propagated with stem cuttings. To do this, cut a non-flowering stem at the top on a 45 degree angle, above the node. Cutting should be a minimum of 15cm long with at least a few nodes, removing all but a few of the upper leaves. On the bottom, cut straight, just below the node. “Aid growth by dipping the base of the cutting in rooting hormone,” suggests Rachel. “Or dip cuttings into active mānuka honey with a UMF of 15.” Plant about a third of each cutting into a gritty mix of perlite, vermiculite or sand and leave in a humid spot out of direct sunlight. “You can increase the humidity by placing the pot in a plastic bag,” says Rachel. “Don’t forget to water your cuttings, too.”


If propagating indoors or during cooler months, Bianca advises using a heat pad that helps mimic spring soil temperatures, and encourages roots and shoots to develop faster. Stem cuttings can also be propagated in water. “Change the water weekly, and when enough roots form, transplant into individual pots,” says Bianca.


SHOP 3 1 2 4 10 11 12 8 9 7 6 5
1 Mr Fothergill’s wooden dibber stick, $6.98, I/N: 0232205. 2 Holman ‘WX1’ tap timer and wi-fi hub, $144.56, I/N: 0246021. 3 Trojan ‘D Handle’ fibreglass steel garden fork, $37.28, I/N: 3360924. 4 Cyclone ‘Cottage’ spade, $49, I/N: 3369598. 5 Saxon mini greenhouse with seed tray, $10.54, I/N: 2960182. 6 Nylex 15m soaker hose, $34.93, I/N: 0012423. 7 Triple plant propagation station, $23.98, I/N: 0269227. 8 Scape 10L plastic watering can in Dark Green, $16.90, I/N: 0238681. 9 Saxon 2 piece bypass pruning set, $9.98, I/N: 0103876. 10 Burnet’s rooting hormone dip, $9.90/50g, I/N: 0339969. 11 Scotts Osmocote seed raising & cutting mix, $12.98/25L, I/N: 8912735. 12 Egmont propagation heat pad, $52.98, I/N: 0281408. Some products are not available at all Bunnings stores, but may be ordered.
Propagating in water is a no-fuss, low-maintenance way to grow more plants
bunnings | bunningsnz | bunnings.co.nz 49
rosemary, hydrangea, coleus, buxus, camellia, geranium and most indoor plants including devil’s ivy, philodendron and monstera
Layering
This involves encouraging the parent plant to produce new plants, which remain attached while they grow roots. Once healthy roots have formed, the new plants can be severed and transplanted. “Layering works best with plants like monstera and devil’s

TOP PICKS
blackberries, strawberries, azaleas, rhododendron
ivy that develop aerial roots,” says Bianca Boman. “It also works well for plants like strawberries that root easily when nodes touch the ground.”

Layering is best done in spring and summer when plants are actively growing. “Bend stems downwards,


pin the nodes to the ground and lightly cover with soil,” says Bianca (see above). For indoor plants, especially those with thicker stems like philodendrons and monstera, try aerial-layering. Cover a node with moistened sphagnum moss and wrap with plastic to keep it moist. When roots form, the new plant is ready to be detached and transplanted.
Keep in mind…
with wheels in Charcoal, $34, I/N: 0327517. 9 The Organic Garden


200cm
Some products are not available at all Bunnings stores, but may be ordered.


100cm
41cm
in
SHOP 1 2
3 4 5 6 8 9
7
1 Fountain Products 697mm x 655mm x 425mm raised garden bed in Charcoal, $39.83, I/N: 0176623. 2 Holman 4 tier greenhouse with misting kit, $62, I/N: 3321805. 3 Mr Fothergill’s ‘Jiffy’ 60mm peat pot, $7.46/pack of 26, I/N: 2961318 (plant not included). 4 Nylex ‘Alpine’ 750ml trigger garden sprayer, $6, I/N: 0273731. 5 Saxon 200cm x 140cm x 70cm small walk in greenhouse, $69, I/N: 0331636. 6 Cyclone ‘Backyard Farmer’ 4m x 4m x 5mm anti bird net, $13.98, I/N: 0331906. 7 Saxon 23.5cm cotton calico gloves, $1.98/one size pair, I/N: 0256789. 8 Fountain Products 610mm x 510mm x 240mm raised garden bed
Co
x
x
raised garden bed
Monument, $176, I/N: 0045658.
Bring on the berries and get into layering to enjoy a bumper harvest
50 bunnings.co.nz | bunningsnz | bunnings Photography
n Remember to always wear gloves and a mask when handling potting mix.
Gap Photos/Janet Johnson
HANDY AND BUILT TO LAST
All Fiskars pruners have fully hardened, precision-ground steel blades to enhance performance, and ergonomic design. Quality and innovative design is consistent across the range, with Fiskars’ pruners scooping the Red Dot ‘Best of the Best’ design award.


Make the cut
No matter how big or small your garden, pruning is essential for keeping plants in shape, encouraging fruit and flowers, and preventing disease. Not to mention the simple joy to be found in breathing new life into old trees, controlling wayward vines (hello passionfruit!) or creating topiary. Attempting the task with blunt or inferior blades is hard work, and can also damage plants and lead to fungal and insect attack. To get the job done properly, you need high-quality tools.
A TOOL FOR EVERY GARDENER
Fiskars hand pruners are designed for every type of gardener, from the casual potterer to the professional landscaper, so you can find the right tool for you. Solid The entry-level Solid series is perfect for weekend gardeners, or those with small outdoor areas who need an affordable, efficient tool for everyday maintenance tasks, such as deadheading and light trimming. Plus With additional features and a PowerLever™ mechanism in selected models, which maximises leverage for easier cutting of tough stems and branches, the Plus series is ideal for medium to large gardens.
X-Series These heavy-duty pruners are suited to the most demanding green thumbs. Highly durable and ergonomic, some X-Series models include PowerGear™, which gives up to three times the force and cutting efficiency of standard pruners.
Built for
and
comfort
cutting power, Fiskars
pruners
keep your garden in good order
Advertising promotion
Every keen gardener needs quality tools, so discover the ‘shear’ brilliance of Fiskars pruners
Fiskars ‘X-series P961’ 26mm L bypass pruner, $68.97, I/N: 0241675
Fiskars ‘Single Step’ bypass pruner, $26.73, I/N: 3350342
Fiskars ‘Solid P341’ 20mm bypass pruner, $32.05, I/N: 0241664
When pruning, always wear protective gear such as gloves and long sleeves, as the leaves and sap of some plants can be skin irritants and/or cause allergic reactions. Some products are not available at all Bunnings stores, but may be ordered.
Fiskars ‘Solid P321’ 20mm bypass pruner, $26.75, I/N: 0241661
Fiskars ‘Plus P521’ 24mm bypass pruner, $38.88, I/N: 0241666
Fiskars ‘Plus P721’ 24mm bypass pruner with PowerLever™, $48.97, I/N: 0241667
Fiskars ‘Plus P751’ 24mm metal bypass pruner, $58.88, I/N: 0349714
Visit bunnings.co.nz/brands/f/fiskars
Fiskars ‘X-series P921’ 24mm M bypass pruner, $62.76, I/N: 0295533


fast fixes
MAKE THIS WEEKEND THE ONE TO TACKLE THAT QUICK JOB YOU’VE BEEN MEANING TO DO FOR AGES!
Words KYLIE JACKES
We’ve all got them: annoying chores around the house that we keep putting off. But armed with the right tools and equipment, actually doing them can be surprisingly swift and gratifying. Here’s our advice on 10 tasks you can DIY this weekend.
Get lines in order
Clotheslines get a lot of use and, over time, the cords may loosen or wear, but the good news is the solutions are simple. Replacement cord is available off the shelf in store, says Damien Cunliffe at Daytek. “And parts can be sourced through the Special Orders Desk.”
1 2
Installing or relocating an existing clothesline is a straightforward job. For wall-mounted models, use a hammer drill and masonry bit to fit the brackets to brick with masonry screws. If your fold-down line is freestanding, it’s a case of either setting the posts of an in-ground model in foundation holes filled with aggregate and concrete, or fixing the posts’ base plates onto a concrete patio with the recommended fasteners. Follow the manufacturer’s manual – especially safety instructions.
Renew silicone
Replacing cracked and discoloured silicone around the bath, shower, mirrors and sink will instantly refresh a bathroom, says Bunnings magazine contributor and DIY specialist Natasha Dickins (@LittleRedIndustries). “This is an easy job even for DIY novices. Scrape out as
much existing silicone as possible, then apply a thick layer of silicone remover and leave it for a few hours, before cleaning off with a cloth soaked in methylated spirits,” explains Natasha. “Apply new silicone with a caulking gun or, even easier, use an all-in-one sealant product with attached applicator.”

UPDATE IT MAINTENANCE TIPS
10
Get cracking with a caulking gun and refresh your shower area by replacing shoddy silicone
bunnings | bunningsnz | bunnings.co.nz 53
Photography Getty Images. Some photographs feature products from suppliers other than Bunnings.
3

Sort out the pantry
Dealing with a disorganised pantry can seem like an overwhelming chore, but the benefits of doing it are huge.
Professional organiser Bonnie Black says it can result in less food wastage and make cooking quicker and easier. For a complete pantry overhaul, she suggests setting aside half a day to pull out all the contents so items can be categorised, containerised and reshelved according to frequency of use. “Good organisation systems include a carousel for sauces, oils and vinegars, tiered shelving for cans and a large basket for kids’ after-school snacks,” Bonnie says. She recommends a consistent storage style, whether it’s clear stackable containers which maximise your pantry space, or recycled jars with handwritten labels.
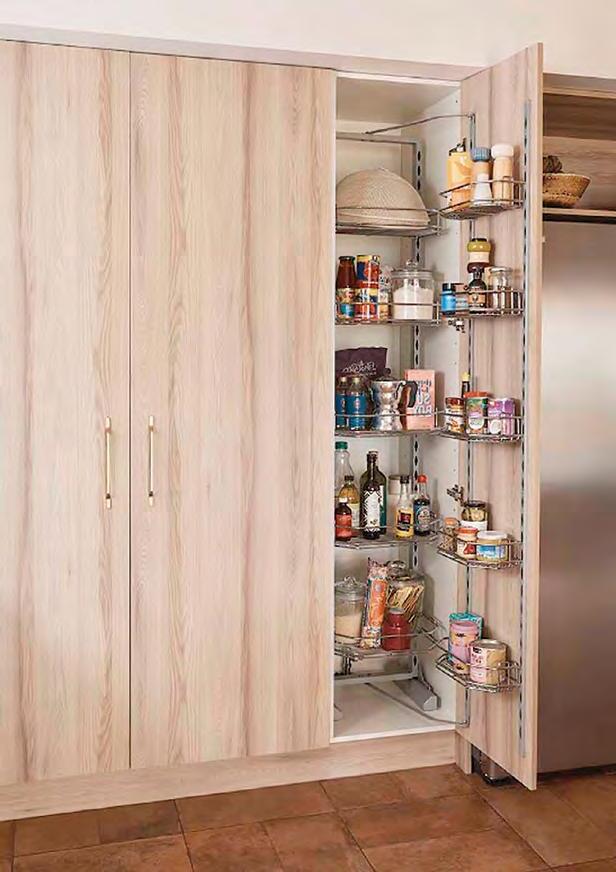
Improve pantry storage and organisation with adjustable racks that fit inside a cupboard and door. Kaboodle Kitchen 450mm 6 tier pantry pullout baskets in Chrome, $565.13, I/N: 2667708† (five tiers used)
Tighten loose seats
A loose quick-release toilet seat can be fixed in a flash.
“Wearing gloves, push the hinge release buttons at the back of the toilet seat to remove it,” explains Natasha. “Use a small flathead screwdriver to pry the metal fixing caps off the plastic discs underneath, then put the seat back in position to hold the pins while tightening the screws. Lift off the seat again to clip on the caps, then reinstall. When you hear the hinges click into place, the job’s done.”
Stop the drops
Fixing a tap with an annoying drip can take a mere 15 minutes once you have the right parts. “Generally, the cause is worn parts like the washer, O-ring or jumper valve. Before getting started, check with the manufacturer or local authority if you’re permitted to repair yourself, or need to call in a licensed plumber,” says Natasha. “If it’s a DIY job, make note of the product and pick up a ready-to-go repair kit.” To get started, ensure the water is turned off at the mains, then turn the tap on. Disassemble by removing the handle, flange, then spindle using an adjustable spanner. Replace the worn parts with new ones and reassemble.
Keep in mind…
n Before undertaking any DIY activity, be sure you have the necessary skills, use the correct tools and wear the appropriate safety equipment.
n All professional plumbing work must be carried out by a licensed plumber.
n Before drilling into walls, use a stud finder to check for wiring or pipework, and turn off the power before working. If unsure, call a professional.
n Follow product packaging instructions for accurate dilution of strong cleaning solutions. Wear a mask and gloves for serious cleaning tasks and store out of reach of children and pets.
n Use the right ladder for the job, make sure it has non-slip feet and is set up on a flat, stable and solid surface. Wear sturdy footwear, maintain three points of contact (for example, both feet and one hand) on it at all times and have another person nearby in case you need help. Use a ladder rest or gutter clamp instead of leaning the ladder directly on guttering.
n Wear gloves and a mask when handling mulch.
4
“The cause of pantry chaos is often inadequate storage, with no systems in place to categorise the contents”
Bonnie Black, professional organiser 5
54 bunnings.co.nz | bunningsnz | bunnings
Fill the dings
If your home’s walls have succumbed to holes from picture hooks or door handle-inflicted gouges, grab a fast fix off the shelf. “For small holes, mini kits have everything you need to sand, smooth in filler and scrape away the excess,” explains Natasha Dickins. “The longest part of the process is the 30-minute drying time.” For larger holes, Natasha recommends using a suitably sized self-adhesive patch with a multipurpose joint compound. “Once the final filler coat has been sanded, repaint the area,” she adds.

Give timber TLC
Patchy colouring, fading, flaking and peeling are tell-tale signs your exterior timber needs attention. Oiling a deck or outdoor furniture is a job that can be knocked over in a day, but give yourself a weekend so you can take your time prepping the surface and allow generous drying time between coats. Brenna Mathews of Cabot’s says cleaning is a vital first step. “Without removing surface contaminants like dirt, mould and oil, timber can struggle to absorb a new coating and continue to discolour, so give the surface a good sweep and use a specifically formulated cleaner,” she says.


7 8 9 10
silicone, $19.93/100g, I/N: 1210586. 2


1 Selleys ‘Ezi Press’ wet

long handle deck scrub brush, $16.90, I/N: 4460246. 3 Inabox ‘Shoe Box’ 36cm x 27cm x 18cm stackable storage container, in White, $9, I/N: 0353063. 4 Ezy Storage ‘Brickor’ storage basket in White, $5.94/ large, I/N: 2583805. 5 Cabot’s ‘Deck Clean’ exterior timber cleaner, $20.88/1L, I/N: 0302443. 6 Hyde ‘Better Finish’ 100mm wall repair patch kit, $24.98, I/N: 0121658. 7 Selleys silicone remover, $37.75/375g, I/N: 0340602. 8 Inabox ‘Twin Vertical’ 34cm x 27cm x 14cm stackable drawer, $17, I/N: 0353066. 9 Stanley 150mm adjustable wrench, $17.99, I/N: 0525479. 10 Fix-A-Tap ‘Delaware’ 13mm tap repair kit, $10.07/pack of 2, I/N: 0143789. Some products are not available at all Bunnings stores, but may be ordered.


4
3
SHOP
5 6
2
1
area
Oates
6 7
Invest in a long-handled deck scrub brush to make short work of cleaning your outdoor room’s floor
bunnings | bunningsnz | bunnings.co.nz 55 Photography Cabot’s. †Available to order at the Special Orders Desk. Bonnie Black: littlemissorganised.com.au.
“Thoroughly stir your decking oil and, if bubbles appear, wait for them to settle before applying the product in the direction of the wood grain” Brenna Mathews, Cabot’s
De-hassle hoses


Problem hose connections sap the joy from gardening. Georgia Liversage at Holman says common issues include blow-offs due to loosely attached fittings or low-quality connectors that can’t grip to the hose. Hand-tighten the connector to ensure it’s closely threaded but, if that doesn’t work, opt for high-quality connectors that have a separate compression ring. To straighten out a kinked hose, Georgia’s tip is to stretch it out in the sun for a few hours. “Allow it to fully cool before wrapping it in a figure-8 shape to prevent kinks,” she says. “Or switch to a retractable hose reel.”
ABOVE Scooping debris from gutters takes only a few minutes, but helps prevent moisture damage and improve fire safety

Clear gutters
Although easy to ignore, clearing gutters is a good home-maintenance habit. Work around the perimeter on a sturdy, level ladder and scoop out leaves into a bucket. To prevent leaf build-up and lessen upkeep, consider installing gutter guards.


Mulch beds


Spending a few hours topping garden beds with mulch is a rewarding job with long-lasting benefits. Doing this provides organic matter, which enriches the soil, helps lock in moisture and suppresses weeds to create a lower-maintenance garden. Good options include pea straw and lucerne mulch and bark-based varieties such as pine, cypress and hardwood. Before adding mulch, make sure to water the ground first. Next, spread the mulch 5-7cm thick and water in well so it settles.
1 Cyclone gutter cleaning tool, $12.98, I/N: 0898465. 2 Nylex retractable hose reel, $168/20m, I/N: 0130863. 3 Nylex 12mm brass sprinkler adaptor, $9.88, I/N: 0098684. 4 Whites ‘StayMesh’ 160mm mesh gutter kit with clips, $11.50/6m, I/N: 3040319. 5 Daltons coloured bark mulch in Black, $10.89/40L, I/N: 0242161. 6 Daltons ‘Number 3’ bark mini chip, $10.69/40L, I/N: 0253407. 7 Holman ‘Combo’ 12mm hose end trigger guns, $18.02/set of 2, I/N: 0246065. Some products are not available at all Bunnings stores, but may be ordered.


Scan the QR code

Follow these tips for scraping out old bathroom silicone: bunnings. co.nz/removing-silicone

2 SHOP 1
6 4 5 3
Watch it!
10 8 9
“Ill-fitting sprinkler adaptor ends can cause blow-offs and leaks if the O-ring isn’t watertight”
Georgia Liversage, Holman
7 56 bunnings.co.nz | bunningsnz | bunnings Photography
A layer of mulch looks great and can reduce weeding and watering
Getty Images.

NEW MOULD Selleys Wet Area
Soaking hot
THEY’RE OFTEN THE STAR OF A BATHROOM – SO HERE’S HOW TO FIND A TUB THAT PLAYS THE ROLE PERFECTLY
 Words by DONNA FLEMING
58 bunnings.co.nz | bunningsnz | bunnings
A wall recess provides excellent storage alongside a freestanding tub
Being the centrepiece of many bathrooms, baths need to not only look good, but be functional and practical. With an array of shapes, styles and materials available, there’s a lot to consider before buying. Here are some tips on how to choose the ideal soaker.
Space considerations
You may love the idea of a luxurious spa-like freestanding bath, but interior designer Shannon Pepper of Shannon Pepper Design (spdesign.co.nz), who specialises in bathroom design, says this may not be the tub for you if your bathroom is compact. “A back-towall bath or an inset one would be a better option in that case,” she

advises. Luke Di Michiel, industrial designer at Caroma, agrees it’s crucial to balance the size of your bathroom with your choice of bath. “That will mean less chance of the bathtub impacting the traffic and flow to the basin, shower or toilet,” he says.
Soak ing style
If you love indulgent soaks and space is not an issue, a freestanding bath could be best. Or check out the Caroma Newbury inset bath that comes with an optional head and backrest.
If your tub is primarily practical – for example, getting kids clean – an inset bath fits the bill. Their design means they have a ledge that’s ideal for keeping shampoos and soaps handy, which freestanding baths don’t have.
TUB TYPES
There are three main bath styles to choose from
Freestanding baths
Deep, freestanding baths in striking shapes – rectangular, oval and slipper-style – have grown increasingly popular because they make a strong design statement. The Caroma ‘Contura’ (above) creates a striking focal point. However, due to their generous dimensions, they need plenty of room, says Luke. “Bear in mind freestanding baths need space around them so you can fit a mop or vacuum cleaner,” he says.
Inset baths
Also known as built-in baths, these are fitted flush against a wall, enclosed by a customised surround. “If you’re restricted when it comes to space then it is better to go with this because they take up less room,” says Shannon. Baths like the Estilo acrylic bath tub are great if you don’t have enough room for a separate shower and bath. Its edge is designed to redirect spray run-off from the shower back into the bath.
Back-to-wall (D-shaped) baths
These models are a blend of inset and freestanding baths. “For those who love the look of a freestanding bath, but don’t have the space in the bathroom, a solution is a D-shaped tub that looks like it is freestanding from the front but actually sits flush against the wall,” says Luke. “This saves space and also means you don’t need to clean behind it.” In addition, their design means these can be easier to plumb.


“Don’t be shy about testing out the tub you’re thinking about buying. Climbing inside and lying down will show you how comfortable it is, and also if there are any issues getting in and out of it”
Luke Di Michiel, Caroma
Caroma ‘Contura’ 1700mm freestanding bath in White, $3,977, I/N: 0302914†
Bath, for similar try Estilo 1675mm x 700mm x 420mm drop in bathtub, $231, I/N: 4821915
bunnings | bunningsnz | bunnings.co.nz 59 Photography Caroma; Clearlite Bathrooms; (opposite page) Larnie Nicolson, styling Sam van Kan. Some photographs feature products from suppliers other than Bunnings. †Available to order at the Special Orders Desk. UPDATE IT BATHROOM HEROES
Bath, for similar try Caroma ‘Cube’ 1600mm freestanding back to wall bath in White, $2,321.70. I/N: 4821433†. Some products are not available at all Bunnings stores, but may be ordered
For freestanding baths, you’ll need either a removable shelf or caddy that sits across the tub to place accessories on, or room for a stool or table within easy reach.
“The other option is putting shelves on the wall that can be reached from the bath, or a niche into the wall,” suggests Shannon Pepper. “But there can be issues – for example, if you are renovating an old home, you may not be able to put a recess in the wall because plumbing is there, or there’s a lintel under a window.”
If your bath is likely to be used by more than one person at a time, choose a model with a central wastewater outlet, so one person doesn’t end up perched on the plug.
Plumbing options

This is crucial if you are renovating – your existing plumbing may not be easily compatible with the type of bath you want. Inset baths are much easier to plumb in as they sit against the wall and their pipework is hidden behind the surround.

For freestanding baths, you need to consider the tapware and wastewater location. “Freestanding baths generally require the installation of a freestanding bath filler, which needs specialised floor mounting and water supply access via the floor,” says Luke Di Michiel. “This might not be possible for all installations.”


Materials matter
Most baths tend to be made from acrylic, which Luke notes is usually cheaper and lighter than alternative materials and has good heatretention properties. Solid surface baths – with a smooth, seamless, non-porous finish made from engineered composite materials such as natural minerals and resin – are also popular. These have a matte finish and are often thinner, says Shannon. “They might only be 12mm thick all round whereas acrylic is generally a lot thicker.”


1 Caroma ‘Titan’ stainless steel bath/shower mixer, $379, I/N: 5002690†. 2 Caroma ‘Newbury’ 1670mm bath in White, $642, I/N: 0111713†. 3 Caroma ‘Cupid’ freestanding bath, $2,178.90, I/N: 0306415†. 4 Kinetic 40mm bath plug and waste with flange, $29.02, I/N: 0302925. 5 Greens ‘Penny’ shower/bath mixer with diverter in Gun Metal, $258, I/N: 0208027†. 6 Mondella ‘Rumba’ bath spout in Matte Black, $90.23, I/N: 0134836†. 7 Caroma ‘Classic’ 1700mm oval bath in White, $598, I/N: 0931067†. 8 Foreno ‘E-Steel’ minimal bath spout in Brushed Stainless Steel, $212.93, I/N: 0231305. 9 Stylus ‘Origin’ 1550mm freestanding bath in White, $1,239, I/N: 0325579†. 10 Estilo 1500mm x 700mm x 410mm acrylic bath tub in White, $230, I/N: 4821916. 11 Clearlite Bathrooms ‘Dina Shub’ 1200mm x 820mm x 420mm bath in White, $677, I/N: 0612534†. 12 Argent 210mm bath spout in Brushed Gold, $149, I/N: 0206667†. 13 Caroma 1600mm back to wall freestanding cube bath in White, $2,321.70, I/N: 4821433†. 14 Foreno open bath spout in Chrome, $192.60, I/N: 0315438†. 15 Caroma ‘Noir’ 1700mm freestanding bath in Black and White, $2,749, I/N: 4821438. Some products are not available at all Bunnings stores, but may be ordered. All professional plumbing work must be carried out by a licensed tradesperson.


4 5 6 3 2 7 8 9 10 11 12 13 14 15 SHOP 1
60 bunnings.co.nz | bunningsnz | bunnings †Available to order at the Special Orders Desk.
Warm welcome
Create the bathroom of your dreams with a sleek three-in-one-solution


Fill your pamper palace with light and warmth while quickly clearing the air thanks to the award-winning IXL Tastic Ovation Whether you need a haven for unwinding after a hard day or you’re aiming to increase your home’s value, the bathroom is one space you have to get right. This means adding features that are stylish, while also being super-functional and eco-friendly. Seems like a tall order? Luckily the IXL Tastic Ovation ticks all these boxes. Made and designed in Australia, this brilliant bathroom essential triumphed in the Australian Brand Awards 2021 by winning the ABA100 award for product innovation. Perfect for 5-star energy rated homes in New Zealand, it complies with G4 building codes and NZ’s Healthy Home Standard for bathrooms and kitchens.
HEAT OF THE MOMENT
Bask in the glow of instant warmth thanks to revolutionary Halo Heat™ technology, which makes you feel toasty and wonderful the second
The IXL Tastic Ovation’s contemporary look is as sophisticated as its design
you switch it on. The 800W heat lamp and exhaust fan are covered by a two-year replacement warranty, while the unit itself is backed by a five-year in-home warranty.

SHINING EXAMPLE
Brighten your life with the IXL Tastic Ovation’s 4000K cool white LED lighting, frosted to diffuse gently through your bathroom while providing generous illumination for applying make-up or shaving.

CLEAR WINNER
Billowing steam is banished effortlessly, thanks to a powerful side-ducted centrifugal fan. An inclined outlet optimises ducting and makes installing the IXL Tastic Ovation a breeze. It also features a self-sealing backdraught stopper – which not only helps keep out pests aiming to intrude, but protects you from cold air flowing back into your bathroom.
To find out more about the IXL Tastic ‘Ovation’, go to ixlappliances. co.nz or scan the QR code.

Some products are not available at all Bunnings stores, but may be ordered. Any hardwired electrical fixtures must be installed by a licensed electrician.
Advertising promotion
IXL Tastic ‘Ovation’ 3 in 1 bathroom heater, exhaust fan and light, $589, I/N: 0251870
@ixlappliances @IXLappliances
CIRCULAR SAW


IN OUR NEW SERIES, WE SHOWCASE THE ITEMS YOU NEED IN YOUR TOOLBOX. IN THIS ISSUE, WE DISCOVER THE TRUE CAPABILITIES OF THIS POWERFUL AND VERSATILE DIY MUST-HAVE
Words GUN ARVIDSSEN
Stock your workshop with a few power essentials, and you’ll never be at a loose end when you need to repair or upgrade something. Whether you’re planning to cut decking, build furniture or take on a project such as a pergola, a circular saw is the perfect tool.
Cutting edge
Most mains-powered saws for DIYers are in the 184mm class – they take a 184mm-diameter blade. Some specialised saws, such as Ozito’s plunge track saw kit, use a different-size blade (165mm), while larger units – used by tradies – are fitted with a 235mm blade. Cordless circular saws popularly use 165mm blades, but some have smaller blades as well as 184mm blades. Many saws have a maximum (or
no-load) speed of 4000-5800rpm (revolutions per minute). However, a larger blade circumference means the cutting edge travels more quickly relative to what you’re cutting, so high-diameter blades tend to remove more material smoothly and swiftly.
Blades are made from hardened steel, with tungsten carbide teeth. A higher tooth count of around 60 teeth gives the cut edge a smoother finish. However, it takes longer to cut through than a general-purpose 24-tooth blade. Specialised blades for cutting metal and fibre cement sheet can also be fitted by tradies and expert DIYers. When changing the blade, Bunnings power tools buyer Mike Jaggs says to put safety first. “The number one rule is to remove the power source,” he says. “Unplug the unit or remove the battery.
Ensure you follow the manual and check out the many videos online. Finally, new blades can be sharp, so it pays to wear gloves during removal and installation.”
Power and glory
Corded circular saws vary in power from 1200W to 2050W. Unless you plan to do lots of cutting at maximum depth through thick hardwood, a saw in the 1200-1500W range should be sufficient.
Brushless technology means some high-end cordless saws can operate at similar power levels to 1800W corded saws. But generally, cordless saws are more for portability than to tackle long cuts through thick, hard timber.

Accessorise in style

SHOP
2 3 1
Mains-powered saws are loud, so invest in earmuffs – some feature bluetooth so you can enjoy music while working. Protect your eyes with safety glasses or goggles, and plug in a portable vacuum to suck up most of the sawdust your tool creates. Even small amounts of fine airborne particles – especially from cutting materials such as particleboard, MDF or melamine – can be harmful to your health, so wear a dust mask, too. 4 5 6
1 Makita 18V 165mm brushless circular saw, $378/skin only (battery and charger sold separately), I/N: 6240314.

2 3M ‘WorkTunes’ bluetooth ear muffs, $117.30, I/N: 0095130. 3 AEG ‘Fusion’ 18V 184mm circular saw, $408/skin only, I/N: 0317131. 4 Irwin 184mm 60T circular saw blade, $43.98, I/N: 0172626. 5 Diablo ‘Steel Demon’ 165mm 48T ferrous metals circular saw blade, $73, I/N: 6370900. 6 Tactix P2 respirator, $49.98/pack of 20, IN: 0380437.

Keep
in mind…
n When using power tools, always wear the recommended safety gear.
n Before starting any DIY activity with power tools, make sure you have the appropriate skills for the task at hand and use the correct tools for the job.
DO IT WORKSHOP KIT Ozito
TALK ESSENT I AL GUIDETool
165mm 1200W plunge track saw kit, $349, I/N: 6290615
62 bunnings.co.nz | bunningsnz | bunnings
Total control


There’s no need to be intimidated by all the levers and guides on your saw’s baseplate – as soon as you learn what they all do, you’ll be rocking them like a pro!


The cut-depth control moves the baseplate higher or lower relative to the body of the saw, allowing a greater or lesser section of the blade to penetrate the piece that you’re cutting.


Andrew Murray at Ozito says to set the depth so one or two teeth on the blade will cut through the other side of your timber. “This will ensure the maximum amount of teeth on the blade are inside your cut while cutting, and give you the result and finish you will be most happy with.”
The tilt control allows you to make bevelled cuts at angles up to 45° off the vertical. This lets you cut mitred edges on framing or cladding, as well as creating specialised wall fixings called split battens.


Your saw will also come with an accessory called a rip fence. “A rip cut is a cut you make that is long and straight, often along the grain of a length of timber,” says Andrew. “It is not limited to a circular saw, however, it is a very common application for this particular tool.” The rip fence locks into the baseplate of your saw, and can be adjusted to guide the blade parallel with the edge of the material it is cutting.

“A rip fence makes it easy to cut long, straight lengths repeatedly, and create the widths of timber or other timber-like material (such as plywood) you need for your project,” says Andrew.


ABOVE Ryobi ‘ONE+’


18V HP brushless circular saw, $299/ skin only (battery and charger sold separately), I/N: 0291681.


Ozito ‘PXC’ 18V 165mm circular saw, $139/skin only, I/N: 0033141. Some products are not available at all Bunnings stores, but may be ordered.

CUT-DEPTH CONTROL
CONTROL
TILT
RIP FENCE
Rust-Oleum Trade ANZ For additional project inspiration & application tips visit www.rustoleum.co.nz/zinsser


VROOM FOR IMPROVEMENT
GIVE YOUR GARAGE DOORS SOME TLC AND THEY'LL WORK HARDER AND SMARTER


Projects and photography NATASHA DICKINS
CHANGE THE WEATHER SEAL
Garage doors tend to take up a big percentage of a home’s facade, so it’s worth keeping them maintained – not just for looks, but to ensure they work smoothly and efficiently, too.
Get your metal roller or sectional door looking and working like new with these simple repairs that can be done in one weekend, from the replacement of the weather seal along the bottom edge to installing a new 'smart' automated door opener.

The hardworking piece of rubber along the base of a garage door eventually deteriorates, but it only costs a few dollars to replace. Before you buy a replacement weather seal, make a note of your door brand, the width and how the seal folds into the track. Also check you have the correct drill bit for the screws that attach the side door guides to the wall.
Tools & materials
n Safety equipment (gloves and eye protection)

n Tape measure
n Drill with 8mm (5/16") nut driver

n Screwdriver
n Scraper
n Utility knife
n Barbecue wipes
n Silicone spray
n Garage door weather seal
1 Open the door fully and, on the side with the most space, use a drill with an appropriate bit to remove the screws holding the guide on the wall and move it away. Use a screwdriver to remove the plastic cartridge or stopper on the metal track that holds the seal. Tip: We needed an 8mm nut driver for these screws.
2 Wear gloves to slide the old weather seal along the metal track to remove it completely. Run a scraper into the recesses and along the base to remove all debris, then clean with barbecue wipes. Tip: Change an automated door to manual via the switch or lever on the side before opening it by hand to remove the seal.

3 Lubricate the track by using the attached straw to spray silicone into the recesses. Feed the new seal into the two track recesses. Tip: Enlist another pair of hands to help feed in the new seal while you pull it along, to help prevent it from slipping out while avoiding stretching the rubber.
4 Pull the seal through and trim with a short overhang on the ends to allow for shrinkage, then replace the cartridge or stopper. Push the door to fully open and reposition the guide on the door, reinstalling the screws in the existing wall holes. Tip: Use a sharp knife to avoid agitating the seal out of the track when cutting.
N A TASHA DICKINS bunnings | bunningsnz | bunnings.co.nz 65 DO IT GARAGE MAKEOVER
INSTALL A DOOR OPENER


Convert a manual-lift roller door into one that opens automatically via a smartphone but, before installing, check there is at least 95mm clearance from the side of the roller to the wall and a power point. You’ll need an opener and connectivity kit, and two ladders. Make sure you also read the manufacturer’s safety recommendations. Follow these steps to install it yourself or visit the Service Desk‡ and arrange for Bunnings to do this for you.
Keep in mind…
n Garage doors attract creepy crawlies, so guard against them by wearing gloves and closed footwear.
n Always wear a mask and eye protection while cleaning.
n Use the right ladder for the job, make sure it has non-slip feet and is set up on a flat, stable and solid surface. Maintain three points of contact (for example both feet and one hand) on it and make sure another person is nearby. Never stand on the top rung.


n Don’t allow people or pets to walk under the open garage door while working on it.
Tools & materials
n Safety equipment (gloves, ear and eye protection)

n Tape measure
n Small shifting spanner

n Drill with 8mm nut driver and 5.5mm bit
n Two ladders
n Tie-down strap

n Drop sheet
n 13mm socket

n Screwdriver
n Garage door opener and smart connectivity kit

n Felt-tip pen
n 40mm timber offcut
1 Disable the locks and manually check the door opens smoothly. To begin installation, on the opposite side to where the opener will go, clip the supplied stop collar over the axle, against the drum, and tighten with a small shifting spanner.


2 To pin the door and prevent it from ballooning upwards when it moves, close it fully then lift by half a turn to secure supplied self-tapping metal screws into the ends, about 50mm in and through the drum behind, using a drill with an 8mm nut driver. Tip: Work from inside the garage on a stable ladder.
3 Knot the red rope through the cable loop at the side. Pull the cord to hear a click and check the legs turn freely. If your opener is on the left of the door, follow the instructions to change it from the factory-set right opening. Tip: After installation, adjust the rope to be 1800mm above the floor.
4 Open the door and secure a tie-down strap around the rolled drum. Position a ladder underneath with a folded drop sheet on top. Mark the position of the nuts before removing the U bolt from the wall bracket with a 13mm socket. Lift the axle to move the rolled drum onto the ladder and remove the bracket.
5 Slide the opener over the fork to straddle the spokes in the drum. Replace the wall bracket and lift the door back into position. Place the supplied clamp over the axle and through the bracket to tighten the screws over the marks with a 13mm socket. Remove the strap and ladder.

6 Measure halfway along the base of the door and use the weight bar as a template to drill holes with a 5.5mm bit, securing it with supplied bolts using a screwdriver and spanner. Add the warning labels, plug in the opener and follow instructions to set the door-opening limits, testing with a timber offcut.
7 To install connectivity kit sensors, position supplied mounting brackets inside either side of door, the same distance up from the floor, no higher than 100mm, and secure with appropriate screws. Check the eyes of the sensors face each other and the invisible beam between them is unobstructed.
8 Unplug the door opener before running sensor cables to the control panel using supplied self-adhesive cable mounts to hold them against the wall. Remove the access panel of the opener to connect the wires. Plug in the router and opener, then download the app to pair the door to your devices.
1 Grunt 25mm pull tie down strap, $8.95/4m, I/N: 4310166. 2 Chamberlain ‘MyQ’ connectivity kit for smart garage door opener, $158, I/N: 0133221. 3 Stanley 150mm adjustable wrench, $17.99, I/N: 0525479. 4 Chamberlain ‘RollerLift Plus’ roller garage door opener, $569.75, I/N: 0133220*. 5 Gorilla 150kg 6 step double sided ladder, $258, I/N: 0381589. Some
TOOLKIT
1 2 DIY
5
43
products are not available at all Bunnings stores, but may be ordered.
‡Not all services
*This product
a coin/cell
children. 66 bunnings.co.nz | bunningsnz | bunnings
A smart garage door opener adds an extra level of security to your home
are available in all stores; conditions apply.
uses
battery. Keep out of reach of


UPCYCLED BEDSIDE
THREE OF A KIND
ANY OF THESE COOL PIECES CAN BE MADE OVER IN A SINGLE WEEKEND
Photography MICHELLE HOLDEN
Styling SAMANTHA POINTON
Looking for an easy decor update you can create yourself? Use this weekend wisely by doing something gorgeous for your home: take your bedroom styling up a notch with a clever transformation of an ordinary bedside cabinet; sand back that dated coffee table and treat it to an on-trend Danish oil finish or give a boring, flush door a colourful makeover using moulding to mimic expensive panelled carpentry. Weekend sorted!


REVIVED TIMBER TABLE FAUX-PANEL DOOR

DO IT STYLE FIXES
Replace tired old varnish with a fresh Scandi finish
Give a boudoir basic a creative makeover
Take a plain, budget door from flush to flash!
bunnings | bunningsnz | bunnings.co.nz 69
Painted wallpaper
UPCYCLED BEDSIDE
For our contemporary makeover of this dated but otherwise sound bedside cabinet, we chose a super-tactile look: chalky matte paint over primer formulated for glossy surfaces, textured paintable wallpaper and chic leather and brass pulls.
Tools & materials
n Safety equipment (mask, ear and eye protection and disposable gloves)
n Drop sheet
n Screwdriver
n Scraper
n Orbital sander with 120-grit abrasive disc
n Microfibre cloth
n Paint stirrer

n 50mm angled brush
n Mini microfibre roller with spare covers
n Mini tray with disposable liners
n Pencil and tape measure
n Scissors
n Drill with 4mm bit
n Spanner
n Combination pliers
n Preloved bedside cabinet
n Timber filler
n 180-grit abrasive paper with sanding block
n Three-in-one primer
n Ultra-matte chalk paint
n Paintable textured wallpaper
n Low-sheen interior paint
n Leather handles with supplied fasteners
1 Working in a well-ventilated area, set out a drop sheet and place the bedside cabinet on top. Take out the drawers and remove the handles with a screwdriver. Use a scraper to smooth over the handle holes with timber filler, leaving to dry. Sand with 180-grit abrasive paper to remove excess.


2 On the outside of the cabinet, use an orbital sander with a 120-grit abrasive disc to smooth over larger, flat areas. Next, smooth all over using 180-grit abrasive paper with a sanding block. Tip: There’s no need to completely remove the finish, you just need to create a ‘key’ for the primer.
3 Wipe away any dust with a damp microfibre cloth. Stir three-in-one primer for about five minutes, then apply using an angled brush along the edge profiles and corners, and a mini microfibre roller for the larger, flat areas. Leave to dry thoroughly.
4 Stir the chalk paint well and, in the same way as the primer, apply two coats to the outside of the cabinet, leaving to dry thoroughly after each coat. Tip: We used a chalk-effect paint, which has good coverage and a durable, scratch-resistant surface.


5 With the wallpaper facing right-side down, mark around the drawer fronts with a pencil, adding clearance on all sides. Cut with scissors. Tip: For the clearance, add 10mm to the thickness of the drawer front, which is usually about 20mm. Cut the corners with 45° angles to easily fit around the edges.
6 Spray contact adhesive over the front and sides of the drawer fronts, as well as the underside of the wallpaper. Leave the adhesive to become touch-dry according to the pack instructions. When ready, position the paper, folding the sides over the drawer-front edges. Press to hold.


7 Stir hard-wearing, low-sheen paint thoroughly, then use a clean brush to apply two coats over the wallpaper covering the drawer fronts, leaving to dry after each coat. Tip: To give the wallpaper a woven rattan or linen look, choose a creamy beige tone (we used Dulux Mt Maunganui).
8 Mark the centre of the drawer fronts, 40mm down from the top, and drill right through with a 4mm bit. Check the depth of the drawer front against the handles’ supplied snap-off screws and adjust to fit with a spanner and combination pliers. Screw in the handles and replace the drawers.
70 bunnings.co.nz | bunningsnz | bunnings
†Available
Project editing Natasha Dickins. Styling assistants Katie Turner and Rebecca Waldron. Some photographs feature products from suppliers other than Bunnings. Paint colours may vary on application.
to order at the Special Orders Desk.
REVIVED TIMBER TABLE
Transform an unloved old coffee table into a stylish centrepiece – all it takes is some patient sanding and a couple of coats of furniture oil.

Tools & materials
n Safety equipment (disposable gloves, mask, ear and eye protection)
n Drop sheet
n Orbital sander
n Palm sander
n Cloths
n Paint stirrer
n Preloved coffee table
n 80-, 120- and 180-grit abrasive discs

n 120-, 180- and 240-grit abrasive paper with sanding block
n Furniture oil
1 Dulux ‘Wash&Wear’ low sheen interior paint in Vivid White, I/N: 1370156.


2 Rust-Oleum ‘Chalked’ ultra matt paint in Charcoal, $49.49/887ml, I/N: 1580861.


3 Superfresco Easy ‘Monaco’ paintable wallpaper sample, $6/0.5m, I/N: 0167767†. 4 Lane 128mm leather handle in Tan, $36.95/pack of 2, I/N: 4224040.
5 Ryobi 300W random orbital sander, $99, I/N: 0261603.


6 Ozito 230W random orbital sander, $44, I/N: 0316335.

7 Feast Watson ‘Scandinavian Oil’ interior timber oil, $59/1L, I/N: 1570426. 8 Ryobi 100W palm sander, $89, I/N: 6210776. Some products are not available at all Bunnings stores, but may be ordered.
Scan the QR code
Be amazed at how well it comes up: bunnings. co.nz/upcycled-bedside
1 Place the table on a drop sheet. Using an orbital sander for larger areas and a palm sander for smaller sections, smooth the table all over with an 80-grit disc to remove the bulk of any varnish. Remove remaining varnish with 120-grit discs. Hand-sand with 120-grit paper to clean around the trim and into the corners, lightly rounding over the edges.
2 Smooth all over using sanders with 180-grit discs. Hand-sand with 180-grit abrasive paper around the trim, into the corners and along the edges to remove potential splinters.
3 Using 240-grit abrasive paper with a hand-sanding block, continue to smooth all over, working in the direction of the wood grain for a silky finish, lightly rounding over the corners and edges. Wipe the entire table clean with a damp cloth to remove any dust.


Scan the QR code


Here’s another makeover to inspire you! bunnings.

co.nz/revived-timber-table
4 Stir the furniture oil well, but avoid shaking the can (which may create bubbles). Wearing gloves, apply the oil with a cloth, working in the direction of the wood grain and leaving to dry overnight. Tip: Turn the table upside down to work on the feet, legs and underside first, flipping it over to do the top last.
5 Lightly hand-sand all over with 240-grit abrasive paper, then wipe away dust with a damp cloth. Apply a second coat of oil with a clean cloth and leave to dry.

Watch it!
1
3 4
2 6 7 8
5 DIY TOOLKIT
bunnings | bunningsnz | bunnings.co.nz 71 Watch it!
FAUX-PANEL DOOR

Make an entrance by giving a plain internal door a classy new look with trim and paint. We’ve used half-round beading, but you can use moulding with a wider, more detailed profile. Cut the long sides first; if you make a mistake, they can be repurposed for shorter pieces. Most doors are in high-traffic areas, so choose a hard-wearing paint tinted in your favourite feature colour. Have permission to paint a door in your rental but not to remove and rehang it? Mask over the door hardware before painting in situ.

Tools & materials
n Safety equipment (mask, eye protection and gloves )
n Drop sheet
n Pair of sawhorses
n Tape measure and pencil
n Level
n Combination square
n Mitre box and handsaw
n Cloth
n 50mm angled paintbrush

n Mini microfibre roller and tray
n Flush internal door
n Half-round moulding•
n 180-grit abrasive paper with sanding block
n Construction adhesive with applicator


n Primer
n Semi-gloss water-based enamel paint (we used PPG Paints ‘Ultimate Enamel’ in Amazing Ada)
1 Haydn 110mm mini paint tray, $5.25, I/N: 0755836.
2 Dulux ‘1Step Prep’ primer, sealer and undercoat in White, I/N: 1370231. 3 Hume Pine ‘Pinetrim’ 18mm x 6mm untreated clear pine half round moulding, $5.22/2.4m, I/N: 0293524• 4 Irwin ‘Xpert’ 550mm 10 TPI fine handsaw, $38.99, I/N: 0171679. 5 Paint Partner 3.6m x 2.6m canvas drop sheet with PE back, $23.65, I/N: 1660308. 6 Monarch ‘All Purpose’ 50mm wall synthetic paintbrush, $13.49, I/N: 1660613.

7 PPG Paints ‘Ultimate Enamel’ semi gloss water based paint in White, $51.55/1L, I/N: 0171667. Some products are not available at all Bunnings stores, but may be ordered.


Scan the QR code

1 Lay a drop sheet over a pair of sawhorses, then place the door on this. Mark out the feature trim design with a tape measure and pencil, using a level as a straightedge. Tip: Check that the moulding won’t impede the handle or the door jamb.
2 Transfer the measurements onto lengths of moulding, using a combination square to mark the mitred ends. Tip: We set out three panels with 18mm x 6mm half-round fly beading, but you could choose any design and profile for the moulding.
3 Cut the moulding, long sides first, using a mitre box with a handsaw. Smooth the ends using 180-grit abrasive paper with a sanding block to remove any breakout. Tip: Secure the mitre box to your workbench with screws through existing holes in the base.

Now see how to revamp your home’s entry: bunnings.co.nz/ paint-a-front-door

Watch it!
4 Check that the moulding fits as you cut each piece. Once you’re happy with the moulding, fix it in position using construction adhesive, pressing each piece down firmly. Remove the excess adhesive with a damp cloth and leave to dry.


5 Apply primer, using an angled brush to cut in over and around the moulding and a mini roller over the rest of the surface of the door. Tip: We used a new door. If you’re using an existing door, remove the handle and hinges prior to priming and painting.
6 Apply two coats of waterbased enamel using an angled brush to cut in over and around the moulding and a mini roller over the rest of the surface of the door, leaving to dry after each. Reinstall the hardware or remove the masking tape and then hang the door.

Keep in mind...
n If using power tools, always wear the recommended safety gear and follow the manufacturer’s instructions for use.
n When painting or using aerosols like spray adhesive, work in a wellventilated area, wear a mask, eye protection and gloves, and protect surrounds with a drop sheet.
2 1 5 6 3 DIY TOOLKIT
4 7
72 bunnings.co.nz | bunningsnz | bunnings Project editing Natasha Dickins. Paint colours may vary on application. •Timbers vary by region; contact your local store for further information.


Fantastic foliage
Bring drama to your garden with striking forms and colours
Phormium

This green-and-pink varietal of our native harakeke (flax) comes with sunset-tinted edges. When combined with complementary colours, such as pink roses or red penstemons, it creates a pleasing palette. As it grows to 1.8m high, leave space for it to spread out, and prune dead leaves in winter.
Hen & chicken fern
Also known as mouku, this easy-togrow native fern with dense clumps of feathery fronds is an appealing feature plant for a moist, shady spot. Its graceful, arching leaves, which grow up to 1m long, also look lovely cascading from pots – either indoors or in the garden.

Canna hybrid
This sun-loving perennial has paddle-shaped green and gold leaves, and large, orange-speckled golden flowers. It can cope with a variety of conditions but may die back in cooler areas, in which case cover the rhizomes with mulch or pot in a warm spot, to be planted out after Labour weekend.
Tractor seat
Named for the shape of its glossy green leaves, Ligularia reniformis will grow into an attractive 1m x 1m clump, with yellow flowers on long stems in midsummer. It can cope with full sun or partial shade but can also handle a damp spot. Protect it from slugs and snails.
FOR MORE PLANTS, VISIT bunnings.co.nz/plants
Like all flaxes, this varietal is drought tolerant and will cope with most conditions.
Plant in a sheltered spot, protected from wind and sun, in well-drained, humus-rich soil.
At up to
this cultivar adds vertical impact and makes a statement planted en masse.
Its distinctive leaves provide instant interest, especially with contrasting plants.

 (Ligularia reniformis)
(Phormium ‘sundowner’)
(Asplenium bulbiferum)
(Canna ‘Tropicanna Gold’)
1.8m tall,
Tractor seat
Phormium
Hen & chicken fern
(Ligularia reniformis)
(Phormium ‘sundowner’)
(Asplenium bulbiferum)
(Canna ‘Tropicanna Gold’)
1.8m tall,
Tractor seat
Phormium
Hen & chicken fern
74 bunnings.co.nz | bunningsnz | bunnings
Canna hybrid
PLANTS LEAFY INTEREST
Words Rachel Clare. Photography (hen and chicken fern and tractor seat) Getty Images, (phormium and canna) Alamy Stock Photo.