Spot-clean only (washing machine not recommended). Put water and a small amount of laundry detergent in a bowl and use a cloth or microfiber to gently scrub the yarn. Let it air-dry (dryer not recommended). A lint roller works well to remove any dust and lint in between washings.
All rights reserved. No part of this work may be reproduced or used in any form or by any means — graphic, electronic, or mechanical, including photocopying or information storage and retrieval systems — without written permission from the publisher.
The scanning, uploading, and distribution of this book or any part thereof via the internet or any other means without the permission of the publisher is illegal and punishable by law. Please purchase only authorized editions and do not participate in or encourage the electronic piracy of copyrighted materials.
“Better Day Books,” the floral book logo, and “It’s a Good Day to Have a Better Day” are registered trademarks of Schiffer Publishing, Ltd.
“Schiffer,” “Schiffer Publishing, Ltd.,” and the pen and inkwell logo are registered trademarks of Schiffer Publishing, Ltd.
ISBN: 978-0-7643-7044-1
Published by Better Day Books, an imprint of Schiffer Publishing, Ltd.
Better Day Books
Email: hello@betterdaybooks.com Web: www.betterdaybooks.com Visit us on Instagram! @better_day_books
For our complete selection of fine books on this and related subjects, please visit our website at www.betterdaybooks.com. You may also write for a free catalog.
Better Day Books titles are available at special discounts for bulk purchases for sales promotions or premiums. Special editions, including personalized covers, corporate imprints, and excerpts, can be created in large quantities for special needs. For more information, contact the publisher.
VIDEO INSTRUCTIONS
If you want to follow along with a video showing how to make this project, you can watch at the link below! I highly recommend that you follow along with both the video and the written instructions.
https://showcasefk1.betterdaybooks.com
Password: JIG-89ZY62
WELCOME
Hello! Welcome to the Jiggle the Jellyfish Super Simple Finger Knitting Kit! I’m so glad that you picked up this kit and that you decided to give finger knitting a try (or to continue in your finger-knitting journey).
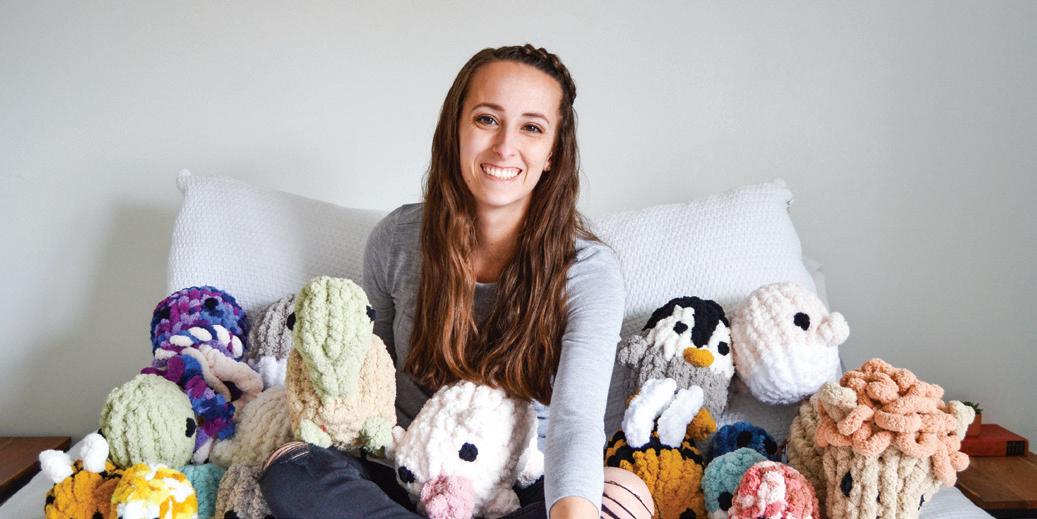
My name is Sabrina, I am the owner of Sab’s Stuffies, and I have a passion for teaching others how to finger-knit, especially complete beginners. I started my journey back in 2019, when I made my very first chunky-knit blanket. Although this first blanket didn’t turn out great, I was still so proud of it and what I had accomplished. I had learned a new skill, and I didn’t want to stop there.
Fast-forward to the summer of 2021, when I started figuring out how to make stuffies. I loved designing them and coming up with new patterns. Once I realized that so many other people were interested in learning how to make them too, I decided to try creating video tutorials to teach people how to make my stuffies! I haven’t looked back since, and it has given me a new purpose in my business.
I hope you enjoy making Jiggle the Jellyfish. Happy knitting!
Sabrina-Rose
BEFORE YOU BEGIN
Make sure you grab a tape measure or ruler before you start knitting! It’s easy to accidentally overestimate or underestimate the sizes of your loops and yarn lengths, which can ultimately throw off your finished result.
Also, if you’re a beginner in finger knitting, try to make your loops and stitches small and tight. Beginners can sometimes make things too big and loose because they are trying to make sure they can see what they’re doing, but if you do this, your jellyfish may end up much bigger than mine, and there’s a risk that the fiberfill will escape from inside.
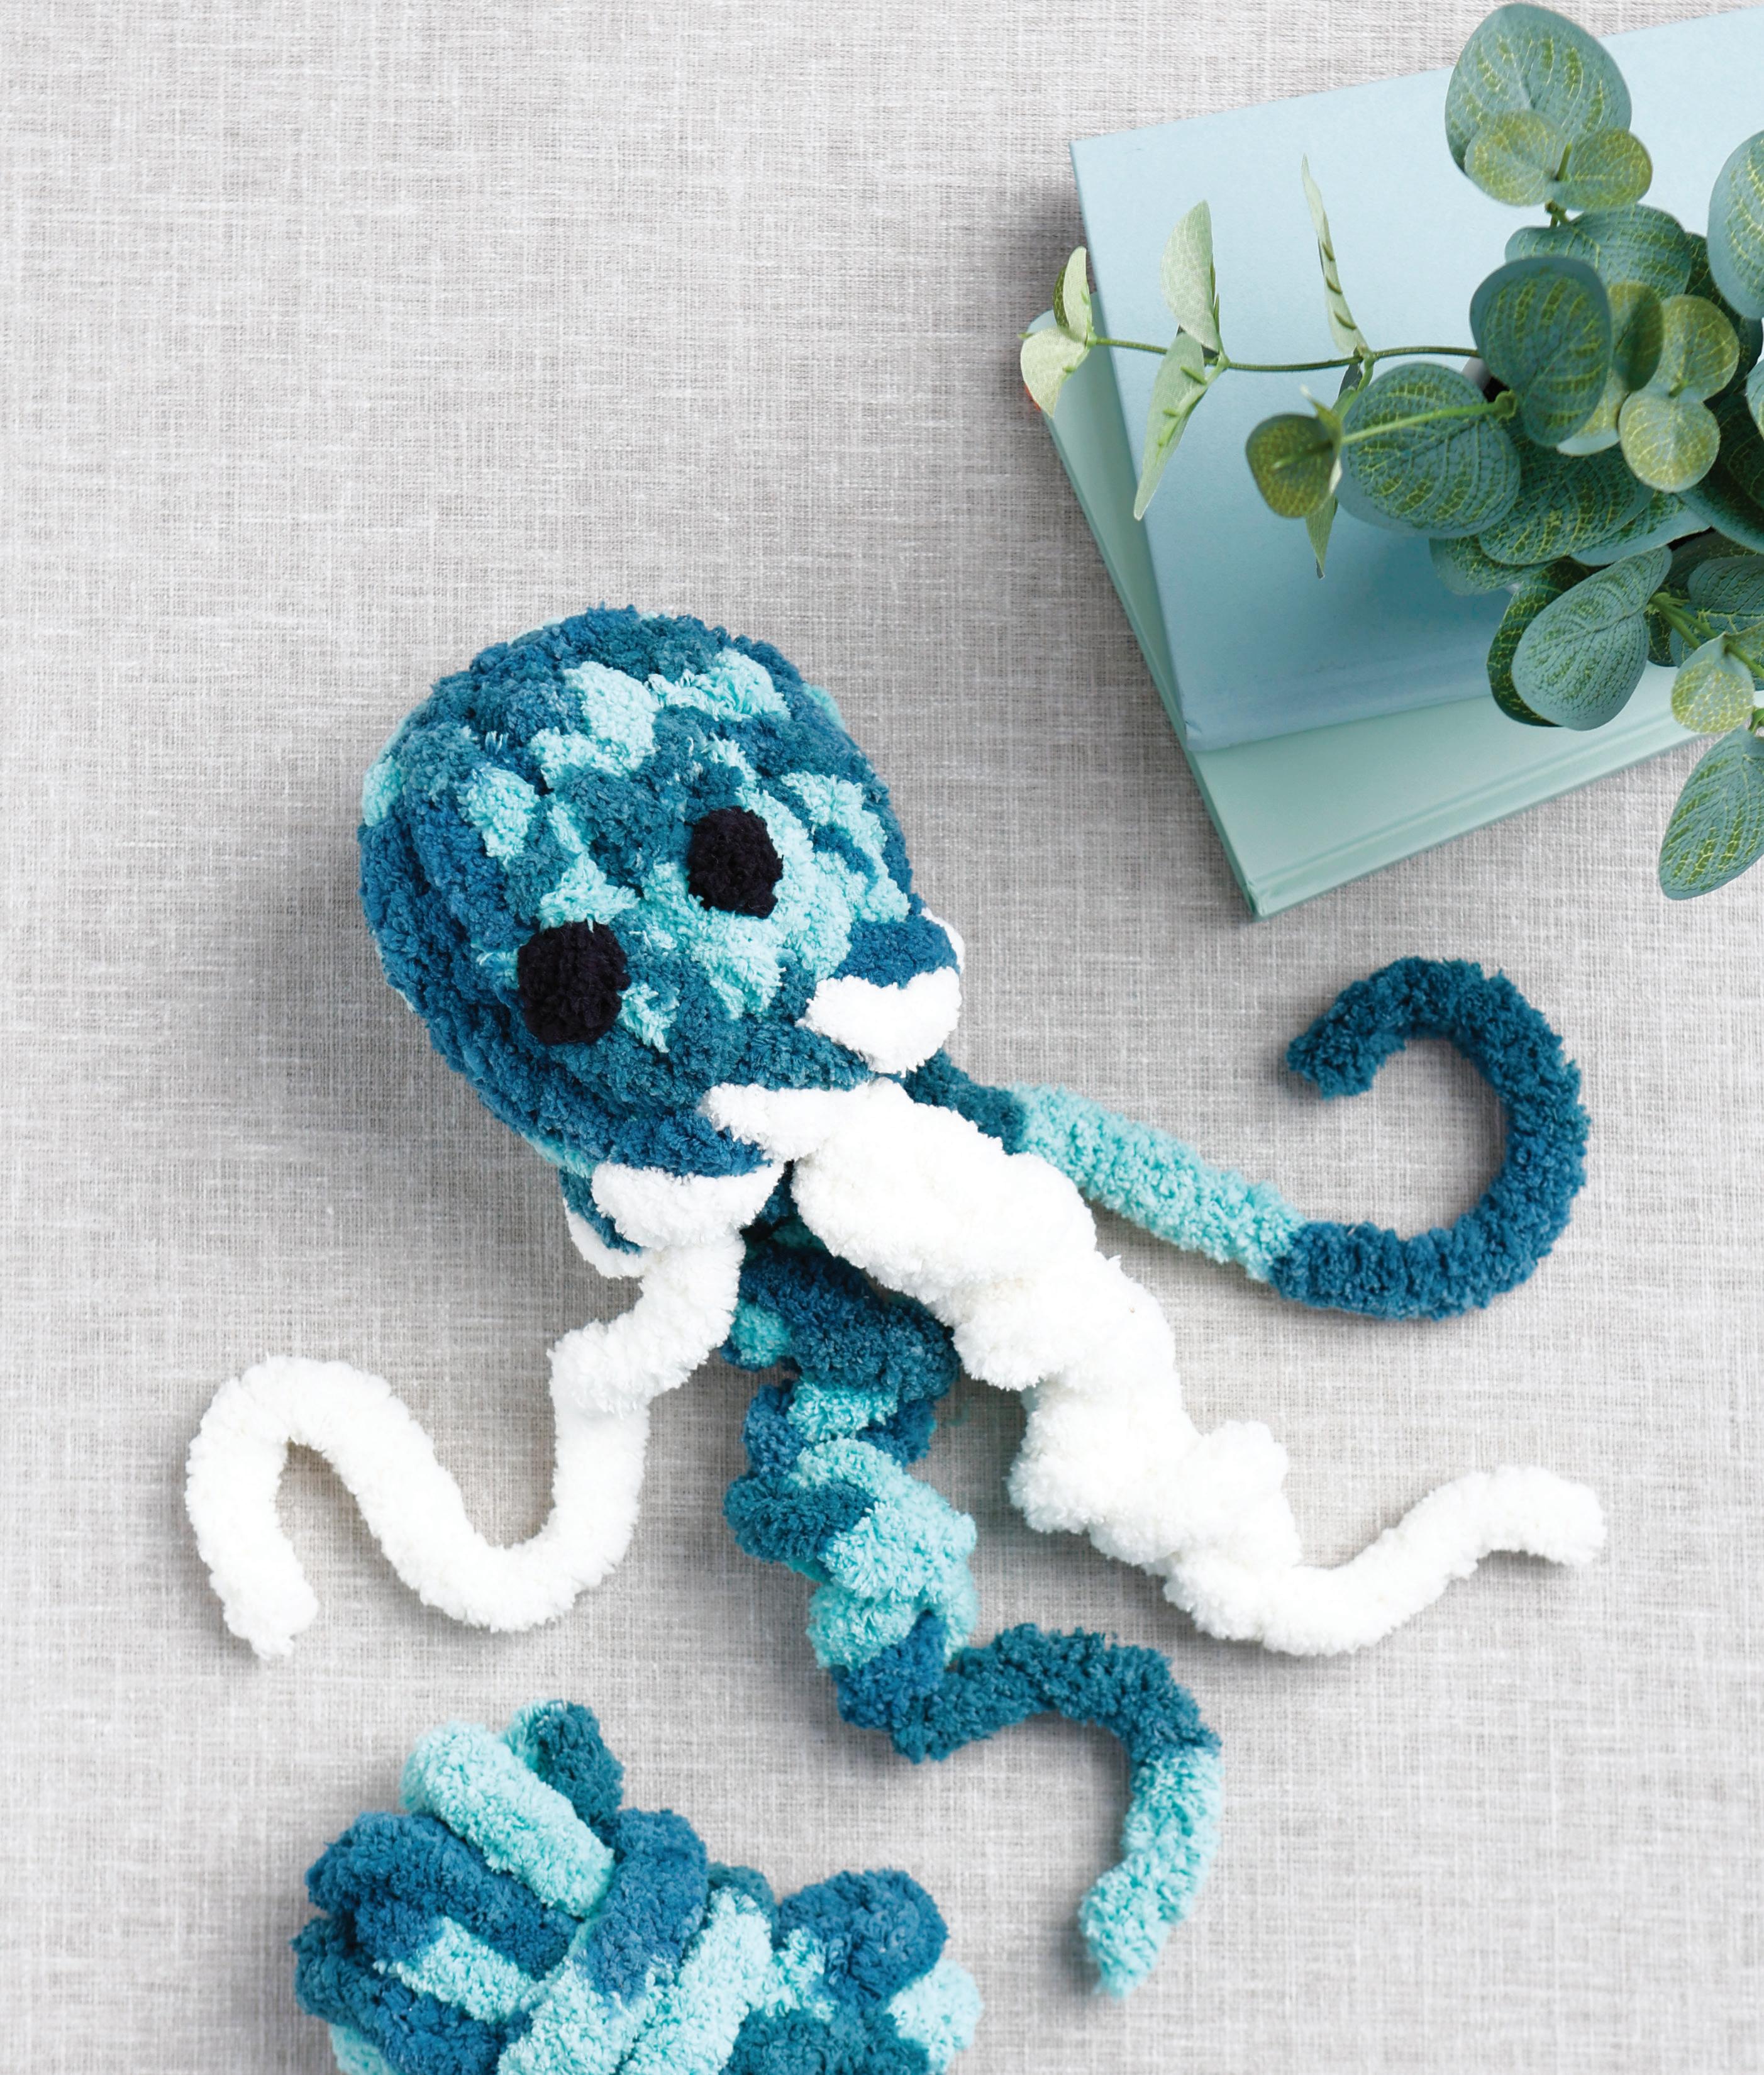
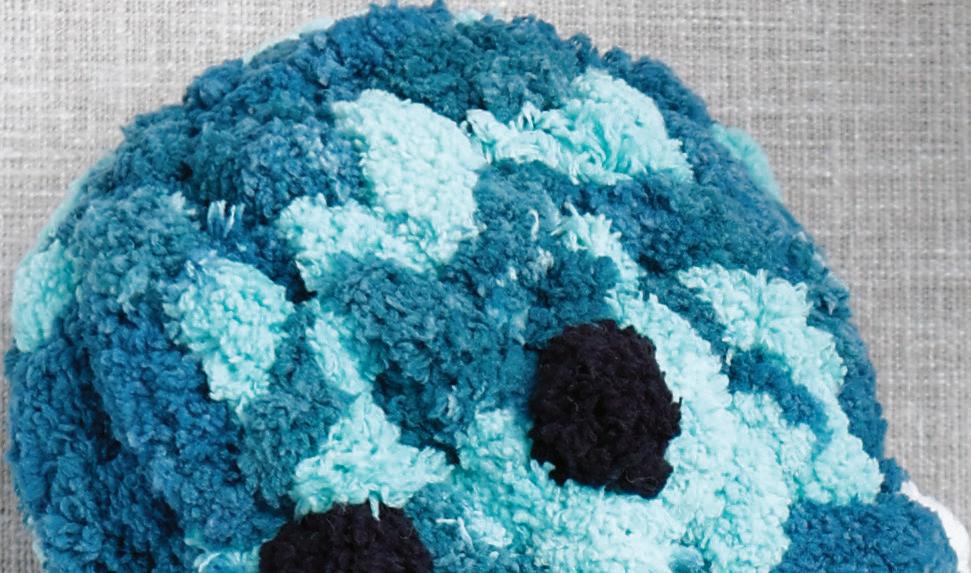
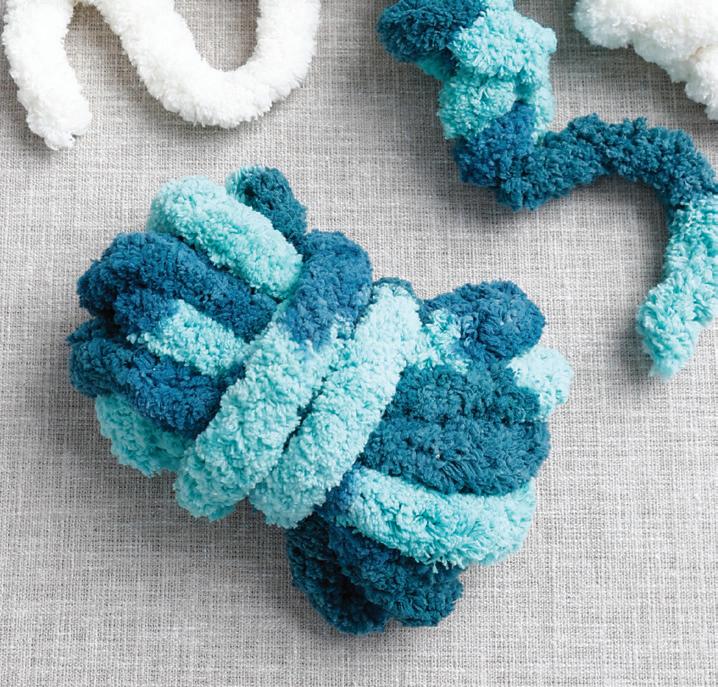
JELLYFISH HEAD
00:08
STEP 1 Using the variegated yarn, start by creating a slip knot, leaving an 8" tail of yarn. Here is a step-by-step breakdown for how to make a slip knot. First, grab the yarn with both your left and right hands, with around 4" of yarn held in between them and the 8" tail of yarn to the left.
STEP 3 Insert your left thumb and index finger into the loop you just created.
STEP 2 With your right hand, bring the yarn to the front of your left hand so the yarn is crossed over and you have created a loop.
STEP 4 With your left thumb and index finger, grab the working yarn (the yarn to the right) and pull it through the loop to create another loop.
STEP 5 Keeping hold of the new loop you just created, pull down on your tail yarn to tighten and secure the finished slip knot. The loop of this slip knot should be about 1" wide.
01:55
STEP 7 Row 1 (continued): To continue, you will do what is called chaining on loops. This is a movement whereby you stick two fingers through the existing loop, grab the working yarn, and pull up a new loop of the working yarn through the previous loop. This photo shows sticking your fingers through the loop. . .
STEP 6 Row 1: Here is your finished slip knot! It is the beginning of what we call Row 1. We’ll continue working on Row 1 in the next few steps.
STEP 8 Row 1 (continued): . . . and this photo shows after having pulled through a new loop. For this project, you need to chain on a total of 8 loops; the first slip knot you just made counts as the first loop of the 8. Keep pulling up a new loop of working yarn through the previous loop made until you have your target total number of loops. Each loop should be around 1" wide. Measure the loops if you can, to make sure you’re starting off with a good foundation.
STEP 9 Here is the finished chain of 8 total loops! Make sure your work looks like mine before proceeding. If it is too big and loose, you will have trouble later. It’s easy enough to redo this chain now!
04:15
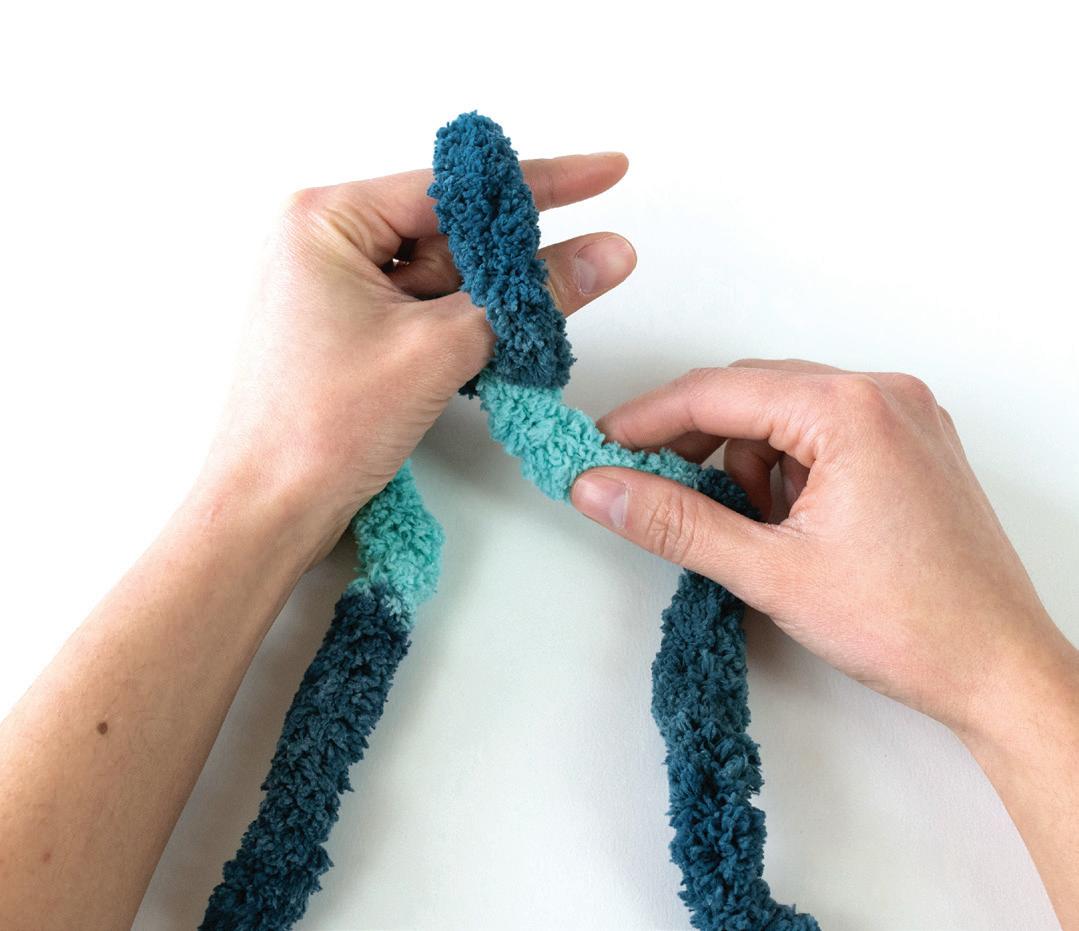
STEP 11 Row 2: Now let’s learn to knit onto our chain to create a new row—in this case, Row 2. To “knit,” you pull up loops through each top loop of the chain row (or previous row), working to the right around the chain. So, start by putting your left index finger through the first chain loop (the next available chain loop after where your working yarn is).
03:40
STEP 10 Make a circle by pulling your tail yarn through the last loop (loop 8 of your chain row) until you’ve pulled it through all the way to the first slip knot. Ensure that both your tail yarn and working yarn are pointing in the same direction now, away from you or to the right.
STEP 12 Row 2 (continued): Grab and pull a loop of the working end of the yarn through the loop so it comes out the top (shown as the left here). (You must always ensure that you keep the work oriented to yourself so that you are pulling through on the same side: top, or left, depending how you’re holding your work.)
STEP 13 Row 2 (continued): Continue the row by repeating this grab-and-pull-through knit action in each top loop of the chain row, always working to the right and making sure each new loop is the same size, around 1" wide. Row 2 will contain a total of 8 loops knitted this way, but for now, proceed only to a total of 6 loops, then read on.
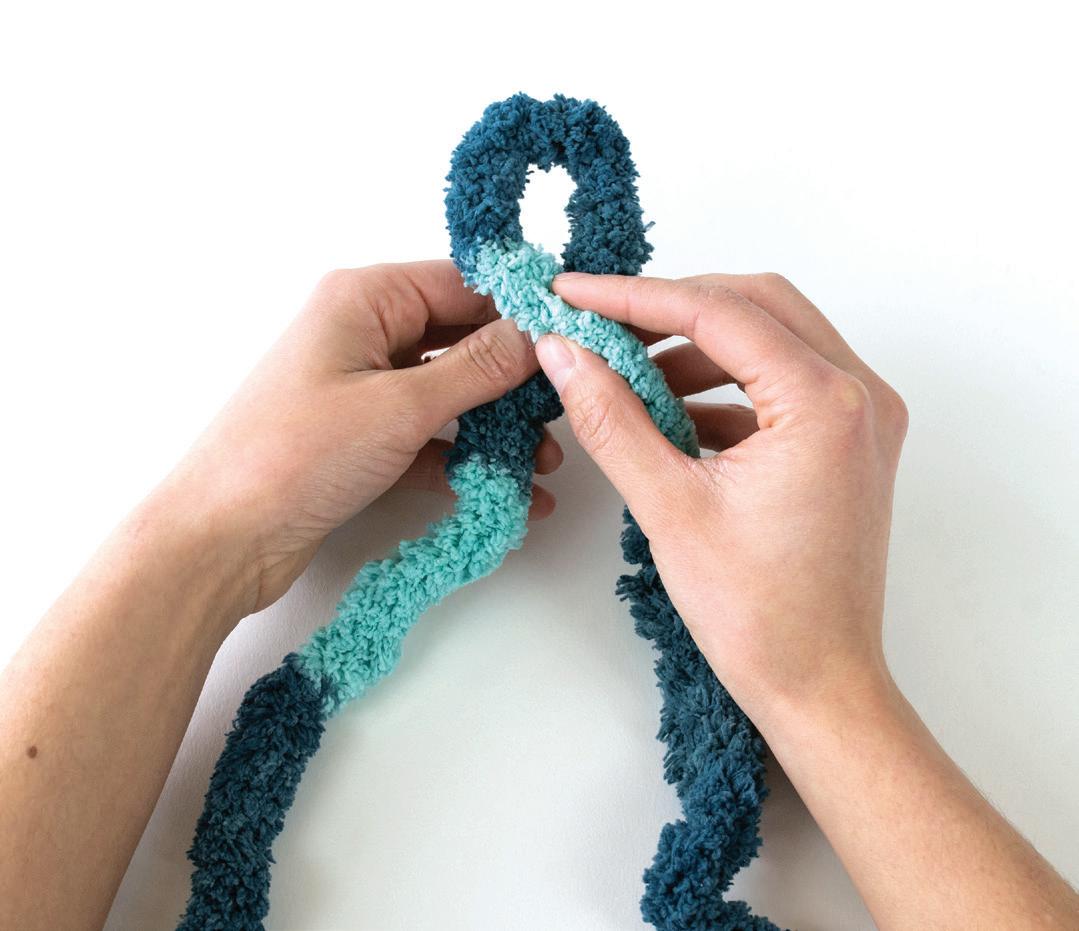
STEP 15 Row 2 (continued): The eighth loop that you make will be in the chain loop directly after that as normal, even though that chain loop might be a little twisted or harder to locate than previous chain loops. I have my finger through it in this photo and am about to pull the eighth loop through it.
STEP 14 Row 2 (continued): The seventh loop you make in this row will be through the same chain loop as the tail yarn is hanging through. Before you pull up this seventh loop, though, you need to feed the tail yarn through the center of the work so it is going out of the work on the opposite side from your working yarn. Then knit the seventh loop as normal.
STEP 16 Go ahead and pull it through. Now you’ve finished Row 2!
07:46 11:49
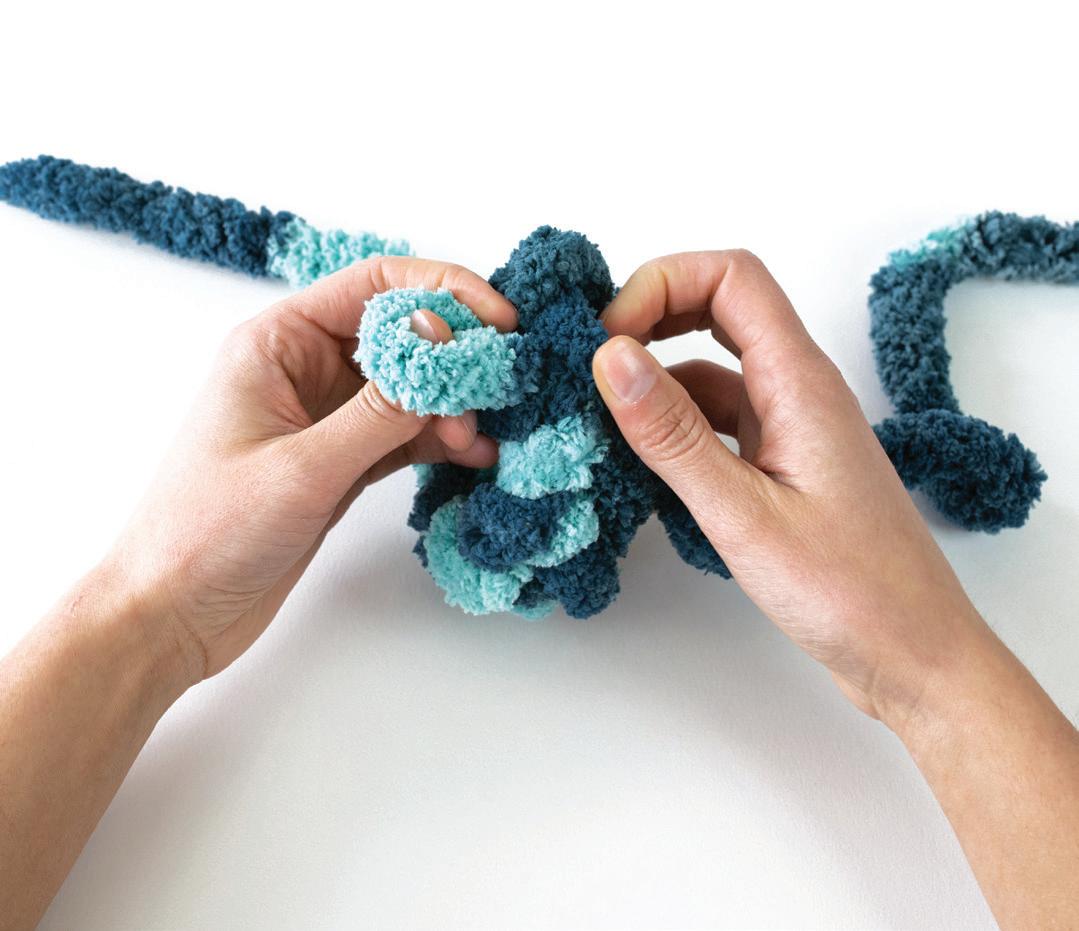
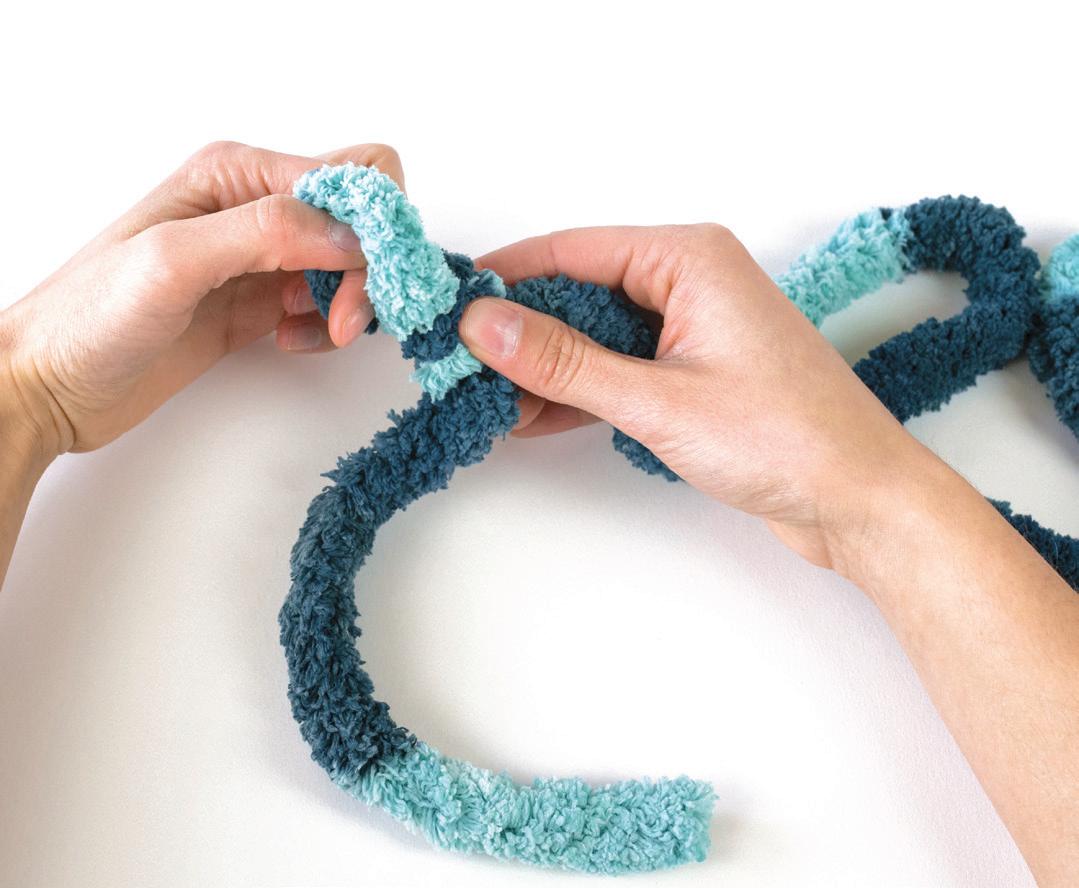
STEP 17 Rows 3–6: Knit 8 for each row. Continue working to the right and pulling up loops for each row just as you did for Row 2, remembering to keep the loops consistently sized at around 1" wide. For these rows, of course, you are pulling up loops through the 8 loops made in the previous row, instead of through the initial chain loops. You can keep track of where you are in a row by knowing that the seventh loop you make will line up with the tail yarn, and the eighth loop that you make will be in the loop directly after that.
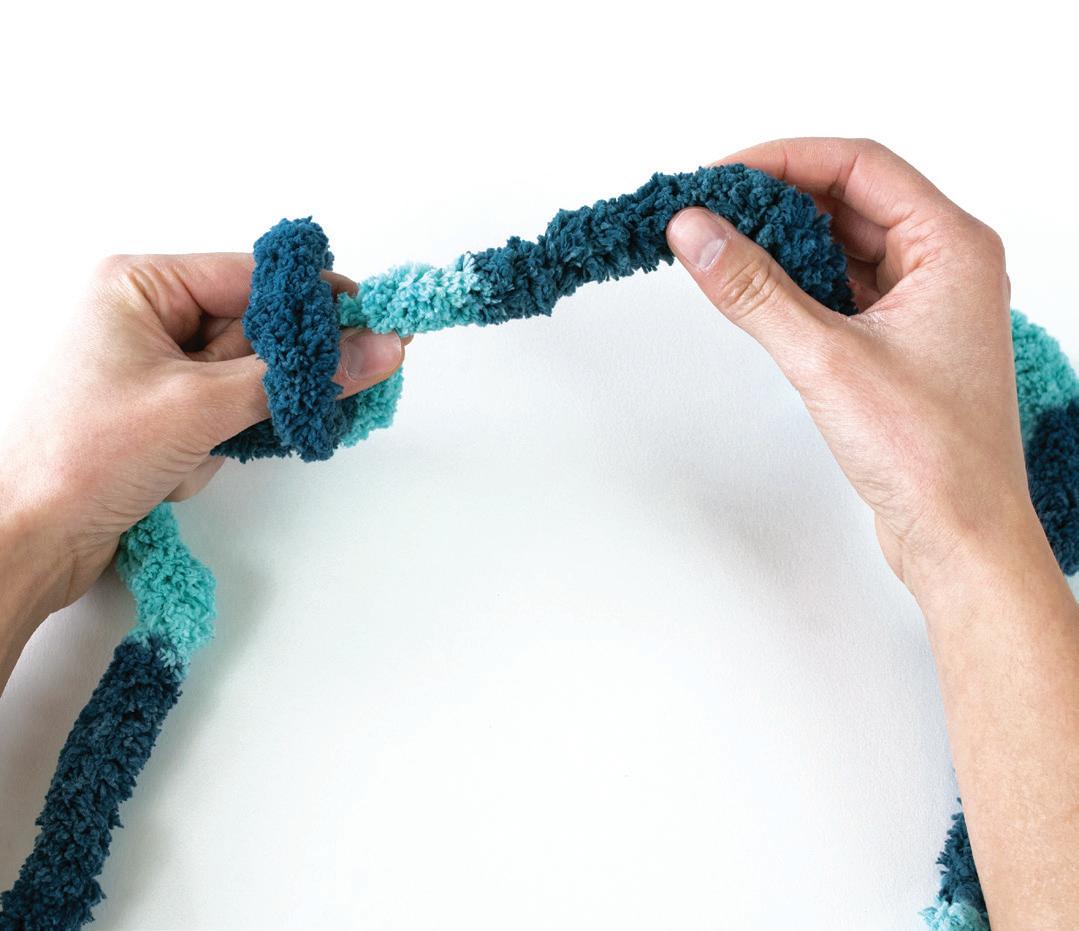
STEP 19 Row 7 (continued): Take the first loop of Row 7 (the left loop) and pull it over the top of and down around the second loop of Row 7 (the right loop).
STEP 18 Row 7: This row is when we start “closing off” the work. Start a fresh row just like you have for the past several rows, but only knit 2 to start, and pull up these loops to be around 2 1/2" wide instead of the 1" that you’ve done in all previous rows.
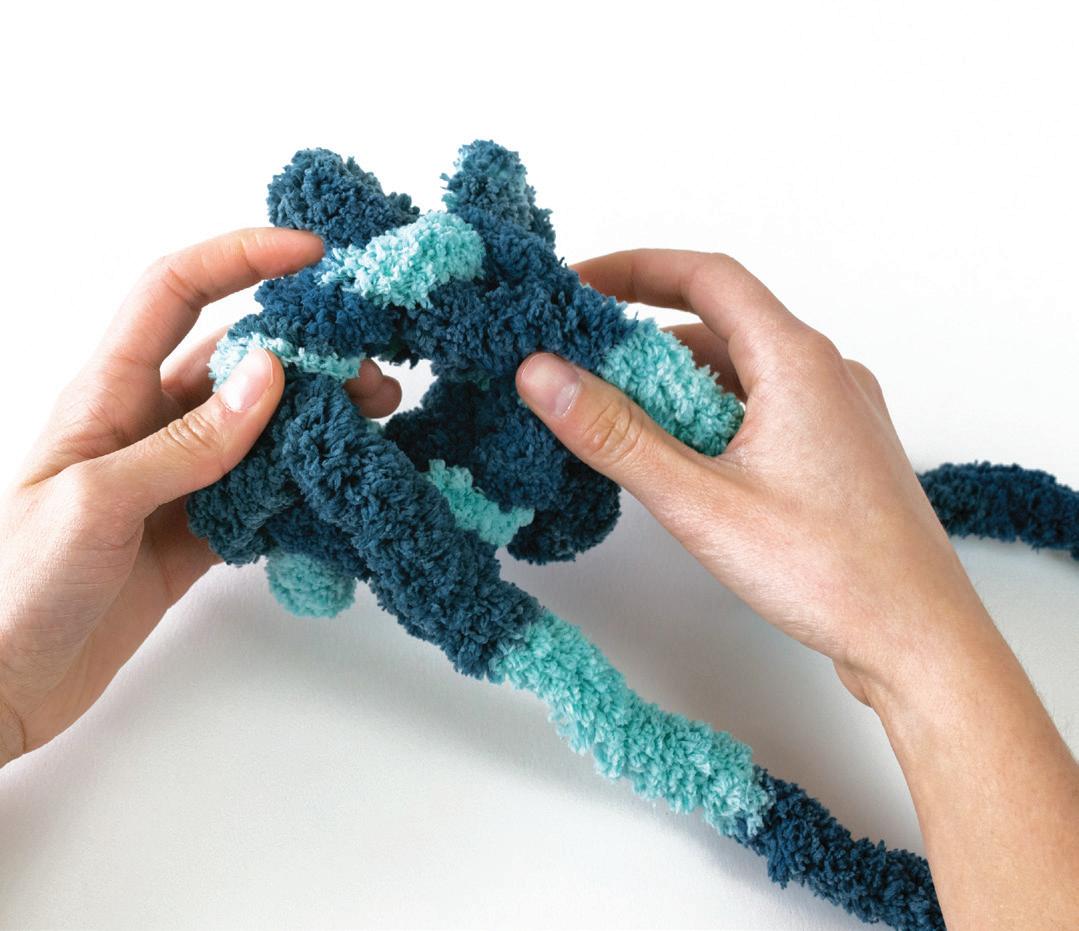
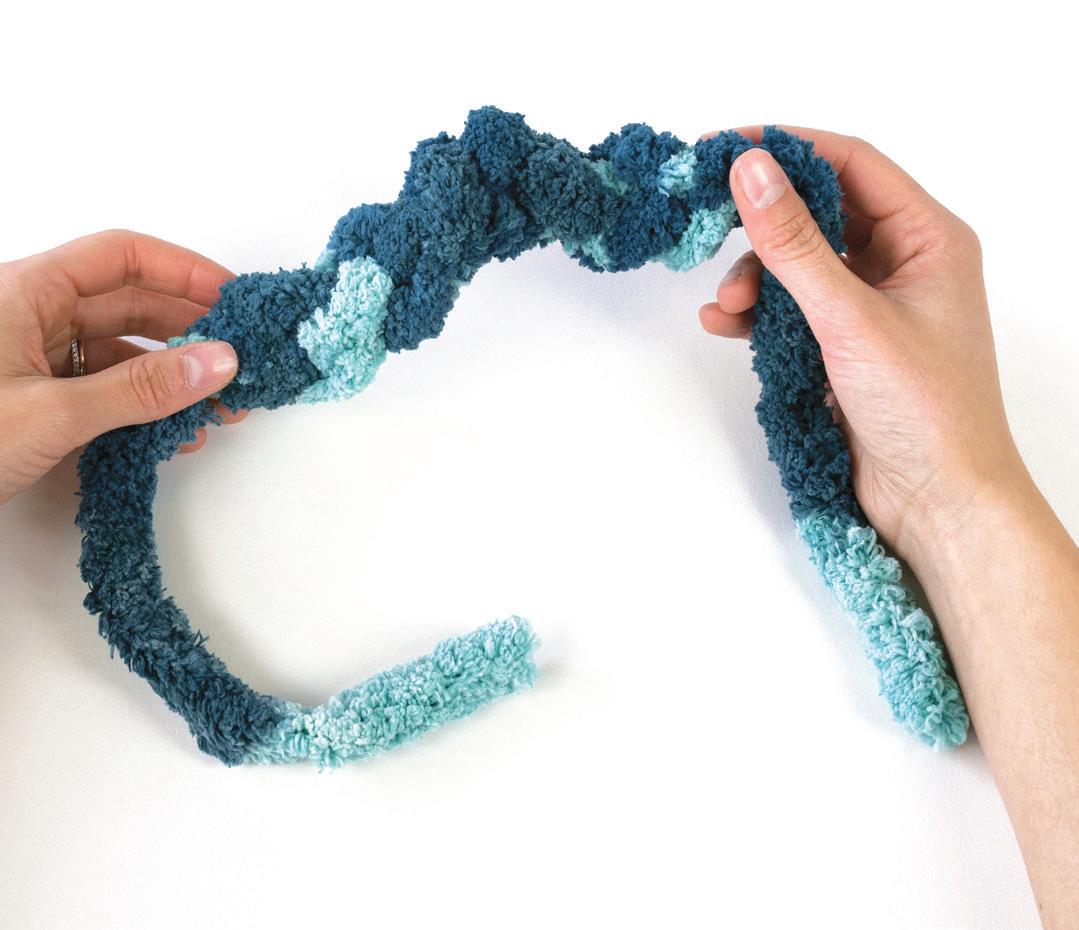
STEP 20 Row 7 (continued): Continue this pattern. That is, pull up a third loop that is around 2 1/2" wide, then pull the second loop down over the third loop, etc. Keep going like this until there is just one loop left, the eighth loop. Make this last loop 1 1/2" instead of 2 1/2" wide.
14:46
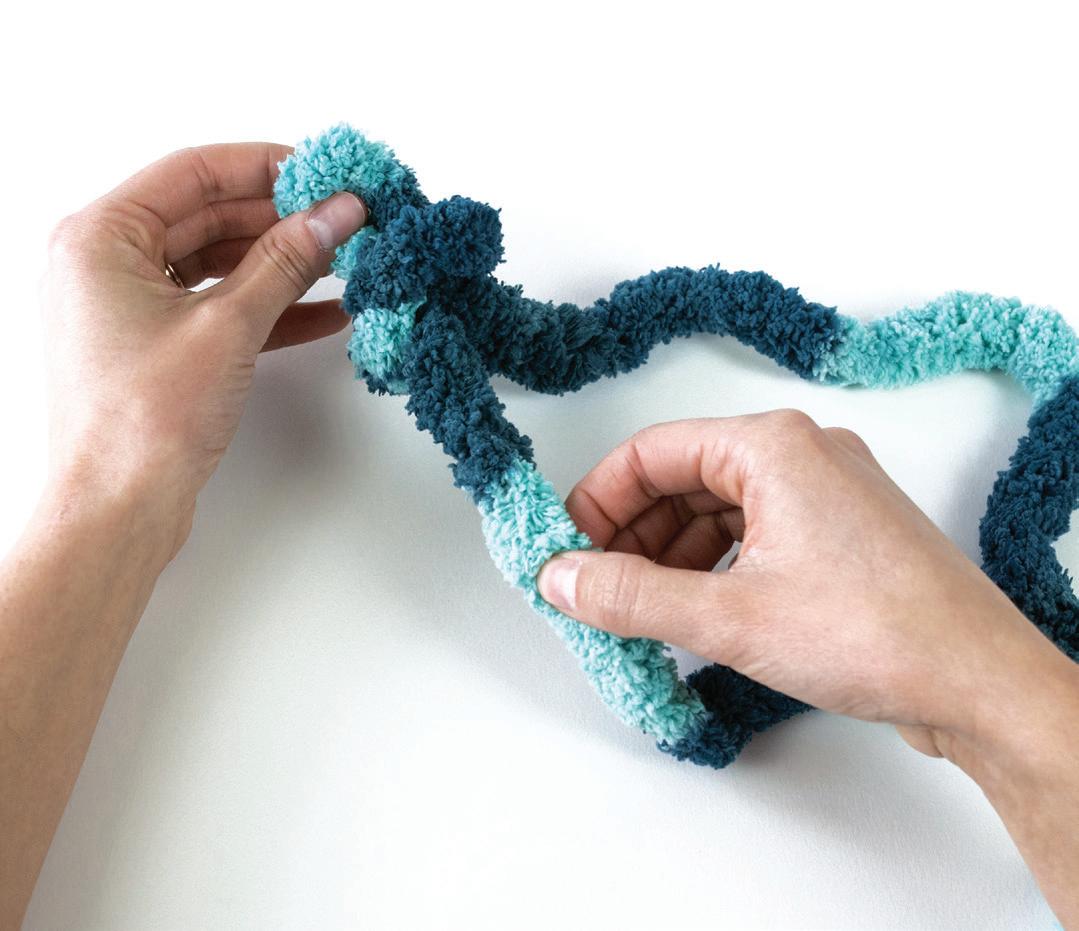
STEP 21 Row 8: Row 8 is worked into the previous row but is different in a few ways. First, because Row 7 closed off the work, it looks and feels more like the initial chain than a normal row. Second, for Row 8, you will be working new loops through the inside loops of Row 7, not through the top/outer loops of Row 7 as you had been doing up to now. You will pull up a new 1 1/2" loop through each of the inside loops until there are a total of 7 loops up (including the loop left up in step 20). Start by putting your left index finger through the first loop.
STEP 23 Row 8 (continued): Repeat until there are a total of 7 loops up (again, including the one you created in step 20).
STEP 22 Row 8 (continued): Grab the working end and pull it through. This is your second loop of Row 8. In this photo, I am holding the new second loop with my right index finger and thumb.
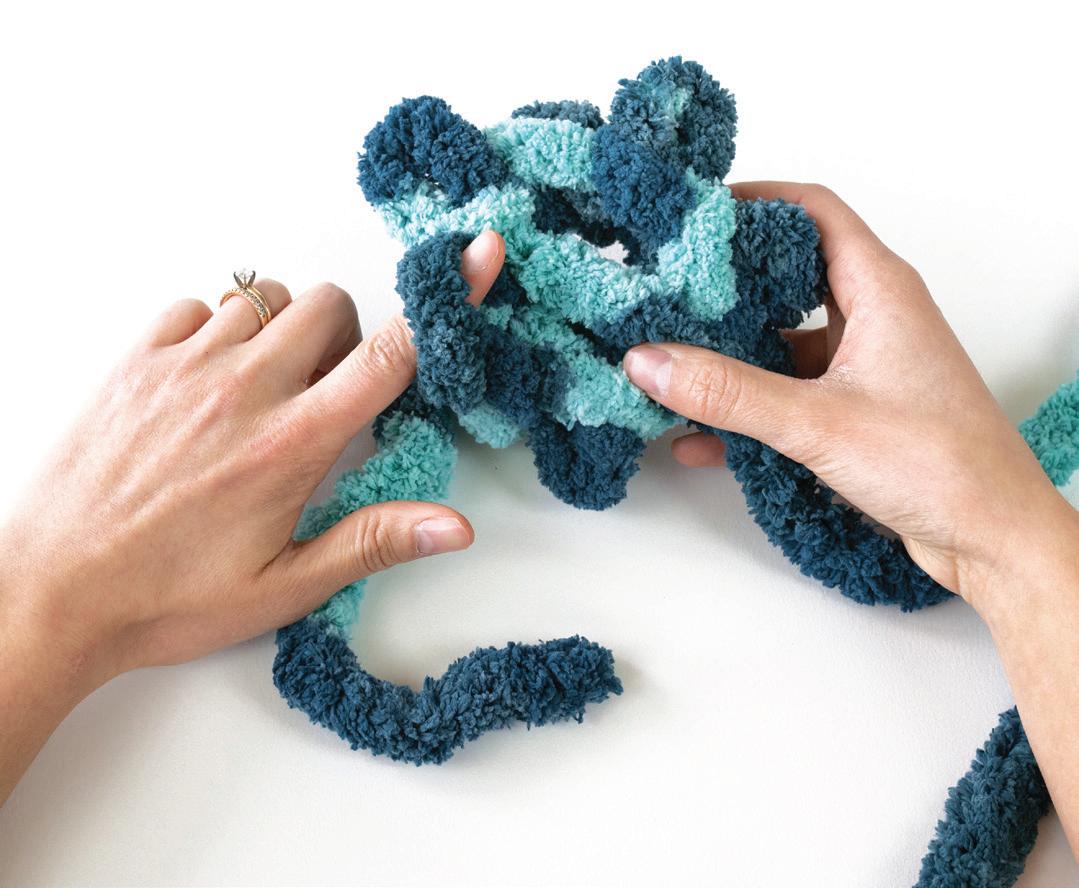
STEP 24 Cut the working yarn, leaving about 1 1/2 feet of yarn free. This is still going to be called the working yarn, even though it has been cut. The tail yarn is still the short piece of yarn that is currently sticking out of the top of the jellyfish head.
17:10
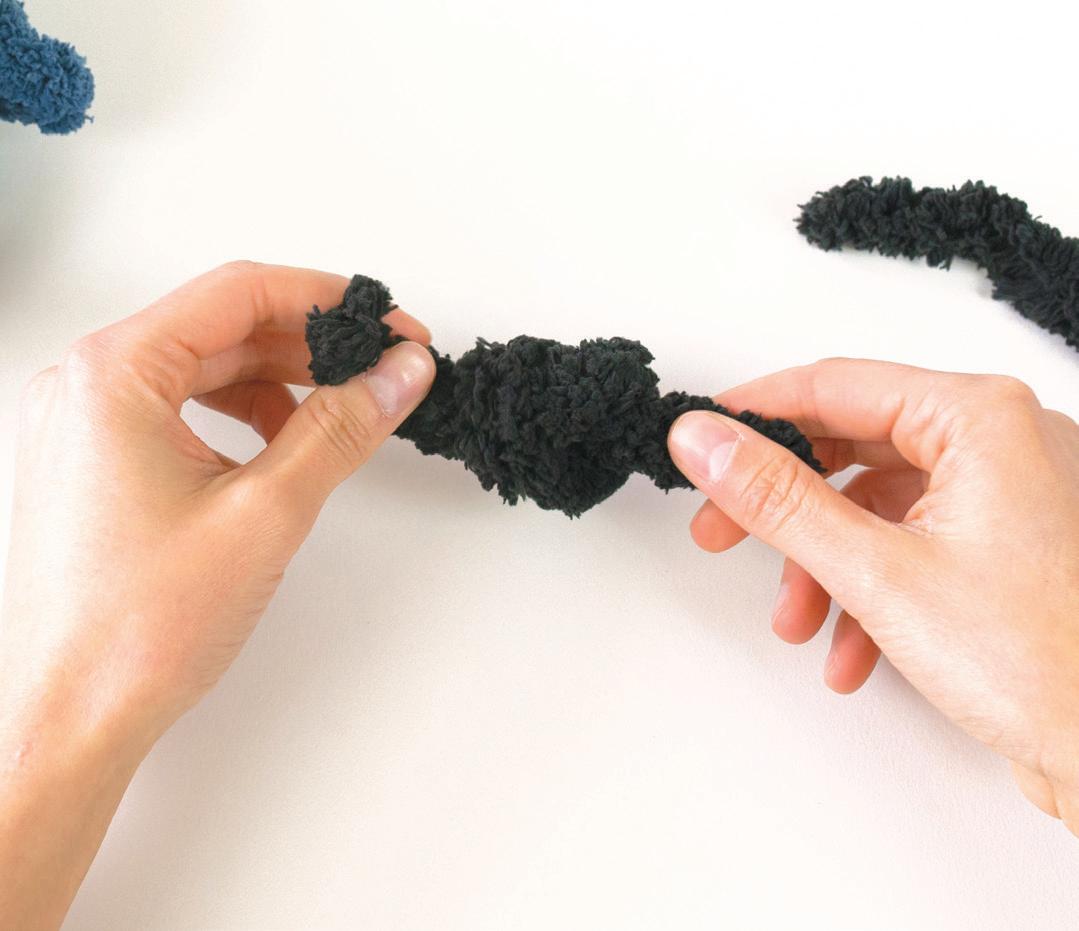
STEP 25 It’s time to add our jellyfish’s eyes! Cut two 6" pieces of black yarn and tie a single, simple overhand knot at the center of each piece.
20:51
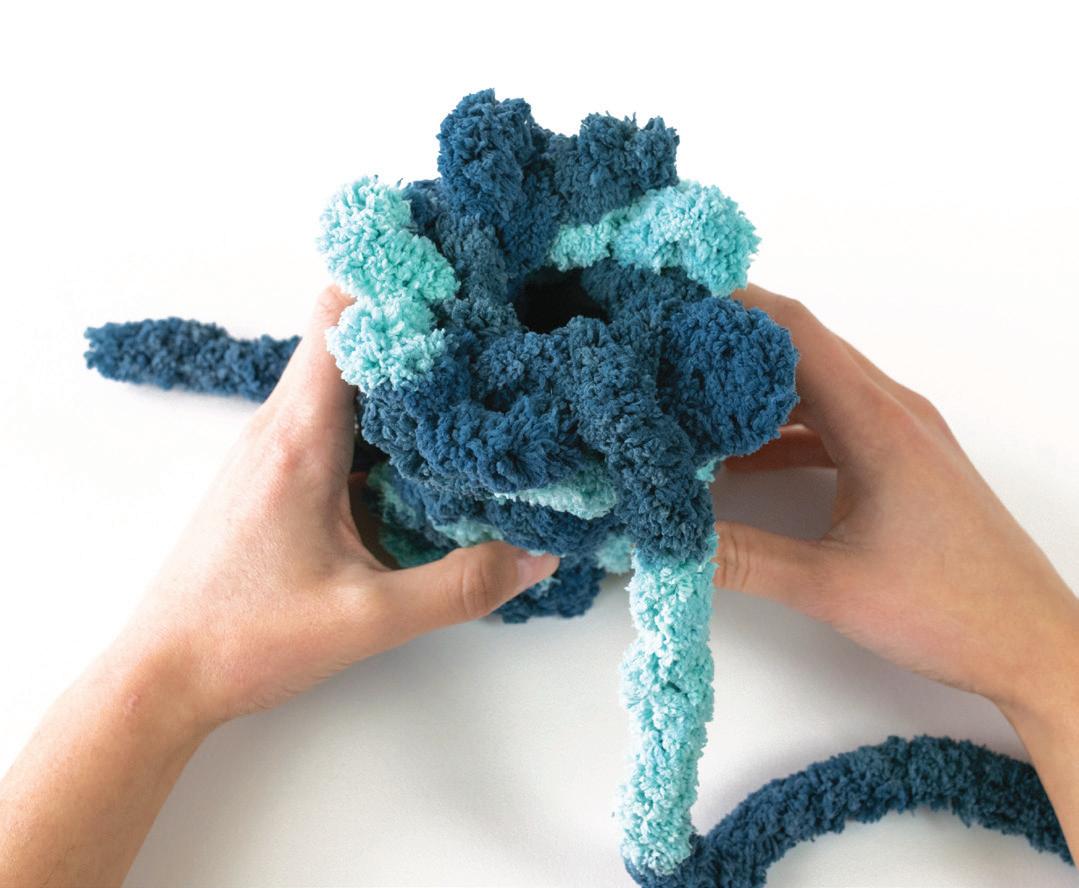
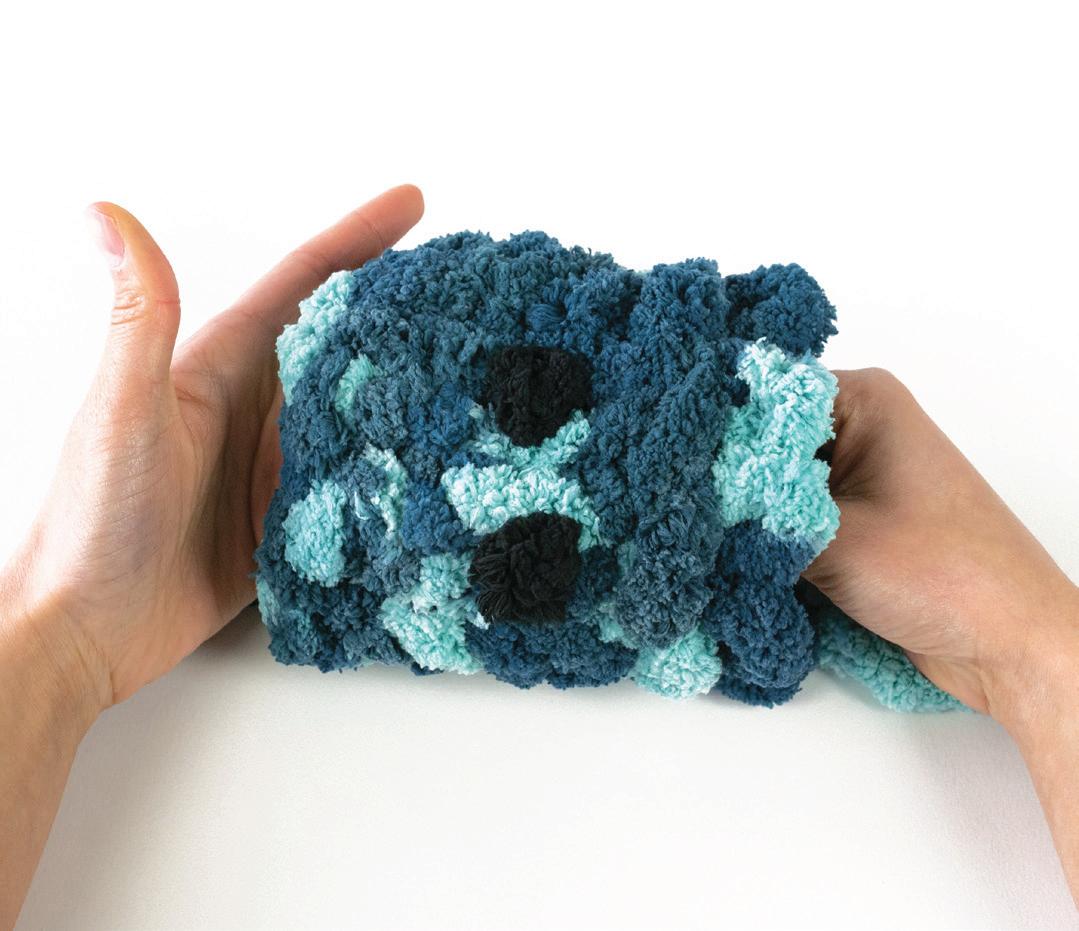
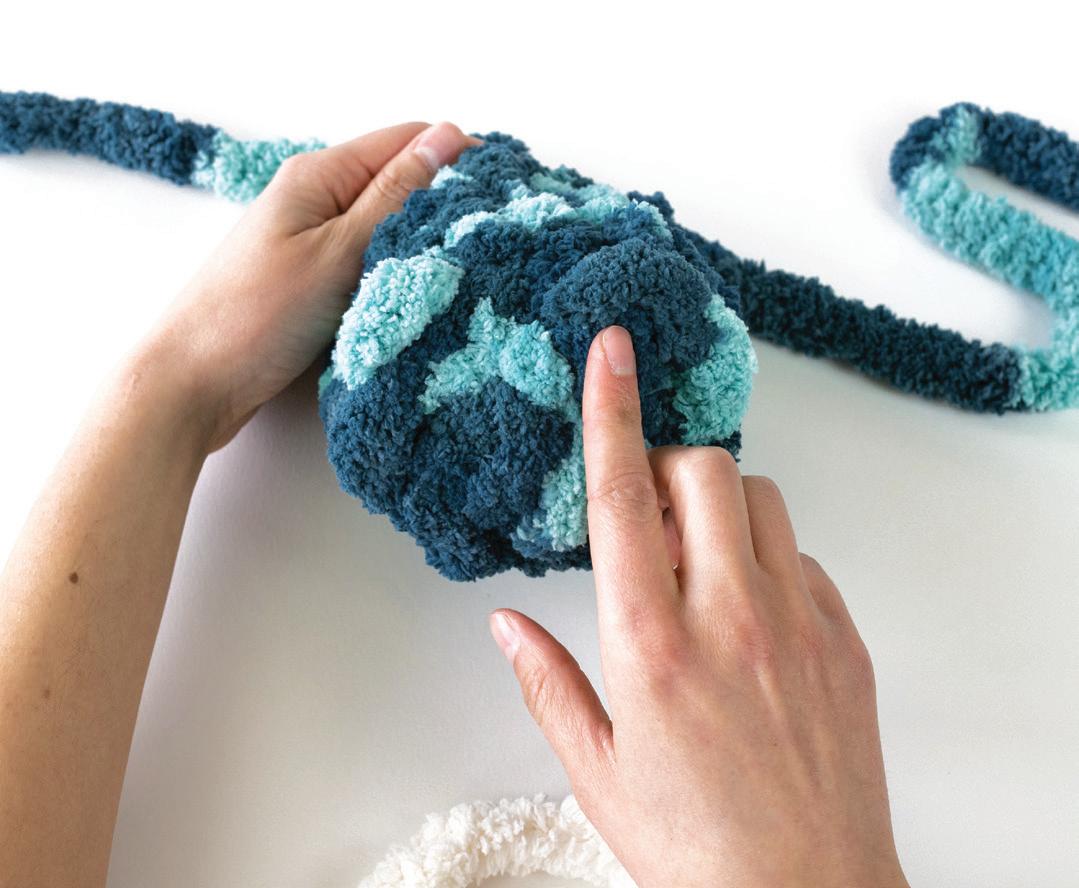
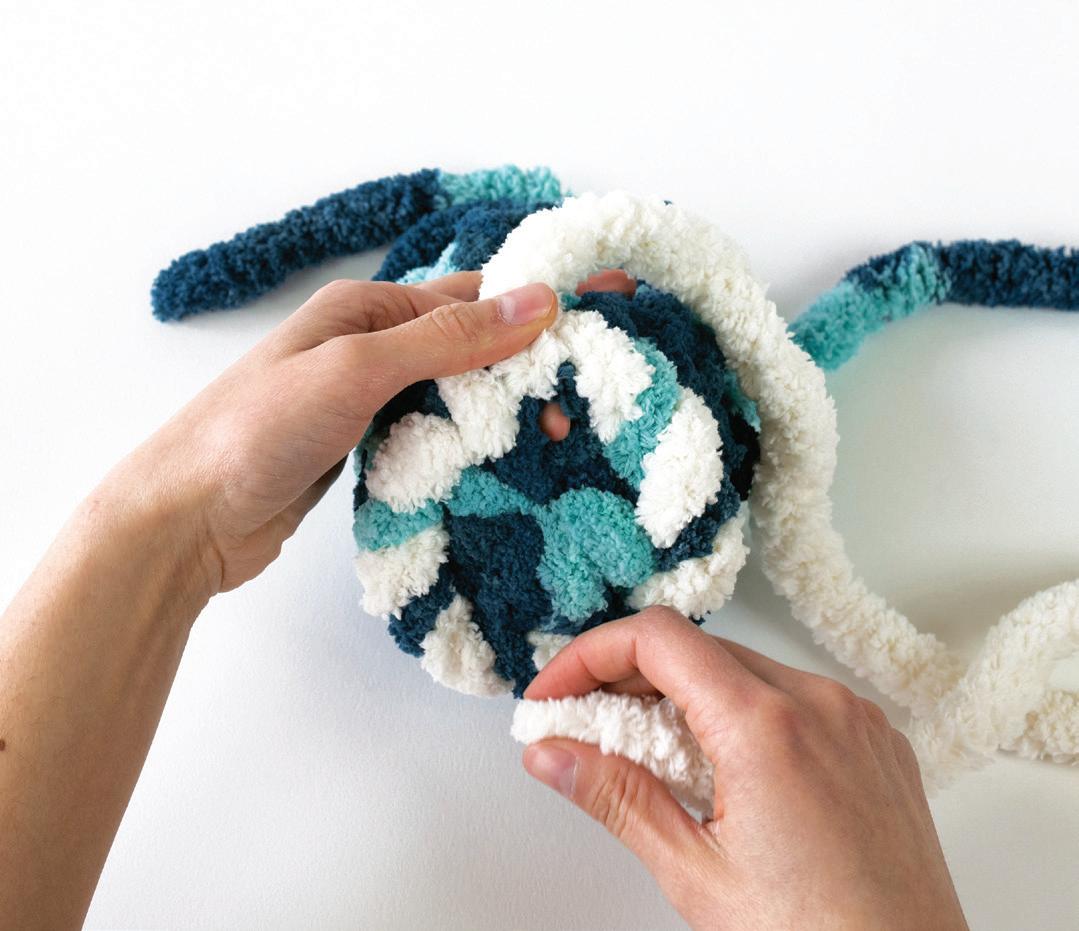
STEP 27 Now that the eyes are in, we can close off the bottom of the jellyfish head. Take the working yarn and feed it through each of the bottom loops (Row 8) one at a time, pulling the yarn through each loop from the inside toward the outside. You should be working toward the left as you work through each of the loops.
STEP 26 Choose where you want the eyes to appear. Feed one loose end of one eye piece through from the outside of the head to the inside, pulling until the eye knot sits against the head. Then feed the other loose end through one “stitch” above the eye knot so that the eye knot sits on the stitch. Tie the loose ends together inside the head in a double knot to secure the eye. Repeat with the second eye.
STEP 28 Work your way around until you’ve fed the working yarn through all 7 loops of Row 8. Tighten as you go, making sure not to accidentally tighten so much that you lose the last loop that you come to. They can be hard to see, so be careful! After feeding through the last loop, tighten the whole thing once more.
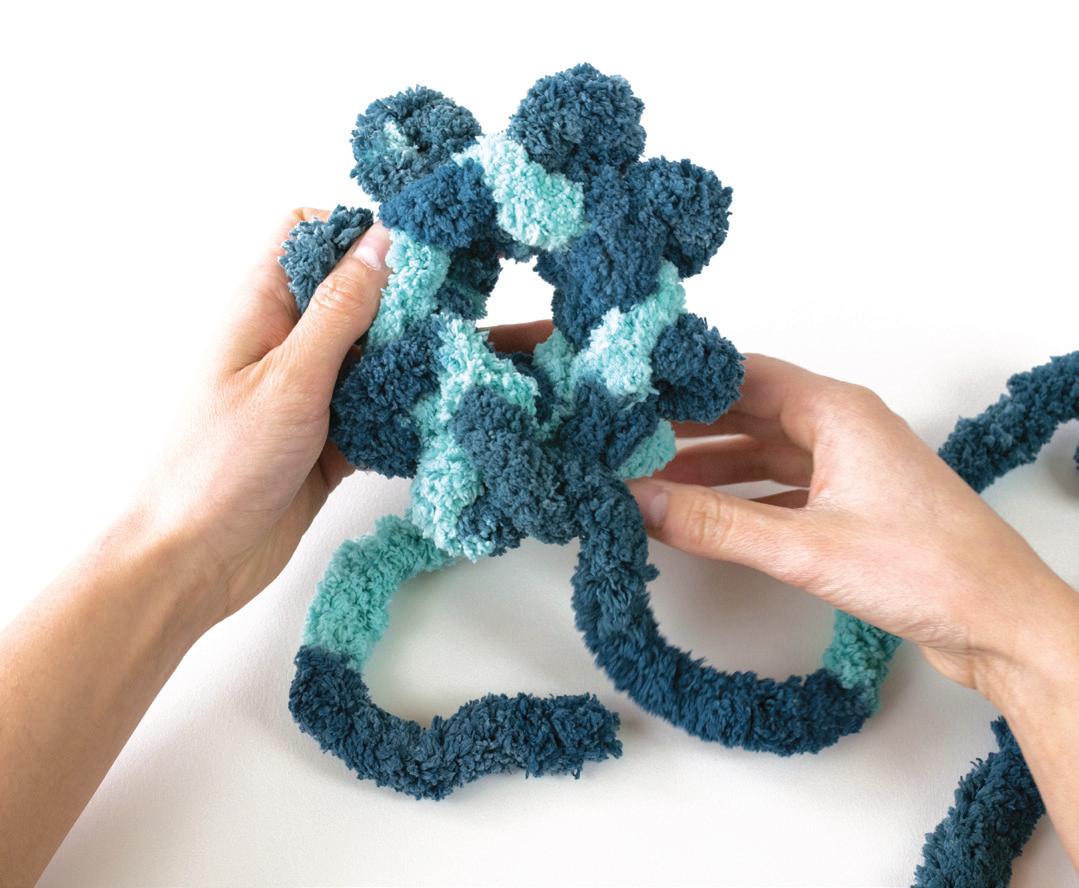
STEP 29 Make an overhand knot at the base of the working yarn, snug up against the bottom of the jellyfish.
STEP 30 Find the center of the hole that you just closed up on the bottom of the jellyfish. Push the working yarn and the last knot you made in through the hole so the working yarn ends up completely inside the head. Pull the working yarn out through the top of the head. Now, at the top of the head, you will have a short tail yarn and a long working yarn sticking out.
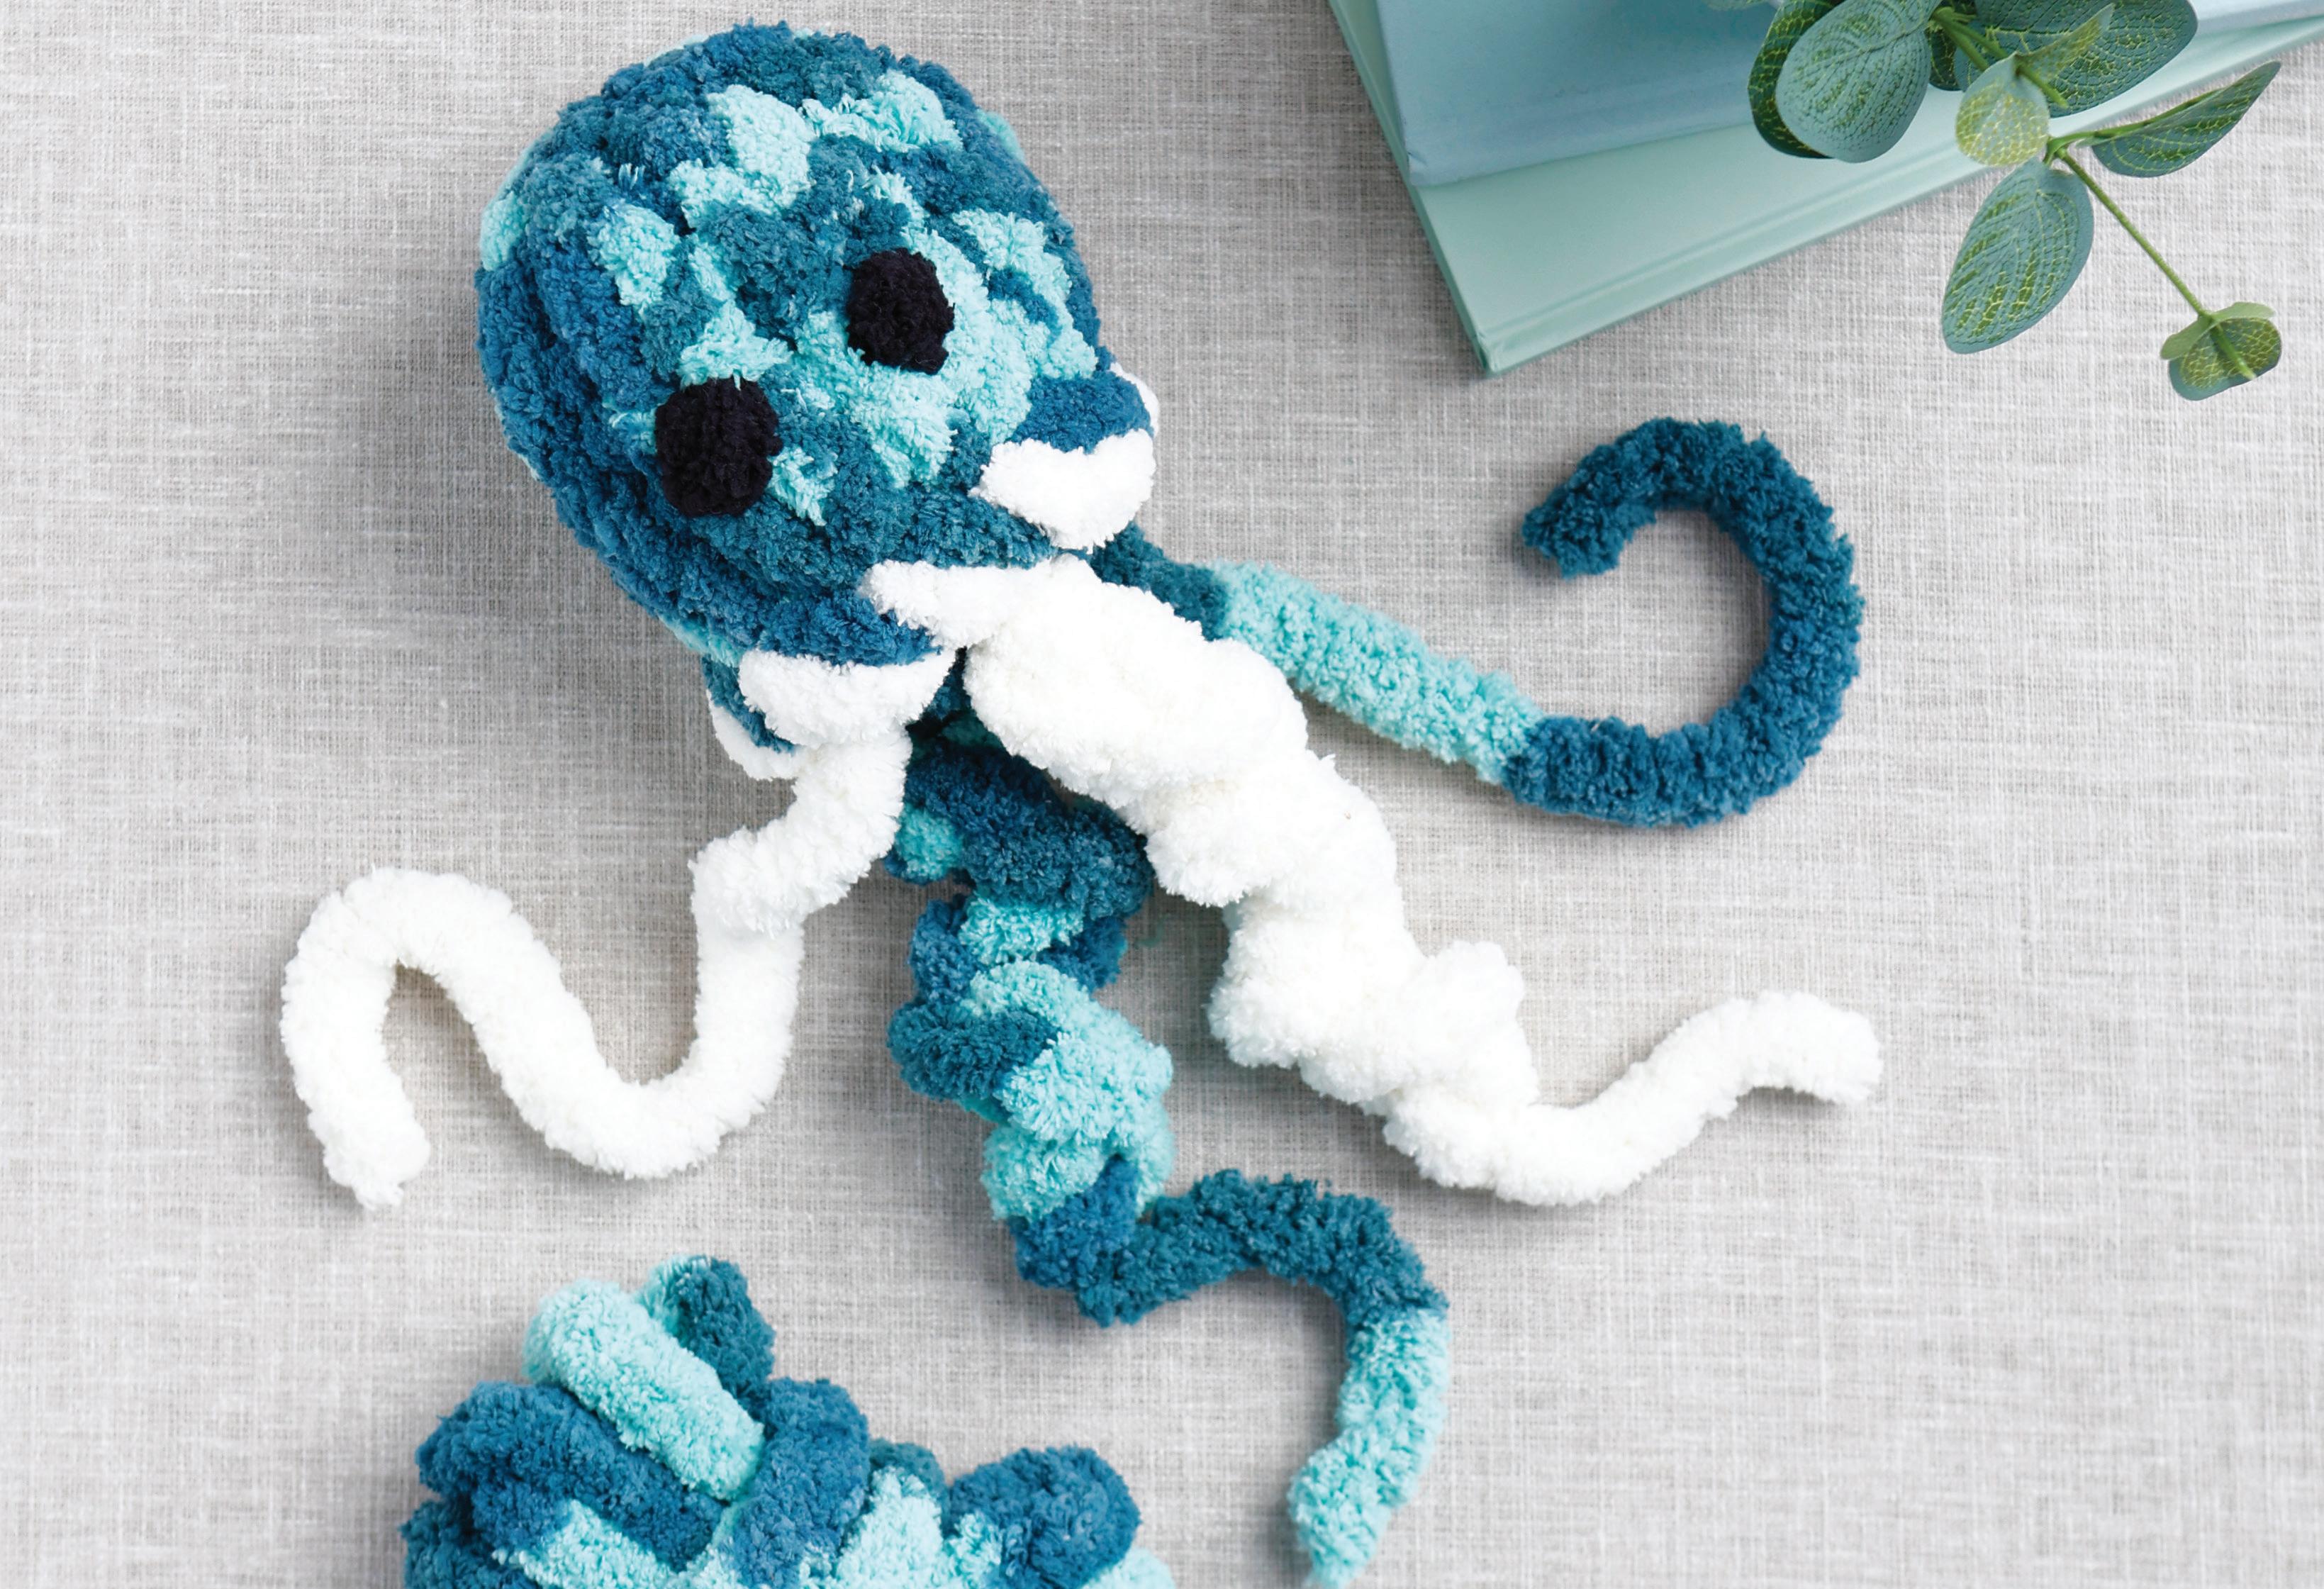
STRAIGHT TENTACLES
STEP 31 Cut a 2 1/2-foot piece of the white yarn. Now look for a spot around the perimeter of the bottom of the head that is a bit of a dip/different than the rest of the perimeter. Take one end of the yarn and insert it up into the bottom of the jellyfish beneath the loop right next to this dip.
STEP 32 Pull this yarn up through the inside of the jellyfish head until just a bit of it sticks out of the top of the head.
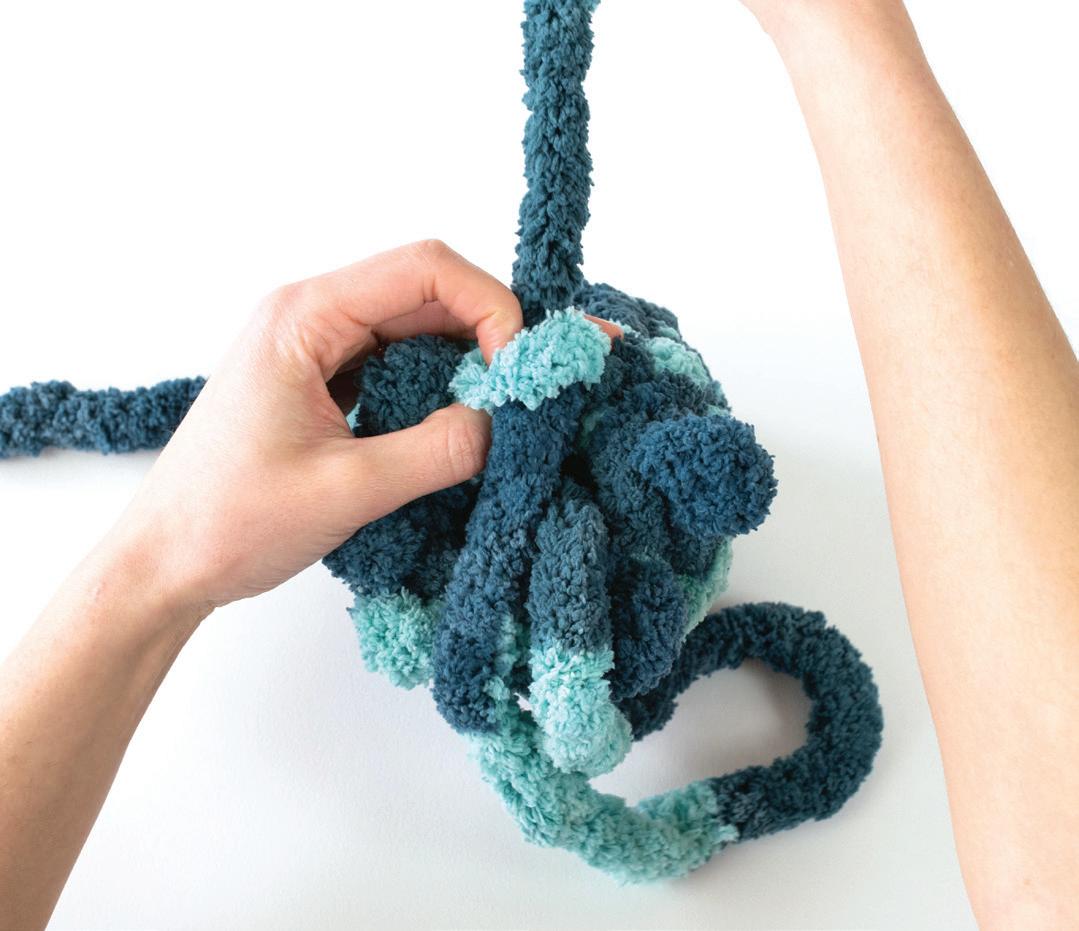
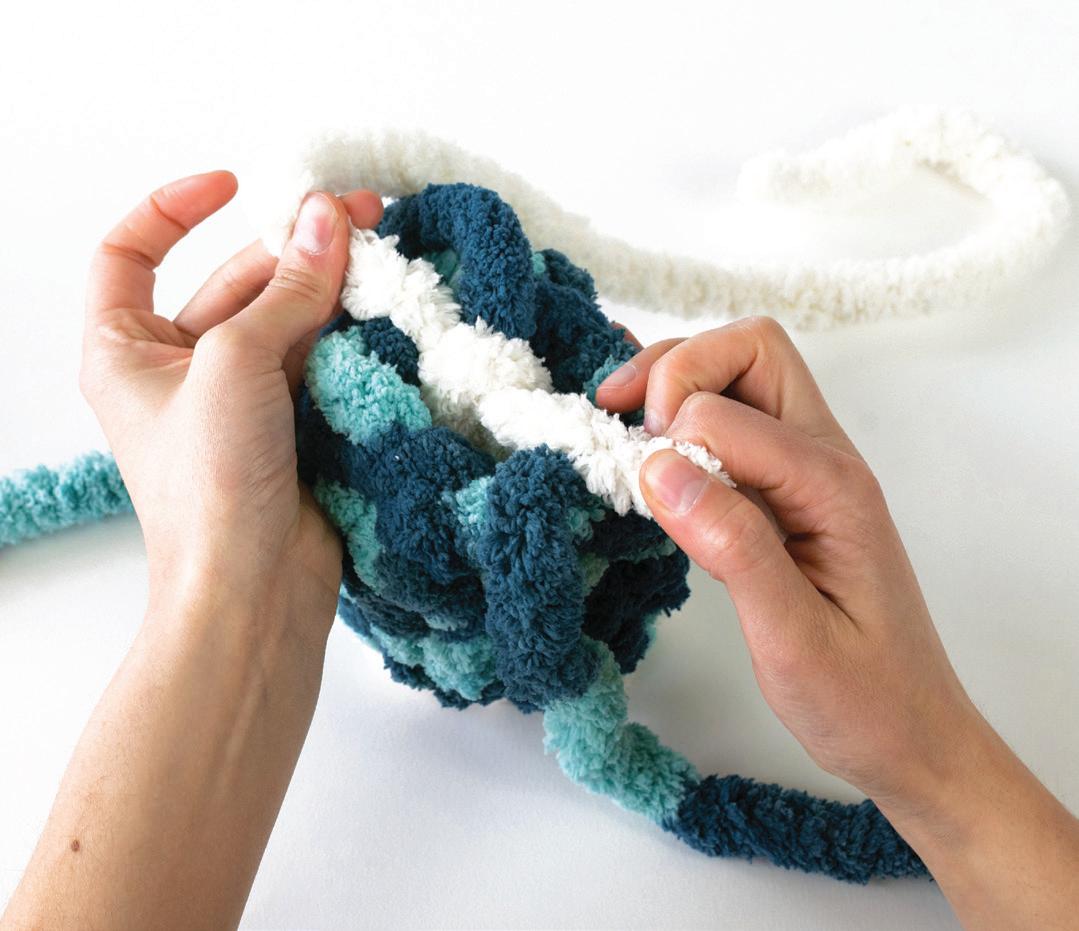
STEP 33 Take the working length of yarn that’s hanging from the bottom of the head and weave it through each of the outer loops around the base of the head, working in one direction and always going from the outside in. Start by going through the same loop through which the working yarn is currently hanging. Also end there.
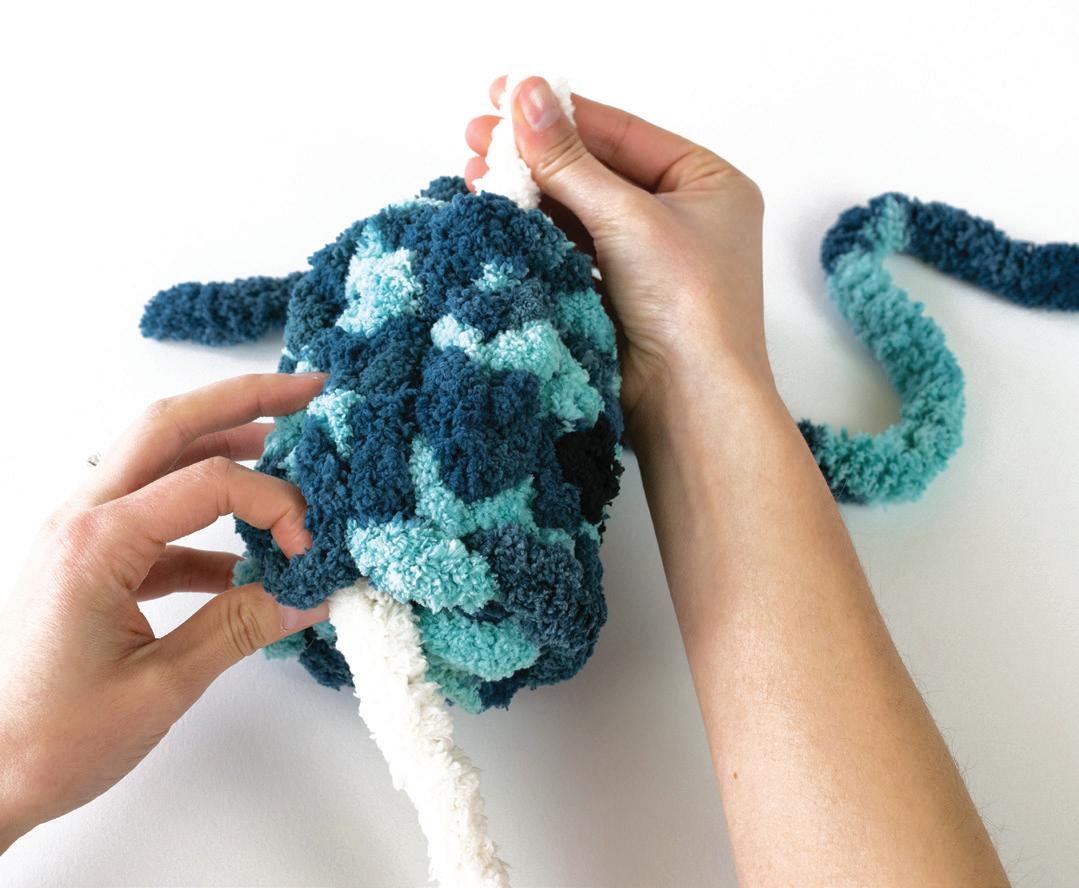
STEP 35 Tie the shorter white yarn and the longer variegated yarn together, then push and slide their knot all the way down inside the jellyfish head to the bottom, while still holding the two ends of the knotted yarns up at the top. This means move/slide the knot itself down the length of the yarns, rather than making a knot at their tops and then shoving the whole thing down inside the head. Repeat once more to create and slide down a second knot.
STEP 34 Push the remaining length of working yarn to the inside of the head, making sure it’s pulled up in through a different hole than the other side of the yarn from step 31. Pull it all the way up through the opening at the top of the head, just like you did with its other end earlier. You now have four ends sticking out the top: the shorter tail variegated yarn, the longer working variegated yarn, the very short white yarn, and the longer white yarn.
STEP 36 Now repeat the same set of two knots again but with the shorter white yarn and the longer white yarn. Again, make one knot, slide it all the way down into the head, and repeat with a second knot. Be sure to leave the short tail end of the variegated yarn completely alone—don’t tie it with anything.
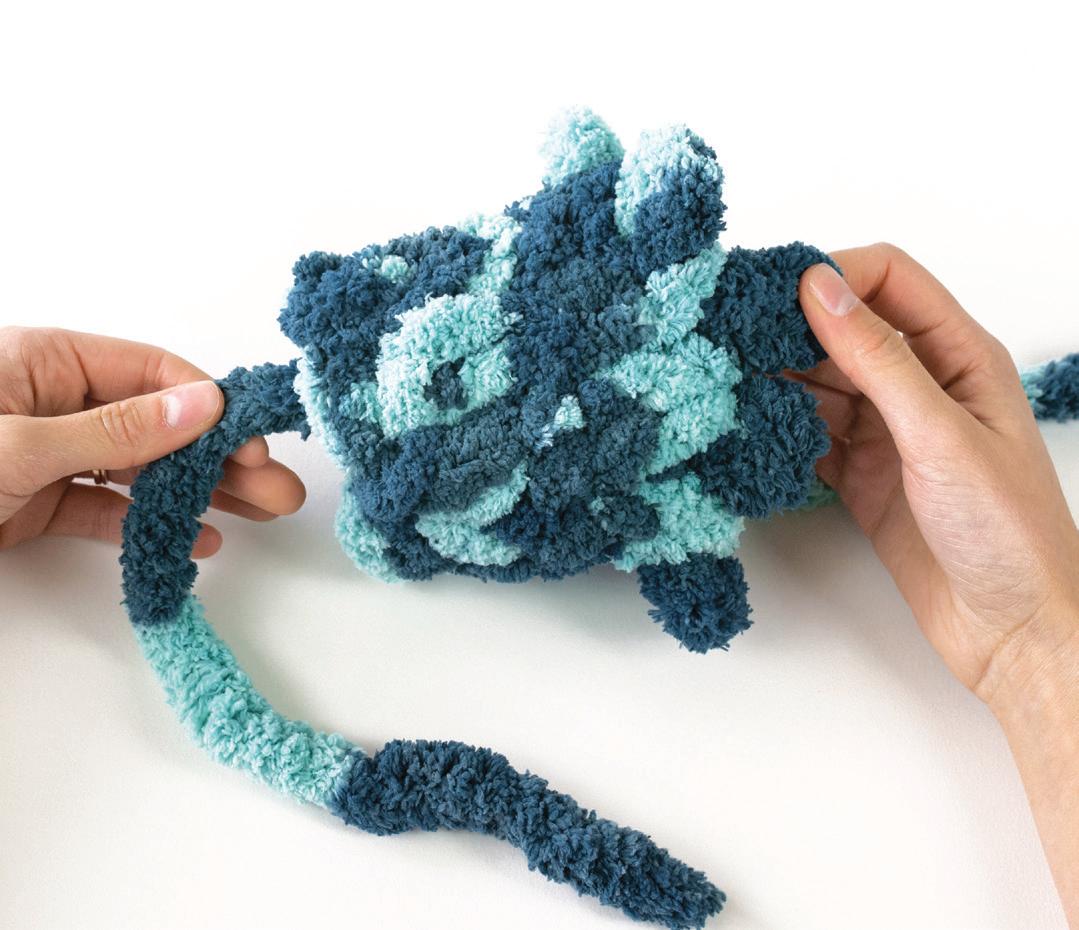
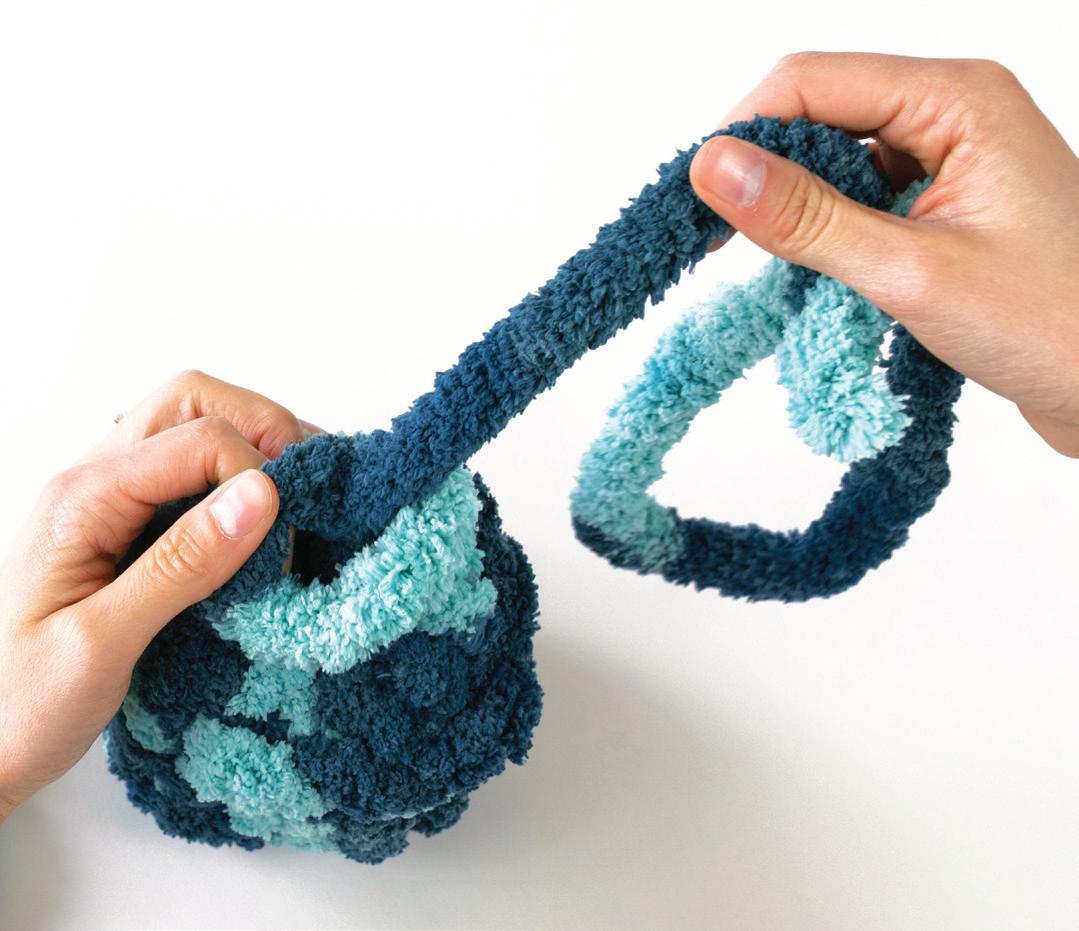
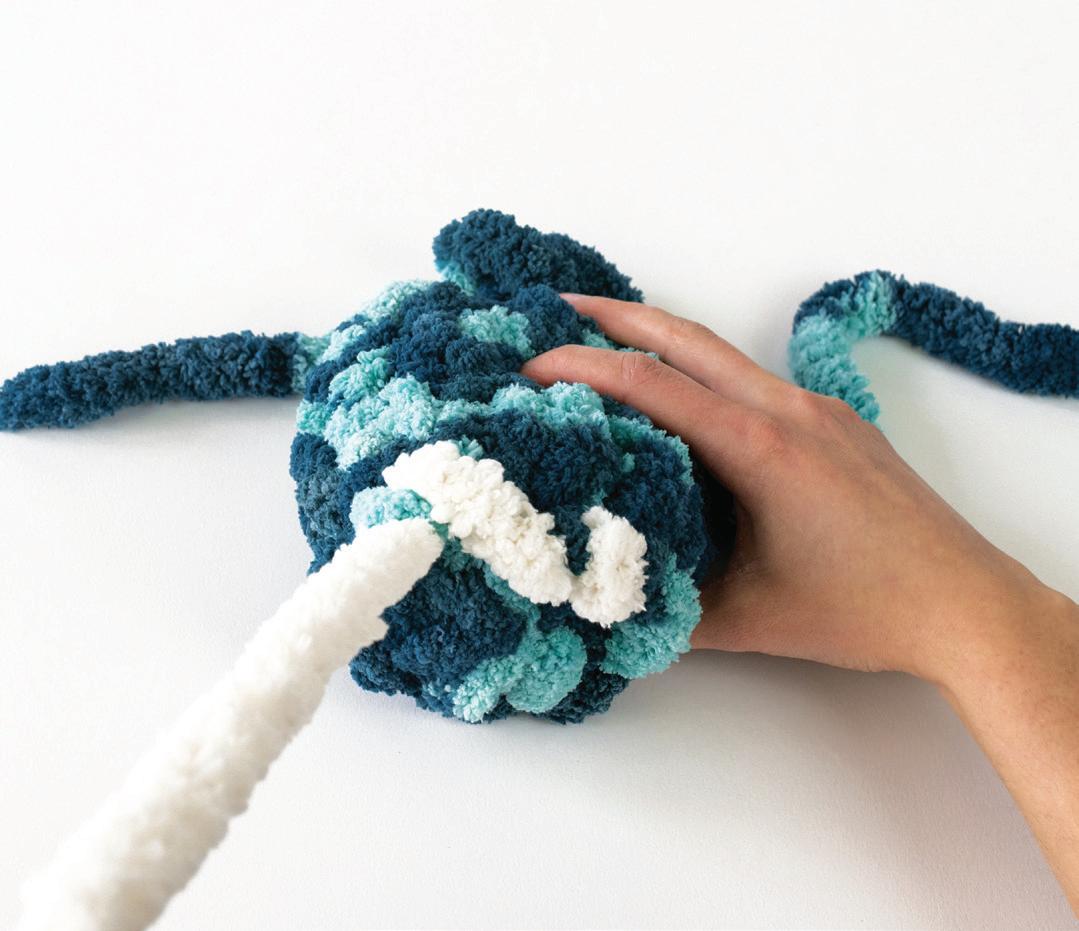
STEP 37 All this knotting has secured the two straight tentacles, which are your two longest pieces: one in the variegated yarn and one in the white yarn. Now it’s time to push these tentacles back down through the jellyfish head, out through the bottom of the head, and to the outside of the project. As you bring them out at the bottom, place them across from each other, one to the left of the eyes and one to the right of the eyes. Don’t worry about their lengths right now.
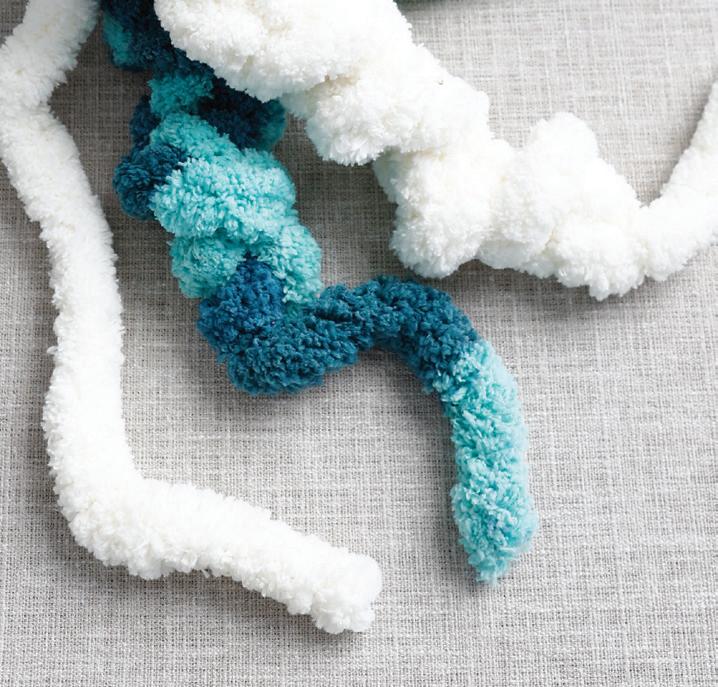
CURLY TENTACLES
31:02
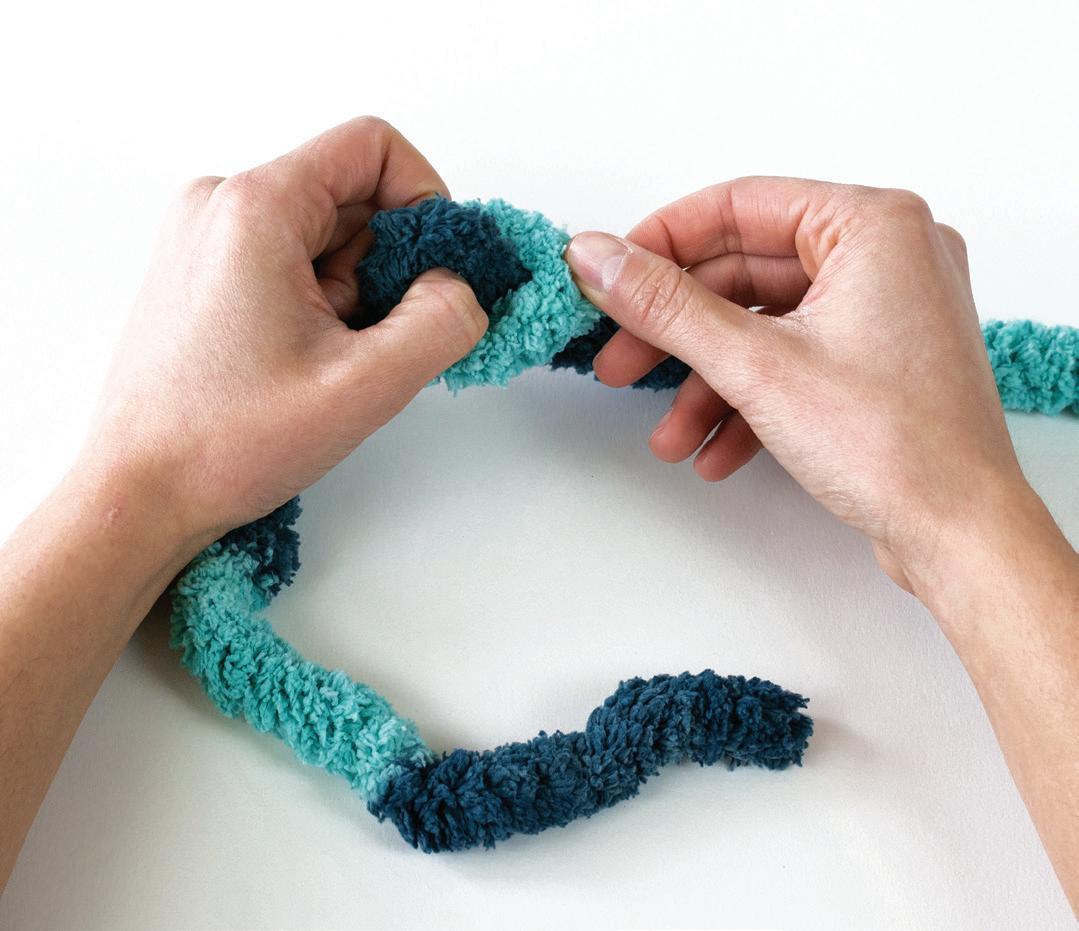
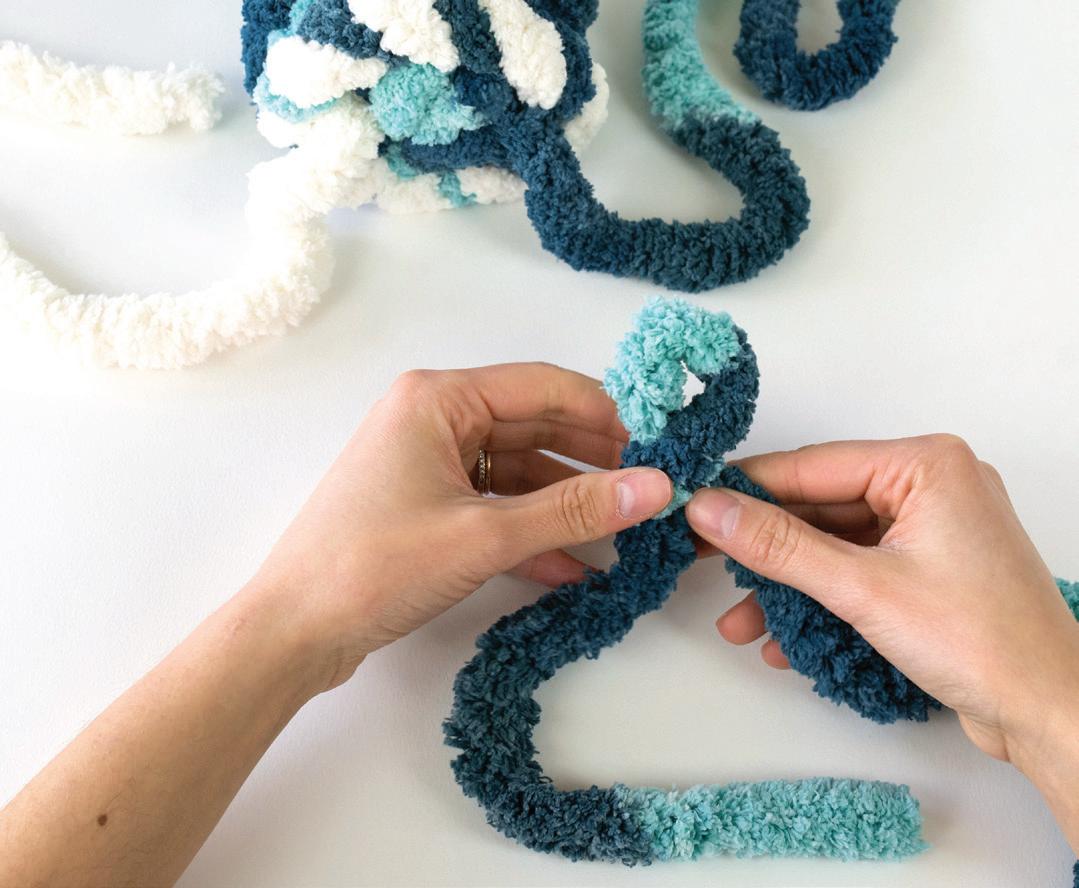
STEP 38 It’s time to make and attach the two curly tentacles— one with the variegated yarn and one with the white yarn. Here are the instructions for making one at a time. First, choose whichever yarn color you want to make your first curly tentacle from, then create a slip knot with that color that has an 8" tail of yarn. The loop should be about 2 1/2" wide.
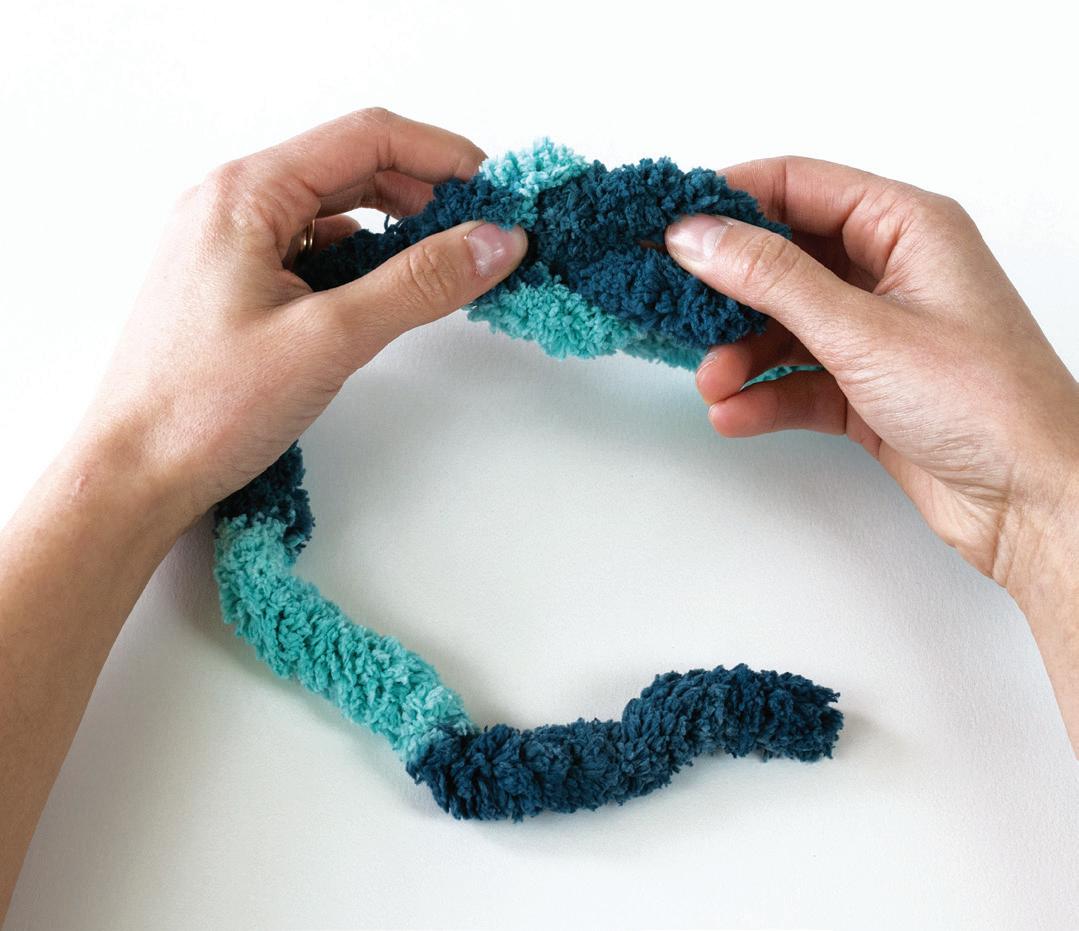
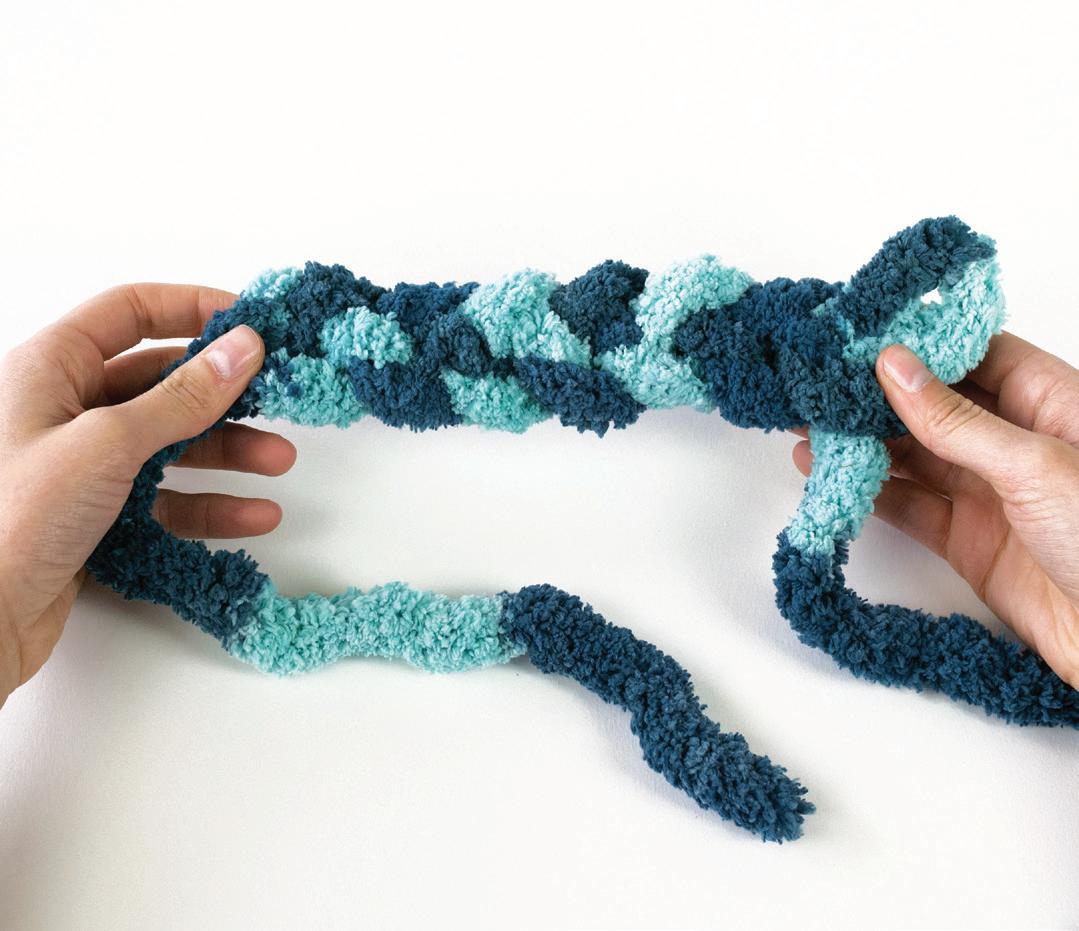
STEP 39 Now create a chain, but twist each loop once before pulling up the next loop through it. One twist will turn the loop into a kind of figure eight, and you pull the next loop through the top of the figure eight. Chain on a total of 8 twisted loops this way (the initial slip knot counts as 1). Twist the last loop and keep your finger in it to keep it twisted.
STEP 40 To close off the tentacle, cut the working yarn, leaving an 8" tail, and then pull this working yarn through the last twisted loop. Pull to close and tighten this end. You’ve completed one tentacle! Now make a second with your other color.
35:52
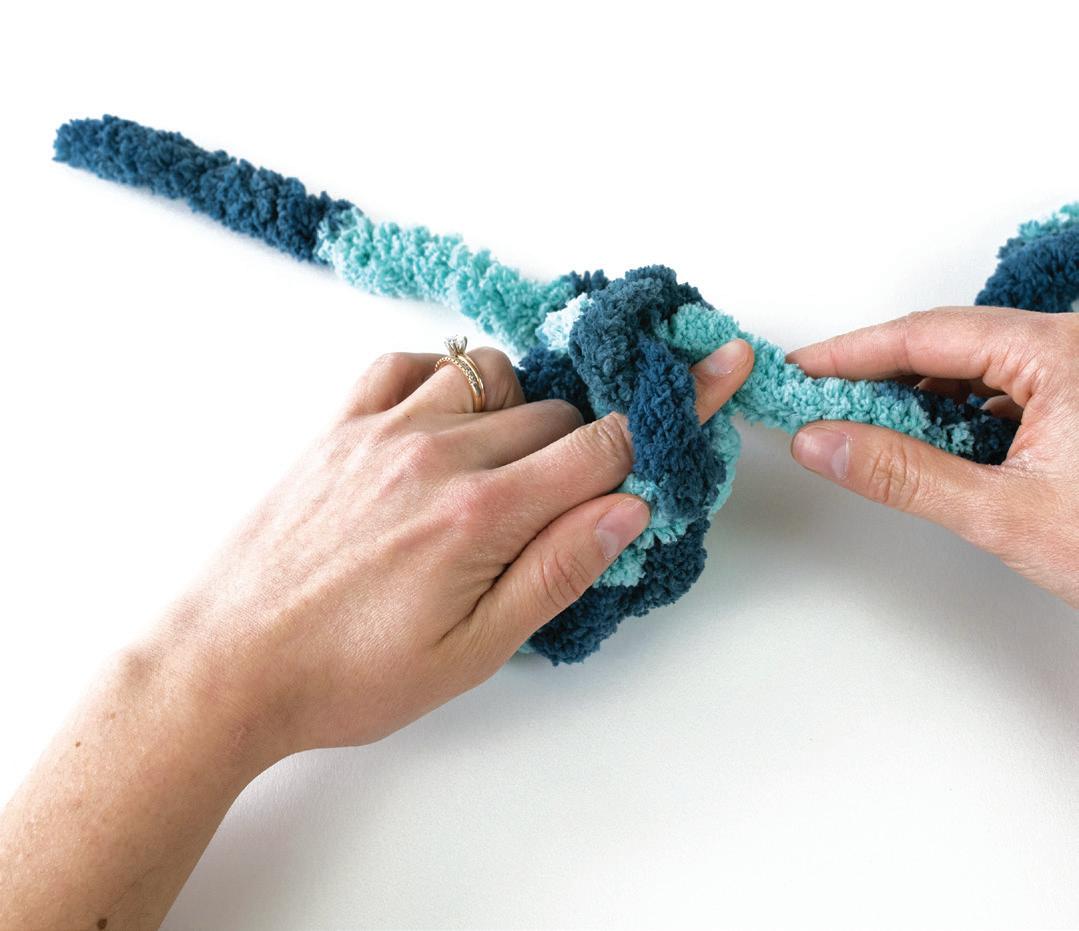
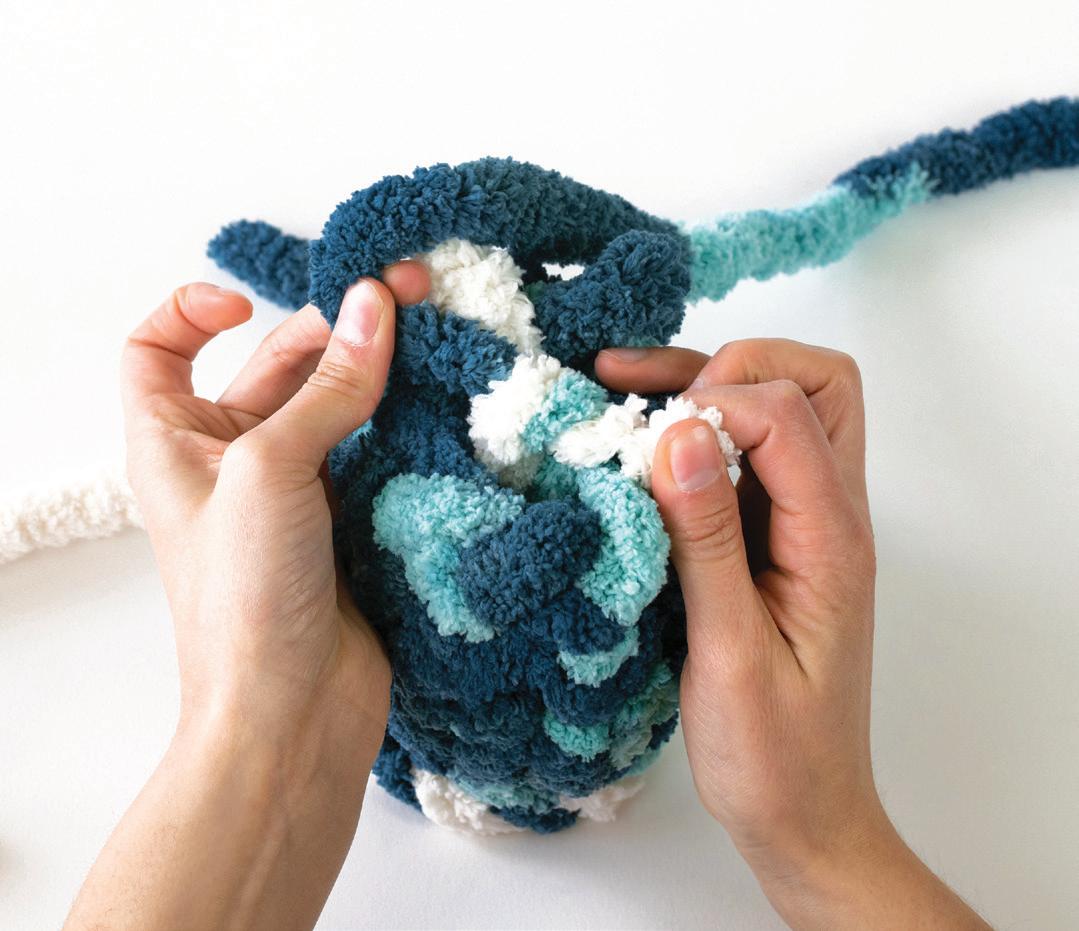
STEP 42 Tie the two curly tentacles’ working ends together with a double knot deep on the inside, near the bottom of the head, to secure them in place—just like you did in step 35. Then double-knot one of the tentacles with the short white yarn too. The goal of all this knotting is to create one big knot in the center of the head that will make the tentacles extra secure; if you instead have a bunch of smaller knots, the tentacles might slip out through the bottom if they are pulled.
35:00
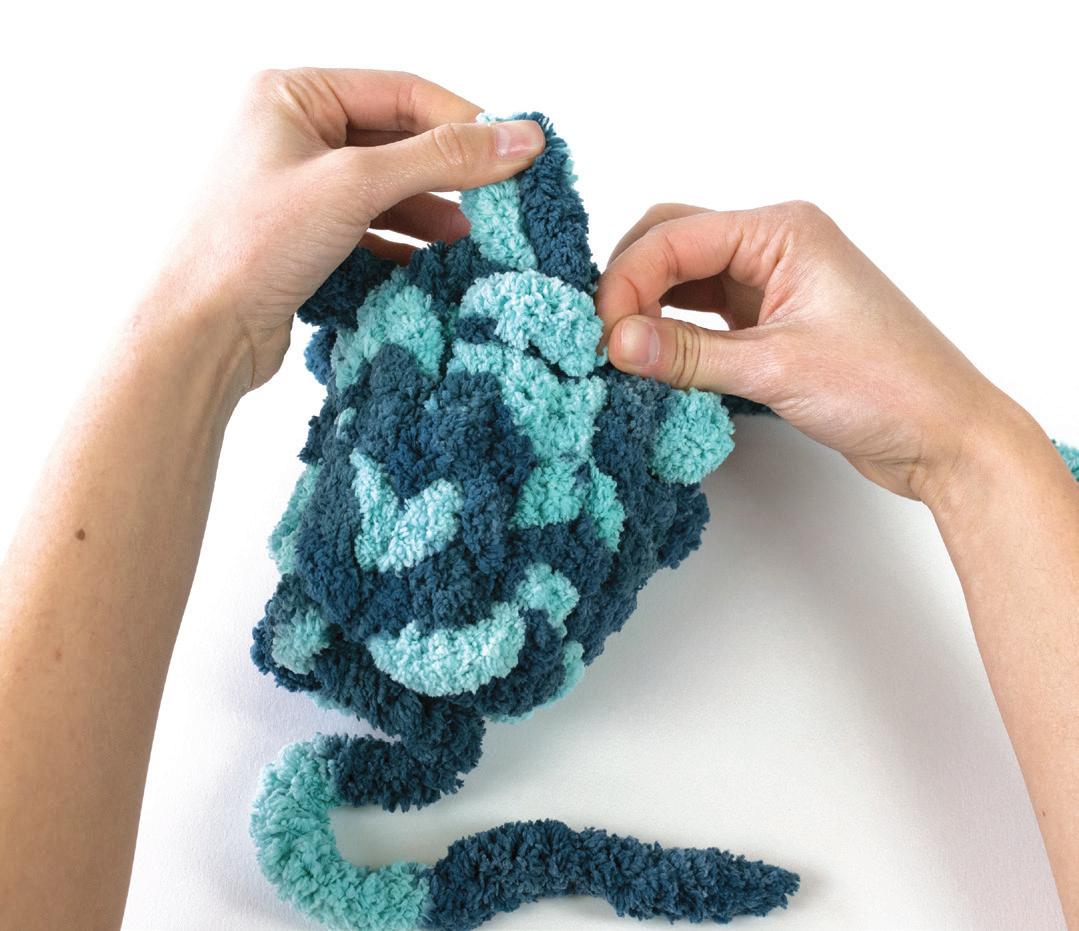
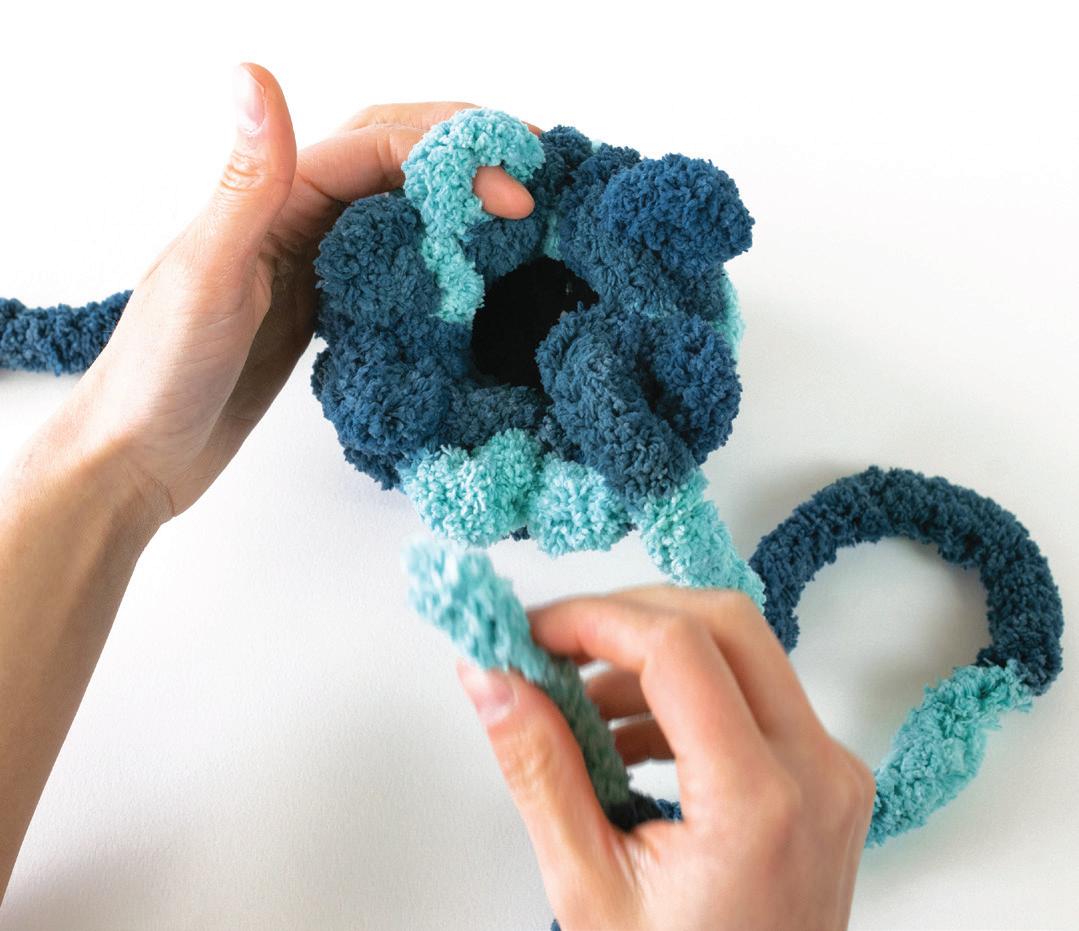
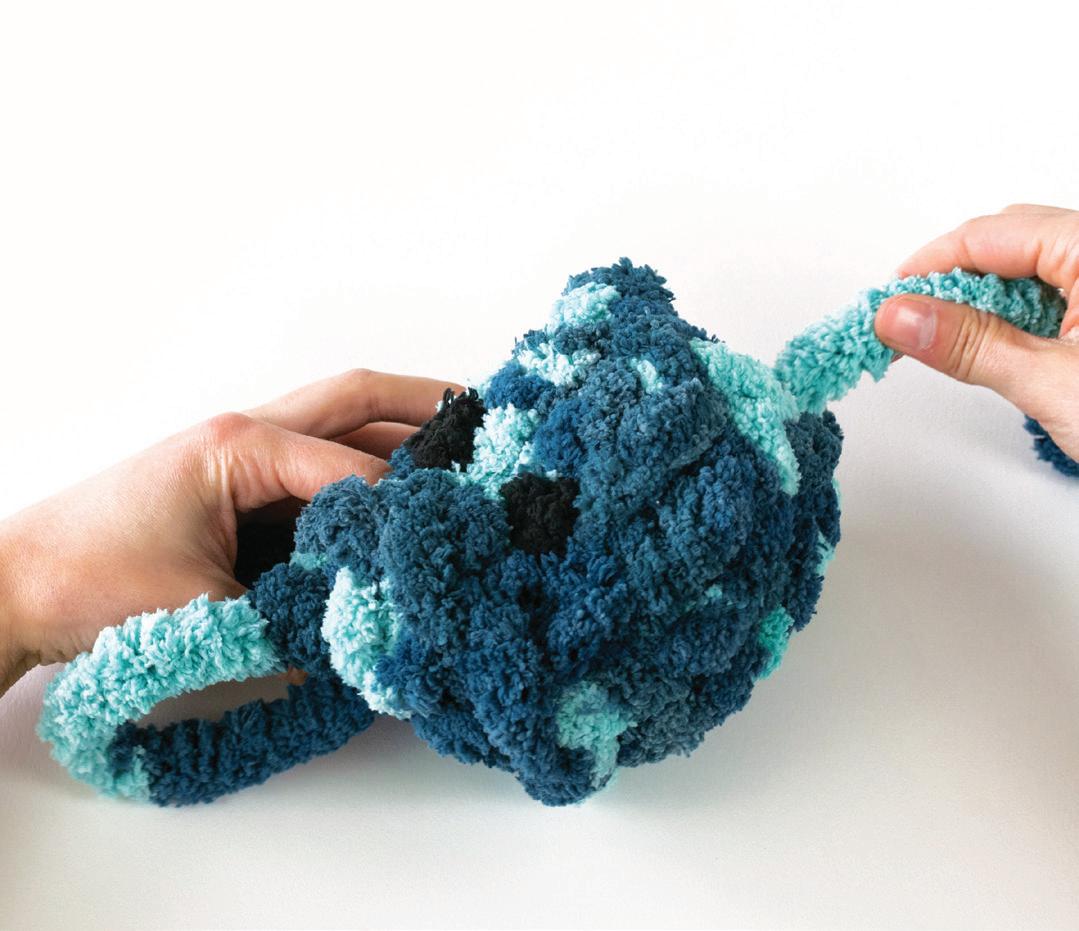
STEP 41 Pull one working end of each curly tentacle up through the bottom of the jellyfish, one tentacle in the front and one in the back (in between the straight tentacles), until the curly part of each tentacle is touching the bottom of the head and the working end is sticking out of the top of the head.
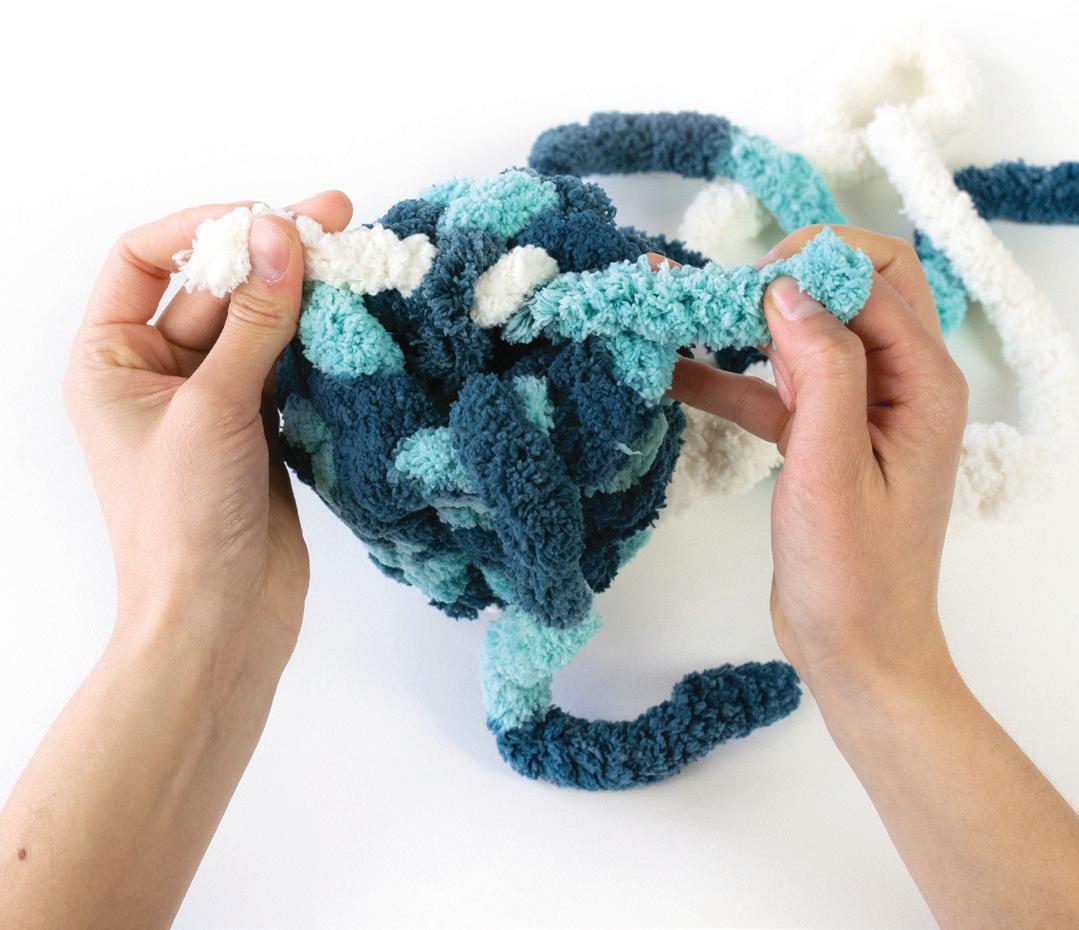
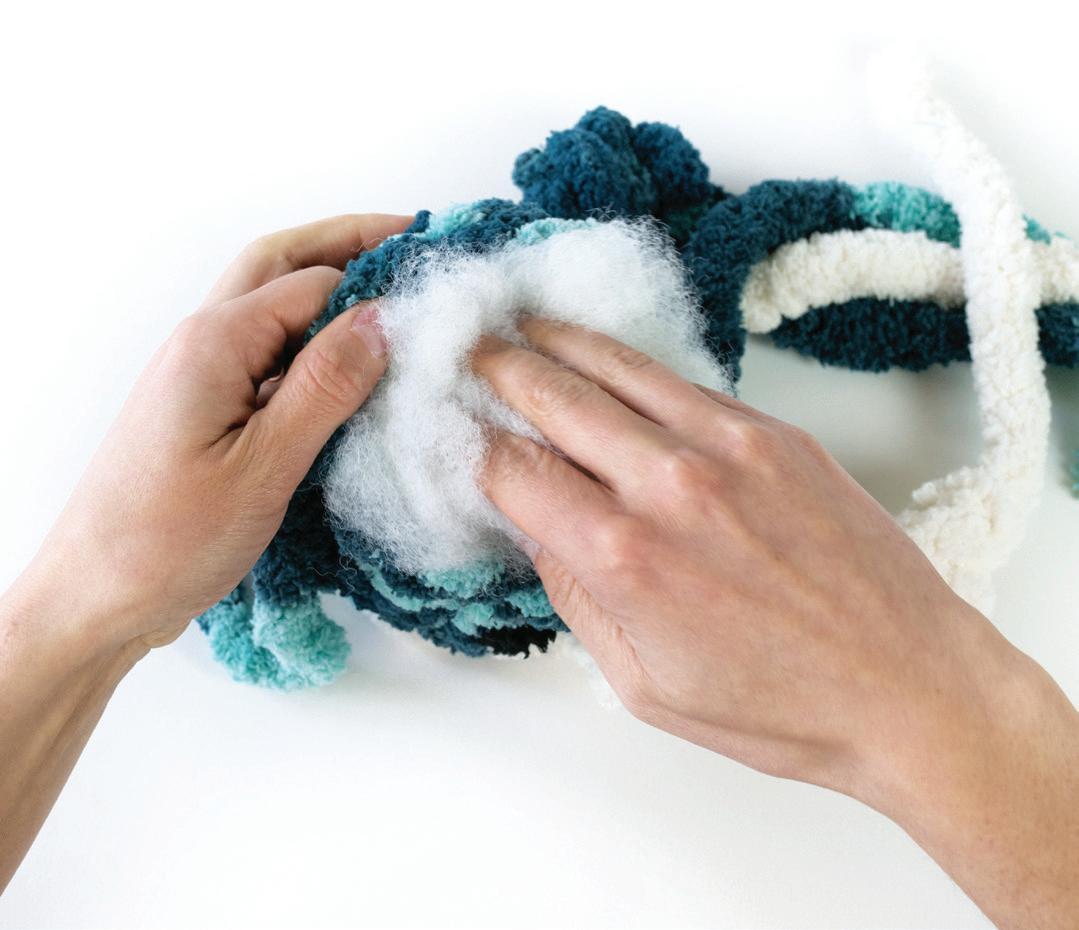
STEP 43 Through the hole in the top, stuff the jellyfish head with fiberfill. At this point, stuff right down on top of all the knots and yarn ends except for that very first variegated tail yarn from the beginning that you haven’t knotted with anything else yet. Make sure to keep that tail yarn on the outside of the project as you stuff.
37:19
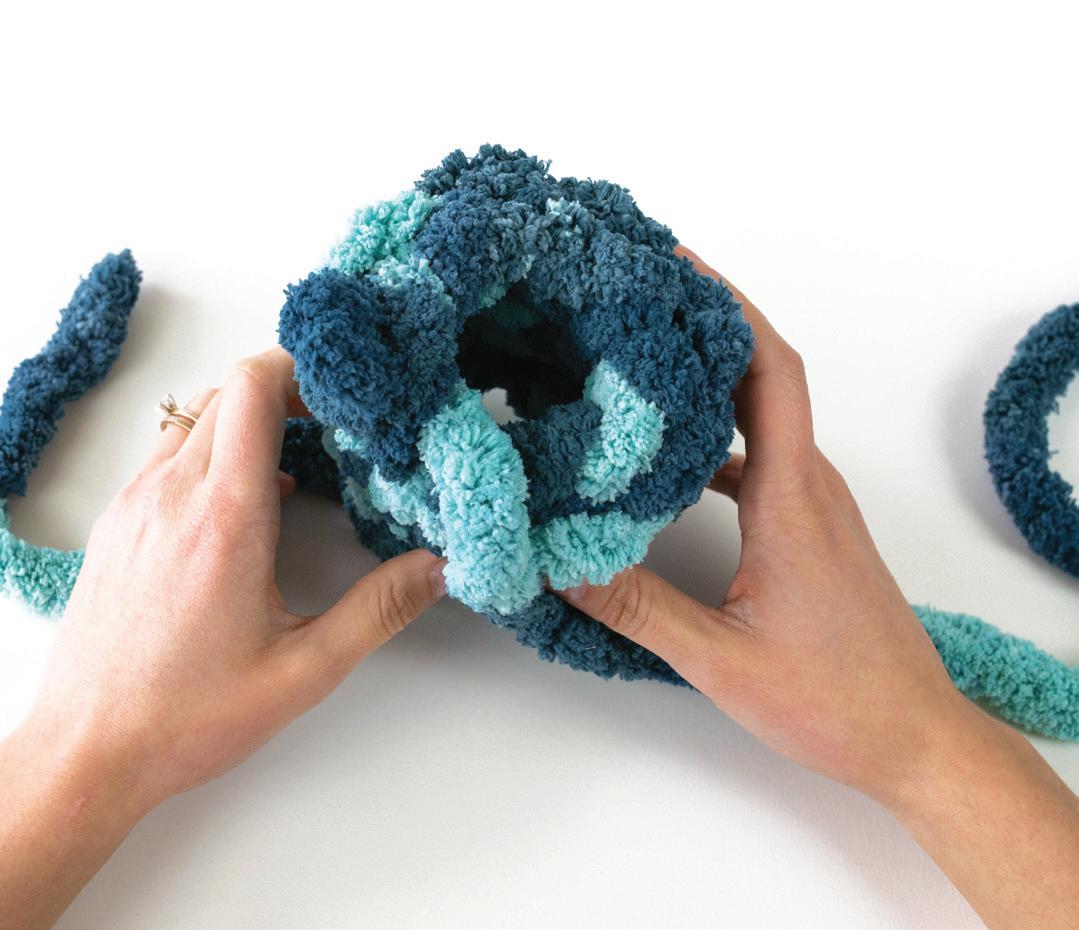
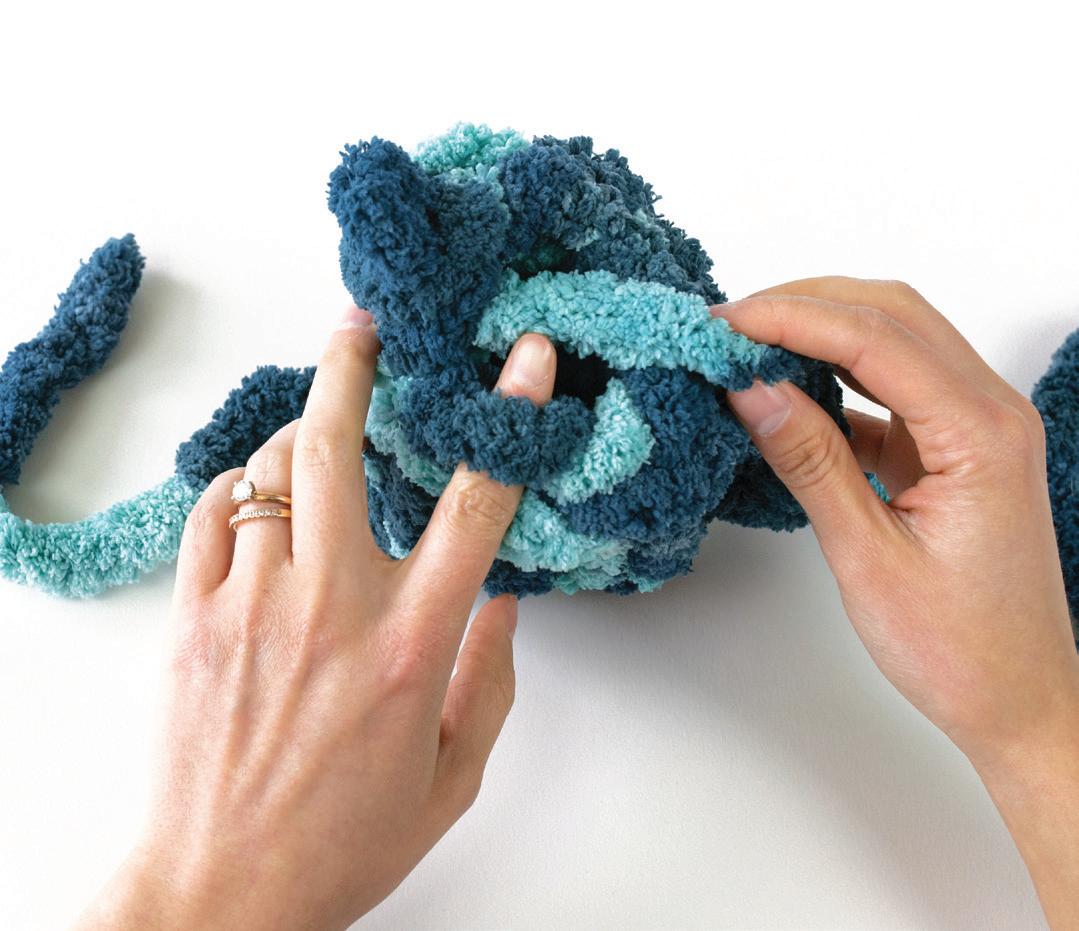
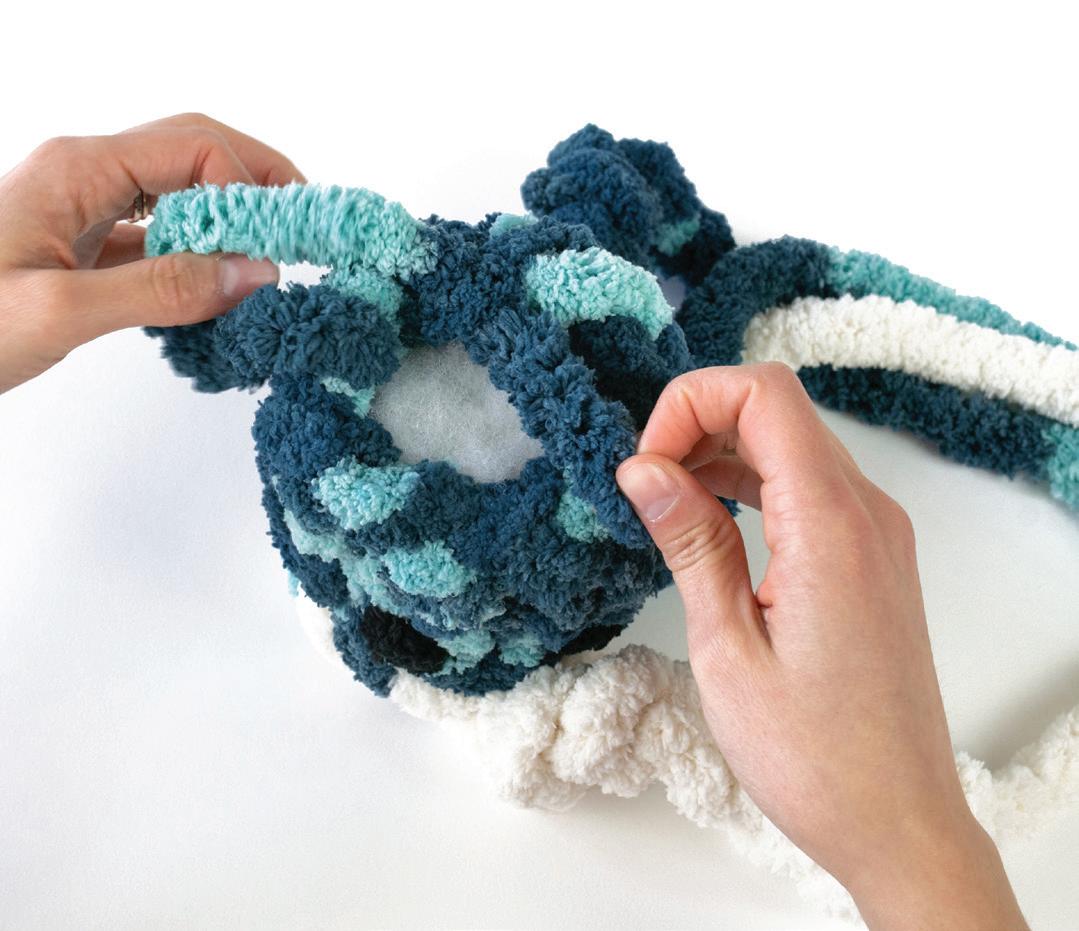
STEP 44 It’s finally time to close the top of the head! Working to the right, pull the variegated tail yarn through each of the top loops, going from the outside toward the inside. Tighten as you go. (Note: It’s important to work to the right here, not to the left.)
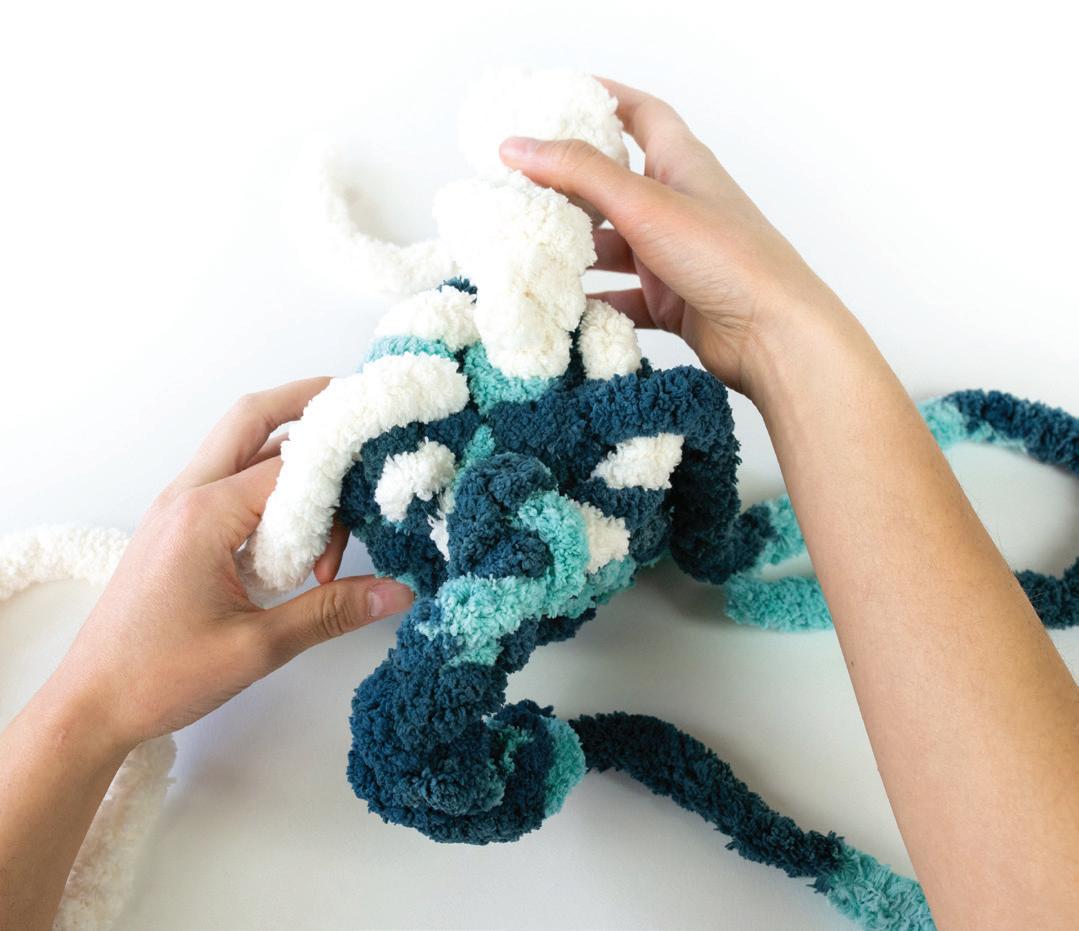
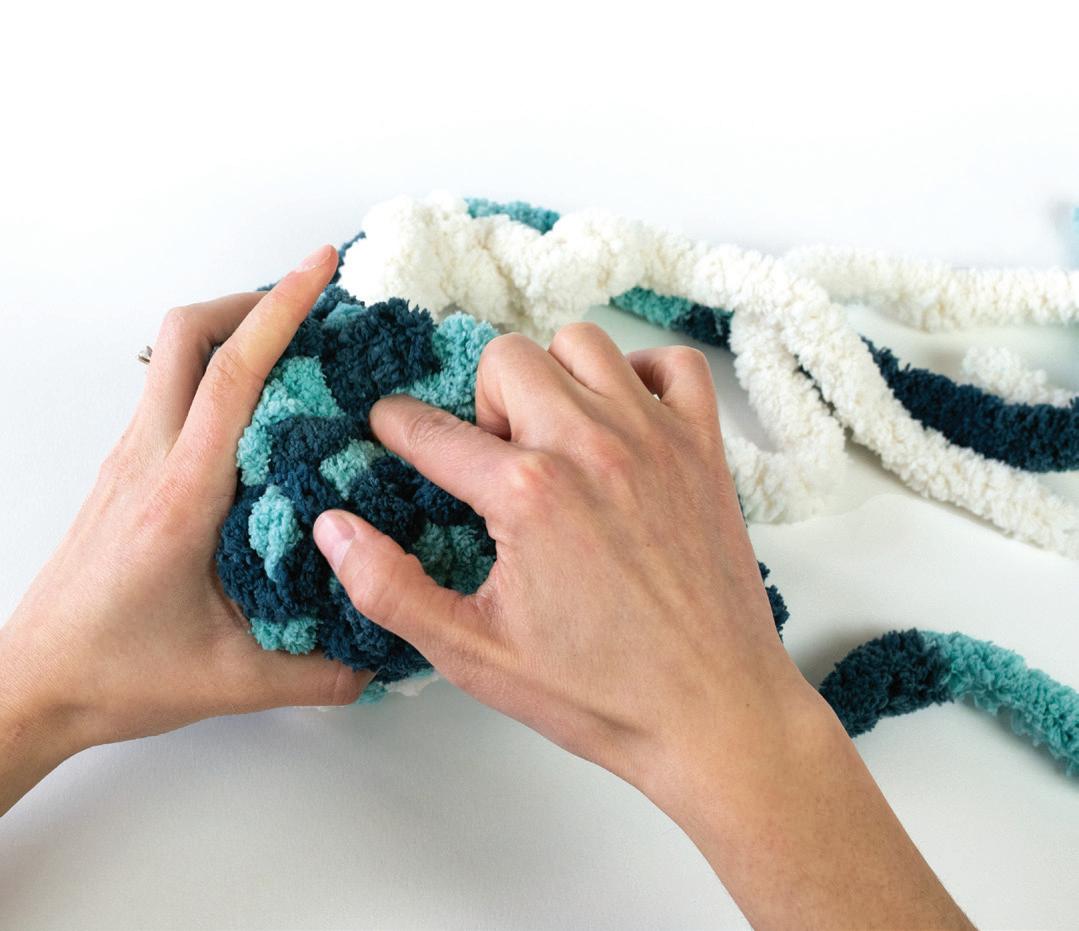
STEP 46 Find the center of the hole that you just closed up at the top of the head. Push the tail yarn and its double knot down through the hole so the strand of yarn and the knot are now entirely on the inside of the head.
STEP 45 Make a double knot at the base of the tail yarn, snug up against the top of the jellyfish head.
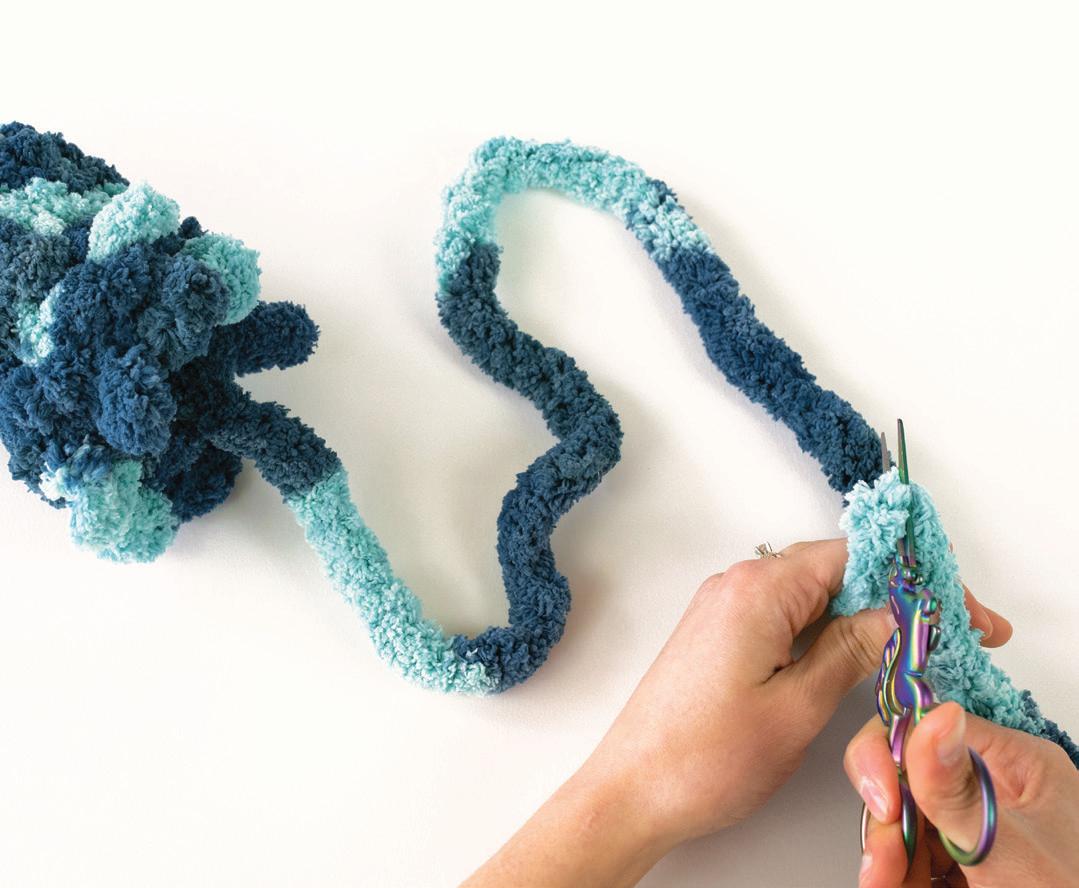
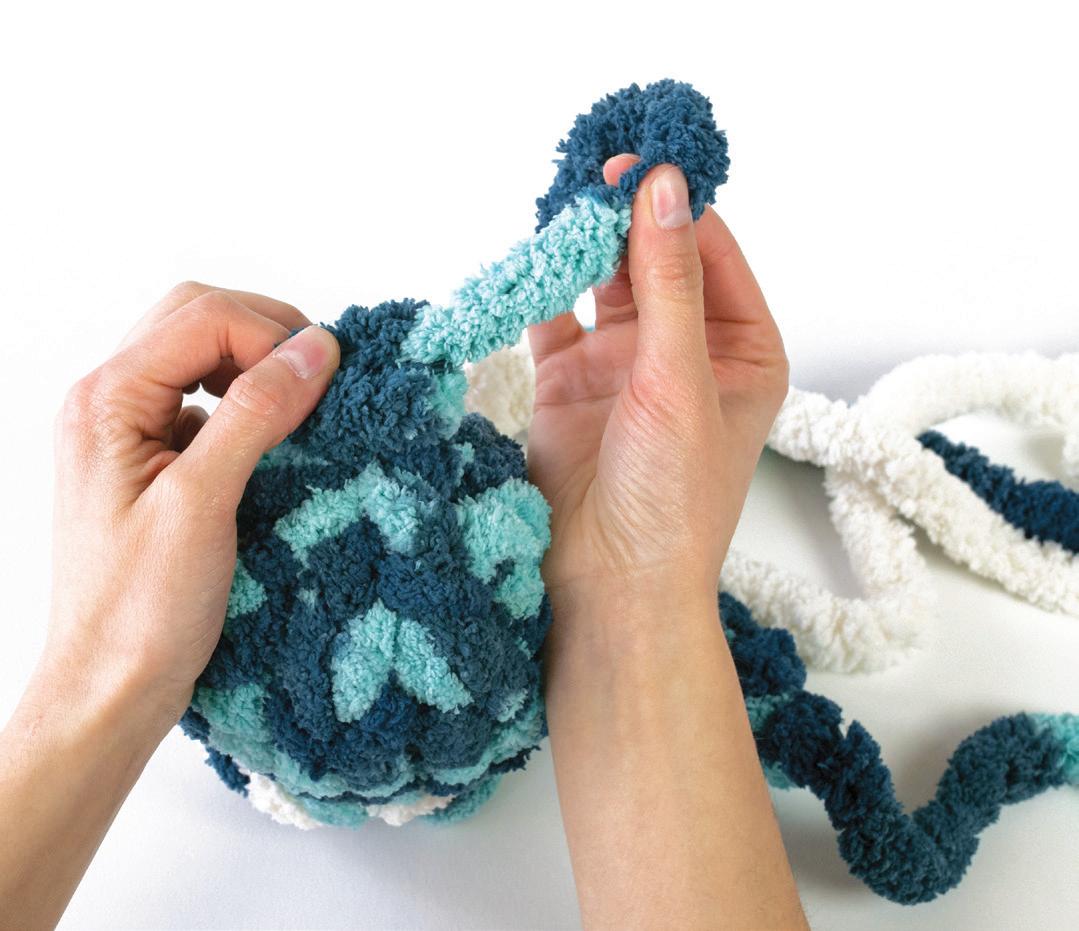
STEP 47 Trim the bottoms of the tentacles to make them all the same length (or your desired lengths). Make sure you don’t accidentally cut the curly part of the curly tentacles.
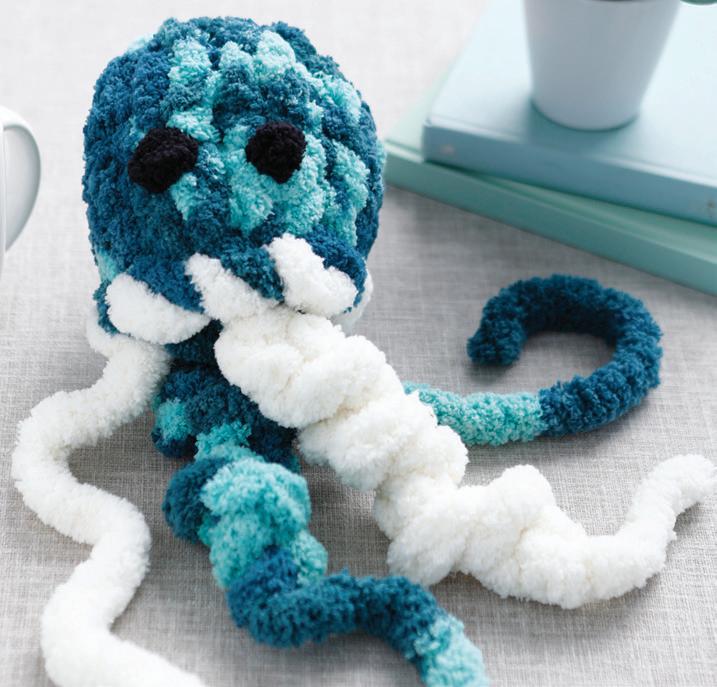
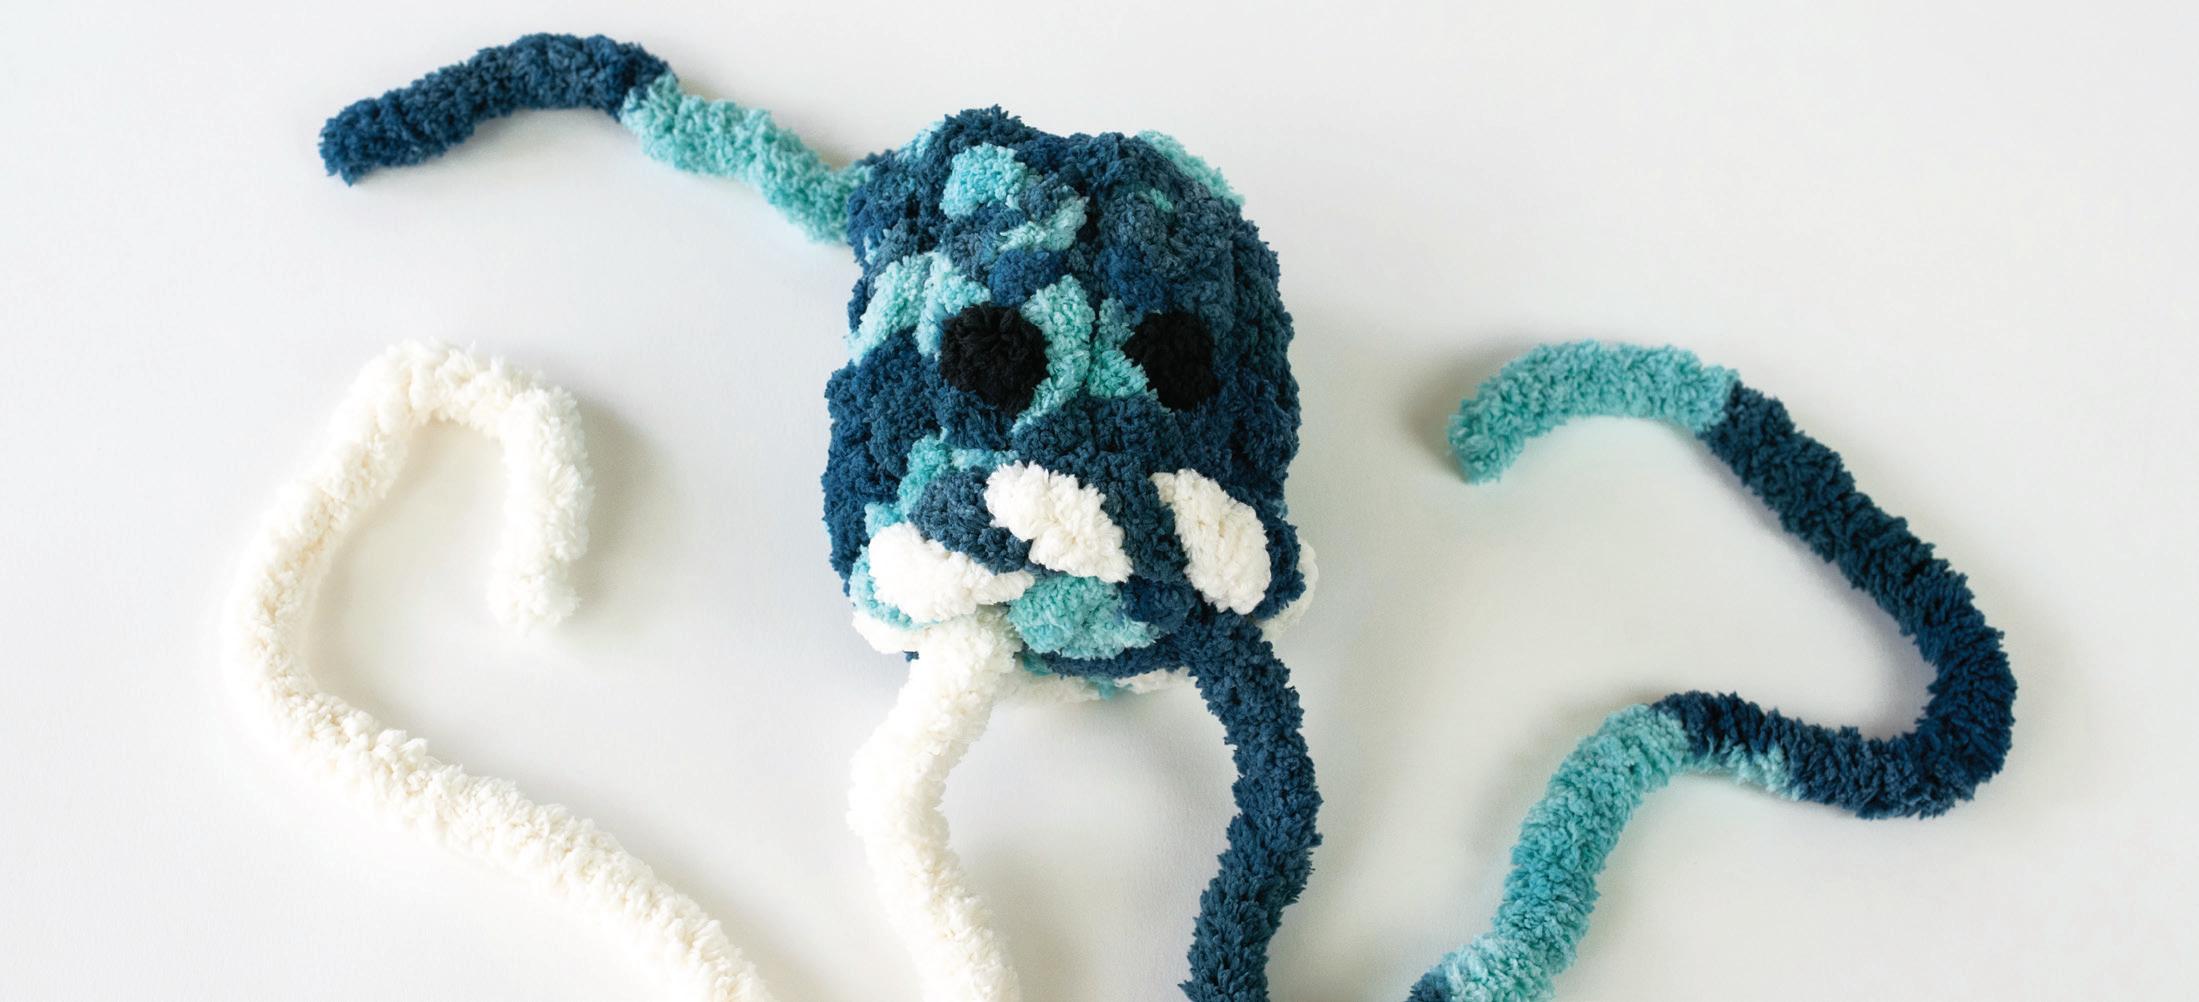
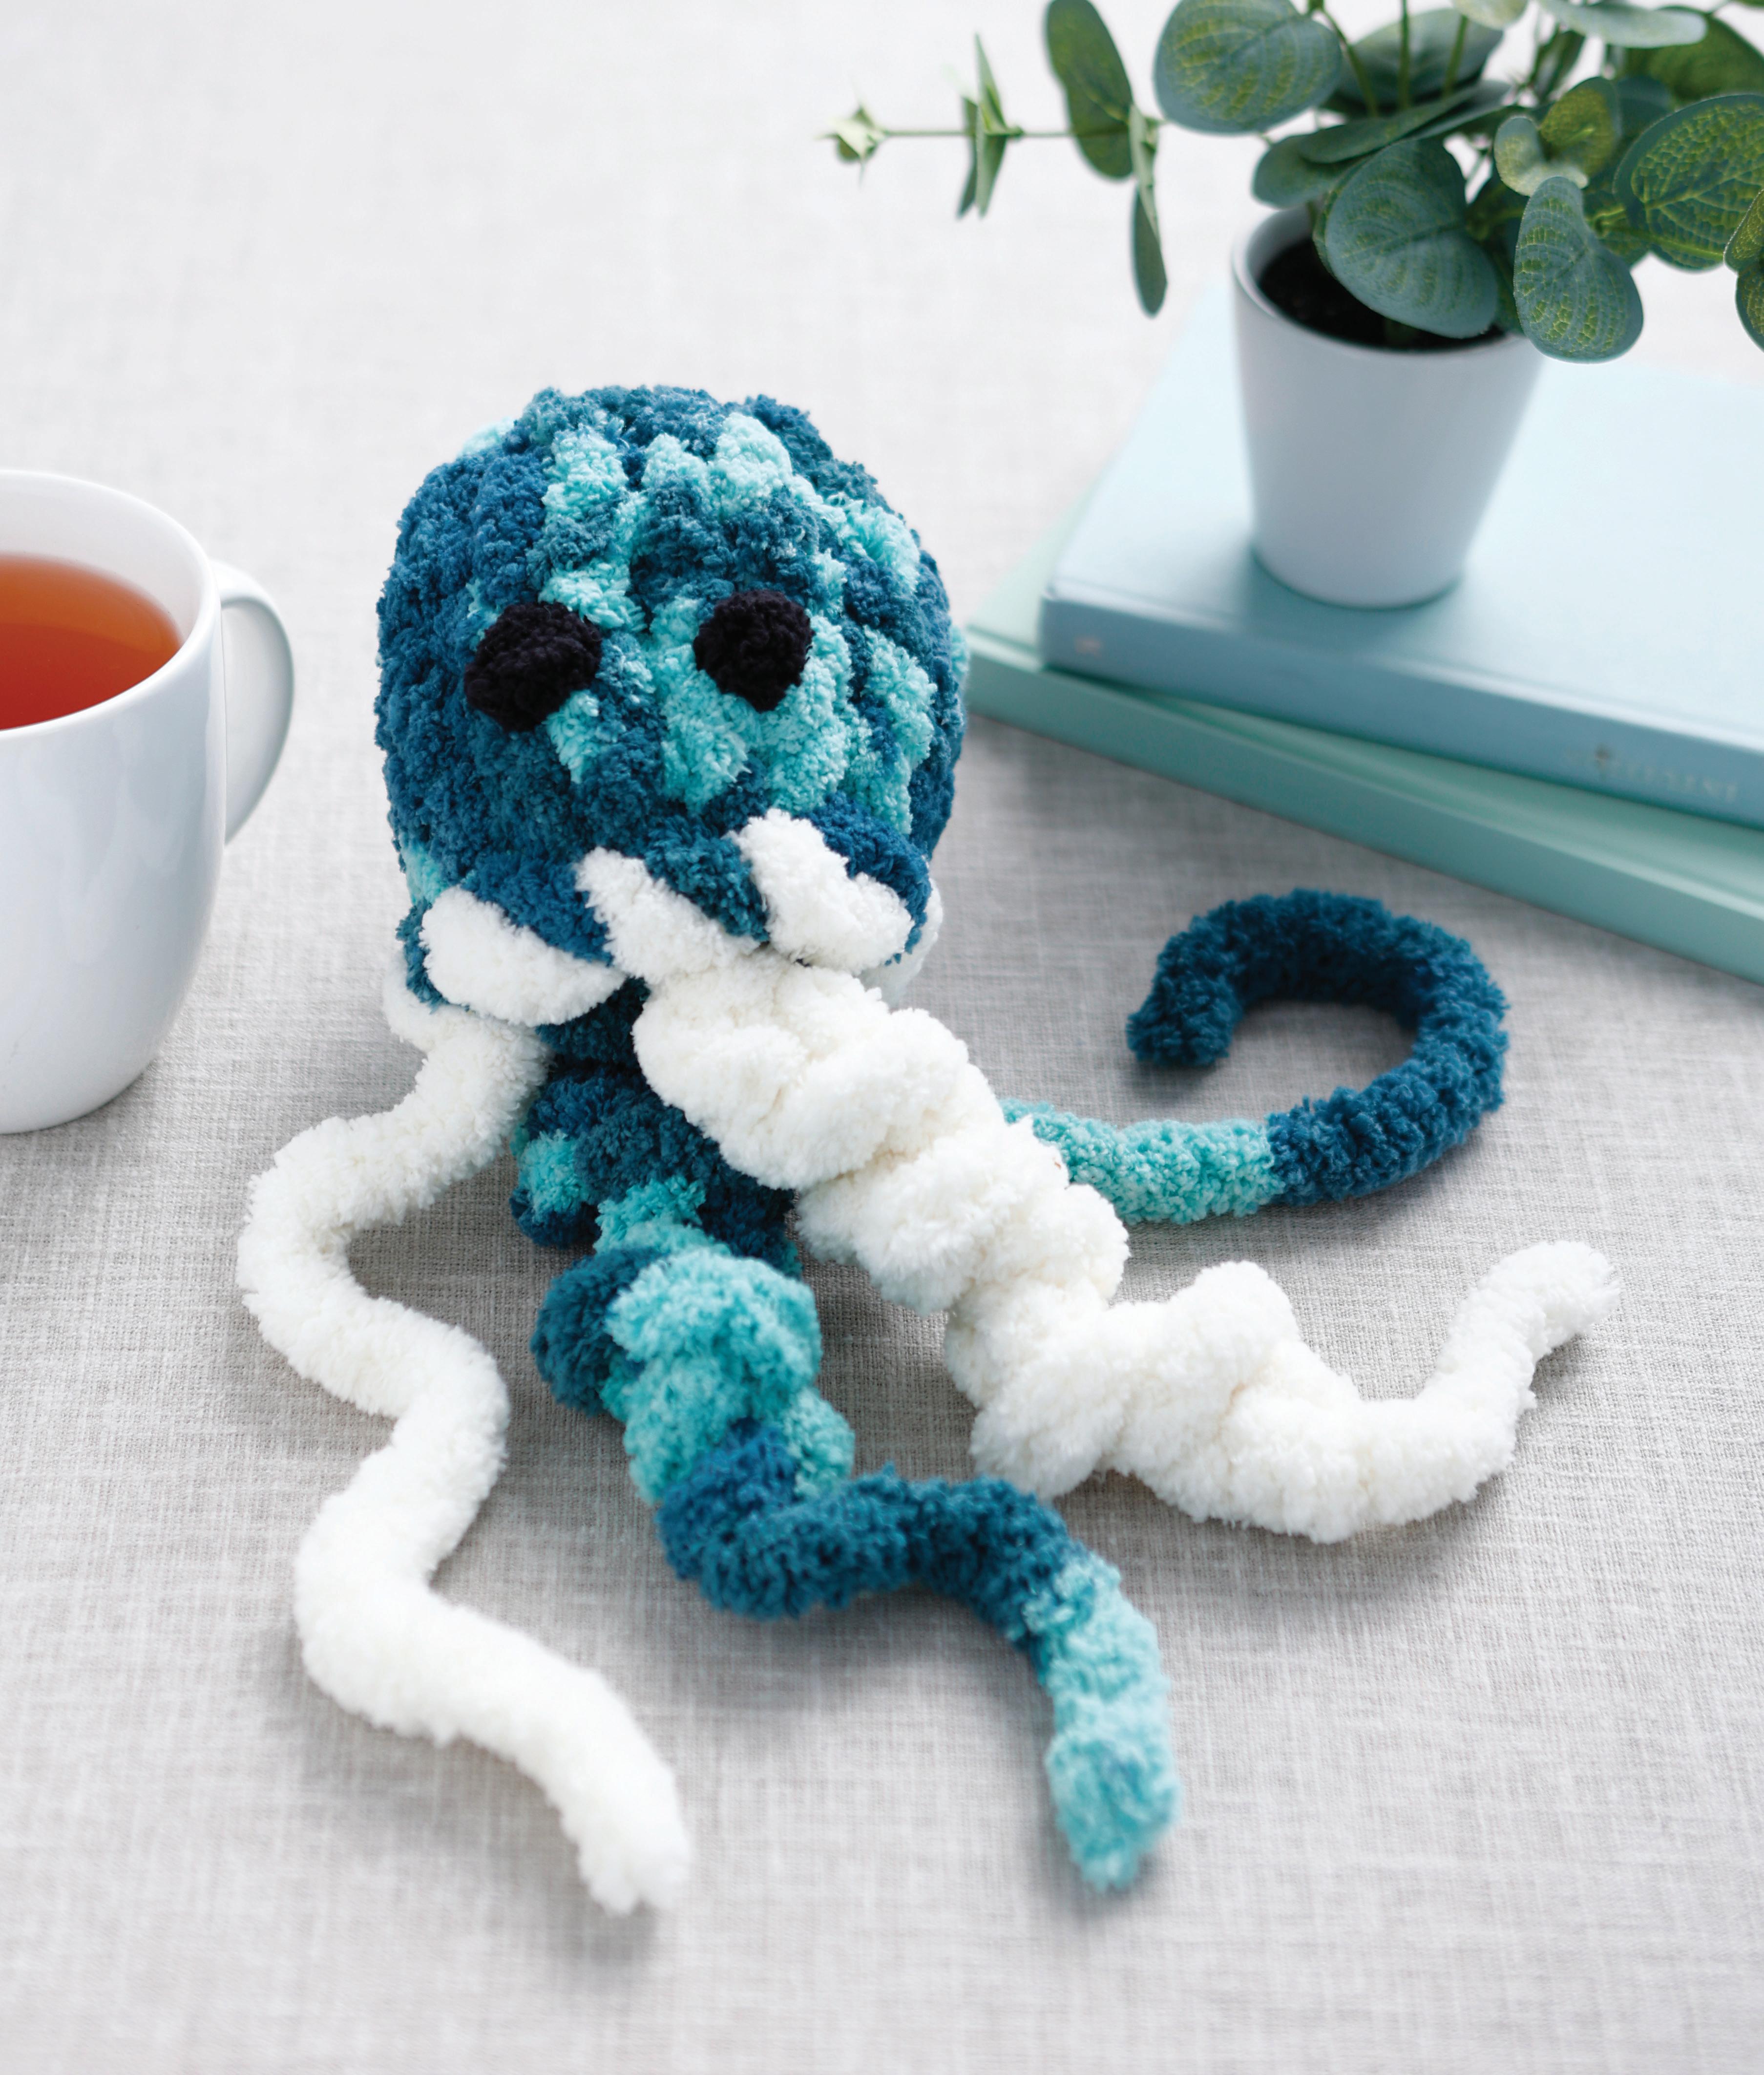
Congratulations, you made it! Jiggle the Jellyfish is complete!
Business is personal at Better Day Books. We were founded on the belief that all people are creative and that making things by hand is inherently good for us. It’s important to us that you know how much we appreciate your support. The book you are holding in your hands was crafted with the artistic passion of the author and brought to life by a team of wildly enthusiastic creatives who believed it could inspire you. If it did, please drop us a line and let us know about it. Connect with us on Instagram, post a photo of your art, and let us know what other creative pursuits you are interested in learning about. It all matters to us. You’re kind of a big deal.
www.betterdaybooks.com better day books
MORE FINGER-KNITTING FUN!
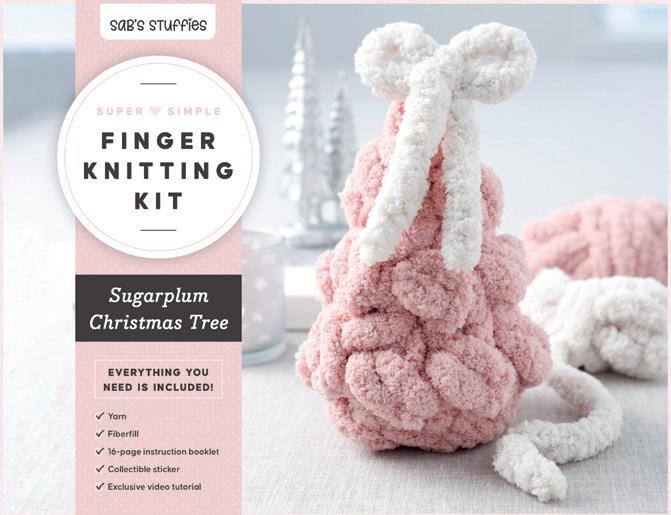
If you loved this kit, be sure to check out the Sugarplum Christmas Tree kit and the author’s book, Get Started in Finger Knitting!
The Sugarplum Christmas Tree kit is just like this kit—it includes the yarn and fiberfill you need to knit a sweet holiday tree, a full instruction booklet, a collectible sticker, and access to an exclusive knit-along-with-the-author video tutorial.
ISBN 978-0-7643-7043-4, $29.99
If you want to really learn the fundamentals of finger knitting and how to make 17 diverse projects, then grab a copy of Get Started in Finger Knitting: Patterns and Instructions for Making Chunky Blankets, Cozy Pillows, and Cute Stuffies by Hand! Through this 144-page book, you’ll start with the basics, learning the best yarns to use and mastering techniques like making a slip knot, adding rows, and increasing and decreasing. Then you’ll dive into 17 super-soft, beginner-friendly projects, including a cozy blanket, a pillow, and adorable animals like a hen, bumblebee, and whale.
ISBN 978-0-7643-7004-5, $19.99
Sabrina-Rose Benedict rocketed to internet fame after her finger-knitted blankets and pillows charmed followers around the world. Now, her not-so-small business, Sab’s Stuffies, carries blankets, pillows, animal stuffies of all sizes, and a collection of DIY kits on everything from ghosts to snowmen. Find out more about her at www.sabsstuffies.com.