
General Information
Welcome
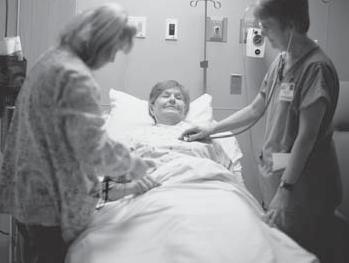
Thank you for choosing the Baptist Center for Joint Replacement to help restore your quality of life with a new hip or knee. Nearly 8 million people in the United States are already living with joint replacements, while over one million new procedures are being performed each year. These surgeries are among the most effective ways to relieve pain, restore independence, and return to the activities you enjoy.
Advances in surgical techniques, prosthetics, and robotics now allow patients to recover faster than ever. Most patients walk with a therapist on the day of surgery before returning home the same day, with overnight stays reserved only when additional monitoring is needed. By around 10–12 weeks, most people are moving with less pain, more confidence, and greater independence in daily life. Reaching full strength, endurance, and the ability to take on more demanding tasks often takes 6 to 12 months, depending on your health and commitment to rehabilitation.
Our program is designed to guide you through every step from preparation before surgery to support at home afterward. This guidebook, along with the virtual education you will receive before surgery, will give you the tools and information you need for a safe and successful recovery.

General Information
The Purpose of the Joint Guidebook
This guidebook is designed to help you prepare for your joint replacement surgery and recovery. It explains what to expect before, during, and after your procedure, and provides practical tools to make your experience as smooth as possible.


Inside, you’ll find information about surgery preparation, pain management, mobility, home safety, medications, and follow-up care. You’ll also learn what steps you can take to support your recovery and get the best results from your new joint.
This resource is meant to be used along with the virtual education you’ll receive before surgery and the guidance of your care team. It does not replace medical advice. Always follow the instructions of your surgeon and healthcare team first. Keep this guidebook handy, refer to it often, and share it with the family members or friends who will be supporting you.
Preparing for Surgery
Overview of Baptist Center for Joint Replacement
The Baptist Center for Joint Replacement offers a dedicated program for hip and knee replacement within the Baptist Health System. With advances in orthopedic care, most patients now go home the same day of surgery. Some may remain overnight if additional monitoring is medically necessary, but this is no longer routine.
Because joint replacement is elective, you should plan to recover at home — either in your own home or with family or friends. Coverage for shortterm rehab, which means a temporary stay in a rehab facility for therapy and support, is limited and based on medical need rather than circumstances like living alone. That’s why it’s important to prepare your home in advance and arrange for help during your first few days. This guidebook and the virtual education you’ll receive before surgery will show you how to prepare, arrange support, and set yourself up for a safe recovery at home.
Features of the program include:
• Nurses, therapists, and patient-care technicians who specialize in joint replacement
• Private rooms (if an overnight stay for observation is required)
• A focus on personalized recovery activities
• Family and friends serving as “coaches” in your recovery
• Personalized discharge teaching with you and your coach
• A Joint Care Navigator who works with you and a Nurse Case Manager to plan your discharge
• This comprehensive patient guidebook


Preparing for Surgery
An Introduction to Joint Replacement
Joint replacement surgery is one of the most common and successful orthopedic procedures. It involves removing the damaged parts of a joint and replacing them with a prosthetic implant designed to reduce pain and restore function. These surgeries are most often performed on the hip and knee, where arthritis or injury causes daily pain and limits mobility. Patients are usually considered for surgery when pain or stiffness interferes with everyday activities such as walking, exercise, work, or recreation, and when nonsurgical treatments like medication, physical therapy, or injections are no longer effective.
Thanks to modern surgical methods, anesthesia, and recovery protocols, most patients walk with a therapist the same day of surgery. Many return home that same day, while some remain overnight if extra monitoring is needed. Recovery continues in stages: the first several weeks focus on pain control, mobility, and therapy exercises, while the following months bring gradual improvements in strength, endurance, and function. By 10–12 weeks, many patients notice meaningful improvements in their daily activities, though full recovery may take 6 to 12 months depending on health, motivation, and rehabilitation progress.
What is osteoarthritis and why does my hip or knee hurt?
Joint cartilage is a tough, smooth tissue that covers the ends of bones where joints meet. It cushions the bones during movement and, because it is slippery, allows the joint to move with very little friction. Osteoarthritis, the most common type of arthritis, is a wear-and-tear condition that damages this protective cartilage. It can develop slowly over many years or progress more quickly after an injury or repetitive stress. As the cartilage wears down, the bone ends become exposed, leading to painful bone-on-bone contact. This often causes pain, swelling, stiffness, and reduced motion in the joint. Osteoarthritis typically occurs later in life and may affect just one joint or several.
What is a knee replacement?
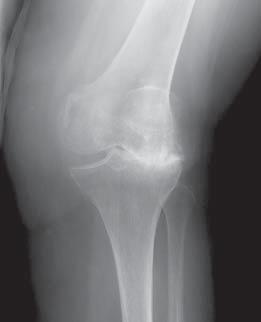

A knee replacement is actually a bone and cartilage replacement using an artificial surface. The entire knee is not removed, as some people think. Instead, the damaged bone ends are resurfaced with an implant: a metal alloy on the femur and a durable plastic spacer on the tibia and patella (kneecap). This creates a new, smooth cushion
Preparing for Surgery
and a functioning joint that can reduce or even eliminate pain, allowing for improved mobility and quality of life.
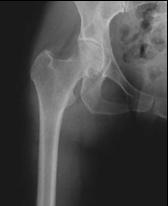
What is a hip replacement?
A hip replacement is a surgery that removes the arthritic ball of the upper femur (thighbone) along with damaged bone and cartilage from the hip socket. The ball is replaced with a metal implant fixed securely inside the femur, and the socket is lined with a plastic or metal insert, often supported by a metal shell. Together, these components create a smooth, functioning joint that relieves pain and restores mobility.
What Results Can I Expect After Joint Replacement?
Results vary depending on the quality of the surrounding tissue, the severity of arthritis at the time of surgery, your activity level, and how closely you follow your doctor’s instructions. Advances in orthopedics continue to improve outcomes, with many patients returning home the same day of surgery or after a short observation stay. Most notice meaningful improvements in pain, mobility, and daily function within 10–12 weeks, with recovery continuing to build over the following months.
Am I too old for this surgery?
Age alone is not usually a barrier to joint replacement. If you are in reasonable health and want to maintain an active, productive lifestyle, you may be a candidate. Your surgeon may ask you to see your personal physician to confirm your overall health and readiness for surgery.
How long will my new joint last and can a second replacement be done?
Joint implants have a limited life expectancy that depends on factors such as age, weight, activity level, and medical condition. Over time, wear and tear may lead to loosening or mechanical failure. While following your surgeon’s recommendations can help extend the life of your implant, there is no guarantee of how long it will last. If needed, a second replacement, called a revision surgery, can be performed.
Why might I require a revision?
Just as your natural joint can wear out, a joint replacement may also wear over time. The most common reason for revision is loosening of the implant from the bone, but wear of the plastic spacer can also make a new spacer necessary. Your surgeon will review the possible complications of joint replacement with you before surgery to ensure you understand every aspect of the procedure.
Preparing for Surgery
What are the major risks?
Most joint replacement surgeries go very well without complications. Serious risks, though uncommon, include infection, pneumonia, or blood clots. To lower these risks, your care team uses antibiotics, breathing exercises, and blood thinners, and surgeons take special precautions in the operating room. A multifaceted approach is used to minimize complications and keep you safe.
Should I exercise before the surgery?
Yes. Strengthening your muscles before surgery can help with recovery. Please review pages 12–15 for specific exercises you should start doing now.
Will I need blood?
Modern surgical practices have greatly reduced blood loss during joint replacement, but in some cases a transfusion may still be needed. If you are concerned, discuss options with your surgeon beforehand. For more details, see the Appendix on Blood Transfusions. Baptist Health also has options for patients whose religious beliefs do not allow transfusion, which should be discussed with your surgeon prior to surgery.
How long will I be incapacitated?
You should not expect to be incapacitated for long. Most patients get out of bed and walk with a therapist on the day of surgery. If you go home the same day, you’ll continue your recovery and exercises there. If you stay overnight for observation, you’ll be up the next morning, sitting in a chair or recliner and working with therapy before discharge. Early and frequent mobilization is a key part of our program, whether you recover at home the same day or after a short stay.
How long will I be in the hospital?
Most patients go home the same day of surgery. Some may stay one night for observation if additional monitoring or therapy is needed before discharge. In either case, certain recovery goals must be met to ensure you are safe to return home. If those goals are not achieved, your stay may be extended for further therapy or testing.
What if I live alone?
Joint replacement is considered elective surgery, and discharge is expected to be directly home or to the home of a relative or friend. This applies whether you go home the same day of surgery or after a short observation stay. It’s important to plan ahead and arrange for support during your first few days of recovery. Insurance coverage for short-term rehab is based on medical need, not on social circumstances such as living alone or being
Preparing for Surgery
a caregiver. Because of this, placement in a rehab facility after surgery cannot be guaranteed.
Will I need a second opinion prior to the surgery?
Your surgeon’s scheduler will contact your insurance company to pre-authorize your joint replacement. If a second opinion is required by your insurance, you will be notified.
How long does the surgery take?
The hospital schedules about two to two-and-a-half hours for surgery. This includes time for the operating room staff to prepare before surgery and take x-rays afterward.
Do I need to be put to sleep for this surgery?
You may have a general anesthetic, often called “being put to sleep.” Some patients prefer a spinal or epidural anesthetic, which numbs the legs without requiring you to be asleep. The decision will be made by you, your surgeon, and the anesthesiologist. For more details, see the Appendix on Anesthesia.
Will the surgery be painful?
Some discomfort after surgery is expected, but your team will make every effort to keep you comfortable. While you are asleep, your surgeon will inject medication directly into the joint to help with pain relief. A multimodal approach is used, which may include opioids, acetaminophen, nonsteroidal medications, and muscle relaxers. The goal is to use multiple methods to manage pain while minimizing opioids so you stay comfortable, alert, and ready to participate in therapy soon after surgery.
Who will be performing the surgery?
Your orthopedic surgeon will perform the surgery, often with the help of an assistant.
How long and where will my scar be?
The length and location of your scar will vary depending on your surgery, but surgeons aim to keep it as short as possible. If you already have a scar in the area, your surgeon may be able to use it for the new incision. Some numbness around the scar is common, though much of the sensation often returns over time.
Will I need a walker, crutches, or a cane?
Yes. After surgery you will need a walker for safety, specifically a two-wheeled rolling
Preparing for Surgery
walker, as it provides the most stability. Your surgeon’s office will arrange for delivery to your home before surgery, and you will need to bring the walker with you to the hospital. If you live outside the delivery area, the walker may be delivered to you at the hospital on the day of surgery. Most patients start with a walker and then transition to a cane as balance and strength improve.
Where will I go after discharge from the hospital?
You should plan to go directly home, either to your own home or to that of a relative or friend. Insurance coverage for short-term rehab is based on medical need, not on social circumstances like living alone or being a caregiver. Because of this, rehab placement cannot be guaranteed
Will I need help at home?
Yes. For the first several days or weeks, depending on your recovery, you will need help with tasks such as meals, cleaning, or errands. Planning ahead reduces the amount of help required for example, doing laundry, stocking up on groceries, preparing frozen meals, and arranging your home before surgery.
Will I need physical therapy when I go home?
Yes. Most patients start with in-home physical therapy ordered by their surgeon, then progress to outpatient therapy as soon as they can comfortably travel. The length of therapy varies for each patient.
How long until I can drive and get back to normal?
This depends on which leg was operated on and the type of car you drive. If your surgery was on the left leg and you have an automatic transmission, you may be driving in about two weeks. Surgery on the right leg may delay driving for up to six weeks. Always discuss driving with your surgeon to get a recommendation specific to your situation. Recovery to your normal activities depends on your progress, and you should always follow your surgeon’s or therapist’s advice. Remember, you cannot drive while taking opioids, as it may be considered driving under the influence.
When will I be able to get back to work?
Most people need at least one month off from work, unless their job is very sedentary and can be done while using a walker or cane. Your surgeon will guide you on when it is safe to return, and an occupational therapist may make recommendations for joint protection and energy conservation at work.
Preparing for Surgery
When can I have sexual intercourse?
This is a common question with joint replacement. The timing should be discussed with your orthopedic surgeon, and there is no need to feel embarrassed. If you are more comfortable, your surgeon may provide written information for you to review privately.
How often will I need to be seen by my doctor following the surgery?
Your first follow-up visit usually takes place 2-3 weeks after discharge. Additional visits are typically scheduled at six weeks, twelve weeks, and then every one to two years, depending on your progress and your surgeon’s recommendations.
Are there any permanent restrictions following this surgery?
Yes. High-impact activities such as running, tennis, or basketball are not recommended, and injury-prone sports like downhill skiing should be avoided. Patients who have hip replacement surgery will also need to follow specific precautions to reduce the risk of dislocation, usually for the first three months. You will receive your customized set of precautions in writing with your discharge instructions, and your surgeon will let you know when they can be discontinued.
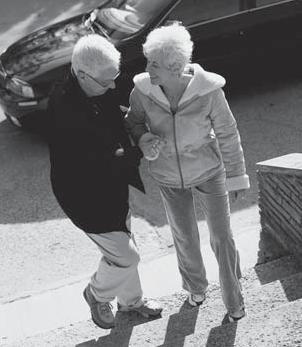
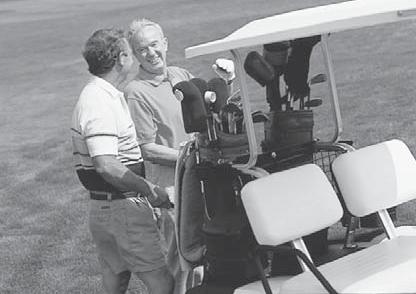
What physical/recreational activities may I participate in after my recovery?
You are encouraged to enjoy low-impact activities such as walking, dancing, golf, hiking, swimming, bowling, and gardening. These types of activities promote health, mobility, and long-term success of your joint replacement.
Should I try to lose weight before my joint replacement?
This is a common question and an important one to discuss. Many patients with hip or knee arthritis find activity painful, which can lead to weight gain over time. Losing some weight before surgery can be helpful, but the safest way is through healthy diet changes and staying as active as your joint allows. Stimulants, appetite suppressants, or weight loss supplements are not recommended, since stopping them after surgery often leads to weight regain at the worst time. If you are already prescribed these medications, you may continue them, but for most patients, adjusting diet and gentle activity are the best approaches to weight loss before surgery.
Preparing for Surgery
Role of the Joint Care Navigator
The Joint Care Navigator serves as your main point of contact throughout your joint replacement journey. They act as a link between nurses, therapists, and your case manager while you are in the hospital, and they provide education and guidance before and after surgery. Their role is to help you understand the surgical process and give you the tools you need to lower your risk for complications such as blood clots, infection, or pneumonia.
The Joint Care Navigator will:
• Provide your preoperative education and ensure you have the information you need before surgery.
• Act as your liaison throughout treatment before surgery, during your hospital stay, and through discharge home.
• Answer questions and direct you to resources within the hospital.
• Coordinate your hospital care with the joint replacement team.
• Work closely with your case manager to guide your discharge planning, ensuring home care and any needed equipment are in place before you go home.
You may contact your Joint Care Navigator at any time with questions or concerns. Their phone number can be found on the back of this guidebook.
Pre-Register
After your surgery is scheduled, you will receive a call to complete pre-registration. Having the following information ready will make the process quicker and easier:
• Your full legal name, address, and phone number
• Social Security number
• Name of the insurance holder, along with their address, phone number, employer, and work phone number
• Your insurance company’s name, mailing address, policy and group numbers, and insurance card
• Your employer’s name, address, phone number, and occupation
• Name, address, and phone number of your emergency contact (this may be the same person as above)
When you come to the hospital, bring your insurance card, driver’s license or photo ID, and any co-payment required by your insurance company.
Preparing for Surgery
Obtain Medical and Anesthesia Clearance
Your safety is a top priority for your orthopedic surgeon. For this reason, you may be asked to obtain medical clearance before your joint replacement surgery. When your surgery is scheduled, you may be given a clearance form. Follow the instructions provided by your surgeon, and have the form completed by your primary care physician.
If you see specialists such as a cardiologist or nephrologist you may also be asked to obtain clearance from them. When scheduling these visits, let the office know the appointment is for preoperative medical clearance. Please note that these clearance visits are in addition to your preoperative appointment with your surgeon.
Obtain Laboratory Tests
When your surgery was scheduled, you may have received a lab order from your surgeon. Follow the instructions provided about when and how to complete these tests, and be sure to have them done as directed to avoid delays in your surgery.
Billing for Services
After your procedure, you will receive separate bills for different parts of your care. These may include anesthesia, the hospital stay, radiology, pathology (if applicable), physical and occupational therapy, and the surgical assistant. If you are unsure about your insurance coverage or participation requirements, contact your insurance company directly.
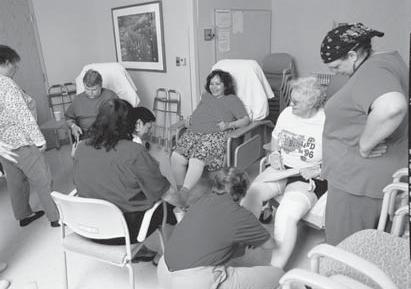
Start Preoperative Exercises
Arthritis often causes patients to favor their painful joints, which can lead to weakness and make recovery more difficult. To prepare, it is important that you begin the exercise program included in this guidebook before surgery. Strengthening your muscles now will support your new joint and help improve your recovery.
Preparing for Surgery
Preoperative Exercises, Goals, and Activity Guidelines
Exercising before Surgery
Being as fit as possible before your joint replacement will help you recover more quickly. The exercises in this program are part of your preparation, and your surgeon would like you to start them now. The full set should take about 15–20 minutes and should be done twice a day, on both your surgical and non-surgical sides. Continue daily until the day of surgery. Think of this as the minimum amount of exercise you should be doing before your procedure.
You will also receive a customized exercise sheet after surgery. Many of the exercises will be the same, but your therapist will tailor them to your needs and type of joint replacement. Remember, it’s important to strengthen your whole body, not just your legs. Pay special attention to your arms with exercises like chair push-ups (exercise #8), since you will rely on arm strength to get in and out of bed or chairs, walk safely, and perform your therapy after surgery.
Stop any exercise that causes sharp or significant pain, and contact your surgeon for guidance on modifications or alternatives.
Joint Replacement Exercises (Before and After Surgery)
(See the following pages for descriptions )
1. Ankle Pumps
2. Quad Sets (Knee Push-Downs)
3. Gluteal Sets (Bottom Squeezes)
4. Abduction and Adduction (Slide Heel Out and In)
5. Heel-slides (Slide Heel Up and Down)
6. Short Arc Quads
7. Long Arc Quads
8. Armchair Push-Ups
9. Straight Leg Raises (Knee Replacement Only)
10. Knee Extension Stretch (Knee Replacement Only)
2 times/day
Preparing for Surgery
Hip and Knee Exercises Range of Motion and Strengthening Exercises
Ankle Pumps


Flex your foot. Point your toes. Repeat 20 times.
Quad Sets (Knee Push-Downs)
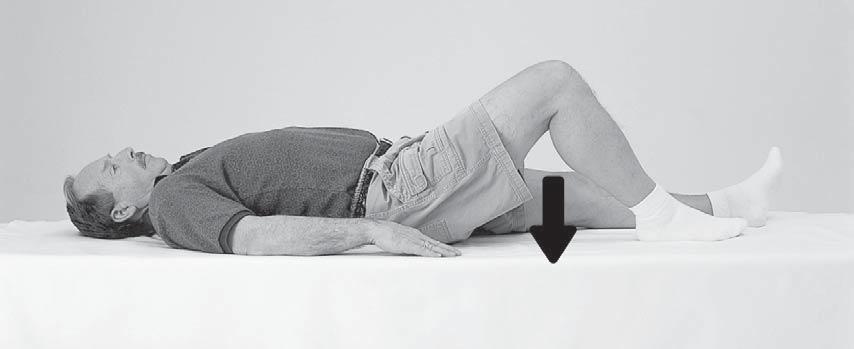

Lie on your back, and press your non-bent knee into the mat, tightening the muscles on the front of your thigh. Do NOT hold your breath. Repeat 20 times.
Preparing for Surgery
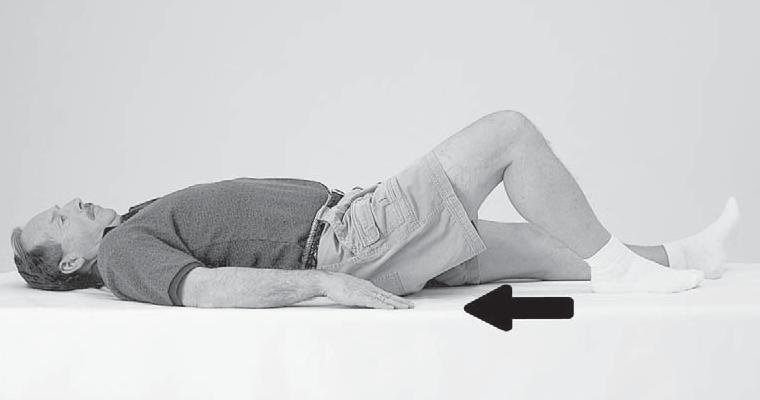
Gluteal Sets — (Bottom Squeezes)


Squeeze the muscles of your bottom together. Remember to NOT hold breath. Repeat this 20 times.
Hip Abduction and Adduction (Slide Heels Out and In)
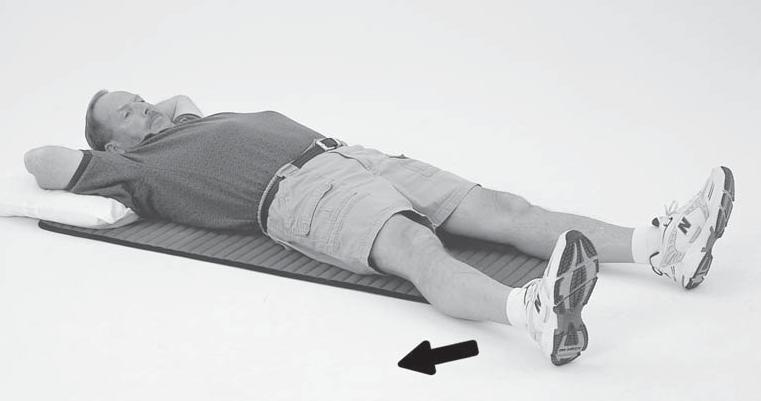
Lie on your back, and slide your leg out to the side. Keep your toes pointed up and your knees straight. Bring the leg back to the starting point. Repeat 20 times.
Preparing for Surgery
Heel Slides — (Slide Heels Up and Down)
Lie on your couch or bed. Slide your heel toward your bottom. Repeat 20 times.
Short Arc Quads
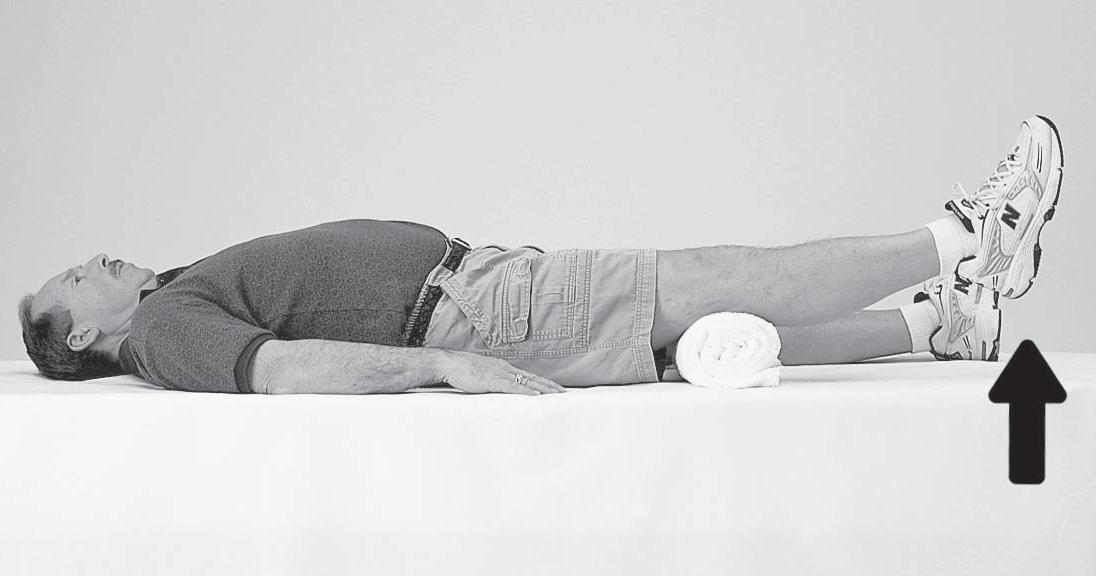
Lie on your back, and place a towel roll under your thigh. Lift your foot, straightening your knee. Do not raise your thigh off of the towel roll. Repeat 20 times.
Preparing for Surgery
Long Arc Quads
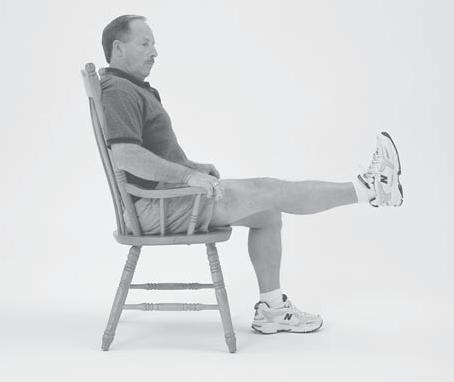

Sit with your back against a chair. Straighten your knee. Repeat 20 times.
Armchair Push-Ups


This exercise helps to strengthen your arms for rising from a chair and walking with a walker. Sit in an armchair. Place your hands on the armrests. Straighten your arms, lifting your bottom up off the chair seat. Keep your feet flat on the floor. Repeat 20 times.
Preparing for Surgery
Knee Exercises Straight Leg Raises
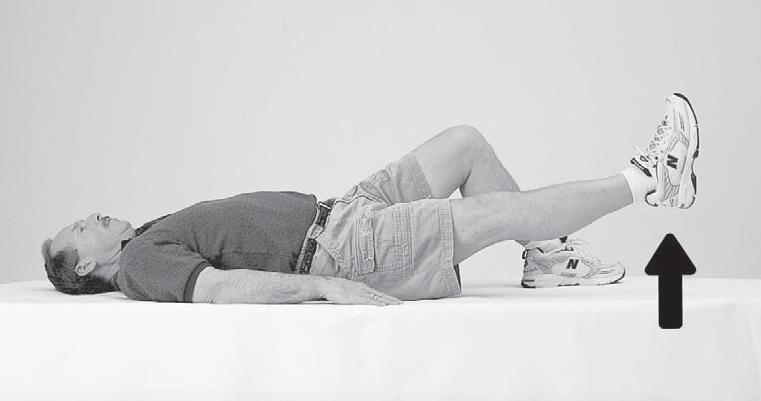
KNEES ONLY: Lie on your back, with your unaffected leg bent at the knee, and your foot flat. Lift the opposite leg up 12 in. Keep your knee straight and your toes pointed up. Relax. Repeat 20 times.
Knee Extension Stretch
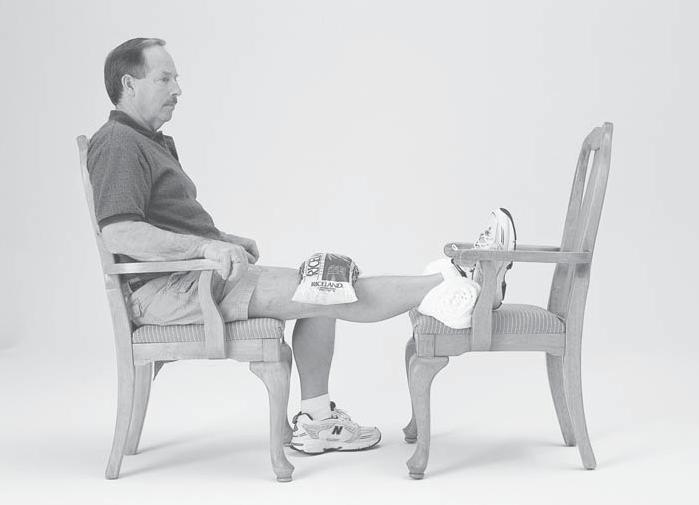

KNEES ONLY: Prop the foot of your operative leg up on a chair. Place a towel roll under your ankle and an ice pack over the knee. Place 5 lbs. of weight on top of knee (5 lb. bag of rice works well). Remain in this position for 10 min.
Preparing for Surgery
Read “Anesthesia” (Appendix)
Joint replacement surgery requires either general or regional anesthesia. Please review the Appendix on Anesthesia for information from our anesthesia department. If you have questions, or if you would like to request a particular anesthesiologist, contact your surgeon’s office and notify the nurse at your PACE appointment.
Stop Smoking
It is strongly recommended that you stop smoking or using any form of tobacco at least six weeks before surgery. Nicotine reduces circulation, slows bone healing, and limits your body’s ability to deliver oxygen to tissues or remove waste, all of which are critical for recovery.
***Baptist Health is a tobacco-free environment. Smoking, vaping, or tobacco use is not permitted anywhere on campus including in your car. This policy is in accordance with Florida law and is enforced by security and the Jacksonville Sheriff’s Office.***
Preparing for Surgery
Preoperative Visit to Surgeon
About one to two weeks before surgery, you will have an appointment at your surgeon’s office. This visit serves as a final check-up and a chance to ask any remaining questions. You will complete paperwork, sign a consent form, and meet with a PACE nurse either in person or by phone. The nurse will review important information with you and ask questions to ensure you are fully prepared for surgery.

Stop Medications that Increase Bleeding
Five days before surgery, stop all anti-inflammatory medications such as aspirin, Motrin®, Naproxen, Vitamin E, and similar products. These medications can increase bleeding risk. If you are taking a blood thinner, you will receive special instructions on when and how to stop it. The PACE nurse will also review your other medications with you and give specific guidance.
Prepare Your Home for Your Return from the Hospital
Have your home ready before surgery so it is safe and easy to manage after discharge. A little preparation can make recovery much smoother:
• Clean your home, do laundry, and put it away.
• Put fresh linens on your bed.
• Prepare meals and freeze them in singleserving portions.


• Complete yard work or household chores such as mowing, gardening, or pet care.
• Remove throw rugs, tack down loose carpeting, and move cords or clutter from walkways.
• Install night lights in bathrooms, bedrooms, and hallways.
• Arrange for someone to collect your mail and help with pets or loved ones if needed.
Preparing for Surgery
When to Arrive at the Hospital for Surgery
The hospital or your surgeon’s office will call you the day before your procedure to let you know your exact arrival time. It’s important that you arrive promptly at the time you are given. This allows the team to prepare you for surgery, start your IV, and answer any last-minute questions. Arriving late can delay your surgery, and in some cases may result in rescheduling. Occasionally, surgery times are moved up if another case is cancelled, so your procedure could begin earlier than originally planned.
When to Stop Eating and Drinking
Unless instructed otherwise, do not eat anything after midnight the night before your surgery. This includes gum, candy, mints, lozenges, and cigarettes. You may drink clear liquids until two hours before your scheduled arrival at the hospital. At your PACE appointment, you will receive more detailed instructions, including a complete list of approved clear liquids.
What to Bring to the Hospital
Pack lightly and bring only what you need:
• Complete medication list (include prescription medications, over-the-counter drugs, vitamins, and supplements with the name, dose, frequency, and reason for use)
• Photo ID
• Health insurance or pharmacy card
• Advance care directives (if you have them)
• Toiletries (toothbrush, toothpaste, deodorant, etc.)
• Comfortable clothing such as a T-shirt, shorts or sweatpants, and sneakers
• Two-wheeled rolling walker
• Personal medical items if you use them (hearing aids, CPAP/BiPAP machine, glasses, dentures, eye drops, inhalers, insulin, etc., in labeled containers)
Important reminders:
• Leave your walker, suitcases, and other bags in the car. A family member or friend can bring them in once you are settled in your room.
• Do not bring medications or supplements from home, as your care team will provide everything you need while in the hospital.
• Leave valuables such as jewelry, large amounts of cash, or credit cards at home. Baptist Health cannot be responsible for lost or stolen belongings.
Discharge
Day of Surgery
What to Expect
In the pre-op holding area, you will be prepared for surgery. This includes starting an IV, cleansing the operative site, and reviewing important questions with your nurse and anesthesiologist. Your surgeon will see you here before the procedure. When it is time, you will be escorted to the operating room, anesthesia will be administered, and your surgery will begin.

After surgery, you will go to the recovery area for one to two hours. During this time, your pain will be managed, your vital signs closely monitored, and an X-ray taken of your new joint. From there, you will either be discharged home the same day as most patients are or moved to an observation room if your surgeon feels additional monitoring is needed.
On the day of surgery, you will likely get out of bed to walk with a therapist. It is also important to begin ankle pump exercises to help prevent blood clots. You should also start using your incentive spirometer and practicing the deep breathing exercises you learned during your education. For your comfort and safety, visitation is recommended to be limited to one or two close family members or friends on the day of surgery.
After Surgery — Recovery and Observation
Most patients are able to go home the same day of surgery once they meet certain milestones, such as walking safely with a therapist, eating and drinking without difficulty, and having pain well controlled. Before you leave, your care team will review discharge instructions and answer any final questions to ensure you feel prepared for recovery at home.
For patients who remain overnight for observation, the next morning typically begins early:
• You will be helped out of bed and dressed in your own clothes. (Bath wipes are available if you would like them.)
• Breakfast will be served while you are seated in a bedside recliner.
• Your surgeon, physician assistant, or nurse practitioner will check on you.
• A physical therapist will work with you to get up and walk; your coach should be present, as their support is important to your success.
• You will also take part in a discharge teaching session, where important information is reviewed to prepare you for a safe transition home.
Discharge
Going Home
Whether you go home the day of surgery or stay overnight for observation, when it is time to leave the hospital, you must have a responsible adult to drive you home. It is important to arrange this ahead of time.
Before leaving, you will receive written discharge instructions covering medications, activity, and physical therapy. If your surgeon has ordered medical equipment, it will usually be delivered to your home before surgery; if not, it may be provided at the hospital. Please remember that medical equipment is non-refundable once signed for, and it must go home with you.
Home care services, such as physical therapy, are arranged preoperatively by your surgeon’s office. If you are admitted for observation, these services will be verified either by your surgeon’s office or the inpatient case manager before you go home. Rest assured that your care team will coordinate everything you need so you feel confident going home safely.
If You are Going to a Sub-Acute Rehab Facility
With this type of surgery, almost all patients recover well enough to go directly home either to their own home or the home of a friend or relative. In rare cases (less than 2% of patients), a short-term rehab stay may be needed if complications or medical concerns prevent a safe discharge home.
Eligibility for rehab is based strictly on medical criteria and must be approved by your insurance company. Social factors such as living alone or pet care are not considered, so it is important to make alternative plans for help at home before surgery. If you qualify, the hospital will coordinate your transfer and paperwork. You or your family will need to arrange transportation, which is usually not covered by insurance. Rehab stays typically last 3–5 days, depending on your progress, and you will be given instructions by the rehab staff when you are discharged home.
Postoperative Care
Caring For Yourself at Home
When you return home, there are a few important things to keep in mind for your safety, comfort, and recovery.
Managing Discomfort
Some soreness is normal after surgery, but these steps can help you stay comfortable as you heal:
• Take pain medication 45–60 minutes before physical therapy.
• Work with your surgeon to gradually taper prescription pain medicine as you improve.
• Change positions every 45 minutes throughout the day.
• Use ice on your joint to reduce discomfort, especially before and after exercise. Always place a barrier, such as a pillowcase, between the ice and your skin.
Body Changes
Your body will take time to adjust after surgery, and it’s normal to experience some temporary changes:
• A reduced appetite is common at first. Drink plenty of fluids to stay hydrated, and your desire for solid food will return.
• Difficulty sleeping is normal. Avoid long daytime naps to help reset your sleep routine.
• Expect lower energy for at least the first month.
• Narcotic pain medications may cause constipation. Use stool softeners or laxatives if needed.
Blood Thinners
You will be prescribed a blood thinner to help prevent blood clots. The length of treatment is usually two to six weeks, depending on your individual situation. Take it exactly as directed by your surgeon. Call your surgeon’s office right away if you notice bleeding from unusual places (such as stool, urine, eyes, or mouth), persistent nosebleeds, or multiple unexplained bruises. It is important that these symptoms are addressed promptly.
Postoperative Care
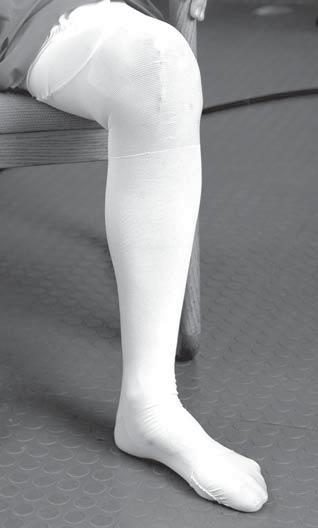
Stockings
You will be asked to wear special compression stockings after surgery. These stockings improve circulation, help reduce swelling, and lower the risk of blood clots.
• Elevate your legs throughout the day, lowering them during meals. For knee replacement, elevate the operated leg about 10–12 inches. For hip replacement, keeping your legs parallel to the floor is sufficient.
• Wear the stockings most of the day, but remove them for one to two hours twice daily to protect your skin.
• Notify your surgeon right away if you notice increased pain, redness, or swelling in either leg.
• Ask your surgeon when you can stop wearing the stockings. This is usually about three weeks after surgery.
Caring For Your Incision

Some drainage and swelling can be normal after surgery, but it’s important to know how to care for your incision and when to call your surgeon. Always follow your surgeon’s specific instructions, as closure methods and dressings may vary.
• Keep your incision dry unless your surgeon instructs otherwise. Some closures or dressings are water-resistant, but do not assume yours is unless your nurse or surgeon confirms it.
• Keep your incision covered with a dressing until staples are removed, usually 10–14 days. If your surgeon uses glue or sutures, follow their exact instructions when you go home. Written instructions will be provided.
• If your surgeon requires dressing changes, you will be taught how to do this before discharge. You will be sent home with enough supplies to last until your follow-up appointment.
• Contact your surgeon right away if you notice increased drainage, redness, pain, odor, or heat at the incision site.
• Take your temperature if you feel warm or unwell. Call your surgeon if it is greater than 101°F.
Postoperative Care
Recognizing & Preventing Potential Complications
Signs of Infection
Some redness, swelling, and discomfort are normal after joint replacement and can improve gradually for up to three months. Still, it’s important to know when to call your surgeon:
• Worsening swelling or redness at the incision site
• Changes in the color, amount, or odor of drainage
• Increasing pain in the joint
• Fever greater than 101°F
Prevention of Infection
Taking steps to protect your new joint lowers your risk of infection:
• Care for your incision exactly as instructed
• Take prophylactic antibiotics for dental work or other invasive procedures, as prescribed
• Inform your physician and dentist that you have a joint replacement
Signs of Hip Dislocation after a Hip Replacement
Hip dislocation is rare, but it’s important to recognize the warning signs:
• Severe hip pain
• Awkward leg rotation or noticeable shortening of the leg
• Inability to walk, bear weight, or move the leg normally
Postoperative Care
Blood Clots
Surgery can slow blood flow in the veins of your legs, which may cause blood to clot. This is why blood thinners are prescribed after joint replacement. If a clot occurs despite these measures, you may need to be admitted to the hospital for intravenous treatment.
Signs of blood clots in legs
Call your surgeon if you notice:
• Swelling in the thigh, calf, or ankle that does not go down with elevation and persists overnight
• Pain, heat, or tenderness in the calf, behind the knee, or in the groin area
Note: Blood clots can form in either leg.
Prevention of blood clots
• Perform ankle pumps regularly
• Walk short distances as directed
• Wear your compression stockings as instructed
• Take blood thinners exactly as prescribed
Embolism
If a blood clot is not recognized, it can travel to the lungs, heart, or brain. This is called an embolism and it is a medical emergency. Call 911 immediately if you suspect this has occurred.
Signs of an Embolism
• Sudden chest pain
• Rapid or difficult breathing
• Shortness of breath
• Sweating
• Confusion or anxiety
• A feeling of impending doom
• Stroke-like symptoms (weakness or numbness on one side, difficulty speaking or swallowing)
Preventing an Embolism
• Take steps to prevent blood clots in the legs
• Recognize the signs of a clot and contact your physician promptly
Postoperative Care
Joint Replacement Postop Exercises & Goals
Exercising is one of the most important things you can do to get the best results from your joint replacement. Your surgeon and physical therapist will guide you on safe exercises during your recovery.
You may receive therapy at home or in an outpatient facility, but it’s essential that you also continue an ongoing home exercise program. Staying active and committed to your exercises will help you reach your recovery goals.
The following pages outline specific goals and guidelines for your exercises after surgery. Always consult your surgeon before starting or changing your exercise routine.
Weeks One and Two
Whether you go home the same day as surgery or stay briefly for observation, your focus during the first two weeks will be on safety, mobility, and independence. Typical goals include:
• Continue using a walker (usually a two-wheeled rolling walker) unless your surgeon instructs otherwise
• Bend your new joint actively: knees to at least 90° and hips to at least 60°
• Fully straighten your knee or hip
• Sponge bathe or shower independently (if permitted by your surgeon) and dress yourself
• Begin resuming light homemaking tasks once cleared by your surgeon
• Perform your therapy exercises twice a day, with or without a therapist
Weeks Two to Four
By weeks two to four, most patients notice steady improvements and begin regaining more independence. Staying committed to your home exercise program is essential, even if you are also receiving outpatient therapy. Typical goals during this stage include:
• Continue meeting all goals from weeks one and two
• Progress from walker support to a cane or single crutch as directed
• Walk at least one quarter mile
• Climb and descend a full flight of stairs (12–14 steps)
• Bend your joint: knees beyond 90° and hips to 90°


Postoperative Care
• Fully straighten your knee or hip
• Shower and dress independently
• Resume more household activities
• Perform your therapy exercises twice daily, with or without a therapist
• Begin driving if your left knee or hip was replaced and you drive an automatic transmission vehicle (only with your surgeon’s approval)
Weeks Four to Six
By this stage, most patients are becoming much more independent. Your home exercise program becomes especially important as supervised therapy sessions may taper off. Goals for this period typically include:
• Continue meeting all goals from weeks one through four
• Walk with a cane or single crutch as needed
• Walk one quarter to one half mile
• Progress on stairs from one step at a time to regular stair climbing (foot over foot)
• If knee replacement: actively bend the knee to at least 110° and fully straighten it
• Drive a car, whether surgery was on the right or left side (with your surgeon’s approval)
• Continue your home exercise program twice daily
Weeks Six to Twelve
By six to twelve weeks after surgery, many patients are resuming most of their normal daily and recreational activities. Your continued commitment to your home exercise program will help you regain strength and confidence. Typical goals for this stage include:
• Continue meeting all goals from weeks one through six
• Walk without a cane or crutch and without a limp
• Climb and descend stairs in a normal pattern (foot over foot)
• Walk one half to one mile comfortably
• If knee replacement: bend the knee to 120° and fully straighten it
• Improve overall strength to about 80% of normal
• Resume low-impact activities such as dancing, bowling, and golf

Postoperative Care
Home Exercises after Joint Replacement
Always follow your surgeon’s instructions before beginning a home exercise program. If you are recovering quickly, your therapist may recommend adding extra exercises to support your progress.
Precautions and Home Safety Tips
To protect your new joint and keep yourself safe:
• Do NOT pull up on your walker to stand.
• Do NOT sit in a chair that is too low.
• Choose chairs with armrests whenever possible.
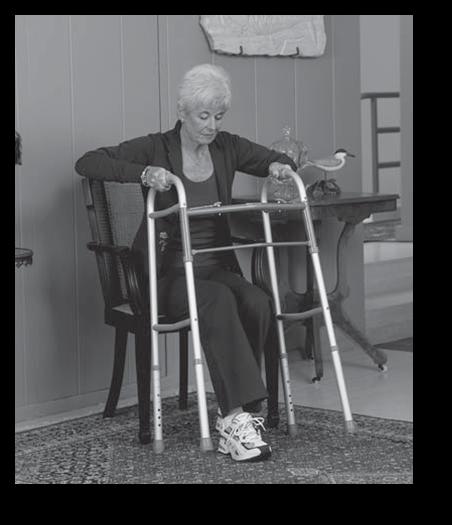
How to Stand Safely from a Chair
1. Scoot forward to the edge of the chair.
2. Place both hands on the armrests and push yourself up. (If the chair has no armrests, place one hand on the walker while pushing off the side of the chair with the other hand.)
3. Balance yourself fully before reaching for the walker.
Proper Method

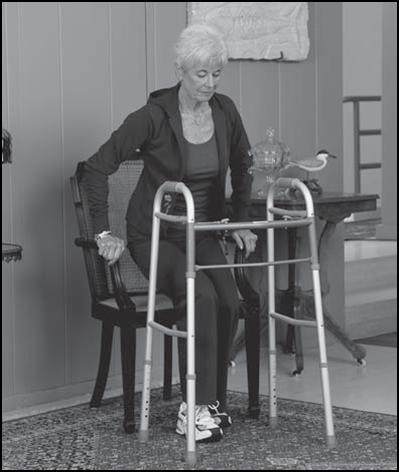
Improper Method

Postoperative Care
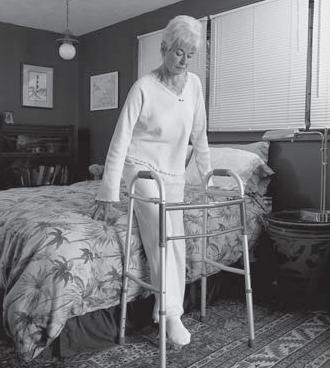
Transfer – Bed
When getting into bed:
Follow these steps to get into bed safely after surgery:
1. Back up to the bed until you feel it against the back of your legs (stand midway between the foot and head of the bed).
2. Reach back with both hands, sit down on the edge of the bed, and scoot toward the center of the mattress.
3. Move your walker out of the way, but keep it within reach.
4. Scoot your hips around until you are facing the foot of the bed.
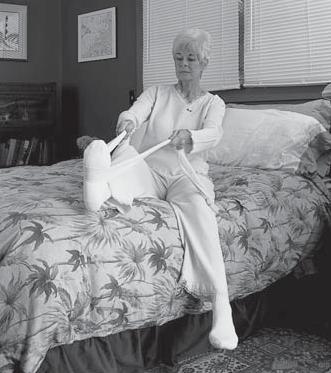
5. Lift your surgical leg into the bed while scooting around. If needed, use a cane, rolled bed sheet, belt, or leg lifter to assist.
6. Scoot further and lift your other leg into the bed.
7. Scoot your hips toward the center of the bed.
When getting out of bed:
Use the following steps to get out of bed safely:
1. Scoot your hips to the edge of the bed.
2. Sit up while lowering your non-surgical leg to the floor.
3. If needed, use a leg lifter to lower your surgical leg to the floor.
4. Scoot forward to the edge of the bed.
5. Push up with both hands from the bed. If the bed is low, place one hand on the walker while pushing up with the other.
6. Balance yourself fully before grabbing for the walker.


Postoperative Care
Transferring Into the Tub with a Bath Seat
Getting in and out of the tub can feel tricky at first, but using a bath seat makes the process safer and easier.
1. Place the bath seat in the tub facing the faucets.
2. Back up to the tub until it touches the back of your knees, making sure you are lined up in front of the seat.
3. Reach back with one hand for the bath seat while keeping the other hand on the center of the walker.
4. Slowly lower yourself onto the bath seat, keeping your surgical leg straight out in front of you.
5. Move the walker out of the way, but keep it within reach.
6. Lift your legs one at a time over the edge of the tub. If needed, use a leg lifter to assist the surgical leg.
Safety Notes:
• Bath seats, grab bars, long-handled bath brushes, and hand-held showers can make bathing easier and safer, but they are usually not covered by insurance.
• Always use a rubber mat or non-skid adhesive on the bottom of the tub or shower.
• To keep soap within easy reach, make a simple soap-on-a-rope by placing a bar of soap in the toe of an old pair of pantyhose and attaching it to the bath seat.
Getting out of the tub using a bath seat:
Follow these steps to exit the tub safely after surgery:


1. Lift your legs one at a time over the outside edge of the tub. Use a leg lifter for the surgical leg if needed.
2. Scoot forward to the edge of the bath seat.
3. Place one hand on the back of the bath seat for support while placing the other on the center of the walker. Push yourself up slowly.
4. Balance yourself fully before reaching for the walker.
Postoperative Care
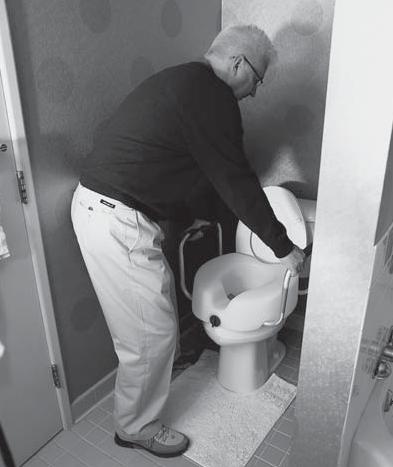
Transfer – Toilet
For Hip Replacement Patients
Unless you already have elevated height toilets at home (18-19 inches from floor to seat), you are required to use a raised toilet seat or a three-in-one bedside commode over your toilet for at least 12 weeks after surgery.
For Knee Replacement Patients
A raised toilet seat or bedside commode can still be helpful, but it is not required.
When Sitting Down on the Toilet
1. Take small steps and turn until your back is to the toilet. Never pivot.
2. Back up until the toilet touches the back of your legs.
3. If using a commode with armrests, reach back for both armrests and lower yourself slowly.
(If using a raised toilet seat without armrests, keep one hand on the walker while reaching back for the seat with the other.)
4. Slide your surgical leg out in front of you as you sit down.
When Getting Up from the Toilet
1. If using a commode with armrests, push up using the armrests.
(If using a raised toilet seat without armrests, place one hand on the walker and push off the toilet seat with the other.)
2. Slide your surgical leg out in front of you as you stand up.
3. Balance yourself fully before reaching for the walker.

Postoperative Care
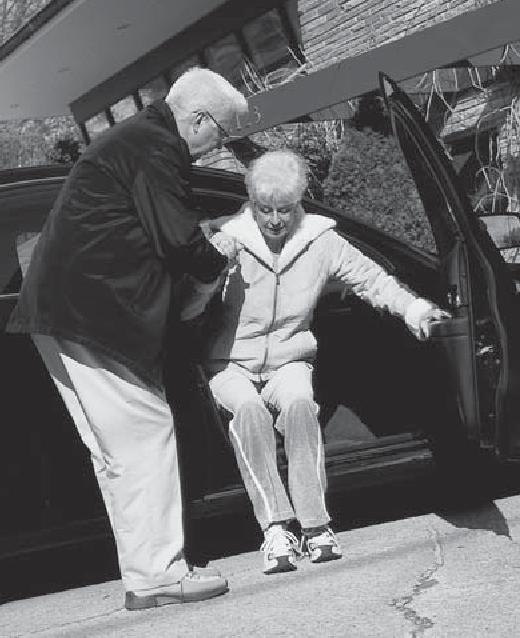
Transfer – Automobile
Getting in and out of a car safely after joint replacement takes a little planning. These steps can make the process easier and more comfortable:
1. Push the car seat all the way back. Recline it, if possible, then return it to the upright position for traveling.
2. Place a plastic trash bag on the seat to help you slide and turn frontward more easily.
3. Back up to the car until the seat touches the back of your legs.
4. Reach back for the seat and slowly lower yourself down, keeping your operated leg straight out in front of you. Be sure to duck your head so you don’t bump the doorframe.
5. Lean back slightly as you turn and lift your operated leg into the car.
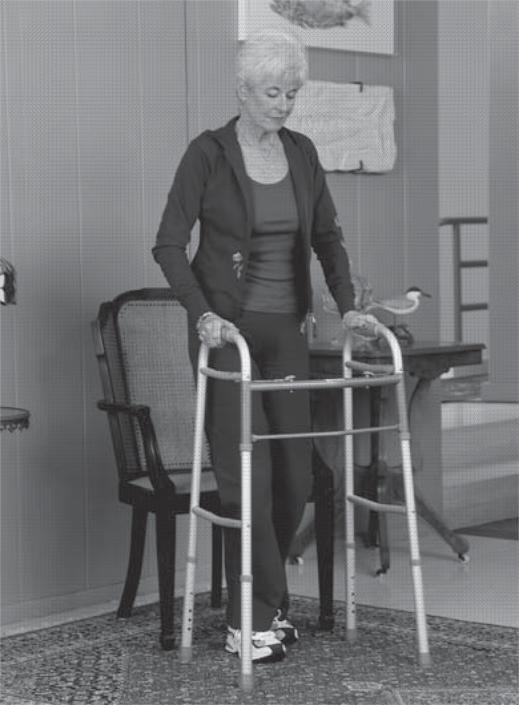
Walking
Using your walker correctly will help you stay safe and steady as you regain strength and mobility.
1. Move the walker forward.
2. With all four walker legs firmly on the ground, step forward with your surgical leg. Place your foot in the middle of the walker area, not past the front legs of the walker.
3. Step forward with your non-surgical leg.
4. Take small steps. Do not step unless both walker wheels and legs are flat on the floor.


Postoperative Care
Personal Care
Using a reacher or dressing aid.
Reachers and dressing sticks make it easier and safer to put on clothing after surgery without bending too much.
1. Sit down.
2. Put your surgical leg in first, followed by your non-surgical leg. Use a reacher or dressing stick to guide the waistband over your foot.
3. Pull your pants up over your knees until they are within easy reach.
4. Stand with the walker in front of you for support, then pull your pants up the rest of the way.
Taking off pants and underwear:
Using the right technique makes undressing safer and protects your surgical leg.
1. Back up to the chair or bed where you will be undressing.
2. Unfasten your pants and let them drop to the floor. Push your underwear down to your knees.
3. Lower yourself slowly, keeping your surgical leg straight out in front of you.
4. Remove your non-surgical leg first, then your surgical leg.
Tip: A reacher or dressing stick can help you lift clothing away from your feet and off the floor.


Postoperative Care
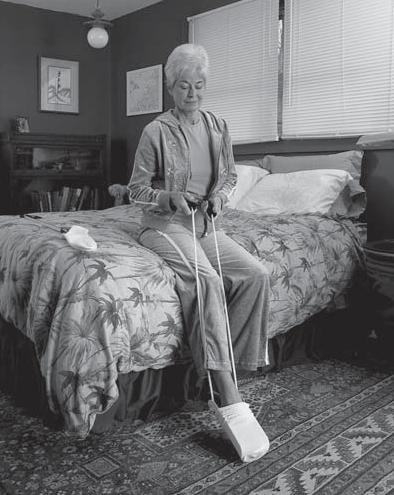
How to use a sock aid:
A sock aid helps you put on socks without bending too much, protecting your new joint.
1. Slide the sock onto the sock aid.
2. Hold the cord and lower the sock aid in front of your foot. (This is easier if your knee is bent.)
3. Slip your foot into the sock aid.
4. Straighten your knee, point your toe, and pull the handles to slide the sock on. Keep pulling until the sock aid comes free.
If using a long-handled shoehorn:
A long-handled shoehorn allows you to put on shoes without bending too much or straining your new joint.
1. Use your reacher, dressing stick, or long-handled shoehorn to slide your shoe in front of your foot.
2. Place the shoehorn inside the shoe against the back of the heel, with the curve of the shoehorn matching the curve of the shoe.
3. Lean back if needed, then lift your leg and place your toes into the shoe.
4. Step down into the shoe, sliding your heel down along the shoehorn.
Note: Wear sturdy slip-on shoes or shoes with Velcro closures or elastic laces. Do not wear high-heeled shoes or shoes without backs.

Postoperative Care
Around the House
Making small adjustments at home will help you save energy, protect your new joint, and stay safe as you recover.
Kitchen
• Do not get down on your knees to scrub floors use a mop or long-handled brushes instead.
• Plan ahead by gathering all your cooking supplies at once. Sit to prepare your meal when possible.
• Store frequently used items within easy reach to avoid bending or stretching.
• For a more comfortable working height, use a high stool or add cushions to a chair when preparing meals.
Bathroom
• Do not get down on your knees to scrub the bathtub.
• Use a mop or long-handled brushes for cleaning.
Safety and Avoiding Falls
• Pick up throw rugs and tack down loose carpeting. Cover slippery surfaces with carpets that are firmly anchored to the floor or that have non-skid backs.
• Be aware of all floor hazards such as pets, small objects, or uneven surfaces.
• Provide good lighting throughout your home. Install nightlights in the bathrooms, bedrooms, and hallways if more light is needed.
• Keep extension cords and telephone cords out of pathways. Do NOT run wires under rugs, this is a fire hazard.
• Do NOT wear open-toe slippers or shoes without backs. They do not provide adequate support and can lead to slips and falls.
• Sit in chairs with armrests. It makes it easier to get up.
• Rise slowly from either a sitting or lying position to avoid getting lightheaded.
• Do not lift heavy objects for the first three months and then only with your surgeon’s permission.
For the Long Haul
Do’s and Don’ts for the Rest of Your Life
Even after you’ve met your recovery goals, it’s important to stay active and protect your new joint. A regular exercise program helps maintain strength, mobility, and overall health. With your orthopedic surgeon’s and primary care provider’s approval, aim for exercise 3–4 times per week for 20–30 minutes at a time.
High-impact activities such as running or singles tennis are not recommended because they place too much stress on the joint. High-risk activities like downhill skiing should also be avoided due to the chance of fractures or damage to the prosthesis. Infections remain a long-term concern, so preventive antibiotics may be required before dental work and certain medical procedures for at least two years after surgery.
What to Do in General
• Take antibiotics one hour before dental work or other invasive procedures, as long as you are directed to by your surgeon.
• Remember that although the risk of infection is low, it never goes away completely. A prosthetic joint can attract bacteria from infections elsewhere in the body.
• If you develop a fever over 101°F or sustain a deep cut or puncture wound, clean the area, apply a sterile bandage, and notify your doctor.
• Superficial scratches may be treated with topical antibiotic ointment, but notify your doctor if the area becomes painful, red, or swollen.
• Ask your surgeon for an implant card confirming your joint replacement. Carry it with you, as implants can trigger metal detectors at airports and other security checkpoints.
• When traveling, stop and move around at least once an hour to prevent stiffness.
• See your surgeon yearly, unless directed otherwise. (See Appendix: The Importance of Lifetime Follow-up Visits.)
For the Long Haul
What to Do for Exercise
Low-impact activities are the best way to stay fit, protect your new joint, and enjoy an active lifestyle for years to come. Good options include:
• Exercise classes designed for jointfriendly movement
• Regular walks (1–3 miles, as tolerated)
• Walking on a home treadmill
• Stationary bike
• Workouts at a fitness center with lowimpact equipment
• Recreational activities such as golf, bowling, gardening, or dancing
What NOT to Do for Exercise
To protect your joint and lower your risk of injury, avoid:
• Running or other high-impact activities
• High-risk sports such as downhill skiing or similar activities

Exercise Your Right
Put Your Health Care Decisions in Writing
At Baptist Health, it is our policy to respect your wishes and ensure your individual choices are honored as part of your care.
What Are Advance Medical Directives?
Advance Directives are documents that let you communicate your health care wishes to your caregivers. If you have a Living Will or have appointed a Health Care Agent and later become unable to speak for yourself, Baptist Health is committed to honoring those decisions.
There are several types of Advance Directives. You may wish to consult an attorney regarding the legal implications of each:
• Living Will – Written instructions that explain your wishes for health care if you have a terminal condition or irreversible coma and cannot communicate.
• Appointment of a Health Care Agent (also called a Medical Power of Attorney) – A document that lets you name someone (your agent) to make medical decisions for you if you are unable to do so.
• Health Care Instructions – Your specific choices about treatments such as lifesustaining equipment, hydration and nutrition, and the use of pain medications.
Bringing Advance Directives to the Hospital
When you are admitted to the hospital, you will be asked if you have an Advance Directive. If you do, please bring copies of your documents so they can become part of your medical record.
Note: Advance Directives are not required for hospital admission.
Helpful Resource
For more information, visit www.honoringchoicesfl.com
Blood Transfusions
Know Your Options
When a transfusion is needed, blood may come from:
• Your own blood (donated ahead of time, called autologous donation)
• A directed donor (a friend or family member you select)
• The community blood supply
Receiving your own blood is generally the safest option, but not everyone can donate for themselves.
Being Your Own Blood Donor (Autologous
Donation)
If you are eligible, your surgeon may recommend donating blood for yourself about three weeks before surgery. The last donation must be made at least three days before surgery.
Benefits:
• Provides the best match
• Eliminates the risk of viral infection (such as hepatitis or HIV) from transfusion
• Helps conserve the community blood supply for emergencies
Possible Risks:
• Lowers your iron level, which may require iron supplements
Procedure:
• Your surgeon will let you know if this is recommended, usually when postoperative anemia is a concern
• The Florida–Georgia Blood Alliance typically handles collection, scheduled through your surgery team
• Blood can be donated every three days, but one week apart is preferred
• Eat a light meal two to three hours before donating
• Be prepared to provide a health history and list of medications (infection may disqualify you)
• Your blood is reserved exclusively for you until it expires, at which point it is destroyed
Important Notes:
• Continue any prescribed iron therapy until surgery
• Notify the blood bank if your surgery date is rescheduled
• There is a fee for collection and testing, charged whether or not your blood is used
Choosing Family or Friends to Donate (Directed Donation)
You may also ask family or friends to donate for you. This is called directed or designated donation. While this can feel reassuring, directed donations are not statistically safer than the community blood supply.
Benefits:
• Peace of mind from knowing your donor personally
Possible Risks:
• Donors may feel pressured to give even if their health history makes their blood unsafe
• Infections can still be transmitted even when the donor is known to the patient
• Donor blood may not always be available by your surgery date due to testing issues or mechanical problems
• If unused, donor blood is released to the community supply one week after your scheduled surgery date
Process and Safeguards:
• Donors are screened using a detailed health questionnaire
• All collected blood is thoroughly tested
• Any unacceptable units are discarded
• Fees apply for drawing and processing directed donations
• Notify the hospital’s blood bank if your surgery date changes
Anesthesia
Your anesthesiology team is here to keep you safe and comfortable before, during, and after your surgery. They will work closely with your surgeon and care team to ensure your procedure goes smoothly.
Who are the anesthesiologists?
At Baptist Health, the Operating Room, Post-Anesthesia Care Unit (PACU), and Intensive Care Units are staffed by board-certified or board-eligible physician anesthesiologists. Each anesthesiologist is an individual practitioner with privileges to provide care at this hospital.
What types of anesthesia are available?
Your anesthesiologist will tailor anesthesia to your personal needs. The options include:
• General anesthesia – provides complete loss of consciousness.
• Regional anesthesia – numbs a large area of the body through an injection of local anesthetic. Common techniques include spinal blocks, epidural blocks, and arm or leg blocks. Medications can also be given to make you relaxed or drowsy.
Will I have any side effects?
Your anesthesiologist will discuss the risks and benefits of each option, as well as potential side effects. Some patients experience nausea or vomiting after surgery, though this is less common today thanks to improved techniques and medications. If these side effects occur, medications will be provided for relief.
Pain after surgery is normal, but your care team will work with you to keep you as comfortable as possible using a pain scale (0–10) to guide treatment.
What happens before surgery?
You will meet your anesthesiologist immediately before your procedure. They will review your medical history, test results, allergies, and current medications to determine the safest and most effective anesthesia plan for you. They will also answer your questions.
Before surgery begins, your surgical nurses will start an IV and administer any preoperative medications. In the operating room, monitoring devices (such as a blood pressure cuff and EKG) will be placed to ensure your safety.
Appendix
What happens during surgery?
Your anesthesiologist is responsible for your comfort and well-being before, during, and immediately after surgery. They will closely manage vital functions such as your heart rate, blood pressure, temperature, and breathing. If needed, they will also provide fluids or blood replacement.
What happens after surgery?
You will wake up in the Post-Anesthesia Care Unit (PACU), where specially trained nurses will monitor your breathing, heart function, and comfort. You may receive extra oxygen during this period.
Can I choose my anesthesiologist?
Most patients are assigned an anesthesiologist, but you may request one in advance through your surgeon’s office. Please note that availability may depend on scheduling and insurance coverage. Contact your insurance company directly with any questions about participation or coverage.
The Importance of Lifetime Follow-Up Visits
Orthopedic surgeons have found that many patients don’t return for regular follow-up visits after joint replacement often because they don’t realize it’s recommended or don’t understand why it’s important. These visits are essential for protecting the longterm health of your joint replacement.
When should you follow up?
• Every year, unless your surgeon gives you a different schedule.
• Anytime you have mild pain lasting more than a week.
• Anytime you develop moderate or severe pain.
Why are follow-up visits important?
1. To check the integrity of your implant.
If you have a cemented knee replacement, the cement may develop small cracks over time from stress and use. You likely won’t notice these changes, as they usually happen slowly. A crack doesn’t always mean you’ll need another surgery, but it does mean closer monitoring. If left unchecked, a cracked cement or loosening implant can lead to pain or bone changes called osteolysis (bone thinning). Detecting issues early allows your surgeon to prevent bigger problems down the road.
2. To monitor wear of the plastic liner.
The plastic liner in your joint can wear down over the years. Tiny particles may trigger a reaction in the bone similar to osteolysis, which can weaken the bone and loosen the implant. Replacing a worn liner early and strengthening the bone can help prevent this from becoming more serious.
How are problems detected?
X-rays taken at your follow-up visits allow your surgeon to compare changes over time and detect problems early. These appointments are quick, convenient, and give you peace of mind.
Even if you’re doing well, your surgeon wants to see you regularly to ensure your joint stays healthy for years to come. If you’re unsure when your next visit should be, call your orthopedic office they’ll be glad to hear from you.
© 2025 Baptist Health
Joint Concepts® and Biomet® are trademarks of Biomet, Inc. Motrin® and Band-Aid are registered trademarks of Johnson & Johnson. Tylenol® is a registered trademark of McNeal Consumer Brands. Betadine® is a registered trademark of Purdue Frederick, Co.