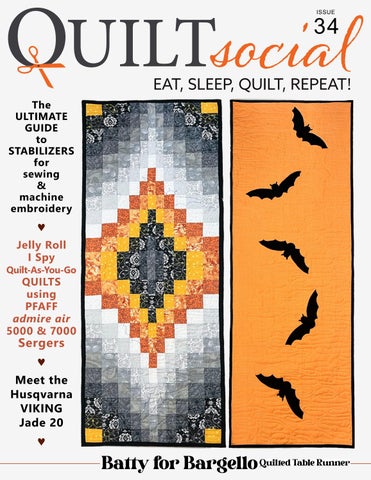
QUILTsocial | Issue 34

Page 1


OU ILT 

The ULTIMATE GUIDE to STABILIZERS for sewing & machine embroidery

Jelly Roll I Spy

Quilt-As-You-Go QUILTS using PFAFF admire air 5000 & 7000 Sergers

Meet the Husqvarna VIKING Jade 20

Editor'sLetter

Welcome to another exciting issue of QUILTsocial! This time, we’re diving deep into the mesmerizing world of bargello quilting. Our feature project, Batty for Bargello, is a reversible quilted table runner that’s as fun to make as it is to admire. You’ll learn the secrets of cutting perfect strips, piecing with accuracy, and experimenting with creative layouts that bring bargello blocks to life. And because we love giving projects a polished finish, you’ll also discover unique reversible binding techniques that make this table runner truly stand out.

But the inspiration doesn’t stop there! Machine embroiderers will be thrilled with our comprehensive guide to stabilizers from Sulky and UNIQUE – from tear-away and cut-away to water-soluble and heat-away films – giving you the confidence to master any machine embroidery project.

We also shine the spotlight on the PFAFF admire air sergers with fast, clever projects like a vibrant jelly roll quilt, a quick I Spy quilt, and a charming quilt-as-you-go baby quilt. Plus, we explore decorative seams and binding techniques that elevate even the simplest runner into something spectacular.

And don’t miss our deep dive into the Husqvarna VIKING Jade 20. Sleek, smart, and powerful, this machine comes alive in your quilting room when paired with the right accessories. From perfect ¼" seams to beautiful appliqué and easy binding, we show you how to make the most of it.

Wherever your quilting journey takes you – bargello, embroidery, serging, or machine magic – this issue is packed with inspiration to keep your creativity soaring.

Cheerfully,

Photo by Tyler Davis-unsplash

OUILT 

PUBLISHER, EDITOR-IN-CHIEF, ART DIRECTOR

Carla A. Canonico carla@QUILTsocial.com

PUBLISHER, ADVERTISING SALES

John De Fusco john@QUILTsocial.com

PHOTOGRAPHERS

Carla A. Canonico, John De Fusco

BLOGGERS/CONTRIBUTORS

Elaine Theriault crazyquilteronabike.blogspot.com

Robin Bogaert quiltingintheloft.com

Margaret Sweete margsweete@gmail.com

GRAPHIC & WEB DESIGN

Carla A. Canonico carla@QUILTsocial.com

GRAPHIC ASSISTANT and SOCIAL MEDIA

Sondra Armas

Maria Corina Guillen

WEBSITE / BLOG: https://QUILTsocial.com

Like us on Facebook : QUILTsocial

Follow us on Pinterest : quiltsocial

Follow us on Instagram : quiltsocial

Follow us on X: @QUILTsocial

WHERE TO GET YOUR COPY

QUILTsocial is a quarterly eMagazine published by A Needle Pulling Thread. It is available free for personal use online at https://QUILTsocial.com

EDITORIAL

Designers and other contributors who would like to be considered for future issues please email carla@QUILTsocial.com with a brief description of your work and your proposed project for the magazine.

©2025 QUILTsocial. All rights reserved. Issue 34. ISSN 2368-5913

No part of this publication may be reproduced without written permission from the publisher.

All designs, patterns, and information in this magazine are for private, non-commercial use only, and are copyrighted material owned by their respective creators or owners.

OUILT 

6 Batty for Bargello | A quilted reversible table runner

7 2 essential TIPS for cutting perfect bargello patchwork strips

8 Accurately piecing the Batty for Bargello Quilted Table Runner

10 Creative quilt layouts with a bargello quilt block

12 Batty for Bargello | unique reversible finishes

16 Mastering Sulky and UNIQUE stabilizers for sewing & machine embroidery

18 Choosing & using tear-away stabilizers for sewing & machine mbroidery

22 How to choose and use SULKY Cut-Away stabilizers for machine embroidery

26 Your guide to using Sulky Water-Soluble stabilizers for stunning embroidery

30 Mastering Sulky Heat-Away Clear Film stabilizer for embroidery projects

34 Piece a vibrant jelly roll on the PFAFF admire air 5000 Serger

36 Make an I Spy quilt fast with the PFAFF admire air 7000 Serger

37 Quilt-As-You-Go baby quilt with the PFAFF admire air 5000 Serger

39 Piecing a runner with decorative exposed seams on the PFAFF admire air 7000

40 Quilt and bind a runner with decorative seams on PFAFF admire air 7000

42 Meet the Husqvarna VIKING Jade 20 – sleek, smart, and built to impress

44 Maximize the Husqvarna VIKING Jade 20 with must- have accessories

47 2 ways to sew a perfect 1/4" seam on the Husqvarna VIKING Jade 20

50 2 beautiful applique techniques with the Husqvarna VIKING Jade 20

53 Binding quilts with ease using the Husqvarna VIKING Jade 20

Batty for Bargello

A quilted reversible table runner

I’m so excited to share with you how to make a reversible fall and Halloween table runner. It's so versatile with its bargello style on the front and batty and Halloween designs on the back. This table runner is made with Fabric Creations Cotton and UNIQUE sewing notions. Through the process of making this project, you will learn how to bargello piece, quilt as you go, and sew easy bat appliqués to the back making it reversible.

The Batty for Bargello bat template and free coloring page are at the end of the feature. The graphic layout is in under 'Accurately piecing the Batty for Bargello Quilted Table

What is bargello? Bargello was really developed early in the history of needlepoint embroidery as stitches, long and short that create gorgeous repetitive designs. Quilters have adapted bargello as a series of fabric strips with carefully chosen colors that are laid out in a mathematical pattern to create beautiful, ombré wave-like patterns.

To make this Batty for Bargello Quilted Table Runner I used the following:

• UNIQUE sewing 30 binding and hem clips

• Fairfield Quilter's 80/20 Quilt Batting

• Best Press Starch Alternative

• KAI Ultra Rotary Cutter Replacement Straight Blade -45mm

• HEATNBOND Feather Lite Iron-On Adhesive

• Gütermann MCT Sew-all Thread

Other required materials:

• 12 different 8" x 21" pieces of cotton fabric, ranging in color from dark to light in 4 color ways, pictured here. I used orange as a color pop and to reflect the season. Fat quarters will work, Fabric Creations Cotton and a few from my own stash. The fabric colors are:

- 3 shades of black

- 3 shades of dark gray

- 3 shades of light gray to white/gray

- 3 shades of orange

• 22" x 52" fabric for the backing

• 12" x WOF fabric for binding

• light weight fusible web

• clips to hold binding: UNIQUE sewing 30 binding and hem clips

• fabric starch or alternative

• quilt batting

• thread to match the fabric, I used Gütermann's orange, black, white and gray

• sharp rotary blade and rotary cutter

• 6” x 24" cutting ruler recommended

• cutting mat

• sewing machine

• ¼" foot

• free motion foot

• scissors

• a hot dry iron

Photos by Robin Bogaert
Batty for Bargello Reversible Table Runner made with gorgeous Fabric Creations Cotton
Materials needed to make the Batty for Bargello Quilted Table Runner
Runner.'

2 essential TIPS for cutting perfect bargello patchwork strips

I’ll share tips and notions for success to complete the cutting process including the importance of a brand new and very sharp KAI Ultra Rotary Cutter Replacement Straight Blade - 45mm for my rotary cutter and Best Press Starch Alternative.

Cutting Instructions

1. Insert a new, sharp rotary cutter blade into your rotary cutter. I used the KAI Ultra Rotary Cutter Replacement Straight Blade 45mm and I can tell you it’s extremely sharp. It’s a tungsten steel blade, made for cloth, leather, vinyl, film, and paper. The bonus is when you’re done with it or want to switch out the blade, it comes with a reusable storage container.

TIP 1 It’s important with bargello style piecing to have a sharp blade as accuracy in sizing of all the fabric pieces is key to getting the right ombré and wave effect. It also reduces hand fatigue if a sharp blade is in your rotary cutter. With this project, we will be cutting several strips and then sub-cutting pieced units, so accuracy and ease of cutting are essential.

2. Number all fabrics as shown from 1 to 12, take a photo of your fabric and number as shown or label fabric pieces with tape. If you don’t number your fabrics the process gets very confusing, and you lose track of the design. Your end fabric must be gradually shaded colors. As you can see in the photo the darkest color is 1 and it gradually goes to 9. In the end, I added the pop of orange. If you follow the way I chose the fabric, 12 fabrics of varying shades dark to light, you will achieve the same effect. Place the pop of color where you want it, use the coloring page to try out your colors and design.

3. Iron all fabric with a dry iron and I recommend using Best Press Starch Alternative. With bargello piecing accuracy is a key to success.

TIP 2 This is a product I use all the time because it stabilizes the fabric making it slightly sturdier, it removes all creases, and there’s no clogging, no flaking, and no residue as well. When needing accurate piecing, using a starch or starch alternative helps the fabric to stay static and it will not stretch as easily. You’ll achieve a nicely squared fabric. It’s important to use a dry iron with no steam as the steam will dilute the starch effect and allow your fabric to stretch more easily.

4. Once all fabric is ironed, cut 3 strips 21/2” x 21” from each fabric. You’ll have 36 strips cut, don’t forget to keep your fabric numbered. I used my numbered photo for reference.

To recap bargello piecing success TIPS: use a sharp rotary blade, I used the KAI Ultra Rotary Replacement Blade, use Best Press Starch Alternative so that fabric doesn’t stretch and number your fabrics so you don’t lose track of the design. With these tips you’re ready for the fun part.

The KAI Rotary Blade Used
Fabrics identified by number light to dark
Ironing all fat quarters of Fabric Creations Cotton with Best Press Starch Alternative and a dry iron

Accurately piecing the Batty for Bargello

Quilted Table Runner

Working with Gütermann Sew-all Thread, a ¼” machine sewing foot, seam ripper, and flat flower head pins will insure accurate piecing.

Piecing thread from Gütermann MCT Sew-all Thread, strong and fine

Sewing Instructions

1. Sew all strips together lengthwise with right sides together starting with strip 1 and ending with strip 12 as shown. Insert a 1⁄4” foot, and sew slowly and accurately with fine thread to match or blend with the colors of the strips.

TIP It is recommended to stitch with a fine strong thread like Gütermann Sewall Thread as the stitches show up as very fine so as not to increase the bulk in all the many seams a bargello block creates. I used a soft gray to blend with all colors. Focus and sew slowly as accuracy is key.

2. Press in one direction for all strips as shown. This will allow for flat seam intersections. Do not use steam, as the pre-starched fabric is stable at this point. A hot dry iron works the best.

4. Make 2 more of these strip sets, sewing from 1 to 12 right sides together, pressing in the same direction and squaring.

5. Sew strips 1 to 12 right sides together lengthwise to make a tube as shown here, matching raw edges. Make 3 tubes from all strip sets.

6. Make sure that the sides match well if not, trim where necessary so the tube lies flat.

7. Cut the following from the left-hand side of the squared strip set as shown, if you’re left-handed you could cut from these cuts for one block:

• 3 strips 11/2”

• 2 strips 13/4”

• 2 strips 2”

• 2 strips 21/2”

• 2 strips 23/4”

Strips are sub cut from 2 tubed strip sets, follow the cutting directions above.

3. Trim to square up the strip set.
Sewing the strips together with a 1/4” foot
Seams are pressed with a hot dry iron in one direction.
The strip set is trimmed.
Sewing the strip set into a tube
Tube is sewn together and trimmed square to lay flat.

8. Referring to the layout diagram on this page, seam rip at different sections of each strip to create the strip configuration needed to lay out the correct pattern. You’ll be staggering each color to create the pattern.

Seam ripping at specific sections to achieve the layout shown on this page

9. Once all the strips are seam ripped where needed, lay them out and number the rows 1- 11 as shown. I used masking tape at the top of each strip so that the numbering system would not come off.

10. Sew each row together in groups of two, use flat pins or fine pins at each intersection of the seams, pinning through one seam to the other carefully. With careful pinning, you’ll achieve success but this is a crucial moment in the process, well worth the time it takes. Sew carefully with a ¼” foot making sure all seams lie flat.

Bargello Layout Diagram

11. Remove the taped labels and press in the same direction for all units. Pressing in the same direction at the strip piecing and block construction stage will allow the block to lay flat and it’ll also make it easier to quilt through.

12. Make one more of these blocks to get ready to choose a table runner layout. You’ll need 2 blocks to make a table runner measuring approximately 221/2”

48”.

Inching forward... I hope you enjoyed piecing tutorial with Gütermann MCT Sew- all Thread. By now I’m thinking you can imagine the possibilities with this big block.

Rows of strips numbered so they are accurately sewn together. Note: These are row #’s and not color numbers.
Starting the process of careful pinning the rows in groups of 2. Initially using flat flower head pins.
The bargello block is complete.
Strips are pressed in the same direction.
x

Creative quilt layouts with a bargello quilt block

I suggested making two blocks in my previous tutorial to make the table runner. Let’s explore a few layouts.

Accurately piecing the Batty for Bargello Quilted Table Runner, you can imagine it repeated and turned different ways to make different design configurations. If we made bed-sized quilts with multiple blocks. This allows many design possibilities because many blocks are needed. Larger quilt design options are shown on the next page.

King-size 110” x 96” quilt

Queen-size 96” x 88” quilt

Throw size quilt 66” x 72”

After making the two blocks as suggested, you’ll have some of one tube left over. You could make tote bags, placemats, potholders, and more with the scraps and any additional blocks you’d like to make. Use the free coloring page at the end of this feature to try designing your bargello block.

You can see the design possibilities are exciting and infinite with this single bargello block!

Up next, I show how to add the Fabric Creations Cotton appliqued bats to the backing with an easy quilt-as-you-go method and stitched with white and black Gütermann MCT

Sew-all Thread

Layout suggestion 1
Layout suggestion 2
Layout suggestion 3
Layout suggestion king-size quilt with 22” x 24” blocks
Layout suggestion for a queen-size quilt
Layout suggestion for a throw-size quilt

Batty for Bargello unique reversible finishes

I chose layout 1 with the gorgeous Fabric Creations Cotton showing off the beautiful orange in the center as shown below. I’ll discuss how to quilt the table runner with Fairfield Quilter’s 80/20 Quilt Batting and Gütermann MCT Sew-all Thread. I’ll also demonstrate how to add the appliqued bats with HeatNBond Feather Lite Fabric Adhesive and easily sew the binding with UNIQUE sewing binding and hem clips

Finishing Instructions

1. Sew block 1 to block 2 in the center as shown. Pin to match all seams.

Two bargello blocks being sewn together with orange sections towards the center, pinned carefully

2. Press the seam open so that the table runner will lay flat.

3. Cut a 22” x 52” piece of orange fabric and the same for the batting. Fairfield Quilter’s 80/20 Quilt Batting was used for this project, it’s lofty, but lays flat enough when needed, shows texture when quilted and is lovely.

4. Download and trace the bat design onto the paper side of the HeatNBond Feather Lite Iron-on Adhesive as shown. Trace with a pencil or permanent marker so it’s easily visible. I used five of these bats.

5.

6. Using scissors cut the bats out on the traced lines as shown.

7. Remove the paper and iron the bats glue side down to the pre-cut orange piece of fabric, audition how they need to be laid out before pressing with an iron.

TIP Use a hot dry iron and a pressing action; for best results do not move the iron back and forth.

Press the glue side of the fabric adhesive bats onto the solid black fabric as shown.
Tracing on the paper side of the fabric adhesive
Glue side of the fabric adhesive being ironed to black fabric.
Five applique bats cut out Remove the paper from the fabric.

8. Center, sandwich, and baste the bargello quilt top, batting, and backing that has the bat appliques facing outwards.

9. Turn the table runner to the backing, install a free motion foot on your machine, engage feed dog down function and stitch and quilt as you go with black thread close to the edge of each bat as shown.

10. Quilt the remainder of the table runner in a pattern of choice, I chose to quilt mine with an atmosphere style design in white as shown with a free motion method. The black thread for the bats will show up on the front of the table runner as shown and this creates a subtle design element

11. Prepare binding by cutting 4 strips 21/2” by width of fabric from black fabric.

TIP Here’s a free tutorial on Binding a Quilt if you need it.

I chose to sew my binding to the back of the quilt and fold it towards the front, I clipped it with UNIQUE sewing binding and hem clips as shown and found them very helpful to hold the binding while sewing. I then topstitched the binding very close to the edge with black thread.

See the completed Batty for Bargello Quilted Table Runner! we discovered the very interesting bargello technique of piecing and design with Fabric Creations Cotton. I discovered some fantastic notions including Fairfield Quilter’s 80/20 Quilt Batting, UNIQUE sewing binding and hem clips, Gütermann MCT Sew-all Thread, KAI Ultra Rotary Cutter Replacement Straight Blade and Best Press Starch Alternative. I encourage you to look for these products at your local sewing or quilt shop.

I sincerely hope you enjoyed and more importantly will try to make a bargello quilt block or two. This reversible table runner enhances your fall and Halloween decor.

Bats are auditioned and pressed in the center onto the orange backing fabric.
Bargello table runner centered, basted, and sandwiched.
Free motion quilting and applique all at once with black thread very close to the edge of the bat applique.
Quilted atmosphere lines with free motion quilting and white thread.
Quilted bats showing subtly on the front of the table runner with black thread
Quilt binding sewn to the backing and rolled to the front, clipped with binding and hem clips

Mastering Sulky and UNIQUE stabilizers for sewing & machine embroidery

Greetings, everyone, as we discuss one of my favorite topics. OK, I have many favorite topics, but I hope to clear up a lot of confusion about stabilizers!

In January 2025, I posted a quick overview of the difference between batting, interfacing, stabilizers, and fusible web on QUILTsocial. That same week, I provided an in-depth overview of the properties of fusible webs and where and how to use them.

Now, I'll be using Sulky and UNIQUE stabilizers to provide insight into which one(s) to use when. I'll discuss using stabilizers in sewing mode and machine embroidery.

If you choose the correct stabilizer, it’s never (or very rarely) visible in the finished product. Sometimes, the stabilizer must remain in the project to provide stability even after the stitching process, but it’s discreetly on the underside of the stitching. Most stabilizers are often completely removed.

Using the incorrect stabilizer will result in puckers, tucks, tunneling, and misformed stitches. Sometimes, the wrong choice comes from a lack of knowledge, but it can also be from trying to find the cheapest solution to stabilize your project. The bottom line is that your project will lack a polished look if you don't use the correct stabilizer.

Hopefully, after following along here, you'll better understand why using the correct stabilizer is essential.

There are four main categories of stabilizers based on how they are REMOVED. Within each category are special stabilizer properties and weights; we'll discuss each category in greater detail later.

Photos by Elaine Theriault
A variety of stabilizers
Puckers resulting from no stabilizer used for machine embroidery Tunneling resulting from no stabilizer for satin stitch

While the Sulky products are colorcoded to help you select the correct product, reading each package to identify the recommended usage is essential.

In addition to the color coding, each category has a symbol representing its removal method:

• Red – removed with heat

• Green – removed by tearing

• Purple – removed with scissors

• Blue – removed with water

Within each category, there are multiple sizes. Some products are available by the bolt. Others come in a handy resealable tube in a variety of widths, including 8", 12", and 20". The lengths can vary from 5 to 12 yards. You'll also find small quantities in one-yard or three-yard packages and, in some instances, sheets of 81⁄2" x 11".

Since there are so many varieties, having a package of each would be nice! Test them out and then determine which products you need in larger economy sizes and which you need in smaller amounts.

If you're using the stabilizer for machine embroidery, the size you buy is determined by the embroidery hoops you use. Some of the products are toppers as we'll see in this feature, and you don't need large pieces. Remember that you may not find all the sizes available in all the products. Here is a sampling of the various sizes.

As I said, all the available options can be confusing, but read through the entire feature, and you'll soon be an expert the next time you shop for a stabilizer.

And there's one more option that I want to let you know about. Most stabilizers are white, but the odd one is black, and reading the label will show you that.

Take some time when shopping. Don't just buy because it's on sale; don't just grab what you think is the correct product. Get familiar with the labels and the properties of each removal method, and check the quantity in the package.

TIPS for stabilizers

1. Label: The stabilizer packaging is colorcoded, including a symbol identifying the removal method. The instructions are also on the label. It's critical to keep the label with the product. Many of the products look remarkably similar without the label, so keep them labeled to make good use of them. If the packaging isn't resealable, use a zippered plastic bag and keep the label with the stabilizer.

2. Experiment: Don't be afraid to experiment with the various products and keep notes on what worked best and what didn't. Keep a small sample swatch to help you figure out what product to use and when. Use page protectors or some other form of organization to help you with your next project.

3. Storage: Some water-soluble stabilizers must be kept in a sealed plastic bag to prevent breakdown from high or low humidity levels. Read the instructions to ensure you are storing your products correctly.

4. Storage: I group my stabilizers by category. Then, when I need to find a particular type of stabilizer, it's easy to look in that bin and choose the appropriate stabilizer for my needs.

5. Use: Do NOT skimp on the stabilizer or use a hack because it's cheaper. The results will not be the same, and you'll be disappointed and risk ruining your project.

I spend a lot of time working on samples, but when I need to select a stabilizer, it's easy to know which one to pick. More importantly, I know how the products work, and the result will be fantastic! Nothing is worse than starting to stitch on your good fabric or a ready- made garment, only to discover that you did not use the correct stabilizer!

Color-coded packaging of the four methods of removing the stabilizer
Different size options for stabilizers
Black and white stabilizer options

Choosing & using tear-away stabilizers for sewing & machine embroidery

I’m working with stabilizers that are removed by tearing. I’m using several Sulky products, one stabilizer from HeatnBond and two from UNIQUE. I’m not comparing the results between products but to use different tear-away stabilizers to highlight properties or weights.

There are guidelines to help us choose one stabilizer over another, and sometimes, we may need multiple products. As these are guidelines, not set-in-stone rules, the more familiar you become with the properties and weights, the easier it is to choose the correct product(s) for the job.

I’ll start in sewing mode. Wide and/or dense stitches in sewing mode require a stabilizer. If not, the result can look disastrous.

I’ll use a basic tear-away stabilizer for the sewing mode samples.

I used the satin stitch to demonstrate why a stabilizer is essential and tested what happens at various stitch widths. In these samples, the length is 1.0 mm, which is not dense, but the stitch reaches a maximum width of 9 mm. The numbers on the sample indicate the stitch width. I used a bobbin-weight thread (60-weight) and a 40-weight decorative thread in the needle.

There’s one layer of fabric and zero stabilizer. Let’s see what happens.

As you can see, the puckering started around the 3.9 mm stitch width and got significantly worse as the width increased. No one would want these results on their project.

What do we do about it? We add stabilizer, of course. I’m using a tearaway stabilizer because typically, but not always, decorative stitches, particularly satin stitch, will be hidden within the final product. If the back were going to be visible, I’d choose another stabilizer, which we’ll discuss later.

I used the Sulky Soft, Lightweight, TearAway Stabilizer (Tear Easy) and started with one layer. My samples include only 5 mm to 9 mm stitches, as there were no issues with the narrower widths.

With one layer of stabilizer, there’s still a lot of tunneling and puckering in all widths.

So, I tried two layers of Tear-Easy. This sample looks much better than using a single layer; almost all the puckers have disappeared. I have NOT pressed any of the samples, so this is excellent quality.

A group of tear-away stabilizers
A stitch out of various satin stitch widths with no stabilizer
Satin stitches using one layer of Sulky Soft, Lightweight, tear-away stabilizer
Two layers of Sulky Tear Easy tear-away stabilizer

However, the packaging stated that I might want to use one, two, or three layers (or more) of stabilizer, so I added a third layer. Notice that the samples are labeled. It doesn’t have to be pretty, but it needs to be functional and something you can refer back to.

With a good press, I could probably get away with two layers of Tear-Easy stabilizer for this wide satin stitch, but do you see what a difference a little bit of stabilizer makes to the final look?

There’s another tear-away product called Sulky Stiffy, which is a medium-weight stabilizer. Let’s try that out and see what happens. All the stitches are perfectly flat. I did not press these samples.

I thought I’d try two layers just for fun. There would be no need even to press this. It’s flat and likely overfill, at least on this fabric.

The samples above are a great example of why we need to test. It’s not enough to grab a stabilizer to put under our stitching; you need to think about the type of stitches and the weight of the stabilizer. The fabric type can also influence what kind of stabilizer to use. I’m not looking at the cost of these stabilizers, but I would assume that the medium weight is more expensive.

If you have used more than one layer of tear-away stabilizer, it’s best to remove one layer at a time. Multiple layers mean more effort to clean up the project. Tearing one layer at a time is less likely to damage the stitches.

So buying the lightweight, thinking it’s a bargain, isn’t always a bargain if you have to use twice as much to do the same job, and it takes twice as long to remove. See how choosing the correct stabilizer makes more sense?

The stabilizer will tear away from the straight edge of the satin stitch with no problem; however, if you use a more decorative stitch, that is not the case. In this example, I used a feather stitch with a tear-away stabilizer. If I tear the stabilizer away, I may damage (loosen) some stitches.

Instead of tearing, I would fold the stabilizer along the edge of the fly stitch and cut it with applique scissors.

I want to mention that in this sample, I replicated the seams from my quilt to test whether I needed a stabilizer. I used lightweight interfacing (permanent) on the blocks, so I made the sample using the same materials, with the seams pressed to one side. I attempted to stitch without a stabilizer, but it started to pucker, so I added a tear-away. Again, was this the best stabilizer? The inside won’t show when the quilt is together, but I could have used a different product.

Here’s another situation you may run into. As mentioned, I’m always experimenting to determine what to use when needed. I had a pair of child’s shorts that I wanted to stitch a decorative stitch along the hem. Do I need a stabilizer? And if so, which one? Experimenting with a ready-made garment is tricky because there’s no fabric to sample.

I positioned an open stitch on the hem and did NOT use a stabilizer. If I had put the line of decorative stitch higher so it didn’t fit on the hem, I could have used a tear away, but there would be bits of paper between the stitches, which would not have been pretty, and the paper would have been scratchy on the skin. So, I would have chosen a different kind of stabilizer. Stay tuned to know what I would have chosen.

Three layers of Sulky Tear Easy stabilizer
One layer of Sulky Stiffy tear-away stabilizer
Two layers of Sulky Stiffy tear-away stabilizer
Using scissors to trim the tear-away stabilizer
A sewing sample with stabilizer and without
The front and back of decorative stitches without stabilizer

Now, let’s move to machine embroidery.

Tear-away stabilizer is a very common stabilizer used for machine embroidery. It’s readily available, has multiple widths to accommodate various hoop sizes, and is economical. However, if the back of the embroidery will show, it is NOT the best product to use. And you’ll see more about that in this feature. Once you remove the excess tear-away stabilizer, here’s what the back of an open machine embroidery design looks like.

Removing the stabilizer between the stitches would require a lot of time, and you risk the danger of loosening a stitch or two. Leaving this inside is OK, provided the back will not be visible. It will eventually break down.

Let’s see what happens to the stabilizers when we move on to some denser embroideries. Please note that these are not scientific experiments; I’m just doing some quick stitch-outs, and there are MANY iterations I could do. I just want to show you the value of experimenting while giving you some idea of what these stabilizers do. I’m also NOT comparing one brand of stabilizer to another. All brands worked equally well within the limits of the experiment.

I used a bobbin weight thread (60-weight) and a 40-weight embroidery thread for the needle. The fabric is one layer of muslin, and each sample uses a different stabilizing method. I used a metal hoop for these samples and gave the samples a quick press directly on my ironing surface. I should have used my wool mat to prevent flattening the stitches.

Pressing brings up a whole other question, which I don’t have time to explore here. But what surface works best for pressing machine embroidery? Should I press before or after the removal of the stabilizer? Hmm – more exploring! But you can see what happens during the experimentation stage. You do something, and then you have more questions. I love this process and have learned so much!

For these two stitch-outs, I used the HeatnBond StitchnSew Tear-Away stabilizer as the principal stabilizer. For the sample on the left, that is the ONLY stabilizer I used. I removed the stabilizer from the left sample and then pressed it, and there are some puckers and a few ripples. While I’m using a full-coverage embroidery fill, it’s not overly dense, so imagine what would happen with a more dense design.

In the sample on the right, I used the same HeatnBond StitchnSew Tear-Away stabilizer on the bottom. Before I hooped the fabric, I ironed a piece of Sulky Totally Stable stabilizer to the wrong side of the fabric.

Remember, we talked about different properties within the tear-away category. Well, here’s a new property. Totally Stable has a coating on the underside that allows it to be fused temporarily to provide extra support for thin fabrics or any fabric that is not stable and could shift in the hoop during the machine embroidery stitch out.

Sulky Totally Stable is a fantastic product that can control those “shifty” fabrics! Plus, it adds extra support for the overall pattern fill, as I typically slide another layer of stabilizer under the hoop just before I press Start.

FYI: Sulky Totally Stable comes in black and white.

In this next sample, I used two different, UNIQUE branded stabilizers. The first one (UNIQUE Tear Away) is for medium to heavy-weight fabrics, and I slid an extra layer of HeatnBond tear-away stabilizer under the hoop before I started.

The second sample uses the UNIQUE Easy Stitch stabilizer for light to mediumweight fabrics, and it also has an extra layer of HeatnBond tearaway stabilizer. I pressed both samples on my ironing surface. The stabilizer is still attached.

Both samples work very well with the second layer of stabilizer. What is critical to know is that all the brands performed equally well, but because of the somewhat dense fill pattern, the second layer was key to the integrity of the design.

Here’s a look at the UNIQUE Easy Stitch, which is perforated. This product looks quite different, so keeping the labels attached is essential. Would you remember what it is if you ran across this in your stabilizer stash?

The reverse side of a machine embroidery design with excess tear-away stabilizer
Two samples of machine embroidery and different stabilizer methods
Sulky Totally Stable comes in black and white
Samples of machine embroidery using UNIQUE and HeatnBond tear-away stabilizers

You can see the extra layer of tear away on the back.

A perforated tear-away stabilizer

One final property I want to discuss in the tear-away category is a sticky stabilizer, which allows you to do machine embroidery on a fabric that would be hard to hoop. Sometimes, you do NOT want to hoop your fabric, such as a fabric with a nap, like velvet, or perhaps the hooping process will bruise the edges, which can happen with solid, dark colors.

While you could use a metal hoop for those fabrics, the sticky stabilizer serves two purposes. It allows you to hoop odd-shaped or small items and keeps thin or shifty (bias) fabrics in place.

It’s easy to use. Simply hoop the Sulky Sticky + stabilizer with the shiny paper face up.

an embroidery hoop

Score the paper with a pin and remove the protective paper to reveal the sticky surface on the stabilizer.

Removing the protective paper

I embroidered the same motif on a lightweight piece of chambray that was too small to be hooped. The sticky stabilizer held that fabric firmly in the hoop, and the result looks fantastic. I only used one stabilizer.

An embroidery sample on chambray with Sulky Sticky + stabilizer

To sum up, using the correct tear-away stabilizer is essential to a beautifully finished item, whether with decorative stitches in sewing or working with machine embroidery designs. When selecting the type (and weight) of tearaway stabilizer, here are some things to keep in mind:

• Density (width) of the design/stitches

• Type and weight of the fabric

• Easy to hoop if doing machine embroidery

And remember the various properties of the tear-away stabilizer:

• weight

• iron-on ability

• sticky

• color

Above all, remember that tear-away stabilizers are often used for items where the back will not be visible, so if small bits of the stabilizer remain during removal, it’s no big deal. Those remaining bits of tear-away stabilizer can also be itchy if they stay in a garment.

Sort your tear-away stabilizers: check if you have different colors or special properties, and make sure they are labeled! If your product gets separated from its label, simply attempt to tear a corner, and if it tears easily, then it’s very likely a tear-away product.

Next, you should run a couple of tests using multiple combinations. You’ll be amazed at what you’ll learn.

I have only scratched the surface of tear-away stabilizers, but the more you use them, the more you understand the properties and the removal process, and the better your projects look. Be sure to read the labels and check out the links provided to find additional details.

Sulky Sticky + stabilizer in

How to choose and use SULKY Cut-Away stabilizers for machine embroidery

I’m working with Sulky Cut Away stabilizers. These stabilizers also come in various sizes – the one-yard package or the roll in widths of 8” to 20”. Most are available in white, but several also come in black.

Remember that these are not scientific experiments, nor did I go back to see how to improve something if it didn’t work as well as I would have liked. I used T-shirt knit fabrics for the samples, with a 60-weight bobbin thread and a 40-weight embroidery thread in the needle. I used a traditional two-part embroidery hoop for the first samples and a metal hoop for the final ones. I’ll explain more when I get there. All of them had ONE layer of stabilizer.

I used Sulky Soft'n Sheer for this sample. It’s a textural (fabric-looking) stabilizer that’s very soft to the touch. I used a traditional hoop, but I didn’t want to hoop the knit fabric, so I floated it (laid it on top of the stabilizer) and used the machine embroidery basting stitch around the hoop to secure the fabric. Soft’n Sheer is a lightweight stabilizer suitable for lightweight fabrics, including T-shirt knits. It comes in black and white.

My stitch sample includes fill patterns for lettering and a shape, satin stitch lines for the other type of lettering, and the heart outline.

The overall quality looks pretty good!

Someone asked a question about stabilizing garments. They had heard the expression, “If you wear it, don’t tear it,”’ meaning don’t use a tear-away stabilizer on a garment. So I decided to try it.

I used the HeatnBond Stitch n Sew tearaway stabilizer. From the perspective of the front, this looks no different than the one done with the cut-away stabilizer.

A sample stitched using HeatnBond Stitch'n Sew tear-away

I wanted to wash all the samples to see what would happen to them. I stitched two samples using the Soft n Sheer stabilizer. I wanted to leave one large piece of stabilizer on one sample and cut out the stabilizer separately for the various shapes on the second sample.

For the tear-away, I tore the majority of the stabilizer away.

Here’s something to contemplate about the tear-away. I found removing the stabilizer around the small lettering and the heart outline tricky. I had to be extra careful not to stretch the fabric or damage the stitches. And as you can see, there are lots of bits of stabilizer still caught in the letters. I removed more (see above), but cleaning that up took time as I didn’t want to stretch the fabric or damage the stitches. We discussed in the previous article with the tear- away and how it’s not the best stabilizer if the back is visible. While this is the inside of a garment, it’s still visible if you look inside the garment, but more importantly, it’ll likely be next to someone’s skin, and that paper can be scratchy!

Here’s what it looks like after washing. I have not ironed this, and all the stitching held up exceptionally well. There was no substantial puckering around any stitchouts, even the dense ones.

Sulky Cut Away stabilizers
A sample stitch-out using Sulky Soft’n Sheer with a knit fabric
stabilizer
Different stabilizer removal
Removing the tear-away stabilizer from the knit fabric

When I looked at the back, everything seemed to be just fine. I was surprised at the difference (or lack thereof) in the two cut-away examples. I expected the one with the cut shapes of stabilizer to pucker more than the one where I left it in one piece, but they seem to have the same appearance on the front.

However, the stitch-out using the tearaway stabilizer still has many bits of the paper-like stabilizer trapped between the stitching. I would NOT be happy with this next to my skin.

The next stabilizer is called Sulky Cut Away Plus. I only have pictures after washing, but that’s OK. It’s the after that we want to see. It’s a medium-weight, non-woven stabilizer.

The knit fabric is very much the same weight as the previous examples. Look at how beautiful those stitches are. I also floated the knit in the traditional hoop, with only the cut- away stabilizer in the hoop. For the economical-minded stitchers, a metal hoop requires smaller amounts of stabilizer. Just saying! I basted around the hoop to stabilize the fabric. Do not use the basting function of your embroidery machine if the stitching will leave holes, as with leather, vinyl, or cork.

One issue with putting embroidery designs on a garment, particularly one that will touch the skin, is those people with sensitive skin, especially babies and small children. Many adults, myself included, dislike something scratchy touching their skin.

So, on the back of one of the stitchouts, I put a layer of Sulky Tender Touch, a permanent, iron-on “Cover-a-Stitch.” It is soft and flexible, even though it’s fusible. I did NOT fuse it long enough, so the edges on the T-shirt fabric did come up slightly during the washing process, but the difference between the two samples is incredible. The one with the Tender Touch is so soft that I would have zero issues putting it next to my skin. The one on the left? Although the stabilizer is smooth, some of the stitches are rough. My vote would be always to use Tender Touch. You can buy it on a bolt!

In addition, Tender Touch works as a stabilizer for lightweight fabrics. There’s a lot of information on the packaging, so be sure to read it. And don’t forget to make some samples.

So far, the main difference between the two stabilizers we have chatted about is the product's texture and weight. The Tender Touch had the additional property of being a fusible.

The next two products are also fusible. I used a metal hoop for the remainder of the samples. I’ll say that I’ve become a fan of metal hoops as the amount of required stabilizer is less; it’s faster and easier (for arthritic hands) to hoop the fabric, with no danger of bruising the fabric, etc. Remember to follow the manufacturer’s instructions for hoops –in this case, no more than eight magnets on any metal hoop.

The other reason I used a metal hoop for these two products is that you start by fusing a piece of the stabilizer to the wrong side of the fabric. I don’t want to fuse a larger-than- necessary piece of stabilizer to the back of my stitch-out. The metal hoop worked just fine. Look at how stable those stitches are! Amazing flat!!! This stabilizer is called Sulky Fuse’n Stitch and is a heavyweight permanent stabilizer.

Stitch-outs using Sulky Soft’n Sheer cut-away and HeatnBond Stitch n Sew tear-away stabilizers
The back of the samples using Sulky Soft’n Sheer cut-away and HeatnBond Stitch n Sew tearaway stabilizers
Stitch-outs with Sulky Cut Away Plus stabilizer
The back of the stitch-outs using Sulky Cut-Away Plus and Tender Touch stabilizers
Using a metal hoop to hoop the knit fabric
Stitch-out using Sulky Fuse’n Stitch cut-away stabilizer

Here’s the back of the stitch-out. I was a bit torn on this one, as once the stabilizer is in place, you can’t remove the excess, and you need a piece large enough to stabilize the stitching. It's for use on heavier fabrics than T-shirt knits. But the stability is impressive. In the future, I would round the corners of any of the stabilizers.

The back of the stitch-out using Sulky Fuse’n Stitch Cut-Away stabilizer

Here’s the front of that design after washing. It looks incredible, although it’s a bit overkill for this fabric's weight. This product is more in line with decorator-weight fabrics or those used for outerwear.

The next cut-away is called Sulky Soft’n Sheer Extra. It’s a medium-weight iron-on cut- away permanent stabilizer. It has a fabric-like texture like the Soft’n Sheer, and you could use one layer of this stabilizer instead of two layers of Soft’n Sheer.

Because it’s fusible, you must cut a piece large enough to stabilize your area, but the advantage of this one is that you can reheat the area after stitching and pull back the excess stabilizer. Cut it away, and it’s beautiful. There is no need to baste in the hoop if you float your fabric, and no excess stabilizer on the back.

I was very impressed with this product. Look how stable everything looks.

And here’s what the back looked like as I removed the excess fusible stabilizer. I’ve never used a product like this before, and without reading the instructions, I would never have known that I could reheat the sample and remove the excess. Then, I gave it another quick press and let it cool. This stabilizer is a new product, and it’s very cool.

Trimming the excess Sulky Soft’n Sheer Extra stabilizer away

The final product for this look at stabilizers is called Sulky Stitch’n Seal, which seals the back of embroideries stitched on waterproof fabric. WOW –who knew! It’s also a new product.

Since I did NOT have any waterproof fabric in the house, I started by making a water- resistant fabric using HeatnBond Vinyl and fused it onto a piece of cotton. The vinyl was another product that I’ve meant to try for a long time. It was super easy to use. Again – reading the instructions is essential.

I didn’t make a note, but I don’t think I used any stabilizer on the back and stitched my embroidery directly onto the vinyl-covered cotton. These products are new territory for me, but it was so easy!

The next step was to take a piece of the Sulky Stitch’n Seal and fuse it to the wrong side. The instructions said to experiment, and well, I learned that you need a press cloth, as you can see by the little goof on the lower left side.

And here’s the final design. WOW – I love it!

Wow – what a fascinating journey through the world of cut-away stabilizers. I have only scratched the surface of what you can do with the cut-away stabilizers, but I hope I’ve shown you enough to realize that there are no magic formulas for which stabilizer to use when. I learned so much about new products with properties I’ve never tried before.

I want to try additional stitch-outs with these products to become more comfortable and knowledgeable about the cut-away stabilizers and their various properties.

Stitch-out with Sulky Soft’n Sheer Extra
The stitch-out on the HeatnBond Vinyl
The Stitch’n Seal on the wrong side of the embroidery stitches
The finished stitch-out on water-resistant fabric
The stitch-out after washing using Sulky Fuse’n Stitch Cut-Away Stabilizer

Your guide to using Sulky Water-Soluble stabilizers for stunning embroidery

In this article, I’m working with Sulky stabilizers, and I also have one from the UNIQUE brand to try. Like the other categories we discussed, there are various properties and weights, so there are many options to ensure you get one that meets your needs.

I love doing two-sided embroidery, which means the front and the back will be visible. Two-sided embroidery is common in ready-made items like garments, placemats, table runners, hats, etc. You know your friends will peek at the back, so making the back look as pretty as the front is essential! You can create stand-alone items like freestanding lace, scarves made from yarns, thread painting, and much more!

Here’s an example of some threadpainted (free motion) jellyfish. I placed a water-soluble stabilizer in a wooden hoop for free-motion thread painting. Then, I stitched the thread in a pattern that meshed the thread with itself. You can use multiple shades of thread and any pattern that you wish. Because the thread creates a tight mesh, it retains its shape when the water-soluble stabilizer is gone.

The jellyfish consists of a top and a bottom, and the loose yarn tails are positioned between the two sections and stitched together. It was easy to applique the body onto the quilt top.

There’s so much more, so let’s get started. I started by making a free-standing lace ornament. Like the free-motion thread painting above, the free-standing lace is made ONLY with thread. There’s no fabric.

I used the Sulky Fabri-Solvy and a metal hoop. I cut a piece of stabilizer and used the magnets to adhere the stabilizer to the hoop. Yes – I also love my metal hoops! I used red thread in the bobbin to match the red thread on top since both sides of this design will be visible.

Although this stabilizer resembles a loosely woven fabric, it will dissolve easily in water.

TIP Ensure all your stabilizers are labeled. Becoming familiar with the categories, weights, and properties is essential so you don’t grab the incorrect one.

Although the stabilizer has a few ripples, the final outer edge of the stitching is perfectly aligned, so the design did not shift even with all those dense stitches. When not using the correct weight or type of stabilizer, it’s possible that the final stitches will be out of alignment with the underlay stitches. In this case, the design is perfect!

All that’s left is to trim the excess stabilizer away, rinse it in warm water, and let it dry. Leaving some stabilizer in the project acts like a fabric stiffener, allowing the free-standing designs to maintain shape.

There’s a sticky version of Fabri-Solvy called Sulky Sticky Fabri-Solvy, which works very well when you have an unstable fabric that will shift during the embroidery process. Denim is one fabric that I love to embroider using the sticky stabilizer.

Sulky stabilizers: Ultra Solvy, Solvy, Paper Solvy, Sticky Fabri-Solvy, Fabri-Solvy, and Super-Solvy
Thread painted jellyfish using water-soluble stabilizer
A free-standing lace design on Sulky Fabric-Solvy
The edge of the stitching is perfectly aligned.
A free-standing heart using Sulky Fabric-Solvy water-soluble stabilizer

Another reason I love this stabilizer is that it can be challenging to put ready-made items in a hoop to stabilize them for embroidery. The sticky stabilizer provides stability while floating the item in the embroidery hoop. I love this product when I’m embroidering on garments, as the garment will stick to the stabilizer during embroidery. It completely washes away, leaving no bits of stabilizer on the back of the embroidery.

This stabilizer has two sides. One side is the Fabri-Solvy, while the other has a protective paper covering the stabilizer’s sticky adhesive.

It’s easy to use. Hoop the stabilizer so the shiny paper side is up. There’s no need to hoop the fabric, which is a massive benefit because many items just can’t be hooped.

Take a pin and score the paper, carefully, not to cut the sticky stabilizer beneath.

Remove all the paper inside the hoop, exposing the sticky adhesive.

Mark the registration marks on your project.

TIP It’s a great idea to print a copy of the embroidery design on paper to help with the positioning. I like to use the Clover WHITE Chaco-Liner for marking. Then, align the chalk registration lines with the horizontal and vertical notches on the embroidery hoop. Once the registration marks are aligned, press your item to the adhesive. You can lift the project multiple times, and it will continue to stick to the adhesive in its new position.

I basted around the hoop to provide extra stability, but it’s unnecessary. I’ve used the sticky stabilizer to hoop many hard-to-hoop items, like bowls made from clothesline, purchased placemats, plastic table mats, and much more! I’ll only baste if the holes from the basting stitches will disappear.

Then stitch.

TIP When working with a two-sided project, be careful with the density of your design, which may not look nice on the other side if it's too dense. This design is relatively open and will look just fine on the inside of the shirt. The color of your bobbin thread can also make or break the look on the back of the stitch-out.

I removed the basting stitch and took the stabilizer (and the garment) from the hoop. Remove the excess stabilizer before rinsing. This stabilizer resembles fabric and needs to be cut, which is easy enough to do with duck-billed applique scissors.

Be VERY careful when you do this. The stabilizer is still very sticky; putting a tiny snip in the fabric would be easy. Slow and steady.

Removing the excess stabilizer

I could go in closer and remove more, but I’ll leave it like that. It’s best not to tempt fate! Since there is a fair amount of stabilizer, I’ll rinse it with hot water, but it’ll require a good wash to remove the excess. Too much of the stabilizer down the drain could cause problems, so if you’re uncomfortable, you could always soak it in a bucket to remove most of the excess and dump the water outside. Even if all the stabilizer is gone by rinsing, I like to wash garments to remove this stabilizer completely.

The two sides of the Solvy Sticky Fabri-Solvy water-soluble stabilizer
Score the protective paper on the Sulky Sticky Fabri-Solvy.
Remove the protective paper from the Sulky Sticky Fabri-Solvy
The garment is temporarily adhered to the Sulky Sticky Fabri-Solvy.
The embroidery design using the Solvy Sticky Fabri-Solvy water-soluble stabilizer

The excess water-soluble stabilizer is gone.

And there’s the shirt. It looks amazing! I can’t wait to wear it!

Now let’s move on to water-soluble stabilizers with a completely different texture. These stabilizers resemble plastic film and come in a variety of weights. We’ll start with Sulky Super Solvy I had a napkin that I wanted to do some stitching on, but I did NOT want any paper-type stabilizer on the other side, so it’s a perfect candidate for a watersoluble stabilizer. I put a layer of Super Solvy in the metal hoop and then used the magnets to secure the stabilizer and the napkin.

Oh my gosh! It turned out beautifully. I was genuinely impressed; even with the satin stitching, there was zero puckering! I sent this to my daughter, who is getting married next year. I love the design and the quality! Am I looking for more work?

Now, an interesting thing happened. I didn’t have time to deal with some of these samples for about ten days, so they sat on the table with the watersoluble stabilizer exposed to the air in my basement. Be very careful, as water-soluble stabilizers are sensitive to humidity.

The fabric started to ripple because the stabilizer started to shrink as it interacted with the air! WOW!!!

TIP Store ALL your water-soluble stabilizers in a closed zipper bag. Keep the labels with the products, as they are hard to identify once they are out of the package!

This stabilizer resembles a plastic film and is easy to tear away along the edge of the satin stitch along the outside of the motif. The bits left inside the loops will rinse away with water.

Here’s the back of the napkin. I have to say the stitching is impressive, and there is ZERO stabilizer to pick out since I’m using water-soluble. It pays to determine which stabilizer works best for the job, even if it might cost a little more. The results are worth the extra.

I used Sulky Super Solvy for the napkin, which was very stable. Sulky Solvy also looks like plastic film but is lighter in weight.

For this sample stitched on fleece, I used Super Solvy in the metal hoop and Solvy as a topper. The topper is placed on top of the fleece to help get clean, crisp edges around the embroidery. Although the excess stabilizer is gone, some of the stabilizers remain beneath the stitches. A quick rinse will remove that.

It looked like this before I removed the Sulky Solvy from the top. I basted the Solvy to the fabric so I wouldn’t have to babysit it while it was stitching. Removing the basting stitches from the fleece is easy enough, and they will disappear.

The embroidery design on the denim shirt
An embroidery design on a white napkin
Using Sulky Super Solvy on a napkin
Removing the Sulky Super Solvy water-soluble stabilizer
The back of the napkin
Sulky Super Solvy in the hoop, Sulky Solvy as a topper
Sulky Solvy is a stabilizer topper on a fleece fabric

Here’s another sample where I used the UNIQUE Trace-Away, a lightweight stabilizer on the bottom, and the Super Solvy on the top. Look at how crisp the stitching edges are once the topper stabilizer is removed. Super Solvy was overkill on the top, but I was just trying different combinations.

I found the lightweight stabilizer had started pulling away from the underside of the stitching. It’s not a bad thing – it just means that the lightweight stabilizer wasn’t quite strong enough for the density of those satin stitches. That’s something important to take note of. The design still stitched beautifully, but the stabilizer may not have remained stable in the hoop if there were many more dense stitches, which would cause the embroidery to shift.

Now, let’s try the Sulky Ultra Solvy, a heavy-weight stabilizer. Although it’s also a plastic film, it’s very thick and works beautifully with dense designs.

I’ll sandwich some yarn between two layers of water-soluble stabilizer and make a scarf.

I started by putting a layer of Sulky Ultra Solvy in a 465 by 260 mm embroidery hoop. Then, I cut many pieces of green yarn in various weights and textures and laid them on the stabilizer. I’ll make the scarf as long as two hoopings, so I cut them to an appropriate length.

I left extra lengths of yarn at the start to create the fringe and only had to trim the excess yarn from the ends after removing the piece from the hoop. Keep the excess stabilizer. The lighter weights can be dissolved in water to make a fabric stiffener, which is excellent for decorative stitches, and I think it can be helpful when cutting fabric with a digital cutter. Moisten the smaller pieces of the heavier stabilizer and stick them together to create a larger piece.

Here’s a picture of it during the embroidery process on the second hooping. It worked like a charm and was easy to do! Like everything, the second hooping was much easier than the first, and there was much less waste on the top stabilizer.

Wow, what an exciting day. There are so many possibilities for water-soluble stabilizers. I love the Sulky brand as it has many weights, and the different properties make it easy to find one that works for your project.

As mentioned, this is not a scientific experiment – that would take days. But I learned a lot while playing.

Because these designs were not intricate, removing all the stabilizers by hand was easy, and there was no need to wash the sample. I did not rinse the sample, so the water-soluble stabilizer remains under the stitches.

I created a grid pattern in the mySewnet Embroidery Software, now called Creativate, and stitched over the yarns. The two layers of water-soluble stabilizer secured the yarns on both sides without the yarn catching on the needle or the embroidery foot. Once the stitching was complete, I trimmed away all the excess stabilizer and cut the fringe on both sides to about 6 inches.

A sample using UNIQUE Trace Away on the bottom and the Super Solvy on the top
The lightweight water soluble stabilizer is starting to perforate.
Removing the topper stabilizer
Prepping the second hooping of yarn sandwiched between two layers of water-soluble stabilizer
One end of the trimmed scarf
Stitching the yarn scarf
The fringe at the beginning of the scarf

Mastering Sulky Heat-Away Clear Film stabilizer for embroidery projects

I threw the items I created into the washing machine to see how they would look after washing. It's a good test as the item needs to look as good after washing as before. Remember, with water-soluble stabilizers, none of the stabilizer remains in the item if it's washed. Wait – I rinsed the free-standing lace ornament in the sink to allow some of the stabilizer to stay, giving it body. The free-standing lace ornament (red heart) (Sulky Fabri-Solvy) and the white napkin (Sulky Super Solvy) came out beautifully. The fleece sample on the left (Sulky Super Solvy in the metal hoop and Sulky Solvy as a topper) looks fantastic; however, the one on the right (UNIQUE Trace-Away on the bottom, and the Super Solvy on the top) puckered. We'll come back to that one in a second.

Here's the denim shirt (Sulky Sticky Fabri-Solvy), which I did not press after removing it from the dryer, so you could see what it looks like without pressing. It turned out amazing!

Here's the part I love about the watersoluble stabilizers. Look at the inside of that shirt. Impeccable!! I haven't worn it yet, but should I find it scratchy directly next to my skin, I'll wear a light T-shirt underneath or fuse a piece of Sulky Tender Touch over the design, and it'll be amazing! I'd prefer not to see the cutaway stabilizer on the inside as I like the clean look of the stitches, but if I need to, the Tender Touch is the way to go. The choice of the design and stabilizer makes for a beautiful garment.

The last item I created in my previous article was the yarn scarf sandwiched between two layers of water-soluble stabilizer (Sulky Ultra Solvy in the hoop and Sulky Solvy) for the top. It's stunning! You don't see the stitches when using a matching thread for the machine embroidery. You could make the scarf thicker by adding more strands of yarn, but this density works for me. I love it! It was super easy to make and much faster than knitting a scarf! It makes me look at my yarns in a whole different way!

Now, let's go back to that sample that puckered. I only used a water-soluble stabilizer on this stretchy fleece. The satin stitch on both letters is quite wide – probably too wide, as it might get snagged on something. A wide satin stitch, especially on a knit, requires something to support the stitches.

I could reduce the width of the satin stitch, thereby making smaller letters, or I could change the satin stitch to a fill pattern. The best solution is to use a cutaway stabilizer that will remain in the project to provide support.

I love that regardless of what happens to the samples, there's a way to fix it! This problem- solving is why I make samples – to learn, test, and figure out what works for each type of fabric and design.

Let's move on to two other types of water-soluble products. The first one is called Sulky Paper Solvy. This product is perfect for creating templates for machine quilting, punchneedle, hand embroidery, or even paper piecing. Trace or photocopy the design onto the 81⁄2" by 11" sheets of paper and stitch on the lines. When finished, remove the excess paper and rinse the bits away. I love that it works well in the printer, which saves a lot of time. You could also use it as a stabilizer.

Washed samples using water-soluble stabilizer
Embroidery design on a denim shirt
The backside of the stitching on the denim shirt
Yarn scarf using water-soluble stabilizer and machine embroidery
A sample with the incorrect stabilizer for the fabric and the design type

I've used it to make a paper pieced block. It was easy to remove the stabilizer by giving it a quick rinse under the tap. I also tried spritzing it with water, but it did need a rinse to remove all traces of the dissolved stabilizer.

Paper Solvy only comes in 81/2" x 11" sheets.

While this product may resemble the Paper Solvy in that it only comes in 81/2" by 11" sheets, is water soluble and is used to transfer patterns, it's the same product as one we saw – Sulky Sticky Fabri-Solvy. This size format is called Sulky Stick'n Stitch. Use it to transfer designs for hand embroidery, thread painting using a sketch, punch needle, cross stitch, and quilting. I LOVE that this product works with the printer – super handy!

There's a protective layer of paper on the

sticky side of the stabilizer. Print on the fabric- like side, remove the protective paper layer, and adhere the design to the back or front of your fabric, depending on the technique. Punchneedle would be on the back side, while most other methods would be on the front. Watch for reverse images if that's important to the design.

Rinse the excess away when the stitching is complete. I didn't have a chance to try this product, but I've used something similar in the past, and I LOVE it because it saves a lot of time to get a design onto the fabric.

Finally, let's move on to the fourth

category of the Sulky stabilizers. I don't have much experience with this type, so I'm interested in trying it out. There's only one product, and it's called Sulky HeatAway Clear Film

Where would you use this?

It provides stability like the previous stabilizers, but the heat- away product might be the solution if you can't wash the item and wish all the stabilizers to vanish. Perhaps the thread or fabric is not colorfast, or the fabric itself doesn't like water. It sounds like fun, so let's give it a try.

Having read the packaging, I noticed it says NOT to use this product on a piece of fabric with a nap, like terry cloth or fleece. So what did I choose to experiment with? Fleece! Just because I wanted to see the reaction.

I took the same initials as we saw earlier, but made them smaller. I put a layer of the Heat- Away on the top and the bottom. Then, I basted around the design to hold the top stabilizer in place and stitched the design.

When I finished, I ripped some, but not all, of the excess stabilizer away. I could have removed more, but I intentionally left some excess to see what happened with the nap.

I didn't realize how much ironing I had to do to remove the stabilizer. I did not use steam as was indicated in the directions, but the heat and duration of the pressing did flatten the fleece more than I would have liked. But this is what happened on the front, where I also left more than necessary stabilizer. You can see how some of the stabilizer got caught in the nap, precisely as the packaging said it would!

A paper pieced block stitched on Sulky Paper Solvy
The paper pieced block after rinsing the Sulky Paper Solvy away
Sulky Stick'n Stitch
Sulky Heat-Away Clear Film
Excess Heat-Away Clear Film remains.
Heat-Away Clear Film after removing with heat

So, where would you use this? Think back to Day Two when I discussed TearAway stabilizers. Remember this sample? These are red decorative stitches on white fabric, which I had no intention of washing, so water-soluble stabilizers were out of the question. The tear-away stabilizer I used will remain in the project. Had I used Heat-Away, removing the excess from the back would have been simple! But I didn't know about HeatAway when I did this.

A red and white sample is perfect for Heat-Away stabilizer.

Wow – that's so many types of stabilizers and so much information! As you've seen from some of my samples, knowing what's available and how it can make or break your project is important. It's essential to know the difference between the four categories (tear-away, cutaway, water-soluble, and heat-away) and to understand the properties of the various types within each category.

Of course, you'll want to get your hands on some of each stabilizer I mentioned here, but to help you decide which format of each to buy, here's something you may want to start with. A Sulky Stabilizer Sampler pack has one piece (8" by 10") of all 19 types of stabilizers.

What I love about it is that the packaging has excellent information on all the different stabilizers broken down by category.

Each stabilizer sheet is labeled to help you learn what each looks and feels like.

You'll also find a chart showing you which size format each type is available in. You may not want a bolt of each type, but for those you use frequently, a bolt may be what you need. You also want to consider the size of machine embroidery hoops you most frequently use and ensure the size format you purchase will accommodate those hoops.

The Sulky Stabilizer Sampler pack is an excellent reference. And like everything else in your reference library, you need to make sure that you read this information and then experiment with the various types. Your projects will be amazing!

Seeing the not-so-perfect examples also helps to realize that even experienced sewists don't always get it right. But more importantly, I hope that you realize there's no one recipe for any project. Consider the type and weight of fabric, the embroidery design, the decorative stitches, and any other factors when choosing a stabilizer.

Don't be afraid to experiment, but on a sample! You can confidently tackle anything when you understand the properties and what will happen!

Be sure to check out the amazing Sulky and UNIQUE brand stabilizers. There's sure to be one that will suit the type of fabric, your embroidery design, or your handwork creations that will make your project a breeze to stitch, and the result will fill the air with oohs and ahhs from your friends.

I hope these articles has been informative for you. I had loads of fun and learned a lot! Have a great day! Ciao!

The Sulky Stabilizer Sampler pack
The labeled sheets of stabilizer and a chart of size formats
A recap of the Sulky stabilizers

I was asked, “Can I make a quilt on my serger, and why would I?” Well, that’s easy, it's faster for sure, and the seams don’t fray. So, I decided to play around with a couple of PFAFF sergers and explore the things I can do and the things I choose not to do. The first serger I chose was the PFAFF admire air 5000. I’m piecing a jelly roll quilt with a twist, based on a picture I saw on Pinterest.

This air threading (loopers) serger is a 4/3/2 thread overlocker with 15 stitches. A cloth guide (seam guide) is also available for it.

But I’m getting ahead of myself.

I should start by saying that I saw a picture of a unique jelly roll quilt on Pinterest, with no pattern, just an idea. I pulled out my PFAFF admire air 5000 and set it up with gray serger thread, in a four-thread overlock wide. Gray is my goto color of thread for a multi-color quilt. This serger also has a Cloth Guide (think seam guide) that comes in the optional Utility Feet kit, and set it for ¼”.

Piece a vibrant jelly roll on the PFAFF admire air 5000

Serger

Now you think that would be it... However, some quilts require a scant ¼” seam, some just an accurate ¼” seam, and others just the same seam allowance (whatever that may be). And now you ask, how do I figure that out? How do I adjust it?

set seam allowance.

Just like with a sewing machine, you test it. After choosing the Wide 4-thread overlock, I set the stitch length to approximately 3.5 and the blade width to around 6 (traditionally, it's set at 6.5 for this stitch). I took some scrap white cotton and cut some rectangles and marked the ¼” seam line and then serged the seam. If the left needle was on the line, it’s a perfect ¼” closer to the raw edge it’s a scant ¼”, further into the main body of the fabric it’s a larger seam. The

the

Since I leave my blade up, I can adjust the seam with the blade width(position). This is something new to us as quilters and sewers; we never used to do this, as we never had the ability to do it! If I were using a serger without a cloth guide, which I am next, I would use the blade as a guide and do what I call a “whisker cut,” run the fabric along the blade and just trim the threads that come off it

by

Photos
Margaret Sweete
I started a jelly roll quilt using the PFAFF admire air 5000 serger.
Two fabric rectangles marked with a 1/4” seam line using a fine marker and ruler, ready for testing my
Three fabric seam allowance tests, one was a scant 1⁄4”, one was perfect, and one was too big a seam allowance. You can tell the difference by looking where the left needle stitches are compared to
marked 1⁄4” seam.

and not touch the fabric itself. This takes practice to stay straight and not cut into the fabric, especially as the serger can go so fast, slow down, or adjust your serger speed control, until you get the hang of it. You may also need to adjust the looper (tension), but I leave that to you to decide.

I now have my seam allowance where I want it. For this quilt, I chose a ¼” seam (not scant). And now on to stitching.

The picture I saw had vibrantly colored strips separated by dark squares. And then sewn together with the squares off set in the main body. I found a vibrantly colored jelly roll, and a mottled navy for the squares. From the picture I saw the jelly roll strips had selvedges removed and they were cut roughly in half. I laid them out in the order they came (color pattern) off the roll and cut many 21/2" x 21/2" squares of the navy. And then just started serging square to strip, square to strip, until all of them were sewn together. I gathered it all up, threw it off my balcony, and started rolling it up in a neat(ish) roll, so at least I had something instead of a pile of fabric.

Now came the hard part, which I later figured out, thanks to the benefit of hindsight. You need to pick a length at the start of the strip to cut and sew on the side. I had multiple starts/seams! Why(?), because you don’t want the squares to line up. So, a square is 2”, a strip is 20ish, do some math. I ended up around 53” long strip after several false starts.

Once you have a width determined, it’s just a matter of stitching a seam, flipping it open, and trimming with scissors. You can press the seams open as you go along, if you prefer, or wait until the end. Remember, you can add a strip to the other side, start at the other end, or do whatever you want, so that the squares are spread out. At this point, it’s a matter of continuing until you've finished all the fabric or reached the desired size.

I will caution you to take care when stitching or pressing to avoid a curve (think rainbow shape) that I got. Originally, I was making a baby size with the stripes going vertically. When I thought I was finished, I pressed and found a portion had a crazy curve (think rainbow). I had to trim (without saving it), and now I have the strips going horizontally, so I had to stitch on more to create a rectangle. Too many strips going one way, stitched too fast???

With the navy border, to ground the colors, it’s now a throw-sized quilt. Sometimes crazy things happen when you don’t plan carefully enough and just jump in! At any rate, it's down and I like the finish.

This 52” x 60” quilt top is too big for me to quilt in a short time, so I will send it out to the long armer.

This jelly roll quilt was pieced on the PFAFF admire air 5000. Up next, I’m piecing an I Spy charm pack quilt on the PFAFF admire air 7000.

The vibrant jelly roll I chose, along with the navy mottled fabric I selected for the squares, borders, and binding.
My roll of strips and squares is serged together and then sort of neatly rolled up to have control over the “fabric”.
Four rows accomplished: wondering where and how to add the 5th?
The final Jelly Roll Serger Quilt features a navy mottled border in a throw size.

Make an I Spy quilt fast with the PFAFF admire air 7000 Serger

I’m piecing an "I Spy" quilt from a charm pack that includes 100, 5” squares. PFAFF admire air 7000. I set up the serger with my favorite gray thread in a wide 4-thread overlock stitch, and then, as I did earlier, set the blade width at 6 and the stitch length at 3.5. I ran a test with some scrap rectangles. The PFAFF admire air 7000 doesn’t have a cloth guide, but it does have an extension table, so it's easy to support the rows!

Using the blade as a guide, I serged the test pieces, trimming only the loose threads from the fabric edge, not the fabric itself (a whisker cut). When I was satisfied with the seam allowance, close to ¼”, not perfect but close enough using the blade as a seam guide, I was ready to start.

The idea behind this quilt was inspired by a picture I found on Pinterest, along with an I Spy Quilt layout featuring an embroidered name panel at the top. Simple and unique. I planned a 12-row quilt with 9-blocks across. In the middle of rows 3 and 4 from the top, I planned an embroidered panel of 3 x 5 block width. I ended up needing 98 squares, and I had two fabrics I wanted to add in one with trains and one with dinosaurs. And then a navy border and binding. It could not be easier or faster.

I started chain piecing blocks together, creating the 9-block rows. I did around 4-5 rows at a time, and then. Pressed the seams, alternating the direction of the seams for each row. This worked up SOOOOO fast. The blocks were 50 (x 2) unique kid prints. So, I could find one and say, 'Find the other.' The block went together so quickly I soon had to start stitching rows, I don’t pin but I do use clips and an awl to control the seams as I butt joined them.

For the embroidered 2 x 5 block panel, I planned appliqué letters creating my grandson's name, “Dean,” in my “Creativate Elite Software ” that were 41/2” tall and proportionately wide. I put them in the roughly 10” x 22” space leaving a good 1” margin, (after seam allowances) I planned for them to be all different in alignment and position. I embroidered them on my PFAFF creative icon 2. To make a nice applique I used HeanBond Lite on the back of the fabric and precut the fabric appliques using my SINGER MOMENTO 24” Craft Cutting Machine. Very similar to what I did with the dinosaurs in my February 2025 post, Mini quilt making with mySewnet + PFAFF creative expect 350. When all of this was stitched together, I found I needed a border, so I added a 41/2” navy border.

Again, as it's 48” x 60”, I plan to send this out to the long armer for quilting.

PFAFF admire air 7000 shown with extension table, gray thread and chain piecing squares into rows.
Rows of 5” charm squares are ready for pressing and serging the rows together.
Stitching 9 block rows together, alternating the seams in the rows as I go.
The finished I Spy Quilt is now complete, featuring the embroidered panel and navy border.

Quilt-As-You-Go baby quilt with the PFAFF admire air 5000 Serger

What would I need to do now, as you ask? Well, I will tell you, and this is very important, our sergers will stitch through anything (practically), but sometimes we can make it easier for ourselves and a better finish to use the settings we have on the serger. I’m quilting using the quilt-as-you-go method, which means most of the time I’m serging through 2 layers of batting, and 4 layers of cotton fabric. I have the Presser Foot Pressure Adjustment on this serger, let's use it!

What this means is I test the many layers and adjust the Presser Foot Pressure until the fabric sandwich stitches through with a nice seam, and doesn’t ripple the fabric or require it to be pulled through. I found that my setting was almost maxed, as I had picked a cotton batt, the lightest one I could find.

Once I have our serger set up, then it's on to cutting. I found a few photos of baby quilts on Pinterest that I liked again, and I experimented with strip sizes (remembering that odd numbers look the best), until I found the combination I liked. Mine turned out to be 21/2”, 4”, 81/2” (finished strip widths) and repeat. For every strip, you need top fabric, bat, and backing fabric ALL cut the same (3”, 41/2”, 9” selvedge to selvedge), cuts.

It takes longer to cut all of this than to sew it together, dramatically longer!

Start with the first sandwich (white print fabric, batting, and backing), with the fabric good sides out and the batting in the middle. I use Clover Wonder Clips to hold the layers in position. Serge one long edge. I then take it to the ironing board and press. I position the unserged edge flat along a line and take the 41/2” blue strip and align the raw edges (good side down) on top of the white strip, and clip. Then, I take the batting and place it on top of the blue fabric, reclip.

Turning the whole sandwich over, I position the blue flannel backing, good side down, on top of the pile, all the raw edges together. I now have a thick fabric sandwich, consisting of batting, blue batik, white print fabric, batting, blue flannel (the original first strip fabric sandwich), and the blue flannel, all clipped together with Wonder Clips.

Note: It’s a personal preference which side the batting is added (to the front or to the back) in this Quilt-As-You-Go method (or Flip and Turn technique). I added mine to the front.

Continue to add strips in the pattern until you have them all used up (white-4, blue batik-4, print-3) and serge the top edge.

Notes:

• You may encounter an excess of fabric or batting at the end of each seam. My batting and blue batik were extra long, and I just used scissors to roughly trim them.

• I pressed these seams so that the fabric/batting lay flat for adding the next strip.

PFAFF admire air 5000 serger set up for 4-thread overlock -wide with grey serger thread and the cloth guide attached.
Adding the 4th strip to the quilt, note the Clover Wonder Clips holding the whole 6 layers together, with all raw edges aligned and ready for serging.

I have cut all my strips from selvedge to selvedge, so how wide will my quilt be?? After it’s all serged together, I need to trim the selvedges from the left and right sides. Your quilt width will be determined by the narrowest (width) fabric used. My white print was the smallest and had the widest selvedges. I ended up with a size of 401/2” wide by 511/2” long. Once these are all trimmed off, go back and serge the left and right sides.

I had my entire quilt done, ready for binding in 90 minutes; it took twice to three times longer to cut, as I had to press all the prewashed fabrics (my choice) and then lay each strip good side up. This helps when you start piecing.

The completed Quilt-As-You-Go Strip Quilt is ready for binding.
Adding the 4th strip to the quilt, note the Clover Wonder Clips holding the whole 6 layers together, with all raw edges aligned and ready for serging.
Piles of fabric and batting laid out in order of use.

Piecing a runner with decorative exposed seams on the PFAFF admire air 7000

I’m back on the PFAFF admire air 7000 to piece a runner with decorative exposed seams. To start, I visited CREATIVATE Quilting Software and created a 4-block runner, featuring the “Road to Oklahoma” block, which utilizes three fabrics: black, gray, and white, to represent the three fabrics I have: white, gray, and black with silver metallic flecks.

I created the runner in CREATIVATE Quilting Software and sent it to CREATIVATE Crafting Software, so I could cut the runner out on my SINGER MOMENTO 24” Cutting Machine. For a step-by-step guide on the process, see my post: Cutting fabric for a mini quilt with SINGER MOMENTO 24 & mySewnet Software

I choose the fabric and looper thread as they complement each other. The fabrics are black, mid-gray and white with a silver metallic fleck. The looper thread I chose is a mid-gray with a silver metallic wrap around it. Since the looper thread is 12-weight, I know that I will have to test-stitch the Wide 4-thread overlock to adjust the looper tensions. My serger is already set up in a ¼” seam, so I was confident that this would be fine, and it’s important in this block to be accurate, as everything SHOWS!

This runner is pieced with wrong sides together, and I’m using the blade as a seam guide. I only want a “whisker cut”, (trimming the excess threads only), not the body of the fabric, I slowed the serger down (speed setting) to avoid going to fast as I have a “heavy foot ” To truly understand the whisker cut look at the waste tray below, multiple pieces of fabric stitched together and barely anything in it!

You need to plan ahead which way the seam is going to be pressed, as you want to have the nicer side of the seam facing out, so you can plan which fabric needs to be on top. I did make a mistake somewhere along the way. I'm not sure where, but when I went to piece the blocks together, I ended up having to put in sashing because the seams wouldn't align.

Continue stitching until each block is pieced together. When I finished all 4 blocks, I realized I was short on black and silver fabric and needed the runner to have 3 blocks, not four, to have enough fabric for borders and binding. And when I went to sew the blocks together according to my pattern, I realized I had made a mistake and ended up using sashing strips instead.

I pieced a runner with exposed seams and decorative gray/silver metallic threads in the loopers. Most sergers can do this; I chose to do it on the PFAFF admire air 7000 because it has an extension table and speed control. When all seams show they need to be accurate (slow the speed down!) and the tension needs to be perfect. The extension table helps keep all the pieces flat and in line for a straight seam. The bigger, the bolder the seam, the more accurate you need to be!

PFAFF admire air 7000 setup for 4-thread overlock wide with decorative threads in the loopers.
Needle gray serger threads, and 12-weight gray/ silver metallic thread for the loopers, with test stitch outs.
PFAFF admire air 7000 setup for a Wide 4-thread overlock stitch with bold decorative threads in the loopers.
3-Block black, gray, and silver runner with exposed decorative serged seams.

Quilt and bind a runner with decorative seams on PFAFF admire air 7000

I’m using the chain stitch to quilt this runner. Why? Because I can, it’s a small piece, and I can manage it on my serger extension table. I set it up in chain stitch using combinations of gray, black, and white threads. I also adjusted the thread tension and presser foot tension as needed. I’ll apply an organic style of quilting, which means that I’m stitching wavy, irregular lines from one narrow end to the other. Controlling the seams as I go so that they will lie flat in the direction I pressed them.

Notes:

• With chain stitch, you always start and end on fabric.

• With chain stitch, it unravels easily, so you need to start and end on the batting. Be careful when ending each line of stitching to avoid pulling out the thread. When you bind, you look at the stitches.

The previous picture shows me quilting the runner with chain stitching, controlling the exposed decorative seams, in an organic wavy line. The picture below shows the back of the runner, highlighting the quilting lines to illustrate the organic technique.

When I was finished quilting the body of the runner, I should have quilted down the side edges of the fabric to control it; this would make the edge finishing easier (3-thread wide overlock stitch)

When I finished all the quilting, I took the runner to my cutting board and trimmed it, ready to bind. I set up the PFAFF admire air 7000 in a 3-thread wide overlock stitch (still set at ¼” seam) with gray thread. The 3-thread overlock stitch is an edge finish, and that is how I will prep my runner, as well as the first two quilts I made for this blog: the Jelly Roll quilt and the “I Spy” quilt, both of which are quilted (by the longarm) and trimmed. If my serger is set up in a 4-thread overlock instead of a 3-thread overlock, I will still use it. Stitch width only matters if you’re applying a narrow binding, like I will do on the runner.

The three quilts I made, the Jelly Roll Quilt and I Spy Quilt, I prepped for binding with a 3-thread wide overlock, and the Striped Baby Quilt I finished the edge with a 4-thread wide overlock stitch. They will be bound on my PFAFF creative icon 2 using the double fold quilt binder (a 5⁄8” double fold binding). The runner I am going to do on the serger with a narrow binding like I do with small crafty projects.

I cut my binding at 2 ¼” diagonally, join the strips, and then press the double-fold binding in half lengthwise. I re-thread my PFAFF admire air 7000 in a 4-thread wide overlock stitch, using gray serger thread in the needles and upper looper; however, in the lower looper, I use Gütermann fusible thread (it’s white). This way, I can fuse the binding down after I stitch it!

Stitch the binding on the back, press the binding seam open, flip the runner over, press the binding down in place with lots of steam. This will activate the fusible lower looper thread.

PFAFF admire air 7000 set up with the extension table, chain stitching a thread, and tension test sandwich.
Quilting the runner with the chain stitch on the PFAFF admire air 7000
The back of the runner shows organic wavy gray chain stitch lines.

Some people use this to finish the binding; others use it as a basting to hold the binding in place while you top stitch.

Note: If topstitching, match the thread in the needle to the binding on top, (black binding) and the bobbin thread to the backing fabric (white backing fabric).

In summary, I worked with both the PFAFF admire air 5000 and the PFAFF admire air 7000 sergers. Showing different piecing techniques on both. I always finish my edge before binding on the serger (after quilting), preferably with a 3-thread overlock wide stitch, but in truth, it's always a 3 or 4 thread overlock stitch (whichever stitch the serger is set up in) and whatever thread colour is loaded. It doesn’t matter what color of thread, as it’s always under my binding. Just taking this one step makes binding a breeze, regardless of your binding method. For quilts, I use the double-fold quilt binder on my PFAFF creative icon 2. For crafty projects, I can use the single fold quilt binder OR bind on the(any) serger, whatever I have out and working in my sewing room.

Note: You can bind on any serger using the above technique; however, you cannot chainstitch a quilt on a serger that doesn’t have a coverstitch feature.

Here are the finished quilts; join me next time for more exciting quilting and sewing machine tutorials.

Pressing the binding down in place with lots of steam to activate the fusible thread.
Completed black, gray and white runner with exposed decorative serged seams.
The Jelly Roll Quilt, the Quilt-As-You-Go Quilt, and the I Spy Quilt all finished and quilted too. All pieced, using the PFAFF admire air 5000 and admire air 7000.

Meet the Husqvarna VIKING Jade 20 sleek, smart, and built to impress

It's so exciting to write about a unique sewing machine. Wait until you see the Husqvarna VIKING Jade 20 design – a sewing-only machine. Doesn't it already look interesting based on what you see on the box?

It was quick to unpack the Jade 20, which I love. I set the sewing machine on the table, and WOW --- this is a very unique design. It looks so sleek and modern that you can easily put it on your bookcase when you're not sewing, and no one would ever know it's a sewing machine. You could be a closet sewist!

Here's what it looks like from the back. It still looks sleek and compact, but I prefer the front. From this view, we can identify that it's a sewing machine. Intrigued? Read on!

To open it up, you rotate the dial to the left to unlock that middle section and push it forward.

That unit in the center is a STORAGE BOX. How clever is that? Look how big that storage box is; it has two compartments. The Jade 20 accessories are in the compartment on the right-hand side. Now, what could we store in that other larger compartment?

It's the perfect spot for the power cord and the foot pedal! OK – you cannot deny that this is a brilliant storage system. This design provides built-in storage and doubles as a hard case to protect the machine when traveling to quilt retreats or classes at your local quilt shop, storage at your house, and keeping the dust from infiltrating the sewing machine. Because of its smaller footprint, it'll easily fit on a shelf when not in use. Who would guess it's a sewing machine?

Here's a better look at that foot pedal. It's a good size, so you won't have issues finding it under the table when sewing.

Instruction photos by Elaine Theriault
Husqvarna VIKING Jade 20
The Jade 20 with the storage box attached
The back of the Jade 20
Removing the storage box on the Jade 20
The inside of the storage box
Store the foot pedal and power cord in the storage box
A foot pedal

And now that we have the storage box out of the machine, here's what the Jade 20 looks like. Even when ready to sew, it looks sleek and futuristic! At the end of your sewing session, it would be super easy to pop that storage box back into the middle and put it back on your bookcase. I'm not a fan of putting my machine away every night, but if I didn't have a lot of space and needed to put it away, I like how easy this one is and how sleek it looks when closed up!

The lid pops up to reveal the thread path, a sewing guide, the built-in stitches menu, the thread path, and much more. Of course, my favorite thing in the box is the User's Guide! I swear I'm the only one who gets excited about a User's Guide, but I've learned so much from reading them.

As we go through the User's Guide, we'll also have a closer look at the accessories that come with the Jade 20.

Isn't this a super exciting sewing machine? Yep – the Husqvarna VIKING Jade 20 looks like a perfect machine for a student, a second machine for retreats/ travel, or someone who has downsized and no longer has a dedicated sewing spot. Let's not forget new sewists. The Jade 20 sewing machine is sure to be coveted by many different groups.

The Jade 20 with the storage box removed
The flip-up lid on the Jade 20
The User's Guide
The bag of accessories

Maximize the Husqvarna VIKING Jade 20 with must-have accessories

The User’s Guide is an overlooked item but contains so much critical information. One of the first pages I’d check out is the parts of the sewing machine. There’s an excellent diagram to help you learn the parts of the sewing machine. Knowing what part does what is instrumental to successful sewing, and if you need to adjust something, you know what to do. As a quilt teacher, I’ve had students attempt to change various settings using the incorrect function. It only takes a few minutes to sit in front of the Jade 20 and identify each part. You can go to the appropriate page to learn more about that function if you require further information.

A well-labeled diagram

There’s also a page for the items on the back of the sewing machine. Yep – some things are visible only from the back, so check out both sides. Become comfortable with the terminology and use the correct words when asking for advice. Saying that the dial thingy isn’t working makes it challenging for someone to understand the problem.

Another handy place to check in the User’s Guide is the list of presser feet that come with the machine. I recently talked to someone who said they only used one foot because they didn’t know what the others were for! That’s why there’s a User’s Guide to help you maximize your machine's benefit. You’ll find feet for inserting zippers, overcasting raw edges, making buttonholes, sewing, etc.

The other important information is on the right-hand page, which lists the stitches in the Utility Menu and what they are for. Most people would use the straight stitch for everything, which could potentially work, but you’re not getting the maximum benefit of the rest of the stitches.

There are 82 stitches in total, including the Utility Stitches mentioned here, as well as quilting and decorative stitches. Be sure to sit at the Jade 20 and review the presser feet and the stitches. Knowing this information can significantly increase your success and the ability to try different techniques and work with other fabrics. If you only use the straight stitch with Utility Foot A, you’re missing 99% of what the Jade 20 can do.

There’s loads of other great information in the User’s Guide. I’ll only mention one more page. The page that talks about spool pins and caps. You’ll learn how to load a spool of thread on the machine and when to use the various accessories. Again, using these items correctly will ensure better results and fewer hassles when solving problems with broken threads, etc.

The User’s Guide is not significant, and I highly recommend you sit down and browse it. Don’t be shy – read that information. I’ve been sewing for 25+ years, and I had to refer to the user’s guide to know how to thread the machine (slightly different positioning of thread guides from others I’ve used), and I couldn’t figure out how to open the accessory tray. It was all in the User’s Guide. Trust me, the User’s Guide is the first place I go to find the answer to any question about the sewing machine.

Here’s a picture of all the included Presser Feet. It’s a great basic set with feet for piecing (more on that next), decorative stitching, inserting a zipper, making a blind hem, overcasting (finishing a raw edge), two different styles of buttonholes, a guide for quilting and a glide pad to help with sticky fabrics like vinyl.

Remember that most of the Husqvarna VIKING branded presser feet will fit the Jade 20. The Jade 20 is a Category 6 machine, so be sure when shopping for accessories or additional feet that they will fit a Category 6 machine. Your local dealer will be able to assist you. I’ll test out some of these and some optional feet.

Diagrams for the back of the sewing machine
Presser feet and stitch overview
Understanding Spool Pins (and Caps)
Presser feet for the Jade 20

I want to show you something about Utility Foot A and Decorative Stitch Foot B. The feet look almost identical from the top. Only the bar in front of the needle is different.

But you can see a significant difference on the back of those two presser feet. The flat- bottomed presser foot (Utility Foot A) is for general-purpose sewing. The channel on the bottom of Decorative Stitch Foot B allows for the easy passage of thicker lines of decorative stitching, usually done with 40-weight (heavier) thread. The channel reduces the potential of jamming due to the height of the decorative stitches.

There’s also a variety of accessories, which are all identified in the User’s Guide. If you’re unfamiliar with something here, you can find the name and description (if necessary) of the tool’s use in the User’s Guide. See how vital that guide is? It contains a lot of information, so don’t be shy or embarrassed. I learned MUCH from reading those guides.

Five bobbins come with the Jade 20, and you can purchase additional bobbins from your Husqvarna VIKING dealer. Verify that you’re getting the correct bobbin, as different machine categories require a different bobbin.

Now, where will you store all these accessories and presser feet? It’s a personal choice, and I sometimes like to keep all the accessories and presser feet in an external container. However, if you want to keep things together and avoid another box hanging around, there’s an accessory toolbox that you can use to store things in.

The two sides slide (I had to look that up because I couldn’t figure it out), but there are two compartments, one on each side, and you could easily store the accessories in one and the presser feet in the other. It makes it a quick and easy place to store these items when it's on the machine. Be sure you keep the accessories in a safe place because not finding the appropriate item when needed is frustrating.

If you wish to have additional space to work, which I would love, an optional extension table is available. Slip off the accessory toolbox, set it aside, and slide on the extension table. Instantly, you have a much larger area to work with, which is great for quilting or even piecing, so your work doesn’t fall off the side or the back and cause the needle to flex, which can lead to broken needles.

If we flip up the lid, you’ll find a sewing advisor guide on the left-hand side. This guide provides starting settings (tension, stitch width and length, and presser foot) depending on the fabric (type and weight) for various sewing techniques. Please take a minute and study it so you understand it. These guidelines can be changed if the settings don’t give you a successful stitch.

On the right-hand side of the lid, you’ll find a diagram and the stitch number for each of the 82 stitches in the Jade 20. The first 10 are on the functional panel. You’ll find a listing of the first row of stitches (Utility Stitches) with their name and purpose in the User’s Guide. Be sure to study that list so you know you’re using the best stitch for the job you’re working on.

Utility Foot A and Decorative Stitch B
The bottom of Utility Foot A and Decorative Stitch Foot B
Accessories for the Jade 20
The accessory toolbox slides open.
The optional extension table for the Jade 20
The sewing advisor guide
A diagram of the 82 built-in stitches

You’ll find the tension dial on the top of the machine above the needle. I don’t know how often I hear, “I have auto tension; therefore, I don’t need to learn how to adjust the tension.” I hate to disappoint, but the auto tension is set for 50-weight thread in the top and bottom with two pieces of cotton fabric. The Jade 20, or any other sewing machine, has no way of knowing what type of thread I’m using. It also can’t detect if I use different thread weights in the bobbin and the top.

Do yourself a favor and play with that tension. This dial is to change the TOP thread tension. For the most part, we do NOT touch the bobbin tension. That’s just asking for trouble unless you’re more experienced. Set the top tension to zero, which means there’s NO tension on the top thread. Now sew a straight line. Look at the back. What happens to the quality of the stitching? Then raise it to 1 and stitch another line. Repeat this process, and always look at both sides until you reach the highest (9). This exercise will help you to learn how to use the tension dial. When you need to get back to Auto Tension, use the dial and go back to 4. That’s so easy!!!!

The last thing for to mention is the function panel, where we can change the stitch, the length or the width, and many other things.

And there you have it – a good overview of all the accessories, where to get more information, and a sneak peek into what we can sew on the Husqvarna VIKING Jade 20. Do not be afraid or embarrassed to browse that User’s Guide. It’s such an essential piece of the sewing machine. It’s my go-to for any questions, and I have also learned so much from reading User’s Guides over the years.

The top tension dial
The function panel on the Jade 20
Husqvarna VIKING Jade 20 sewing machine

2 ways to sew a perfect ¼" seam on the Husqvarna VIKING Jade 20

Here's a myth I've heard over the years. You should attempt to piece one project on the same machine because different machines give different ¼" seam allowances. FALSE! If you understand the math behind the ¼" seam allowance and use the presser feet and the machine settings correctly, you can sew any project on multiple sewing machines and get the correct size every time.

Ask me how I know, as I've used multiple sewing machines to sew the same project, and I've had no issues. We also want to remember that it's the desired finished (or unfinished) size of the piece and not so much about the seam allowance, although they work together. Accuracy of cutting and pressing also comes into play with the size.

The first method existed long before ¼" feet were a thing. I'm using a stitch in the Utility Menu (Stitch Number 20) to sew my seams.

You'll find the first ten stitches on the stitch selection menu, and you simply push the appropriate button to select the stitch. For stitches 11 – 82, you must punch in the two digits corresponding to the stitch. So, in this instance, I pushed 2 and 0 quickly, and the ¼" stitch loaded, and the stitch number showed on the display.

Use the Utility Foot A and sew along the side of the foot. You may need to tweak that by moving the fabric slightly to the inside or the outside of the foot. It all depends on the thickness of the fabric and the thread weight.

I changed the stitch length, which was easy. The default is 2.5, and my preference is 2.0, which ensures the stitches will not come undone but isn't super tricky to rip if needed. The light beside the stitch length function is on to indicate it is outside the default setting. That same function allows you to change the stitch density of satin stitches. Yes – I found that in the User's Guide!

I was sewing some blocks for a project that I had to complete, and the size was perfect, with no fudging required. It's as easy as pie if you consider thread weight, fabric, and the markings on the presser foot. I'll say that after years of sewing ¼" seam allowances, I could practically sew an accurate seam by eye, but I still rely on the edge of the presser foot as my primary guide.

So, method number one was perfect. Let's try the second method, which is to use an optional ¼" piecing foot. I'll use the Adjustable 1/4" Foot, which works for Category 1 – 9 Husqvarna VIKING branded sewing machines. There are other options, some with a guide on the side. Try both styles to see which one you prefer. I prefer the one with no guide. For this method, we rely on the foot to give us the ¼", not the needle setting, as per method number one.

Utility Stitch Number 20
Stitch Number 20 on the display
Using the Utility Foot A and Stitch Number 20 to get 1/4" seam allowance
The stitch length of 2.0
The completed piece is accurate
The Adjustable 1/4” Foot

I need to use Stitch Number One with the needle in the center position for this method. Again, I changed the default stitch length to 2.0.

Again, you may have to move the fabric slightly to the left or the right, depending on the thread weight and the fabric. It's incredible how many people think that just because this is a ¼" foot, they can rely entirely on the foot when there are other factors to consider!

Here's something I noticed. There's a ¼" line across the bobbin case cover. This is perfect to help get the fabric lined up for the ¼" seam allowance. In this photo, I've moved my fabric slightly to the left so you can see the line, which is helpful with the optional ¼" foot.

The second section, where I used the optional ¼" foot, was also the perfect size. So it doesn't matter which method, but try both. You'll get consistent and correct sizes with both methods. That is at least three different sewing machines that I've used for this project, and all the blocks are the correct size. Another myth busted!

Here are a couple of tips to help with your sewing your quilt tops together:

1. Hold your fabrics until you get to the end. See how this piece aligns with the ¼" guide on the bobbin case cover. Do not take your hands off, as the fabric will go wonky!

2. Use the Safety Stiletto to hold the seam allowances in place. The Jade 20 had no issues sewing across the bulky seam allowances, and the Safety Stiletto held everything in place. It's my go-to sewing tool, and I dislike sewing without it.

3. Looking for a great pair of snips to cut your threads? The Husqvarna VIKING Easy Snips are amazing, and I use them for all my snipping. Since I'm a chain piecer, there's a lot of snipping, and the Easy Snips are perfect.

4. When chain piecing, lift the presser foot slightly to insert the following two pieces of fabric without cutting the thread. Push the fabric right up to the needle. You don't waste thread this way; the piece behind the needle helps align this next piece. I love chain piecing.

5. Another tip for chain piecing is to use an ender/leader to avoid cutting the thread chain. I insert a seam from another project when I finish the end of my pieces for one project, and I have nothing else to sew. In some cases, I sew small triangles together for half-square triangles, or in this case, I'm sewing some braids that I found in my UFO stash. I'll call this my bonus project!

6. The last tip for sewing is to hold the bobbin and top threads when you start a new seam line. You'll have a thread nest under your work if you don't. Why? The sewing machine attempts to form a stitch even though you're at the beginning of the seam. Its job is to pull the top thread to the bottom to create a stitch, which happens even at the beginning of a row. Hold the threads tight and then trim them off. The underside of the seam remains clean.

The settings for 1/4" seam allowance with Stitch Number 1
A 1/4" guideline on the bobbin case cover
Hold your fabric until the end of the seam
The Safety Stiletto
Husqvarna VIKING Easy Snips
Chain piecing
A fabric braid

Hold the threads at the beginning of a line of stitching

The quality of the stitch for the Jade 20 is superb. Look how even that stitch is; it stayed even when going over the bumpy intersection on the right. I am very impressed with the stitch quality.

The quality of the top of the stitch is impressive

Looking at the back of the stitch, we see a clear definition for each stitch. I did not touch the tension, and the stitches are amazing! That's a great indication of how beautiful the Jade 20 performs.

And here's my completed block – it came out perfectly. Multiple sewing machines can provide the same seam allowance. Understanding the techniques, using the proper presser feet, and having such fantastic stitch quality as on the Jade 20 made this easy to create.

WAIT – I forgot to mention one other great feature on the Jade 20 – the needle threader! This feature is a game changer for those with "experienced" eyes. It's so easy to use! I love it! Remember to use size 80/12 needles or larger if you need to use the needle threader.

I'll certainly do more piecing on the Husqvarna VIKING Jade 20. The stitch quality and ease of use are impressive. And it's such a great machine to take to class or quilting retreat. Be sure to pop into the local dealer to have a better look at it.

The stitches are well-defined on the underside of the seam
A quilt block
Threading the needle with the needle threader

2 beautiful applique techniques with the Husqvarna VIKING Jade 20

I’m very impressed with the straight stitch quality of the Husqvarna VIKING Jade 20, and I can’t wait to see how it performs for some applique stitches. I have two favorite methods of applique and will try them both. Let’s get started!

I’ll start with an invisible applique stitch Here are my preparation steps:

• Turn the edges of the applique shape under as I’ve done with this circle.

• Use a water-soluble glue to secure the applique shape to the background.

materials

• bobbin-weight white thread for the bobbin

• 60-weight (thin) thread that matches my applique shape for the top.

• size 60/8 needle. I’m a fan of using small needles with thin threads. Remember, the needle threader will not work with that small needle, so I thread it by eye.

One other essential item is the presser foot. I love to use the optional Open Toe Presser Foot for all my applique.

A channel on the underside allows the decorative stitches to slide under without jamming, and the open front of the foot provides fantastic visibility into the small areas of your applique shapes. Remember, when purchasing optional feet, to check that they are the correct category for the Jade 20, a Category 6 machine.

Now, let’s get the Jade 20 set up. I started by winding a bobbin with the bobbin weight thread, which was super easy. If you noticed, the bobbin weight thread was on a cone, so I used an external thread stand.

I started with a length of 3.0, but I found this to be a bit long, so I ended up settling on a length of 2.0. The length and width are things you must experiment with. When selecting the length and width of your stitches, consider these factors: skill, eyesight, fabric, applique shapes, thread weights, and personal preferences.

The orange lights beside the stitch width and length indicate that both are outside the default setting. When I’m sewing, the screen will reflect the stitch number, and if I need to see the length or width, I simply touch the plus or minus, and the setting appears back on the screen. These functions are super easy to use.

I chose Stitch Number 5, which is the zigzag stitch.
I selected a stitch width of 1.5.
Supplies for machine invisible applique
The front of the metal Open Toe Presser Foot
The underside of the Open Toe Presser Foot
Winding a bobbin
Stitch Number Five – the zigzag stitch
Stitch Length setting

The Jade 20 is now threaded, and the appropriate stitch settings are selected. The applique shape is ready, and it’s time to start stitching. Look how easy it is to see right to the needle using the Open Toe Presser Foot. It’s a must for machine applique.

I pull my bobbin thread to the top and place the applique shape so the needle falls in the appropriate spot. Don’t forget to lower the presser foot. Now, here’s something to note about the invisible applique stitch. We don’t want the stitches to show, so as the needle swings to the right of the zigzag, ensure the needle skims the edge of the applique shape but doesn’t touch it.

This positioning means that when the needle swings to the left of the zigzag stitch, 99% of the stitch is on the applique shape, so I use thin threads that match the applique shape. If the thread color is slightly lighter or darker, it’s not a huge issue – the stitches are tiny. Alternatively, you could use invisible thread but lower the top tension if you do.

Carefully stitch around the applique shape. Here are a couple of things to keep in mind. If you are working on a circle like in this example, pivot your work slightly after every 5 or 6 stitches, depending on the curve. Lift the presser foot lever slightly to raise the foot, pivot the fabric, lower the presser foot, and continue. It’s fast and easy to do. Your needle should be in the down position whenever you pivot.

The other thing to remember is that the foot pedal has a tap function. So if you stop and the needle is on the wrong side to pivot, simply tap on the foot pedal to advance the needle by half a stitch. It’s so easy. I love this feature and use it constantly, especially for applique.

Here’s one of my completed circles. If you look closely, you’ll see a few places where my stitch does not lie close to the applique shape. That’s because I didn’t pivot soon enough, and the stitch went away from the circle. But notice how 99% of that zigzag stitch rests on the applique shape. And when not magnified as in this photo, it’s invisible. Again, I shortened the stitch length as I thought this was a bit long.

Invisible machine applique

Here’s the back of the applique. As I mentioned, I found this stitch length too long, so I shortened it. When I return to the start point, I simply stitch over the starting stitches by about a half-inch. I’m thrilled with the results of my machineinvisible applique with the Jade 20.

Now, I’ll look at my other favorite machine applique technique, raw edge. I like to finish my raw edges with various decorative stitches, and there are lots to choose from in Jade 20.

Here are my preparation steps:

• Trace the applique shapes onto the fusible web.

• Fuse the fusible web to the wrong side of the fabric and cut out the shapes.

• Using the manufacturer’s instructions, fuse the applique shape to the background.

materials

• bobbin-weight white thread for the bobbin

• 40-weight (machine embroidery weight) thread that matches my applique shape for

• the top. Contrasting threads also work nicely.

• size 80/12 needle

The Stitch Length
Clear visibility with the optional Open Toe Presser Foot
The needle swings to the right of the zigzag and off the applique shape
The needle position on the left side of the zigzag stitch
The back of the machine invisible applique

Supplies for raw edge applique

I use a Tear-A-Way Stabilizer for any wide decorative stitch, including a satin stitch. The stabilizer is essential to prevent your background from being pulled up. You’ll remove it after the stitch is complete.

Tear-A-Way stabilizer

For the blue flower center, I chose Stitch Number 45, the mossy satin stitch with two uneven edges. It’s one of my favorite applique stitches for raw edge applique.

Keeping the same methodology for the needle position as mentioned above, I stitched around the center of the flower. Because this stitch does not have a straight right-hand edge, I use the red center mark on the Open Toe Presser Foot to keep it lined up with the edge of the applique shape.

Stitching the center of the flower

Then I selected the Satin Stitch – Stitch Number 27, changed the top thread (40-weight), and stitched around the flower's outer edge. Be sure to pivot frequently, especially if the curve is tight. Don’t forget to use the foot pedal tap and add an extra stitch or two in the indentations to get complete coverage. A shape like this flower is a good one to practice on.

The more frequently you pivot, the smoother the stitching line will be!

Stitching the curved edge of the flower

And now it’s done, and it looks gorgeous! I love the stitch quality of the Jade 20. Remember, if your sewing machine has a built-in satin stitch like the Jade 20, you want to use that rather than a compressed zigzag. It’ll give you much better coverage.

Here’s a close-up of both stitches. WOW – I’m very impressed. Remember, you can modify the width and length of all the stitches; you’re not required to use the default settings. They are simply a starting point. Experiment!

All that remains is to remove the stabilizer from the back. As its name indicates, it’s super easy to tear it away.

Removing the Tear-A-Way stabilizer

And here’s the back of the piece. Notice that some of the top thread shows through to the back. That's supposed to happen! Don’t adjust the tension to eliminate this. The top thread showing on the back is an indication of good tension for applique stitches, in particular, the satin-style stitches.

Well, I have to say that I’m very impressed. The Husqvarna VIKING Jade 20 is an entry- level machine, yet it performs amazingly well regarding stitch quality and features.

The back of the raw-edge applique

Stitch Menu
The completed applique
A detail of the stitches

Binding quilts with ease using the Husqvarna VIKING Jade 20

I didn’t have time to quilt something, so I grabbed a table runner I made years ago. I had gotten it quilted a while back, but the binding was not attached yet. Testing various options on the Jade 20 was the perfect opportunity to get the binding on.

TIP When I make a quilted item, I always make the binding and the backing before storing it in the “to be quilted” pile. You may accidentally use the matching fabric for something other than its intended purpose. Plus, starting the binding process is easier if the binding is ready. No excuses!

Depending on the quilting style, some edges of the project are loose. In this case, you can see the three individual layers at the corner, which act like three independent pieces of fabric. If I were to put the binding on this, there’s a good chance I’d get some tucks or puckering along the way.

I’ll use the Edging Foot J, which is part of the accessories for the Jade 20. I used Utility Stitch Number 4 (Three-Step Zigzag) to overcast the edges, as the user’s guide recommended. Remember,

there is loads of helpful information in that User’s Guide. A finger on the edging foot helps form and keep the stitch flat, especially when overcasting cotton fabrics. Because I have the bulk of the batting, the stitches remained flat. The Edging Foot J was beneficial to keep a consistent stitch placement around the edge of the table runner.

See how the right edge of the stitch overlaps the edge of the fabric on the right, and the finger helps keep everything lined up. It’s a super-easy presser foot to use. I love using it for overcasting edges, especially when dealing with a quilted project's loose edges.

And here’s the edge of the table runner with the Three-Step Zigzag. It’s fast and works very well. I don’t get too technical when turning a corner, as the stitching will be inside the binding.

I like using the optional Interchangeable Dual-Feed Foot when sewing the binding. I appreciate the extra feed teeth on the top of my project, located on the bottom of the Interchangeable Dual-Feed Foot, to ensure a smooth application. If the binding is too loose, the edges will ripple. If they are too tight, the edges will pull in.

The Interchangeable Dual Feed Foot with two stitch plates and two quilting/ edge guides (right and left) is in the box. The plates easily snap onto the bottom of the presser foot.

The components of the Interchangeable Dual Feed Foot

You can purchase three additional stitch plates, two with guides and one without, so depending on the stitch type and your preference, you’ll have access to a foot that works for you.

The quilted table runner and binding
Three individual layers of fabric on a quilted project
The Edging Foot J
Using the Edging Foot J to overcast the edge of a table runner
The Three-Step Zigzag is used to overcast the edge of a quilted table runner

I selected one of the stitch plates in the kit and attached the Interchangeable Dual Feed Foot to the Jade 20. It’s super easy to attach. Take note at the top; the U-shaped lever is around the screw that holds the needle in place. If that lever is not around the screw, the dual-feed foot will not work. Be sure to check the instructions included in the box.

There’s one part of the function panel that we haven’t discussed yet, and it’s just above the needle. Here, you’ll find the speed control, START/STOP, and the reverse button. I’ll use the reverse button to anchor the ends of the seams when attaching the binding to the back of the table runner.

I tested the seam allowance to ensure it was correct for the width of the binding strips, and I was ready to sew. A reminder: when you turn the corners, pull the binding strip back so the folded edge is flush with the top. If not, you’ll have excess fabric in the corner, and you will not get a 90- degree corner.

Once you get the binding stitched to the back of the table runner, it’s time to sew (applique) the binding to the front. There are many ways of doing this and numerous stitches that you can use. I decided to try something a bit different. I found a variegated blue thread and used it on the top and bobbin, as I would stitch entirely on the binding on both sides. Usually, I make the top side of the binding slightly larger than the back so the bobbin stitches appear on the backing.

And remember to use the Safety Stiletto on the corners. Your fingers will not fit under the presser foot, so fold up the mitered corner a couple of inches before you get to the corner and hold it in place with the stiletto.

This method means that instead of bringing the binding slightly beyond the top stitching line, I brought it just to the stitch line on the top. I quickly did the calculation in my head. I’m stitching through EIGHT layers of fabric and the batting. Would the Jade 20 be able to stitch through all those layers? Again, the stitch quality was outstanding! I left the stitch length at the default setting of 2.5, but I could have increased it to 3.0. Not a single skipped stitch! I was thrilled with the results.

And here’s what it looks like on the back. I think I did very well on my first try at this technique.

I’m not sure I’ll be a fan of this technique, as I feel some of the stitching (that initial first line of stitching) shows more than I would like. I also found it slower, but that could be because it was the first time.

For more detailed information on applying a binding, refer to my 'Binding a Quilt ' post.

The Interchangeable Dual Feed Foot
The speed control, START/STOP, and reverse functions
Keep that folded edge flush with the top of the quilt
Using the Safety Stiletto on the corner
The stitching through EIGHT layers of fabric and the batting
Some of the first line of stitching shows on the front
Three additional stitch plates
The stitching on the back of the table runner

And here’s the finished table runner with the Jade 20, which performed beautifully with everything I put under the needle.

Here’s a picture of the entire table runner. Wow, it turned out amazing. Can you see how flat it lies? No rippling, no pulling in. It’s beautiful! It’s amazing what you can accomplish if you have the right tools.

I enjoyed playing with the Husqvarna VIKING Jade 20. I was so impressed by the quality of the stitch, regardless of which stitch type I tried.

The Husqvarna VIKING Jade 20 would make a great second machine. Or for a new sewist or someone with limited space, it would be amazing. Remember back to Day One when we talked about the sleek design for the storage unit and how this does NOT look like a sewing machine sitting on a shelf? It would be the perfect machine for lots of people. But don’t just take my word for it –go to your nearest Husqvarna VIKING dealer and check it out for yourself!

Have a great day! Ciao!!!

The Husqvarna VIKING Jade 20
The finished table runner with the Jade 20
The blue and white table runner

BUSINESS DIRECTORY

Bytowne Threads - Ottawa, ON

 1.888.831.4095  bytownethreads.com

 mlj@bytownethreads.com

To list your business please email john@quiltsocial.com

Featuring Aurifil thread from Italy. Long staple Egyptian cotton threads - 270 colours in 12, 28, 40 and 50 wt; 88 colours in 80 wt. Polyester Aurilux - 240 high sheen colours. Wool threads - 192 colours. Many kits available. Check our website!

El Cajon Sew & Vac

1077 Broadway, El Cajon, CA 92021

619.442.2585, sewezr.com

Gitta's

271 Lakeshore Rd E, Mississauga, ON L5G 1G8

 905.274.7198  gittas.com

 questions@gittas.com

Nestled in the east village of Port Credit, Gitta's is the place where stitchers meet with their stitching friends, shop for stitching supplies and see the new stitching designs from Europe and the United States. Haus of Stitches

626 Main Street, Humboldt, SK S0K 2A0

 306.682.0772 or toll-free 1.800.344.6024

 hausofstitches.ca

Our one of a kind store offers everything you need for sewing, quilting, knitting, rug hooking and needlework. Authorized dealers for Janome and Elna.

Kelly's Creative Sewing

804 Main St, Dartmouth, NS B2W 3V1

 902.435.7380  kellyscreativesewing.ca

 kellyscreativesewing@gmail.com

We offer sales and on-site service of high-end domestic embroidery, sewing machines and sergers, as well as a variety of educational programs.

Ottawa Sewing Centre

1390 Clyde Ave, #107, Ottawa, ON K2G 3H9

 613.695.1386  ottawasewing.com

 ottawasewing@gmail.com

Authorized Dealers for Brother, BabyLock, Elna, Q'nique & Grace quilting frames. Specialize in sales, parts & servicing for all makes & models of quilting/embroidery/sewing/serger/overlock machines & cabinets by Sylvia Design.

Sew Productive

47 Mill St E, Acton, ON

 519.853.0007  sewproductive.ca

 melinda@sewproductive.ca

Classes, clubs, fabric, thread, notions, crafting. Certified sales, service, and repair for Husqvarna VIKING®, PFAFF®, Singer®, and HandiQuilter®.

The Quilt Store / Evelyn's Sewing Centre

17817 Leslie St, Unit 40, Newmarket, ON L3Y 8C6  905.853.7001 or toll-free 1.888.853.7001

The Quilt Store West

695 Plains Rd E, Unit 6, Burlington, ON L7T 2E8  905.631.0894 or toll-free 1.877.367.7070

 thequiltstore.ca

Now with 2 locations to serve you, we are your Quilt Store Destination! The staff here at The Quilt Store is always on hand to provide Quilt Wisdom, Quilt Inspiration and most of all we pride ourselves as the place to make... All Your Quilt Dreams Come True!

The Stitcher's Muse Needleart #101 - 890 Crace St, Nanaimo, BC V9R 2T3

 250.591.6873  thestitchersmuse.com

 info@thestitchersmuse.com

A divine little shop with supplies for all your hand stitching needs! Friendly, knowledgeable, helpful staff. Cross stitch, canvaswork, needlepoint, embroidery, counted thread, lace making & more. Books, patterns, fabric, threads, tools.

The Yarn Guy

15 Gower St, Toronto, ON M4B 1E3

 416.752.1828 or toll-free 1.800.836.6536

 theyarnguy.com  info@sewknit.ca

See us on Facebook, follow us on Twitter! Knitting machines, sewing machines, repairs, parts for Passap, Studio, Singer, Silver Reed, Superba, White. Sewing notions and supplies, books, ball yarns, coned yarns, TAMM yarns, Paton's yarns, Bernat yarns, Phentex yarns, Bernat kits & crafts.

Upper Canada Quiltworks – Quiltworks Studio PO Box 64, Brockville, ON K6V 5T7

 613.865.7299  uppercanadaquiltworks.com

 uppercanadaquiltworksstudio@gmail.com

Quilt patterns and books, fabric and notions, felted wool, wool kits, punchneedle patterns and supplies and Valdani embroidery floss. Workshops in quilting, punchneedle, wool applique, rughooking, sewing, sign painting & more!

Main Street

3V1

Turn static files into dynamic content formats.

Create a flipbook
Issuu converts static files into: digital portfolios, online yearbooks, online catalogs, digital photo albums and more. Sign up and create your flipbook.