
11 minute read
RUDOLPH MASTER CLASS


RUDOLPH THE TOY REINDEER
Who knew cake could be so cuddly? Sculpt and texture this little reindeer to resemble a plush toy, perfect for holiday decoration and dessert.
BY DANETTE EIDE
LEVEL:
Danette
Eide, owner of Danette’s Creative Corner, is an international award-winning cake artist. She has won cake competitions in the U.S. and U.K. and has also been featured on several TV shows. A self-taught artist, she is also an astrophysicist and works as a rocket scientist. Originally from the U.S., she now resides in Norway with her husband, a professional pianist. Danette is most known for sculpted cakes with animations. She builds, designs, and programs all the electronics and recently started her own company called Caketronix, so every cake artist can make their cakes come alive! Her micro-controller is patent-pending. COMPONENTS
Edibles:
Five 6-inch cakes Ganache Modeling chocolate White fondant (The Sugar Paste) Gel food coloring: gray, red, and chestnut brown (Rainbow Dust ProGel) Gray buttercream Water Airbrush colors: chocolate brown, mother of pearl, and black (Spectrum Flow)
Equipment:
Knife or scissors Cake boards Four 8½-inch threaded rods, 8 millimeters thick 7½-inch threaded rod, 8 millimeters thick Aluminum foil tape Cat’s tongue tool (Cerart) Wood grain impression mat Dresden tool Knit molds (Marvelous Molds) 2½-inch round cutter Quilting needles Stitch tool Ball tool Piping tip Button mold (Wilton) Airbrush (Spectrum Flow)
facebook.com/DanettesCreativeCorner instagram.com/Danettes_Creative_Corner


WHAT YOU NEED

1
4 2
5 3
6a
BUILD THE REINDEER BODY
1. Cut 2 cardboard bases following the template. The base for the body should be 5½ inches by 3½ inches. The base for the head should be 5½ inches by 3½ inches at the back and taper to 3 inches at the front.
2. Build the structure, using the 8½-inch rods for the legs and the 7½-inch-long rod for the neck and head.
3. Cover the structure in aluminum foil tape to make it food-safe.
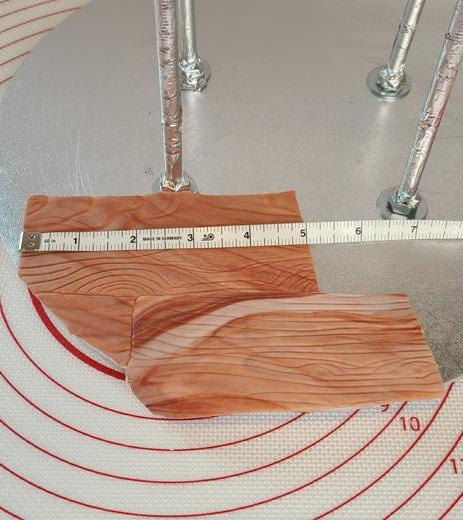
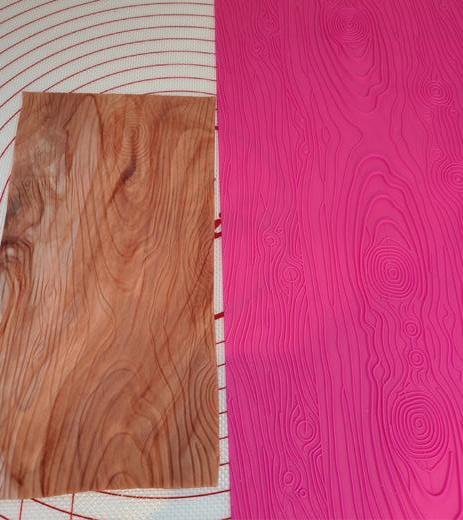
4. Stack 2½ round cakes for the body and 2 cakes for the head. 5. Carve the body and head into the desired shapes and coat them in ganache. 6. Using a bit of modeling chocolate and a cat’s tongue tool, build up the bottom of his face, chest, and rear. 1. Color some white fondant gray, red, and chestnut brown with gel food coloring. 2. Taking your brown fondant, marble it with a little white and roll it out onto a wood grain impression mat. 3. Cut the fondant into small 2-inch-by-5-inch rectangles so that they look like wood planks. Use these to cover your base board. 4. Use your Dresden tool to push slightly in between the wood planks to give them added depth. 5. Cover the body and head of the reindeer in gray fondant.

6b
Tip: HAVING VISIBLE SEAMS IN THE FONDANT IS OKAY. YOU WON’T NOTICE AFTER IT IS TEXTURED.
LAYER ON THE FONDANT
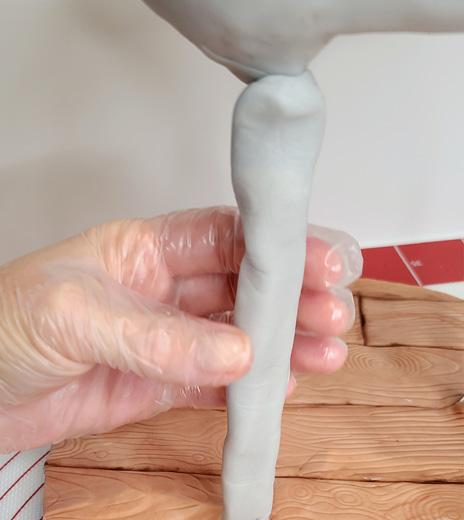
6. Roll out 4 equal sausage shapes for the legs. Taking a sharp knife, cut down the center and wrap each one around the metal rod legs. Use your fingers to smooth them out and make them uniform in thickness down the leg. 7. Make 4 smaller sausage shapes. Using the palm of your hand, smooth 1 side down to form wedges. 8. Wrap the wedges around each of the edges on the base of the body where it meets the leg.
Don’t worry about the seams at this point.
2
5a

6b 3


5b
7a 4
6a
1a
1b


7b 7c 8 2a
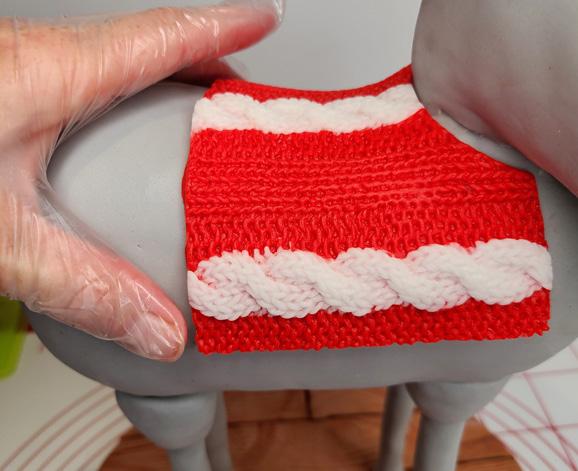

MAKE THE REINDEER’S BLANKET


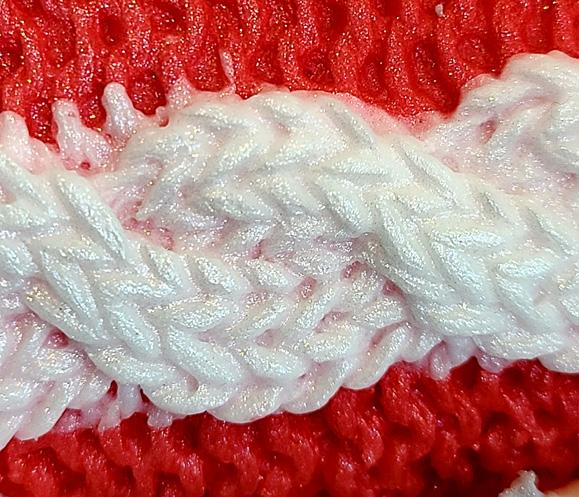
1. Press a bit of white fondant into a spiral knit mold. Then, cover and press in the red fondant to complete the pattern. 2. Take a 2½-inch round cutter and cut out a section in the middle at the top so that the

2b
blanket lays flat around his neck.
3. Repeat Steps 1 and 2 to create a small section to go around his chest. Be sure to line up the red and white pattern. 4. Use the same round cutter and slightly trim the corners off the back of the blanket.
sausage shape, long enough to go all the way around the border of the blanket. Pinch together about 7 or 8 quilting needles and repeatedly stab them into the fondant to create a fluffy texture. 6. Place the piece around the blanket. Once it is secure, use the needles to add just a little extra fluff.
3a
3b
4


5a


5b
MAKE THE MATCHING HAT AND SHOES

ADD THE TEXTURE
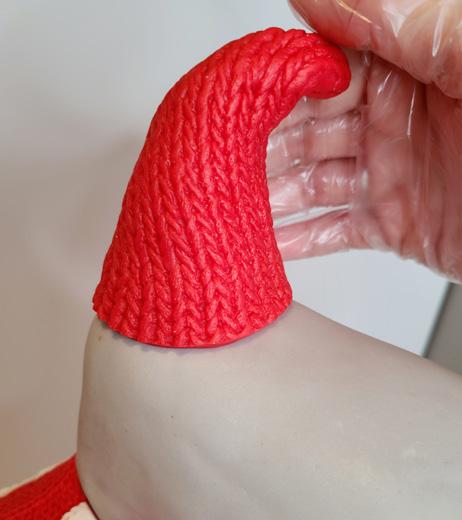
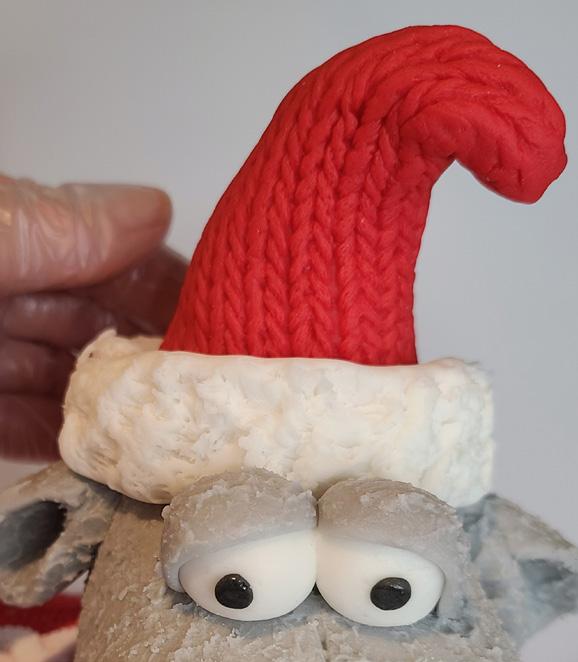
1. Take a little bit of modeling chocolate and create a small cone to go on top of his head. 2. Press red fondant into a knit mold. Then, wrap it around the modeling chocolate cone to shape it into his hat.
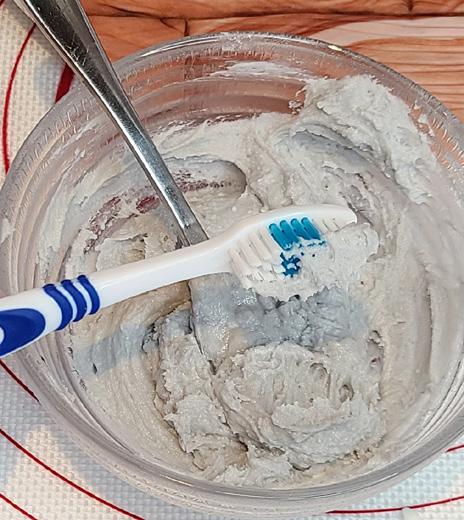
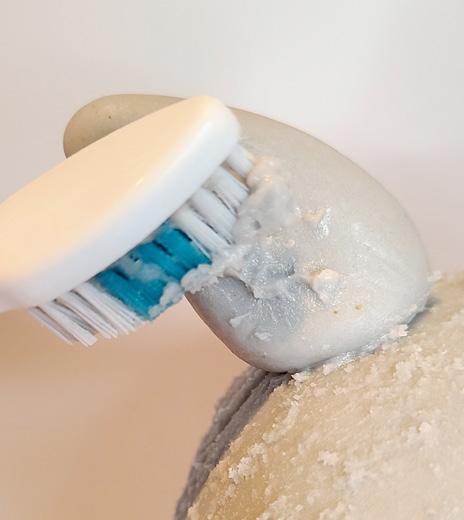
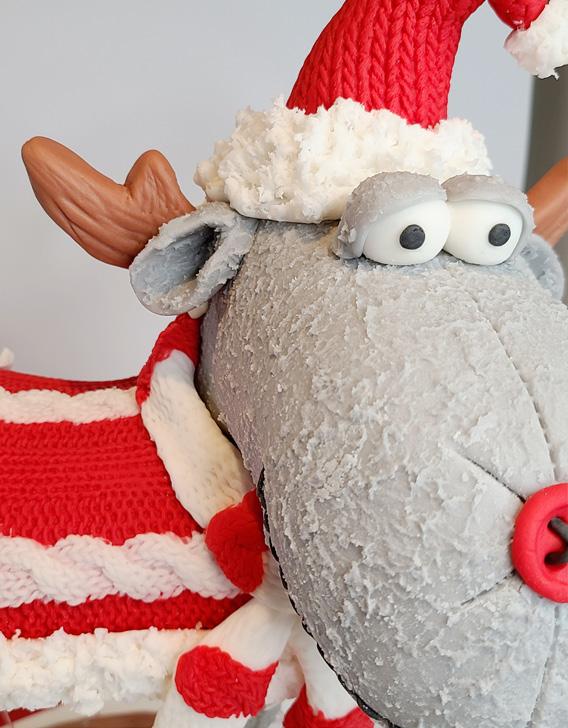
1. Dip a toothbrush into gray buttercream and lightly dap it onto the reindeer’s body. This will create a fleece-like texture to resemble a doll.
2. Create a small cone about 2 to 3 inches long for the tail. Using your fingers, slightly squish the tail to be thinner and then texture with the buttercream.
3. Let the buttercream harden for about 15 minutes. Once it is firm to the touch, take your stich tool and trace down his backside, tail, and face. Make a little “X” where his nose will go—this will just add that extra 3. Create 4 balls out of the red fondant, about 2 inches around. Take a knife and make a small cut in the back and then wrap them around the base of the legs for his shoes.
detail to make him look like a real doll.
4. Roll out and cut 1 circle for his ears. Cut it in half and roll the straight edge together to form the ear.
5. Use the ball tool just to give it a little more shape and soften out the edges of the ears. 6. Attach to the head using toothpicks and then texture with buttercream.
1a 1b 2a
2b 3a 3b

6a


6b

1a

2b
3b


4 1b


2c
3c 2a
3a
3d
5 6a 6b 1a
1b
2a
SHAPE THE EYES, NOSE, AND MOUTH

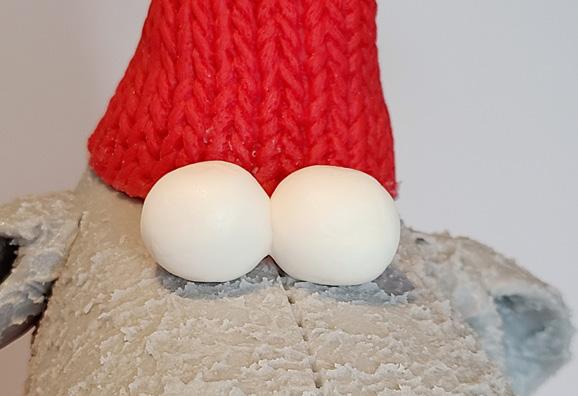
1. For the eyes, shape 2 white spheres. Place them on his head and then take 2 small pinches of dark gray fondant for his pupils. 2. To create his eyelids, cut out 2 small circles with the back of a piping tip. Then, use the ball tool to thin out the edges and
make them more oblong. 3. Attach each eyelid. Use either the Dresden or cat’s tongue tool to press on the eyelids and shape them. Texture with buttercream.

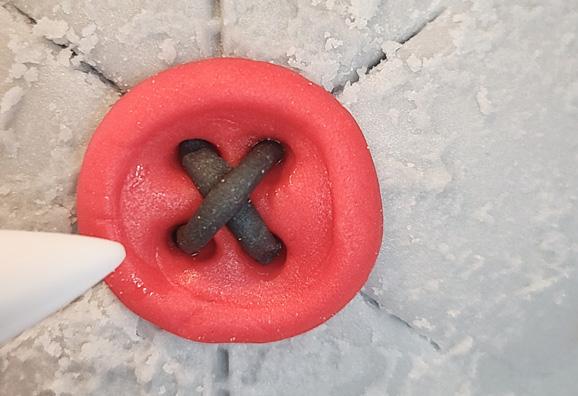
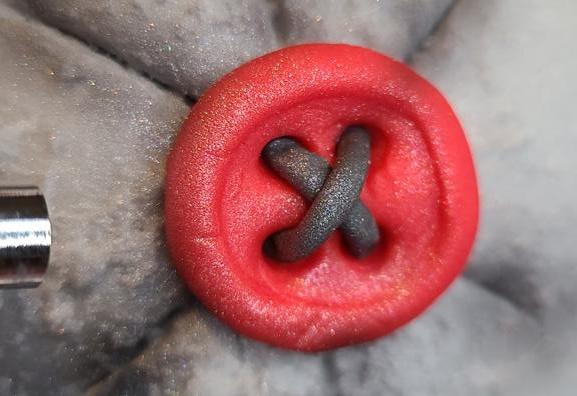
4. Use the button model with red fondant to create a nose. 5. Roll out a very thin rope of dark gray fondant and cut 2 small pieces to use for the string in his button nose. 6. Use the stitch tool to make an outline for the mouth. Roll out a long thin rope of dark gray fondant. Place a little water into the crease that you just made and start pushing the rope into the mouth. Make sure to push in heavy every so often to make it look like a stitch.
2b
3a

3b 6a

6b
8. Using your fingers, shape 2 small brown antlers.
Remember: He is a stuffed animal, so they do not have to be perfect and they can be any shape.
1a


3c

4a


4b


5a

5b
ADD THE FINAL ACCESSORIES


1. Roll out a long white sausage shape. Texture it with your needles and then wrap it around the base of the hat, making sure to get it behind the eyes. Once it is on, you can go back and add just a little more texture.
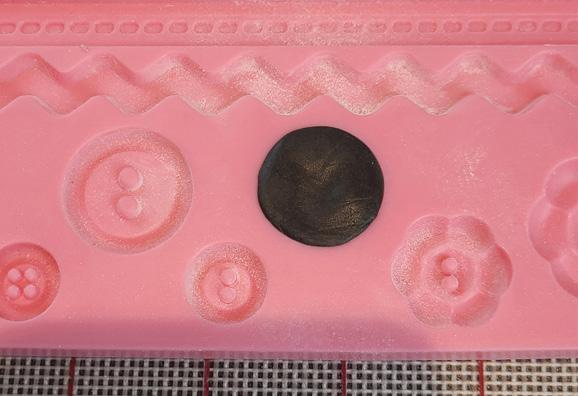
2. Make a small ball of white fondant and squish it onto the tip of his hat. Then, lightly texture it with your needles. 3. Create 2 dark gray buttons for his front shoes.
4. To create string for his shoes, use the same method as you did for his nose.
5. Finish the shoes by making 4 white sausage shapes, texturing them, and wrapping them around for cuffs on his shoes.
6. Using the knit mold, create a scarf. Press the red into the rope stitch hole and cover it with the white fondant.
7. Cut it into 3 equal pieces.
Wrap these around the neck to create his scarf.
1b
2a
2b
3a
3b
4a

4b


5a


5b

6a


6b 7a

7b
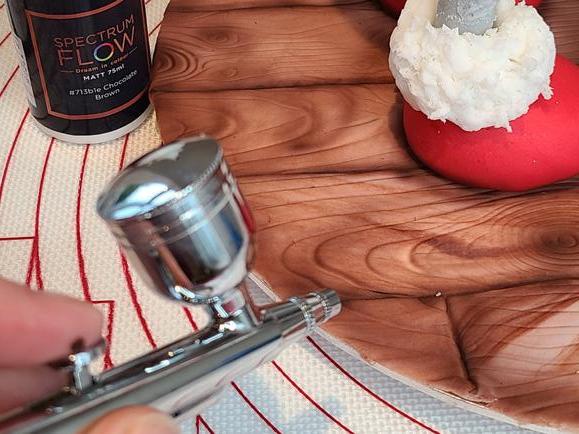
2. Airbrush the entire reindeer with the mother of pearl color. This will just add a nice
Christmas sparkle to him. 3. Use the black airbrush color to spray all areas that would have a natural shadow or where you want a feature to pop. I went around the shoes, in all the seams created with the stitch tool, around the blanket, and in the ears and antlers. ACD
1
8a
8b 2
3a
3b
AIRBRUSH TO FINISH
1. Using the chocolate brown airbrush color, darken the creases between the wood planks. You can also darken some of the wood grain pattern just to make it pop.


